

How to Insert a Video in PowerPoint (from a File on Your PC or Shared Drive)

Insert or Embed a Video in a PowerPoint Presentation from a File and Set Playback Options
by Avantix Learning Team | Updated October 9, 2021
Applies to: Microsoft ® PowerPoint ® 2010, 2013, 2016, 2019 and 365 (Windows)
You can insert a video into a PowerPoint presentation from a file on your PC or from a shared drive. Video can help to engage your audience and focus attention. In 2010 and later versions, video files are embedded or copied into PowerPoint by default so video files can increase file size significantly.
Recommended article : How to Compress Video and Audio Media in PowerPoint to Reduce File Size
Do you want to learn more about PowerPoint? Check out our virtual classroom or live classroom PowerPoint courses >
When inserting video in PowerPoint, consider the following:
- PowerPoint 2010 and later versions support common video formats such as WMV (Windows Media Video file), ASF (Windows Media file), MP3 and MP4 (Movie files) and AVI (Windows Video File).
- The default format for PowerPoint 2013 and later versions is MP4.
- In 2010 and later versions, video is embedded by default not linked as in previous versions.
- If you choose to link to a video, it's good practice to copy the video file to the same folder as your presentation before you link. You will not be able to apply certain types of formatting to linked videos.
Note: Buttons and Ribbon tabs may display in a different way (with or without text) depending on your version of PowerPoint, the size of your screen and your Control Panel settings. For PowerPoint 365 users, Ribbon tabs may appear with different names. For example, the Video Tools Playback tab may appear as Video Playback.
Although you can insert a video in Slide Master View, we'll assume here that most of your videos will be inserted on slides in Normal View.
Inserting a video from a file
To insert a video from a file and embed it on a slide:
- In Normal View, navigate to the slide where you want to insert a video.
- Click the Insert tab in the Ribbon.
- Click Video. A drop-down menu appears.
- Depending on your PowerPoint version, choose Video on My Computer, Video on My PC or This Device. A dialog box appears.
- Navigate to the folder where your video is saved and click the video to select it.
- On the bottom right of the dialog box, click Insert to embed the video. You can also double-click it. If you click the drop-down menu beside Insert, you can choose Link to File. If you decide to link rather than embed, you may want to copy your video or movie clip to the same folder as your presentation before you insert it on your slide. PowerPoint will place the video in the center of the slide.
- In Normal View, click the video and then Play on the media controls to play the video.
After you insert a video, two tabs will appear in the Ribbon when you click the video (Video Tools Playback and Format or Video Playback and Format) in Normal View.
Below is the Video Tools Playback tab in the Ribbon with a video selected (this may appear as Video Playback):

Below is the Video Tools Format tab in the Ribbon with a video selected (this may appear as Video Format):

Playing a video automatically or when clicked
You can change the way a video plays when you run a slide show.
To control the way a video plays during a slide show:
- In Normal View, click the video on the slide.
- Click the Video Tools Playback or Video Playback tab in the Ribbon.
- In the Video Options group, beside Start, choose In Click Sequence, When Clicked On or Automatically from the drop-down menu.
If you select When Clicked On, you must click directly on the video when running a slide show.
Playing a video full screen
You can play a video so that it fills the entire screen when you run a slide show. However, depending on the resolution of the original video file, it might appear distorted if the video is lower quality.
Be sure to preview your video so that if the video appears distorted or blurry, you can turn off the full screen option. If you set a video to be displayed full screen and it is also set to start automatically, you can drag the video frame off the slide into the gray work area so that it will not be visible on the slide or flash briefly before the video goes to full screen.
To set a video to play full screen during a slide show:
- In the Video Options group, select the Play Full Screen check box.
Controlling video volume
To control video volume:
- In the Video Options group, click Volume and then choose Low, Medium, High or Mute.
- You can also set the volume of a video by using the volume slider on media controls that appear below the video.
Be sure that volume is turned on through your Control Panel settings on your computer.
Hiding a video when not playing
During a presentation, you can hide a video until you are ready to play it. However, you should create an automatic or triggered animation to start the video or you won't see it play during the slide show.
To hide a video when not playing:
- In the Video Options group, select the Hide While Not Playing check box.
Looping a video
To play a video continuously during a presentation, you can loop the video:
- In the Video Options group, select the Loop until Stopped check box.
Rewinding a video after playing
To rewind a video after playing during your presentation:
- In the Video Options group, select the Rewind after Playing check box.
Showing media controls during a slide show
To show the media controls during your presentation when running a slide show:
- In Normal View, click the Slide Show tab in the Ribbon.
- In the Set up group, select the Show Media Controls check box.
Fading a video in or out
You can start or end your video with a fade effect for a certain number of seconds.
To start or end a video with a fade effect:
- In the Editing group, under Fade Duration, choose or enter a duration for Fade In or Fade Out. To add a timed fade to the beginning of your video, in the Fade In box, click the up and down arrows to increase or decrease the fade in time. To add a timed fade to the end of your video, in the Fade Out box, click the up or down arrows to increase or decrease the fade out time.
Cropping a video
You can also crop a video in PowerPoint to remove specific areas in the video.
To crop a video:
- Click the Video Tools Format or Video Format tab in the Ribbon.
- Click Crop in the Size group.
- Position the pointer over a black cropping handle and drag the handle.
- Click Crop again to finish cropping.
Trimming a video
You can trim video at the beginning and end of each clip so you can start at any point and end the clip earlier. Trimming is different from cropping.
To trim a video clip:
- In the Editing group, click Trim Video. A dialog box appears.
- To trim the beginning of the clip, click the start point (a green marker on the far left). When the pointer becomes a two-headed arrow, drag the arrow to the desired starting position.
- To trim the end of the clip, click the end point (a red marker on the right). When the pointer becomes a two-headed arrow, drag the arrow to the desired ending position.
In this article, we've reviewed inserting video files in PowerPoint presentations from a PC or shared drive, controlling playback during a slide show as well as cropping and trimming. In future articles, we'll look at video formatting techniques and how to export a PowerPoint presentation as a video.
Subscribe to get more articles like this one
Did you find this article helpful? If you would like to receive new articles, join our email list.
More resources
How to Embed a YouTube Video in PowerPoint
How to Highlight Text in PowerPoint (5 Ways)
How to Add Audio in PowerPoint Presentations
A Beginner's Guide to Video Formats in PowerPoint
PowerPoint Keyboard Shortcuts to Play and Control Video During a Slide Show
Related courses
Microsoft PowerPoint: Intermediate / Advanced
Microsoft PowerPoint: Design for Non-Designers
Microsoft PowerPoint: Accessible PowerPoint Presentations
Microsoft PowerPoint: Animations Bootcamp
Microsoft Excel: Intermediate / Advanced
VIEW MORE COURSES >
Our instructor-led courses are delivered in virtual classroom format or at our downtown Toronto location at 18 King Street East, Suite 1400, Toronto, Ontario, Canada (some in-person classroom courses may also be delivered at an alternate downtown Toronto location). Contact us at [email protected] if you'd like to arrange custom instructor-led virtual classroom or onsite training on a date that's convenient for you.
Copyright 2024 Avantix ® Learning
You may also like

How to Insert or Type E with an Accent Mark in PowerPoint (È, É, Ê, Ë, è, é, ê, or ë)
You can insert or type e with an accent mark in PowerPoint using built-in tools or keyboard shortcuts (including Alt code shortcuts). The letter e can be inserted with an accent in both upper or lower case in text boxes or placeholders on slides, the slide master or layouts. The following are common accents in upper or lower case – È, É, Ê, Ë, è, é, ê, or ë.

How to Fade a Picture or Part of a Picture in PowerPoint (Using a Gradient)
You can fade a picture in PowerPoint by drawing a rectangle shape on top of the picture and then filling the rectangle with a gradient from opaque to transparent. This technique is often used to fade an image into the background of a slide. Since the rectangle is placed on top of the image and then text may be placed on top of the rectangle, you may need to reorder the objects.

How to Lock an Image, Shape or Other Object in PowerPoint
You can now lock an image, shape or other object in PowerPoint. Objects can be locked in Normal View or Slide Master View. Only PowerPoint 365 users can lock objects to prevent moving and resizing. This is helpful if you want to select and move other objects on the slide or prevent others from moving or resizing an object. You can lock items using the context menu or the Selection Pane.
Microsoft, the Microsoft logo, Microsoft Office and related Microsoft applications and logos are registered trademarks of Microsoft Corporation in Canada, US and other countries. All other trademarks are the property of the registered owners.
Avantix Learning |18 King Street East, Suite 1400, Toronto, Ontario, Canada M5C 1C4 | Contact us at [email protected]
Our Courses
Avantix Learning courses are offered online in virtual classroom format or as in-person classroom training. Our hands-on, instructor-led courses are available both as public scheduled courses or on demand as a custom training solution.
All Avantix Learning courses include a comprehensive course manual including tips, tricks and shortcuts as well as sample and exercise files.
VIEW COURSES >
Contact us at [email protected] for more information about any of our courses or to arrange custom training.
Privacy Overview
Pin it on pinterest.
- Print Friendly
- PRO Courses Guides New Tech Help Pro Expert Videos About wikiHow Pro Upgrade Sign In
- EDIT Edit this Article
- EXPLORE Tech Help Pro About Us Random Article Quizzes Request a New Article Community Dashboard This Or That Game Popular Categories Arts and Entertainment Artwork Books Movies Computers and Electronics Computers Phone Skills Technology Hacks Health Men's Health Mental Health Women's Health Relationships Dating Love Relationship Issues Hobbies and Crafts Crafts Drawing Games Education & Communication Communication Skills Personal Development Studying Personal Care and Style Fashion Hair Care Personal Hygiene Youth Personal Care School Stuff Dating All Categories Arts and Entertainment Finance and Business Home and Garden Relationship Quizzes Cars & Other Vehicles Food and Entertaining Personal Care and Style Sports and Fitness Computers and Electronics Health Pets and Animals Travel Education & Communication Hobbies and Crafts Philosophy and Religion Work World Family Life Holidays and Traditions Relationships Youth
- Browse Articles
- Learn Something New
- Quizzes Hot
- This Or That Game
- Train Your Brain
- Explore More
- Support wikiHow
- About wikiHow
- Log in / Sign up
- Computers and Electronics
- Presentation Software
- PowerPoint Insertions
5 Ways to Embed a Video File in Microsoft PowerPoint
Last Updated: March 27, 2024 Fact Checked
Embedding a Web Video
Embedding a video file, embedding a stock video, using android, linking movie files (powerpoint 2007).
This article was co-authored by Mitch Harris and by wikiHow staff writer, Rain Kengly . Mitch Harris is a Consumer Technology Expert based in the San Francisco Bay Area. Mitch runs his own IT Consulting company called Mitch the Geek, helping individuals and businesses with home office technology, data security, remote support, and cybersecurity compliance. Mitch earned a BS in Psychology, English, and Physics and graduated Cum Laude from Northern Arizona University. This article has been fact-checked, ensuring the accuracy of any cited facts and confirming the authority of its sources. This article has been viewed 1,131,844 times.
If you want to spruce up your PowerPoint presentations, you can add a video to your slides. If you have a video file on your computer, you can easily embed it into your presentation. You can also embed YouTube videos, use looping stock videos, or, on older versions of PowerPoint, link to the videos. This wikiHow will show you how to add a video to Microsoft PowerPoint using your Windows, Mac, or Android device.
Things You Should Know
- Copy a YouTube URL. In PowerPoint, click "Insert' → "Video" → "Online Videos/Movie". Paste the URL and click "Insert".
- To embed a video file, click "Insert" → "Video" → "This Device" → select a file → "Insert".
- To use a stock video, click "Insert" → "Video" → "Stock Videos" → select a video → "Insert".

- You must have a subscription to use Office 365 . [1] X Trustworthy Source Microsoft Support Technical support and product information from Microsoft. Go to source
- Adding a video to your PowerPoint can help you make a great presentation .

- You can insert a video from supported websites such as: YouTube, SlideShare, Vimeo, Microsoft Stream, and Flip.

- On Mac, this will look like Online Movie .

- You'll see a preview of the video.

- To adjust when the video plays, click the drop-down menu next to Start: . Select In Click Sequence , Automatically , or When Clicked On .
- Check the boxes to apply any of the following: Play Full Screen , Hide While Not Playing , Loop until Stopped , and/or Rewind after Playing .
- Click Volume to adjust the video's volume. Select Low , Medium , High , or Mute .

- Select the web video and click the Video Format tab.
- Click Poster Frame on the left of the toolbar.
- Click Image from File… .
- Select From a File , Stock Images , Online Pictures , or From Icons .
- Select the image source from the chosen method, and then click Insert .

- Stock videos work best as a background graphic to your PowerPoint text, since these videos loop seamlessly

- The stock video will be added to your slide. By default, it will cover the entire slide.

- PowerPoint is available for Android in the Google Play Store .

- The menu will open.

- If you want to take a video using your camera, tap Open Camera instead.
- The video file will be added to your PowerPoint.

- Videos can only be "embedded" (included in the presentation file itself) in PowerPoint 2010 or newer.

- Click the Office button and select "Publish."
- Select "Package for CD" and then select your presentation.
- Ensure that "Linked files" is selected in the "Options" menu.
Community Q&A
You Might Also Like

- ↑ https://support.microsoft.com/en-us/office/insert-a-video-from-youtube-or-another-site-8340ec69-4cee-4fe1-ab96-4849154bc6db#OfficeVersion=Windows
- ↑ https://support.microsoft.com/en-us/office/insert-audio-or-video-in-powerpoint-for-android-95e0a2af-35fb-405a-8536-cdcd934f659a
- ↑ https://support.office.com/en-us/article/My-movie-doesn-t-play-190cf574-183d-4b7f-b627-3783a14b7b07?ui=en-US&rs=en-US&ad=US
- ↑ https://support.office.com/en-us/article/Add-and-play-a-movie-in-a-presentation-f3fcbd3e-5f86-4320-8aea-31bff480ed02
About This Article

1. Open the slide. 2. Click Insert . 3. Click Movie . 4. Click Movie from File or Video on my PC . 5. Select the video and click OK . 6. Click Playback . 7. Choose how to play the video. 8. Save your presentation. Did this summary help you? Yes No
- Send fan mail to authors
Reader Success Stories
Rjan Berglund
May 26, 2017
Is this article up to date?

Jun 20, 2017
Nov 7, 2016
Jul 27, 2016

Featured Articles

Trending Articles

Watch Articles

- Terms of Use
- Privacy Policy
- Do Not Sell or Share My Info
- Not Selling Info
wikiHow Tech Help Pro:
Level up your tech skills and stay ahead of the curve
How to embed a video in PowerPoint for a more engaging presentation

What type of content do you primarily create?
Making an engaging PowerPoint presentation is no easy feat.
You have to figure out what to say, and what you want your audience to grasp. Then, decide how to bring the two together to deliver a compelling presentation.
One popular way to add flair is by embedding video into the content, like what Dr. Frans de Waal did in his TED Talk on inequity aversion . To emphasize his points, he included videos of animal experiments, turning a mind-numbingly boring topic into an engaging and viral presentation—which now has over 5 million views.
In this step-by-step guide, you’ll learn how to embed a video in PowerPoint so you can create exceptional presentations that grab your audience’s attention and help them remember what you said.
How to embed a video in PowerPoint from your PC or Mac
First, of course, you’ll need a video, either one online or from your media library. The next step is to find a way to make it play during your PowerPoint presentation. You could do it manually by bringing up the video from another website or program while you’re speaking, but that process is clunky and you might end up facing technical challenges.
Luckily, there are simpler and easier methods of embedding videos in PowerPoint. You can link to your video file externally or embed it directly in your presentation.
Use the tutorial below to insert videos in PowerPoint from a computer.
How to embed a video in PowerPoint in Windows
Step 1: select the powerpoint slide.
Launch Microsoft PowerPoint on a Windows computer and open a blank or existing PowerPoint file.
Then, go to the slide you want to embed a video and select the Insert tab in the toolbar.
Step 2: Click Video > This Device
Select the Video option. Here, you can either embed a video from your computer or from an online source, like a website or YouTube and other supported platforms.
Click This Device from the drop-down menu to embed a video from a folder on your computer.
PowerPoint supports MP4 files encoded with H.264 video and AAC audio. So, you can upload videos in file formats, such as M4V, MOV, ASF, AVI, MPG, MPEG, or WMV.
If you don't want to play a video full screen, resize it to your preferred dimensions.
For precise height-to-width proportions:
- Select Format (PowerPoint 2013 or newer) or Options (PowerPoint 2010) in the Size group
- Click the Dialog Box Launcher Icon image
- Click Size, then select the Lock aspect ratio checkbox under Scale
- Enter your preferred height and width under Size and rotate or enter the percentage of size that you want in the Scale height and width boxes
Then, select Video Format to access formatting options like borders and effects or right-click the video for more options. You can also use the Designer tool to choose from professional slide templates.
Then, click the Playback tab to trim your video, add captions, choose playback options, like In Click Sequence, Automatically, or When Clicked On.
Note: In PowerPoint for Microsoft Office 365 or PowerPoint 2016 version 1709 or later, you can use the In Click Sequence option. This way, your video can play in sequence with other actions you’ve programmed on the slide, like animations or transitions.
To insert a web video, select Video > Online Videos .
Note: PowerPoint supports YouTube, SlideShare, Vimeo, Stream, and Flip video providers.
Step 3: Click Insert
If you choose to embed an online video, copy the link to the video you want to embed and paste it in the blank field. A preview of your video will appear in the Insert video pop-up.
Click the Insert button to embed the video in your presentation.
PowerPoint will download and insert the video on the selected slide. You can drag the edges of the video thumbnail to resize it, then use Video Format options, like shape, border, and effects to enhance the video.
Select the Playback tab to insert captions or choose how your video plays (automatically or when clicked).
Note: You can’t change when an online video starts. But if you’re embedding a YouTube video, you can copy the video URL at the current time to link from a specific start time.
Click the Slide Show tab to preview the video with all the formatting changes you made. Then, save your presentation to your computer or click the Share button to move or copy it to the cloud.
How to embed a video in PowerPoint on a Mac
To embed a video in PowerPoint for Mac, you’ll need to save the video file in the same folder as your presentation.
Launch PowerPoint and open a blank or existing presentation, then select the slide you’d like to add a video to.
Select Insert .
Step 2: Click Video > From File
Click Video to access video embed options from the drop-down menu:
- Video browser
- Video from file
- Stock videos
- Online film
Select Video from file to insert a video file from your Mac.
In the Choose a Video dialog box, select the video file you want to insert, then click the Insert button to embed the video on the slide.
If you want to put a link to the video on the slide, click Show Options in the lower left corner of the dialog box.
Then, select the Link to file box, and click Insert .
Select the Video Format tab to add effects and choose whether your video will play automatically or when clicked.
Tip: If you’re using the 2016 version of PowerPoint (or newer), you can play back videos with multiple audio tracks. These versions also support closed captions and subtitles embedded in video files.
Select the Playback tab to do the following:
- Trim your video
- Add fade in and fade out effects
- Play the video on full screen or hide during the show
- Insert captions
- Select start time options (in click sequence, automatically, or when clicked)
- Loop the video to play repeatedly and continuously during the presentation
- Rewind your video
How to embed a video in PowerPoint from YouTube
Embedding a YouTube video to a PowerPoint presentation is simple. You can use the video URL or integrated search function to embed a video you uploaded to YouTube or someone else’s video (with permission).
To add a video to your PowerPoint presentation, you’ll copy the video embed code and paste it into the slide you want. The code will load the video at the source and play it on the platform you’re using.
You won’t need to download and upload the video from YouTube and the video will load and play faster regardless of the file size. Plus, you can share video content that’s covered under copyright, so you’re not in danger of crossing any legal lines.
Follow these steps to embed a video in PowerPoint from YouTube on a Windows PC or Mac.
How to embed a video in PowerPoint from YouTube in Windows
Step 1: click “insert video”.
Open a PowerPoint presentation and select the slide you want to embed your video.
Click Insert > Video .
Step 2: Choose “Online video”
Select the Online Videos option.
Step 3: Insert the URL from YouTube
Right-click the video to copy the video link or embed code, or click Share to get the embed code. Then, paste the URL or embed code in the link field.
A preview of your video will appear in the Insert video dialog box.
Click Insert to embed the video in your presentation.
Resize the video thumbnail, then use the video formatting options to enhance it.
Click Playback play the video automatically or when clicked or add captions. Then, preview the video with all the edits you made and save or share your presentation.
Note: YouTube’s video file formats are similar to those PowerPoint supports, so your video will likely play without issues. However, YouTube supports some formats that PowerPoint doesn’t, including FLV, 3GPP, WebM, DNxHR, ProRes, HEVC (h265), and CineForm. If your video isn’t playing, check to make sure it’s a supported file format.
How to embed a video in PowerPoint from YouTube on a Mac
Step 2: choose “online film”.
Select Online Film .
A URL pop-up will appear prompting you to enter the link to the YouTube video.
Go to YouTube and copy the link or embed code of the video you want to embed in your presentation. You can right-click the video and select copy video URL or copy embed code, or click Share and copy the video link or embed code.
Paste the video link or embed code in the URL pop-up in your PowerPoint presentation, then click Insert .
Resize your video and polish your slides before saving the presentation to your computer.
How to insert a video file link in PowerPoint
Embedding a video in PowerPoint may be convenient, but it increases the size of your presentation.
To reduce your presentation file size, insert a video file link to create a linked video. The downside with linked videos is that links can break, but you can prevent this by copying and storing your presentation and linked videos in the same folder, then linking to the video there.
Ensure you have a stable internet connection, then use the steps below to insert a video file link in PowerPoint on a PC or Mac.
Insert a video file link in PowerPoint on a PC or Mac
Step 1: take a screenshot of the video.
Find the video you want to link to in PowerPoint and take a screenshot of the clip.
To take a screenshot in Windows, you can either use the Snipping tool, press the PrtScn (print screen) key and Windows Logo key on your keyboard.
If you’re using a Mac computer, you can take a screenshot by pressing and holding SHIFT + COMMAND + 3 keys together (for full screenshot) or SHIFT + COMMAND + 4 keys to screenshot a specific area.
Step 2: Insert the screenshot in your presentation
Alternatively, navigate to the slide you want to add your screenshot to, select Insert > Pictures > Picture from File . Then, find the screenshot you took, select Insert to add it to the slide, then crop, resize, and position it to your liking.
Step 3: Hyperlink the image to your video
Right-click the image and select Link .
If your video is in Descript, copy the video link from your dashboard.
Insert the video link in the address field then click OK .
The hyperlink will be connected to the image itself, not other elements on the slide or the entire slide.
Click Slide Show to test your video and ensure it links to the right video. When you click on the image, it will open in a web browser, ready for you to play.
Why can’t I embed a video in PowerPoint?
Embedding videos to a PowerPoint presentation is a straightforward process, but sometimes the video may fail to play. Let’s review some reasons for playback failure and how to resolve them.
Video playback issues
Video playback may fail in PowerPoint if:
- The storage folder is corrupt
- The video’s audio is out of sync
- The video file is corrupt, damaged, in an unsupported file format, or missing certain files
How to fix: Convert your video into a supported file format, check PowerPoint playback settings, or make the video visible by unchecking the Hide while not playing option in the playback tab. You can also save your presentation using the PPT or PPTX extension, so it’s easier to open the file in older or modern Office versions.
File size and compatibility
Your video might not play if the file is too big. To resolve this issue, compress the media file by going to File > Info > Compress Media. Then, select one of these options:
- Presentation quality/full HD: Adjusts the video size while maintaining its quality.
- Internet quality/HD: Saves on space and video quality.
- Low quality/Standard: Saves more space but doesn’t keep overall video and audio quality. This option is ideal if you want to share the presentation with others and ensure your videos will still play.
If your video file is incompatible with PowerPoint, it may be in an unsupported file format or missing a codec.
How to fix: Convert the video to a supported format or add a missing codec to your computer for smooth playback.
Broken links
When adding an online video, you might accidentally enter an incorrect link or the video link may be broken at the source. This means it won’t embed correctly and won’t play when you’re presenting.
How to fix: Before inserting or embedding an online video, install the required updates for your version of PowerPoint and check that you’ve copied the right link. Then, test your video to ensure it plays on any device.
Make the best videos to embed in PowerPoint with Descript
Embedding a video in PowerPoint is a pretty simple process with several benefits for you and your audience. To prevent yawns and glazed-over eyes, you’ll need professional-quality videos that will draw your audience in, keep them engaged, and improve message recall.
Descript’s audio and video editing software lets you record, edit, and publish studio-grade videos to YouTube, then embed them in your PowerPoint presentations in a few clicks.
Plus, Descript’s AI-powered automatic transcription generates high-quality transcripts from your video’s audio, which you can use as notes while making your presentation. You can also use Descript’s AI features to get text summaries, auto-generate copy for social media posts, and enhance your audio with Studio Sound .
Take Descript for a spin today to make quality videos that will help you deliver exceptional PowerPoint presentations.
Related articles

Featured articles:

How long can YouTube Shorts be? YouTube's guidelines, explained
Discover how long YouTube Shorts can be, and learn the ideal duration, resolution, and strategies for successful Shorts.

How to create YouTube Shorts from existing video: A beginner’s guide
Learn how to create YouTube Shorts from existing videos. Unlock tips and tricks for repurposing content effectively.

Descript tutorial for beginners: 6 steps to get started
Hit the ground running with this Descript tutorial. Import, edit, and publish your audio or video project with the intuitive text-based editor.

30 faceless YouTube channel ideas for anonymous engagement
Discover 30 faceless YouTube channel ideas to drive engagement and make money without showing your face.

How to change your YouTube channel name for a fresh rebrand
Read this step-by-step guide on how to change your YouTube channel name in seconds, and learn best practices for rebranding.

How much do YouTubers make? See real-world examples
There's no single answer to how much YouTubers make. But whatever your channel size, this article will give you a good idea of what to expect.

Articles you might find interesting
Product Updates
New in Descript: Share your Overdub Voice, choose filler words to remove, and more

How to sync audio and video: 3 options with tips
It’s frustrating when your video sound lags behind what people see on screen. Here’s how to sync both the audio and video footage.

It ain't over yet: 6 podcast marketing tips for a show that's ended
Just because your show is already out in the world doesn’t mean you can’t work your marketing skills! Here are six ways to get more listens to the podcast you've worked so hard on.

How to edit crosstalk in video
You don’t want to cut out crosstalk willy-nilly — there’s an art to editing this conversational collision.

How to record with OBS: A beginner’s guide
Learn how to record with OBS like a pro! Our step-by-step guide covers everything you need for high-quality recordings!

The ultimate guide on how to get more views on TikTok
Learn how to get more views on TikTok and create engaging content with these 11 tips.
Join millions of creators who already have a head start.
Get free recording and editing tips, and resources delivered to your inbox.
Related articles:
Share this article
PowerPoint Video Not Playing? Here’s How to Fix it Fast!
By: Author Shrot Katewa

It is annoying when you want to play a video during your presentation speech but PowerPoint just refuses to play the video! The video may either fail to work or display just the audio/video. There are actually several reasons why this could happen!
So, in this article, we will take a closer look at the various issues related to playing video in PowerPoint, and I will also provide you with a few quick solutions to each of the issues.
So, without further adieu, let’s get started!
1. Video Not Playing in Presentation Mode
Although Microsoft PowerPoint is one of the powerful presentation tools out there, it is not perfect. There may be more than a few reasons why video is not playing in the presentation mode of your PowerPoint.
The most common problem that users face is that the format of the media file is either not supported by PowerPoint, or the media file might have missing fragments, or the file may have a syncing issue, or the media file may just be corrupted.
In the following subsection, I will explain the possible solutions to a corrupted media file in your PowerPoint presentation.
1a. PowerPoint Video Cannot Play Media Error
There are two possible solutions to a corrupted file. You can either optimize the media compatibility or clear the temporary data on your Windows operating system. Both of the solutions are described below.
Optimizing media compatibility
Follow the simple steps given below to optimize the compatibility of the video file with your PowerPoint presentation.
Step-1: Go to “Info”
The first step of the process is to go to the “Info” section located in the “ File ” tab, which is the first tab in the ribbon of your PowerPoint window.
Step-2: Click on ‘Check Compatibility’
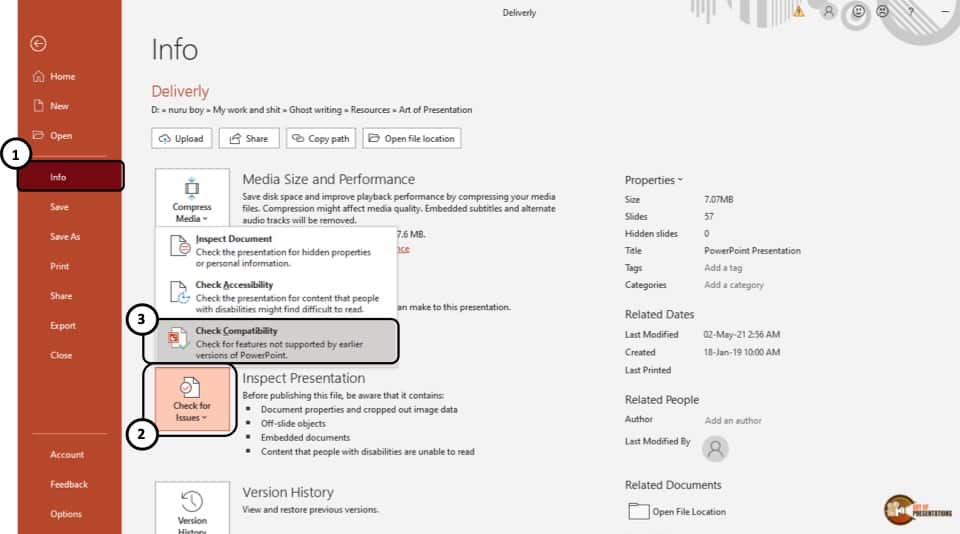
The next step is to click on the “ Check for issues ” button and select the “ Check compatibility ” option from the drop-down menu.
Step-3: Click on the “Ok” button
After you have selected the “ Check compatibility ” option, Microsoft PowerPoint will automatically detect the media files, report to you the issue with your video file, and try to fix it.
To finish optimizing the media file, click on the “ Ok ” button and the issue should be resolved.
Clearing the temporary files
Microsoft PowerPoint may fail to play your video files if there are too many temporary files on your Windows operating system. To clear these temporary files, follow the easy steps described below.
Step-1: Launch the “Run Prompt”
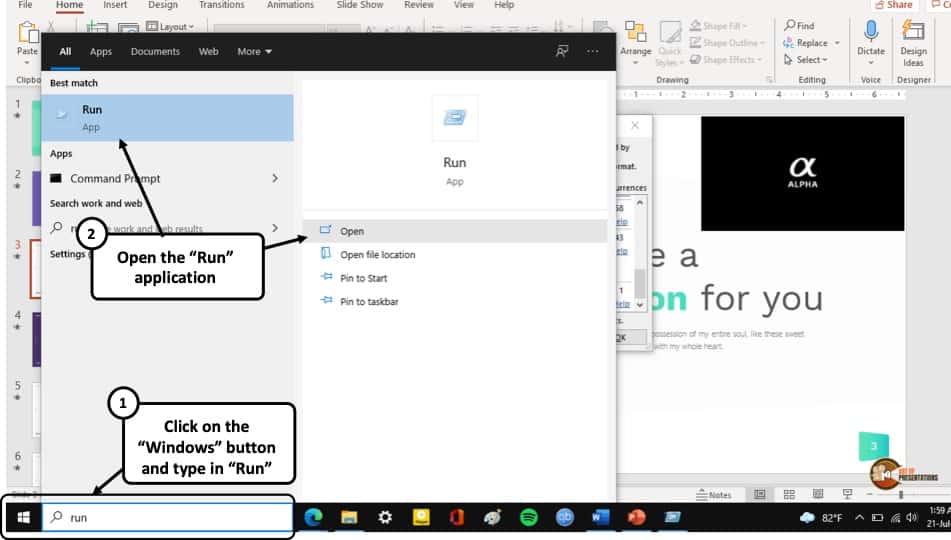
To being, go to the “ Start ” menu of your computer and launch the “ Run Prompt ”
Step-2: Type in the “%temp%” command
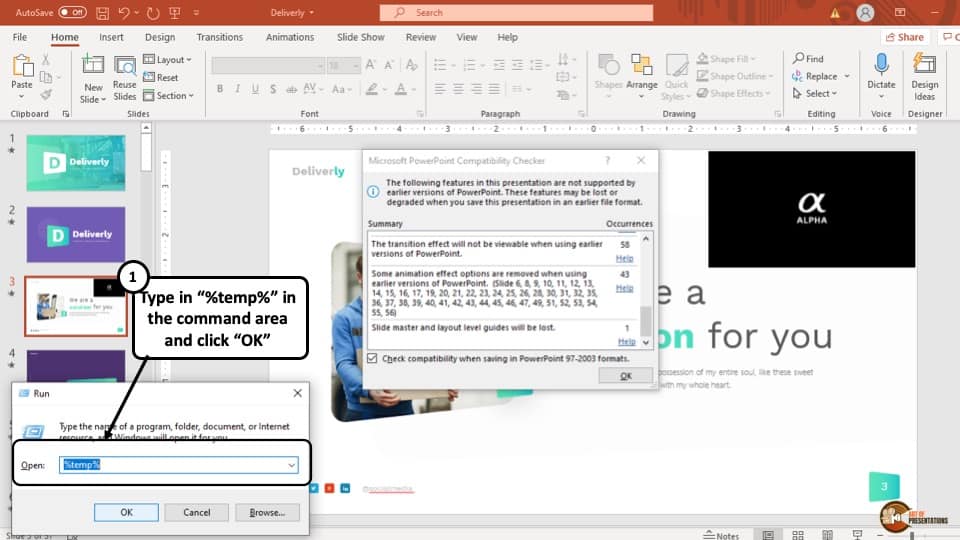
After you have launched the “ Run Prompt ”, type “%temp%” in the search box and hit the “ Ok ” button.
Step-3: Delete all the files
Once you have clicked on the “ Ok ” button, a new folder will open on your screen. This folder contains all the temporary files that are present on your computer.
Select all the files and delete them. Skip the files that are still in use and the video should be good to go.
2. YouTube Video Not Playing in PowerPoint
There are several reasons why a YouTube video may not play in your PowerPoint presentation. Some of the reasons why this may happen and possible solutions to them are given below.
1. The link used to embed the YouTube video was a shared link and not an embedded link. If you have entered the link that is used to share the video, then the video will not play in your PowerPoint presentation. To fix this issue, insert the embedded link of the YouTube video instead of the shared link.
2. The YouTube video that you embedded in your Presentation may not be available anymore. In order to avoid this issue, do not use videos that are in “ Private viewing only ” settings.
3. The embedded file may be in an unsupported format. Most versions of Microsoft PowerPoint supports “.wmv” files. Hence, videos that are in a different format may not play in your PowerPoint presentation. Make sure the video file is in the right format.
3. Video Only Plays Audio in PowerPoint
Sometimes, the video file only plays the audio of the video file in Microsoft PowerPoint.
This may happen either because the inserted video file is not supported by the PowerPoint software, or the file is too large. Another reason might be that the file is corrupted, or the Windows operating system is missing some necessary codecs.
Following are 3 possible solutions to these problems.
Solution 1 – Convert the video file
To convert the video file, follow the simple steps given below.
Step-1: Go to the “Info” section
The first step is to go to the “ Info ” section of the “ File ” tab which is located at the right-most corner of the ribbon of your PowerPoint presentation.
Step-2: Click on the “Media Size and Performance” option
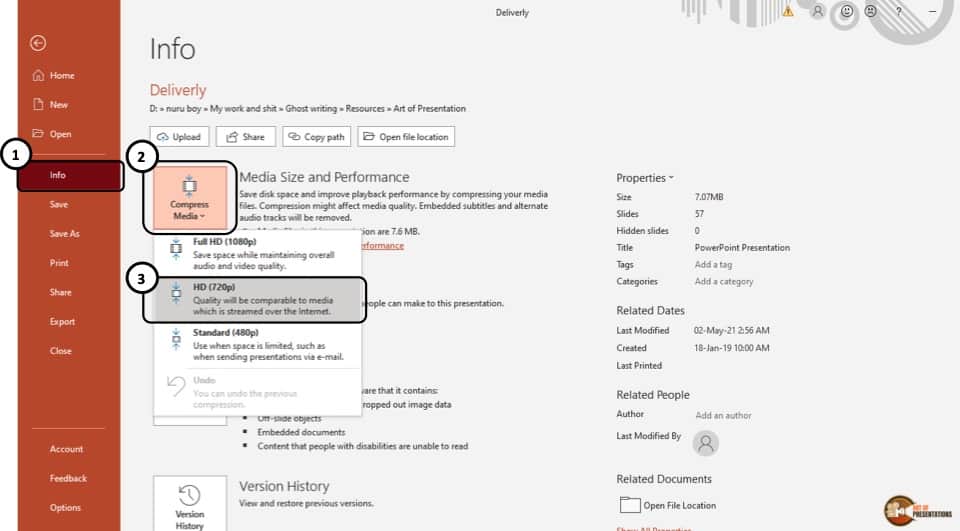
The second step is to click on the “ Media Size and Performance ” option which is the first option in the “ Info ” section
Step-3: Click on the “HD (720)” button
After clicking on the “ Media size and performance ” option, a drop-down menu will appear. From that drop-down menu, click on the “ HD (720) ” option.
This will compress the size of the video and convert it to a supported format.
Solution 2 – Clear temporary files
Like the previous issue, sometimes your computer may be working on too many temporary files, due to which the video file in your PowerPoint presentation may not be functioning properly.
Simply follow the steps described earlier in this article and delete all the temporary files operating in your Windows operating system.
Solution 3 – Install missing codecs
Right out of the box, Windows does not support every media codecs. It is possible that the video file in your PowerPoint presentation is only playing audio because some of the codecs in your Windows are missing.
To fix this issue, you can download a codec pack from the internet. Some of the best Codec packs are,
1. K-Lite Codec Pack
2. Media Player Codec Pack
3. X- Codec pack
4. Audio of the Video Doesn’t Work in PowerPoint
If the audio of the video in your PowerPoint presentation is not working, try all the solutions mentioned in the above section. If it still doesn’t work, then maybe the PowerPoint software is muted in your computer.
To make sure the audio of your PowerPoint is not muted, turn on the video in your presentation and follow the simple steps described below.
Step-1: “Right-click” on the “speaker/headphone” button
At first, you have to “ Right-click ” on the “ Speaker/Headphone ” volume button in the taskbar of your computer. It is the right-most button on the taskbar and its icon looks like a handheld speakerphone (as showcased in the image below)
Step-2: Select the “Open Volume Mixer” option
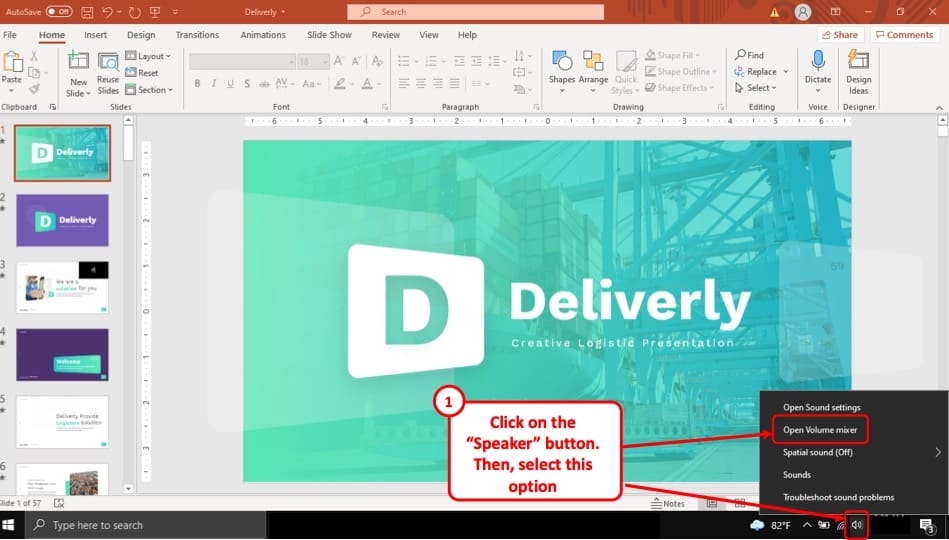
After you have opened the “ Speaker/Headphone ” menu from your taskbar, click on the “ Open Volume Mixer ” option which is the second option in the menu.
Step-3: Click on the volume icon under the PowerPoint section
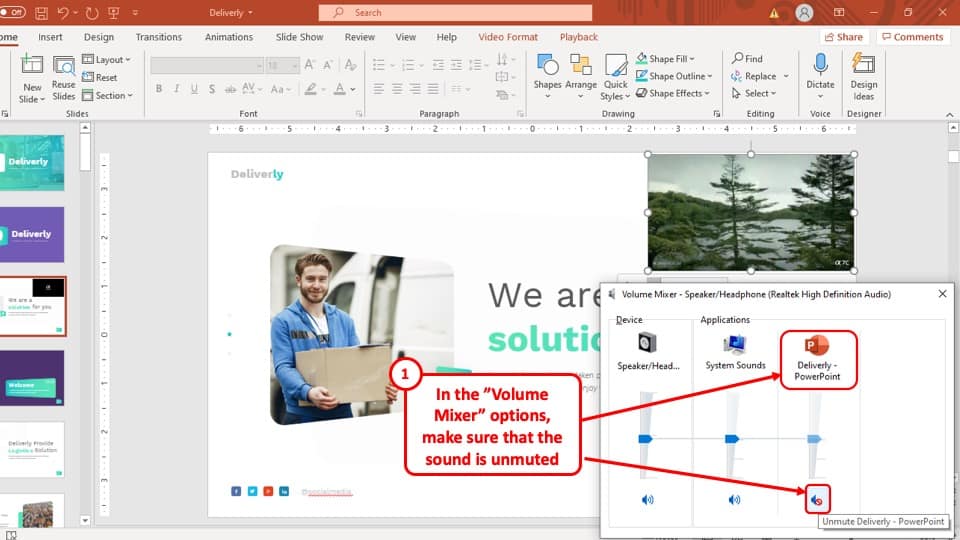
Once you have selected the “ Open Volume Mixer ” option, a pop-up window will appear on the bottom right corner of your screen.
Click on the small volume icon with a red cross over it, which will unmute the PowerPoint software on your computer.
5. Video Doesn’t Play Automatically
To play a video file in your PowerPoint presentation automatically, you have to change the playback settings of the video file.
This might sound a little difficult but the whole process is described in 2 simple steps below.
Step-1: Go to the “Playback” tab
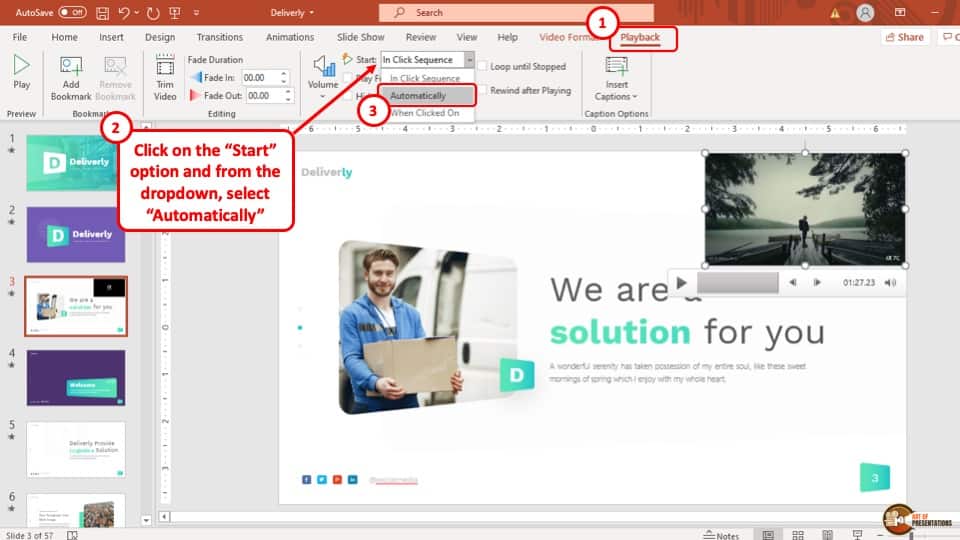
At first, turn on the video in your PowerPoint presentation. This will allow you to access the “ Playback ” tab which appears on the ribbon when a media file is played.
Step-2: Select the “Automatically” option
Now, select the “ Automatically ” option which is located in the “ Start ” drop-down menu of the “ Video Options ” section in the “ Playback ” tab.
The video should now play automatically when the slide is opened.
6. PowerPoint Export to Video Not Working
To fix videos not exporting in your PowerPoint presentation, you may have to optimize the media file using the method mentioned earlier in this article.
You might also have to update your PowerPoint software if it is outdated or repair it if needed. To learn more on how to update Microsoft PowerPoint, you can read one of our articles on this topic by clicking here .
I will discuss the process of repairing PowerPoint below:
Step-1: Go to “Add or remove programs”
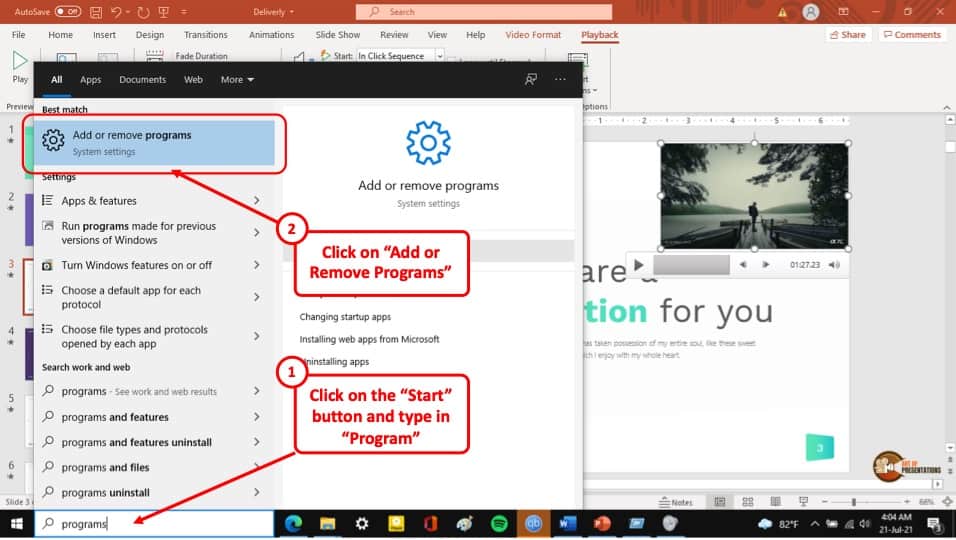
The first step is to go to the “ Start ” menu of your computer and launch the “ Add or remove programs ” tool.
Step-2: Click on the “Advanced Options” button
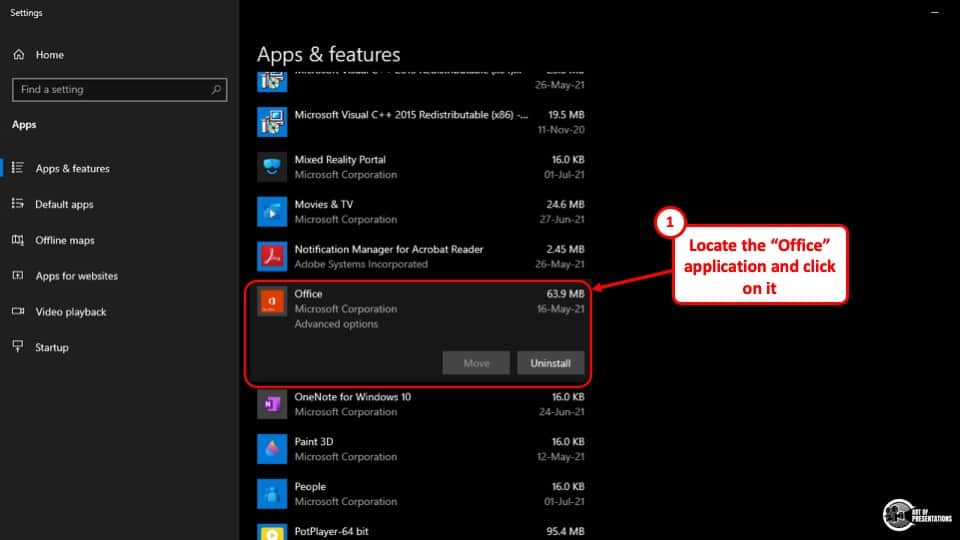
The second step is to find your Microsoft Office program and select the “ Advanced options ” button.
Step-3: Select the “Repair” option
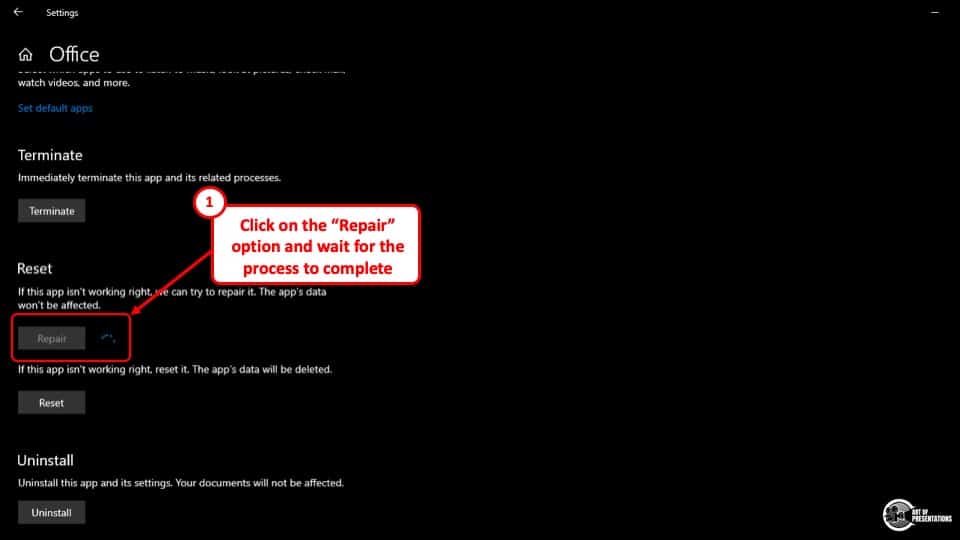
After you click on the “ Advanced Options ” button, you will be taken to a new window. From that window, under “ Reset ” select the “ Repair ” option.
Once the scanning and repairing are complete a tick mark will appear beside the “ Repair ” option, which will indicate that the repairing is complete.
7. How to Change Video Source in PowerPoint?
Unfortunately, there is no direct way to change the path of the source of a video in your PowerPoint presentation.
You can use a macro to fix this problem but honestly, it is easiest to simply re-attach the video to your PowerPoint presentation.
To change the video source in your PowerPoint presentation, delete the initial video, move the video file to the same folder as the PowerPoint presentation and insert the video again and the source of the video will change accordingly.
Credit to Benzoix (on Freepik) for the featured image of this article (further edited)
- DynamicPowerPoint.com
- SignageTube.com
- SplitFlapTV.com

PowerPoint Create as Video: Quality and File Size
May 10, 2020 | How-To
We have talked about using a PowerPoint presentation to design your advertising, commercials, menu boards and more for digital signage on television screens. See our SignageTube digital signage in the cloud solution, as well as our iPoint digital signage solution.
A PowerPoint presentation is great to edit your video content and exporting to video formats is included. Open your PowerPoint presentation and click File, Export, Create as video.

It is true that the higher the resolution and the dimensions, the better the video. However, the HD and ultra formats just don’t fit in my on-line language course. The ideal dimension is 1280×720., a viewer doesn’t need to scroll up and down to see the video.

Yes that is correct. The higher the resolution, the better the quality is, but also the video file size will grow, and the longer the rendering will take! If it does not fit, then keep it at 1280×720.

Why is it, when I save a video in the lowest resolution of 852 X 480, Powerpoint is changing the file to 840 X480 making it incompatible with another program that requires the 852 X 480 format?
Submit a Comment
Your email address will not be published. Required fields are marked *
Pin It on Pinterest
- StumbleUpon
- Print Friendly

Microsoft Learn Q&A needs your feedback! Learn More
May 20, 2024
Microsoft Learn Q&A needs your feedback!
Want to earn $25 for telling us how you feel about the current Microsoft Learn Q&A thread experience? Help our research team understand how to make Q&A great for you.
Find out more!
Contribute to the Microsoft 365 and Office forum! Click here to learn more 💡
April 9, 2024
Contribute to the Microsoft 365 and Office forum!
Click here to learn more 💡
PowerPoint Forum Top Contributors: Steve Rindsberg - John Korchok - Bob Jones AKA: CyberTaz ✅
May 10, 2024
PowerPoint Forum Top Contributors:
Steve Rindsberg - John Korchok - Bob Jones AKA: CyberTaz ✅
- Search the community and support articles
- Microsoft 365 and Office
- Search Community member
Ask a new question
Can't see name of video file embedded in Power Point anymore
I've opened a PPoint presentation created in version 2003 in my new PPoint 2010. I need to burn a CD with that presentation which includes several embedded video files. I need to find out the video file names so I can grab the actual video files and include them on the CD.
I used to just right-click on the video embedded in the slide and find out its name. I've been everywhere inside version 2010 and I can't seem to do it unless I had inserted that video as an object inside of a "movie" as it used to be called.
Can somebody help?
Report abuse
Reported content has been submitted
Replies (6)
Have you tried the selection pane? Home Tab | Select | Selection Pane... This will list the name of the movie but not the path.
17 people found this reply helpful
Was this reply helpful? Yes No
Sorry this didn't help.
Great! Thanks for your feedback.
How satisfied are you with this reply?
Thanks for your feedback, it helps us improve the site.
Thanks for your feedback.
The selection pane is not the final answer, but it's definitely helpful. Thanks much for your help! :-)
If the video is embedded, i don't see a way to get the original location. But info about all linked media can be viewed here:
File | Info | Look for View Links under Optimize Media Compatibility.
7 people found this reply helpful
1 person found this reply helpful
- Article Author |
- Volunteer Moderator
If the videos are truly embedded, you don't need to include the video files on the CD. They're part of the PPTX file.
If they're linked, they need to be included on the CD. One easy way to get a list of the linked videos and other linked files is to use the Links Report feature of my PPTools FixLinks add-in. The Links Report is fully functional in the free demo version; no nags, no timeouts, etc.
http://www.pptools.com/fixlinks/
5 people found this reply helpful
Question Info
- Norsk Bokmål
- Ελληνικά
- Русский
- עברית
- العربية
- ไทย
- 한국어
- 中文(简体)
- 中文(繁體)
- 日本語
A .gov website belongs to an official government organization in the United States.
A lock ( ) or https:// means you've safely connected to the .gov website. Share sensitive information only on official, secure websites.
- About Mild TBI and Concussion
- After a Mild TBI or Concussion
- Health Disparities in TBI
- Comparing Head Impacts
- Clinical Guidance
- Mild Traumatic Brain Injury Management Guideline
- Resources for Health Care Providers
Traumatic Brain Injury & Concussion

About Moderate and Severe TBI

Preventing TBI
Symptoms of Mild TBI and Concussion

Where to Get Help

Facts About TBI
For Medical Professionals

Clinical Guidance for Pediatric mTBI

Health Care Provider Resources
CDC Programs

HEADS UP Online Training Courses
National Concussion Surveillance System
Core State Injury Prevention Program (Core SIPP)
A traumatic brain injury, or TBI, is an injury that affects how the brain works. TBI is a major cause of death and disability in the United States.
For Everyone
Health care providers.
How-To Geek
How to send powerpoint presentations with an embedded video.
Need to send out a PowerPoint that has an embedded video? Here's how to send a presentation without breaking it.
Quick Links
Create a folder, embed a video in powerpoint, compress the folder.
PowerPoint allows you to embed videos directly in your presentation. However, if you share the presentation, you might discover the embedded video no longer works. Here’s how to send your presentation with the embedded video still intact.
The issue here is that the embedded video doesn’t actually become a part of your slideshow. When you embed a video in PowerPoint, you’re simply telling PowerPoint the location of the media on your computer. PowerPoint then references that video on the designated slide.
If you want to send the presentation with the embedded video, you’ll need to package them together.
First things first, you’ll create a folder to store both the PowerPoint and video file. Note that you need to do this before embedding the video in your presentation. If you change the location of the video file after you embed it, the video will no longer work.
To create a new folder in Windows, right-click on the location where you want to place it, select “New” from the drop-down menu, and then select “Folder” from the submenu.
If you're using a Mac, you'll simply right-click and select "New Folder."
You’ll be prompted to name the folder. Name it something memorable, and then store your presentation and video file in this folder.
Now that both files are in the same location, open the PowerPoint file and embed the video . To do this, navigate to the slide where you want to embed the video; then go to the “Media” group of the “Insert” tab and select “Video." From the drop-down menu that appears, select “Video on My PC" if you're using a Windows machine or "Movie from File" if you're on a Mac.
A dialog box will then open. Navigate to the location of the video, select it, and click “Insert."
With the video now embedded in your presentation, save and then close PowerPoint.
Now it’s time to package the files together by zipping the containing folder.
Related: Everything You Need to Know About Zip Files
To do this on Windows, right-click the folder, select “Send To” from the menu, and choose “Compressed (Zipped) Folder” from the submenu.
Mac users will right-click the folder and select "Compress 'Folder Name'."
You’ll now have a zipped file containing both the PowerPoint presentation and the video file.
When you want to send the presentation, give the zipped file instead of just the individual PowerPoint file. Once the recipient receives, unzips, and opens the presentation, the embedded video will be playable.
Save a presentation as a movie file or MP4
To run your presentation on computers that don't have PowerPoint installed, you can save your presentation as a video file.
MOV files can be played in any application that supports QuickTime movies. The MP4 format is an international standard, so it's supported more broadly, especially on hardware devices.
Save in a video format
Select File > Export .

(Don't use Save As , because it doesn't offer video options.)
Open the File Format list and select the video format that you want ( MP4 or MOV ).

If the MP4 and MOV options aren't in your version of PowerPoint, see Requirements below for more information.
Select the video Quality you want: Presentation Quality , Internet Quality , or Low Quality . The higher the video quality, the larger the file size.
If you have recorded timings and want to use them in the video you create from your presentation, make sure the box next to Use Recorded Timings and Narrations is checked. You can also choose to set the amount of time the video will spend on each slide if you don't have a set timing.
When you've made all your selections, choose Export .
Note: When you export your presentation as a video, any narrated audio that was recorded in Slide Show will play, but other embedded media files won't play.
After you've saved your presentation as a video, you can share it just as you would any other video, by using applications or devices that can open and play videos.
Requirements for saving in a video format
Limitations on presentations saved as movies.
When a presentation plays as a movie, each slide appears for a uniform amount of time unless you set individual timings, or record the slide show to establish timing for the entire presentation. For more information about setting slide timings, see Rehearse and set slide timings .
Several transitions play differently in a movie than they do in a presentation. Animation effects don't play in a movie at all.
Animate text and objects
Add, edit, or remove transitions
Record a slide show
Rehearse and set slide timings

Need more help?
Want more options.
Explore subscription benefits, browse training courses, learn how to secure your device, and more.

Microsoft 365 subscription benefits

Microsoft 365 training

Microsoft security

Accessibility center
Communities help you ask and answer questions, give feedback, and hear from experts with rich knowledge.

Ask the Microsoft Community

Microsoft Tech Community

Windows Insiders
Microsoft 365 Insiders
Was this information helpful?
Thank you for your feedback.
IMAGES
VIDEO
COMMENTS
On the File menu, select Save to ensure all your recent work has been saved in PowerPoint presentation format (.pptx). Select File > Export > Create a Video. (Or, on the Recording tab of the ribbon, select Export to Video .) In the first drop-down box under the Create a Video heading, select the video quality you want, which pertains to the ...
On the PowerPoint window, in the left sidebar, click the slide in which you want to add a video. At the top of the PowerPoint window, click the "Insert" tab. In the "Insert" tab, under the "Media" section (which is to the extreme right side of the interface), click "Video." You'll now see an "Insert Video From" menu.
To insert a video from a file and embed it on a slide: In Normal View, navigate to the slide where you want to insert a video. Click the Insert tab in the Ribbon. Click Video. A drop-down menu appears. Depending on your PowerPoint version, choose Video on My Computer, Video on My PC or This Device. A dialog box appears.
Join 400,000+ professionals in our courses here 👉 https://link.xelplus.com/yt-d-all-coursesLearn how to create a video using PowerPoint. I'll first show you...
To turn a PowerPoint presentation into a video, first, open your presentation with the PowerPoint app on your Windows or Mac computer. In the top-left corner of PowerPoint, click the "File" option. From the sidebar that opens after clicking the "File" option, select "Export." In the "Export" menu, click "Create a Video."
Watch this video to learn how to convert your PowerPoint presentation into a video. When you make a recording of a presentation, all its elements (narration,...
To insert a video file into PowerPoint, open your presentation and select a slide. From the ribbon bar, click Insert > Video > Video on my PC. Locate the video file on your PC in the Insert Video ...
Learn how to publish your own video using Microsoft PowerPoint with narration, annotations, animations, and timings. As full disclosure, I work at Microsoft ...
Record new layer: Pick this for recording your video as a new layer on top of an existing recording. 2. Click Record at the bottom of the Record panel. 3. Drag over the area of your screen you wish to record. Click Start Recording. Press Space to start recording the full screen. 4. Click Stop to finish recording.
Click or tap the Video button in the Media section and a small menu opens. Press the " Video on My PC" option to embed a video from your PC. PowerPoint, Embed, video. File Explorer will open. Search for the folder containing the video that you want to insert into your presentation.
Adjust the playback settings. Select the video and click the Playback tab. You'll be able to edit how your video plays on the slide. To adjust when the video plays, click the drop-down menu next to Start:.Select In Click Sequence, Automatically, or When Clicked On.; Check the boxes to apply any of the following: Play Full Screen, Hide While Not Playing, Loop until Stopped, and/or Rewind after ...
Step 3: Click Insert. In the Choose a Video dialog box, select the video file you want to insert, then click the Insert button to embed the video on the slide. If you want to put a link to the video on the slide, click Show Options in the lower left corner of the dialog box.
Browse to the location where you want to save the file and give it a name then press "Save.". While the video is being created, you will see the small progress bar at the bottom of your PowerPoint window. Wait till this is done and then go to your video. Now you can double-click your video file and it will automatically play with your video ...
All you have to do is copy either the URL or the embed code: Just as before, paste either of these into the "online film" dialog box and your video will appear on the slide. Quick note: to embed the video in PowerPoint, the video must be publicly available, or at least viewable via link.
Most versions of Microsoft PowerPoint supports ".wmv" files. Hence, videos that are in a different format may not play in your PowerPoint presentation. Make sure the video file is in the right format. 3. Video Only Plays Audio in PowerPoint . Sometimes, the video file only plays the audio of the video file in Microsoft PowerPoint.
A PowerPoint presentation is great to edit your video content and exporting to video formats is included. Open your PowerPoint presentation and click File, Export, Create as video. There, you can choose the type of video. There are 4 types: Standard with a resolution of 852 × 480 pixels. HD with 1280 × 720 pixels.
Below are some of the best Visme animated presentation templates and PowerPoint video templates that use interactive features. 8. Graffiti Style Interactive Animated PowerPoint Template. This presentation template has seamless transitions from slide to slide plus a number of creative pop-ups.
If the video is embedded, i don't see a way to get the original location. But info about all linked media can be viewed here: File | Info | Look for View Links under Optimize Media Compatibility. In version 2003 you would right-click on the video and select "edit movie object" to find out the path. Simple.
Learn how to insert Video in slides in PowerPoint 2021 for Microsoft 365. Then once you insert the video further customize the settings. Learn more at https:...
Custom copilot is pre-populated with information from the file/folder selection. The copilot has a default folder name, branding, description, sources you've selected, and other fields already. You can keep these fields and parameters as-is, or easily update them. Customize the identity with a name change. Customize the grounding knowledge.
Nov. 6, 2023. Mild Traumatic Brain Injury Management Guideline. View clinical recommendations for diagnosis and management of adults with mild TBI. Apr. 29, 2024. Health Care Provider Resources. View resources to manage and prevent concussions. Apr. 15, 2024.
From the drop-down menu that appears, select "Video on My PC" if you're using a Windows machine or "Movie from File" if you're on a Mac. A dialog box will then open. Navigate to the location of the video, select it, and click "Insert." With the video now embedded in your presentation, save and then close PowerPoint.
Azure AI Video Indexer, a cloud and edge video solution, enables textual video summarization with the following build announcements: Preview at the cloud: Textual video summarization in Azure AI Video Indexer powered by Azure Open AI . The feature of textual video summarization in Azure AI Video Indexer, cloud edition is powered by Azure Open AI.
British online used-car retailer Cazoo Group will appoint administrators from advisory firm Teneo for the viability of its business, the company said in a regulatory filing on Tuesday.
Crystal McKinney, a former model, filed a lawsuit against Sean "Diddy" Combs on Tuesday accusing him of sexual assault stemming from a 2003 incident in New York City.
Save in a video format. Select File > Export. (Don't use Save As, because it doesn't offer video options.) Open the File Format list and select the video format that you want ( MP4 or MOV ). If the MP4 and MOV options aren't in your version of PowerPoint, see Requirements below for more information. Select the video Quality you want ...