Thinking In 3D: A Better Way To Solve Complex Problems
- Self-improvement
We shouldn’t confuse just thinking with good thinking . Practically every situation we encounter requires thinking before acting. But commonly, your usual cognitive methods won’t cut it. You’ll need a fresh perspective. A new way to look at things to solve a complex problem. That’s where thinking in 3D – or three-dimensional thinking – can help.
The scientific word for 3D thinking is spatial visualization .
Spatial visualization is the ability to rotate, maneuver, and disassemble two and three-dimensional objects in your head. You interact with objects with your working memory to see how they look from all sides and potentially figure out how they were assembled.

Strong 3D thinkers can even invent whole structures in their heads before even picking up a drawing tool to start the initial blueprint.
Commonly, people who are dyslexic are considered strong 3D thinkers.
One example is James Russell . The person who invented the compact disk in 1973 – or at least the first operating prototype was produced then.
In an interview , he shares that a large part of the design was invented in his head before he even touched a pencil.
All that sounds great.
But you might ask: “How we can leverage thinking in 3D in our daily lives besides faster-constructing Legos?” And, potentially, “Why do we need to use this thinking type ?”
That’s what we’re going to look at in this post.
Let’s dig in:

What is 3D Thinking?
More specifically, what is 3D thinking in relation to problem solving?
Three-dimensional thinking in relation to solving everyday problems can be considered your ability to observe situations from all sides. Disassemble them, so you can find the core issue and then find a creative solution outside the current domain.

Let’s consider an example so we can grasp the idea better…
The tenants of a large office building were complaining about the slowness of the elevator. It took several minutes to go from the ground floor to the top. Senior people were wasting time (and money). 1
A consulting firm was hired that provided the cost for improving the current elevator and potentially adding a new, faster elevator. However, the cost was too high. Then, a young psychologist who was working in the building’s personnel suggested something else – to put mirrors in the elevators. This way, the people waiting will look at themselves. When the mirrors were installed, the complaints magically stopped. In fact, some tenants commented that they were quite satisfied with the improvements in the speed – which were actually zero.
In this example, the problem wasn’t solved with a solution on the X and Y axis – if we consider X to be the speed of the current elevator and Y to be adding an extra elevator. It was solved by Z – changing the perspective of the users of the elevator.

The ride with the elevator was still slow, but it was no longer intolerably boring. The mirror gave people something to do. A chance to look at the most precious thing in the world for them – themselves.
Why is 3D Thinking Important?
3D Thinking is important in real life because certain problems can’t be solved in the two-dimensional world.
Think about your own work. Do the problems you face on a daily basis have a clear set of rules? A clear structure that you can approach with a standard toolbox?
No. The rules are mystifying. The best solution, if it exists at all, can be found only after periods of deep thinking, reflection, and trial and error.
Plainly, the solutions to most of our issues are surprisingly not obvious.
To showcase why three-dimensional thinking is important, let’s look at this great example that I previously shared in my article on critical thinking strategies . 2
We’re going to solve a puzzle – a Greek Cross puzzle. Here’s the setting:
You take ten coins and you arrange them to match the following illustration:

The objective is to move just two coins so you can form two rows, containing six coins each when added up either horizontally or vertically.
Pause and think.
Take your time, I’ll wait.
Your final result should look like this (the solution to the puzzle):

On top of the center coin, you place a second coin. And this second coin is on the Z axis.
Few people can figure out the solution because we’re constrained by our own minds. We think that we can only “play” with the X or the Y axis.
What Is The Difference Between 2D and 3D thinking?
Two-dimensional thinking is seeing the observable truths about objects and ideas. You see things for what they are. Three-dimensional thinking takes things further. You see things for what they can be.
For instance, wind on its own is just air in your face. It can feel good, bad, and it can even destroy your house.
But wind, seen from a different perspective, can help you run faster, sail, and even produce energy.
In essence, 3D thinking is not looking at things independently – in a void. But actively digging. Searching for all of their characteristics and how different objects can connect to each other.
What Is An Example of 3D thinking?
How can 3D thinking help you with your everyday challenges?
That’s the question.
To answer it, let’s look at several examples:
3D Thinking In The Workplace

If you’re a business owner and you want to motivate your people to perform better. The usual routes will be to a) offer additional rewards in some sort of bonus scheme; b) you threaten people that you will fire them.
And while the two probably work in some cases. Scientists argue that tasks that require rudimentary cognitive skills are better performed when people are intrinsically motivated – doing something that matters. 3
3D Thinking When Consuming Content

Since a large part of our daily lives is related to consuming content. (Hey, you’re doing this right now.) It’s important to think about our incentives in relation to the content and why are we watching/reading something.
Usually, we look at the surface of the information:
- What is being shared?
- How can I use this information in my own life?
But another way to look at info is by asking yourself the following extra questions:
- How this content was created?
- What are the reasons behind the creation of the content?
Let’s take a regular YouTube channel as an example.
Not only that is great to think about how the video was created – especially if you want to start your own channel. But it also leads you to the other question: What are the incentives of the creator?
Sure, he wants to share his experience, a tutorial, etc. But commonly, people creating content are doing it to gain more subscribers, money, fame. So, thinking about their reasons can help you realize that you shouldn’t believe everything they are sharing and that you probably shouldn’t click on that bell icon – to get notified when there is a new video.
3D Thinking in Habit Formation

As long as factories continue to produce all kinds of sugary things. As long as companies funnel billions of dollars into marketing these sugary things like finger-licking good food. We need habits.
List of good habits in relation to how we eat, exercise, and in all sorts of other categories.
Of course, dozens of online gurus only wait for you to type the word “how to build lasting habits”, so they can attack you with their “simple” 3-step process or something.
But if we apply 3D thinking, we can see that having good habits is not only about reading about habits and exercising when you are feeling motivated.
To build lasting habits, you need a plan on how to practice the habits even when you are not motivated and when things don’t go as planned.
How Do You Start Thinking In 3D?
The solutions to a lot of our problems are not ahead of us. They are not even around us – hiding somewhere in the periphery of our minds. They are deeply buried in our unconsciousness or can be discovered in a completely different field.
To become a 3D thinker, not only that you should think outside the current box. But you have to add more boxes.
What I mean by that, is that after you state your challenge, it’s best to look for solutions from a parallel or a distant field.
The greater the distance from your current field, the greater your chance of producing new and original ideas. Meaning that if you sell computers and you want to increase your sales, a better idea will be not to look at how other businesses that sell computers operate. But look at companies that are doing something totally different.
What Einstein famously did which led him to the theory of relativity is to imagine himself pursuing a beam of light.
He said, “If we could travel next to a light wave, what would we see?”
His answer was, “I should observe such a beam of light as an electromagnetic field at rest though spatially oscillating.” 4
Or plainly, he did a thought experiment.
He positioned himself in the middle of the problem and started thinking about what could happen.
The point is to remove the blinders holding you back so you can accept a different perspective.
If we return to the business owners selling computers, we might try to think like a computer.
I know. Weird.
But helpful?
Absolutely.
For instance, “If I’m a computer, what would my concerns be? What would I feel? How would I advertise my features?”
Probably Steve Jobs asked himself such questions which led him to create the Macintosh.
A boring gray box that looks lifeless doesn’t look cool.
A fun-looking one with inviting colors? Much better.
What Apple did is to showcase computers in a totally different light. Colorful. Fun. Exciting. Giving you the ability to become an artist – not a boring accountant. Moreover, the iconic 1984 Super Bowl ad showcased their product as liberating. Saving people from the nefarious Big Brother (IBM at the time).
Even though it’s hard to define a concrete path toward thinking in 3D. If I am to create one. It will look like this:
How do you start thinking in 3D:
- State your challenge.
- List the common ways it can be solved.
- Look for a field unrelated to yours – a distant field.
- Choose a specific keyword/component from that other field.
- Think about how you can apply this component to your own field.
Some Closing Thoughts
Money. More stuff. More people. These are not the only ways to solve a problem.
Instead of looking to buy more things when there is an issue – or invite more people into a meeting. Optimize for gathering insights .
The more ideas you collect in your head (and in a notebook – if you’re a note-taker). The more thinking tools you’ll have at your disposal.
Nobody’s going to do your thinking for you. You have to do it yourself, whether you’re rich or poor. And you have to do a good job if you want to fix situations and progress.
3D thinking is a great way to escape the rut of linear thinking (common thinking). An awesome thinking tool that you can place in your mental arsenal, allowing you to imagine solutions and find outcomes in your head before even moving a muscle.
Add to your mental toolset by reading the following:
- How To Integrate The 16 Habits of Mind Into Your Daily Life
Intriguing Examples of Critical Thinking in Everyday Life
- The Importance of Teaching Critical Thinking
- How The Iceberg Model of Systems Thinking Can Help You Solve Problems?
Trouble Saying No to Temptations?
Join Farview: A newsletter fostering long-term thinking in a world driven by impatience. Trusted by over 4,300 thinkers, Farview is a concise, thoughtfully organized newsletter helping you handle the self-sabotaging thoughts trying to corrupt you.
- Ted Talks, Perspective is everything, Rory Sutherland. On the web: https://www.ted.com/talks/rory_sutherland_perspective_is_everything
- I first found out about this puzzle – and thinking technique – from the book Thinkertoys . I highly recommend checking it if you want to push the limits of your creative thinking.
- Manzoor F, Wei L and Asif M (2021) Intrinsic Rewards and Employee’s Performance With the Mediating Mechanism of Employee’s Motivation. Front. Psychol. 12:563070. On the web: https://doi.org/10.3389/fpsyg.2021.563070
- John D. Norton, Chasing a Beam of Light:Einstein’s Most Famous Thought Experiment. On the web: https://sites.pitt.edu/~jdnorton/Goodies/Chasing_the_light/
Related Entries

Overcoming Obstacles: A Simple 3-Step Process To Handle Daily Challenges

Why Great Things Never Came From Comfort Zones
The 6 Best 3D Brain Teaser Puzzles for Handheld Challenges and Spatial Problem Solving
From board game Kanoodle to cast-iron playthings.

Gear-obsessed editors choose every product we review. We may earn commission if you buy from a link. Why Trust Us?
At Popular Mechanics , we’ve got an office full of curious puzzlers and calculated tinkerers. So, to find out which puzzles are worth spending that precious mental energy (and money) on, we called some in, dropped them off in a common space, and Slacked some colleagues to help put them together. If you’re a puzzle fiend and love to get your brain working, below are the ones that most impressed our resident nerds.
Game on and check our picks for the best retro gaming consoles , board games for families , and beginner gaming PCs .
The Best 3D Brain Teaser Puzzles
- Best Overall: Educational Insights Kanoodle
- Best Upgrade: Craighill Tycho Puzzle
- Best Hanayama: Bepuzzled Labyrinth Hanayama
- Best for Kids: Uncommon Goods T-Rex 3D Puzzle Building Kit
- Best 3D Puzzle: Original 3D Crystal Puzzles Grand Castle Deluxe
What to Consider
Types of puzzles.
Brain teaser puzzles cover a broad range, from multi-piece posers you take apart and reassemble to 3D jigsaws.
Multi-piece puzzles are either lock-based (which involve pulling apart and putting together geometric shapes via turning, clicking, maneuvering, or shimmying each piece) or spatial (which involve organizing and arranging items based on color, shape, or both).
Japanese puzzle maker Hanayama is one of the most popular brands in this space, specializing in handheld cast-iron pieces that require unlocking and removing pieces from one another and putting them back together. Hanayama rates its puzzles using difficulty levels 1 to 6, with higher numbers indicating more difficulty. Of course, these are subjective ratings, but after testing a few, we believe the higher-end Hanayama puzzles involve creative problem-solving that the average person finds difficult.
While traditional 2D jigsaw puzzles are assembled on flat surfaces and resemble a box art image, 3D jigsaws are slightly more challenging. They require spatial awareness—a.k.a., an understanding of how things fit together in space—and actual instructions. Sometimes, the pieces are lettered or numbered. But, like most puzzles, you can kick it into hard mode by tossing those instructions.
<p>Are" class="redactor-autoparser-object">https://www.tiktok.com/@popula... you someone who enjoys reassembling puzzles? If not, stick to something simple that doubles as a display once it’s complete. Logic puzzles from Hanayama aren’t always the best to show off on a shelf or desktop, but higher-end pieces from Craighill are practically made for showing off. 3D jigsaw puzzles are similar to regular jigsaw puzzles—you likely won’t remember where all the pieces go if you disassemble and reassemble it several months apart.
How We Tested
“Brain teaser” is a bit subjective, but we settled on products that enhance and stimulate spatial reasoning skills, critical thinking, and logic—with a healthy dose of fun. We only focused on puzzles that involve pulling pieces apart and putting them together, playing with colors, and tinkering.
We researched popular puzzle brands and landed on a few major ones: BePuzzled, Hanayama, and Kanoodle-maker Educational Insights. We ignored any products that looked flimsy or cheap. We also avoided any wooden puzzles, as their difficulties are hard to gauge, they’re mostly geared toward children, and, frankly, they remind us of that peg game from Cracker Barrel —also cheap. Lastly, for the sake of brevity, we avoided anything that seemed like a multi-pack overkill , focusing on quality instead of quantity.
BePuzzled, Hanayama, Uncommon Goods, and Educational Insights sent various puzzles for us to try out in our offices. I emptied each box onto a table and told my colleagues, “Hey, come over here and work on these while I watch you tinker.” Through two weeks of work-time breaks, lunch hours, and random communal puzzling sprees, we gauged each puzzle below on effort (How hard is this to figure out? How much time is this taking?), difficulty (How many people did it take to solve?), value (Would we do this puzzle again?), and material (Is it plastic or metal?).
Although we typically keep a 2D puzzle on the table for screen breaks, the puzzlers at Popular Mechanics found that the best 3D puzzles were the straightforward ones that needed little to no explanation. Anything that felt the most enticing to pick up and play, either due to visual attraction or office gossip/word of mouth, topped our final list.
Educational Insights Kanoodle 3D Brain Teaser Puzzle

Kanoodle recently became a TikTok sensation , and after spending hours tinkering with it at the office, picking up games over breakfast, and watching colleagues play it, I can see why: It’s highly addictive. Holistically, it’s got everything I want in a brain teaser puzzle—it’s colorful, pocket-sized, easy to learn, super stimulating, and it makes me feel like a genius when I solve it.
Kanoodle’s goal is simple, but it always proves challenging. The board has 48 spaces, 12 uniquely shaped, color-connected beads, and a booklet of 200 puzzles, sorted in numerical order from easiest to hardest. To play, pick a puzzle from the booklet and set your pieces on the board according to the puzzle’s design. After setup, you’ll notice you have pieces left over. The goal is to fit those pieces on your board without moving the design you just laid out.
It’s comparable to clearing lines in Tetris, except instead of clearing lines, your prize is being able to shut your Kanoodle case. There are also a few pages of 3D puzzles, which involve stacking play pieces on top of each other.
Educational Insights claims Kanoodle expands spatial reasoning skills and enhances critical thinking. Several resources for children with autism recommend Kanoodle for developing fine motor skills, including National Autism Resources and Therapy Shoppe .
“It’s a fun, engaging way to develop problem-solving skills,” says Digital Content Producer Amber Joglar , who spent hours playing this at her desk instead of working (sorry, Amber). “The puzzles get more challenging and involved as you move through levels, and it’s a nice way to get a brain break that doesn’t involve screen time.”
The game is excellent for ages 7 and up, and we especially recommend it for adults looking for a non-screen activity . (It’s helped me calm down on more demanding days.) Its clamshell, pocket-sized packaging makes it easy to travel with and, as evidenced by my office mates, it’s easy to learn and play with others. We simply can’t get enough of this game.
Craighill Tycho 3D Brain Teaser Puzzle

The Tycho puzzle is hefty and beautiful, with eight interlocking stainless steel and brass components. You spin it on a countertop to break it apart, then reassemble it by sliding pieces in place. In its core is a hidden cavity that can hold a surprise—large enough for a tiny fortune-cookie-sized message, really—and it’s got a solid weight of nearly 2 pounds . It’s a tough cube puzzle that feels brutalist by design.
We’ve been passing this cube around in the office to see who can assemble it the fastest, and a group of four colleagues got it in less than 30 minutes, though it took lots of tinkering and talking through to reassemble. Many love its weight and feel, and several (myself included) say it looks mesmerizing on a shelf or countertop. It’s definitely a statement piece in a way, maybe establishing authority on a boss’s desk or classiness on a mantle at home.
It also stinks like coins. After toying with the puzzle, the combination of brass and steel had our hands smelling like pennies. If you prefer your puzzles scentless, this may not be for you. It’s also relatively expensive due to its craftsmanship and heavy materials.
We also tried the very similar Tetra puzzle from Craighill, which was as big of a hit in our offices as the Tycho. Though we prefer the Tycho due to its eight-piece makeup (rather than the Tetra’s four), we still enjoyed it. It’s $98—less than the Tycho and still hardy enough to make a statement.
Bepuzzled Hanayama Labyrinth Metal 3D Brain Teaser Puzzle

The objective of this two-piece puzzle is simple: Remove both rings and put them back together. It’s not as easy as it looks. A nub on each end of the horseshoe-like ring marked “Laby” prevents the two rings from pulling away from each other, while both sides of the other ring present two different labyrinths. You must guide the nubs on one ring through the mazes on the other ring, and try not to hit any dead ends on the way.
I tinkered with this Hanayama-branded brainteaser for 20 minutes before giving up. Meanwhile, one of my colleagues fiddled with it for two hours only to get nowhere. Our Assistant Reviews Editor, Adam Schram , successfully pulled both rings apart by feeling his way through the maze while talking and keeping his mind occupied on other things—and in 10 minutes, no less.
The puzzle has a great weight to it. And while it’s made of metal, unlike Craighill’s pieces, it doesn’t stink of it. Both pieces feel like solid cast iron, lending a pleasing tactility and heft. The brand says this puzzle has a difficulty level of 5 for “experts,” but your mileage may vary if you’re anything like Schram.
We also tested the Hanayama Infinity puzzle , in which users pull out bearings from a seemingly invincible figure-8 loop. Staff Photographer Trevor Raab figured it out in less than 10 minutes despite its level 6 difficulty. We do like its design quite a lot, though.
Uncommon Goods T-Rex 3D Puzzle Building Kit

Not so much a brain teaser as it is a 3D puzzle, this T-Rex 3D puzzle-building kit is still a mild head-scratcher. It takes the traditional 2D puzzle and changes it into a layered pile of 3D cardboard, where you slide pieces into slots to make a shape. It has 72 numbered, precut pieces you pop out of place and attach to each other. The box says it’ll take 60 minutes to complete, but Raab assembled it solo in less than 30.
Because of its easy difficulty level and unique 3D build, we highly recommend this for children learning spatial awareness. It’s also a great art project when complete, as a simple paint job would make this pop in a bedroom or on a desktop. Although it’s made of cardboard, its pieces are sturdy and it doesn’t feel cheap.
Original 3D Crystal Puzzles Grand Castle Deluxe 3D Brain Teaser Puzzle

If this looks annoying to put together, you’ll be happy to know that it very much is. And if you like that sort of challenge, the Grand Castle Deluxe is a frustrating yet satisfying build—the total opposite of the cardboard T-Rex. Rather than slide its parts into place, you assemble this puzzle by correctly stacking and interlocking its 105 transparent plastic pieces. Each piece has tiny (hard to read, due to its clear plastic) letters that correspond to others… somehow . Frankly, we don’t even know if we’re doing it right—it doesn’t come with instructions, and after visiting a URL on the back of the box, its PDF instructions aren’t quite helpful, either.
Its rigor isn’t solely due to a lack of instructions but also its design—every piece looks the same, even if they’re in different shapes. After unboxing and dumping each plastic bag full of pieces out on a table, we had a hard time figuring out where even to start.
It’s not impossible, though. Producer Barry Knoblach took a long while to lay out the pieces and assess the situation. “As someone who prefers finishing puzzles instead of seeing how long they take to complete, I was frustrated when I eventually got stuck,” he says. “The castle’s spires are especially difficult, and no directions came with the box. The puzzle is fun once you get the hang of it, but lack of clarity on its parts knocks my rating of it down.”
Uncommon Goods 540 Colors 3D Brain Teaser Puzzle

Probably our favorite puzzle to look at and assemble as a group, this sphere is a blast. It has 540 pieces and cycles through a rainbow ombre gradient, transitioning from red to pink to orange to yellow as you spin it. Each plastic piece is slightly curved, and they’re all satisfying to slot together. The finished puzzle sits on top of a plastic pedestal to display.
Four of us assembled this in less than two hours, separating the pieces by color and then attempting to link each bright hue with its washed-out transitional pieces. It’s remarkably sturdy when put into place, and it’s fun to assemble a puzzle in a shape that should, theoretically, be smooth.
The only problem we had with it was its transitional colors. It was difficult to tell which faded, white-washed pieces fit where, as some color differences were hard to make out. The transitions between each colored area isn’t as smooth as we’d like. Piece placement definitely benefits from a second opinion and a flashlight.
Kevin Cortez is an editor for Runner's World, Bicycling, and Popular Mechanics covering reviews. A culture and product journalist for over ten years, he’s an expert in men’s style, technology, gaming, coffee, e-bikes, hiking, gear, and all things outdoors. He most recently worked as the Style Editor for Reviewed, a top product recommendation site owned by USA TODAY. He also helped with the launch of WSJ's Buy Side commerce vertical, and has covered the music and podcast industries for Mass Appeal, Genius, Vulture, Leafly, Input, and The A.V. Club. Equally passionate about leisure as he is his penmanship, Kevin dedicates his spare time to graphic novels, birding, making cold brew, and taking long, meandering walks.

.css-cuqpxl:before{padding-right:0.3125rem;content:'//';display:inline;} Toys .css-xtujxj:before{padding-left:0.3125rem;content:'//';display:inline;}

The 8 Best Rubik’s Cubes for Fun and Frustration

The 9 Best Robotics Kits for Kids

The 11 Best Nerf Guns

The Best Lego Building Accessories

Black Friday Lego Deals 2023: Save on Every Set

The Best Kids’ Electric Cars

The Best Remote Control Toys

The Best Lego Advent Calendars for 2023

Post-Amazon Prime Day Lego Deals 2023

The Best RC Boats for Racing and Sailing

The Best Remote Control Cars for Kids and Adults
Or search by topic
Number and algebra
- The Number System and Place Value
- Calculations and Numerical Methods
- Fractions, Decimals, Percentages, Ratio and Proportion
- Properties of Numbers
- Patterns, Sequences and Structure
- Algebraic expressions, equations and formulae
- Coordinates, Functions and Graphs
Geometry and measure
- Angles, Polygons, and Geometrical Proof
- 3D Geometry, Shape and Space
- Measuring and calculating with units
- Transformations and constructions
- Pythagoras and Trigonometry
- Vectors and Matrices
Probability and statistics
- Handling, Processing and Representing Data
- Probability
Working mathematically
- Thinking mathematically
- Mathematical mindsets
- Cross-curricular contexts
- Physical and digital manipulatives
For younger learners
- Early Years Foundation Stage
Advanced mathematics
- Decision Mathematics and Combinatorics
- Advanced Probability and Statistics
Published 2004 Revised 2012
Thinking 3D
We thought for a while and then realised that the starting point for very young children is the language that we use to describe positional relationships of objects in space. Behind, beside, in front, to the left, to the right are all important in the development of children's understanding of objects in three dimensions. From this idea we developed the Building Blocks problem.

Our problem Chain of Eight Polyhedra also focuses on the properties of 3D shapes, and in particular on the characteristics of their faces. Analysing the polyhedra in this way and getting to grips with the associated vocabulary will equip children with the confidence to talk clearly and easily about three dimensional problems.
Triangles to Tetrahedra combines all of the above skills and concepts, and draws too on the notion of combinations. In tackling this problem, knowledge of the properties of a tetrahedron is essential, but almost immediately other questions come to mind. How is the length of the sides of the triangular faces important? Can it simply be a matter of combinations? What other factors do I need to consider? In answering these questions, children will be using positional language, visualising and applying what they know about properties of shapes. And of course they will be describing, reasoning, hypothesising, justifying and explaining, which are all key mathematical skills.
And so, in conclusion, we are now convinced that 3D geometry for younger children is not 'hard and scary'. If we create problems like these to give our pupils a good grounding in this topic, equipping them with complementary knowledge and skills, then perhaps three dimensional problems will never become 'hard and scary' at all.
3D Shape Puzzles
3D shapes have SO MANY different characteristics! These playful 3D shape puzzles are a great way to tie them all together!
Snag your set below and then hop over and grab our popular 3D Shape Activities in our shop or on Teachers Pay Teachers!

Getting Ready
To prep, I printed off the 3D shape puzzles, ran them through the laminator and cut out the individual puzzle pieces.
I like to laminate when I’m using an activity in the classroom because it makes the parts extra durable. Plus, it allows me to use them again year after year.

Tip : I chose to make the puzzles normal-size, but you could print the pieces extra large and use them as a whole-class matching game.
Working with a small group of students, I placed the square-based pyramid label in the center of the table. I explained that students would need to find three bottom pieces that fit with it:
- a line drawing of the shape
- a count of its faces, vertices and edges
- a real world object that matched
The kids were eager to get started, so they quickly found the line drawing and slid it into the first spot.
To help them figure out how many faces, vertices and edges it had, I gave them a square-based pyramid model that we had in our set of 3D shapes. Then, I had them count each characteristic.
Then, they found the matching piece and placed that in the next spot on our puzzle.
With just one piece left to go in our 3D shapes puzzle, I challenged them to think of a few real world objects that were square-based pyramids. It was a stretch, but one child remembered seeing a picture of the Louvre Pyramid in a book. Another student excitedly recalled the Egyptian Pyramids.
Voila! It was a match.

The children continued working their way through the puzzles until all pieces had been matched.
Grab Your Download
Ready for some fun 3D learning? Click on the blue button below for your free download and then hop over and grab our popular 3D Shape Activity Pack in our shop or on Teachers Pay Teachers!

Similar Posts

Ten Frames Rainbow Match

Sprout House

Linear Measurement Scavenger Hunt

Back to School Ten Frames

Number Sense Mystery Puzzles

Number Bingo
Leave a reply cancel reply.
Your email address will not be published. Required fields are marked *

44 Common 3D Print Problems – Troubleshooting Issues 2023

Written by: 3DSourced
January 17, 2024
You’re here because you’ve either just had a complete 3D print failure, or your prints aren’t quite perfect. We don’t settle for less than perfect, so we don’t expect you to either.
Wondering why your 3D print failed?
Rest assured, the problems and solutions to every 3D printing issue you could experience are explained in this tips & fixes-packed guide to 3D printing.
Each issue has a clear high resolution photograph, a detailed explanation of the subject, and a problem-solving checklist for how to improve 3D print quality.

This includes instructions for software settings and even best practices for specific prints and materials, where applicable.
Hopefully, this guide saves you hours of frustration – if you feel it’s useful to you please share it & tell others!
Our guidance is based on findings from extensive tests carried out with our own 3D printers and filament. Your exact experience may vary depending on your particular device and materials.

1. First Layer Issues
The first layer of your print is probably the most important layer. As the foundation to your whole print, it is essential in providing proper adhesion to the build plate.
Many common 3D printing problems stem from a poor first layer. There are a couple of things that can go wrong when printing your first layer.
Nozzle too close to the bed
Signs that your nozzle might be too close to the bed:
- Printed line is way thinner than desired. It might get so thin it turns transparent.
- Excess filament is squished upwards at the edges of the current printing line creating a rough surface and wavy patterns. (You can feel the roughness when touching it carefully even during the print).
- Filament is getting torn off the bed when the next neighboring line is printed.
- Finished prints are hard to remove from the print bed.
Explanation:
- If your nozzle is too close to the bed, there is not enough space between the nozzle and the bed to extrude the proper amount of filament. Excess filament is either squished upwards between individual printed lines or isn’t extruded at all creating additional pressure in the HotEnd.
- Excess filament that gets squished to the sides and upwards might get torn off the bed on the next pass by the nozzle destroying adhesion and making the top of your first layer very rough to the touch.
- Excess filament might also get picked up by the nozzle and might drip back on your print later. This is especially common for PETG.
- If filament backs up in the HotEnd because it cannot get extruded due to the nozzle being too close to the bed, your extruder might even get jammed and start clicking.
- Squishing your first layer too much into the bed can lead to prints that are almost impossible to remove from the build plate when done.
How to fix: Adjust nozzle to bed distance either by tightening the 3 or 4 levelling screws of your printer and using thicker paper stock for manual bed levelling or by adjusting your z-offset value when using a bed levelling sensor. Make sure you’re not pressing down on your bed when levelling it.
Nozzle too far away from the print bed
Signs that your nozzle might be too far away from the bed:
- When looking at the bottom of your printed object, you can clearly make out individual lines with a noticeable gap between each line.
- During printing the first layer, the individual lines are not touching each other.
- There’s small gaps where the lines of the infill are not touching the outlines of the wall.
- The shape of the extruding line is very round. With the proper distance, extruded line is slightly squished, pancake-shaped.
- Individual printed lines are barely sticking to the build plate.
- Parts are warping off the build plate or become loose during the prints.
Description: If your nozzle is too far from the bed there is not enough filament extruded to properly fill the space between nozzle and bed. The line currently extruding is barely making contact with the bed. Individual lines making up the first layer are not connected to their neighbors and they’re not touching the outlines of your object’s wall. All this usually leads to poor adhesion problems like warping or detaching of your object mid-print.
How to fix: Adjust nozzle to bed distance either by tightening the 3 or 4 leveling screws of your printer and using thicker paper stock for manual bed leveling or by adjusting your z-offset value when using a bed leveling sensor. Make sure you’re not pressing down on your bed when leveling it.
Print Not Sticking
Signs that your print isn’t sticking: Your print is lifting off the bed, such as warping, or returning to your printer with a bird’s nest (as per image in ‘Print Not Sticking To The Bed’ section below).
Explanation: In this instance, it’s likely your print has popped off the bed after slight warping, due to insufficient adhesion. This can happen on the first layer (less likely) or several layers into the print. If your print has warped, but remained adhered to the bed, see [Warping] .
How to fix: Adjust nozzle to bed distance either by loosening the 3 or 4 leveling see [Print Not Sticking To Bed] .
Printer specific tips
- Prusa MK2/MK2S : The Prusa’s PINDA sensor is temperature sensitive and will give false readings if the probe is heated before the mesh bed leveling. Raise your probe a good distance off the bed during the preheat before mesh leveling at the beginning of a print.
- Creality CR10/Tevo Tornad o: Both printers come with a fairly large bed. And they’re not necessarily the flattest. Try leveling the bed not at the outermost corners but rather a bit further in.
- Wanhao i3 : keep your hands well away from the bed while feeling the paper dragging during the leveling process. The stock bed frame is rather flimsy and looking at it sternly screws up the results. Repeat leveling procedure at least 3-4 times or more to make sure it stays level. Try leveling at full printing temp, use Preheat in the menu.
- Tevo Tarantula: green stock SN04 sensor is unreliable. Level manually and keep your hands well away from the bed while feeling the paper dragging during the leveling process. The stock bed frame is rather flimsy and looking at it sternly screws up the results. Repeat leveling procedure at least 3-4 times or more to make sure it stays level. Try leveling at full printing temp, use Preheat in the menu.
- Ultimaker 2/2+: The bed carrier flexes a lot when turning the leveling screws, especially the ones in the front. Keep hands clear. Don’t bother with the bed level assistant, just run through it and do the rest manually.
Filament specific tips
- PLA likes to be squished more into the bed than other filament types to provide good adhesion.
- PETG usually prints better with a higher nozzle to bed distance to avoid the nozzle picking up filament that might drip on your print later during the print. Also, the extra distance helps prevent excessive adhesion issue that for example might occur when printing on glass or PEI beds.
- TPU and Flexible PLA will also adhere stronger than you might like if printed too close to a PEI or specialist bed surface (such as BuildTak).
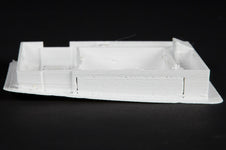
2. Print Not Sticking To The Bed
This is one of the most common issues with many 3D printers. If your adhesion is lacking, you might end up with warped print – or no print at all besides a huge mess of tangled filament on your bed (e.g. Green ‘birds nest’ print you see here).
Many common 3D printing problems stem from a poor first layer . The following are the various causes for bed adhesion to fail before or during a print.
Platform not level
Signs that your platform isn’t level:
Either your nozzle is too near or too far (or both) at the same time along the X or Y-axis. Or in other words: if the left side of your nozzle is too close and the right side it is fine or even too high up, your bed is most likely at an angle – not level with the nozzle. The same goes for front and back and of course, this can happen on both axis at the same time.
When your platform isn’t properly leveled, i.e. the nozzle to bed distance varies in different locations across the bed, your nozzle might be too close in some areas and too far away in others.
How to fix: On most printers, the print bed is leveled by adjusting 3 or 4 screws under the print bed. (If your printer is equipped with automatic bed leveling, this step might not be necessary even though it won’t hurt to do it manually at least once initially). Leveling is actually not the correct term for what we’re doing, but that’s what everybody is calling it. What we’re doing is to make sure that the gap between the nozzle tip and the bed is the same all across the bed. Hence: the bed and nozzle are “level” with each other.
In order to do so:
- Heat up your bed and nozzle to proper printing temperature, retract filament a bit and make sure the nozzle is clean (and no filament is oozing out during the leveling process).
- Move the heated nozzle to the first corner of the bed.
- Slide a piece of paper between the bed and the nozzle. Loosen or tighten the bed level for that corner screw until you notice a bit of drag when sliding the paper under it.
- Continue to the next corner, position your nozzle over it, adjust the screw so you get the same amount of drag.
Do so for at least all four corners, then check the middle of the bed.
This might require multiple passes, as turning one screw usually affects the other screws as well. At the same time, while we’re leveling the bed, we’re also setting the nozzle to bed distance. By using thicker or thinner paper in this process you also set the nozzle to bed distance at the same time. The receipt paper from your last grocery store purchase for example sets the nozzle to bed distance usually works quite well for PLA while thicker paper might work better for PETG.
Platform is warped
Signs your platform is warped:
While printing the first layer, a warped bed will show effects of the nozzle being too near or too far.
One way to easily tell if your bed is warped would be to use a steel ruler or a straight edge, put it onto your bed and look at the gap between the edge and the bed. You might be surprised. Another way to find out: if you leveled the bed for all 4 corners, but the midpoint or some random points on the bed are off, then your bed is warped (or the axis bent).
Explanation: As with platform not level (above), a warped build plate will cause issues with the nozzle to bed distance. Uneven or warped build platforms is the most common mechanical problem we’ve seen in today’s 3D printers and it can be observed in all price classes and all bed surfaces. Neither a milled aluminum plate, FR-4 board, or even a glass sheet is guaranteed to be 100% even.
How to fix: Usually, you can work around warped build plates by printing a very thick first layer (but do not exceed maximum layer height = 75% nozzle size. i.e. 0.3mm for a 0.4mm nozzle). If all else fails, try printing with a raft. Also, with a warped build plate, leveling your bed in such a way that your nozzle to bed distance fits in a smaller area will allow you to work reliably with at least part of a warped build plate.
Or in other words, when dealing with a warped bed do not try to level your bed at the 4 outermost corners, but pick a smaller area in the center of the build plate and try to level it as best as possible there. The idea behind this is that most of the prints seldom require the whole bed, so make a smaller area work well.
Clean your bed
Signs the bed needs a clean:
- The bed isn’t spotless clean, if you see debris from a previous print, dust, gunk, spots, etc.
- You see lumps, build-up or an uneven coat of your favorite bed adhesive.
- Look at the bottom of a finished print: do you see some dents in an otherwise smooth bottom surface that shouldn’t be there? If so, chances are high something was or is still sticking to the bed there that caused the dent (or the nozzle was too close in that spot). When printing the first layer over a fingerprint on a glass plate for example, you can usually see the print bubble up in that spot
Explanation: A dirty print surface will make your adhesion suffer. Any debris from previous prints needs to be removed before starting a new print. If your nozzle rumbles over leftover remnants of your previous prints it will start bouncing and it might introduce vibration in your printer depending on how stiff your bed carrier may be.
Often overlooked is the detrimental effect of oily or greasy residue on your print surface, like for example a mere fingerprint.
How to fix: Degrease your bed surface regularly according to the manufacturer’s instructions. Use either isopropyl alcohol/isopropanol in a high concentration or pure acetone. Stay away from window cleaners, dish washing liquids and soaps, especially those that are supposed to be good for your skin, as most of them will leave a residue behind that will negatively affect bed adhesion.
First layer too fast
Signs the first layer is printing too fast:
The obvious sign that you are printing too fast is when the extruder can’t keep up with pushing filament through at this speed and you see [Under Extrusion] . This is true for the 1st layer as well, but you’ll have to be way off for it to show. Determining the proper first layer speed is more “subtle”, the result is simply poor bed adhesion and there is no tell-tale sign that says: “adhesion failed because it was printed too fast”. Look at your slicer settings instead.
The speed you’re printing your first layer at has direct influence over how well the molten filament bonds to the bed surface. Print slower to increase adhesion. Or faster to decrease adhesion. Since we’re talking about prints not sticking to the bed, we want to increase adhesion, therefore print slower.
How to fix:
Every proper slicer out there has the option to specify a different print speed for your first layer. In Cura, it is called “Initial Layer speed”. In Simplify3D it is called “First Layer Speed”. We’re pretty sure your slicer has this setting as well, under some variation of those names. Usually, a speed of 30mm/s or less is good for the first layer, you can increase the speed later on but experimenting is key.
Check extrusion settings to ensure the proper amount of plastic is extruded
Signs the wrong amount of plastic is extruding:
In general: signs that you’re not extruding the proper amount of plastic are either under- or over-extrusion, infill leaving gaps, walls turn out too thin and layers not thick enough (not squished). However, for the first layer, there is usually no clear indication, as the result looks the same when your nozzle to bed distance is wrong. (So your best bet is to eliminate extrusion issues by doing a proper extruder calibration before leveling your bed & setting the nozzle to bed distance).
Print distance (unless compensated by the printer) needs to match your first layer height and the amount of plastic that is actually extruded while printing your first layer. If your printer is not extruding enough plastic to fill the distance between nozzle and bed (3D printer under extrusion), you will end up with adhesion problems. Too much, or over-extrusion and you have excess filament that needs to go somewhere.
- Calibrate the extruder steps required to extrude the requested amount of filament.
- Check your extrusion multiplier in your slicer software to ensure proper amount of filament is extruded.
- Check that you selected the proper filament size (1.75mm/2.85mm/3.00mm) in your slicer.
- Ensure filament can be transported properly (i.e. filament unspools freely from the spool, no excess friction in the filament path).
- Ensure nozzle isn’t blocked or partially blocked. This is a very common cause of under-extrusion or uneven extrusion. See [Clogged Nozzle].
Print temperature for first layer
Signs the first layer print temperature is incorrect:
There are lots of different issues that can lead to adhesion problems and the end result always looks the same: prints not sticking / warping. Unless you’re way off there is no telltale sign when dealing with adhesion issues that clearly says: your temperature was off. It either sticks or it doesn’t stick & warps. Later on in a print, problems like rough corners, curling or sloppy overhangs – or printing a temperature tower – will give better indications if your temperature might be off in general.
Many 3D printing first layer problems are caused from the incorrect printing temperature during the first layer as it directly affects adhesion to the build plate. Printing colder will decrease adhesion. Printing hotter (to a point) will increase adhesion. Stay within the manufacturer’s suggested range, at least around 10°C below the glass transition temperature.
Almost all slicers out there will allow you to set a different print temperature for your first/initial layer. Use this feature to adjust bed adhesion without it affecting the rest of your print.
Printing colder will decrease adhesion. Printing hotter (to a point) will increase adhesion. But do not exceed the maximum recommended print temperature for the filament you’re using to avoid the filament deteriorating in the HotEnd, which might lead to clogs. Print as cool as possible while maintaining proper adhesion is best.
Bed temperature first layer
Signs your bed temperature is incorrect:
There are lots of different issues that can lead to adhesion problems and the end result always looks the same: prints not sticking / warping. Compare your slicer settings with the recommendations from the filament manufacturer. One indication that your bed temperature might be too high is the [Elephant foot] or curling close to the bed, where the defect gets less pronounced the further away from the bed you get.
Bed temperature (if your printer is equipped with a heated bed) has a lot of influence on how well your first layer will stick to the bed. A colder bed usually decreases adhesion, a hotter bed will increase adhesion. But do not set your bed temperature too high. A common problem we’re seeing from our customers is setting the bed temperature way too high for the material they’re printing with. You need to stay around 10°C below the glass transition temperature (Tg) of the filament you’re trying to print.
Look up the glass transition temperature of the material you’re printing. Ensure your bed temperature is at least around 10°C below the glass transition temperature. If your bed is far below the glass transition temperature and you’re having trouble with your print not sticking, increase your bed temperature in 5°C increments until the issue is resolved (staying below the GT temp).
For rigid.ink PLA for example, do not exceed 50°C. More is not better. If your bed is too hot, you will increase warping forces and the risk of prints warping or even detaching during the print is increased instead of prevented – and you’ll invite other problems later on in the prints, like Elephant foot or caved in walls.
Part cooling fan settings
Signs you need to check your part cooling fan settings:
If your part cooling fan is spinning while printing the very first layer you need to look at your fan settings.
Enabled part cooling fans harden the printed line before proper bonding has occurred. This causes poor adhesion and warping might occur.
You want to allow the currently extruding line of filament to bond with the bed surface. This applies to all our filaments and is especially important to check with PLA.
Disable the part cooling fan for the first layer.
Use build plate adhesion helpers
Signs you need to use a build plate adhesion helper:
If you have checked all of the above and your print is still not sticking, you may want to consider using a build plate adhesion helper.
Adhesion helpers can be as simple as using a brim or a raft. Or if you’re using an M3D wave bonding will also assist. Or you can experiment with different surfaces or coatings for your print bed like for example:
Permanent surfaces:
- PrintBite/FR-4/Garolite
- BuildTak/FakeTak
- Phenolic sheet/FR-2
- Naked glass
Temporary coatings:
- ABS Juice (Slurry)
- PVA Wood glue
- Vinyl-based hairspray/3DLac
- Sugar/Saltwater
- Kapton Tape
- Painters Tape/Blue Tape
When applying helpers to your bed, make sure you apply a thin and even coat. We do not want mountains of glue stick, nor thick patches of hairspray. Nice, thin and even is key. When applying tapes, do not let the edges overlap, apply the tape strips so they sit flush against the previous strip. And do make sure you’re not trapping air bubbles when applying your tape or surface.
There’s nothing worse than an uneven surface because of bubbles and with the cost of some of these surfaces, having to toss a brand-new surface because of bubbles underneath it can be quite annoying.
Please Note: Not all surfaces and coatings suit all materials so check with the manufacturer before making your choice.
For a full explanation: 3D print not sticking to bed
3. Prints Sticking Too Much
Maybe less common than the opposite problem with prints not sticking or warping, but prints sticking excessively to your print bed may happen . Possible reasons and fixes include:
Nozzle to bed distance
See [Nozzle too close]
Bed Temperature
Signs your bed temperature needs changing:
You’re printing at the higher bed temperature range and experiencing your prints sticking too much.
Explanation: A hotter bed temperature means increased adhesion.
How to fix: Check you’re not printing too close to the glass transition temperature of the material.
Reduce the bed temperature in increments of 5°C until your print adheres correctly.
You may also want to consider printing the first layer faster and/or colder.
Bed adhesion
Signs you need to reduce your bed adhesion:
You’re printing a ‘sticky’ filament such as flexible materials or PETG.
Explanation: Some materials are known for adhering extremely well to the bed, check manufacturer information for details.
How to fix: Degrease your bed surface regularly according to the manufacturer’s Add a very thin layer of talcum or baby powder onto your bed. Ensure you remove any excess powder.
Release agent
Signs you need a release agent:
You’re not using anything on your bed and your prints are extremely difficult to remove. On occasion, it may even cause damage to your bed.
Adding an additional film between your bed and the print will ensure that the print will detach taking away the coating with it instead of tearing up the bed surface.
Use a thin, even layer of PVA glue stick or vinyl-based hairspray coating on the build plate to act as “release agent”.
Extrusion multiplier
Signs your extrusion multiplier needs changing:
Your prints are sticking too much and are hard to remove. You already tried [nozzle too close] or can’t adjust your nozzle to bed distance. Yet you’re still seeing too much material being extruded while printing the first layer (overstuffed layer, filament is getting squished upwards at the edges of the printed line).
The extrusion multiplier will affect the pressure on the material flow onto the bed which will alter the adhesion of the print. Less pressure on the material flow on the bed will lower the adhesion of the print
Slightly decrease the extrusion multiplier and perform a small test after each change until the adhesion is correct.
Signs you need to freeze it:
The obvious sign that you are printing too fast is when the extruder can’t If you have tried to alter settings and added a release agent without success, freezing could be the way to go.
Freezing the print and the print bed hardens everything which makes it easier to remove. Prevention is the best tool though, so we do suggest this as a last option or if it is too late and your print is already stuck.
Put the affixed print and bed into a freezer for a few hours. The print should then pop off with some light tapping once cool enough.
- PETG is known to be strong enough to rip chunks out of glass plates when cooling down after a print or bonding permanently to a PEI bed.
- Flexible filaments have a habit of sticking way to well to certain bed surfaces. Add Kapton tape for flexible filaments. Peel the Kapton tape from the bed, then the tape from the bottom of your print to minimize the risk of damaging your print when trying to pry it off your bed.
Warping can be caused by a few different variables but is fairly easy to recognise and resolve. Read below more information on warping and how to fix it.
Signs of warping:
Usually it starts in the corners and can progress if the print isn’t stopped. The print will start to lift and appear to peel away from the bed.
Your prints are sticking too much and are hard to remove. You already tried [nozzle too close] or can’t adjust your nozzle to bed distance. Yet you’reWarping occurs when the physical forces that come into play as a material is cooling down exceeds the adhesion strength of the printed object holding it onto your build plate. Warping is increased, the higher the temperature difference is within the printed object, and/or the higher the difference is between printed temperature and room temperature.
- See [Print not sticking to the bed].
- Balance the printing and room/chamber temperature. Print a little cooler depending on the initial printing temperature. If you’re starting at the lowest point in the suggested temperature range, you might want to increase the room temperature instead. The difference between printing temp and room temp shouldn’t be too great or you’ll experiencing warping.
- To print cooler – start at your current nozzle temperature and work your nozzle temperature down in 5°C increments.
- To increase chamber or ambient (room) air temperature – increase the room or chamber temperature in 5°C increments to reduce the difference in temperature and therefor the tendency to warp. See below for more information on heated enclosures.
- Print thinner layers. For example starting at a typical 0.2mm layer height, try 0.15mm or even 0.1mm layer height. This will reduce stress on your part during printing.
- Make sure you’re not setting your bed temperature close to the glass transition temperature of your filament (stay 10°C below). You can locate rigid.ink glass transition temperature in the downloadable datasheet for your material on the product page settings tab.
Freezing the print and the print bed hardens everything which makes it If you need more info on warping, causes and fixes, you can view our article on preventing warping here.
Printer specific tips:
The CR-10(S) suffers quite badly from ‘bowling’ – This is where the centre of the glass plate is unsupported to either the metal backplate is bowed downwards or the glass itself is not completely flat. Other versions are doming, twisting, and patches.
You can fix bowling and twisting by adding ‘shims’ to support the low areas. We use the white version of masking/draughtsman tape for this as it is thinner (and we think it looks neater than the blue).
Doming that is caused by a backplate that is warped upwards in the centre can also be fixed this way by adding tape as necessary around the edges and corners.
Doming caused by warped glass might be fixed simply by inverting the glass plate and using the bowled fixing method.
It is much harder if the glass plate is actually thicker in the middle as you will be unlikely to be able to completely remove the problem. Just find the flattest side, put this on top, and adjust as best you can.
5. Inconsistent Extrusion: How To Fix Under Extrusion
3D printing under extrusion is one form of inconsistent extrusion (the other being over extrusion ). Unfortunately, it can have a myriad of causes. No 3D printer troubleshooting guide would be complete without the full list of causes.
Here’s an attempt to classify and list possible reasons and fixes. We also have a dedicated article on under extrusion issues here.
Signs of under extrusion:
The signs are easy to spot: you end up with weak prints that crumble, crack or tear under even slight stress, you have visible gaps in your objects, walls start becoming see through because solid areas show spongy patches instead.
Your prints are sticking too much and are hard to remove. You already tried [Under extrusion occurs when your printer is unable to supply the correct amount of material needed to correctly print a layer.
Under extrusion in general
- Make sure your filament can unspool freely from the reel.
- Check the filament path for any blockages or areas of strong friction.
- Verify the filament diameter is consistent. Especially very cheap filaments suffer from fluctuations in filament diameter. Too thin and there isn’t enough filament fed into the HotEnd, too thick and there might be too much friction to push through the extruder and the related filament path.
- Check the extrusion settings in your slicer, namely filament diameter, extrusion multiplier.
- Check proper print temperature and speed. Try printing hotter and slower.
- Also see [filament not feeding properly] .
If you printer is constantly under extruding, as in: it is not pushing enough plastic, it is best to recalibrate the steps/mm value of your extruder to ensure your extruder delivers the proper amount of filament requested. Once the steps per mm are set correctly, the next step to a proper calibration is to set your extrusion multiplier (also called feed rate) properly. Both steps/mm as well as extrusion multipliers are filament dependent and might even change over time.
Or it could simply be a matter of you having changed the extrusion multiplier for a recent print and forgot to reset it in your slicer. Also, very often the root cause for constant under-extrusion is a partially clogged nozzle. Cleaning out your nozzle would be a good start. Also check [filament not feeding properly] .
3D printer not extruding mid-print
You’ve come back to find your 3D printer not printing anymore. This along with coming back to find a ‘birdsnest’ are the two most cliche versions of failed 3D prints. For some reason or another, your 3D printer stops extruding mid print:
- Filament has stripped or is blocked in the extruder. See [Clogged Nozzle]
- Filament is kinked, snapped or ran out. The filament has twisted or you got a knot on the reel. See our article How to untangle a tangled spool
- Filament diameter isn’t consistent. Especially very cheap filaments suffer from fluctuations in filament diameter. Too thin and there isn’t enough filament fed into the HotEnd, to thick and there might be too much friction to push it in through the extruder and the related filament path.
- You’re trying to print a part with too aggressive retraction 3D printing settings or excessive amount of retractions in a short period of time. Check your 3D printer retraction settings and lower total amount of retractions occurring and/or reduce retraction distance. Sometimes loosening the feeder gear idler pressure onto the filament can help.
- Overheated stepper drivers. A lot of tinkerers like to increase the Vref of their stepper drivers, often needlessly. This could lead to overheated steppers. Also, when printing high temperature filaments in an enclosed or heated build chamber steppers tend to get considerably hotter.
- Nozzle clogged mid print. This again can have a lot of different causes. See [Clogged Nozzle]
- If it happens very early in the print, it might be too much back pressure because the nozzle is too close to the bed. See [Nozzle too close] .
- In general: Try printing hotter or slower. But do not exceed the maximum print temperature of the filament, as it might start to deteriorate in your nozzle and clog. Very common error is to boil rigid ink PLA by exceeding the maximum print temperature.
- Check for warping. Warped areas are closer to the nozzle increasing back pressure. See [Warping]
- Monitor nozzle temperature while printing, check for high drops in print temperature.
- Keep your nozzle clean, especially after switching between different filament types.
- When using particle filled filaments, consider using a bigger nozzle.
- Flexible filament got stuck. Flexible filaments are difficult to print with most extruders out there, as they tend to escape the intended filament path and simply get stuck. Try printing way slower, try printing hotter (within the recommended range) and maybe even consider upgrading to a different extruder design specialised in printing flexible filaments.
- Also see [Filament not feeding properly] .
Under extrusion at the beginning of a print
Under extrusion at the beginning of a print is common and to a point to be considered normal. It can take a bit to get the flow of filament going, this is where using a skirt if no brim is required comes in handy.
- Consider using a skirt as this will show how consistently the material is being laid down before you waste filament on the printed object itself
- Modify your start code in your slicer to add some extra priming. While you’re checking the codes, make sure you don’t have an excessive retract in your end code.
- Often, not extruding properly at the beginning of a print is a result of the nozzle being too close to the bed or issues mentioned in the sections above.
- Check print temperature, you might be printing too cold.
Under extrusion after retraction
During a 3D printing retraction, especially with very aggressive retract settings, there could be not enough filament in the nozzle to properly start the print again at the end of the travel move.
- Lower your retraction length.
- Give it a bit extra restart distance to prime the nozzle after the retraction.
A series of very fast retracts can chew up a filament so that the feeder gear can slip on the damaged filament once you start extruding again.
- Slow down the retraction speed.
- Check that the feeder pinch wheel tension is correct.
6. Inconsistent Extrusion: How To fix Over Extrusion
3D printing over extrusion is one form of inconsistent extrusion (the other being under extrusion). Here’s information on over extrusion:
Too much plastic is coming out of the nozzle. You will be able to see this on your print (if not when coming out of the nozzle) the lines will be thick, uneven and ‘blobby’ in areas.
Over extrusion is when the printer is extruding too much plastic through the nozzle. This can happen because of a few settings being slightly off but read below for how to fix it.
Recalibrate the steps/mm value of your extruder to ensure your extruder delivers the proper amount of filament requested. Once the steps per mm are set correctly, the next step to a proper calibration is to set your extrusion multiplier (also called feed rate) properly to combat over extrusion 3D printing.
Both steps/mm as well as extrusion multipliers are filament dependent and might even change over time. Or it could simply be a matter of you changing the extrusion multiplier for a recent print and forgot to reset it in your slicer.
Temperature can play a factor in 3D printing over extrusion, so as always ensure you’re printing at the cooler end of the spectrum for your material.
7. Filament Not Feeding Properly
Proper operation depends on your extruder being able to feed the correct amount of material at any given time. Any messing with the feed of filament will likely ruin your print.
Here’s what to look out for. But first, listen closely to the noise your extruder motor is making, it’ll give you a clue.
You can also read our full article on filament not feeding properly .
Extruder motor is clicking
A stepper motor will start clicking when it is skipping steps . That is in the case of an extruder motor when the force required to push the filament further is higher than the motors strength. Possible reasons include:
Deformed filament
Remove the filament from the extruder and check how it looks. Is it deformed, as in no longer round but crushed so that its diameter is now wider than it should be? If so you might want to try to decrease the idler pressure on your feeder gear.
Conversely, if the filament is not crushed, but just has a gouge taken out of it where the hob gear has repeatedly slipped, increasing the idler pressure may restore correct filament feeding. Just don’t overdo it or the problems listed above will likely happen.
Reduce strain
This problem is made worse when you’re trying to print something that requires a lot of retractions in a short amount of time. Try to reduce the amount of retractions or set your retracts to be less aggressive.
Reduce friction
Check your filament path for excess friction.
Worn PTFE liner
A lot of HotEnds, even in direct extruders, include a PTFE liner, i.e. a short piece of Bowden tube somewhere between nozzle and heat break. In most Bowden style extruders, the tube extends all the way from the extruder down into the HotEnd. If this inner tube is worn or degraded (happens when printing too hot, usually above 260°C) the friction increases and might be too much for the extruder stepper motor to overcome.
Check PTFE liner gap
If the HotEnd uses a PTFE liner and it is frayed or has been cut at an angle. Any gap there will lead to clogs sooner or later as the melted filament will leak out around the outside of the liner causing the liner’s inner diameter to deform and reduce.
When using an Ultimaker: check the PTFE coupler in your HotEnd. It is considered consumable and will need replacement on a regular basis.
Nozzle clogged
Your nozzle or HotEnd is clogged. This could be any of the benign reasons like printing too cold, or too hot, or too fast, using too much retraction or nozzle to close to the bed, etc. But there are also some mechanical things to look into, especially if the problem reappears after you cleaned it.
If your HotEnd wasn’t assembled properly, a common point of failure here is if the nozzle is tightened against the heater block instead of tightening it against the heat break.
Increase the Vref of the extruder stepper, giving it a little more power to maybe push a bit stronger without skipping. But do keep an eye on the motor and driver temperatures if you do.
Bowden tube issues
If you’re using a Bowden extruder, these are also common points of failure:
- There’s debris in the Bowden tube.
- The Bowden tube is worn in the inside and has increased friction.
- The bend radius of the Bowden tube is too high. Consider a longer tube or straighten its path.
- A common issue with Bowden style extruders is when the tubing isn’t pushed all the way into the HotEnd. Or the end of the tube is frayed or has been cut at an angle. Any gap there will lead to clogs sooner or later as the melted filament leaks out around the tube causing it to deform.
If the extruder isn’t clicking
But still no filament is coming out of the nozzle it is very likely we have a problem right around the feeder part of the extruder.
Motor is wildly turning back and forth even with no filament loaded:
This could be a sign of a loose motor cable either at the board or the motor end, a broken cable or broken or loose pin in the connector. Or a failed motor. Or wrong cable configuration with leads swapped. If this happens, stop what the printer is doing immediately, let it cool down and power it off!
A broken wire on a stepper can easily destroy a driver chip by creating high voltage spikes as the stepper is connected and disconnected (the same damage can occur if you manually disconnect or reconnect a stepper motor while the printer is powered-up).
8. Extruder Is Grinding Filament
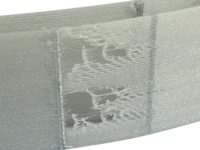
Grinding filament is never welcome and not what you want to see but keep reading on how to spot and fix the issue.
Signs the extruder is grinding filament:
The picture on the left shows a section of filament after it was manually pulled out of the extruder. You can see the dent where the drive gear dug in deep into the filament, making further transport of this filament impossible. It had to be removed manually with a bit of force.
This usually happens when the pressure inside the HotEnd gets too high or if there is anything blocking filament transport. 3D printer filament grinding can be caused by a number of different things, read our ‘How to fix:’ section to learn more.
Deformed filament or filament diameter too thick
Use good calipers or a better yet a micrometer screw gauge to measure the diameter of the filament coming of the spool and check if it is round or has been flattened. If it is thicker than it should be or no longer perfectly round, return the spool to the manufacturer/seller for a replacement. Cheap filaments often have large fluctuations in their diameter.
Filament not unspooling from the spool, kinked, knotted or twisted on the spool
You may be able to see the issue and untangle the knot or remove a layer or two if there is a kink. If you cannot see the issue but your spool will not unspool easily, or it is repeatedly happening, please see our article [How to untangle a tangled or knotted spool] .
Too much friction in filament path (especially common with worn or dirty Bowden tubes)
Check the filament path is clean, especially if using a Bowden tube. If your Bowden tube or another part has become worn it may need replacing.
Trying to extrude too much material for the nozzle size
Calibrate your extruder and reduce your material flow. Especially when switching to smaller nozzle sizes your extrusion settings need to be spot on. The smaller diameter holes are way less forgiving as we’re facing higher pressure trying to extrude through a smaller hole to begin with. Too much pressure and the drive gear of the feeder motor is likely to start grinding instead of pushing the filament.
Partial (or full) clog in the nozzle or HotEnd
See [Clogged Nozzle] .
The nozzle being too close to the bed (bed levelling is off) or too close to the previously printed layer (warping)
See [Nozzle to close to the bed] and/or [Warping] .
Trying to print too cold
Check the temperature range of the filament you’re printing. Increase your printing temperature gradually in 5°C increments within the range, staying around 10°C below the glass transition temperature (for rigid.ink, find GT temp in the downloadable datasheets in the settings tab on product pages).
Trying to print too fast
Printing too fast, if you haven’t adjusted other settings to allow for the extra speed, can cause issues such as not being able to feed the filament fast enough. Try reducing your speed in 10mm/s increments until it feeds correctly.
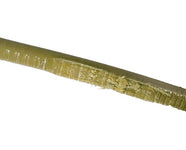
9. Extruder Is Crushing Filament
Just like filament being grinded, filament being crushed isn’t ideal. The issues are often related but can be resolved.
Signs the extruder is crushing filament:
A tell-tale sign for filament being crushed is that is appears deformed. This piece of filament in the picture for example, is clearly deformed and is no longer round. It was crushed between the idler and feeder drive gear.
This problem is related to [Extruder is grinding filament] and is usually a precursor of that. This happens a lot when:
- The feeder gear idler pressure is way too high, deforming the filament while it passes through the feeder.
- The same part of filament is getting retracted, pushed forward, retracted multiple times. Printing something with a lot of retractions in short order will wreak havoc on the filament, especially if the feeder idler pressure is squeezing the filament a bit too tight.
Idler Tension
If your extruder is equipped with some form of idler tension adjustment, decrease the tension. Lacking that you might be able to modify the feeder in some other manner (for example shortening the idler spring or replacing it with a softer spring). Or try a different, harder filament type or brand.
FToo many retractions
If the problem is caused by too many retractions, use a slicer software that allows better control and reduce the amount of retractions occurring.
10. Other Filament Issues
The quality and state of your filament plays a vital role to the success and quality of your prints. Here are some common issues with filament to look out for:
Inconsistent diameter
If your filament diameter is not consistent, you’ll notice it in your prints. Sections that are too thin will produce under-extrusions or fail to get gripped and transported by the drive gear. Parts that are too thick will over-extrude or even get stuck somewhere along the filament path. High quality filament has a consistent diameter from beginning to the end of the spool.
Filament slipping
There could be a thin section on a spool with inconsistent diameter. Or maybe your extruder’s feeder idler pressure is not high enough or possibly the drive gears teeth are worn or gunked up.
Moisture absorbtion
Filament will absorb moisture, Nylons and PVA especially, but it can also happen with ‘normal’ filament, even PLA, it just takes longer. Make sure you store your filament in sealed bags with freshly charged desiccant.
Stale filament
Filament can go stale, especially after it absorbs moisture or was exposed to UV/sunlight for quite a while. Generally once exposed to the air, we suggest replacing filament over 6 months old. However, if stored correctly it can last much longer and if unopened and stored in a cool, dry space may last indefinitely
Brittle filament
Brittle filament, breaking or snapping may mean stale filament. There are also some of the more brittle formulas, especially for PLA or PMMA, which might snap when passing the drive gear or is bent for example in a Bowden tube at a higher angle.
A good test for the ‘freshness’ of PLA filament is to bend it to 90 degrees (at room temperature ~20°C) with your fingers. If it snaps, it is stale. Pull 10-15 meters off the reel and try again. You might be lucky – it may only be the top layers that have gone stale.
11. Clogged Nozzle
Clogged extruders happen. Here are why they happen, how to prevent them and what to do if you have one.
Signs of a clogged nozzle:
Most full blockages will give you an early warning sign by under extruding first, signalling a partial blockage. Sometimes a particle or containment within the filament (guaranteed not to happen with rigid.ink) will lodge in an otherwise clear nozzle causing it to block immediately.
Clogged nozzles can happen due to various reasons. Here’s a list of the most common reasons we’ve experienced:
- Either the filament was printed too hot or had the nozzle distance was too close to the bed.
- The printer was left sitting idle with a heated nozzle.
- Dust & dirt might have been pulled into the now clogged extruder HotEnd.
- The filament was contaminated (some cheap stuff is full of things that shouldn’t be in there).
- The nozzle has not been regularly cleaned and build up has occurred.
- The filament you were previously printing, printed at a very different temperature to the current filament.
- Filament material and/or brand is being switched regularly without cleaning in between.
- Wood filament was being printed (we’ve had some of the best clogs ever when printing with wood filament!).
Prevention is always better if possible, but not always enough or perhaps it’s too late. Always check your printer manufacturer’s recommendations first.
Prevent a clogged extruder
Filament can go stale, especially after it absorbs moisture or was exposed to UV/sunlight for quite a while. Generally once exposed to the air, we
- Prevent any accumulation in your nozzle by doing pre-emptive maintenance (regularly cleaning).
- Use a filament filter. This is a small tool that is used (often clipped on) before the filament feeds through the extruder to filter away anything that may be sitting on the filament (dust/dirt). They can be printed and files are available on websites like thingiverse.
- Make sure never to exceed the recommended HotEnd temperature for whatever filament you’re trying to use. Cooked filament blocks nozzles. This includes staying around 10 °C below the glass transition temperature (rigid.ink GT temp available on downloadable datasheets in the settings tab on product pages).
- Use particle filled filaments in nozzle with at least 0.5mm diameter or greater.
- We recommend FLOSS, a high-performance cleaning filament, to make preventive maintenance easy. Extrude a bit of rigid.ink Floss on a regular basis, such as between material changes and the risk of clogs should be lessened drastically. Especially when switching from a high temp material to a low temp one, or when cleaning up after particle filled filaments.
Unblock a clogged nozzle
- You can try to dislodge the block in your nozzle with an acupuncture needle, hypodermic needle or an uncoated high-e guitar string. Once you got the clog dislodged, try cleaning filament (see FLOSS, a high-performance cleaning filament ).
- A highly effective yet brutal (if done improperly) way to clean a blockage are so call cold pulls or the “atomic method”. We’ve got an article on nozzle cleaning methods here .
- Another equally brutal and somewhat dangerous way is to torch your nozzle with a blowtorch (after removing it from the printer first!). The idea is to heat and melt the blockage within the nozzle. This is NOT a method rigid.ink advise for safety reasons.
- With ABS you could try to soak it in an acetone bath overnight. The acetone should dissolve the blockage but will only work with materials acetone soluble have been used (rigid.ink ABS, ASA, PMMA, HIPS and Polycarbonate).
- You can do the same for PLA with a bath of ethyl acetate.
12. Other Blockages
Unfortunately, the nozzle isn’t the only place where clogs might occur. If no filament is coming out of the nozzle anymore the actual blockage might not be in the nozzle itself. You’ll have to check the whole filament path, starting from the feeder to the nozzle.
- Often, blockages occur right after the drive gear, especially when using flexible filaments. This can be common for some printers, so be sure to read up on if your printer is suitable to print flexible filaments. Modifications can also be printed for some extruders, files are available on websites like thingiverse.
- Bowden tubes like to gather debris, increasing friction, causing blockages. Inspect, clean and replace as needed.
- Another notorious spot is where the Bowden tube in Bowden extruders (or the PTFE liner tube in certain HotEnds) meets up with the metal bits. If the tip of the tube is frayed, dented, carbonised or cut at anything but a 90° angle, this is inviting trouble. Also make sure your tube is seated firmly as far in as possible. If the tube moves, for example during retractions, chances for a blockage increase.
- Right around the heat break. Usually a sign of insufficient HotEnd cooling or too high of a retraction distance.
Also read our chapter [Filament not feeding properly]
13. Stringing and Oozing
3D printer stringing and nozzle oozing are two common 3D printer problems that usually share the same root cause. Printing too hot and using inadequate retraction settings.
Signs of stringing and oozing:
The signs on stringing and oozing are usually quite obvious, as seen on the print in the image. There will be bits of filament fraying off your print and some areas of the print will have excess filament where it has oozed. You may also be able to see the filament is very runny coming out of the nozzle.
As filament stringing and oozing is often caused by incorrect printing temperature and retraction settings. Printing too hot will cause the filament to be too runny and also mean it will take longer to cool once printed allowing for stringing and oozing. Not having enough retraction can also mean more filament is being extruded and causes these issues.
Increase retraction distance
Increase the retraction distance in your slicer. There’s usually a limit for how far up you can retract filament before you’re running into other issues, but as a general rule of thumb: up to 3mm is ok for most direct extruders, 4-6mm should be ok for long Bowden systems.
Increase retraction speed
Increase the retraction speed. Maximum speed depends entirely on your extruder, so it is hard to come up with a valid recommendation, when in doubt try up to 40mm/s. Check with your printer manufacturer.
Arrange prints closer
Long travel distances around the build plate tend to make your 3D print stringy, so if you can rearrange the objects to be closer on the bed, this could help against stringing 3D printing. This may not be an option for single item prints
Increase travel speed
Try increasing your travel speed in your slicer. Travel speed is the speed the speed the nozzle moved around the print bed. More speed means less time to ooze between layer points.
Calibrate steps and multiplier
Whenever you encounter any sort of extrusion issues, make sure your basics are covered – properly calibrated extruder steps/mm and extrusion multiplier, both are key to nice prints. Over-extrusion encourages 3D print stringing. See [Over Extrusion] .
Increase cooling
Increase cooling fans. Try increase in 20% increments, or try 100% when bridging or excessive stringing occurs.
In some instances 100% fans may not be enough. Some users fit additional cooling fans or even just put a desktop fan next to your printer to increase airflow.
Print single objects
If printing multiple parts at once, try printing single objects instead of placing multiple objects on the build plate. This eliminates all travel moves between multiple objects and will cut down on 3D printing stringing & oozing between multiple prints.
Filament specific tips:
- Flexible filament usually needs longer retractions as it stretches while being pulled backwards. However retractions on flexibles is even trickier than actually printing flexible filaments, so you might be forced to go with shorter or even no retraction at all in order to be able to print it in the first place.
- ASA, like ABS, reacts strongly to sudden temperature changes. If you all of a sudden blast it with full part cooling fans, it might crack.
14. Overheating
One of the ugliest forms of bad 3D prints is overheating . Here’s some information on how to spot it, why it happens and how to fix it:
Signs of overheating:
Your print has the correct general shape but has deformed where it has overheated. This can be at the start of your print or part way through. See the tip of the (supposed) spike in the image that has become molten because of overheating.
Overheating is exactly what it says, the filament has become too hot and isn’t cooling enough. The main cause of overheating is insufficient cooling.
- Increase the part cooling fans. If you’re not using 100% part cooling fans you can try increasing up to 100% which should help. This may not be suitable for all filaments though so be sure to check the manufacturers recommendations.
- Try printing colder to begin with. Sometimes you can get away with a cooler printing temperature for the rest of the print with the same result. Alternatively, reduce the temperature when the printer is approaching the problem area.
- Print slower, giving the print more time to cool down. Consider the 15 second rule: the time for the nozzle coming back to the same point on your object should not be less than 15s.
- If your slicer supports it, set a minimum time per layer to ensure proper cooling. This usually results in the slicer dynamically slowing down the print speed to ensure the minimum layer time, which, in this particular case, won’t help all that much.
- Pro tip: you could add a pause to the layer change script and park the nozzle away from the object for a few seconds.
- Workaround: try printing two copies of the object at the same time, the travel moves between the 2 objects will increase the layer time and allow for more cooling.
- PLA is often printed with 100% cooling fans anyway so if you’re seeing overheating, it suggests your printing temperature is too high. We always suggest starting at the lower end of the suggested temperature range and work your way up.
- ASA does not like fans or draughts. Part cooling fans should not reach more than 10-20% with ASA. A warm ambient temperature is best but that doesn’t mean print at the hottest temperature within the range. Try reducing your printing temperature if you experience over heating with ASA.
- For other filaments that you’re already printing at 100% part cooling fans, try adding extra external fans next to the printer to provide further cooling.
15. Elephants Foot
Elephant’s foot is a classic problem in 3D printing but don’t worry we’re here to help.
Signs of elephant foot:
You’ll see a flared out 1st layer, making our parts too big. Followed by a concave indentation of the next few lines before things straighten out as the heat radiating from the heat bed diminishes. As shown in the image.
The heat from the bed tends to be too much for the filament causing it to flare out. As the print continues higher and the heat from the bed diminishes the print, prints normally.
- Increase the part cooling fans. If you’re not using 100% part cooling lower the bed temperature. Make sure you’re within the heated bed temperature range advertised by the manufacturer. The highest point in the range should never exceed 10°C below the glass transition temperature (rigid.ink Tg are available in the downloadable datasheets in the settings tab on product pages).
- Increase the nozzle to bed distance slightly. If you’re already at the lower end of the heated bed temperature range, you can try increasing the nozzle to bed distance slightly.
16. Walls Caving In
A very similar problem to elephants foot, sans the flared-out first layer.
Signs of walls caving in:
Part of the wall of a print has caved in and then returned to the correct structure after a few layers.
The weight of the subsequent layers crushes the lower layers that never had a chance to fully harden.
- Lower the bed temperature. Make sure you’re within the heated bed temperature range advertised by the manufacturer. The highest point in the range should never exceed 10°C below the glass transition temperature (rigid.ink Tg are available in the downloadable datasheets in the settings tab on product pages).
- Set your printing temperature lower. The cooler you can print, the quicker the printed filament will cool, preventing layer crushing and caving.
- You can also try increasing the cooling fan speed if not already at 100%. Do check with the manufacturer this is suitable for the material you’re using.
- PLA is often printed with 100% cooling fans anyway so if you’re seeing caving in, it suggests your printing temperature is too high. We always suggest starting at the lower end of the suggested temperature range and work your way up. High quality, pure PLA will be best printed at or below 200°C.
- ASA does not like fans or draughts. Part cooling fans should not reach more than 10-20% with ASA. A warm ambient temperature is best but that doesn’t mean print at the hottest temperature within the range. Try reducing your printing temperature if you experience caving in with ASA.
- For other filaments that you’re already printing at 100% part cooling fans, try adding extra external fans next to the printer to provide further cooling, if reducing the print temperature is not effective enough.
17. Curling and Rough Corners
Curling and rough corners is very easy to spot and looks quite the mess compared to the sides of the print.
Signs of curling and rough corners:
Rough corners are basically corners that are curling upwards. They are very hard to miss as they only appear to affect the corners of your print. The beams corners in the image is the classic test case to demonstrate 3D print curling.
Curling as well as rough corners are another symptom of printing too hot – or insufficient cooling. Printer curling happens a lot when printing overhangs – or in corners.
- Try printing cooler. Sometimes you can get away with a cooler printing temperature for the rest of the print with the same result. We always suggest printing at the lower end of the temperature range suggested by the manufacturer.
- Print slower to give the printed line more time to cool before the next layer is put down.
- When printing in an enclosure: open all doors/panels to lower ambient temperature. This may not be suitable for all materials, check with the manufacturer/seller.
- Workaround: Try a different layer height. In the classic benchy case, printing the benchy at a 0.2mm layer height usually makes the problem disappear while it is really apparent when printing the benchy with 0.1mm layers. In other cases, a lower layer height works better. Experimenting may be needed for your particular print so make one small change at a time and test.
- Pro tip: Increase overall cooling capabilities by adding more external fans next to the printer or optimizing fan duct design.
- ASA does not like fans or draughts. Part cooling fans should not reach more than 10-20% with ASA. A warm ambient temperature is best but that doesn’t mean print at the hottest temperature within the range. Try reducing your printing temperature if you experience curling/rough corners with ASA.
18. Cracking or Layer Separation
Cracking can be difficult to differentiate from temporary under extrusion but this section will help you figure it out and how to fix it.
Signs of cracking or layer separation:
On a first glance, it can be tricky to differentiate between cracking and temporary under-extrusion as both leave gaps in layers or leave the print looking like it’s missing layers. Best way to tell them apart is: cracked layers are clean cuts and might show a bit of an upwards bend or warp, while under-extrusion tends to leave a spongy material deposition in the cracks.
Cracking occurs when 3D printing layers separate because of the forces exerted on the print when layers cool at a different rate. Warping forces exceed the layer adhesion strength and the layers simply separate.
Lower layer height
You could be trying to print using a layer height that is too high for your nozzle. Maximum layer height should not exceed 75% of your nozzle size (i.e. 0.3mm for a 0.4mm nozzle).
Increase temperature
If you’re printing higher temperature materials (around 230°C or above), you may be printing too cold for that material. Increase your printing temperature in 5°C increment tests until the issue is resolved.
Reduce cooling
Slow down or turn off your part cooling fan speed. Avoid sudden large increases in fan speed like when going into bridging mode. We want to avoid drastic temperature changes.
Use an enclosure
Protect your print from drafts of cold air. If you’re not using a printer that is enclosed, build your own enclosure around it.
Round the edges
If after these changes, you’re still getting 3D print problems with layers separating it may be worth reducing the stress on the corners of the print by rounding the model, reducing the stress on the edges. You’ll notice sharp corners (like in the image above) will crack first as the stress here is greater.
Change filament
Some filaments simply have less layer adhesion than others. If you’ve tried all the tips above you may need to seek better quality filament that has solid 3D printing layer adhesion.
rigid.ink Filament is guaranteed against this. If you’re still experiencing this issue with rigid.ink, get in touch and we’ll resolve or exchange it for you.
- ABS is highly susceptible to 3D printer layer separation due to cold air hitting the print before it has cooled down fully. We suggest no fans for rigid.ink ABS. rigid.ink ABS prints best in a fully enclosed and even heated chamber.
- ASA can also be very susceptible to 3D printer layer separation. rigid.ink ASA does prefer a warm ambient temperature so a heated, closed chamber is best. However, it can be used with an unheated enclosure or even on an open printer with a simple draught shield (it’s the draughts that matter most!). This is why we suggest using minimal fans around 5-20% fan speed.
- PLA may suffer from cracking and layer separation problems if you’re printing too cool. Try increasing the printing temperature in 5°C increments, until you get successful layer adhesion.
19. Layers Shifting & Misaligned Layers
Some 3D printing issues like this, appear as completely random and isolated events. There are some checks that can be done to fix it though so keep reading to learn more.
Signs of layers shifting and misaligned layers:
As seen in the image, you can see the shift in the print and that the layers are not aligned.
Unfortunately issues like this can happen randomly and often part way through a print. The ‘How to fix:’ section below can also be used as a check-list before you set your print going to prevent this happening.
Slow it down
Trying to print too fast will cause the motors to skip, resulting in 3D printing layer shifting. Try reducing your speed and running test prints.
Pro tip: check your jerk and acceleration settings as well.
If also warping or curling
IIf you’re also experiencing warping or curling, it could be that the HotEnd simply crashed into a section that has curled upwards. This picture however does not show any signs of warping or curling.
Check filament is free
A temporary problem with the filament not unspooling cleanly (a knot or tangles on the spool) might have blocked the movement of the (direct drive) extruder causing your 3D printer shifting layers. See our article [How to untangle a tangled or knotted spool] .
Printer lubrication
You’ve got mechanical friction on this axis (the X-axis in this picture). Check if your printer moves freely along this axis, clean and lubricate the mechanical parts like smooth rods, lead-screws or rails and check for broken bearings.
Check belts & pulleys
ILoose belts or not properly tightened pulleys will cause layers to shift as the requirement amount of travel will not be achieved. So, check the belt(s) for the axis affected and if necessary tighten according to the specifications of your printer manufacturer. Also check if all pulleys are properly tightened to the motor shafts for the axis in question. Usually, NEMA motors have a flat side on the motor shaft, it is best to tighten your pulley against this flat side to ensure best grip.
Increase the Vref for this stepper motor to give it a bit more strength
- Prusa MK2 – If you’re using a Prusa MK2(S) disable silent mode to avoid 3D printing errors like these.
20. Layers Missing or Skipped Layers
This may be one of those problems with 3D printing that you can live with, although it can be an early warning sign of worsening under extrusion.
Signs of weak of under extruded infill:
Your 3D printing infill looks weak or under-extruded (spongy in appearance).
Most likely the layer isn’t missing, but due to a mechanical issue with your Z-axis, there was an uneven step when moving up to the next layer. Can easily be mistaken for [Under Extrusion] or [Cracking or Layer Separation] .
- Reduce the Z-axis movement speed in your slicer settings.
- Make sure your Z-axis can travel freely. In some case, if the filament doesn’t unspool smoothly from the reel, Z-axis travel can be blocked or in a direct drive extruder setup the extruder motor might yank the extruder upwards.
- Check your Z-axis, Clean and lubricate your smooth rods, rails, lead-screw etc. and look for broken bearings. If the error occurs exactly on the same layer in repeated prints, there could also be an issue with a bent or misaligned lead screw.
- Pro Tip: check acceleration and jerk settings for the Z-axis.
- Check the exact resolution of your Z-axis (motor steps and properties of the lead-screw) and set layer heights to use full steps. Sometimes, a 0.12 layer prints nicer than a 0.1mm.
- If this is a newly assembled DIY printer kit, look into the micro-stepping behaviour of your stepper drivers. If this is a pre-built machine, contact the manufacturer for hardware support.
21. Weak or Under-Extruded Infill
Often due to settings being slightly out, while you may get away with poor infill not affecting the external appearance of your 3D print quality, it provides almost no stability to the print.
Reduce extrusion settings
Most slicers automatically increase the infill 3D printing speed or use a bigger extrusion multiplier/line width than regular outlines. This setting is often proportionally set by applying a multiplier to your general 3D printer settings. If you’re pushing your printer to its limits in speed and extrusion volume, the infill is the most likely place where it starts to fail first. Therefore, either reduce your general extrusion settings, or find the modifier for the infill and reduce that.
Increase heat on faster prints
You may be printing too cold for the desired print speed. Printing faster or at higher extrusion rates requires more heat to melt the proper amount of plastic in time. Increase your temperature in 5°C increment tests until the issue is resolved.
You’ll experience infill issues if you’re trying to use a layer height that is too high for your nozzle or extruder. Stick to a maximum layer height of 75% of your nozzle size (i.e. 0.3mm for a 0.4mm nozzle).
22. Deformed Infill
Infill is usually printed in a regular pattern, like in a grid, or boxes or even honeycomb structures. If you notice your infill printing deformed there’s a few things you can check.This may be one of those problems with 3D printing that you can live with, although it can be an early warning sign of worsening under extrusion.
Signs of deformed infill:
The pattern of infill appears deformed rather than printing evenly.
There may be some settings that aren’t quite correct which is causing deformed infill. If the structure chosen is not suitable extra support may be needed.
Infill printed too fast
With most slicers, the infill is printed at the highest print speed specified, while outlines for example are printed slower. So, the first place to notice too high print speeds is often the infill. Lower your print speed gradually to test if this fixes the issue as you might be printing too fast.
Decrease skip
You may have set the infill to skip layers. If the infill deforms, decrease the skip amount.
Increase infill extrusion width
Your infill extrusion width may be still be set at a reduced amount (if you were trying to save weight on a previous print). Set it to 100% (or higher) to see if that helps.
Insert diaphragm
Some slicers allow a solid diaphragm to be printed every so many layers. This can be used to support subsequent infill layers (and as a by-product, they can increase the rigidity of the structure significantly).
Print hotter
Try increasing the print temperature (in 5°C increments) printing faster requires increasing your print temperature to melt enough plastic in time.
Tighten belts & pulleys
Loose belts or pulleys could be responsible for a printer’s inability to perform sharp directional changes at higher speeds, which could result in deformed infill patterns, especially if it consists of sharp angles. Tighten the belts & pulleys to stop this problem.
23. Insufficient Retractions
It may be tempting here to improve 3D print quality by sanding or cutting these sections from the print, and while that’s an OK fix, prevention is always the best way to fix 3D print issues.
Signs of insufficient retractions:
Similar to stringing and oozing, you will see excess filament on your print in areas where there is not meant to be filament.
There’s a limit how far you can push your extruder to do retractions. If, after maxing out your retraction settings as described in the [Stringing and 3D printer oozing] chapter, you’re still seeing signs of insufficient retractions there are some other things to consider, see ‘How to fix:’ below.
Use non-stationary retractions in your slicer software
This is a setting in your slicer software. Standard retracts are happening while the extruder is stopped, which can lead to oozing and additional material being deposited on the model. The idea being using non—stationary retracts is to retract while the nozzle is still moving, which might improve results.
Use a different restart distance
This is a setting in more advanced slicers. During retraction a configurable length of filament is pulled back from the nozzle before a travel move occurs. After the travel move completed, the same length is then pushed backed into the nozzle before actual printing restarts. Altering the restart distance allows you to influence what happens at the end of the travel move. You can tell your slicer to push back more or less filament than initially has been retracted.
Use longer restart distance in order to make up for material that oozed during the travel move (usually used when you see dents or holes at the restart point). Or use a shorter (or negative) restart distance to push back less filament than initially retracted, which will help with eliminating blobs at the restart point
Printer cooler
Stringing at its heart is molten filament oozing out of the nozzle during a fast travel move. The hotter your print temperature, the more likely it is that oozing might occur. So when in doubt try printing cooler, reduce in 5°C increments performing small tests each time.
Try a different spool of filament
Some filaments are more prone to stringing than others. Not all brands print equally well. This is also true for different filament types. PETG is more likely to string than for example ABS. If you can’t get rid of excessive stringing (after speaking to the manufacturer), try some other filament type or brand.
24. Blobs and 3D Printing Zits
Blobs and 3D print zits on the outside of your model can seriously affect the looks of print. Here are a few possible causes how you can cut down on these 3D printing artifacts.
Signs of blobs and 3D printing zits
Blob and 3D printing zits are another case of excess filament on your print. There isn’t usually a large amount of stringing and it only happens on some areas of the print.
Often caused by retraction settings, additional filament blobs out and onto the print.
Z-Hop (lift nozzle before retraction/travel), a very popular feature in most of today’s slicers can encourage blobs right at the retraction point. There’s two ways to go about this: either try increasing your retraction or disable the Z-hop.
At the point where the layer change happens, a small blob will appear, the so-called Z-scar (or ‘Zipper’). It is not always possible to eliminate the Z-scar entirely by adjusting retraction settings, but modern slicers give you some choices where this Z-scar appears: the default is usually for the Z-scar to appear randomly or where the slicer thinks it would be best to optimise print speed.
Usually you get a way cleaner looking print if you instead pick a specific less noticeable location for the Z-scar yourself. Like in a corner of a print, or at least somewhere in the back. Also choosing a specific location for the Z-scar will prevent the z-scar from splattering 3D printing blobs all over the print and confines them in more or less straight line along the Z-axis.
3D printer blobs and zits also appear on the surface of your print in random locations if your filament absorbed too much moisture. The steam building up inside the nozzle will make the filament pop at random times which will squirt out additional plastic (then followed by a dent because of lack of filament in the nozzle). Try drying your filament before printing to remove any moisture causing dent. To prevent moisture in the future, ensure you’re storing your filament correctly in an air-tight sealed bag with freshly charged desiccant, in a cool dry place. Do not leave filament out for longer than during printing.
25. Infill Poking Through Outline
Although perhaps not the most unsightly finish, it isn’t what you want to see on a print you’ve waited hours for.
Signs of infill poking through the outline:
At a first glance, the blobs in the picture shown might look just like your standard blobs from improper extrusion. On a second look, you’ll notice that the blobs in this picture actually match with where the infill pattern meets up with the outside wall. This shows you’ve got infill poking through the outlines.
The blobs are usually a result of the retraction that is occurring at those points. You may also have to look at your outline settings.
- Use more outlines to stop the infill poking through.
- Tell your slicer to print the outlines before doing the infill.
- As the blobs are usually a result of the retraction, optimising your retraction settings as well as calibrating basic extrusion parameters will help as well.
- Reducing the infill overlap amount in your slicer will also help.
26. Scratches on Top Layers
If it indeed is a scratch, sometimes it is hard to tell if it is really a scratch or if the line was in fact caused by the nozzle oozing onto the top surface during the move. Time to get out the magnifying glass to check.
Signs there’s scratches on the top layers:
There is a visible scratch on the top layer that is not a line from oozing filament.
The long scratch visible on the top layer in the picture shown was caused by the nozzle dragging across the top layer when moving across to go on printing the rest of the frame around it. Most likely, the 3D printing surface of that layer is over-extruded (or slightly warped or pillowed) and that’s why the nozzle scratched it in the move.
- One approach would be to try and fix the over-extrusion or the warp. See [Over Extrusion] and/or [Warping] .
- Another is to use the Z-Hop feature of your slicer. Z-Hop will lift the nozzle up a certain amount before moving across to prevent the scratch.
- Use combing (also known as “avoid crossing outline”). With combing, the nozzle will travel along the outline instead of crossing it and going straight across your print, which will often avoid this issue entirely (though not necessarily in this example).
27. Gaps & Holes
This is a common fault and there are many reasons for gaps in your print, depending on where they’re located. It’s worth checking everything mentioned in this section so that you don’t miss the exact cause.
Signs of gaps & holes:
Probably one of the most obvious problems to spot in a print. There will be visible gaps and holes in your print, like in the image shown.
Unfortunately, there can be many reasons for the gaps and we have broken them down in the ‘How to fix:’ section below.
In the top layer / pillowing
3D printer pillowing occurs when trying to print a solid layer over a coarse infill grid. Depending on your infill percentage and your layer height, it may take a lot of layers to fully close the top surface over infill to produce a nice, smooth surface. Figure at least 1mm of combined layers for your top layer as a rule of thumb. So, if you’re printing with a layer height of 0.2mm use at least 5 top layers to play it safe. Other ways to reduce 3D printing pillowing are:
- Print colder or increase fan speeds. Better cooling improves bridging performance, and that’s basically what we’re doing when printing over infill.
- Use a higher infill percentage. More infill means smaller gaps, which are easier to cover.
- Another possible cause for gaps in your top layer is under-extrusion . See [Under-extrusion] .
Holes and gaps in floor corners
These 3D printer errors happen where a horizontal surface meets an inclined one. The top layer(s) looks like the printer could not be bothered to print all the way to the edge. Its causes are similar in nature to pillowing, but it can be more annoying to nail the exact cause when everything else is looking great!
There are a lot of possible causes of this, here’s a list of problem and solutions:
- Under-extrusion can cause holes and gaps. Increase the extrusion multiplier/feed rate, also see [Under-extrusion] .
- Not enough top layers – increase the top layers count so you are printing at least 1mm thick.
- Printing too hot – print at a lower temperature so the plastic sets in position faster.
- Printing too fast – slow down the print speed. This allows the extruded plastic to cool more before the next pass of the nozzle. If kept too warm, the layer will peel back from where it was printed.
- Not enough cooling – if at all possible, increase cooling during the printing of these parts of the object. Always check this is suitable for the material you’re using with the manufacturer.
- Too little infill – increasing the infill percentage will help. Also look at the minimum infill length in your slicer and reduce this to allow smaller runs of infill to be printed at the edges of an object instead of being ignored.
- The infill outline overlap is too small – all slicers can set how much the infill overlaps the outlines/perimeters of the object being printed. This setting makes sure they go all the way to the edge and fuse together and so help support the layers above. Try increasing this and note the result (too much and you will likely see the infill pattern poking through the object’s visible walls and other such surfaces).
- Not enough outlines/perimeters – these also have a support role to fill, so increase these if at all possible.
- Too much retraction – causes there to be gaps in positions where retractions take place, so reduce this.
Between infill and outlines
If this happens on your first layer, chances are your nozzle to bed distance is not set properly. Your nozzle is probably too far away from the bed. See chapter [First Layer Issues] . If it happens later in the print:
- This could be a result of printing too fast, try printing slower.
- It could be a sign of (temporary) under extrusion. See [ Under-extrusion] .
- Another possibility is wrong extrusion settings in your slicer. Check what was dialled in is correct for your printer and print.
- Increase your extrusion multiplier Simplify3D.
- Increase extrusion width.
- Increase overlap settings.
Gaps between thin walls
When trying to print thin walls that are not multiples of your nozzle width in thickness, there is a common problem with slicers leaving a gap inside walls, severely weakening the structural strength of your wall. It is rather straightforward issue: if you’re trying to print a wall that is 0.9mm thick with a 0.4mm nozzle, an average slicer might end up using 2 lines at 0.4mm each and leave a gap of 0.1mm, as it doesn’t know a way to close the remaining 0.1mm.
Therefore you should always strive to stick to a multiple of your nozzle width when designing thin walls to help alleviate the issue:
- Thin wall options – A lot of slicers today have special thin wall options, make yourself familiar with them and see where they can take you.
- Adjust line width – Adjust (not necessarily increase) line width or the amount of outlines to force your slicer to construct your wall differently.
- You can try increasing your extrusion multiplier to close the gap by intentionally over-extruding.
- You can also set a narrower nozzle diameter in your slicer settings than you actually have fitted. If used with care and balanced against the extrusion multiplier, this can overcome some situations that your favourite slicer cannot cope with.
Read more: every way to fix gaps and holes in 3D prints .
28. Small Parts & Features Not Printing
The detail in 3D printing is one of the things that makes it so incredible. But what happens when small parts and features don’t print? Keep reading to find out…
Signs of small parts and features not printing
You’re unable to see the detail in detailed sections of your print. Smaller parts are deformed and not printing correctly compared to the rest of the print.
If you don’t have the right set up for the part you’re trying to print, your printer will struggle to achieve small parts and features. When trying to print with a 0.4mm nozzle it is hard to draw a 0.1mm line. Slicers usually give up at one point or another and won’t even try to print features that are way smaller than your nozzle width (if placed on the XY plane).
- Check your slicer settings for thin wall options.
- Rotate the part so the fine details are on the Z-plane and reduce your layer height if necessary.
- Get a finer nozzle, the finer the nozzle the smaller lines you can print.
- Redesign the part or scale it up so the features are big enough to be printed. There is specialised software out there that will increase wall width without changing overall part dimension, might be worth a look, especially for architectural prints this comes in handy often.
29. Lines On The Side Of Your Prints
This refers to very apparent lines on the side of your print that should not be there (like in the image shown), not the standard layer lines of your print.
Signs of lines on the side of your prints:
You will be able to see off lines on the side of your print. The lines may be vertical and possibly even wobbly, like in the image shown.
Besides trying to print way too fast (incl. too high acceleration and jerk settings), the root cause of these 3D printing errors are often of mechanical nature.
- Check Z-axis assembly, it may be bent or misaligned.
- There may be lose pulleys, make sure they are tightened.
- Check belt tension of your X & Y axes.
- Friction on the axes may be preventing smooth movement over the print. Clean and lubricate the axes.
- Make sure there are no big variations in temperature during printing. No sudden increase in fans or drop in room temperature/draughts.
- Inconsistent extrusion may cause this issue. See [Under Extrusion] and/or [Over Extrusion] .
- Lower your printing speed and check acceleration and jerk settings, these may also be too high.
30. Temperature Variations
While temperature variations are unlikely to result in a failed 3D print, they’re unsightly.
Signs of temperature variations:
Variations between layers will be visible. You can diagnose this from layers with uneven extrusion: [Under Extrusion] and [Over Extrusion] .
These variations in layers are often a result of temperature fluctuations. Best would be to try a few tethered prints while running a monitoring software. For example the free and open source Pronterface to graph the exact temperature at the nozzle during printing.
- Try some PID Tuning. If you’re not familiar with PID tuning, YouTube has tons of tutorials on how to do PID tuning on various printers.
- Check the heater cartridge leads for any breaks or lose connectors.
- Check the Thermocouple leads for any breaks or lose connectors.
- On E3D HotEnds, check the black Molex connector for the thermistor, or better yet, remove that connector and crimp/solder the leads instead.
31. Vibrations and 3D Printing Ringing
Good 3D printers are like good speakers, solid and heavy, with some dampening.
Read more: 3D print ghosting or ringing (vibrations)
Signs of vibrations and 3D printing ringing:
Lines are appearing on your print as if they are a shadow of some detail on the print, see the image used.
More commonly vibrations and 3D printing ringing are caused by mechanical issues but there are a couple of settings that could also cause this issue.
- You may be printing too fast. Artefacts of vibration or ringing/ghosting are often related to printing too fast.
- It could be an indication that your acceleration and jerk settings are too high. The higher the mass of your extruder, the more susceptible it is to these artefacts when printing at higher speeds. This is where Bowden extruders shine.
- Loose belts or pulleys could be the cause so be sure to check they are tightened.
- Backlash in your motion system. Backlash (or in other words too much play) is a mechanical problem with your printer hardware. Might mean something has come loose or is worn. Check with your printer manufacturer for possible fixes.
- Worn or dirty bearings or rods that cause friction in the travel. Ensure they are clean or replace if needed.
- The so called “stick slip” issue with linear bushings. The stick/slip effect is a common issue when using polymer or metal bushings instead of ball bearings, usually caused by poor alignment, bent or rough rods or similar mechanical problems. Stick/Slip is like a stutter during the acceleration phase of what should be a smooth linear motion.
- Vibration might be reduced by installing NEMA dampeners.
- Artefacts introduced by the stepper drivers can be reduced by installing smoothers or different stepper drivers.
32. Dimensional Accuracy Of Your Prints
To achieve true dimensional accuracy is one of those 3D printer issues that is not easy and requires a very well-tuned printer, solid motion systems and flawless mechanics. Here are the key factors to achieving perfect 3D printer tuning:
Design considerations
FFF 3D prints squish layers down, making them slightly wider than the 3D model. So be aware holes will be smaller and external surfaces will be slightly larger on the printed object than the CAD model.
First layer
Squishing your first layer into the bed will have a small impact on accuracy along the Z-axis.
Over or under-extrusion as well as an improper extrusion multiplier can cause slight dimensional inaccuracies. Get your extrusion dialed in properly. These inaccuracies are usually rather constant, i.e. independent from the size of the printed object.
Steps / mm settings
An increasing dimensional error (increasing with the size of the print) is usually a sign of improper steps/mm settings for your X,Y or Z axes. This can be calibrated and corrected in firmware or the printers menu.
Printer frame
Check the rigidity and proper alignment of your printer frame. If your frame is not true, your prints won’t be either.
A common trend today seems to be, throw more and more sensor and computing power at trying to fix poor frame geometry. No amount of software beats a well setup printer. Make sure your frame is aligned well.
33. Circles Are Not Round
It can be quite confusing when you’ve set a circle to print and it comes out an oval. Here’s why this can happen and how to fix it:
Signs circles are not round:
Pretty obvious most of the time, but sometimes they can be only slightly off so be sure to look out for them.
Oval circles instead of round ones are usually due to a mechanical problem. On tiny circles only a few mm in diameter, blobs usually along the Z-scar, might cause the circle to look oval instead.
Occasionally it can be down to having differing steps/mm values entered for the X and Y axes. This can happen (rarely) by EEPROM value corruption, but usually comes down to a user-induced fault.
For more details, read our standalone articles on 3D printed circles not coming out round .
- Check axes, belt tension, pulleys and gears are tight, clean and in position.
- Check different steps/mm in the slicer for on of the axes has not accidently been input incorrectly.
- Be careful when entering new settings via the printer’s manual front-panel controls, we’ve all experienced ‘finger-trouble’ before and hit something on the controls we shouldn’t. Double check everything was input as it should’ve been.
- Check the Z-scar to prevent blobs altering the shape. See [Blobs and 3D Printing Zits] .
34. Leaning Prints
The print in the image is a classic case of leaning. It starts out ever so slightly but increases in “momentum”. This is not layer shifting , this problem got nicknamed “Leaning”.
Signs of leaning prints:
Usually a very slight but constant or proportionally increasing deviation along one axis. In contrast: a layer shift is a sudden singular(ish) occurrence at a much bigger scale.
Prints that are leaning to one side are usually caused by mechanical issues.
- Slipping pulleys or gears or belts can cause the print to slightly shift and start leaning. Tighten pulleys/gears/belts to stop this happening.
- Friction along the axis might cause it to lose steps. Just a few steps here and there, enough to make it lean. Clean and lubricate the axis so there’s no friction.
- A misaligned printer frame or bed will result in a leaning print as well, check everything is as straight as possible.
35. Poor Surface Quality Above Supports
Sometimes it is enough to print at a lower layer height to get better 3D printing quality surfaces over supports, increasing cooling or lower printing temps. Anything that increases bridging performance will help here as well, as bridging is what we’re in fact doing.
However, if this doesn’t work or you repeatedly experience this issue, keep reading to learn what else you can do to stop poor surface quality above supports.
Signs of poor surface quality above supports:
We’re looking at the bottom of an object that was printed above a slicer generated support structure. It looks rough, even a bit droopy.
The slicer generated support structure is not suitable for your set up and some adjustments are needed.
As previously mentioned, sometimes adjusting your temperatures or layer height can help get better 3D print quality surfaces but here’s some other things to consider:
Adjust support gap
Normal support structures for single extruder systems are designed in such a way so they are easy to break away from the finished print. Therefore, they intentionally leave a small gap between the support structure and the actual model that sits on top of it. The height of this gap is usually adjustable in your slicer settings. Less gap means better quality but also harder to remove.
If the gap is too close, breaking off the supports will damage the surface of your actual object.
Dual extrusion
If you find yourself suffering from this problem a lot, you might want to think about getting a dual extrusion system. Printing with water soluble rigid.ink PVA or the easy to remove rigid.ink Break-Away will allow you to transition seamlessly from support to the actual model completely eliminating the gap and the problems it entails.
Increase support density
Support structures are usually not printed solid, but rather, like infill, use a percentage, often called support density. Increase this density to improve the surface quality of the part printed above the support.
Rotate Model
Often, the object to be printed can be rotated on the bed so less supports are needed. Or you could split the model in half using a plane cut tool and avoid the supports entirely.
Custom Supports
If you designed the model yourself, read up on design guidelines to reduce the need for supports in the first place, or how to place your own supports at design time.
36. Failing Supports
Failing supports are not what anyone needs when using supports. Unfortunately, it happens, and can even happen to several independently failed support like in the image displayed.
Signs of failing supports:
Usually you’re using supports because they are needed for your print. If your supports fail it will be very visible as your print will not be complete.
Support pillars, especially when setup using a low support density are not the most stable things and will be in increasing danger of toppling over the taller they get.
- Avoid isolated towers, place your supports in bigger groups.
Reduce printing speed for support.
Use higher support density and if your slicer supports it – a different support pattern.
If your slicer supports it, have a brim or a solid bottom layer added to your supports.
37. Poor Bridging
Bridging, i.e. printing (more or less) long distances unsupported over thin air is tricky business. It requires different settings than regular printing, usually speed and cooling is key to the success.
Signs of poor bridging:
Saggy lines in the picture show poor bridging performance.
If you don’t have the correct settings for the bridging needed, then you will experience saggy lines and poor bridging.
Advanced slicer software detects when bridging is required and will allow you to apply different settings for the bridge.
- Increase extrusion multiplier for the bridge.
- Try different speeds, slower is usually better, but results may vary so experimenting is key.
- Increase your fan speed for bridges. We want the material to harden quickly without drooping. May not be suitable for all materials, check with the manufacturer/seller.
- Make sure your slicer is actually using bridging mode. If you’re using Simplify3D, make sure bridging of outlines is enabled.
- More advanced bridging options like direction of the lines that make up your bridge or increasing the start and end zone of a bridge can help as well.
- Better than trying to optimise bridging performance is trying to avoid bridges to begin with. If possible, reorient your part on the build plate so less bridges are required or add supports to your bridges. With supports under your bridge, it won’t be able to droop as much.
38. Stringy & Droopy Overhangs
Overhangs are where you’re printing a slanted surface without any support beneath. This is asking quite a lot of your printing, especially if you’re thinking of exceeding the 45° rule.
Also see our article [How to print overhangs, bridges and exceeding the 45° rule] .
Signs of stringy and droopy overhangs:
Your overhangs should appear as smooth as the rest of your print if set up correctly. If they are looking more like the image shown, you’re experiencing droopy overhangs.
Stringy prints or droopy overhangs are usually a result of printing too hot or insufficient cooling. In a way overhangs are even worse to print than bridges. As bridges have a supported start and landing zone. The overhang doesn’t, it just clings to the neighbouring line.
- Reduce your printing temperature in 5°C increments until your overhangs are smooth.
- Increasing cooling (fan speed). If you’re already at 100%, you can ensure all chamber doors are open or add external fans to beside the printer. May not be suitable for all materials, check with the manufacturer/seller.
- Tell your slicer to print the inner perimeters first before printing the outlines.
- If you design your model yourself, avoid overhangs at an angle greater than 45°.
- If the overhang cannot be avoided, consider using supports to hold them up.
- Check your extrusion settings. Do the basic extrusion calibration of extruder steps/mm and extrusion multiplier.
39. Molten/Deformed Prints
If the prints coming from your printer look like somebody held a blowtorch to it keep reading.
Signs your print is molten/deformed:
All of your print appears to be ‘melted’, droopy and deformed. In 3D printing, you want for a smooth consistent print, not like the example in the image.
If your prints are suffering from these deformities, chances are you’re printing too hot or do not have sufficient cooling fans.
Print cooler
Printing cooler is the best advice we can give in this instance.
One, if not the most common problem we see in tech support is people printing way too hot. We’re not sure why this is; some presume hotter temperatures will improve flow rate. Sure, there’s a bit of a give here and there especially with thermistors not being the most accurate critters to begin with, but your first check should be – are you exceeding the print temperature recommendation for the filament used? We always suggest starting at the lowest point in the recommended range and work your way up in 5°C increments, if needed.
Check with the filament manufacturer’s documentation to make sure. Just because it says “PLA” on the box, it does not mean they will all print the same! There are hundreds, possibly thousands, of different types of PLA produced across the world.
Print slower
Printing slower allows the heat building up in the printed object to dissipate before the next pass of the nozzle over the same area of the print.
Check/increase fans
Make sure your fans are working. You can try to switch to fans that are pushing more air or add more fans. Sometimes, using a desk fan as a workaround can help you until a more streamlined solution is found.
Cooler ambient
The ambient temperature is too high. If your printer is enclosed, open all doors, side panels or top covers to keep the ambient temperature down. Even the best fans are inefficient if all they’re doing is moving hot air around.
40. Burnt Stuff Dripping On Your Print
Even if all your settings seem to be set correctly, the unexpected can cause issues with your prints.
Signs of burnt stuff dripping on your print:
See the drop of brown molten ooze on that picture there? It not only looks poor, especially if it lands on one of the outer surfaces, it can ruin your print when your HotEnd hits it on the next pass. We’ve had multiple cases where a drop like this damaged some of our (cheaper) printers. So, let’s try and avoid this.
Most commonly due to build up on the nozzle of a leaking HotEnd, but can be worse with certain materials.
Clean the outside of the nozzle
Over time your nozzle tends to pick up traces of molten material, due to over-extrusion or warping or similar. It happens. Clean your nozzle between prints. We’ve seen printers where you’d be hard pressed to tell the original colour of the nozzle installed (or if there is a nozzle at all!).
Calibrate extrusion
Calibrate your extrusion rate, over-extrusion will lead to more build-up.
Leaking HotEnd
Your HotEnd might be leaking. Especially on cheap kit printers the HotEnd or nozzle is often installed wrong. As basic rule: the nozzle needs to be tightened against the throat of the heat break and not against the heater block.
Clean the HotEnd, then start a few more prints. Pay close attention to where the filament is appearing again – is it getting picked up by the tip of the nozzle eventually wandering upwards, or does it appear at any of the threads around the heater block first?
- PETG especially tends to gather on your nozzle, accumulate during the print and eventually drip. This (and its sometimes-excessive adhesion to certain build plate surfaces) is why we recommend not squishing your first layer when printing with PETG.
- When printing Wood particle filled filament the polymer binding agents (cellulose resin and/or viscose blended with PLA) tends to drip from your HotEnd in a honey like consistency when printing to hot. Or after it sat in a heated nozzle for a while. Print colder and at a constant speed.
41. Popping Noises Coming From Your Nozzle
Are you sure it is popping from the nozzle and not clicking from the extruder motor? If it is clicking, see [Filament not extruding properly] . If it is indeed a popping nozzle, here are some pointers:
Dry filament
You’re trying to print moist filament. Some filaments attract and absorb moisture from the air at very high rates. When trying to print such filament, the moisture will turn into vapor and give small popping noises. Dry your filament before use, especially Nylon.
Retraction settings
Turn down your retraction settings. You’re HotEnd might be sucking in air, even though this is usually more of a whistle than a pop.
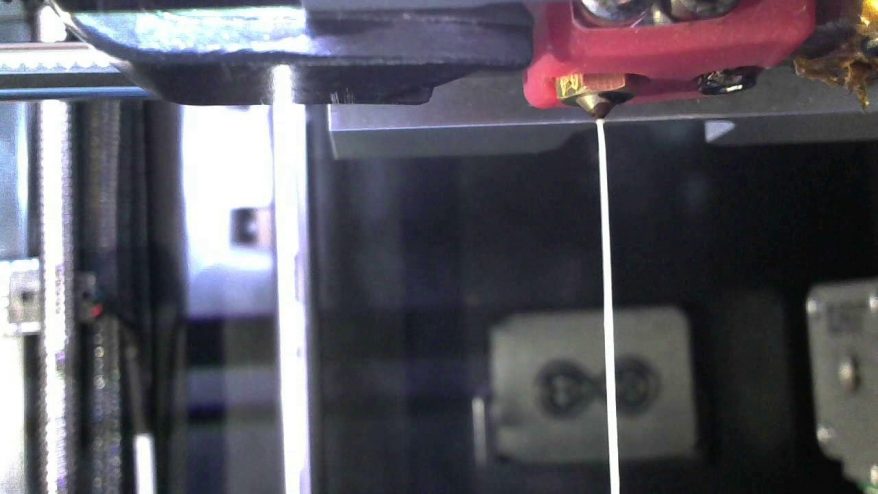
42. Steam/Smoke Coming Out Of Your Nozzle
This is basically a continuation of the last topic. Moisture in your filament doing strange stuff or the machinery isn’t clean from manufacturing.
Steam coming out of your nozzle
Explanation.
If the filament is wet enough, you will see steam coming from your nozzle. While usually harmless, the print quality will suffer greatly from this.
If it’s too late and moisture has affected the filament, try drying the filament or replace the spool.
To prevent moisture store your filament dry, this is why we at rigid.ink provide special Mylar (metallic) resealable bags with each order. Maybe build a dry box for storage or even to keep the filament dry while printing sensitive materials like Nylons or PVA, with those materials, a few hours on an especially humid day is all it takes.
Smoke coming out of your nozzle
Usually this is a hardware issue. Clicking means the motor is stalled, so that it is just twitching and not rotating. This will eventually ruin your print, leading to layer shifts or leaning prints.
- There is too much friction when the motor tries to move. Clean, lubricate smooth rods, lead-screws and check bearings.
- Something may be blocking the movement of the axis in question. Check alignment and anything that could prevent the movement.
- You’re trying to operate your motors at too high speeds (including acceleration/jerk settings), lower and try again.
- Insufficient current may be being supplied to them (check Vref on the stepper driver for this axis).
- The motor may have overheated, allow to cool and see if it happens again.
43. Clicking Motors
If you hear a motor clicking it’s a sure sign that something is wrong. If it is the extruder motor that is clicking, check this chapter: [Filament not extruding properly] . For any other stepper clicking, continue here.
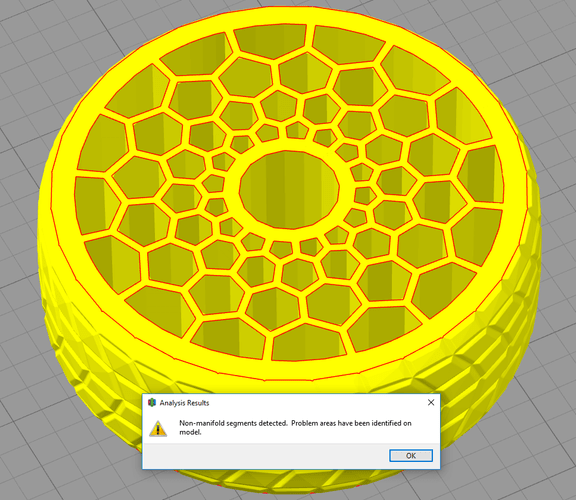
44. I Cannot Print Model X
Places like Thingiverse, Youmagine, etc. are great for downloading free models to print. However, people uploading these models are not necessarily aware what design considerations need to be done for a certain printer type to be able to print the model in question. Sometimes all your 3D printing troubleshooting efforts can be mute if the file just isn’t printable.
Some models are designed for resin based printers and will fail miserably on FDM filament based printers. There are certain geometries that are impossible to print with filament based printers and throwing supports at it might not be enough to make it work. There are STL files that are not meant to be printed at all. Some models that should print ok are plain and simple broken. Some print fine unless you try to scale them.
Downloading STL files is a hit and miss kind of thing. Some work, others won’t. You can try some of the free STL fixing tools, like Netfabb-online, MakePrintable.com or the like, but your results may vary. Not all STL files will print. Luckily MyMiniFactory boast guaranteed printable files, so this is usually a good place to start.
Something that might help you sort out the good from the bad when browsing these ‘free’ model download sites.
Taking Thingiverse as an example, if you see an object you are interested in printing, if there are no associated photographs of the printed object supplied by the uploader, and all you see is the system-generated blue object image – it might not be at all printable. Take a look at the associated comments section to confirm this one way or another.
It may be that the model is just fine, or has only just been uploaded. In any case, if there is another similar object that has photos, comments and lots of downloads, you might be better off looking to see if that meets your needs first.
I hope this troubleshooting 3D printing guide was helpful. If you still have any other issues, or want more detail, we have linked to guides within each solution which should help. We also recommend books on troubleshooting various 3D printing issues in our best 3D printing books guide .
Related Articles:
- How to Fix Warping on 3D Prints
- How to Fix Salmon Skin 3D Prints
Was this content helpful? Give us your feedback here.

Learn More About 3D Sourced

The 6 Main Types of FDM 3D Printer Explained

40+ 3D Printing Industry Statistics (2024 Update)

12 Best Thingiverse Alternatives For STL Files in 2024

5 Best 3D Printers for Miniatures & Terrain in 2024
The 56+ Coolest Things To 3D Print in 2023

13 Best Free 3D Modeling Software (For Beginners) 2024

11 Best 3D Printers in 2024 (All Budgets)

6 Best Large 3D Printers in 2024 (All Budgets)

4 Fastest 3D Printers in 2024 (All Budgets)

5 Best 3D Printers For Beginners in 2024
Exceptional value with anycubic’s latest 3d printer deals.

22+ Coolest 3D Printed Robotics Projects (2024 Update)

8 Best DIY 3D Printer Kits in 2024 (From $150!)

3D Printing In Space – Top Projects in 2023

Best 3D Printed Shoes in 2023 (Sneakers, Heels & More)

The Best 3D Printer Buyer's Guide Resource & 3D Printer Reviews
[email protected]
3D Printers 3D Scanners 3D Software Guides Rankings Interviews News
Most Popular
Best 3D Printers Best 3D Scanners Best 3D Modeling Software Best 3D Slicers Best Resin 3D Printers Fastest 3D Printers Best Large 3D Printers
Useful Links
About us About the team How we do our reviews Careers Contact Us
Sign up to our newsletter
Privacy policy
Affiliate disclaimer
Editorial policy
End Burnout & Healthcare Staff Shortages With 3D Problem Solving with David Dibble
This week, we sat down with David Dibble, creator of the 3D Problem-Solving model which works to transform systems within organizations to improve productivity, safety, and quality of care while reducing burnout, staff shortages, and costs. Come along with us as we learn more about 3D Problem-Solving in this episode of the Caring Support Podcast!
Tell us about yourself.
I'm just a guy out there trying to change the world, in this particular case, trying to change the world of health care. We've developed a program that people can introduce primarily with staff to change the systems in which we deliver care, and in so doing reduce burnout rates and staff shortages and increase the quality of care and safety. All those things that, I think, health care has really been looking for recently. So that's sort of me in a nutshell.
What made you get into your line of work?
It's a bit of a long story, which I'll try to keep somewhat brief. I got out of college and started a company with about $5,000 in the back of an old warehouse. Over time, we built it into about a $10 million business. I had 100 or so employees and I was still relatively young, and I guess you'd say relatively successful. I thought once you have all the stuff, you're supposed to be happy, and I was somewhat dismayed to find out that I wasn't. So, I started looking into some of those bigger questions in life like: who are we and why are we here and what's the purpose of life and those sorts of things. That got me introduced to a guy named W. Edwards Deming. He's probably the number one quality guru in history. He's credited with turning Japan around after World War Two, and he taught Toyota how to do it. I looked at implementing his teachings in my own company, and it took the company from being a good company to being a great company. Then that got me on this whole path to systems-based quality where eventually I got pulled to health care and that brings us to today.
What is 3D problem solving and how was this method developed?
Well, going back to the work with Deming and Prigogine, there was another really amazing individual that I ran into around this time. This is a little bit later, but his name was Don Miguel Ruiz, and he wrote a book called The Four Agreements, which became an international bestseller. I think he’s probably sold 5 million copies by now. I was very fortunate to work with him for about eight years, and he was working in personal transformation. I learned a ton about personal transformation that could also be integrated into this new model, which we ended up calling 3D Problem-Solving. Then it was kind of a mash-up of Don Miguel's work, Prigogine’s work, and Deming's work, which all together became 3D Problem-Solving. The big thing with 3D Problem Solving is we can implement it and sustain it in health care. All these other systems change processes and models, things like Lean and Six Sigma and Lean Sigma and even Toyota. None of them can be sustained in health care and 3D Problem Solving can. So, we get the benefits of a systems-based approach to problem-solving, but also critically importantly, we can sustain it after we implement it. So, I think that's the big differentiator between 3D Problem Solving and some of these other programs that have been out there.
How does your 3D Problem-Solving method work towards building better healthcare workplaces?
Well, there are a couple of things that are integral to making it so we can implement it in health care. One of them is that it uses a pull strategy rather than a push strategy. You'll see that all these other change programs support, they’re top down. So, someone up in the C-suite says, ‘Oh my gosh, the next shiny object is coming down the road, and we need to do this’ . Then it's pushed down through the organization and sort of dumped in the laps of staff and they’re told to do this. We know what happens when you push people, you tend to get pushback. One of the things that we did early on when putting the model together was making sure we were using a pull strategy. We take it to staff, and we say, ‘Hey, it's 100% voluntary. Only people who want to do it can do it.’ We never push anybody. Nobody's ever ordered to do anything. It's all voluntary, it's people who really want to make a difference in health care, who are drawn to it, and they basically come in and they become a part of the process because they want to. Early on, they find it's fun, it's inspiring, and we actually can create the systems change that everybody is really looking for and they get to experience success. The program then grows organically just through word of mouth where successes are spread into other departments.
Can you tell us about a case or two where you went into an absolute mess and how your method turned that organization around?
We have an outcomes report for large and small hospitals. It's a thick document, but there are a few stories that are just remarkable today. I'll share one with you.
I had been on a call with the CEO and with a couple members of the board and they had a couple of members of the C-suite. I'll never forget this, their CEO, John, asked me: “well, how much work have you done in health care?” I said, “None.” He said, “Well, what do you know about health care?” I said, “Well, really, nothing, except I know it's really goofed up. And there's probably a lot of good work that could be done in there if we could fix the systems.” He said, “This might be the worst sales pitch I've ever heard.” I said, “Well, I know, John, but look, systems are systems. It doesn't matter whether it’s health care or anywhere else. I really do know about systems improvement. It might even be a good thing that I don't know anything about health care because I don't have any preconceived notions about it.”
He ended up taking a flier on me, but one of the first things that always happens when you're doing consulting work in health care is they always want to give you their worst problems. One of their worst problems was a wellness centre, that was kind of the stepchild for the hospital. It was a couple of miles away from the main hospital and it had been one of their worst departments for probably close to a decade. The year before, out of 272 similar facilities nationwide, they had been ranked number two seven two by Press Ganey in customer satisfaction or patient satisfaction. Do you know how hard it is to be last out of 272? I mean, it's almost impossible, but they did it.
They sent me down to work with the director down there and try and straighten this place out. I was talking to the director, and I said, “Look, I have no doubt we can straighten this place out. The opportunity for you is not really in straightening the place out. If you want to, I'll train you in 3D Problem Solving and you will become an excellent leader and manager and problem solver. Then, you can move up in the organization if you want to.” So, he said, Yeah, you'd like to do that. He was an incredible student who later became the CEO of the hospital. The long and the short of the wellness centre story is that in a little less than one year, they moved from number 272, dead last, to the 96 percentiles with Press Ganey in patient satisfaction in one year and it's remarkable.
You’ve also worked with an organization where you took their nurse turnover rate from 27% to under 5% in under three years. And you also raised their healthcare graduate hire rates by 66%. How did you do that?
We just went in and did the systems work. People don't really understand that everything in health care is systems and subsystems all the way from the C-suite to the person sweeping the floors at night. 94% of the outcomes that we get good and bad are a function of those systems and subsystems. When we look at turnover rates for nurses, those turnover rates, good or bad, are a function of these systems which are invisible to the people that work in them. They don't even know they exist. Sadly, most of them think they do, which of course they don't, because no one can know what the systems look like unless you make them visible. The only way you can make them visible is to take the people that work in the system and pull that information out of them and put it up on the wall, where you can see it, and that's what 3D Problem Solving does. It takes that information from the people that actually work in the systems, and we get it up where we can see it, and then we condense it down into the critical 20% of the systems that are producing 80% of the problems we want to solve.
Going back for a minute to nurse turnover, the vast majority of turnover, whether it's health care or any other workplace, are for two primary reasons. One is bad management and bad supervision. The interesting thing about bad management and bad supervision, most of that is caused by bad systems. Managers are bad managers when they're working in bad systems. The second one is in bad recruitment and retention systems, including bad care delivery systems. When those systems are bad, you're not going to feel good working there and you're not going to be successful. What is that going to do? It’s going to drive you out of that job, just like it's doing in health care in general right now.
We went in and we were working in fixing systems in nursing. Suddenly people are getting happier because they're providing better care, they're feeling better about their jobs and that sort of thing. At the same time, I was working with the CNO on their retention systems for their nurses and in their recruitment system. We fixed those and improved those and the next thing you know, we were getting, 66% more recruits, and new recruits coming from the nursing school in the community. They had a 27% rate of turnover in their nurses, but now the nurses are becoming happier and they're recruiting better, then the rates start to go down. Over three years, it went from 27% to under 5%. This hospital was competing against larger hospitals that could pay bigger bonuses and that sort of thing. It turns out that if we fix the systems, those things don't matter nearly as much.
The UAB has just submitted two peer reviews on implementing the 3D Problem-Solving method. What are you hoping to come out of those publications?
Health care is very much attuned to evidence-based processes, evidence-based care, that sort of thing. They also are very much attuned to peer-reviewed evidence-based information, particularly new information. The idea that these two peer-reviewed papers coming out of a really good academic health care system, going to major journals, I think will open up mainstream health care both in the U.S. and internationally to 3D Problem-Solving.
One of the papers is going to be how UAB used 3D Problem-Solving for looking at the wellness of staff and improving turnover rates and burnout rates. The second one is on how they used it to improve quality of care and safety. If there are any bigger issues in health care right now, I really don't know what they are.
So how can organizations contact you about getting your help with implementing the 3D Problem-Solving method?
Probably the best way is you can go to our website. It's TheNewAgreements.com . Also, you can go to DavidDibble.com and there's all kinds of information on there both on 3D Problem Solving and also you can contact me through the website. I'm also available at [email protected] and then I am very active on LinkedIn.
I seem to be very fortunate in creating kind of a tribe of kindred spirits working in health care who really do want to make a difference in health care. We've got some graduates out of our 3D Problem-Solving facilitator certification program, which my hope is we can scale that program into health care in a way where we really can turn health care around and start solving some of these problems, particularly coming out of the pandemic.
Is there anything else that you would like to tell us about?
I would like to say that I believe that we are entering interesting times. Being a bit of an expert on both systems-based improvement, based on Deming and the law of dissipated structures, and based on Prigogine’s work, those principles are hard at work in health care. They're invisible. People don't know about them. I think we're coming up on a time where we're going to have to start making some difficult choices, new choices to go different directions in health care, particularly at the leadership and management level, because everything that has been going on in health care over the last 30 years plus have been taking us down essentially the wrong road. That wrong road has stressed the systems to the point of breaking. And we're already seeing what Prigogine calls reorder. That's the breakdown of these systems that unless we get in there and repair these systems, which can only be done by staff, particularly at the care delivery level, these systems are going to come apart and they're going to take staff and patients down with them. We're at this critical juncture where we're either going to be proactive in making these changes, which are going to be made one way or the other, because the law of dissipative structures, there's no choice in where that's going to take these things if we do nothing. I think we're reaching a tipping point where we need to get busy doing our real work in the world, which is changing these systems and setting ourselves up and staff and patients for success.
About David Dibble:
Four years ago, David had a powerful dream that sat him straight up in bed and scared him wide awake. He was told quite clearly that he was to take 3DPS into healthcare and the world in a meaningful way and it would be a catalyst for making a real difference in the world. It’s taken him almost four years to get everything ready to follow the instructions of what he calls Inner Wisdom.
David Dibble is a husband of 50 years, father to three grown children and a grandfather.
Conquering Surgical Studies and Deficiencies in Women's Healthcare
Let's Learn About Self-Care - A Conversation with Karisa Haverkamp
Working as a Frontline PSW & HCA
Living Life as a PSW In Today's World - A Conversation with Taylor Booroff
Find Your Dream Job Today!
Get updates from caring support.
We'll keep you updated on all new application updates and features!
Your Ultimate Geometry Solver and Math Word Problem AI Assistant

Learn geometry with us
Use advanced features including AI assistant powered by ChatGPT to solve word problems, live previews, step-by-step solutions, export to gallery and weight calculator.
Certified by teachers
We're an Educational App Store certified app. With the endorsement from the Educational App Store, educators and students can confidently integrate Geometry Solver app into their classrooms and parents can have their peace of mind.
Awarded by the professionals
Geometry Solver has been honored with #11 place in the 'Mobile Learning in Action' awards in the Math category. Experience the award-winning app and witness firsthand why it has garnered such high acclaim.
110+ geometric shapes
Our Geometry Solver app provides quick and accurate solutions for calculating perimeter, surface area, and volume of over 110 2D and 3D shapes. Whether it's triangles, circles, spheres, or pyramids, we've got you covered.
AI Assistant
Say goodbye to the frustration of solving complex math word problems. Our AI assistant, powered by ChatGPT, helps you break down and solve any math word problem step-by-step, making math a less daunting task.
Step-by-step solutions
Understand the logic behind each calculation with our detailed step-by-step solutions. You'll gain valuable insights into the problem-solving process, helping you learn and improve your math skills.
Export to gallery
Easily export your calculations and solutions to your gallery and share them with your friends, classmates, or colleagues. Collaborate, discuss, and learn together.
Weight calculator
Discover the weight of any given shape by choosing a material and density. Our weight calculator feature provides accurate weight calculations, making it ideal for projects that involve construction, manufacturing, or design.
Live previews
Experience real-time shape transformations as you change any property - whether it's adjusting the dimensions or angles. Witness the immediate visual impact of your modifications.
Formulas cheat sheet
Access a comprehensive collection of formulas at your fingertips, providing you with instant reference for calculating the surface area, volume, and other essential properties of 2D and 3D shapes.
How will you benefit?
With over 110 2D and 3D shapes, an AI assistant powered by ChatGPT, step-by-step solutions, and a weight calculator feature, our app is designed to make geometry calculations and math problem-solving a breeze.

Download Geometry Solver
Click on the AppStore link and start learning.
Scan your word problem
And let our AI Assistant solve it for you.
Calculate shape properties
Such as surface area, perimeter, volume and others.
Watch it in action
Still not convinced? Watch a short clip that shows all the major features!
Screenshots
Solve Geometry Problems with Ease: Our Geometry Solver app provides quick and accurate solutions for calculating perimeter, surface area, and volume of over 110 2D and 3D shapes. Whether it's triangles, circles, spheres, or pyramids, we've got you covered.
Enter 3 values to calculate all properties of a triangle

Solve surface area and volume of 3D shapes such as a pyramid

AI assistant powered by ChatGPT will solve your math word problems

Check step-by-step solutions for every calculation

Export your calculations to photo gallery and share it with your friends

Or just use this app to look at the formulas and theorems

Geometry solver for most common shapes such as rectangle

Along with more than 110+ other 2D and 3D shapes

Loved by the users
Join hundreds of thousand users who experienced a significant improvement in their geometry skills.
I can and have done most of these formulas with a calculator over my career but I don’t have to these days. This app is well organized, professional in its appearance and functionality.
Well designed
The list of geometric shapes just keeps growing! Please if you could add a kite shape, that would be awesome. Thank you.
Regular updates
What a great app. Clear and concise. Easy to use and view. Shows formulas. Even links out to wikipedia for further info on a particular shape or exercise. Impressive! Thanks Devs!
This is amazing
Geometry Solver app has been a game-changer for me as a math teacher. It saves me so much time and helps my students understand geometry concepts better. There are frequent improvements and updates.
A game changer
Geometry Solver includes all the shapes I am likely to need. The variables are clearly indicated and a pop-up window is provided indicating the formula applied. It all makes for a very useful app.
Ultimate Geometry Solver
I struggled with math word problems, but the AI Word Problem Assistant in this app has made it so much easier for me. I can finally tackle complex problems with confidence.
AI Assist rules!
Supercharge your math skills with geometry solver.

3D Trigonometry Practice Questions
Click here for questions, click here for answers, gcse revision cards.

5-a-day Workbooks

Primary Study Cards

Privacy Policy
Terms and Conditions
Corbettmaths © 2012 – 2024
Help | Advanced Search
Computer Science > Computer Vision and Pattern Recognition
Title: theoretical analysis for expectation-maximization-based multi-model 3d registration.
Abstract: We perform detailed theoretical analysis of an expectation-maximization-based algorithm recently proposed in for solving a variation of the 3D registration problem, named multi-model 3D registration. Despite having shown superior empirical results, did not theoretically justify the conditions under which the EM approach converges to the ground truth. In this project, we aim to close this gap by establishing such conditions. In particular, the analysis revolves around the usage of probabilistic tail bounds that are developed and applied in various instances throughout the course. The problem studied in this project stands as another example, different from those seen in the course, in which tail-bounds help advance our algorithmic understanding in a probabilistic way. We provide self-contained background materials on 3D Registration
Submission history
Access paper:.
- HTML (experimental)
- Other Formats
References & Citations
- Google Scholar
- Semantic Scholar
BibTeX formatted citation
Bibliographic and Citation Tools
Code, data and media associated with this article, recommenders and search tools.
- Institution
arXivLabs: experimental projects with community collaborators
arXivLabs is a framework that allows collaborators to develop and share new arXiv features directly on our website.
Both individuals and organizations that work with arXivLabs have embraced and accepted our values of openness, community, excellence, and user data privacy. arXiv is committed to these values and only works with partners that adhere to them.
Have an idea for a project that will add value for arXiv's community? Learn more about arXivLabs .
IMAGES
VIDEO
COMMENTS
Making 3D Problems 2D. A very common technique for approaching 3D Geometry problems is to make it 2D. We can do this by looking at certain cross-section(s) of the diagram one at a time. Example Problem Problem. On a sphere with a radius of 2 units, the points and are 2 units away from each other. Compute the distance from the center of the ...
A new way to look at things to solve a complex problem. That's where thinking in 3D - or three-dimensional thinking - can help. The scientific word for 3D thinking is spatial visualization. Spatial visualization is the ability to rotate, maneuver, and disassemble two and three-dimensional objects in your head.
There are other benefits to solving 3D puzzles and brain teasers. They may include improvements in concentration and memory, problem-solving ability and patience, as well as logic and pattern analysis. The best part is that you'll have so much fun working with them that achieving these benefits won't feel like a chore.
This is part of our collection of Short Problems. You may also be interested in our longer problems on 3D Shapes. Printable worksheets containing selections of these problems are available here:
In Renal Transplant, the average length of stay for fresh kidney transplants decreased by 1.38 days. But charts and data are not the only reason there is a waiting list to engage CPT. The team's unique approach, which they call 3D Problem-Solving, taps into the emotions of the care team before anything else.
Problem-solving with 3-D vectors. 3-D vector problems can be solved using the same principles as 2-D vector problems (see Problem Solving using Vectors); Vectors can be used to prove two lines are parallel, to show points are collinear (lie on the same straight line) or to find missing vertices of a given shape
Best Upgrade: Craighill Tycho Puzzle. Best Hanayama: Bepuzzled Labyrinth Hanayama. Best for Kids: Uncommon Goods T-Rex 3D Puzzle Building Kit. Best 3D Puzzle: Original 3D Crystal Puzzles Grand ...
There are 23 NRICH Mathematical resources connected to Nets, you may find related items under 3D geometry, shape and space. Broad Topics > 3D geometry, shape and space > Nets Problem Primary curriculum Secondary curriculum
Thinking 3D. The NRICH team develop problems for the whole site collaboratively, choosing themes that can be explored by children from 5 to 19. When the team are faced with the topics such as "3D geometry" we often need to pause and think about what this might mean for younger pupils. When thinking of 3-D, our initial thoughts ranged around ...
by Alastair Jennings. Updated Sep 6, 2022. Complete 3D printing troubleshooting guide. All common 3D printing problems and their solutions. Includes both FDM and SLA 3D printing issues. Advertisement. Complete 3D printing troubleshooting guide.
These playful 3D shape puzzles are a great way to tie them all together! Snag your set below and then hop over and grab our popular 3D Shape Activities in our shop or on Teachers Pay Teachers! Getting Ready. ... Who knew practicing symmetry, problem-solving, counting, geometry, and comparison skills could be so easy and fun? ...
3D Builder - Learning Connections Essential Skills Problem Solving - combine and assemble blocks to make new objects Geometric Thinking - represent three dimensional figures Spatial Reasoning - changing perspective on a grid. Common Core Connection
Rest assured, the problems and solutions to every 3D printing issue you could experience are explained in this tips & fixes-packed guide to 3D printing. Each issue has a clear high resolution photograph, a detailed explanation of the subject, and a problem-solving checklist for how to improve 3D print quality.
The big thing with 3D Problem Solving is we can implement it and sustain it in health care. All these other systems change processes and models, things like Lean and Six Sigma and Lean Sigma and even Toyota. None of them can be sustained in health care and 3D Problem Solving can. So, we get the benefits of a systems-based approach to problem ...
Just make sure the kids are doing the thinking and you're not telling them how to solve it!) Day 1. This is a fun activity that really encourages kids to think about the attributes of 3-D shapes. It also integrates science and makes kids think about how the shape of an object affects how it moves. It's super easy.
The Corbettmaths Practice Questions and Answers on 3D Shapes. GCSE Revision Cards
The eight disciplines (8D) model is a problem solving approach typically employed by quality engineers or other professionals, and is most commonly used by the automotive industry but has also been successfully applied in healthcare, retail, finance, government, and manufacturing. The purpose of the 8D methodology is to identify, correct, and ...
You'll gain valuable insights into the problem-solving process, helping you learn and improve your math skills. Export to gallery. ... With over 110 2D and 3D shapes, an AI assistant powered by ChatGPT, step-by-step solutions, and a weight calculator feature, our app is designed to make geometry calculations and math problem-solving a breeze. ...
nets of 3d shapes. Explore more than 291 "3d Shape Problem Solving" resources for teachers, parents and pupils as well as related resources on "3d Shape Nets". Instant access to inspirational lesson plans, schemes of work, assessment, interactive activities, resource packs, PowerPoints, teaching ideas at Twinkl!
Explore more than 292 "3D Shape Problem Solving" resources for teachers, parents and pupils as well as related resources on "3d Shape Nets". Check out our interactive series of lesson plans, worksheets, PowerPoints and assessment tools today! All teacher-made, aligned with the Australian Curriculum.
Questions 1, 4 and 7 (Problem Solving) Developing Using one 2D shape from a net, identify which 3D shape could be made. Names (not images) of simple 3D shapes given (cubes, cuboids and triangular or rectangular based pyramids). Expected Using one 2D shape from a net, name two familiar 3D shapes (including prisms) which could be made.
3D Trigonometry Practice Questions - Corbettmaths. 5-a-day GCSE 9-1. 5-a-day Primary. 5-a-day Further Maths.
We perform detailed theoretical analysis of an expectation-maximization-based algorithm recently proposed in for solving a variation of the 3D registration problem, named multi-model 3D registration. Despite having shown superior empirical results, did not theoretically justify the conditions under which the EM approach converges to the ground truth. In this project, we aim to close this gap ...
Original fast and robust approach for solving the moment-of-fluid interface reconstruction problem on tetrahedral meshes. Explicit parametrization of the centroid locus at fixed volume on tetrahedra. Improved technique for obtaining an initial condition for the minimization algorithm.