Subject Explorer
School Subjects
Math & Science
Business & Technology
Electives & Health
Board & Administration
Teaching & Learning
Audio/Video Lectures
Books & Documents
Classifieds
Jobs & Resources
Discussions
Language & Literature

Practice Projects for Microsoft Word

Word 9 Table
In this practice project for Word, students create a document with a title and table. The table has two columns that have different font alignment and incluces various fonts. …

Word 8 Formatting Text
In this practice project for Word, students create a document using a different size and color font for the title than the rest of the paragraph. …

Word 7 Bullets
In this practice project for Word, students create a document with two different types of bullets showing points and subpoints. …

Word 6 Letter
In this practice project for Word, students create a letter. Included in the letter is a heading on the right, indented paragraphs, and the closing and signiture near the middle of the document. …

Word 5 Text And Outline
In this practice project for Word, students create a document that contains several paragraphs of text and also includes an outline with key points and subpoints. …

Word 4 Modified Text
In this practice project for Word, students create a document with the heading on the right, a boldfaced, centered title, and indented paragraphs. The document is double-spaced. …
Word 3 Basic Text
In this practice project for Word, students create a document with the heading on the right, a boldfaced title that is centered, and several paragraphs that are indented. …

Word 22 Preset Headings
In this practice project for Word, students create a document using the preset headings to create a title bar. The document has different alignment and font, blanks, and a short outline. …

Word 21 Formatting Options
In this practice project for Word, students create a document that shows some different effects that can be used with the same font. …

Word 20 Numbered List
In this practice project for Word, students create a document that includes a centered title followed by a numbered list. …

Word 2 Heading 2
In this practice project for Word, students create a document that has a centered title, a heading in the upper right corner, and indented paragraphs. …

Word 19 Advanced Table
In this practice project for Word, students create a document with a table showing a school schedule. The blocks in the table are different sizes and will take individual work within the blocks to …

Word 18 Columns
In this practice project for Word, students create a document with a header and two colomns. The columns include boldfaced and italic font and different alignment. …

Word 17 Columns
In this practice project for Word, students create a document with two identical columns in landscape orientation. Included in each are indented lines and different alignment and font. …

Word 16 Lesson Notes Handout
In this practice project for Word, students create a document like a student handout. This includes an outline with several levels, blanks for students to write on, and different font. …

Word 15 Lesson Notes
In this practice project for Word, students create a document with a header and two outlines. Students are asked to use the automatic numbering and outlining features in Word. They must use different …

Word 14 Table
In this practice project for Word, students create a scoresheet using a table. Students must use different sizes, colors and styles of font, including different alignment. …

Word 13 Outline
In this practice project for Word, students create an outline using the automatic outline in Word, including many levels of subpoints. …

Word 12 Formatting
In this practice project for Word, students create a document with a centered title in all capitals, the first letter of each word slightly larger than the rest. Throughout the document the font is …

Word 11 Formatting
In this practice project for Word, students create a document similar to a test or quiz. They must include points and subpoints, blanks, boldfaced text, tabs, and spacing. …
Resource Type:
Pass it on:
Leave a Reply
- Skip to main content
- Skip to secondary menu
- Skip to primary sidebar
- Skip to footer
Erin Wright Writing
Writing-Related Software Tutorials
How to Use Microsoft Word (10 Core Skills for Beginners)
By Erin Wright
Do you want to learn how to use Microsoft Word quickly? This tutorial teaches ten core skills for beginners.
Table of Contents
How to Start a New Document
How to change the font, size, and color, how to change the alignment, line spacing, and indentations, how to add headings, how to change the margins, how to add images, how to add page numbers, how to add headers and footers, how to run the editor (spelling and grammar check), how to save and print your file.
Please note that this is a quick start guide. I have in-depth tutorials for most of these topics for those who would like to learn more.
Watch all the steps shown here in real time!
Explore more than 250 writing-related software tutorials on my YouTube channel .
The images below are from Word for Microsoft 365. These steps are similar in Word 2021, Word 2019, and Word 2016.
We will cover these ten core skills in Word for Mac in a separate tutorial.
- Open Word on your computer.
When Word opens, you will be in the Home screen of the Backstage view.
- Select Blank document to start a new document. (Alternatively, select Open if you want to open an existing Word document.)

When the new document opens, you will be in the Home tab in the ribbon , and your cursor will automatically be placed towards the top, left-hand corner of the page, ready to type.

You can change the font, size, and color before or after you type text. However, if you want to change existing text, first left-click, hold, and drag with your mouse to select the text.

- Select the Home tab in the ribbon if you are not already there (see figure 2).
- Select the menu arrow to open and choose from the (A) Font , (B) Font Size , or (C) Font Color menus in the Font group.

If you selected existing text, that text will change immediately. If you haven’t selected existing text, all new text will feature the choices you just made.
Further Reading: How to Change the Font, Font Size, and Font Color in Microsoft Word
Like the font choices shown above, you can change the alignment, line spacing, and indentations before or after you type text. However, if you want to change existing text, first left-click, hold, and drag with your mouse to select the text.
- Select the Home tab, if you are not already there (see figure 2).
- Select the Align Left , Center , Align Right , or Justify button to position the text on the page.

- Select the Line and Paragraph Spacing menu arrow and then choose a spacing option from the drop-down menu.

- Select the Decrease Indent or Increase Indent buttons to adjust the indent as necessary.

Further Reading: How to Adjust Line Spacing in Microsoft Word and Three Ways to Indent Paragraphs in Microsoft Word
You can turn existing text into a heading or choose a heading level before typing the heading text.
- Select the Home tab if you are not already there (see figure 2).
- Select a heading level from the Styles group.

- If the heading level you want isn’t visible, select the More button.

- Select a heading level from the menu that appears over the Styles group.

Further Reading: How to Create and Customize Headings in Microsoft Word
You can change the page margins for your entire Word document at once.
- Select the Layout tab in the ribbon.

- Select the Margins button and then select an option from the drop-down menu.

Further Reading: How to Adjust the Page Margins in Microsoft Word
- Place your cursor where you want to insert the image.
- Select the Insert tab in the ribbon, select the Pictures button, and then select the location of the image:
- This Device lets you choose an image stored on your computer or network server.
- Stock Images lets you choose stock images, icons, cutout people, stickers, and illustrations. The full stock image library is only available to users signed into Word for Microsoft 365.
- Online Pictures lets you search for images through Bing, Microsoft’s search engine.

For this tutorial, we will insert an image stored on the device.
- (For “This Device” option only) Locate and select the image in the Insert Picture dialog box and then select the Insert button.

Your image should now appear in your Word document.
- (Optional) Select one of the resizing handles and then drag the image to a new size.

- (Optional) Select the Layout Options button and then choose how the image is positioned with the surrounding text:
A. In Line with Text
E. Top and Bottom
F. Behind Text
G. In Front of Text
The effect of each option will depend on the size of your image and the density of your text. So, you may need to experiment with several options to find the one most suited to your content.

Further Reading: How to Insert and Modify Images in Microsoft Word
- Select the Insert tab in the ribbon (see figure 13).
- Select the Page Number button and then select a location from the drop-down menu, followed by a design from the submenu.
- Select the Close button to close the Header and Footer tab. (This tab only appears when the Header and Footers areas are active.)

Further Reading: How to Add Page Numbers in Microsoft Word
- Select the Header or Footer button and then select a design from the drop-down menu.

- Type your text into the placeholders.

- Select the Close button to close the Header and Footer tab (see figure 18).
Further Reading: How to Insert Headers and Footers in Microsoft Word
In Word for Microsoft 365, the spelling and grammar check is called the Editor. Your spelling and grammar options will depend on which version of Word you are using. Therefore, your interface may look different than the images shown below.
- Select the Review tab in the ribbon and then select the Editor button. (Older versions of Word will have a Check Document button, instead.)

- Select the corrections or refinements category you want to review in the Editor pane.

- If Word finds a possible error, select a recommendation or select Ignore Once or Ignore All .

Word will automatically move to the next issue within the category.
- Select a new category or select the closing X to close the Editor.

What Is the Difference between the Editor Button and the Spelling and Grammar Button?
You may notice a Spelling and Grammar button next to the Editor button in the Review tab. This button provides a quick way to check only spelling or spelling and grammar without checking the additional refinements reviewed by the Editor.

Further Reading: How to Use the Editor in Word for Microsoft 365
I recommend saving your file before printing just in case there is a disruption during the printing process.
- Select the File tab in the ribbon.

- Select the Save tab in the Backstage view.

- Select the location where you want to save the File.

- Type a name in the File Name text box and then select the Save button.

- Once you have saved your document to a specific location, you can then select the Save icon if you make changes to the document later.

- To print, reselect the File tab (see figure 26) and then select the Print tab in the Backstage view.

- Ensure the correct printer is selected and turned on, enter the number of copies into the text box, and then select the Print button.

From there, follow any additional dialog boxes provided by your printer.
Updated November 26, 2023
- Microsoft Word Tutorials
- Adobe Acrobat Tutorials
- PowerPoint Tutorials
- Writing Tips
- Editing Tips
- Writing-Related Resources

- Get started with computers
- Learn Microsoft Office
- Apply for a job
- Improve my work skills
- Design nice-looking docs
- Getting Started
- Smartphones & Tablets
- Typing Tutorial
- Online Learning
- Basic Internet Skills
- Online Safety
- Social Media
- Zoom Basics
- Google Docs
- Google Sheets
- Career Planning
- Resume Writing
- Cover Letters
- Job Search and Networking
- Business Communication
- Entrepreneurship 101
- Careers without College
- Job Hunt for Today
- 3D Printing
- Freelancing 101
- Personal Finance
- Sharing Economy
- Decision-Making
- Graphic Design
- Photography
- Image Editing
- Learning WordPress
- Language Learning
- Critical Thinking
- For Educators
- Translations
- Staff Picks
- English expand_more expand_less
Word - Getting Started with Word
Word -, getting started with word, word getting started with word.

Word: Getting Started with Word
Lesson 1: getting started with word, introduction.
Microsoft Word is a word processing application that allows you to create a variety of documents , including letters, resumes, and more. In this lesson, you'll learn how to navigate the Word interface and become familiar with some of its most important features, such as the Ribbon , Quick Access Toolbar , and Backstage view .
Watch the video below to become more familiar with Word.
About this tutorial
The procedures in this tutorial will work for all recent versions of Microsoft Word , including Word 2019 , Word 2016 , and Office 365 . There may be some slight differences, but for the most part these versions are similar. However, if you're using an earlier version , you may want to refer to one of our other Word tutorials instead.
The Word interface
When you open Word for the first time, the Start Screen will appear. From here, you'll be able to create a new document , choose a template , and access your recently edited documents . From the Start Screen , locate and select Blank document to access the Word interface.

Click the buttons in the interactive below to learn more about the Word interface.

Microsoft Account
From here, you can access your Microsoft account information, view your profile, and switch accounts.
The Tell me bar allows you to search for commands, which is especially helpful if you don't remember where to find a specific command.
Command Group
Each group contains a series of different commands . Simply click any command to apply it. Some groups also have an arrow in the bottom-right corner, which you can click to see even more commands.
Quick Access Toolbar
The Quick Access Toolbar lets you access common commands no matter which tab is selected. By default, it includes the Save , Undo , and Redo commands.
The Ruler is located at the top and to the left of your document. It makes it easier to make alignment and spacing adjustments .
Click and drag the vertical scroll bar to move up and down through the pages of your document.
Zoom Control
Click and drag the slider to use the zoom control. The number to the right of the slider bar reflects the zoom percentage .
Document Views
There are three ways to view a document: Read Mode displays your document in full-screen mode. Print Layout is selected by default. It shows the document as it would appear on the printed page. Web Layout shows how your document would look as a webpage.
The Ribbon contains all of the commands you will need to perform common tasks in Word. It has multiple tabs , each with several groups of commands.
Document Pane
This is where you'll type and edit text in the document.
Page and Word Count
From here, you can quickly see the number of words and pages in your document.
Working with the Word environment
All recent versions of Word include the Ribbon and the Quick Access Toolbar , where you'll find commands to perform common tasks in Word, as well as Backstage view .
Word uses a tabbed Ribbon system instead of traditional menus. The Ribbon contains multiple tabs , which you can find near the top of the Word window.

Each tab contains several groups of related commands . For example, the Font group on the Home tab contains commands for formatting text in your document.

Some groups also have a small arrow in the bottom-right corner that you can click for even more options.
Showing and hiding the Ribbon
If you find that the Ribbon takes up too much screen space, you can hide it. To do this, click the Ribbon Display Options arrow in the upper-right corner of the Ribbon, then select the desired option from the drop-down menu:

- Auto-hide Ribbon : Auto-hide displays your document in full-screen mode and completely hides the Ribbon from view. To show the Ribbon, click the Expand Ribbon command at the top of screen.
- Show Tabs : This option hides all command groups when they're not in use, but tabs will remain visible. To show the Ribbon, simply click a tab.
- Show Tabs and Commands : This option maximizes the Ribbon. All of the tabs and commands will be visible. This option is selected by default when you open Word for the first time.
To learn how to add custom tabs and commands to the Ribbon, review our Extra on Customizing the Ribbon .
Using the Tell me feature
If you're having trouble finding a command you want, the Tell Me feature can help. It works just like a regular search bar. Type what you're looking for, and a list of options will appear. You can then use the command directly from the menu without having to find it on the Ribbon.

The Quick Access Toolbar
Located just above the Ribbon, the Quick Access Toolbar lets you access common commands no matter which tab is selected. By default, it shows the Save , Undo , and Redo commands, but you can add other commands depending on your needs.
To add commands to the Quick Access Toolbar:

The R uler is located at the top and to the left of your document. It makes it easier to adjust your document with precision. If you want, you can hide the Ruler to create more screen space.
To show or hide the Ruler:

Backstage view
Backstage view gives you various options for saving, opening a file, printing, and sharing your document. To access Backstage view, click the File tab on the Ribbon .

Click the buttons in the interactive below to learn more about using Backstage view.

From here, you can open documents saved to your computer or to your OneDrive.
Save and Save As
You'll use Save and Save As to save documents to your computer or to OneDrive.
From the Print pane, you can change the print settings and print your document. You can also see a preview of your document.
From here, you can export your document in another file format, such as PDF/XPS .
Click here to close the current document.
From here, you can invite people to view and collaborate on your document.
Return to Word
You can use the arrow to close Backstage view and return to Word.
From the Account pane, you can access your Microsoft account information, modify your theme and background, and sign out of your account.
Here, you can change various Word options . For example, you can control the spelling and grammar check settings, AutoRecover settings, and language preferences.
The information pane will appear whenever you access Backstage view. It contains information on the current document. You can also inspect the document to remove personal info and protect it to keep others from making further changes.
From here, you can create a new blank document , or you can choose from a large selection of templates .
Document views and zooming
Word has a variety of viewing options that change how your document is displayed. You can choose to view your document in Read Mode , Print Layout , or Web Layout . These views can be useful for various tasks, especially if you're planning to print the document. You can also zoom in and out to make your document easier to read.
Switching document views
Switching between different document views is easy. Just locate and select the desired document view command in the bottom-right corner of the Word window.

Zooming in and out
To zoom in or out, click and drag the zoom control slider in the bottom-right corner of the Word window. You can also select the + or - commands to zoom in or out by smaller increments. The number next to the slider displays the current zoom percentage , also called the zoom level .

- Open Word , and create a blank document .
- Change the Ribbon Display Options to Show Tabs .
- Using Customize Quick Access Toolbar , add New , Quick Print , and Spelling & Grammar.
- In the Tell me bar , type Shape and press Enter .
- Choose a shape from the menu, and double-click somewhere on your document.
- Show the Ruler if it is not already visible.
- Zoom the document to 120%.
- Change the Document view to Web Layout .

Change the Ribbon Display Options back to Show Tabs and Commands , and change the Document View back to Print Layout .
/en/word/understanding-onedrive/content/

Want to create or adapt books like this? Learn more about how Pressbooks supports open publishing practices.
Word Practice 1

Here is a video demonstrating the skills in this practice. Please note it does not exactly match the instructions:
Complete the following Practice Activity and submit your completed project.
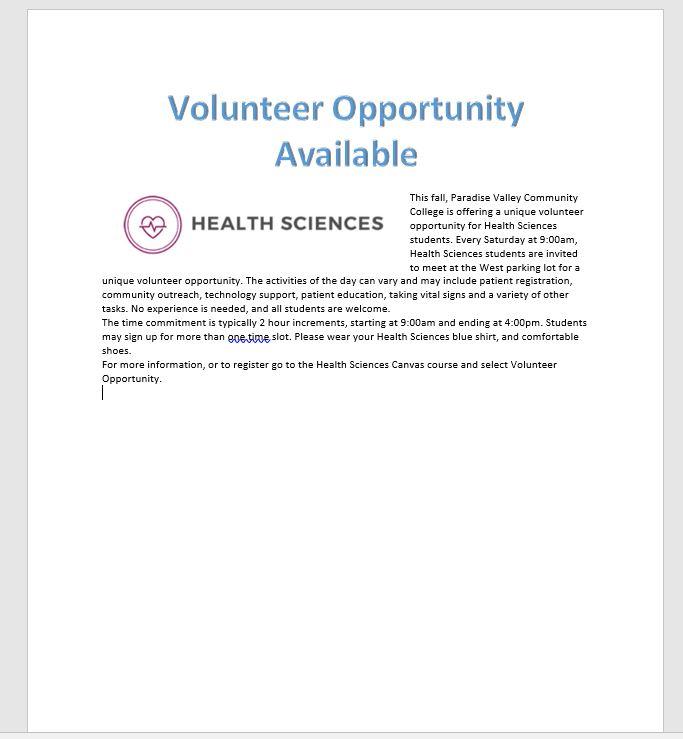
For our first assignment in Word, we will create a flyer to be printed or posted online. The flyer will advertise a volunteer opportunity for Health Sciences students at Paradise Valley Community College. Key skills in this practice are inserting text and pictures, textboxes, formatting text and footers.
- Start Word. Click Blank Document .
- Show formatting marks by navigating to the Home Tab, Paragraph Group, and selecting the Show/Hide icon. This is a Toggle Button . This means it has two modes, on and off. To turn it on, click it once, to turn it off, click it again.
- Show the ruler by navigating to the View tab, Show Group, and selecting the Ruler Check Box . A Check Box is a type of input control . A checkboxes value is only included in the submitted data if the checkbox is currently checked. In other words, when the box is checked, the value is included.
- Navigate to the File Tab to enter Backstage View. In backstage view, select File, then Save As. Click the Browse button. In the Save As dialog box , navigate to your file structure from the previous chapter, then open the Word folder. In the Name field, type Yourlastname_Yourfirstname_Word_Practice_1 as the file name, and then save.
- Type Volunteer Opportunity Available and press Enter twice.
- Type the following text: This fall, Paradise Valley Community College is offering a unique volunteer opportunity for Health Sciences students . Press spacebar.
- Navigate to the Insert Tab, Text group, and choose the Object arrow. Then choose text from file. In the Insert File dialog box, browse to the location where you saved the files from Canvas. Select the file Text_Word_Practice1. Click OK. The text will automatically update your document.
- Select all of the text in the document. On the Home Tab, Font Group, ensure the Font is Calibri and font size is 12.
- Select the title, Volunteer Opportunity Available, including the paragraph mark. On the Home Tab, Font Group, select the arrow next to Text Effects and Topography . In the third row, third column, a pply the Fill: Blue, Accent color 5; Outline: White, Background color 1; Hard Shadow: Blue, color 5 text effect.
- With the title still selected, change the font size to 36.
- On the Home Tab, Paragraph Group, choose Center to align the title centered on the page.
- On the Home Tab, Font Group, change the font color to Blue, Accent 1 for the title.
- With the title still selected, on the Home Tab, in the Font Group, choose the arrow next to the Text Effect and Typography icon. Apply a Shadow and under Inner, click Inside: Right text effect.
- Position the insertion point at the beginning of the paragraph that begins with This Fall.
- On the Insert tab, Illustrations group, choose Pictures . Navigate to your saved files from Canvas and choose the HSPicture_Word_Practice1 image.
- Be sure the picture is selected, and apply the Square text wrapping option.
- Using the sizing handle at the lower right hand corner of the picture, drag up and to the left until the bottom of the graphic is aligned at approximately 3.5 inches on the vertical ruler.
- Click Undo to return the picture to its original size. The Undo icon is located in the quick access toolbar in the upper left hand corner.
- On the Picture Tools, Format tab, in the size group, change the shape width to 4”.
- On the Quick Access Toolbar , click the Save icon. Then, compare your document to the image below.
- Ensure the picture is still selected. Display the Layout dialog box by selecting the Layout Options shortcut menu, then choose see more. In the Layout dialog box for the picture, make sure the Position tab is selected.
- Set the horizontal alignment to Left, relative to Margin.
- Set the vertical alignment to Top, relative to Line. Select OK to close the dialog box.
- With the picture selected, apply the Soft Edges 10 Point picture effect. This is on the Picture Tools Format Tab, Picture Styles group, under Picture Effects, Soft Edges.
- With the picture selected, on the Picture Tools, Format tab, in the Adjust Group choose the Artistic Effects arrow. Apply the Pastels Smooth artistic effect. Dese lect the picture .
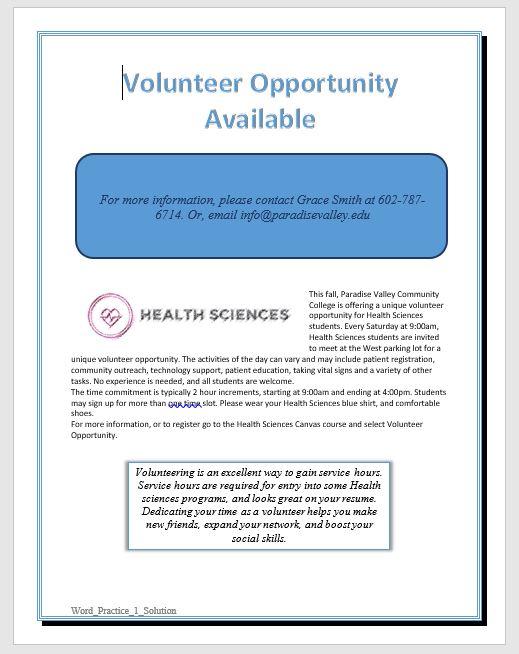
- On the Design Tab, in the Page Background Group, select Page Borders. Add a page border selecting the:
- Shadow setting
- Triple Lines style
- Blue, Accent 1 color
- Whole document
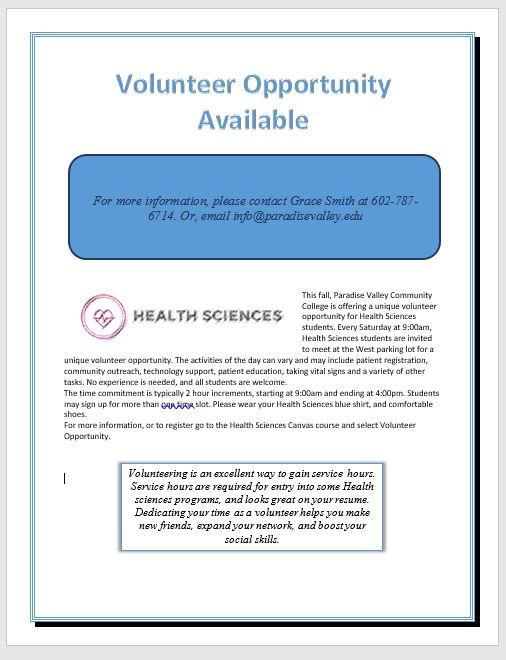
- Position the insertion pointer at the blank paragraph below the title and press Enter six times.
- On the Insert Tab, in the Illustrations group, choose Shapes . Insert a Rounded Corners Rectangle shape at the left margin at approximately 1.5 inches on the top ruler. Click once to insert a 1-inch by 1-inch Rounded Rectangle, or use the drag and drop feature.
- On the Drawing Tools, Format Tab in the Size group, Change the shape height to approximat ely 1.8 and the shape width to 6.4.
- Select the Rectangle shape and type the following text: For more information, please contact Grace Smith at 602-787-6714. Or, email [email protected]
- Italicize the text, change the font to Calibri and increase the font size to 16. Deselect the text.
- Select the same text as above and explore the mini-toolbar , by clicking the Font Color button arrow and under Theme Colors, click on Blue, Accent 5, Darker 50%.
- With the shape still selected, go to the Drawing Tools, Format Toolbar, the Shape Styles Group. Select the arrow next to Shape Outline and under Theme Colors, click on Blue, Accent 5, Darker 50%. Change the weight to 3pt.
Compare your document to the image below.

- Using the keyboard shortcut CTRL+END , navigate to the end of your document. If your keyboard does not have these keys, click to put your insertion point after the period on opportunity. Hit enter 3 times.
- Your insertion point should be approximately at the 8” mark on the side ruler. On the Insert tab, in the text group, click the arrow next to the textbox and draw a text box at approximately the 1”mark on the vertical ruler. Draw a text box by dragging down to create a text box that is approximately 1.5 inches high by 4.5 inches wide. Type the following in the text box: Volunteering is an excellent way to gain service hours. Service hours are required for entry into some Health sciences programs, and looks great on your resume. Dedicating your time as a volunteer helps you make new friends, expand your network, and boost your social skills.
- Select and Drag the textbox, by clicking and holding on the outer edge, until the horizontal green alignment guide displays above the first blank paragraph mark and the vertical green alignment guide displays in the center of the page. To be more precise:
- In the Layout dialog box on the Position Tab for the text box set the horizontal alignment to Centered, relative to Margin.
- Set the Vertical alignment by typing .25 in the Absolute position box and selecting Below Paragraph .
- On the Size tab, type 1.5 in the Absolute Height box and 4.5 in the Absolute Width box. Then, click OK.
- With the textbox still selected, on the Drawing Tools, Format Tab, in the Shape Styles group Apply the Colored Outline – Blue, Accent 1 shape style.
- Under Shape Effects , apply the Offset Center outer shadow shape effect to the text box.
- Select the text in the text box, change the font size to 13 italics, and center the text.
- Save the document. Compare your document to the image below.
- On the Insert tab, in the Header & Footer Group, choose Edit Footer. On the Header & Footer Design Toolbar, in the Insert Group, choose Document Info. Use Document Info to insert the file name in the footer. Select the File Name Field . The File Name should display in the lower left hand footer of the document. Do not type it in, rather use the Document Info Field.
- In Backstage view, click on Show All Properties, and type the following:
- In the Tags box: trainee, flyer, internship
- In the Subject box: Your course name and section number
- In the Author box: Your first and last name
- Turn off formatting marks. As a reminder, formatting marks are on the Home Tab, Paragraph Group.
- Take a moment to compare your document to the image below and make any modification based on what you have learned.
- Using Find and Replace, (Home tab | Editing | Replace), change all instances of pvcc and Paradise Valley to spscc or South Puget Sound.
- Zoom in to view the document in a larger size. Zoom is located in the lower right hand corner of the Word window.
- Save again, and ensure you have your file saved in a safe location. Take note of that location because you will need to find your file to upload it for grading.
- Submit the file for grading per your instructor’s instructions.
A starting point for creating a new document in Microsoft Word
Characters that display on the screen but do not print, indicating where the Enter key, the Spacebar, and Tab key were pressed, also called non printing characters
A button that can be turned on and off by clicking it once to turn on, and clicking again to turn it off
A small box which can be clicked to indicate a check is turned on or off to indicate an on or off response
Allows the user specify the drive, directory, and name of a file to save their file
Decorative formats, such as shadowed or colors that make text stand out
Images or graphics that are stored locally on a computer or flash drive and can be uploaded to a document to add visual interest
The manner in which text displays around an object
Located above the Ribbon (top-left) and provides access to commonly used features and commands, such as Save and Undo/Redo, and is customizable
Picture formatting options that control the manner in which text wraps around a picture or other object
Formats applied to images that make pictures resemble sketches or paintings
A decorative border that appears outside the margins on each page and can be solid, dashed, or an artistic style
Lines, arrows, starts, banners, ovals, rectangles, and other basic shapes with which you can illustrate an idea, a process or a workflow
Appears whenever you right-click text in Word, Excel or PowerPoint and provides a quick-access version of the Font group on the Home tab, plus a few extra buttons from other groups
Allows you to apply preset colors and effects to quickly change the appearance of your shape
Allows you to change the outline color, weight (thickness), and style of a the outline surrounding a shape
One or more keys used to perform a menu function or other common functions
A moveable, resizable container for text or graphics
A green vertical or horizontal line that displays when you are moving or sizing an object to assist with proper placement
A grouping of coordinating effects that can be applied to a shape including shadows, glows, reflections, soft edges, bevels, and three-dimensional (3-D) rotations
Placeholders that store and display data, and can perform simple tasks like returning the page number or current date and time
Any word, phrase, or number string related to the file that may help you locate the file later
Intro to Microsoft Office Copyright © 2021 by Abby Rusu & Maricopa Millions is licensed under a Creative Commons Attribution 4.0 International License , except where otherwise noted.
Share This Book
- Trending Now
- Foundational Courses
- Data Science
- Practice Problem
- Machine Learning
- System Design
- DevOps Tutorial
- BCA 1st Semester Syllabus (2023)
Fundamentals of IT & Computers
- Basics of Computer and its Operations
- Characteristics of Computer System
- Types of Computers
- Number System and Base Conversions
- What is Algorithm | Introduction to Algorithms
- What is a Flowchart and its Types?
- What is an Operating System?
- DOS Full Form
- Types of Operating Systems
- Commonly Used Operating System
- Difference between Word Processor and Text Editor
Introduction to Microsoft Word
- Introduction to MS Excel
- Introduction to Microsoft PowerPoint
C Programming
- C Programming Language Tutorial
- Operators in C
- Control Structures in Programming Languages
- C if else if ladder
- Nested switch case
- Introduction to Divide and Conquer Algorithm - Data Structure and Algorithm Tutorials
- Understanding Time Complexity with Simple Examples
- What is PseudoCode: A Complete Tutorial
- Arithmetic Operators in C
- C Functions
- Parameter Passing Techniques in C
- Difference Between Call by Value and Call by Reference in C
- Scope rules in C
Basic Mathematics
- Determinant of a Matrix
- Mathematics | Limits, Continuity and Differentiability
- Advanced Differentiation
- Chain Rule Derivative - Theorem, Proof, Examples
- Taylor Series
- Relative Minima and Maxima
- Beta Function
- Gamma Function
- Reduction Formula
- Vector Algebra
Business Communication
- What is Communication?
- Communication and its Types
- BCA 2nd Semester Syllabus (2023)
- BCA 3rd Semester Syllabus (2023)
- BCA 4th Semester Syllabus (2023)
- BCA 5th Semester Syllabus (2023)
- BCA 6th Semester Subjects and Syllabus (2023)
- BCA Full Form
- Bachelor of Computer Applications: Curriculum and Career Opportunity
Microsoft word is a word processor software developed by Microsoft in 1983. It is the most commonly used word processor software. It is used to create professional quality documents, letters, reports, resumes, etc and also allows you to edit or modify your new or existing document. The file saved in Ms Word has .docx extension. It is a component of the Microsoft Office suite, but you can buy it separately and is available for both Windows and macOS. The latest version of Ms Word is 2019. In this article we will learn the features of Ms Word, but first we learn how to open Ms Word?
How to open MS Word?
The following step shows how to open MS words:
Step 1: Type Ms Word in the search bar.

Step 2: Select Ms Word application.
Step 3: Select a blank document and press create button.

Then you will get a window like in the image below where you can write your content and perform different types of operations on that content, like font type, style, bold, italic, etc. You can also add images, tables, charts to your document.

Features of MS Word
Now let us discuss the features or components of the Ms Word. Using these features, you can perform different types of operations on your documents, like you can create, delete, style, modify, or view the content of your document.
It contains options related to the file, like New(used to create a new document), Open(used to open an existing document), Save(used to save document), Save As(used to save documents), History, Print, Share, Export, Info, etc.

It is the default tab of Ms Word and it is generally divided into five groups, i.e., Clipboard, Font, Paragraph, Style and Editing. It allows you to select the color, font, emphasis, bullets, position of your text. It also contains options like cut, copy, and paste. After selecting the home tab you will get below options:

It is the second tab present on the menu bar or ribbon. It contains various items that you may want to insert into a Microsoft word. It includes options like tables, word art, hyperlinks, symbols, charts, signature line, date and time, shapes, header, footer, text boxes, links, boxes, equations, etc., as shown in the below image:

It is the third tab present in the menu bar or ribbon. It is used for freehand drawing in Ms Word. It provides different types of pens for drawing as shown below:

It is the fourth tab present in the menu bar or ribbon. The design tab contains document designs that you can select, such as documents with centered titles, offset headings, left-justified text, page borders, watermarks, page color, etc., as shown in the below image:

It is the fifth tab present on the menu bar or ribbon. It holds all the options that allow you to arrange your Microsoft Word document pages just the way you want them. It includes options like set margins, display line numbers, set paragraph indentation, and lines apply themes, control page orientation and size, line breaks, etc., as shown in the below image:

7. References
It is the sixth tab present in the menu bar or ribbon. The references tab lets you add references to a document, then create a bibliography at the end of the text. The references are generally stored in a master list, which is used to add references to further documents. It includes options like, Table of Contents, Footnotes, Citations & Bibliography, Captions, Index, Table of Authorities, smart look, etc. After selecting References tab, you will get the below options:

8. Mailings
It is the seventh tab present in the menu bar or ribbon. It is a least used tab in the menu bar. This tab is where you would create labels, print them on envelopes, do mail merge, etc. After selecting mailing, you will get the below options:

It is the eighth tab present in the menu bar or ribbon. The review tab contains, commenting, language, translation, spell check, word count tools. It is good for quickly locating and editing comments. After selecting a review tab, you will get the options below:

It is the ninth tab present in the menu bar or ribbon. View tab allows you to switch between single page or double page and also allows you to control the layout tools It includes print layout, outline, web layout, task pane, toolbars, ruler, header and footer, footnotes, full-screen view, zoom, etc. as shown in the below image:

Please Login to comment...
Similar reads.

- School Learning
- School Programming
Improve your Coding Skills with Practice
What kind of Experience do you want to share?

- school Campus Bookshelves
- menu_book Bookshelves
- perm_media Learning Objects
- login Login
- how_to_reg Request Instructor Account
- hub Instructor Commons
Margin Size
- Download Page (PDF)
- Download Full Book (PDF)
- Periodic Table
- Physics Constants
- Scientific Calculator
- Reference & Cite
- Tools expand_more
- Readability
selected template will load here
This action is not available.
16.8: Assignment- Microsoft Word
- Last updated
- Save as PDF
- Page ID 18706
\( \newcommand{\vecs}[1]{\overset { \scriptstyle \rightharpoonup} {\mathbf{#1}} } \)
\( \newcommand{\vecd}[1]{\overset{-\!-\!\rightharpoonup}{\vphantom{a}\smash {#1}}} \)
\( \newcommand{\id}{\mathrm{id}}\) \( \newcommand{\Span}{\mathrm{span}}\)
( \newcommand{\kernel}{\mathrm{null}\,}\) \( \newcommand{\range}{\mathrm{range}\,}\)
\( \newcommand{\RealPart}{\mathrm{Re}}\) \( \newcommand{\ImaginaryPart}{\mathrm{Im}}\)
\( \newcommand{\Argument}{\mathrm{Arg}}\) \( \newcommand{\norm}[1]{\| #1 \|}\)
\( \newcommand{\inner}[2]{\langle #1, #2 \rangle}\)
\( \newcommand{\Span}{\mathrm{span}}\)
\( \newcommand{\id}{\mathrm{id}}\)
\( \newcommand{\kernel}{\mathrm{null}\,}\)
\( \newcommand{\range}{\mathrm{range}\,}\)
\( \newcommand{\RealPart}{\mathrm{Re}}\)
\( \newcommand{\ImaginaryPart}{\mathrm{Im}}\)
\( \newcommand{\Argument}{\mathrm{Arg}}\)
\( \newcommand{\norm}[1]{\| #1 \|}\)
\( \newcommand{\Span}{\mathrm{span}}\) \( \newcommand{\AA}{\unicode[.8,0]{x212B}}\)
\( \newcommand{\vectorA}[1]{\vec{#1}} % arrow\)
\( \newcommand{\vectorAt}[1]{\vec{\text{#1}}} % arrow\)
\( \newcommand{\vectorB}[1]{\overset { \scriptstyle \rightharpoonup} {\mathbf{#1}} } \)
\( \newcommand{\vectorC}[1]{\textbf{#1}} \)
\( \newcommand{\vectorD}[1]{\overrightarrow{#1}} \)
\( \newcommand{\vectorDt}[1]{\overrightarrow{\text{#1}}} \)
\( \newcommand{\vectE}[1]{\overset{-\!-\!\rightharpoonup}{\vphantom{a}\smash{\mathbf {#1}}}} \)
Microsoft Word Assignments
Follow the instructions on the accompanying links to complete the assignments:
- Part A: Do As You’re Told
- Part B: Outline
- Part C: Flyer
- Introduction to Computer Applications and Concepts Microsoft Word Week 1 Assignments. Authored by : Melissa Stange. Provided by : Lord Fairfax Community College. Located at : http://www.lfcc.edu/ . License : CC BY: Attribution
9 Microsoft Word Tips to Edit Your College Assignment Faster
Struggling to edit your college assignments efficiently? Here are some useful Microsoft Word tips to accelerate your editing process and save time.
Assignments at the college and university levels are research-heavy, and you’re often expected to produce write-ups with a significant number of pages. Just when you think you’re done with producing the required word count, the next step is equally challenging and time-consuming: editing.
From keyboard shortcuts to simple, built-in features such as Find and Replace and the automatic table of contents, here are several tips you can use to edit and format your college assignment more efficiently in Microsoft Word.
1. Leave Paragraph Spacing as Your Last Step
Let’s first start on the right track. When you have a 3,000-word essay or report ahead, it’s tempting to set double-spacing when you only write a few sentences or a paragraph at most. It gives the comforting illusion that you have done more work than you actually have.
But to be more efficient at the final editing stage, it’s best to leave paragraph spacing as your last step. This way, you save time because you don’t have to scroll up and down much more than you need to while navigating through different sections and pages of your text.
2. Learn to Utilize Keyboard Shortcut Keys
Keyboard shortcuts make editing and formatting much faster compared to using a mouse. For example, when you use your mouse to select some words, you’ll probably miss a letter or two and have to re-highlight, or overshoot and include a period when you don’t need to.
In this case, you can select text accurately by using Ctrl + Shift , and the left and right arrow keys in Windows. There are many more Microsoft Word keyboard shortcuts that will enable you to get most editing done on the keyboard, without having to switch to your mouse or trackpad. Don’t underestimate the amount of time you save with this method!
3. Hide the Headers and Footers
When you’re reading through a continuous body of text, the blank headers and footers may feel disruptive. To have a smoother reading and editing experience, hide the headers and footers to join all the pages together.
Hover your cursor over the gray space between your current page and the next, then double-click. When you need to use the headers and footers in Microsoft Word again, unhide them by hovering your cursor over the page separator line and double-click.
4. Collapse the Headings and Subheadings
For long report-style assignments, you’ll likely split your content into headings and subheadings. As you move from one section to the next, or jump between sections to rewrite and edit, make it easier to scroll through your text by collapsing the headings.
Hover over the heading title, then click the triangle icon that appears next to it to hide the content. If you want to hide all headings at once, right-click on any heading, and select Expand/Collapse > Collapse All Headings .
5. Automatically Sort References by Alphabetical Order
The works cited list is an essential section in any higher education assignment and is usually sorted by alphabetical order. You’ve likely added references to the list as you cite them in your essay, but when it comes to sorting at the end, it’s unfeasible and time-consuming to sort them manually. You can simply sort them automatically in Microsoft Word.
Select all your references and go to the Home tab. Under the Paragraph section, click the Sort icon (A and Z, with a downward arrow). In the Sort by field, choose Paragraphs . In the Type field, select Text . Then, select Ascending and click OK . The list will now be sorted by alphabetical order.
However, you might notice a couple of outliers. For example, when some references start with symbols instead of a letter, they will all likely be pushed to the very top. These are the few ones you’ll then need to manually reinsert into your list correctly.
6. Use Find and Replace to Avoid Spelling Mistakes
Whether they’re textbooks or journal articles, every student has probably encountered authors with surnames that are a little tricky to spell. Typing the name over and over for each in-text citation is prone to human error. To avoid misspellings, you can use Find and Replace.
First, use a unique abbreviation as a placeholder when you write your assignment. I recommend including a number in this abbreviation. This is because if your abbreviation only consists of letters, there’s a chance that this short combination of letters may have appeared elsewhere, as a part of a word, in your essay.
Once you’re done with the body content, it’s time to replace the abbreviation with the actual surname. In the Home tab, click Replace in the Editing tab. In the Find what field, type your abbreviation. In the Replace with field, type the actual author's name. Then, click Replace All . All your abbreviations will now be replaced with the correct author surname.
7. Insert Your Picture Into an Invisible Table
If you haven’t quite got the hang of formatting pictures in Microsoft Word, here’s a simple alternative that helps guarantee your image won’t cause your text to break up at weird places: insert your picture into an invisible table.
Go to the part of the text where you want your picture to appear. Press Enter to go to a new paragraph. Head to the Insert tab, click Table , and select one box to create a 1x1 table. With the cursor inside your table, click Pictures > Insert Picture > This Device to upload your picture into the document.
You can resize your picture within the table. Once you’re satisfied, highlight the table, go to the Table Design tab, click Borders > No Border . The black table border will then disappear. Your picture now appears to be perfectly fitted between two paragraphs of text.
8. Have an Overview of Multiple Page at Once
When you’re almost done editing, it’s best to scroll through all the pages to make sure there are no odd blank pages, separate sections, or incorrect image displays. But if you have more than 20 pages worth of content, scrolling through that much content quickly is just dizzying.
Instead, go to the View tab. In the Zoom section, click Multiple Pages . This zooms out your Microsoft Word document , so you can view two or three pages at once. You can also click the Zoom slider at the bottom right to zoom out even more and view more pages at once.
9. Automatically Create a Table of Contents
One of the final assignment components is the table of contents. If you’ve been manually keying in each heading, typing a line of periods that end with the heading’s corresponding page number, and double-checking the said page number yourself, it’s time to let Microsoft Word handle the task.
First, make sure you have applied the correct style to your headings. You can check this by clicking on each heading and see which style is selected in the Home tab. Then, number the pages of your Microsoft Word document .
Finally, go to the blank page where you want to insert your Table of Contents. Head to the References tab, click on Table of Contents , and select one of the Automatic Tables . Microsoft Word instantly generates a table of contents for you.
Improve Your Editing Process in Microsoft Word
By applying the above tips, you can revise your assignment more quickly and effectively without burdening yourself with eye fatigue. Cut down on the excessive scrolling and other manual tasks that can be done automatically by Microsoft Word.
Plus, saving time on editing means you have even more time to proofread and review your essays thoroughly, enabling you to produce higher-quality essays and reports.

22 Basic Microsoft Word practice exercises for beginners
- May 23, 2017

Microsoft Word Exercises for Practice: – This article is very important for a basic computer course, for college and school students learning Microsoft Word online and offline. In this, you will get the best ideas on how to learn and practice Microsoft Word. And you can explore the capabilities of Microsoft Word as a business software in this post.
The best way to learn anything is by doing exercises and creating samples of existing materials from experts. It’s ok that you know about Bold, Italic, Page Layout, Insert Menu, View options, etc. but it’s great if you can use such options in creating anything in Microsoft Word.
I mean tools are the same, but the field, seed, and process are changed. So, Can you do that with the same tools? I know farmers do it daily.
So, let’s explore how to learn Microsoft Word. Microsoft Word Exercises ideas that I think every student around the world should practice.
Microsoft Word practice exercises for beginners:
1. create and design admission/enquiry forms etc..
To create this kind of form, you need to use shapes, text boxes, colors, formatting options, tables, and horizontal lines in MS Word. This is a very good exercise to practice because it will give you an idea of how to use such options practically on various official documents that we use in our daily official life.
These days many people do not create forms and charts usually they download them. That makes the forms boring. And often you see similar kinds of formats in forms. But as a student or teacher or small business owner if you learn to create such forms not only do you expand your thinking and creativity but you can also utilize this ability in business and job.
See a sample in the image below.

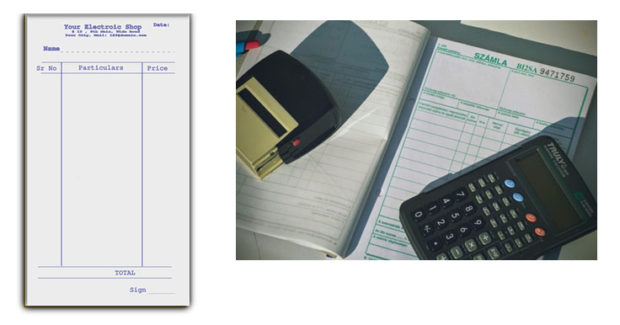
2. Create bills/leaflets/brochures. See the sample below.
Everyone has various designs of bills such as your refrigerator shopping bill, computer bill, electricity bills, and various other kinds of bills. So you can practice in Microsoft Word to create that type of bill format. It’s good for practice in which you will learn the Insert menu option, text adjustment between the table, page size, and text boxes.
3. Design E-book cover pages / Magazine front/ books front/back page using the cover page option in Insert Menu.
This practice is an advance. But try to find the books and magazine cover pages. And try to make it similar in MS Word. Imagine if you’re the designer, how you will design the same content or front page. You will learn while practicing this about the Cover Page option in MS Word or you can design without using that option. The benefit of learning this is about understanding the various practical uses of Microsoft Word in our daily lives.

4. Create Business Cards using Shapes, text, and colors.
People use Adobe Photoshop, Corel Draw, and websites to create business cards nowadays automatically and manually. You can also use that. But it’s about mastering MS Word options and skills. When you create and design anything in Microsoft Word. Your basic computer skills become strong. That helps you in the future when you start working on a Computer or MS Office or MS Word. Also, basic computer skills are very important before doing any degree course in IT. So, Design the business cards similarly you see in the below sample picture.

This is an advanced exercise, but if you do it and create cards then the options you’ve learned during your computer courses in MS Word remain forever in your brain.
Related: Importance of MS Word in Education
5. Use smart art and create organizational charts and showcase relations:
Smart Art is one of the favorite options in Microsoft Word. Smart art is used to draw diagrams that are used to showcase the content visually that will be easy to understand and manage. As you see below the smart art image Hierarchy Diagram is used to create an organizational chart or structure of the Telecom company.
This is the best method to understand and teach certain things to students, teachers, parents, and companies. You will see such organizational charts in the company’s office and government head offices.

Radial Cluster:
I have created this radial cluster diagram and organizational chart using Smart Art in Microsoft Word to showcase the difference between Managed WordPress Hosting and Shared Hosting” in one of the latest published posts. You can practice and create a similar chart to showcase the relation or useability differences.
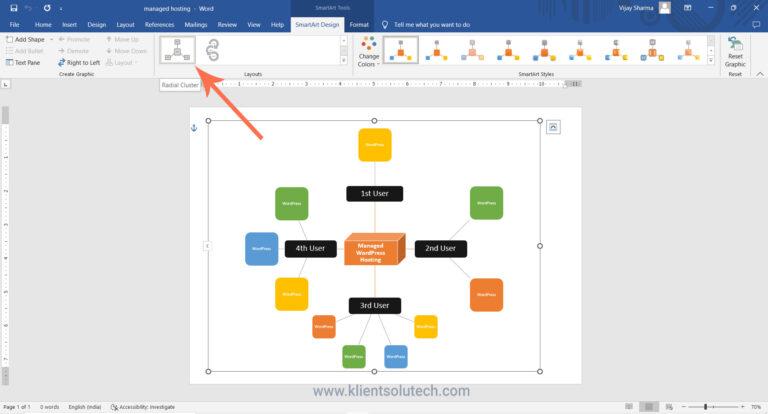
Structural Chart:

I hope that you can see (if not zoom in the browser using (Ctrl+ + ) both WordPress hosting and shared hosting smart images that are created in Microsoft Word.
When you practice MS Word Option to create the above diagram or any other, you get many problems. Those problems were not there while you were learning MS Word. These are the problems such as font size adjustment, lines adjustment, etc. colors, shape adjustment, etc. when you use tools or Word applications to communicate your point of view.
So, when you solve these problems by yourself or with the help of your computer course instructor it will be great for your computer knowledge and MS Office skills. Because when you solve the problem you learn very important working lessons in MS Word. This is why you’re learning.
Related: Steps to create a simple business plan using templates in Word App
6. Make book content page or index page
This is another idea in which you need to create an index or content page of the book. In this process, you will learn about the first-line indent, hanging indent, and the perfect use of the ruler bar in Microsoft Word.
And also about a page number, and a hyperlink (if it is an eBook). You can discuss this article with your computer teachers, to allow us or provide us with similar things to practice on.

7. Try to create a similar Header and footer that you’re seeing in the Book
This is the most important option and thousands of students find it difficult to use the header and footer. It’s easier to learn header and footer one time but if you’re not practicing it in various ways or the things such as books header and footer, it’s tough for you to explain it to others.
That’s why I am suggesting you try using the different styles of header and footer. And you will get such an example from the books.

8. Insert the Image into the shape
This is a little easy. But you must know easier things more than difficult things. Because in interviews especially related to IT, people ask easier questions than difficult ones.
So, practicing even on small things is also beneficial. You don’t know when it will be helpful for you in the future.
So, insert an image into the shape. Take and draw a shape from the Illustration menu, place it on a page a little higher in size, and then double-click on the shape. Go to the shape fill option and click on the picture. As an example, you can see the following image.

Related: – Top 10 powerful uses of Microsoft Word.
9. Practice hyperlinking and creating links between Word document texts to D: /, Play songs from Microsoft Word text, and create links between internal and external files.
This is the most important option in Microsoft Word. Most of the processes on the internet contain links. The hyperlink is the starting point in which you learn how things are connected.
It’s also a great option for Web Designers or web designing teachers to teach “How website links work” by using the hyperlink as an example.
As you can see in the image below, I am displaying the connection between the play song text to the location of the song.
Now you need to select the text in which have written the play song and then insert a hyperlink (Ctrl+K) and in the hyperlink address, put the path of the song. After that press, the Ctrl button and click on the blue link, so now any song that you selected will start playing.

Here is my complete article based on the Hyperlink option: – Hyperlink Example within Microsoft Word Document
10. Design a Happy Birthday Message by using Word Art and print it.
I think it’s the easiest thing for you. You can use the Word Art option for this. You can create the best wishes message in MS Word. After that, you can print. And give it to the person. It’s about creating small things at home. This is also a good way to make kids interested in learning the computer.
Also good for students and kids to create fun things and print or give them as a gift to parents. So, they will enjoy your creativity.

11. Create a chart and show the product price comparison between years:
The chart option is very important in Microsoft Word and Excel. However, the use of the chart option and any other option in MS Word depends on the demand for a certain content type.
For example, you’re writing a book or making notes about something in which you have to write and explain the price comparison between 3-4 years. Then you can use the chart for visualizations to analyze the data.
In visual format or the chart, it’s easier for people to understand, what you mean. Also, it gets more views or focus than the content.

So, try to create the chart you’re seeing in the above image.
12. Get the newspaper and see the text-based advertisement and Design
Design and create text or image-based advertisements that you saw in the newspaper. Designing such an advertisement will be a very beneficial role for Microsoft Word students or people learning Advanced Microsoft Word skills. Advertisement designs contain high-quality images, text, and layouts. And these designs are created by experts. When students practice expert material and create similar or better than that.
I think that movement is great for learners and teachers. So, try to create as many as you like. It will make you master MS Word. And I think doing exercises after completing the class topic is the best way to learn MS Word.

13. Take a double-column book or newspaper and design or create a similar paragraph style in the Word document .
Not all often type or create content in a double column. I know computer teachers can teach you such options. But they will not be able to explain the deepest or professional uses of such options for certain reasons.
So, I will suggest that you use the column option and find the newspaper similarly as you see below and create or type the text as you’re seeing in the newspaper. And if you’re having a problem, ask your teachers. So, when your teachers teach you how to do that thing or this thing, it will be great for your knowledge.
14. Create a letterhead or identity card of any company or institution that you have and insert the Watermark with that company name in the document.

You can create an identity card, visiting card or birthday card in MS Word. As you’re seeing below this is an example of cards and letterheads. But you can find such things. And practice your MS Word knowledge in creating an identity card, and letterhead.
This will give you an idea of how to adjust the text in different shapes and areas. Also, this is a good exercise in which you learn after printing, what size you need to adjust on the page. And when you do that, you learn very precious things in MS Word.
In this video tutorial, you will get basic ideas to create a letterhead. You will get ideas to insert letterhead content in the header and footer, you will also learn how you can use watermarks in letterhead, and how to print and adjust content on the page. The video tutorial is in Hindi, but even if you’re not familiar with the Hindi language, you can still learn and watch it for practice ideas:
Step by Step Guide to create printable letterhead in Microsoft Word and Google Docs
15. Decorate a Word document with a page border, and content border, add patterns, and write beautiful text in it.
This is the easiest page layout option, in which you can learn about page borders in MS Word, text borders, color or shading on the page, and pattern.
These options are very beautiful when you’re creating eBooks, making notes, and doing anything that requires the following type of style. See the image below and try to create something similar to this one.

16. Insert Images and Practice on Format Menu and Image Options.
You can use image options and style to decorate, retouch, and adjustment of colors and brightness in MS Word. As you can see, I have created various styles and image effects. These are easy to create.
But to learn more advanced effects later in other professional software, you need to learn and practice such things during your basic computer course.

17. Insert a template or download the new template in Microsoft Word from the Internet and edit those templates with your content.
There are 100+ templates almost for anything in the Microsoft Word Template option. The top benefit of using the template is that if you don’t know how to create or design a certain thing then you can just download the template and replace the existing text with your text. And it’s done.
This is the most important option that you should learn because it’s tough when you don’t know how to design or create anything, so try to practice on 10+ templates and see what it will look like.

Related: Uses and features of Microsoft Word.
18. Practice Typography
Write 10 lines or 10 sentences and then change the font, style, color, and size of each sentence. make each one different from than previous and next..
Fonts are the face of the text. The following image displays various fonts and styles. Just create similarly. During the practice, you will learn which font will be better for the specific text. Just write 10 lines and differentiate each one.

19. Create a Tenant management form in Hindi or your native language.
We use computers or technology mainly for two reasons the one is Innovation and the second is problem-solving. There are various ways of solving problems using computers. Some problems are solved immediately or some take time. For example, you can create an accounts management software to manage business incoming, outgoings, cash flow, balance, and taxes.
Similarly, there are software and mobile apps to manage tenants. I have created this form for my office space owner. He wanted a simple solution that they could follow and manage easily. They are not that much familiar with apps and other digital methods. I told them about digital options. But they want something that can be taken care of easily and also send tenants’ details for police verification when needed.
So we created the following form and this is also an example of immediate problem-solving using a computer and Microsoft Word. Now after printing one copy of this, they can photocopy it as per the number of tenants they want to manage.

So as beginners, you can try to create a similar form by using the Table feature in Microsoft Word. For the best practice 1st create and decide on columns on rough physical paper and the details that you want. You can create a better form than this and I expect that from you.
And for Hindi or your native language, even if you do not have Hindi font or French or Spanish font on your computer or in Microsoft Word. You can use Google Translate for this, convert the word into Hindi or Spanish, and then copy and paste it into the form table column.
20. Practice to design a brochure for an event
When you try creating this brochure design in Microsoft Word, you’ll learn basic and advanced techniques. This includes using image effects, grouping shapes, adding colorful bullets, and creating textures. These skills are valuable, especially if you plan to work with Word or as a virtual assistant. But even as a Word beginner, practicing these exercises is essential for building your Word skills.

Here you can watch a free video tutorial to learn brochure design : Brochure Design Practice in Microsoft Word | Word Exercise for Beginners | Hindi Tutorial
21. Learn and Practice creating business card designs in Microsoft Word
Today, there are plenty of software options available for creating business cards, such as online tools, Adobe InDesign, Corel Draw, Photoshop, Canva, and more. However, making a printable business card may seem straightforward but does involve some technicalities and creative flair.
As a student, it’s beneficial to tackle challenging and intricate design tasks in Microsoft Word, like this business card project. This practice will help you strive for excellence and mastery of Word skills. Consider it your 21st exercise towards becoming a Word expert.
Here you can watch a complete and detailed video tutorial on this: How to Create Modern Business Card Design in MS Word | Step-by-Step Detailed Tutorial
22. Practice to create a professional-looking certificate design
Practicing certificate design and Microsoft Word is essential because it empowers you with valuable digital skills that are increasingly relevant in today’s technology-driven world. By honing your proficiency in Microsoft Word, you not only gain the ability to create professional certificates but also enhance your competence in document formatting, layout design, and image manipulation. These skills have broad applications across various personal and professional tasks, making you more adaptable and capable in a digital environment.
Furthermore, practicing certificate design offers you a practical avenue for skill development while producing tangible outcomes. It allows you to create certificates for courses, achievements, or even for your own business, helping you develop an eye for aesthetics, attention to detail, and the ability to produce polished documents. Overall, this practice not only enhances your digital competence but also provides you with a versatile skill set that can significantly benefit your personal and professional growth.
By creating and practicing below certificate design below, you will be able to explore various design options to create a professional-looking certificate. This is just a sample but along with this design, you can take it’s design to the next level.

If you want to learn how you can do it please follow this step tutorial: How to create a professional-looking certificate design in Word | Step-by-Step Tutorial in Hindi
I think if you practice Microsoft Word by working on these exercises then it will be enough to make you above average among all the students around the world doing basic computer courses or learning Microsoft Word.
Because after learning Microsoft Word, you have to work with professionals or in companies. And almost all official works are related directly and indirectly to the above exercises.
So, this is the best method to learn Microsoft Word by doing exercises. And this is about practical knowledge.
I hope these Microsoft Word Exercises ideas will be helpful for you. To learn more visit: Top 10 Basic and Advanced Microsoft Word skills
How useful was this post?
Click on a star to rate it!
Average rating / 5. Vote count:
No votes so far! Be the first to rate this post.
We are sorry that this post was not useful for you!
Let us improve this post!
Tell us how we can improve this post?

Vijay Sharma
Hi, Welcome to my personal blog, Klient Solutech, where I share insights, strategies, trends, and observations on the dynamic world of Technology, Digital Marketing and Web Development.
Related Posts
Simple process to create engaging presentations in powerpoint.
- November 21, 2023
How to learn Microsoft Office Online at Home
- October 9, 2023
5 Best CRM Software to build intact customer relationships
- July 7, 2023
good practical please send more practical in winword. Thanks
These are good Practical exercises. Please send list of practicals of MS Word in Vocational IT NSQF level-1 subject code-402 class IX
please send a book which covers exercises like this
Great content! Thanks for putting this out there!
This is very nice
I have recently joined a Private Computer classes at the age of 53. Can you guide me through WORD, EXCEL, POWERPOINT & INTERNET
Is it possible for you send step by step Assignments for all the above 4 courses, so that I can evaluate whether I am learning properly or not ?
Hi, That’s a very good concern as a student “whether I am learning properly or not” I think 80% students ignore this. I will contact you by email. Age is not a problem. I expect you have strong reason or specific task or goals to learn all these three + internet in this age. Yes, I can evaluate through giving you assignment and testing it.
Leave a Reply Cancel Reply
Your email address will not be published. Required fields are marked *
Name *
Email *
Save my name, email, and website in this browser for the next time I comment.
Post Comment
Search for: Search Button
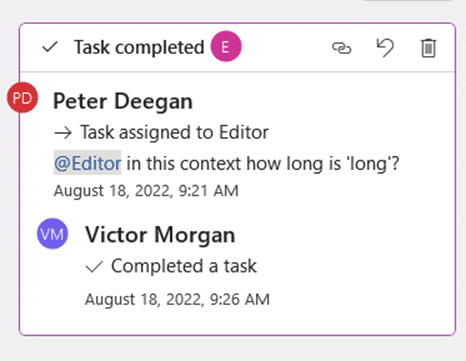
How to Assign Tasks in Microsoft Word
People working on a shared Word document can now assign tasks ‘To Do’ within the document, then mark a task as resolved or even reassign it. Here’s how Assign Tasks works and who gets it.
Assigning Tasks is an extension of the existing Comments feature for shared documents. When you use an @mention for someone else in your team or group, a new ‘Assign to:’ option appears like this.
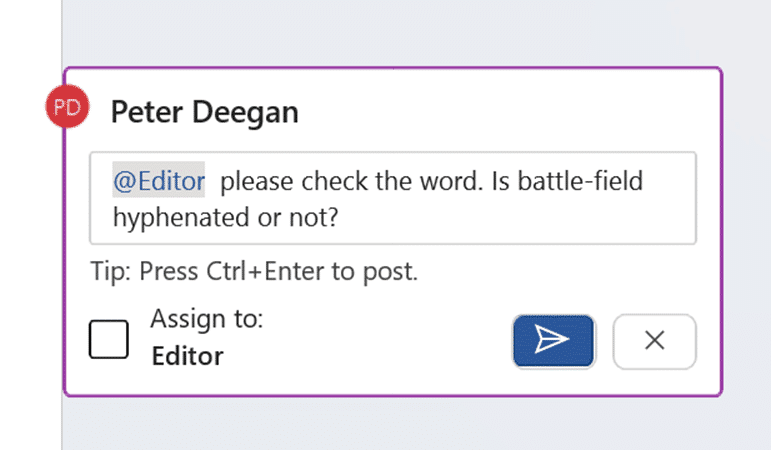
Check that box and the comment becomes a task as well, listed above the comment.
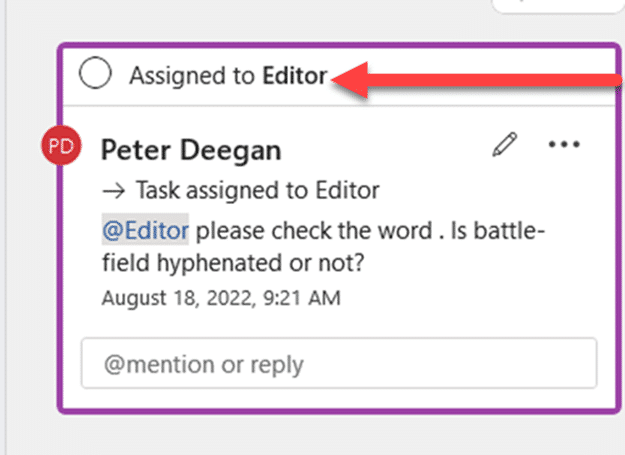
The person assigned the task gets an automatic email to notify:

Assign a task to yourself by @mentioning your own name then assigning the task.
Task is separate from the comment thread
Keep in mind that the task is separate from the comment thread, even though it doesn’t seem that way.
A Task can be marked as ‘Resolved’ while the comment messages continues.
Resolve or Complete a Task
Each Task can be marked as ‘resolved’ separately from the thread itself by clicking on the circle “Assigned to”.
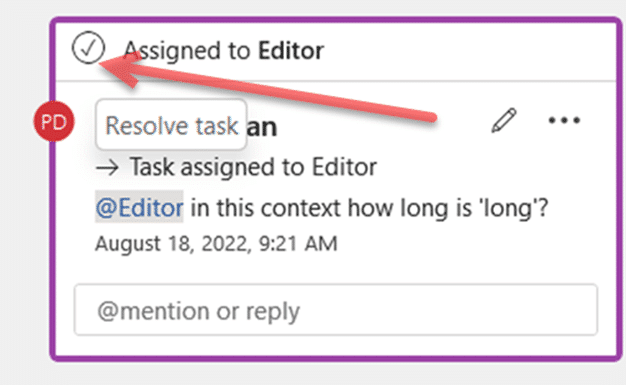
The task then shows as completed with a comment added showing who tagged ‘completed’.
Reopen or resume a Task
If the task still needs work, click the Undo button to Reopen the task.
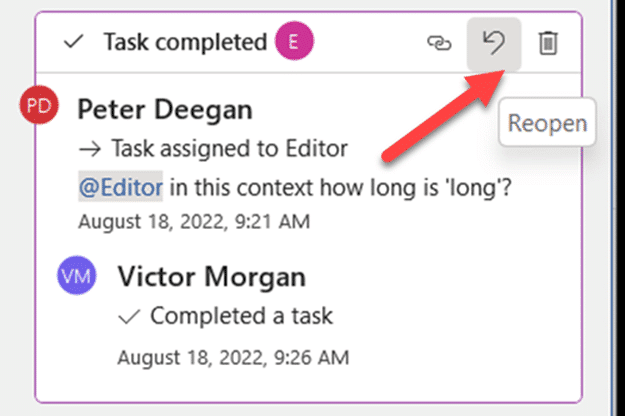
Or click the Trash Can icon to delete the task entirely.
Reassign a Task
A task can be reassigned to someone else. Add another comment with a new @mention, that will create an optional ‘Reassign to’ prompt.

More to come?
Tasks in Word docs seems like just the start of another extension of Microsoft 365 integrations.
There are already plans for Assign Tasks in upcoming Excel. PowerPoint can’t be far behind.
We were surprised that assigned tasks aren’t added to the person’s Microsoft To Do app. Or even just a link in the email to add the task to To Do. Surely that’s on Microsoft’s own development To Do list?
A summary list of assigned tasks should appear in the document. Perhaps a list of comments that can be filtered to show tasks, completed or not.
With better ‘in document’ task displays, there should be room for solo users to make their own ‘To Do’ list within a document. A great way to manage content in a long or complex doc.
Who gets it?
The Word document has to be saved on OneDrive or Sharepoint, according to Microsoft. We could only get Assign Tasks working on SharePoint, at the time of testing.
Assign Tasks is currently in Word on the web plus two beta releases
- Word 365 for Windows v2206 build 15321.10000 and later
- Word 365 for Mac, v16.66 build 22090700 and later
As usual, it’ll spread to preview and public releases in coming months.
The same feature is also in development for Excel 365 on the web plus for Windows and Mac.
One person Comments in Word Dictate your comments into a Word document Like👍button now in Word Comments
About this author

Office-Watch.com
Office 2021 - all you need to know . Facts & prices for the new Microsoft Office. Do you need it? Office LTSC is the enterprise licence version of Office 2021.
Office 2024 what's known so far plus educated guesses. Microsoft Office upcoming support end date checklist.
Latest from Office Watch
- Immersive Reader in Word for Windows, Mac and iPad
- Presenter Coach makes for better PowerPoint presentations
- Word changes a Paste Text option
- Paste Text Only gets a Word shortcut and confusion
- Try a faster Microsoft 365 secure login
- Use free Copilot to summarize Word documents
- Ear 👂 symbol in Word, Excel, PowerPoint and Outlook
- Great image Resize options now in Windows
- Making pictures smaller - some more options.
- Use the Force with your PowerPoint & online backgrounds
- Star Wars look in Word and PowerPoint
- Happy Star Wars Day - with Microsoft Office
- How to save an Outlook attachment without knowing it
- Two ways to pay for Copilot with Microsoft Office
- PowerPoint trim video reaches the web
- PowerPoint video audio compression tricks and traps
- What is ‘grounding’ in Copilot?
- Import EML MSG and OFT files with Outlook (new)
- The Outlook setting everyone should check
- Microsoft Teams is changing its name to … Teams
Templates for college and university assignments
Include customizable templates in your college toolbox. stay focused on your studies and leave the assignment structuring to tried and true layout templates for all kinds of papers, reports, and more..

Keep your college toolbox stocked with easy-to-use templates
Work smarter with higher-ed helpers from our college tools collection. Presentations are on point from start to finish when you start your project using a designer-created template; you'll be sure to catch and keep your professor's attention. Staying on track semester after semester takes work, but that work gets a little easier when you take control of your scheduling, list making, and planning by using trackers and planners that bring you joy. Learning good habits in college will serve you well into your professional life after graduation, so don't reinvent the wheel—use what is known to work!
How-To Geek
6 features i'd love to see in microsoft word.
A few small additions would make a huge difference.
Quick Links
- An Automatic Quick Access Toolbar
- Removing (and Adding) Blank Pages
- Instant Saving
- More Excel-Type Function User-Friendliness in Tables
- Add Attachments to Mail Merge
- Better Image Integration
With its many features to support you when creating and editing documents, Microsoft Word is a powerful word processor. However, as a daily user of the desktop version of the software, there are some features that I've hoped would be added for many years—but my wishes are yet to be granted.
1. An Automatic Quick Access Toolbar
Microsoft's Quick Access Toolbar (QAT) is a great way of adding those features and functions that you use frequently to your toolbar at the top of your Microsoft Word window. For example, to speed up my work as a proofreader, I created macros and added these two buttons to my QAT to automatically make certain formatting changes every time I open up a Word document created by somebody else.
You can also quickly access most of Word's functions through the search box at the top of the window.
While these are both certainly useful ways to make things happen without having to trawl through Word's many menus, they both come with their problems.
Using the QAT is great if, like me, you only have a couple of icons to choose from, but if there are lots of things you do on a regular basis on Microsoft Word, your QAT can quickly become congested and confusing. That ultimately slowing you down as you try to remember which icon is the one you need to click. Equally frustratingly, the QAT isn't available on Microsoft Word for the web.
The search bar is only useful if you know the best keywords to type to find the feature you're looking for, and the Recently Used Actions and Suggested Actions that pop up when you click the search bar don't seem to represent reality.
To rectify this issue and speed up your work, Microsoft Word should have an extra tab on the ribbon, called Frequently Used Actions, that syncs between both the paid desktop app and its web-based counterpart. This alternative to the QAT would automatically log the tools you use more often in Microsoft Word, and make them available automatically without you having to manually add them to a toolbar, search for the function, or learn the keyboard shortcut.
2. Removing (and Adding) Blank Pages
There are various reasons for there being a blank page in a Word document, ranging from empty paragraph markers to hidden page or section breaks. You can use the Show/Hide icon (¶) to see if there are empty paragraph markers, and this will certainly go some way to helping you identify the source of the blank page.
The most problematic cause of a blank page for me, however, has been Microsoft Word insisting on there being a paragraph marker after a table.
As you can see in the screenshot above, after creating my table, clicking ¶ reveals that a new page has been created, even though this is the end of my document and I don't want a new page. As a result, to remove the extra page, I would have to change my font or line and paragraph spacing options, or adjust the page borders. And you can tell your printer not to print page 2 of your document, but it shouldn't be necessary to have to remember to do this.
The ideal solution to this issue would be for Microsoft to insert a Remove Blank Page option in the Layout tab on the ribbon.
You might also find situations where it would be useful to add a blank page to your document. While you can do this by adding a page break, because they're invisible unless you click "¶", sometimes it's easy to forget that they're there. So, as well as adding the option to remove the blank page, Microsoft should also consider having an Add Blank Page icon, too.
3. Instant Saving
Microsoft's AutoSave is a really handy safety net, as it automatically saves your work to your OneDrive . This means that you don't have to press Ctrl+S before closing your Word document, and if your computer suddenly shows you the blue screen of death , you can be confident that your work is sitting in the cloud, ready for you to continue once your PC has recovered.
But there's a catch. If you haven't initially saved your document, it won't be uploaded to your OneDrive, as Word will regard your document as a draft until you give it a name and save it to a folder.
As you can see in this example, I haven't given the document a name, so AutoSave is turned off, even though I have started to add text. If my computer were to require a spontaneous update, I'd lose this work.
As a workaround to this issue, it would be really handy if new Word documents were to save automatically as soon as they're created, even if named according to the first three or four words you type onto the page. What's more, with today's AI age, it would be even more useful if Word could scan your document, give it an appropriate name, and save it to a folder in your OneDrive where other similar documents have already been uploaded. But maybe that's pie-in-the-sky territory.
4. More Excel-Type Function User-Friendliness in Tables
You can use around 20 basic calculation formulas in tables on Microsoft Word , including =SUM, =AVERAGE, =COUNT, and =ROUND. But there's still a long way for Microsoft to go in this area.
First off, when you launch the Formula window after creating your table, there's no way for you to know which functions you can and cannot use. Unlike in Microsoft Excel, which offers formula suggestions when you start to type them into a cell, a very basic dialog box appears on Word, ultimately limiting what is actually a potentially really useful feature.
What's more, because there are no cell references on Word's tables, you have to type ABOVE , BELOW , LEFT , and RIGHT , which just seems cumbersome and less reliable.
And there's another issue (and it's a big one). If you change any of the values in the table, the calculations won't update automatically. Instead, you have to press Ctrl+A (to select all the functions) and F9, and it's very easy to forget to do this.
I'd really like to see Microsoft bring Word and Excel closer in this regard. When you create a table, the cells should be headed with column letters and row numbers, you should be given more of a clue which formulas you can use (and you should be able to use more), the formula syntax should be identical to what you'd type in Excel, and the formulas should update automatically if the data they rely on changes.
5. Add Attachments to Mail Merge
Word's Mail Merge tool is great for distributing the same copy of a document or email to many people but with certain elements personalized for each recipient, such as their name at the top. Let's say you want to send a personalized wedding invitation email to 100 friends and family, and you want to attach the itinerary to your email. While you can, indeed, send that personalized invitation through Word's Mail Merge, there are no easy ways to attach your itinerary. Instead, you'd have to install an add-in—which can work intermittently or pose a security risk—or create a complex macro—which takes a great deal of time to learn how to do.
I guess a lot of people would benefit greatly from the simple addition of an Add Attachment button to the Mail Merge dialog box in Microsoft Word—I know it'd make me very happy!
6. Better Image Integration
When you add images to a Word document , they can be frustrating to position and control, and often lead to layout changes in your work. Sometimes, it's difficult to know which option to choose when you right-click the image and select "Wrap Text," and selecting the wrong one can lead to the text behaving erratically around the image.
Also, if you add a large image to your document, this can significantly slow down its processing speed.
As an experienced Word user, I can adjust the settings and, ultimately, find ways to have the image behave how I want it to, but it shouldn't be that difficult. Things would be so much easier if, when you insert an image, a dialog box appeared before you see the image appear in your document, giving you options such as where and how you want the image to be placed among your words.
Ultimately, I'm a big fan of Microsoft Word and use it daily without any issues. But having these few extra features added would make my life a lot easier.

May 17, 2024
Add a border to a page in Word for iPad
Harshit Jain
- Add our blog to your RSS feed reader" href="/rss/blog.xml" data-bi-name="RSS Subscription" data-bi-id="rss_feed" data-bi-bhvr="120" data-bi-socchn="RSSSubscription" title="Microsoft 365 Insider Blog RSS" target="blank" class="d-inline-block">
Hey, Microsoft 365 Insiders! My name is Harshit Jain, and I’m a Product Manager on the Word team. I’m excited to share with you an important update to Word for iPad that will allow you to add a border to a page, making the document more structured and visually appealing.
Now you can enhance the appearance of your documents with Page Layout features in Microsoft Word for iPad. The Page Border feature allows you to improve readability and increase audience engagement by adding professional-looking borders to your reports, essays, presentations, and more.
How it works
1. Open an existing document or create one in Word for iPad and select Layout > Page Border .

2. Select a preset border style from the Presets menu option.

3. Or you can create your own border style by selecting the Custom menu option and picking the type, weight, style, and color.

After you’ve made your selection, the page border will show up automatically in your document.
Tips and tricks
- Fine-tune every aspect of your page border with user-friendly customization tools. Adjust the line thickness, pick from a variety of color schemes, and even add styles to achieve the perfect look for your document.
- Take advantage of Page Border’s responsive design functionality, allowing you to seamlessly adapt your borders to different document sizes and orientations. Whether you’re working on standard letters, legal documents, or creative projects, the borders remain visually appealing and consistent.
Availability
This feature is available to Microsoft 365 Insiders running iOS Version 2.76 (Build 23073006) or later.
If you have any feedback or suggestions, tap your profile photo, tap Help & Feedback , and then tap Tell Us What You Like or Tell Us What Can Be Better .
Sorry, JavaScript must be enabled to use this app.

Microsoft Learn Q&A needs your feedback! Learn More
May 20, 2024
Microsoft Learn Q&A needs your feedback!
Want to earn $25 for telling us how you feel about the current Microsoft Learn Q&A thread experience? Help our research team understand how to make Q&A great for you.
Find out more!
Teams Forum Top Contributors: EmilyS_726 ✅
May 10, 2024
Teams Forum Top Contributors:
EmilyS_726 ✅
Contribute to the Teams forum! Click here to learn more 💡
April 9, 2024
Contribute to the Teams forum!
Click here to learn more 💡
- Search the community and support articles
- Microsoft Teams
- Teams for education
- Search Community member
Ask a new question
If I turn in a word assignment on teams and edit it after as it is still turned in, does the teacher know?
- Subscribe to RSS feed
Report abuse
Reported content has been submitted
Replies (2)
- Microsoft Agent |
Dear hshshsshsh,
Good day. Thank you for posting to Microsoft Community, and we are happy to help you.
As per your description, you want to know whether your teacher can see your changes to the submitted Word.
If you edit a Word assignment after turning it in on Teams, the teacher will be able to see the edited version. However, the teacher may not receive a notification for the edit, so it's best to communicate with him directly if you make any changes to your submitted assignment. We have the specific function called Turn in again, it provides you turn in again if you make changes.
Let me know if you have any questions. Have a nice day!
Claire | Microsoft Community Moderator
Was this reply helpful? Yes No
Sorry this didn't help.
Great! Thanks for your feedback.
How satisfied are you with this reply?
Thanks for your feedback, it helps us improve the site.
Thanks for your feedback.
Yes, I handed in an assignment by the due date but It is not as good as I would want. so as long as my teacher hasn't looked at my work yet or marked it can i edit it and get away with her marking my better work?
Or will she get notification or something that I edited this and that. or just That I edited but she doesn't what or how long.
so I guess long question short.
What does my teacher know about me editing the doc. If she has not looked at it yet?
Question Info
- Assignments
- Edit or delete assignments
- Norsk Bokmål
- Ελληνικά
- Русский
- עברית
- العربية
- ไทย
- 한국어
- 中文(简体)
- 中文(繁體)
- 日本語
- Newsletters
IE 11 Not Supported
Microsoft deal makes khan academy's ai assistant free for teachers, microsoft is giving k-12 teachers in the u.s. free access to khan academy’s ai assistant, which can help students practice lessons and help teachers devise lesson plans, quizzes and assignment instructions..

Microsoft Edge for Business: Revolutionizing your business with AI, security and productivity
- Lindsay Kubasik
Safe browsing is more important than ever as today’s digital landscape sees increased hybrid work, growing SaaS adoption and AI integration into daily workflows. It can be a challenge to ensure your organization’s data is protected, no matter the device or user location.
To accomplish this, you need a browser designed to fit your needs, and that’s where Microsoft Edge for Business can help. It’s a secure enterprise browser, optimized for AI, and built for the unique challenges you face today. By tapping into the power of the Microsoft security stack, Microsoft 365 and Copilot with commercial data protection, Edge for Business secures sensitive data, while helping accelerate productivity.
Learn more about the innovations we are sharing at Build today:
Security & AI
Reduce browser data exfiltration with expanded screenshot prevention across more apps and AI tools
Improved leak protection in sensitive word, excel and powerpoint documents in edge, easily keep your estate up-to-date with edge management service, extend mda protections to edge sessions on unmanaged devices.
- Make Edge your own with organization branding
Productivity & AI
Get multiple AI services under control with Edge management service
Get videos translated in real time with edge.
- Browse together with Workspaces – now with AI and on mobile
Keep your browser tidy with tab auto-grouping
- Watch Edge for Business: secure, productive, optimized for AI
With a simple screenshot, it can be easy for your organization’s data to be exfiltrated to another party or shared with AI. To help stop this, we’re excited to announce that the data leak control capabilities in Edge for Business are expanding to support screenshot prevention policies. When these policies are set, screenshot attempts while using Edge on desktop will be prevented by showing a black screen instead of the protected content. This protection also applies to Copilot in the Edge sidebar so prompts and responses in Copilot cannot be captured by screenshot. These policies can be set across Microsoft 365, Microsoft Defender for Cloud Apps (MDA), Microsoft Intune Mobile Application Management (MAM) and Microsoft Purview. This will give your organization additional protection to help keep sensitive data from leaking.
Edge for Business support for screenshot prevention will become available in the coming months.
We’re also expanding the ability for Edge for Business to honor usage rights restrictions on Word, Excel and PowerPoint files marked as sensitive. You can now limit the ability for Copilot to reference highly sensitive content via sensitivity labels, as well as restrict screen capture. These advanced restrictions from sensitivity labels have not been possible in any browser until now. This expanded protection will allow Edge to take full advantage of the settings you can already apply to these documents in the desktop apps. It also builds on the editing, printing and copying protections already available in Edge today. With this exclusive and native browser support, you can have a greater peace of mind that your sensitive data has more safeguards when using Edge for Business.
This will be available in the coming weeks.
Ensuring that all browser instances are up-to-date is essential to defend against threat actors. Here’s how we’re making it easier than ever for you. The Edge management service was launched as a reimagining of how browser management and configuration should work for you. We’re continuing to invest in simplifying IT workflows and are excited to share that you can now get a single view into managed Edge instances. You can easily know which instances are up-to-date or not. If you need to enforce actions from there, you can schedule a one-time update or send a recommendation to the user to update their browser to prevent workflow interruptions. You can also add extra browser protections, such as disabling just-in-time JavaScript compilation, by turning on enhanced security mode. With this consolidated view of your Edge instances, you can stay ahead of threats and reduce vulnerabilities on your managed devices.
This will be available in public preview in the coming weeks.

With the rise of hybrid work, you may have noticed more unmanaged devices accessing your network. To help protect your data in Edge beyond managed devices, we have enabled unmanaged device support with Intune MAM to provide app protections and the ability to wipe organizational data.
To bring you even more protection, Edge for Business now has native support for session policies with MDA. This provides granular controls over site protections that let you take actions such as blocking or monitoring file downloads and uploads, clipboard actions and printing on unmanaged devices. These policies will be applied directly to users signed into Edge with their Entra ID. This will achieve better performance since there is no need for the proxy used in other browsers. And with no need for JavaScript-based enforcement controls, you gain better WebApp compatibility and more compliance for work resource access.
This is available in public preview today.
Make Edge for Business your own with organization branding
It’s hard work configuring your browsers to protect your data and provide a unified experience for your organization. To help this, you can customize Edge for Business to make it your own by applying your organization’s branding. Through the Edge management service, you can add your company name, color and logo to customize the look and feel. With visual cues in the profile pill, profile flyout and taskbar icon, your users will know that they are working in the browser you’ve configured to maximize their productivity and safety.
This is available today.
With the Edge management service, you have a one-stop-shop for managing AI in Edge for Business. Within a configuration profile, you can block public AI services that may not be compliant for your organization and also have fine-tune control over Copilot, such as enabling or disabling Copilot from accessing page content. You can also manage the browser’s AI features outside of Copilot, such as enabling or disabling text predictions, “Find on page” suggestions for websites, or AI generated themes.

There’s more video content available than ever, but much of it is inaccessible to large parts of the population due to language barriers and hearing disabilities. Real-time video translation uses AI to translate videos into available preferred languages in real-time through audio dubbing and/or subtitles. With just a few clicks, you’ll be able to open the door to watching many more video across a variety of languages. Simply click on the translate icon, select the current and preferred language, and let AI do the rest.
Real-time video translation is coming soon to popular video websites such as YouTube, LinkedIn, Reuters, CNBC News, Bloomberg, Coursera and more. It’ll be available from English to German, Hindi, Italian, Russian and Spanish, and from Spanish and Korean to English, with additional languages and video websites coming in the future.
Learn more here .
Stay organized with Workspaces – now with AI and on mobile
Workspaces help you organize your tabs by project, so you can quickly pull up a browser window with all the related tabs saved together. And now, Workspaces are getting even better with AI. Copilot and Bing search can create a workspace with pre-populated tabs to help you get started on your projects. In Copilot in Edge, simply type “Create a workspace for,” followed by the topic of your choice, and your workspace is automatically created with a selection of suggested websites. You’ll also see a pop-up box to help you create a workspace when you search your topic in Bing.
Now, you can kickstart your projects more easily while knowing that your work will be automatically saved and kept up to date. Creating a workspace through Bing search is available in preview today, and creating a workspace through Copilot will be available in preview soon.
And in addition to AI, Workspaces will be coming to mobile, so you can take your workspaces with you wherever you go. Workspaces will be in preview for Android mobile devices in the next few months.
If you’re someone who always has lots of tabs open across different topics and interests, we’ve got a fast and easy solution for you. Announced last year, tab auto-grouping uses the power of AI to automatically group your browser tabs by theme with group names and colors to differentiate them. You can either select “Organize tabs” in the tab actions menu or ask Copilot to do it for you. Find your important tabs with ease today!
AI is becoming essential for work to keep pace in today’s digital world. Microsoft Edge for Business is here as your secure enterprise browser, optimized for AI. Check out the announcements to learn more about Copilot with commercial data protection, and refer to this short video for security configuration options for Edge for Business and AI. We appreciate your feedback. We’re inspired by you, our customers, to keep improving Edge for Business so it’s the best browser for your organization.
Watch the video:
Assignments
Create an assignment in Microsoft Teams
Assign quizzes in Microsoft Teams
Turn in an assignment in Microsoft Teams
View and navigate your assignments (student)
View and navigate your assignments (educator)
Manage assignments on a mobile device
Grade, return, and reassign assignments
Delete an assignment in Microsoft Teams
Add a tag to your assignment
Adjust assignment settings in your class team
Assign work to multiple classes at once
Create group assignments or assign to individual students
Create and manage grading rubrics in Microsoft Teams
Collaborate with other educators on a form or quiz
Edit an assignment in Microsoft Teams
Schedule work to assign later
Save an assignment as a draft in Microsoft Teams
Repost an assignment in Microsoft Teams
Add MakeCode activities to assignments in Microsoft Teams
Send weekly assignment summaries to parents and guardians
Turn-in celebrations in Microsoft Teams assignments
Use Turnitin with Microsoft Teams
Edit Word documents in Teams for Education
Use OneNote Class Notebook in Teams
Review student work in Class Notebook
Provide written, audio, or video feedback in Class Notebook
Deleting and restoring a OneNote Class Notebook that's linked to a Microsoft Teams assignment
Assign quizzes from Microsoft Teams without affecting individual Forms limits

Need more help?
Want more options.
Explore subscription benefits, browse training courses, learn how to secure your device, and more.

Microsoft 365 subscription benefits

Microsoft 365 training

Microsoft security

Accessibility center
Communities help you ask and answer questions, give feedback, and hear from experts with rich knowledge.

Ask the Microsoft Community

Microsoft Tech Community

Windows Insiders
Microsoft 365 Insiders
Was this information helpful?
Thank you for your feedback.
- College Football
- Football/Soccer
- Motorsports
- Pro Wrestling
- Baltimore Orioles
- Boston Red Sox
- New York Yankees
- Tampa Bay Rays
- Toronto Blue Jays
- Chicago White Sox
- Cleveland Guardians
- Detroit Tigers
- Kansas City Royals
- Minnesota Twins
- Houston Astros
- Los Angeles Angels
- Oakland Athletics
- Seattle Mariners
- Texas Rangers
- Atlanta Braves
- Miami Marlins
- New York Mets
- Philadelphia Phillies
- Washington Nationals
- Chicago Cubs
- Cincinnati Reds
- Milwaukee Brewers
- Pittsburgh Pirates
- St. Louis Cardinals
- Arizona Diamondbacks
- Colorado Rockies
- Los Angeles Dodgers
- San Diego Padres
- San Francisco Giants
Sports. Honestly. Since 2011
Tampa bay rays designate veteran right-hander for assignment, activate former top prospect.
- May 22, 2024
Chris Drosehn

The Tampa Bay Rays started the season off on a sour note but recently have clawed back to .500. They’ve faced plenty of injuries, particularly in the pitching department, where they have almost a full rotation on the shelf. The Rays feature a staff that’s in the bottom third of the league in terms of performance. What was the usual promising season from the Rays quickly derailed. They are getting a piece that they lost recently back in a promising right-hander, Ryan Pepiot . To make room for Pepiot, the Rays have designated veteran right-hander Erasmo Ramirez for assignment.
Ryan Pepiot Returns
Pepiot, 26, proved to be a boost to a Rays rotation that has lost the likes of Drew Rasmussen , Jeffrey Springs , and Shane McLanahan over the past year. He landed on the IL with a leg contusion after taking a comebacker off his leg from Starling Marte back on May 8th. With Zach Eflin hitting the IL recently as well, the Rays will hope to get some semblance of stability from Pepiot’s return.
The right-hander came over from the Los Angeles Dodgers in the trade for Tyler Glasnow and Manuel Margot . He has proven his bit of hype correct so far, ranking as high as No. 70 on MLB’s Top 100 and sixth in the Dodgers organization. He’s pitched to a 3.68 ERA across 36.2 innings, failing to go six innings in two of his seven starts.
Pepiot has found some level of dominance on the mound as well. Of starters that have thrown at least 30 innings this season, he’s 13th in K% at 29.1%. He’s ninth in WHIP at 0.93. He limits the traffic and should see the ERA head in the right direction as he returns against the Red Sox on Wednesday.
Erasmo Ramirez Designated for Assignment
An old friend of the Rays in Erasmo Ramirez has found his way off the roster this season. Ramirez is your typical journeyman pitcher who found a role in the bullpen but has recently had a tough time as he continues through the back end of his career. Ramirez, 34, is in his second stint with the Rays.
He’s covered 15 innings this season and pitched to a 4.20 ERA. What is troubling is he’s given up three homers and has only struck out eight batters. The lack of swing and miss has always been a factor for Ramirez. Unfortunately, it’s given him issues outside of the beginning of his career with the Rays and his time with the Washington Nationals in 2022. Ultimately, it’s the walks that have likely led to this decision. Ramirez has a walk rate of 9.1%, and that just won’t fly in the bullpen.
Time will tell if Ramirez’s career is over, but he may still have a stop or two left after this.

A Closer Look at the Yankees Outfield Prospect Hitting Lasers at Double-A
New York Yankees outfield prospect Jared Wegner is pushing forward with a solid display of tools and statistics to back up his profile. Wegner is

Analyzing Aaron Judge’s Huge Turnaround
Less than a month ago, Aaron Judge was already being written off by much of the baseball world. Those skeptics couldn’t have been more wrong.

Former Chicago Cubs Top Prospect Brennen Davis Is Obliterating Triple-A Pitching
There was a time when outfielder Brennen Davis was the Chicago Cubs top prospect in their farm system. This was before injuries derailed his progress

Reds Getting (Literally) Hit with Injury Bug
The Cincinnati Reds are now facing another player getting hit by a pitch and going on the injured list. It’s turning into a theme around
Send Us A Message
IMAGES
VIDEO
COMMENTS
Microsoft Word is a word processor developed by Microsoft. It was first released in 1983 under the name Multi-Tool Word for Xenix systems. MS Word is a popular word-processing program used primarily for creating documents such as letters, brochures, learning activities, tests, quizzes and students' homework assignments.
Word 11 Formatting. ★★★★★. Kendall Myers November 15, 2017. In this practice project for Word, students create a document similar to a test or quiz. They must include points and subpoints, blanks, boldfaced text, tabs, and spacing. …. 1 2.
If you like this video, here's my entire playlist of Word tutorials: http://bit.ly/2FY6NVTLearn the basics of effectively using Microsoft Word, including how...
Microsoft applications and systems including Access, Excel, OneNote, Outlook, PowerPoint, SharePoint, Windows, and Word. A former small business owner and recovering workaholic, she has worked for over 36 years with Microsoft and Microsoft technologies and for over 26 years in the training and certification industry.
Are you a student or a teacher struggling with creating assignments in MS Word? Look no further! In this video, we'll provide you with a comprehensive guide ...
Microsoft Word for Beginners. 1.5 hours . Updated: 05/21/2018. This is a basic computer workshop. Microsoft Word is a word processing program. We use it to create documents such as letters and reports. In this workshop, we will learn the parts of the window; create and format documents.
Pro Tip: To select the entire document, press Ctrl + A on your keyboard. Figure 3. Selected text. Select the Home tab in the ribbon if you are not already there (see figure 2). Select the menu arrow to open and choose from the (A) Font, (B) Font Size, or (C) Font Color menus in the Font group. Figure 4.
The Word interface. When you open Word for the first time, the Start Screen will appear. From here, you'll be able to create a new document, choose a template, and access your recently edited documents. From the Start Screen, locate and select Blank document to access the Word interface. Click the buttons in the interactive below to learn more ...
Switch to Editing view: click Edit Document > Edit in Word for the web. Type and format text, add pictures, adjust the layout of the page, and more. For more advanced editing, click Open in Word. Work together on the same doc. To work together in Word for the web, you edit a document as you normally would.
Training: Watch and learn how to use Word in Windows. Explore Microsoft Word training guides, articles, and how-to videos.
Navigate to the File Tab to enter Backstage View. In backstage view, select File, then Save As. Click the Browse button. In the Save As dialog box, navigate to your file structure from the previous chapter, then open the Word folder. In the Name field, type Yourlastname_Yourfirstname_Word_Practice_1 as the file name, and then save.
Write great papers with Microsoft Word. You may already use Microsoft Word to write papers, but you can also use for many other tasks, such as collecting research, co-writing with other students, recording notes on-the-fly, and even building a better bibliography! Explore new ways to use Microsoft Word below.
Step 1: Type Ms Word in the search bar. Step 2: Select Ms Word application. Step 3: Select a blank document and press create button. Then you will get a window like in the image below where you can write your content and perform different types of operations on that content, like font type, style, bold, italic, etc.
Introduction to Computer Applications and Concepts Microsoft Word Week 1 Assignments. Authored by : Melissa Stange. Provided by : Lord Fairfax Community College.
From keyboard shortcuts to simple, built-in features such as Find and Replace and the automatic table of contents, here are several tips you can use to edit and format your college assignment more efficiently in Microsoft Word. 1. Leave Paragraph Spacing as Your Last Step. Let's first start on the right track.
The Course in detail. 60 assignments properly categorized. In this course you will practice on the following categories, using Microsoft Word 2019/365: 1. Create and Manage Documents. 2. Format Text, Paragraphs, and Sections. 3. Create Tables and Lists.
CSC 110: Introduction to Computers Learning Unit 4: Word Assignment - Editing/Formatting Page 2 of 3 Assignment Instructions: 1. Copy and paste the text provided into a Microsoft Word document 2. Make the following changes to the title "Dress for Success." a. Make the font bold b. Center the text horizontally c. hange the font to ...
Microsoft Word practice exercises for beginners: 1. Create and Design Admission/Enquiry Forms etc. To create this kind of form, you need to use shapes, text boxes, colors, formatting options, tables, and horizontal lines in MS Word.
13. Word count. Show the word count properly for the body of your assignment, because it's' important. Place your cursor on the Introduction title, hold the Shift key down, and got to the end of the Conclusion. And then Tools>Word Count and record the number of words. 14. Spelling and Grammar Check.
When you use an @mention for someone else in your team or group, a new 'Assign to:' option appears like this. Check that box and the comment becomes a task as well, listed above the comment. The person assigned the task gets an automatic email to notify: Assign a task to yourself by @mentioning your own name then assigning the task.
Templates for college and university assignments. Include customizable templates in your college toolbox. Stay focused on your studies and leave the assignment structuring to tried and true layout templates for all kinds of papers, reports, and more. Category. Color. Create from scratch. Show all.
Create a new document. On the File tab, select New. Select Blank document, or double-click a template image or type the kind of document into the Search for online templates box and press Enter. Tip: For practice using Word features, try a learning guide like Welcome to Word or Insert your first table of contents. Add and format text.
Removing (and Adding) Blank Pages. Instant Saving. More Excel-Type Function User-Friendliness in Tables. Add Attachments to Mail Merge. Better Image Integration. With its many features to support you when creating and editing documents, Microsoft Word is a powerful word processor. However, as a daily user of the desktop version of the software ...
1. Open an existing document or create one in Word for iPad and select Layout > Page Border. 2. Select a preset border style from the Presets menu option. 3. Or you can create your own border style by selecting the Custom menu option and picking the type, weight, style, and color. After you've made your selection, the page border will show up ...
As per your description, you want to know whether your teacher can see your changes to the submitted Word. If you edit a Word assignment after turning it in on Teams, the teacher will be able to see the edited version. However, the teacher may not receive a notification for the edit, so it's best to communicate with him directly if you make any ...
Microsoft CEO Satya Nadella announces Team Copilot at Microsoft Build on Tuesday, May 21, 2024. ... For anyone with qualms about taking direction or assignments from an AI bot, the company noted ...
Microsoft is giving K-12 teachers in the U.S. free access to Khan Academy's AI assistant, which can help students practice lessons and help teachers devise lesson plans, quizzes and assignment ...
Microsoft Edge for Business is here as your secure enterprise browser, optimized for AI. Check out the announcements to learn more about Copilot with commercial data protection, and refer to this short video for security configuration options for Edge for Business and AI. We appreciate your feedback.
The basics Manage assignment details Other features. Create an assignment in Microsoft Teams. Assign quizzes in Microsoft Teams. Turn in an assignment in Microsoft Teams. View and navigate your assignments (student) View and navigate your assignments (educator) Manage assignments on a mobile device. Grade, return, and reassign assignments.
Tampa Bay Rays Designate Veteran Right-Hander for Assignment, Activate Former Top Prospect. May 22, 2024. Chris Drosehn. The Tampa Bay Rays started the season off on a sour note but recently have clawed back to .500. They've faced plenty of injuries, particularly in the pitching department, where they have almost a full rotation on the shelf.