- Meta Quest 4
- Google Pixel 9
- Google Pixel 8a
- Apple Vision Pro 2
- Nintendo Switch 2
- Samsung Galaxy Ring
- Yellowstone Season 6
- Recall an Email in Outlook
- Stranger Things Season 5

How to record audio on Google Slides
Google Slides is an excellent tool for creating presentations fast and sharing them online. If you want to jazz up your presentations and make them a little more interesting, then knowing how to record audio on Google Slides can make the process a whole lot easier.
What You Need
Google Drive
Google Slides
If you are looking for a way to automatically start an audio file for a particular slide, you may have noticed that Google Slides has no quick built-in recording option. But with the right online tools, you can still put one together quickly to help with demos, voiceovers, description sounds, and more. Here’s how.
How do you record your voice on Google Slides?
If you’ve never used Slides before, you can visit this webpage to get started quickly. Choose the blank slide to begin a new slideshow, or access another Slides presentation that’s been shared with you in Google Drive. When you’ve navigated to a slide that needs an audio effect, you’re ready to begin.
Step 1: Slides doesn’t have a built-in audio recorder, but that’s not a huge concern when the internet is filled with free recorder tools. As long as you have a mic, you can create an audio file to use in Slides.
If this is a one-time audio recording for a presentation, we suggest using the super-speedy Rev Online Voice Recorder , where you simply select Record , give the site permission, and start talking. If you’re going to be creating a lot of audio files over time, then you may prefer to install the ChromeMP3 Recorder extension from Hablacloud.
If you aren’t recording something but rather using an existing clip, make sure it’s in a common format like MP3.
Step 2: To upload your audio file to Google Drive, log into Drive, select New , and select File upload . Find the audio file on your local storage, typically in Recent downloads , and select it. Google with automatically upload it to Drive.
- This new Google Sheets feature is going to save so much time
- How to draw in Microsoft Word
- How to format an SSD to improve performance and protect your data
Step 3: On the slide where you want to add audio, select Insert , then select Audio in the drop-down menu.
Step 4: In the new window, you’ll see all the audio files you currently have in Drive. If you haven’t cleared out your Drive files in a while, you may need to use the Recent or search tools to help you locate it. When you find it, choose the file and then Select .
Step 5: You will now get a small icon on the slide to let you know there’s an audio file there, and a new menu on the right with your Audio playback options.
Spend a little time in the audio menu to make sure the sound is playing like it should. You can choose to have it play on click or automatically, and adjust the volume for when the audio plays. You also have the ability to choose to loop the audio if you want and whether or not you want the audio to stop playing when you move to the next slide.
Step 6: With the settings configured, your slide should now be able to play audio the way you had in mind. You can repeat this process for any slide that needs audio in your presentation.
Now that you've nailed adding recorded audio to Google Slides, why not learn how to draw on Google Slides .
Editors' Recommendations
- How to build a PC from scratch: A beginner’s guide
- How to edit a PDF in Google Drive
- How to change your Skype name
- How to clear cookies
- Donald Glover is making a movie with Google’s new video AI
- How-To Guides

PC gaming is one of the best ways to experience the most graphically-rich and mechanically-demanding titles. Thanks to platforms like Steam, you’ll never have a shortage of games to choose from, but not all MMORPGs and first-person shooter gems are created equal. That being said, one of the best things you can do for your PC gaming experience is to make sure your fps (frames per second) settings are optimized.
Returning Windows 10 or 11 to their defaults with a factory reset can be a great way to improve performance, clear our old unnecessary software, and make your PC feel like-new again. While you can always use our Windows speed up tricks to give your system a boost, sometimes there's no substitute for starting from scratch.
Here's how to factory reset Windows 10 and Windows 11 to get your PC feeling right again.
Oh, social media. Sometimes it’s just too much, folks. If you’re finding yourself in a position where shutting down your Instagram account for a period of time sounds good, Meta’s powers that be have made it pretty simple to deactivate your Instagram account. It’s also quite easy to completely delete your Instagram, although we wouldn’t recommend this latter option if you plan on returning to the platform at a later date.
- PRO Courses Guides New Tech Help Pro Expert Videos About wikiHow Pro Upgrade Sign In
- EDIT Edit this Article
- EXPLORE Tech Help Pro About Us Random Article Quizzes Request a New Article Community Dashboard This Or That Game Popular Categories Arts and Entertainment Artwork Books Movies Computers and Electronics Computers Phone Skills Technology Hacks Health Men's Health Mental Health Women's Health Relationships Dating Love Relationship Issues Hobbies and Crafts Crafts Drawing Games Education & Communication Communication Skills Personal Development Studying Personal Care and Style Fashion Hair Care Personal Hygiene Youth Personal Care School Stuff Dating All Categories Arts and Entertainment Finance and Business Home and Garden Relationship Quizzes Cars & Other Vehicles Food and Entertaining Personal Care and Style Sports and Fitness Computers and Electronics Health Pets and Animals Travel Education & Communication Hobbies and Crafts Philosophy and Religion Work World Family Life Holidays and Traditions Relationships Youth
- Browse Articles
- Learn Something New
- Quizzes Hot
- This Or That Game
- Train Your Brain
- Explore More
- Support wikiHow
- About wikiHow
- Log in / Sign up
- Computers and Electronics
- Website Application Instructions
- Google Applications
Simple Ways to Record Audio and Add It to Google Slides
Last Updated: April 27, 2024 Fact Checked
Recording Tools
Adding audio to google slides.
This article was co-authored by wikiHow staff writer, Darlene Antonelli, MA . Darlene Antonelli is a Technology Writer and Editor for wikiHow. Darlene has experience teaching college courses, writing technology-related articles, and working hands-on in the technology field. She earned an MA in Writing from Rowan University in 2012 and wrote her thesis on online communities and the personalities curated in such communities. This article has been fact-checked, ensuring the accuracy of any cited facts and confirming the authority of its sources. This article has been viewed 4,796 times. Learn more...
Do you want to record audio to add to your Google Slides slideshow? Unfortunately, recording audio is not possible with Google Slides, but don't worry! This wikiHow article lists some recording tools that you can use for free and walks you through adding an audio file to Google Slides so it's not hard to do!
Things You Should Know
- Since Google Slides does not record audio, you'll need to use another recording tool and then add your audio to your slideshow.
- Use recording programs like Voice/Sound Recorder on Windows 10/11 and Android, or Voice Memos on iPhone, iPad, and Mac.
- Upload the recording to Google Slides by clicking "Insert > Audio" and selecting your voice recording.

- There are also advanced editing and recording techniques that you can use in this free app.

- To record with Audacity, make sure your mic is selected in the toolbar drop-down menu, then press the red circle icon to begin recording. Press it again to stop recording. Go to File > Export and save your file to your computer.

- Mic Note limits free accounts to 10 minutes of recording time for each note and doesn't allow editing.

- Since Google Slides is a desktop web application, this method will work for both Windows and Mac computers.

- If you're not sure how to save your audio file to Google Drive, you can read How to Add Files to Google Drive Online .

- You'll see a speaker icon on the slide you added the audio to.
- When you're editing your slides, you'll have the option to click Format Options when you have the speaker icon selected; click it to be able to change the default settings for the audio file. You can set the audio to play automatically when the slide appears or make it continuously loop the entire time the slide is on the screen.
- When your Google Slide presentation is in presentation mode, you'll either be able to listen to the audio by clicking the speaker icon or it will start automatically, depending on the options set in "Format Options." [3] X Research source
Expert Q&A
You might also like.

- ↑ https://support.apple.com/guide/voice-memos/record-vmaa4b813415/mac
- ↑ https://support.apple.com/guide/iphone/make-a-recording-iph4d2a39a3b/ios
- ↑ https://shakeuplearning.com/blog/how-to-insert-audio-in-google-slides-step-by-step/
About This Article

- Send fan mail to authors
Is this article up to date?

Featured Articles

Trending Articles

Watch Articles

- Terms of Use
- Privacy Policy
- Do Not Sell or Share My Info
- Not Selling Info
wikiHow Tech Help Pro:
Level up your tech skills and stay ahead of the curve
How-To Geek
How to add audio to google slides.
Add audio to your presentation so you don't hear crickets afterwards.
Quick Links
How inserting audio in google slides works, uploading audio to google drive, how to import audio to google slides.
Adding audio to your presentation, whether it's gentle background music for a wedding slideshow or a voice recording for a remote learning session, can keep your audience interested, engaged, and entertained. Here's how to do it with Google Slides.
Though a seemingly simple feature, inserting audio in Google Slides hasn't always been an option. Previously, the only way to insert audio in your Google Slides presentation was by inserting a video or linking to a site like Spotify---just inserting the audio file alone wasn't possible. Thankfully, now you can.
The caveat here is you can't upload the files directly from your local machine. You can only upload them from Google Drive. So unlike PowerPoint where you can record your audio directly in the application , you'll need to record your audio separately for Google Slides, upload the audio to Google Drive, and then add it to your presentation from there.
This obviously isn't limited to audio recordings. As long as the audio files are MP3 or WAV , you can upload any type of audio you like, including music.
Related: How to Convert a WAV File to MP3
If you don't already have your audio file uploaded to Google Drive, head over to your Google Drive account and click the "New" button in the top-left corner of the window.
Next, click "File Upload" in the menu that appears.
File Explorer (or Finder on Mac) will open. Locate and select the file you want to upload and then click "Open."
Once the audio file is uploaded, open your Google Slides presentation that you'd like to add the audio to, click "Insert" in the menu bar, and then click "Audio."
The "Insert Audio" window will appear. In the "My Drive" tab, select the file you'd like to upload by clicking it.
Next, click the blue "Select" button in the bottom-left corner of the window.
A speaker icon in a grey circle will appear on the slide. You can resize the icon by clicking and dragging the handles that appear when selected. You can also rearrange the position of the icon by clicking and dragging it to the new location.
Underneath the icon, you'll find the play/pause and volume options.
You can also choose how and when the audio plays during the presentation. When you click the icon, the "Format Options" pane appears on the right-hand side of the window. You'll automatically be in the "Audio Playback" group.
Under "Start Playing," you can decide if you want the audio to play when you click the audio icon or if you want it to play automatically when you make it to the slide.
You can also pre-set the volume of the audio during the presentation. Click and drag the slider under "Volume When Presenting" to adjust it.
Underneath the slider, you'll see these three options:
- Hide Icon When Presenting - This option, as the name implies, hides the icon when you're presenting. This option is only available if you selected the option for the audio to start playing automatically.
- Loop Audio - Once your audio reaches the end, it will start over. This is ideal for background music during a wedding or graduation ceremony.
- Stop on Slide Change - Once you move to the next slide, the audio will end.
That's all there is to it. Adjust the playback options to fit the atmosphere of your presentation.
Now that you know how to add audio, try mastering other basic functions to create the ultimate slideshow.
Related: The Beginner's Guide to Google Slides
How to Record Audio on Google Slides [Step by Step]
- Updated May 20, 2024
- No Comments
Google Slides is ideal for quickly creating visually stunning presentations and sharing them online with your clients and coworkers. If you want to make your presentations a bit more interesting, you can jazz them up by recording audio and adding it to your slides.
Unfortunately, Google Slides doesn’t have a built-in recording option, so you can’t automatically select a particular slide and start recording. However, with the right tools, you can easily put together a clear and crisp audio and insert it into your presentation. Here’s how.
Preparing to Record Audio
Recording audio on Google Slides may seem like a very complex and confusing process. Luckily, by following the correct steps, it becomes something almost anyone can do. However, before you start recording, here are a few tips that can help you prepare for the presentation and elevate it to the next level:
Select the Right Equipment
One piece of equipment that can completely enhance your presentation is a good microphone. While most computers and cell phones have built-in microphones, they don’t offer the professional-grade audio quality you’re aiming for. For this reason, it’s advisable to invest in a high-quality microphone, like the LARK MAX , or even one that’s on the lower cost side of the spectrum.
Write a Script
It’s better to prepare a script for every slide you’ll add audio to. Since you’ll know what to say and when to say it, you’ll be able to record your audio more quickly and easily.
Keep in mind that a good script breaks down the entire presentation into a few important points. Make sure you also add an introduction to give listeners an overall idea of the topic you’ll be describing, and then explain each point, step, or sub-idea included in the presentation.
It’s also advisable to match the tone of your script to the environment. For instance, if you’re presenting to board members, use formal language, while a more casual speech will be suitable for a discussion between your friends. Lastly, try to be clear and concise, and avoid going off-topic in the script.
Choose the Right Recording Platform
There are several different recording software available today, so make sure you choose one that best suits your needs. Consider the factors that matter the most to you, such as ease of use, virtual guest capabilities, cost, or recording tools, before making a decision. Make sure you also choose software that’s compatible with your device and provides high-quality recordings, so you can enjoy the crispest and clearest audio.
Pick the Ideal Recording Environment
The right room for recording depends on a wide range of factors, such as the room’s size, acoustics, and shape. Rooms with minimal reverberation or echo, good sound insulation, and a moderate size, are more suitable for recording audio. Carpets, curtains, and soft furnishings can further help absorb unwanted sound and enhance your recording’s sound quality.
Clear your Throat
Most people underestimate the importance of a smooth, good-quality voice. There’s no need to hire a professional voice-over artist – simply have the right warm-up, and you’ll be able to deliver much better content.
Sound Confident
Your confidence won’t increase with teleprompters and high-quality microphones alone. Practice your script in front of a mirror to ensure you sound great.
Recording the Audio
While there’s a wide range of recording software available, it’s important to remember that a difference in quality also exists. To ensure you choose the right option, the following are two popular recording platforms and the steps to recording audio with them:
ChromeMP3 Recorder
A free recording application, ChromeMP3 is perfect for beginners who want to make an audio recording quickly and easily. The app allows you to start, stop, playback, and rewind a recording, and more. It saves your recording as a compact MP3 file, but you can also save your recording directly to Google Drive for easier uploads to Slides. However, keep in mind that it only works with ChromeOS.

Here are the steps you need to follow to record audio with ChromeMP3:
- Download and install ChromeMP3 Recorder, and then launch the app.
- Click on the button with the circle to start recording.
- End your recording by clicking on the button with the square. A window should appear on your screen for the location of the saved audio file.
- Navigate to the Google Drive tab, click on My Drive , and then name and save the recording.
Audacity
Audacity is a free, versatile audio recording tool that allows you to capture and edit your audio recordings. With effects like tempo and speed changes, you can also tweak your audio to fit the style of your presentation. The app supports popular audio files, like WAV and MP3, making it ideal for quick hands-on recording sessions.
Here’s how you can record audio for Google Slides with Audacity:
- Download and install Audacity, and then launch the app.
- Personalize features like audio drivers and sample rate (optional).
- Navigate to the toolbar header and use the drop-down menu to choose your microphone and speaker.
- Click on the red circle button to start your recording and click on the black square button next to it to stop the recording.
- If you want to edit the recording, use the app’s tools, such as the cut, copy, and paste tools.
- Click on File > Export , and then select a file type, like mp3, to export the audio.
- Give a name to your recording and save it.
Uploading Audio to Google Drive and Inserting Audio Into Google Slides
Once you’ve recorded your audio, you can upload it to Google Drive and then insert it into each slide. Here’s what you need to do:
- Log into your Google Drive, select New , and then click on File Upload .

- Locate your audio file on your computer and select it.
- Wait for Google to upload the files. It’s better to organize the audio files by naming them according to the slide you want to add them to.
- Open your presentation on Google Slides and navigate to the slide on which you want to add the audio. Click on Insert and choose Audio from the drop-down menu.

- The new window will display all the audio files you have in your Drive. Locate the audio you want to add, choose it, and click on Select .

- Your slide should now have a small icon that indicates the slide has an audio file. There should also be a new menu on your screen’s menu listing Audio Playback options.
- Replay the audio and explore the audio menu to ensure the sound is playing just like it should. You can have the audio play automatically or on click, and even adjust the volume level for when the recording plays. Google Slides also gives you the option to loop the audio and stop it from playing when you switch to the next slide.

- Once you’ve configured the settings, your slide should play the recording the way you want it to. Repeat this process for any other slides that you want to add audio to.
Can I record audio directly on Google Slides?
Unfortunately, Google Slides doesn’t allow you to record audio directly. However, you can record audio using a third-party app, upload it to your Google Drive, and then insert it into your slides.
What audio file formats are supported by Google Slides?
Google Slides supports WAV and MP3 file formats. It’s also important to note that it only supports files that are in your Google Drive, so make sure you upload them beforehand.
How can I ensure my audio plays automatically in a Google Slides presentation?
To ensure your audio plays automatically in your presentation, insert your audio, navigate to the Audio Playback options, and under the Start Playing header, click on Automatically .
Are there any limitations to the size of the audio file I can upload to Google Drive for use in Google Slides?
While Google Slides doesn’t have a strict limit on the file size, it’s advisable to optimize the audio file for faster loading times.
- Google Slides , Record Audio , step by step

I am John, a tech enthusiast with a knack for breaking down complex camera, audio, and video technology. My expertise extends to social media and electronic gadgets, and I thrive on making the latest tech trends understandable and exciting for everyone. Sharing my knowledge through engaging content, I aim to connect with fellow tech lovers and novices alike, bringing the fascinating world of technology to life.
Leave a Reply Cancel reply
Your email address will not be published. Required fields are marked *
Table of Contents

Related Posts
![How to Reinstall Audio Drivers? [Step by Step]](https://www.hollyland.com/wp-content/uploads/2024/05/how-to-reinstall-audio-drivers-step-by-step.jpg "how to record audio for a google slides presentation")
How to Reinstall Audio Drivers? [Step by Step]
Are you experiencing sound issues on your computer? Whether it’s crackling audio, no sound at all, or distorted playback, faulty audio drivers could be the
![How to Cut Audio in Audacity? [Step by Step]](https://www.hollyland.com/wp-content/uploads/2024/05/how-to-cut-audio-in-audacity-step-by-step.jpg "how to record audio for a google slides presentation")
How to Cut Audio in Audacity? [Step by Step]
The world of audio editing is undergoing a tremendous shift as technology advances and accessibility to powerful editing tools increases. With the rise of software
![How to Speed up Playback in Davinci Resolve [Step by Step]](https://www.hollyland.com/wp-content/uploads/2024/05/how-to-speed-up-playback-in-davinci-resolve-step-by-step.jpg "how to record audio for a google slides presentation")
How to Speed up Playback in Davinci Resolve [Step by Step]
DaVinci Resolve is a powerful video editing software used by professionals and hobbyists alike. However, due to its extensive capabilities, achieving smooth playback can be
How to See Keyframes in Davinci Resolve [Step by Step]
DaVinci Resolve is a powerful video editing software used by professionals and amateurs alike. Keyframes are essential in animation and video editing as they allow

Disclosure: MyeLearningWorld is reader-supported. We may receive a commission if you purchase through our links.
How to Add Audio to Google Slides: Record Voice Overs, Narration, & More
Last Updated: 11/06/2023
By Scott Winstead
- Share on Facebook
- Share on LinkedIn
- Share on Reddit
- Share on Pinterest

Google Slides is a versatile tool with more than 800 million monthly users to create presentations, lectures, and more. But as an instructional designer who’s created countless online learning modules, I can tell you that even the best slideshow tool can’t overcome a boring, bland presentation, and a lot of times, that’s exactly what a presentation without audio is.
Audio can be a game-changer for any presentation. It can transform a run-of-the-mill slideshow into a captivating experience. While visuals convey information, audio adds depth, emotion, and impact to your message.
Google Slides does not have audio recording built-in, but the good news is it’s pretty easy to add audio to Google Slides. You don’t even need any technical skills really. To have a narration with your presentation, you have to create the audio file(s) separately and then upload the file(s) to add audio to your Google Slides. Or alternatively, you can use a screen recording plugin like VEED that will let capture your presentation on your desktop screen while you speak over it and record the whole thing to share with others.
Don’t worry — it’s easier than you might think. I’m going to show you exactly how to add voice and audio to Google Slides presentations.
Types of Audio You Can Add to Google Slides
Before I get into the step-by-step process of adding audio to a Google Slides presentation, let’s take a second to go over some ideas for the different kinds of audio you might want to consider using in your slideshow. Each type serves a unique purpose and can elevate your presentation in different ways.
Narration: Adding Voiceovers to Slides
Think of narration as your personal guide through the presentation. It’s your voice providing context, explanations, and insights as your audience navigates each slide. Whether you’re delivering a complex technical concept or sharing a heartfelt story, narration humanizes your content.
If you’re adding narration to a Google slideshow, make sure you focus on the following:
- Scripting: Craft a clear, concise script that complements your visuals.
- Tone: Adjust your tone to match the content—be it informative, enthusiastic, or empathetic.
- Practice: Rehearse your narration to ensure a smooth, engaging delivery.
- Recording Tools: Utilize quality recording tools and consider investing in a good microphone for pristine audio.
Background Music: Enhancing the Atmosphere
Background music provides ambiance and sets the mood. It can make your presentation feel dynamic, cinematic, or simply pleasant. The right music can keep your audience engaged and emotionally connected to your content.
Consider the following when adding background music to Google Slides:
- Genre: Choose music that aligns with your presentation’s theme and message.
- Volume: Ensure the music doesn’t overpower your narration or visuals.
- Transitions: Use music strategically during transitions to maintain flow.
- Royalty-Free Sources: Explore royalty-free music libraries for legal and diverse music options.
Sound Effects: Using Audio Cues for Emphasis
Sound effects can be a great tool for adding emphasis and engagement to your presentation. When used correctly (and sparingly), they grab your audience’s attention, highlight key points, or add humor. From subtle chimes to dramatic crescendos, sound effects can punctuate your presentation.
Consider the following when adding sound effects to Google Slides:
- Relevance: Ensure sound effects and audio clips enhance the content and align with your message.
- Timing: Precisely time sound effects for maximum impact, emphasizing key moments.
- Consistency: Maintain a consistent style, tone, and volume level with sound effects throughout your presentation.
- Moderation: Avoid overusing sound effects in your slide deck, as too much can be distracting.
4 Steps to Add Audio & Voice Over to Google Slides
- How to Use Google Slides →
- Matching Audio Narration with the Slide Presentation →
- Recording Your Voice →
- Adding Audio Files to Google Slides →
1. How to Use Google Slides
Google Slides is a powerful, cloud-based presentation tool that lets you create, edit, and collaborate on stunning presentations effortlessly. With intuitive features, real-time collaboration, and seamless sharing options, it's the go-to platform for crafting engaging and visually appealing slideshows.
Google Slides is a presentation program that is part of the Google Suite of productivity tools. It allows users to create, edit, and share presentations online.
Google Slides is similar to other presentation programs such as Microsoft PowerPoint and Apple Keynote. However, it has some unique features that make it a powerful tool for creating and delivering presentations, like its collaborative features and templates.
If you need a Google account and do not want a Gmail account, just go to Google.com and click the “Sign In” icon in the upper right corner of the browser window and then select “Create account” to set up a new account. You can link your existing email account to your Google account. It does not have to be a Gmail account.

Alternatively, you can get a free Gmail account and never use it except to give you access to Google Drive and Google Tools, including Google Slides, if that is all you want to do.

For the purposes of this tutorial, let’s assume you have a Google Slides presentation already made and you just need to add audio to it.
2. Matching Audio Narration with the Google Slide Presentation

If you want to use narration for a full continuously-playing slideshow, write the script that you will use for all the slides and then watch the slide presentation playback as a slide show to get the timing or your narration to match the progression of the slide as the slideshow plays. This is probably the trickiest part of the whole process.

You will want to edit your script and/or change the playback speed of the slides to match your audio recording of the narration.
Practice reading your script with the slides running in the slideshow mode until you can read the script perfectly .
It is easier to work with the audio file for a slideshow that plays without stopping if you can record the audio narration in one take rather than piecing a bunch of short takes together.
If your video presentation is long or the viewer uses self-pacing to manually click through the slides, you can break up the audio playback into sections or have a separate audio file for each slide. In that case, you need to make sure the audio recordings match, in terms of sound quality.
You want to listen to the audio playback carefully to be certain that the narration playback sounds nice and smooth to the listener. You want to avoid any abrupt volume or tonal changes between slides that may create a distraction or startle the listener.
Problems may arise if the audio recording sessions are in different places under different sounding conditions. To avoid problems, try to record in the same way and the same place if you plan to use separately recorded audio files together in the same presentation. Otherwise, not only will your audio potentially sound disjointed, but it could be an editing nightmare trying to get everything to blend together seamlessly.
3. Recording Your Voice

To record your voice, you can use a free-to-use recording application such as Audacity or a free recorder such as Movavi or another free online recorder. Also, most smartphones have an app to record your voice, which is easy to use.
Another option is to use VEED for more of a live presentation recording.
VEED is an app that has screen recording capabilities, which allows you to record a live voiceover to your Google Slides presentation and then save and share the video file with others. You can screen record on Windows or Mac with this plugin.
Be sure to record your voice in a quiet place with little or no background noises when trying to add audio to Google Slides presentations.
Speak clearly and directly into your voice over microphone in a clear natural voice – a headset microphone is great for this kind of narration work. Do not overdrive the recording by speaking too loudly and also do not speak too softly. Excessively quiet audio requires adding too much gain later (to increase the sound volume), which may introduce unwanted noise or distort your audio, making it difficult for your audience to follow along and even harder to create captions or a transcript with transcription software .

If you want to add background music or sound effects you will want to use a program like Audacity or another audio editing software to bring those things together into one audio file as a balanced audio mix. If you are getting serious about this effort, review our tips on how to create a professional voiceover recording home studio .
4. How to Add Audio to Google Slides
Once you create your audio file(s), then you upload the files to your Google Drive so that they are stored on the Google Cloud and available for Google Slides to access them. Most virtual conference platforms and webinar software will allow you to upload pre-recorded presentations with voiceovers.
Upload the Audio File(s)
To upload audio files to Google Drive, select the triangular Drive icon from the Google Tools menu (to see the tools menu use the grid button in the upper right-hand corner of your browser) and then click on the “New” button and select “File Upload” and then choose the audio file from your device. Wait for the upload to complete before you attempt to use the audio file.

Share the Audio File(s)
Share the audio file by right-clicking on its filename on Google Drive and then click on “Share.” Allow access to anyone with the link to remove restrictions on the use of this file. This gives access to the audio files to your Google Slides viewers. Be careful. This important step is often overlooked. When you share a Google Slides presentation without also sharing the audio files, your viewers can’t hear them.

Insert Audio File(s) to Google Slides
Open the Google Slides file that you want to use or create a new one. Choose the slide where you want to insert audio. Then, from the menu choices select “Insert” and scroll down to select “Audio.” Click the audio file you saved to your Google Drive to select it and then click the “Select” button.

After you insert audio into your Slides presentation, you will see a little speaker-shaped icon appear on your slide. You can play the audio by clicking on the speaker icon. You can change the placement of the speaker icon by dragging it to a different position on the page.
Audio Format Adjustments
Within Google Slides there are some basic sound adjustments available when you add audio files. When the audio object is selected you can click on “Format Options” in the toolbar. There you will see the default settings appear and the adjustments that can be made.
The adjustments include the volume of the audio file playback. You can choose whether the audio file will play automatically or if it requires a click to start it. If you choose “start playing automatically,” then you can also choose to hide the speaker icon since it is no longer necessary as the audio plays on its own.
You can also choose to loop audio if you want it to continuously repeat. You can stop the audio on a slide change if you only want the audio to be available for just one slide. If you uncheck this box not to stop audio on slide change, the audio will continue to play when the slide changes.

Audio Preview
While you are in the editing mode making slides, you can preview the inserted audio by clicking on the speaker icon and then clicking on the play button.

Watch this video by Stephen Kwiecinski. He shows three different ways to add a voiceover to Google Slides using Audacity.
BONUS for Teachers
New EdTech Classroom’s Sam Kay shows how to use free Google Slides Add-Ons to make interactive slide presentations. Add-Ons are made by third-party software developers to add features and make your slide presentations more interesting. He suggests you use Pear Deck to add audio to your slides.
Dos and Don’ts of Adding Audio to a Google Slides Presentation
Now that you understand how to add audio into Google Slides presentations, let’s go over some quick tips and best practices for using it:
These tips will save you from potential audio mishaps and elevate your presentation game.
- Do Script Your Narration: If you’re adding voiceovers, script them thoughtfully. A well-written script keeps your narration concise, on-point, and engaging. Practice your delivery to sound natural and confident.
- Do Balance Audio Levels: Ensure a harmonious blend of audio elements. Your narration should be clear and audible, while background music and sound effects should complement, not overpower.
- Do Time Sound Effects Strategically: Timing is everything with sound effects. Use them to emphasize key points or transitions. When executed right, they can add a dynamic touch to your presentation.
- Do Test Your Audio: Always, always test your audio setup before the actual presentation. Check for volume levels, audio quality, and any potential technical glitches.
- Do Provide Closed Captions: For inclusivity, consider providing closed captions for your narration. It ensures that your content is accessible to all audiences, including those with hearing impairments.
The Don’ts:
- Don’t Go Crazy with Sound Effects: It’s tempting to go wild with sound effects, but resist the urge. Too many can overwhelm your audience and detract from your message.
- Don’t Use Copyrighted Music Without Permission: Unless you have the rights or use royalty-free music, avoid incorporating copyrighted music into your presentation. You don’t want to deal with any nasty legal issues.
- Don’t Neglect Audio Quality: Poor audio quality is a presentation buzzkill. Invest in a decent microphone and record in a quiet space to ensure clear narration.
- Don’t Rush Narration: Speak at a steady, comprehensible pace. Rushed narration can leave your audience struggling to keep up.
- Don’t Distract with Inconsistent Audio: Maintain a consistent style and tone with audio elements throughout your presentation. Sudden changes in volume or style can be jarring.
Can you record audio in Google Slides?
No, Google Slides doesn’t currently have a built-in audio recording feature. However, Google Slides does have the option to insert audio into a presentation, meaning you can record your audio separately outside of Google Slides and add it easily.
Can you do voice overs on Google Slides?
Yes, you can add voiceovers to your Google Slides presentation by recording it separately and inserting it into the presentation. Once you’ve recorded your voiceover, you can insert the output file with just a couple of clicks.
Why can’t I add audio to Google Slides?
If you’re running into issues adding audio in Google Slides, it might be because you’re trying to use a file type that’s not supported or you don’t have the right permissions to add audio to your presentation. Make sure you’re using a supported file type and that you have the correct permissions for inserting audio and making edits before trying again.
What audio files can be added to Google Slides?
Currently, you can insert audio in Google Slides if it’s a .wav or .mp3 file type. Inserting audio files that aren’t .wav or .mp3 will likely result in an error.
Final Notes on Adding Audio to Google Slides
As you can see, it’s actually pretty easy to add audio to your Google Slides presentations. There’s no need to be intimidated, even if you never made any voiceover recordings. After a little bit of practice, you will quickly get the hang of how it all works.
It is fun to add audio and voice to your Google Slides, and it’s an easy way to create instructional videos .
As you become more confident you can learn how to mix in background music as well.
You can even add GIFs to Google Slides presentations .
Not a Google Slides fan? You can also easily add audio to PowerPoint presentations in a similar fashion.
If you have issues with syncing audio and video recorded separately check out 11 ways on how to do it .
Have more questions about recording voice overs? Check out our guide to the best voice over training courses to improve your skills.
Still need help trying to add audio to a Google Slides presentation? Comment below with your concerns so we can help you out.
Udacity Review: Are the Nanodegree Programs Worth the Money?
How to add a gif to google slides presentations: step-by-step guide, leave a comment cancel reply.
Save my name, email, and website in this browser for the next time I comment.

Home Blog Google Slides Tutorials How to do a Voiceover on Google Slides
How to do a Voiceover on Google Slides
Google Slides is often used to share presentations online. Sometimes, these presentations can be confusing for the recipient unless there is additional information that can help elaborate each slide. While Google Slides, unlike PowerPoint, does not allow recording a voiceover to narrate your slides, you can insert separately recorded audio files to your slides to generate a narration.

Google Slides Voice-Over Recording
You can record your voice-over recordings and save them to a folder in Google Drive to insert in slides via New > File Upload. Google Slides does not support many audio formats, so make sure your narration is in MP3 or WAV format. Otherwise, the file will not show up when you try to insert it in Google Slides.

We recommend that you keep a naming convention for your files that makes them easy to identify so that you can conveniently incorporate them for relevant slides later on.
It is necessary to ensure that your audio files are not restricted. Select one or more files and select Share via right-click context menu.

Ensure all files are accessible via the link for recipients with at least View Only privileges. This will ensure that your audience is able to play the audio from within the Google Slides file. Otherwise, the audio icon will show a message asking the viewer to request access to the audio file.

How to Narrate Google Slides
Once your audio files have been uploaded to Google Slides, and you have unrestricted the sharing of those files, go to your Google Slides Theme and add audio for each slide via Insert > Audio .

Select the audio file with the narration to insert into the current slide and drag it to place it in the desired location on the slide.

After the audio file has been added, you can click to preview the sound. Furthermore, you can customize audio playback options to play the audio automatically or manually, in a loop, and to stop the audio when the slide changes.

To customize the look of the way your audio icon appears on the slide, see the menus below the Audio playback menu on the right sidebar. Using these options, you can adjust the audio icon’s size, position, and color and add a drop shadow and reflection.
Once your narrations are added to respective slides, you can share your presentation and enable the recipients to listen to the narration on each slide automatically or manually (based on your playback settings).

Audio narrations can only be helpful if they are clear and concise, with good voice quality. If you are struggling with context, you can write a script for each slide and read from it to make your narrative more focused.
Make sure you record your narrations in a place where there isn’t any background noise, or you have a noise cancellation headset to cancel out unwanted sounds in the background. It’s always a good idea to playback and check the voice narrations for sound and contextual clarity.
Since Google Slides supports only MP3 or WAV audio formats, you might need to convert your audio narrations to another format before uploading them to Google Drive. You can also use CloudConvert or other Google Drive-supported apps to make conversions from the cloud.

Like this article? Please share
Google Slides, Presentation Approaches, Presentation Ideas, Presentation Skills Filed under Google Slides Tutorials
Related Articles

Filed under Google Slides Tutorials • May 21st, 2024
How to Make a Timeline on Google Slides
Follow our step-by-step instructions to make a timeline on Google Slides, either with templates or starting from scratch. Check it out!

Filed under Google Slides Tutorials • May 17th, 2024
How to Import Google Slides Themes
Importing Google Slides Themes is an easy task that can bring life into your presentations. Learn how to reuse old slides to create new cool themes here.

How to Make Google Slides Vertical
Power up your presentation skills by learning how to make google slides go vertical. Step-by-step instructions with examples.
Leave a Reply
- Affiliate Disclaimer
- Privacy Policy
- Terms & Conditions
eLearning Desk
Your Online Learning Guide
How to Record a Google Slides Presentation (with Audio & Video)

Whether you’re teaching an online class or having an important meeting, recording your Google Slides presentation can come in handy later for your or your students’ reference.
Stay with us as we break down how to record a Google Slides presentation with audio and video using free software.
- 1.1 Step #1: Ensure You Have the Required Resources
- 1.2 Step #2: Install Required Software
- 1.3 Step #3: Run the Tool
- 1.4 Step #4: Set Up Your Presentation
- 1.5 Step #5: Prepare to Record
- 1.6 Step #6: Start Recording
- 2.1 Related posts:
How to Record a Google Slides Presentation (with Audio & Video)
Before you can begin recording your Google Slides presentation, you will need a few things:
Step #1: Ensure You Have the Required Resources
- A microphone (you can use your laptop’s mic or wear a headset)
- Recording software (we touch on this in the coming section)
- A Google account
Step #2: Install Required Software
There are several software tools available online for free that you can use to record a Google Slides presentation. For the sake of ease and clarity, we use Apowersoft, a free tool that you can download from CNET .
After downloading the executable, double click on it to run it and complete the wizard to install.

We recommend using this tool because it is 100% free to use and does not limit how much of your presentation you can record.
While an earlier version of the tool did not add a watermark to recorded videos, in the new version, you will have to sign up with Apowersoft to record videos without a watermark.
It’s important to remember that the basic tool does not offer any editing features. In other words, you will need to record your presentation in one take or use another editing program to piece together the clips of your presentation.
If you’re a teacher, we recommend recording short videos since they’re convenient to make and also easier for students to watch.
Step #3: Run the Tool
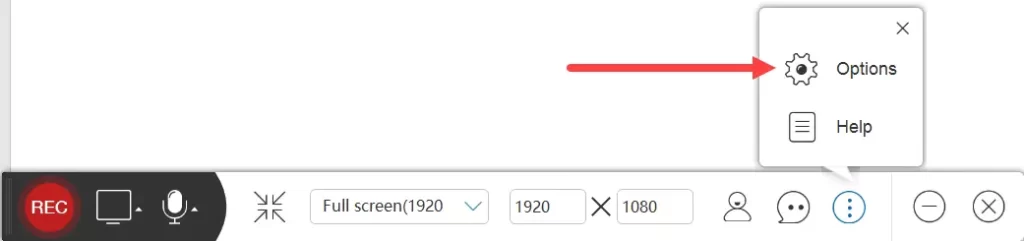
When you launch Apowersoft Free Screen Recorder, it will show you the region you can record with the tool right away.

You can change the region the tool will record by moving the recording area around by clicking and dragging the button in the middle. You can alter the bounds of the recording area by simply dragging the bounds as you please.
Alternatively, you can click on the “Full Screen” icon on the panel on the bottom. Since you need to record a Google Slides presentation, this is the button you want to click.
It’s also important to set up the tool correctly before proceeding to the next steps. If you look at the Apowersoft recorder’s panel, you will find video and audio options next to the record button on the left.

Ensure that the tool is set to record your screen and not your webcam and that the tool is recording audio from the correct microphone.
Note that if there is a video in your slideshow, you will need to record the sound from your computer.
Remember that choosing to record the system’s sounds also means that your computer’s error sounds (“bing”) and all other system sounds may also be recorded.
Step #4: Set Up Your Presentation
Before you can start recording, navigate to slides.google.com and find your presentation. Next, click on the “Slideshow” button in the top right corner. This will display the presentation in full-screen mode.

It’s important to ensure that your slides on Google slides load completely before you start recording. If all the slides aren’t fully loaded, the transitions from slide to slide may look choppy in your recording.
Step #5: Prepare to Record
When both the recording tool and your presentation are ready, you can hit the record button on the panel. Clicking the button will make a popup appear. If you have logged into your Apowersoft account, it will record without a watermark.
You will also see the hotkeys you can use to control the recording in the popup.

If you hit the “OK” button, a 3-second countdown timer will appear before the tool starts recording. If you don’t want the Apowersoft recorder’s panel to appear in your recording, like in the following image:

You will need to navigate to the options menu by clicking on the three dots button on the right side of the panel.
You can then toggle the “Show recording toolbar” option off from the options menu.

You can also change several other settings from this menu, including the recording format and the “Record” and “Stop Recording” keyboard shortcuts.
Step #6: Start Recording
Navigate to your slideshow window and click the “Rec” button. The tool will start recording after the countdown. You can go through the slides by pressing the right and left buttons.
One of the most useful features of this tool is that it allows you to pause recording at certain points if you need a moment to proceed to your next talking point.
If you’ve left the recording panel enabled, you can use it to pause the recording whenever you want.
Alternatively, you can press Ctrl-Alt-F3 to pause the recording. After you’ve caught up with the talking points or taken a moment to focus, you can press Ctrl-Alt-F1 to start the recording again.
After you finish recording the slideshow, press Ctrl-Alt-F2 to stop recording. The tool will then automatically start playing the video you recorded, and you can go through it.
You can use the handles on the extreme left and right of the player to trim the beginning and end of the video.
However, we suggest that you do not do any trimming with this software since it sometimes ruins the recording by not trimming at the correct point.
If you’re satisfied with the recording, click on the “Save” button on the bottom right to save the video.
A menu with a default name for the recording and the folder where it’ll be saved will open up.
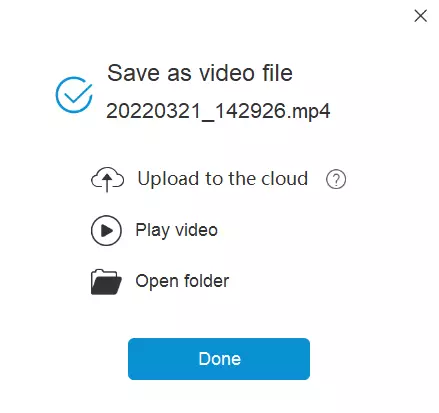
You can rename the file from this menu without any hassle. You can also select where you want to save the video from the “Open Folder” button.
If you’ve signed up with Apowersoft, they will offer you free cloud storage to save your videos. You can upload the video directly to the cloud storage by clicking on the “Upload to the cloud” button in the Save menu.
Alternatively, you can upload the video you recorded straight to YouTube, Vimeo, Google Drive, or Dropbox by clicking the “Cloud” button instead of the “Save” button.
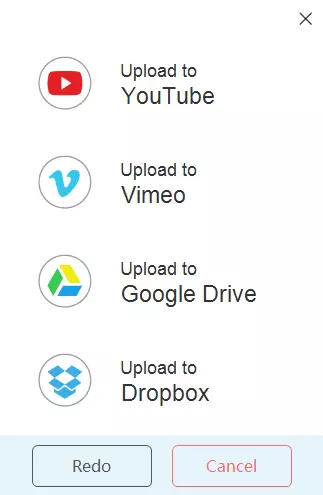
If you are a teacher, saving the video to Google Drive may be the right way to go. You can easily share the video with your students by making the video sharable and sending them the link to the file.
How to Convert Google Slides to PowerPoint in Simple Steps
While there are many ways to record a Google Slides presentation, using the Apowersoft free video recorder is one of the easiest ways to go about it.
The software is quite intuitive, and you should be able to figure out what buttons perform which function without expressly reading through this guide.
That being said, learning all the functions before you begin using the tool is an excellent way to ensure you get the most out of the tool and make a solid recording for your future reference or for your students.
Related posts:
- 10 Top Disadvantages of Online Classes
- 15 Huge Benefits of Online Classes
- The Role of Operating Systems
By Maverick
This is Maverick. During Covid-19 Pandemic, A School Teacher turned into an online Instructor. Here I Share How you can build your own Online School and offers eLearning to your Students. I'm trying to make the eLearning Desk a resource for Students as well as for Teachers.
Related Post
10 ways to use a document camera for online learning, 10 best free drawing apps for students and digital artists 2024, 10 best wireless microphone for teachers in 2024.

Add Audio or Sound to Google Slides (6 ideas + 9 savvy tips)

Google Slides is an awesome presentation tool and it’s only getting better with the recent additions to its audio and sound features [2021]. Can you easily add audio or sound in Google Slides? Yes ! It’s a great way to make your presentation or slideshow stand out and it’s a breeze to do.
In this how-to add audio or sounds in Google Slides article, we’ll walk you through every step of the process, plus you’ll learn:
- About research into enhancing a message with sound or audio .
- Examples using audio or sounds in slideshows and presentations
- 7 quick steps how-to add audio to Google Slides , no sound engineering skills required!
- More Google Slides tips and techniques for recording audio, sharing your presentation or slides plus more.
Jump into the world of Google Slides with your new slide buddy. We have created this article to help you make more impactful, creative, and memorable slideshows that draw people in. Adding audio is simple but also tricky as there are so many different ways we can infuse it into our presentations. For more articles on how to create better slideshows check out our other tips for presentation creators
Enhance a message with sound and audio.
Many articles have been written about how sound can be used as a creative communication tool to help grab attention and create an engaging experience .
In 2018, PHMG published the first findings of its research into the impact of music in marketing, messaging, and branding. This study was conducted in Australia, UK, and the US to 1000 consumers in each country.
The study found that over 60% of people believe sounds, such as instrumental music and audio clips can be more memorable than visuals and influencing emotional reactions.
Understanding that sound can make a difference in how we feel and help convey a message, let’s explore how you could use this in presentations to help captivate, persuade or entertain!
Examples of using audio or sounds in slides
So how can we use audio or sounds in our presentations? Here’s 6 examples and benefits!
- Add background music or song to your presentation to help create a certain emotion or ambience you wish the audience to feel.
- Insert an audio clip to a slide so that someone viewing it on their own can understand more about the context of each slide.
- Add a sound effect to animation to create a more immersive experience or emphasize a key point to guide the audience’s attention.
- Embed a narration or voice-over to each slide to make your presentation more inclusive for people with visual impairments or to provide guided instructions.
- Insert a sound bite or speech from a famous individual or subject matter expert to add authenticity to quote or image.
- Use a digital recording during your presentation to give you a chance to take a pause and stop talking!
Below you’ll also find some more creative ideas on using audio clips or sound bites to make your presentations more interactive and engaging for your audience.
I could talk more about the benefits of adding audio to your slides or presentations, however, this topic deserves its own article! It would be great to know if this would be of interest to you? And if you would like to share your examples of using audio within Google Slides, just drop a note in the comments at the bottom of the page!
How to Add Audio to Google Slides
Quick Guide
- Upload your audio file to Google Drive.
- Set the sharing permissions of the audio file in Google Drive
- In Google Slides, choose a slide. From the menu, click Insert and select Audio.
- In the Insert Audio pop-up window, select your audio file to be inserted.
- Position the audio icon on your slide as required.
- Configure the audio format options as required.
- Test your audio with both the “Present” and “Share” buttons.
- Finished! You can now present it live, share it with a specific group or host it on your website/blog.
Step by step
Step #1: Upload your audio file to Google Drive.
To learn how to upload an audio file to Google Drive see our article on working with PowerPoint and Google Drive , as the same steps are required for voice, music, or sound files.
Jump to the record, create, or where to download audio files #tips if you don’t have one!
Step #2: Share your audio file in Google Drive.
If you are not presenting in person and are sharing slides, for example through email, social network, or other messaging services, it is important to ensure the right permission settings have been applied to your audio file.

Once your .wav or .mp3 audio file has been uploaded to Google Drive
Right-click the audio file choose Share

Under Share with people and groups pop-up window, enter the email address you want to share with.
Within the the “Get Link” section, change from “Restricted” to “Anyone with the link”
Select Viewer (or Editor, Commenter as required.)
Step #3: Navigate to the insert audio option
The image below shows where you can find the Insert ‘Audio’ option.
At this time [April 2021] it is only available for computers/desktops , and not available on Android, iPad, and iPhone apps. However, this does not prevent your viewers from hearing your audio on their mobile devices.

In Google Slides, choose a slide.
From the menu, select Insert > “Audio”.
Step #4: Select your audio file from Google Drive
One of the tricky things I find when embedding my audio file or files to my Google docs is actually finding the audio file. So here are a couple of #tips!

The first place I look for my files is in the ‘Recent’ Tab on the Insert audio pop-up window (see #1 in the image).
If this doesn’t work for you it’s best to use the ‘search’ bar.
#tip If you are using multiple audio files in your slideshow, number and name your files clearly, to help you add the right file to the right slide.
Step #5: Position the audio speaker icon on your Google doc as required.
Once you have selected your file as above the speaker icon will appear on your slide after a moment. You can resize, click and drag it to any desired position
Pro #tip! Instead of using the standard audio playback/speaker icon on your slide, get creative and personalize it !
To personalize the audio playback icon:
- Right-click the audio /speaker icon
- Select Replace Image from the menu.
Make a choice from the options available, such as from Drive, Photos, By URL, Camera, local system, or even search from the Web.
Step #6: Select the audio format options as required.
Google Slides offer many format options to help you create the embedded audio experience you require.

You can set up your Google Slides presentation to start playing your audio when you click on a slide or automatically play audio recordings once the slide is viewed.
The volume slider lets you set the right volume of the audio. This is really handy if you want just soft background music playing while the presenter is speaking at the same time (or to play a loud intro or outro to depending on your goals.)
There are other interesting ways you can use your audio clips. For example, looping the sound so that it repeats a short sound clip over and over again.
If you want your audio to continue playing through the entire presentation or across multiple slides then uncheck that box where it says “Stop on Slide Change.”
Further down the side menu are many styling options that you can apply to the playback speaker icon.
Step #7: Test your embedded audio file hit the “Present” and “Share” button at the top right.
You’re now able to play audio or sounds in Google Slides, so it’s time to test it thoroughly.
Share the link to a friend to help check your file and the slide presentation is viewable and playable.
#tip Remember to check that people can play your audio by using the Access checker before you share a presentation! As step #2, use the Access checker to make sure people can hear your presentation. If they don’t, the Access checker will suggest changing the permissions.
Step #8: Presenting or sharing your slideshow.
With Google Slides you have a number of options available if you want to share your slideshow when you are not available to be present in person.
Embed your Google slideshow with audio on a website or blog or share it with a large or non-restricted audience.

“Publish to the web” is the best way to share it widely while giving you control to turn on or off the publishing status. To start, in Google Slides
Go to the “File” menu option and click “Publish to the web”
Click the tab labeled “Embed” or “Link” depending on your website integration options available.
Choose the options to specify how the slideshow starts, ends, or loops, or how big the slides should show by choosing the “Slide size” or “Auto-advanced slides” settings.
Then you are ready to hit the Publish button.
Copy and Paste the code provided onto your webpage or blog or share the link (URL) with your audience.
Sharing your slideshow to a specific person, group, or audience.

If you have sensitive information or don’t want everyone to be able to view your slideshow then follow the detailed instructions outlined in Step #2
- Add the people and group in the Share with people and groups section.
- In the Get link section, ensure Restricted is selected.
- Click the “Copy link” to provide the link to your audience over email, WhatsApp or other messaging app or platform.
Audio and sound Google Slides tips.
Above I have detailed the step-by-step approach to how Google Slides allows you to insert sounds to a presentation or slideshow, now itʼs time to dive into sharing some helpful tips that will maximize engagement and other ways to make an impact.
Record, create, link to or download audio files for your slideshow or presentation.
Above in Step #1 , I outlined how to upload an audio file to Google Drive, however what if you don’t have one available to upload yet? Let’s look at 3 options on how you can record, create or find audio file to upload, embed or link to.
1) #Tip. Record your own voice for your slides.
If you want an exciting voice but can’t find the right person for the job, try recording yourself!
For your own audio narrations or voice overs a PC, Mac, mobile or tablet will allow you to record your own audio which you can then upload to your Google Drive.
There are also free or paid online services and applications available to record just audio (or audio and video) such as an online voice recorder, Audacity , or Movavi , which offer added features, that are easy to use and cost-effective options or free.
Google suggests using mp3 and .wav audio files in our Slides presentation even though Google Drive, supports MP3, MPEG, WAV, .ogg, .opus audio file formats.
So to avoid playback issues with Google Slides docs we recommend using an audio file converter if your audio file formats are not already available as .mp3 and .wav formats.
RECORDING YOUR VOICE TIPS
If your audio quality is poor people will be less likely to listen and learn from what you have to say. Here are some tips on how to create a great recording of your voice.
- Speak close to the mic, to avoid echo or feedback.
- Record in a quiet place where there’s no background noise like TV or music playing.
- Rehearse it.
- Before you start recording, take a deep breath and relax!
2) #Tip. Linking to audio files on the internet or online streaming services.
You can also add music or to your Google slideshow by way of embedding a link to streaming music platforms such as YouTube, Amazon Music or Spotify.
To embed or link to a streamed soundtrack or video from YouTube: Once you have copied the shareable link, in Google Slides navigate to > Insert > Video> and paste the copied link. Then format and position your embedded video as required.
When using YouTube content in Google Slides, one very useful feature is being able to trigger the video to play automatically, ‘on click’ or manually, and set it to play from a specific start time to end-time. To link to an online music subscription service such as Spotify, Amazon Music, Apple Music, or Google Play: Once you have copied the shareable link, in Google Slides navigate to > Insert > Text box > Format the textbox as required > With the Text box still selected from the Insert menu, choose link> paste your link in the box provided. Then format or position your embedded YouTube video as required.
While it is possible to link to an audio file or online streaming services, there are some things to consider:
- Be careful around issues such as copyright, sharing permission or interruptions with Ads
- If you are presenting your content an internet connection would be required to connect to the online streaming service.
- If you click a link that to a URL, it will also open the linked page or app in a new browser window.
3) #Tip. Downloading audio files from a website or app.
There are a number of free and paid services such as archive.org , pixabay , free music archive or Storyblocks , that allow you to download stock music, sound effects, background sounds and more.
When going down this route be aware of the various copyright, royalty or Creative Commons license requirements. As you may have to provide attributions, pay a fee or agree to certain terms and conditions depending on how it will be used or distributed.
Sharing your audio presentation – #Tip. File permissions with Google Drive.
Note: You can only share files that you own or have edit access to.
Sharing files is often a challenge but don’t worry we’ve all been there! Having the power to protect access to your files is one reason Google Drive is so great.
To avoid or solve the common “you need permission”, “you need permissions to play this audio file”, ‘request access for that audio file’ or “request access permissions” error messages when trying to make your slideshow with audio public:
- To make permission sharing simple, keep all your slide assets including .mp3, .wav audio files or .mp4 files in the same folder as your slide deck.
- Double-check the sharing permissions you have granted for your audio file in Step #2 are set to both: “Anyone with the link” and set as “Viewer” (or editor, commenter).”
- If your Google account is through a nonprofit, business (work), or education (school) organization, check that your administrator has allowed users outside your organization to view (comment on or edit shared) files.
- As per Step #7 thoroughly test your presentation and file permissions before you present or share. To do this > Click the “Share” button from Google Slides > From the “Share with people and other groups” window > “Copy Link” to your clipboard. Then share the link to a friend to help check your file and the slide presentation is viewable and playable!
Start or stop an audio presentation playing automatically .
To play background music for the whole duration of a slideshow (photos slideshow) for a celebration or gathering e.g. a presentation night, birthday, graduation or wedding event or other memorial service that is going to be continuously running in the background. Follow the steps below.
To loop the same audio file across all slides automatically (as shown on Step #6 above )
- Click the audio icon in the Google slide
- Select Audio Playback > under Format options sidebar
- Choose start playing as “automatically”
- Adjust the volume settings e.g. for soft background music lower the slider where Options > volume when presenting is displayed.
- Check (tick) “ Hide icon when presenting ”.
- Check (tick) the “ Loop audio “
- Uncheck (remove tick) “ Stop on Slide Change ”
Now when you click “Present” the sound file will continue even when the slides changes, perfect for when you want your slideshow running on auto-pilot.
To loop a slideshow with continuous background music that is shared with “ Publish to the web” (as shown on Step #8 above with either ‘link’ or ’embed’) configure these settings in Google Slides:
- Repeat the loop audio steps above.
- File menu > “ Publish to the web “
- Choose the interval or speed the slides should auto-advance (autoplay) . I would recommend selecting a minimum auto-advance of every 5 seconds.
- Tick if the slideshow should start as soon as the slide player loads (or not).
- Tick restart the slideshow after the last slide to loop the slides continuously if desired.
We’ve covered a lot of ground in this article about how audio or sounds can be a powerful tool to help keep people engaged throughout your slideshow presentation, how to add audio or sounds to Google Slides and also share it with your audience.
Now you have the know-how it’s time to put your ideas into practice!
One very simple, original and creative way to make a memorable presentation is to add a famous voice-over to the start of a presentation or using a soundbite to end a presentation to reflect your message.
If you need help adding audio into Google Slides, let us know! Our team has experience working with Google Slides so we would love to talk about how best to plan out your upcoming presentation incorporating our tips from this article.
Have any of these methods helped make your next presentation more engaging or would you like to show us your examples? Share in the comments below!
This article walks through and displays images of the desktop web browser experience that is currently live at the time of the article edit [May 2021]. As Google Slides is an evolving product with new features being introduced regularly, some of screen designs or wordings may have changed by the time you are reading this article. We aim to do our best to keep are articles updated, however we always appreciate your feedback if any changes have been observed.

Leave a Reply Cancel Reply
Add Comment
Save my name, email, and website in this browser for the next time I comment.
Post Comment
Related Posts
Fastest method: how to insert gif into google slides.
- Slidesgo School
- Google Slides Tutorials
How to Add and Edit Audio or Music in Google Slides

Do you want your presentation to be more dynamic? If you need to engage your audience by giving a professional presentation, you can add music to your slide deck. We’re going to teach you how to add and configure audio or music for your presentations .
Adding Audio from the Insert Tab
Editing audio, adding online audio, adding audio from youtube.
- Before you add any audio, please note that Google Slides only works with audio files stored in your Google Drive account, so you need to upload them beforehand. The supported formats are .mp3 and .wav.
- Open your presentation in Google Slides and select the slide where you want to add audio or music. If you want the audio to be played in all the slides, you’ll need to add it to the first slide.
- Click Insert → Audio. A new window will open. Please note that this option might not be available in some countries where the update that includes it hasn’t been applied yet.
- The audio files stored in your Google Drive will be displayed here. Choose the one you want to add to your presentation and click Select. An icon will appear in the slide. Click it to access the playback functions.
- Click the audio icon.
- Go to the toolbar and click Format options. As an alternative, you can right-click the loudspeaker icon → Format options. You can also click Format → Format options. A new panel will open on the right side of the screen.
On this panel you’ll find the following settings:
- From the Audio playback tab, you can configure everything regarding the playback. For example, you can determine whether the audio plays on click or automatically. You’ll find below the volume slider and three checkboxes to stop the playback when going to the next slide, loop the audio or hide the audio icon (the latter can only be modified if the “Automatically” option is selected under “Start playing”).
- From the Size & Rotation tab you can modify the width and height values for the audio icon. You can also lock the aspect ratio so that you can keep the proportions of the icon.
- From the Position tab you can determine where to place the audio icon, having its top-left corner or its center point as reference. To move the icon, just modify the values of the X and Y axes.
- From the Recolor tab you can change the color of the icon, choosing from different presets generated according to the palette of your presentation.
- From the Adjustments tab you can set the transparency, the lightness and the contrast of the icon.
- The remaining tabs, Drop shadow and Reflection, contain a checkbox to enable or disable these effects. Click their respective drop-down arrows to access their settings, such as color (only for the drop shadow) and behavior (angle, transparency, distance and blur).
- You can replace the audio icon with your own, or even a picture, by right-clicking → Replace image. If you want to find out how to insert images, please refer to the How to Insert, Crop or Mask Images in Google Slides tutorial.
- Open your presentation in Google Slides and select the slide where you want to add audio.
- Insert an icon or image. We’ll use this resource to link the online audio. Please refer to the How to Add and Modify Icons in Google Slides tutorial if you don’t know how.
- Add the link to the online audio. If you don’t know how to do it, please refer to the How to Add Hyperlinks in Google Slides tutorial.
- Once linked, click the icon. A new window will appear, where you must click the Play button of the online audio from the specified URL. Some audio platforms, such as Soundcloud, allow you to generate an autoplay sharing link. With that, you just need to click the icon to play the audio automatically.
- If you want to pause the playback, you’ll need to exit the presentation mode and do it manually.
- Insert the video that you want for your presentation. Please refer to the How to Add a Video in Google Slides tutorial if you don’t know how.
- Decrease the size of the video and place it outside the visible part of the slide.
- Go to the Video playback options and set the video to autoplay. To do this, right-click the video → Format options. Then, click the Video playback drop-down arrow and check “Autoplay when presenting”. If you want to learn more about this panel, please refer to the How to Add a Video in Google Slides tutorial.
- Please note that the audio will stop when changing slides.
Do you find this article useful?
Related tutorials.

New feature available: edit our templates with Canva
Whenever you need to create, Slidesgo is there. We’re continually enhancing your presentation design process with templates that are primed to impress for any occasion. And in order to let your ideas flow best, comfort is key. How could Slidesgo help you with this? By making you feel right at home with our resources, no matter your preferred platform.You spoke, and we listened. Now, your favorite slides can be accessed on a new platform: Canva! This new format adds to our existing options (PowerPoint and Google Slides), expanding your ways to utilize our first-rate presentation content. We’ve started with a selection of Canva-ready...

How to print PowerPoint notes
Crafting an impactful PowerPoint slideshow and delivering a captivating presentation are distinct skills. The first focuses on designing appealing visuals to convey a clear message, while the second involves employing effective presentation techniques to ensure the audience grasps the idea. The content of this article will help you with the latter part of this process, guiding future presenters on how to print PowerPoint with speaker notes to enhance your presentations success and effectiveness.

Discover Our Online Presentation Software for Free
We have great news for you today! If you’ve been a Slidesgo fan for years (or months, or weeks, or days, or mere hours, we welcome everyone!), you’ll probably know for now that our templates are available mostly in two formats: for use in Google Slides and PowerPoint.Google Slides is a free tool, since you only need a Google account in order to use it. PowerPoint, on the other hand, is part of the Microsoft Office suite, so it’s not a free program, but that didn’t stop it from being one of the most popular options in the world!What if we...

Webinar: Presentation Audit
With more than 15,000 templates released on Slidesgo and a user base composed of millions of people, we estimate that the total number of presentations created adds up to… um, a lot! Our team of professional designers work very hard to provide you with editable slides so that the only thing you need to do is, well, customize the elements to your liking. Starting from any given template, the results may vary a lot depending on the person who edited the contents.Have you ever wondered “Is my presentation good enough?” and wished that an expert on presentations looked at your template...
- Available Courses
- The Google Teacher Podcast
- Kasey as a Guest
- Video Library
- FREE Downloads
- Choice Boards
- Google Resources
- Google Classroom
- For Tech Coaches
- Favorite Books & Gadgets
- Presentations
- Blended Learning with Google
- Google from A To Z
- Dynamic Learning Workshop
- Bulk Discounts
- About Kasey Bell
- Google Training for Schools
- Sponsorship and Advertising
- Connect on Social
- Copyright Policy
- Privacy Policy
Shake Up Learning
Shake Up Learning in your classroom today!
How to Insert Audio in Google Slides (Step-by-Step)
May 2, 2019 by Kasey Bell
The long-awaited Google Slides audio feature has finally arrived!

For many years, teachers have been asking me how to add audio–usually narration or background music–to Google Slides.
Google has heard our request and we now have a new menu option: Insert > Audio ! Hooray!
There are so many ways that we can use this feature in our lesson plans and student projects.
If you are looking for project ideas, be sure you take a look at my previous post: 25 Ways to Use Audio in Google Slides .
Currently, this feature is only available on the desktop version of Google Slides.
How to Insert Audio in Google Slides! Hooray! We can finally add narration, background music, or any type of audio we want! #gsuiteedu #shakeuplearning
How to Insert Audio in Google Slides
Below is a YouTube video tutorial. Keep reading to see all the steps (and tips) in the blog post as well.
Keep in mind, this feature allows us to INSERT audio, not create the audio file itself.
The file must be an .mp3 or .wav file type.
You can insert audio clips, sound effects, or music if you own the file and have the rights to use it.
Creating Your Own Audio Files
Since Google Slides doesn’t provide you with a recording option, you will need to use a separate application to record the audio file and save it to your Google Drive.
Here are a few apps to try for audio recording: Online Voice Recorder (web-based, no sign-in), Audacity (Mac or PC), or GarageBand (Apple only).
A simple search in the Chrome Web Store will also help you find many other options, particularly for Chromebooks.
Once you have located or created your audio, you are ready for the next step.
STEP 1: Save your audio file to your Google Drive
If you already have an audio or music file you want to use, be sure it is saved to your Google Drive.
To upload and store files in Drive, go to Drive, click on the NEW button, and select FILE UPLOAD .

Don’t forget! If you are sharing this slide deck with your students or anyone else that will need to play the audio file, the audio must be shared separately from Google Drive.
Right-click on the file from Google Drive, and click on Share .

Share this file so that at least anyone with the link can view. Learn more about sharing in the Guide to Google Drive Sharing .
Open your Google Slides file or create a new one.
(Tip: Type in Slides.new to create a new slide deck quickly.)
Select the slide where you want to insert the audio file.
Then go to INSERT>AUDIO

Select the file from your Google Drive.

After you click SELECT, a speaker button will appear on your slide. Click on the icon to play the audio or move the button anywhere you like on the slide.

Related: How to Record and Insert Audio in Google Slides with Mote
Audio Format Options
There are a few adjustments you can make to your audio file once it is inserted in the slide.
This is similar to the options you see with videos as well. ( CLICK HERE to learn more about video options in Google Slides .)
When the speaker icon is selected (has the blue bars), you can click and drag to place it where you want.
You can also click on FORMAT OPTIONS in the toolbar. (This contextual menu will only appear when the object is selected.)
A sidebar menu will appear that will give you some playback options.
(The screenshot below are the default settings.)

You can choose to have it play “on click,” or to play automatically when you present that slide.
If you choose to have it play automatically, you can also hide the icon because most likely, you won’t need to see it on the screen.
You can also adjust the volume level of the audio.
You can choose to have the audio loop so that it plays over and over again.
And last, but not least, you can uncheck the box that says “Stop on slide change,” and this will allow the audio to continue to play when you change slides.
How to Play Audio in Your Google Slides
You can preview the audio and play while you are in editing mode by hovering over the speaker icon or clicking on it to select it and then click play.
When you are in presentation mode, you can click on the speaker button to play the audio, or just hover and click the play button.
Learn More About Google Slides!
Join the google slides master class online course.
I frequently refer to Google Slides as the Swiss Army Knife of the G Suite tools because it is capable of being so much more than a presentation tool. In this course, you will learn how to use Slides in new and unexpected ways in your classroom that will engage your students and make learning more dynamic!
K-12 teachers are going to LOVE THIS COURSE!
This class is perfect for beginner to intermediate users to take their skills to the next level and become a Google Slides Master!
(Prerequisite: basic knowledge of slides, how to access and create new slides.)
Click here to learn more and to ENROLL TODAY!
Learn All About the Course
What’s Included?
- Video-based lessons
- Bonus 1: Stop-Motion Animation
- Bonus 2: How to Create Magnetic Poetry with Slides and Drawings
- Bonus 3: 50 Google Slides Lesson and Project Ideas
- Supporting Resources
- Best Practices and Tips
- 6 hours of professional learning credit
- Purchase orders are accepted (Just email Kasey[at]ShakeUpLearning.com (replace [at] with @.)
- Bulk license discounts
- Get your whole team, campus, or district on board
Check out all of my Google Slides Resources here!
© Shake Up Learning 2023. Unauthorized use and/or duplication of this material without express and written permission from this blog’s author and/or owner is strictly prohibited. Excerpts and links may be used, provided that full and clear credit is given to Kasey Bell and Shake Up Learning with appropriate and specific direction to the original content on ShakeUpLearning.com. See: Copyright Policy.
Subscribe Today!
Get the inside scoop.
There was an error submitting your subscription. Please try again.
- Contact Shake Up Learning
Privacy Overview
4 Best Free and Easy Audio Recording Tools for Google Slides
These are the best ways to add audio directly to your Google Slides for a more rich result.

The ability to add audio to Google Slides has been one of the most requested features for many years. If you've read our Google Classroom review and are now using that, Slides is a very useful tool to add. Being creative, we have worked around this limitation in the past by embedding YouTube videos in Slides, or using a tool such as Screencastify to record a video of Slides while speaking. Although those workarounds still have their place, it is wonderful that we now have the option to add audio directly to a slide.
Being able to add audio to Google Slides can be used in so many ways in school:
- Narrating a slideshow
- Reading a story
- Making an instructional presentation
- Providing spoken feedback on writing
- Having student explain a solution
- Giving directions for a HyperSlides project
- And much more
Get the latest edtech news delivered to your inbox here:

The only big pain point still left is the actual recording of the audio. You see, even though we can now add audio to a Google slideshow, there isn't a simple built-in recording button. Instead you need to record the audio separately with another program, then save it to Drive, and then add it to a slide.
So that brings up the big question: What are some easy ways to record audio? When using my Windows PC, I can use a free program such as Audacity. Students often will be using Chromebooks, so we need some web-based options.
We are going to take a look at four excellent, free options for recording audio right in your web browser, and then how to add that audio to Google Slides.
- How do I use Google Classroom?
- Google Classroom review
- Chromebooks in education: Everything you need to know
1. ChromeMP3 Recorder from HablaCloud

The first tool we are going to look at is by far the simplest of the bunch: The "ChromeMP3 Recorder" web app from HablaCloud . This tool however is a web app, not a website, which means it only runs on Chromebooks, not other computers such as PCs or Macs.
Tech & Learning Newsletter
Tools and ideas to transform education. Sign up below.
If you are on a Chromebook though, this is a fantastically easy tool to use. Here's how it works:
- First, install the "ChromeMP3 Recorder" web app. You can get the Chrome Web Store link on the site at HablaCloud .
- Once the web app has been installed, you can open it from the Chromebook app launcher when needed.
- When the app opens, simply click the red "Record" button to start recording. You can click the "Pause" button if needed during recording.
- When done, click the "Stop" button.
- The app will now ask you where you want to save the MP3 file in your Google Drive. You can also name the file at this point to make it easier to find later.
That's it! This tool doesn't offer any other editing options. Just a simple way for anyone to record and save audio on a Chromebook.
2. Online Voice Recorder

If you want another tool that is just about as simple but runs on Chromebooks, PCs, and Macs, then you can use the " Online Voice Recorder " website.
If I am not on a Chromebook, this tool is is usually my "go to" for anytime I need to record some quick audio on the web. Here's how it works:
- Go to the site at OnlineVoiceRecorder .
- Click the mic button to start recording.
- Note: You will need to give it permission to use your microphone the first time you use the site.
- Click the "Stop" button when done.
- You will now get a screen where you can preview your voice recording. If needed, you can trim the start and end of the audio to remove any extra dead space.
- When done, click "Save."
- The MP3 file will be downloaded to your device!
Note: If using a Chromebook, you can have the file save directly to your Google Drive by changing the "Downloads" option in your Chromebook settings.
3. Beautiful Audio Editor

The next tool for recording audio online is the " Beautiful Audio Editor ". This tool is reasonably easy to use as well, but offers extra editing features. If you just need to record some simple audio, this might be more options than you need but would be helpful if you plan to do some editing to the recording afterward. Here's how it works:
- Launch the tool at Beautiful Audio Editor .
- Click the "Record" button at the bottom of the screen to start recording. Note: You will need to give it permission to use your microphone the first time you use the site.
- Click the "Stop" button when done.
- Your recorded track will now be added to the editor.
- You can drag the play head back to the start and press the play button to preview your recording.
- If you need to trim out any of the audio, you will need to use the "Split Section" and "Remove Section" buttons in the top toolbar.
- When you are happy with the audio, you can click the "Download as MP3" button to generate a link to save the file to your device.
Editing for this tool includes the option to change the audio speed, combine multiple tracks, fade the volume in and out, and more. You can get detailed directions by clicking the "Help" menu option.
4. TwistedWave

If you need even more fancy editing tools, another audio recording option is " TwistedWave ". The free version of this tool allows you to record up to 5 minutes at a time. Here's how it works:
- Go to the website at TwistedWave .
- Click "New document" to create a new file.
- Click the red "Record" button to start recording.
- You can click at the start of your clip and press the "Play" button to preview your recording.
- If you need to trim any of the audio, you can click and drag with your mouse to select the portion you want to get rid of, and then press the "Delete" button. When you are happy with the audio, you can download it my clicking "File" then "Download."
- Better yet, to save it directly to your Google Drive you can click "File" then "Save to Google Drive." TwistedWave will ask you to log in with your Google account and give permission.
This tool provides other features in addition to simple editing. In the "Effects" menu you will find tools to increase or decrease the volume, fade in and out, add silence, reverse the audio, change the pitch and speed, and more.
Adding Audio to Google Slides
Now that you have recorded your audio with one of the tools described above, you can add that audio to Google Slides. To do this, two things must be true for the recordings:
- The audio files must be in your Google Drive, so if you saved somewhere else, such as the "Downloads" folder on your computer, you will need to upload the files to your Drive. For easy access, and to help with the next step, you should put all of the files in a folder in Drive.
- Next, the audio files need to be shared so anyone with a link can play them. This can be done file by file, but it is much easier to simply change the sharing permissions for the entire folder that contains the recordings.
With those steps completed, you can add audio from your Google Drive to Google Slides as follows:
- With your Google slideshow open, click "Insert" in the top menu bar.
- Choose "Audio" from the drop-down menu.
- This will open up the "Insert audio" screen, where you can browse for or search for the audio files saved in your Google Drive.
- Choose the file you want and then click "Select" to insert it into your slide.
After the audio file has been added to your slide, you can edit several options for it including volume, autoplay, and loop. Here's how:
- Click on the audio file icon to select it.
- Then click the "Format options" button in the top toolbar.
- Finally click "Audio playback" in the side panel that opens.
- Here you can adjust settings such as:
- Start playing "On click" or "Automatically"
- Set the "Volume level"
- "Loop audio" if you want it to keep playing after it ends
- And "Stop on slide change" if you want the audio to end (or continue) when the user moves to the next slide.
Luke Edwards is a freelance writer and editor with more than two decades of experience covering tech, science, and health. He writes for many publications covering health tech, software and apps, digital teaching tools, VPNs, TV, audio, smart home, antivirus, broadband, smartphones, cars and much more.
Digital Leisure Reading Does Less to Aid Comprehension Than Print Reading
GPT-4o: What Educators Need to Know
AI, Absenteeism, Cybersecurity, and More at the Tech & Learning Regional Leadership Summit in New England
How to Record Audio on Google Slides: A Step-by-Step Guide
Recording audio on Google Slides is a breeze once you know how. All you need to do is insert an audio file into your presentation, and voila! You’ll have your voice or music playing alongside your slides. Let’s get into the nitty-gritty of how to make your slides come alive with sound.
Step by Step Tutorial on How to Record Audio on Google Slides
Before we dive into the steps, it’s important to note that Google Slides doesn’t have a built-in recording feature. Therefore, you’ll have to record your audio using a different program, save it to your drive, and then insert it into your slides.
Step 1: Record Your Audio
Record your audio using any recording software of your choice. There are plenty of free options available online, like Audacity or even the voice recorder on your phone.
Recording your audio externally gives you the flexibility to edit your audio file to perfection before adding it to your slides. Make sure to save it in a format compatible with Google Slides, like MP3 or WAV.
Step 2: Save Your Audio File to Google Drive
Once your audio is ready, upload it to Google Drive. Make sure the file is in an easily accessible location.
Saving your audio file in Google Drive makes it super easy to insert it into your slides. Plus, it ensures that your audio stays linked to your presentation, even if you move it to another device.
Step 3: Insert Your Audio into Google Slides
Open your Google Slides presentation, click on ‘Insert’ from the menu, then select ‘Audio.’
This step is where the magic happens. By inserting your audio, you can enhance your presentation and keep your audience engaged.
Step 4: Adjust Playback Settings
After inserting your audio file, you can adjust the playback settings. Here, you can set your audio to play automatically, loop, or hide the audio icon.
Adjusting your playback settings gives you control over how your audio interacts with your presentation. It helps in making your presentation more seamless.
Once you’ve completed these steps, your Google Slides presentation will have a perfectly embedded audio file that enhances your audience’s experience.
Tips for Recording Audio on Google Slides
- Make sure your audio is clear and free of background noise.
- Keep your audio files organized in your Google Drive for easy access.
- Experiment with the playback settings to find what works best for your presentation.
- Consider adding a transcript of your audio for accessibility purposes.
- Keep your audio files short and to the point to maintain your audience’s attention.
Frequently Asked Questions
Can i record audio directly on google slides.
No, Google Slides doesn’t have a direct recording feature. You’ll need to record your audio separately and then insert it.
What audio formats are supported by Google Slides?
Google Slides supports MP3 and WAV audio formats.
Can I add audio to a specific slide or to the entire presentation?
You can add audio to a specific slide or have it play throughout the entire presentation by adjusting the playback settings.
Can I edit my audio file once it’s inserted into Google Slides?
You can’t edit the audio file in Google Slides. Any edits should be done before you upload the file to Google Drive.
Is it possible to add multiple audio files to a single presentation?
Yes, you can add multiple audio files to your presentation, but you’ll need to insert each one separately.
- Record your audio.
- Save your audio file to Google Drive.
- Insert your audio into Google Slides.
- Adjust playback settings.
Incorporating audio into your Google Slides presentation can take it from good to great. Whether you’re looking to add a personal touch with your voice or set the mood with some background music, following the steps outlined above will help you achieve just that. Remember to keep your audio clear, concise, and relevant to your presentation’s content. Also, don’t forget to make use of the handy tips to ensure your audio is a hit. With a dash of creativity and a sprinkle of technical know-how, your presentation is sure to be music to your audience’s ears. So, go ahead, record that audio for your Google Slides and watch your presentations come to life!

Kermit Matthews is a freelance writer based in Philadelphia, Pennsylvania with more than a decade of experience writing technology guides. He has a Bachelor’s and Master’s degree in Computer Science and has spent much of his professional career in IT management.
He specializes in writing content about iPhones, Android devices, Microsoft Office, and many other popular applications and devices.
Read his full bio here .
Share this:
- Click to share on Twitter (Opens in new window)
- Click to share on Facebook (Opens in new window)
- Click to email a link to a friend (Opens in new window)
- Click to share on LinkedIn (Opens in new window)
- Click to share on Reddit (Opens in new window)
- Click to share on Pinterest (Opens in new window)
- Click to share on Tumblr (Opens in new window)
Related posts:
- How to Insert Audio into Google Slides: A Step-by-Step Guide
- How to Change Slide Dimensions in Google Slides
- How to Duplicate a Slide on Google Slides
- How to Hide a Slide in Google Slides
- How Do I Screen Record on my iPhone 13? A Step-by-Step Guide
- How to Record a WhatsApp Video Call on iPhone or iPad: Step-by-Step Guide
- How to Screen Record on iPhone X: A Step-by-Step Guide
- Why Can’t I Screen Record? Troubleshooting for Windows & iPhone
- Why Doesn’t My iPhone Screen Recording Have Sound? – Troubleshooting Tips
- How to Screen Record on iPhone 14
- How to Delete Multiple Slides in Google Slides
- How to Screen Record iPhone: Step-by-Step Guide
- How to Get Screen Record on iPhone 14
- How to Make a Screen Recording on iPad: A Step-by-Step Guide
- IOS 17: How to Add Screen Record on iPhone – A Step-by-Step Guide
- Importing Keynote Presentations to Google Slides: A Step-by-Step Guide
- How to Make Columns in Google Slides
- How to Screen Record on iPhone 12: A Step-by-Step Guide
- How to Record Phone Calls on an iPhone: A Step-by-Step Guide
- How to Disable Screen Recording on iPhone 11
Educircles.org
This tutorial will show you how to teach lessons online by recording a Google slides lesson with audio and video.
Recording your Google Slides presentation is something you might want to do if you have to teach using distance learning and you want to create some digital resources for your students.
So, in this tutorial, I will show you
- How to record a video of you teaching a lesson using Google Slides.
- Some free software that you can use to record screencasts.
- How to upload the video to Google Drive
- How to get a link to share with your students (if you’re a teacher.)
NOTE: This video is also good if you’re a student:
- Instead of teaching a lesson, you’re probably recording a presentation for your teacher.
- At the end, you can use the link to share your video with your teacher to hand in your homework.
Resources you need for this tutorial
A couple of things to know before we start…
- You need a microphone. Maybe your laptop has a microphone, or maybe you want to wear a headset.
- The free software to record the screencast (I’ll show you how to get it in a second) and
- of course you need a Google account.
You do not need a webcam because we’re not doing any video of ourselves. So you can record in your pyjamas or with bed head, and no one will be the wiser.
What software can I use to record a Google Slides presentation (screencast)?
Free screencast software option #1: apowersoft free screen recorder.
I use something called Apowersoft Free Screen Recorder and I use the version from CNET – it’s a very specific download that I use.
I like it because…
- it’s free (it’s not a trial version.)
- There is no time limit to how long of a Google Slideshow video that you can record.
- There’s no watermark.
Of course, because it’s free, it’s a basic version with zero editing features.
(This means you have to record everything in one cut… or use another program or the premium version to edit together your video.)
PRO TEACHER TIP:
- If you record short teacher videos, it’s easier for you to record and maybe less intimidating for your students to watch (i.e. it’s not too long.)
- Also, shorter videos with good titles might make it easier for students to find what they’re looking for later on if they want to review a lesson.
Free Screencast Software Option #2: FlashBack Express
I’m going to show you how to get the Apowersoft download from CNET but of course I’m also recording this screencast of me doing a tutorial of a screencast, so the second screen recorder I’m exploring right now is called FlashBack Express.
SIDE NOTE: It seems like it’s a little easier to trim the beginning and end of a video using FlashBack express, but I find it takes longer to save the video, and I have to go in and set the resolution of the recording myself or the video looks kind of pixelated.)
Video Tutorial:
How to record a google slide presentation for distance learning.
Click here to watch the tutorial on YouTube
Okay so let’s go to Google. If I Google Apowersoft Free screen recorder, I get a couple of options.
The first few are from the official website – they’ve updated the software, which is great, but now this version is a free trial version and so it doesn’t have all of the features that the old version used to have.
I want to go to this CNET link which has an old version of the software, and I know this is the one I want because it has a blue camera icon with a red dot. I just click download here to get it from CNET.
I have already installed this, so I’m going to do a demo screencast of this slideshow about critical thinking.
When the software opens up, it’s going to right away show me a region that I can record. I probably want to record just my screen, so present the slideshow and change the bounding area (the recording area) so it just records the size of the slides in my Google slides.
A couple of things:
You want to wait for your Google slides to completely load. There is a loading bar at the bottom of the screens. You can start your slideshow before the loading bar is completely done, but your animations and transitions may look a little bit choppy. I recommend waiting until the Google slides was completely loaded so that your animations look great.
This is the recording toolbar from the screenshot software I’m using.
- I could go fullscreen and record everything or
- I can just record a region.
There’s an option for video – you can choose between your WebCam or your screen.
There’s an option for audio – right now I’m just recording my microphone.
You may want to choose the system sound and microphone setting if you have a video playing on your computer (in your lesson) and you want to record the sound from the video and your lesson.
Just be aware, the system sound also includes things like “bing” sound effects – like when your windows open.
Couple of other things on the side here.
- I have options and I could turn off the recording toolbar once I start recording if I don’t want it in. If you leave it on the screen, it will be part of your slideshow. (Unless you drag it to the side offscreen.)
- If I click on record (I can see there is) no watermark and the microphone is on.
- I’m going to click okay and so it counts down and then I can start my lesson.
- Once it starts recording, I’m going to make sure that I click on the window with the slideshow to make sure that I’m in the slideshow and then I can use the right and left cursor buttons on my keyboard so that I can slide through the slideshow and that way I don’t have to worry about accidentally moving my mouse when I click on the screen to move forwards.
When I stop recording on this video…
- it will automatically start playing back what it recorded.
- There’s a save button here.
- Even though there’s an option here to change and trim out the beginning and the end to get the exact section I want to record, I find that this older version of the software is a little bit glitchy, and sometimes I’ll set it to record a certain part and then it won’t actually record that part it. (It won’t actually trim to that spot.)
- So, I find it’s best in this free software just to start a presentation right away and then at the end leave a few seconds (of silence) as I end it.
So I’m going to close this – I’m not going to say that version.
I can see my slideshow here. My Google slides is here and the toolbar here is ready to record so I’m gonna hit record and then I’m going to move the toolbar out of the way and I’m gonna start this lesson.
Am I ready yes move that all the way…
SAMPLE LESSON ON CRITICAL THINKING:
Okay, today we’re going to start a unit on critical thinking and before we can talk about critical thinking , I’m just going to ask you a few questions to get your minds on and ready for this lesson.
So, the first “minds on” question is this: What is thinking and what does it mean to think?
So I’m going to get you to pause the video and I’m going to have you jot down on paper or in a Google Docs, what is thinking what does it mean to think?
So, pause the video and jot down some ideas.
Okay, we’re back. So, I’m going to ask you a second “minds on” question and it’s this:
What is critical thinking, and how is critical thinking different from regular thinking?
So, on your jot notes page, jot down a few ideas and pause the video. How is critical thinking, different from regular thinking? Pause the video.
Here is the third, final “minds on” question: How is critical thinking different from being critical of someone else’s ideas?
So, sometimes you might say, oh, that person is criticizing someone. Well, what’s the difference between critical thinking and being critical of someone or someone else’s ideas?
Pause the video and jot down some ideas about how is critical thinking different from criticizing someone.
Pause the video.
Okay, so now that you’ve had a chance to think about critical thinking, I’m going to have you write a paragraph response and I’m going to give you two options.
The first paragraph question is this: Why do we need to think critically?
So, if you choose this option, you look at your jot notes and you write a paragraph. Why do we need to think critically?
Or, option number two: What might happen when we don’t think critically?
So, if you choose the second option, you look at your jot notes from the previous “minds on” questions and you write a paragraph. What might happen when we don’t think critically?
To recap… You’re going to write a paragraph to one of these two questions:
- Option #1. Why do we need to think critically?
- Option #2. What might happen when we don’t think critically?
Once you write your paragraph, hand it in and tomorrow in our next lesson, we’re going to be looking at critical thinking.
So I paused this video. Apowersoft is automatically playing back what I had.
I can see that the lesson started around seven seconds.
If I move this scrubber to seven seconds, I can see the time at the beginning.
So if I move my mouse over the blue triangle – It changes into a white line with two arrows. That’s how I know I can move it backwards and forwards.
If I jump to the end of the video – I can see that even though I jumped forwards, the software is a little bit glitchy and it got rid of my blue timeline area.
So what I do is, on a separate piece of paper, I just write down when I want the video lesson to end (in this case at 242)
I know that because at the bottom here in white, it says 242 in the timeline.
At the beginning, I think I want to start around seven seconds. Maybe, I will start it at five.
Click and drag from around five seconds to three minutes.
(It automatically starts playing back my voice so just pause it.)
I’m just going to move my mouse – hover over the blue triangle
I’m gonna move it to around seven seconds to begin with and then at the other and I’m to move it to around 242 (and I know this because I watched the video and then I just wrote down sometimes.)
So now I have this blue area where I’m going to save.
I’m going to hit the save button… save as a video …file and I can play the video
(I’m not entirely sure that cropped any sounds – and I’ve found, sometimes in the past, this software is not great at trimming at the beginning.)
I’m just going to go to the end of the video…
Okay, so that looks pretty good. I’m pretty happy with that.
… If I open the folder to see where it saved it. It shows me this place where it saves all the videos.
It automatically records
- the first file was just a trial that we had
- the second one is once it records, it saves the file right away.
- this top file here – This is the one I want to upload.
So, I’m just going to rename the file. I’m going to call it Minds On Critical Thinking.
I’m going to play it just to double check this is the video I want.
If I go back to the recording software, I have to click done. If I click anywhere else, it will just beep at me. But, if I click done, there’s a couple of options here:
- this one is to save the file to the cloud. I’m not going to use it. It uploads it to a service that they have here ShowMore. That’s what they’re using. I don’t want to use.
- I could click this button over here that says share. But, I find I don’t actually use these options. It just opens up the Google Drive and I can do that manually myself.
Okay, so I’m going to hit cancel. So I have saved this. I’m going to close the recording. it automatically goes back to recorder. I’m going to close that software.
I’m going to go to my Google drive.
This is the folder where I want to upload my video.
What I’m gonna do is just drag the video file from the folder where it was saved into Google Drive.
Now it is uploading the file into Google Drive.
I find initially, it may take a few minutes for Google to process the video.
So, if I try to watch it right now, I’ll get this message that says, “hey, we’re processing the video. Check it out later” and later on, it will be fine.
I’m going to just escape and get out of that.
But now that it’s up here in my Google folder, I can get the link to share with somebody.
So if I right–click here on the file name, I can click on share and I can choose some options.
I can get a shareable link up here.
- I might change it so that only the people in my school can see it.
- I might change it so that anyone can see it.
If I click on more, I have…
- the option to make the video link either public on the Internet or
- I can make it so that anyone who has the the specific link can find it.
If I choose the top two versions, it means they don’t have to sign in. They can just watch it and that might be what works for you.
Or, you may choose it so that only people at your school or organization can view this.
Or, you might decide, hey, I don’t want that it all. I don’t want to link share and what I can do is then type in people’s names directly and share the video like a normal Google doc.
I’m going to copy this link. And now if I open a new window, if I pasted the link in here, the video will show.
This was the link that I would share with my students or with my teacher.
So that was a tutorial on how to record a Google slide presentation that includes audio and video.
Create Your Course
How to do a voiceover on google slides or powerpoint, share this article.
Voice-over presentations offer a better learning experience because they are a more engaging way to learn.
Some students learn better through visual cues, while others learn by listening. Adding voice-over narration to your presentations allows students to benefit from the best of both worlds.
Thankfully, adding voice-over to your presentations isn’t as complicated as it used to be. In most cases, once you have your slides ready, you’ll need to take just a few extra steps to add narration.
In this post, we’ll share four ways to do a voiceover presentation. This includes voice-over on Google Slides, PowerPoint, screen recording, and with Thinkific. At the end of the article, you will also find five tips for adding a good voice-over.
But, before we get into the options, let’s quickly cover the only ground rule regarding recording voice-overs: Don’t sacrifice sound quality. Viewers are willing to put up with rough visuals but don’t forgive poor sound. Most computers have built-in microphones that sort of get the job done, but we recommend headphones or a USB Microphone to improve the quality of your voiceover.
Related: How To Set Up A DIY Home Video Recording Studio For Cheap
Now, let’s get into your voice-over options.
Skip ahead here.
Option 1: How to do a voice-over on Google Slides
Option 2: how to do a voice-over on powerpoint, option 3: how to do a voice-over with screen recording, option 4: how to do voice-over presentations with thinkific, follow these five tips for adding a good voiceover, final thoughts, 4 ways to do voice-over presentations.
There are two main routes you can take to record a voiceover for your presentations:
You may want to use PowerPoint or Google Slides to add a voiceover to each slide that plays as students navigate the presentation. PowerPoint has recording functionality built in, but with Google Slides, you must take some extra steps to record your audio and upload it to Google Drive before you can embed it on each slide.
Alternatively, you may want to ditch the slides and create a screen recording of the presentation. To do this, you can use any screen recording software as you talk through the slides and turn your presentation into a video lesson. And if you’re a Thinkific user, you can create voiceover slides with the Presentation lesson feature.
Use this list to skip to your preferred voice-over narration method:
- How to do a voice-over on Google Slides
- How to do a voice-over on PowerPoint (Microsoft Office)
- How to do a voice-over screen recording
- How to do voice-over slides with Thinkific
Google Slides doesn’t have built-in functionality to record your slides, but you can still accomplish the same with it with an extra step. You can add voiceover to Google Slides by uploading an audio file saved in Google Drive to each slide.
For this option, you only need Google Slides and a computer with a microphone.
Let’s go through the steps:
Step 1: Create your audio files for each slide and upload them to Google Drive.

Tip: Organize your files with a naming convention. You’ll need to locate these files in the next step. Following a naming convention for your audio files, including Course, Lesson, and Slide numbers, helps keep them organized.
Step 2: Insert audio to your slide and configure play settings
Next, you can insert audio from your drive into each slide individually.

The files you uploaded should be in the Recent tab, but you can also search for the file manually.

Step 3: Configure your audio settings
Google Slides allows you to specify how the voiceover should act. To open the Format options menu, click on the speaker icon, then go to Format options under the Format menu.

Voice-over formatting options for Google Slides:
- Autoplay- When a student clicks the slide, you can choose if you want the audio to play automatically or manually.
- Loop—You can define whether you want the recording to stop or repeat once it reaches the end.

- Button size and color– You can resize the button by dragging the corner and changing the color using the “Recolor” option.

An online course or membership site can be a wildly successful way to monetize content.
Need help figuring out where to start? Get free training and start building for free !
Microsoft PowerPoint has a feature that many average users don’t know about, which allows you to add voice-over narration to your PowerPoint. For this option, all you’ll need is Microsoft PowerPoint and a computer with a microphone.
On Windows computers:
Step 1 – in the top menu, go to slideshow >> record slideshow..
You can record from the beginning of the presentation or from the current slide you’re on.

Step 2- Start recording
Once you select which recording you’d like to go ahead with, you’ll be in full-screen mode with options to record, stop, and replay. Once you click record, there will be a countdown timer from 3.

Anything you type in the notes section of the PowerPoint can be viewed by clicking on the notes button at the top.

The recording will stop automatically once you make it to the final slide. You can also pause, stop, or replay a recording at any time by pressing the pause button in the top left of your screen.

You can also record a video of yourself in the corner by selecting the video option in the bottom right corner.

Step 3 – Testing your narration
Once you’re finished, a speaker icon will appear at the bottom right corner of all the slides with recorded narration.

You can play, skip to time, or adjust the volume of the narration by hovering over the speaker icon.

On Mac Computers:
Step 1 – click on slide show..

In the top menu, click Slide Show and choose the slide you want to start working on. Unlike on Windows, you will have to select the slide you want to work on manually. If it is the first slide you wish to choose, do so.
Step 2 – Click on Record Slide Show

Step 3 – Choose the input method

On the top of the screen, you can turn off the camera, if you wish to, or turn it on.
The next button helps you choose the voice input, whether your Mac’s built-in mic or an external device.
Step 4 – Add a voice-over to slides

As with the Windows version, add voice-over to the slides one by one and add notes if you wish.
Step 5 – Complete recording

Once your voice-over is complete, click the same button to stop recording. Again, you can add notes if you wish. Then, move to the next slide.
Step 6 – Click on tips for more controls

Click on Tips for several functions and shortcuts you can use on your Macbook to control your voice-over recordings. The Mac version of the PowerPoint tool is much easier to use.
Step 7 – Verify your voice-over for accuracy

After your voice-over is complete, return to your presentation and check that it is accurate by clicking on the “Play” icon at the bottom of each slide.
The last option involves recording your screen and audio as you discuss the presentation.
Check out our guide: How To Record Your Screen On Any Device .
We’ll show you free options and two paid options with advanced editing features:
Hit record on video conferencing software
The easiest and cheapest option for screen recording without additional software is to join a Google Meet or a Zoom call by yourself, share your screen, and press the recording button.
This may be easy for a simple presentation but may prove frustrating for a longer presentation—the inability to edit means you’ve got one shot at making it through without any mistakes.
Use a built-in screen recorder.
On Windows 10 or 11 , click Windows + G to open the Xbox Game Bar tool. Press “Start Recording” to begin. This native Microsoft solution allows you to record both video and audio or video alone.
If you’re on a Mac , you can video record the entire screen or just a portion of it. Shift-Command (⌘) + 5 will display on-screen controls for recording the entire screen. However, this method does not record audio, so you’ll need to record your voiceover while recording your screen, but you will need to use a separate device.
Then, you’ll need to combine the audio and video/visual files in an editing software of your choice.
Turn to dedicated screen recording tools.
If you want more control over recording and editing your video and audio, you’ll need to invest in dedicated recording tools like Screenflow or Camtasia .
While dedicated tools will often cost, they also come with a significant boost in editing power.
Here are our two favorite options :

Screenflow is an Apple-exclusive application for video editing and screencasting. It’s one of the best options for screen capture.
This software functions well as a video editor for novice editors, but it lacks the more complex functionality of a tool like Adobe Premiere Pro.

Camtasia is an all-in-one screen recorder and video editor that works on both Windows and Mac. It’s one of the most widely used screen recording and video editing systems and is popular for its user-friendly interface.

Unlike Camtasia, Loom is a dedicated screen recording tool. It’s designed for online educators, corporate professionals, and others who need to communicate on a regular basis but want to offer something more engaging than an email or slide deck.
Users can record and edit video in seconds, using a browser plug-in or dedicated app. Additionally, the platform offers apps for desktops and mobile devices, AI functionality (as an add-on), transcriptions and closed-captioning, and more.
If you’ve created a presentation on an external platform like Keynote, PowerPoint, or Google Slides, you can use a Presentation lesson to display it within your Thinkific course !
This function enables you to record audio while speaking to specific slides. You can also upload a recording for each slide.
For online educators, trainers , or even other creators, this functionality allows you to create a custom, more personable experience for students without adding another tool to your workflow.
To create a Presentation lesson, you will need to upload a PDF file. Each page in your PDF will be converted to images that will be displayed as slides within your Presentation lesson for students to navigate through.
If you have created a presentation in an external platform like PowerPoint, you can simply export it as a PDF and upload it to Thinkific.
Here are the steps to create a Presentation lesson with voice-over on Thinkific .
With that, let’s explore what it takes to ensure a good voiceover.
- Invest in a good microphone – While most cell phones and computers come equipped with built-in microphones, they may not provide the professional-grade quality you’re looking for. If your budget allows, we recommend upgrading to a higher-quality microphone , even if it is on the low-cost side of the spectrum.
- Use a teleprompter – Some people are natural at public speaking, but most of us aren’t. So, try using a teleprompter. You can turn your phone or desktop into one with free apps, allowing you to read out your content rather than memorizing and filling in the details as you go.
- Clear your throat – Most people do not realize the importance of a good quality voice. In fact, voice-over artists are hired simply because of their excellent voices! While you don’t need to hire a professional to record your own videos, you can deliver better content with the right warm-up.
- Sound confident —Confidence doesn’t come with good-quality microphones and teleprompters alone. Practice talking in front of a mirror to ensure that you sound and look great.
- Edit audio if necessary – Despite our best efforts, people make mistakes. Listen to your slides repeatedly and make changes until you are completely satisfied with how you sound.
Whichever method you choose, turning a regular presentation into an engaging voice-over is sure to improve the quality of your presentation.
But here’s a thought: Why not monetize your presentations with an online course?
Sign up with us for free and try it out (we dare you) .
Not ready to take the leap but still interested in improving the quality of your production? Check out one of these related guides:
- Best Equipment & Software For Creating Online Courses
- How to be Confident on Camera (Tips from Jon Youshaei)
- The 5 Most Effective Teaching Styles (Pros & Cons of Each)
- How to Create Video For Your Online Coaching Course
This blog was originally published in October 2022, it’s since been updated in May 2024.
Colin is a Content Marketer at Thinkific, writing about everything from online entrepreneurship & course creation to digital marketing strategy.
- 10 Instructional Design Models For Creating A Winning Online Course
- How To Craft Magnetic & Compelling Learning Outcomes
- Essential Questions To Ask In Your Training Evaluation Survey
- Best Equipment & Software For Creating Online Courses
- How to Create a Compelling Sales Page for Your Online Course
Related Articles
How to create an online course for free (software & tools).
Trying to create an online course on a small budget? Expert Kathryn Hocking shares 10 free & low-cost tools for creating online courses.
How to Plan an Online Course (Templates & Tips)
Learn the top things to do when planning your course, and download the free templates in each section to put these concepts into action.
How to Structure Your Course (Ultimate Guide)
This article will teach you the different components of a well-structured course and provide some tips on how to put them together.
Try Thinkific for yourself!
Accomplish your course creation and student success goals faster with thinkific..
Download this guide and start building your online program!
It is on its way to your inbox
- Trending Blogs
- Geeksforgeeks NEWS
- Geeksforgeeks Blogs
- Tips & Tricks
- Website & Apps
- ChatGPT Blogs
- ChatGPT News
- ChatGPT Tutorial
- How to Embed a Video in Google Slides
- How To Add Audio To Google Forms
- How To Share a PPT In Google Docs
- How to Start a Q&A Session in Google Slides
- How To Link a Video To Google Docs
- How to Create a Resume Using Google Slides
- How to embed Slides in New Google Sites ?
- How to set audio loop in amp-audio of Google AMP ?
- How to Add a Range Slider in Android?
- How to Manage Audio Focus in Android?
- How to add controls to an audio in HTML5 ?
- How to Play Audio from URL in Android?
- How to Embed Audio and Video in HTML?
- Python - Add audio files in kivy
- How to Clear or Release Audio Resources in Android?
- Android Auto Image Slider with Kotlin
- How to preload an audio in HTML5 ?
- How to create an image carousel in New Google Sites ?
- How to Fetch Audio file From Storage in Android?
How to Add Audio in Google Slides
If you want to make your presentation extraordinary with some audio on Google Slides, you have come to the right place. Whether you want to add background music, narrate your slides, or include a sound effect, inserting audio in Google Slides is a breeze. Let’s learn how to make your presentation more engaging with sound.

Add Audio in Google Slides
How to add audio to google slides from an android or iphone, audio format options in google slides, faqs – how to insert audio in google slides.
Adding audio is a fantastic way to engage your audience and make your content more dynamic. Whether you want to include background music, narration, or sound effects, Google Slides makes it easy for you. Here’s the process for you all,
Step 1: Open Google Slides
Open your Google Slides presentation on any web browser or Desktop.

Step 2: Select the Slide
Select the slide where you want to add the audio.

Step 3: Navigate through the ‘Insert’ menu
Click on Insert at the top menu in the Google Slides toolbar.

Step 4: Add Audio
Hover over Audio. You’ll see two options,
- Audio from Google Drive: Choose this if your audio file is already stored there.
- Audio: This lets you upload an audio file directly from your device.
Step 5: Select the Audio
Select your preferred option and choose the audio file you want to add.

Step 6: Do changes accordingly
An audio icon will appear on your slide. You can drag it to position it and resize it for better placement.

It’s often easier to edit Google Slides using a desktop device, you can also add audio files to your presentations directly using an Android or Apple phone. Here’s how you can do the same,
Step 1: Record your audio
Use a high-quality audio recording app to capture the audio track you want to add to your presentation. Edit your files, and save them to your device.
Step 2: Upload the track you want
Navigate to your Google account on your phone, and go to your Google Drive. Here, press the +New, and upload relevant audio tracks.
Step 3: Share Permission
Click on your uploaded audio file in your account, and navigate to sharing permissions. Ensure that the audio track is available for Anyone with the link.
Step 4: Upload the Audio
Use your device to access your presentation document. Here, choose the slide you want to work on. Then select Insert, then Audio, and upload your audio files as needed.
Step 5: Adjust accordingly
Move your audio icon where you want it to appear in your finished Google Slides presentation. If you want to adjust audio settings, you can access format options, followed by the playback menu.
How to Play Audio in Google Slides
To play audio in your Google Slides, you need to follow few steps. The steps are given below for your reference,
- While editing your slide, hover over the speaker icon and click it to preview the audio.
- In presentation mode, click the speaker button to play the audio or simply hover and click the play button.
When adding audio to your Google Slides, you have a few format options. Google Slides supports various audio file formats, including MP3, WAV, AAC, and FLAC. Make sure your audio files are in one of these supported formats to easily integrate them into your presentations. Once you’ve uploaded your audio file to Google Drive, follow these steps to format it to your presentation,
Step 1: Go to Format and Select Customize Your Audio
Customize audio playback options, such as starting to play “On click,” “Automatically,” or “Stop on slide change” by right-clicking the audio icon and selecting “Format options”

Step 2: Stop on slide change
Uncheck the option that says ‘Stop on Slide Changes’ in the format option only.
.webp "how to record audio for a google slides presentation")
In conclusion, adding audio to Google Slides is a powerful tool to enhance your presentations. With a few simple steps, you can insert background music in Google Slides, narration, or sound effects to make your content more engaging and impactful. So, learn Google Slides and start experimenting with audio!
Can you record voice on Google Slides?
No, you can’t directly record your voice within Google Slides. But you can record your voice externally and import the recording.
How do you type audio on Google Slides?
You can’t “type” audio directly into Google Slides. Text and audio are different data types. However, you can add speaker notes to your slides, which are text notes only visible to the presenter during a slideshow.
How do you insert audio into Google Docs?
Similar to Google Slides, Google Docs doesn’t have built-in audio recording. However, you can insert audio files from your Google Drive into your document using the “Insert” > “Drawing” option. Create a drawing and then insert the audio file within the drawing.
How to add audio in Google Slides from YouTube?
Unfortunately, you can’t directly insert audio from YouTube into Google Slides, but you can Download the audio by using online tools from YouTube as an MP3 file. Once downloaded, upload the MP3 file to your Google Drive and then insert it into your slide using “Insert” > “Audio” as mentioned earlier.
Please Login to comment...
Similar reads.

- Google Slides
- Google Apps
Improve your Coding Skills with Practice
What kind of Experience do you want to share?
- Disk & Data Manager
- Partition Wizard
- Power Data Recovery
- ShadowMaker
- Media Toolkit
- uTube Downloader
- Video Converter
- Download Video Converter
- Screen Record
How to Record Audio on Google Slides | Record Slides to Video
Adding audio or narration to Google Slides can make your presentation more vivid. This post introduces how to record audio on Google Slides and how to record Google Slides presentation to a video. Seek an easy-to-use free screen and audio recorder for Windows 10? You can try MiniTool Video Converter that comes with a built-in Screen Record feature.
How to record audio on Google Slides?
In Google Slides, you can add voice narration to make your presentation more vivid and clear. However, Google Slides doesn’t have a built-in audio recording feature that lets you record audio for your presentation. You can create an audio file with free voice recorders, then upload and insert it into your Google Slides presentation.
Still, a guide for how to record Google Slides presentation to a video file is also included in this post.
MiniTool Video Converter Click to Download 100% Clean & Safe
How to Record Audio on Google Slides
To record audio for Google Slides presentation, you can use some free voice recorders. Below we list 3 free tools for your reference.
1. Windows Voice Recorder
Windows 10 has a built-in free voice recorder tool named Voice Recorder. Windows Voice Recorder allows you to record audio from a microphone or headset.
File format: Sound Recorder saves the recorded video in WAV file before Windows 7 and records audio in MPEG-4 Part 14 M4A format in Windows 10.
- You can click Start , type voice recorder , and select Voice Recorder app to open Windows Voice Recorder app.
- Click Record button or press Ctrl + R to start recording voice.
- Click Stop button to end the recording. The recorded audio file will be automatically saved in an .m4a file, under Documents -> Sound recordings folder.
2. Audacity
Audacity is a free and open-source audio editor & recorder application. It is available on Windows, Mac, and Linux. It can record live audio from a microphone or mixer, or record audio from other media.
File format: MP3, WAV, AIFF, FLAC, AU and Ogg Vorbis.
3. Online Voice Recorder
You can also use this free online voice recorder to record audio for Google Slides. It allows you to use a microphone to record your voice directly in the browser and save the audio track as an MP3 file. It also lets you cut your recording.
How to Insert Audio and Video in Google Slides
Supported audio and video formats:
Google Slides supports MP3 and WAV audio formats, and MP4 video format.
Add audio to Google Slides:
- To add audio to Google Slides, you can open your presentation and select the slide you want to add audio.
- Click Insert tab on the menu bar, and select Audio .
- Select and insert the audio file to Google Slides.
Add video to Google Slides:
- Open your presentation and select the slide where you want to add the video.
- Click Insert and click Video .
- In the pop-up window, click Search, By URL, or Google Drive to add a YouTube video or add a video from Google Drive. Click Select to insert the video to Google Slides.
How to Play Audio on Google Slides
- You can click Format Options and you can see some audio playback options.
- You can choose “On click” to play the audio when you click the audio icon and click Play in your presentation, or choose “Automatically” to play the audio track when it comes to this slide.
- You can also adjust the audio volume when presenting, choose to hide the audio icon, make the audio loop, etc.
How to Record Google Slides Presentation to a Video
If you want to turn Google Slides presentation into a video file, you can use some free screen recorders for Windows 10 .
1. MiniTool Video Converter
As the best free screen recorder for PC, MiniTool Video Converter lets you record anything on your computer screen for free and without watermark. It can also record system audio and microphone audio when recording screen.
This program can not only record screen and audio but also convert video to audio or audio to video format. Its Video Download function also lets you download YouTube videos for free.
How to record a Google Slides presentation
- Launch MiniTool Video Converter on your PC.
- Click Screen Record and Click to record screen .
- Open your Google Slides presentation. Press Ctrl + F5 to play it or press Ctrl + Shift + F5 to play it from the very beginning.
- Select Full screen to record full screen or click Select region to choose the Google Slides window to record. Click Record button in MiniTool Screen Recorder window to record the Google Slides presentation.
- Click Stop to end the recording process when it finishes. You will get an MP4 recording file.

How to record audio on Google Slides
If you only want to keep the audio on Google Slides, you can further use MiniTool Video Converter to separate audio from video , namely, convert MP4 to MP3.
- Click Video Convert on the main UI of MiniTool Video Converter.
- Click + icon or Add Files icon to add the source MP4 video file of the Google Slides presentation.
- Click Edit icon under Target section, click Audio tab, and select MP3 as the output.
- Click Convert button to start converting MP4 to MP3 to only keep audio of Google Slides presentation.

2. Screencastify
To record Google Slides presentation to a video file, you can also use Screencastify. It is a screen recorder extension for Chrome. No download required. You can add the Screencastify extension to your Chrome browser and use it to record Google Slides presentation on screen with microphone audio or webcam.
Click to Tweet
How to record audio on Google Slides? Google Slides does not let you record audio for the presentation directly. But you can use the 3 free voice recorders introduced in this post to record an audio file and then insert it into Google Slides presentation.
To record Google Slides presentation to a video file, you can use MiniTool Video Converter or Screencastify Chrome extension to easily do it.
If you have questions about MiniTool Video Converter, please contact [email protected] .
How to Record Audio on Google Slides FAQ
About the author.
Position: Columnist
Google Slides
How to Add Speaker Notes in Google Slides?

Table of Contents
Speaker notes in Google Slides can be a valuable tool for improving your presentations. They provide a way to add helpful reminders and extra details that you don’t necessarily want to include on the slides themselves. These notes act like a personal guide, staying hidden from the audience while giving you easy access during your presentation.
By using speaker notes, you can avoid memorizing everything or relying on cue cards. They act as prompts to keep you on track and ensure smooth delivery. Whether you’re giving a class presentation, working on a project presentation, or preparing for an important event, mastering speaker notes in Google Slides can help you deliver your message effectively.
- Open your Google Slides presentation.
- Locate the speaker notes area . It’s usually a text box at the bottom of your screen that says “Click to add speaker notes.”
- Show speaker notes if hidden . If you don’t see the text box, go to the “View” menu and select “Show Speaker Notes.”
- Start typing your notes . Click on the text box and begin adding your reminders and talking points for each slide.
- Remember, only you see the notes . During your presentation, the speaker’s notes will be visible only on your screen, not to the audience.
- Click away to save . When you’re done adding notes for a slide, simply click outside the text box to save them.
Create presentation slides with AI in Seconds in Google Slides
10M+ Installs
Works with Google Slides

How To Use Presenter View With Speaker Notes?
- Launch Presenter View : Locate the “Slideshow” button in the toolbar. Click the dropdown arrow next to it and choose “Presenter View.”
- Dual-Screen View : A new window will appear alongside your presentation. This window displays your speaker notes, a timer, thumbnails of the previous and next slides, zoom options, and audience tools.
- Focus on Your Notes : Use this dedicated window to refer to your speaker notes while you present.
- Navigate Slides : Control the presentation flow from the main browser window, where your audience sees the slides.
How To Print Your Slides with Speaker Notes?
- Open your Google Slides presentation . Locate and open the presentation you want to print.
- Access the Print Preview : Navigate to the “File” menu and select “Print preview.” Alternatively, use the keyboard shortcut: Ctrl + P (Windows) or Command + P (Mac).
- Choose ‘1 Slide with Notes’ : In the print preview window, under “Layout,” look for the “Print layout” dropdown menu. Select “1 slide with notes” from this menu. This will ensure your slides print alongside your speaker notes.
- Customize Print Settings (Optional) : This window allows you to adjust additional settings like paper orientation (portrait or landscape), paper size, and color mode (color or black and white) to fit your needs.
- Print Your Slides : Once you’re happy with the preview and settings, click the “Print” button to print your slides with speaker notes.
Also Read : How to Print Google Slides with Notes?
Closing Thoughts
Speaker notes are a game-changer for Google Slides presentations. They empower you to deliver confident and informative talks by keeping you on track and providing valuable details at your fingertips. With the ease of adding, viewing, and printing speaker notes, you can focus on connecting with your audience and leaving a lasting impression. So, adopt the power of speaker notes and take your presentations to the next level!
- No design skills required
- 3 presentations/month free
- Don’t need to learn a new software

Frequently Asked Questions
Can the audience see the speaker notes.
No, the speaker notes are private to you, the presenter. Only you will see them during your presentation, while the audience focuses on the slides themselves.
Can I edit my speaker notes?
Absolutely! You can edit and modify your speaker notes at any time. This lets you ensure you have all the critical points you want to cover during your presentation.
What’s the advantage of adding speaker notes?
Speaker notes act as a helpful guide during your presentation. They jog your memory on key points and help you avoid missing any important information.
How do I add speaker notes in Google Slides?
Click on the designated area at the bottom of your slide that says “Click to add speaker notes.” Here you can type in all your talking points and reminders.
Can people editing my presentation see the speaker notes?
No, speaker notes are private and only visible in the presenter view. They won’t be shown to anyone editing the presentation itself.
How do I activate speaker notes on the Google Slides app?
On the app, go to the “View” menu and select “Presenter Notes.” This will display the speaker notes section below your slide.
Save Time and Effortlessly Create Presentations with SlidesAI

How to video record yourself presenting a PowerPoint

What type of content do you primarily create?
Recording yourself presenting a PowerPoint can be challenging, especially getting the technical aspects right. You need to capture your screen, webcam, and audio seamlessly while delivering your content naturally and avoiding awkward transitions between slides.
Finding a tool that integrates all these components can seem daunting. However, recording yourself presenting a PowerPoint doesn't have to be reserved for the tech-savvy or professional speakers.
Whether you're a teacher creating online lessons, a marketer producing a product demo, or someone looking to improve their presentation skills, this guide will walk you through user-friendly tools and strategies that will teach you how to video record yourself presenting a PowerPoint.
- Recording yourself presenting a PowerPoint can be challenging, but it doesn't have to be reserved for experts.
- Video recording offers unlimited reach, repurposing opportunities, and a more engaging experience.
- Use PowerPoint's built-in recording feature or tools like Descript for a polished presentation.
- Other tools like Zoom, Loom, OBS Studio, Clipchamp, and Quick Time Player can also be used for recording.
- Tips include practicing your script, using slide notes, ensuring high-quality audio and lighting, and incorporating storytelling techniques.
Why video record yourself presenting a PowerPoint?
Video recording your PowerPoint presentations offers several advantages:
- Unlimited reach : Unlike in-person presentations confined to a specific time and location, recorded videos allow your message to reach audiences globally at their convenience.
- Repurposing opportunities: Recorded presentations can be repurposed as evergreen content across multiple platforms, such as social media, online courses, webinars, and internal training materials, maximizing their value.
- Personal and engaging : Recording yourself narrating a presentation adds a personal touch and dynamic element that static slides alone cannot replicate. Your viewers can see and hear you deliver the content, creating a more immersive and engaging experience.
How to record your presentation with the PowerPoint app
Built-in recording feature in powerpoint.
1. Open the PowerPoint slide you want to record.
2. Click on the Record tab of the top toolbar.
3. Click on the Record button and choose from any of the following options:
- From Current Slide
- From Beginning
4. You'll see the PowerPoint screen recording window.
5. Select the microphone and camera from the icon on the top-right.
6. Click the Stop and Replay buttons to end or replay your recording.
7. To export your presentation's recording, click Export to Video within the Recording tab.
Benefits : Easy to use, no external tools needed
Limitations : Limited editing capabilities.
How to make a more polished recording of your presentation with Descript
While PowerPoint's built-in recording features are helpful, they may not produce the refined result you want for your presentation. That's where Descript comes in handy.
It’s a whole production studio at your fingertips, with video recording, transcription, and editing capabilities, ready to transform dull PowerPoint slides into an engaging experience for your audience. Descript also has a built-in screen recorder.
You can use Descript on Windows, Mac, or even straight from your web browser.
Here's step-by-step guide to recording your PowerPoint presentation with Descript.
Set up your screen recording
1. Install and open Descript. At the top of the editor, click and open the Record panel.
2. Select Screen.
3. Set Recorder settings:
Adjust the default recording settings to your liking, including the transcription language, the maximum recording resolution, and more.
4. Set recording options. Choose which audio and video sources to record (e.g., microphone, computer audio, camera). Remember to turn the camera on to capture your talking head video alongside your PowerPoint presentation.
5. Click the Additional Settings icon for
- Studio Sound (Optional): Enhance audio quality with noise reduction and background removal
- Transcription (Optional): Enable automatic transcription for easier editing
- Recording separate audio tracks
6. Add (optional) Speaker labels for each audio track (e.g., "Narrator," "Expert") by typing them in the text box next to your audio inputs.
Capture your screen recording
1. Select the right recording option:
- Recording into script : Choose this if you haven’t recorded anything yet.
- Replace selection : Choose this if you already have a script and want to replace a specific section with a new recording.
- Record new layer : Pick this for recording your video as a new layer on top of an existing recording.
2. Click Record at the bottom of the Record panel.
3. Drag over the area of your screen you wish to record. Click Start Recording. Press Space to start recording the full screen.
4. Click Stop to finish recording
Bonus: Descript creates separate tracks for camera, microphone, and computer audio. You can edit each track individually for more precise control.
- Do a short test recording to ensure everything is set up correctly.
- Set your recording to transibe for easier editing.
Editing and polishing your PowerPoint recording in Descript
Descript's AI video editing tool makes it a breeze to trim, cut, and splice your video footage, ensuring a seamless flow from start to finish. You can add smooth transitions and other visual effects to make your presentation pop.
Here’s a glimpse of how to edit and polish your PowerPoint recording in Descript:
Edit your recording like a doc
Did you make a mistake during a slide transition? No problem. Just delete those sections in the text transcript (created automatically by Descript) and the video will adjust to match.
Remove filler words
Sound smoother and more confident by easily removing filler words like "um" and "uh" from the transcript.
Fix voiceover mistakes by typing
Didn't nail your delivery on a specific slide? No need to start from scratch! Descript's Overdub feature lets you simply type in the correct narration and replace the audio on that slide with AI voice cloning.
Boost video quality and engagement :
- Crisp up audio quality by reducing background noise and room reverb with the AI-powered Studio Sound feature.
- Replace your background completely with the Green Screen Video Editor —look like you're presenting in a sleek studio or broadcasting from a beach.
- Enable Eye Contact simulation with AI, so it appears you're making direct eye contact with viewers, even if you’re looking or reading something off-camera.
Other ways to video record yourself presenting a PowerPoint
Use Zoom’s meeting recording feature to record yourself giving a PowerPoint presentation. Start a Zoom meeting with yourself, share your PowerPoint window, and enable recording
Loom is a handy screen recording tool that also offers a webcam overlay. Launch the Loom app or Chrome extension and set it to record your screen and webcam. Expect high-quality recordings but no advanced editing features. The free plan offers only five minutes of recording at a stretch.
3. OBS Studio
OBS Studio is a free, open-source screen recorder/streaming software with a steeper learning curve. It’s popular among advanced or tech-savvy users who need granular customization and control.
To record your presentation, add a "Screen Capture" source to capture your PowerPoint window and a "Video Capture Device" source for your webcam.
4. Clipchamp: Recording natively in Windows
You can use Microsoft’s Clipchamp , the built-in screen recorder and video editor for Windows, to simultaneously capture your computer screen, webcam, and audio for recording your PowerPoint presentation. It’s also available as a browser-based app. You can record up to 30 minutes on screen and webcam recordings.
Users can also adjust the screen and webcam recordings in the editing timeline separately.
5. Quick Time Player Recording natively in Mac
Use Mac’s Quick Time Player to record your PowerPoint presentation. It’s not as straightforward as the other options on this list, so here’s a quick guide to help you out:
- Launch Quick Time Player.
- Select File and go to New Movie Recording.
- You'll be recording your entire screen in addition to recording your face, so adjust the size and location of the recording window so that it's in a nonintrusive corner of your PowerPoint.
- Go to View and select Float on Top .
- Next, go to File and select New Screen Recording.
- On the menu that appears, select Record Selected Portion and drag a border around your PowerPoint and the webcam recording window.
- Press Record and start presenting.
- You can adjust the video quality and the audio source in the webcam recording window.
How to turn your PowerPoint presentation slides into a video
Did you know PowerPoint lets you save your presentation as a video, too?
Here's a breakdown of the two ways you can do so—keeping all the presentation elements (narration, animation, pointer movements, timings, and so on) intact in the presentation itself.
Save your PowerPoint presentation as a video
This creates a separate video file (MP4 or WMV) that anyone can play, even without PowerPoint.
Follow these steps:
- Save your presentation
- Go to File > Export > Create a Video
- Ultra HD (4K): Best for large screens (if you have Windows 10+)
- Full HD (1080p): Great for computers and TVs
- HD (720p): Good for streaming online or on DVDs
- Standard (480p): Smallest size, good for phones
4. Decide on narration
- If you haven't recorded yourself talking, choose "Don't Use Recorded Timings and Narrations" from the dropdown menu
- If you have a recording, choose "Use Recorded Timings and Narrations." You can also set how long each slide shows for (default is 5 seconds)
5. Click Create Video
6. Name your video, pick a folder to save it in, and choose a file type (MPEG-4 or Windows Media Video)
Creating the video might take a while, especially for longer presentations. You can even leave it running overnight. Once done, find your video in the chosen folder and double-click to play it.
Save your PowerPoint presentation as a slideshow
This saves your presentation as a special file (PPSX) that starts playing automatically on full screen when opened. It only works with PowerPoint.
Here’s how it works:
- Make sure your presentation is saved (regular PowerPoint file)
- Go to File > Save As .
- Pick a folder to save the slideshow in.
- Under Save as type, choose PowerPoint Show (*.ppsx) .
- Click Save .
Now when someone opens the file, it will automatically play the slideshow.
Pro tips for making better video PowerPoint presentations
Practice your script.
Recording a flawless PowerPoint video rarely happens in one take. The key is practice.
Record practice run-throughs and watch them back. Make notes on areas that need improvement or parts lacking clarity. The more you drill your script, the more confident and natural you'll sound in the final recording.
Take advantage of PowerPoint's built-in Speaker Coach . The feature shows you whether your pace is too fast or slow, your use of filler words like "um," and suggestions to improve your voice modulation.
Use slide notes for coherent delivery
Wouldn’t a personal teleprompter make presentations so much easier? That’s what slide notes are for.
Having your thoughts and talking points organized within your PowerPoint file lets you have all crucial information and prompts readily available when recording.
Go ahead and add detailed notes or even a full script for each slide. This will help you stay on track and provide a handy transcript reference if you need to do any editing or voiceover work in post-production.
Use high-quality audio equipment or turn on Studio Sound
Poor audio recording quality is a surefire way to make even the most visually polished video feel amateurish. Do your presentation justice by investing in a decent external or Bluetooth microphone and audio interface to capture clear voiceover audio.
If you must use a built-in mic, record in a quiet environment to minimize background noise pickup. Or better yet, pair up with an AI-powered audio enhancement tool like Descript's Studio Sound , which reduces background noise , reverb, and other artifacts.
Ensure a clean background and even lighting
Ditch cluttered backgrounds. You want people to focus on the content of your PowerPoint and not be distracted by the funny shapes and colors in your video.
Your video lighting and framing matters, too. Position yourself facing a natural light source or bring supplemental video lighting to eliminate weird shadows and squinting-level glare.
Look directly into the camera or turn on Eye Contact
Looking directly into the camera is essential to create a sense of connection with the audience. Position your webcam or camera at eye level and imagine you're talking to a friend. If you're using Descript, enable the Eye Contact feature to auto-adjust your gaze towards the camera.
- Dress professionally and maintain a good posture to project confidence and authority.
- Use visuals, animations, and multimedia elements to enhance your presentation and keep your audience engaged.
- Consider adding closed captions or subtitles to your video for better accessibility and engagement, especially for those watching without sound.
- Speak clearly and at a moderate pace, using vocal variety to emphasize key points and maintain interest.
- Incorporate storytelling techniques, real-life examples, or personal anecdotes to make your video presentation more relatable and memorable .
Take your PowerPoint presentations from amateur to amazing
Recording yourself virtually presenting a PowerPoint allows you to distribute your message using the most engaging type of content: video. And there are many screen recording tools out there that can capture your screen and web camera footage with just a few clicks.
But how do you stand out?
By focusing on the presentation's depth, your delivery, and the video's quality. The first two are the bare minimum to communicate your message effectively.
But the right screen capture software and all-in-one video creation tool like Descript can help you with third. Use the tool to improve the quality of your recorded PPT presentations.
With Descript, it's easier than ever to record your screen, polish up the audio, and create stunning visuals all in one place. So why wait?
Sign up for Descript today and simplify your workflow while creating a PowerPoint presentation video that sticks with your audience in the long term.
How do you make a presentation video with your face?
To create a presentation video with your face, follow these steps:
- Open your presentation in PowerPoint.
- Go to the Slide Show tab.
- Click on Record and choose From Current Slide or From Beginning .
- Choose your microphone and camera by clicking on a sound icon on the top-right.
- Start recording by clicking on the record button.
- Speak into your microphone to narrate the presentation.
- Your webcam will capture your face during the recording.
- Click Stop when you finish recording.
- Export your recorded presentation by clicking on File> Export>Create a video.
How do you present yourself in PowerPoint?
To present yourself effectively in PowerPoint, follow these steps:
- Determine the key information to include in your presentation.
- Design and prepare your PowerPoint slides with a cohesive theme.
- Craft a compelling introduction to engage your audience.
- Tailor your presentation to different time constraints for flexibility.
- Capture the audience's attention before you begin speaking.
Related articles

Featured articles:
10 excellent Loom alternatives to record your screen
Looking for the best ways to record your screen without Loom? Find out 10 Loom alternatives, their features, and pricing.

How to record a YouTube video: A guide for all devices
If you want to record a YouTube video for personal use or fair-use repurposing, here are the steps to get started.

For Business
Social media video marketing: Everything you need to know
Learn how to win over potential customers (and the algorithms) with the right social media video marketing tools, strategy, and optimizations.

How to record a podcast on Zoom: A beginner’s guide
Follow this step-by-step guide on how to record a podcast on Zoom, then learn about why it may not be your best recording option.

How to record a Microsoft Teams meeting: 5 easy ways
Learn how to record a Microsoft Teams meeting on any device and get answers to common problems.

10 effective how-to videos to engage your audience
How-to videos are a great way to educate your audience. Whether you’re recording a software demo or training instructions, here’s how to create a how-to video.

Articles you might find interesting
Dynamic vs. condenser microphones: What’s the difference?
A dynamic microphone uses a magnetic field to generate an electrical signal. A condenser microphone is a type that creates audio signals using a capacitor.

Product Updates
Season 2 updates: New ways to make shareable video for promoting your work, blazing-fast publishing, and more
Today we’re releasing our quarterly product update, with new features for making shareable video for promoting your work on social media, blazing-fast publishing, and more.

How to stop saying “um”: 6 tips for removing filler words
Want to stop saying um, like, you know, and other filler words? Learn tips for flawless speech—and how to edit out filler words afterward with Descript.
Case study: 2 podcasters who use SquadCast and Descript to simplify their podcast production workflow
We love showing off the creative folks in the SquadCast and Descript communities that have the art of recording and editing figured out with our integrated platforms.

Podcast livestream: How to stream your podcast live & engage your audience
Curious about what it takes to livestream a podcast? Learn the different types of podcasts and platforms to broadcast from in this guide.

Join millions of creators who already have a head start.
Get free recording and editing tips, and resources delivered to your inbox.
Related articles:
Share this article
How can I record audio for my PowerPoint presentation?
May 13, 2024 /
To record audio for your PowerPoint presentation, simply go to the “Insert” tab, click on “Audio,” and then select “Record Audio.” You can then record your audio directly within PowerPoint and easily add it to your slides. This feature allows you to enhance your presentation with narration, music, or sound effects.
- What are the benefits of creating and delivering online PowerPoint presentations?
- What are the benefits of using Microsoft PowerPoint in Canada?
- How can I add speech or audio to my PowerPoint presentation?
- How can I add audio narration to my PowerPoint presentation?
- What are the benefits of using professional animation in PowerPoint presentations?
Popular Posts

Common Challenges in Tailoring Presentations—and Solutions

Dos and Don’ts of Pre-Seed Pitch Deck Creation

How to Write a Teaser Pitch Deck that Captivates

Tips for a Persuasive How It Works Slide

What Not to Do When Presenting Funding History

Why Raising Funds Without a Pitch Deck Can Backfire
COMMENTS
Step 2: To upload your audio file to Google Drive, log into Drive, select New, and select File upload. Find the audio file on your local storage, typically in Recent downloads, and select it ...
You can use the panel on the left side of the window to navigate through your slides. 3. Click the Insert tab. You'll see this in the horizontal menu above the document, next to File, Edit, and View . 4. Click Audio. You'll find this next to an icon of a speaker near the top of the drop-down menu. 5.
Once the audio file is uploaded, open your Google Slides presentation that you'd like to add the audio to, click "Insert" in the menu bar, and then click "Audio." The "Insert Audio" window will appear. In the "My Drive" tab, select the file you'd like to upload by clicking it. Next, click the blue "Select" button in the bottom-left corner of ...
Open your presentation on Google Slides and navigate to the slide on which you want to add the audio. Click on Insert and choose Audio from the drop-down menu. The new window will display all the audio files you have in your Drive. Locate the audio you want to add, choose it, and click on Select.
Open the Google Slides file that you want to use or create a new one. Choose the slide where you want to insert audio. Then, from the menu choices select "Insert" and scroll down to select "Audio.". Click the audio file you saved to your Google Drive to select it and then click the "Select" button.
In this Google Slides tutorial you are going to learn how to add a voice recording to a Google Slide presentation ( Record your voice / narrate in Google Sli...
Select the audio file with the narration to insert into the current slide and drag it to place it in the desired location on the slide. After the audio file has been added, you can click to preview the sound. Furthermore, you can customize audio playback options to play the audio automatically or manually, in a loop, and to stop the audio when ...
Since you need to record a Google Slides presentation, this is the button you want to click. It's also important to set up the tool correctly before proceeding to the next steps. If you look at the Apowersoft recorder's panel, you will find video and audio options next to the record button on the left.
Open the slide you want to add audio and then click Insert > Audio > My Drive to add the audio you've just uploaded. Insert the Added Audio Recording to Google Drive. Step 3. A speaker icon will appear on the slide and tap it to adjust the playback time, volume, position, color, and size.
In Google Slides, choose a slide. From the menu, click Insert and select Audio. In the Insert Audio pop-up window, select your audio file to be inserted. Position the audio icon on your slide as required. Configure the audio format options as required. Test your audio with both the "Present" and "Share" buttons.
The supported formats are .mp3 and .wav. Open your presentation in Google Slides and select the slide where you want to add audio or music. If you want the audio to be played in all the slides, you'll need to add it to the first slide. Click Insert → Audio. A new window will open.
Open your Google Slides file or create a new one. (Tip: Type in Slides.new to create a new slide deck quickly.) Select the slide where you want to insert the audio file. Then go to INSERT>AUDIO. Select the file from your Google Drive. After you click SELECT, a speaker button will appear on your slide.
Note: If using a Chromebook, you can have the file save directly to your Google Drive by changing the "Downloads" option in your Chromebook settings. 3. Beautiful Audio Editor. (Image credit: Beautiful Audio Editor) The next tool for recording audio online is the " Beautiful Audio Editor ".
Before we dive into the steps, it's important to note that Google Slides doesn't have a built-in recording feature. Therefore, you'll have to record your audio using a different program, save it to your drive, and then insert it into your slides. Step 1: Record Your Audio. Record your audio using any recording software of your choice.
How to record audio for Google Slides with Audacity. Step 1: Download Audacity from your browser and follow the install process. Step 2: Launch the application. Step 3: Audacity has many adjustable features including sample rate and audio drivers that you can personalize if you like.
To add audio to your presentation, find the Insert menu at the top of your Google Slides window. Click on it, and you'll see a dropdown menu appear with a list of options. From here, select the third option from the top: Audio. Go to the Insert > Audio menu to find your uploaded MP3 recorded voiceover.
Step 1: Get started on Riverside. Create a free account on Riverside.fm or choose from a paid plan with more features. Click Get Started and create an account instantly by signing into a Google or Apple ID account, or just enter in your name, email, and preferred password. No need to install anything.
This tutorial will show you how to teach lessons online by recording a Google slides lesson with audio and video. Recording your Google Slides presentation is something you might want to do if you have to teach using distance learning and you want to create some digital resources for your students. So, in this tutorial, I will show you . How to ...
A window appears onscreen counting down five seconds until the recording starts. In Google Slides, go to View > Slideshow on the menu bar. This displays your slides in full screen mode so that you can present. Go to View > Slideshow to play your Google Slides presentation deck in full screen.
Step 1: Use a high-quality audio recording app, like Riverside, to capture the audio track you want to add to your presentation. Edit your files, and save them to your device. Step 2: Navigate to your Google account on your phone, and go to your Google Drive. Here, press the +New , and upload relevant audio tracks.
Step 1: Create your audio files for each slide and upload them to Google Drive. Tip: Organize your files with a naming convention. You'll need to locate these files in the next step. Following a naming convention for your audio files, including Course, Lesson, and Slide numbers, helps keep them organized.
Step 2 - Start Recording. Next, grant Vimeo Record permission to access your microphone and camera. Ensure that you are on the screen with your Google Slides presentation. Vimeo Record automatically syncs with your audio and video sources. Click on the Record button.
Move your audio icon where you want it to appear in your finished Google Slides presentation. If you want to adjust audio settings, you can access format options, followed by the playback menu. How to Play Audio in Google Slides . To play audio in your Google Slides, you need to follow few steps. The steps are given below for your reference,
How to Record Audio on Google Slides. To record audio for Google Slides presentation, you can use some free voice recorders. Below we list 3 free tools for your reference. 1. Windows Voice Recorder. Windows 10 has a built-in free voice recorder tool named Voice Recorder. Windows Voice Recorder allows you to record audio from a microphone or ...
Locate and open the presentation you want to print. Access the Print Preview : Navigate to the "File" menu and select "Print preview.". Alternatively, use the keyboard shortcut: Ctrl + P (Windows) or Command + P (Mac). Choose '1 Slide with Notes' : In the print preview window, under "Layout," look for the "Print layout ...
Record new layer: Pick this for recording your video as a new layer on top of an existing recording. 2. Click Record at the bottom of the Record panel. 3. Drag over the area of your screen you wish to record. Click Start Recording. Press Space to start recording the full screen. 4. Click Stop to finish recording.
To record audio for your PowerPoint presentation, simply go to the "Insert" tab, click on "Audio," and then select "Record Audio.". You can then record your audio directly within PowerPoint and easily add it to your slides. This feature allows you to enhance your presentation with narration, music, or sound effects. 0.