Training Presentation Example
Are you training a team of new recruits to your company? Or delivering a webinar on a topic in your industry? To pull off a training session, webinar, or coaching session effectively, you’ll need an organized presentation as a visual aid.
A good training presentation can provide structure to your speech and boost your confidence as a presenter. It can also deliver your message efficiently, and stick with your audience long after your presentation is over.
Use our training presentation template to:
- Present information simply and logically
- Help you stay focused on your speech
- Motivate, inspire, or inform your audience

Customize Your Training Presentation Template
Structuring your training presentation properly and including the right slides are both important. Illustrate your points by using graphics like bullet lists, pictographs, bar charts, images, and more. Each of these options can be added to your training presentation template in an instant. We reviewed the best training presentation examples and here are the recommended slides to include:

Pro Tips for Creating Your Training Presentation
Here are tips from our favorite training presentation examples.
Does your presentation inform, inspire, persuade, or entertain? Tailor your speech according to your goals.
Make sure you add an introduction in the beginning of your presentation. Explain why you’re speaking on the topic to build your audience’s confidence and trust.
Will your audience want to listen to your speech, or engage with it through questions and stories? Are they completely new to the presentation topic or will they be experts?
Before your training or webinar ends, leave your audience with a summary of your main message.
More Popular Templates

30-60-90 Presentation Template
Learn how Beautiful.ai’s 30-60-90 template can help you plan a new employee's first 3 months onboard

Press Kit Presentation Template
Beautiful.ai’s press kit template helps you compile your company information that a media contact may request if they were to cover you in their publication or news outlet.

Software Integration Presentation
There’s a lot of moving parts involved in software integration. Keep it all organized with a software integration template.
.jpeg "compile a visual presentation for a training session")
Master Thesis Presentation Template
Learn how Beautiful.ai’s master thesis template can help you showcase your knowledge and end your degree program on a positive note.

Company Overview Template
We've geared this Company Overview template specifically for those with younger companies — be it a small, medium or even startup business.

Project Retrospective Presentation Template
Learn how Beautiful.ai’s project retrospective template can help your team reflect on a completed project and learn from the successes and failures.
How to Create an Inspiring Presentation for your Workshop

Have you ever been at a presentation or workshop and found yourself forcing your eyes to stay open?
Bored out of your mind, and struggling to focus, the host is bleating on… and on. The concepts are too hard to follow, the words becoming a meaningless, tiresome cloud. Next time you struggle to sleep, it’ll be this guy’s waffling drivel that’ll send you to the land of nod.
Together, we’ll discover how to put the “Pow!” back into PowerPoint.
Design your next session with SessionLab
Join the 150,000+ facilitators using SessionLab.
Recommended Articles
A step-by-step guide to planning a workshop, how to create an unforgettable training session in 8 simple steps, 47 useful online tools for workshop planning and meeting facilitation.
In this article we’ll explore:
- Why visual presentations are important
- What to consider when planning presentations
How to design an engaging visual presentation
- How to choose an engaging format
- Which tools are best for designing presentations
- Tips on how to deliver your workshop presentation
Why Are Visual Presentations Important?
The purpose is to share brilliant ideas with an audience. This might be a piece of work or an educational concept in a workshop; the aim is to communicate with people, make them feel something , and take action. We all want our audience to leave an event feeling motivated and inspired, and that the workshop was of value.
The importance of visuals is often overlooked, either due to a lack of confidence in working with visual design, lack of time or both. For a workshop facilitator, using visual aids could actually save time, better represent our ideas and concepts to a group, and help you present more confidently. “How?”, you ask.
When it comes to saving time, a picture is really worth a thousand words. There is no need to type up your presentations or make wordy bullet points on every slide when a simple image can share the message for you.
Visual presentations put across an immediate message. Images are emotive and can deliver a story much faster than words, visuals are processed 60,000 times faster in the brain than text . An image that can share an idea, can be more memorable than trying to remember very specific terminology.
Creating visuals becomes part of a wider conversation in inclusive communication. Images are universally understood, and the eyes can “read” a picture with less effort than reading and comprehending several paragraphs. Imagine describing the color blue as a phrase. It is much easier to present it as it exists.
Graphics are easy to share, and 65% of us are Visual learners . For anyone who has missed out on the meeting, a visual booklet can do the job of sharing the subject with them, and the added benefit of being able to view it in their own time. The power of social media also plays a huge part in the spreading of information and well-designed infographic slides can take your presentations and workshops outside of the room, with the potential to make a global impact. Sharability goes further with visual elements.
For me, a visual presentation is a lifesaver! Using slides has saved me a lot of time and made me feel more confident whilst presenting too. I don’t fumble around with notes, as the visuals can act as a prompt to remind me of where I’m at in my talk.
When presenting online, I find the value of visuals and slides even more important. It takes the attention away from my actions, and onto the graphics themselves. The participants can hear what I’m saying, but their eyes focus on the visual information which helps in retaining information and ideas beyond the workshop.
What to consider when creating a visual presentation
I’m naturally quite a visual person, and I’ve often wondered if I could make a visual presentation without planning first what it is that I want to say. As an experiment, I gave it a go and it was a huge struggle. So, if you think that designing visuals is something that only designers can do and that they find it easy… it doesn’t and they don’t.
As a starting point: get out a pen and paper and write down everything you want to say. This ensures you have all of the ideas and information out in black and white . I find that by leaving space between the writing and structuring, coming back at it with fresh eyes is a perfect way to work without feeling rushed. I rarely add to what I’ve written, it’s mostly about removing.
Recently I had written a LOT of information for an event. A day later, I took a second view to edit. A lot of writing is quite self-indulgent, so it helps to consider the audience . I cut up sections of the paper, keeping only what was the most necessary information , and collated it together. The rest of the sentences didn’t make the cut. You can try the editing exercise here .
Less is More- an exercise in editing #presentation #presentation skills #writing #workshop #meeting design This exercise is ideal for editing written content in a hands-on way. A simple and effective exercise for editing workshop content or presentation text for talks. Use it when you have to write for a specific audience and want them to stay focused on the most important information.
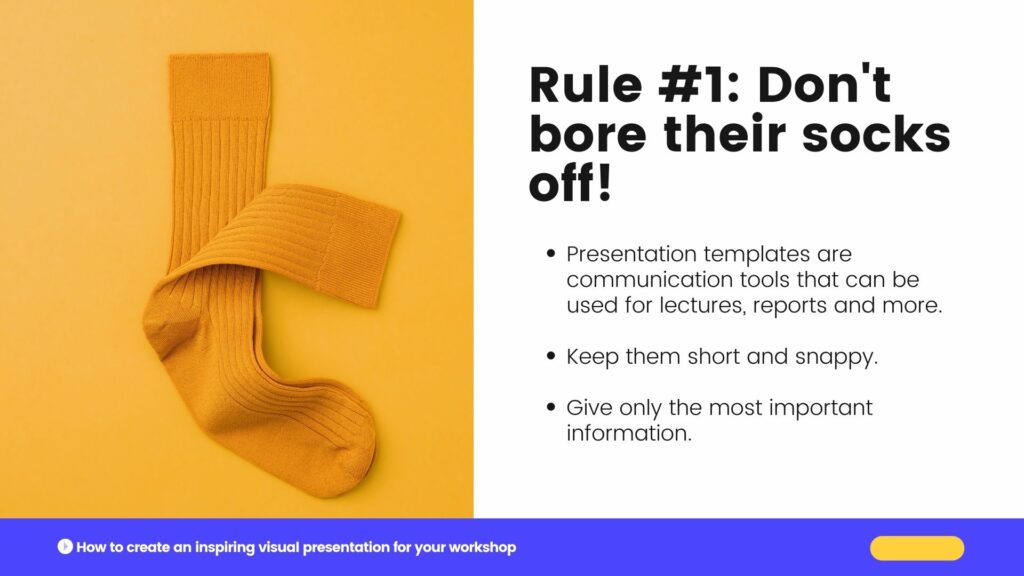
As an expert in your field, it’s likely you’ll have a lot of content, and editing is so valuable to ensure your audience has relevant details. Don’t bore their socks off 😉
So now that you have an idea of your core content, you can move along the process, considering these factors before jumping into the design stages:
Let’s start by asking, “ who is your audience? “
- if you are being commissioned to present a topic to a pre-determined group, then you’ll need to cater to their understanding of the topic. You’ll want to ensure that the information will be relevant and meets or goes beyond their expectations.
- if the topic is of your own choice, and the angle you’ve chosen to take, who do you want to take part? Finding them, and attracting them to the workshop will be part of your marketing efforts, as well as how you plan your structure and content.
We wouldn’t plan a workshop for ten-year-olds in the same way we might for adults. Consider what tone of voice you might use, the style in which we present how we use slides, and the content itself. You won’t be able to do this for each and every individual, but how you determine and empathize with your listeners can be done by creating a persona, or several personas .
Create an overarching idea of who might be present, then consider how to engage them and meet their needs by asking yourself the following in more depth:
Why are they there?
Let’s look at their reason for attending your event. Have they come to learn from you in particular? If you are a specialist in your field and the workshop is an area of great interest to people, you’ll most likely have a deep understanding, and along with that, expectations to be filled.
Have they come to gain a better understanding of the topic? Are they there to challenge themselves and their existing views, or perhaps yours?
How much do they know already?
Are your participants already proficient in the topic you’re delivering? You’d hopefully know this in advance of your workshop so you can adapt your material, and create a pitch in line with the group’s knowledge. If their experience level is unknown, an opener to your discussion might be to ask about their subject knowledge, ideas and expectations. That way you can tailor your language and approach.
It helps to be well versed in your workshop, to select sections you can skip out in favor of diving deeper into more advanced information. Improvisation isn’t usually a skill you’d immediately connect with presenting, but with practice, learning how to improvise can become an empowering tool to have.
For beginners, you’ll most likely take an introductory approach. This doesn’t mean it has to be dry or boring. Make it more interesting and engaging by weaving in an interactive exercise, or team debate within your presentation design. That way, the participants can gather more hands-on experience to support their understanding. This can of course use visual handouts, such as a workbook, or include a well-designed visual exercise on an interactive whiteboard.
What is their background and communication style?
Your presentation style, language, and cultural references should be considered in the writing and designing process. I recently attended a workshop on how we can create better inclusion for diverse audiences by considering the language we use. It really made me think about how we often lean towards using English as a “default” language, and how words often hold different weights and contexts in other languages.
Remote workshops and presentations mean we may have a very diverse audience than if we were presenting in-person, in one location. Online could mean 140 people in different time zones across different countries with different backgrounds. Being aware of differences makes it easier to use inclusive, easy-to-understand language in your presentation so that no one feels alienated. Speaking with clear articulation will make a big difference in how you are understood.
You might have the best workshop on the planet, but if you don’t communicate in the style of your group, the impact will be lost. Do they want a short and snappy talk with a clear outcome at the end? Some audiences appreciate a motivational and inspirational talk that is led through emotional storytelling. Knowing their communication preferences can win over or lose your audience.
Before you begin designing your presentation, it’s important to consider what your purpose is. This is your mission statement, your project brief and your raison d’être. Here is where you want to ask yourself, what is it that you want your audience to think, feel or do? Are we creating an emotional impact or an educational goal?
Be as clear as possible with your core message, making it as specific as possible, so that you can keep this in mind throughout the process of writing, editing, designing and delivering presentations. This will keep your focus sharp, and avoid any unnecessary derailments taking your viewers away from what it is you hope to achieve.
Common purposes are to: inspire, inform, persuade or entertain .
- I want to inspire the audience to help reduce food poverty by leading a cookery workshop using supermarket waste.
- I want to inform the group about the future of rural tourism, so they might consider how they could adapt their own farming businesses to host visitors.
- I want to persuade my team to reduce our use of plastic in the fashion industry, by presenting a viable alternative made from mushrooms.
- I want to entertain by pretending to be a Martian visiting Earth for the first time . My purpose is to help the participants understand their product from a new perspective!
A Martian Sends a Postcard Home #creative thinking #idea generation #remote-friendly #brainstorming #energizer #team Use Craig Raine’s poem A Martian Sends a Postcard Home to spur creative thinking and encourage perspective shifting in a group. After a warm-up, you can then use this martian perspective to describe your product or service and gain new insights and ideas.
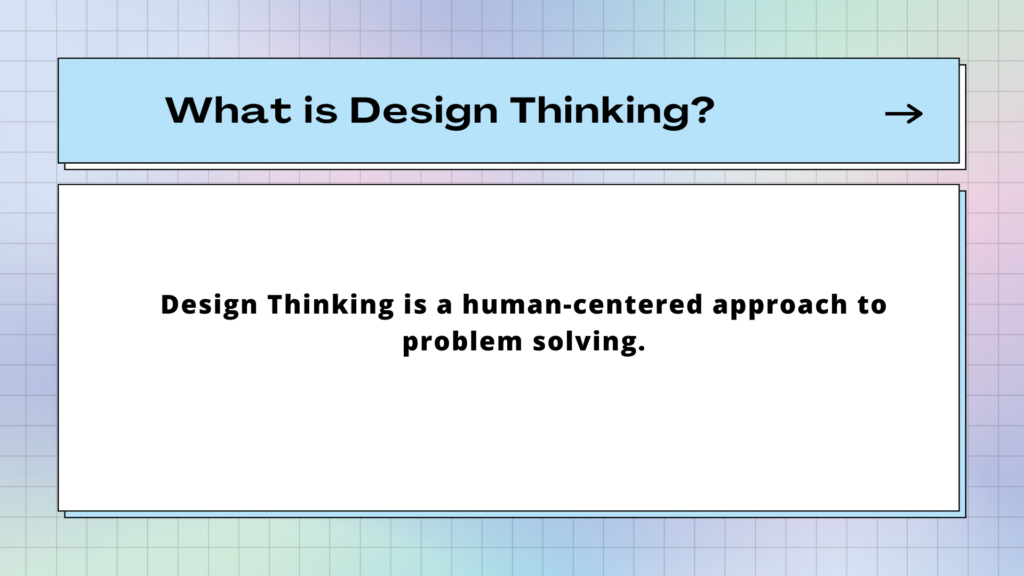
I recently designed a workshop called Design Thinking for Beginners and ran a SessionLab show and tell session aimed at facilitators who would like to run the workshop for teams new to design thinking. If you missed it, you can watch it back here. My purpose was to inform the attendees of the challenges newbies have with design thinking, and how they can make it a fun and digestible process.
I chose to relate each stage of design thinking to an everyday project of choosing or baking a birthday cake. My presentation was broken down into manageable chunks. Describing design thinking could be a laborious task, but keeping the text definition simple, with plenty of white space highlighted the point in one sentence.
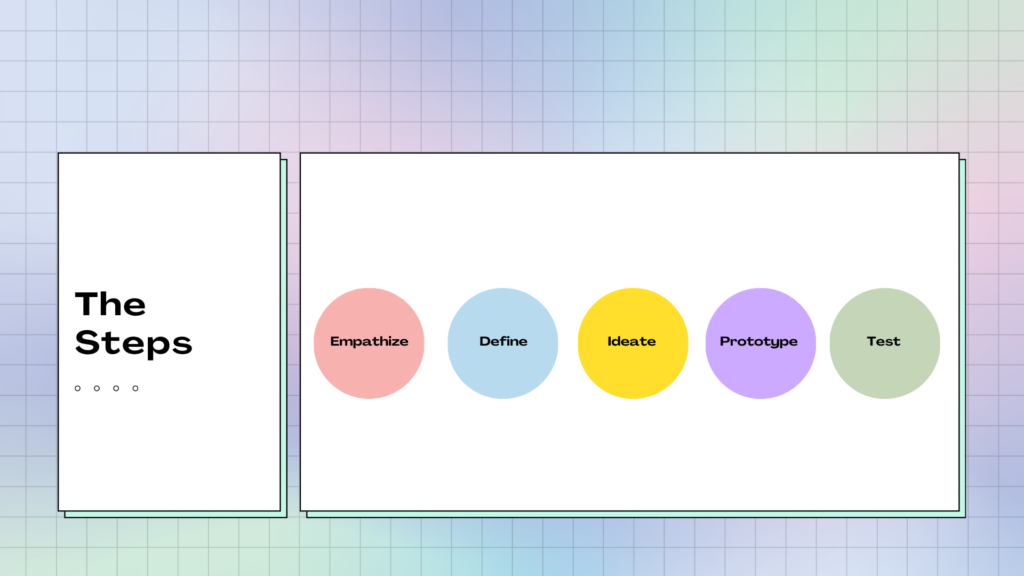
For the workshop itself, I incorporated interactive exercises throughout the process to lock in the understanding of design thinking and how we generate ideas. For the ideate stage of design thinking- I created a game show style exercise called the Ideas Vault where I chose to create a fun layout like a 90s computer game. The design process worked by gathering inspiration using a mix of pre-made Canva templates and adding my own twist. I talk more about Canva and design tools here .
The way you choose to structure a visual presentation will depend wholly on the purpose. The way you communicate your key message should be crafted in a way for the audience to follow along easily and act on those all-important takeaways at the end.
A solid structure will also make sure your points are clear so that you stay calm and on track when presenting. The structure of your topic, when written down and broken into manageable chunks will help hugely when it comes to creating the visual elements later. (we’ll get to that in the next section!)
Some common ways to structure your presentation could be
- Problem > Solution > Impact. Which you might use if your purpose is to inspire the audience to take action on a topic, by showing them a viable solution.
- You may start with an informative session and create a workshop as we mentioned before, to lead people through a learning process.
- A creative structure might be through storytelling , which might inspire and entertain. Once upon a time, this event happened, followed by the outcome and moral of the story.
- In any case, your presentation could follow the classic layout of: introduction, main body & conclusion, and you’d have a good foundation for your content.
Introduction
You have the first few seconds to grab people’s attention. First impressions are just as important as they’re made out to be! The introduction is the most important part, where the group will connect with you and decide if they want to listen to you or not. What would be a great hook for the audience to immediately buy into your presentation from the start?
Some people introduce themselves at the beginning- but you don’t have to. If you’re beginning with a story, this can be a very effective way to warm up your participants and make sure they’re really listening to you. Then you can introduce yourself when you know they have your attention, and they value what you have to say.
A quote or a provocative question or fact can get people thinking. You may use a thought-provoking image, which could be a prop, a video or a photo that introduces your presentation from the get-go. If you are offering a solution, go straight to the problem in your introduction.
Main body of presentation
Now that you’ve got your audience’s attention, and they have gathered an understanding and are intrigued to learn more, we can delve into the juice of your subject.
The main body involves presenting the data, and the important pieces of information. If you are offering a solution to the problem you introduced, expressing this with a visual, we place the subject right in front of them, and they don’t have to work so hard and use their imagination.
The main body doesn’t have to be a one-sided conversation. Listen! You might ask the group to interact, asking for their perspective. A talk or workshop can be a dialogue between the presenter and the group.
Your conclusion should be as snappy and engaging as your introduction. It may even loop back to the provocative question, or challenging problem. You’ll want to consider the impact on the attendees and most importantly, what you want them to do next! What action do you want them to take beyond the workshop?
What are the key takeaways? Highlight them as Problem > Solution > Impact.
An effective class should tie up the opening question and objective, but still leave space for further exploration and discussion. Like a great film! They should not be saying, “I’m glad that’s over”. If it’s been designed with the audience in mind, they should feel something- energized or excited.
Now that you’ve written the content and designed the structure, here are our top tips to get you creating impactful visuals to complement what you present verbally. We’ll cover:
- How to design your slides and what information to include
- How typography impacts accessibility and design
- Making smart color choices for both emotional connection and accessibility
Designing your slides
When approaching a blank canvas, it can be hard to know where to start. Some people start with deciding how many slides they’ll use- the question, “How many slides are too many slides?” crops up regularly in these types of articles. Expert presenters say not to go over 20 visual slides, but this will of course depend on the length and complexity of your subject. Another tip is not to spend more than a minute on each slide to keep it snappy and people engaged.
If I am creating a presentation from scratch, I’ll start with the first slide, and keep it very simple before moving on to the next one. Always asking “what is this slide saying? ” The first slide will be the title of my discussion, which will be visible to everyone joining the room. It sets the tone for what the topic will be about. If we were creating one around the topic of designing workshop slides, it might look like this:
I think the most important thing to remember is that each slide should have its own purpose, and not be overloaded with text. Where possible, use an image rather than words and think about how we might convey this message visually. Always start by defining the message and asking what the key takeaway for participants is. You can always further explain verbally.
When choosing an image, consider the audience and their context- a local photograph they can relate to, or a familiar face will often have more to say than a generic stock image.
Text will likely be used on your slides, and how much text is too much? If you begin planning your content by writing it all out and keeping only the most important parts, designing your slides will be a lot easier. I’d always recommend editing continuously throughout the process to create a meaningful message. If you can say something in 3 bullet points rather than 10, please do! Your audience will have a much easier time retaining the information.
“Good design is invisible”
Unless the subject of your presentation is about typography, it’s probably not the best time to be cracking out your most recently found, favorite font that’s “a bit different” or unusual. Stick to standard, trusted and most legible fonts that audiences can read and are familiar with. Otherwise, they’ll distract from the content. And content is King.
“Good design is invisible”, a true and very useful phrase from Dieter Rams, who considers functionality in design as honest, long-lasting and with as little design as possible. This is a good theory to take throughout the design process. When looking for the right font, consider the tone you are using throughout your delivery too, and the overall message you are giving.
Good typography is your best friend for a presentation. When creating visuals for screens, as mentioned before, we are not typing out our speech word-for-word. Any text that is visually presented will have a very definite purpose as to why it is being displayed. This might be a quote, some data or the title of a book along with some further information in short form. Presentation slides are not a book.
Legibility is the most important thing when it comes to designing your visuals. Sans serif fonts are typically the best option for reading on a screen. Help your audience understand what you are communicating as quickly and easily as possible by ensuring the font sizes are easy to read.
Create contrast and visual interest by choosing two fonts, one for headers and one for any body text. The contrast should still be harmonious, and not jarring to the eyes. Font hierarchy can help the audience differentiate between key points and more specific information. By choosing different weights and sizes, you can ensure your message is clearly heard and understood.
- Minimum font size for main copy and bullets: 18 points
- Preferred font size for main copy and bullets: 24 points
- Preferred font size for headers or titles: 36 to 44 points
Personally, I like to choose font sizes slightly larger than recommended for body text. When we have a text-heavy page, I prefer to give the text plenty of surrounding white space and edit the copy as much as possible. From a design perspective, it helps legibility; and from a content perspective, it doubly ensures only the relevant text is presented on screen. I would definitely edit again at this stage. In this example for screens, the body text is 28pt and written in Open Sans, and the “Ideate” heading is 44pt in Agrandir wide.

Before creating any printed material for presentations, consider if it will truly be used and the environmental impact. I’d usually opt for sharing a digital version for people to refer back to after the workshop. It’s good practice to create a black and white version so that if it is printed out, the printing costs will be lower. There are of course digital accessibility issues, and some people might prefer a printed version. If so, select a serif font for any long text in a workbook or feedback form, with a minimum font size of 10-12pt.
Key points:
- Use Contrast
Deciding on the color scheme for a presentation is one of my favorite parts! Of course, you may have been given a branded color scheme to use, but if you have free reign in color choice and you enjoy the creative process, it can be a lot of fun.
For my show and tell on Design Thinking, I used the analogy of baking a cake and I felt that they conjure up an image of pastels. I used a gradient on the background so that I could use an array of colors without it being overbearing. I selected five key pastel colors for each stage of design thinking and to evoke a playful feel throughout. I was careful not to allow the colors to take over, so you’ll primarily see black and white use of color at the forefront for legibility.
Here are the key elements of how to choose a color scheme to complement your content :
The first, and most important point when choosing colors, is to use contrast. Make sure your text and graphics stand out from the background and are easily seen. Contrast is the difference in opposing colors so that they don’t blend in together A light background should use dark text and perhaps one or two bold accent colors to highlight key points. A dark background should use light fonts.
If you’re unsure of how easy a slide is to read, there are an array of online tools that can check the contrast for you by following the web accessibility guidelines. On Contrast Checker , you can enter the HEX code of the background and foreground colors, and you’ll get an idea of legibility. The sliders in the tool can be used if you need to improve the contrast and amend the color choices. There are also resources to guide you in how to select the color with an online eyedropper tool in case you’re not familiar with the HEX color codes.
Another contrast checker tool also shows the background and foreground with text examples and gives a rating to the accessibility of the text. This website has a whole host of tools, and can even pick a suitable palette for you.
If you’re working with a client, they may already have their own brand packaging and presentation template, including their colors. You may feel that this removes your choice of colors as it has been decided already, for example, they may use an in-house color language to refer to particular data on a graph. But the opposite may be true and might mean further considerations for visuals. It is important to know how to choose because when you create graphics or diagrams because you may have to select colors so that explanatory text can be seen on top of a shape or part of a graph.
When working with a client, it is important to share any documentation with their design team, and the best way to do this is by providing editable files. Working with a designer can massively lift the load on creating your presentation visuals. If there is no design team, but you are given design assets to work with, sharing both your visuals and your presentation agenda for collaboration and sign-off is a must. Create your agenda in SessionLab , and attach your visual presentation for ease of sharability.
Studies have shown that color has an effect on expressing or feeling emotions. It will help to consider the tone that you are using throughout your presentation, the message you are delivering, and how you might want your audience to feel.
Warm colors, in the middle of the color spectrum, that aren’t too bold or too light create a warm and comfortable feeling. Bright reds and oranges can feel energetic and powerful. Or even create a sense of danger. In contrast, cooler colors such as greens, blues and purples can feel calm or evoke a sense of sadness.
We have an exercise that can help identify emotions and grow a better emotional vocabulary, the feelings wheel . It includes a visual attachment displaying the emotions in a range of colors- this may help select a tone for your color scheme.
The Feeling Wheel #emotional intelligence #self-awareness #icebreaker #team building #remote-friendly By growing our emotional vocabulary, we can better identify our emotions, and check in with ourselves. Doing so can help bring a level of self-awareness, and a better understanding of others.
How to choose an engaging presentation format
We are almost there! The content is edited and your visual slides are ready, the next stage is to consider the format in which you’ll deliver your workshop or meeting. This is when you can consider any additional tools that you can use to your advantage when presenting. This might be video, photography or visual data. Or even props. Consider which other visual aids may help people to better understand the process or story you are conveying.
What presentation method will keep them engaged? How will you inspire and capture their imagination?
I’d recommend simplicity, and not try to include every form of media. Consider the purpose and message and select which format delivers it most effectively. Used with intention, video can be great. But animated graphics or flashy text is unnecessary and will add to the cognitive load of your audience, especially if they have any visual impairments.
Video can be very effective, so long as it’s kept brief. If it’s longer than a minute, you may lose the attention of the audience, and the momentum of your presentation. A film clip should be creative and add another dimension, not an infomercial or promo piece, it’s a tool to say something that you cannot put across otherwise.
Films can have great benefits of showing a story. In a TED Talk about the intelligence of crows, the scientist showed a clip of the crow bending a hook to create a tool and fish a piece of food out of a tube. It put across his point better than anything he could’ve said.
I use recordings in situations like this, to demonstrate a case study. It’s often more powerful to have the original storyteller sharing their experience than me giving a second-hand account of the tale. Bringing in other voices in this way can add further diversity to your workshop.
Still images
JPEGs are compressed files and are used for photo formats. When a photo is taken, it is a RAW file that is editable. Once it’s compressed to a JPEG, it retains around a tenth of the information, meaning it is a smaller and less detailed file. JPEGS are used in photography, but not in vector graphics (drawings, typography, graphs, etc), as the detail lost can create pixelation if you aim to blow the image up to a larger size.
PNGs retain detail and are editable. They are still compressed files, but the pixels aren’t lost. Any graphics you create should be saved as a PNG, as you’ll be able to keep the image sharp, regardless of the size.
The photography you choose must be relatable. I’m definitely not against stock imagery per se, it’s amazing to have access to a library of searchable images to strengthen what you are saying. But, often you’ll see the same images repeated in different workshops and presentations and they’ll start to lose their meaning, or become too familiar. There are great free resources like Unsplash and if you spend time looking for a more unique way to put your point across, there are lots to choose from.
I’ve also had an Adobe Express subscription which gives access to photography and graphics and templates which you to customize in editing with little design skills. Ideally, being able to take your own photographs, or work with a professional photographer to capture exactly what you want is going to give your audience a far more unique experience. This is often a luxury.
As facilitators, a way around this could be to create our own library of photos that we capture at each presentation. When I’ve run crafting workshops, it feels quite natural to take photographs of the work we are creating. And those who are camera-shy, they’re more open to photographs of their hands in action. Over time, we’ll have a whole collection of resources.
If you enjoy photography, having a good camera as part of your kit might intrigue people, invite people to take photos of each other and the workshop process. This could be an exercise that you do to open or close your talk. Or in some cases, especially if it’s a visual presentation, and not too distracting, invite people to take their own photos and share after with a #hashtag (promo and photos in one!) And of course, get everyone’s signature attesting they are OK with photos.
Visual data & symbols
Visualizing data makes it more interesting, engaging and memorable than cold hard figures. For the majority of audiences, it’s easier to understand in a visual format than in a list of forgettable numbers. By creating charts, graphs or maps, we are able to see patterns and understand the context of the statistics. A pie chart displaying percentages in corresponding colors tells our brain quickly which section has the largest number.

Even when we analyze word-driven data, a visual representation is easier to see straight away. When I’ve worked with community groups in the design thinking process, we’ve often used Google surveys to capture written evidence. This type of qualitative data can be a challenge to sift through, so for an initial overview, a tool like word cloud can show how many times a particular word or phrase appears and turns it into an image. The more times a word appears, the larger it is on the image.
The use of icons and emojis (sparingly! And in context 😉) can add another element of visual understanding to presentations. Illustrations and hand-dawn symbols might better express your point than a photograph too. An opportunity to work with a live scribe or graphic facilitator whilst presenting could add an interesting dimension to a talk. If it involves audience participation, having someone on hand to capture the conversation visually can keep engagement and attention going!
The best tools for designing your presentation
Canva has become a much more powerful tool than it was. You can even edit your workshop recordings with it now! It’s perfect for anyone with little design knowledge as it has great templates for presentations, lots of which are free. It has social media templates too, which are perfect for advertising your upcoming workshop.
Adobe Creative Suite
I do love Creative Suite , and it still is a great package of tools for designers. Photoshop, Illustrator and InDesign are the industry standard for design tools and have all the capabilities you’d need as a graphic designer. If that package is beyond your scope, Adobe Express is a great option for pre-made templates and stock imagery. Like Canva, it also works well as an app on a smartphone.
Keynote
Keynote comes as standard with MacBook and has had a whole new upgrade including being able to use the camera on your Mac or an external camera to show yourself directly on the slides. Super handy for an online event! You can also show the screen of a connected iPad or iPhone and it now has co-hosting capabilities.
Of course! SessionLab is where you can keep all of your presentation notes, and break down the agenda into blocks, so if you decide to switch up parts of your presentation- you can drag and drop to a different section of your talk. It is a much easier process, as it will also keep any other attachments or exercises in that block neatly collated in one place. It’s easy to share with any co-hosts or clients before the presentation day arrives!
How to deliver a workshop presentation with visuals
Some people memorize their speech word for word, which can work well if you’re a dab hand at amateur dramatics.
On the other hand, that might feel too stressful or rigid. Bill Murray is famously known to read a script once and throw it away! For you, it may be better to consider the key points you’d like to make, and really know your subject matter so whatever arises, you’ve got it covered. Your visuals might act as a prompt for you too, the main message will be communicated visually, and you can feel free to go into more depth.
The best way to ensure that you nailed the slide design for your session is to practice. It’s important to practice noting your timing, that you’ve covered all the important points, and that each slide transitions smoothly from one to the next. You want the presentation to be as seamless as possible. The best way to practice is in front of someone and gather feedback.
Before our design thinking for beginners show and tell, I rehearsed in front of my fellow team members, instructing them to wear their “facilitator’s hats” whilst listening, so they could hear from a facilitator’s perspective and give constructive feedback.
Afterward, you can continue to add and edit, removing some sections, and making room for more key discussions to be had in-depth. If it is an informal presentation that you will run more than once, it could develop over time. If it is a one-off very important meeting, it’s vital to get as much preparation practice as possible.

Expect nerves
If I get nervous, I purposely talk slightly slower than I usually would naturally, and it calms the nerves down. There’s also no harm in mentioning that you’re nervous, it’s an honest approach and can create an authentic connection.
We’re all human. And no one would expect you to not be nervous. Nerves, to an extent, can be a good thing. They bring a bit of energy and focus to your talk, and a little adrenaline. If you know your subject matter inside out, all you really need to do is breathe, and talk.
Speaking with one of our community members, Yvonne Chin Irving on the subject of nerves, she suggested diaphragmatic breathing, or more a more fun term, “balloon breathing”:
Belly breathe. Slowly. Imagine your tummy has a balloon that fills up when you breathe. Exhale all the air. Notice your tummy as it flattens. Next, breathe in slowly and fill your “balloon” with breath 🎈. Do this a few times to help calm yourself down. You can start this on the way to your session, do it in the car or while you’re setting up for your session. (It really works) Yvonne Chin Irving
We’d love it if you joined the conversation in our SessionLab community!
Having a technical rehearsal beforehand can help avoid blips. Ensure the right people have screen-sharing abilities, and that screens in the in-person space work. Iron out any microphone issues or problems with echo prior to the big presentation! On the day itself a technical disaster could strike, so here are some practical tips to circumnavigate these and stay professional:
- Create different formats for your presentation. If it’s a Keynote or Powerpoint, have a PDF version available in case of any tech issues you’ll still have a high-quality version available.
- If including video, have backup screen-shots as images to demonstrate your points in case the video doesn’t run.
- Be analog ready. Know your presentation without the use of slides- or print them out so that if there is a complete technical breakdown, you can confidently present. This might include creating printed handouts for people to refer to when you direct them to do so. Or, if they have their own smartphones, send them the link to your visuals or any important videos to watch back after your talk, to avoid distractions as you speak.
Accessibility
Ensuring your audience has the best experience, requires being aware of accessibility needs. Is access to the building easy for anyone with physical disabilities? Are the seats comfortable, and allow for ease of viewing for people of different heights?
We’ve discussed the best way to use typography for ease of reading for anyone with visual impairments, and when setting up your screen, it is a good idea to see how it will look in the actual event environment. Additionally, you may share larger-print handouts on yellow paper for anyone with dyslexia. This is another reason why knowing your audience in the planning stage will make sure your presentation is enjoyable and accessible for everyone.
Agenda planning
SessionLab is an agenda planning tool that makes presenting a lot smoother! You are able to allocate time to each section of content to keep yourself on track throughout. In your preparation stage, you can attach all of your materials to your SessionLab agenda, knowing exactly when you’ll use each of them. It’s so neatly organized and easy to edit and shift blocks if you decide to change the order of content for a future session.
In conclusion
I hope you have found this guide valuable, and that it inspires lots of ideas when planning your next presentation! There are a wealth of resources dotted around this article, and I’ll include a few more here that I highly recommend:
Lean Presentation Design A whole website by Maurizo la Cava dedicated to presentation strategy
Ted Talk: How to Write Less, but say more is an excellent talk by Jim VandeHai about short and effective communication.
Five Things to Know About Your Audience Before You Present if You Want to Be Successful useful tips on how to empathize with your group for a more successful presentation.
Let us know below in the comments if you have any questions, or any tips of your own to add to the conversation!
Leave a Comment Cancel reply
Your email address will not be published. Required fields are marked *

Going from a mere idea to a workshop that delivers results for your clients can feel like a daunting task. In this piece, we will shine a light on all the work behind the scenes and help you learn how to plan a workshop from start to finish. On a good day, facilitation can feel like effortless magic, but that is mostly the result of backstage work, foresight, and a lot of careful planning. Read on to learn a step-by-step approach to breaking the process of planning a workshop into small, manageable chunks. The flow starts with the first meeting with a client to define the purposes of a workshop.…

How does learning work? A clever 9-year-old once told me: “I know I am learning something new when I am surprised.” The science of adult learning tells us that, in order to learn new skills (which, unsurprisingly, is harder for adults to do than kids) grown-ups need to first get into a specific headspace. In a business, this approach is often employed in a training session where employees learn new skills or work on professional development. But how do you ensure your training is effective? In this guide, we'll explore how to create an effective training session plan and run engaging training sessions. As team leader, project manager, or consultant,…

Effective online tools are a necessity for smooth and engaging virtual workshops and meetings. But how do you choose the right ones? Do you sometimes feel that the good old pen and paper or MS Office toolkit and email leaves you struggling to stay on top of managing and delivering your workshop? Fortunately, there are plenty of online tools to make your life easier when you need to facilitate a meeting and lead workshops. In this post, we’ll share our favorite online tools you can use to make your job as a facilitator easier. In fact, there are plenty of free online workshop tools and meeting facilitation software you can…
Design your next workshop with SessionLab
Join the 150,000 facilitators using SessionLab
Sign up for free
Researched by Consultants from Top-Tier Management Companies

Powerpoint Templates
Icon Bundle
Kpi Dashboard
Professional
Business Plans
Swot Analysis
Gantt Chart
Business Proposal
Marketing Plan
Project Management
Business Case
Business Model
Cyber Security
Business PPT
Digital Marketing
Digital Transformation
Human Resources
Product Management
Artificial Intelligence
Company Profile
Acknowledgement PPT
PPT Presentation
Reports Brochures
One Page Pitch
Interview PPT
All Categories
Top 7 Training Presentation Templates with Examples and Samples

Sherin Sethi
“The only thing worse than training your employees and having them leave is not training them and having them stay.” - Henry Ford
Employee training and productivity optimization have increased thanks to integrated learning and hybrid work environments. These days, corporate training consists of an array of live online courses, SCORM courses that workers can take at their leisure, and in-person group sessions.
Training is the fuel for development, creativity, and employee empowerment—it's not just a box to be checked during the onboarding process. Teams that get practical training are equipped with the knowledge and abilities necessary to meet the expectations of their specific field of work. It's essential for maximizing potential, encouraging teamwork, and ensuring that everyone in your organization has the tools necessary to give their all.
According to a Fierce Inc. survey, 86% of executives and workers attribute workplace failures to ineffective communication and cooperation. Thus, the modern corporate world greatly needs effective business communication. In light of this SlideTeam curated the Top 10 Business Communication Training Presentations to make the task easier.
Training presentations are the foundation of the efficient flow of data. They create a bridge between knowledge and understanding, breaking down complex ideas into easily understood nuggets. An effective presentation may engage your audience, improve retention, and lead to thought-provoking conversations.
Picture yourself as a mid-level marketing manager in a bustling technology company. You are given a task to deliver a compelling training session to your team. You know the importance of effective presentations, but the challenge of crafting engaging content that aligns with your industry and captivates your audience is real.
You are not alone in this. The struggle of developing training presentations that are visually-appealing, educational, and engaging for the trainees is one that many professionals experience. With the help of our pre-designed PowerPoint Templates, draft your training presentations like a breeze. These top 7 training presentation templates are 100% editable and customizable. This gives you the time to focus on the content rather than the design of the presentation.
Let's explore the Templates now!
Template 1: Business Development Training template
This PowerPoint bundle includes a total of 78 slides that showcase the value of training and development initiatives for businesses to maintain current expertise among staff members and address any skills shortages. It highlights the interpersonal, communication, emotional intelligence, and other abilities needed for employees to achieve their objectives and keep a positive mindset inside the company. Additionally, this deck offers leadership abilities like strategic thinking and people management, which support treating staff members just and favorably while enhancing their self-assurance and productivity. It emphasizes technical abilities, including proficiency with program writing like Python, SQL presentation strategies, etc.

Download Now!
Template 2: Workforce Training Template
This PowerPoint Bundle highlights the relevance of workforce training to keep your employees up to date. It consists of several coaching programs showcasing various methods to train your employees, the importance of coaching for employees and employers across the firm, etc. It also includes training guidelines for employees at the workplace and a game plan for maximizing their performance. Aiding employees in achieving their personal goals by lending additional support and enabling personalized learning experiences to manage skill gaps are also part of this informative bundle.

Template 3: Learning Management System Training Program template
This informative deck, a compilation of 46 slides, depicts your organization's requirement for a learning management system. Issues like delays in the project, employees suffering from skill gaps in compliance with their job profiles, and low conversion rates, which lead to the need for training within the organization, are a part of this bundle. Developing a training program that could be classroom-based, online training sessions, or on-the-job training, etc, is also included.

Download now!
Template 4: Employee Training Program Proposal Template
The core component of any successful business lies in efficient personnel administration. It is now essential for businesses to focus on the overall growth and development of employees in the workplace. The employee training program becomes essential to train newly hired employees and help them adjust to their roles. This informative bundle includes evaluating employees by assigning them tasks, providing feedback, conducting ice-breaking sessions between the trainer and employees, etc. The timeline of the training program, vision, and mission of the training program, along with past client testimonials, are also included.

Template 5: Training proposal template
This PowerPoint Template is a deck of 29 slides. It depicts an in-depth proposal regarding corporate training and professional growth. Objectives and actions such as team building workshops, ensuring the stability of the business, time management, etc., are included. These must be carried out during the training session, along with identifying the responsibilities of the teams and employees. Drafting a budget and presenting an estimated time of the course is also a part of this informative bundle.

Template 6: Workshop Training Proposal Template
Professional grooming has become essential to human resource management, encompassing anything from writing formal emails to being proficient in the newest software and engaging in fundamental communication and personality development activities. This PowerPoint Slide presents an outline for pitching your company’s resources for training your clients’ employees. It showcases a cover letter, table of contents that allows you to get through all the major highlights of the presentation, objectives, and project context. Components of your proposed workshop, like corporate communication, Microsoft suite proficiency, personality development, etc, are included with this training proposal. Specially designed graphs, charts, and line diagrams ensure your pitch is presented in the best possible outline. The training objectives of the workshop, like social media presence management, formal etiquette, corporate lingo fluency, fundamentals of finance, and more, are also presented.

Template 7: Training And Development Powerpoint Template
This PowerPoint Template set showcases how training and development maximize the performance of employees in an organization. It includes an interactive learning roadmap of planning, delivering, and evaluating. This eye-catching deck includes a personalized development plan, a professional development plan, monitoring, and feedback, along with information about the team, the vision of the organization, and its goals.

Template 8: Training Schedule Powerpoint Template
This PPT Slide showcases the importance of a training schedule for smoothly conducting the tasks. The training schedule for enhancing email writing skills, improving communication skills, or any other skill businesses require to stay ahead of cut-throat competition from their competitors is presented in different colors for a clear understanding of the client.

Elevate Your Training Sessions
It is not just the information but also how it is delivered that makes training impactful. You may enhance your training sessions with our tailored training presentation templates, curated to your needs. Whether you are holding client presentations, team training, or product launches, our PowerPoint Templates for training presentations offer a polished and captivating framework that ensures consistency and saves you time. The meticulously planned layouts, interactive features, and attention to detail will captivate the audience, making your training sessions more memorable and successful.
Related posts:
- How to Design the Perfect Service Launch Presentation [Custom Launch Deck Included]
- Quarterly Business Review Presentation: All the Essential Slides You Need in Your Deck
- [Updated 2023] How to Design The Perfect Product Launch Presentation [Best Templates Included]
- 99% of the Pitches Fail! Find Out What Makes Any Startup a Success
Liked this blog? Please recommend us

Top 5 Critical Analysis Templates with Samples and Examples

Top 10 Recruitment Budget Templates with Samples and Examples
This form is protected by reCAPTCHA - the Google Privacy Policy and Terms of Service apply.

Digital revolution powerpoint presentation slides

Sales funnel results presentation layouts
3d men joinning circular jigsaw puzzles ppt graphics icons

Business Strategic Planning Template For Organizations Powerpoint Presentation Slides

Future plan powerpoint template slide

Project Management Team Powerpoint Presentation Slides

Brand marketing powerpoint presentation slides

Launching a new service powerpoint presentation with slides go to market

Agenda powerpoint slide show

Four key metrics donut chart with percentage

Engineering and technology ppt inspiration example introduction continuous process improvement

Meet our team representing in circular format

Home Blog Education How to Create and Deliver Training Presentations That Make an Impact
How to Create and Deliver Training Presentations That Make an Impact

Blended learning and hybrid workplaces have improved how employees train and optimize their work output. Corporate training is now a rich combination of in-person group sessions, live online lessons, and SCORM courses that employees can follow at their own pace.
Are your training presentations up to the challenge?
Learning & Development strategists, HR, and performance management managers take note. In this guide, we’ll show you how to create a training deck from start to finish . Plus, some template examples and optimization tips for creating training presentations that make learning more effective.
What is a Training Presentation?
A training presentation is a set of slides created to teach a skill or increase knowledge of a topic. They’re used in training and development strategies in companies worldwide. Across the slides in a training presentation, employees learn essential information and skills to do their jobs better and grow in their careers.

Types of Training Presentations
Training presentations form part of all L&D initiatives in an HR department. They have one of two purposes; to train employees for the job at the present moment and to train them for growth and the future.
Training for the job instructs employees on how to carry out their assigned tasks and responsibilities . The skills they learn follow guidelines from the company’s brand, processes, and structure.
Examples include:
- On-the-job training
- Practice simulations
- Orientation
- Skillbuilding

To train for growth , employees are given resources to increase their capabilities, like learning new technology or methodology. They learn skills that will help their career future, preparing them for a promotion within the company or for changing teams laterally in a new role.
Growth training includes topics like:
- Soft skills
- New technology
- New processes or methodologies
- Job rotation
- Personal development
- Career expansion

Why Are Training Presentations Important?
High-quality training and development initiatives in a corporate setting offer many benefits. Three of the most relevant are employee buy-in and retention, company culture, and professional development.
Employee Buy-in and Retention
When training presentations are achieved at a high standard, team members in People Management, Human Resources, Learning & Development, and DEI feel confident and proud of their work in training fellow employees.
They accompany employees along training paths, so it’s better if they’re invested in what they’re sharing. For a solid brand identity —and clear company culture—thorough training helps with buy-in straight out of the gate with an onboarding strategy. Then continues with regular training initiatives that lead to retention, satisfaction and loyalty.
Company Culture
The role of company culture in an organization has a lot of weight towards brand equity. But a strong culture doesn’t happen overnight; it’s instilled in the employees’ minds through team-building activities, motivational seminars, and equitable training in all aspects of work.
Company culture flows through the ongoing interaction between trainers and trainees. Group sessions and training days help build relationships between teams and employees. Feeling invested is a trait developed through the right type of training.
Professional Development
High-quality training for professional development is essential in every organization. On-the-job training for daily tasks is only part of the puzzle; employees also need to train for growth.
In-company training for professional development includes training for higher—or lateral—positions. Offering training for the future not only heightens professional development for individual employees but also carves a strong culture.
How to Create a Training Presentation
Let’s create a training deck together. We’ll use a case study to guide us along.
You and your L&D team at an IT Company are preparing a company-wide training session about the SCRUM framework before implementing it in more aspects of the business. The Training presentation is titled “Understanding the SCRUM Framework. Agilizing our productivity, together.” Sessions will be blended/hybrid to accommodate both in-office and remote employees. There will be a camera recording the instructor, and remote employees will see the presentation and the video of the instructor talking side by side on their screen.

1. Plan and prepare
Planning and strategizing are as important in training as in other business areas. Your training presentation already has a purpose, company-wide training about the SCRUM framework. But if you aren’t sure what employees need to learn to increase productivity and employee satisfaction, you’ll have to do some research.
Figuring out your people’s learning and development needs takes some work. Are you using a performance management system? What does the reporting reveal? Where are employees failing to set goals? How can training presentations help?
Analyze the reports, and you’ll see where they’re lacking. Plan upskilling strategies around those topics. With a clear objective, start preparing the training, presentation, and conversation points for group sessions.
Put together a lesson plan covering the main characteristics of your presentation. Use it as a foundational reference during the production of the training presentation slides .

2. Create a basic structure
Creating a structure for a training presentation is a critical step before designing slides or even writing the content. Training presentations with a set structure are more impactful than ones without.
Following a structure makes the transference of knowledge much simpler. Write an outline that follows that structure. Do it on a document or use a visual tool like a storyboard to overview the full presentation deck .
The main structure for any training presentation has three parts; beginning, middle, and end. Yes, it’s that simple.
- Start with an agenda slide that covers the contents of the training presentation and builds a framework of what to expect out of this training program. Follow by listing the syllabus for the course and required learning material that will be accessible, and where students should download/access such content.
- Inform learners that at the end of the presentation, they will have all the basic and practical knowledge to understand and begin working with a SCRUM framework.
- Explain (if necessary) what they need as a prerequisite to get the most out of the training.
- Any instructions they need to follow during the session, such as how to approach practical exercises or instructions for deliverables expected.
- Share all supplemental material through links they can download or access from. This should also include any book chapter mentioned, video resources, photos, etc. Cloud-based storage accessible from the Company’s intranet tends to suit all needs.

- Throughout the meatiest slides of the presentation, teach them about the SCRUM framework. Then share how their team will use it to agile production and work in general.
- Use visual training techniques to explain themes and topics clearly.
- Create interactive moments for learners to imprint information.
- Incorporate a variety of teaching formats to cover all learning styles; video, text, images, infographics, interactive activities, etc.

- Craft a few slides summarizing what they learned using a highlights list.
- Have learners take a quiz to test their knowledge and offer results that include the right answers to the questions they got wrong.
- Share references to supplemental material where learners can get more information on the topic.

The Middle Structure
In the middle is where most of the magic happens. A training presentation is much like a lecture in its purpose. Therefore, using teaching and lecture techniques in your presentations can only be a good idea.
Here are six lecture structures that you can apply to the middle of your presentation. For the SCRUM Framework training, we’ll use the first example .
- Start with what students can be expected to know to what students don’t know.
- Proceed from reality to abstract ideas, theories, and principles.
- Begin with generalizations and continue with particular examples and applications.
- Open with simple ideas and round them up with complex ones
- Start sharing common misconceptions and then explain the truth.
- Go from a whole view to a detailed view.
3. Gather resources
Organize all the content you’ll need for the presentation in a folder on the cloud or your team’s content library. Browse the SlideModel template collection, where you’ll find plenty of slides, full decks, and cut & copy elements to include in your training deck. For the slides to describe the SCRUM framework, we used this 3D PPT template of how the parts of the framework are interconnected.

Resource checklist for any training presentation:
- All visuals, videos, and PowerPoint slides add value to the training.
- Case studies and examples support your points.
- Your company has the appropriate licenses to use the resources that are included in the final design.
- All references, citations and attributions are gathered for inclusion in the training documentation.
- Your templates are from Slidemodel.
4. Design the slides
Now, it’s time to put it all together and design the slides. Get all your resources ready, a list of all the templates you’ll use, and start a new project on PowerPoint.
Have your outline and/or storyboard open and start designing slides. Start with the cover and then follow the structure you decided on. Work your way through to the end and add a quiz. Here are some instructional presentation design best practices to help you along.
- Create visual unity and balance by choosing a color theme and font pairing that supports the brand message and purpose of the training.
- Mind the flow between slides from beginning to end. Use subtle transitions that don’t distract from the learning.
- Use a table of contents, section dividers, and interactive slide menus for easier navigation.
- Ensure each slide has a focal point and a visual hierarchy between all other elements.
All training material emulates the company brand, its values and vision. As marketing material follows visual and messaging brand guidelines, so should internal development content.
Rather than mix & match slide templates, you can try a really fast method to create an entire training presentation by stating its topic, checking the suggested content, and selecting the desired slide design. This is possible thanks to the SlideModel’s AI Presentation Maker .
5 Training Presentation Slide Examples
Are you looking for inspiration to create a training presentation? SlideModel has numerous designs suitable for explaining, visually dissecting, and analyzing the material. Likewise, you’ll find templates that help L&D strategists communicate with instructors during the planning phase and beyond.
Here are five templates that can help with your training presentation design.
Employee Onboarding
First, this multi-slide ppt template for training is an employee onboarding presentation . Use it to cover all characteristics of a corporate onboarding process. Slides include;
- Pre-boarding
- Training Activities
- Onboarding Roadmap
- Title & closing slides

Managerial Grid
The Blake & Mouton managerial grid is a great way to explain and analyze the different types of management based on production concerns and people concerns. Production concerns are characterized by tasks, and people are concerned with relationships.
Matrix Grids can be used for other purposes as well. Like stakeholder engagement , talent analysis , and content marketing.

Multichapter Presentation
Does your training content span long chunks of information? Separate it into digestible sections and create a multichapter training presentation. If it still feels very long, separate each chapter into a lesson of a comprehensive digital course. This multichapter presentation template will help you either way. Plus, it will add considerable visual value to the deck as a whole.

SWOT Analysis
Teaching the SWOT Analysis process is best achieved with a “start big and continue into the details” presentation structure. This 5-slide template starts with the main idea and then delves deeper into each section. A visual structure like this also works for any concept that needs explanatory simplification. Simply separate the main concept into four parts and create a further slide for each.

5Cs of Customer Service
Nothing exudes versatility as much as infographics. This template has one function, to describe and analyze the 5Cs of customer service . Nevertheless, you get six visually different infographic compositions for the same topic in one template. How else can your content be separated into five sections with the same first letter? This—all words with the same first letter—is a mnemonic technique that will help your learners absorb and retain information.

How to Deliver Your Training Presentation
How will you deliver the training presentation to your learners? Depending on the company culture and working model, your training presentation will appear in any of the following scenarios.
1. As visual support to your In-person group training session.
The in-person group training session is the most common—until the pandemic changed many things. Your training presentation is the visual support during the event.
Here are some tips for delivering a presentation during a group training session.
- Practice your ability to talk to a group. Notice your voice inflections or lack thereof. Practice the lesson with the training slides to support your spoken or activity-based teaching material.
- Remember that presenting a business presentation and teaching with a training presentation aren’t the same. If you’re new to in-person group training, research to learn and practice instruction skills.
- While training, maintain constant interaction with the learners. Ask them questions, and let them ask you questions. Invite anyone interested to join the online whiteboard for notetaking and mind-mapping the lesson.
2. As Part of a Live Online Session for Hybrid Teams.
Online, blended learning is quickly becoming popular with L&D teams. But how does it work? And why is it so special?
When you have hybrid teams with some employees in-office, others at home, and even more in other parts of the world, you need training solutions that work for everyone.
For the SCRUM training, we’d do the following:
- Prepare the training presentation slide deck.
- Organize a space for the in-person group and plan the event.
- Set up a camera to record the lesson or training session.
- Invite all employees to the session and offer them options of attendance; in-person, online, and live, watching the event recording.
- Get set up to stream the session live. You can use a webinar tool like Streamyard or the one inside your LMS platform. Someone might need to help so you can concentrate on the training rather than the technical tasks.
- Stream the lesson live and record it. On Chromecast , choose to use the split screen. One side shows the video of you teaching, and the other is the training presentation you prepared.
- Send the recording to the employees that didn’t attend in person or live online.

3. As a lesson in a digital course
Your training presentation can be its own course or part of a bigger one. In a comprehensive multi-lesson course, each section has its training presentation or a combination of presentations and other material. Use e-learning tools like SCORM and xAPI to create courses learners can do at their own pace, which you can keep track of.
Create your SCORM and xAPI courses with PowerPoint, SlideModel, and the iSpring PPT plugin . Once finished, upload it all to your LMS platform and enroll employees to learn.
What’s the difference between SCORM and xAPI? The visual below has all the answers.

Read our guide on how to create an online course for detailed instructions and tips to make your course stand out.
3. As a PDF document
Delivering a training presentation as a PDF document shouldn’t be your first choice, but consider it for those employees that prefer learning that way. The same training presentation you create for in-person training, online learning or hybrid sessions can be downloaded as a PDF and shared via email or through the learning portal.
Takeaways for how to create successful PowerPoint Training Presentations
Optimize your training presentations to be as efficient as possible using instructional design techniques from the pros. Start with your trusty authoring combination of PowerPoint and SlideModel, and add an iSpring design plugin to complete the toolkit. Follow the steps in the sections above and then some.
Implement Interactivity
Add interactivity to your training presentations to make them more engaging while touching on more learning styles. Interactivity can be as simple as a navigation menu between slides, dialogue simulations, and quick in-slide quizzes. Use xAPI and an LMS to create interactive training presentations for any topic.
After discussing the importance of interactivity, take a look at our 5-topic training presentation template showcased in the following video. With a tabbed menu, this training PPT template is ideal for presenting the agenda of your training session and delivering it in a streamlined manner. Each tab can represent a unique topic or module, making it easier for your audience to follow along and understand the progression of your training. The slide layout not only enhances visual appeal, making it more engaging than traditional slides, but also promotes organized content delivery.
Animated presentation templates, such as the one shown, are an effective way to captivate your audience and make the learning experience more memorable. This kind of animations add an element of surprise and engagement that static slides might lack. When paired with interactive elements mentioned earlier, such training templates can transform your training presentations into immersive learning experiences.
Add In-Slide Video
Hybrid learning and online learning have a wide berth of possibilities. One is in-slide video recordings of you—the training presenter—talking to the audience on the other side of the screen.
This is especially practical for digital training presentations that never had an in-person session and instead are all done online. Use tools like Loom and Camtasia to record yourself speaking as you flip through the training slides. Then share the final video output on your company’s learning platform.
Offer Supplemental Material
Regardless of how you deliver your training deck, it’s always a good idea to offer supplemental material for the learner. Let’s look at some ideas:
- If you deliver the training presentation as a video with much narration, offer a PDF transcript for download.
- On an LMS platform, add printable PDF worksheets and further reading material.
- Before or during an in-person session, give handouts and worksheets.
- In a hybrid webinar, share links to online games that help reinforce the topic.
- In any scenario, offer further resources for self-paced learning.
Incorporate Gamification
One of the best teaching techniques for turning training presentations from meh to memorable is gamification. Using games and game-like visual qualities helps learners capture and retain information better. Gamification techniques like badges, challenges, and competition elevate the learner’s feeling of happiness and contentment. They enjoy the process more and therefore learn more effectively.
Cover Multiple Platforms
Reach all employees where they are by creating and delivering versatile training presentations that are viewable on any device, from wall projectors to mobile phones. Create interconnectivity between them with downloads, digital whiteboards for notetaking, online chatrooms, handouts, etc.
Don’t forget also to follow accessibility standards. For example, closed caption subtitles on videos and e-reader-compatible text.
Share Questionnaires And Surveys At The End
Do you agree with the business notion that nothing in business is worth it unless you can track it? If so, then your training presentations must have a callback. Shortly after the learner has attended, watched, or listened to your training presentation, send them a short survey to gauge their satisfaction. Combine this with testing and quizzing results, and over a short time; you’ll have a good grasp on the effectiveness of your training.
Give a Certificate of Completion
Offer your learners a certificate of completion. As its name indicates, a certificate is essential for certifying that a person has taken your course. Create a visual certificate that you can send as a pdf in an email. Include all the necessary information for the learner to mention the completed course on their LinkedIn profile.

In less than three thousand words, you learned why training presentations are important for business, how to create and deliver them, plus tips on how to make your training presentations amazing.
Your L&D team and all your trained employees will benefit from optimized training presentations that use SlideModel templates for PowerPoint and Google Slides. Support your learners with visuals and instructional infographics. Start downloading educational templates today.

Like this article? Please share
Presentation Approaches, Presentations Filed under Education , Presentation Ideas
Related Articles

Filed under Design • March 27th, 2024
How to Make a Presentation Graph
Detailed step-by-step instructions to master the art of how to make a presentation graph in PowerPoint and Google Slides. Check it out!

Filed under Presentation Ideas • February 29th, 2024
How to Make a Fundraising Presentation (with Thermometer Templates & Slides)
Meet a new framework to design fundraising presentations by harnessing the power of fundraising thermometer templates. Detailed guide with examples.

Filed under Presentation Ideas • February 15th, 2024
How to Create a 5 Minutes Presentation
Master the art of short-format speeches like the 5 minutes presentation with this article. Insights on content structure, audience engagement and more.
Leave a Reply
Blog – Creative Presentations Ideas
infoDiagram visual slide examples, PowerPoint diagrams & icons , PPT tricks & guides
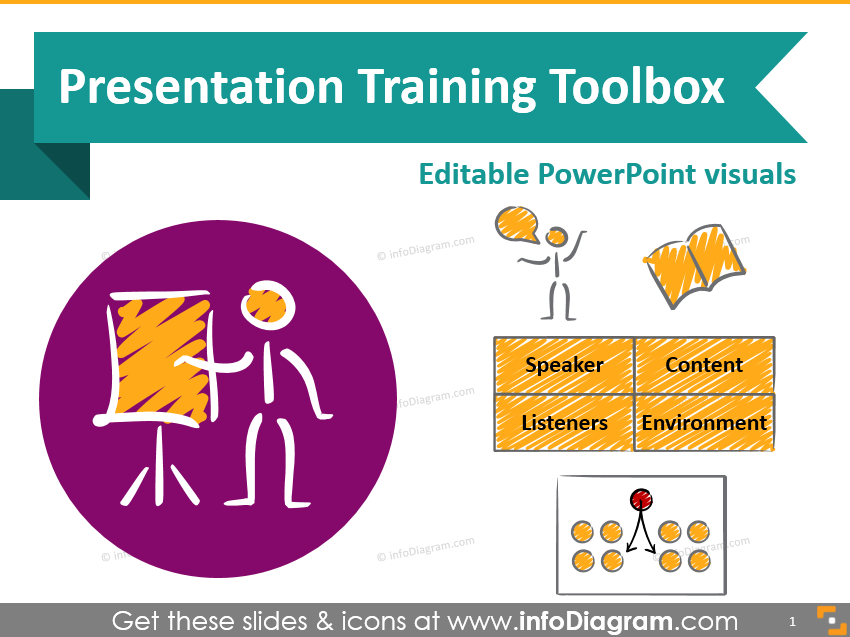
7 Sections for Effective Presentation Training Slides
Last Updated on March 11, 2024 by Rosemary
Are you delivering a public speaking or presentation skills training? Find some inspiration for your slides here.
Explore our Business Performance PPT Reports category on the website for more resources to boost your presentation impact.
In this article I suggest how you can prepare engaging PowerPoint visuals covering presentation training topics, specifically:
- How to illustrate presentation structure and content types on a slide
- Visualizing speaker and listener types
- Presenting various meeting room setups
- How to show hints for preparing speech and presentation itself
- Closing the presentation training with a recap and summary slide
Whether you are a professional communication trainer or a beginner, I believe you can find some handy examples.
Note: All slide examples are from the Presentation Skills Training PPT Toolbox . Click the pictures to see details.
We’re talking a lot here about presentation content, right visualizations, showing concepts… Let’s get back tot he roots and recall the very basics of high-quality presentation and how it should look like.
Words are the most powerful drug used by mankind. Rudyard Kipling
Rudyard Kipling was right that words are a very powerful tool, however, if used and delivered effectively. Let’s break down some theories into short sections.
#1: Illustrating Presentation Structure by Drawing

In my presentation experience, I see usually those 3 most popular kinds of structures: classical 3-part, monotonous and ‘Hollywood-movie’ style. When you explain such structures, I suggest you draw a simple diagram like the one above. Either on a flipchart or if you want to have materials prepared before, then make a slide with those speech flow diagrams.
You can either show them all together on one slide for comparison or put each on a separate slide. This way you will get attention and focus on one presentation type at a time.
For discovering more tips for structuring presentations I recommend checking Nancy Duarte’s blog series: Structure Your Presentation Like a Story and her book Resonate.
4MAT – My Favorite Presentation Structure

Out of various speech structures, I like the most the 4MAT concept. It is pretty simple and works for me.
I suggest that when you create a presentation, ask yourself those four questions. Those are questions listeners have in their heads when they listen to you.
Using the 4MAT framework helps me to see things from the viewpoint of my audience and be sure listeners will get their ideas right.
#2: Explore Presentations by Content

It’s obvious the presentation content defines the presentation type. However, it’s good to remind yourself what’s the goal of the presentation – to inspire or to entertain only? Do you want to persuade your audience of your idea or only to inform, to give a report?
Some examples:
- For inspiring presentations: Talks on TED.com are the best examples. Or check one of Elon Musk’s speeches on the Mars Mission . Politicians use this presentation to type a lot
- Informative presentations are usually used when you do a project summary report or yearly business review. Unfortunately, lots of school lectures fall into this category, even though the teachers should work on moving towards an inspiring segment with a bit of entertainment to keep kids attention.
- For persuasive presentations just think of the last sales or marketing presentation you experienced.
- For entertainment – check out any stand-up comedy talks, for example, this (being a father I really appreciate that later talk).
- A mixture of entertainment and information is e.g. famous John Oliver show
You have to make sure that your speech is relevant to the audience you’re speaking to.
#3: Analyze the Speaker Types

When teaching about properly preparing a talk, you need to consider also different speaker types classification. I put here four kinds of presenters: a typical talkative salesman style, an analyst type who likes to go into details (sometimes too much), a monotonous teacher style (that would need a point of wake up) and an involving storyteller. However, you can think of other examples based on your experience.
Depending on the particular speaker type, you can use its strong sides to build the presentation differently and also support it with proper visuals. For instance, for a talkative salesman, the agenda slides can provide a structure to follow. On the other hand, a too much detailed analyst on lengthy teacher talk can benefit from having a strong visual section slides that will wake up your audience.
#4: Analyze the Listener Groups

Knowing the speaker type is one thing. However, even more, important is to examine the audience carefully to reach them best.
Every presenter should ask first “Who are my listeners”? Do they prefer a formal or informal way of communication? Are they feelers or thinkers (see MBTI types of personality )? Will the audience be active or rather passive during the talk?
When doing a presentation training, you should address this key question. And what is the better way than to illustrate it e.g. by a set of icons?
In my slides, I added there also a hand drawn chart where you can position the major listeners’ types. Then you can place and move around the central circle to show various audience cases on a knowledge and involvement scale.

In a training, you can include a similar chart (or apply those presentation training diagram slides ) for determining the audience type.
#5: Room set up – the importance of the presentation environment

After talking about the presentation audience and speaker types, a good presenter should think also about the place where the talk will take place. Choosing a suitable environment is an important factor for the effective delivery of the speech.
I distinguish here five common kinds of room setups: classroom, multiple groups environment, interactive roundtable, big theater and sitting in a circle. Each one suits a different purpose. Some of these you need to arrange before, of course, you will know if you speak at a big conference that there will likely be a theater-like room. However, sometimes even a small change of sitting arrangements can provide a totally different atmosphere for a speech.
- Classroom setup assumes rather one-directional communication from teacher to students.
- Roundtable or sitting in a circle encourages discussion and underlines equality of all participants.
- Having clusters of multiple groups is great if you want to have several teams working on some group work.
#6: Presenting Hints for Speech Preparation

If you want to add a list of things to remember before making a presentation, I suggest you try to illustrate each point with some image, as I did above. This creates a better mnemonic association for each point and people will remember the hints longer. Even better, replace the bullet points with a vivid diagram along with keeping the icons.
#7: Presenting Summary of the Training

At the end of the training, remember to repeat the main message once again. Present the main conclusion, and give your audience something to think about. You can write it down on a slide clearly, without too many distractions. Or write it by hand on a board or flipchart.
Resources for Presentation Training
Besides the links I shared above I recommend those further reading and resources
- Toastmasters International public speaking clubs all over the world
- Books: Slide:ology Nancy Duarte and Presentation Zen by Garr Reynolds
- Our PowerPoint Training templates for various soft-skills training, see details below.
- Feedback Training Presentation Hints
- Motivation Training Presentation Template & Ideas
So if you’re having training on how to create and deliver a presentation, you can reuse slides from our collection in your projects. Or just get inspiration from my slides and create them yourself.
If you decide to go for our hand-drawn style diagrams, you will be able to easily edit all content, adapt the colors to your brand, and add the whole slides or particular charts to your training presentation.
For more inspiration, subscribe to our YouTube channel:
Graphics resource: Presentation skills training toolbox
You can also check the presentation template we’ve designed with illustrations of types of speakers or presentation structures:
Presentation Skills Training Toolbox
If you like such scribble style, see the complete All Scribble Symbols Bundle , with over 250 handwritten hand-drawn symbols and shapes.
About the author: Peter Zvirinsky is a slide design trainer and the founder of infoDiagram. He is helping presenters, trainers and various business managers to communicate their ideas in clear visual way usually in form of PowerPoint slides. Peter loves changing text information into simple diagrams and he wants to inspire also others to use this visualization process in everyday life. Reach out to Peter on LinkedIn or via his slide design & training website.
Published by

Chief Diagram Designer, infoDiagram co-founder View all posts by Peter Z

Training Presentation Template
Effectively develop your workforce with an engaging training presentation template that simplifies the training creation process.
Trusted by 65M+ users and leading companies
About the Training Presentation Template
Upskilling your workforce can cultivate a more creative and innovative workplace. When you provide high-quality training, you equip your team for success.
How you present your training can make or break the experience for your employees. Even the most in-depth training content can go over your employees’ heads if they’re not fully engaged in the experience.
The Training Presentation Template helps you outline your training and provide a visually engaging presentation for your employees. Plus, it’s easy for you to collaborate with other trainers by hashing out ideas on the board and customizing the template from your brainstorming sessions.
Once the training is over, your team can use your Training Presentation Template as a single source of truth to refer back to. No more switching back and forth between a slide editor, paper documents, and handwritten mind maps in someone’s notebooks.
How to use the Training Presentation Template
The Training Presentation Template is already designed for you on your board — that’s why it’s so easy to create a training presentation with Miro. You can say goodbye to boring training slides.
You can easily edit and customize the training presentation to fit your needs and match your company’s branding. Whether you need to change up the colors, add a logo, link to some additional training resources, or complement your training with images, this template makes customization simple and painless.
And there’s no need to stay constricted within the template, either. You can add or remove frames to get as many or as few slides as you need to create stunning training content.
Customize your frames with your training content
In Miro, frames are your presentation “slides.” All frames are contained within a board on the platform. They hold all the content of your slide and keep it together so it’s ready to present your training, just like you would with a traditional slide editor.
Once you open your Training Presentation Template, you can:
Change the text
Adjust the font
Change the background color
Replace images with your own
Add more images
Drag and drop to switch the order of your frames. When you do, everything contained within the frame will also move. There’s no need to select all the elements within the frame first!
To add elements within the frame, simply pull in images, text boxes, and other elements you’d like to use. You can double-click the title of each frame to give them a different title if desired.
Duplicate frames to add more slides.You can even add new frames by drawing on the board for a custom ratio or by selecting from one of the existing frame ratios, like 16:9.
For more in-depth information on how to customize your training material, read about presentation mode in Miro .
Brainstorm training content with your team
Because your frames are in a Miro board, you can use the remainder of the board to collaborate with anyone else helping to build out the training. Brainstorm slide ideas by putting together mockup designs and sketches. Alternatively, add mind maps to the board to map out your training.
View your Frames list and export
You can view all the frames on your board with the Frames list. This list will give you a preview of what your training presentation will look like when you export your board.
Drag and drop your frames to change the order if desired. Once you’re happy with how everything looks, you can save your training presentation as a PDF.
Present your training in Miro
If you want to present directly from your board without leaving Miro instead of exporting a PDF, you can do that. Miro has a built-in presentation mode designed for that purpose.
When you activate presentation mode , you’ll start a slideshow from your existing training presentation frames. Use your arrow keys to move back and forth between frames.
Tips for structuring a training presentation
Greet the audience first when you structure your training presentation frames. Next, introduce yourself or the training team.
Once you complete the introduction section, jump into the training by tackling the challenge this training is designed to help them overcome. You should also state your expectations to your employees. For example, do you want them to interact during training? Will you only take questions at the end? Should they expect a quiz or an exam once the training is over?
Go into the main topic of your training and give a summary before each section with time for questions if possible. When you create your conclusion, summarize the main training points and key elements to retain.
You can wrap up the training presentation by giving a call to action to let them know what’s next for them. That could be homework, a specific goal, another upcoming training session, assessments, or more.
To encourage discussion, leave a slide at the end that signals you’re ready to take questions.
What should be included in a training presentation?
Make sure to include content that appeals to different learning styles. Not every employee learns in the same way.For example, you can include flow charts and maps for visual learners. Add some text to your slides for learners who prefer to read. For kinesthetic learners, include some real examples and practical exercises to be performed during the training session. Finally, auditory learners will benefit from hearing you speak during the presentation.
How do you give an effective training presentation?
When you give your training presentation, make sure you’re well-rested for the occasion. It’s important to appear open and approachable.If you’re giving a training presentation that’s longer than 30 minutes, schedule some short breaks to allow for better retention. You should also add interactive elements in between sections. For instance, include exercises with scenarios to gauge your employees’ understanding of the content. Thank your employees for their attention once you conclude the training session. Answer any questions you can. When possible, clear your schedule after the presentation so that employees can speak to you one-on-one about further questions and concerns.
Get started with this template right now.

Consulting Proposal Template
Works best for:.
Presentations, Business Management
Use this Consulting Proposal Template to develop an active working relationship with your prospects. Show them what you do, what you can deliver for them, and why they should work with you.

Annual Report Presentation Template
Trying to cut down on the time it takes to create a stunning yet professional annual report presentation to wow your stakeholders? Use this template to outline all the in-depth information about your company’s performance in an engaging and easy-to-digest way.
Logo Presentation Template
Presentations, UX Design
Make your logo ideas shine with the Logo Presentation Template. Use it to deliver logo designs, explain the thought process behind them, and show how they work in various contexts.

Demo Presentation Template
Presentations, Meetings
Present your ideas confidently and professionally with this Demo Presentation Template. Use it to show potential and existing customers how your product or service works so they can fully appreciate its value.

Marketing Proposal Presentation Template
Presentations, Marketing
The Marketing Proposal Template is a simple outline you can use to quickly and easily structure your next bid for a project.

Product Roadmap Presentation Template
Presentations
Use the Product Roadmap Presentation Template to outline your plan for product development. Whether starting from scratch with a new product or updating an existing product, delivering a roadmap presentation aligns your team and keeps partners in the loop.
How to create effective visual training content
- Written by: Emily Pinch
- Categories: Effective eLearning , Visual communication
- Comments: 1

Training. A word powerful enough to send shivers down the spines of those tortured by countless uninspiring , bullet point laden training presentation s on … You can’t even remember ! T raining content tends to be associated with being dull and ineffective , but it doesn’t have to be this way . Inspire, engage, and transport your audience away from the land of lifeless training and into the world of compelling visual content. Here are some tips on why and how you can make your training content more effective through its structure, visuals, and design.
WHY your training content needs to be visual
“If learners think that it looks bad, you may have lost a good percentage of the battle in getting them to pay attention” – Patti Shank, Director of Research, The eLearning Guild.
H ow do we avoid falling into the trap that Patti describes? The first thing we can do is get rid of all of those nasty bullet points.
But often this pushes us to the other extreme – where instead of bullet points, we have beautiful Instagram-worthy images and no text at all. Yes, they look nicer, no they don’t help us understand machine learning, or a sales cy c le…
Then what happens is we try and combine these two ideas – take our bland bullet points and put a nice image in the background. Again it looks nicer, but it’s not helping learners understand anything more deeply.
For that there’s another way. It involves visuals that help explain the content , with short labels instead of full bullet-pointed sentences; the images are stunning, but also meaningful; and crucially the visuals don’t makes sense on their own – they need a presenter or narrator to guide the learner through the content.

That’s all lovely isn’t it. But how do you reach that happy medium to create this effective visual training content? Let me explain.
HOW to create effective visual training
What tool to use? PowerPoint.
Training content can be distributed to learners in various ways: it could be presented in person, presented online or be a self-led online course. Whatever the scenario, PowerPoint gives you the right balance between quality and cost to support these various use cases.
PowerPoint is great for rapid learning content creation , but some eLearning and training content providers often produce tedious ‘click through’ courses that send people to sleep. When used properly, PowerPoint has all the tools to enable you to animate visuals , add interactivity and create well-designed slides – the perfect ingredients for a tasty training treat! Animations will bring static visuals to life and can aid the explanation of tricky concepts, while interactive elements engage the user and can be used to reveal content or navigate self-led courses. Not convinced your training content needs to be more visual? Read on…
You can create great training material in PowerPoint, but if you’re after something different, check out our guide to PowerPoint alternatives .
Effective content B ullet points are a poor choice.
Training content often falls unsuccessfully between positions. “Proper” writing – like in a book – works fine. Animated or video content – like on TV – works fine. Audio-only content – like the radio – works well too . B ut , a lot of training content somehow fits in the middle – mixing trite bullet points (not full prose), with audio that conflicts with the text. Even though this approach doesn’t work, many persist with it.
T he most engaging content follows a well-structured flow or story. It’s important to get this right first so you have something solid to build on when moving onto visuals and design.
Top tips when structuring your content:
- Identify your key message or story : Make sure your key message is clear – what do you want people to rem e mber from your training? What do you want them to change or what action do you want them to take?
- Ensure relevance for your audience: Continually tie your content and key messages back to your audience and their situation, so they can see the relevance in the material. This will help them to better understand your key message and make them more likely to remember and act upon it.
- Have a solid structure: Often the framework of Problem > Solution > Impact is a good one to follow. Tell a story with your structure and take your audience on a logical and flowing journey. For more inspiration, have a read of our blog post on how to use familiar teaching principles to better structure your content.
- Limit bullet points and text : Your slides are for your audience’s benefit and shouldn’t function as your own personal teleprompter. If your slides say just about everything that you say, then your audience won’t know where to pay attention – to you or to your slides
- Remove the nonessential : This applies to the content of your talk and to the visuals on your slides . Cutting the superfluous is one of the hardest things to do . Whi lst all your content may seem important, if you are limited on time then you need to really cut your content and focus on what essential messages to include.
- Focus visual attention: Your slides should complement your verbal message, not detract from it by unnecessary visual clutter. Don’t overwhelm your audience by throwing all your content at them in one go, their focused visual attention is short so split out your points into shorter bitesize chunks which are quicker to digest. Use animation to break things up and stagger the entrance of information or visuals, especially if the content is complex.
Once you’re happy with your content, it’s time to translate your message into meaningful visuals.
Effective visuals? Decoration isn’t enough.
Decorating text-based training content isn’t enough to actually create visual training content. It isn’t visual training content unless the visuals actually help do more than just make things look nice. Printing a book on patterned paper doesn’t create a graphic novel. Putting a nice picture in the corner of a PowerPoint slide doesn’t create visual training content.
Just adding pictures doesn’t mean you’ve enhanced the content. This is the difference between decoration and visualisation.
Visualisation is essential for effective visual training content
If you want to create visual training content, then you need to use visualisation to create material that actually helps your learners understand what it i s that you are trying to help them learn. Think charts, diagrams, pictures, animated sequences. Think of the thing you might sketch on paper or a flipchart if you were trying to explain something face-to-face. Then make that visual training content using a tool that works for you. PowerPoint isn’t the only way to create your content, but it can be one of the easiest, and it plays (relatively) nicely with Articulate Storyline and Adobe Captivate.
Top tips for visualisation:
- Establish relationships within your content : I s there a process or journey you can use as a theme throughout your presentation? People remember stories that flow well better than disjointed messages.
- Use relevant images : T here’s nothing worse than a cheesy stock image that has nothing to do with what you’re talking about. Only use images that support and enhance your message rather than distract from it.
- Explain your graphs and charts : Charts can be complicated; you often need to see all the detail to understand the bigger picture. What’s important is that you guide people through your charts. Using animation to build things up in a logical sequence and then highlighting trends, or key data points will help your audience understand the chart and what the implications of it are.
- Cut down text on slides : Keep text to a minimum and break up longer points into key words that are much easier for your audience to take in. Pairing up key points with an icon enables quicker recognition of terms, making it easier for people to take on information, so they can spend more time thinking about the content/implication/outcome or listening to the presenter talking.
- Show locations on maps : If you have a list of locations, try animating them across a map . Create your own editable map to show locations around the world and how they might all connect, global route maps for travel or logistics or to link data to specific locations.
- Use timelines : Dates and events are so much easier to understand when you arrange them on a timeline. They also look much nicer than a bullet-pointed list with some haphazard illustrations.
- Replace text with labelled images : Why have a paragraph of text when you can label professional product images or annotate parts of a complex diagram. Use animation to reveal labels one by one to stagger the information, making it easier for your audience to follow along.
- Consider a variety of formats : Different formats provide a different type of experience for your audience – audio, visual, video, interactiv e – a mixture of a few will have the best impact and keep your audience engaged. Variety is key , especially for self-led eLearning courses .
- Use animation: Visualising your content is great, but animation is key for pacing the flow of information and keeping your audience engaged. Instead of revealing a complex slide all at once, build it up step-by-step. This gives you the opportunity to talk about each point individually, synchronising your narrative with your visuals.
For more helpful tips on creating more visual presentations and eLearning, check out this article .
So, you’ve figured out what the most effective visuals are to convey your all-important key messages, but how do we make them LOOK awesome?
Effective design? Bad design puts learners off.
When it comes to training content, your audience will be quick to judge your presentation by its visual style. If your training looks awful (100 slides on a white template, six long bullet points in unmatched fonts, anyone?) learners will expect the worst. I f the content is good but the presentation sucks, your training becomes demotivating and demoralising .
So, d on’t let your slide design let you down, here are some key principles of presentation design that will help make your visuals more effective …
- Use high-quality graphics : H igh-resolution images will truly help enhance the visual impact of your slides. Unsplash is one our favourite free stock photo sites but there are lots of other sources out there . However, good graphics won’t work if they are plonked on your slide without any thought. Use alignment and cropping to resize and arrange your images neatly , or use the image to tell part of a story .
- Image editing : Y ou don’t need fancy photo editing software to adjust your images, you can do a lot just within PowerPoint itself! H ead to the ‘Picture Format’ tab in the ribbon within PowerPoint for various adjustment controls. If you want to take things further, h ere is a guide on custom image cropping , perfect for when you want to crop to specific shape or ‘cut out’ part of your image.
- White space is important : Whilst high quality images look great, it’s important to leave space for other content on your slide. Create areas of contrast with clear focal points to focus your audience’s attention on the key information.
- Choose your fonts well : Too many different fonts in a slide or a presentation can be distracting, limit yourself to one or two – we’ve got a good guide to help you if you’re struggling to make a decision . Generally, s ans-serif fonts are often easier to read on slides than serif fonts . Fo nt size also matters , the less text you have , the larger your fonts can be . For help on choosing the right font or making sure your te xt formatting is consistent , check out our tips and tricks.
- Use grids to guide you : A grid system helps to lay out your content in a clear and consistent way . Grids help you organize your content into easy to follow sections whilst eliminating wonky alignment that will distract your audience.
- Colour themes : Setting the right colour palette is essentia l, it gives everything a consistent feel and allows you to adhere to your brand . The best way to handle colours in PowerPoint is to set your template colour theme . You can also use colour as a language to convey meaning and help your audience understand t he content , for example red for wrong, green for right, yellow and black for danger .
But one word of warning! Attractive training content is necessary for success , but only if you’ve put effort into consolidating and visualising your content first!
So, there you have it all the tips and tricks to help you transform your training content into effective and memorable experiences! We all know why our content needs to be more visual, but now you know how to get there. S pend some time on editing your content, think about the best visuals to support your content, and then us e the key principles of presentation design to tie it all together beautifully ! Your audience will thank you for it, trust us.

Emily Pinch
Senior consultant; group visualisation lead, related articles, mastering high-impact conference presentations.
- PowerPoint design / Visual communication
Conference presentations are really hard to get right compared to day-to-day presentations. How do you tackle bigger stages, bigger rooms, bigger audiences and higher stakes?

5 common eLearning assessment mistakes (and how to fix them)
- Effective eLearning
Calling all eLearning aficionados! We’re back with a brand-spanking new blog post all about eLearning assessments. When we work with subject matter experts to develop multiple-choice questions we see the same mistakes again and again that make a big impact on the validity and reliability of assessments. But don’t despair, we’re going to show you how to fix them!

Presentation tips & tricks advent calendar
- Presentation skills / Visual communication
It’s finally here, the holiday season! As the nights grow longer and the air grows colder, we know that all you want to do is settle down near a roaring fire, and snuggle up under the blankets with a good book PowerPoint presentation. Well BrightCarbon are here to help, with our festive presentation advent calendar.

I have read your blog its awesome
Leave a Reply Cancel reply
Save my name and email in this browser for the next time I comment.
Join the BrightCarbon mailing list for monthly invites and resources
We have worked with BrightCarbon for over 5 years, across a number of healthcare divisions, where they have been a very important part of our bid programme, supporting numerous awards of new contracts. Sarah Appleton Brown Practice Plus Group

Improve your practice.
Enhance your soft skills with a range of award-winning courses.
Using visual aids during a presentation or training session
June 21, 2018 - Gini Beqiri
Visual aids can enhance your presentations – they can increase the audience’s understanding of your topic, explain points, make an impact and create enthusiasm. It has become more important to make information visual:
“Something is happening. We are becoming a visually mediated society. For many, understanding of the world is being accomplished, not through words, but by reading images” – ( Lester, 2006 )
In this article, we discuss how to use visual aids for presentations or training sessions.
What are visual aids?
Visual aids are items of a visual manner, such as graphs, photographs, video clips etc used in addition to spoken information. Visual aids are chosen depending on their purpose, for example, you may want to:
- Summarise information.
- Reduce the amount of spoken words, for example, you may show a graph of your results rather than reading them out.
- Clarify and show examples.
- Create more of an impact, for example, if your presentation is on the health risks of smoking, you may show images of the effects of smoking on the body rather than describing this. You must consider what type of impact you want to make beforehand – do you want the audience to be sad, happy, angry etc?
- Emphasise what you’re saying.
- Make a point memorable.
- Enhance your credibility .
- Engage the audience and maintain their interest.
- Make something easier for the audience to understand.

Preparation and use of visual aids
Once you have decided that you want to use a visual aid, you must ensure that the audience is able to quickly understand the image – it must be clear. They can be used throughout your speech but try to only use visual aids for essential points as it can be tiring for the audience to skip from one visual to another.
Preparation
- Think about how can a visual aid can support your message. What do you want the audience to do?
- Ensure that your visual aid follows what you’re saying or this will confuse the audience.
- Avoid cluttering the image as it may look messy and unclear.
- Visual aids must be clear, concise and of a high quality.
- Keep the style consistent, such as, the same font, colours, positions etc
- Use graphs and charts to present data.
- The audience should not be trying to read and listen at the same time – use visual aids to highlight your points.
- One message per visual aid, for example, on a slide there should only be one key point.
- Use visual aids in moderation – they are additions meant to emphasise and support main points.
- Ensure that your presentation still works without your visual aids in case of technical problems.
- Practice using the visual aids in advance and ask friends and colleagues for feedback. Ask them whether they can clearly see the visual aid and how they interpret it.
During the presentation
- Ensure that the visual aids can be seen by everyone in the audience.
- Face the audience most of the time rather than the image.
- Avoid reading from the visual aid.
- As soon as you show the visual aid the audience’s attention will be drawn to it so you must immediately explain it. You will be ignored if you talk about something else.
- Make it clear to the audience why you are using it.
- When you no longer need the visual aid ensure that the audience can’t see it.
Tailor to your audience
Choose your visual aids tactically so you appeal to your audience. This means finding images your audience can relate to, images they will find familiar and images they will like. Also think about what style of visual aid is suitable for the audience; is it quite a serious presentation? Can you be humorous? Is it more formal or informal?
Example of using visual aids
When watching this video, notice how the presenters:
- Talk to the audience while writing
- Turn their body to the audience while writing
- Don’t spend too long writing in one session
Types of visual aids
There are a variety of different types of visual aids, you must decide which will suit your presentation and your audience.
Microsoft PowerPoint is widely used for presentations because it’s easy to create attractive and professional presentations and it’s simple to modify and reorganise content compared to other visual aids. You can insert a range of visual items into the slides which will improve the audience’s focus. Also, the audience can generally see slideshows better than other visual aids and you don’t have to face away from them. However, your presentation can look unprofessional if this software is used poorly.
- Have a clear and simple background.
- Avoid using too many different types of fonts or font sizes.
- Only use animations for a purpose, such as, to reveal the stages of a process, otherwise this can be distracting and look amateurish.
- Use a large font size – a minimum of 24pt.
- Use bullet points to summarise key points.
- Consider providing handouts of diagrams because the audience will find the diagrams easier to read.
- Avoid putting too much text on a slide.
- Avoid using red or green text as it’s difficult to read.
- There should only be one key point for each slide.
- Always have a back-up plan in case there is a technical issue and you cannot show the visuals on the day, for example, bring handouts or a poster.
Whiteboards
Whiteboards are great for providing further explanations, such as, showing the order of a process, creating diagrams or explaining complex words or phrases. They’re often used to display headings and write down audience suggestions. Whiteboards are also ideal for displaying important information for the entire duration of the presentation, such as, key definitions, because the audience can just glance at the whiteboard for a reminder.
- Ensure that enough time has passed for the audience to take notes before rubbing something off of the whiteboard.
- Write concisely to avoid facing away from the audience for too long.
- Handwriting must be large and legible.
- Practice beforehand as you may feel nervous about writing in front of an audience at the time.
Handouts are papers that contain key information from your presentation or they may provide further information. They prevent you from overwhelming the audience as there will be less information on the slides and therefore less information they need to write down.
You must consider when you want to give the audience the handouts:
- If given at the beginning and middle of your presentation the audience may be reading rather than listening to you or they might not pay attention to what you’re saying as they already have the information.
- If given at the end of your presentation the audience may be trying to take lots of notes which may reduce the amount of information they are actually understanding.
To manage this, provide the audience with partially completed handouts so they will have to listen to what you’re saying to be able to fill in the gaps. Providing the audience with graphs and charts beforehand is also beneficial because the audience will find them easier to read than, for example, from a slide.
- Tips on creating handouts for your presentation

Video clips
Using videos are a great wait to engage the audience and increase their interest. Use video to bring motion, images and audio into your presentation.
- Ensure that any videos used are relevant to the presentation’s content.
- Only show as much of the video as necessary.
- Never show a really long clip.
- Videos can be difficult to fit into the structure of a presentation so ensure that you tell that audience why you’re showing them a clip and tell them what to look for.
- Inform the audience how long the video will last.
Flip charts offer a low cost and low tech solution to record and convey information as you speak. They’re more beneficial for smaller audiences and they are favoured for brainstorming sessions as you can gather ideas easily. Flip charts are also widely used for summarising information and, like with a whiteboard, you can use them to show permanent background information.
- Before your presentation, place the flip chart in a location that you can easily access.
- Prepare any sheets you can in advance, even if you can only write down the headings.
- Flip charts can be moved so you can avoid facing away from the audience – stand next to it and continue to face the audience.
- Have only one main idea per sheet.
- Write legibly, largely and in block capitals so it’s more visible.
- Check with the audience that they can read the text – do not use a flipchart if there is a large audience.
- Only write in black and blue ink. Red ink is good for circling or underlining.
- Using a pencil write notes to yourself beforehand so you remember what to include – the audience will not see this writing. Also drawing lines in pencil beforehand can keep your handwriting straight.
- Flip back through the sheets to consolidate points.
- Practice writing on the flip chart advance as you may feel nervous at the time of presenting.
Poster boards can be created using a variety of visual devices, such as graphs and images. They’re generally quite portable and you can make them as elaborate as you want. However, they can be expensive to produce if the poster is quite complex.
- One poster per message or theme
- Use block capitals
- Avoid using posters when presenting to large audiences as they will not be able to see the content
Product, objects or artefacts
Objects can be useful tools for making an impact or even for making a dull topic more interesting. Sometimes they’ll be needed for technical and practical reasons, such as, showing a model or conducting an experiment.
- If you are presenting to a small audience consider passing the object around but provide enough time so they won’t have to divide their attention between the object and what you’re saying.
- If the audience is large ensure that you move the object around so everyone sees it.
- The audience will be more distracted from what you’re saying when they’re looking at the object so keep it hidden until the right time and provide the background information before revealing it.
- Explain why you’re using the object.
- If you are conducting an experiment or demonstration, move slowly with exaggerated movements so the audience can follow. Also explain precisely what’s going on.
Two examples of live product demos:
Key points for using visual aids
Try to find out what the presentation room is like beforehand, such as, the layout of the room, the equipment etc, so you can see if your visual aids are appropriate and whether they will work there but always have a contingency plan regardless. Also remember that the audience should be able to understand an image almost immediately.
Before your presentation, ensure that you practice with your visual aids so you know how to operate the equipment. If something goes wrong you’ll have a better chance of solving the problem.
Research suggests that using colour increases people’s motivation to read and their enthusiasm for a presentation. Software like PowerPoint is great for producing colour visuals.
Using the colour wheel can help when choosing your presentation’s colours:
- Colours opposite each other in the wheel are complementary and they create contrast. Using complementary colours makes your text more readable.
- Colours next to each other are analogous and they are harmonious. Using analogous colours makes your presentation more unified.

The Adobe colour wheel , which helps you pick complementary colours for your presentation design.
Avoid using too many colours in your presentation as this can look cluttered and unprofessional and keep your colour themes continuous, for example, if you highlight all the key words on one slide in blue, continue to do this throughout the presentation. Also be careful with colour associations, for example, in many cultures red is linked to danger. Try to represent your words and topics with colours that make sense and are appropriate.
Many people are blue-green or red-green colour-blind so avoid putting these colours next to each other’s in, for example, a graph. If you cannot avoid placing these colours next to each other then use text to clearly label items.
Research suggests that information displayed visually is well remembered: “retention of information three days after a meeting or other event is six times greater when information is presented by visual and oral means than when the information is presented by the spoken word alone.” ( U.S. Department of Labor OSHA Office of Training and Education, 1996 )
There is also significant evidence suggesting that most learning occurs visually – some researchers suggest that 83% of human learning happens visually. The psychologist Bruner conducted multiple studies which suggest that people remember 80% of what they see and do, 20% of what they read and only 10% of what they hear.
Visual aids are worth including in your presentations because they can help you explain information more coherently which makes presenting easier for you and learning easier for the audience. They also help add variety to your presentation thus making it more interesting for the audience. If the audience understand what you’re saying and they are more engaged, they’re more likely to be persuaded by you.
- Magazine Issues
- Magazine Articles
- Online Articles
- Training Day Blog
- Whitepapers
- L&D Provider Directory
- Artificial Intelligence
- Employee Engagement
- Handling Customer Complaints
- Diversity and Inclusion
- Leadership Development Case Studies
- Positive Relationships
- Teams and Teambuilding
- Awards Overview
- Training APEX Awards
- Emerging Training Leaders
- Training Magazine Network Choice Awards
- Online Courses
- Training Conference & Expo
- TechLearn Conference
- Email Newsletter
- Advertising
5 Tips for Creating Effective Visual Training Content
With the use of visuals in training content rising, how can we best evaluate visuals and make them more effective for learning goals?

The use of visuals in training content is rising, in part because of the increasing need for remote learning opportunities. Unfortunately, part of this rise is also an increase in bad or confusing visual content.
How can we best evaluate visuals and make them more effective for learning goals? While some best practices have emerged, we’d be wiser to reflect on what practices are supported by academic research.
Fortunately, there have been numerous research studies conducted in the past few decades that can help us better understand how to create visual content that will support training . Here are some of the most significant findings to date and some ideas about how you can use these insights to improve your training content.
1. Visuals can enhance comprehension, memory, and motivation.
A number of studies in the 1970s demonstrated that visuals can aid in comprehension. In the 80s and 90s research continued to show that visuals can help learners better memorize and recall material, and they can also arouse attention and enhance motivation.
This means it is important for you to visualize the concepts that are more difficult to understand as well as the ones that you want to make sure learners remember. These concepts can be visualized in graphics like flow charts, timelines, diagrams, mind maps, graphs, or process infographics, like the one below.

In more recent years, researchers have said that in particular infographics (short for informational graphics) can be invaluable for sharing complex content in a way that is highly accessible. Infographics are great for training and development and can be used, for example, in internal reports, presentations, training handouts, and job aids .
2. Special care must be taken, especially when visuals are used for learning purposes.
Of course, not all visuals or infographics are effective and it is easy to produce bad infographics . Some of the most significant errors researchers have noted , for example, are irrelevant, unattractive, or inconsistent use of colors, icons, and other visual elements.
One of the most significant mistakes you can make is when you attempt to bundle too much information into one visual, so it’s wise to split complex topics into multiple visuals. This can be done in a series of presentation slides or in parts of a linear infographic that can be scrolled through online.
Mislead i ng visuals that cause the learner to draw false conclusions are even more damaging. Studies have shown that misinterpretation of visuals can happen even when the accompanying text is accurate. This means you should place just as much attention on the visuals as you do on the text in your training materials.
All of these errors can not only cause the learner to become confused and inattentive, negating any benefits the visuals may have provided, they can also create negative impressions and mistrust between you and the learner, according to research .
3. Data visualizations can be helpful, depending on attitudes and chart types.
Some visuals are based on data – these are called data visualizations. These can take many forms, such as bar charts, line charts, pie charts, word clouds, pictographs, or maps.
According to studies conducted in 2014 , visuals like graphs can be persuasive because they are viewed as being scientific. Note they are less so if the learner has a decreased belief in the importance of science, so you will need to keep your audience in mind as you decide whether to use them.
There has been a lot of debate about whether these visuals can be used to change people’s minds. Research so far indicates that charts may be especially helpful when learners do not yet have existing attitudes about the topic, whereas tables may be more persuasive if learners have attitudes that the data does not support.
There are so many different types of charts and graphs, and some are more effective than others. Studies have shown that vertical bar charts in particular are the easiest for learners to understand, more so than pie charts or other representations.
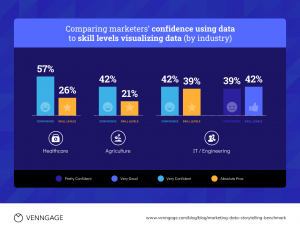
4. Colors and images make learnings more memorable – but be cautious that they don’t distract.
Infographics with detailed or elaborate decorations or images are more memorable, according to a study in 2010 . This means you can use elements like illustrations and backgrounds to make your visuals easier for learners to recall. Researchers have also found that infographics using multiple colors are more memorable. A platform like Venngage offers colorful infographic templates with these elements already created so it’s accessible for design beginners.

Still, researchers have also said that visuals that are comprehensible “at-a-glance” are more quickly retrieved from memory, even if they are detailed. So the trick to creating memorable visuals is always to balance visual appeal with clarity – too much clutter can bog the learner down. Learners spend the most amount of time looking at the text in visualizations, specifically titles , so you should also make sure this text is limited and drives the message home directly and quickly.
You can also help learners recall information later by using everyday objects in photos and icons, according to researchers . Pictograms, as well as diagrams, can serve as visual hooks, allowing a learner to retrieve knowledge later, research says .
Again, you should look to use visuals that support both comprehension and memory – sometimes you will need to use a straightforward bar graph to communicate data succinctly and other times you can use diagrams that will be more surprising and therefore more memorable for the learner.
While data visualizations, illustrations, and icons can be fun to use, it’s best not to use them unless there’s a clear purpose for them. According to a study in 2010 , learners can perceive when visuals are indeed distractions and they will subsequently make assumptions about the designers intentions.
5. Visuals that play a crucial role in learning should be tested.
Designers often use icons and illustrations that they assume learners will understand the meanings of. According to a 2007 study , these assumptions can be entirely false. Cultural background may especially impact a learner’s interpretation of images, so if you are designing materials for learners of various backgrounds, it is particularly important to keep this in mind.
Symbols that are conventional and frequently seen, such as a stop sign, maybe well understood, but those used in different situations to signify different meanings, such as arrows, may cause confusion or even misunderstanding.
Since visuals can play a crucial role in learning, any assumptions that designers make can result in interference with learning objectives. Therefore, you should also test your visuals with target audiences before implementing them broadly, especially if the audience is multicultural.
Now that you are more aware of the many things to pay attention to when creating visual training content, you will want to prevent any major mishaps and make sure the visuals you create are indeed helpful learning aids. Visuals are game-changers for learners so I encourage you to keep learning about how you might best use them to support employee training and development.
RELATED ARTICLES MORE FROM AUTHOR

Leadership Qualities, Skills, and Abilities that Propel People to Excellence

Why the Workplace Needs DEI 2.0, and How to Build It

Unlocking Authentic Leadership: 10 Essential Tips Everyone Should Embrace
Online partners.
Apply for the 2025 Training APEX Awards Today
We use essential cookies to make Venngage work. By clicking “Accept All Cookies”, you agree to the storing of cookies on your device to enhance site navigation, analyze site usage, and assist in our marketing efforts.
Manage Cookies
Cookies and similar technologies collect certain information about how you’re using our website. Some of them are essential, and without them you wouldn’t be able to use Venngage. But others are optional, and you get to choose whether we use them or not.
Strictly Necessary Cookies
These cookies are always on, as they’re essential for making Venngage work, and making it safe. Without these cookies, services you’ve asked for can’t be provided.
Show cookie providers
- Google Login
Functionality Cookies
These cookies help us provide enhanced functionality and personalisation, and remember your settings. They may be set by us or by third party providers.
Performance Cookies
These cookies help us analyze how many people are using Venngage, where they come from and how they're using it. If you opt out of these cookies, we can’t get feedback to make Venngage better for you and all our users.
- Google Analytics
Targeting Cookies
These cookies are set by our advertising partners to track your activity and show you relevant Venngage ads on other sites as you browse the internet.
- Google Tag Manager
- Infographics
- Daily Infographics
- Popular Templates
- Accessibility
- Graphic Design
- Graphs and Charts
- Data Visualization
- Human Resources
- Beginner Guides
Blog How to Ensure Team Participation in Training With Engaging Visuals
How to Ensure Team Participation in Training With Engaging Visuals
Written by: Jennifer Gaskin Sep 17, 2021

So, your company has realized it must invest in team members by providing training and development opportunities only to find that team members are disengaged. Ensuring the entire team participates enthusiastically in training means pulling out every tool in your arsenal, including engaging visuals.
People are visual learners, and by integrating engaging visuals into your training and development programs, you’ll help ensure everyone sticks it out through the process and participates in the spirit of learning and collaboration.
Venngage for Training and Development is the best way to ramp up team participation in training with engaging visuals. Collaborate with your team in real time, make sure all assets follow brand guidelines and export your training materials to PowerPoint—all in just several clicks.
START CREATING FOR FREE
Click to jump ahead:
What is team training and development, what are the 3 kinds of training participants.
- How do you encourage training participation?
Engaging ways to use visuals in your training programs
- Training participation FAQs
Employee training and development is one aspect of workplace education and learning programs in which an entire workforce, one department or a small team goes through training.
The training session could be aimed at increasing individual knowledge or skills, bolstering teamwork and collaboration or generally improving performance.
If you’ve ever seen or participated in a trust fall, that’s a form of team training and development, aimed at building trust between individual team members.
In a workplace setting, team training and development can be challenging, particularly if the end goal is increasing individual job performance. After all, every person is unique, but a team-based program needs to paint with a broad brush.

CREATE THIS INFOGRAPHIC TEMPLATE
Learn more about how to make sure your employees are team players. Having a workforce filled with those eager to collaborate and be part of a functional team will ensure training participation and make your team training endeavors much easier.
Return to Table of Contents
Training and development professionals classify training participants into three broad categories based on how active they are likely to be in the program (credit training expert Jordan Burke ):
- Prisoners : Team members who take part in training because it’s required, not because they choose to
- Passengers : Team members who are simply happy to take part in training because it’s a change of pace but who don’t know if they’ll get anything out of it
- Participants : Team members who are fully engaged in the learning process and have a firm grasp of its benefits
Flipping the first two groups into participants and keeping all three groups fully engaged throughout the training sessions requires using many types of communication and motivational tools.
How do you encourage participation in training?
Burke’s post outlines several best practices for encouraging team participation in training programs, including:
- Explain why training is necessary
- Explain the ways in which it will benefit them
- Position training as a positive investment in the team
We’d like to add one more point: in addition to doing all these, you can integrate visuals into your training materials .
Most people are visual learners , and having different kinds of graphic illustrations in your training and learning programs makes it easy for adult learners to understand, remember and engage with training materials.
Let’s take a look at some different ways you can apply visuals to your training programs to encourage training participation from other employees.
Fortunately, there are many ways you can use visuals to help motivate team members to get and stay engaged with training programs. Whether you’re looking for something small like a flyer or large like a PowerPoint presentation , Venngage has you covered.
Contrast and compare
Personalize training materials, visualize processes, provide pro tips, be informative.
Visual assets like infographics are ideal for comparing and contrasting various aspects. Customize the templates below to fit your training and development needs.

Infographics that allow readers to visualize various elements side-by-side make it easy to see the takeaways, which can increase the chances of the information sticking in the minds of your team training participants.

Use comparison infographics in your training materials whether you’re comparing just two aspects or as many as four, as this infographic does. Or get creative and compare even more elements.

Break out of the traditional, corporate design mode and go for a more vintage look by customizing this comparison infographic with your training materials.

Comparison infographics can also boost team training participation by adding an element of data visualization, like this one. To maximize engagement and encourage participation, ensure the data included is easy to digest.
Return to List of Tips for Training Visuals
Making team members understand what they can expect to get out of training means creating some materials that are unique to each individual. That could mean personalized skill assessments, individual development plans or other unique visuals.

CREATE THIS ROADMAP TEMPLATE
People want to see how they stack up, so consider creating a matrix like this to give team training participants a way to visualize the skillsets they should focus on. This is also a great way to foster collaboration and intra-team coaching, as one employee who lacks a certain skill may seek mentorship from one who has it.

CREATE THIS CHECKLIST TEMPLATE
This training assessment tool isn’t necessarily something to share with the group, but before you begin to develop your training plan , have your team members conduct an honest self-assessment related to your training topic. This will help you understand where they are skill-wise and it will help them understand the purpose of the training, which as we’ve learned, can turn a Prisoner into a Participant.

Add microlearning features to your team training visuals. A dashboard design like this will help encourage a little friendly competition and motivate employees to learn, but make sure people aren’t just earning badges and that they are fully grasping the material.

This employee performance review uses a quadrant format to provide an individualized team member performance evaluation. If your training sessions will last a while, consider creating one for each team member at regular intervals.
- Creating an Effective Performance Management System with Visuals
- How to Easily Create Job Aids that Improve Employee Performance
If your team training is related to implementing new processes and procedures, creating engaging visuals that explain or depict the process is the best way to ensure all training employees understand the process and can participate by asking relevant questions about it.

Letting team members know what they can expect is an excellent way to keep them engaged and increase motivation, as they’ll feel more in control of the learning process.

If your training session is related to installing a new system, procedure or process, a step-by-step description of the new way of doing things is a great way to engage your entire team.

Customize a timeline like this to give your team details about the new process, including what happens at each step and how long each one takes. This is ideal for installing new processes that are associated with a figure; in this case, it’s a length of time, but it could work for other numbers-based information as well.

CREATE THIS MIND MAP TEMPLATE
Though this Kanban mindmap was created for a development team, it’s easily customizable to keep your training participants engaged in learning their new system, procedure or process as well as how every member of the team fits in.
- Top Tips for Using Visuals in Trainings
- How to Diagram a Business Process [Process Diagramming Templates]
- 28 Process Infographic Templates and Visualization Tips
Even those who are already likely to be active participants will feel they’ve gotten a little something extra if you can share pro tips that make them even more effective team members.

Use engaging illustrations and bold colors like the ones in this customer service process infographic to share helpful tips with your team members going through training. It’s important to tell them something they don’t already know, though, so be sure the tips are unique and actionable.

Organize your tips into a do’s and don’ts list infographic like this one pager , so they can visualize not only what to do but what not to do. This is also a great template to use when you want to encourage training participation in the form of discussion over what should and shouldn’t be done for a specific process.

One of the best use cases of pro tips in driving team training participation is when your organization is asking them to do something completely unique, whether it’s adapting to a new way of doing things or getting used to a new computer program.

Add large, engaging icons like the ones in this list infographic . Simple icons and illustrations are often the most effective, as the brain does not have to recall a great deal of visual information to bring the tips to mind.
Empowering your team members with information is an excellent way to keep them engaged and working toward a collective goal. And if the information you’re sharing can help them understand the background of an issue or learn a new procedure, even better.

CREATE THIS PRESENTATION TEMPLATE
Particularly when it comes to lengthy trainings that involve presentations and PowerPoint decks, keep each slide simple and information-based, like this employee presentation on avoiding phishing scams .
Once you’re done editing the training presentation, you can export it in PPTX format to later use on PowerPoint or Google Slides. This is one of the best features exclusive to Venngage Business users

Focusing on information is also useful in installing standard operating procedures and new processes. It’s easy to imagine this information being relegated to a boring page in a manual, but by including useful information at the top, your training employees are much more likely to understand what they need to do after training.
Related : 15+ Standard Operating Procedure Checklists for Better Workflow and Smoother Training

Understanding why the training matters is another way of ensuring participants remain engaged. Consider creating an informational infographic like this one that includes data that helps drive home the importance of team participation in training and development.

CREATE THIS POSTER TEMPLATE
Subtle visuals can be effective at sharing new information with team members during training. The subdued color palette and arrow shapes in this infographic help convey a great deal of dense information in an engaging way.
Training participation FAQ
Do you have more questions about increasing motivation and enabling team participation in your training and development efforts? We have answers.
Why is participation important in a team?
If a team lacks participation from all members, then it’s really just a collection of individuals. True teamwork requires every member to participate by sharing their labor, expertise and encouragement.
How do you improve team participation?
Improving team participation means first understanding each team member and why they seem unwilling to take part in training programs. Once you understand what’s holding them back, you can craft visuals and other assets to ensure they’re engaged with the process.
Why is it important to participate in training?
We’ve all been through boring seminars that we didn’t get much from, but an effective training exercise requires active participation. Asking questions, rephrasing lessons you’ve learned and helping team members understand material are all signs that you’re an eager participant.
In summary: Encourage training participation and engagement from your team members with visual tools
Team participation in the workplace is a critical aspect of collaboration, and every organization benefits from having diverse voices. Engage your team during training and development exercises by creating visuals to keep them informed and entertained.
Discover popular designs

Infographic maker

Brochure maker

White paper online

Newsletter creator

Flyer maker

Timeline maker

Letterhead maker

Mind map maker

Ebook maker
- 1800-915-8583
How To Give An Effective Virtual Training Presentation
In a work from home world virtual presentations and online meetings have become the norm. Almost all industries have had to shift their processes to virtual means and employee training certainly has not been an exception.
As the demand for accessing training materials and resources online has grown, many companies have been looking for ways to continue providing learning and development (L&D) training to their employees. The good news is that professional training opportunities can be provided to employees no matter where they are.
Adapting In-Class Training To Virtual Training: How Training Company Has Kept Up
Over the last few years, our team at Training Company has been working around the clock to ensure that all of our clients and their employees are provided with the content and tools they need to continue their upskilling journey while working remotely. Just like you, the Coronavirus pandemic came as a little surprise, but we haven’t let it stop us in our tracks.
We’ve been keeping up with your employee training needs by ensuring that all of our courses can be accessed and completed online from the comfort of your own home. One of the main questions that we’ve been asked is: How have you been converting in-class training?
While many of our training modules are offered as eLearning courses , through the help of virtual training presentations we can bring the value of an in-person training instructor straight to your home. These virtual training sessions allow for learner participation, feedback and real-time conversations.

Top Things To Keep In Mind When Transitioning To A Virtual Presentation
When transitioning a presentation that was intended to be delivered in-person, you must make sure to keep the following things in mind to make sure that it still packs a punch and provides the same value virtually.
Below, we’ve listed the top things a virtual training presentation and provider should do when ensuring that employees can continue learning and upskilling from home.
- Know the technology – Nothing screams unprepared when hosting a virtual training session than not familiarizing yourself with the video and web conferencing software that’s being used beforehand. Complete a dry run beforehand to make sure that the presentation flows well. Also, make sure that the platform you are using is accessible and easy-to-use by employees also.
- Keep content engaging – As in-class training sessions allow learners to engage directly with the trainer, virtual presentations need to have engaging content to make up for this. The last thing you want is for participants to be jumping between various window tabs. A virtual presentation should avoid being too ‘word-heavy’ and instead should include plenty of engaging visuals and funny memes.
- Include session activities – Just because you’re not together in person doesn’t mean that you can’t incorporate activities that encourage participation. These could be exercises, polls or pop quizzes. Aim to involve participants every 4 minutes.
- Provide post-training resources – Always make sure to follow up on a virtual training presentation with resources that employees can use to reinforce learning. Consider sending out a transcript of questions and answers once the virtual session is over along with additional reading resources.
What Programs Are The Best To Use?
There are multiple web and video conferencing programs available that cater to companies that want to transition their learning and development training plan to the virtual world. Choosing this program depends on the needs of your company and employees. For example, do you intend to host online meetings for up to 1,000 or just 100? Are your employees not very tech-savvy? That will also play into which platform you choose.
In our opinion, some of the best video conferencing programs currently on the market include Zoom (which we’ve all heard about by now), Cisco Systems Webex Meetings, GoToMeeting, Microsoft Teams and GoToWebinar.
When it comes to providing virtual training presentations online, you will need a program that provides features such as:
- High-Quality Audio & Video
- Easy To Use Interface
- Screen Sharing
- Chat Function
- Multi-Device Support
- File Sharing

Why Integrate With A Learning Management System?
If your company hasn’t already, it may be time to consider integrating with a Learning Management System (LMS). What is it? An LMS is an online software-based platform that allows a company to manage, deliver and measure employee training programs all from one dashboard.
Many companies have recently been investing in an LMS platform as part of their employee learning and development training program. Having one platform that allows you to not only deliver training content to employees but also, track employee participation is becoming a fundamental part for many when providing an effective training strategy.
Learning Management Systems are the perfect platform for providing blended learning opportunities to your employees. Not only do they host online training modules but they also feature in-built web conferencing that allows you to carry out your in-person training sessions online.
Another benefit that an LMS can provide is the ability to follow up training content with skills tests and other complementary courses to improve learning retention and engagement. Sounds almost too good to be true, doesn’t it?
How We Can Provide A Custom & Curated LMS For Your Business With Blended Learning
Here at Training Company, we offer all clients the opportunity to use our very own white-labelled LMS platform . Your learning dashboard and platform is completely customizable and created to reflect your visual branding standards, at a fraction of the cost.
When using our LMS, you can access our extensive library of over 90,000 training modules or upload your own content. You will also have full access to employee profile analytics, course progress metrics and tracking results. All while being fully customized to your brand so that you can provide a consistent learning experience for your company.
Boost Campaign Performance Through Video
Discover how to boost your next campaign by using video.
7 Visuals that Make for Effective Remote Employee Training Materials
Ask learning and development professionals what their biggest challenge is and they’ll tell you it’s keeping learners engaged.
Considering the deluge of information employees are bombarded with, sending them a text-heavy onboarding manual or professional development training material is sure to get lost in the shuffle.
This is where visual learning can prove to be effective.
According to a research study :
- 58% of employees believe that they remember information longer when it’s visual
- 41% of employees say they learn better with visuals
- Employees absorb information 7% faster when communications are visual
It’s safe to conclude that using visual training materials leads to an increase in engagement and information retention while helping employees grasp concepts with ease.
Let’s take a look at seven visuals that make for effective remote employee training materials.
1. Infographics
A handbook filled with blocks of text versus a visually appealing infographic — which one is likely to capture and retain your attention?
Chances are it’s the latter.
Infographics make for powerful employee training materials because they have the ability to present complex information in a manner that’s easy to grasp and understand.
While creating infographics, make sure you minimize text and support the information with visuals such as illustrations, photos , graphs, icons, and symbols.
Here are the different ways to use infographics in your remote employee training materials:
- Simplify complex concepts
- Summarize information
- Visualize data and statistics
- Make comparisons
- Organize information and aid comprehension
For example, here’s a comparison infographic that illustrates the dos and don’ts by laying them out side-by-side. Notice how it pairs every point with an icon which makes the information memorable.
Source: Venngage
2. Presentation decks
Presentation decks are common employee training and development materials, regardless of whether you’re delivering synchronous or asynchronous training.
But if your slides are monotonous, poorly designed, consist of too much text, and have an endless list of bullet points, then you might be inflicting ‘ death by PowerPoint ’ on your employees.
If you want to make an impact with presentation decks, you need to make them visual. No, boring stock photos don’t count. Use meaningful visuals that help you deliver your message while adding to the overall aesthetic.
Here are design best practices to consider while creating presentation decks for employee training materials:
- Focus on one key takeaway per slide
- Use visuals to make the information memorable
- Include a variety of slide layouts to keep the audience engaged
- Minimize text on the slides (not more than five lines of text per slide)
- Stick to a color scheme
- Emphasize information with colors, text size, and weight
Take a look at this engaging presentation deck. It combines icons, graphs, and text to present the information effectively and capture the reader’s attention.
3. Videos
Microsoft saved $303 per person when they decided to replace their classroom training sessions with videos.
And this is just one of the benefits of including videos in your employee training and development program.
It’s no secret that videos are highly engaging content formats. Not only do they demonstrate concepts and deliver information effectively but they also have the power to improve retention and retain the learner’s attention for a longer period of time.
You can create different types of employee training videos such as:
- Screencasts: to provide a demonstration or step-by-step tutorial
- Explainer videos: to introduce a concept, tool, or process
- Interactive videos: to create an immersive learning experience
- Animated videos: to explain a complex topic
Here’s a good example of an animated video by Reach Out that educates employees about workplace bullying.
4. Charts
Good data makes for great stories and deserves to be part of your employee training content.
But what happens when you fail to present that data effectively? Your training program becomes a data dump.
This is where charts come into the picture. When used properly, they can:
- Improve comprehension of complex concepts
- Reinforce the core message
- Make key insights memorable
- Increase the persuasiveness of claims
Whether you’re sharing business data or presenting industry trends, it’s important to pick the right kind of chart for your data. This will add clarity and prevent misinformation.
The broad objectives of using charts can be divided into:
- Inform (eg. donut chart, pictograph, etc.)
- Compare (eg. bar chart, pie chart, bubble chart, etc.)
- Show change (eg. line chart, area chart, timeline, etc.)
- Organize (eg. table, list, Venn diagram, etc.)
- Reveal relationships (eg. scatter plot, histogram, etc.)
Here’s an example of a bar chart that illustrates the net gains and losses without overwhelming readers. It uses a simple color palette and has clear data labels.
5. Checklists
A huge part of employee training is ensuring that employees implement their learnings in their day-to-day work. One way to achieve that is to provide employees with checklists.
Apart from being functional and informative, checklists also help reinstate and summarize large chunks of information. They aid task prioritization and motivate employees to take action.
Here are the different ways to use checklists as part of employee training:
- Employee onboarding
- Safety training
- Performance evaluation
- Employee wellbeing
- Job aids for recurring tasks
Take a look at this job aid checklist example. It uses short sentences to outline the various tasks. The clean background and color-coded categories make it easy to scan and read.
6. Roadmaps
As a learning and development professional, your goal is to ensure that your employees get access to the right kind of training that is in line with the company’s objectives.
Enter learning paths.
As stated in the book, Learning Paths , mapping out learning paths reduces training time by 30% or more.
Creating learning paths or roadmaps involves chalking out what your learners need to achieve along with the method of learning and duration. It helps trainers and learners take a more structured approach and makes it easier to track training progress.
Create a personalized learning roadmap for employees that takes into account their individual learning paths and goals. This serves as a reference, improves productivity , and keeps them motivated.
Here is an example of a learning roadmap template you can use. It breaks the timeline into smaller segments and allots specific tasks for each time frame.
7. Flowcharts
Let’s say you want to educate employees about a new business process or explain a complex workflow. Instead of communicating it in words alone (and have them forget it), why not create a flowchart?
Flowcharts are a useful way to represent a series of steps and guide the learner to make informed decisions.
The best part about flowcharts is that they serve as effective post-training visual aids. They help employees retain information, solve complex problems on the job, and prevent mistakes.
While designing flow charts, it’s a good idea to include a short introduction for context. You can use colors, icons, and arrows to emphasize information. Make sure you keep the design simple and only include essential information that helps employees follow the instructions with ease.
Here’s a flowchart that can be part of your customer support training program. It shows the multiple paths and clearly communicates the corresponding action that needs to be taken.
The takeaway: use visuals to create engaging training materials
There is no way your employee training and development program can generate results if you continue to provide your remote employees with boring training material.
Your focus should be to create training content that’s functional and engaging. Using the right kind of visuals will help you create impactful training material that will aid learning and improve employee performance.
Keep learning
What is video-based learning and how to implement it, a complete guide to digital employee onboarding in 2024, 7 tips for creating engaging hr videos for training, 8 best practices for remote training in 2023, how to record yourself giving a presentation, how to make employee training interactive , didn't find what you were looking for.

Personal Development
Using visual aids during a presentation or training session.
Communication
Productivity
Work Skills
Benefits of Utilizing Visual Aids During Presentations and Training Sessions
Including visual aids in presentations can be incredibly beneficial in a variety of ways. They can help to increase understanding, explain concepts, make an impact, and create enthusiasm. In today's world, making information visual is more important than ever.
What Are Visual Aids?
Visual aids are any items used to supplement spoken information in a visual manner, such as videos, photographs, graphs, and more. Depending on their purpose, visuals can be used to reduce the amount of spoken words, clarify points, emphasize key messages, create a memorable impression, enhance credibility, engage the audience, and make information easier to absorb.
How to Prepare and Utilize Visual Aids
Once you have decided to incorporate visual aids into your presentation, it is important to ensure the audience is able to quickly understand the message. Visual aids should be used sparingly throughout the presentation, as too many can become overwhelming. When preparing visuals, keep the following in mind:
- Determine how the visual will support your message
- Make sure visuals follow the flow of your speech
- Avoid cluttering images
- Ensure visuals are high quality
- Maintain a consistent style
- Use graphs and charts to display data
- Don't have the audience read and listen at the same time
- Utilize visuals in moderation
During the presentation, it is essential to make sure the visuals can be seen by everyone in the audience. Speak to the audience instead of the screen, avoid reading from the visual, explain the image as soon as it is shown, make it clear why you're using it, and when you no longer need it, make sure it is not still visible. When choosing visuals, pick ones that are tailored to the audience. They should be able to relate to the images, find them familiar, and enjoy them. You want to use visuals that are appropriate for the audience.
Types of Visual Aids
Microsoft PowerPoint is one of the most commonly used visual aids for presentations as it helps to create attractive, professional slides with the ability to modify and rearrange content. It also allows for a range of visual items to be inserted into the slides, providing greater focus for the audience. Slideshows can usually be seen better than other visuals, and you can remain facing the audience while presenting.
Whiteboards are an excellent option for further explanation, detailing a process, creating diagrams, and helping to explain complex words and phrases. They can also be used to keep key information visible throughout the entire presentation, such as key definitions that audience members can reference when needed.
Handouts are another way to provide essential information from the presentation without overwhelming the audience by putting too much information on the slides. They can also be used to provide extra information.
Videos are a great way to engage and interest audiences. Videos can bring audio, motion, and images into the presentation.
Flip charts provide a low-cost and low-tech solution to recording and conveying information. They are better for smaller audiences, and they are a great choice for brainstorming. Flip charts are also used to summarize information and display important background information.
Writing notes to yourself ahead of time can help you remember what to include. The audience will not see these notes. Additionally, drawing pencil lines ahead of time can help to keep your handwriting straight. Remember to practice writing on the chart ahead of time to combat nerves during the presentation.
Poster boards can be created using a range of visuals such as graphs and images.
Using Visual Aids for Presentations
Visual aids can be a great way to keep an audience engaged and interested in a presentation. They are also versatile and can be as complex as desired. However, the cost of a complex presentation with visual aids should be taken into consideration. Additionally, visual aids can be used to make a dull topic more interesting or to demonstrate a model or experiment.
Choosing Visual Aids for Your Presentation
Prior to a presentation, it is important to take the context into consideration. This means checking the room where the presentation will be taking place. Additionally, the visuals should be easy to understand without being too complex. Practicing with the visual aids beforehand can help to identify any problems that may arise.
Using different colours in a presentation can be great for grabbing attention. Software such as PowerPoint makes it easy to use colours, although it is important to use the colour wheel for harmony and contrast. Too many colours can make a presentation look unprofessional and cluttered, and consideration should be given to the message that the colours may be communicating.
Benefits of Visual Aids
Research suggests that retention and understanding of information can be improved with the use of visual aids. For instance, the U.S. Department of Labor OSHA Office of Training and Education found that retention of information three days after a meeting was six times greater with visual and oral aids than with spoken language alone. Additionally, psychologist Bruner conducted studies to suggest that people will remember 80% of what they see and do, 20% of what they read, and just 10% of what they hear.
When used appropriately, visual aids can help to make presentations smoother for you and easier to understand for the audience. Additionally, visuals that are tailored to the audience can help to raise engagement and interest.
Achieve Your Goals
Join shiken for free.

AI-powered learning tools. Create, relax, learn.
Try Shiken Premium for Free
- Draft and add content
- Rewrite text
- Chat with Copilot
- Create a summary
- Copilot in Word on mobile devices
- Frequently asked questions
- Create a new presentation
- Add a slide or image
- Summarize your presentation
- Organize your presentation
- Use your organization's branding
- Copilot in PowerPoint for mobile devices
- Draft an Outlook email message
- Summarize an email thread
- Suggested drafts in Outlook
- Email coaching
- Get started with Copilot in Excel
- Identify insights
- Highlight, sort, and filter your data
- Generate formula columns
- Summarize your OneNote notes
- Create a to-do list and tasks
- Create project plans in OneNote

Create a new presentation with Copilot in PowerPoint
Note: This feature is available to customers with a Copilot for Microsoft 365 license or Copilot Pro license.
Create a new presentation in PowerPoint.

Select Send . Copilot will draft a presentation for you!
Edit the presentation to suit your needs, ask Copilot to add a slide , or start over with a new presentation and refine your prompt to include more specifics. For example, "Create a presentation about hybrid meeting best practices that includes examples for team building.”
Create a presentation with a template
Note: This feature is only available to customers with a Copilot for Microsoft 365 (work) license. It is not currently available to customers with a Copilot Pro (home) license.
Copilot can use your existing themes and templates to create a presentation. Learn more about making your presentations look great with Copilot in PowerPoint .

Enter your prompt or select Create presentation from file to create a first draft of your presentation using your theme or template.

Edit the presentation to suit your needs, ask Copilot to add a slide , organize your presentation, or add images.
Create a presentation from a file with Copilot
Note: This feature is only available to customers with a Copilot for Microsoft 365 (work) license. It is not currently available to customers with a Copilot Pro (home) license.

With Copilot in PowerPoint, you can create a presentation from an existing Word document. Point Copilot in PowerPoint to your Word document, and it will generate slides, apply layouts, create speaker notes, and choose a theme for you.

Select the Word document you want from the picker that appears. If you don't see the document you want, start typing any part of the filename to search for it.
Note: If the file picker doesn't appear type a front slash (/) to cause it to pop up.
Best practices when creating a presentation from a Word document
Leverage word styles to help copilot understand the structure of your document.
By using Styles in Word to organize your document, Copilot will better understand your document structure and how to break it up into slides of a presentation. Structure your content under Titles and Headers when appropriate and Copilot will do its best to generate a presentation for you.
Include images that are relevant to your presentation
When creating a presentation, Copilot will try to incorporate the images in your Word document. If you have images that you would like to be brought over to your presentation, be sure to include them in your Word document.
Start with your organization’s template
If your organization uses a standard template, start with this file before creating a presentation with Copilot. Starting with a template will let Copilot know that you would like to retain the presentation’s theme and design. Copilot will use existing layouts to build a presentation for you. Learn more about Making your presentations look great with Copilot in PowerPoint .
Tip: Copilot works best with Word documents that are less than 24 MB.
Welcome to Copilot in PowerPoint
Frequently Asked Questions about Copilot in PowerPoint
Where can I get Microsoft Copilot?
Copilot Lab - Start your Copilot journey

Need more help?
Want more options.
Explore subscription benefits, browse training courses, learn how to secure your device, and more.

Microsoft 365 subscription benefits

Microsoft 365 training

Microsoft security

Accessibility center
Communities help you ask and answer questions, give feedback, and hear from experts with rich knowledge.

Ask the Microsoft Community

Microsoft Tech Community

Windows Insiders
Microsoft 365 Insiders
Find solutions to common problems or get help from a support agent.

Online support
Was this information helpful?
Thank you for your feedback.
IMAGES
VIDEO
COMMENTS
To pull off a training session, webinar, or coaching session effectively, you'll need an organized presentation as a visual aid. A good training presentation can provide structure to your speech and boost your confidence as a presenter. It can also deliver your message efficiently, and stick with your audience long after your presentation is ...
Create different formats for your presentation. If it's a Keynote or Powerpoint, have a PDF version available in case of any tech issues you'll still have a high-quality version available. If including video, have backup screen-shots as images to demonstrate your points in case the video doesn't run. Be analog ready.
Top Tips for Creating an Effective Training Presentation. What we commonly call "effective presentation" is the right balance of two elements: the content you provide and how you deliver it. The first part is on your expertise and every piece of information you can share. But the second part is where the real magic happens.
Template 5: Training proposal template. This PowerPoint Template is a deck of 29 slides. It depicts an in-depth proposal regarding corporate training and professional growth. Objectives and actions such as team building workshops, ensuring the stability of the business, time management, etc., are included.
The in-person group training session is the most common—until the pandemic changed many things. Your training presentation is the visual support during the event. Here are some tips for delivering a presentation during a group training session. Practice your ability to talk to a group. Notice your voice inflections or lack thereof.
7. Add fun with visual quizzes and polls. To break the monotony and see if your audience is still with you, throw in some quick quizzes or polls. It's like a mini-game break in your presentation — your audience gets involved and it makes your presentation way more dynamic and memorable. 8.
Get away from text-heavy Death by PowerPoint slides and use these ideas to convey your messages using visuals, diagrams, and animations, so that your present...
How to illustrate presentation structure and content types on a slide. Visualizing speaker and listener types. Presenting various meeting room setups. How to show hints for preparing speech and presentation itself. Closing the presentation training with a recap and summary slide. Whether you are a professional communication trainer or a ...
The Training Presentation Template is already designed for you on your board — that's why it's so easy to create a training presentation with Miro. You can say goodbye to boring training slides. You can easily edit and customize the training presentation to fit your needs and match your company's branding.
How to Deliver Effective Training Presentations. 1. Practice and Rehearse. Preparation and practice are key to delivering a perfect and polished presentation. Familiarize yourself with the content and practice your delivery multiple times. Pay attention to your tone, pitch, and expressions during the rehearsal.
Visualisation is essential for effective visual training content. If you want to create visual training content, then you need to use visualisation to create material that actually helps your learners understand what it is that you are trying to help them learn. Think charts, diagrams, pictures, animated sequences.
10. 30-Day Action Plan Template. Good corporate training material is all about preparing your employee for the company workforce. By adding a 30-Day Action Plan Template to your arsenal you'll be able to get your new trainees organized and focused on what matters, helping them to seamlessly adapt to their new role.
3. Develop your content and materials. 4. Practice and rehearse. 5. Deliver and evaluate. 6. Here's what else to consider. Creating a presentation training session can help you and your team ...
Tip #2: Use visuals to help explain complex concepts. If any of the content you are delivering in training is particularly heavy or difficult to understand, this is another great opportunity to include a visual. If you work in or with organizations in the healthcare, finance or technology industries, for example, you may already be using ...
By assessing learner understanding, collecting and analyzing feedback, and embracing a culture of continuous improvement, you can enhance the quality of your presentations and deliver exceptional learning experiences. Crack the code on successful training presentations! Engage your audience with proven strategies.
Visual aids must be clear, concise and of a high quality. Use graphs and charts to present data. The audience should not be trying to read and listen at the same time - use visual aids to highlight your points. One message per visual aid, for example, on a slide there should only be one key point.
Infographics are great for training and development and can be used, for example, in internal reports, presentations, training handouts, and job aids. Image credit: Venngage. 2. Special care must be taken, especially when visuals are used for learning purposes. Of course, not all visuals or infographics are effective and it is easy to produce ...
Venngage for Training and Development is the best way to ramp up team participation in training with engaging visuals. Collaborate with your team in real time, make sure all assets follow brand guidelines and export your training materials to PowerPoint—all in just several clicks. START CREATING FOR FREE.
Provide post-training resources - Always make sure to follow up on a virtual training presentation with resources that employees can use to reinforce learning. Consider sending out a transcript of questions and answers once the virtual session is over along with additional reading resources.
Our easy-to-use, fully customizable templates give you a quick and easy starting point to create all of your onboarding and training materials. Create visual content you can easily share with your employees and customers. Our template library includes a variety of presentations, infographics, documents, explainer videos, graphics for your ...
It's safe to conclude that using visual training materials leads to an increase in engagement and information retention while helping employees grasp concepts with ease. Let's take a look at seven visuals that make for effective remote employee training materials. 1. Infographics. A handbook filled with blocks of text versus a visually ...
Benefits of Utilizing Visual Aids During Presentations and Training Sessions. Including visual aids in presentations can be incredibly beneficial in a variety of ways. They can help to increase understanding, explain concepts, make an impact, and create enthusiasm. In today's world, making information visual is more important than ever.
Call or email today to get started. You know that your team needs to improve their virtual and hybrid presentations to executives, clients, and prospects. You can build their skills with a focused, practical training course. Email me or call me today at 905-510-4911 (Eastern time zone) so we can start discussing how to customize the session for ...
Select the Copilot button in the Home tab of the ribbon. Enter your prompt or select Create presentation from file to create a first draft of your presentation using your theme or template. Copilot will replace your current presentation with a new one. If needed, save a copy first and rerun the steps above. If you already have a copy, confirm ...