- Start the presentation and see your notes in Presenter view Article
- Add speaker notes to your slides Article
- Rehearse and time the delivery of a presentation Article
- Record a slide show with narration and slide timings Article
- Print your PowerPoint slides, handouts, or notes Article
- Create a self-running presentation Article


Record a slide show with narration and slide timings
You can record your PowerPoint presentation—or a single slide—and capture voice, ink gestures, and your video presence. When completed, it’s like any other presentation. You can play it for your audience in a Slide Show or you can save the presentation as a video file. So, instead of just “handing the deck” to someone, people can see your presentation with the passion and personality intact.
A new feature for Microsoft 365 was rolled out in early 2022. Exactly when your business has this feature is also based on when your admin distributes new features in Microsoft 365.
This article contains procedures for both the new experience and the classic experience:
New experience
Classic experience

All recording tools are in the Record tab in the ribbon, but you can start by selecting the Record button.

You can also record by selecting one of the options in the Record section of the Record tab.

If you have notes in your presentation, they’re turned into text at the top of the screen so you can use them like a teleprompter as you record.
Tip: Use the auto-scroll feature in teleprompter and set it to scroll at your preferred speed.

There are several options you can use when you record a presentation. You can turn your camera and microphone on or off by selecting the icons at the top. There are several options you can use when you record a presentation. You can turn your camera and microphone on or off by selecting the icons at the top. To change your camera or microphone, choose the Select more options <···> icon. You can even add a customizable camera that can be resized, repositioned, and formatted to go with your slide content. Select Edit , then select Cameo . Adjust the formatting for the camera, then select Record again to return to the recording environment.
In the Select the camera mode menu, you can select Show Background or Blur Background .

You can also change the layout in the Views menu to switch between Teleprompter , Presenter View , or Slide View .

When you’re ready, select Start recording and a countdown will begin.
Use the onscreen laser, colored pens, or highlighters in the tray below markup slides and it’ll record as well.
To record narration for a specific slide, use the previous or next arrows.
Note: Narration won’t record during slide transitions so let those play first before you start speaking.
Pause the recording as needed or select Stop if you’re done.
To review the video, select the Play button.
To quickly delete and re-record your video on current slide or on all slides, select Delete . While Clear will delete the recorded narration, Reset to Cameo additionally replaces the recorded narration with the camera feed for an easy retake.

When you’re done, select Export > Export Video .
After you successfully export the video, you can view the video by selecting View and share video .

At any time, you can return to your document by selecting the Edit button.
Want more?
About Record in PowerPoint
Create a self-running presentation
Export or turn your presentation into a video
Classic experience
Turn on the Recording tab of the ribbon: On the File tab of the ribbon, click Options . In the Options dialog box, click the Customize Ribbon tab on the left. Then, in the right-hand box that lists the available ribbon tabs, select the Recording check box. Click OK .

To get ready to record, select Record on either the Recording tab or the Slide Show tab of the ribbon.
Clicking the upper half of the button starts you on the current slide.
Clicking the lower half of the button gives you the option to start from the beginning or from the current slide.

(The Clear command deletes narrations or timings, so be careful when you use it. Clear is grayed out unless you have previously recorded some slides.)
The slide show opens in the Recording window (which looks similar to Presenter view), with buttons at the top left for starting, pausing, and stopping the recording. Click the round, red button (or press R on your keyboard) when you are ready to start the recording. A three-second countdown ensues, then the recording begins.

The current slide is shown in the main pane of the Recording window.
You can stop the recording any time by pressing Alt + S on your keyboard.
Navigation arrows on either side of the current slide allow you to move to the previous and next slides.
PowerPoint for Microsoft 365 automatically records the time you spend on each slide, including any Animate text or objects steps that occur, and the use of any triggers on each slide.
You can record audio or video narration as you run through your presentation. The buttons at the lower-right corner of the window allow you to toggle on or off the microphone, camera, and camera preview:

If you use the pen, highlighter, or eraser, PowerPoint records those actions for playback also.

If you re-record your narration (including audio and ink), PowerPoint erases your previously recorded narration (including audio and ink) before you start recording again on the same slide.
You can also re-record by going to Slide Show > Record .
You can pick a pointer tool (pen, eraser, or highlighter) from the array of tools just below the current slide. There are also color selection boxes for changing the color of the ink. ( Eraser is grayed out unless you have previously added ink to some slides.)
To end your recording, select the square Stop button (or press S on your keyboard).
When you finish recording your narration, a small picture appears in the lower-right corner of the recorded slides. The picture is an audio icon, or, if the web camera was on during the recording, a still image from the webcam.

The recorded slide show timing is automatically saved. (In Slide Sorter view, the timings are listed beneath each slide.)
In this process, what you record is embedded in each slide, and the recording can be played back in Slide Show. A video file is not created by this recording process. However, if you need one, you can save your presentation as a video with a few extra steps.
Preview the recorded slide show
On the Slide Show tab, click From Beginning or From Current Slide .
During playback, your animations, inking actions, audio and video will play in sync.

Preview the recorded sound
In the Recording window, the triangular Play button near the top left corner lets you preview the recording of the slide that currently has the focus in that window.

In Normal view, click the sound icon or picture in the lower-right corner of the slide, and then click Play . (When you preview individual audio in this way, you won't see recorded animation or inking.)

You can pause playback while previewing the audio.
Set the slide timings manually
PowerPoint for Microsoft 365 automatically records your slide timings when you add narrations, or you can manually set the slide timings to accompany your narrations.
In Normal view, click the slide that you want to set the timing for.
On the Transitions tab, in the Timing group, under Advance Slide , select the After check box, and then enter the number of seconds that you want the slide to appear on the screen. Repeat the process for each slide that you want to set the timing for.
If you want the next slide to appear either when you click the mouse or automatically after the number of seconds that you enter—whichever comes first—select both the On Mouse Click and the After check boxes.
You can use manual slide timings to the trim the end of a recorded slide segment. For example, if the end of a slide segment concludes with two seconds of unnecessary audio, simply set the timing for advancing to the next slide so that it happens before the unnecessary audio. That way you don't have to re-record the audio for that slide.
Delete timings or narration
The Clear command is for deleting timings or narration from your recording that you don't want or that you want to replace.
In the Recording window, the Clear command in the top margin of the window allows you to:
Clear recordings on the current slide
Clear recordings on all slides
In Normal view, there are four different Clear commands that allow you to:
Delete the timings on the currently selected slide
Delete the timings on all slides at once
Delete the narration on the currently selected slide
Delete the narration on all slides at once
If you do not want to delete all the timings or narration in your presentation, open a specific slide that has a timing or narration that you do want to delete.
On the Recording tab of the PowerPoint for Microsoft 365 ribbon, on the Record Slide Show button, click the down arrow, point to Clear , and then choose the appropriate Clear command for your situation.

Turn off timings or turn off narrations, and ink
After you've recorded your PowerPoint for Microsoft 365 presentation, any timings, gestures, and audio you performed are saved on the individual slides. But you can turn them all off if you want to view the slide show without them:
To turn off recorded slide timings: On the Slide Show tab, clear the Use Timings box.
To turn off recorded narrations and ink: On the Slide Show tab, clear the Play Narrations box.
Publish the recording to share it with others
Once you've edited the recording to your satisfaction, you can make it available to others by publishing to Microsoft Stream.
With the presentation open, on the Recording tab, select Publish to Stream .
Type a title and a description for the video.
Set other options, including whether you want others in your organization to have permission to see the video.
Select the Publish button.
The upload process can take several minutes, depending on the length of the video. A status bar at the bottom of the PowerPoint window tracks the progress, and PowerPoint shows a message when the upload is finished:

Click the message to go directly to the video playback page on Microsoft Stream.
Create closed captions
To make your video more accessible by including closed captions, choose from these options, which are described in separate Help articles:
Manually write a closed caption file yourself
Get a closed-caption file automatically generated by Microsoft Stream
Once you have a closed-caption file, you can add it to your video file by using PowerPoint .
Record a slide show
With your presentation open, on the Slide Show tab, click Record Slide Show .
(The Clear command deletes narrations or timings, so be careful when you use it. Clear is grayed out unless you have previously recorded some slides.)
In the Record Slide Show box, check or clear the boxes for your recording, and click Start Recording .

More about these options:
Slide and animation timings : PowerPoint automatically records the time you spend on each slide, including any animation steps that occur, and the use of any triggers on each slide.
Narrations, ink, and laser pointer: Record your voice as you run through your presentation. If you use the pen, highlighter, eraser, or laser pointer, PowerPoint records those for playback as well.
Important: Pen, highlighter, and eraser recording are available only if you have the February 16, 2015 update for PowerPoint 2013 or a later version of PowerPoint installed. In earlier versions of PowerPoint, pen and highlighter strokes are saved as ink annotation shapes.
At the top left corner of the window is the Recording toolbar, which you can use to:

If you re-record your narration (including audio, ink, and laser pointer), PowerPoint erases your previously recorded narration (including audio, ink, and laser pointer) when you start recording again on the same slide.
You can also re-record by going to Slide Show > Record Slide Show .
To use ink, eraser, or the laser pointer in your recording, right-click the slide, click Pointer options , and pick your tool:
Laser Pointer
Highlighter
Eraser (This option is grayed out unless you have previously added ink to some slides.)
To change the color of the ink, click Ink Color .
To end your recording, right-click the final slide, and click End Show .
Tip: When you finish recording your narration, a sound icon appears in the lower-right corner of each slide that has narration.
The recorded slide show timings are automatically saved. Timings are shown in Slide Sorter view just beneath each slide.
In this process, what you record is embedded in each slide, and the recording can be played back in Slide Show. A video file is not created by this recording process. However, if you want a video file, you can save your presentation as a video with a few extra steps.
On the Slide Show tab, click From Beginning or From Current Slide.
During playback, your animations, inking actions, laser pointer, audio and video play in sync.
Preview the recorded audio
In Normal view, click the sound icon in the lower-right corner of the slide, and then click Play.
PowerPoint automatically records your slide timings when you add narrations, or you can manually set the slide timings to accompany your narrations.
On the Transitions tab, in the Timing group, under Advance Slide , select the After check box, and then enter the number of seconds indicating how long the slide should appear on the screen. Repeat the process for each slide that you want to set the timing for.
Tip: If you want the next slide to appear either when you click the mouse or automatically after the number of seconds that you enter—whichever comes first—select both the On Mouse Click and the After check boxes.
The Clear command is for deleting timings or narration from your recording that you don't want or that you want to replace. There are four different Clear commands that allow you to:
On the Slide Show tab of the PowerPoint ribbon, on the Record Slide Show button, click the down arrow, point to Clear, and then choose the appropriate Clear command for your situation.
Turn off timings or turn off narrations, ink, and laser pointer
After you've recorded your PowerPoint presentation, any timings, gestures, and audio you performed are saved on the individual slides. But you can turn them all off if you want to view the slide show without them:
To turn off recorded narrations, ink, and the laser pointer: On the Slide Show tab, clear the Play Narrations box.
Turn your mouse into a laser pointer
Animate text or objects
Turn your presentation into a video
Create a self-running presentation
Record your presentation

Toggle video and audio options in the options dropdowns in the recording toolbar.

Note: Your video will be re-recorded just as you had styled.
After you exit Recording Studio with the Esc key (or by clicking End show ) you will see narration (audio/video) applied to your slide along with the proper slide timings and ink animations.
Tip: Audio, video, and inking elements can all be resized and moved in edit view after recording.

Reset to Cameo
To delete your recording and retain your camera style, do the following:
On the Record tab, select Reset to Cameo .

Clear timings or narration
On the Record tab, select Clear Recording

Keyboard shortcuts during the recording process
Related information.
Present with Cameo
Save a presentation as a movie file or MP4
Record audio in PowerPoint for Mac
Add or delete audio in your presentation
Prepare to record
To begin, open the presentation you want and click the Slide Show tab.
Tip: If your presentation has a lot of slides, you might find it more convenient to work in Slide Sorter view. Click View > Slide Sorter to try it out.
Here are some things to check before you begin recording:
If you want to record only part of your slide deck, do one of the following before you begin:
Select the slides you don't want to include, and click Hide Slide .
Click Custom Show > Custom Slide Show > + (add).

Use the Rehearse button to change the timing between slides without affecting the narration or gestures you've already recorded.

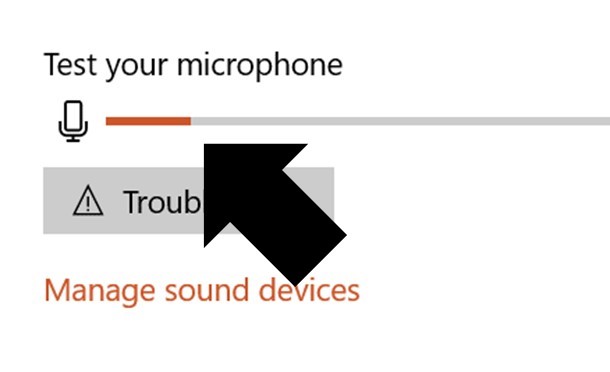
Make sure your microphone is set up correctly. On the Mac, go to System Preferences > Sound .
Record your slide show
If you want to add narration or commentary to the slide show, make sure your microphone is set up and working.
To start recording:
Click the Slide Show tab, select the slide where you want the recording to begin, and then click Record Slide Show .

During recording, use Ctrl+click to access the recording commands that let you navigate through the slides, change cursors, or trigger screen blackouts or whiteouts.

Click End Show to stop recording.
A Save dialog box appears. Click Yes to save your recording, or No if you want to record it again.
Saving overwrites anything you've previously recorded. If you want to record another slide show with the same set of slides, save your presentation file with a different name.
Click Play from Start to preview your recording.
You may want to print this list of keyboard shortcuts to refer to while you're recording:
Set playback options
When you've finished recording and are ready to distribute the presentation, click Set up Slide Show and choose the options that are right for your audience.

Show type Show full screen or windowed.
Show options Turn off narration or animations.
Slides Choose a subset of slides, or a Custom show if you've set one up.
Advance slides Set up this version of the slide show so someone can page through it manually.
Add, change, or remove transitions between slides
Start the presentation and see your notes in Presenter view
We're sorry. PowerPoint for the web doesn't support recording a slide show.

Need more help?
Want more options.
Explore subscription benefits, browse training courses, learn how to secure your device, and more.

Microsoft 365 subscription benefits

Microsoft 365 training

Microsoft security

Accessibility center
Communities help you ask and answer questions, give feedback, and hear from experts with rich knowledge.

Ask the Microsoft Community

Microsoft Tech Community

Windows Insiders
Microsoft 365 Insiders
Was this information helpful?
Thank you for your feedback.
How-To Geek
How to record voiceover narration in powerpoint.
If you're not able to physically present your slideshow, record a voiceover narration to make sure no points are missed.
Quick Links
Preparation, record a voiceover for your presentation.
If you’re sending out your presentation instead of giving it in front of an audience, but you feel adding a vocal explanation would better help to deliver the message, record a voiceover narration. Here’s how to do it.
Before you begin your PowerPoint narration, you’ll need to make sure you’ve made the proper preparations.
Set Up Your Mic
First, you’ll need a microphone. Most modern computers have a built-in microphone that gets the job done, but investing in a USB microphone will increase the audio quality of the narration by quite a bit.
The built-in microphone will be set as your input device by default, so if you plan on using it for the PowerPoint narration, you don’t need to take any additional steps in setting it up. However, if you plan to use a USB microphone for the narration, be sure to set it as the input device.
To do this on Windows, right-click the volume icon found on the right of the taskbar. In the menu that appears, select “Open Sound Settings.”
The “Sound Settings” window will appear. Here, scroll down to the “Input” section and click the box under “Choose your input device.”
If you’re using a USB microphone, it will appear here. Select it to set it as the input device.
The steps for Mac users are extremely similar. The only difference is you should go to "System Settings" and select "Sound" instead of right-clicking the volume icon like on Windows. From there, the steps are the same.
Take Notes and Rehearse
With your mic set up, you’re ready to start recording, right? Well, not quite. While you may not be physically standing in front of the audience delivering this presentation, you still need to treat it as though you are. This means going through the basics---taking notes and rehearsing your delivery.
One thing you can do to help you record a successful narration is to write out a script. As with a live presentation, though, you don’t want to sound like you’re reading straight from your notecards. Practice reading through the script a few times so that it sounds natural and fluid.
Once you’re confident in your delivery, it’s time to start recording.
Open the PowerPoint presentation in which you would like to record a voiceover narration. Head over to the “Slide Show” tab and, in the “Set Up” group, select “Record Slide Show.” Once selected, a drop-down menu will appear. Here, you can choose to start the narration from the beginning or from the current slide. If you choose to start recording from the current slide, make sure that you’re on the slide you’d like to start recording from.
Related: How to Record Your Screen with Microsoft PowerPoint
In this example, we’ll choose “Record from Beginning.”
Now, you’ll be in full-screen mode. You’ll notice a few extra tools appear, including a record button at the top-left corner of the screen. When you’re ready to start recording, click this button.
When you select the record button, a countdown timer will appear, giving you a three-second delay between clicking the button and starting your recording.
You can now start recording your voiceover narration! Continue through the presentation by clicking the right arrow to go to the next slide.
You can pause the recording at any time by pressing the pause button in the top-left corner of the window. The recording will automatically end when you make it to the last slide. Alternatively, you can press the stop button, also located at the top-left corner of the screen.
If you want to play your narration back, you can select the replay button.
A speaker icon will appear at the bottom-right corner of each slide that has a recorded narration. You can also play your narration back on each slide by hovering over the icon and pressing the play button.
If you’re not satisfied with the narration, simply repeat these steps to re-record.
- Irresistible Tech Gifts for That Special Dad
- Killer Smartphone Deals We Love
How to Do a Voiceover on PowerPoint
Narrate your presentations with ease
:max_bytes(150000):strip_icc():format(webp)/ColettaTeske-af57404a91b342578a97252b7dbd720f.jpg "how to create a presentation with voice over")
- Central Washington University
What to Know
- Single slide: Select a slide. Go to Insert > Audio > Record Audio . Type a name, select Record , then read your script. Select Stop .
- Entire slideshow: Select View > Normal and choose the first slide. Select Slide Show > Record Slide Show > Record from Current Slide .
- To review the recording, click the sound indicator (it looks like a speaker) and then select Play to hear your recording.
This article explains how to record a voiceover on PowerPoint for a single slide or for the entire slideshow. The instructions apply to PowerPoint for Microsoft 365 , PowerPoint 2019, PowerPoint 2016, and PowerPoint 2013.
How to Record a Voiceover for a Single Slide
Before narrating your PowerPoint presentation, be prepared:
- You’ll need a microphone attached to, or built into, your computer. Test the microphone to make sure it is working. Set the sound level so your audio is easy to hear.
- Prepare yourself for the narration. Write a script you can follow while recording the voiceover. Practice the presentation a couple of times so your voiceover will sound smooth.
- Decide whether to record the voiceover one slide at a time or record a voiceover for the entire presentation in one go.
The simplest way to record audio for a voiceover is to record one slide at a time. To get started, select the slide where you want to add the narration, then go to Insert > Audio > Record Audio .
Here’s how to record a voiceover on the slide:
Type a Name for the voiceover narration.
Select Record (the button with a red dot).
Read your script or ad-lib the narration.
Select Stop when you’re finished recording.
The Record Sound dialog box disappears, and a speaker indicating sound appears in the center of the slide.
To review the recording, click that sound indicator and then select Play to hear your recording.
When you're finished, click anywhere outside the playback controls to accept the recording.
You’ll see an audio icon in the middle of the slide. Move this icon anywhere on the slide to get it out of the way of other elements on the slide.
How to Record a Voiceover for an Entire Presentation
The voiceover for the entire presentation can be recorded at one time. In addition to recording a voiceover, you can record a video of yourself giving your presentation.
To set up your presentation when you want to narrate an entire slideshow:
Select View > Normal
Select the first slide in the presentation where you want to record audio.
Select Slide Show > Record Slide Show > Record from Current Slide .
In PowerPoint 2019, the Recording window opens.
In PowerPoint 2016 and earlier versions, a Record Slide Show dialog box prompts you for further options. In the Record Slide Show box, select options to set up the slideshow:
- Slide and animation timings: When recording, PowerPoint automatically tracks the timing of slide changes and any animations that occur.
- Narrations, ink, and laser pointer: When recording, PowerPoint automatically tracks when narrations, any inking, or laser pointing occurs.
Leave both checked to make automating your slideshow easier.
Select Record .
In PowerPoint 2016, select Start Recording .
Select Pause to temporarily stop the recording if you need a break.
If you made a mistake and want to start over, select Clear > Clear Recordings.
In PowerPoint 2016 select Clear > Clear Recordings on Current Slide .
When you’ve finished recording a slide, select the Advance button to advance to the next slide or press the spacebar on your keyboard.
When you’re done recording your narration on the slide, select Stop and close the recording window to return to the presentation.
You may have noticed some controls at the bottom left side of the screen. These are a few controls to aid you in your presentation.
These handy handy tools include the Laser Pointer , Highlighter , and Eraser . As you advance through your presentation, mark or highlight parts of your slides as you narrate. PowerPoint records the timing of these marks (if you left the boxes checked) to go along with your narration. Likewise, using the laser pointer shows a simulated red laser dot so that you can point out different things on your slides as you narrate your presentation.
How to Listen to the Recorded Voiceover
Once you’ve recorded your narration, you can go back to the slides and listen to your voiceover.
Here’s how to play a narration:
Select the slide containing the voiceover you want to hear.
Look for the recording icon on the slide. It should appear as either a small video screenshot or a speaker icon on the slide.
Hover over select this icon and then click Play to preview the recording.
How to Turn a Voiceover Off
If you don’t want to hear your narrations when playing a slideshow, but want to keep the narrations with the slide, turn voiceover off.
To turn voiceover off, select Slide Show and click to deselect the Play Narrations checkbox.
How to Delete a Voiceover
There are a couple of ways to delete voiceover audio in your presentation. To delete the audio on a single slide, find and select the recording on that slide, then press the Delete key.
To delete the voiceover from all the slides in a presentation: Select Slide Show and then select the down arrow to open the Record Slide Show menu. Then, select Clear Narration on All Slides .
Embedding Versus Linking Audio Files in PowerPoint
When you use the PowerPoint tools to record a voiceover narration, the audio file is embedded in PowerPoint. This means the audio is part of the PowerPoint file and not stored in a separate file, making it easy to play your presentation on any device.
If you have audio you recorded using other software and it's stored on your computer, you can link to the audio file. Linked files keep your presentation size smaller, but links can be broken if the audio file isn't available to the PowerPoint presentation. To prevent broken links, store the presentation file and the audio files in the same folder on your computer.
Get the Latest Tech News Delivered Every Day
- How to Add Audio to PowerPoint
- How to Make a Slideshow on PowerPoint
- Adding Sounds, Music or Narration to PowerPoint Slide Shows
- How to Get PowerPoint on a Mac
- Edit Music, Sound, or Other Audio Settings in PowerPoint
- How to Make and Add Your Own Sound on TikTok
- Loop a PowerPoint Slide Show
- How to Convert PowerPoint to Video
- How to Use Speaker Notes in PowerPoint
- Change Order of Animations for PowerPoint Slides
- How to Add Music to PowerPoint
- How to Change a Black-and-White Picture to Color in PowerPoint
- How to Add Page Numbers in PowerPoint
- Add, Delete or Change the Order of PowerPoint Slides
- Using Design Themes in PowerPoint
- Create Family Trees Using PowerPoint Organization Chart
How to do a voiceover on a PowerPoint presentation and add pre-recorded audio to your slides
- You can record a voiceover in PowerPoint and insert it into your next presentation using the software's Audio recording feature through the Insert menu.
- Recording and inserting a voiceover into PowerPoint is a relatively similar process on an Apple Macbook and Windows PC.
- Once you've recorded your audio, you can click the microphone icon that appears on your slide and playback your recording.
- Visit Business Insider's Tech Reference library for more stories .
Public speaking is a valid and common fear. And although you might be trying to hone your public speaking with your free time at home , there's a way you can incorporate your voice into your next PowerPoint presentation without the pressure of speaking on the spot.
How? Microsoft PowerPoint has a feature that lets you create narration for all slides as you see fit. This way, you can record — and re-record — voiceovers for your presentations that won't make you cringe.
The process is virtually identical for both Mac and PC users and you can use your computer's built-in mic or a headset. Whatever your operating system of choice is, easily record narration over a PowerPoint slide in a few quick steps.
Check out the products mentioned in this article:
Microsoft office (from $149.99 at best buy), apple macbook pro (from $1,299.00 at apple), acer chromebook 15 (from $179.99 at walmart).
SteelSeries Arctis 1 Wireless Headset (From $92.49 at Amazon)
How to record a voiceover for PowerPoint on a PC
1. Open a new or existing or presentation in PowerPoint.
2. From the top toolbar, select "Insert."
3. Toward the far right side, click "Audio."
4. Choose "Record Audio…"
5. Name your audio file.
6. Click the circle icon when you're ready to start recording.
7. Select "OK" when you're done recording.
8. A microphone icon will indicate the narration has been added to the slide.
How to record a voiceover for PowerPoint on a Mac
1. Open a new or existing or presentation in PowerPoint for Mac.
2. Find and select "Insert" from the top toolbar.
4. Select "Record Audio…"
5. Name the audio file, and click the circle icon when you're ready to start recording.
6. Click "Insert" when you're ready to finalize.
7. You can click the microphone icon on the slide to hear your recording.
Related coverage from Tech Reference :
How to download and access microsoft powerpoint on your mac computer, how to add a border to slides in powerpoint, and give your slideshow a sleek design, how to change and format the background of your powerpoint slides to custom designs, how to change your language settings in microsoft powerpoint in 3 different ways, how to copy or duplicate a powerpoint slide and put it anywhere in your slideshow.
Insider Inc. receives a commission when you buy through our links.
Watch: Apple just launched a $6,000 Mac Pro, available this fall
- Main content
Critical PowerPoint Shortcuts – Claim Your FREE Training Module and Get Your Time Back!
How to Narrate a PowerPoint Presentation (Step-by-Step)
- PowerPoint Tutorials
- Shortcuts & Hacks
- October 29, 2019
In this article you’ll learn how to narrate a PowerPoint, with either just your voice or using the new video narration feature.
Firstly, there are two different tools you can use to narrate your PowerPoint slides.

#1: Record Audio is the legacy PowerPoint narration tool. Although this tool doesn’t have as many features, it is faster to open and use, and is handy if you want to drop a voice note on a slide.
Features of this tool include:
- Voice narration only
- Adds narration to one slide at a time only
#2: Record Slide Show is the NEWEST (and best) narration tool in PowerPoint, giving you two different types of narration options plus a variety of other options.
The features here are:
- Voice narration
- Video narration (so your audience can also see your face)
- Allows you to narrate an entire presentation in one sitting
- Automatically sets slide timings for you if you later want to convert PowerPoint into a video
And before you get lost in either tool, let’s cover a few things which will help you out (trust me).
Narration definition in PowerPoint

In PowerPoint, narration simply means recording your presentation as you walk someone through it, so that you can easily share the whole thing with someone else.
On top of that, if you get creative, you can use your narrated PowerPoint files to:
- Share your presentation with team members around the world
- Create a library of best practices for your company
- Build training materials for new hires
1. You don’t need fancy recording equipment
Don’t let fancy equipment or a professional recording studio hold you back from narrating your presentation. For most situations, using the built-in microphone on your personal computer is enough.
For example, if you are doing something relatively informal, such as walking a colleague through something in PowerPoint, the quality of your audio doesn’t need to be extremely high.
If you are creating training materials or giving an important presentation, I recommend getting a decent USB microphone (you can see a list of top rated microphones here ).
That’s because they will help remove any background noise.
2. Find a quiet space and tell people you are recording
Regardless of the quality of your microphone, I recommend finding the quietest place possible to record your narration and let everyone know not to bother you.
When evaluating a quiet place, here are some things to be careful of and to spot check:
- Noisy air conditioners or refrigerators
- Street noise (cars, planes or pedestrians)
- Loud background office or cafe noise
- Cell phones, doorbells or other pinging noises
- Your kids playing in the background
For instance – imagine you are in the middle of narrating your presentation. All of a sudden a colleague knocks on your door or the doorbell rings, and you’re interrupted. It’s not the end of the world, but it will throw you off and likely annoy you.
In addition, if there is too much background noise (like a running air conditioner), the noise can be very distracting to whoever is watching the recording.
3. Check your microphone
The last thing you want to do is walk through your entire presentation, and then discover that your microphone wasn’t working.
Therefore, before narrating your PowerPoint, I recommend double-checking your recording equipment every time before you hit record. This includes ensuring that your equipment is properly plugged in (it happens).

- Right-click the speaker icon in the task bar (lower right-hand corner of your desktop)
- Select Open Sound settings
- Choose your Input device
- Click on Troubleshoot under T est and troubleshoot
Note: If you don’t see the audio bar filling up with color as you talk, that means that your input device is either not selected or not properly connected.
- Connect all your audio and video equipment to your computer
- Restart your computer: Start, Power, Restart
#1. Record audio (audio narration only)
While this is the legacy narration tool in PowerPoint, I want to cover it first.
That’s because even if you decide not to use it to narrate your PowerPoint presentation, it is extremely useful for dropping voice notes on your slides.
When used this way, you can quickly capture your thoughts and ideas about a slide without having to get bogged down editing or building it out on the spot.
Below I’ve detailed how to use this tool to narrate PowerPoint slides.
1. Open the Record Sound dialog box

To open the Record Sound dialog box, simply:
- Navigate to the Insert tab
- Open the Audio drop down
- Select Record Audio
Keep in mind that you can only narrate one slide at a time using this tool. Hence why it’s great for dropping voice notes on a slide, one by one.
2. Record your audio narration

Inside the Record Sound dialog box you can narrate your PowerPoint slide. Simply:
- Type in a Name for your Audio Clip
- Select the Record button (the red dot) to begin narrating
- Click Stop (the square) to stop your narration
- Hit Play (the triangle) to listen to your narration
- Click OK to save the narration to your slide
As a result, you will see a little audio object added to your slide that you can move around and resize if you like.

The audio file can also be played (simply click on the play icon) in both the Normal View and Slide Show View of your presentation.
In this way, you can work your way through your presentation, adding voice notes to your PowerPoint slides that you or your colleagues can play back from within your presentation.
To learn all about adding music to PowerPoint and how to loop your audio files, read our article here .
3. Playing your PowerPoint narration
By default, your audio file will be set to play In Click Sequence (explained below).
That means it will be added at the end of any animation sequences, trigger actions, etc.. If you don’t have any of these on your slide, it will automatically play when you to to advance to the next slide.
All you need to do is advance your slide (click, hit the space bar or arrow keys, etc.) and it will play.

To change when your audio file plays, simply:
- Select your Audio file
- Navigate to the Playback tab
- Open the Start drop down
- Choose either In Click Sequence , Automatically or When Click On
In Click Sequence means that your audio file plays as part of the click sequence of actions that happen on your slide. This includes animated sequences, trigger actions, and videos, all of which you can set in the Animations Pane.
If you do not have any sequences set up on your slide, your audio file will play right before you advance to the next slide in your presentation.
Automatically means your audio file plays as soon as you get to that slide in your presentation, instead of playing right before you advance to the next slide.
When Clicked On means your audio file will only play if someone clicks on it during the presentation in Slide Show mode. For example, you can use this option for a piece of audio that you may not have the time to play, allowing you to choose in the moment whether to play it or not.
4. Delete or overwrite a previous narration file
To delete an audio file narration, simply select the object on your slide and hit Delete on your keyboard.
If you want to overwrite or change an existing narration, simply use the Record Audio dialog box again (as described above). Doing so will overwrite the existing audio file on your slide.
Warning: Two narration audio files cannot exist on a slide at the same time. That means that if you narrate a PowerPoint slide a second time, the first recorded file will be overwritten.
To be clear, that means you will need to start over – from scratch – for the individual slide where you want to change the narration.
While you can trim an audio file in PowerPoint, you cannot split apart or merge different audio files like you could if you used dedicated audio editing software.
#2. Record Slide Show (audio + video narration)
The Record Slide Show command is the NEWEST and BEST way to narrate a PowerPoint presentation for a few reasons, including:
- Record both audio and/or video narrations
- Narrate your entire presentation in one sitting (you are not limited to creating slide-by-slide narrations)
- You can use the pen, highlighter and laser pointer commands and have them captured in your narration too
- The tool allows you to pause and restart your recording
- All your slide timings are automatically recorded, allowing you to use them to turn your PowerPoint presentation into a video (see how to do that here )
In short, unless you have a really good reason not to use the Record Slide Show command to narrate your presentation, this is what you should be using.
As you will see below, there are a lot more settings you can toggle on and off, but don’t let this stop your from recording your presentation.
1. Open the Record Slide Show dialog box

To open the Record Slide Show dialog box, simply:
- Navigate to the Slide Show tab
- Open the Record Slide Show command
- Choose Record from Beginning
If you simply click the Record Slide Show command in the Ribbon (instead of opening up the drop down) it will begin recording from the current slide.
Wait a couple of seconds, and the Record Slide Show commands will load, and you can start narrating your presentation.
2. Record your slide show narration
There are a lot more options you can choose from in the Slide Show dialog box that that I will explain below, but recording your narration is still pretty easy and straight forward

To start recording your slide show narration, simply:
- Choose your Camera and/or Microphone
- Make sure your Camera and/or Microphone is turned on
- Use the Record , Stop and Replay commands to start and stop your narrations
- Use the Arrow (or use your arrow keys) to advance to the next slide
Once you start recording, you get the option to pause the recording. This allows you to pause and collect your thoughts whenever you need to, and continue narrating your presentation when you are ready.

When you are finished, the individual video and/or audio file narrations are added to the lower right-hand corners of each individual slide, as you can see below.

As you can see in the picture above, your audio and video narrations are recorded and saved on a slide-by-slide basis. That means you can review and record narrations on any slide within your presentation.
Warning: You can only have one narration file per slide.
If you re-record an audio or video narration, it automatically overwrites any previous narrations you had on that slide.
The only way to have two different narration files on the same slide, is to record one with the Record Slide Show dialog box, and record the second with the Record Audio command.
3. Set your narration to Play
Your Record Slide Show narrations are set to play Automatically .
That means that whenever you run your presentation (from beginning or from current), your audio and/or video narration will automatically play.

To change when your audio or video narration plays, simply:
- Select the Narration file on your slide
- Choose either In Click Sequence , Automatically or When Clicked On
4. Record Slide Show options

Record (or hit R) to start recording your narration.
Pause (or hit I) to pause your narration and collect your thoughts. This button only displays once you’ve started recording.
Stop (or hit S) to end your narration. If you hit Record again, your new narration will overwrite the existing one.
If you want to stop narrating your current slide before starting on the next one, don’t use the Stop button. Instead, simply navigate to your next slide using your arrow keys or the forward arrow on screen.
Replay to replay your narration for the current slide. This button only becomes active after you have recorded a narration for that slide.
B. Speaker Notes options

Notes (or hit N) to open or close your speaker notes for that slide. The Notes window is fairly small and you cannot resize it very well.
Your action of opening and closing the speaker notes pane will not show up in your recorded narration.
Font Size commands increase and decrease the font size of your speaker notes so that you can see them better.
In my opinion the speaker notes pane is too small and not flexible enough for reviewing lots of speaker notes.
To learn how to print your speaker notes in PowerPoint, read our guide here .
C. Clear Recordings options

Clear Recordings allows you to clear your previous recording on either the current slide or on all the slides in your presentation.
You can also overwrite your recording and slide timings by simply recording over the top of your narrations.
Note: Using Clear Recordings removes both your slide timings and narrations.
That means that if you want to remove your narrations but keep your slide timings, you will want to clear recordings outside of the Record Slide Show dialog box. See how to clear timings and narrations below.
D. Input options: Camera and Microphone

Microphone allows you to choose which microphone you want to record with. So if you are using a microphone other than your computer’s built-in one, this is where you want to select your microphone before you begin recording your narration.
Camera allows you to choose which camera or webcam you want to use if you are recording video narrations. If you are using a camera other than your computer’s built-in one, this is where you want to select it before you begin your narration.
E. Advance Slide options

Next Slide advances the click sequence of your presentation, the same way hitting the right arrow key or clicking your slide with your mouse does.
If you have animated sequences or music that is supposed to play, clicking forwards will trigger those sequences, and eventually advance you to the next slide.
Previous Slide moves you back one slide in your presentation, but it is only available to you when you are not recording.
That’s because re-recording a narration automatically overwrites the previous narration. So once you start your recording, you can only move forward in your presentation.
F. On / Off: Camera and microphone

Microphone (on/off) turns your selected microphone on or off. You can turn your microphone off and still click through your presentation if you want to mute your sound in the recording.
Camera (on/off) turns your selected camera on or off. This allows you to add or remove video recording in your narration.
Camera Preview displays what your camera is recording during your narration. If seeing yourself onscreen while you narrate your presentation bothers you, simply turn camera preview off.

G. Ink options: Eraser, Pen and Highlighter

The Pen (Ctrl + P), Highlighter (Ctrl + I), and Eraser (Ctrl + E) allow you to draw and highlight things on your slides during your presentation.
To change the color of your ink, simply click on one of the colors at the bottom of your screen.
Anything that you draw on your slides during your narration will be recorded as you draw them. That means that someone watching the recording will see you draw on the slide, as you narrate your presentation.
H. Slide Timings options

Slide Timings show you how long you have spent on each slide, and which slide you are on within your presentation.
Therefore, if you are converting your PowerPoint presentation into a video, these slide timings determine how long you spend on each slide.
To learn all about how to convert PowerPoint to video, read our guide here .
I. Close / Minimize options

Close / Minimize allows you to close out of (or minimize) the Record Slide Show app.
Use the Close icon (the x) to exit out of the Record Slide Show dialog box and return to the Normal View of your presentation. You can also hit the Esc key on your keyboard to close out of the dialog box.
#3. How to clear your Timings and Narrations

To clear your Timings and Narrations from the Normal View of PowerPoint, simply:
- Open the Slide Show tab
- Open the Record Slide Show drop down
- Select Clear
- Choose the Timings or Narrations you want to clear
If the Clear command is grayed out when you open the Record Slide Show drop down, that means that you do not have any Narrations or Timings (same as for transitions) set for your presentation.
Clear Timing on Current Slide removes the set transition timing for the current slide.
Clear Timings on All Slides removes the set transition timings on all the slides within your presentation.
Clear Narration on Current Slides removes any voice or video narration you’ve recorded on the current slide.
Clear Narration on All Slides removes any voice or video narrations from your entire presentation.
Note: You can also clear the Timings and Narrations for your slides at the same time from inside the Record Slide Show dialog box.

Inside the dialog box, simply click the X and choose to Clear Recordings on Current or Clear Recordings on All .
#4. How to compress your PowerPoint narrations

Adding audio and video narrations to PowerPoint significantly increases the size of your presentation as you can see in the picture above.
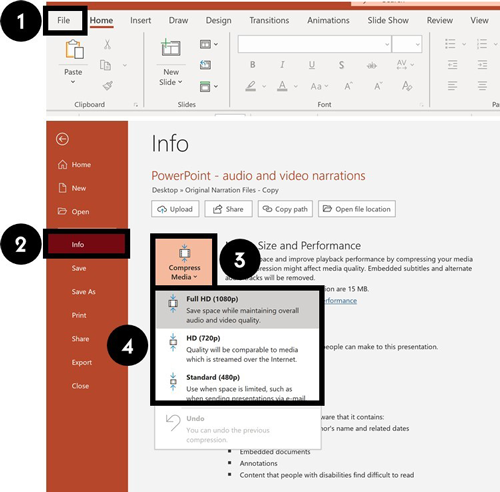
Therefore, I recommend compressing your file after you’re done recording narrations.
After narrating your PowerPoint, you can compress your audio and video narrations. To do that, simply:
- Navigate to the File tab
- Select the Info group
- Open the Compress Media drop-down
- Choose a compression quality
PowerPoint automatically uses the Full HD (1080p) when recording your voice and video. So if you are tight for space, you will need to choose either the HD (720p) or Standard (480p) options .
To learn a variety of other ways you can reduce your PowerPoint file size, read our compression guide here .
That’s how to narrate a PowerPoint, and the different options you have using the Record Audio and Record Slide Show options.
If you have the latest version of PowerPoint, I highly recommend using the Record Slide Show option as it gives you the most options to work with.
Just keep in mind that narrating your PowerPoint with audio and video can greatly increase the size of your presentation. Therefore, you may end up needing to consider compress it.
If you enjoyed this article, you can learn more about how to improve your PowerPoint skills by visiting us here
What’s Next?
Related articles, about the author.

Popular Tutorials
- How to Strikethrough Text (l̶i̶k̶e̶ ̶t̶h̶i̶s̶) in Word, Excel & PowerPoint
- How to Make Animated Fireworks in PowerPoint (Step-by-Step)
- Strikethrough Shortcut (l̶i̶k̶e̶ ̶t̶h̶i̶s̶) for Word, Excel & PowerPoint
- How to Create a Flash Card Memory Game in PowerPoint (Like Jeopardy)
- Keyboard Shortcuts Not Working: Solved
PowerPoint Tutorial Categories
- Strategies & Opinions
- Presentation Design
- Pictures, Icons, Videos, Etc.
- New Features
- Miscellaneous
- Charts & Data Viz
We help busy professionals save hours and gain peace of mind, with corporate workshops, self-paced courses and tutorials for PowerPoint and Word.
Work With Us
- Corporate Training
- Presentation & Template Design
- Courses & Downloads
- PowerPoint Articles
- Word Articles
- Productivity Resources
Find a Tutorial
- Free Training
- For Businesses
We help busy office workers save hours and gain peace of mind, with tips, training and tutorials for Microsoft PowerPoint and Word.
Master Critical PowerPoint Shortcuts – Secure Your FREE Training Module and Save Valuable Time!
⌛ Master time-saving expert techniques.
🔥 Create powerful presentations.
🚀 Propel your career to new heights.
We value your privacy – we keep your info safe.
Discover PowerPoint Hacks Loved by Industry Giants - KKR, AmEx, HSBC!
Over 114,880 professionals in finance, marketing and sales have revolutionized their PPT skills with our proven methods.
Gain FREE access to a full module of our premium PowerPoint training program – Get started today!
We hate spam too and promise to keep your information safe.
You are currently viewing a placeholder content from Facebook . To access the actual content, click the button below. Please note that doing so will share data with third-party providers.
Blog > Record voice narration for PowerPoint
Record voice narration for PowerPoint
01.11.21 • #presentation #powerpoint #voiceover #narration.
In this blog post, you'll learn how you can add a narration for your PowerPoint presentation. Adding audio or video narration can be very helpful, especially in a time where many seminars and meetings have to be conducted online. If you would rather give your presentation using a live stream (which has many benefits), scroll down to the bottom and learn how you can do that!
Here's what you need for recording:
- a microphone (your computer's microphone should do)
- a finished set of PowerPoint slides
- a video camera (only if you want to record video as well)
- Open your PowerPoint presentation or create a new one.
- In the taskbar, select Slide Show . Then click Record Slide Show .
- Choose the option Record from Beginning .

- You'll now get to a different view, which we'll call "Recorder View". Here's an overview:

- In the bottom right corner, you'll see three icons. The one on the left is for switching the microphone on/off. Make sure this function is turned on. The icon in the middle is for turning on/off your camera. You can choose if you want to switch the video recording on or not. The last icon is only available if you've chosen the video recording function. If the function is enabled, you'll be able to see a video preview.
- In the top right corner under "Settings", you can choose what microphone (and camera) you'd like to use. This is only relevant if you have an external recording device that you would like to use. If you're recording with your computer, you don't have to set anything here.
- Now it's time to record. Click the big red Record button on the top left and start speaking.
- Tip: You can either record all the slides at once without pressing pause, or you record each slide individually, then click pause, then go on to the next slide and record again. However, it's important to note that PowerPoint creates an individual audio file for each slide, even if you record all at once.
- Important : PowerPoint does not record during transitions, so only speak when you're on a slide.

- You can also draw on your slides with the painting tools on the bottom. These drawings will be saved to your presentations.
- On the bottom left corner, you'll see what slide you're on. You can also see two time counts. The first one is for the recording on the current slide, the second one is for the recording of the presentation overall.
- If you want to delete the whole voiceover, click Clear and Clear Recordings on all Slides . If you only want to delete the recording on the specific slide you are on, click Clear Recording on current Slide.
- If you want to re-record the audio from one slide after deleting it, just go to that slide and click Record again. Record what you want to say, then click Stop when you're done.
- Once you're done, leave the Recorder View. Click the small x in the top right corner or hit Esc .
- You can now either save the presentation as a regular PowerPoint file (just click Save and you're done) or as a video. If you'd like a video, follow the instructions below:
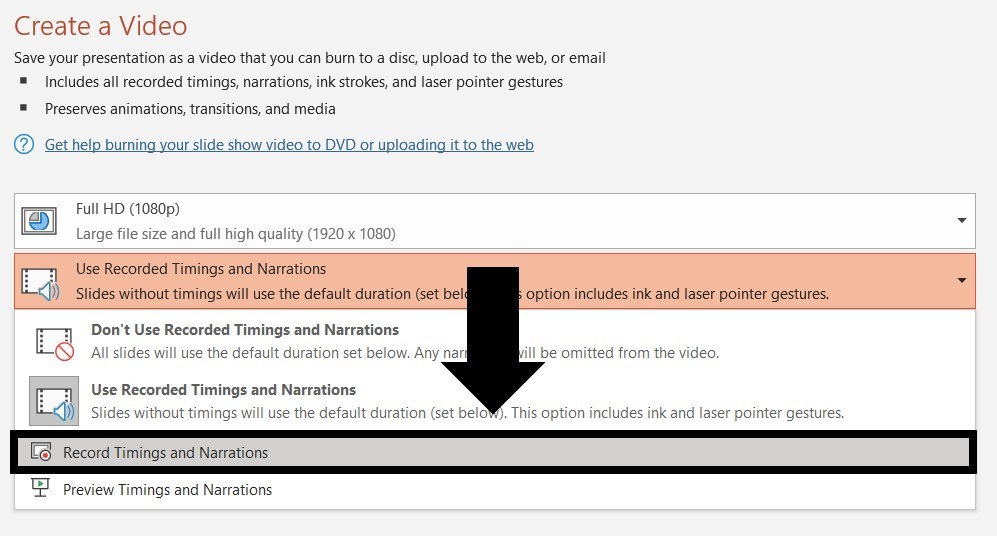
Save Presentation as Video
- Go to File in the PowerPoint taskbar

- Choose Export on the left, then Create a Video .

- Select the quality you'd like. We recommend Full HD (1080p).
- In the following drop-down menu, make sure Use Recorded Timings and Narrations is selected.

- The setting Seconds spent on each slide is only for the slides where there is no recording (if you have recordings on all of your slides, you can just ignore this setting.)
- Click Create Video and choose where the video should be saved. The video creation might take a while, so don't close PowerPoint right away!

Live interaction with polls & quizzes
If you prefer to give a talk where you can also interact with your audience, then the free software SlideLizard is the ideal solution! Using live polls , Q&A and feedback , your presentations will become even more exciting and interactive. SlideLizard integrates directly with PowerPoint, making it a breeze to use.

Can I record a presentation in PowerPoint?
Yes, PowerPoint also allows you to record your presentation with voice and video narration. You can read about how this works in our blog .
How can I record a presentation in PowerPoint with audio and video?
At first create your presentation. For the recording you will need a microphone (the one on your computer should do), your finished presentation and a video camera (if you also want to record a video). We have created a tutorial on our blog where you can read the further steps.
Related articles
About the author.

Pia Lehner-Mittermaier
Pia works in Marketing as a graphic designer and writer at SlideLizard. She uses her vivid imagination and creativity to produce good content.

Get 1 Month for free!
Do you want to make your presentations more interactive.
With SlideLizard you can engage your audience with live polls, questions and feedback . Directly within your PowerPoint Presentation. Learn more
Top blog articles More posts

Create an animated timeline in PowerPoint + Free Template

How to use the morph transition in PowerPoint

Get started with Live Polls, Q&A and slides
for your PowerPoint Presentations
The big SlideLizard presentation glossary
Internal preview.
An Internal Preview is a statement, which is made in the body of the speech, so that the audience knows what the speaker is going to discuss next.
Leading Questions
Leading questions subconsciously make the respondent think in a certain direction.
.pptm file extension
A .pptm file is a macro-enabled presentation created by MS PowerPoint which contains slides with layout, images, texts and embedded macros.
Internal Communication
Internal communication is particularly important for corporate communication. It communicates important information from leadership to staff so that they can do their jobs in the best possible way and work processes run well.
Be the first to know!
The latest SlideLizard news, articles, and resources, sent straight to your inbox.
- or follow us on -
We use cookies to personalize content and analyze traffic to our website. You can choose to accept only cookies that are necessary for the website to function or to also allow tracking cookies. For more information, please see our privacy policy .
Cookie Settings
Necessary cookies are required for the proper functioning of the website. These cookies ensure basic functionalities and security features of the website.
Analytical cookies are used to understand how visitors interact with the website. These cookies help provide information about the number of visitors, etc.
Create Your Course
How to do a voiceover on google slides or powerpoint, share this article.
Voice-over presentations offer a better learning experience because they are a more engaging way to learn.
Some students learn better through visual cues, while others learn by listening. Adding voice-over narration to your presentations allows students to benefit from the best of both worlds.
Thankfully, adding voice-over to your presentations isn’t as complicated as it used to be. In most cases, once you have your slides ready, you’ll need to take just a few extra steps to add narration.
In this post, we’ll share four ways to do a voiceover presentation. This includes voice-over on Google Slides, PowerPoint, screen recording, and with Thinkific. At the end of the article, you will also find five tips for adding a good voice-over.
But, before we get into the options, let’s quickly cover the only ground rule regarding recording voice-overs: Don’t sacrifice sound quality. Viewers are willing to put up with rough visuals but don’t forgive poor sound. Most computers have built-in microphones that sort of get the job done, but we recommend headphones or a USB Microphone to improve the quality of your voiceover.
Related: How To Set Up A DIY Home Video Recording Studio For Cheap
Now, let’s get into your voice-over options.
Skip ahead here.
Option 1: How to do a voice-over on Google Slides
Option 2: how to do a voice-over on powerpoint, option 3: how to do a voice-over with screen recording, option 4: how to do voice-over presentations with thinkific, follow these five tips for adding a good voiceover, final thoughts, 4 ways to do voice-over presentations.
There are two main routes you can take to record a voiceover for your presentations:
You may want to use PowerPoint or Google Slides to add a voiceover to each slide that plays as students navigate the presentation. PowerPoint has recording functionality built in, but with Google Slides, you must take some extra steps to record your audio and upload it to Google Drive before you can embed it on each slide.
Alternatively, you may want to ditch the slides and create a screen recording of the presentation. To do this, you can use any screen recording software as you talk through the slides and turn your presentation into a video lesson. And if you’re a Thinkific user, you can create voiceover slides with the Presentation lesson feature.
Use this list to skip to your preferred voice-over narration method:
- How to do a voice-over on Google Slides
- How to do a voice-over on PowerPoint (Microsoft Office)
- How to do a voice-over screen recording
- How to do voice-over slides with Thinkific
Google Slides doesn’t have built-in functionality to record your slides, but you can still accomplish the same with it with an extra step. You can add voiceover to Google Slides by uploading an audio file saved in Google Drive to each slide.
For this option, you only need Google Slides and a computer with a microphone.
Let’s go through the steps:
Step 1: Create your audio files for each slide and upload them to Google Drive.

Tip: Organize your files with a naming convention. You’ll need to locate these files in the next step. Following a naming convention for your audio files, including Course, Lesson, and Slide numbers, helps keep them organized.
Step 2: Insert audio to your slide and configure play settings
Next, you can insert audio from your drive into each slide individually.

The files you uploaded should be in the Recent tab, but you can also search for the file manually.

Step 3: Configure your audio settings
Google Slides allows you to specify how the voiceover should act. To open the Format options menu, click on the speaker icon, then go to Format options under the Format menu.

Voice-over formatting options for Google Slides:
- Autoplay- When a student clicks the slide, you can choose if you want the audio to play automatically or manually.
- Loop—You can define whether you want the recording to stop or repeat once it reaches the end.

- Button size and color– You can resize the button by dragging the corner and changing the color using the “Recolor” option.

An online course or membership site can be a wildly successful way to monetize content.
Need help figuring out where to start? Get free training and start building for free !
Microsoft PowerPoint has a feature that many average users don’t know about, which allows you to add voice-over narration to your PowerPoint. For this option, all you’ll need is Microsoft PowerPoint and a computer with a microphone.
On Windows computers:
Step 1 – in the top menu, go to slideshow >> record slideshow..
You can record from the beginning of the presentation or from the current slide you’re on.

Step 2- Start recording
Once you select which recording you’d like to go ahead with, you’ll be in full-screen mode with options to record, stop, and replay. Once you click record, there will be a countdown timer from 3.

Anything you type in the notes section of the PowerPoint can be viewed by clicking on the notes button at the top.

The recording will stop automatically once you make it to the final slide. You can also pause, stop, or replay a recording at any time by pressing the pause button in the top left of your screen.

You can also record a video of yourself in the corner by selecting the video option in the bottom right corner.

Step 3 – Testing your narration
Once you’re finished, a speaker icon will appear at the bottom right corner of all the slides with recorded narration.

You can play, skip to time, or adjust the volume of the narration by hovering over the speaker icon.

On Mac Computers:
Step 1 – click on slide show..

In the top menu, click Slide Show and choose the slide you want to start working on. Unlike on Windows, you will have to select the slide you want to work on manually. If it is the first slide you wish to choose, do so.
Step 2 – Click on Record Slide Show

Step 3 – Choose the input method

On the top of the screen, you can turn off the camera, if you wish to, or turn it on.
The next button helps you choose the voice input, whether your Mac’s built-in mic or an external device.
Step 4 – Add a voice-over to slides

As with the Windows version, add voice-over to the slides one by one and add notes if you wish.
Step 5 – Complete recording

Once your voice-over is complete, click the same button to stop recording. Again, you can add notes if you wish. Then, move to the next slide.
Step 6 – Click on tips for more controls

Click on Tips for several functions and shortcuts you can use on your Macbook to control your voice-over recordings. The Mac version of the PowerPoint tool is much easier to use.
Step 7 – Verify your voice-over for accuracy

After your voice-over is complete, return to your presentation and check that it is accurate by clicking on the “Play” icon at the bottom of each slide.
The last option involves recording your screen and audio as you discuss the presentation.
Check out our guide: How To Record Your Screen On Any Device .
We’ll show you free options and two paid options with advanced editing features:
Hit record on video conferencing software
The easiest and cheapest option for screen recording without additional software is to join a Google Meet or a Zoom call by yourself, share your screen, and press the recording button.
This may be easy for a simple presentation but may prove frustrating for a longer presentation—the inability to edit means you’ve got one shot at making it through without any mistakes.
Use a built-in screen recorder.
On Windows 10 or 11 , click Windows + G to open the Xbox Game Bar tool. Press “Start Recording” to begin. This native Microsoft solution allows you to record both video and audio or video alone.
If you’re on a Mac , you can video record the entire screen or just a portion of it. Shift-Command (⌘) + 5 will display on-screen controls for recording the entire screen. However, this method does not record audio, so you’ll need to record your voiceover while recording your screen, but you will need to use a separate device.
Then, you’ll need to combine the audio and video/visual files in an editing software of your choice.
Turn to dedicated screen recording tools.
If you want more control over recording and editing your video and audio, you’ll need to invest in dedicated recording tools like Screenflow or Camtasia .
While dedicated tools will often cost, they also come with a significant boost in editing power.
Here are our two favorite options :

Screenflow is an Apple-exclusive application for video editing and screencasting. It’s one of the best options for screen capture.
This software functions well as a video editor for novice editors, but it lacks the more complex functionality of a tool like Adobe Premiere Pro.

Camtasia is an all-in-one screen recorder and video editor that works on both Windows and Mac. It’s one of the most widely used screen recording and video editing systems and is popular for its user-friendly interface.

Unlike Camtasia, Loom is a dedicated screen recording tool. It’s designed for online educators, corporate professionals, and others who need to communicate on a regular basis but want to offer something more engaging than an email or slide deck.
Users can record and edit video in seconds, using a browser plug-in or dedicated app. Additionally, the platform offers apps for desktops and mobile devices, AI functionality (as an add-on), transcriptions and closed-captioning, and more.
If you’ve created a presentation on an external platform like Keynote, PowerPoint, or Google Slides, you can use a Presentation lesson to display it within your Thinkific course !
This function enables you to record audio while speaking to specific slides. You can also upload a recording for each slide.
For online educators, trainers , or even other creators, this functionality allows you to create a custom, more personable experience for students without adding another tool to your workflow.
To create a Presentation lesson, you will need to upload a PDF file. Each page in your PDF will be converted to images that will be displayed as slides within your Presentation lesson for students to navigate through.
If you have created a presentation in an external platform like PowerPoint, you can simply export it as a PDF and upload it to Thinkific.
Here are the steps to create a Presentation lesson with voice-over on Thinkific .
With that, let’s explore what it takes to ensure a good voiceover.
- Invest in a good microphone – While most cell phones and computers come equipped with built-in microphones, they may not provide the professional-grade quality you’re looking for. If your budget allows, we recommend upgrading to a higher-quality microphone , even if it is on the low-cost side of the spectrum.
- Use a teleprompter – Some people are natural at public speaking, but most of us aren’t. So, try using a teleprompter. You can turn your phone or desktop into one with free apps, allowing you to read out your content rather than memorizing and filling in the details as you go.
- Clear your throat – Most people do not realize the importance of a good quality voice. In fact, voice-over artists are hired simply because of their excellent voices! While you don’t need to hire a professional to record your own videos, you can deliver better content with the right warm-up.
- Sound confident —Confidence doesn’t come with good-quality microphones and teleprompters alone. Practice talking in front of a mirror to ensure that you sound and look great.
- Edit audio if necessary – Despite our best efforts, people make mistakes. Listen to your slides repeatedly and make changes until you are completely satisfied with how you sound.
Whichever method you choose, turning a regular presentation into an engaging voice-over is sure to improve the quality of your presentation.
But here’s a thought: Why not monetize your presentations with an online course?
Sign up with us for free and try it out (we dare you) .
Not ready to take the leap but still interested in improving the quality of your production? Check out one of these related guides:
- Best Equipment & Software For Creating Online Courses
- How to be Confident on Camera (Tips from Jon Youshaei)
- The 5 Most Effective Teaching Styles (Pros & Cons of Each)
- How to Create Video For Your Online Coaching Course
This blog was originally published in October 2022, it’s since been updated in May 2024.
Colin is a Content Marketer at Thinkific, writing about everything from online entrepreneurship & course creation to digital marketing strategy.
- 10 Instructional Design Models For Creating A Winning Online Course
- How To Craft Magnetic & Compelling Learning Outcomes
- Essential Questions To Ask In Your Training Evaluation Survey
- Best Equipment & Software For Creating Online Courses
- How to Create a Compelling Sales Page for Your Online Course
Related Articles
How to record your screen on any device.
If a screenshot says a thousand words, a screen recording says it all. Learn how on any device – including Mac, Windows, iPhone, or Android.
Podcasting & Online Course Creation (Daniel J Lewis Interview)
Thinkific Teach Online TV interview with podcasting expert Daniel J Lewis on the similarities between podcasting and online course creation.
Using Educational Technology: Types, Benefits, and Examples to Inspire You
Let’s look at 6 common types of educational technology and the benefits to using them to increase course registration and engagement.
Try Thinkific for yourself!
Accomplish your course creation and student success goals faster with thinkific..
Download this guide and start building your online program!
It is on its way to your inbox
Home Blog Google Slides Tutorials How to do a Voiceover on Google Slides
How to do a Voiceover on Google Slides
Google Slides is often used to share presentations online. Sometimes, these presentations can be confusing for the recipient unless there is additional information that can help elaborate each slide. While Google Slides, unlike PowerPoint, does not allow recording a voiceover to narrate your slides, you can insert separately recorded audio files to your slides to generate a narration.

Google Slides Voice-Over Recording
You can record your voice-over recordings and save them to a folder in Google Drive to insert in slides via New > File Upload. Google Slides does not support many audio formats, so make sure your narration is in MP3 or WAV format. Otherwise, the file will not show up when you try to insert it in Google Slides.

We recommend that you keep a naming convention for your files that makes them easy to identify so that you can conveniently incorporate them for relevant slides later on.
It is necessary to ensure that your audio files are not restricted. Select one or more files and select Share via right-click context menu.

Ensure all files are accessible via the link for recipients with at least View Only privileges. This will ensure that your audience is able to play the audio from within the Google Slides file. Otherwise, the audio icon will show a message asking the viewer to request access to the audio file.

How to Narrate Google Slides
Once your audio files have been uploaded to Google Slides, and you have unrestricted the sharing of those files, go to your Google Slides Theme and add audio for each slide via Insert > Audio .

Select the audio file with the narration to insert into the current slide and drag it to place it in the desired location on the slide.

After the audio file has been added, you can click to preview the sound. Furthermore, you can customize audio playback options to play the audio automatically or manually, in a loop, and to stop the audio when the slide changes.

To customize the look of the way your audio icon appears on the slide, see the menus below the Audio playback menu on the right sidebar. Using these options, you can adjust the audio icon’s size, position, and color and add a drop shadow and reflection.
Once your narrations are added to respective slides, you can share your presentation and enable the recipients to listen to the narration on each slide automatically or manually (based on your playback settings).

Audio narrations can only be helpful if they are clear and concise, with good voice quality. If you are struggling with context, you can write a script for each slide and read from it to make your narrative more focused.
Make sure you record your narrations in a place where there isn’t any background noise, or you have a noise cancellation headset to cancel out unwanted sounds in the background. It’s always a good idea to playback and check the voice narrations for sound and contextual clarity.
Since Google Slides supports only MP3 or WAV audio formats, you might need to convert your audio narrations to another format before uploading them to Google Drive. You can also use CloudConvert or other Google Drive-supported apps to make conversions from the cloud.

Like this article? Please share
Google Slides, Presentation Approaches, Presentation Ideas, Presentation Skills Filed under Google Slides Tutorials
Related Articles

Filed under PowerPoint Tutorials • May 22nd, 2024
How to Remove Animations from PowerPoint and Google Slides
This tutorial explains how to remove animations/transitions in PowerPoint and Google Slides

Filed under Google Slides Tutorials • May 22nd, 2024
How to Add Audio to Google Slides
Making your presentations accessible shouldn’t be a hard to accomplish task. Learn how to add audios to Google Slides and improve the quality and accessibility of your presentations.

How to Translate Google Slides
Whereas Google Slides doesn’t allow to natively translate slides, such process is possible thanks to third-party add-ons. Learn how to translate Google Slides with this guide!
Leave a Reply
Animoto Blog
- Video Marketing
- Video Ideas
- News & Features
How to Create Video Voice Over Presentations (With Templates!)
Mar 14, 2023
Presentation videos allow you to make your pitch to anyone, from anywhere. With the right combination of text, music, visuals, and voice over, you can engage and persuade any audience. With a voice over video, you can create a presentation that sparks emotions and helps you connect with everyone who watches.
In this blog, we’ll show you how to do a voiceover on a video and share tips to create impactful video voice over presentations.
The benefits of adding voice overs to presentation videos
Presentation videos can be leveraged throughout your entire organization. Any department, from sales to marketing, customer support, and HR can create a voice over video to share information in an engaging way.
Many of today’s top hybrid companies are already using videos in meetings to inform their teams, clients, and online audiences. Just last year, in fact, presentation videos were among the most commonly-made videos by businesses. Here are just a few reasons why they are becoming such a popular communication tool.
- Improves information retention: Video appeals to a wide variety of learning styles by using both audio and visual storytelling. When you share information in a way that resonates with your audience, their recall and retention rates will surely improve. Some studies have even shown that viewers retain 95% of a message after watching it in a video, compared to only 10% when reading it.
- Adds personalization: Voice over narration adds a unique element that only you have – your voice! These recordings add a personal touch to your videos that draws viewers in. A little personalization can go a long way for attracting and retaining attention!
- Complements your on-screen visuals: Voice overs actually complement and add value to your visuals. Rather than overloading your video with text, you can use voice over narration to go into more detail. Then, the text can be used to summarize main points and key takeaways.
How to make video voice over presentation with Animoto
Animoto makes it easy to create video voice over presentations! Just follow the steps below to record your custom voice over narration and create a polished presentation video that can engage any audience.
1. Choose a video template or start from scratch
First things first, choose a template! Use one of the free presentation templates below, or browse through our template library for a great starting point. You can also create your own voice over video from scratch for the perfect fit!
2. Customize your video with text, photos, and more
Now it’s time to make your video your own! Apply different themes to transform the design of your video with a single click. Or, make your video on-brand by adding your logo and brand colors. Then add supporting text, photos, video clips, and screen recordings to create a engaging and easy-to-follow business presentation .
You can even use music and voice overs together to craft a compelling story! Just remember to choose a neutral music track that won’t compete with your voice over tracks, and adjust the volume of your music to play quietly in the background.
3. Record or upload your voice over tracks
Next, create your voice over. You can either record a voice over track from scratch or upload existing voice overs right into Animoto. Just follow these simple instructions or dive into our [complete guide to voice over narration]( https://animoto.com/blog/video-marketing/voice over-animoto-guide) to learn how:
- Click on the “Audio” icon at the top of the page to open the audio menu.
- Click the microphone button below your video preview.
- Click “Upload voice over” and select your track or click on “Record voice over”
- Click the red button to record. You’ll see a three-second countdown, after which your recording will begin. Click the stop button to end your recording.
4. Trim or reposition your voice over tracks
Now it’s time to edit your voice overs. You can drag the buffers on either end of the recording to trim off any unwanted sound. Then, drag and drop the recording throughout your audio timeline to align with the visuals on screen.
5. Adjust the volume of your voice over tracks
Select on your voice over track and click the volume button. Then, increase or decrease the volume of your track to help it shine over any background music.
6. Download and present your voice over presentation
Finally, your presentation is ready to share! Download your presentation video to your device for easy sharing and storage. You can then add your presentation to a portable USB to present it in person. Alternatively, you can embed your presentation in an email or share it directly to social media to connect with your online audiences.
Tips for creating professional voice over presentation videos
If you don’t have much experience with voice over narration, it can be hard to know where to start. That’s why we’ve put together some tips to help you record great voice overs in fewer tries!
Write a voice over script
Scripts can save you a lot of time! Instead of having to cut out pauses and “umms” from your voice overs, try writing a script so you can stay on track. This will boost your confidence, help you sync your voice over with your video, and ensure that you know exactly what to say and when.
Find a quiet place to record
Cut down on background noise to create more professional and crisp-sounding recordings. Small confined spaces like closets are great at filtering out background noises. Even recording in a room away from windows can eliminate unwanted outside noises and let your voice shine through.
Practice first before hitting record
Go through a practice run before the “real deal”. This will help you feel more comfortable and confident once you click the record button. Practice makes perfect, you know!
Don't record everything all at once
Recording a long voice over presentation can be quite the mouthful. Instead of worrying about saying everything all at once, record multiple voice over tracks and piece them together! Doing so makes it easier to trim bit by bit and drag your recordings throughout the video so they align perfectly with your visuals.
Use a good microphone
Last but not least, use a good microphone. Even using the microphone on your headphones will provide you with crisper audio than your computer’s mic. But if you’re creating a series of video voice over presentations, you may want to consider using a high-quality external microphone like the ones on this list .
Types of presentation videos you can make (plus templates)
Presentation videos can be made for virtually any topic! From recapping a meeting, to sharing quarterly results and making a sales pitch, you can personalize any presentation with voice over. Here are some video ideas and templates you can use for free to start off on the right foot.
Presentation
This template is a great place to start for your next presentation. Simply record your screen as you run through your presentation slides and speak through them as you go. You can create this video with voice over narration or turn on your webcam and speak directly to your audience!
Educational presentation
Present to your peers, board members, or classroom with a voice over video! This template brings topics to life with simple text boxes, animations, pictures, and video clips.
Team update
Keep the teams across your organization up-to-date and engaged with a voice over video! Use this presentation to share your progress, hurdles, and next steps with any audience. In addition to voice over, you can also include screen and webcam recordings to help tell your story!
Workplace explainer
Explain the importance of new workplace policies with a business presentation ! These are great assets for managers, HR professionals, and anyone who wants to educate their teams.
Meeting recap
Recap the best parts of your latest in-person and online meetings in an engaging way. With meeting recap videos, you can make sure your key takeaways are front and center. It’s also an impressive delivery method for sharing findings and results with clients!
Customer onboarding
Make sure new customers hit the ground running by creating an engaging onboarding video! This can be used to get new clients setup with a new product or make sure that they know where to go for help. It’s a great touchpoint to include right at the start of your relationship.
Training videos can also come to life with a lively voice over track! Check out this Manager Training video that outlines an upcoming training course. Just add the details of your own training program, including due dates, add your branding, and make it your own with voice over narration.
Make a personal connection through video voice over presentations
Whether you want to make personal connections online or build excitement for your next presentation, you can do so with voice over! And with professional templates at your fingertips, you can create a voice over video in less time with double the impact. All you need is an idea and your voice!
Voice over video presentation video FAQ
How long should a video presentation be.
Video presentations should be around thirty to sixty seconds for maximum engagement. These presentations engage your audience through visuals and audio to engage viewers with multiple learning styles.
What tools do I need to record a voice over?
All you need is a [voice over recorder]( https://animoto.com/features/voice over-video) and a microphone to record voice overs! As a bonus, you can use an integrated recorder and video-maker to turn your recordings into engaging presentation videos.
Are USB microphones good for voice overs?
External USB microphones can make your voice overs sound more crisp and professional. Oftentimes, even using the mic on your headphones provides better quality than computer microphones.
- Marketing video
- How-to video
- Slideshow video
- Social media
- Promo video
- Birthday video
- Intro / Outro videos
- Explainer video
- Email marketing
- Training video
- Internal communications video
- Presentation video
- Photography
- Real Estate
- Marketing Agency
- HR / People Ops
- Video commenting tool
- Screen recorder
- Photo video maker
- Music library
- Online video editor
- Video trimming
- Stock library
- Privacy policy
- Terms of use
- Animoto Tutorials
© 2024 Animoto Inc. All Rights Reserved.
Voice over generator for PowerPoint

Looking for our Text to Speech Reader ?
Featured In
Table of contents, why are voice overs a good idea for powerpoint, how to record a voice over using powerpoint, create a professional voice over quickly and easily with speechify voiceover studio, try speechify voiceover studio today, how do i set up voice over in powerpoint, can you put a voice recording over a powerpoint, how do you get powerpoint to read to you.
Using a voice over generator for PowerPoint adds style, professionalism, and natural properties to your presentation. Here’s how.
PowerPoint (PPT) is Microsoft’s app for making and editing presentations. As part of Microsoft Office, PowerPoint is available on Mac, PC, and mobile devices. It lets users create brand-new or template-based presentations, add text, art, images, animations, or videos, and share their work with others.
Adding voice over as audio support is particularly useful when making PowerPoint presentations and can enhance content delivery. Here’s how to use a voice over generator for PowerPoint, no matter whether you’re using the online PPT maker or the desktop PPT creator app.
What makes a good PowerPoint presentation?
A good PowerPoint presentation seamlessly blends form and function to engage, inform, and persuade its audience. At its core, clarity and conciseness are paramount, ensuring that slides are not overloaded with excessive text or overly complex graphics. Instead, each slide should convey a singular idea, augmented by impactful visuals and limited bullet points. A consistent design theme with appropriate color contrasts, legible fonts, and organized layouts provides visual cohesion and ensures easy readability.
Additionally, the integration of relevant images, charts, and graphs can bolster comprehension and retention of the content. Beyond the slides themselves, the presenter's delivery plays a pivotal role—a dynamic narrative, aligned with the visuals, can bring the content to life, sustaining audience attention and fostering understanding. Ultimately, a successful PowerPoint presentation is one that is both visually appealing and effectively communicates its intended message.
Voice overs complement PowerPoint presentations in many ways. Here are some the best reasons to add a voice over to a presentation.
Boost reliability and validity
Adding clear audio voice over to a presentation adds validity to its content. The audience can feel that validity, which in turn increases the feelings of reliability and adds faith in the content.
Add emotion
Besides increasing validity, a voice over on PowerPoint slides makes the content more emotional. The presentation adds passion that accentuates the vision and values of the presentation.
Serve as a call to action
Voice over functionality is very captivating. It passes the call to action to your audience even without apparent references. This is mainly because the presentation becomes more emphatic when natural-sounding voices are behind it.
Make content more inclusive
Text to speech software and a voice over make any presentation more inclusive and accessible. People with learning disabilities like dyslexia, ADHD, and visual impairments can listen to the content without feeling overwhelmed about reading it.
Recording and adding a voiceover on PowerPoint is simple. Just follow the steps below, and you’ll be good to go.
- Open the PowerPoint presentation where you want to add a voice over.
- Hit the “Record” button from the upper-hand ribbon. You can also choose from different recording options in the “Record” tab.
- You can use the text from the presentation as a teleprompter as you record yourself. Any existing notes will be transformed into text during the recording.
- With proper permissions, turn on or off your camera or microphone.
- Press “Start recording” when ready.
- Use the “left” or “right” arrows to record voice overs for a particular slide.
- Make pauses by pressing the pause button or selecting “Stop” to finish.
- Review the recording by pressing the “Play” button. If you’re unhappy with it, you can edit it by pressing “Retake recording.”
- Export the presentation as a video file by hitting “Export” and “Export Video.”
As you can see, adding a voice over to your PowerPoint presentation can be done from within the app. However, the steps may be a bit too complex for some users. Also, you may not be comfortable with the idea of using your own voice.
But luckily, we have a solution for that.
Originally just a text to speech (TTS) app, Speechify has now expanded into fully customizable, real-time AI voiceover generation with Speechify Voiceover Studio . You can use it to create professional voice overs that sound like real human voices for Microsoft PowerPoint, Google Slides, and other—in addition to recording e-learning and tutorial videos, podcasts, audiobooks, and more. Create audio dialogs, training videos, or stunning slide-show presentation voiceovers in seconds.
The human-like voices, plenty of playback options, and affordable pricing make Speechify Voiceover well worth the consideration.
You can use your own video editor to edit the text to speech voices however you like, or you can use Speechify’s own AI video maker . And if you don’t want to use PowerPoint or Google Slides, you can create your slide-show presentation with Speechify AI Slides.
Here’s an overview of Speechify’s AI Voice Generator features:
- More than 200 high-quality AI voices
- Over 20 different languages and accents
- Complete customization over pronunciation, pauses, pitch, and more.
- 8,000+ licensed background music soundtracks
- Unlimited uploads and downloads
- Commercial usage rights
- 24/7 customer support
- Fast audio editing and processing
- Export in WAV or MP3 files
Speechify Voiceover Studio can provide high-quality natural-sounding voices for your PowerPoint presentations. The ease of use and quick generation of audio files make this app suitable for users of all ages and computer skills.
Try Speechify Voiceover Studio for free today.
You can use the app’s in-built voice recorder feature and record yourself or use third-party computer-generated AI voices offered by Speechify.
Yes, you can use your own voice recordings or computer-generated voices from third-party software like Murf or Speechify over a PowerPoint slide.
PowerPoint has a speech recognition tool you can use to read text out loud. Go to “Speech Recognition,” then “Text to Speech,” and set the reading speed and other properties.
Ultimate guide to NaturalReader and reviews
ChatGPT 5 Release Date and What to Expect

Cliff Weitzman
Cliff Weitzman is a dyslexia advocate and the CEO and founder of Speechify, the #1 text-to-speech app in the world, totaling over 100,000 5-star reviews and ranking first place in the App Store for the News & Magazines category. In 2017, Weitzman was named to the Forbes 30 under 30 list for his work making the internet more accessible to people with learning disabilities. Cliff Weitzman has been featured in EdSurge, Inc., PC Mag, Entrepreneur, Mashable, among other leading outlets.
Hire voice artist
Sign up to book a professional voice over artist.
Sign up as a voice artist
Get a free account today for access to casting listings.
- Blog detail
How To Create a PowerPoint Presentation with Voiceover
.jpg&width=1028&zc=1 "how to create a presentation with voice over")
Bring your project to life with the perfect voice over.
If you have any questions or need any help, feel free to contact us:
+44 (0) 208 6387 409
This site uses cookies. Find out more. Okay, thanks
Byte Bite Bit
How to Do a Voice Over on PowerPoint: Easy Steps for Professionals
If you’re looking to add a personal touch to your PowerPoint presentations, doing a voice over can make all the difference. Recording a voiceover allows us to provide additional context, explain complex slides, or even add a touch of humor to our presentations. It’s a great way to make sure our message is conveyed exactly as we want it to be.

To get started with a voiceover in PowerPoint, all we need is a computer with a microphone and our presentation ready to go. Whether you’re using PowerPoint on a PC or a Mac, the process is fairly straightforward. Head over to the “Slide Show” tab, and select “Record Slide Show.” From here, we can start recording from the beginning of our slide deck or from the current slide. Don’t worry if you’re not a tech wizard; it’s simpler than it sounds.
Imagine presenting a slide show with your voice guiding the audience through each point, just as if you were in the room with them. This method turns a standard presentation into a more engaging and dynamic experience. It’s also helpful for those who might not be able to attend a live presentation but still need to understand our content. So, let’s dive in and see how we can bring our slides to life with our narration in PowerPoint!
- 1.1 Optimizing Audio and Video Quality
- 1.2 Selecting the Right Tools and Equipment
- 2.1 Incorporating Visuals and Audio
- 2.2 Writing a Compelling Script
- 3.1 Mastering Narration and Voiceover
- 3.2 Effective Use of Annotations
- 4.1 Editing and Refining Recorded Content
- 4.2 Sharing and Distribution Methods
Preparing Your Presentation
To successfully integrate a voice-over in your PowerPoint, careful preparation is essential. This includes ensuring high audio and video quality and selecting the appropriate tools and equipment.
Optimizing Audio and Video Quality
For high-quality voice recordings, let’s start with a good microphone . A USB microphone often offers better sound quality compared to built-in laptop mics.
We need a quiet space to record. Eliminating background noise gives our audience a clearer and more professional-sounding presentation.
It’s also helpful to test our audio levels. This ensures our voice is neither too loud nor too soft.
Lighting is crucial for any videos we might add. Natural light or soft white bulbs work best to make us look our best on camera.
Equally important is the backdrop. A clean and non-distracting background helps keep the focus on our presentation.
Selecting the Right Tools and Equipment
Having the right gear is half the battle. We’ll benefit from a good microphone as mentioned. Besides a USB microphone, even a dedicated recording device can work wonders.
Using a pop filter can help reduce any unpleasant popping sounds from our speech. It’s those little details that can make a big difference.
A tripod for our camera can stabilize our recordings. Shaky videos can be distracting and unprofessional.
Audio editing software is also important. Free options like Audacity or built-in tools in PowerPoint can fine-tune our recordings, trimming silence and enhancing quality.
In our preparation, high-quality inputs and proper gear create a professional and engaging presentation. This attention to detail ensures we deliver our message clearly and effectively.
Creating Engaging Content
Effective voice-overs in PowerPoint require well-coordinated visuals and audio, as well as a compelling script that captures and retains your audience’s attention.
Incorporating Visuals and Audio
Incorporating images, animations, and video narration can significantly enhance the engagement of your PowerPoint presentation. We should consider these critical elements:
- Images and Animations: Use high-quality images that correlate with the subject matter. Animations can add appeal but should be used sparingly to avoid overwhelming the audience.
- Video Narration: Including a video of the presenter adds a personal touch, making the content more relatable. We can utilize the “Insert” ➡ “Audio” ➡ “Record Audio” options to add recordings to specific slides.
- Audio Icons and Background Sound: Strategically placing audio icons makes it easy for viewers to access narration, while subtle background music or sound effects can enrich the atmosphere without distracting from the content.
Writing a Compelling Script
A compelling script is the backbone of engaging content. It’s vital that our script is clear, concise, and targeted:
- Clarity and Conciseness: Avoid jargon and complex sentences. Keep sentences short to facilitate easier understanding.
- Audience Engagement: Use anecdotes or questions to make the narration interactive. Posing rhetorical questions can provoke thought and captivate the listener’s interest.
- Tone and Pacing: Maintain a conversational tone to make the audience feel at ease. Pay attention to pacing to ensure that the narration aligns with the slide transitions and visual elements.
Here’s an example of a structured script approach:
- Introduction: Greet the audience and outline the presentation’s purpose.
- Main Content: Present key points with clarity, including examples and explanations.
- Conclusion: Summarize the critical messages and provide a call to action.
Writing engaging content for a PowerPoint voice-over revolves around balancing the visual elements and a well-crafted script. This combination is key to capturing your audience’s attention and keeping them hooked throughout the presentation.
Recording Techniques
When creating a voiceover in PowerPoint, mastering narration and making effective use of annotations can significantly enhance the presentation. Let’s dive into these essential techniques.
Mastering Narration and Voiceover
Recording a voiceover may seem simple, but achieving a professional touch requires a bit of finesse. To start, open your presentation and go to Slide Show > Record Slide Show . Choose either to start recording from the beginning or from the current slide.
It’s crucial to speak clearly and at a moderate pace . The tone should be engaging yet professional. We should practice our script a few times before recording to ensure we sound confident and natural. Always have notes handy for key points to avoid any long pauses or filler words.
Remember, it’s not just about the voice . Proper use of a good-quality microphone can make a significant difference. USB mics are generally user-friendly and provide clear sound quality. Additionally, recording in a quiet environment minimizes background noise, giving a cleaner final product.
Using pauses and intonations effectively can make our narration more compelling. Avoiding monotone speech helps in keeping the audience engaged, and varying our pitch and volume can emphasize critical points.
Effective Use of Annotations
Annotations can add an extra layer of clarity to our presentation. Utilizing tools like the pen, highlighter, and laser pointer can direct the viewers’ attention and underscore significant points.
To begin, navigate to Slide Show > Set Up > Browsed at a Kiosk . After setting this up, select Annotations where you’ll find options like Pen , Laser , and Highlighter .
The pen tool is useful for underlining or circling crucial information during our voiceover. Meanwhile, the highlighter helps in shading important text or areas without distracting from the overall slide.
The laser pointer is especially handy when presenting complex diagrams or charts. We can guide the viewer’s eye seamlessly from one point to another. Remember to use these tools sparingly; overusing them can clutter the slide and distract from our narration.
By mastering our voiceover technique and efficiently using annotations, we can create engaging, clear, and impactful PowerPoint presentations.
Finalizing Your Presentation
After recording your voiceover in PowerPoint, it’s crucial to refine the audio and then decide how to share your polished presentation. These actions ensure that your final product is professional and engaging.
Editing and Refining Recorded Content
Once the initial recording is complete, it’s time to edit. We need to play back each slide to ensure audio quality. If you hear any mistakes or unclear parts, re-record those segments.
Deleting unnecessary audio clips is vital. Simply select the audio icon and hit “delete.” For clearer audio, use the “Trim Audio” feature to cut out silences or irrelevant parts.
Regularly save your progress to avoid losing work. Using the “preview” option to replay the presentation helps catch any overlooked errors. Consistent refinements guarantee a polished final product.
Sharing and Distribution Methods
With the audio fine-tuned, let’s focus on sharing the presentation. Save the file in a widely compatible format like PPTX or PDF with embedded audio. For easy distribution, consider exporting it as a video file which can be uploaded to platforms like YouTube .
Sharing directly from PowerPoint via email or cloud storage is also straightforward. Use options like OneDrive or Google Drive for easy sharing. Using links instead of attachments can avoid file size limits and provide accessibility.
Our goal is to make sure the audience can view the presentation effortlessly. Choose a method that best suits their needs for maximum impact and accessibility.
Related posts:
- How to Play PowerPoint Slides Automatically Without Clicking: Step-by-Step Guide
- How to Embed Excel into PowerPoint: A Step-by-Step Guide
- How to Add Hyperlink in PowerPoint: A Step-by-Step Guide
- How to Add Notes to PowerPoint: Enhance Your Presentations with Ease
- How to Add Music to PowerPoint: Step-by-Step Guide for Seamless Presentations
- How to Create an Org Chart in PowerPoint: Step-by-Step Guide for Beginners
- How to Wrap Text in PowerPoint: A Step-by-Step Guide
Leave a Comment Cancel reply
Save my name, email, and website in this browser for the next time I comment.
How to Do a Voice Over Like a Pro: The Complete Guide

Marketing Content Strategist

Table of contents
What is a voice over, why is a good voice over important for your video, do i need a professional voice talent for great voice over, the essential elements of a good voice over, how can i make my voice sound better on voice overs, how to record a voice over, don’t forget the captions and audio transcription, how’s it feel to be a voice over pro, making a voiceover, the faqs, subscribe to techsmith’s newsletter.
Whether you’re making a YouTube video or recording a presentation, if you make videos — especially how-to and explainer videos — you will almost certainly need to record voice overs. In fact, depending on how many videos you create, you may have to do a lot of voice over work.
For many people, the thought of recording their voice and sharing it with the world is horrifying. Or at least genuinely uncomfortable. But it doesn’t have to be difficult or stressful!
So what is voice over recording? And how do you record voice overs that grab and keep your audience’s attention? Well, buckle up, because you’re about to find out!
In this article, we’ll discuss the ins and outs of what a voice over is, how you can record your own, and go over some voice over tips for beginners. Here’s what you’ll learn:
- How to record, edit, and add your voice over to your video in six easy steps .
- Four things that ensure a great voice over .
- Which audio recording software is best for voice overs?
- How to not hate the sound of your own voice .
The Marketer’s Ultimate Guide to Video
In our FREE ebook, we’ve put together practical strategies to get out of the woods and create engaging, powerful video content on your own that reaches your audience.
A voice over recording (or just a “voice over”) is a person speaking (but not seen) during a video — often describing, highlighting, explaining, or providing additional context to what a viewer sees.
It’s often confused (or equated) with narration. And, while they are similar, they are not quite the same thing.

Narration is a specific type of voice over that describes all of the on-screen action, often telling a story based on what’s happening. While narration is more commonly used for entertainment, non-narration voice overs are often used on instructional, informational, and educational videos.
An easy way to think about it: All narration is a voice over, but not all voice overs are narration.
Some might think that the audio portion of a video is less important than the visual aspects, but that’s not true. Most people that watch videos say they are more likely to stop watching a video with bad audio vs. one with lower-quality video.
In fact, a recent TechSmith study of viewing habits showed that more than 25% of video viewers watched a video all the way through because the audio was good — more than those who said professional video style was most important.
This isn’t that surprising when you think about it. While the on-screen elements of your video are what makes it a video, in many cases, it’s the voice over that helps people truly understand what’s being shown.
Muddy, muffled, or otherwise garbled or difficult-to-understand audio tracks are frustrating to viewers. And, for people who are blind, but still need the information your video provides, good audio is essential.
So great audio isn’t just important. It’s a fundamental necessity to keep an audience interested and engaged — and to ensure they get the information they need.
The Easiest and Fastest Way to Record and Edit Voice Over Audio!
Audiate makes recording and editing your voice as simple as editing text in a document.
The short answer: No.
Just because quality voice over is important for the success of your video, it doesn’t mean you need to go to great lengths (and expense) to get it. Some people think you need to have one of those super-snazzy radio voices to produce good voice overs for your videos, but that simply isn’t true.
Sure, if you have the budget and you’re making professional videos, you can hire a professional voice over artist. But it’s not necessary.
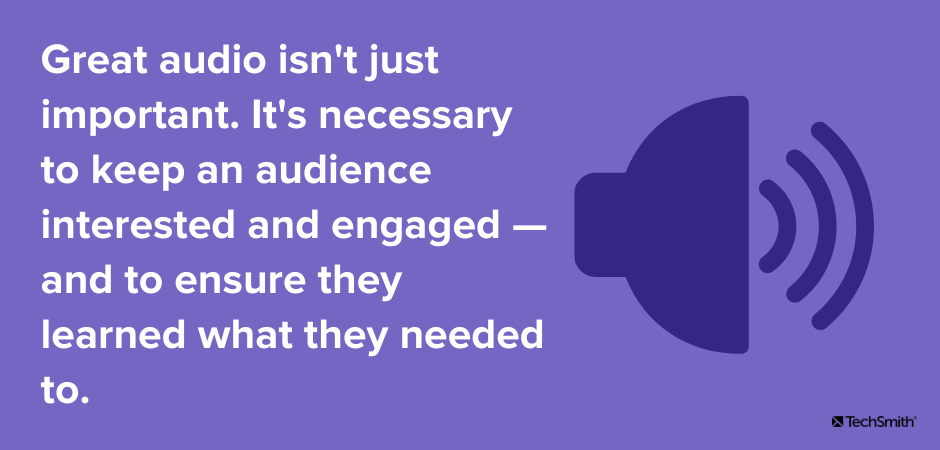
With the help of this guide, you’ll soon see why most videos don’t need professional voice overs and that you really can do it yourself! But how can you record your voice over a video? First, you need to know what good voice over is.
When most of us think of great video voice overs, we probably think of actors like Morgan Freeman or James Earl Jones, usually because there’s a tendency to associate voice overs with having a really great voice. And while that can help, it’s not a prerequisite for doing a voice over.
In fact, with a little know-how and some practice, almost anyone can produce a professional-quality voice over for a video. All you have to keep in mind are the key elements that make a voice over stand out:
- Audio clarity and volume
- Vocal tone and inflection
- Pronunciation
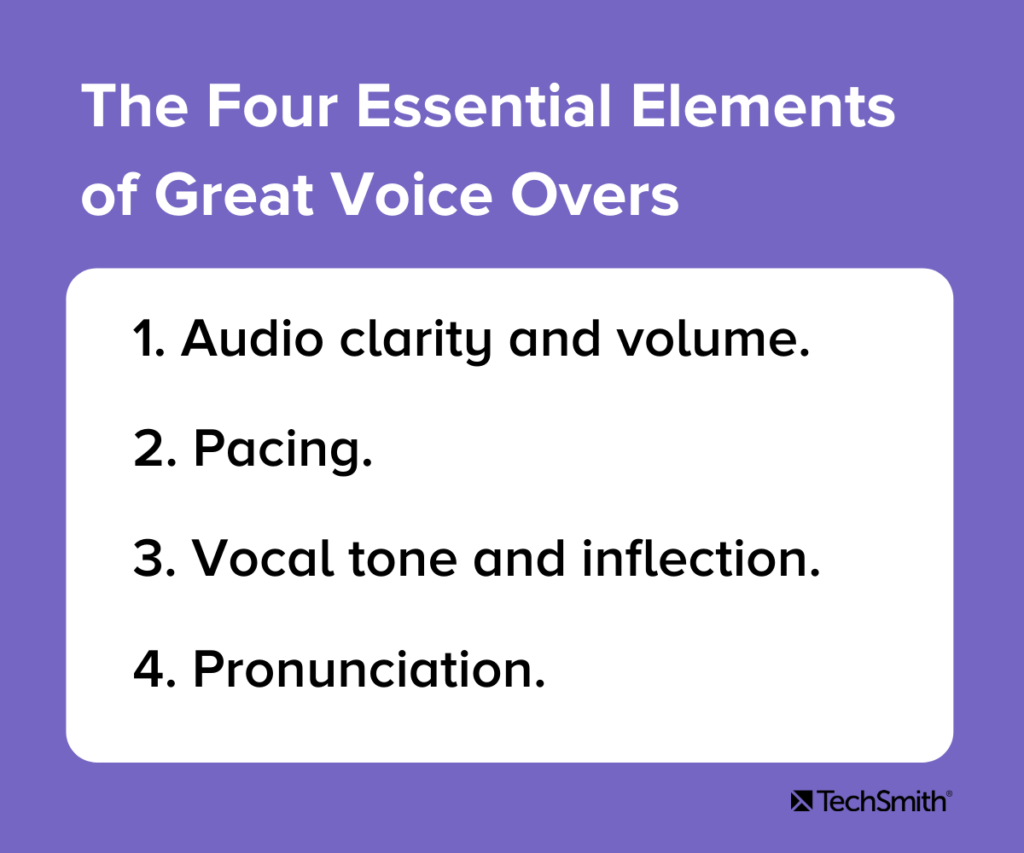
1. Audio clarity and volume
The clarity of your voice and speaking at a comfortable volume may be the most essential parts of great audio.
If your voice over recording is fuzzy or muddy sounding, it will be difficult for people to understand and your audience will be distracted and unable to absorb the information or may simply switch your video off. Either way, they’ll miss your message and you’ll miss an opportunity to share your knowledge.
Similarly, if the volume of your audio is too low, it may be difficult for people to hear. And if it’s too loud, you risk distorting it. Fortunately, there is a solid sweet spot for getting the volume just right, which we’ll talk more about in a moment.
Ever talk with someone who has a really exciting story to tell, but they’re so excited about it that they rush through it and when they’re done you can’t even remember what they were talking about? Or, someone who drones on and on with no end in sight, while you struggle to keep your eyes open?
This is called pacing, and it’s really important to get right. Too fast and your audience won’t know what hit them. To slow and they’re likely to get bored.
The best voice overs have a natural and deliberate pace, which is why you should always write a script (and practice it!) before you start recording as this will help you speak naturally. You should also remember that pacing includes things like pausing now and then to take a breath, either for effect or to give the listener a break to process important information.
3. Vocal tone and inflection
Like pacing, vocal tone and inflection refer to ensuring you speak naturally and pleasantly. You want to sound friendly and engaging, but not so much that you sound fake.
No one wants to sound like a game show host (or like Troy McClure). But, you also want to avoid a monotone robot voice which, like pacing that’s too slow, can be boring and off-putting.
4. Pronunciation and enunciation
The final element of great voice over work is ensuring that you pronounce each word correctly and that you speak clearly enough to be understood. Avoid mumbling, but don’t shout or over-enunciate, either.
Be mindful of your regional accent (yes, we all have them) and pronunciations as they relate to your audience. While it’s perfectly acceptable to “warsh” your hands in Missouri or have a great “idear” in New England, those pronunciations may confuse people from other locations.
Don’t worry, though. No one expects you to sound like a professional voice actor. The best thing you can do is speak naturally and clearly — the rest will follow with practice.
This is the number-one issue most people bring up when they have to do a voice over for their video.
Most of us rarely have to hear our own voices in audio recordings. We’re used to the rich, warm sound of our own voices in our own ears and there’s no way around the fact that you sound different on a recording than you do to yourself.
So how do you stop hating the sound of your own voice? Well, you just have to get used to it.
Think of it this way: Your voice on recordings is how you actually sound to everyone around you. When you speak to others, that’s what they hear. the only one who hears a difference is you.
So, there’s really nothing to be embarrassed or feel shy about.
Everyone who does voice work has to overcome this hurdle. But, like most things, the more you do it, the easier it gets. Once you’ve done enough voice-over work, your voice will sound just as normal on recordings as it does in your own ears.
Of course, if you really can’t get over it, you can always ask someone for help. Whether that means enlisting a friend or colleague, or hiring a professional to do the work for you.
1. Preparing to record
Not all videos need a ton of preparation. Quick one-off screencasts or a fast demonstration of a new user interface for a colleague can probably be done on the fly. But, for videos where you want a more polished look or need to cover more information, a bit of preparation goes a long way.
Find a quiet place to work
You’ve probably seen what a recording studio looks like. Professional voice over artists typically have a room somewhere with walls covered in sound-absorbing foam, a fancy microphone setup with a pop screen, and a computer workstation that looks like NASA’s Mission Control.
Luckily, you don’t have to go that far to get great results. You can create a great voice recording space with minimal effort and very little expenditure.
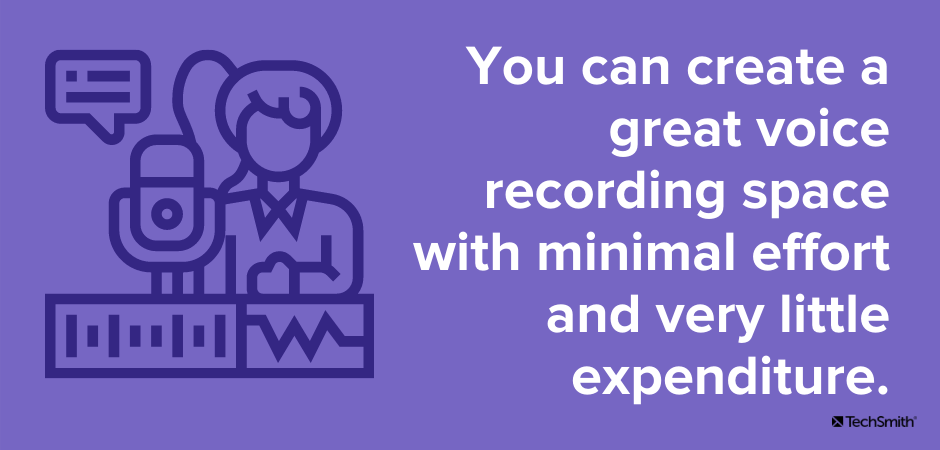
First — and most importantly — you’ll want a space that’s free from distracting noises and where you are unlikely to be interrupted. Most decent microphones pick up even faint ambient sounds, and those sounds will make it into your recording.
If your space is at work, avoid areas where you can hear your coworkers talking, etc. Or, plan to record when no one else is in the office.
Wherever you are, be mindful of the sounds of your heating and cooling system. If you can’t find a spot where you can’t hear air rushing through your ducts, you may want to shut down your furnace or AC while you’re recording.
If your recording space is near a window, listen for sounds from outside, such as wind, birds chirping, and dogs barking. Be especially mindful of traffic sounds — particularly loud delivery trucks as these will almost definitely be picked up in your recording.
Nowhere is going to be completely silent, so find the best place you can — even if that means thinking outside the box.
For example, you might find the quietest place you can find to record is in your car (with the engine off, of course). It might not be the ideal setup, but if all you need to do is speak into a microphone, it might be the quietest environment you have access to — and you might be surprised by the results!
Choose a microphone
Next, you need a decent microphone. We won’t go too in-depth with this here, but we do have another article detailing the best microphones for recording video .
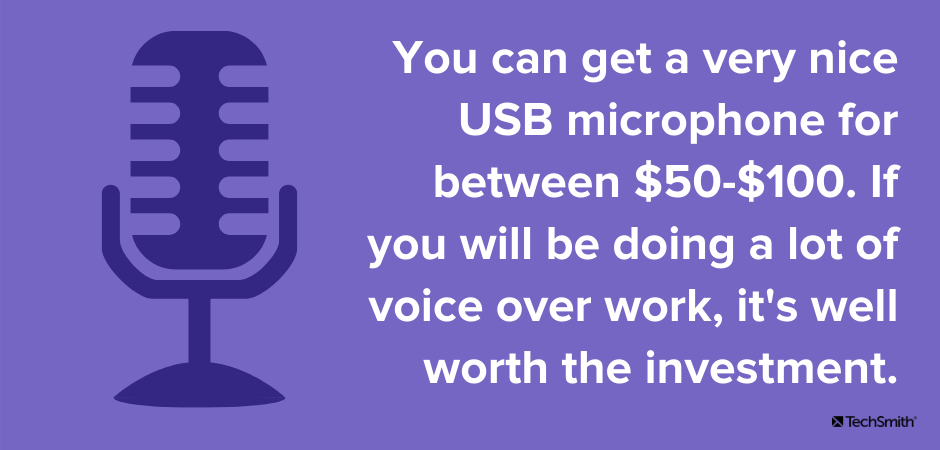
What we will say, however, is you should definitely avoid recording your voice ovesr on your laptop microphone, if possible. While built-in mics are fine for the likes of Zoom meetings, even a low-cost external microphone will be better for a video voice over.
You don’t need to spend hundreds of dollars, either. You can get a decent USB microphone for $50-$100, which is well worth the investment if you’ll be doing a lot of voice over work. However, even the headphones that come with your smartphone (which usually have a small built-in mic) will record a better sound than just your computer’s microphone.
If you do intend to use an external mic, we’d also recommend investing in a pop filter . They’re cheap and help minimize the distracting sounds caused by hard consonants such as “p” and “b.”
Choose your audio software
There’s no shortage of audio recording software on the market and most of them will offer more or less the same level of functionality. But, for the average user, these tools are often complicated and come with a high learning curve to be of any practical use.
So, with that in mind, we’d recommend checking out TechSmith’s Audiate — which comes with a seven-day free trial.
2. Write a script
Having a script is probably the single most important thing you can do to ensure your voice over sounds professional. Nothing ruins a good voice over faster than a lot of “uhms” and “ahs” as you try to remember what you wanted to say.
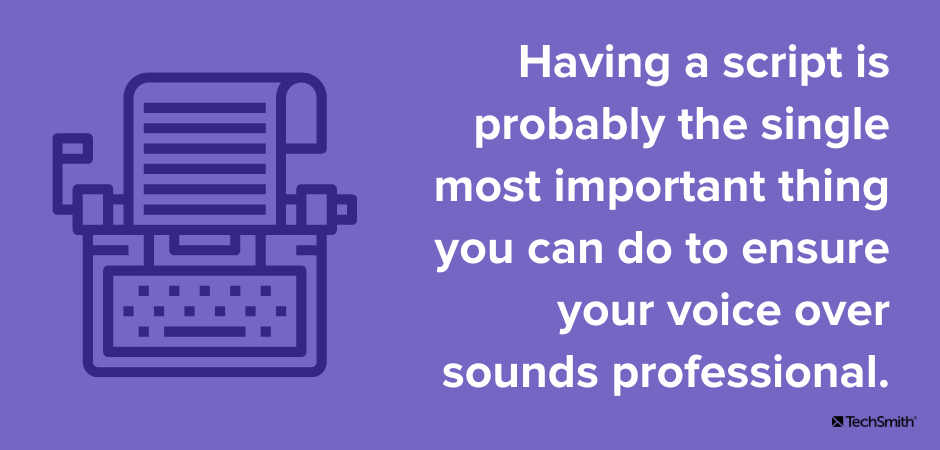
The best scripts will include everything you intend to say, word for word. Taking the time to write this out before recording helps ensure that you will cover everything you want to without the risk of wandering off into unrelated topics.
To write a script, you should first outline the points you want to make and then write the full script based on that outline.
Once it’s written, read your script aloud several times before recording, and be mindful of words or phrases that may feel awkward or difficult to say. A script often sounds and feels different when it’s read out loud compared to how it sounds in your head.
This great blog post will give you more information on writing your script.
3. Do a test recording
Now that all the essential tools are in place, it’s time to record your voice over!
Before you get down to the real thing, though, be sure to run a test recording to ensure your equipment is working as it should, and your audio levels are good.
Even if nothing has changed from the last time you did a voice over, it’s still good practice to run a test first. There’s nothing worse than jumping straight into the recording, only to finish and find that something wasn’t set up properly.
You don’t need to record the entire script for your test recording, but a few paragraphs will give you enough to ensure that the audio is clear and doesn’t include any stray or ambient noises.
Top Tip: When you listen back to your test recording, use headphones to check the audio quality. These will be much better than your computer speakers at picking up any unclear audio, feedback, or weird noises.
While you’ll obviously want the audio to sound good on the cheapest speakers, you (and your audience) will be much happier if you use headphones to check for quality. Remember, many of your viewers will probably listen via headphones, so you want to make sure they have the best possible audio.
Microphone placement
You also want to consider where to place your microphone. If it’s too close to the person speaking, it will pick up all kinds of weird mouth noises and air puffs. However, if it’s too far away you might sound lost in a large room.
Ideally, place the microphone about six to eight inches from your mouth, and slightly below your chin. If you’re using an LAV (clip-on mic), make sure it’s about six to eight inches below your mouth.
You should also be mindful of the surface where you place your mic. Some microphone stands will be susceptible to picking up noises from the desk or table they’re sitting on, so be sure to listen for those types of sounds on your test recording.
Check your volume levels
Getting the volume level right for your audio ensures that it’s easily heard and not distorted. If the volume is too low, your audience will have trouble hearing what you say. If it’s too high, you risk garbled audio or blowing out your people’s ear drums.
While you can always make a video louder and adjust levels when you edit, starting with the best possible audio level as you record is always your best bet.
The folks over at Premium Beat have a great post on recommended audio level settings , but here are a few basics.
- Audio levels are measured in decibels (dB).
- In audio editing, 0db is actually the maximum you want to achieve. It sounds weird, but trust us.
- For the most part, your ideal audio level is between -10db to -20db. Your audio should peak around -6db.
- Never go above 0db, as your audio will distort or “clip.”
Most audio recording software will have indicators that let you know when your audio is in danger of being too loud and clipping.
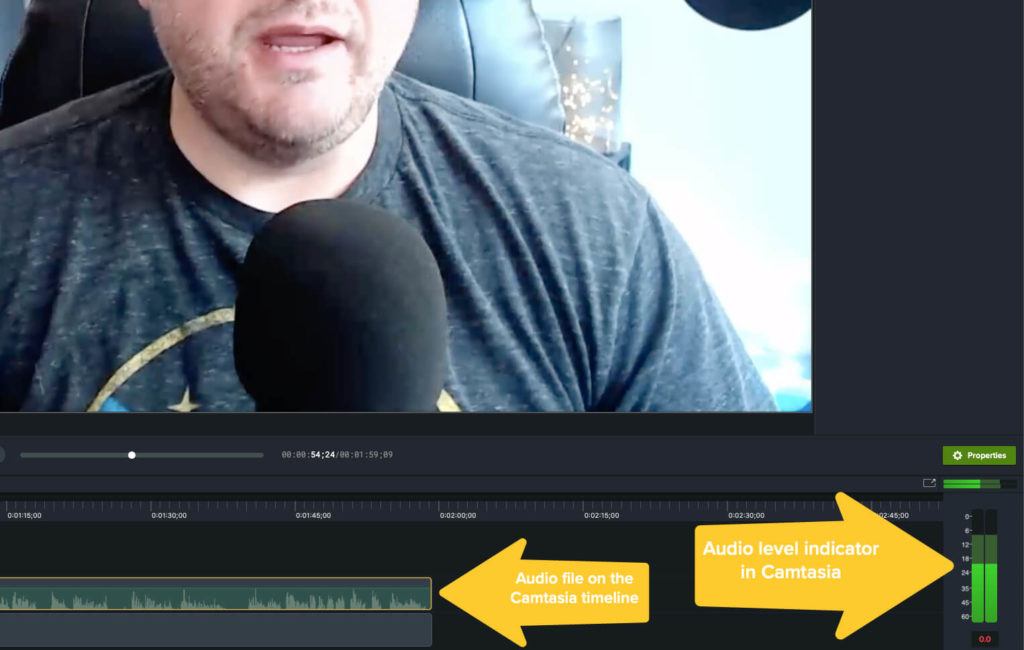
The image above shows TechSmith’s Camtasia interface with the waveform (a graphical representation of your audio recording) on the left and the level indicator on the right. The indicator shows that the audio peaked at just under -6db and is well within the acceptable levels.
4. Record your voice over
Once you’re satisfied with your microphone placement and audio levels, you’re ready to record your voice over! With Audiate, it’s as simple as clicking the record button and speaking.
As you record your script, remember these key tips for ensuring a great voice over:
- Speak slowly and clearly : Enunciate each word, but don’t concentrate on it to such an extent that you sound like a robot.
- Pro Tip : Smiling while you read your script can help you sound happier and more natural.
- Pro Tip : With Audiate, you’ll be able to see and edit your voice over’s text, so you can easily go back and fix any mistakes when you’re done.
- Take breaks : If you struggle with the script or it just gets too hard to keep going, pause your recording and take a break. Rewrite any parts of the script that may be giving you too much trouble and try again.
- Practice makes perfect : As with anything, voice overs get easier the more you do them. Don’t give up if it’s not perfect the first time!
5. Edit your audio
When you finish recording, it’s time to edit. Even if you didn’t make any mistakes, there’s a good chance there’ll be a few things that need fixing. At the very least, you’ll want to trim the beginning and end to remove any dead space.
However, Audiate makes it so easy to edit that you’ll barely have to lift a finger. The video below gives a great overview of how to work in Audiate.
With traditional audio software, you have to hunt through your recording to find your mistakes and edit them individually. Even a short video could take an hour or more to edit depending on how complicated your edits were.
But with Audiate, you can just read the text before highlighting and deleting any mistakes you find. You might also notice that the Audiate interface (below) is much less complicated than the software shown in the screenshot above.
When editing a voice over, it’s always worth listening to the entire recording from start to finish, before making any changes.
While you might find it useful to make some notes to remind yourself of something you want to edit later on, you should try and focus on listening to the overall pacing and tone of your recording on the first listen.
Does it sound like you hoped? Are there any parts that sound rushed, or too slow? Are any words unclear? Did you mumble? Are there weird silences or strange sounds? There’s no better time to answer these questions than on your first listen.
Once you’ve listened o your voice over all the way through you can go back to the beginning and start editing and reducing audio noise . You might also want to cut out any abnormally long silences between sentences or statements.
But remember, pauses are ok! In fact, they’re necessary to help break up the audio and make it feel more natural and conversational.
6. Import your audio into your video editor
In Camtasia, importing and working with audio only takes a couple of clicks and with Audiate, it’s even easier. You might also want to check out this post on syncing audio and video in Camtasia, but for the most part that’s it! You have just successfully recorded your voice over!
It’s worth remembering that Camtasia can also be used to add music to your video , trim your footage and even crop the frames of your videos .
We’ve already mentioned that a large portion of your audience will probably listen to your video via headphones. But, what if we told you that there’s also a high chance that many people will watch your video with no sound at all?
This is why adding captions and subtitles to your video , as well as providing an audio transcription, are so important. For those who can’t, or otherwise won’t, listen to the audio elements of your video, captions allow them to digest all of the information your video provides.
This is another reason why Audiate is so incredibly helpful.
With most other audio tools, you would have to send your audio out to a professional transcription service to have an audio file transcribed and timestamped. Even if you typed out a full script, it won’t have the necessary time stamps to be used as a captions file.
But with Audiate, the transcription happens automatically, complete with time stamps that can be used as captions.
Once you’ve recorded and edited your voice over, you can export that transcription as a caption file (and SRT file) and import it directly into Camtasia. Then, Camtasia will automatically insert the captions into your video. It’s practically magic!
Recording a voice over like a pro is easy when you know what you’re doing, and you have the right tools at your disposal.
However, taking the proper steps before you hit the record button — and then taking the time to edit your audio appropriately — will go a long way to ensure your voice overs sound professional and engaging.
And remember, practice makes perfect! The more you do it, the more natural it will become.
No! You can do great voice over work with minimal investment. All you need to get started is a microphone and audio recording software.
The short answer is you just have to get used to it. But, there are a few things you can do to improve the overall sound of your voice, including speaking from your diaphragm rather than at the top of your throat. Also, be sure to have some water handy for when you’re recording. It’s important to keep your vocal cords hydrated!
There are many options available for audio recording, but if you only need to record voice overs, TechSmith Audiate is your best bet.
Probably not. While a laptop mic is fine for calling into a Zoom meeting, you’ll want an external microphone for your voice over recording. Fortunately, you can pick up a good microphone for between $50-$100.
No! You can do it yourself with great results. You just need the right tools and a little practice.
Note: This post was updated in July 2023 to include new information.
Additional Resources
How to generate ai voice: enhancing your workflow with ai, the easiest way to shorten a video for social media, how to get good audio recordings from your home office.
Make Presentations that Talk. In Minutes.

Natural human-like Voiceovers
Turn your bland presentation into an engaging one with Murf's realistic, human-like AI voiceovers.

Easy-to-use, intuitive interface
Save time, save effort and save yourself the trouble of recording and editing voiceovers.

Languages, Accents & Styles
Tweak the tonality, accent, pronunciation, emphasis, add music and pauses to your slide with Murf's text-to-speech studio.
Start creating voice overs
Nothing sells better than a perfectly told story. Narrate your slide show using our curated 120+ human-like text-to-speech voices. Adjust pitch, tonality, volume and add emphasis on the right word using our text to speech studio. A script is all you need, Murf will handle the rest.
How to Create a Voiceover for Presentations in 5 simple steps
- 1 Upload your presentation in jpg/jpeg/MP4 format on Murf Studio.
- 2 You can also type in your e-learning script or if you have a pre-written version of any learning content, copy-paste it to Murf's text editor.
- 3 Choose the voice you want to use. Murf comes with male and female voices, both young and old. Align the text with visuals in the studio.
- 4 Use customization features such as emphasis, pause, and pronunciation to add more depth to the learning module.
- 5 Click on ‘Build Audio’ to render and preview the final voiceover.

Reliable and Secure. Your Data, Our Promise.

Add power of narration to your PowerPoint presentation
You don't see silent movies nowadays, do you? Well, there's a reason for that. People pay less or no attention to a silent visual. In fact, the age of Reels and TikTok has proved how any complex information could be catered to the masses through an audiovisual delight. That applies to your slide show presentation as well. To understand better, let us look at some of the common goals of a presentation:
Persuasion : A presentation can be more effective in persuading your target audience if the information is presented with a narration.
Form a connection : Your audience is more likely to believe in your presentation if the narration is done using the right gender of voice, correct tone, and by placing the right emphasis.
Simplify key concepts/data : Some information can be hard to express visually alone. A realistic-sounding voiceover can help in explaining it, thus, making it more interesting for the audience.
An act of professionalism : A presentation clubbed with a natural-sounding voiceover will demonstrate your dedication and efforts, thus, showing how professional you are.
Still not convinced? Let us tell you a fact!
A research by the University of Denmark indicates that the average global attention span is dwindling. Due to the increasing amount of information inflow, the audience has a new challenge in the form of the inability to read and retain text in a presentation or a research paper.
For presenters, this has culminated in a complex situation. Those who want to put across their slideshow meaningfully now need to battle the transient attention of the viewers as well. This can be curbed by supercharging your slide show presentation with a voiceover. We know that adding a narration would go a long way in making things easier for your audience.
Murf can help you help your audience. How?
AI Voice Generator for Presentations
By using Murf's AI voice generator , you can generate the right voiceover presentation in a fraction of the time. You can upload a pre-recorded audio file of your entire presentation and convert it into an AI voice over. Well, that's not all! You also get to save some money along the way.
Unlike in older days, now you don't have to pay a hefty sum of money to hire voiceover artists for your presentation. Nor do you have to wait for days for the final product to emerge. With Murf studio, you can integrate natural-sounding voices with your powerpoint presentation.
Now when you hear the AI Voices, it can be a major turn-off, given its robotic, bland, and devoid of inflections in the narration. We understand that the problem with most other text to speech programs is that they read everything in one flat, robotic tone. Besides, monotonous pitches can leave your audience unaffected and unmoved. Your content deserves a perfectly tailored voice. Murf is like no other TTS, it's 'As Natural As It Can Get.'
120+ Natural-Sounding Voiceovers for Presentations
So, Murf's TTS studio empowers your PowerPoint presentation or audio file of your voiceoever based on the various options on available Depending upon what you're presenting, the data, and how you want it to be portrayed, choose the most suited voice. It also allows users to change the pitch, tone, and accent of the voice.
Just use Murf to make your slide show reach horizons by using any foreign language VO. With many different languages to choose from, you can reach many untapped areas for your pitches, ideas, data, research, etc.
Convert raw, pre-recorded audio to a professional voiceover
One of the best features of Murf is that it can transcribe the audio you upload on its interface. In case you have a raw recording of your voice with background noise, all you need to do is upload the audio on Murf Studio, and it'll transcribe it in text format for you to edit.
You can simply mask the background noise by adding supportive music. Using Murf's simple and intuitive interface, you can sync your audio with your video and make the watching experience flawless.
How to add voiceover to Google Slides presentation?
Now you can write, edit, and playback your voiceover scripts while creating Google Slide presentations using Murf's add-on. It makes you in charge of the slides and voiceover.
1. Search Murf in the Google Slides add-on option.
2. Install the Murf add-on to add audio files to your Google Slides presentation
3. Click on the install button on the Murf icon.
4. Follow the set of instructions that appears to install the Murf plug-in.
5. Once installed, go to Murf within Google Slides. Next, on the add-ons menu, click on 'Murf.'
6. Click on 'Open Murf,' and Murf's studio will appear on the right side of your screen.
7. You can find a consolidated voiceover generating studio within your Google slides, thus, saving the extra process of uploading your slides on Murf.
Apart from this, you can start recording your own voiceover, you can edit the text and sync your script with your slides right on Google Slides. The simplicity and convenience of use cuts down the average turnaround time. So, you can create more informative and engaging slideshows or pitches.
Why Murf Text to Speech Software?
Adjust tuning, and remove the monotonous tone by playing with various features available on Murf's text to voice Studio. Turn those sleepyheads into enthusiastic listeners. Get lots of awesome features to generate a perfectly-crafted voiceover for your Microsoft PowerPoint presentation or a Google Slides presentation.
Speaking rate
Slower speech is best for complex topics, whereas a faster voice is ideal for creating a sense of urgency. Luck for You! Murf lets you slow down your VO or speed it up with just one click!
Pitch personalization
Higher voices are viewed as more cheery and energetic, whereas lower voices convey trust and authority. Murf lets you adjust the pitch for each word to suit your presentation.
You can completely change your voiceover by adding a pause. See for yourself! "Did you change, Dad?" "Did you change Dad?" Murf lets you add all these pauses.
Background music
You need just the right background music to create the right ambiance for your presentation. Murf, your Voiceover superhero, lets you choose from dozens of background music tracks and add them seamlessly "behind" your voiceover.
Imagine if Cersei Lannister's famous dialog "Power is Power" was delivered in a flat monotone. You can't, right? Murf lets you stress specific words to place emphasis where needed.
Loud voices convey confidence, urgency, and anger. In contrast, a softer voice conveys intimacy or warmth. Murf lets you adjust the volume of your voice so your narration is heard clearly and loudly or softly and gently, depending on your slide show.
Application of AI Voiceovers for Presentation
Small businesses.
Don't burn a hole in your pocket because of a passive, silent call-to-action (CTA). Add voice to it and make it active. Also, create cost-effective, realistic-sounding voiceovers for tutorials, promo videos, and explainers.
Break the barrier of language and make your knowledge more accessible using the 20+ languages available on Murf. Simplify the complex data for your audience with storytelling.
Non-profit Organizations
Make your powerpoint presentation of fund pitches more appealing, empowered with data and narration. Increase the reach of reports, data, and solutions with the diverse tools available in Murf, like accents and languages.
Frequently Asked Questions
Murf supports text to speech in.

Important Links
How to create.

- Virtual Reality
- Video-Based Learning
- Screen Capture
- Interactive eLearning
- eLearning Resources
- Events and Announcements
- Adobe Learning Manager
- Adobe Connect
- Recent Blogs
- VR projects
- From your computer
- Personalize background
- Edit video demo
- Interactive videos
- Software simulation
- Device demo
- System audio / narration
- High DPI / Retina capture
- Responsive simulation
- Full motion recording
- Advanced actions
- Conditional actions
- Standard actions
- Execute Javascript
- Shared actions
- Learning interactions
- Drag and Drop interactions
- eLearning Community
- Tutorials/Training
- Deprecated features
- Support questions
- New version
- Reviews/Testimonials
- Sample projects
- Adobe eLearning Conference
- Adobe Learning Summit
- Customer meetings
- Announcements
- Adobe Captivate Specialist Roadshows
- Account settings
- Active fields
- Activity modules
- Adobe Captivate Prime
- Auto enrollment using learning plans
- Automating user import
- LMS Branding
- Certifications
- Classroom trainings
- Content curation
- Content storage
- Course level reports
- Create custom user groups
- Customize email templates
- Default fields
- eLearning ROI
- Employee as learners
- Extended eLearning
- External learners
- Fluidic player
- Gamification and badges
- getAbstract
- Harvard ManageMentor
- Integration with Adobe Connect and other video conferencing tools
- Integration with Salesforce and Workday
- Integration with third-party content
- Integrations
- Internal and external users
- Internal server
- Learner dashboard
- Learner transcripts
- Learning objects
- Learning plan
- Learning programs
- Learning styles
- LinkedIn Learning
- LMS implementation
- Managing user groups
- Multi tenancy
- Multi-scorm-packager
- Overview of auto-generated user groups
- Prime integration
- Self-Paced trainings
- Set up announcements
- Set up external users
- Set up gamification
- Set up internal users
- Single sign-on
- Social learning
- Tincan/xAPI
- Types of course modules
- Virtual classroom trainings
- Accessibility
- Adobe Connect Mobile
- Breakout Rooms
- Case Studies
- Collaboration
- Connectusers.com
- Customer Stories
- Product updates
- Social Learning
- Virtual Classrooms
- Virtual Conferences
- Virtual Meetings
- Unified Communications
- Free Projects
- Learning Hub
- Discussions
Presentations are crucial for effective communication, and this blog offers ten tips to make them more engaging. Suggestions include structuring your presentation like a story, using clear visuals and icons, and incorporating music and audience activities. By following these ideas, you can create memorable presentations that educate, motivate, and deeply resonate with your audience.
Presentations are the heartbeat of communication, pulsating with energy in classrooms, boardrooms, and beyond. But who wants a lackluster presentation that leaves the audience yawning? The great news is that it doesn’t have to be that way! A mesmerizing presentation has the ability to educate, motivate, and deeply resonate with your audience.
This blog is brimming with creative ideas to transform your presentations from forgettable to phenomenal. From storytelling techniques to interactive elements, get ready to turn your next presentation into a captivating experience for any audience.
10 Ideas to Keep Your Audience Engaged During a Presentation
Presentations can be powerful tools, but a dull one can quickly lose the audience. This guide equips you with 10 creative ideas to grab attention and engage any audience!
- Structure your presentation like a story: Structuring presentation like story by crafting a narrative starting with a captivating hook. Take your audience through your topic, and connect your message with real-world stories to make it resonate. This emotional connection helps them remember your key points.
- One Topic per Slide: Focus on clarity and avoid overwhelming your audience with information overload. Dedicate each slide to a single clear and concise point. For truly innovative presentations ideas state clear points to keep your audience engaged and ensure they grasp your message effectively,
- Use contrasting colors: Don’t be afraid to play with color! Incorporate contrasting colors in your creative presentations to make text pop off the screen and highlight key points. This vibrant approach grabs your audience’s attention and keeps them visually engaged. Think bold text against a light background, or vice versa. Avoid dull color palettes and experiment to find combinations that complement your topic and brand.
- Add music to your presentation: Adding music to your presentation can improve audience engagement and maintaining their interest. Carefully select music that complements your content and matches the tone of your message. Use instrumental tracks for professional settings or upbeat music for more informal contexts. Ensure the volume is balanced so it doesn’t overpower your voice, and strategically place music during transitions, intros, and outros for a polished, impactful delivery.
- Use icons for every pointer: Replace the bullet points in your text with simple and easily recognizable icons. Using icons can make your message more visually appealing and easier to understand and remember, as they are visually engaging and instantly recognizable.
- Visualize your data with engaging graphics: Presenting intricate and comprehensive data in visually engaging and easily understandable formats, such as interactive charts, detailed graphs, and compelling infographics, has the potential to significantly enhance the audience’s capacity to comprehend the information and retain it for extended periods.
- Enter a new dimension with 3D graphics: For fun presentation ideas , add another dimension by considering using 3D graphics to add depth and dimension to your presentation, making it even more visually engaging and impactful.
- Engage your audience with activities: Don’t forget to incorporate audience participation. You can engage your audience by using polls, hosting Q&A sessions, or even incorporating hands-on activities suitable for the setting. This will help to keep your audience actively involved and interested in your presentation.
- Bind people using emotions : Craft your presentations to resonate with your audience emotionally by incorporating compelling stories that evoke strong feelings. By establishing an emotional connection, your presentations are more likely to leave a lasting impact and be remembered by your audience.
- Share your slide deck for reference after the presentation: It’s a great idea to offer your audience access to your presentation slides after delivering your presentation. Doing so provides them with a valuable reference tool they can revisit at their convenience. This allows them to reinforce their understanding of the key points and takeaways from your presentation, and it can leave a lasting impression of your professionalism and willingness to help them continue learning.
By incorporating these creative ideas, you can transform your next presentation into a captivating experience that informs, inspires, and truly connects with your audience. Remember, your passion and enthusiasm are contagious, so embrace your creativity, practice your delivery, and get ready to deliver a presentation that will leave a lasting impression!

You must be logged in to post a comment.

Services & Software

Get Microsoft's upgraded Pro OS for a small fraction of the regular price, but only while the sale lasts.

Our Top Picks
From VPNs to playlists for your pup, here’re all the best services and software of 2023.

Latest Stories
We help you decide which services to keep, try or cancel.

Apple's Big AI News at WWDC Includes an OpenAI Partnership, Report Says

How to Watch 'Hit Man,' Starring Glen Powell

France vs. Luxembourg Livestream: How to Watch International Friendly Soccer From Anywhere

T20 Cricket World Cup Livestream: How to Watch India vs. Ireland From Anywhere

Get Starz for $3 a Month Right Now With This New Deal

'Impractical Jokers': How to Watch Every Episode of the Comedy Show From Anywhere

Final Hours to Get Microsoft Office for Windows or Mac for Just $30

Nab a Lifetime Babbel Subscription at 74% Off While This Limited-Time Deal Lasts

iOS 17.5 Is Here, but Don't Miss These iOS 17.2 Features

Give Your iPhone a Security Boost With This iOS 17 Feature
IMAGES
VIDEO
COMMENTS
This video will show you how to create a voice over PowerPoint presentation. This PowerPoint slideshow can be uploaded online and made accessible to the virt...
In the Options dialog box, click the Customize Ribbon tab on the left. Then, in the right-hand box that lists the available ribbon tabs, select the Recording check box. Click OK. To get ready to record, select Record on either the Recording tab or the Slide Show tab of the ribbon.
Open the PowerPoint presentation in which you would like to record a voiceover narration. Head over to the "Slide Show" tab and, in the "Set Up" group, select "Record Slide Show.". Once selected, a drop-down menu will appear. Here, you can choose to start the narration from the beginning or from the current slide.
In this step-by-step tutorial, learn how to add a voice over / narration to a PowerPoint slide presentation. You'll learn three different methods to adding a...
To add audio to your presentation, find the Insert menu at the top of your Google Slides window. Click on it, and you'll see a dropdown menu appear with a list of options. From here, select the third option from the top: Audio. Go to the Insert > Audio menu to find your uploaded MP3 recorded voiceover.
Go to Insert > Audio > Record Audio. Type a name, select Record, then read your script. Select Stop. Entire slideshow: Select View > Normal and choose the first slide. Select Slide Show > Record Slide Show > Record from Current Slide. To review the recording, click the sound indicator (it looks like a speaker) and then select Play to hear your ...
How to record a voiceover for PowerPoint on a PC. 1. Open a new or existing or presentation in PowerPoint. 2. From the top toolbar, select "Insert." 3. Toward the far right side, click "Audio ...
Record your audio narration. Inside the Record Sound dialog box you can narrate your PowerPoint slide. Simply: Type in a Name for your Audio Clip. Select the Record button (the red dot) to begin narrating. Click Stop (the square) to stop your narration. Hit Play (the triangle) to listen to your narration.
Tutorial. Open your PowerPoint presentation or create a new one. In the taskbar, select Slide Show. Then click Record Slide Show. Choose the option Record from Beginning. You'll now get to a different view, which we'll call "Recorder View". Here's an overview: In the bottom right corner, you'll see three icons.
Here's how to do a presentation with voice over using Visme. Record your own audio by clicking on the "Record" option to the top right of the "Add Audio" tab. Once chosen, you will see a red record button appear below your slide. To start recording your own narration within Visme, simply click on the red button and speak into your microphone.
Import your slides. With Camtasia, you can import PowerPoint slides and insert the audio afterward. No more recording your screen while you run through your slides. Just click File > Import > Media or, in the Media tab, click the Import Media button and navigate to select your PowerPoint files.
Step 1: Create your audio files for each slide and upload them to Google Drive. Tip: Organize your files with a naming convention. You'll need to locate these files in the next step. Following a naming convention for your audio files, including Course, Lesson, and Slide numbers, helps keep them organized.
Step #1: Plan and Strategize. For any successful project to be a success, including your new video presentation, you must plan and strategize. You and your team need to know the purpose of the video presentation before you even start putting together content or visuals.
Select the audio file with the narration to insert into the current slide and drag it to place it in the desired location on the slide. After the audio file has been added, you can click to preview the sound. Furthermore, you can customize audio playback options to play the audio automatically or manually, in a loop, and to stop the audio when ...
Click the microphone button below your video preview. Click "Upload voice over" and select your track or click on "Record voice over". Click the red button to record. You'll see a three-second countdown, after which your recording will begin. Click the stop button to end your recording. 4.
Just follow the steps below, and you'll be good to go. Open the PowerPoint presentation where you want to add a voice over. Hit the "Record" button from the upper-hand ribbon. You can also choose from different recording options in the "Record" tab. You can use the text from the presentation as a teleprompter as you record yourself.
Head on to the recording studio. Access the "Present and record" option on the editor's top-right side or click on the three-dot menu to select it among recommended actions. Select "Go to recording studio" and set up your camera and microphone. Start recording with your notes in Presenter's View and have the options to pause and ...
Learn to create an online lecture quickly and easily using Voicethread. This is a beginner's guide. Learn how to add your presentation slides, reorder them...
Here are the steps to record your voiceover in a single take: Step 1: Head to the Slide Show tab in Microsoft PowerPoint and select Record Slide Show. Click this and click 'Start recording from the beginning'. Step 2: Your slideshow will now open in presentation mode and begin recording. You can start talking, and your voiceover will be ...
If you're looking to add a personal touch to your PowerPoint presentations, doing a voice over can make all the difference. Recording a voiceover allows us to provide additional context, explain complex slides, or even add a touch of humor to our presentations. It's a great way to make sure our message is conveyed exactly as we want it to be.
The indicator shows that the audio peaked at just under -6db and is well within the acceptable levels. 4. Record your voice over. Once you're satisfied with your microphone placement and audio levels, you're ready to record your voice over! With Audiate, it's as simple as clicking the record button and speaking.
Don't burn a hole in your pocket because of a passive, silent call-to-action (CTA). Add voice to it and make it active. Also, create cost-effective, realistic-sounding voiceovers for tutorials, promo videos, and explainers. Educators. Break the barrier of language and make your knowledge more accessible using the 20+ languages available on Murf.
To create multimedia presentations, you need the right tools. Below are four tools to help you create engaging multimedia presentations. Software #1: Visme. The first software on the list is Visme. The varied collection of integrations in our editor is just the right combination to create a multimedia presentation that will make an impact.
How to create voice-over narration for your PowerPoint Presentation in Microsoft Office Professional 2010Instructional Technology Training Video Tutorial by:...
Presentations are crucial for effective communication, and this blog offers ten tips to make them more engaging. Suggestions include structuring your presentation like a story, using clear visuals and icons, and incorporating music and audience activities. By following these ideas, you can create memorable presentations that educate, motivate, and deeply resonate with your audience.
All the news and tips you need to get the most out of the services, apps and software you use every day.
Our tools help create your fundraiser. Click the 'Start a GoFundMe' button and answer a few questions to get started. You'll add your fundraiser details and set your goal, but can always adjust these anytime. ... Their GoFundMe has raised over $2,600 to help cover the cost of… Read more. $0 raised of $0 goal ...
To achieve that, create videos sharing the stories of real-life people to whom your audience can relate. Grainger's Melissa Hodai and Bean Porter share how they did with the brand's Everyday Heroes series in their Content Marketing World 2023 presentation. "Human focus is what creates connection for us," Melissa says.