The Couch Manager
Prepare for the future of work. Learn how to manage virtual and hybrid teams more effectively.

How to Read Notes While Presenting PowerPoint Slides
Here’s a quick hack that shows you how to read notes while presenting PowerPoint slides live during a webinar or meeting.
This is a setup I use to present to an audience when I need to rely on speaker notes (without having anyone see my notes).
You’ll need two monitors, an external webcam (one that you can adjust above your notes), Microsoft PowerPoint, and online presentation software that can share one screen at a time (such as Webex).
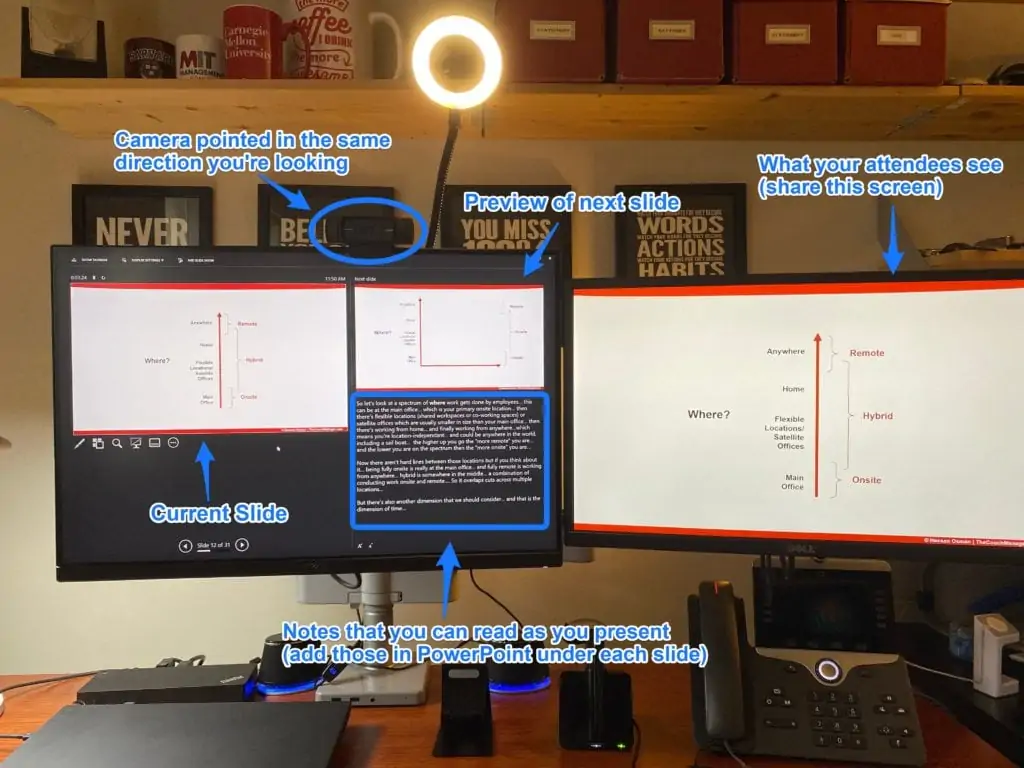
Step-by-step instructions on how to read notes while presenting PowerPoint slides
- Add the notes you want to reference throughout the presentation underneath each slide of your PowerPoint deck ( click here to learn how to add notes if you don’t know how to do that in PowerPoint)
- Start a slide show on one of your two monitors (in the picture above, I used my right monitor to present a full screen version of my slide show)
- Display “presenter view” on the other monitor ( here’s how )
- Share the slide show screen on Webex or any other online collaboration tool ( here’s how in Webex)
- Line up your webcam above the notes in “presenter view.” This helps make sure you are looking in the direction of your audience and not off to the side.
- Read through your notes as you progress through your slides. You can even “vertical scroll” through your notes if you have a lot to material to go through.
How to Read Your Notes While Presenting
Going through your notes line by line can sound very scripted and your audience will be able to see your eyes moving from left to right as you read.
To avoid having people know that you’re just reading off of your screen, try to speak extemporaneously by only adding the main bullet points in your notes. This way, you’ll be able to break eye contact from your notes as you speak naturally to the content. The idea is to use your notes as a backup solution to fall back on and help make sure you cover all the points you need to cover.
Update: If you’d like to present and read notes while directly looking at the camera, you’ll need to use a teleprompter with an app. Here’s a short video I put together that shows you how .

About The Couch Manager
My name is Hassan Osman. I write short books and I teach short courses for busy managers. I also run a free weekly newsletter called AI for Leaders that helps business leaders prepare for the future of work.

- Meta Quest 4
- Google Pixel 9
- Google Pixel 8a
- Apple Vision Pro 2
- Nintendo Switch 2
- Samsung Galaxy Ring
- Yellowstone Season 6
- Recall an Email in Outlook
- Stranger Things Season 5
How to add notes to your Microsoft PowerPoint slides
When you present a slideshow, it’s likely that you have more to say than what displays on the slides. You may want to expand on the text you’ve included, or if the slide only contains visuals, explain them further.
Add speaker notes to a slide in PowerPoint
Hide notes while editing a slideshow, view speaker notes during a slideshow.
Luckily, Microsoft PowerPoint provides a built-in feature for speaker notes. This allows you to add notes to each slide and then see them in Presenter View when you start the show.
What You Need
Microsoft PowerPoint
Open your PowerPoint presentation and select the first slide where you want to add notes.
Step 1: Go to the View tab and choose either Normal or Outline View . This allows you to see your slide along with the note you plan to add.
If you’re wondering how to add a note in PowerPoint without changing the view, the short answer is: You can’t. But if you prefer not to use Normal or Outline View, you can check out the Notes Page view in the same section of the ribbon.
While still technically a “view,” this displays your slide and a text box for your note as a printed page, as shown below.
Step 2: Display the Notes panel below the slide if it’s not visible using one of the following:
- Click the Notes button in the Status Bar at the bottom.
- Move your cursor to the bottom of the window. When you see the two-sided arrow, drag up until the panel displays.
- Best Microsoft Office deals: Get Word, PowerPoint, and Excel for free
- How to convert Google Slides to PDF
- How to buy Microsoft Office: all methods, explained
Step 3: When the panel is empty, you’ll see “Click to Add Notes” within it. Place your cursor in the box and type your note.
Step 4: You can apply simple formatting to your note using the tools on the Home tab or in the floating toolbar. This is handy if you want to add bullet points or emphasize the font with bold, italics, or an underline.
Step 5: If you have a lengthy note within the panel, you’ll see a scrollbar appear on the right so that you can move down and see the entire note. You can also drag up on the panel to enlarge it.
If you want your slide in full view as you're assembling or editing your slideshow, you can hide the presenter notes. This does not delete them; it merely moves the notes panel out of view.
Do one of the following to hide your notes:
- Drag the notes panel downward until it no longer displays.
When it’s time to present your slideshow, you can use Presenter View to see your speaker notes. This allows you to view the notes for each slide on your monitor while presenting the slideshow on another. Your audience will not see your notes.
Step 1: Go to the Slide Show tab. On Windows, check the box for Use Presenter View in the Monitors section of the ribbon. On Mac, click the Presenter View button in the Start Slide Show section.
If you’ve already started the slideshow, you can still turn on Presenter View. Click the Three Dots in the Presenter Toolbar and choose Show Presenter View (Windows) or Use Presenter View (Mac).
Step 2: You’ll then see your notes display on the right side of the screen, with your slide on the left. As you advance each slide, the notes will display accordingly.
Step 3: The text for your note wraps automatically to the next line, and you have a scrollbar to move through those lengthy notes.
To adjust the font size for the notes, use the buttons below the notes panel.
Whether you want to add notes to PowerPoint to talk through your slideshow or simply as references while you assemble your slides, be sure to take advantage of this built-in feature.
For additional ways to work in Microsoft PowerPoint, check out how A.I. can help you create your slideshows .
Editors' Recommendations
- How to keep your Microsoft Teams status active
- How to add audio or video to Google Slides
- How to change your background in Microsoft Teams
- How to embed a YouTube video in PowerPoint
- How to convert a PowerPoint to Google Slides
- How-To Guides

Few communication applications are as versatile as Microsoft Teams. Along with allowing you to send quick messages to teammates or launch a video chat, the software is fully integrated with Office 365 so you can optimize its performance. One of its most useful features, however, is the ability to create a new team. This lets you group people together so they can chat about certain projects or goals without spamming everyone in your organization.
Knowing how to make a new team and how to properly organize teams makes it easy for a company to enhance productivity and streamline communication. When used effectively, Microsoft Teams is useful for both in-office and remote workers, ensuring everyone stays on the same page regardless of location.
PowerPoint makes it easy to give a great presentation thanks to intuitive software that lets anyone craft an eye-catching deck. What's even better, however, is the option to use Presenter View. This lets you leave notes for yourself that can be viewed on your computer screen while everyone else is only seeing your presentation.
Do you have any clue how much power your PC consumes when you’re playing video games? Or how about when it’s just sitting idly? Whether you’re trying to figure out how to cut down on energy costs, or simply want to know how much toil your PC endures when running Abode Creative Suite, you’ll want to learn how to measure your PC’s power draw.
Fortunately, there are several different tools you can use to monitor this important statistic. Some are built right into your operating system, while others will require a separate download. You can also purchase certain external devices to keep tabs on your desktop’s energy output.
How to See Your Notes When Presenting in PowerPoint

As a presenter, delivering a seamless and confident presentation is key to making a lasting impression. However, it can be challenging to remember every detail of your presentation, especially if you have a lot of content to cover. Fortunately, with PowerPoint’s Presenter View, you can easily access your notes and confidently deliver your presentation. In this article, we will cover all aspects of using PowerPoint’s Presenter View to enhance your presentation.
Table of Contents
Why You Need to See Your Notes When Presenting in PowerPoint
Presenting without having your notes at hand can be daunting and can affect the quality of your presentation. Whether you are presenting in front of a small group or a large audience, you will need to have access to your notes. This will help you deliver your presentation confidently, as you will have a clear idea of what to say or do next. In addition, having your notes visible can help you stay focused on the topics you want to cover and avoid straying off-topic.
Another reason why it is important to see your notes when presenting in PowerPoint is that it can help you manage your time effectively. By having your notes visible, you can keep track of the time and ensure that you are covering all the important points within the allocated time frame. This can help you avoid rushing through the presentation or running out of time before you have covered all the key points.
Furthermore, having your notes visible can also help you engage with your audience better. When you are confident and well-prepared, you are more likely to make eye contact with your audience and use body language effectively. This can help you build a connection with your audience and keep them engaged throughout the presentation.
How to Access Presenter View in PowerPoint
Before you can access Presenter View, you need to have a PowerPoint presentation open in Slide Show mode. Once your presentation is open, simply click on the ‘Slide Show’ tab and check the box beside ‘Use Presenter View.’ Your screen will then automatically switch to Presenter View, allowing you to see your notes and other helpful controls.
Presenter View is a great tool for giving presentations, as it allows you to see your notes and upcoming slides while your audience only sees the current slide. You can also use Presenter View to zoom in on specific parts of your slide, draw on your slides, and even use a virtual laser pointer to highlight important information. To exit Presenter View, simply press the ‘Esc’ key on your keyboard.
Understanding the Presenter View in PowerPoint
Presenter View is a powerful tool that enables you to manage your presentation effectively. It comprises several elements, including:
- The slide display area, which shows the slide that your audience sees.
- The notes section, which displays any text that you have added as notes or comments.
- The timer, which can help you stay within your allotted time.
- The navigation controls, which let you move forward and backward in your presentation easily.
- The zoom slider, which enables you to zoom in and out of your slides for added detail.
- The laser pointer and highlighter tools, which allow you to emphasize important points on your slides.
Presenter View also allows you to preview upcoming slides, giving you a chance to prepare for the next section of your presentation. This feature can be especially helpful if you need to refer to specific information on a later slide.
In addition, Presenter View provides a way to keep your audience engaged by allowing you to add annotations to your slides. You can draw attention to specific areas of your slide, highlight key points, or even add additional information that may not be included in the slide itself.
Setting Up Presenter View: Step-by-Step Guide
If you want to customize your Presenter View experience, follow these steps:
- On the ‘Slide Show’ tab, click ‘Set Up Slide Show.’
- Under ‘Multiple Monitors,’ select the ‘Use Presenter View’ checkbox.
- If you’re using a single monitor, select the ‘Display slide show on’ option and choose your primary monitor.
- If you’re using dual monitors, select the ‘Display slide show on’ option and choose the monitor that you want to display Presenter View on.
- Customize the Presenter View by selecting the options that you want to use, such as speaker notes, the timer, and the navigation controls.
- Click ‘OK.’ Your Presenter View should now be set up.
It’s important to note that not all versions of PowerPoint have the Presenter View feature. If you don’t see the ‘Use Presenter View’ checkbox under ‘Multiple Monitors,’ it’s likely that your version of PowerPoint doesn’t support this feature. In this case, you may need to upgrade to a newer version or use a different presentation software that offers Presenter View.
How to Customize Presenter View Settings in PowerPoint
If you have specific preferences for Presenter View, you can customize it by following these steps:
- Click the ‘Settings’ button in the Presenter View toolbar.
- Select the options that you want to use, such as the color scheme, font size, and slide size.
- Click ‘Save Changes’ to apply your changes.
Customizing your Presenter View settings can greatly enhance your presentation experience. For example, you can choose to display your notes on one screen while your audience sees only the slides on the other screen. Additionally, you can select the option to display a timer or a clock to help you keep track of time during your presentation. Experiment with different settings to find what works best for you and your audience.
Using Presenter View on Dual Monitor Setup
If you have a dual-monitor setup, you can use Presenter View to present your slides on one screen while managing your notes and tools on the other screen. To do this, simply select the ‘Use Presenter View’ checkbox under ‘Multiple Monitors’ in the ‘Set Up Slide Show’ dialog box. Once you start presenting, the Presenter View screen will appear on the secondary monitor, while the slides will appear on the primary screen.
Presenter View is a great tool for presenters who want to keep their notes and tools hidden from the audience. With Presenter View, you can see your notes, upcoming slides, and a timer, while your audience only sees the current slide. This feature is especially useful for longer presentations, where you may need to refer to your notes or keep track of time.
Another benefit of using Presenter View is that it allows you to easily navigate through your presentation. You can use the arrow keys on your keyboard to move forward or backward through your slides, or you can use the thumbnails on the Presenter View screen to jump to a specific slide. This makes it easy to adjust your presentation on the fly, without having to interrupt the flow of your presentation.
Troubleshooting Common Issues with Presenter View in PowerPoint
If you experience common issues with Presenter View, such as notes not displaying correctly, audio not working, or distorted visuals, try these troubleshooting tips:
- Make sure that your computer meets the minimum system requirements for using Presenter View.
- Check that the correct audio output is selected in the control panel.
- Review your slides and notes to ensure that there are no formatting errors.
- Try closing other open applications to free up system resources.
- Ensure that your computer is updated with all available updates.
- Try reinstalling or repairing PowerPoint to eliminate any software conflicts.
However, if these troubleshooting tips do not resolve your issues, there may be other factors at play. One possible cause of issues with Presenter View is outdated or incompatible drivers for your computer’s graphics card. Check with your computer manufacturer or graphics card manufacturer to see if there are any updates available.
Another potential issue could be related to your computer’s display settings. Make sure that your display settings are optimized for the resolution and aspect ratio of your presentation. You may also want to try adjusting the scaling settings to see if that improves the display of your slides and notes.
Tips and Tricks for Effective Note-taking During Presentation
To get the most out of Presenter View, try these effective note-taking tips:
- Organize your notes by slide or topic to stay on track during the presentation.
- Use bullet points and keywords to keep your notes concise and easy to read.
- Include cues or action words to remind you of any demonstrations, animations, or other interactive elements in your presentation.
- Use the highlighter tool to draw attention to the most critical points.
Enhancing Your Presentation with Presenter View
Presenter View can enhance your presentation in several ways, such as by allowing you to add visual aids and multimedia elements, manage your time effectively, and engage your audience. By using Presenter View, you can keep your presentation on track, highlight key information, and maintain your audience’s attention throughout.
The Importance of Rehearsing Your Presentation with Presenter View
Practicing your presentation with Presenter View can help you become familiar with the interface, identify any errors or issues, and ensure that your presentation will run seamlessly. Use Presenter View during your presentation rehearsal to simulate the actual presentation environment and get a feel for how it works.
Taking Advantage of the Laser Pointer and Highlighter Tools in Presenter View
The laser pointer and highlighter tools are handy for emphasizing key points on your slides and improving audience engagement. To use them, simply press and hold the ‘Ctrl’ key and click the mouse to activate the laser pointer or highlighter. Release the key to deactivate them.
How to Switch Between Slides and Notes during a Presentation
If you need to switch between slides and notes during your presentation, simply click the ‘Notes’ button in the Presenter View toolbar. This will display your notes and allow you to scroll through them as needed.
Utilizing the Timer and Countdown Features of Presenter View
The timer and countdown features are useful for keeping your presentation on track and ensuring that you do not exceed your allotted time. To use them, simply enable the ‘Timer’ feature in the ‘Settings’ section of Presenter View. You can then set the countdown time and choose whether to display it during the presentation or keep it hidden.
Sharing Your Screen Using Presenter View in Microsoft Teams or Zoom Meetings
If you are using Microsoft Teams or Zoom Meetings to deliver your presentation remotely, you can still use Presenter View by sharing your screen. To do this, simply select the ‘Share Screen’ option and choose the ‘Presenter View’ screen. This will allow you to present your slides while keeping your notes and controls visible to you for an uninterrupted presentation experience.
By following the steps and tips outlined in this article, you can use PowerPoint’s Presenter View to deliver a polished and professional presentation that wows your audience. Always remember to rehearse your presentation before the actual day so that you’re comfortable with the tools and settings for Presenter View, and ready to tackle any issue that might arise.
By humans, for humans - Best rated articles:
Excel report templates: build better reports faster, top 9 power bi dashboard examples, excel waterfall charts: how to create one that doesn't suck, beyond ai - discover our handpicked bi resources.
Explore Zebra BI's expert-selected resources combining technology and insight for practical, in-depth BI strategies.

We’ve been experimenting with AI-generated content, and sometimes it gets carried away. Give us a feedback and help us learn and improve! 🤍
Note: This is an experimental AI-generated article. Your help is welcome. Share your feedback with us and help us improve.

- Accessories
- Entertainment
- PCs & Components
- Wi-Fi & Networks
- Newsletters
- Digital Magazine – Subscribe
- Digital Magazine – Info
- Smart Answers
- Best laptops
- Best antivirus
- Best monitors
- Laptop deals
- Desktop PC deals
When you purchase through links in our articles, we may earn a small commission. This doesn't affect our editorial independence .
Can PowerPoint speak aloud & read the text in my slideshows?

Can PowerPoint speak aloud and read the text in my slideshows? Yes, it can. Using the Speak command, also known as the Text to Speech (TTS) feature, PowerPoint can read the text in your slideshows and in your notes out loud.
Be advised, however, that there is not a pause and continue feature with Speak. This is available only with the Read Aloud command, which is available in Word and Outlook, but not yet in PowerPoint or Excel.
Add the Speak command to the Quick Access Toolbar
1. Click the Customize arrow on the Quick Access Toolbar.
2. From the drop-down menu, select More Commands .
3. On the Word Options screen > Customize the Quick Access Toolbar , locate the Choose Commands From field box and select All Commands .
4. Scroll down to the Speak command, select it, then click the Add button in the middle/center of the screen, and click OK .
5. PowerPoint adds the Speak command to the end of the Quick Access Toolbar, and now you’re ready to listen.

Add the Speak button to Quick Access Toolbar
Click the Speak command button to hear your text
1. Ensure that your system’s speakers or sound devices are turned on.
2. Highlight a section of text inside the applicable slide, or highlight the notes beneath the target slide, and then click the Speak command button.
3. PowerPoint reads the highlighted text or notes on the selected slide.
4. Click the Speak command button once to begin the reading session, then click it again to stop.
NOTE: The Speak command cannot automatically read an entire presentation. You must select the text in each text box on every individual slide you want read. If you require continuous audio in your presentation, use the Insert tab > Audio (from the Media group)> Audio on My PC . Note that you must first record and save the audio file before you can add it to your slideshow.

Highlight the specific text, click the Speak command, then listen
Change Speak preferences in the Control Panel
The Speak preferences are defined in Windows, not in PowerPoint.
1. Click Start > Windows System > Control Panel
2. Select Ease of Access > Speech Recognition > Text to Speech , and the Speech Properties dialog window opens on the Text to Speech tab.
3. Under Voice Selection , choose MS David Desktop for a male voice, or MS Zira Desktop for a female voice.
4. Click the Preview button to listen to each voice, then make your selection.
5. Use the slider under Voice Speed to adjust the speaking pace (slow, normal, or fast) of the reader.
6. Click the Audio Output button to define or set up the Sound preferences.
7. Click the Advanced button to select or change the output device.

Change Speak preferences in Windows Control Panel
Once PowerPoint is doing the talking for you, you’ll be ready to check out the Speak features in Word, Outlook, and Excel.
Home » Features » How to read notes while presenting in PowerPoint
How to read notes while presenting in PowerPoint
- March 10, 2015
- Features , Microsoft 365
This feature has been there for over 18 years. But only with 2013 version did it become easy enough for everyone to use it. You will need it someday – read this and be prepared.
The Need: Presenter View
Often, we have a complex presentation to deliver and many objectives to achieve. Writing down everything on the slides is a bad idea. Nobody reads crowded slides. Besides there are things you can NEVER put down on the slides – like answers to tricky questions. Some things you wanted to mention at some point of time – if the need arises. Often we have confidential information like competitor details, pricing details, discount limits, shortcomings of our products, your cheat sheet, your checklist of things to cover …
Basically we are talking about anything which cannot go on the slide itself but you need to refer to it WHILE you are presenting.
Yes paper is the best option. But if we want to store things RELATED to specific slides, paper becomes cumbersome. That is why PowerPoint provides notes.
But notes cannot be read during a regular presentation. You are WRONG!
To view notes WHILE you are presenting – you must use the Presenter View option.
Practice first – never try on stage for the first time
This feature may sound so simple that you may become over-confident and try it in a live presentation. DON’T. You will fail. Practice it first – WITH A PROJECTOR attached.
How to view slides while hiding them from audience
Here the assumption is that the projector (or plasma screen or video conferencing output) is attached to your laptop / tablet.
Just before starting the presentation, go to Slide Show tab and choose the option: Use Presenter View.
NOTHING happens. Why? Because this option means Use presenter view when you start presenting.
So start presenting. And then you will see something different.
Laptop and Projector show DIFFERENT things
Presenter View is just a window showing you many things including slide notes. That window is shown on your laptop. But the audience can see only the final presentation. They cannot see the notes.
Best of both worlds. Simple and Effective.
Using the Presenter View
It shows you current slide, next slide, notes and some more buttons. It also starts a timer automatically.
Now you control the presentation from here and the end result is seen by the audience.
Using notes
As you can see here, the notes are not fitting. There is a scroll bar.
Other option is to reduce the font size. But beyond a point, smaller font size will not be visible.
Remember: Notes are NOT a substitute to lack of knowledge!
If you do not know the topic – do not present.
These notes are just for quick reminders of things to cover, points which you often miss, related topics and so on. Ideally notes should be a few words or phrases. Not paragraphs.
Presenter View is just a window
Double click on the title bar of this window to resize it. What does it mean? Not only can you see the presenter view on your laptop, you have your ENTIRE laptop with all its software loaded available to you. Whatever you do here will NOT be visible by the audience.
That is NOT all. In fact that is a minor benefit.
The REAL benefit is that you have all applications available on your laptop at your disposal. So you may want to check the price list, read some FAQ document on your web site, check something with your colleague or boss on chat, look at the LinkedIn page of some senior person in the audience – whatever you want you can do.
Of course you have to maintain eye contact with the audience and not get totally distracted. THAT IS WHY I am asking you to practice this view. Once you practice it, it is like carrying two laptops – one for presentation and one for everything else!
What if I forget to activate presenter view
No problem. Right click anytime during the presentation and choose Show Presenter View . The switch between laptop to projector screen will happen even if you started in the CLONE (duplicate the screens) mode.
Panic! Presenter view got reversed
Yes – sometimes you see the presentation and the audience can see the Presenter View – complete with your cheat sheet displayed in full glory… ha ha.
Learn from this: No notes on first few slides!
But if it does reverse DO NOT PANIC. Move the mouse BEYOND your laptop screen – usually on the right edge – only then it will appear on the projector screen.
Now – while looking at the projector screen – choose the menu option Display Settings on the presenter view – and select Swap Presenter View .
What did I learn
If you have only one monitor – how do you try presenter view? No problem – it is WRITTEN in the tooltip of the Presenter View checkbox.
Hats off to Microsoft Office Team!
Did you like presenter view post your experience here..
If you like this feature, share it with your team and loved ones. Gift them some knowledge!
- PowerPoint , Presentations
Queries | Comments | Suggestions | Wish list Cancel reply
Subscribe to blog.
Email Address
Popular articles
- How to customize annoying Teams Notifications
- Conduct meetings with two monitors
- Teams Live Events Dos and Don’ts
- Conducting Online Conferences using Teams
- Training Vs Adoption
- Who can see my OneDrive files
- Reduce eyestrain using Dark Mode
1100+ in-depth blog articles
Pivot table pro course.
Yes. You use Pivot Tables everyday. Now it is time to find out the real power and nuances. 5.5 hours video, exercises, samples, Q&A.

Excel to Power BI Course
Learn Power BI using the concepts you already know in Excel. Fast transition, in-depth coverage and immediately usable.

How to Use PowerPoint Speak to Read Text Aloud
Microsoft PowerPoint has a built-in text-to-speech feature called Speak, which lets you read text out loud. Here's how to use it.
With PowerPoint presentations, it's usually you, or an audio or video clip, doing all the talking. But what if you want to give your voice a much-needed break without interrupting the presentation?
Microsoft PowerPoint has a built-in but hidden Speak feature that allows it to read out the text of your presentation slides, similar to the Read Aloud feature in its cousins—Word and Outlook.
In this article, you'll learn how to set up and use the Speak feature in Microsoft PowerPoint to read out your slides and power up your presentations, plus how to manage it.
How to Enable Speak in Microsoft PowerPoint
The Speak feature has been available in PowerPoint since PowerPoint 2010, but not many are aware of this because it's neither on the Ribbon area nor on the Quick Access Toolbar by default.
With a little tweaking, however, you can enable Speak on the Ribbon and QAT, and get PowerPoint talking just like your Google Assistant . Here's how:
- Open the PowerPoint desktop application.
- Drag the scroll bar, scroll all the way down and click on Speak . The commands are arranged alphabetically, so you can jump to “S.”
- Speak will be enabled for all documents in PowerPoint by default.
- Return to your Quick Access Toolbar , and you should see the Speak button, but it may be inactive.
Related: How to Read Text Out Loud on Android: Methods You Can Use
How to Use Speak to Read Microsoft PowerPoint Documents Aloud
Once Speak is added to your Quick Access Toolbar or Ribbon, you can start listening to your PowerPoint presentations. Here's how:
- Launch the PowerPoint desktop application and open any existing document.
- Click on Speak and it will start speaking or reading out the selected text.
You'll notice that unlike the Read Aloud feature, Speak functions basically as a play/stop button on the Quick Access Toolbar. It can also be playing in the background while you do other tasks.
Related: Everything You Need to Know About TikTok's Text-to-Speech Feature
How to Manage Speak in Microsoft PowerPoint
If you want to manage how Speak works, you'll have to go through the Windows menu. Here's how:
- Press the Windows key on your PC and click on Control Panel .
- Click on the Voice selection dropdown to select a different voice. Your options will depend on your version of Windows.
- Voice Speed is set to Normal by default. You can adjust this by dragging the slider left or right between “Slow” and “Fast.”
- Click OK when done.
Related: How to Set Up and Manage the Read Aloud Feature in Microsoft Word
Power Up Your PowerPoint Presentations With Speak
Whether you're feeling tired and exhausted or you have a speech impairment, you can power up your PowerPoint presentations with Speak and let it do the talking on your behalf. It's also available in Word, Outlook, and OneNote.
Speak is clearly not as robust or as accessible as Read Aloud, perhaps due to the fact that PowerPoint already has several other built-in audio/visual tools. However, it is good enough to do the basic tasks of helping you make an audio presentation or read another's presentation aloud.

Oct 15, 2019
Making your PowerPoint slides work with a Screen Reader
- Add our blog to your RSS feed reader" href="/rss/blog.xml" data-bi-name="RSS Subscription" data-bi-id="rss_feed" data-bi-bhvr="120" data-bi-socchn="RSSSubscription" title="Microsoft 365 Insider Blog RSS" target="blank" class="d-inline-block">
Hi, I’m Peter Wu, a Principal Software Engineer in the PowerPoint team, and I want to share some news about investments we are making to enable you to make your presentations more accessible and reach more people.
Most people with low or no vision use a screen reader to use and work with their computers and mobile devices. Since they cannot see the slides in the presentation, they rely on the screen reader to “speak” the slide contents. As a presenter, you can make a few tweaks to your presentation that will ensure that your content works well with a screen reader.
Setting a reading order
You should make sure that the objects on the slide are read in a logical order. Otherwise, the audience members using a screen reader may not understand your message, or worse they may be getting an entirely different message than the one you intended.
Suppose you have arranged several objects on the slide in a way that is easy for people that can see the slide to read and understand. The order that people read the objects in is usually based on their positions on the slide. People tend to read the objects in the same order that they read text in their language. For example, English text usually flows from left-to-right and then from top-to-bottom, so people expect objects on the slide to follow that order.
But, when using a screen reader, the objects may be read in an entirely different order and there is no way to tell what order the objects will be read in just by looking at the slide.
Introducing the Reading Order pane! It lets you, the author of the presentation, know what order the objects will be read in and enables you to make any adjustments you deem necessary.
To open the Reading Order pane:
- Click Review > Check Accessibility .
- In the Accessibility Checker, click the arrow to the left of the Check reading order category under Warnings , and then click an item.
- Click the down arrow to the right of the selected item and click Verify object order . The objects are listed in the order that the screen reader will read. To make any adjustments, drag-and-drop or use Ctrl+Up Arrow and Ctrl+Down Arrow.
In addition to customizing the slide ordering, you can use the Reading Order pane to group objects into logical units, add alt text to objects, review automatically generated alt text, and remove objects from the reading order. See Make slides easier to read by using the Reading Order pane to learn more.
Adding Slide Titles
You’ll also need to make sure every slide has a unique and meaningful title. When navigating through the slides in the presentation, the screen reader announces the number and title of each slide. If the slides have no titles or identical titles, it is hard for the screen reader user to tell where they are.
If your slide already has a Title placeholder, all you need to do is add one by clicking the arrow to the left of the Missing slide title category under Errors , select an item, click the arrow to the right, and then click Edit Slide Title .

But what if your slide does not have a Title placeholder? Click the arrow to the left of the Missing slide title category under Errors, select an item, click the arrow to the right, and then click Add Slide Title . You’re taken to the “offending” slide where you can add a descriptive title.
Even if you don’t want to have a title visible on the slide, you should still add one to make the slide accessible. To do so, click Add Hidden Slide Title in the drop-down list displayed when clicking the arrow to the right of the selected slide flagged as missing a title. You can see the title while you are editing the slide in PowerPoint and screen readers read the title, but your audience cannot see the title when you present.
Accessibility Checker may also flag a slide as missing a title, even though it appears to have one when you look at it. The cause is usually that a regular text box was used rather than a Title placeholder. If you switch to Outline View, you can see the title in bold next to each slide icon. If there is no text next to the slide icon, there is no title. But, you can easily turn the text box into the title by selecting it and then clicking Set as Slide Title in the drop-down list displayed when clicking the arrow to the right of the selected slide flagged as missing a title. To confirm that the title has been set, just check the slide icon in the Outline Pane and make sure that it appears in bold.
For more information about how you can use these commands and other techniques to add slide titles, see Title a slide .
Empowerment and inclusion
By taking these simple steps, you will make your presentations more accessible to everyone. People who rely on a screen reader will be able understand your message and contribute to the discussion.
Availability
The Reading Order pane is available in PowerPoint for Windows to users running Insider version 1910 or later.
The commands for adding Slide Titles are available in PowerPoint for Windows to users running version 1907 or later.
We typically release features over some time to ensure that things are working smoothly. This is true for Insiders as well. We highlight features that you may not have because they’re slowly releasing to larger numbers of Insiders. Sometimes we remove elements to further improve them based on your feedback. Though this is rare, we also reserve the option to pull a feature entirely out of the product, even if you, as Insiders, have had the opportunity to try them.
If you have any feedback or suggestions, you can submit them using the Help Improve Office (🙂) button in the top right corner, or use the Help > Feedback menu.
Learn what other information you should include in your feedback to ensure it’s actionable and reaches the right people. We’re excited to hear from you!
Sign up for the Office Insider newsletter and get the latest information about Insider features in your inbox once a month!
Sorry, JavaScript must be enabled to use this app.

Contribute to the Microsoft 365 and Office forum! Click here to learn more 💡
April 9, 2024
Contribute to the Microsoft 365 and Office forum!
Click here to learn more 💡
PowerPoint Forum Top Contributors: Steve Rindsberg - John Korchok - Bob Jones AKA: CyberTaz ✅
May 10, 2024
PowerPoint Forum Top Contributors:
Steve Rindsberg - John Korchok - Bob Jones AKA: CyberTaz ✅
- Search the community and support articles
- Microsoft 365 and Office
- Search Community member
Ask a new question
How to see my notes while recording narrations in PowerPoint
Report abuse.
Reported content has been submitted
Replies (13)
* Please try a lower page number.
* Please enter only numbers.
Let me help you to see the Narration while recording.
Refer to the sections Record a narration before or during a slide show and Preview a narration in the following link and check if it helps:
http://office.microsoft.com/en-us/powerpoint-help/record-and-add-narration-and-timings-to-a-slide-show-HA102749693.aspx
Let us know if the steps mentioned in the link were helpful to you.
Thank you.
2 people found this reply helpful
Was this reply helpful? Yes No
Sorry this didn't help.
Great! Thanks for your feedback.
How satisfied are you with this reply?
Thanks for your feedback, it helps us improve the site.
Thanks for your feedback.
Thanks for your reply.
I can see narrations recording on the screen but I still can't see my notes that are my narrations. Do I have to memorize them all?
The step 3 in the "Record comments on a slide" article said that I can see "record" but there is no "record" in the dialog. And can't record comments either on a slide.
By the way, I have Surface Pro with windows8.1 installed Office 365 home premium.
Thanks for your help.
4 people found this reply helpful
Hi, everybody out there, who are wondering why we can't see the notes while recording. No we can't. Because it does not have the function for it. That's why Microsoft Support Team wasn't reply to my question here, I guess or because I haven't paid enough for the software.
I think that PowerPoint doesn't have this functions yet. I maybe wrong but I couldn't get any reply from Microsoft Support Team but I figured out how to see the notes for my narrations during recording. There is a way to see them I found. I had to use the dual monitor configuration and run the slideshow. That case I can see the presenter screen on my PC and the slideshow on the another monitor. Again, this is not for building the presentation. It's only for the record of the voice for the slideshow we are running.
I think that it's for our boss to see if we did right while we were doing the presentation correct on the end of the day. If we have done OK for our work, we can use it again with the recorded one on the next show.
So, we have to look for an alternate and a better one if we like to have this function, I guess. Or add on, such as an articulate.com. I probably haven't paid enough for Microsoft but I've paid whatever they required, but yes, they said it's without any support. And they said to me if you wanted any support, you should pay more. I just couldn't afford to pay more than $300.00 to find out "Sorry, you can't!"
I was looking for the solution including "Sorry, you can't" or "There is a way but you have to pay for it."
I just wanted to find out if I could do it or not.
THAT'S THE ANSWER FOR THIS QUESTION. THANKS. PLEASE REPLY IF I'M WRONG.
67 people found this reply helpful
I'm still having very hard time to record voices on the slides and playback. I figured out this MS Powerpoint doesn't have a function to record voices while building a presentation although we can record our voice while presenting but it's not easy and controllable.
When I go on the menu on top,
SLIDE SHOW
Record Slide Show (Both Checked)
MY Slide Show is launched and the presenter slide show with note displays on my Surface Pro and the presentation displays on the another monitor since I have dual monitor configuration. I also see recording diagram with elapsed time on the presenting monitor.
Then, I pressed Enter key to move the next slide, the recording diagram will disappear. It works on the another monitor and on my Surface Pro screen but either slide sample on the left nor notes on the presenter screen. When I hit enter key again, the new slide will insert on the presenter PC.
In this same operation it works sometimes as I expected. That is moving the next slide and notes as well by pressing enter key.
Rehearse Timing in the menu does the same.
And no selection available if I have custom slide shows. The recording slide show will be only the first one in the custom slide show list.No chance to pick up other ones.
Am I missing something to do?
Thanks for your help.
36 people found this reply helpful
- Article Author |
- Volunteer Moderator
If you don't need the sound to be continuous from one slide to the next, you could record your narration in a sound editor like Audacity (free), which'll give you FAR better control over the sound quality and allow you to edit out any oopsies. Save each slide's sound to a file as you finish recording it, then insert it on the slide (Insert | Audio).
Or you can Insert | Audio | Record Audio to record and insert the audio using PPT's default settings.
You can then either have the audio start when clicked (the default) or you can select it, then Animations | add a PLAY animation, change timing to Start: With Previous to have the sound play automatically.
You can do all of this in normal view, where you can see your slide notes.
Or you could print your notes. To dead trees, or save them as PDF and open the PDF and PPT (in windowed view) and record your narration.
10 people found this reply helpful
That link is similar to the answer found in the PowerPoint ? icon. However, it does not show you how to set a mode in which you can see your notes and record your voice at the same time. This is frustrating.
My solution: Copy & paste my notes into Note Pad and start my narration for each slide. I think that the notes in PowerPoint were developed to be viewed only for live presentations--not voice recordings.
It would be a wonderful upgrade if we could record narration and see our notes at the same time. ;-)
15 people found this reply helpful
- Volunteer Moderator |
- Article Author
1 person found this reply helpful
I agree with you, that this would be a great feature.
And I agree with John; his suggestion is the best way of getting your request in front of the developers who add features to PPT.
Meanwhile, here's a bit of VBA that'll automatically export your notes text to a file and open the file. Saves all that wrist-wearying select/copy/paste stuff.
Export the notes text of a presentation
I could not find the VBA for exporting notes to another file. That would have been helpful.
I fail to see why MS has not corrected the problem of why one feature (recording) turns off another related feature (presenter mode). It would seem that Steve as an authorized moderator could count how many people over what period of time want this corrected rather than direct us to have to log it into a list of requested enhancements.
And, BTW, this thread was about the 10th item list from the Google search on "cannot see speaker notes when recording in powerpoint" --so some would have gotten fed up by the 5th on the list.
12 people found this reply helpful
Question Info
- Norsk Bokmål
- Ελληνικά
- Русский
- עברית
- العربية
- ไทย
- 한국어
- 中文(简体)
- 中文(繁體)
- 日本語
Knowt AI PowerPoint Summarizer
Upload any PPT & Kai will make notes & flashcards instantly. In < 30 seconds Kai will study your slides and tell you all the important stuff in it.
Drag & drop a PowerPoint or Google Slides file to upload
Tap to upload a PowerPoint or Google Slides file
select files
Or upload from Google Drive
1,300,000 +
students & teachers
1,100,000 +
notes created
4,000,000 +
flashcards created
Learn your powerpoints faster with our AI-powered PPT Summarizing Tool
The ppt summarizer built to help you learn..
It’s as simple as sending a text to Kai, and he’ll explain anything in your PPT to you like a tutor would.
Take practice tests generated from your PPT
Kai will read through your PPT and create a test that highlights the key concepts.
Upload a PPT now
Upload video
Upload PPTs from any site in seconds
Use our Chrome extension to upload a PPT from any webpage to Knowt in seconds.
Download the chrome extension
Do more in less time with the Knowt PPT Summarizer
We're all about helping you learn better, but quicker.
Instant PPT Summaries
Kai will read through your PPT, find the key details, and make you a summary of the important stuff.
AI PPT Summarizer
Flashcards ready for you
Kai will read through your PPT, find the key details, and make flashcards for you to practice.
Upload a PPT
Mark up your PPT with annotations and comments
Our PDF editor lets you write directly on your uploaded files.

I loved knowt for vocab flashcards! Especially to import from quizlet with a link literally chefs kisss.

I used knowt to study for my apush midterm and it saved my butt! The import from quizlet feature helped a ton too. Slayed that test with an A!! 😻😻😻
Trusted by millions across the globe
Our community of students and teachers trust Knowt to create and study on.
Knowt helped me tremendously with my AP exams, World History and Chem in particular. Taking notes and immediately having a study guide created was such a life saver when I was on a time crunch. I did way better than I expected thanks to Knowt!!

Knowt’s quiz and spaced repetition features have been a lifesaver. I’m going to Columbia now and studying with Knowt helped me get there!

This app really came in clutch when AP exams were around the corner. Especially with the spaced repetition method, it helped me remember the important concepts. :)

Knowt has been a lifesaver! The learn features in flashcards let me find time and make studying a little more digestible.

Absolutely excellent. Easy to use, much more visually pleasant than Cram and no rudimentary features are behind a paywall. It’s simply excellent.

I used Knowt to study for my APUSH midterm and it saved my butt! The import from Quizlet feature helped a ton too. Slayed that test with an A!! 😻😻😻

I loved the AI for flashcard writing, it saves so much time! The unique spaced repetition can really come in clutch for last minute studying and helps you remember everything!

I love Knowt so much! The platform is a dream and seeing all of the new features each update makes me so happy! Thank you, Knowt, for being so amazing :)

Knowt has been an absolute life-saver for me - no other revision methods worked for me. It’s also incredible considering Knowt is free! The variety of tools available is perfect for any learning or revision type. Thanks, Knowt!
Endless ways to use Knowt
Not a PowerPoint person? No problem -- you can do so much more.
Make flashcards from PDFs
Kai will read your PDF, find the key details for you and make notes and flashcards for you to practice
AI PDF Summarizer

Video Summarizer
Kai will watch your lecture videos, turn them into notes and flashcards instantly.
AI Video Summarizer
AI Flashcards
You can make flashcards and study them for free with learn mode, spaced repetition, and more.
Make flashcards from notes
You can take notes and Kai will make flashcards from them instantly.
Oh you’re an explorer?
We have over 2 million resources across various exams, and subjects to refer to at any point.
Browse by exam
Knowt AP Hub
AP Study Guides
Knowt IB Hub
IB Study Guides
Knowt GCSE Hub
GCSE Study Guides
Explore top flashcards
Explore top notes, explore subjects, engineering, social studies.
How-To Geek
6 ways to create more interactive powerpoint presentations.
Engage your audience with cool, actionable features.
Quick Links
- Add a QR code
- Embed Microsoft Forms (Education or Business Only)
- Embed a Live Web Page
- Add Links and Menus
- Add Clickable Images to Give More Info
- Add a Countdown Timer
We've all been to a presentation where the speaker bores you to death with a mundane PowerPoint presentation. Actually, the speaker could have kept you much more engaged by adding some interactive features to their slideshow. Let's look into some of these options.
1. Add a QR code
Adding a QR code can be particularly useful if you want to direct your audience to an online form, website, or video.
Some websites have in-built ways to create a QR code. For example, on Microsoft Forms , when you click "Collect Responses," you'll see the QR code option via the icon highlighted in the screenshot below. You can either right-click the QR code to copy and paste it into your presentation, or click "Download" to add it to your device gallery to insert the QR code as a picture.
In fact, you can easily add a QR code to take your viewer to any website. On Microsoft Edge, right-click anywhere on a web page where there isn't already a link, and left-click "Create QR Code For This Page."
You can also create QR codes in other browsers, such as Chrome.
You can then copy or download the QR code to use wherever you like in your presentation.
2. Embed Microsoft Forms (Education or Business Only)
If you plan to send your PPT presentation to others—for example, if you're a trainer sending step-by-step instruction presentation, a teacher sending an independent learning task to your students, or a campaigner for your local councilor sending a persuasive PPT to constituents—you might want to embed a quiz, questionnaire, pole, or feedback survey in your presentation.
In PowerPoint, open the "Insert" tab on the ribbon, and in the Forms group, click "Forms". If you cannot see this option, you can add new buttons to the ribbon .
As at April 2024, this feature is only available for those using their work or school account. We're using a Microsoft 365 Personal account in the screenshot below, which is why the Forms icon is grayed out.
Then, a sidebar will appear on the right-hand side of your screen, where you can either choose a form you have already created or opt to craft a new form.
Now, you can share your PPT presentation with others , who can click the fields and submit their responses when they view the presentation.
3. Embed a Live Web Page
You could always screenshot a web page and paste that into your PPT, but that's not a very interactive addition to your presentation. Instead, you can embed a live web page into your PPT so that people with access to your presentation can interact actively with its contents.
To do this, we will need to add an add-in to our PPT account .
Add-ins are not always reliable or secure. Before installing an add-in to your Microsoft account, check that the author is a reputable company, and type the add-in's name into a search engine to read reviews and other users' experiences.
To embed a web page, add the Web Viewer add-in ( this is an add-in created by Microsoft ).
Go to the relevant slide and open the Web Viewer add-in. Then, copy and paste the secure URL into the field box, and remove https:// from the start of the address. In our example, we will add a selector wheel to our slide. Click "Preview" to see a sample of the web page's appearance in your presentation.
This is how ours will look.
When you or someone with access to your presentation views the slideshow, this web page will be live and interactive.
4. Add Links and Menus
As well as moving from one slide to the next through a keyboard action or mouse click, you can create links within your presentation to direct the audience to specific locations.
To create a link, right-click the outline of the clickable object, and click "Link."
In the Insert Hyperlink dialog box, click "Place In This Document," choose the landing destination, and click "OK."
What's more, to make it clear that an object is clickable, you can use action buttons. Open the "Insert" tab on the ribbon, click "Shape," and then choose an appropriate action button. Usefully, PPT will automatically prompt you to add a link to these shapes.
You might also want a menu that displays on every slide. Once you have created the menu, add the links using the method outlined above. Then, select all the items, press Ctrl+C (copy), and then use Ctrl+V to paste them in your other slides.
5. Add Clickable Images to Give More Info
Through PowerPoint's animations, you can give your viewer the power to choose what they see and when they see it. This works nicely whether you're planning to send your presentation to others to run through independently or whether you're presenting in front of a group and want your audience to decide which action they want to take.
Start by creating the objects that will be clickable (trigger) and the items that will appear (pop-up).
Then, select all the pop-ups together. When you click "Animations" on the ribbon and choose an appropriate animation for the effect you want to achieve, this will be applied to all objects you have selected.
The next step is to rename the triggers in your presentation. To do this, open the "Home" tab, and in the Editing group, click "Select", and then "Selection Pane."
With the Selection Pane open, select each trigger on your slide individually, and rename them in the Selection Pane, so that they can be easily linked to in the next step.
Finally, go back to the first pop-up. Open the "Animations" tab, and in the Advanced Animation group, click the "Trigger" drop-down arrow. Then, you can set the item to appear when a trigger is clicked in your presentation.
If you want your item to disappear when the trigger is clicked again, select the pop-up, click "Add Animation" in the Advanced Animation group, choose an Exit animation, and follow the same step to link that animation to the trigger button.
6. Add a Countdown Timer
A great way to get your audience to engage with your PPT presentation is to keep them on edge by adding a countdown timer. Whether you're leading a presentation and want to let your audience stop to discuss a topic, or running an online quiz with time-limit questions, having a countdown timer means your audience will keep their eye on your slide throughout.
To do this, you need to animate text boxes or shapes containing your countdown numbers. Choose and format a shape and type the highest number that your countdown clock will need. In our case, we're creating a 10-second timer.
Now, with your shape selected, open the "Animations" tab on the ribbon and click the animation drop-down arrow. Then, in the Exit menu, click "Disappear."
Open the Animation Pane, and click the drop-down arrow next to the animation you've just added. From there, choose "Timing."
Make sure "On Click" is selected in the Start menu, and change the Delay option to "1 second," before clicking "OK."
Then, with this shape still selected, press Ctrl+C (copy), and then Ctrl+V (paste). In the second box, type 9 . With the Animation Pane still open and this second shape selected, click the drop-down arrow and choose "Timing" again. Change the Start option to "After Previous," and make sure the Delay option is 1 second. Then, click "OK."
We can now use this second shape as our template, as when we copy and paste it again, the animations will also duplicate. With this second shape selected, press Ctrl+C and Ctrl+V, type 8 into the box, and continue to do the same until you get to 0 .
Next, remove the animations from the "0" box, as you don't want this to disappear. To do this, click the shape, and in the Animation Pane drop-down, click "Remove."
You now need to layer them in order. Right-click the box containing number 1, and click "Bring To Front." You will now see that box on the top. Do the same with the other numbers in ascending order.
Finally, you need to align the objects together. Click anywhere on your slide and press Ctrl+A. Then, in the Home tab on the ribbon, click "Arrange." First click "Align Center," and then bring the menu up again, so that you can click "Align Middle."
Press Ctrl+A again to select your timer, and you can then move your timer or copy and paste it elsewhere.
Press F5 to see the presentation in action, and when you get to the slide containing the timer, click anywhere on the slide to see your countdown timer in action!
Now that your PPT presentation is more interactive, make sure you've avoided these eight common presentational mistakes before you present your slides.
Waning Fed rate cut bets boost US Treasury yield forecasts: Reuters poll
- Medium Text

Sign up here.
Reporting by Sarupya Ganguly; Polling by Pranoy Krishna, Rahul Trivedi and Vijayalakshmi Srinivasan; Editing by Ross Finley, Alexandra Hudson
Our Standards: The Thomson Reuters Trust Principles. New Tab , opens new tab

Markets Chevron

Take Five: The good, the bad and the ugly
Markets are hoping for evidence that will solidify a brightening global economic outlook, though rising trade tensions are casting a cloud, while G7 finance ministers gather in Italy.

Global equity funds experienced strong demand for the third consecutive week, in the seven days to May 15, bolstered by a softer U.S. jobs report and lower-than-expected inflation figures, which increased expectations that the Federal Reserve may begin cutting rates this year.

To revisit this article, visit My Profile, then View saved stories .
- Backchannel
- Newsletters
- WIRED Insider
- WIRED Consulting
Will Knight
OpenAI’s GPT-4o Model Gives ChatGPT a Snappy, Flirty Upgrade

Since it launched in late 2022, OpenAI’s ChatGPT has generally fended off suggestions that it has emotions or desires by responding that it’s just an artificial intelligence model. Upgrades announced by OpenAI Monday showed the company apparently trying to make the chatbot act more like a human.
In demos, the new version of ChatGPT was capable of rapid-fire, natural voice conversations, picked up on emotional cues, and displayed simulated emotional reactions of its own.
During a livestream from the company’s headquarters in San Francisco on Monday, Mira Murati, OpenAI’s chief technology officer, announced that ChatGPT will be powered by a new, more powerful AI model called GPT-4o. The model will be available to both free and paid users of ChatGPT via a new desktop app as well as the existing mobile app and web version.
Murati said the GPT-4o model allows ChatGPT to respond more rapidly to voice, image, and video input than OpenAI’s previous technology. In demos, she and other OpenAI employees had fast-flowing conversations with ChatGPT, which answered using a liveley and expressive female-sounding voice and nimbly kept up when interrupted.
ChatGPT adopted different emotional tones during the conversation and at times responded as if it were experiencing feelings of its own. When an OpenAI employee said he had been talking about how “useful and amazing” the chatbot is, it responded flirtatiously, gushing “Oh stop it, you’re making me blush.”
“This just feels so magical, and that’s wonderful,” Murati said, adding, “over the next few weeks we’ll be rolling out these capabilities to everyone.”
At another point in the demo, ChatGPT responded to OpenAI researcher Barret Zoph’s greeting by asking, “How can I brighten your day today?” When Zoph asked the chatbot to look at a selfie of him and say what emotions he was showing, ChatGPT responded, “I’ll put my emotional detective hat on” and warmly said, “It looks like you’re feeling pretty happy and cheerful … whatever’s going on, it looks like you’re in a great mood.”
In a blog post Monday, OpenAI’s CEO, Sam Altman, highlighted the significance of the new interface. “It feels like AI from the movies; and it’s still a bit surprising to me that it’s real,” Altman wrote. “Getting to human-level response times and expressiveness turns out to be a big change.”
OpenAI’s tweaks may make ChatGPT more engaging and popular, but they may also change the way users think about the program.
ChatGPT became a sensation last year thanks to its remarkable ability to answer questions and generate text with what often resembles humanlike understanding. But OpenAI and leading competitors such as Google have so far generally sought to limit the anthropomorphism of their chatbots, by refusing to answer certain types of questions and having models remind users that they are mere computer programs.

Eric Ravenscraft

WIRED Readers

Despite that caution, the sometimes lifelike repartee of the latest chatbots can tap into users’ emotions. Some companies have adapted the technology to maximize this phenomenon, offering AI companions that role-play different human emotions or are offered as AI girlfriends and boyfriends . Some AI researchers have warned that the long-term implications of deploying programs that mimic and respond to emotions could be unwelcome.

A team at Google DeepMind last month released a research paper exploring the ethical risks that may arise as AI assistants become more capable. Among other things, the researchers warn that such assistants could become highly persuasive and addictive. Last year, a British man pleaded guilty to breaching security at Windsor Castle , saying that a chatbot he had exchanged more than 5,000 messages with had encouraged him to do so.
In addition to snappier conversational skills, OpenAI says its GPT-4o model makes ChatGPT better able to make sense of images, including photos and charts, and can store more information about a user in its “memory” to provide a more personalized experience.
OpenAI says it will make GPT-4o available to users of the free version of ChatGPT, essentially upgrading all users to its most capable AI model.
Google is expected to unveil new AI technologies of its own at the search company’s I/O developer conference starting Tuesday. Competition between companies working on AI seems unlikely to cool down. At the end of today’s OpenAI event, Murati promised that the company would soon be offering more announcements, “on our progress towards the next big thing.”
You Might Also Like …
In your inbox: Will Knight's Fast Forward explores advances in AI
He emptied a crypto exchange onto a thumb drive —then disappeared
The real-time deepfake romance scams have arrived
Boomergasms are booming
Heading outdoors? Here are the best sleeping bags for every adventure

Steven Levy

Reece Rogers

Use Immersive Reader in PowerPoint
Immersive Reader is a feature that helps to improve reading skills for people of all ages and abilities. Immersive Reader shows text in a window where you can have it read aloud or formatted in ways that enhance reading, such as words divided into syllables, color coded and tagged for parts of speech, or extra spacing between words and lines.
Immersive Reader is now available for PowerPoint for the web.
Using Immersive Reader
Do any of the following:

To have the text read aloud, in Immersive Reader, click the Play button.

Changing Immersive Reader preferences
When in Immersive Reader, you can change the way you interact with the text by using the following options:
Text Preferences let you change the text font and size, increase word spacing, apply themes, and show source formatting.
Grammar Options let you divide the words into syllables and color code and tag parts of speech.
Reading Preferences let you focus on one to three lines, access an online picture dictionary, or translate the text into several languages with the ability to toggle easily between the original and translated versions.

Need more help?
Want more options.
Explore subscription benefits, browse training courses, learn how to secure your device, and more.

Microsoft 365 subscription benefits

Microsoft 365 training

Microsoft security

Accessibility center
Communities help you ask and answer questions, give feedback, and hear from experts with rich knowledge.

Ask the Microsoft Community

Microsoft Tech Community

Windows Insiders
Microsoft 365 Insiders
Was this information helpful?
Thank you for your feedback.
IMAGES
VIDEO
COMMENTS
To open the Comments pane, press Alt+R, P, P. You hear: "Comments on slide.". If the Comments pane is already open, press F6 or Shift+F6 until you hear: "Comments on slide." Press the SR key+Right or Left arrow key to move through the comments. Your screen reader reads the comments as you land on them.
Start presenting. On the Slide Show tab, in the Start Slide Show group, select From Beginning. Now, if you are working with PowerPoint on a single monitor and you want to display Presenter view, in Slide Show view, on the control bar at the bottom left, select , and then Show Presenter View.
Launch PowerPoint. Look for Slide Show tab. When found, click it and select From Beginning visible under Start Slide Show group. If you are working with PowerPoint on a single monitor and still ...
By default, PowerPoint is set to use Presenter view when you run a slide show. You can change this setting on the Slide Show tab of the PowerPoint ribbon: Read Start the presentation and see your notes in Presenter view for more details about how to see and use Presenter view. Print speaker notes. See Print slides with or without speaker notes ...
Here's how to add notes in PowerPoint: Select a slide you want to add notes to. View the Notes pane located beneath each slide. If it's not visible, you can make it appear by clicking Notes on the bottom taskbar. You will see a blank space with the prompt "Click to add notes."
Line up your webcam above the notes in "presenter view.". This helps make sure you are looking in the direction of your audience and not off to the side. Read through your notes as you progress through your slides. You can even "vertical scroll" through your notes if you have a lot to material to go through.
When you're creating a presentation in PowerPoint, you can add speaker notes to refer to later while delivering the slide show in front of an audience. Learn...
Next, in the pane on left, select the slide where you'd like to add speaker notes. Next, click the "Notes" button at the bottom of the window. A small box reading "Tap to Add Notes" will appear beneath the slide. For Mac users, this will say "Click to Add Notes.". Now, simply type the speaker notes for that slide.
Step 2: Set up the PowerPoint Slide Show in a window. Set up your PowerPoint file to display the Slide Show in the window it is in instead of in full screen mode. PowerPoint refers to this as the "Browsed by an individual" mode or Reading View. To use this mode, on the Slide Show ribbon, click on the Set Up Slide Show button.
Click the Notes button in the Status Bar at the bottom. Move your cursor to the bottom of the window. When you see the two-sided arrow, drag up until the panel displays. Step 3: When the panel is ...
If you want to customize your Presenter View experience, follow these steps: On the 'Slide Show' tab, click 'Set Up Slide Show.'. Under 'Multiple Monitors,' select the 'Use Presenter View' checkbox. If you're using a single monitor, select the 'Display slide show on' option and choose your primary monitor.
PowerPoint reads the highlighted text or notes on the selected slide. 4. Click the Speak command button once to begin the reading session, then click it again to stop.
In this video, you will learn how to add speaker notes to your Powerpoint presentations.Speaker Notes in PowerPoint is one of the many user-friendly tools ad...
That is why PowerPoint provides notes. But notes cannot be read during a regular presentation. You are WRONG! To view notes WHILE you are presenting - you must use the Presenter View option. Practice first - never try on stage for the first time. This feature may sound so simple that you may become over-confident and try it in a live ...
Microsoft PowerPoint is a presentation design software that is part of Microsoft 365. This software allows you to design presentations by combining text, images, graphics, video, and animation on slides in a simple and intuitive way. Over time, PowerPoint has evolved and improved its accessibility to users.
Zoom allows you to share different screens with your meeting participants. You can use PowerPoint to present slides in a clean visual format; however, how to...
Here's how: Launch the PowerPoint desktop application and open any existing document. Select the portion of the text that you want to be read out loud. This will activate the Speak button in the Quick Access Toolbar. Click on Speak and it will start speaking or reading out the selected text. To stop Speak, simply click on Stop Speaking .
Read the next line of Notes. Alt+A. Read the previous line of Notes. Alt+Z. Read the elapsed time (the timer starts to run as soon as you start the Presenter View). Alt+W. Read the next step (for example, the next slide, next animation, or end of show). Alt+Q. Close Presenter View. Esc
Click Review > Check Accessibility. In the Accessibility Checker, click the arrow to the left of the Check reading order category under Warnings, and then click an item. Click the down arrow to the right of the selected item and click Verify object order . The objects are listed in the order that the screen reader will read.
My solution: Copy & paste my notes into Note Pad and start my narration for each slide. I think that the notes in PowerPoint were developed to be viewed only for live presentations--not voice recordings. It would be a wonderful upgrade if we could record narration and see our notes at the same time. ;-) John Korchok.
The Knowt AI PPT Summarizer is a PPT Summarizing Tool build specifically for students to learn and understand their readings better. It saves students lots of time by outlining the key information from each slide in your powerpoint, elimininating all the fluff. Once you upload your slides and generate a summary from your PPT, you can also make ...
Don't just read off of your slides—you'll bore your audience. Practice and rehearse your presentation or create index cards with speaking notes to make your presentation more engaging. Don't use a new design, transition, animation, etc., on each slide—you'll clutter up your design. Choose one single design, color scheme, font ...
2. Embed Microsoft Forms (Education or Business Only) If you plan to send your PPT presentation to others—for example, if you're a trainer sending step-by-step instruction presentation, a teacher sending an independent learning task to your students, or a campaigner for your local councilor sending a persuasive PPT to constituents—you might want to embed a quiz, questionnaire, pole, or ...
The recently published CVE-2024-21427 Windows Kerberos Security Feature Bypass Vulnerability fixed the potential bypass of authentication policies configured in Active Directory. We strongly recommend that you deploy the latest security updates, including the most recent patch, to your servers and devices to help ensure you have the latest protections available.
Use Notes while you present. In Presenter View, your Notes for each slide appear under the Next slide. Scroll to view all of them if necessary. Use the Make the text larger or Make the text smaller buttons to change the size of the Notes.
Animated presentations help grab the attention of viewers more than static ones can. And they can be especially helpful when you're giving a virtual or Zoom presentation and need to keep an online audience engaged.. To help you make the most of your time on stage or a screen, use animated PowerPoint templates in your content to add a new angle to your visuals.
Prior to GPT-4o, you could use Voice Mode to talk to ChatGPT with latencies of 2.8 seconds (GPT-3.5) and 5.4 seconds (GPT-4) on average. To achieve this, Voice Mode is a pipeline of three separate models: one simple model transcribes audio to text, GPT-3.5 or GPT-4 takes in text and outputs text, and a third simple model converts that text back to audio.
Read Next. Markets category Investors pour money into stocks, bonds as inflation worries ebb - BofA says 6:41 AM UTC · Updated ago. Rates & Bonds category China expected to stand pat on lending ...
Murati said the GPT-4o model allows ChatGPT to respond more rapidly to voice, image, and video input than OpenAI's previous technology. In demos, she and other OpenAI employees had fast-flowing ...
Using Immersive Reader. Do any of the following: Select a portion of text, one or more objects on a slide that contain text, or one or more slides, and then select View > Immersive Reader. Or use the keyboard shortcut Ctrl + Shift + I (or Cmd + Shift + I for MacOS). Right-click a slide, one or more slide thumbnails, an object that contains text ...