How to Write Essay Titles and Headers
The deadline for your latest writing assignment is mere minutes away. You’re rushing to get the final details together and suddenly realize you’ve forgotten a title. You quickly throw something random on top of the page and submit it to your teacher.
You’re not satisfied with your title, but you vow to do better next time. And you will!

You’ve learned from your mistake: essay titles are not a last-minute detail. They’re an integral part of any piece of written work and should be planned out earlier on in the writing process.
Titles lead to your reader’s first impression of your essay, and the headings help organize your thoughts and make the essay easier to read. Let’s take a look at how you can turn your titles from an afterthought into a well-thought-out writing element.

How Do You Write a Great Title?
People DO judge a book by its cover, and they will judge your essay by its title. So writing a strong title is an important part of starting your writing off on the right foot.
Your essay title has two main functions:
- Inform your reader
- Spark your reader’s interest
Additionally, keep in mind these three pointers:
Be clear and concise
Vague titles do not inform the reader. Provide a specific description of what your focus will be. Your audience wants to know precisely what they will be reading.
Bad Example: Oceans
Good Example: Disappearing Ocean Life in the Pacific Rim
Offer an exciting tidbit or interesting fact
If your title is boring, readers will not want to keep reading. Offer them something that will get attention.
Bad Example: How Consumers are Wrongly Spending Money
Good Example: The Seven Million Dollar Mistake
Everyone may be writing a college admissions essay, but don’t title yours: My College Admissions Essay . No matter what the prompt, make your title something that stands out from the stack.
Bad Example: My Research Project
Good Example: Relocating the Human Race to Mars
How Do You Create a Great Header?
Essay headers are often overlooked by writers, but they can really help your readers as they journey through your essay. While the title may get the reader hooked, the headers keep them moving smoothly through your paper. They enhance readability and help explain what is most relevant in the essay.
Each essay header should answer these two questions:
- What will I learn?
- What is the focus?
When readers approach a new section of your essay, they will have a better reading experience if they have a small preview of what’s to come.

Writing a useful header should be relatively easy. Read through your paragraphs and see what the main idea of is. From here, make a list of sub-topics that are discussed in each section. The best way to do this is to pull from the main points you listed out in your outline (which you, of course, remembered to do!).
Remember the following details about writing a header:
Be simple, but informative
You don’t want to give away all of your ideas here, but you need to give some guiding information.
Bad Example: Eating Too Many Fatty Foods Can Increase Your Cholesterol Levels
Good Example: How Your Diet Affects Your Health
Be consistent throughout your essay.
Choose a pattern and stick with it throughout the entirety of the assignment. If you start off by having a heading for each paragraph, keep it that way until the end. Also, make sure the format remains the same. If your first heading is in the form of a question, all of the rest should be as well.
Bad Example: Beaches, What is Up With Littering?, I Want to Clean Up the Planet
Good Example: Neglected Beaches, Effects of Litter, Motivated Activists
Just like when you are writing a title, there are generic headings you can lean on to get it done quick and easy. But don’t use these. Your conclusion shouldn’t have the header, "Conclusion." Come up with something unique for each part of your essay to keep your reader from feeling fatigued as they read on.
Bad Example: Conclusion
Good Example: Will the Pandas Survive?
Be organized and helpful
Your essay should be scannable. This means that if someone needs information fast, they can find it without having to read every word of your piece.
Although titles and headers are often neglected, they are very important to your pieces of writing. They grab your reader’s attention from the start and keep them focused throughout the rest of your essay. Taking the time to craft great titles and headers can advance your writing to the next level.
Don’t overlook the title and section headers when putting together your next writing assignment. Follow these pointers for keeping your writing organized and effective.
101 Standout Argumentative Essay Topic Ideas
Need a topic for your upcoming argumentative essay? We've got 100 helpful prompts to help you get kickstarted on your next writing assignment.
Writing a Standout College Admissions Essay
Your personal statement is arguably the most important part of your college application. Follow these guidelines for an exceptional admissions essay.

MLA Format Guide - 9th edition
- Essay Formatting
How to Create a Header
- To add your header, either double-click in the top inch of the page or select the "Insert" tab in Microsoft Word, navigate to the "Header & Footer" section, select "Header," and click the first option titled "Blank."
- When editing your header, navigate to the "Design" tab and check the box beside "Different First Page" as every heading after your first page should only include the page number.
- Still in the design tab under the "Header & Footer" section, select "Page Number." In the drop-down box, select the first option, labeled "Top of Page," then select the third option labeled "Plain Number 3." Add your last name in front of the page number, and change the font settings to match that of the rest of your paper.
- On the next line, set the text alignment to align your text to the left side of the page (under the "Paragraph" section of the "Home" tab) and on four different lines type your first and last name, your instructor's name, the course the assignment is for, and the date in the format DD Month YYYY.
- On the next line, center the text (under the "Paragraph" section of the "Home" tab) and type the title of your paper.
An example of an MLA formatted header is included below.

How to Create a Works Cited Page
You can create your Works Cited page before, during, or after you write your essay. If you do not create it before, be sure to document the sources you used, including any website links, so you can go back and create your citations later. Citation format will be discussed in a later section, but this section will detail how to create a Works Cited Page.
- At the end of your essay, insert a page break (found under the "Insert" tab) and center the words "Works Cited" at the top of your page (not in the header). If there is only one source being cited, type "Work Cited".
- Insert your citations in alphabetical order in the subsequent lines. Make sure they are left aligned.
- If your citation is more than one line, apply the hanging indent feature to everything after the first line for each individual entry. You can do this by selecting the second line of the entry, navigating to the "Home" tab in Microsoft Word, selecting the arrow at the bottom right in the "Paragraph" section to open up the "Paragraph Settings" box, and under the "Indentation" section, select the drop-down box labeled "Special," and choose "Hanging". This will move everything but the first line of your citation slightly to the right.

Other essay formatting notes
When formatting your essay, there are a few things to keep in mind:
- Use the correct font as listed under the "Home" tab of this guide. Double-space your text, use 12 pt font, and use a legible font style, such as Times New Roman, Ariel, Calibri, etc., ensuring that the regular and italic font styles are distinct.
- After the first page, only include your last name and the page number in the top right corner of the header.
- Change the paragraph options to remove space before and after all paragraphs. Select the entire essay (you can use the Ctrl + A feature), and in the "Paragraph" section of the "Home" tab, select the drop-down arrow where you can adjust the line spacing and make sure both selections at the bottom of the drop-down box read "Add Space Before Paragraph" and "Add Space After Paragraph". If they say "Remove Space Before Paragraph" and/or "Remove Space After Paragraph," click to remove the space.
- On the last page, include a Works Cited page with your citations listed in alphabetical order.
- Last Updated: Oct 13, 2023 9:40 AM
- URL: https://uaccm.libguides.com/what_is_MLA_style
- How to setup your software
- Sample MLA Paper – normal paper
- Sample MLA Paper – has cover page
- Sample APA Paper
- Sample Chicago Paper
- Sample CSE Paper
- APA Format Guidelines
MLA Format Heading
This page contains guidelines on how to properly format the headings of your research paper using the MLA format.
1. The Opening Page:
On the opening page or the first page, you would include the whole heading and your paper’s title. The whole heading would include the following information:
- Your Instructor’s Name
- Your Class Information
- Your Paper’s Due Date
- Font: choose an easy to read font such as Times New Roman.
- Font Size: set the font size to be twelve (12) throughout your research paper, including your paper’s title. Never set the font site larger than 12.
- Margins: 1-inch for top/bottom/right/left throughout your paper.
- Double-space: double-space throughout your paper. Don’t add extra spaces (besides double-space) between your headings, your title and your paragraphs.
Sample of the Opening Page:
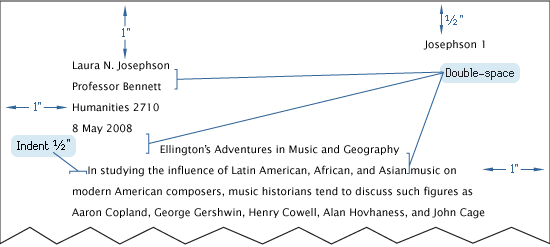
A sample of the first page of your paper.
2. The Inner Pages:
For the pages that follow the first page, set the heading like this: instead of the whole heading, you would use the header feature on your word processing program and including the following information: Your Last Name and the Page Number.
Sample of the Inner Page:
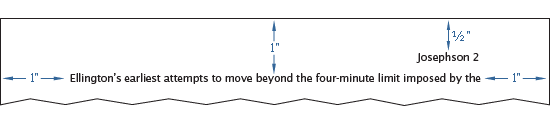
Example of the heading for inner pages.
3. The Works Cited Page:
Every research paper must include a works cited page.
- The works cited list is placed at the end of your paper, on a new page.
- The heading for your works cited pages should be the same as the heading for your inner pages, which include your name and the page number at the top.
- Enter the title as “ Works Cited ” and place this title 1-inch from the top of the page, see more details in the example illustration picture below.
Sample of the Works Cited Page:

Example of the works cited page.
– MLA Handbook, 8th edition
If you find this website useful, please share with a friend:
This helped a lot thank you
Thank you so much 😀
Best website hands down. Got an A, thank you!
Thank you and God bless you! Jesus loves you!
I like how this site tells us the perfect way to write an essay on paper.
This page is helpful to a new student.
this is great!
Cool. But how many grade school students will look at this website to see how to set up their papers.
Wow, This site is amazing!
I have the following level 3 heading in my thesis:
Project management office and (pmo) metrics team.
Should the abbreviation pmo be in lower case as it is or should it be in upper case?
Please Advise. Thanks.
So for the works cited page, you don’t need the name, teacher, date, and period heading at all?
No. It should only be on the first page of the essay.
This is some good stuff to know.
I have to write a paper for an application and they want it to be in MLA format. I don’t know how to do the heading because it’s not going to one teacher in particular and it is not for one class.
I don’t think you need a heading besides the “Last name-1” on the inner pages.
Hey Shannon. You might try “To Whom it may concern” or something like that. Don’t trust me on this because I am not for sure on that and if you did do this you might get it wrong and whoever might not accept your application. I hope you figure out how to do it and do great on that application! 😀 – Christopher
Leave a Comment
Current ye ignore me @r *
Leave this field empty
Next post: Commonly Misspelled or Confused Word Pairs
Previous post: MLA Format Cover Page
- The Format of the Research Paper
- MLA Format Cover Page
- MLA Format Headings
- MLA Citations
- MLA Format Works Cited
- MLA Format FAQs
- MLA Format Sample Paper
- MLA Sample Paper w/ Cover and Outline Pages
HOW TO SETUP YOUR SOFTWARE
- MLA Format using Google Docs
- MLA Format Microsoft Word 2016
- MLA Format using Pages on Mac
Copyright © 2011–2024 • MLA Format • All rights reserved. Currently, MLA is at its 8th edition. This website has no official relationship with the Modern Language Association and is not endorsed by the MLA.
Want to create or adapt books like this? Learn more about how Pressbooks supports open publishing practices.
13.1 Formatting a Research Paper
Learning objectives.
- Identify the major components of a research paper written using American Psychological Association (APA) style.
- Apply general APA style and formatting conventions in a research paper.
In this chapter, you will learn how to use APA style , the documentation and formatting style followed by the American Psychological Association, as well as MLA style , from the Modern Language Association. There are a few major formatting styles used in academic texts, including AMA, Chicago, and Turabian:
- AMA (American Medical Association) for medicine, health, and biological sciences
- APA (American Psychological Association) for education, psychology, and the social sciences
- Chicago—a common style used in everyday publications like magazines, newspapers, and books
- MLA (Modern Language Association) for English, literature, arts, and humanities
- Turabian—another common style designed for its universal application across all subjects and disciplines
While all the formatting and citation styles have their own use and applications, in this chapter we focus our attention on the two styles you are most likely to use in your academic studies: APA and MLA.
If you find that the rules of proper source documentation are difficult to keep straight, you are not alone. Writing a good research paper is, in and of itself, a major intellectual challenge. Having to follow detailed citation and formatting guidelines as well may seem like just one more task to add to an already-too-long list of requirements.
Following these guidelines, however, serves several important purposes. First, it signals to your readers that your paper should be taken seriously as a student’s contribution to a given academic or professional field; it is the literary equivalent of wearing a tailored suit to a job interview. Second, it shows that you respect other people’s work enough to give them proper credit for it. Finally, it helps your reader find additional materials if he or she wishes to learn more about your topic.
Furthermore, producing a letter-perfect APA-style paper need not be burdensome. Yes, it requires careful attention to detail. However, you can simplify the process if you keep these broad guidelines in mind:
- Work ahead whenever you can. Chapter 11 “Writing from Research: What Will I Learn?” includes tips for keeping track of your sources early in the research process, which will save time later on.
- Get it right the first time. Apply APA guidelines as you write, so you will not have much to correct during the editing stage. Again, putting in a little extra time early on can save time later.
- Use the resources available to you. In addition to the guidelines provided in this chapter, you may wish to consult the APA website at http://www.apa.org or the Purdue University Online Writing lab at http://owl.english.purdue.edu , which regularly updates its online style guidelines.
General Formatting Guidelines
This chapter provides detailed guidelines for using the citation and formatting conventions developed by the American Psychological Association, or APA. Writers in disciplines as diverse as astrophysics, biology, psychology, and education follow APA style. The major components of a paper written in APA style are listed in the following box.
These are the major components of an APA-style paper:
Body, which includes the following:
- Headings and, if necessary, subheadings to organize the content
- In-text citations of research sources
- References page
All these components must be saved in one document, not as separate documents.
The title page of your paper includes the following information:
- Title of the paper
- Author’s name
- Name of the institution with which the author is affiliated
- Header at the top of the page with the paper title (in capital letters) and the page number (If the title is lengthy, you may use a shortened form of it in the header.)
List the first three elements in the order given in the previous list, centered about one third of the way down from the top of the page. Use the headers and footers tool of your word-processing program to add the header, with the title text at the left and the page number in the upper-right corner. Your title page should look like the following example.

The next page of your paper provides an abstract , or brief summary of your findings. An abstract does not need to be provided in every paper, but an abstract should be used in papers that include a hypothesis. A good abstract is concise—about one hundred fifty to two hundred fifty words—and is written in an objective, impersonal style. Your writing voice will not be as apparent here as in the body of your paper. When writing the abstract, take a just-the-facts approach, and summarize your research question and your findings in a few sentences.
In Chapter 12 “Writing a Research Paper” , you read a paper written by a student named Jorge, who researched the effectiveness of low-carbohydrate diets. Read Jorge’s abstract. Note how it sums up the major ideas in his paper without going into excessive detail.

Write an abstract summarizing your paper. Briefly introduce the topic, state your findings, and sum up what conclusions you can draw from your research. Use the word count feature of your word-processing program to make sure your abstract does not exceed one hundred fifty words.
Depending on your field of study, you may sometimes write research papers that present extensive primary research, such as your own experiment or survey. In your abstract, summarize your research question and your findings, and briefly indicate how your study relates to prior research in the field.
Margins, Pagination, and Headings
APA style requirements also address specific formatting concerns, such as margins, pagination, and heading styles, within the body of the paper. Review the following APA guidelines.
Use these general guidelines to format the paper:
- Set the top, bottom, and side margins of your paper at 1 inch.
- Use double-spaced text throughout your paper.
- Use a standard font, such as Times New Roman or Arial, in a legible size (10- to 12-point).
- Use continuous pagination throughout the paper, including the title page and the references section. Page numbers appear flush right within your header.
- Section headings and subsection headings within the body of your paper use different types of formatting depending on the level of information you are presenting. Additional details from Jorge’s paper are provided.

Begin formatting the final draft of your paper according to APA guidelines. You may work with an existing document or set up a new document if you choose. Include the following:
- Your title page
- The abstract you created in Note 13.8 “Exercise 1”
- Correct headers and page numbers for your title page and abstract
APA style uses section headings to organize information, making it easy for the reader to follow the writer’s train of thought and to know immediately what major topics are covered. Depending on the length and complexity of the paper, its major sections may also be divided into subsections, sub-subsections, and so on. These smaller sections, in turn, use different heading styles to indicate different levels of information. In essence, you are using headings to create a hierarchy of information.
The following heading styles used in APA formatting are listed in order of greatest to least importance:
- Section headings use centered, boldface type. Headings use title case, with important words in the heading capitalized.
- Subsection headings use left-aligned, boldface type. Headings use title case.
- The third level uses left-aligned, indented, boldface type. Headings use a capital letter only for the first word, and they end in a period.
- The fourth level follows the same style used for the previous level, but the headings are boldfaced and italicized.
- The fifth level follows the same style used for the previous level, but the headings are italicized and not boldfaced.
Visually, the hierarchy of information is organized as indicated in Table 13.1 “Section Headings” .
Table 13.1 Section Headings
A college research paper may not use all the heading levels shown in Table 13.1 “Section Headings” , but you are likely to encounter them in academic journal articles that use APA style. For a brief paper, you may find that level 1 headings suffice. Longer or more complex papers may need level 2 headings or other lower-level headings to organize information clearly. Use your outline to craft your major section headings and determine whether any subtopics are substantial enough to require additional levels of headings.
Working with the document you developed in Note 13.11 “Exercise 2” , begin setting up the heading structure of the final draft of your research paper according to APA guidelines. Include your title and at least two to three major section headings, and follow the formatting guidelines provided above. If your major sections should be broken into subsections, add those headings as well. Use your outline to help you.
Because Jorge used only level 1 headings, his Exercise 3 would look like the following:
Citation Guidelines
In-text citations.
Throughout the body of your paper, include a citation whenever you quote or paraphrase material from your research sources. As you learned in Chapter 11 “Writing from Research: What Will I Learn?” , the purpose of citations is twofold: to give credit to others for their ideas and to allow your reader to follow up and learn more about the topic if desired. Your in-text citations provide basic information about your source; each source you cite will have a longer entry in the references section that provides more detailed information.
In-text citations must provide the name of the author or authors and the year the source was published. (When a given source does not list an individual author, you may provide the source title or the name of the organization that published the material instead.) When directly quoting a source, it is also required that you include the page number where the quote appears in your citation.
This information may be included within the sentence or in a parenthetical reference at the end of the sentence, as in these examples.
Epstein (2010) points out that “junk food cannot be considered addictive in the same way that we think of psychoactive drugs as addictive” (p. 137).
Here, the writer names the source author when introducing the quote and provides the publication date in parentheses after the author’s name. The page number appears in parentheses after the closing quotation marks and before the period that ends the sentence.
Addiction researchers caution that “junk food cannot be considered addictive in the same way that we think of psychoactive drugs as addictive” (Epstein, 2010, p. 137).
Here, the writer provides a parenthetical citation at the end of the sentence that includes the author’s name, the year of publication, and the page number separated by commas. Again, the parenthetical citation is placed after the closing quotation marks and before the period at the end of the sentence.
As noted in the book Junk Food, Junk Science (Epstein, 2010, p. 137), “junk food cannot be considered addictive in the same way that we think of psychoactive drugs as addictive.”
Here, the writer chose to mention the source title in the sentence (an optional piece of information to include) and followed the title with a parenthetical citation. Note that the parenthetical citation is placed before the comma that signals the end of the introductory phrase.
David Epstein’s book Junk Food, Junk Science (2010) pointed out that “junk food cannot be considered addictive in the same way that we think of psychoactive drugs as addictive” (p. 137).
Another variation is to introduce the author and the source title in your sentence and include the publication date and page number in parentheses within the sentence or at the end of the sentence. As long as you have included the essential information, you can choose the option that works best for that particular sentence and source.
Citing a book with a single author is usually a straightforward task. Of course, your research may require that you cite many other types of sources, such as books or articles with more than one author or sources with no individual author listed. You may also need to cite sources available in both print and online and nonprint sources, such as websites and personal interviews. Chapter 13 “APA and MLA Documentation and Formatting” , Section 13.2 “Citing and Referencing Techniques” and Section 13.3 “Creating a References Section” provide extensive guidelines for citing a variety of source types.
Writing at Work
APA is just one of several different styles with its own guidelines for documentation, formatting, and language usage. Depending on your field of interest, you may be exposed to additional styles, such as the following:
- MLA style. Determined by the Modern Languages Association and used for papers in literature, languages, and other disciplines in the humanities.
- Chicago style. Outlined in the Chicago Manual of Style and sometimes used for papers in the humanities and the sciences; many professional organizations use this style for publications as well.
- Associated Press (AP) style. Used by professional journalists.
References List
The brief citations included in the body of your paper correspond to the more detailed citations provided at the end of the paper in the references section. In-text citations provide basic information—the author’s name, the publication date, and the page number if necessary—while the references section provides more extensive bibliographical information. Again, this information allows your reader to follow up on the sources you cited and do additional reading about the topic if desired.
The specific format of entries in the list of references varies slightly for different source types, but the entries generally include the following information:
- The name(s) of the author(s) or institution that wrote the source
- The year of publication and, where applicable, the exact date of publication
- The full title of the source
- For books, the city of publication
- For articles or essays, the name of the periodical or book in which the article or essay appears
- For magazine and journal articles, the volume number, issue number, and pages where the article appears
- For sources on the web, the URL where the source is located
The references page is double spaced and lists entries in alphabetical order by the author’s last name. If an entry continues for more than one line, the second line and each subsequent line are indented five spaces. Review the following example. ( Chapter 13 “APA and MLA Documentation and Formatting” , Section 13.3 “Creating a References Section” provides extensive guidelines for formatting reference entries for different types of sources.)

In APA style, book and article titles are formatted in sentence case, not title case. Sentence case means that only the first word is capitalized, along with any proper nouns.
Key Takeaways
- Following proper citation and formatting guidelines helps writers ensure that their work will be taken seriously, give proper credit to other authors for their work, and provide valuable information to readers.
- Working ahead and taking care to cite sources correctly the first time are ways writers can save time during the editing stage of writing a research paper.
- APA papers usually include an abstract that concisely summarizes the paper.
- APA papers use a specific headings structure to provide a clear hierarchy of information.
- In APA papers, in-text citations usually include the name(s) of the author(s) and the year of publication.
- In-text citations correspond to entries in the references section, which provide detailed bibliographical information about a source.
Writing for Success Copyright © 2015 by University of Minnesota is licensed under a Creative Commons Attribution-NonCommercial-ShareAlike 4.0 International License , except where otherwise noted.
Purdue Online Writing Lab Purdue OWL® College of Liberal Arts
APA Headings and Seriation

Welcome to the Purdue OWL
This page is brought to you by the OWL at Purdue University. When printing this page, you must include the entire legal notice.
Copyright ©1995-2018 by The Writing Lab & The OWL at Purdue and Purdue University. All rights reserved. This material may not be published, reproduced, broadcast, rewritten, or redistributed without permission. Use of this site constitutes acceptance of our terms and conditions of fair use.
Note: This page reflects the latest version of the APA Publication Manual (i.e., APA 7), which released in October 2019. The equivalent resource for the older APA 6 style can be found here .
APA Style uses a unique headings system to separate and classify paper sections. Headings are used to help guide the reader through a document. The levels are organized by levels of subordination, and each section of the paper should start with the highest level of heading. There are 5 heading levels in APA. Regardless of the number of levels, always use the headings in order, beginning with level 1. The format of each level is illustrated below:
Thus, if the article has four sections, some of which have subsections and some of which don’t, use headings depending on the level of subordination. Section headings receive level one format. Subsections receive level two format. Subsections of subsections receive level three format. For example:
Method (Level 1)
Site of Study (Level 2)
Participant Population (Level 2)
Teachers (Level 3)
Students (Level 3)
Results (Level 1)
Spatial Ability (Level 2)
Test One (Level 3)
Teachers With Experience. (Level 4)
Teachers in Training. (Level 4)
Teaching Assistants . (Level 5)
Test Two (Level 3)
Kinesthetic Ability (Level 2)
In APA Style, the Introduction section never gets a heading and headings are not indicated by letters or numbers. For subsections in the beginning of a paper (introduction section), the first level of subsection will use Level 2 headings — the title of the paper counts as the Level 1 heading. Levels of headings will depend upon the length and organization of your paper. Regardless, always begin with level one headings and proceed to level two, etc.
Special headings called section labels are used for certain sections of a paper which always start on a new page.
- Paper title
- Appendix A (and so on for subsequent appendices)
These labels should be positioned on their own line at the top of the page where the section starts, in bold and centered.
APA also allows for seriation in the body text to help authors organize and present key ideas. For lists where a specific order or numbered procedure is necessary, use an Arabic numeral directly followed by a period, such as:
On the basis of four generations of usability testing on the Purdue OWL, the Purdue OWL Usability Team recommended the following:
- Move the navigation bar from the right to the left side of the OWL pages.
- Integrate branded graphics (the Writing Lab and OWL logos) into the text on the OWL homepage.
- Add a search box to every page of the OWL.
- Develop an OWL site map.
- Develop a three-tiered navigation system.
Numbered lists should contain full sentences or paragraphs rather than phrases. The first word after each number should be capitalized, as well as the first word in any following sentence; each sentence should end with a period or other punctuation.
For lists that do not communicate hierarchical order or chronology, use bullets:
In general, participants found the user-centered OWL mock up to be easier to use. What follows are samples of participants' responses:
- "This version is easier to use."
- "Version two seems better organized."
- "It took me a few minutes to learn how to use this version, but after that, I felt more comfortable with it."
Authors may also use seriation for paragraph length text.
For seriation within sentences, authors may use letters:
On the basis of research conducted by the usability team, OWL staff have completed (a) the OWL site map; (b) integrating graphics with text on the OWL homepage; (c) search boxes on all OWL pages except the orange OWL resources (that is pending; we do have a search page); (d) moving the navigation bar to the left side of pages on all OWL resources except in the orange area (that is pending); (e) piloting the first phase of the three-tiered navigation system, as illustrated in the new Engagement section.
Authors may also separate points with bullet lists:
On the basis of the research conducted by the usability team, OWL staff have completed
- the OWL site map;
- integrating graphics with text on the OWL homepage;
- search boxes on all OWL pages except the orange OWL resources (that is pending; we do have a search page);
- moving the navigation bar to the left side of pages on all OWL resources except in the orange area (that is pending);
- piloting the first phase of the three-tiered navigation system, as illustrated in the new Engagement section.
If your bulleted list is part of the sentence and is not preceded by a colon, treat the bullets like a part of the sentence, adhering to standard capitalization and punctuation. This option is helpful for complex or longer bulleted sentences that may be more difficult to read without the aid of punctuation. For items in a bulleted list that are phrases rather than sentences, no punctuation is necessary.
English Composition 1
Inserting headers into essays.
According to the MLA (the Modern Language Association), each page of an essay, including the first page, should include the writer's last name and the page number inserted as a header in the upper right corner of the page, as illustrated below:
The header should not be typed where the text of your papers should be. It should be inserted as a header in your word processor so that your last name and the page number appear slightly above the first line of text on each page.
This page explains how to insert a header using Microsoft Word 2010. The procedure for inserting a header will vary depending on what type of word processor you are using, but a similar approach to what is explained below should work in other word processors.
How to Insert a Header in Microsoft Word
Begin by opening in your word processor the document in which you want to add the header.
- Make the "Insert" ribbon active at the top of the screen.
- Click the "Page Number" icon.
- Click "Top of Page."
- Click "Plain Number 3."

- Type your last name and a space just before the page number that will be added to the upper right of your document.
- If the header is not in the correct fonts, highlight your name and the page number, make the "Home" ribbon active, and choose the correct fonts.

Double left mouse click anywhere outside of the header area to return to the text area of your document.
If you need to make changes to the header after you have added it, just double left mouse click in the header area of the document.
If you do not see the header added to your document, the problem most likely is the "View" you are using. To see the document with the header, just make the "View" ribbon active and click "Print Layout."
Copyright Randy Rambo , 2019.

Formatting College Papers Using Microsoft Word 2010: Headers & Footers (Page Numbers)
- Formatting With Word Home
- Text Basics
- Formatting Text
- Modifying Page Layout
- Check Spelling & Grammar
- Using Indent Tabs (Hanging Indent)
- Line & Paragraph Spacing
- Headers & Footers (Page Numbers)
Headers & Footers
In this lesson, you will learn how to insert and edit headers and footers. The header is a section of the document that appears in the top margin, while the footer is a section of the document that appears in the bottom margin. Headers and footers generally contain information such as page number, date, document name, etc.
GCFLearnFree.org®
Watch The Video
- << Previous: Line & Paragraph Spacing
- Next: Get Help >>
- Last Updated: Mar 23, 2023 6:41 PM
- URL: https://library.hccs.edu/papers_msword
©2022 Houston Community College Libraries

- Get started with computers
- Learn Microsoft Office
- Apply for a job
- Improve my work skills
- Design nice-looking docs
- Getting Started
- Smartphones & Tablets
- Typing Tutorial
- Online Learning
- Basic Internet Skills
- Online Safety
- Social Media
- Zoom Basics
- Google Docs
- Google Sheets
- Career Planning
- Resume Writing
- Cover Letters
- Job Search and Networking
- Business Communication
- Entrepreneurship 101
- Careers without College
- Job Hunt for Today
- 3D Printing
- Freelancing 101
- Personal Finance
- Sharing Economy
- Decision-Making
- Graphic Design
- Photography
- Image Editing
- Learning WordPress
- Language Learning
- Critical Thinking
- For Educators
- Translations
- Staff Picks
- English expand_more expand_less
Word - Headers and Footers
Word -, headers and footers, word headers and footers.

Word: Headers and Footers
Lesson 16: headers and footers.
/en/word/columns/content/
Introduction
The header is a section of the document that appears in the top margin , while the footer is a section of the document that appears in the bottom margin . Headers and footers generally contain additional information such as page numbers , dates , an author's name , and footnotes , which can help keep longer documents organized and make them easier to read. Text entered in the header or footer will appear on each page of the document.
Optional: Download our practice document .
Watch the video below to learn more about headers and footers in Word.
To create a header or footer:
In our example, we want to display the author's name at the top of each page, so we'll place it in the header.

To insert a preset header or footer:
Word has a variety of preset headers and footers you can use to enhance your document's design and layout. In our example, we'll add a preset header to our document.

If you want to delete a Content Control field, right-click it and select Remove Content Control from the menu that appears.

Editing headers and footers
After you close the header or footer, it will still be visible, but it will be locked . Simply double-click a header or footer to unlock it, which will allow you to edit it.

Design tab options
When your document's header and footer are unlocked, the Design tab will appear on the right side of the Ribbon, giving you various editing options:

To insert the date or time into a header or footer:
Sometimes it's helpful to include the date or time in the header or footer. For example, you may want your document to show the date when it was created .
On the other hand, you may want to show the date when it was printed , which you can do by setting it to update automatically . This is useful if you frequently update and print a document because you'll always be able to tell which version is the most recent.

- The Date and Time dialog box will appear. Select the desired date or time format .
- Check the box next to Update automatically if you want the date to change every time you open the document. If you don't want the date to change, leave this option unchecked.

- Open our practice document . If you've already downloaded our practice document to follow along with the lesson, be sure to download a fresh copy by clicking the link in this step.
- Open the header .
- Choose Align Right on the Home tab and type your name.
- Below your name, use the Date & Time command on the Design tab and insert the date using whatever format you want.
- In the footer section, insert the preset footer Grid . If your version of Word doesn't have a Grid preset, you can choose any available preset.
- Close the header and footer.

/en/word/page-numbers/content/
- 301 Academic Skills Centre
- Study skills online
Formatting your assignments
Illustrated step-by-step guides to help you understand the formatting and presentation expectations of university assignments.

Introduction
Although formatting your essay, report or dissertation can feel like a lesser priority than the process of research and writing itself, it is an important way to ensure your ideas are given the spotlight through visually accessible, professional presentation. Formatting can be a minefield, especially when you’re formatting at the last minute; it’s important to leave a few days at the end of your essay writing process for working on your formatting, and to spend some time familiarising yourself with the different aspects of formatting.
301 Recommends:
Our Essay Structure and Planning workshop will outline how to analyse your essay question, discuss approaches logically structure all your ideas, help you make your introductions and conclusions more effective, and teach how to link your ideas and ensure all essay content flows logically from the introduction.
Below, you will find some general introductions to the key areas.
Action: know the rules
Because formatting rules can vary greatly depending on your department or assignment, it’s crucial to check the formatting specifications in your assignment description/rubric, and any general departmental presentation standards, as a first port of call. Many referencing systems also have specific rules about how to format your work, so make sure to familiarise yourself with the university library’s referencing guides . Many referencing systems also have more detailed style guides available via their websites.
Formatting key information
Assignment cover sheets .
In some departments, you may be expected to include a cover sheet on the front page of your assignment. This is a page including key information about your assignment, such as your module number, student registration number, essay title, and submission date.
You may be asked to submit a plagiarism declaration and to make your markers aware of any disabilities through the yellow sticker system . If you are asked to include a cover sheet in your assignment, your department should make you aware of where you can access this.
Assignment titles
Place your assignment title at the top of your first page, either centre or left aligned, in bold font. At university, you may be assigned a pre-designed essay title/question, or asked to select from several possible titles. You may also be asked to design your own essay title. Here are some top tips on designing your own title:
- To bring focus to your essay, draft a working title at the essay planning stage. You can come back and review this title in light of your finished essay draft.
- Make sure to use action words in your essay title that reflect the skills your assessors are looking for, both in the assignment description and the marking criteria you have been given. For example, if heavy emphasis is placed on critical analysis, you could use a title like ‘Analyse the effect of…’ See this glossary of essay terms , containing examples that you can use in your own titles.
- The action words you choose can also help you to reflect the structure of the essay in your question. For example, an essay using the action word ‘Discuss’ might use a for/against/conclusion or advantages/disadvantages/conclusion structure, or an essay using the term ‘Analyse’ might break an issue down into parts, e.g. into key themes, to understand its meaning as a whole. Think about the type of essay you want to write: do you want it to be comparative, look at several topics equally, or do you have a clear argument that you want to put forward? You can then create a question that gives you the opportunity to approach the topic from your own perspective.
- Make sure to include the main terminology you are working with in your assignment title.
- Make sure your question has a realistic scope, without being so broad that you cannot answer it within the limitations of your essay. To limit your question, you could include any limiting factors you are working with, such as specific time periods, geographical regions or sub-themes within the overall topic area. For example, in the title ‘Evaluate the proposition that a global monoculture will destroy diversity and difference’, the broad topic of global monoculture is limited down through a specific sub-focus on diversity and difference.
Stating word counts
Depending on the instructions you have been given, you may be asked to state your word count, either on your cover sheet or at the beginning of your essay. If you are asked to include this information, make sure your word count accurately reflects the assessment guidance: for example, are references included in your word count?
Visual clarity
Line spacing .
Most assignment descriptions specify that you should increase the space between each line on the page, from the standard 1.0 spacing to either 1.5 or 2.0 spacing. You are asked to do this to make the essay more visually accessible and easier to read, by breaking up the number of lines on each page.
Download this step-by-step illustrated guide to line spacing in Microsoft Word and Google Docs.
Fonts
All non-examination based assignments should be word processed rather than handwritten. Most assignment descriptions will specify that for visual clarity, and to ensure a professional appearance, you should use a plain, sans-serif font such as Arial. For readability, this should be in 11 or 12 point size. Check your departmental or assignment guidance for any specific rules about font choices.
Page numbering, headers and footers
Including page numbers in your assignments makes them more accessible. Depending on the departmental guidance you have been given, you may be asked to include these in either the header or the footer of your essay (the blank space above and below where the text would go on a normal page in a word processor). It may also be helpful to include your registration number and the module code of the essay in the same header or footers that specify the page number.
Download this step-by-step illustrated guide to adding page numbers and using headers and footers in Microsoft Word and Google Docs.
Page layout
Margins .
A margin is the amount of blank space on either side of a paragraph in a normal word processor. Traditionally, assignment descriptions specified that the margins should be made wider at the binding edge (the left hand side) of the page, to allow for easier reading of printed essays. However, with the shift to online essays, you might not be asked to do this any more and the default settings on your word processor are likely to be sufficiently wide.
For printed dissertations and theses, you may receive specific guidance about the suitable layout of margins, as these are more likely to be printed: see this university guide on formatting PhD theses .
Download this step-by-step illustrated guide to adjusting margins in Microsoft Word and Google Docs.
Paragraph alignment
Most formatting instructions specify that paragraphs should be lined up in a straight line (aligned) on the left hand edge, but left jagged on the right hand edge (like this page). This is called left alignment, or flush-left style, and should be the default alignment setting for your word processor. This style can be helpful for visual accessibility, but check any specific instructions you have been given by your department to see which style of alignment you have been asked to use.
Download this step-by-step illustrated guide to adjusting paragraph alignment in Microsoft Word and Google Docs.
Paragraph indentation
You may be asked to add indents to your paragraphs: an indent is an additional small gap between the margin and the beginning of a paragraph (it makes a ‘dent’ in the first line of your paragraph). Indents are used to provide extra clarification that the reader is starting a new paragraph after finishing the last one: therefore, they should not be used in the first paragraph of your essay. Indents are not always required, and whether you are expected to use them may depend on your referencing style , and any formatting instructions you have been given by your department.
Download this step-by-step illustrated guide to indenting paragraphs in Microsoft Word and Google Docs.
Formatting referenced material
Footnotes and endnotes .
Some referencing systems require you to use footnotes or endnotes to format your references (make sure to check the library’s referencing guide to familiarise yourself with the expected format of your referencing style). Inserting a footnote into your word document when you have cited from a source adds a superscript number (a number formatted in a smaller font) to the sentence. It creates a note with a matching number at the bottom of the page you are working on (in the footer), which you can add the reference information to.
Endnotes work in the same way, but instead of appearing at the bottom of the page, the reference list appears at the end of the document.
Download this step-by-step illustrated guide to manually inserting footnotes and endnotes in Microsoft Word and Google Docs.
References and bibliographies
Instead of, or alongside footnotes/endnotes, some referencing systems ask you to include a bibliography and/or a reference list at the end of the essay (make sure to check the library’s referencing guide to familiarise yourself with the expected format of your referencing style). A reference list is a list of all the sources you have directly referred to in the essay, which could be ordered numerically or alphabetically, depending on your referencing style.
A bibliography could be used alongside, or instead of, a reference list, depending on your referencing style; here, you list all the sources you have consulted that have influenced your ideas, whether they are included in the essay or not. The way this is ordered also depends on your referencing style.
If you auto-generate your citations in Microsoft Word or Google Docs, you can auto-generate your bibliography instead of creating it manually: instructions for doing so are in the resource below. If you use a different reference manager, such as Mendeley, Zotero, or Endnote, these have their own specific instructions for auto-generating bibliographies. See the reference management resources offered by the university.
Download this step-by-step illustrated guide to manually or automatically formatting a bibliography or reference list in Microsoft Word and Google Docs.
Block quotations
When you need to include a quotation in your essay that is three or more lines long, you can add this as a block quotation. A block quotation appears on a separate line to the other parts of the paragraph, and is indented (i.e. there is a wider gap between a block quotation and the left-hand margin than there is between the rest of the paragraph and the left-hand margin). Block quotations aren’t placed in quotation marks, so the indentation is used to indicate that you are using a quotation.
Check your referencing guide and any departmental guidance to learn more about the specific rules on formatting block quotations in your department. Because they take up large chunks of your word count, and break up the flow of your texts, make sure to use block quotations sparingly: they are especially helpful when you are going to perform close analysis of a large section of text. For more information on different types of quotation and how to use them, see our workshop on paraphrasing and using academic sources.
Download this step-by-step illustrated guide to formatting block quotations in Microsoft Word and Google Docs.
Advanced formatting
Headings and contents tables .
Most standard short essays do not include headings, other than the essay title and reference list and/or bibliography. Section headings may be required for some longer or more structured types of academic writing, such as reports; reports often follow a very closely prescribed structure, so it is essential to pay very careful attention to the specific guidelines issued with your brief. Make sure that any system you use for numbering your headings and subheadings is consistently applied throughout the document.
Depending on the advice you have been given, and the length and complexity of a lab report, you may also be required to include a table of contents to help the reader navigate between headings. Contents tables are generally standard practice in longer assignments such as dissertations and theses. Make sure to check any departmental guidance you have been given about formatting reports.
Download this step-by-step illustrated guide to formatting headings and contents tables in Microsoft Word and Google Docs.
301 Recommends: Scientific Writing and Lab Reports Workshop
This workshop will help you to familiarise yourself with some of the specific expectations associated with this assignment format.
Figures and tables
Some kinds of essays, dissertations and reports will require you to make use of figures (pictures, diagrams, and graphs) and tables (any data in a table format). Figures and tables are normally numbered in sequence, e.g. ‘Table 1’, ‘Figure 4’, and are directly referred to in the text according to their number, rather than according to their location on the page (e.g. ‘as shown in Table 2’ rather than ‘as shown below’).
If your text is of dissertation or thesis length, or if your text has several figures, it may also be helpful to include a list of figures immediately after the table of contents. Some referencing guides have specific rules about presenting and referencing tables and figures, so make sure to familiarise yourself with these and carefully read any specific instructions about figures and tables in your assignment brief.
Download this step-by-step illustrated guide to inserting figures and tables and creating lists of figures/tables in Microsoft Word and Google Docs.
Top tips for formatting tables and figures:
- Make sure that any tables or figures you use are placed below the paragraph where you refer to them, and that you have directly referred to all figures and tables in the text of the essay.
- The caption for a table usually acts as its title, so this is placed above the table in the document. The caption for a figure is usually placed underneath the figure. Do not include unnecessary additional titles in the graph image itself, if the title is already included in your image caption.
- Make sure to label your captions consistently, choosing between ‘Fig.’ or ‘Figure’ and consistently using either a full stop or a colon after the label (i.e. ‘Figure 1:’ or ‘Fig. 1.’)
- Your caption should clearly and succinctly explain what the figure or table is. If the figure is taken from an external source, you must provide a reference that accurately reflects its copyright status (see these university library guides to inserting and attributing images and figures in university work).
- Make sure to include legends in any charts you use (a key that helps to explain the data in the chart). Any data series you use should be clearly distinguishable from each other (e.g. avoid printing a report with coloured graphs in black and white!) If you are only using one series of data, a legend is not always necessary.
- Make sure tables are clear and easy to read, using sans serif fonts, a readable font size, and avoiding unnecessary use of colour.
- Make sure graphs are clear and easy to read, with clearly and appropriately labelled axes. Be wary of 3D effects that may obscure the clarity of a graph.
- Make sure to avoid presenting the same information in a graph and a table.
- Images and figures in printed essays, such as dissertations and theses, should be large enough for the text and numbers to be legible on the printed copy. Make sure they do not extend beyond the print margins of the document.
301 Recommends: Displaying Data in Graphs and Tables Workshop
This workshop will provide more technical advice on using graphs and tables in your work. See also this Engineering department guidance on formatting graphs and tables in Engineering lab reports.
Appendices
Appendices commonly appear in dissertations, theses, and lab reports. An appendix provides supporting information that gives the reader a better understanding of the essay, but that might be too long, detailed or awkward to insert into the main body of the essay without breaking up its flow. Interview questions or transcripts, sample questionnaires, raw data, figures, photographs, large/complex datasets, and diagrams are all examples of information that could be included in an appendix, if it is relevant to do so.
The reader should be able to understand the essay without reference to this supporting information, as all the most important and relevant information needed to answer the question should be included in the body (i.e., the appendix should not be used to make room for content that doesn’t fit within your word count). Your appendices must be clearly signposted and explained in the body of your report, highlighting any information that is essential for your reader to understand. Do not include any appendices that are not referenced in the text itself.
The appendices should be placed in numerical or alphabetical order, and signposted according to this specific system (e.g. ‘Appendix B indicates that…’) They should be clearly labelled, using headings that match up to the in-text reference. Appendices usually appear at the very end of the assignment, after your references/bibliography. Make sure to list any appendices used in your table of contents; if you have been instructed to do so by your department or within your referencing system, you could include a list of appendices separate to your contents list.
The specific format of the appendix heading, and the reference made to the appendix in the text, depends on your referencing style , so make sure to carefully review this information before you design your appendices.
Download this step-by-step illustrated guide to inserting appendices and creating lists of appendices in Microsoft Word and Google Docs.
Tips and resources
- Use this 301 proofreading checklist to check over your work when you are finished.
- Use the University Library referencing guide for advice about referencing and formatting that is specific to your referencing style. If you need extra clarification about formatting rules, it is often possible to download an extended style guide from the official website for a specific referencing system.
- For further training on referencing, using reference generators, and using images in your work, see the University Library workshop programme .
Related information
Academic Writing
Proofreading
Essay structure and planning
Scientific writing and lab reports
Creating accessible Word documents

Be the first to hear about our new and upcoming workshops!
The 301 Academic Skills Centre newsletter is a fortnightly email for study skills, mathematics and statistics.
Be the first to find out about our:
- new and upcoming workshops,
- special events and programmes, and
- new and relevant online materials and resources.
- Skip to main content
- Skip to secondary menu
- Skip to primary sidebar
- Skip to footer
Erin Wright Writing
Writing-Related Software Tutorials
How to Insert Headers and Footers on Specific Pages in Microsoft Word (PC & Mac)
By Erin Wright
This tutorial shows how to insert headers and footers on specific pages in Microsoft Word. For example, you may want to have a different header and footer for each chapter in your document.
The bonus section at the end shows how to remove the header and footer from the first page of the document or the first page of the section.
Table of Contents:
How to Insert Headers and Footers on Specific Pages
How to remove the header and footer from the first page of the document or section.
This tutorial is available as a YouTube video showing all the steps in real time.
Watch more than 250 other writing-related software tutorials on my YouTube channel .
The images below are from Word for Microsoft 365. These steps also apply to Word 2021, Word 2019, Word 2016, Word 2013, and Word for Microsoft 365 for Mac (a.k.a., Word for Mac).
The following steps will insert headers and footers on specific pages in Microsoft Word documents with or without existing headers and footers.
- Select the Home tab in the ribbon.

- Select the Show/Hide button to show your formatting marks.

- Select the Layout tab in the ribbon.

- Place your cursor at the beginning of the page where you want the header or footer to start.

- Select the Breaks button in the Page Setup group.

- Select the Next Page section break from the drop-down menu.

The section break should appear at the bottom of the previous page.

- Double-click in the header or footer area of the page where you want new headers or footers to start.

Double-clicking opens the Header & Footer tab, which only appears when the headers or footers are selected.
- Deselect the Link to Previous button to disconnect the headers or footers in the section you just created from the previous section. When this button is deselected, its background color changes from dark gray to a light gray matching the rest of the ribbon.

Important Notes about the Link to Previous Button
Deselecting the Link to Previous button only disconnects the headers or footers—it doesn’t disconnect the headers and footers.
The Link to Previous button will also disconnect any page numbers in the headers or footers. Please see “ How to Start Page Numbers on a Specific Page in Microsoft Word (PC & Mac) ” for more information.
Skip to Step 11 if you have existing headers or footers.
- Select the Header or Footer button in the Header & Footer group.

- Select a style from the drop-down menu.

- Enter your information into the header or footer placeholders or replace existing text.

- Select the Close Header and Footer button.

The headers or footers you just created should now be different than the headers or footers in the previous section.
- Repeat steps 3 through 12 until you have created new headers or footers in each of your sections, as necessary.
- Reselect the Show/Hide button in the Home tab to hide your formatting marks (see figure 2).
You may want to remove the header and footer from the first page of your document if it is a cover page or the first page of the section if it is a title page.
- Place your cursor in the first page of the document or the first page of the section.
- Double-click inside the header or footer area to open the Header & Footer tab (see figure 8).
- Select Different First Page in the Options group.

The header and footer should be removed from the first page of the document or section.
- Select the Close Header and Footer button (see figure 13).
Related Resources
How to Combine Text and Page Numbers in Headers and Footers in Microsoft Word
How to Insert and Delete a Blank Page in Microsoft Word (PC & Mac)
How to Add Page Numbers in Microsoft Word
Updated March 01, 2024
- Microsoft Word Tutorials
- Adobe Acrobat Tutorials
- PowerPoint Tutorials
- Writing Tips
- Editing Tips
- Writing-Related Resources
Assessment Types
- Critical Review
Literature Review
- Presentations
What is a Literature Review?
A literature review is different to an essay. It provides a snapshot of what we know about the research on a particular topic. The author is required to do a comprehensive search of relevant and recent literature (journal articles, text books, websites) to identify what is known about a topic. The main themes are then identified and crtically analysed. A literature review should cover:
- Compare and contrast the research, what are the common themes in the research?
- Are there any debates or disagreements in findings?
- Are there any gaps or limitations in the research reviewed?
- What are the strengths and limitations of the research?
What are the steps to write a literature review?

Adapted from Scribbr. Click here to learn more
Tips for Success Writing a Literature Review
- If it is your first time allow more time that you would for an essay or report.
- Finding quality research will make every step easier. Contact the library for help finding research.
- It can be difficult keeping track of sources. Use a note taking guide.
- Be flexible. Your structure may change as you write.
How do I Structure a Literature Review?

Organising Body Paragraphs
Do not arrange by articles.

Arrange by themes and ideas across the articles.

What does it look like?
Adapted from:
Ni Shé, C., Farrell, O., Brunton, J., & Costello, E. (2021). Integrating design thinking into instructional design: The #OpenTeach case study. Australasian Journal of Educational Technology , 38 (1), 33–52. https://doi.org/10.14742/ajet.6667
What language do I use in a Literature Review?
- << Previous: HELI
- Next: Presentations >>
- Last Updated: May 10, 2024 4:43 PM
- URL: https://eca.libguides.com/assessments
5 Ways to Insert a Footer in Microsoft Excel
Follow along with this Microsoft Excel tutorial to learn how to insert a footer in Excel.
Often you need to print Excel worksheets as reports for the physical distribution to different departments, clients, students, etc. It’s customary to add a footer in such printed documents for several reasons.
You might want to add page numbers, copyright disclaimers, security notifications, and company branding. Though it’s fairly easy to add footers in Microsoft Word by simply clicking on the footer area, that’s not the case for Microsoft Excel.
Excel doesn’t readily allow you to add footers unless you know the tricks to do so. Read this article until the end to learn various methods to add footers in Excel.
Add Footer in Excel Using Page Layout View
You must enable the appropriate view to add a footer to a worksheet. This is the Page Layout view.

Go to the worksheet to which you want to add a footer.
Press Alt + W + P to access the Page Layout view.
You should now see the Add header placeholder text in the worksheet.

Scroll to the bottom of the page to find the Add footer text.
Click on that to enable three footer cells in the spreadsheet.

Press the Tab button to cycle through the three cells.
You can now type your footer text or numbers as per your requirements.
You can press Alt + W + L to go back to the original spreadsheet view of Excel.
Now, when you go to the Print Preview screen, you shall see the footer texts in the worksheet pages you’re printing.
Add Footer in Excel From Insert Tab
The Header & Footer command button is the default way to access the footer option in an Excel spreadsheet. It’s inside the Insert tab of the Excel ribbon menu.

You can press Alt + N + H1 to start inserting a header text automatically.
Now, click anywhere on the worksheet page to disable the header text.

Scroll down to find the Add footer option at the bottom of the page.

Click on any of the footer cells to start entering your content.
Add Footer in Excel Using Page Setup Dialog
Another way to add a footer in Excel without accessing the Page Layout view is the Page Setup dialog box. However, you can’t see the footer text after adding that. You must enter the Page Layout view or Print Preview to visualize the footers you’ve added.

You can press Alt + P + SP to call the Page Setup dialog box.
You shall see the Page tab in the Page Setup dialog. Go to the Header/Footer tab.
If you haven’t set up a custom footer yet, the Footer drop-down menu shall show the None option.

Click on that to expand the list of default footers.
Choose any of the footer formats from the list.
Click Print Preview to visualize how Excel shall print the footer in your spreadsheet pages.
If you’re satisfied with the view, click OK to apply.
Add Footer in Excel for the Chart Sheet
You can’t use options like the Page Layout command in the View tab or Excel Status Bar to insert a footer in a Chart sheet in Excel.
The only option to add a footer is through the Page Setup dialog box.

For a Chart sheet , the Page Setup tool can be accessed using the Insert > Header & Footer command button or by pressing the shortcut key Alt + P + SP .
Now, the rest of the process of entering a new footer or editing an existing one is the same as explained so far.

You can’t see the footer yet. However, it’ll show up if you enter the Print Preview screen.

If you need to add a footer to a chart of your worksheet, follow the steps mentioned above.

Adding an Image Footer in Excel
This feature enables you to add company logos, brand images, or any other relevant picture as a footer in your spreadsheet reports.

Press the hotkey Alt + P + SP to bring up the Page Setup dialog on the target worksheet.
Navigate to the Header/Footer tab and click on the Custom Footer button.

You shall now see the Footer dialog box.
Click on a footer field, like the Left section , Center section , or Right section where you wish to add the footer image.

Click on the Insert Picture button above the Right section footer field.
To upload an image from the PC, click on the From a file option and choose your image file.
Click OK to apply the footer.

Go to the Print Preview screen to find out how the image shows up on the page.
Customizing a Footer in Excel
On the Page Setup dialog, in the Header/Footer tab, you shall find the following options to customize the position or interval of footers:

- You can ensure the first printed page remains clean by eliminating headers and footers by selecting the Different first page check box.
- For distinct headers and footers on odd and even-numbered pages, opt for the Different odd & even pages check box.
- Check the Scale with document box to maintain consistency in font size and scaling with the worksheet. Alternatively, deselect this feature for independent font size and scaling in headers or footers.
- Align header or footer margins precisely with the left and right worksheet margins by selecting the Align with page margins check box. If you need specific margins for headers and footers distinct from worksheet margins, clear the Align with page margins option.
You can add various footer elements in Excel from the Footer dialog. Find below the content you can add and their customization options:

- To change the font of the footer you can select the text and click on the Format Text (A) on the Footer dialog. In the Format Text dialog, you shall also find customizations like font size, color, underline, font type, and more.

- If you wish to add page numbers, you can click on the Insert Page Number button. You can also use the Insert Number of Pages button to add the relevant content.

- Do you want to add the date and time as a footer in your Excel reports? You can use the Insert Date and Insert Time button.
Other important footer items you can add are:

- Insert File Path
- Insert File Name
- Insert Sheet Name
- Insert Picture
- Format Picture (only active if you’ve added a footer image)
Add Footer in Excel Using Excel VBA
You can use the following VBA script to add a footer in Excel with guided input boxes. All you need to do is create a VBA macro using the script. When you run it, the script shall show visual prompts so you can create a custom footer.

Find out how to create a macro using the above script, by going through this quick Excel tutorial:
📒 Read More : How To Use The VBA Code You Find Online
Once you’ve created the macro, hit Alt + F8 to bring up the Macro dialog.
Select the AddFooter macro and hit the Run button.
Once you execute the macro, Excel shall show a series of prompt boxes to collect information about your footer.
If you enter an input in a prompt box and click OK , the script shall end and enter the footer.
If you click Cancel in one prompt, Excel shall show the next prompt.
Here is the order of prompts the script shall show:
- Manual footer text
- Page number as footer text
- Add date and time as footer text
- Sheet name as a footer
- File path as a footer
- File name as a footer
- Footer position selection

For example, I entered Yes in the Date and Time prompt.

For the final input box, I’ve chosen the Center as the footer position.

Find above a sample of date and time inserted as a footer using the VBA script.
Here’s another cool VBA script to programmatically add an image as a footer for the active worksheet:

If you execute the above script, Excel shall ask you to select an image from the local storage of your PC or Mac.

Then, Excel shall also show you an input box so you can enter the position of the footer.

Find above the output of the VBA script.
Conclusions
So far, you’ve learned six different methods to insert a footer in Excel. These methods include Excel user interface commands, shortcut keys, and Excel VBA scripts.
Try the methods you like according to your level of Excel expertise. I personally recommend the Excel VBA-based method as it offers visual queues throughout the process.
If you need a customized VBA script to add a unique footer in Excel, you can let me know in the comment box so I can create one for you. Also, if you know a better method to add a footer in Excel, mention that in your comment.
About the Author

Bipasha Nath
Subscribe for awesome Microsoft Excel videos 😃

John MacDougall
I’m John , and my goal is to help you Excel!
You’ll find a ton of awesome tips , tricks , tutorials , and templates here to help you save time and effort in your work.
- Pivot Table Tips and Tricks You Need to Know
- Everything You Need to Know About Excel Tables
- The Complete Guide to Power Query
- Introduction To Power Query M Code
- The Complete List of Keyboard Shortcuts in Microsoft Excel
- The Complete List of VBA Keyboard Shortcuts in Microsoft Excel
Related Posts

7 Ways to Remove Page Breaks in Microsoft Excel
May 8, 2024
This Microsoft Excel tutorial shall help you learn how to remove page breaks...

8 Ways to Print on One Page in Microsoft Excel
Feb 23, 2024
If you often use up printer paper by printing unnecessary cell ranges in...

7 Ways to Set the Print Area in Microsoft Excel
Jan 23, 2024
If you wish to print selective areas from your worksheet to save paper sheets...
Submit a Comment Cancel reply
Your email address will not be published. Required fields are marked *
Save my name, email, and website in this browser for the next time I comment.
Submit Comment
This site uses Akismet to reduce spam. Learn how your comment data is processed .
Get the Latest Microsoft Excel Tips
Follow us to stay up to date with the latest in Microsoft Excel!

Stuart Weitzman School of Design 102 Meyerson Hall 210 South 34th Street Philadelphia, PA 19104
215.898.3425
Get Directions
Get the latest Weitzman news in your Inbox:
Case studies in design: open call to study projects designed in community.

Receive Weitzman Press Announcements
Case Studies in Design is a new effort to create opportunities for community and design leaders to think together about ways to catalyze transformational design, planning, and place-keeping from the ground up. The goals are to learn from ambitious projects designed in community, to share knowledge and experience through dialogue and a public library of case studies, and to train ourselves for new practices of creative, collective action. We hope to build conversation among thinkers and doers in community organizations, movements, public agencies, schools, and the architecture, landscape, planning, heritage and art fields.
Projects designed in community Case Studies in Design will support the development of 5 case studies per year, over 3 years (15 case studies prepared by 15 people in total). The aim is to study projects where design and planning helped build community power, and where community-led processes produced new forms of design agency through:
1. Deep conversation to shape the nature and time horizon of the project 2. Openness and deference to rooted leadership 3. Reciprocal (not extractive) processes, creatively designed 4. Collaboration and resource-sharing 5. New alliances to achieve leverage.
Collective writing and thinking project Case Studies in Design is coordinated by PennPraxis , a center at Weitzman School of Design at the University of Pennsylvania that is dedicated to the translation of theory into praxis (or action). Our aspiration is to bring together people from a wide geography and set of perspectives on diverse change efforts. Case study projects could range from outstanding examples of community- engaged design practice to more radical roles and results of design, planning or place-keeping. To propel this collective writing and thinking project, we are seeking applications from people who would like to research and author a case study.
We will support 5 case study writers in 2024 with a fee and expense allowance of $50,000 per author to research, write, and curate or create illustrations for a case study over a period of 8 months. Fees for community members participating in interviews, travel and other expenses will be managed by authors within the resources of the $50,000 lump sum for fee and expense. (Two people may apply to work together on a case project, sharing the fee.)
Public library and action—oriented summit PennPraxis will publish the case studies and create an online public library to disseminate them. We will organize a variety of forums from the classroom to gatherings with policymakers and funders to propagate strategies that increase community conversation and influence in the built environment. In the third year of the effort, with 15 case studies in print, we will organize a summit for community leaders, policymakers, students, practitioners, and thinkers to probe more deeply into methods and to shape lessons learned for key audiences. The aim of the summit is to create culture-shifting dialogue between disciplines, spheres of action, governments, funders and community leaders, practice and theory.
Case study method of conversation and analysis Most design “case studies” are project descriptions and images that focus on the what, not the how—the built project and perhaps its reception and performance. Designers are skilled at presenting the thesis, appearance and materials of their projects; so much so, that it can be difficult to understand whether the project outcomes and process measure up to the image for those who will live with them. The statement of the designer rarely conveys how the project was made, or the perspectives of community leaders, policymakers, scientists and other participants in the process.
Our case studies will place focus on the process—the many collaborators and contingencies—and offer insight into how communities and interdisciplinary teams have attempted to traverse the “valley of death” between ideas and implementation.
We aim to create a case study method that invites analysis and requires participants to shape their own values and strategies—active learning for would-be activist designers and community leaders interested taking on complex challenges. Similar to teaching case studies developed in policy and business schools, we are interested in supporting the creation of case studies that are intentionally open-ended presentations of a compelling situation that carries some conflict and uncertainty, with many different viewpoints included in the reporting, rather than critical essays that offer the authors’ conclusions or a how-to guide. The purpose is to cultivate the users capacity for critical analysis, bias recognition, collaboration, leadership, decision-making and action on challenging issues and projects. We believe that, done well, case research and discussion can help us develop theory from practice, and apply new theory to practice.
Applying to study and document a project Individuals (or pairs) can apply to develop a case for a fee of $50,000 by submitting the following material via this webform in a single pdf file of no more than 20MB:
1) a writing sample—past work that demonstrates capacity for narrative and analytical writing 2) CV or résumé with current contact information 3 a) 2,000 to 3,000-word description of a project that you think would make an interesting case study in community-engaged design, planning or place-keeping, and why (project images are optional) AND / OR 3 b) 500 to 2,000-word response to our outline of the intent of the case study program, including any critique that you think would make it stronger.
An applicant who does not apply with an interest in a particular project (outlined in response to 3a above) may be invited to document a project suggested by someone else. The length of your résumé is less important than your perspective on projects designed in community and capacity to enrich the knowledge base through the medium of case study writing and illistration.
Suggesting a project if you are not applying to write a case study We also welcome suggestions of exemplary projects worthy of deep analysis from colleagues in community and indigenous organizations, movements, public agencies, design and planning practices, and foundations. You can submit a project suggestion (with or without images) via this webform . Recommendations can be of any length, even just a project name and location or link. We can accept file sizes up to 20MB. Please include your contact information in case we would like to reach out to learn more.
Send any questions to [email protected] .
Timeline Applications will be reviewed as they come in until the deadline at 12pm on June 30, 2024. We aim to award all contracts by July 28, 2024, and may award some contracts for early applicants prior to that date. Authors will have 8 months to submit a completed case study (April 1, 2025), with an interim review at roughly 4 months.
Documentation
Download a PDF version of the Call for Applications
Many congratulations to doctoral student Hannah Scheithauer who has been awarded the annual R. Gapper Postgraduate Essay Prize by the Society for French Studies for her essay entitled "Cycles of Violence and Fictions of the ‘Grey Zone’ in Jérôme Ferrari’s Où j’ai laissé mon âme (2010)".
Hannah's essay is part of the thesis that she is currently completing in the Faculty of Medieval Languages under the joint supervision of Ève Morisi (French and Francophone literatures) and Georgina Paul (German and Austrian literatures) on cross-border communities and the limits of ‘multidirectional memory’ in contemporary prose fiction.
The R. Gapper Postgraduate Essay Prize is awarded annually by the SFS for the best essay - on any subject within the scope of French studies - submitted by a postgraduate student at a university based in the United Kingdom or the Republic of Ireland.


2024 Gruber Cosmology Prize Press Release

MARCIA RIEKE RECEIVES $500,000 GRUBER COSMOLOGY PRIZE
New Haven, CT – The 2024 Gruber Cosmology Prize recognizes Marcia Rieke of the University of Arizona’s Steward Observatory for her pioneering work in infrared astronomy, especially her oversight of instruments allowing astronomers to explore the earliest galaxies in the universe.
Rieke will receive the $500,000 award as well as a gold laureate pin at a ceremony that will take place August 8 at the General Assembly of the International Astronomical Union in Cape Town, South Africa. The citation recognizes her “lasting impact on our understanding of the universe,” in particular through her role as Principal Investigator on a key instrument aboard the James Webb Space Telescope (JWST)—an infrared camera that, in the nearly two years since the telescope began scientific operations, has both reinforced and challenged the understanding of the early universe.
Infrared astronomy investigates the part of the electromagnetic spectrum where the wavelengths of light are slightly to substantially longer than in the visible portion—the sliver of the spectrum that our eyes can see. Observing the universe in infrared light allows astronomers to probe the first stars and galaxies by exploiting a physical phenomenon that cosmologists call “redshift.”
When light left the first galaxies, in the period 100 million to 1 billion years after the Big Bang, it occupied the visible and ultraviolet sections of the electromagnetic spectrum. In the 13.7 to 13 billion years since then, the expansion of the universe—the expansion of space itself—has stretched those light waves, lengthening them, shifting them not just toward the red end of the visible spectrum but into the infrared.
Rieke has devoted much of her career to infrared astronomy, both as an observer and in the capacity for which she is receiving the Gruber Prize—as an instrumentalist on major space missions. Astronomers desiring observations in the infrared observe from space because the infrared sky seen through the Earth’s atmosphere is too bright to see distant galaxies.
She served on the Science Working Group for the Space Infrared Telescope Facility (later the Spitzer Space Telescope, which was operational from 2003 to 2020) and as the co-investigator for its onboard Multi-band Imaging Photometer. She then assumed the role of deputy principal investigator for the Near Infrared Camera and Multi-Object Spectrometer on the Hubble Space Telescope. While that instrument allowed Hubble to see galaxies at significantly higher redshifts (and therefore at significantly earlier epochs in the universe) than any previous instrument, it also capped Hubble’s observing capabilities at around a billion years after the Big Bang. If astronomers wanted to see the universe’s first stars and galaxies, they would need a telescope that could see deeper into the infrared.
For that reason, Hubble’s successor, the James Webb Space Telescope (originally the Next Generation Space Telescope), was always going to be primarily an infrared instrument. From 1997 to 2000 Rieke served on the telescope’s ad hoc working group, helping to formulate its instrumentation and aspirations. She next chaired the telescope’s Interim Science Working Group, from 2000 to 2003. In 2002, when the telescope was entering full design and production mode, NASA appointed Rieke the Principal Investigator for JWST’s Near-Infrared Camera (NIRCam). Over the next twenty years, Rieke oversaw the development, delivery, and, after JWST’s launch in December 2021, commissioning of NIRCam.
She has also availed herself of the telescope for her own research as well as her colleagues’. One of the perks of being a principal investigator on a major JWST instrument is an allotment of Guaranteed Observing Time—in Rieke’s case, 900 hours. She and her collaborators have apportioned that observing time among teams that use another advantage of infrared astronomy—the ability to see through the universe’s plentiful repositories of dust—to study the cosmos from the planets, moons, and loose bodies in our solar system, through the star- and planet-forming regions in the rest of our Milky Way galaxy, and across galaxies stretching to Hubble’s 1 billion-years-after-the-Big-Bang horizon.
As for what lies beyond that horizon, NIRCam has repeatedly produced results redefining cosmology. According to JWST, galaxies in the early universe developed earlier, grew larger, and spawned a richer array of elements than previous theories had predicted. While that mismatch of prediction and observation initially resulted in a flurry of articles and essays proclaiming that “Webb broke cosmology,” Rieke (like the vast majority of cosmologists) sees the process as an example of the scientific method at work.
“There’s a story beginning to emerge,” Rieke says, “but we still need some more pieces to the story.” For the next twenty years or more—the duration of JWST’s lifetime—many of those pieces will emerge from the instrument that Rieke, more than anyone else, willed into existence.
Additional Information
In addition to the cash award, the recipient will receive a gold laureate pin and a citation that reads:
The Gruber Foundation is pleased to present the 2024 Cosmology Prize to Marcia Rieke for her pioneering work on astronomical instrumentation to reveal the breadth and details of the infrared universe. Her contributions to flagship space missions have opened new avenues for understanding the history and mechanisms of star and galaxy formation. She enabled the development and delivery of premier instruments providing groundbreaking sensitivity to near-infrared wavelengths to both the James Webb Space Telescope (NIRCam, as Principal Investigator) and the Hubble Space Telescope (NICMOS, as Deputy Principal Investigator). Through these substantive contributions along with earlier work, Marcia Rieke has had a lasting impact on our understanding of the universe.
The Cosmology Prize honors a leading cosmologist, astronomer, astrophysicist or scientific philosopher for theoretical, analytical, conceptual or observational discoveries leading to fundamental advances in our understanding of the universe.
Laureates of the Gruber Cosmology Prize:
- 2023 Richard Ellis , for contributions in galaxy evolution, onset of cosmic dawn and reionization in the high redshift universe, and detection of earliest galaxies via the Hubble Ultra Deep Field study
- 2022 Frank Eisenhauer , for instruments that collected evidence of a black hole at our galaxy center
- 2021 Marc Kamionkowski, Uroš Seljak, and Matias Zaldarriaga, for contributions to methods essential for studying the early universe
- 2020 : Lars Hernquist and Volker Springel, for computer simulations that revolutionized the study of processes behind the structure of the cosmos
- 2019: Nicholas Kaiser and Joseph Silk, revolutionized cosmology with contributions to two of its vital components: dark matter and relic radiation from the Big Bang
- 2018: The Planck Team, Jean-Loup Puget and Nazzareno Mandolesi, for measuring the universe’s contents and the geometry and test inflation with unparalleled precision
- 2017: Sandra M. Faber, for a body of work that has helped establish many of the foundational principles underlying the modern understanding of the universe on the largest scales
- 2016: Rainer Weiss, Kip Thorne, Ronald Drever, and the entire LIGO team, for a first detection of gravitational waves that emanated from the collision of two black holes
- 2015: John Carlstrom, Jeremiah Ostriker, and Lyman Page , for their individual and collective contributions to the study of the universe on the largest scales
- 2014: Jaan Einasto, Kenneth Freeman, Brent Tully and Sidney van den Bergh, for pioneering contributions to the understanding of the structure and composition of the nearby Universe
- 2013: Viatcheslav Mukhanov and Alexei Starobinsky, for contributions to inflationary cosmology and the theory of inflationary perturbations of the metric, which changed our views on the origin of our universe and on the mechanism of formation of its structure
- 2012: Charles Bennett and the WMAP Team, for their exquisite measurements of anisotropies in the relic radiation from the Big Bang---the Cosmic Microwave Background
- 2011: Marc Davis, George Efstathiou, Carlos Frenk , Simon White, pioneering use of numerical simulations to model and interpret the large-scale distribution of matter in the Universe
- 2010: Charles Steidel, for his groundbreaking studies of the distant Universe
- 2009: Wendy Freedman, Robert Kennicutt and Jeremy Mould, for the definitive measurement of the rate of expansion of the universe, Hubble's Constant
- 2008: J. Richard Bond, for his pioneering contributions to our understanding of the development of structures in the universe
- 2007: Saul Perlmutter and Brian Schmidt and their teams: the Supernova Cosmology Project and the High-z Supernova Search Team, for independently discovering that the expansion of the universe is accelerating
- 2006: John Mather and the Cosmic Background Explorer (COBE) Team, for studies confirming that our universe was born in a hot Big Bang
- 2005: James E. Gunn, for leading the design of a silicon-based camera for the Hubble Space Telescope and developing the original concept for the Sloan Digital Sky Survey
- 2004: Alan Guth and Andrei Linde, for their roles in developing and refining the theory of cosmic inflation
- 2003: Rashid Alievich Sunyaev, for his pioneering work on the nature of the cosmic microwave background and its interaction with intervening matter
- 2002: Vera Rubin, for discovering that much of the universe is unseen black matter, through her studies of the rotation of spiral galaxies
- 2001: Martin Rees, for his extraordinary intuition in unraveling the complexities of the universe
- 2000: Allan R. Sandage and Phillip J. E. (Jim) Peebles , Sandage for pursuing the true values of the Hubble constant, the deceleration parameter and the age of the universe; Peebles for advancing our understanding of how energy and matter formed the rich patterns of galaxies observed today
The International Astronomical Union partners with the Foundation on the Prize and nominates the members of the Selection Advisory Board that chooses the Prize recipients. Its members are:
Jeremy Butterfield , University of Cambridge; Mihalis Dafermos , Princeton University; Luis Ho , Kavli Institute for Astronomy and Astrophysics at Peking University; Angela Olinto (Chair), Columbia University; Jean-Loup Puget , The National Centre for Scientific Research (CNRS); Suzanne Staggs , Princeton University; Licia Verde , Universitat de Barcelona. Wendy Freedman of The University of Chicago and Martin Rees of The University of Cambridge also serve as special Cosmology advisors to the Foundation.
The Gruber International Prize Program honors individuals in the fields of Cosmology, Genetics and Neuroscience, whose groundbreaking work provides new models that inspire and enable fundamental shifts in knowledge and culture. The Selection Advisory Boards choose individuals whose contributions in their respective fields advance our knowledge and potentially have a profound impact on our lives.
The Gruber Foundation was established in 1993 by the late Peter Gruber and his wife Patricia Gruber. The Foundation began its International Prize Program in 2000, with the inaugural Cosmology Prize.
For more information on the Gruber Prizes, visit www.gruber.yale.edu , e-mail [email protected] or contact A. Sarah Hreha at +1 (203) 432-6231. By mail: The Gruber Foundation, Yale University, Office of International Affairs, PO Box 208320, New Haven, CT 06520..
Media materials and additional background information on the Gruber Prizes are in our online newsroom: https://gruber.yale.edu/news-media
COMMENTS
Revised on March 5, 2024. The first page of your MLA format paper starts with a four-line left-aligned header containing: Your full name. Your instructor's name. The course name and number. The date of submission. After the header, the title of the paper is centred on a new line, in title case. The header and title do not take any special ...
4. Hover over "Top of Page" and select "Plain Number 3". 5. For the MLA header, enter your last name along with the page number, both right-aligned. For the APA header, input the abbreviated version of the title in all capital letters and press the "Tab" key. MLA essay header example. APA essay header example.
Be consistent throughout your essay. Choose a pattern and stick with it throughout the entirety of the assignment. If you start off by having a heading for each paragraph, keep it that way until the end. Also, make sure the format remains the same.
In MS Word, you can create a header under the "Insert" menu. Double-click the top of the page. Click the "Insert" menu in the toolbar. Click "Page Number", hover over "Top of Page", and click "Plain Number 3". Enter your last name along with the page number, both right-aligned. Now that you know how to format an MLA running ...
At the end of your essay, insert a page break (found under the "Insert" tab) and center the words "Works Cited" at the top of your page (not in the header). If there is only one source being cited, type "Work Cited". Insert your citations in alphabetical order in the subsequent lines. Make sure they are left aligned.
MLA Heading vs. MLA Header. You have graduated from 5-paragraph essays to MLA research papers, so it is time to learn what an MLA heading vs. a header is in MLA format. MLA headings are found on the first page and provide identifying information. MLA headers are identifiers found on every page of your paper.
In the case of a group project, list all names of the contributors, giving each name its own line in the header, followed by the remaining MLA header requirements as described below. Format the remainder of the page as requested by the instructor. In the upper left-hand corner of the first page, list your name, your instructor's name, the ...
2. The Inner Pages: For the pages that follow the first page, set the heading like this: instead of the whole heading, you would use the header feature on your word processing program and including the following information: Your Last Name and the Page Number.
Set the top, bottom, and side margins of your paper at 1 inch. Use double-spaced text throughout your paper. Use a standard font, such as Times New Roman or Arial, in a legible size (10- to 12-point). Use continuous pagination throughout the paper, including the title page and the references section.
Headings are used to help guide the reader through a document. The levels are organized by levels of subordination, and each section of the paper should start with the highest level of heading. There are 5 heading levels in APA. Regardless of the number of levels, always use the headings in order, beginning with level 1.
Align the running head to the left margin of the page header, across from the right-aligned page number. View the sample papers to see how the running head and page number appear in APA Style papers. The page header appears within the top margin of every page of the paper. For student papers, the page header consists of the page number only.
Then, Make the "Insert" ribbon active at the top of the screen. Click the "Page Number" icon. Click "Top of Page." Click "Plain Number 3." Type your last name and a space just before the page number that will be added to the upper right of your document. If the header is not in the correct fonts, highlight your name and the page number, make ...
Indent the first line of every paragraph of text 0.5 in. using the tab key or the paragraph-formatting function of your word-processing program. Page numbers: Put a page number in the top right corner of every page, including the title page or cover page, which is page 1. Student papers do not require a running head on any page.
Figure 1. Insert tab. Select the Header or Footer button in the Header & Footer group. Figure 2. Header and Footer buttons in the Insert tab. Select a built-in style from the drop-down menu. Figure 3. Built-in styles. After you select a style, Word will automatically switch from the Insert tab to the Header & Footer tab.
Headings and subheadings provide structure to a document. They signal what each section. is about and allow for easy navigation of the document. APA headings have five possible levels. Each heading level is formatted differently. Note: Title case simply means that you should capitalize the first word, words with four or more letters, and all ...
In this lesson, you will learn how to insert and edit headers and footers. The header is a section of the document that appears in the top margin, while the footer is a section of the document that appears in the bottom margin. Headers and footers generally contain information such as page number, date, document name, etc. GCFLearnFree.org®
Word has a variety of preset headers and footers you can use to enhance your document's design and layout. In our example, we'll add a preset header to our document. Select the Insert tab, then click the Header or Footer command. In our example, we'll click the Header command. In the menu that appears, select the desired preset header or footer ...
Page numbering, headers and footers . Including page numbers in your assignments makes them more accessible. Depending on the departmental guidance you have been given, you may be asked to include these in either the header or the footer of your essay (the blank space above and below where the text would go on a normal page in a word processor).
Formatting your essay/report When you submit your essay (assignment) for marking, there is a set format you must follow. ... Pagination should be done within the header or footer using the automatic numbering. Also include your details in the header or footer. Use 'Insert' >header or footer > insert your name, student number, assignment ...
Figure 8. Header area. Double-clicking opens the Header & Footer tab, which only appears when the headers or footers are selected. Deselect the Link to Previous button to disconnect the headers or footers in the section you just created from the previous section. When this button is deselected, its background color changes from dark gray to a light gray matching the rest of the ribbon.
A literature review is different to an essay. It provides a snapshot of what we know about the research on a particular topic. The author is required to do a comprehensive search of relevant and recent literature (journal articles, text books, websites) to identify what is known about a topic. The main themes are then identified and crtically ...
The Allentown School District is excited to announce that the annual Martin Luther King, Jr. Essay and Art Contest is now open. All students in grades 4-12 are encouraged to participate. This year the theme, "Leadership and Service," invites students to reflect on the qualities of leadership and service exemplified by Dr. King and how they can apply them to their own lives.
The Header & Footer command button is the default way to access the footer option in an Excel spreadsheet. It's inside the Insert tab of the Excel ribbon menu. Header & Footer command. You can press Alt + N + H1 to start inserting a header text automatically. Now, click anywhere on the worksheet page to disable the header text. Add footer ...
Case Studies in Design is a new effort to create opportunities for community and design leaders to think together about ways to catalyze transformational design, planning, and place-keeping from the ground up. The goals are to learn from ambitious projects designed in community, to share knowledge and experience through dialogue and a public library of case studies, and to train ourselves for ...
Many congratulations to doctoral student Hannah Scheithauer who has been awarded the annual R. Gapper Postgraduate Essay Prize by the Society for French Studies for her essay entitled "Cycles of Violence and Fictions of the 'Grey Zone' in Jérôme Ferrari's Où j'ai laissé mon âme (2010)".. Hannah's essay is part of the thesis that she is currently completing in the Faculty of ...
MARCIA RIEKE RECEIVES $500,000 GRUBER COSMOLOGY PRIZE . New Haven, CT - The 2024 Gruber Cosmology Prize recognizes Marcia Rieke of the University of Arizona's Steward Observatory for her pioneering work in infrared astronomy, especially her oversight of instruments allowing astronomers to explore the earliest galaxies in the universe.. Rieke will receive the $500,000 award as well as a ...