All about Microsoft 365

Generate a report of Azure AD role assignments via the Graph API or PowerShell
A while back, I published a short article and script to illustrate the process of obtaining a list of all Azure AD role assignments. The examples therein use the old MSOnline and Azure AD PowerShell modules, which are now on a deprecation path. Thus, it’s time to update the code to leverage the “latest and greatest”. Quotes are there for a reason…
The updated script comes in two flavors. The first one is based on direct web requests against the Graph API endpoints and uses application permissions, thus is suitable for automation scenarios. Do make sure to replace the authentication variables, which you can find on lines 11-13. Better yet, replace the whole authentication block (lines 7-36) with your preferred “connect to Graph” function. Also make sure that sufficient permissions are granted to the service principal under which you will be running the script. Those include the Directory.Read.All scope for fetching regular role assignments and performing directory-wide queries, and the RoleManagement.Read.Directory for PIM roles.
The second flavor is based on the cmdlets included as part of the Microsoft Graph SDK for PowerShell. As authentication is handled via the Connect-MGGraph cmdlet, the script is half the size of the first one. And it would’ve been even smaller were it not for few annoying bugs Microsoft is yet to address.
In all fairness, switching to the Graph does offer some improvements, such as being able to use a single call to list all role assignments. This is made possible thanks to the /roleManagement/directory/roleAssignments endpoint (or calling the Get-MgRoleManagementDirectoryRoleAssignment cmdlet). Previously, we had to iterate over each admin role and list its members, which is not exactly optimal, and given the fact that the list of built-in roles has now grown to over 90, it does add up. On the negative side, we have a bunch of GUIDs in the output, most of which we will want to translate to human-readable values, as they designate the user, group or service principal to which a given role has been assigned, as well as the actual role. One way to go about this is to use the $expand operator (or the – ExpandProperty parameter if using the SDK) to request the full object.
While this is the quickest method, the lack of support for the $select operator inside an $expand query means we will be fetching a lot more data than what we need for the report. In addition, there seems to be an issue with the definition of the expandable properties for this specific endpoint, as trying to use the handy $expand=* value will result in an error ( “Could not find a property named ‘appScope’ on type ‘Microsoft.DirectoryServices.RoleAssignment'” ). In effect, to fetch both the expanded principal object and the expanded roleDefinition object, we need to run two separate queries and merge the results. Hopefully Microsoft will address this issue in the future (the /roleManagement/directory/roleEligibilitySchedules we will use to fetch PIM eligible role assignments does support $expand=* query).
Another option is to collect all the principalIDs and issue a POST request against the /directoryObjects/getByIds endpoint (or the corresponding Get-MgDirectoryObjectById cmdlet), which does have a proper support for $select . A single query can be used to “translate” up to 1000 principal values, which should be sufficient for most scenarios. With the information gathered from the query, we can construct a hash-table and use it to lookup the property values we want to expose in our report. Lastly, you can also query each principalID individually, but that’s the messiest option available.
Apart from role assignments obtained via the /roleManagement/directory/roleAssignments call, the script can also include any PIM eligible role assignments. To fetch those, invoke the script with the – IncludePIMEligibleAssignments switch. It will then call the /v1.0/roleManagement/directory/roleEligibilitySchedules endpoint, or similarly, use the Get-MgRoleManagementDirectoryRoleEligibilitySchedule cmdlet. Some minor adjustments are needed to ensure the output between the two is uniform, which includes the aforementioned issue with expanding the navigation properties. But hey, it wouldn’t be a Microsoft product if everything worked out of the box 🙂
Here are some examples on how to run the scripts. The first example uses the Graph API version and no parameters. For the second one, we invoke the – IncludePIMEligibleAssignments parameter in order to include PIM eligible role assignments as well. The last example does the same thing, but for the Graph SDK version of the script.
And with that, we’re ready to build the output. Thanks to the $expand operator and the workarounds used above, we should be able to present sufficient information about each role assignment, while minimizing the number of calls made. The output is automatically exported to a CSV in the script folder, and includes the following fields:
- Principal – an identifier for the user, group or service principal to which the role has been assigned. Depending on the object type, an UPN, appID or GUID value will be presented.
- PrincipalDisplayName – the display name for the principal.
- PrincipalType – the object type of the principal.
- AssignedRole – the display name of the role assigned.
- AssignedRoleScope – the assignment scope, either the whole directory (“/”) or a specific administrative unit.
- AssignmentType – the type of assignment (“Permanent” or “Eligible”).
- IsBuiltIn – indicates whether the role is a default one, or custom-created one.
- RoleTemplate – the GUID for the role template.
Now, it’s very important to understand that this script only covers Azure AD admin roles, either default or custom ones, and optionally eligible PIM-assignable roles (do note that the PIM cmdlets/endpoints do not cover all custom role scenarios). Apart from these, there are numerous workload-specific roles that can be granted across Office 365, such as the Exchange Online Roles and assignments, Roles in the Security and Compliance Center, site collection permissions in SharePoint Online, and so on. Just because a given user doesn’t appear in the admin role report, it doesn’t mean that he cannot have other permissions granted!
In addition, one should make sure to cover any applications (service principals) that have been granted permissions to execute operations against your tenant. Such permissions can range from being able to read directory data to full access to user’s messages and files, so it’s very important to keep track on them. We published an article that can get you started with a sample script a while back.
9 thoughts on “ Generate a report of Azure AD role assignments via the Graph API or PowerShell ”
- Pingback: Reporting on Entra ID directory role assignments (including PIM) - Blog
This script is very nicely written, however the output of the Powershell Graph SDK version is incorrect (I didn’t check the other).
If I am eligible to activate a role I’ll be in the eligible list. However once I activate the role, my activated role assignment will show up in the list of role assignments from “Get-MgRoleManagementDirectoryRoleAssignment”. The output of that command doesn’t include a ‘status’ property. Your script assumes that if there’s no ‘status’ then the assignment is permanent, however that’s not accurate. So every eligible user who has activated a role shows up twice in the output of your script – once as as eligible for the role and once as a permanent assignment.
I came across your script because I’m trying to accomplish a similar task. My goal is to enumerate all the users who have eligible or permanent role assignments. I think the answer may be that if a user is in the eligible list, and also in the role assignment list, for the same role, then you can assume that the role assignment came from activation, but that doesn’t really seem very satisfactory.
Thanks Matt. The script is a bit outdated by now, I don’t even know if it runs with the “V2” Graph SDK. I’ll update it at some point 🙂
To further address your comment – neither the Get-MgRoleManagementDirectoryRoleAssignment nor the Get-MgRoleManagementDirectoryRoleEligibilitySchedule cmdlet returns sufficient information in order to determine whether a given (eligible) role assignment is currently activated. You can get this information via Get-MgRoleManagementDirectoryRoleAssignmentScheduleInstance, should be easy enough to add to the next iteration of the script.
Hi, thks for your great work. do you know why i dont see the eligible assignements ?
Seems they made some changes and you can no longer use $expand=* on the /v1.0 endpoint. Try using /beta, should work there. I’ll update the script when I get some time.
I’ve updated the script, let me know if you are still having issues.
Awesome, thank you very much.
Merci merci merci !!! Thanks thanks thanks !!
Leave a Reply Cancel reply
Your email address will not be published. Required fields are marked *
Save my name, email, and website in this browser for the next time I comment.
This site uses Akismet to reduce spam. Learn how your comment data is processed .

- Active Directory Reporting
- Office 365 Reporting
- Azure AD Monitoring
- Managing Azure AD Roles and Permissions with PowerShell

- August 24, 2023
Managing Azure AD Roles and Permissions with PowerShell. Do you need help managing and automating Azure AD Roles and Permissions with Windows PowerShell? This article explains the typical scenarios for automating Azure Role Based Access Control (RBAC) using PowerShell.
To lay the foundation and prepare to manage Azure roles and permissions, we start with an overview of Azure role-based access control (RBAC). Following that, we explain the three elements of role assignment.
There is also a section that explains the prerequisites for managing Azure AD roles and permissions with Windows PowerShell.
The next sections are dedicated to explaining the steps for assigning Azure AD roles using PowerShell.
Finally, we explain how to list roles assigned to users and groups using PowerShell .
Also Read Azure AD Privileged Roles: Manage & Monitor Privileged Access
What is Azure Role-Based Access Control (RBAC)
Azure role based access control (RBAC) allows administrators to do fine grained access control to resources . In other words, Azure RBAC allows admins to control who has access to resources.
Additionally, RBAC controls the level of access to resources in Azure.
At the core of RBAC is role assignments. Azure has hundreds of built-in roles with pre-defined permissions that are assigned to users, groups, or service principals .
The existence of built-in roles with pre-defined permissions makes role assignments easy, as admins do not have to grant permissions to objects directly.
However, there are instances where the built-in roles may not be suitable for an organization’s needs. In this situation, custom roles are created.
This article covers the steps to assign existing roles and also create and assign custom Azure AD roles.
Azure Role Assignment Elements
Assigning role assignments involves 3 elements – security principal, role definition, and scope. The security principal is the Azure Active Directory object to be assigned the role.
On the other hand, the role definition is the built-in or custom Azure AD role that is being assigned while the scope is level the role is assigned. There are 4 scopes of that roles are assigned in Azure.
Specifically, Azure roles are assigned to a resource, a resource group, a subscription, and a management group. To assign a role to a resource, you require the resource ID.
However, assigning a role to a resource group scope requires the name of the resource group. Running the Get-AzResourceGroup command returns all resource groups, including their names in the current subscription.
If assigning a role at the subscription scope, you need the subscription ID. To list all subscriptions in the tenant, run the Get-AzSubscription command.
Finally, roles are assigned a management group scope which requires the name of the management group. To get the name of a management group, run the Get-AzManagementGroup command.
Understanding these elements is important to managing Azure AD roles and permissions with PowerShell. In the remaining part of the article, we explore how the security principal, role definition, and scope are used to assign and manage roles in Azure AD using PowerShell.
Also Read Deploy InfraSOS Office 365 Reporting & Auditing SaaS Tool
Try our Active Directory & Office 365 Reporting & Auditing Tools
Try us out for Free . 100’s of report templates available. Easily customise your own reports on AD, Azure AD & Office 355.
Prerequisites for Managing Azure AD Roles and Permissions with PowerShell
Before an admin assigns roles, they must meet the following requirements:
- The user must be assigned the roles with Microsoft.Authorization/roleAssignments/write permissions. Sole roles with this permission are User Access Administrator , Owner, or Global Administrator.
- Secondly, you require access to Azure Cloud Shell or Azure PowerShell .
- The user account running the PowerShell commands must have the the Microsoft Graph Directory.Read.All permission.
- Finally, to perform some of the tasks in this article, your account requires a minimum Azure AD Premium P1 license .
As we progress in this article, we explain the steps to assign these permissions as required.
Also Read Azure AD Roles & Privileges: Azure AD RBAC Model
Steps to Assign Built-in Azure AD Roles Using PowerShell
I’ll be running the PowerShell commands in this and subsequent sections from Azure Cloud Shell , a browser-based shell that allows running Azure CLI or PowerShell commands . However, I’ll be running the commands from my computer.
If you click the cloud shell link above and sign in with your Azure account, it displays a screen like the one in the screenshot below. The benefit of Azure Cloud Shell is that it does not require installing any PowerShell modules on your PC.

Step 1: Determine the Object ID
You need to get the object ID before assigning a role to an Azure resource. Follow these steps to determine the object ID for a user, group, or subscription.
1. Open the Azure Cloud Shell – shell.azure.com and sign in with your Azure account.
If you’re opening Azure Cloud Shell for the first time, it requires you to create a storage account.
2. Run the commands below to get the ID of the user or group you need to assign a role. In the first command, I an returning the ID of a user that begins with
The first command saves the ID of the user in the userid variable, while the second one saves the group ID of the group to the grouped variable. Before running the commands remember to change the UserPrincipalName and the DisplayName.
Also Read Try InfraSOS Office 365 Reporting & Auditing Solution
Step 2: Get the Role to Assign
The next step for managing Azure AD roles and permissions with PowerShell is determining the role to assign. Start by listing all the available roles in your Azure AD tenant using the following command.
The command displays the Name , and Id of all roles in the tenant. Additionally, it returns True or False in the IsCustom column.

To demonstrate, I want to assign the Security Admin role to the user and group I determined in Step 1. To display the name of the role, I pipe the output of the Get-AzRoleDefinition command to Where-Object as shown in this command.
Step 3: Identify the Role to Assignment Scope
The command below returns the ResourceID of a storage account (resource scope) and saves it in the ResourceID variable.
Later, I assign the user in step 1 the “Security Admin” role in this storage account resource.
Also Read Azure AD Role-Based Access Control Best Practices: How to Use Azure AD Roles and Privileges Effectively
Step 4: Assign the Azure Role
Using the information in steps 1 to 3, run the command below to assign the role to the user . Before running the command, the role is not assigned to this storage account, as shown in the screenshot below.

The first command assigns the “Security Admin” role to a user saved in the $userid variable. Similarly, the second command assigns the same role to a group saved in the $groupid variable.
After running the above commands, refreshing the storage accounts displays the Security Admin role, and the user and group assigned the role.

Also Read Implement Azure AD Role Based Access Control Policies
Display Azure AD Role Assignment Using PowerShell
Earlier, I assigned the “Security admin” role to a user with UPN, [email protected]. If you recall, the userId for the user was saved in the $userid variable.
Similarly, the scope ID of the storage account was saved in the $scoperesourceID variable. To display the role assignment for the user, I run the command below.
The command displays the role assignment details, including the RoleAssignmentName, and scope.

You display the same information for the group by running this command.
Also Read Try InfraSOS Azure AD Reporting & Auditing Tool
Managing Azure AD Roles and Permissions with PowerShell Conclusion
Administering Azure roles requires knowledge of the role based access control model . Additionally, understanding Azure role assignment elements – security principal, role definition, and scope – is essential to manage role assignments with PowerShell effectively.
Not only that, but an account assigning roles has to meet some prerequisites such as such as configuring PowerShell with the required modules and ensuring appropriate administrative privileges.
The step-by-step guide provided in this article offers a clear roadmap to follow when assigning built-in Azure AD roles using PowerShell. From determining the Object ID to identifying the scope for role assignment, each stage is meticulously outlined, facilitating a seamless and controlled role allocation process.
Try InfraSOS for FREE
Try InfraSOS Active Directory, Azure AD & Office 365 Reporting & Auditing Tool
- Free 15-Days Trial
- SaaS AD Reporting & Auditing Solution
Related posts:
- Azure AD Roles and Permissions: Assign & Manage Roles for Users & Groups
- Office 365 Identity & Access: Manage Users & Permissions
- Azure AD Custom Roles: Create & Manage Custom Roles for Azure AD
- Azure AD Privileged Roles: Manage & Monitor Privileged Access
- Azure Storage Security: Secure Accounts with Encryption & Access Policies

- Victor Ashiedu
- No Comments

Leave a comment Cancel reply
Your email address will not be published. Required fields are marked *
Save my name, email, and website in this browser for the next time I comment.
Building a comprehensive report on Azure AD admin role assignments in Powershell
Keeping an eye on azure ad administrative role assignments is crucial for tenant security and compliance. forget about the built-in pim report in the azure ad portal - take reporting to the next level and build your own report with graph, kql and powershell..
Unassigning inactive roles, verifying that all role holders have registered MFA and are active users, auditing service principals, role-assignable groups and guests with roles, move users from active to eligible roles in PIM ( Privileged Identity Management ), and making sure that no synchronized users have privileged roles are just a few ideas for why you should be reporting on this topic.
In this blogpost I will showcase how to gather data from various sources and compile it all into an actionable status report. Since different tenants have different needs and ways of working, I’m providing examples so that you can write your own custom-tailored script.
The report will list the following records:
- Users with eligible or active Azure AD admin roles - including details on last role activation date, role assignment and expiration dates, MFA status and last sign-in date, admin owner account status etc.
- Service Principals / Applications and Managed Identities with active Azure AD admin roles - including details on last authentication date, tenant ownership, etc.
- Role-assignable groups with eligible or active Azure AD admin roles
Note : Role-assignable groups granted one or more Azure AD admin roles will be listed in the report but users with active or eligible membership to such groups will currently not be listed.
See the Report examples chapter for details.
Prerequisites
Connecting to graph and log analytics, mfa registration details, role assignments, principal last sign-in date, eligible role last activation date, default mfa method and capability, admin account owner, service principal owner organization, report examples, example script.
These Powershell modules are required:
- Graph Powershell SDK
- Azure Powershell
Other prerequisites:
- Global Reader role (or other AAD roles granting enough read-access)
- Admin consent to any required non-consented Graph scopes (read-only) in Graph Powershell SDK.
- Reader-role on the Log Analytics workspace where the Azure AD Sign-in and Audit logs are exported.
Connect to Graph with the Graph Powershell SDK using the required read-only scopes, and select the beta endpoint as required by some of the cmdlets:
Then connect to Azure with the Azure Powershell module, for running KQL queries on the Log Analytics workspace data. Read my Query Azure AD logs with KQL from Powershell blogpost for more information on running KQL queries in Powershell. Update the various parameters according to your environment.
Extracting data
We need to extract data from various sources using Microsoft Graph and KQL queries in Log Analytics.
To report on MFA registration details for Azure AD admin role holders it is likely most efficient to extract all registration details and create a hashtable for quick lookup, depending on the number of users in the tenant.
Assigned roles are active role assignments. This query will also return eligible role assignments which are currently activated through PIM, so we’ll filter those out as they will just be duplicates in the report as they are also listed as eligible roles.
Eligible roles are role assignments requiring activation in PIM.
Then we combine the two assignment types into one array. Use the Select-Object cmdlet to pick out a few records while developing and testing the script.
Now we have all the assignment objects we need in the $allRoleAssignments array, and will process each of those objects in a foreach loop to fetch other necessary data. In the following examples I’ve populated the $roleObject variable with one object from the $allRoleAssignments array.
Since the $allRoleAssignments array may contain both users and Service Principals with active or eligible role assignments, the $roleObject.Principal.AdditionalProperties.'@odata.type property will tell which principal type the current object is - either '#microsoft.graph.user or #microsoft.graph.servicePrincipal . And for Service Principals we can differentiate on types in the $roleObject.Principal.AdditionalProperties.servicePrincipalType property - which is either Application or ManagedIdentity .
The quickest way to get an Azure AD user’s last sign-in date is to query Graph for the user and selecting signInActivity .
For Service Principals we need to query the Azure AD logs in Log Analytics with KQL to fetch the date when the Service Principal last signed in.
KQL query for Service Principal of type Application :
KQL query for Service Principals of type ManagedIdentity :
We also need to fetch the latest date of eligible role activations for users. If $roleObject.AssignmentType equals null and the principal is a user, the following KQL query can help out:
Users with administrative roles and no registered MFA method can be a security risk, depending on tenant configuration and conditional access policies. It’s best to avoid it - while also report on the default type of MFA methods active role assignees have. We already have the $mfaRegistrationDetailsHashmap hashtable and can query it for each processed role where the principal is a user.
If you’re following Microsoft best-practises and separating normal user accounts from administrative roles, you should be having a separate admin account for each user who requires privileged roles and access.
When having separate admin accounts it’s also important to check account status of the admin account owners if possible - to make sure that all admin accounts of terminated employees have been disabled and/or deleted. This query will depend on how you identify admin account owners in your tenant, the following example extracts the owner’s accountName from the UPN and queries Graph for any user with that onPremisesSamAccountName + employeeId .
Service Principals of multi-tenant app registrations can be owned by other Azure AD tenants and consented to in your tenant. It’s important to know about these and understand why they have privileged roles.
If $roleObject.Principal.AdditionalProperties.appOwnerOrganizationId is not null , query Graph for the tenant properties of the owner organization.
$spOwnerOrg.displayName will contain the tenant organization name, and $spOwnerOrg.defaultDomainName the tenant’s default domain’, which can provide a better clue of what the Service Principal is used for and by whom.
Note : Know 100% what you’re doing before removing any privileged roles from Service Principals, especially from Microsoft-owned apps which likely have the roles for a very good reason.
That’s about it, we now have the data necessary to compile an actionable status report on all active and eligible Azure AD role assignments.
Compiling the report
We can now construct a PSCustomObject per role assignment with the collected data.
User with eligible role assignment:
User with active role assignment and owner account details:
Service Principal with role assignment:
Managed Identity with role assignment:
Role-assignable group with role assignment:
In case you need more tips on creating a reporting powershell script for this report, take a look at the example script I’ve published on GitHub .
Thanks for reading!
Be sure to provide any feedback on Twitter or LinkedIn .
- ← Previous Post
- Next Post →
Martin's Blog
Azure AD: Assign administrator roles with PowerShell
Martin Schoombee
March 2, 2021
Working with PowerShell always brings up a few interesting gotchas, as things are not always what they seem at the surface. I guess you could say that for any development tool out there, but somehow it happens every time I need to do something with PowerShell. Case in point, you would think that assigning an administrator role would be a simple call to one cmdlet…but things are never quite that simple :-/
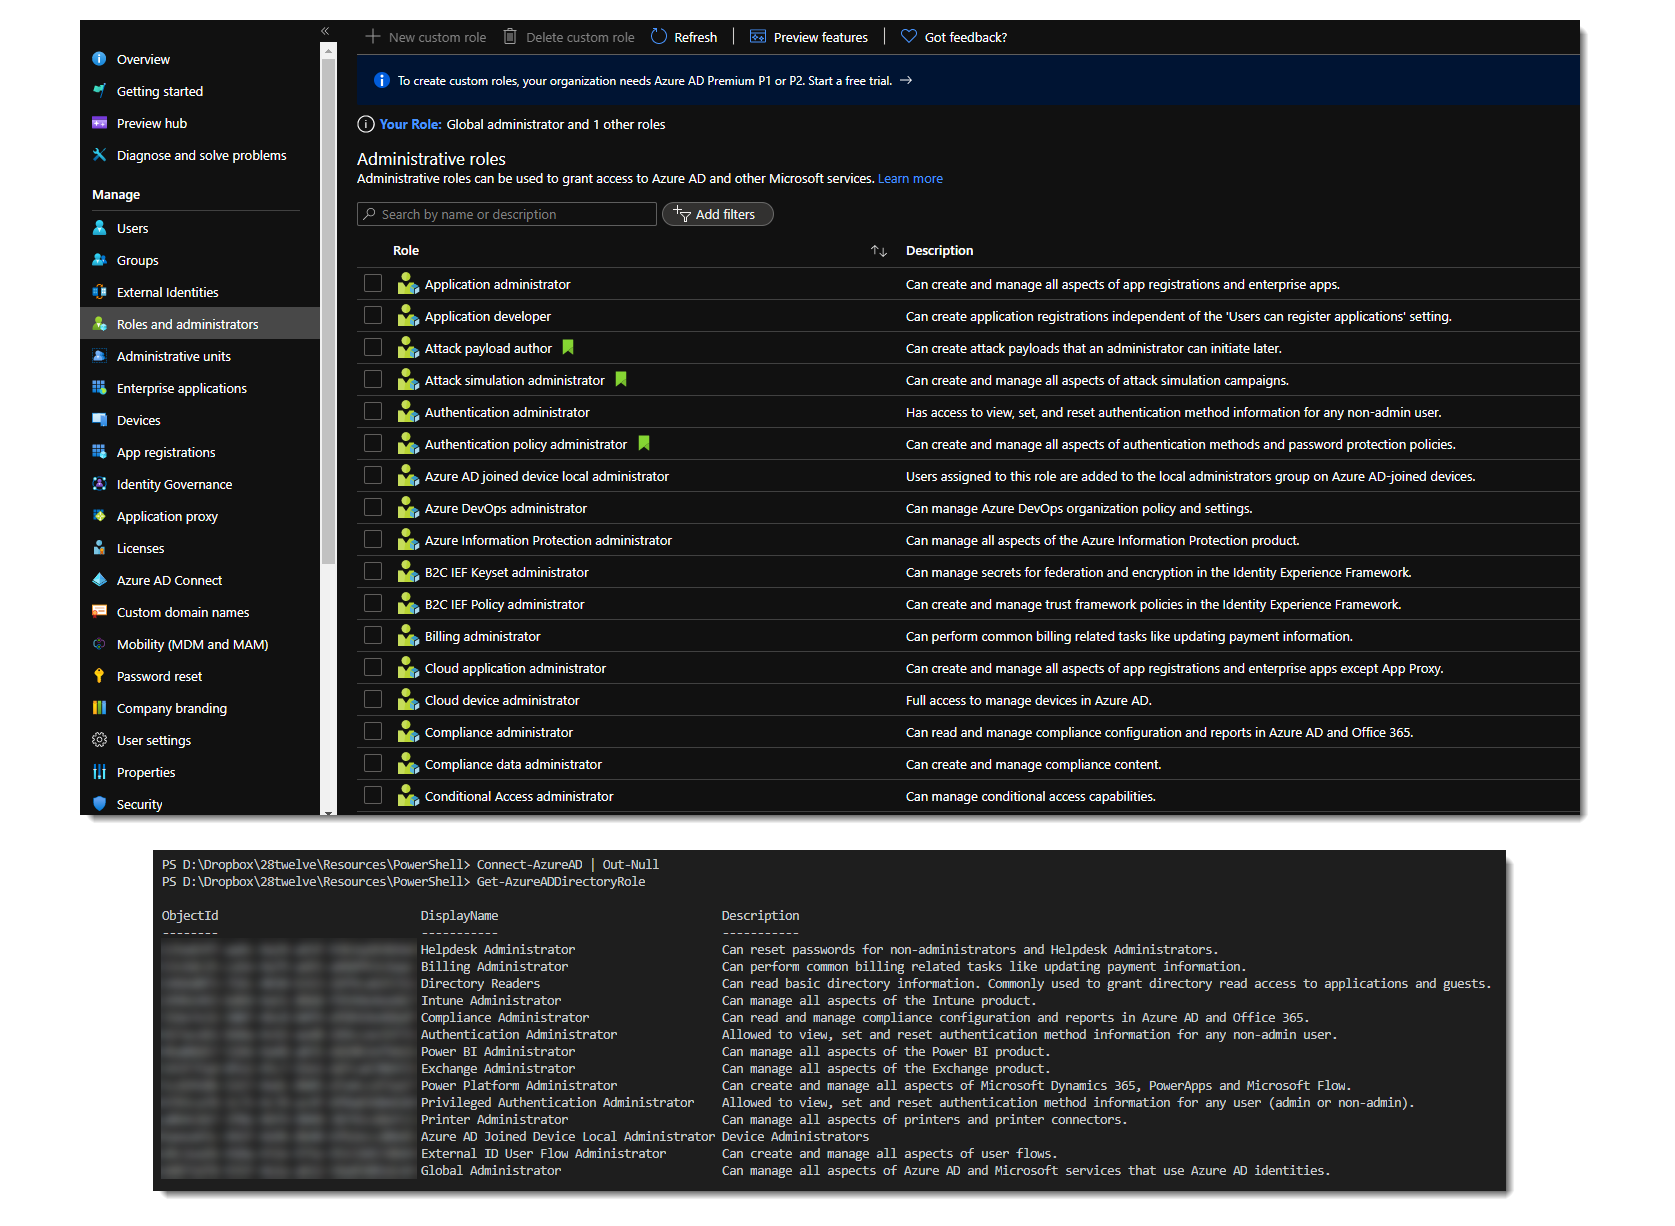
If you look at the Azure AD Roles and administrators page in the Azure portal, you see a long list of administrator roles you can assign to users (or service principals). Compare that to the list returned by the Get-AzureADDirectoryRole cmdlet however and you only see a small subset.

What’s happening here?
The part that’s not necessarily clear from the documentation is that the Azure portal shows a list of available roles (or templates). It seems obvious enough that this would be the case in the portal, as you may not have assigned all of these roles to users yet and you would expect a complete list. But as you can see from the PowerShell results, the fun starts when you think you could just get the role and assign it to a user. How can you assign a role if you can’t get to its object id? How do you get a list of all of the available roles in PowerShell?
After digging for some time you (me) stumble across this gem, the Get-AzureADDirectoryRoleTemplate cmdlet which returns all of the available roles (or templates). Eureka!! Let’s use this object id and assign it to a user with the following snippet…

Not so fast…you get an error saying that the role doesn’t exist…and we know this from what we’ve seen earlier, but it still isn’t clear how we would be able to get an object id to assign.
The solution
The solution is buried underneath many levels of documentation and hours of searching/experimenting:
- Attempt to get the administrator role, using the Get-AzureADDirectoryRole cmdlet.
- If the first step doesn’t return anything, it means that the role has probably never been assigned to a user and we have to enable it in our tenant first. Get the template for the role with the Get-AzureADDirectoryRoleTemplate cmdlet.
- Once you have the template, enable it with the Enable-AzureADDirectoryRole cmdlet. This will create an instance of the role within your tenant, with its own unique object id.
- Now you’ll be able to get to the role and its object id with the Get-AzureADDirectoryRole cmdlet.
- Assign the role to the user (or service principal).
I wish the PowerShell documentation was a bit more explicit in cases like these. Adding a simple comment or two to the documentation of the Get-AzureADDirectoryRole cmdlet will certainly help avoid the hours of confusion and searching…
Want to download the PowerShell script to assign administrative roles? Get it from my GitHub repo.
Share this:
- Click to share on Twitter (Opens in new window)
- Click to share on LinkedIn (Opens in new window)
- Click to email a link to a friend (Opens in new window)
3 thoughts on “ Azure AD: Assign administrator roles with PowerShell ”

Nice article, but even though the role I am trying to assign is enabled, the script did not work, and I did receive the same error message… I think the issue is that you are using the cmdlet Get-AzureADDirectoryRoleTemplate, whereas you should be using Get-AzureADDirectoryRole!!! However, that did not do the trick for me…

What does Get-AzureADDirectoryRole return?
An instance of a DirectoryRole class, whereas Get-AzureADDirectoryRoleTemplate returns a DirectoryRoleTemplate I believe. Moreover, when I inspect both objects, I can clearly see that the ObjectId is accurate when using Get-AzureADDirectoryRole and can actually be mapped to the role I want to fetch. The same does not happen when I use Get-AzureADDirectoryRoleTemplate.
Leave a Reply Cancel reply
Powered by WordPress.com .
Discover more from Martin's Blog
Subscribe now to keep reading and get access to the full archive.
Type your email…
Continue reading

Manage Azure Role Assignments Like a Pro with PowerShell

Today’s blog post is a little bit different. I have a couple of examples of how you can use PowerShell snippets and simple commandlets to get or set role assignmnets in your Azure Subscriptions.
PowerShell examples for managing Azure Role assignments
List all role assignments in a subscription, get all role assignments for a specific resource group, get all role assignments for a specific user, add a role assignment to a user, remove a role assignment for a user, remove all role assignments for a specific user, list all built-in roles, list all custom roles, create a custom role, update a custom role, delete a custom role, list all users or groups assigned to a specific role, list all permissions granted by a specific role, list all resource groups that a user has access to, create a role assignment for a service principal, powershell script to manage azure role assignments.
And now there is a script that combines some of these examples into one usable function:
I hope this was useful. Let me know if you liked the format of this blog and if you want me to include more of these examples.
Vukasin Terzic
Recent Update
- Writing your first Azure Terraform Configuration
- Transition from ARM Templates to Terraform with AI
- Getting started with Terraform for Azure
- Terraform Configuration Essentials: File Types, State Management, and Provider Selection
- Dynamically Managing Azure NSG Rules with PowerShell
Trending Tags
Retrieve azure resource group cost with powershell api.
The Future Of Azure Governance: Trends and Predictions
Further Reading
In my previous blog posts, I wrote about how simple PowerShell scripts can help speed up daily tasks for Azure administrators, and how you can convert them to your own API. One of these tasks is...
Azure Cost Optimization: 30 Ways to Save Money and Increase Efficiency
As organizations continue to migrate their applications and workloads to the cloud, managing and controlling cloud costs has become an increasingly critical issue. While Azure provides a robust s...
Custom PowerShell API for Azure Naming Policy
To continue our PowerShell API series, we have another example of a highly useful API that you can integrate into your environment. Choosing names for Azure resources can be a challenging task. ...
List Azure AD Roles and Role Assignments using Powershell

In my previous posts I discussed about listing Azure AD users and groups and provided Powershell scripts to generate those quickly :
- List all Azure AD Users
- List all Azure AD Groups
In this post I will discuss about Azure AD Roles and Administrators assigned to those roles.
As per Microsoft document – Using Azure Active Directory (Azure AD), you can designate limited administrators to manage identity tasks in less-privileged roles. Administrators can be assigned for such purposes as adding or changing users, assigning administrative roles, resetting user passwords, managing user licenses, and managing domain names. The default user permissions can be changed only in user settings in Azure AD.
Microsoft provides a list of predefined roles to correctly assign users, groups and service principals with only required access to do their job. You can also create Custom roles for administrators (currently a preview feature) if builtin roles do not meet your requirements. With custom roles you can define your own role based access control and scope to apply this role. Refer following document to learn more about it :
Custom administrator roles in Azure Active Directory
I am sharing a script today to generate list of all administrator roles in Azure AD along with members assigned to those roles. I run this script as part of my standard Azure AD reporting and auditing permissions.
Before we start, make sure, you have Powershell Az module installed and imported. Follow this document if you have any issue. We will also need Powershell AzureAD module. Use following command to install AzureAD module :
Next, we will need to login to Azure AD with Connect-AzureAD Command.

Following script block will get all available Azure AD Roles and then loop through each role. Next, it will get members of each role and collect additional information about the user/service principal, including, Display Name, Email, Department, Account Status, Create date etc.
Finally, I export those details to a csv file as output. Here is my complete script for your reference :
You will get a csv file output once it runs successfully as shown below :

Share this:
Get PIM Role Assignment Status For Azure AD Using Powershell
If you’re like me and you love to run reports to get valuable information for your tenant and settings, the get PIM role assignment status is the script for you. Recently I was running a report to audit user permissions in Azure AD and realized that my data was off by a bit. I knew some users were added to Privilege Identity Management (PIM) roles but they weren’t showing up in my report.
The reason they weren’t showing up is because I was using the Get-AzureADDirectoryRoleMember cmdlet and that only shows users with current or activated access. If a user was not elevated in PIM, they basically didn’t have access so it skewing my results.

To give you a better idea of what I’m talking about, the above is a sample of the Helpdesk Administrators role. In the Azure AD GUI, the user is added as an eligible role, meaning he can elevate his just in time access. However in Powershell, since the role is not activated, it is not going to display.
Therefore we are going to use the Get-AzureADMSPrivilegedRoleDefinition Azure AD cmdlet to display the list of roles available and the Get-AzureADMSPrivilegedRoleAssignment to filter for the user we’re specifying.
Requirements for this script to work
In order to make this work you’ll need the following:
- AzureADPreview Powershell module .
I want to emphasize the “preview” in the name of the module. Using just the regular AzureAD module is not not going to work so that’s something to keep in mind.
Script Parameters
Userprincipalname.
Specify the UserPrincipalName for the user you want to check roles for.
Specify the RoleName you want to filter for. This will display all PIM roles that are granted directly or through a group.
By default it will use the TenantId from your current session. If you’re connected to a multi-tenant, you can specify the tenant here.
By using this script you’ll be able to see all the people who have standing access as well as PIM eligible roles.

We can now see that the Helpdesk Administrator is now showing up in our output and in the Assignment column it is labeled as Eligible. We’ll also take note that we can see if the member type is added through a group or if it was added directly. This script will support that option.
Get PIM role assignment status for Azure AD using Powershell will now be in your arsenal of cool tips and tricks for your Syadmin role. If you’re interested in more scripts like this, be sure to check out our Powershell Gallery or Azure Content . Finally, be sure to check out our Youtube Channel for any video content.

Paul Contreras
Hi, my name is Paul and I am a Sysadmin who enjoys working on various technologies from Microsoft, VMWare, Cisco and many others. Join me as I document my trials and tribulations of the daily grind of System Administration.
Is there a possibility we could get an updated version of this using Microsoft Graph or Graph API? I cannot find any suitable alternatives now that the azure cmdlets are depreciated.
Yes. I have the script already created, just need to create an article
Could you upload this script, please? This is wonderfull.
See my updated post for the Graph API version. https://thesysadminchannel.com/get-entra-id-pim-role-assignment-using-graph-api/
See my updated post for the Graph API script. https://thesysadminchannel.com/get-entra-id-pim-role-assignment-using-graph-api/
it was a great job but riles are changed and groups extract cannot work
What about a similar Script for Azure resource roles?
Leave a Reply Cancel reply
Your email address will not be published. Required fields are marked *
Wim Matthyssen
Azure infra, security & governance, azure development and ai/ml, azure identity and security, stéphane eyskens, cloud-native azure architecture, geert baeke, azure kubernetes service & containerization, maik van der gaag, azure infrastructure as code & devops, bart verboven, sammy deprez, azure ai, ml & cognitive services, sander van de velde.
A powershell script for activating an eligible role assignment in Azure AD
By Anatoly Mironov
Recently my role assignments in Azure AD were switched from permanent to eligible ones. This is part of PIM - Privileged Identity Management, you can read more about it on MS Docs:
- Start using Privileged Identity Management
To activate your eligible assignment you can use Azure Portal, Graph API, and PowerShell. The activation in the portal and Graph API is described on MS Docs:
- Activate my Azure AD roles in PIM

My roles within Privileged Identity Management in Azure Portal
I created a simple powershell script for activating my eligible roles quickier when I need it. There are two variants of this script:
- a generic one, that can be run by anyone
- a “shortcut” version that can be created for a specific account, a specific role, to make it even quicker.
A generic version
This version fetches the assignments you have, tenant id (resourcid), your account id (objectid, subjectid), and then it activates your desired role. Some parts can be made even more generic, but the key thing here is that you can adjust it and run for any account.
Shortcut version
This version assumes that you already know all the ids, by running the generic version or by looking it up in Azure. When you know those ids, you can skip many calls to Azure AD, which makes activation quicker and you can start working on your task rather than surfing around to activate your role in Azure.
Save it as a script and run it when you need it. Much quicker. One important note, though: Please be aware that it still can take time to fully activate (propagate) your role, especially SharePoint Administrator, often a couple of minutes. But instead of clicking around, run the script and go grab a cup of coffee, when you’re back, you are good to go.
Security Note. Automating role activations is not less secure. You still have to log in to Azure AD using MFA (I hope you have it) even when you run the script.
- administrator

Explore the latest in AI-powered cybersecurity capabilities announced at Microsoft Secure. Watch on demand > Read the announcement >
Azure Active Directory is now Microsoft Entra ID
New name, same powerful capabilities.

5 ways to secure identity and access in the age of AI.
Help your organization be better prepared for the opportunities and challenges ahead by adopting a comprehensive defense-in-depth strategy that spans identity, endpoint, and network.
Manage and protect with Microsoft Entra ID
Safeguard your organization with a cloud identity and access management solution that connects employees, customers, and partners to their apps, devices, and data.
Secure adaptive access
Protect access to resources and data using strong authentication and risk-based adaptive access policies without compromising user experience.
Seamless user experiences
Provide a fast, easy sign-in experience across your multicloud environment to keep your users productive, reduce time managing passwords, and increase productivity.
Unified identity management
Manage all your identities and access to all your applications in a central location, whether they’re in the cloud or on-premises, to improve visibility and control.
Comprehensive capabilities
?resMode=sharp2&op_usm=1.5,0.65,15,0&wid=1920&hei=1090&qlt=100&fit=constrain "get azure ad role assignment")
App integrations and single sign-on (SSO)
Connect your workforce to all your apps, from any location, using any device. Simplify app access from anywhere with single sign-on.
Passwordless and multifactor authentication (MFA)
Help safeguard access to data and apps and keep it simple for users. Provide ease of use without the inherent risk of passwords.
Conditional access
Apply the right access controls to strengthen your organization’s security.
Identity protection
Automate detection and remediation of identity-based risks.
Privileged identity management
Strengthen the security of your privileged accounts.
End-user self-service
Help your employees securely manage their own identity with self-service portals including My Apps, My Access, My Account, and My Groups.
Unified admin center
Confidently manage all Microsoft Entra multicloud identity and network access solutions in one place.
Multicloud identity and access management
Microsoft Entra ID is an integrated cloud identity and access solution, and a leader in the market for managing directories, enabling access to applications, and protecting identities.

Microsoft Entra ID empowers organizations to manage and secure identities so employees, partners, and customers can access the applications and services they need. Microsoft Entra ID provides an identity solution that integrates broadly, from on-premises legacy apps to thousands of top software-as-a-service (SaaS) application, delivering a seamless end-user experience and improved visibility and control.
Consistently recognized as a Leader by industry analysts

Microsoft recognized for seventh year
Microsoft is a seven-time Leader in the Gartner® Magic Quadrant™ for Access Management. 1 , 2

A leader in access management
Learn why KuppingerCole rates Microsoft a strong positive across all product and leadership dimensions in access management. 3

2022 Company of the Year for Global Identity and Access Management
Frost & Sullivan has named Microsoft the 2022 Company of the Year for the Global Identity and Access Management industry. 4
See why more than 300,000 organizations use Microsoft Entra ID
Get started with microsoft entra id, microsoft entra id p2.
Get comprehensive identity and access management capabilities including identity protection, privileged identity management, and self-service access management for end users. Azure AD Premium P2 is now Microsoft Entra ID P2.
Microsoft Entra ID P1
Get the fundamentals of identity and access management, including single sign-on, multifactor authentication, passwordless and conditional access, and other features. Azure AD Premium P1 is now Microsoft Entra ID P1.
The free edition of Microsoft Entra ID is included with a subscription of a commercial online service such as Azure, Dynamics 365, Intune, Power Platform, and others.
Discover the Total Economic Impact of Microsoft Entra

Microsoft Entra ID increases worker productivity and reduces IT friction. Fifty percent of teams increased identity and access management team efficiency. End–user productivity increased by 13 hours per year and password reset requests decreased by 75 percent.
Explore the Microsoft Entra product family
Safeguard connections between people, apps, resources, and devices with multicloud identity and network access products.
Identity and access management
Microsoft entra id (formerly azure active directory).
Manage and protect users, apps, workloads, and devices.
Microsoft Entra ID Governance
Protect, monitor, and audit access to critical assets.
Microsoft Entra External ID
Provide your customers and partners with secure access to any app.
Microsoft Entra Domain Services
Manage your domain controllers in the cloud.
New identity categories
Microsoft entra verified id.
Issue and verify identity credentials based on open standards.
Microsoft Entra Permissions Management
Manage identity permissions across your multicloud infrastructure.
Microsoft Entra Workload ID
Help apps and services to securely access cloud resources.
Network access
Microsoft entra internet access.
Secure access to internet, software as a service, and Microsoft 365 apps.
Microsoft Entra Private Access
Help users to securely connect to private apps from anywhere.
Additional resources for Microsoft Entra ID
Azure ad is now microsoft entra id.
Microsoft Entra ID is the new name for Azure AD. All licensing and functionality remain the same. No action is required from you.
Microsoft Entra blog
Stay up to date with the latest news about identity and network access product.
The Total Economic Impact™ of Microsoft Entra
Learn how an organization achieved a three-year 240% ROI with Microsoft Entra in this 2023 commissioned Forrester Consulting study. 5
Technical documentation
Explore all the features in Microsoft Entra ID, and view how-to guides, tutorials, and quick-start guides.
Frequently asked questions
What is azure ad what is microsoft entra id.
Azure Active Directory (Azure AD), now known as Microsoft Entra ID, is an identity and access management solution from Microsoft that helps organizations secure and manage identities for hybrid and multicloud environments.
Is Azure AD free? How about Microsoft Entra ID?
Azure AD, now known as Microsoft Entra ID, has a free edition that provides user and group management, on-premises directory synchronization, basic reports, self-service password change for cloud users, and single sign-on across Azure, Microsoft 365, and many popular SaaS apps. The free edition is included with a subscription of a commercial online service such as Azure, Microsoft 365, Dynamics 365, Intune, or Power Platform.
What are the Azure AD licenses?
Azure AD is now known as Microsoft Entra ID, but the licenses and service plans remain the same—Free, P1, and P2.
What’s the new name for Azure AD?
The new name for Azure AD is Microsoft Entra ID. The name is changing, but the capabilities, licensing, and pricing remain the same. No action is required for existing customers.
What happened to Azure AD?
The name changed. Microsoft offers and supports the capabilities and service level agreements of Azure AD under the new name of Microsoft Entra ID, which was announced on June 20, 2023.
Get started
Safeguard your organization with a seamless identity and access management solution.

- [1] Gartner does not endorse any vendor, product or service depicted in its research publications and does not advise technology users to select only those vendors with the highest ratings or other designation. Gartner research publications consist of the opinions of Gartner’s research organization and should not be construed as statements of fact. Gartner disclaims all warranties, expressed or implied, with respect to this research, including any warranties of merchantability or fitness for a particular purpose. Gartner is a registered trademark and service mark and Magic Quadrant is a registered trademark of Gartner, Inc. and/or its affiliates in the U.S. and internationally and are used herein with permission. All rights reserved.
- [2] Gartner, Magic Quadrant for Access Management, Henrique Teixeira, Abhyuday Data, Nathan Harris, Robertson Pimentel. 16 November 2023.
- [3] KuppingerCole, Leadership Compass: Access Management 2022, Richard Hill, April 26, 2022.
- [4] Frost and Sullivan, Microsoft 2022 Company of the Year, Global Identity and Access Management Industry, 2022.
- [5] Forrester Consulting, The Total Economic Impact™ Of Microsoft Entra: Cost Savings And Business Benefits Enabled By Microsoft Entra, commissioned by Microsoft, March 2023. Results are for a composite organization based on eight organizations as stated in the linked study.
Follow Microsoft
- Chat with sales
Available M-F 6 AM to 6 PM PT.
Microsoft Learn Q&A needs your feedback! Learn More
May 20, 2024
Microsoft Learn Q&A needs your feedback!
Want to earn $25 for telling us how you feel about the current Microsoft Learn Q&A thread experience? Help our research team understand how to make Q&A great for you.
Find out more!
Teams Forum Top Contributors: EmilyS_726 ✅
May 10, 2024
Teams Forum Top Contributors:
EmilyS_726 ✅
Contribute to the Teams forum! Click here to learn more 💡
April 9, 2024
Contribute to the Teams forum!
Click here to learn more 💡
- Search the community and support articles
- Microsoft Teams
- Teams for business
- Search Community member
Ask a new question
"Ask your admin to enable microsoft teams" even though Teams license has been assigned
Hi, I have set up a Microsoft 365 test tenant, and I'd like to run some tests with Teams in it. I have two users, both of who have these licenses assigned in the 365 Admin Center: - Office 365 E3 EEA (no Teams)
- Microsoft Teams Essentials
But I still get the "Ask your admin to enable Microsoft Teams" -message, when I try to use Teams on the browser with these users.
I tried installing the Teams app in a virtual machine and logging in there - that gives a different error: "You don't have the required permissions to access this org", which is interesting, since the user is a Global Admin. How to fix this?
- Subscribe to RSS feed
Report abuse
Reported content has been submitted
Replies (3)
- Independent Advisor
Hello Antti, I am a Microsoft user like you, providing solutions to community members; I am NOT a Microsoft employee. You're absolutely right Antti, there seems to be a discrepancy between the licenses assigned and the access your users are getting in Microsoft Teams. Here's how to troubleshoot the issue: 1. License Propagation: Assigning licenses in the Microsoft 365 admin center doesn't always result in immediate access. There can sometimes be a delay in license propagation, which is the process of syncing the license assignment to the user's account. Wait and Retry: Allow some time (usually a few hours) for the license assignment to fully propagate. Then, try logging in to Teams again with your users. Force License Sync (Optional): In some cases, you might be able to force a license synchronization. The exact steps for this can vary depending on your specific Microsoft 365 environment. Here are a couple of resources that might be helpful: PowerShell Script: This Microsoft Docs page describes how to use a PowerShell script to force license synchronization: https://techcommunity.microsoft.com/t5/itops-talk-blog/powershell-basics-how-to-force-azuread-connect-to-sync/ba-p/887043 Azure AD Connect Sync Tool: If you're using Azure AD Connect for directory synchronization, you might be able to trigger a synchronization from the Azure AD Connect tool. 2. License Compatibility: While the "Microsoft Teams Essentials" license seems like it should provide access, there might be an issue with its compatibility with the "Office 365 E3 EEA (no Teams)" license. Review License Details: Double-check the specific details of both licenses in the Microsoft 365 admin center. Ensure that the "Microsoft Teams Essentials" license truly grants full access to Teams functionality. There might be a version of this license that's meant to be an add-on and requires a base license like Office 365 E1 to function properly. 3. User Account Type (For Browser Access): For browser access to Teams, the user account needs to be a cloud-based account. If your test tenant is configured with Azure AD Pass-through Authentication (PTA), on-premises Active Directory user accounts might not have direct access to Teams through a browser. You can refer to this Microsoft Docs page about PTA: https://learn.microsoft.com/entra/identity/hybrid/connect/how-to-connect-pta 4. Troubleshooting the "You don't have the required permissions" Error: This error message for the Teams app in the virtual machine suggests a permissions issue. Here are some possibilities: Virtual Machine Account: Ensure the user account you're using within the virtual machine has the necessary permissions to access Teams. This might involve assigning administrative privileges within the virtual machine itself. Global Admin Permissions in Azure AD (if applicable): If your test tenant uses Azure AD, verify that the Global Admin role for the user is assigned at the Azure AD level, not just within the Microsoft 365 admin center. Hope this helps. -Stephen N.
Was this reply helpful? Yes No
Sorry this didn't help.
Great! Thanks for your feedback.
How satisfied are you with this reply?
Thanks for your feedback, it helps us improve the site.
Thanks for your feedback.
Hi Stephen, 1 & 3. It has been more than 24 hours since the license was applied, and we do not have AD, AzureAD-Connect, PTA or any other hybrid Idp-setup.
2. How can I check the details of these licenses?
4. The user is an Administrator in the VM, and a Global Admin in Azure.
Given that it's been over 24 hours and you don't have a complex directory synchronization setup, let's focus on the license details and the error message in the virtual machine. There are two ways to check the details of the assigned licenses: -Microsoft 365 Admin Center: Log in to the Microsoft 365 admin center and navigate to the "Users" section. Select the user you're having trouble with and check the "Licenses" tab. This will show you a list of all licenses assigned to that user. Look for the "Microsoft Teams Essentials" license and click on it to view its details. -License SKU: Pay close attention to the specific Stock Keeping Unit (SKU) code for the "Microsoft Teams Essentials" license. There might be different variations of this license, and some might require a base license like Office 365 E1 to function fully. The SKU code should be displayed in the license details within the admin center. Here's a Microsoft Docs page listing various Teams SKUs: https://learn.microsoft.com/office365/servicedescriptions/teams-service-description Since the user is a Global Admin in Azure and an Administrator within the virtual machine, the "You don't have the required permissions" error is less likely due to user permissions. Here are some alternative possibilities: Virtual Machine Environment: Make sure Teams is properly installed and configured within the virtual machine itself. There might be specific requirements for the virtual machine environment (operating system, resources) to run Teams successfully. Consult the Teams system requirements documentation for details: https://learn.microsoft.com/en-us/microsoftteams/hardware-requirements-for-the-teams-app Network Connectivity: Ensure the virtual machine has proper network connectivity to access Microsoft 365 services. Firewall rules or network restrictions within the virtual machine environment might be blocking access to Teams. Virtual Machine Account: Double-check that the user account you're using within the virtual machine is a cloud-based account associated with your Microsoft 365 tenant. If you're using a local account within the virtual machine, it might not have the necessary permissions to access Teams services. Based on the license SKU you find in step 1, you can research online or consult Microsoft support to confirm if "Microsoft Teams Essentials" on its own grants full access to Teams functionality or if it requires an additional base license. Investigate the virtual machine environment, network connectivity, and user account type within the virtual machine to rule out any potential issues there. If you're still facing issues after checking these points, consider contacting Microsoft support directly for further assistance https://support.microsoft.com/teams -Stephen N.
Question Info
- Norsk Bokmål
- Ελληνικά
- Русский
- עברית
- العربية
- ไทย
- 한국어
- 中文(简体)
- 中文(繁體)
- 日本語
This browser is no longer supported.
Upgrade to Microsoft Edge to take advantage of the latest features, security updates, and technical support.
az role assignment
Manage role assignments.
az role assignment create
Create a new role assignment for a user, group, or service principal.
Create role assignment to grant the specified assignee the Reader role on an Azure virtual machine.
Create role assignment for an assignee with description and condition.
Create role assignment with your own assignment name.
Required Parameters
Role name or id.
Scope at which the role assignment or definition applies to, e.g., /subscriptions/0b1f6471-1bf0-4dda-aec3-111122223333, /subscriptions/0b1f6471-1bf0-4dda-aec3-111122223333/resourceGroups/myGroup, or /subscriptions/0b1f6471-1bf0-4dda-aec3-111122223333/resourceGroups/myGroup/providers/Microsoft.Compute/virtualMachines/myVM.
Optional Parameters
Represent a user, group, or service principal. supported format: object id, user sign-in name, or service principal name.
Use this parameter instead of '--assignee' to bypass Graph API invocation in case of insufficient privileges. This parameter only works with object ids for users, groups, service principals, and managed identities. For managed identities use the principal id. For service principals, use the object id and not the app id.
Use with --assignee-object-id to avoid errors caused by propagation latency in Microsoft Graph.
Condition under which the user can be granted permission.
Version of the condition syntax. If --condition is specified without --condition-version, default to 2.0.
Description of role assignment.
A GUID for the role assignment. It must be unique and different for each role assignment. If omitted, a new GUID is generetd.
Increase logging verbosity to show all debug logs.
Show this help message and exit.
Only show errors, suppressing warnings.
Output format.
JMESPath query string. See http://jmespath.org/ for more information and examples.
Name or ID of subscription. You can configure the default subscription using az account set -s NAME_OR_ID .
Increase logging verbosity. Use --debug for full debug logs.
az role assignment delete
Delete role assignments.
Delete role assignments. (autogenerated)
Space-separated role assignment ids.
Include assignments applied on parent scopes.
Use it only if the role or assignment was added at the level of a resource group.
Continue to delete all assignments under the subscription.
az role assignment list
List role assignments.
By default, only assignments scoped to subscription will be displayed. To view assignments scoped by resource or group, use --all .
Show all assignments under the current subscription.
List default role assignments for subscription classic administrators, aka co-admins.
Include extra assignments to the groups of which the user is a member(transitively).
az role assignment list-changelogs
List changelogs for role assignments.
The end time of the query in the format of %Y-%m-%dT%H:%M:%SZ, e.g. 2000-12-31T12:59:59Z. Defaults to the current time.
The start time of the query in the format of %Y-%m-%dT%H:%M:%SZ, e.g. 2000-12-31T12:59:59Z. Defaults to 1 Hour prior to the current time.
az role assignment update
Update an existing role assignment for a user, group, or service principal.
Update a role assignment from a JSON file.
Update a role assignment from a JSON string. (Bash)
Description of an existing role assignment as JSON, or a path to a file containing a JSON description.
Coming soon: Throughout 2024 we will be phasing out GitHub Issues as the feedback mechanism for content and replacing it with a new feedback system. For more information see: https://aka.ms/ContentUserFeedback .
Submit and view feedback for
Additional resources

How to implement Principle of Least Privilege(Cloud Security) in AWS, Azure, and GCP cloud
The Principle of Least Privilege (PoLP) is a foundational concept in cybersecurity, aimed at minimizing the risk of security breaches. By granting users and applications the minimum levels of access—or permissions—needed to perform their tasks, organizations can significantly reduce their attack surface. In the context of cloud computing, implementing PoLP is critical. This article explores how to enforce PoLP in the three major cloud platforms( cloud security ): Amazon Web Services (AWS), Microsoft Azure, and Google Cloud Platform (GCP).

AWS (Amazon Web Services)
1. Identity and Access Management (IAM)
AWS IAM is the core service for managing permissions. To implement PoLP:
- Create Fine-Grained Policies : Define granular IAM policies that specify exact actions allowed on specific resources. Use JSON policy documents to customize permissions precisely.
- Use IAM Roles : Instead of assigning permissions directly to users, create roles with specific permissions and assign these roles to users or services. This reduces the risk of over-permissioning.
- Adopt IAM Groups : Group users with similar access requirements together. Assign permissions to groups instead of individual users to simplify management.
- Enable Multi-Factor Authentication (MFA) : Require MFA for all users, especially those with elevated privileges, to add an extra layer of security.
2. AWS Organizations and Service Control Policies (SCPs)
- Centralized Management : Use AWS Organizations to manage multiple AWS accounts. Implement SCPs at the organizational unit (OU) level to enforce PoLP across accounts.
- Restrict Root Account Usage : Ensure the root account is used sparingly and secure it with strong MFA.
3. AWS Resource Access Manager (RAM)
- Share Resources Securely : Use RAM to share AWS resources securely across accounts without creating redundant copies, adhering to PoLP.
Azure (Microsoft Azure)
1. Azure Role-Based Access Control (RBAC)
Azure RBAC enables fine-grained access management:
- Define Custom Roles : Create custom roles tailored to specific job functions, limiting permissions to only what is necessary.
- Use Built-in Roles : Start with built-in roles which already follow PoLP principles for common scenarios, then customize as needed.
- Assign Roles at Appropriate Scope : Assign roles at the narrowest scope possible (management group, subscription, resource group, or resource).
2. Azure Active Directory (Azure AD)
- Conditional Access Policies : Implement conditional access policies to enforce MFA and restrict access based on conditions like user location or device compliance.
- Privileged Identity Management (PIM) : Use PIM to manage, control, and monitor access to important resources within Azure AD, providing just-in-time privileged access.
3. Azure Policy
- Policy Definitions : Create and assign policies to enforce organizational standards and PoLP. For example, a policy to restrict VM sizes to specific configurations.
- Initiative Definitions : Group multiple policies into initiatives to ensure comprehensive compliance across resources.
GCP (Google Cloud Platform)
GCP IAM allows for detailed access control:
- Custom Roles : Define custom roles to grant only the necessary permissions.
- Predefined Roles : Use predefined roles which provide granular access and adhere to PoLP.
- Least Privilege Principle in Service Accounts : Create and use service accounts with specific roles instead of using default or highly privileged accounts.
2. Resource Hierarchy
- Organization Policies : Use organization policies to enforce constraints on resources across the organization, such as restricting who can create certain resources.
- Folder and Project Levels : Apply IAM policies at the folder or project level to ensure permissions are inherited appropriately and follow PoLP.
3. Cloud Identity
- Conditional Access : Implement conditional access using Cloud Identity to enforce MFA and restrict access based on user and device attributes.
- Context-Aware Access : Use context-aware access to allow access to apps and resources based on a user’s identity and the context of their request.
Implementing Principle of Least Privilege in AWS, Azure, and GCP
As a Cloud Security Analyst, ensuring the Principle of Least Privilege (PoLP) is critical to minimizing security risks. This comprehensive guide will provide detailed steps to implement PoLP in AWS, Azure, and GCP.
Step 1: Review IAM Policies and Roles
- Navigate to the AWS IAM Console.
- Review existing policies under the “Policies” section.
- Look for policies with wildcards ( * ), which grant broad permissions, and replace them with more specific permissions.
- In the IAM Console, go to “Roles.”
- Check each role’s attached policies. Ensure that each role has the minimum required permissions.
- Remove or update roles that are overly permissive.
Step 2: Use IAM Access Analyzer
- In the IAM Console, select “Access Analyzer.”
- Create an analyzer and let it run. It will provide findings on resources shared with external entities.
- Review the findings and take action to refine overly broad permissions.
Step 3: Test Policies with IAM Policy Simulator
- Go to the IAM Policy Simulator.
- Simulate the policies attached to your users, groups, and roles to understand what permissions they actually grant.
- Adjust policies based on the simulation results to ensure they provide only the necessary permissions.
Step 4: Monitor and Audit
- In the AWS Management Console, go to “CloudTrail.”
- Create a new trail to log API calls across your AWS account.
- Enable logging and monitor the CloudTrail logs regularly to detect any unauthorized or suspicious activity.
- Navigate to the AWS Config Console.
- Set up AWS Config to monitor and evaluate the configurations of your AWS resources.
- Implement AWS Config Rules to check for compliance with your least privilege policies.
Step 5: Utilize Automated Tools
- Access Trusted Advisor from the AWS Management Console.
- Review the “Security” section for recommendations on IAM security best practices.
- Enable Security Hub from the Security Hub Console.
- Use Security Hub to get a comprehensive view of your security posture, including IAM-related findings.
Step 1: Review Azure AD Roles and Permissions
- Navigate to the Azure Active Directory.
- Under “Roles and administrators,” review each role and its assignments.
- Ensure users are assigned only to roles with necessary permissions.
- Go to the “Resource groups” or individual resources in the Azure portal.
- Under “Access control (IAM),” review role assignments.
- Remove or modify roles that provide excessive permissions.
Step 2: Check Resource-Level Permissions
- For each resource (e.g., storage accounts, VMs), review the access policies to ensure they grant only necessary permissions.
- Navigate to “Network security groups” in the Azure portal.
- Review inbound and outbound rules to ensure they allow only necessary traffic.
Step 3: Monitor and Audit
- Access the Activity Logs.
- Monitor logs for changes in role assignments and access patterns.
- Open Azure Security Center.
- Regularly review security recommendations and alerts, especially those related to IAM.
Step 4: Utilize Automated Tools
- Create and assign policies using the Azure Policy portal.
- Enforce policies that require the use of least privilege access.
- Use Azure Blueprints to define and deploy resource configurations that comply with organizational standards.
- In Azure AD, go to “Privileged Identity Management” under “Manage.”
- Enable PIM to manage, control, and monitor privileged access.
- Access the IAM & admin console.
- Review each policy and role for overly permissive permissions.
- Avoid using predefined roles with broad permissions; prefer custom roles with specific permissions.
- In the IAM console, navigate to “Roles.”
- Create custom roles that provide the minimum necessary permissions for specific job functions.
Step 2: Check Resource-Based Policies
- In the IAM & admin console, go to “Service accounts.”
- Review the permissions granted to each service account and ensure they are scoped to the least privilege.
- Navigate to the VPC network section and select “Firewall rules.”
- Review and restrict firewall rules to allow only essential traffic.
- Enable and configure Cloud Audit Logs for all services.
- Regularly review logs to monitor access and detect unusual activities.
- In the IAM console, use the IAM Recommender to get suggestions for refining IAM policies based on actual usage patterns.
- Enable Access Transparency to get logs of Google Cloud administrator accesses.
- Access the Security Command Center for a centralized view of your security posture.
- Use it to monitor and manage security findings and recommendations.
- Deploy Forseti Security for continuous monitoring and auditing of your GCP environment.
- Use tools like Policy Troubleshooter to debug access issues and Policy Analyzer to compare policies.
Step 5: Conduct Regular Reviews
- Regularly review IAM roles, policies, and access patterns across your GCP projects.
- Use the Resource Manager to organize resources and apply IAM policies efficiently.
By following these detailed steps, you can ensure that the Principle of Least Privilege is effectively implemented across AWS, Azure, and GCP, thus maintaining a secure and compliant cloud environment.
Implementing the Principle of Least Privilege in AWS, Azure, and GCP requires a strategic approach to access management. By leveraging the built-in tools and services provided by these cloud platforms, organizations can enhance their security posture, minimize risks, and ensure compliance with security policies. Regular reviews, continuous monitoring, and automation are key to maintaining an effective PoLP strategy in the dynamic cloud environment.
The 11 Essential Falco Cloud Security Rules for Securing Containerized Applications at No Cost
April 12, 2024
Hack-Proof Your Cloud: The Step-by-Step Continuous Threat Exposure Management CTEM Strategy for AWS & AZURE
March 19, 2024
Web-Based PLC Malware: A New Technique to Hack Industrial Control Systems
March 8, 2024
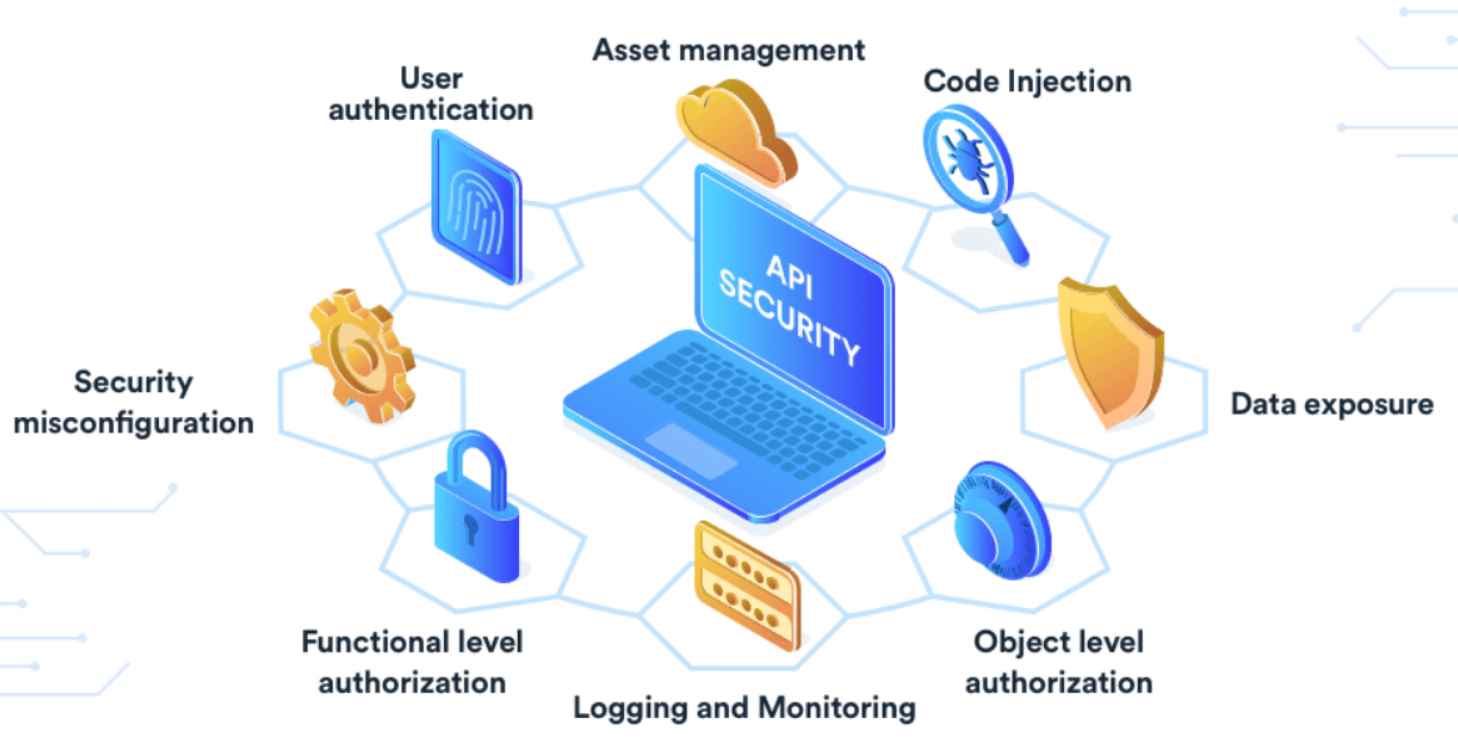
The API Security Checklist: 10 strategies to keep API integrations secure
March 6, 2024

11 ways of hacking into ChatGpt like Generative AI systems
January 8, 2024
How to send spoof emails from domains that have SPF and DKIM protections?
December 20, 2023
Silent Email Attack CVE-2023-35628 : How to Hack Without an Email Click in Outlook
December 15, 2023

How to Bypass EDRs, AV with Ease using 8 New Process Injection Attacks
December 11, 2023

Information security specialist, currently working as risk infrastructure specialist & investigator. 15 years of experience in risk and control process, security audit support, business continuity design and support, workgroup management and information security standards.
Cyber Security Channel

US Govt wants new label on secure IoT devices or wants to discourage use of Chinese IoT gadgets

24,649,096,027 (24.65 billion) account usernames and passwords have been leaked by cyber criminals till now in 2022

How Chinese APT hackers stole Lockheed Martin F-35 fighter plane to develop its own J-20 stealth fighter aircraft [VIDEO]
- Release highlights
- Release support
- ONTAP defaults and limits
What's new in ONTAP 9.15.1
- What's new in ONTAP 9.14.1
- What's new in ONTAP 9.13.1
- What's new in ONTAP 9.12.1
- What's new in ONTAP 9.11.1
- What's new in ONTAP 9.10.1
- What's new in ONTAP 9.9.1
- System Manager integration with BlueXP
- ONTAP platforms
- Cluster storage
- High-availability pairs
- AutoSupport and Active IQ Digital Advisor
- Logical ports
- Support for industry-standard network technologies
- Client protocols
- Aggregates and RAID groups
- Mirrored and unmirrored local tiers (aggregates)
- Root-data partitioning
- Volumes, qtrees, files, and LUNs
- SVM use cases
- Cluster and SVM administration
- Namespaces and junction points
- NAS path failover
- SAN path failover
- Load balancing
- Snapshot copies
- SnapMirror disaster recovery and data transfer
- SnapMirror Cloud backups to object Storage
- SnapVault archiving
- Cloud backup and support for traditional backups
- MetroCluster continuous availability
- Thin provisioning
- Deduplication
- Compression
- FlexClone volumes, files, and LUNs
- Capacity measurements in System Manager
- Temperature sensitive storage
- Client authentication and authorization
- Administrator authentication and RBAC
- Virus scanning
- WORM storage
- ONTAP and VMware vSphere
- Application aware data management
- Get started
- Set up a cluster with System Manager
- Create the cluster on the first node
- Join remaining nodes to the cluster
- Convert management LIFs from IPv4 to IPv6
- Check your cluster with Active IQ Config Advisor
- Synchronize the system time across the cluster
- Commands for managing symmetric authentication on NTP servers
- Additional system configuration tasks to complete
- ASA configuration support and limitations
- When to upgrade ONTAP
- Execute automated pre-upgrade checks before a planned upgrade
- Preparation summary
- Create an upgrade plan
- Choose your target ONTAP release
- Confirm configuration support
- Identify common configuration errors
- Upgrade paths
- Verify LIF failover configuration
- Verify SVM routing configuration
- Summary of special considerations
- Mixed version clusters
- MetroCluster upgrade requirements
- SAN configurations
- Verify compatibility of ONTAP versions
- DP-type relationships
- NetApp Storage Encryption
- LDAP clients using SSLv3
- Session-oriented protocols
- SSH public keys
- Reboot SP or BMC
- Download the ONTAP software image
- Overview of upgrade methods
- Automated upgrade
- Install software package
- Manual nondisruptive standard configuration
- Manual nondisruptive MetroCluster (4 or 8 node)
- Manual nondisruptive MetroCluster (2-node)
- Manual disruptive
- Summary of post-upgrade verifications
- Verify the cluster
- Verify all LIFs are on home ports
- Summary of post-upgrade special configurations
- Network configuration
- EMS LIF service
- Networking and storage status
- SAN configuration
- KMIP server connections
- Load-sharing mirror source volumes
- User accounts that can access the Service Processor
- Update the DQP
- How automatic updates are scheduled for installation
- Enable automatic updates
- Modify automatic updates
- Manage recommended automatic updates
- Update firmware manually
- Do I need technical support?
- What are the revert paths?
- Pre-reversion resources
- Revert considerations
- What should I verify before I revert?
- Summary of pre-revert checks
- SnapMirror Synchronous relationships
- SnapMirror/SnapVault relationships
- Split FlexClone volumes
- FlexGroup volumes
- SMB servers in workgroup mode
- Deduplicated volumes
- User accounts that use SHA-2 hash function
- Anti-ransomware licensing
- S3 NAS buckets
- NFSv4.1 trunking
- 2 or 4-node MetroCluster
- Disable IPsec
- How do I get and install the revert software image?
- Revert my cluster
- Verify cluster and storage health
- Enable automatic switchover for MetroCluster configurations
- Enable and revert LIFs to home ports
- Enable Snapshot copy policies
- Verify client access (SMB and NFS)
- Verify IPv6 firewall entries
- Revert password hash function
- Maually update SP firmware
- Verify user accounts that can access the Service Processor
- Administration overview
- Use System Manager to access a Cluster
- Enable new features
- Download a cluster configuration
- Assign tags to a cluster
- View and submit support cases
- Manage maximum capacity limit of a storage VM
- Monitor capacity with System Manager
- View hardware configurations and determine problems
- Manage nodes
- Download NetApp License Files (NLFs)
- Install ONTAP licenses
- Manage ONTAP licenses
- License types and licensed method
- Commands for managing licenses
- Manage access to System Manager
- What the cluster management server is
- Types of SVMs
- Access the cluster by using the serial port
- Access the cluster using SSH
- SSH login security
- Enable Telnet or RSH access to the cluster
- Access the cluster using Telnet
- Access the cluster using RSH
- Different shells for CLI commands (cluster administrators only)
- Methods of navigating CLI command directories
- Rules for specifying values in the CLI
- Methods of viewing command history and reissuing commands
- Keyboard shortcuts for editing CLI commands
- Use of administrative privilege levels
- Set the privilege level in the CLI
- Set display preferences in the CLI
- Methods of using query operators
- Methods of using extended queries
- Methods of customizing show command output by using fields
- About positional parameters
- Methods of accessing ONTAP man pages
- Manage CLI sessions (cluster administrators only)
- Display information about the nodes in a cluster
- Display cluster attributes
- Modify cluster attributes
- Display the status of cluster replication rings
- About quorum and epsilon
- What system volumes are
- Add nodes to the cluster
- Remove nodes from the cluster
- Access a node’s log, core dump, and MIB files by using a web browser
- Access the system console of a node
- Manage node root volumes and root aggregates
- Start or stop a node
- Manage a node by using the boot menu
- Display node attributes
- Modify node attributes
- Rename a node
- Manage single-node clusters
- Isolate management network traffic
- Considerations for the SP/BMC network configuration
- Enable the SP/BMC automatic network configuration
- Configure the SP/BMC network manually
- Modify the SP API service configuration
- About the Service Processor (SP)
- About the Baseboard Management Controller (BMC)
- Methods of managing SP/BMC firmware updates
- When the SP/BMC uses the network interface for firmware updates
- Accounts that can access the SP
- Access the SP/BMC from an administration host
- Access the SP/BMC from the system console
- Relationship among the SP CLI, SP console, and system console sessions
- Manage the IP addresses that can access the SP
- Use online help at the SP/BMC CLI
- Commands to manage a node remotely
- About the threshold-based SP sensor readings and status values of the system sensors command output
- About the discrete SP sensor status values of the system sensors command output
- Commands for managing the SP from ONTAP
- ONTAP commands for BMC management
- BMC CLI commands
- Manage the cluster time (cluster administrators only)
- Create a banner
- Manage the banner
- Create an MOTD
- Manage the MOTD
- Manage jobs and schedules
- What configuration backup files are
- How the node and cluster configurations are backed up automatically
- Commands for managing configuration backup schedules
- Commands for managing configuration backup files
- Find a configuration backup file to use for recovering a node
- Restore the node configuration using a configuration backup file
- Find a configuration to use for recovering a cluster
- Restore a cluster configuration from an existing configuration
- Synchronize a node with the cluster
- Manage core dumps (cluster administrators only)
- Workflow to add a local tier (aggregate)
- Determine the number of disks or disk partitions required for a local tier (aggregate)
- Decide which local tier (aggregate) creation method to use
- Add (create) local tiers (aggregates) automatically
- Add (create) local tiers (aggregates) manually
- Rename a local tier (aggregate)
- Set media cost of a local tier (aggregate)
- Manually Fast zero drives
- Manually assign disk ownership
- Determine drive and RAID group information for a local tier (aggregate)
- Assign local tiers (aggregates) to storage VMs (SVMs)
- Determine which volumes reside on a local tier (aggregate)
- Determine and control a volume’s space usage in a local tier (aggregate)
- Determine space usage in a local tier (aggregate)
- Relocate local tier (aggregate) ownership within an HA pair
- Delete a local tier (aggregate)
- Commands for relocating local tiers (aggregates)
- Commands for managing local tiers (aggregates)
- Workflow to add capacity to a local tier (expanding an aggregate)
- Methods to create space in a local tier (aggregate)
- Add disks to a local tier (aggregate)
- Add drives to a node or shelf
- Correct misaligned spare partitions
- How hot spare disks work
- How low spare warnings can help you manage your spare disks
- Additional root-data partitioning management options
- When you need to update the Disk Qualification Package
- About auto-assignment of disk ownership
- Display disk and partition ownership
- Change auto-assignment settings for disk ownership
- Manually assign ownership of unpartitioned disks
- Manually assign ownership of partitioned disks
- Set up an active-passive configuration on nodes using root-data partitioning
- Set up an active-passive configuration on nodes using root-data-data partitioning
- Remove ownership from a disk
- Remove a failed disk
- When sanitization cannot be performed
- What happens if sanitization is interrupted
- Tips for managing local tiers (aggregates) containing data to be sanitized
- Sanitize a disk
- Commands for managing disks
- Commands for displaying space usage information
- Commands for displaying information about storage shelves
- Default RAID policies for local tiers (aggregates)
- RAID protection levels for disks
- Drive and RAID group information for a local tier (aggregate)
- Convert from RAID-DP to RAID-TEC
- Convert RAID-TEC to RAID-DP
- Considerations for sizing RAID groups
- Customize the size of your RAID groups
- Flash Pool local tier (aggregate) caching policies
- Determine whether to modify the caching policy of Flash Pool local tiers (aggregates)
- Modify caching policies of Flash Pool local tiers (aggregates)
- Set the cache-retention policy for Flash Pool local tiers (aggregates)
- Flash Pool SSD partitioning for Flash Pool local tiers (aggregates) using storage pools
- Flash Pool candidacy and optimal cache size
- Create a Flash Pool local tier (aggregate) using physical SSDs
- Determine whether a Flash Pool local tier (aggregate) is using an SSD storage pool
- Add cache by adding an SSD storage pool
- Create a Flash Pool using SSD storage pool allocation units
- Determine the impact to cache size of adding SSDs to an SSD storage pool
- Add SSDs to an SSD storage pool
- Commands for managing SSD storage pools
- Benefits of storage tiers by using FabricPool
- Considerations and requirements for using FabricPool
- About FabricPool tiering policies
- FabricPool management workflow
- Add a connection to the cloud
- Install a FabricPool license
- Install a CA certificate if you use StorageGRID
- Install a CA certificate if you use ONTAP S3
- Set up StorageGRID as the cloud tier
- Set up ONTAP S3 as the cloud tier
- Set up Alibaba Cloud Object Storage as the cloud tier
- Set up Amazon S3 as the cloud tier
- Set up Google Cloud Storage as the cloud tier
- Set up IBM Cloud Object Storage as the cloud tier
- Set up Azure Blob Storage for the cloud as the cloud tier
- Set up object stores for FabricPool in a MetroCluster configuration
- Test object store throughput performance before attaching to a local tier
- Attach the cloud tier to an aggregate
- Tier data to local bucket
- Determine how much data in a volume is inactive by using inactive data reporting
- Create a volume for FabricPool
- Move a volume to FabricPool
- Enable and disable volumes to write directly to the cloud
- Enable and disable aggressive read-ahead mode
- Assign a new tag during volume creation
- Modify an existing tag
- Delete a tag
- View existing tags on a volume
- Check object tagging status on FabricPool volumes
- Monitor the space utilization for FabricPool
- Manage storage tiering by modifying a volume’s tiering policy or tiering minimum cooling period
- Archive volumes with FabricPool (video)
- Use cloud migration controls to override a volume’s default tiering policy
- Promote all data from a FabricPool volume to the performance tier
- Promote file system data to the performance tier
- Check the status of a performance tier promotion
- Trigger scheduled migration and tiering
- Create a FabricPool mirror
- Monitor FabricPool mirror resync status
- Display FabricPool mirror details
- Promote a FabricPool mirror
- Remove a FabricPool mirror
- Replace an existing object store using a FabricPool mirror
- Replace a FabricPool mirror on a MetroCluster configuration
- Commands for managing aggregates with FabricPool
- Migrate an SVM
- Monitor migration
- Pause and resume migration
- Cancel migration
- Manually cut over clients
- Manually remove source SVM
- How hardware-assisted takeover works
- How automatic takeover and giveback works
- Automatic takeover commands
- Automatic giveback commands
- Manual takeover commands
- Manual giveback commands
- Testing takeover and giveback
- Commands for monitoring an HA pair
- Commands for enabling and disabling storage failover
- Halt or reboot a node without initiating takeover
- Rest log overview
- Access the REST API log
- Add a volume
- Assign tags to a volume
- Recover deleted volumes
- Manage LUNs
- Expand volumes and LUNs
- Save storage space
- Balance load by moving LUNs
- Balance loads by moving volumes to another tier
- Use Ansible Playbooks to add or edit volumes or LUNs
- Manage storage efficiency policies
- Manage resources using quotas
- Limit resource use
- Clone data with FlexClone
- Search, filter, and sort
- Capacity measurements
- Create a volume
- Enable large volume and large file support
- Configure volume provisioning options
- Determine space usage in a volume or aggregate
- Delete Snapshot copies automatically
- Configure volumes to automatically provide more space when they are full
- Configure volumes to automatically grow and shrink their size
- Requirements for enabling both autoshrink and automatic Snapshot copy deletion
- How the autoshrink functionality interacts with Snapshot copy deletion
- Address FlexVol volume fullness and overallocation alerts
- Address aggregate fullness and overallocation alerts
- Considerations for setting fractional reserve
- Display file or inode usage
- Control and monitoring I/O performance to FlexVol volumes by using Storage QoS
- Delete a FlexVol volume
- Protection against accidental volume deletion
- Commands for managing FlexVol volumes
- How moving a FlexVol volume works
- Considerations and recommendations when moving volumes
- Requirement for moving volumes in SAN environments
- Move a volume
- Commands for moving volumes
- Methods for copying a volume
- Create a FlexClone volume
- Split a FlexClone volume from its parent volume
- Determine the space used by a FlexClone volume
- Considerations for creating a FlexClone volume from a SnapMirror source or destination volume
- Create a FlexClone file or FlexClone LUN
- View node capacity for creating and deleting FlexClone files and FlexClone LUNs
- View the space savings due to FlexClone files and FlexClone LUNs
- Methods to delete FlexClone files and FlexClone LUNs
- Configure a FlexVol volume to automatically delete FlexClone files and FlexClone LUNs
- Prevent a specific FlexClone file or FlexClone LUN from being automatically deleted
- Commands for configuring deletion of FlexClone files
- Obtain a qtree junction path
- Qtree name restrictions
- Convert a directory to a qtree using a Windows client
- Convert a directory to a qtree using a UNIX client
- Commands for managing and configuring qtrees
- What logical space reporting shows
- What logical space enforcement does
- Enable logical space reporting and enforcement
- Manage SVM capacity
- Quota process
- Differences among hard, soft, and threshold quotas
- About quota notifications
- Why you use quotas
- What quota rules, quota policies, and quotas are
- Quota targets and types
- How default quotas work
- How you use explicit quotas
- How derived quotas work
- How you use tracking quotas
- How quotas are applied
- Considerations for assigning quota policies
- How you specify UNIX users for quotas
- How you specify Windows users for quotas
- How default user and group quotas create derived quotas
- How quotas are applied to the root user
- How quotas work with special Windows groups
- How quotas are applied to users with multiple IDs
- How ONTAP determines user IDs in a mixed environment
- How quotas with multiple users work
- How you link UNIX and Windows names for quotas
- How quotas work with qtrees
- How user and group quotas work with qtrees
- How default tree quotas on a FlexVol volume create derived tree quotas
- How default user quotas on a FlexVol volume affect quotas for the qtrees in that volume
- How deleting a qtree affects tree quotas
- How renaming a qtree affects quotas
- How changing the security style of a qtree affects user quotas
- When you can use resizing
- When a full quota reinitialization is required
- How you can use the quota report to see what quotas are in effect
- Why enforced quotas differ from configured quotas
- Use the quota report to determine which quotas limit writes to a specific file
- Commands for displaying information about quotas
- When to use the volume quota policy rule show and volume quota report commands
- How the ls command accounts for space usage
- How the df command accounts for file size
- How the du command accounts for space usage
- Examples of quota configuration
- Set up quotas on an SVM
- Modify (or Resizing) quota limits
- Reinitialize quotas after making extensive changes
- Commands to manage quota rules and quota policies
- Commands to activate and modify quotas
- Enable deduplication on a volume
- Disable deduplication on a volume
- Manage automatic volume-level background deduplication on AFF systems
- Manage aggregate-level inline deduplication on AFF systems
- Manage aggregate-level background deduplication on AFF systems
- Temperature-sensitive storage efficiency overview
- Storage efficiency behavior with volume move and SnapMirror
- Set storage efficiency modes
- Change volume inactive data compression threshold
- Check volume efficiency mode
- Change volume efficiency mode
- View volume footprint savings with or without temperature-sensitive storage efficiency
- Enable data compression on a volume
- Move between secondary compression and adaptive compression
- Disable data compression on a volume
- Manage inline data compaction for AFF systems
- Enable inline data compaction for FAS systems
- Inline storage efficiency enabled by default on AFF systems
- Enable storage efficiency visualization
- Assign a volume efficiency policy to a volume
- Modify a volume efficiency policy
- View a volume efficiency policy
- Disassociate a volume efficiency policy from a volume
- Delete a volume efficiency policy
- Run efficiency operations manually
- Use checkpoints to resume efficiency operation
- Resume a halted efficiency operation
- Run efficiency operations manually on existing data
- Run efficiency operations depending on the amount of new data written
- Run efficiency operations using scheduling
- View efficiency operations and status
- View efficiency space savings
- View efficiency statistics of a FlexVol volume
- Stop volume efficiency operations
- Information about removing space savings from a volume
- Rehost SMB volumes
- Rehost NFS volumes
- Rehost SAN volumes
- Rehost volumes in a SnapMirror relationship
- Features that do not support volume rehost
- Storage limits
- Determine the correct volume and LUN configuration combination for your environment
- Configuration settings for space-reserved files or LUNs with thick-provisioned volumes
- Configuration settings for non-space-reserved files or LUNs with thin-provisioned volumes
- Configuration settings for space-reserved files or LUNs with semi-thick volume provisioning
- Considerations for changing the maximum number of files allowed on a FlexVol volume
- Cautions for increasing the maximum directory size for FlexVol volumes
- Rules governing node root volumes and root aggregates
- Relocate root volumes to new aggregates
- How deduplication works with FlexClone files and FlexClone LUNs
- How Snapshot copies work with FlexClone files and FlexClone LUNs
- How access control lists work with FlexClone files and FlexClone LUNs
- How quotas work with FlexClone files and FlexClone LUNs
- How FlexClone volumes work with FlexClone files and FlexClone LUNs
- How NDMP works with FlexClone files and FlexClone LUNs
- How volume SnapMirror works with FlexClone files and FlexClone LUNs
- How volume move affects FlexClone files and FlexClone LUNs
- How space reservation works with FlexClone files and FlexClone LUNs
- How an HA configuration works with FlexClone files and FlexClone LUNs
- Provision NAS storage for large file systems using FlexGroup volumes
- What a FlexGroup volume is
- Supported and unsupported configurations for FlexGroup volumes
- Enable 64-bit NFSv3 identifiers on an SVM
- Provision a FlexGroup volume automatically
- Create a FlexGroup volume
- Monitor the space usage of a FlexGroup volume
- Increase the size of a FlexGroup volume
- Reduce the size of a FlexGroup volume
- Configure FlexGroup volumes to automatically grow and shrink their size
- Delete directories rapidly on a cluster
- Manage client rights to delete directories rapidly
- Create qtrees with FlexGroup volumes
- Use quotas for FlexGroup volumes
- Enable storage efficiency on a FlexGroup volume
- Protect FlexGroup volumes using Snapshot copies
- Move the constituents of a FlexGroup volume
- Use aggregates in FabricPool for existing FlexGroup volumes
- Rebalance FlexGroup volumes
- Create a SnapMirror relationship for FlexGroup volumes
- Create a SnapVault relationship for FlexGroup volumes
- Create a unified data protection relationship for FlexGroup volumes
- Create an SVM disaster recovery relationship for FlexGroup volumes
- Transition an existing FlexGroup SnapMirror relationship to SVM DR
- Convert a FlexVol volume to a FlexGroup volume within an SVM-DR relationship
- Considerations for creating SnapMirror cascade and fanout relationships for FlexGroups
- Considerations for creating a SnapVault backup relationship and a unified data protection relationship for FlexGroup volumes
- Monitor SnapMirror data transfers for FlexGroup volumes
- Activate the destination FlexGroup volume
- Reactivate the original source FlexGroup volume after disaster
- Reverse a SnapMirror relationship between FlexGroup volumes during disaster recovery
- Expand the source FlexGroup volume of a SnapMirror relationship
- Expand the destination FlexGroup volume of a SnapMirror relationship
- Perform a SnapMirror single file restore from a FlexGroup volume
- Restore a FlexGroup volume from a SnapVault backup
- Disable SVM protection on a FlexGroup volume
- Enable SVM protection on a FlexGroup volume
- Convert a FlexVol volume to a FlexGroup volume
- Convert a FlexVol volume SnapMirror relationship to a FlexGroup volume SnapMirror relationship
- FlexCache volumes supported protocols and features
- Guidelines for sizing a FlexCache volume
- Create a FlexCache volume
- Enable and manage FlexCache writeback
- Considerations for auditing FlexCache volumes
- Synchronize properties of a FlexCache volume from an origin volume
- Update the configurations of a FlexCache relationship
- Enable file access time updates
- Enable global file locking
- Prepopulate a FlexCache volume
- Delete a FlexCache relationship
- Verify your networking configuration after an ONTAP upgrade from ONTAP 9.7x or earlier
- Network cabling guidelines
- Relationship between broadcast domains, failover groups, and failover policies
- Overview (ONTAP 9.8 and later)
- Workflow (ONTAP 9.8 and later)
- Worksheet (ONTAP 9.8 and later)
- Overview (ONTAP 9.7 and earlier)
- Workflow (ONTAP 9.7 and earlier)
- Worksheet (ONTAP 9.7 and earlier)
- Combine physical ports to create interface groups
- Configure VLANs over physical ports
- Modify network port attributes
- Convert 40GbE NIC ports into multiple 10GbE ports for 10GbE connectivity
- Removing a NIC from the node (ONTAP 9.8 or later)
- Removing a NIC from the node (ONTAP 9.7 or earlier)
- Monitor the health of network ports
- Monitor the reachability of network ports (ONTAP 9.8 and later)
- ONTAP port usage on a storage system
- ONTAP internal TCP and UDP ports
- Create IPspaces
- Display IPspaces
- Delete an IPspace
- Create broadcast domains (ONTAP 9.8 and later)
- Add or remove ports (ONTAP 9.8 and later)
- Repair port reachability (ONTAP 9.8 and later)
- Move broadcast domains into IPspaces (ONTAP 9.8 and later)
- Split broadcast domains (ONTAP 9.8 and later)
- Merge broadcast domains (ONTAP 9.8 and later)
- Change the MTU value for ports in a broadcast domain (ONTAP 9.8 and later)
- Display broadcast domains (ONTAP 9.8 and later)
- Delete a broadcast domain
- Determine ports (ONTAP 9.7 and earlier)
- Create broadcast domains (ONTAP 9.7 and earlier)
- Add or remove ports from a broadcast domain (ONTAP 9.7 and earlier)
- Split broadcast domains (ONTAP 9.7 and earlier)
- Merge broadcast domains (ONTAP 9.7 and earlier)
- Change the MTU value for ports in a broadcast domain (ONTAP 9.7 and earlier)
- Display broadcast domains
- Failover overview
- Create a failover group
- Configure failover settings on a LIF
- Commands for managing failover groups and policies
- Create a subnet
- Add or remove IP addresses from a subnet
- Change subnet properties
- Display subnets
- Delete a subnet
- LIF compatibility with port types
- LIFs and service policies (ONTAP 9.6 and later)
- LIF roles (ONTAP 9.5 and earlier)
- Configure LIF service policies
- Create a LIF (network interface)
- Modify a LIF
- Migrate a LIF
- Revert a LIF to its home port
- Recover from an incorrectly configured cluster LIF (ONTAP 9.8 and later)
- Delete a LIF
- Virtual IP (VIP) LIFs
- Optimize network traffic (cluster administrators only)
- DNS load balancing overview
- Create a DNS load balancing zone
- Add or remove a LIF from a load balancing zone
- Configure DNS services (ONTAP 9.8 and later)
- Configure DNS services (ONTAP 9.7 and earlier)
- Configure dynamic DNS services
- Configure DNS for host-name resolution
- Manage the hosts table (cluster administrators only)
- Configure network security using federal information processing standards (FIPS)
- Configure IP security (IPsec) over wire encryption
- Configure firewall policies for LIFs
- Commands for managing firewall service and policies
- Modify QoS marking values
- Display QoS marking values
- Create an SNMP community and assigning it to a LIF
- Configure SNMPv3 users in a cluster
- Configure traphosts to receive SNMP notifications
- Commands for managing SNMP
- Create a static route
- Enable multipath routing
- Delete a static route
- Display routing information
- Remove dynamic routes from routing tables
- Display network port information (cluster administrators only)
- Display information about a VLAN (cluster administrators only)
- Display interface group information (cluster administrators only)
- Display LIF information
- Display DNS host table entries (cluster administrators only)
- Display DNS domain configurations
- Display information about failover groups
- Display LIF failover targets
- Display LIFs in a load balancing zone
- Display cluster connections
- Commands for diagnosing network problems
- Neighbor discovery protocol overview
- Use CDP to detect network connectivity
- Use LLDP to detect network connectivity
- NAS storage overview
- VMware datastores
- Home directories
- Linux servers
- Export policies
- Windows servers
- Both Windows and Linux
- Secure client access with Kerberos
- Enable or disable secure NFS client access with TLS
- Provide client access with name services
- Manage directories and files
- Manage host-specific users and groups
- Monitor NFS active clients
- Enable Linux servers
- Enable Windows servers
- Enable Both Windows and Linux
- Assess physical storage requirements
- Assess networking requirements
- Decide where to provision new NFS storage capacity
- Worksheet for gathering NFS configuration information
- Create an SVM
- Verify that the NFS protocol is enabled on the SVM
- Open the export policy of the SVM root volume
- Create an NFS server
- Create a LIF
- Enable DNS for host-name resolution
- Configure the name service switch table
- Create a local UNIX user
- Load local UNIX users from a URI
- Create a local UNIX group
- Add a user to a local UNIX group
- Load local UNIX groups from a URI
- Load netgroups into SVMs
- Verify the status of netgroup definitions
- Create an NIS domain configuration
- Create a new LDAP client schema
- Create an LDAP client configuration
- Associate the LDAP client configuration with SVMs
- Verify LDAP sources in the name service switch table
- Verify permissions for Kerberos configuration
- Create an NFS Kerberos realm configuration
- Configure NFS Kerberos permitted encryption types
- Enable Kerberos on a data LIF
- Enable or disable TLS for NFS clients
- Create an export policy
- Add a rule to an export policy
- Create a qtree
- Manage the processing order of export rules
- Assign an export policy to a volume
- Assign an export policy to a qtree
- Verify NFS client access from the cluster
- Test NFS access from client systems
- Where to find additional information
- Comparison of exports in 7-Mode and ONTAP
- Examples of ONTAP export policies
- What the typical NAS namespace architectures are
- Authentication-based restrictions
- File-based restrictions
- How ONTAP uses name services
- How ONTAP grants SMB file access from NFS clients
- How the NFS credential cache works
- Create data volumes with specified junction points
- Creating data volumes without specifying junction points
- Mounting or unmounting existing volumes in the NAS namespace
- Displaying volume mount and junction point information
- What the security styles and their effects are
- Where and when to set security styles
- Decide which security style to use on SVMs
- How security style inheritance works
- How ONTAP preserves UNIX permissions
- Manage UNIX permissions using the Windows Security tab
- Configure security styles on SVM root volumes
- Configure security styles on FlexVol volumes
- Configure security styles on qtrees
- How export policies control client access to volumes or qtrees
- Default export policy for SVMs
- How export rules work
- Manage clients with an unlisted security type
- How security types determine client access levels
- Manage superuser access requests
- How ONTAP uses export policy caches
- How the access cache works
- How access cache parameters work
- Removing an export policy from a qtree
- Validating qtree IDs for qtree file operations
- Export policy restrictions and nested junctions for FlexVol volumes
- ONTAP support for Kerberos
- Requirements for configuring Kerberos with NFS
- Specifying the user ID domain for NFSv4
- How ONTAP name service switch configuration works
- LDAP signing and sealing concepts
- LDAPS concepts
- Enable LDAP RFC2307bis support
- Configuration options for LDAP directory searches
- Improve performance of LDAP directory netgroup-by-host searches
- Use LDAP fast bind for nsswitch authentication
- Display LDAP statistics
- How name mapping works
- Multidomain searches for UNIX user to Windows user name mappings
- Name mapping conversion rules
- Create a name mapping
- Configure the default user
- Commands for managing name mappings
- Enable access for Windows NFS clients
- Enable the display of NFS exports on NFS clients
- Enable or disable NFSv3
- Enable or disable NFSv4.0
- Enable or disable NFSv4.1
- Manage NFSv4 storepool limits
- Enable or disable pNFS
- Controlling NFS access over TCP and UDP
- Controlling NFS requests from nonreserved ports
- Handling NFS access to NTFS volumes or qtrees for unknown UNIX users
- Considerations for clients that mount NFS exports using a nonreserved port
- Performing stricter access checking for netgroups by verifying domains
- Modifying ports used for NFSv3 services
- Commands for managing NFS servers
- Troubleshooting name service issues
- Verifying name service connections
- Commands for managing name service switch entries
- Commands for managing name service cache
- Commands for managing local UNIX users
- Commands for managing local UNIX groups
- Limits for local UNIX users, groups, and group members
- Manage limits for local UNIX users and groups
- Commands for managing local netgroups
- Commands for managing NIS domain configurations
- Commands for managing LDAP client configurations
- Commands for managing LDAP configurations
- Commands for managing LDAP client schema templates
- Commands for managing NFS Kerberos interface configurations
- Commands for managing NFS Kerberos realm configurations
- Commands for managing export policies
- Commands for managing export rules
- Reasons for modifying the NFS credential cache time-to-live
- Configure the time-to-live for cached NFS user credentials
- Flush export policy caches
- Display the export policy netgroup queue and cache
- Checking whether a client IP address is a member of a netgroup
- Optimizing access cache performance
- About file locking between protocols
- How ONTAP treats read-only bits
- How ONTAP differs from Windows on handling locks on share path components
- Display information about locks
- Breaking locks
- How FPolicy first-read and first-write filters work with NFS
- Modifying the NFSv4.1 server implementation ID
- Benefits of enabling NFSv4 ACLs
- How NFSv4 ACLs work
- Enable or disable modification of NFSv4 ACLs
- How ONTAP uses NFSv4 ACLs to determine whether it can delete a file
- Enable or disable NFSv4 ACLs
- Modifying the maximum ACE limit for NFSv4 ACLs
- Enable or disable NFSv4 read file delegations
- Enable or disable NFSv4 write file delegations
- About NFSv4 file and record locking
- Specifying the NFSv4 locking lease period
- Specifying the NFSv4 locking grace period
- How NFSv4 referrals work
- Enable or disable NFSv4 referrals
- Displaying NFS statistics
- Displaying DNS statistics
- Displaying NIS statistics
- Support for VMware vStorage over NFS
- Enable or disable VMware vStorage over NFS
- Enable or disable rquota support
- NFSv3 and NFSv4 performance improvement by modifying the TCP transfer size
- Modifying the NFSv3 and NFSv4 TCP maximum transfer size
- Configure the number of group IDs allowed for NFS users
- Controlling root user access to NTFS security-style data
- NFSv4.0 functionality supported by ONTAP
- Limitations of ONTAP support for NFSv4
- ONTAP support for NFSv4.1
- ONTAP support for NFSv4.2
- ONTAP support for parallel NFS
- Use of hard mounts
- Characters a file or directory name can use
- Case-sensitivity of file and directory names in a multiprotocol environment
- How ONTAP creates file and directory names
- How ONTAP handles multi-byte file, directory, and qtree names
- Configure character mapping for SMB file name translation on volumes
- Commands for managing character mappings for SMB file name translation
- NFS trunking overview
- Create a trunking-enabled NFS server
- Prepare your network for trunking
- Export data for client access
- Create client mounts
- Adapting single-path exports overview
- Enable trunking on an NFS server
- Update your network for trunking
- Modify data export for client access
- Reestablish client mounts
- Configure NICS and NFS
- Configure LIFs
- Modify the NFS settings
- Decide where to provision new SMB storage capacity
- Worksheet for gathering SMB configuration information
- Verify that the SMB protocol is enabled on the SVM
- Configure time services
- Create an SMB server in an Active Directory domain
- Create keytab files for SMB authentication
- Create an SMB server in a workgroup
- Create local user accounts
- Create local groups
- Manage local group membership
- Verify enabled SMB versions
- Map the SMB server on the DNS server
- Requirements and considerations for creating an SMB share
- Create an SMB share
- Verify SMB client access
- Create SMB share access control lists
- Configure NTFS file permissions in a share
- Verify user access
- Supported SMB versions and functionality
- Unsupported Windows features
- Configure NIS or LDAP name services on the SVM
- Modify SMB servers
- Available SMB server options
- Configure SMB server options
- Configure the grant UNIX group permission to SMB users
- Configure access restrictions for anonymous users
- Enable or disable the presentation of NTFS ACLs for UNIX security-style data
- How ONTAP handles SMB client authentication
- Guidelines for SMB server security settings in an SVM disaster recovery configuration
- Display information about CIFS server security settings
- Enable or disable required password complexity for local SMB users
- Modify the CIFS server Kerberos security settings
- Set the CIFS server minimum authentication security level
- Configure strong security for Kerberos-based communication by using AES encryption
- Enable or disable AES encryption for Kerberos-based communication
- How SMB signing policies affect communication with a CIFS server
- Performance impact of SMB signing
- Recommendations for configuring SMB signing
- Guidelines for SMB signing when multiple data LIFS are configured
- Enable or disable required SMB signing for incoming SMB traffic
- Determining whether SMB sessions are signed
- Monitor SMB signed session statistics
- Performance impact of SMB encryption
- Enable or disable required SMB encryption for incoming SMB traffic
- Determine whether clients are connected using encrypted SMB sessions
- Monitor SMB encryption statistics
- Enable LDAP signing and sealing on the CIFS server
- Export a copy of the self-signed root CA certificate
- Install the self-signed root CA certificate on the SVM
- Enable LDAP over TLS on the CIFS server
- Configure SMB Multichannel for performance and redundancy
- Configure the default UNIX user
- Configure the guest UNIX user
- Map the administrators group to root
- Display information about what types of users are connected over SMB sessions
- Command options to limit excessive Windows client resource consumption
- Write cache data-loss considerations when using oplocks
- Enable or disable oplocks when creating SMB shares
- Commands for enabling or disabling oplocks on volumes and qtrees
- Enable or disable oplocks on existing SMB shares
- Monitor oplock status
- Supported GPOs
- Requirements for using GPOs with your CIFS server
- Enable or disable GPO support on a SMB server
- What to do if GPO updates are failing
- Manually updating GPO settings on the CIFS server
- Display information about GPO configurations
- Display detailed information about restricted group GPOs
- Display information about central access policies
- Display information about central access policy rules
- Commands for managing CIFS servers computer account passwords
- Display information about discovered servers
- Reset and rediscover servers
- Manage domain controller discovery
- Add preferred domain controllers
- Commands for managing preferred domain controllers
- Enable SMB2 connections to domain controllers
- Enable encrypted connections to domain controllers
- How the storage system provides null session access
- Grant null users access to file system shares
- Add a list of NetBIOS aliases to the CIFS server
- Remove NetBIOS aliases from the NetBIOS alias list
- Display the list of NetBIOS aliases on CIFS servers
- Determine whether SMB clients are connected using NetBIOS aliases
- Stop or start the CIFS server
- Move CIFS servers to different OUs
- Modify the dynamic DNS domain on the SVM before moving the SMB server
- Join anSVM to an Active Directory domain
- Display information about NetBIOS over TCP connections
- Commands for managing CIFS servers
- Enable the NetBios name service
- Requirements for using IPv6
- Support for IPv6 with SMB access and CIFS services
- How CIFS servers use IPv6 to connect to external servers
- Enable IPv6 for SMB (cluster administrators only)
- Disable IPv6 for SMB
- Monitor and display information about IPv6 SMB sessions
- Create data volumes without specifying junction points
- Mount or unmount existing volumes in the NAS namespace
- Display volume mount and junction point information
- Enable or disable multidomain name mapping searches
- Reset and rediscover trusted domains
- Display information about discovered trusted domains
- Add, remove, or replace trusted domains in preferred trusted domain lists
- Display information about the preferred trusted domain list
- What the default administrative shares are
- SMB share naming requirements
- Directory case-sensitivity requirements when creating shares in a multiprotocol environment
- Add or remove share properties on an existing SMB share
- Optimize SMB user access with the force-group share setting
- Create an SMB share with the force-group share setting
- View information about SMB shares using the MMC
- Commands for managing SMB shares
- Guidelines for managing SMB share-level ACLs
- Commands for managing SMB share access control lists
- Configure advanced NTFS file permissions using the Windows Security tab
- Configure NTFS file permissions using the ONTAP CLI
- How UNIX file permissions provide access control when accessing files over SMB
- Supported Dynamic Access Control functionality
- Considerations when using Dynamic Access Control and central access policies with CIFS servers
- Enable or disable Dynamic Access Control
- Manage ACLs that contain Dynamic Access Control ACEs when Dynamic Access Control is disabled
- Configure central access policies to secure data on CIFS servers
- Display information about Dynamic Access Control security
- Revert considerations for Dynamic Access Control
- Where to find additional information about configuring and using Dynamic Access Control and central access policies
- How export policies are used with SMB access
- Examples of export policy rules that restrict or allow access over SMB
- Enable or disable export policies for SMB access
- Use cases for using Storage-Level Access Guard
- Workflow to configure Storage-Level Access Guard
- Configure Storage-Level Access Guard
- Effective SLAG matrix
- Display information about Storage-Level Access Guard
- Remove Storage-Level Access Guard
- Local users and groups concepts
- Reasons for creating local users and local groups
- How local user authentication works
- How user access tokens are constructed
- Guidelines for using SnapMirror on SVMs that contain local groups
- What happens to local users and groups when deleting CIFS servers
- How you can use Microsoft Management Console with local users and groups
- Guidelines for reverting
- List of supported privileges
- Assign privileges
- Guidelines for using BUILTIN groups and the local administrator account
- Requirements for local user passwords
- Predefined BUILTIN groups and default privileges
- Enable or disable local users and groups
- Enable or disable local user authentication
- Modify local user accounts
- Enable or disable local user accounts
- Change local user account passwords
- Display information about local users
- Display information about group memberships for local users
- Delete local user accounts
- Modify local groups
- Display information about local groups
- Display information about members of local groups
- Delete a local group
- Update domain user and group names in local databases
- Add privileges to local or domain users or groups
- Remove privileges from local or domain users or groups
- Reset privileges for local or domain users and groups
- Display information about privilege overrides
- Allow users or groups to bypass directory traverse checking
- Disallow users or groups from bypassing directory traverse checking
- Display information about file security on NTFS security-style volumes
- Display information about file security on mixed security-style volumes
- Display information about file security on UNIX security-style volumes
- Display information about NTFS audit policies on FlexVol volumes using the CLI
- Display information about NFSv4 audit policies on FlexVol volumes using the CLI
- Ways to display information about file security and audit policies
- Use cases for using the CLI to set file and folder security
- Limits when using the CLI to set file and folder security
- How security descriptors are used to apply file and folder security
- Guidelines for applying file-directory policies that use local users or groups on the SVM disaster recovery destination
- Create an NTFS security descriptor
- Add NTFS DACL access control entries to the NTFS security descriptor
- Create security policies
- Add a task to the security policy
- Apply security policies
- Monitor the security policy job
- Verify the applied file security
- Add NTFS SACL access control entries to the NTFS security descriptor
- Verify the applied audit policy
- Considerations when managing security policy jobs
- Commands for managing NTFS security descriptors
- Commands for managing NTFS DACL access control entries
- Commands for managing NTFS SACL access control entries
- Commands for managing security policies
- Commands for managing security policy tasks
- Commands for managing security policy jobs
- How SMB metadata caching works
- Enable the SMB metadata cache
- Configure the lifetime of SMB metadata cache entries
- Display SMB session information
- Display information about open SMB files
- Determine which statistics objects and counters are available
- Display statistics
- Requirements for using offline files
- Guidelines for deploying offline files
- Configure offline files support on SMB shares using the CLI
- Configure offline files support on SMB shares by using the Computer Management MMC
- Requirements for using roaming profiles
- Configure roaming profiles
- Requirements for using folder redirection
- Configure folder redirection
- Access the ~snapshot directory from Windows clients using SMB 2.x
- Requirements for using Microsoft Previous Versions
- Use the Previous Versions tab to view and manage Snapshot copy data
- Determine whether Snapshot copies are available for Previous Versions use
- Create a Snapshot configuration to enable Previous Versions access
- Guidelines for restoring directories that contain junctions
- How ONTAP enables dynamic home directories
- Add a home director share
- Home directory shares require unique user names
- What happens to static home directory share names after upgrading
- Add a home directory search path
- Create a home directory configuration using the %w and %d variables
- Configure home directories using the %u variable
- Additional home directory configurations
- Commands for managing search paths
- Display information about an SMB user’s home directory path
- Manage accessibility to users' home directories
- How ONTAP enables you to provide SMB client access to UNIX symbolic links
- Limits when configuring UNIX symbolic links for SMB access
- Control automatic DFS advertisements in ONTAP with a CIFS server option
- Configure UNIX symbolic link support on SMB shares
- Create symbolic link mappings for SMB shares
- Commands for managing symbolic link mappings
- BranchCache version support
- Network protocol support requirements
- ONTAP and Windows hosts version requirements
- Reasons ONTAP invalidates BranchCache hashes
- Guidelines for choosing the hash store location
- BranchCache recommendations
- Requirements for configuring BranchCache
- Configure BranchCache on the SMB server
- Where to find information about configuring BranchCache at the remote office
- Create a BranchCache-enabled SMB share
- Enable BranchCache on an existing SMB share
- Modify BranchCache configurations
- Display information about BranchCache configurations
- Change the BranchCache server key
- Pre-computing BranchCache hashes on specified paths
- Flush hashes from the SVM BranchCache hash store
- Display BranchCache statistics
- Support for BranchCache Group Policy Objects
- Display information about BranchCache Group Policy Objects
- Disable BranchCache on a single SMB share
- Stop automatic caching on all SMB shares
- What happens when you disable or reenable BranchCache on the CIFS server
- Disable or enable BranchCache
- What happens when you delete the BranchCache configuration
- Delete the BranchCache configuration
- What happens to BranchCache when reverting
- How ODX works
- Requirements for using ODX
- Guidelines for using ODX
- Use cases for ODX
- Enable or disable ODX
- Requirements and guidelines for using automatic node referrals
- Support for SMB automatic node referrals
- Enable or disable SMB automatic node referrals
- Use statistics to monitor automatic node referral activity
- Monitor client-side SMB automatic node referral information using a Windows client
- Enable or disable access-based enumeration on SMB shares
- Enable or disable access-based enumeration from a Windows client
- NAS data requirements
- Enable S3 multi-protocol access
- Create S3 NAS bucket
- Enable S3 client users
- Configure ONTAP for Microsoft Hyper-V and SQL Server over SMB solutions
- What are nondisruptive operations?
- Protocols that enable nondisruptive operations over SMB
- Key concepts about nondisruptive operations for Hyper-V and SQL Server over SMB
- How SMB 3.0 functionality supports nondisruptive operations over SMB shares
- What the Witness protocol does to enhance transparent failover
- How the Witness protocol works
- Remote VSS concepts
- Example of a directory structure used by Remote VSS
- How SnapManager for Hyper-V manages Remote VSS-based backups for Hyper-V over SMB
- How ODX copy offload is used with Hyper-V and SQL Server over SMB shares
- ONTAP and licensing requirements
- Network and data LIF requirements
- SMB server and volume requirements for Hyper-V over SMB
- SMB server and volume requirements for SQL Server over SMB
- Continuously available share requirements and considerations for Hyper-V over SMB
- Continuously available share requirements and considerations for SQL Server over SMB
- Remote VSS considerations for Hyper-V over SMB configurations
- ODX copy offload requirements for SQL Server and Hyper-V over SMB
- Recommendations for SQL Server and Hyper-V over SMB configurations
- Complete the volume configuration worksheet
- Complete the SMB share configuration worksheet
- Verify that both Kerberos and NTLMv2 authentication are permitted (Hyper-V over SMB shares)
- Verify that domain accounts map to the default UNIX user
- Verify that the security style of the SVM root volume is set to NTFS
- Verify that required CIFS server options are configured
- Create NTFS data volumes
- Create continuously available SMB shares
- Add the SeSecurityPrivilege privilege to the user account (for SQL Server of SMB shares)
- Configure the VSS shadow copy directory depth (for Hyper-V over SMB shares)
- Configure existing shares for continuous availability
- Enable or disable VSS shadow copies for Hyper-V over SMB backups
- Display SMB statistics
- Use health monitoring to determine whether nondisruptive operation status is healthy
- Display nondisruptive operation status by using system health monitoring
- Verify the continuously available SMB share configuration
- Verify LIF status
- SAN provisioning with iSCSI
- How iSCSI authentication works
- iSCSI initiator security management
- iSCSI endpoint isolation
- What CHAP authentication is
- How using iSCSI interface access lists to limit initiator interfaces can increase performance and security
- iSNS server registration requirement
- SAN provisioning with FC
- SAN provisioning with NVMe
- SAN volume configuration options
- SAN host-side space management
- Specify initiator WWPNs and iSCSI node names for an igroup
- How LUN access works in a virtualized environment
- Considerations for LIFs in cluster SAN environments
- Improve VMware VAAI performance for ESX hosts
- Microsoft Offloaded Data Transfer (ODX)
- Configure switches for FCoE
- System requirements
- What to know before you create a LUN
- Verify or add the FC or iSCSI license
- Provision SAN storage
- License requirements
- NVMe support and limitations
- Configure an SVM for NVMe
- Provision NVMe storage
- Map an NVMe namespace to a subsystem
- Edit LUN QoS Policy
- Convert a LUN into a namespace
- Take a LUN offline
- Resize a LUN
- Delete a LUN
- What to know before copying LUNs
- Examine configured and used space of a LUN
- Enable space allocation
- Control and monitor I/O performance to LUNs using Storage QoS
- Tools available to effectively monitor your LUNs
- Capabilities and restrictions of transitioned LUNs
- I/O misalignments on properly aligned LUNs
- Ways to address issues when LUNs go offline
- Troubleshoot iSCSI LUNs not visible on the host
- Ways to limit LUN access with portsets and igroups
- Manage igroups and initiators
- Create nested igroup
- Map igroup to multiple LUNs
- Create a portset and bind to an igroup
- Manage portsets
- Selective LUN Map
- Configure your network for best performance
- Configure an SVM for iSCSI
- Define a security policy method for an initiator
- Delete an iSCSI service for an SVM
- Get more details in iSCSI session error recoveries
- Register the SVM with an iSNS server
- Resolve iSCSI error messages on the storage system
- iSCSI LIF failover for ASA platforms
- Configure an SVM for FC
- Delete an FC service for an SVM
- Recommended MTU configurations for FCoE jumbo frames
- Start the NVMe/FC service for an SVM
- Delete NVMe/FC service from an SVM
- Resize a NVMe namespace
- Convert a namespace into a LUN
- Set up in-band authentication over NVMe
- Disable in-band authentication over NVMe
- Change NVMe host priority
- Manage automated host discovery for NVMe/TCP
- Disable NVMe VMID
- Commands for managing FC adapters
- Configure FC adapters
- View adapter settings
- Change the UTA2 port from CNA mode to FC mode
- Change the CNA/UTA2 target adapter optical modules
- Supported port configurations for X1143A-R6 adapters
- Configure X1143A-R6 adapter ports
- Prevent loss of connectivity when using the X1133A-R6 adapter
- Configure an NVMe LIF
- What to know before moving a SAN LIF
- Remove a SAN LIF from a port set
- Move a SAN LIF
- Delete a LIF in a SAN environment
- SAN LIF requirements for adding nodes to a cluster
- Configure iSCSI LIFs to return FQDN to host iSCSI SendTargets Discovery Operation
- Calculate rate of data growth for LUNs
- Restore a single LUN from a Snapshot copy
- Restore all LUNs in a volume from a Snapshot copy
- Delete one or more existing Snapshot copies from a volume
- Reasons for using FlexClone LUNs
- How a FlexVol volume can reclaim free space with autodelete setting
- Clone LUNs from an active volume
- Create FlexClone LUNs from a Snapshot copy in a volume
- Access a read-only LUN copy from a SnapVault backup
- Restore a single LUN from a SnapVault backup
- Restore all LUNs in a volume from a SnapVault backup
- How you can connect a host backup system to the primary storage system
- Back up a LUN through a host backup system
- Ways to configure iSCSI SAN hosts
- Benefits of using VLANs in iSCSI configurations
- Ways to configure FC & FC-NVMe SAN hosts
- FC switch configuration best practices
- Supported number of FC hop counts
- FC target port supported speeds
- FC Target port configuration recommendations
- Configure FC adapters for initiator mode
- Configure FC adapters for target mode
- Display information about an FC target adapter
- Change the FC adapter speed
- Supported FC ports
- Configure the ports
- FCoE initiator and target combinations
- FCoE supported hop count
- World Wide Name-based zoning
- Individual zones
- Single-fabric zoning
- Dual-fabric HA pair zoning
- Zoning restrictions for Cisco FC and FCoE switches
- Shared SAN configurations
- Prevent port overlap between switchover and switchback
- When host multipathing software is required
- Recommended number of paths from host to nodes in cluster
- Determine the number of supported nodes for SAN configurations
- Determine the number of supported hosts per cluster in FC and FC-NVMe configurations
- Determine the supported number of hosts in iSCSI configurations
- FC switch configuration limits
- Calculate queue depth
- Set queue depths
- Architecture
- ONTAP version support for S3 object storage
- ONTAP S3 supported actions
- ONTAP S3 interoperability
- ONTAP S3 validated third-party solutions
- Decide where to provision new S3 storage capacity
- Create an SVM for S3
- Create and install a CA certificate on the SVM
- Create an S3 service data policy
- Create data LIFs
- Create intercluster LIFs for remote FabricPool tiering
- Create the S3 object store server
- Create a bucket
- Create a bucket on a mirrored or unmirrored aggregate in a MetroCluster configuration
- Create a bucket lifecycle rule
- Create an S3 user
- Create or modify S3 groups
- Regenerate keys and modify their retention period
- About bucket and object store server policies
- Modify a bucket policy
- Create or modify an object store server policy
- Configure S3 access for external directory services
- Enable LDAP or domain users to generate S3 access keys
- Enable ONTAP S3 access for remote FabricPool tiering
- Enable ONTAP S3 access for local FabricPool tiering
- Enable client access from an S3 app
- Storage service definitions
- Create mirror for new bucket
- Create mirror for existing bucket
- Takeover from destination
- Restore from destination
- Requirements for cloud targets
- Create backup for new bucket
- Create backup for existing bucket
- Restore from cloud target
- Modify mirror policy
- Plan a configuration
- Create and enable the configuration
- Select buckets for auditing
- Modify the configuration
- Show configurations
- Authentication and access control
- Configuration worksheets
- Enable password account access
- Enable SSH public key accounts
- Manage multifactor authentication with System Manager
- Enable MFA with SSH and TOTP
- Configure local user account for MFA with TOTP
- Reset TOTP configuration
- Disable TOTP secret key
- Enable SSL certificate accounts
- Enable Active Directory account access
- Enable LDAP or NIS account access
- Modify the role assigned to an administrator
- Define custom roles
- Predefined roles for cluster administrators
- Predefined roles for SVM administrators
- Control administrator access with System Manager
- Associate a public key with an administrator account
- Manage SSH public keys and X.509 certificates for an administrator account
- Configure Cisco Duo 2FA for SSH logins
- Generate and install a CA-signed server certificate
- Manage certificates with System Manager
- Configure Active Directory domain controller access
- Configure LDAP or NIS server access
- Change an administrator password
- Lock and unlock an administrator account
- Manage failed login attempts
- Enforce SHA-2 on administrator account passwords
- Diagnose and correct file access issues with System Manager
- Manage administrator groups
- Enable and disable multi-admin verification
- Manage protected operation rules
- Request execution of protected operations
- Manage protected operation requests
- Enable or disable dynamic authorization
- Customize dynamic authorization
- Authorization servers and tokens
- Options for client authorization
- Deployment scenarios
- Client authentication using mTLS
- Prepare to deploy OAuth 2.0
- Deploy OAuth 2.0 in ONTAP
- Issue a REST API call
- Authentication and authorization using SAML
- Manage access to web services
- Manage the web protocol engine
- Commands for managing the web protocol engine
- Configure access to web services
- Commands for managing web services
- Commands for managing mount points on the nodes
- Commands for managing SSL
- Troubleshoot web service access problems
- Verify digital certificates are valid using OCSP
- View default certificates for TLS-based applications
- Generate a certificate signing request for the cluster
- Install a CA-signed server certificate for the cluster
- Install a CA-signed client certificate for the KMIP server
- Security with System Manager
- Use cases and considerations
- Enable anti-ransomware protection
- Enable anti-ransomware protection by default
- Pause protection
- Manage attack detection parameters
- Respond to abnormal activity
- Recover data after an attack
- Modify Snapshot copy options
- Understanding NetApp virus scanning
- Virus scanning workflow
- Antivirus architecture
- Vscan partner solutions
- Install ONTAP Antivirus Connector
- Configure ONTAP Antivirus Connector
- Create a scanner pool on a single cluster
- Create scanner pools in MetroCluster configurations
- Apply a scanner policy on a single cluster
- Apply scanner policies in MetroCluster configurations
- Commands for managing scanner pools
- Create an on-access policy
- Enable an on-access policy
- Modify the Vscan file-operations profile for an SMB share
- Commands for managing on-access policies
- Create an on-demand task
- Schedule an on-demand task
- Run an on-demand task immediately
- Commands for managing on-demand tasks
- Best practices for configuring off-box antivirus functionality
- Enable virus scanning on an SVM
- Reset the status of scanned files
- View Vscan event log information
- Potential connectivity issues involving the scan-mandatory option
- Commands for viewing Vscan server connection status
- Troubleshoot common virus scanning issues
- Monitor status and performance activities
- Basic auditing concepts
- How the ONTAP auditing process works
- Auditing requirements and considerations
- Limitations for the size of audit records on staging files
- What the supported audit event log formats are
- View audit event logs
- Determine what the complete path to the audited object is
- Considerations when auditing symlinks and hard links
- Considerations when auditing alternate NTFS data streams
- NFS file and directory access events that can be audited
- Plan the auditing configuration
- Create the auditing configuration
- Enable auditing on the SVM
- Verify the auditing configuration
- Configure audit policies on NTFS security-style files and directories
- Configure auditing for UNIX security style files and directories
- Display information about audit policies using the Windows Security tab
- Manage file-share event
- Manage audit-policy-change event
- Manage user-account event
- Manage security-group event
- Manage authorization-policy-change event
- Manually rotate the audit event logs
- Enable and disable auditing on SVMs
- Display information about auditing configurations
- Commands for modifying auditing configurations
- Delete an auditing configuration
- Understand cluster revert implications
- Troubleshoot auditing and staging volume space issues
- What the two parts of the FPolicy solution are
- What synchronous and asynchronous notifications are
- FPolicy persistent stores
- FPolicy configuration types
- Roles that cluster components play with FPolicy implementation
- How FPolicy works with external FPolicy servers
- What the node-to-external FPolicy server communication process is
- How FPolicy services work across SVM namespaces
- How FPolicy passthrough-read enhances usability for hierarchical storage management
- Requirements, considerations, and best practices for configuring FPolicy
- What the steps for setting up an FPolicy configuration are
- Additional information about configuring FPolicy external engines to use SSL authenticated connections
- Certificates do not replicate in SVM disaster recovery relationships with a non-ID-preserve configuration
- Restrictions for cluster-scoped FPolicy external engines with MetroCluster and SVM disaster recovery configurations
- Complete the FPolicy external engine configuration worksheet
- Supported file operation and filter combinations that FPolicy can monitor for SMB
- Supported file operation and filter combinations that FPolicy can monitor for NFSv3
- Supported file operation and filter combinations that FPolicy can monitor for NFSv4
- Complete the FPolicy event configuration worksheet
- Requirement for FPolicy scope configurations if the FPolicy policy uses the native engine
- Complete the FPolicy policy worksheet
- Complete the FPolicy scope worksheet
- Create the FPolicy external engine
- Create the FPolicy event
- Create persistent stores
- Create the FPolicy policy
- Create the FPolicy scope
- Enable the FPolicy policy
- Commands for modifying FPolicy configurations
- Enable or disabling FPolicy policies
- How the show commands work
- Commands for displaying information about FPolicy configurations
- Display information about FPolicy policy status
- Display information about enabled FPolicy policies
- Connect to external FPolicy servers
- Disconnect from external FPolicy servers
- Display information about connections to external FPolicy servers
- Display information about the FPolicy passthrough-read connection status
- How security traces work
- Types of access checks security traces monitor
- Considerations when creating security traces
- Create security trace filters
- Display information about security trace filters
- Display security trace results
- Modify security trace filters
- Delete security trace filters
- Delete security trace records
- Delete all security trace records
- Interpret security trace results
- Encrypt stored data (software)
- Encrypt stored data (hardware)
- NetApp Volume Encryption workflow
- Determine whether your cluster version supports NVE
- Install the license
- Manage external keys with System Manager
- Install SSL certificates on the cluster
- Enable external key management in ONTAP 9.6 and later (NVE)
- Enable external key management in ONTAP 9.5 and earlier
- Manage keys with a cloud provider
- Enable onboard key management in ONTAP 9.6 and later (NVE)
- Enable onboard key management in ONTAP 9.5 and earlier (NVE)
- Enable onboard key management in newly added nodes
- Enable aggregate-level encryption with VE license
- Enable encryption on a new volume
- Enable encryption on an existing volume with the volume encryption conversion start command
- Enable encryption on an existing volume with the volume move start command
- Enable encryption on the SVM root volume
- Enable node root volume encryption
- Collect network information in ONTAP 9.2 and earlier
- Enable external key management in ONTAP 9.6 and later (HW-based)
- Configure clustered external key server
- Create authentication keys in ONTAP 9.6 and later
- Create authentication keys in ONTAP 9.5 and earlier
- Assign a data authentication key to a FIPS drive or SED (external key management)
- Enable onboard key management in ONTAP 9.6 and later
- Enable onboard key management in ONTAP 9.5 and earlier
- Assign a data authentication key to a FIPS drive or SED (onboard key management)
- Assign a FIPS 140-2 authentication key to a FIPS drive
- Enable cluster-wide FIPS-compliant mode for KMIP server connections
- Unencrypt volume data
- Move an encrypted volume
- Delegate authority to run the volume move command
- Change the encryption key for a volume with the volume encryption rekey start command
- Change the encryption key for a volume with the volume move start command
- Rotate authentication keys for NetApp Storage Encryption
- Delete an encrypted volume
- Securely purge data on an encrypted volume without a SnapMirror relationship
- Securely purge data on an encrypted volume with an Asynchronous SnapMirror relationship
- Scrub data on an encrypted volume with a Synchronous SnapMirror relationship
- Change the onboard key management passphrase
- Back up onboard key management information manually
- Restore onboard key management encryption keys
- Restore external key management encryption keys
- Replace SSL certificates
- Replace a FIPS drive or SED
- Sanitize a FIPS drive or SED
- Destroy a FIPS drive or SED
- Emergency shredding of data on an FIPS drive or SED
- Return a FIPS drive or SED to service when authentication keys are lost
- Return a FIPS drive or SED to unprotected mode
- Remove an external key manager connection
- Modify external key management server properties
- Transition to external key management from onboard key management
- Transition to onboard key management from external key management
- What happens when key management servers are not reachable during the boot process
- Disable encryption by default
- Data protection overview
- Create custom data protection policies
- Configure Snapshot copies
- Recalculate reclaimable space
- Enable or disable client access to Snapshot copy directory
- Prepare for mirroring and vaulting
- Configure mirrors and vaults
- Resynchronize a protection relationship
- Restore a volume from an earlier Snapshot copy
- Recover from Snapshot copies
- Restore to a new volume
- Reverse resynchronize a protection relationship
- Serve data from a destination
- Configure storage VM disaster recovery
- Serve data from an SVM DR destination
- Reactivate a source storage VM
- Resynchronize a destination storage VM
- Back up data to the cloud using SnapMirror
- Back up data using Cloud Backup
- Peer basics
- Prerequisites for cluster peering
- Use shared or dedicated ports
- Use custom IPspaces to isolate replication traffic
- Configure intercluster LIFs on shared data ports
- Configure intercluster LIFs on dedicated ports
- Configure intercluster LIFs in custom IPspaces
- Create a cluster peer relationship
- Create an intercluster SVM peer relationship
- Add an intercluster SVM peer relationship
- Enable cluster peering encryption on an existing peer relationship
- Remove cluster peering encryption from an existing peer relationship
- When to configure a custom Snapshot policy
- Create a Snapshot job schedule
- Create a Snapshot policy
- Create and delete Snapshot copies manually
- When to increase the Snapshot copy reserve
- How deleting protected files can lead to less file space than expected
- Monitor Snapshot copy disk consumption
- Check available Snapshot copy reserve on a volume
- Modify the Snapshot copy reserve
- Autodelete Snapshot copies
- Restore a file from a Snapshot copy on an NFS or SMB client
- Enable and disable NFS and SMB client access to Snapshot copy directory
- Restore a single file from a Snapshot copy
- Restore part of a file from a Snapshot copy
- Restore the contents of a volume from a Snapshot copy
- Asynchronous SnapMirror disaster recovery basics
- SnapMirror Synchronous disaster recovery basics
- About workloads supported by StrictSync and Sync policies
- Vault archiving using SnapMirror technology
- SnapMirror unified replication basics
- XDP replaces DP as the SnapMirror default
- When a destination volume grows automatically
- Fan-out and cascade data protection deployments
- Install a SnapMirror Cloud license
- DPO systems feature enhancements
- SnapMirror replication workflow
- Configure a replication relationship in one step
- Create a destination volume
- Create a replication job schedule
- Create a custom replication policy
- Define a rule for a policy
- Define a schedule for creating a local copy on the destination
- Create a replication relationship
- Initialize a replication relationship
- Example: Configure a vault-vault cascade
- Convert an existing DP-type relationship to XDP
- Convert the type of a SnapMirror relationship
- Convert the mode of a SnapMirror Synchronous relationship
- Create and delete SnapMirror failover test volumes
- Make the destination volume writeable
- Configure the destination volume for data access
- Reactivate the original source volume
- Restore a single file, LUN, or NVMe namespace from a SnapMirror destination
- Restore the contents of a volume from a SnapMirror destination
- Update a replication relationship manually
- Resynchronize a replication relationship
- Delete a volume replication relationship
- Manage storage efficiency
- Use SnapMirror global throttling
- About SnapMirror SVM replication
- SnapMirror SVM replication workflow
- Criteria for placing volumes on destination SVMs
- Replicate an entire SVM configuration
- Exclude LIFs and related network settings from SVM replication
- Exclude network, name service, and other settings from SVM replication
- Specify aggregates to use for SVM DR relationships
- SMB only: Create a SMB server
- Exclude volumes from SVM replication
- SVM disaster recovery workflow
- Make SVM destination volumes writeable
- Source SVM reactivation workflow
- Reactivate the original source SVM
- Reactivate the original source SVM (FlexGroup volumes only)
- Convert volume replication relationships to an SVM replication relationship
- Delete an SVM replication relationship
- Create and initializing load-sharing mirror relationships
- Update a load-sharing mirror relationship
- Promote a load-sharing mirror
- Use path name pattern matching
- Use extended queries to act on many SnapMirror relationships
- Ensure a common Snapshot copy in a mirror-vault deployment
- Compatible ONTAP versions for SnapMirror relationships
- SnapMirror limitations
- What SnapLock is
- Initialize the Compliance Clock
- Create a SnapLock aggregate
- Create and mount a SnapLock volume
- Set the retention time
- Create an audit log
- Verify SnapLock settings
- Commit files to WORM
- Commit Snapshot copies to WORM on a vault destination
- Mirror WORM files for disaster recovery
- Retain WORM files during litigation
- Delete WORM files
- Move a SnapLock volume
- Tamperproof Snapshot copy locking
- SnapLock APIs
- Configure a single consistency group
- Configure a hierarchical consistency group
- Modify geometry
- Modify application and component tags
- Deployment strategy
- Prerequisites
- Interoperability
- Configure ONTAP Mediator and clusters
- Configure protection
- Convert to SnapMirror active sync
- Convert to symmetric active/active
- Create a common snapshot copy
- Perform a planned failover
- Recover from automatic unplanned failover operations
- Monitor SnapMirror active sync
- Add and remove volumes to a consistency group
- Upgrade and revert
- Troubleshoot
- Remove a SnapMirror active sync configuration
- Remove ONTAP Mediator
- SnapMirror delete operation fails in takover state
- Failure creating a SnapMirror relationship and initializing consistency group
- Planned failover unsuccesful
- Mediator not reachable or Mediator quorum status is false
- Automatic unplanned failover not triggered on Site B
- Link between Site B and Mediator down and Site A down
- Link between Site A to Mediator Down and Site B down
- SnapMirror delete operation fails when fence is set on destination volumes
- Volume move operation stuck when primary site is down
- Release operation fails when unable to delete Snapshot copy
- Volume move reference Snapshot copy shows as the newest
- Prepare to install or upgrade
- Upgrade host OS and Mediator
- Enable access to repositories
- Download install package
- Verify code signature
- Install Mediator package
- Verify installation
- Post-installation configuration
- Manage the Mediator service
- Host maintenance
- MetroCluster overview
- Set up a MetroCluster site
- Set up MetroCluster peering
- Configure a MetroCluster site
- Manage the Mediator
- Perform MetroCluster switchover and switchback
- Modify address, netmask, and gateway in a MetroCluster IP
- Troubleshoot problems with a MetroCluster
- Tape backup overview
- Tape backup and restore workflow
- Use cases for choosing a tape backup engine
- Commands for managing tape drives, media changers, and tape drive operations
- Use a nonqualified tape drive
- Assign tape aliases
- Remove tape aliases
- Enable or disable tape reservations
- Commands for verifying tape library connections
- Qualified tape drives overview
- Format of the tape configuration file
- How the storage system qualifies a new tape drive dynamically
- Tape device name format
- Supported number of simultaneous tape devices
- What physical path names are
- What serial numbers are
- Considerations when configuring multipath tape access
- How you add tape drives and libraries to storage systems
- What tape reservations are
- Options for the ndmpcopy command
- About NDMP for FlexVol volumes
- What node-scoped NDMP mode is
- What SVM-scoped NDMP mode is
- Considerations when using NDMP
- Environment variables supported by ONTAP
- Common NDMP tape backup topologies
- Supported NDMP authentication methods
- NDMP extensions supported by ONTAP
- NDMP restartable backup extension for a dump supported by ONTAP
- What enhanced DAR functionality is
- Scalability limits for NDMP sessions
- About NDMP for FlexGroup volumes
- About NDMP with SnapLock volumes
- Commands for managing node-scoped NDMP mode
- User authentication in a node-scoped NDMP mode
- Commands for managing SVM-scoped NDMP mode
- What Cluster Aware Backup extension does
- Availability of volumes and tape devices for backup and restore on different LIF types
- What affinity information is
- NDMP server supports secure control connections in SVM-scoped mode
- NDMP data connection types
- User authentication in the SVM-scoped NDMP mode
- Generate an NDMP-specific password for NDMP users
- How tape backup and restore operations are affected during disaster recovery in MetroCluster configuration
- How a dump backup works
- Types of data that the dump engine backs up
- What increment chains are
- What the blocking factor is
- When to restart a dump backup
- How a dump restore works
- Types of data that the dump engine restores
- Considerations before restoring data
- Scalability limits for dump backup and restore sessions
- Tape backup and restore support between Data ONTAP operating in 7-Mode and ONTAP
- Delete restartable contexts
- How dump works on a SnapVault secondary volume
- How dump works with storage failover and ARL operations
- How dump works with volume move
- How dump works when a FlexVol volume is full
- How dump works when volume access type changes
- How dump works with SnapMirror single file or LUN restore
- How dump backup and restore operations are affected in MetroCluster configurations
- Use Snapshot copies during SMTape backup
- SMTape capabilities
- Features not supported in SMTape
- Scalability limits for SMTape backup and restore sessions
- What tape seeding is
- How SMTape works with storage failover and ARL operations
- How SMTape works with volume move
- How SMTape works with volume rehost operations
- How NDMP backup policy are affected during ADB
- How SMTape backup and restore operations are affected in MetroCluster configurations
- Access the event log files
- What logging events are
- What dump events are
- What restore events are
- Enable or disable event logging
- Resource limitation: no available thread
- Tape reservation preempted
- Could not initialize media
- Maximum number of allowed dumps or restores (maximum session limit) in progress
- Media error on tape write
- Tape write failed
- Tape write failed - new tape encountered media error
- Tape write failed - new tape is broken or write protected
- Tape write failed - new tape is already at the end of media
- Tape write error
- Media error on tape read
- Tape read error
- Already at the end of tape
- Tape record size is too small. Try a larger size.
- Tape record size should be block_size1 and not block_size2
- Tape record size must be in the range between 4KB and 256KB
- Network communication error
- Message from Read Socket: error_string
- Message from Write Dirnet: error_string
- Read Socket received EOF
- ndmpd invalid version number: version_number ``
- ndmpd session session_ID not active
- Could not obtain vol ref for Volume volume_name
- Data connection type ["NDMP4_ADDR_TCP"|"NDMP4_ADDR_TCP_IPv6"] not supported for ["IPv6"|"IPv4"] control connections
- DATA LISTEN: CAB data connection prepare precondition error
- DATA CONNECT: CAB data connection prepare precondition error
- Error:show failed: Cannot get password for user '<username>'
- Destination volume is read-only
- Destination qtree is read-only
- Dumps temporarily disabled on volume, try again
- NFS labels not recognized
- No files were created
- Restore of the file <file name> failed
- Truncation failed for src inode <inode number>…
- Unable to lock a snapshot needed by dump
- Unable to locate bitmap files
- Volume is temporarily in a transitional state
- Chunks out of order
- Chunk format not supported
- Failed to allocate memory
- Failed to get data buffer
- Failed to find snapshot
- Failed to create snapshot
- Failed to lock snapshot
- Failed to delete snapshot
- Failed to get latest snapshot
- Failed to load new tape
- Failed to initialize tape
- Failed to initialize restore stream
- Failed to read backup image
- Image header missing or corrupted
- Internal assertion
- Invalid backup image magic number
- Invalid backup image checksum
- Invalid input tape
- Invalid volume path
- Mismatch in backup set ID
- Mismatch in backup time stamp
- Job aborted due to shutdown
- Job aborted due to Snapshot autodelete
- Tape is currently in use by other operations
- Tapes out of order
- Transfer failed (Aborted due to MetroCluster operation)
- Transfer failed (ARL initiated abort)
- Transfer failed (CFO initiated abort)
- Transfer failed (SFO initiated abort)
- Underlying aggregate under migration
- Volume is currently under migration
- Volume offline
- Volume not restricted
- Prepare for NDMP configuration
- Verify tape device connections
- Enable tape reservations
- Enable SVM-scoped NDMP on the cluster
- Enable a backup user for NDMP authentication
- Enable node-scoped NDMP on the cluster
- Configure a LIF
- Configure the backup application
- Enable SnapMirror on the Element cluster
- Enable SnapMirror on the Element source volume
- Create a SnapMirror endpoint
- Create a relationship from an Element source to an ONTAP destination
- Create a relationship from an ONTAP source to an Element destination
- Dashboard tour
- Identify hot objects
- Monitor risks with Active IQ Digital Advisor
- System Manager insights
- Gain insights to help optimize your system
- Configure native FPolicy
- Verify that your VMware environment is supported
- Active IQ Unified Manager worksheet
- Download and deploy Active IQ Unified Manager
- Configure initial Active IQ Unified Manager settings
- Specify the clusters to be monitored
- Perform daily monitoring
- Use weekly and monthly performance trends to identify performance issues
- Use performance thresholds to generate event notifications
- Set performance thresholds
- Configure alert settings
- Identify performance issues in Active IQ Unified Manager
- Use Active IQ Digital Advisor to view system performance
- Check the NFS TCP maximum transfer size
- Check the iSCSI TCP read/write size
- Check the CIFS multiplex settings
- Check the FC adapter port speed
- Check the network settings on the data switches
- Check the MTU network setting on the storage system
- Check disk throughput and latency
- Check throughput and latency between nodes
- Identify remaining performance capacity
- Identify high-traffic clients or files
- Enable or disable throughput floors v2
- Storage QoS workflow
- Set a throughput ceiling with QoS
- Set a throughput floor with QoS
- Use adaptive QoS policy groups
- Set adaptive policy group template
- Monitor cluster performance with Unified Manager
- Monitor cluster performance with Cloud Insights
- How ONTAP implements audit logging
- Changes to audit logging in ONTAP 9
- Display audit log contents
- Manage audit GET request settings
- Manage audit log destinations
- Manage AutoSupport with System Manager
- Use AutoSupport and Active IQ Digital Advisor
- When and where AutoSupport messages are sent
- How AutoSupport creates and sends event-triggered messages
- Types of AutoSupport messages and their content
- What AutoSupport subsystems are
- AutoSupport size and time budgets
- Files sent in event-triggered AutoSupport messages
- Log files sent in AutoSupport messages
- Files sent in weekly AutoSupport messages
- How AutoSupport OnDemand obtains delivery instructions from technical support
- Structure of AutoSupport messages sent by email
- AutoSupport severity types
- Prepare to use AutoSupport
- Set up AutoSupport
- Upload core dump files
- Upload performance archive files
- Get AutoSupport message descriptions
- Commands for managing AutoSupport
- Information included in the AutoSupport manifest
- AutoSupport case suppression during scheduled maintenance windows
- Troubleshoot AutoSupport when messages are not received
- Troubleshoot AutoSupport message delivery over HTTP or HTTPS
- Troubleshoot AutoSupport message delivery over SMTP
- Troubleshoot the AutoSupport subsystem
- How health monitoring works
- Ways to respond to system health alerts
- System health alert customization
- How health alerts trigger AutoSupport messages and events
- Available cluster health monitors
- Receive system health alerts automatically
- Respond to degraded system health
- Example of responding to degraded system health
- Configure discovery of cluster and management network switches
- Verify the monitoring of cluster and management network switches
- Commands for monitoring the health of your system
- Display environmental information
- Enable File System Analytics
- View activity on a file system
- Enable Activity Tracking
- Enable usage analytics
- Take corrective action based on analytics
- Role-based access control
- Considerations
- Configure EMS event notifications with System Manager
- Configure EMS events to send email notifications
- Configure EMS events to forward notifications to a syslog server
- Configure SNMP traphosts to receive event notifications
- Configure EMS events to forward notifications to a webhook application
- EMS event mapping models
- Update EMS event mapping from deprecated ONTAP commands
- ONTAP manual pages
- Legal notices
- Request doc changes
- Edit this page
- Learn how to contribute
Creating your file...
Learn about the new capabilities available in ONTAP 9.15.1.
For details about known issues, limitations, and upgrade cautions in recent ONTAP 9 releases, refer to the ONTAP 9 Release Notes . You must sign in with your NetApp account or create an account to access the Release Notes.
To upgrade to the latest version of ONTAP, see Prepare to upgrade ONTAP .
Data protection
Storage efficiency, storage resource management enhancements, system manager.
IMAGES
VIDEO
COMMENTS
List role assignments for a managed identity. Follow these steps: Get the object ID of the system-assigned or user-assigned managed identity. To get the object ID of a user-assigned managed identity, you can use Get-AzADServicePrincipal. Get-AzADServicePrincipal -DisplayNameBeginsWith "<name> or <vmname>".
See the migration guide for Get-AzureADMSRoleAssignment to the Microsoft Graph PowerShell. The Get-AzureADMSRoleAssignment cmdlet gets information about role assignments in Azure Active Directory (Azure AD). To get a role assignment, specify the Id parameter. Specify the SearchString or Filter parameter to find a particular role assignment.
In the Azure portal, click All services and then select the scope. For example, you can select Management groups, Subscriptions, Resource groups, or a resource.. Click the specific resource. Click Access control (IAM).. Click the Role assignments tab to view all the role assignments at this scope.. On the Role assignments tab, you can see who has access at this scope.
Description. Use the Get-AzRoleAssignment command to list all role assignments that are effective on a scope. Without any parameters, this command returns all the role assignments made under the subscription. This list can be filtered using filtering parameters for principal, role and scope. The subject of the assignment must be specified.
To get all AAD roles including their eligible users using PowerShell: Thanks to @thesysadminchannel, By referring to this article, we can get all AAD roles including their eligible users and PIM Assignment Status. I have made a few changes in the portion of the param code block and execute the Begin & Process procedure calls in the same manner as mentioned in that article.
Start by clicking Roles and administrators to display the complete list and a brief description of all the built-in directory roles—including the new delegated app management roles . You can also see your active Azure AD role assignment (if you have one) and can click Your role to access the list of your active assigned roles.
A while back, I published a short article and script to illustrate the process of obtaining a list of all Azure AD role assignments. The examples therein use the old MSOnline and Azure AD PowerShell modules, which are now on a deprecation path. Thus, it's time to update the code to leverage the "latest and greatest".
Assigning role assignments involves 3 elements - security principal, role definition, and scope. The security principal is the Azure Active Directory object to be assigned the role. On the other hand, the role definition is the built-in or custom Azure AD role that is being assigned while the scope is level the role is assigned.
Keeping an eye on Azure AD administrative role assignments is crucial for tenant security and compliance. Forget about the built-in PIM report in the Azure AD portal - take reporting to the next level and build your own report with Graph, KQL and Powershell. Unassigning inactive roles, verifying that all role holders have registered MFA and are ...
Once you have the template, enable it with the Enable-AzureADDirectoryRole cmdlet. This will create an instance of the role within your tenant, with its own unique object id. Now you'll be able to get to the role and its object id with the Get-AzureADDirectoryRole cmdlet. Assign the role to the user (or service principal).
Learn how to manage Azure Role assignments using PowerShell snippets and simple commandlets. Discover examples for listing all role assignments, adding and removing assignments for users or service principals, creating custom roles, and more. Plus, check out a script that combines some of these examples into a single function. Written by Vukasin Terzic.
Howdy folks, Today, we're excited to share that you can assign groups to Azure Active Directory (Azure AD) roles, now in public preview. Role delegation to groups is one of the most requested features in our feedback forum.Currently this is available for Azure AD groups and Azure AD built-in roles, and we'll be extending this in the future to on-premises groups as well as Azure AD custom ...
Use following command to install AzureAD module : Install-ModuleAzureAD #Optional - To use AzureAD preview module run following command Install-ModuleAzureADPreview. Next, we will need to login to Azure AD with Connect-AzureAD Command. Login to Azure AD. Following script block will get all available Azure AD Roles and then loop through each role.
Get PIM Role Assignment Status For Azure AD Using Powershell. By using this script you'll be able to see all the people who have standing access as well as PIM eligible roles. This will check if a user is added to PIM or standing access. For updated help and examples refer to -Online version.
Lately, I have developed such a script to assign Azure AD application roles to users and applications. Hereby, I share it with the community. The script can be found in this gist. Config file. The script is driven by a simple config file, that contains a JSON array of role assignments: description: free text field that describes the role assignment
To list the role assignments for a specific user, use az role assignment list: Azure CLI. Copy. az role assignment list --assignee {assignee} By default, only role assignments for the current subscription will be displayed. To view role assignments for the current subscription and below, add the --all parameter.
Recently my role assignments in Azure AD were switched from permanent to eligible ones. This is part of PIM - Privileged Identity Management, you can read more about it on MS Docs: To activate your eligible assignment you can use Azure Portal, Graph API, and PowerShell. The activation in the portal and Graph API is described on MS Docs:
This program equips you with the necessary expertise to excel in the IT security industry within a Microsoft Azure environment. By acquiring the knowledge and skills provided by this program, you will be well-prepared for roles such as Azure security engineer associate or other similar positions in the field of IT security.
On a side note, since you've asked the question specifically for Microsoft Graph API, I've answered it accordingly. At least for the currently signed in user for an application, you can always find the Application Roles assigned to them from the Role claims available as part of the access token from Azure Active Directory.. This although only helps with roles for current user and not in ...
/content/azure/acom/en-us/products/active-directory. Referer: ChangeLog
The Get-AzureADDirectoryRole cmdlet gets a directory role from Azure Active Directory (AD). Examples Example 1: Get a directory role by ID ... access to applications and guests. 8c6a5c45-e93e-4f2b-81be-b57ad4c43ddd Privileged Role Administrator Can manage role assignments in Azure AD, and all aspects of Privileged Identity Management. 8f8a1cf4 ...
This might involve assigning administrative privileges within the virtual machine itself. Global Admin Permissions in Azure AD (if applicable): If your test tenant uses Azure AD, verify that the Global Admin role for the user is assigned at the Azure AD level, not just within the Microsoft 365 admin center. Hope this helps. -Stephen N.
The uninstall_vote_service job follows similar steps but focuses on removing the Azure Vote service from the cluster. The deploy_chaos_experiments job is more complex, involving the setup of the AKS configuration, deployment of chaos experiments, and management of necessary role assignments in Azure AD.
She was a Hearst fellow in Connecticut and at the San Antonio Express-News where she covered city hall and local issues. She also worked at the Sun Newspapers in Southwest Florida as a general assignment reporter covering politics, business, and health. Liz graduated from Ohio Wesleyan University in 2018 with a B.A. in journalism.
Name Description Type Status; az role assignment create: Create a new role assignment for a user, group, or service principal. Core GA az role assignment delete
Azure AD Roles: Navigate to the Azure Active Directory. Under "Roles and administrators," review each role and its assignments. Ensure users are assigned only to roles with necessary permissions. Role-Based Access Control (RBAC): Go to the "Resource groups" or individual resources in the Azure portal. Under "Access control (IAM ...
Roles Manage access to System Manager What the cluster management server is ... Set up Azure Blob Storage for the cloud as the cloud tier ... Set up an SMB server in an Active Directory domain Configure time services Commands for managing symmetric authentication on NTP servers Create an SMB server in an Active Directory domain ...
I had started coming to a simialr conclusion that the Azure Account Owner does not have the correct role assignments by default in order to carry out Active Directory related tasks. However the challenge i'm facing is that I equally cannot "Add Assingments" in the Assigned Roles menu blade, the button is greyed out for me.