Understanding Presenter View in PowerPoint: A Deep Dive Guide


Origin and Evolution of Presenter View
Why presenter view is a game-changer for professionals, activating and customizing presenter view in powerpoint, in-depth features of the presenter view, common mistakes and how to avoid them, advanced tips for a power presentation, final tips for enhancing your presentation game, introduction to presenter view.
Have you ever found yourself awkwardly toggling between slides and speaker notes during a presentation? Or wished you could preview the next slide without your audience seeing? Enter Presenter View in PowerPoint, a feature designed to make presenting smoother and more professional.
In essence, Presenter View is a special mode in PowerPoint that allows the presenter to see their speaker notes on one screen, while the audience views the note-free presentation on another screen. This dual-screen setup means you can have your notes, upcoming slides, and timer conveniently on one screen while your audience remains blissfully unaware.
“Presenter View is the unseen ally behind many successful PowerPoint presentations.”
Microsoft’s PowerPoint, with its roots tracing back to the late 1980s, has undergone several metamorphoses. Over the years, as technology improved and presentation dynamics changed, Microsoft introduced new features to make the software more user-friendly and versatile. One such innovation is the Presenter View.
Back in the early days of PowerPoint, presenters had to rely on printouts or separate documents for their speaker notes. The advent of Presenter View in the early 2000s was a game-changer. It allowed presenters to merge their slides and speaker notes into one cohesive presentation experience.
The beauty of Presenter View lies not just in its conception but in its evolution. Over different versions of PowerPoint:
- 2003 : Introduction of a basic Presenter View with slides and notes.
- 2007 : Enhanced screen setup with better dual-monitor support.
- 2010 : Introduction of slide zoom and laser pointer features.
- 2013 & Beyond : Integration with touch features, improved UI, and annotations.
Each version brought refinements, making it more intuitive and packed with features, tailoring to the evolving needs of presenters globally.
Fun Fact : Presenter View wasn’t initially as popular as it is today. It took a few iterations and user feedback loops for Microsoft to perfect the balance between utility and user experience.
The Core Components of Presenter View
Presenter View in PowerPoint is like the cockpit for pilots: it’s where all the essential controls and information are at the presenter’s fingertips. Whether you’re a newbie to PowerPoint or a seasoned professional, understanding these components can transform your presentation experience.
- This provides a glance at your current, previous, and upcoming slides. It ensures you’re always prepared for what’s coming next and can seamlessly transition between points.
- The soul of your presentation, speaker notes, are discreetly placed at the bottom or side, only visible to you. These notes can be elaborate explanations, quick pointers, or even personal reminders. They’re like your secret cheat sheet!
- Ever worried about running over time? This feature shows the elapsed time since you began the presentation and, in some versions, allows you to set a countdown. Stay on track and manage your pace efficiently.
- Interactive features that allow you to draw on slides or use a virtual laser pointer. These are especially helpful when you want to emphasize or explain specific points visually.
- Navigate between slides effortlessly and zoom into specific parts of a slide to draw attention or elaborate on details.
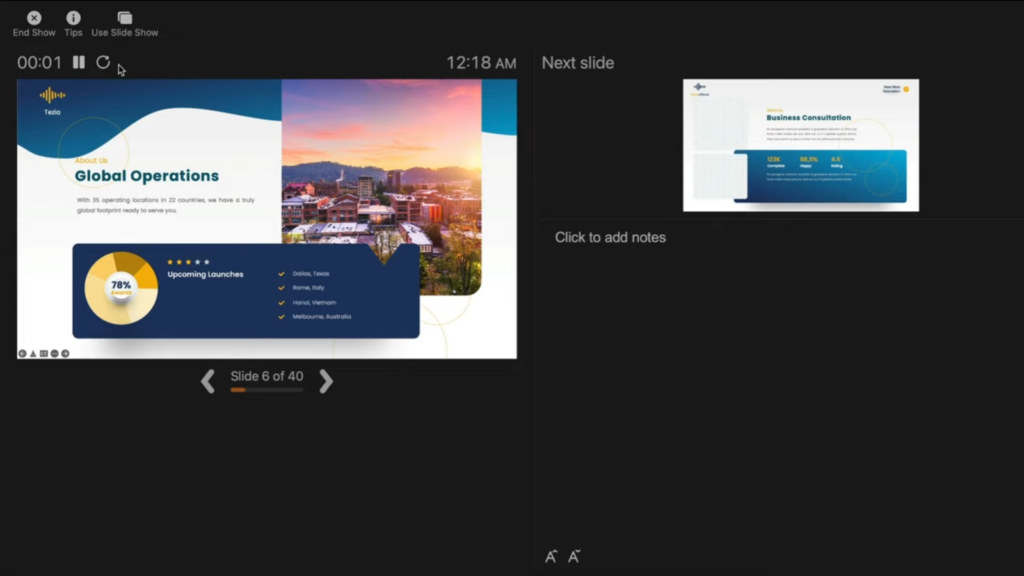
Table: Core Components Overview
Quote : “Presenter View is to a presenter what a dashboard is to a driver. It empowers, directs, and enhances the journey of your narrative.” – Jane Harris, Lead PowerPoint Expert – Powerbacks team
Understanding these components is one thing, but leveraging them effectively during a presentation can make a significant difference. Let’s delve into the ‘why’ behind the significance of Presenter View.
Stepping onto the stage or presenting in a boardroom can often be an overwhelming experience. The constant juggle between capturing the audience’s attention and keeping track of your slides can lead to nervousness. But what if there was a way to have everything you need right in front of you, ensuring smooth sailing through your presentation? Enter Presenter View.
- Having a preview of the upcoming slides and personal notes right in front of you can be a massive boost to confidence. You’re always one step ahead, knowing exactly what’s coming next.
- Instead of turning back to view the screen repeatedly, Presenter View lets you face your audience directly. This creates a more engaging and personal interaction.
- Gone are the days when you’d hold a bunch of cue cards or sheets of paper. With digital speaker notes, you have a cleaner, more organized setup.
- Using the annotation tools and laser pointer, you can make your presentation more interactive, leading to better retention and engagement from your audience.
- There’s no denying that seamlessly transitioning between slides, using interactive tools, and having no physical notes gives a more polished and professional look.
Table: Benefits of Using Presenter View
Quote : “Embracing the Presenter View is not just about leveraging a tool; it’s about amplifying your message and connecting more profoundly with your audience.”
It’s evident that the Presenter View has undeniable advantages for professionals. But how do you activate it and customize it to suit your needs? Let’s walk through the steps.
Starting with PowerPoint 2013, Microsoft enhanced the Presenter View to ensure that it’s both intuitive and user-friendly. Activating it and making it work for you is simple, as outlined in the following steps:
Step-by-Step Guide to Activate Presenter View :
- Start by opening your PowerPoint presentation. This will be the one you intend to deliver.
- At the top, you’ll notice several tabs. Click on the one labeled ‘Slide Show’.
- Within the Slide Show tab, you’ll spot a checkbox labeled ‘Use Presenter View’. Ensure that it’s ticked. If it’s not, simply click on it.
- If you’re using an external projector or display, make sure it’s connected. PowerPoint will automatically detect it and use the Presenter View on your primary display, showing the main presentation on the external one.
- Start your presentation by either pressing F5 on your keyboard or clicking on ‘From Beginning’ in the Slide Show tab.
- Next Slide Preview : Gives a preview of what’s coming next.
- Speaker Notes : Displays your notes for the current slide.
- Slide Navigation : Use this to jump to a specific slide.
- Annotation Tools : Highlight or draw on your slides in real-time.
- Timer : Keeps track of how long you’ve been presenting.
- You can move around the different elements, increase font size of your notes for better readability, or even hide specific components if they’re not required.
Table: Quick Access Tools in Presenter View
Quote : “The beauty of PowerPoint’s Presenter View is the control and flexibility it offers. It’s like having a personal assistant during your presentations.” – Linda Green, Presentation Expert
Now that we know how to activate and customize the Presenter View let’s delve deeper into its features and tools for maximum efficiency during presentations. Shall we proceed?
PowerPoint’s Presenter View is not just a simple “next slide” preview; it’s a hub of tools and functionalities designed to make the presenter’s job easier and the presentation more engaging.
H3: Slide Preview This is arguably the most straightforward feature but also the most helpful. At a glance, you can see what’s coming up, ensuring that you’re always prepared for the next topic or section.
- Smooth Transitions : Eliminates awkward pauses between slides.
- Improved Pacing : Know when to speed up or slow down based on upcoming content.
- Reduced Anxiety : No unpleasant surprises during your presentation.
H3: Speaker Notes For those who don’t rely on pure memory, speaker notes are a lifesaver. They’re your secret weapon, visible only to you, that provides additional context or reminders about what to say.
- Bold the crucial points to ensure they stand out.
- Use concise bullet points for easier and quicker reading.
- Add time cues if you’re aiming to cover specific points within certain timeframes.
H3: Slide Navigation While it’s always best to move sequentially through your slides, there might be instances when you need to skip ahead or return to a previous point. With the slide navigation tool, you can effortlessly hop around your presentation.
- Case Study : During a corporate presentation, John, a sales manager, was posed with a sudden question about Q2 performance. Thanks to slide navigation, he quickly reverted to the relevant slide, addressed the query, and resumed without any hiccups.
H3: Annotation Tools Engage your audience by turning your presentation into an interactive canvas. Whether you’re highlighting an essential statistic or drawing a quick graph, these tools can make a significant impact.
- Use contrasting colors to ensure visibility.
- Don’t overdo it; the aim is to emphasize, not to overwhelm.
- Practice beforehand to ensure you’re comfortable with these tools during the presentation.
H3: Timer It’s easy to lose track of time during a presentation. With Presenter View’s timer, you can keep tabs on the elapsed time, helping you manage the pace and duration of your talk.
- Tip : Always allocate a buffer period. If you’re presenting for 30 minutes, aim to finish in 25. This allows for Q&A or any unexpected delays.
Quote : “PowerPoint’s Presenter View is like a dashboard for presenters. It provides every tool one might need, all within arm’s reach, ensuring a seamless and interactive presentation experience.” – Michael Roberts, Tech Analyst
Understanding the features of the Presenter View is the key to unlocking its potential. With practice and familiarity, it becomes an extension of the presenter, leading to more confident and impactful presentations.
Making the Most of Presenter View
If you’ve ever wanted to feel like a presentation Jedi, mastering the Presenter View is your path to the force. But having the tool isn’t enough – it’s about leveraging its features optimally. Here’s a detailed guide on maximizing the benefits of the Presenter View:
H3: Setup and Access Before harnessing its power, you need to ensure you can access Presenter View without hitches.
- Connect your computer to the projector or external display.
- Launch PowerPoint and open your presentation.
- Go to the Slide Show tab and select Set Up Slide Show .
- In the pop-up, ensure Browsed by an individual (window) is selected.
- Start the slide show. Presenter View should appear on your computer, while the audience sees only the slides.
H3: Customize the Display Remember, it’s your dashboard; make it as comfortable and efficient for you as possible.
- Within Presenter View, hover over the bottom to reveal the toolbar.
- Click on the gear icon to adjust settings.
- Reorder tools based on your preference or hide those you don’t need.
H3: Practice, Practice, Practice The tool’s efficiency relies heavily on your familiarity with it. Do dry runs to ensure you know where everything is and how each feature works.
- Pro Tip : Mimic the presentation environment during practice. If you’re presenting in a large hall, practice with the same setup.
H3: Seamlessly Integrate Other Media If your presentation includes videos, animations, or other media, ensure they play seamlessly in Presenter View.
- Deep Dive : Always embed media within the presentation. Relying on external links or files can disrupt the Presenter View experience.
H3: Engage the Audience Use the tools not just to aid your presentation but to engage your audience. Pose questions, use the pen tool to sketch quick diagrams based on audience inputs, and make it interactive.
- Table of Engagement Techniques :
H3: Master the Art of Transitions Smooth transitions are key to maintaining audience attention. With a preview of the next slide, prepare your narrative to flow seamlessly.
Even with the most powerful tools, human error can play a spoilsport. The Presenter View, as intuitive as it may be, has its quirks. Here’s a list of common pitfalls users face and ways to steer clear of them:
H3: Not Checking Hardware Setup Before you even start the presentation, ensure your hardware is correctly set up. This includes checking the display connection, ensuring the projector or external monitor is detected, and setting up the correct display settings.
- Pro Tip : Always keep a spare HDMI or VGA cable. Technical glitches often come from the most unexpected sources.
H3: Overlooking Speaker Notes Having made the effort of adding speaker notes to your slides, it would be a shame not to use them. They serve as a discreet prompt, ensuring you don’t miss any critical points.
- Fact : According to a study, presenters who actively used speaker notes were 25% more consistent in delivering their core messages.
H3: Ignoring the Timer Time management is crucial. If you have a fixed time slot, exceeding it can inconvenience others and may appear unprofessional. Conversely, finishing too early can leave your audience unsatisfied.
- Actionable Advice : Always have a buffer. If your slot is 30 minutes, aim for a 25-minute presentation, leaving room for Q&A or unexpected delays.
H3: Relying Exclusively on Presenter View Despite its usefulness, never be wholly dependent on Presenter View. Technical glitches happen, and the ability to continue smoothly without it showcases professionalism.
- Case Study : At a major tech conference in 2018, a renowned speaker’s Presenter View malfunctioned. Instead of panicking, he smoothly transitioned to the standard view, using his printed notes as a backup. The audience lauded his adaptability, and his message wasn’t overshadowed by the hiccup.
H3: Not Adapting to Audience Feedback The tools in Presenter View, like slide navigation, are meant to enhance adaptability. If you sense your audience resonating more with a particular topic, don’t be afraid to dwell on it a bit longer or even revisit slides.
By sidestepping these common mistakes, you not only harness the full potential of Presenter View but also project confidence and control. Next, we’ll explore some advanced features to elevate your presentation game even further.
Mastering Presenter View basics can tremendously improve your presentation skills. But if you’re looking to elevate your game and leave a lasting impression, dive into these advanced features:
H3: Seamless Transition Between Slides The art of a great presentation lies not just in the content but also in the delivery. A choppy slide transition can disrupt the flow. PowerPoint offers a plethora of transition effects — from subtle fades to dynamic 3D effects.
- Go to the Transitions tab.
- Browse and select your preferred effect.
- Adjust the transition duration if needed.
- Click Apply To All to maintain uniformity.
H3: Use Zoom to Focus on Details Occasionally, you might want to draw attention to specific details on a slide. Instead of making your audience squint, use the in-built Zoom feature.
- Tip : Combine zoom with a laser pointer or pen tool for emphasis.
H3: Ink Annotations Annotating directly on your slides can be beneficial for interactive sessions or workshops. PowerPoint’s “Ink” feature allows you to do just that.
- Did You Know? : Ink annotations made during a presentation can be saved for future reference!
H3: Embed Multimedia for a Rich Experience Modern presentations often go beyond static slides. Consider embedding videos, audio clips, or even live web content to keep your audience engaged.
- Navigate to the Insert tab.
- Choose Video or Audio and select your file.
- Adjust playback settings under the Playback tab.
H3: Custom Slide Show Sometimes, different segments of your audience require varied content. Instead of having multiple PPT files, create a custom slideshow within the same presentation.
PowerPoint’s Presenter View is akin to a secret weapon, waiting in the wings, ready to empower speakers, educators, and presenters globally. Whether you’re a novice taking your first steps into the world of presentations or a seasoned speaker aiming to refine your skills, the Presenter View, along with the myriad features PowerPoint offers, ensures your content shines in the best light.
Remember, a successful presentation doesn’t merely rely on flashy slides or multimedia elements. It’s the seamless blend of content, delivery, and engagement. And with tools like Presenter View, you’re equipped to handle the technical aspects, allowing you to focus on what truly matters – connecting with your audience.
As Bill Gates once said:
“If you think the PowerPoint presentation is there for you as the presenter, you’re wrong. It’s there for the audience.”
So, the next time you’re gearing up for that crucial pitch, workshop, or lecture, take a moment to familiarize yourself with Presenter View. Your audience — and your confidence — will thank you for it.
Happy presenting!
Save my name, email, and website in this browser for the next time I comment.
- Skill Assessments
- AI Course Builder
- Free Courses
- PowerPoint 2019 Basic
Presenter View in PowerPoint

Start Free Trial
Or log in with:
How to Use Presenter View in PowerPoint

- You can use thumbnails to select slides out of sequence and create a customized presentation for your audience.
- Preview text shows you what your next click will add to the screen, such as a new slide or the next bullet in a list.
- Speaker’s notes are shown in large, clear type so that you can use them as a script for your presentation.
- You can temporarily black out the screen during a presentation and then resume where you left off. This can come in handy during breaks or question and answer periods.
Start Presenter View
- Click the Options button.

The Presenter view fills the screen. The same presentation tools are available below the slide, and it also shows the current time and a thumbnail of the upcoming slide. At the bottom of the screen, use the arrows to move forward or backward in the presentation.
Command Buttons
At the top of the Presenter view, there are command buttons.
- Show Taskbar : Show or hide the Windows taskbar.
- Display Settings : When projecting, swap which display shows the presenter view or duplicate the slide show on both screens.
- End the Slide Show : Return to Normal view.

The timer is located at the top-left corner of the current slide. It keeps track of how long Presenter view has been running.
- Click the Pause button to temporarily stop the timer.

The Notes pane gives you a large look at any notes added to the slide. In Presenter view, you have the flexibility to change the display size.

End Presenter View
You can close Presenter view without ending the presentation entirely.
- Click the Options menu.

You return to the regular slide show view.
To close Presenter View and end the presentation, just press Esc .

FREE Quick Reference
Free to distribute with our compliments; we hope you will consider our paid training.
- LinkedIn-ready certificate
- Skill assessments
- Bite-sized, interactive lessons
- Saved progress

May 9, 2022
Edit your notes in Presenter view in PowerPoint
Victoria Tran
- Add our blog to your RSS feed reader" href="/rss/blog.xml" data-bi-name="RSS Subscription" data-bi-id="rss_feed" data-bi-bhvr="120" data-bi-socchn="RSSSubscription" title="Microsoft 365 Insider Blog RSS" target="blank" class="d-inline-block">
Hey, Officer Insiders! My name is Victoria Tran, and I’m a Program Manager on the PowerPoint team. I’m thrilled to share that you can now edit notes in Presenter view in PowerPoint for Windows. No more switching to Editor view to type or change your notes, even during a presentation!
Edit notes in Presenter view
Accessing and editing your slide content whenever the need arises is a key part of the PowerPoint workflow. Whether you’re making an important edit to your speaker notes during a presentation rehearsal or jotting down feedback during your presentation, the ability to edit notes in Presenter view increases your productivity and eliminates the need to toggle between views.
We are excited to add this highly requested feature and expand the use of PowerPoint notes. In the future, we’ll continue to add support for editing notes in other views, such as Teleprompter view.
How it works
Ready to edit notes in Presenter view?

NOTE: You can also press the F6 key to select the Notes pane in Presenter view. When a white outline appears around the pane, press Enter and start typing to make any updates you want.
Known issues
Presenter view currently only allows basic formatting of notes, such as bold, italics, and underlining (via keyboard shortcuts). Formatting such as text color, highlighting, and other options aren’t yet available.
Tips and tricks
- If you are using keyboard commands to navigate through your slides during a presentation, make sure the text insertion point is not showing in the Notes pane. If it is, the arrow keys will move the insertion point around in the pane instead of navigating the slides.
- If you have two monitors, a full-screen slide will show on one monitor and Presenter view on the other monitor, featuring a view of the next slide, your speaker notes, a timer, and more. If you have just one monitor, you can press Alt + F5 to try out Presenter view.
Availability
We will be rolling the edit notes in Presenter view feature out to Office Insiders running Beta Channel Version 2204 (Build 15225.20000) or later.
Don’t have it yet? It’s probably us, not you.
Features are released over some time to ensure things are working smoothly. We highlight features that you may not have because they’re slowly releasing to larger numbers of Insiders. Sometimes we remove elements to further improve them based on your feedback. Though this is rare, we also reserve the option to pull a feature entirely out of the product, even if you, as an Insider, have had the opportunity to try it.
We want to hear from you! Please click Help > Feedback to submit your feedback about this feature.
Learn what other information you should include in your feedback to ensure it’s actionable and reaches the right people. We’re excited to hear from you!
Sign up for the Office Insider newsletter and get the latest information about Insider features in your inbox once a month!
Sorry, JavaScript must be enabled to use this app.
How to See Your Notes When Presenting in PowerPoint

As a presenter, delivering a seamless and confident presentation is key to making a lasting impression. However, it can be challenging to remember every detail of your presentation, especially if you have a lot of content to cover. Fortunately, with PowerPoint’s Presenter View, you can easily access your notes and confidently deliver your presentation. In this article, we will cover all aspects of using PowerPoint’s Presenter View to enhance your presentation.
Table of Contents
Why You Need to See Your Notes When Presenting in PowerPoint
Presenting without having your notes at hand can be daunting and can affect the quality of your presentation. Whether you are presenting in front of a small group or a large audience, you will need to have access to your notes. This will help you deliver your presentation confidently, as you will have a clear idea of what to say or do next. In addition, having your notes visible can help you stay focused on the topics you want to cover and avoid straying off-topic.
Another reason why it is important to see your notes when presenting in PowerPoint is that it can help you manage your time effectively. By having your notes visible, you can keep track of the time and ensure that you are covering all the important points within the allocated time frame. This can help you avoid rushing through the presentation or running out of time before you have covered all the key points.
Furthermore, having your notes visible can also help you engage with your audience better. When you are confident and well-prepared, you are more likely to make eye contact with your audience and use body language effectively. This can help you build a connection with your audience and keep them engaged throughout the presentation.
How to Access Presenter View in PowerPoint
Before you can access Presenter View, you need to have a PowerPoint presentation open in Slide Show mode. Once your presentation is open, simply click on the ‘Slide Show’ tab and check the box beside ‘Use Presenter View.’ Your screen will then automatically switch to Presenter View, allowing you to see your notes and other helpful controls.
Presenter View is a great tool for giving presentations, as it allows you to see your notes and upcoming slides while your audience only sees the current slide. You can also use Presenter View to zoom in on specific parts of your slide, draw on your slides, and even use a virtual laser pointer to highlight important information. To exit Presenter View, simply press the ‘Esc’ key on your keyboard.
Understanding the Presenter View in PowerPoint
Presenter View is a powerful tool that enables you to manage your presentation effectively. It comprises several elements, including:
- The slide display area, which shows the slide that your audience sees.
- The notes section, which displays any text that you have added as notes or comments.
- The timer, which can help you stay within your allotted time.
- The navigation controls, which let you move forward and backward in your presentation easily.
- The zoom slider, which enables you to zoom in and out of your slides for added detail.
- The laser pointer and highlighter tools, which allow you to emphasize important points on your slides.
Presenter View also allows you to preview upcoming slides, giving you a chance to prepare for the next section of your presentation. This feature can be especially helpful if you need to refer to specific information on a later slide.
In addition, Presenter View provides a way to keep your audience engaged by allowing you to add annotations to your slides. You can draw attention to specific areas of your slide, highlight key points, or even add additional information that may not be included in the slide itself.
Setting Up Presenter View: Step-by-Step Guide
If you want to customize your Presenter View experience, follow these steps:
- On the ‘Slide Show’ tab, click ‘Set Up Slide Show.’
- Under ‘Multiple Monitors,’ select the ‘Use Presenter View’ checkbox.
- If you’re using a single monitor, select the ‘Display slide show on’ option and choose your primary monitor.
- If you’re using dual monitors, select the ‘Display slide show on’ option and choose the monitor that you want to display Presenter View on.
- Customize the Presenter View by selecting the options that you want to use, such as speaker notes, the timer, and the navigation controls.
- Click ‘OK.’ Your Presenter View should now be set up.
It’s important to note that not all versions of PowerPoint have the Presenter View feature. If you don’t see the ‘Use Presenter View’ checkbox under ‘Multiple Monitors,’ it’s likely that your version of PowerPoint doesn’t support this feature. In this case, you may need to upgrade to a newer version or use a different presentation software that offers Presenter View.
How to Customize Presenter View Settings in PowerPoint
If you have specific preferences for Presenter View, you can customize it by following these steps:
- Click the ‘Settings’ button in the Presenter View toolbar.
- Select the options that you want to use, such as the color scheme, font size, and slide size.
- Click ‘Save Changes’ to apply your changes.
Customizing your Presenter View settings can greatly enhance your presentation experience. For example, you can choose to display your notes on one screen while your audience sees only the slides on the other screen. Additionally, you can select the option to display a timer or a clock to help you keep track of time during your presentation. Experiment with different settings to find what works best for you and your audience.
Using Presenter View on Dual Monitor Setup
If you have a dual-monitor setup, you can use Presenter View to present your slides on one screen while managing your notes and tools on the other screen. To do this, simply select the ‘Use Presenter View’ checkbox under ‘Multiple Monitors’ in the ‘Set Up Slide Show’ dialog box. Once you start presenting, the Presenter View screen will appear on the secondary monitor, while the slides will appear on the primary screen.
Presenter View is a great tool for presenters who want to keep their notes and tools hidden from the audience. With Presenter View, you can see your notes, upcoming slides, and a timer, while your audience only sees the current slide. This feature is especially useful for longer presentations, where you may need to refer to your notes or keep track of time.
Another benefit of using Presenter View is that it allows you to easily navigate through your presentation. You can use the arrow keys on your keyboard to move forward or backward through your slides, or you can use the thumbnails on the Presenter View screen to jump to a specific slide. This makes it easy to adjust your presentation on the fly, without having to interrupt the flow of your presentation.
Troubleshooting Common Issues with Presenter View in PowerPoint
If you experience common issues with Presenter View, such as notes not displaying correctly, audio not working, or distorted visuals, try these troubleshooting tips:
- Make sure that your computer meets the minimum system requirements for using Presenter View.
- Check that the correct audio output is selected in the control panel.
- Review your slides and notes to ensure that there are no formatting errors.
- Try closing other open applications to free up system resources.
- Ensure that your computer is updated with all available updates.
- Try reinstalling or repairing PowerPoint to eliminate any software conflicts.
However, if these troubleshooting tips do not resolve your issues, there may be other factors at play. One possible cause of issues with Presenter View is outdated or incompatible drivers for your computer’s graphics card. Check with your computer manufacturer or graphics card manufacturer to see if there are any updates available.
Another potential issue could be related to your computer’s display settings. Make sure that your display settings are optimized for the resolution and aspect ratio of your presentation. You may also want to try adjusting the scaling settings to see if that improves the display of your slides and notes.
Tips and Tricks for Effective Note-taking During Presentation
To get the most out of Presenter View, try these effective note-taking tips:
- Organize your notes by slide or topic to stay on track during the presentation.
- Use bullet points and keywords to keep your notes concise and easy to read.
- Include cues or action words to remind you of any demonstrations, animations, or other interactive elements in your presentation.
- Use the highlighter tool to draw attention to the most critical points.
Enhancing Your Presentation with Presenter View
Presenter View can enhance your presentation in several ways, such as by allowing you to add visual aids and multimedia elements, manage your time effectively, and engage your audience. By using Presenter View, you can keep your presentation on track, highlight key information, and maintain your audience’s attention throughout.
The Importance of Rehearsing Your Presentation with Presenter View
Practicing your presentation with Presenter View can help you become familiar with the interface, identify any errors or issues, and ensure that your presentation will run seamlessly. Use Presenter View during your presentation rehearsal to simulate the actual presentation environment and get a feel for how it works.
Taking Advantage of the Laser Pointer and Highlighter Tools in Presenter View
The laser pointer and highlighter tools are handy for emphasizing key points on your slides and improving audience engagement. To use them, simply press and hold the ‘Ctrl’ key and click the mouse to activate the laser pointer or highlighter. Release the key to deactivate them.
How to Switch Between Slides and Notes during a Presentation
If you need to switch between slides and notes during your presentation, simply click the ‘Notes’ button in the Presenter View toolbar. This will display your notes and allow you to scroll through them as needed.
Utilizing the Timer and Countdown Features of Presenter View
The timer and countdown features are useful for keeping your presentation on track and ensuring that you do not exceed your allotted time. To use them, simply enable the ‘Timer’ feature in the ‘Settings’ section of Presenter View. You can then set the countdown time and choose whether to display it during the presentation or keep it hidden.
Sharing Your Screen Using Presenter View in Microsoft Teams or Zoom Meetings
If you are using Microsoft Teams or Zoom Meetings to deliver your presentation remotely, you can still use Presenter View by sharing your screen. To do this, simply select the ‘Share Screen’ option and choose the ‘Presenter View’ screen. This will allow you to present your slides while keeping your notes and controls visible to you for an uninterrupted presentation experience.
By following the steps and tips outlined in this article, you can use PowerPoint’s Presenter View to deliver a polished and professional presentation that wows your audience. Always remember to rehearse your presentation before the actual day so that you’re comfortable with the tools and settings for Presenter View, and ready to tackle any issue that might arise.
By humans, for humans - Best rated articles:
Excel report templates: build better reports faster, top 9 power bi dashboard examples, excel waterfall charts: how to create one that doesn't suck, beyond ai - discover our handpicked bi resources.
Explore Zebra BI's expert-selected resources combining technology and insight for practical, in-depth BI strategies.

We’ve been experimenting with AI-generated content, and sometimes it gets carried away. Give us a feedback and help us learn and improve! 🤍
Note: This is an experimental AI-generated article. Your help is welcome. Share your feedback with us and help us improve.

- Slidesgo School
- Google Slides Tutorials
How to Use the Presenter View in Google Slides

Google Slides, like PowerPoint, has different presentation modes that can come in handy when you’re presenting and you want your slideshow to look smooth. Whether you’re looking for slides only, speaker notes or the Q&A feature, in this new Google Slides tutorial, you’ll learn about these and their respective settings. Ready? Then let’s explore the presenter view!
Types of presentation modes in Google Slides
Presenter view, start from beginning, present on another screen.
There are three presentation modes in Google Slides.
If you click the “Slideshow” button or press Ctrl/Cmd + F5, your presentation will start directly without any speaker notes. This is the most widely used and the simplest option.
Next to the “Slideshow” button, there’s a drop-down arrow. Click on it to see the different presentation modes:
In this mode, you’ll be able to see the speaker notes, check the timer and adjust other settings, such as questions from the audience. For more information about the speaker notes, please refer to this Google Slides tutorial .
To view the different tools, after clicking “Presenter View”, move your mouse to the lower left-hand corner of the screen. You’ll see the slide number, previous and next slide arrows and three dots. Click on the dots and here are your options:
Open speaker notes
This enables the speaker notes and makes them visible. If you click this button, you might exit fullscreen mode. To go back to fullscreen, press Ctrl/Cmd + Shift + F or click the “Fullscreen” button. For more information, please refer to this Google Slides tutorial .
Turn on the laser pointer
You’ll see a red dot on the screen, which you can move around to point out any element from your presentation.
Full screen
Click this button (or press Ctrl+Shift+F) to enter or exit fullscreen mode.
Click this button to finish the presentation or just press Esc.
If you click on “Auto-play,” more options will appear: Click “Play” and the slides will advance automatically (by default, every two seconds, but there are other options available. You can also choose to play the slideshow on a loop).
Captions preferences
If you have a mic set up, you can enable captions. Click the drop-down arrow to adjust the size of the text and its position on the screen.
If you click on “more”, you can enable the Audience Q&A panel by clicking on the first option that appears. For more information, please refer to this Google Slides tutorial .
More: Downloads, printing, info and options
Under the “More” tab, you can also choose different download formats for your slideshow or print it out. This tab also contains a handy list of keyboard shortcuts (if you prefer handling keys to using your mouse) and the possibility to report problems.
Your presentation will begin from the first slide (Ctrl/Cmd + Shift + F5).
Your presentation will be shown on a different screen via a media display device, such as Chromecast. This option will be available only if there’s another screen available.

Now you’ve mastered the presenter view in Google Slides, which, with a bit of practice, will be a game-changer! Not only will it make you look like a presentation pro, but it will also streamline the process of nailing those crucial talking points. So go out there and strut your stuff – with presenter view on your side, you are unstoppable! And if you’ve found this tutorial helpful, check out more of them on our blog !
Do you find this article useful?
Related tutorials.

Top 10 tips and tricks for creating a business presentation!
Slidesgo is back with a new post! We want your presentations and oral expositions to never be the same again, but to go to the next level of presentations. Success comes from a combination of two main ingredients: a presentation template suitable for the topic and a correct development of the spoken part. For templates, just take a look at the Slidesgo website, where you are sure to find your ideal design. For tips and tricks on how to make a presentation, our blog contains a lot of information, for example, this post. We have focused these tips on business presentations, so that, no matter what type of company or...

How to present survey results in PowerPoint or Google Slides
A survey is a technique that is applied by conducting a questionnaire to a significant sample of a group of people. When we carry out the survey, we start from a hypothesis and it is this survey activity that will allow us to confirm the hypothesis or to see where the problem and solution of what we are investigating lies.We know: fieldwork is hard work. Many hours collecting data, analyzing and organizing it until we have our survey results.Well, we don't want to discourage you (at Slidesgo we stand for positivism) but this is only 50% of the survey work....

Best 10 tips for webinar presentations
During the last couple of years, the popularity of webinars has skyrocketed. Thousands of people have taken advantage of the shift to online learning and have prepared their own webinars where they have both taught and learned new skills while getting to know more people from their fields. Thanks to online resources like Google Meet and Slidesgo, now you can also prepare your own webinar. Here are 10 webinar presentation tips that will make your speech stand out!

How to create the best presentation for an onboarding process
Slidesgo was once a small project with a handful of people working on it. We’re not making this up! But our passion and effort has brought us to where we are today. In the process, our staff has also grown, and let us tell you: it has grown a lot!Do you remember that time when you were the newly-hired employee? You went to the office and thought that everything was too much for you to handle. Lots of faces you’ve never seen before. Lots of tasks that are suddenly your responsibility. Nearly as much new information as a library could...

Teams Forum Top Contributors: EmilyS_726 ✅
May 10, 2024
Teams Forum Top Contributors:
EmilyS_726 ✅
Contribute to the Teams forum! Click here to learn more 💡
April 9, 2024
Contribute to the Teams forum!
Click here to learn more 💡
- Search the community and support articles
- Microsoft Teams
- Unknown/other
- Search Community member
Ask a new question
When sharing a presentation in Microsoft Teams, why does Powerpoint Live seemingly insist on sharing a previous version of a recently amended file?
Hi all, when trying to share a Powerpoint presentation in a Teams call using Powerpoint Live, it opens the incorrect file, or more to the point, an incorrect or previous version of the file.
I have renamed the file by adding 'v2' to the file name (to allow for easier navigation), saved the file and closed Powerpoint. However, Powerpoint Live insists on opening the wrong file when I've selected 'v2'.
Is there anything silly I'm doing wrong? Should I be saving and closing Powerpoint before I even open the Teams call for example?
Thank you in advance for any help with this.
- Subscribe to RSS feed
Report abuse
Reported content has been submitted
Replies (1)
- Independent Advisor
Hi Phil, My name is Umar and I'd be happy to help you out with your question. Please note: This is a user-to-user community forum. We are users just like you who help others. We are not employees of Microsoft. I am sorry for the inconvenience this has caused to you. When sharing a Powerpoint presentation in Microsoft Teams using Powerpoint Live, it may sometimes open an incorrect or previous version of the file, even if you have made recent amendments and saved the file with a new name. Here are some steps and considerations to ensure the most recent version of your PowerPoint file is shared: Ensure Proper File Saving and Closing Save and Close: Ensure you save the latest changes to your PowerPoint file and close it before opening Microsoft Teams. File Location: Verify that the file is saved in the correct location, especially if you are using cloud storage like OneDrive or SharePoint. For specific instructions on the items listed above, kindly check the link below. https://support.microsoft.com/office/0c30ee3f-8674-4f0e-97be-89cf2892a34d Clearing the Teams cache can resolve issues where old versions of files are being accessed: Close Microsoft Teams. Navigate to %appdata%\Microsoft\Teams. Delete all files and folders within this directory. Restart Microsoft Teams. If you are using OneDrive or SharePoint, make sure your files are fully synchronized: Open OneDrive or SharePoint and ensure that the latest changes are reflected online. If using the desktop app, ensure it has completed syncing the latest version to the cloud. Sometimes renaming the file and re-uploading it to the intended location can resolve version conflicts: Rename the file to something distinct, e.g., Presentation_v2_final.pptx. Upload the newly named file to OneDrive, SharePoint, or directly into the Teams meeting. I hope this information is helpful. Please let me know if you have any other questions. Help the next person who has this issue by indicating if this reply solved your problem. Click Yes or No below. Best Regards, Umar Majeed
Was this reply helpful? Yes No
Sorry this didn't help.
Great! Thanks for your feedback.
How satisfied are you with this reply?
Thanks for your feedback, it helps us improve the site.
Thanks for your feedback.
Question Info
- Norsk Bokmål
- Ελληνικά
- Русский
- עברית
- العربية
- ไทย
- 한국어
- 中文(简体)
- 中文(繁體)
- 日本語
- Preferences

Red Square Moscow PowerPoint PPT Presentations


Cloud Storage

Custom Business Email

Video and voice conferencing

Shared Calendars

Word Processing

Spreadsheets
Presentation Builder

Survey builder

Google Workspace
An integrated suit of secure, cloud-native collaboration and productivity apps powered by Google AI.
Tell impactful stories, with Google Slides
Create, present, and collaborate on online presentations in real-time and from any device.
- For my personal use
- For work or my business

Jeffery Clark
T h i s c h a r t h e l p s b r i d g i n g t h e s t o r y !

E s t i m a t e d b u d g e t

Make beautiful presentations, together
Stay in sync in your slides, with easy sharing and real-time editing. Use comments and assign action items to build your ideas together.

Present slideshows with confidence
With easy-to-use presenter view, speaker notes, and live captions, Slides makes presenting your ideas a breeze. You can even present to Google Meet video calls directly from Slides.

Seamlessly connect to your other Google apps
Slides is thoughtfully connected to other Google apps you love, saving you time. Embed charts from Google Sheets or reply to comments directly from Gmail. You can even search the web and Google Drive for relevant content and images directly from Slides.

Extend collaboration and intelligence to PowerPoint files
Easily edit Microsoft PowerPoint presentations online without converting them, and layer on Slides’ enhanced collaborative and assistive features like comments, action items, and Smart Compose.

Work on fresh content
With Slides, everyone’s working on the latest version of a presentation. And with edits automatically saved in version history, it’s easy to track or undo changes.

Make slides faster, with built-in intelligence
Assistive features like Smart Compose and autocorrect help you build slides faster with fewer errors.

Stay productive, even offline
You can access, create, and edit Slides even without an internet connection, helping you stay productive from anywhere.
Security, compliance, and privacy

Secure by default
We use industry-leading security measures to keep your data safe, including advanced malware protections. Slides is also cloud-native, eliminating the need for local files and minimizing risk to your devices.
Encryption in transit and at rest
All files uploaded to Google Drive or created in Slides are encrypted in transit and at rest.
Compliance to support regulatory requirements
Our products, including Slides, regularly undergo independent verification of their security, privacy, and compliance controls .
Private by design
Slides adheres to the same robust privacy commitments and data protections as the rest of Google Cloud’s enterprise services .

You control your data.
We never use your slides content for ad purposes., we never sell your personal information to third parties., find the plan that’s right for you, google slides is a part of google workspace.
Every plan includes

Collaborate from anywhere, on any device
Access, create, and edit your presentations wherever you are — from any mobile device, tablet, or computer — even when offline.

Get a head start with templates
Choose from a variety of presentations, reports, and other professionally-designed templates to kick things off quickly..

Photo Album

Book Report

Visit the Slides Template Gallery for more.
Ready to get started?
- Integrations
- Learning Center
MoSCoW Prioritization
What is moscow prioritization.
MoSCoW prioritization, also known as the MoSCoW method or MoSCoW analysis, is a popular prioritization technique for managing requirements.
The acronym MoSCoW represents four categories of initiatives: must-have, should-have, could-have, and won’t-have, or will not have right now. Some companies also use the “W” in MoSCoW to mean “wish.”
What is the History of the MoSCoW Method?
Software development expert Dai Clegg created the MoSCoW method while working at Oracle. He designed the framework to help his team prioritize tasks during development work on product releases.
You can find a detailed account of using MoSCoW prioritization in the Dynamic System Development Method (DSDM) handbook . But because MoSCoW can prioritize tasks within any time-boxed project, teams have adapted the method for a broad range of uses.
How Does MoSCoW Prioritization Work?
Before running a MoSCoW analysis, a few things need to happen. First, key stakeholders and the product team need to get aligned on objectives and prioritization factors. Then, all participants must agree on which initiatives to prioritize.
At this point, your team should also discuss how they will settle any disagreements in prioritization. If you can establish how to resolve disputes before they come up, you can help prevent those disagreements from holding up progress.
Finally, you’ll also want to reach a consensus on what percentage of resources you’d like to allocate to each category.
With the groundwork complete, you may begin determining which category is most appropriate for each initiative. But, first, let’s further break down each category in the MoSCoW method.
Start prioritizing your roadmap
Moscow prioritization categories.

1. Must-have initiatives
As the name suggests, this category consists of initiatives that are “musts” for your team. They represent non-negotiable needs for the project, product, or release in question. For example, if you’re releasing a healthcare application, a must-have initiative may be security functionalities that help maintain compliance.
The “must-have” category requires the team to complete a mandatory task. If you’re unsure about whether something belongs in this category, ask yourself the following.

If the product won’t work without an initiative, or the release becomes useless without it, the initiative is most likely a “must-have.”
2. Should-have initiatives
Should-have initiatives are just a step below must-haves. They are essential to the product, project, or release, but they are not vital. If left out, the product or project still functions. However, the initiatives may add significant value.
“Should-have” initiatives are different from “must-have” initiatives in that they can get scheduled for a future release without impacting the current one. For example, performance improvements, minor bug fixes, or new functionality may be “should-have” initiatives. Without them, the product still works.
3. Could-have initiatives
Another way of describing “could-have” initiatives is nice-to-haves. “Could-have” initiatives are not necessary to the core function of the product. However, compared with “should-have” initiatives, they have a much smaller impact on the outcome if left out.
So, initiatives placed in the “could-have” category are often the first to be deprioritized if a project in the “should-have” or “must-have” category ends up larger than expected.
4. Will not have (this time)
One benefit of the MoSCoW method is that it places several initiatives in the “will-not-have” category. The category can manage expectations about what the team will not include in a specific release (or another timeframe you’re prioritizing).
Placing initiatives in the “will-not-have” category is one way to help prevent scope creep . If initiatives are in this category, the team knows they are not a priority for this specific time frame.
Some initiatives in the “will-not-have” group will be prioritized in the future, while others are not likely to happen. Some teams decide to differentiate between those by creating a subcategory within this group.
How Can Development Teams Use MoSCoW?
Although Dai Clegg developed the approach to help prioritize tasks around his team’s limited time, the MoSCoW method also works when a development team faces limitations other than time. For example:
Prioritize based on budgetary constraints.
What if a development team’s limiting factor is not a deadline but a tight budget imposed by the company? Working with the product managers, the team can use MoSCoW first to decide on the initiatives that represent must-haves and the should-haves. Then, using the development department’s budget as the guide, the team can figure out which items they can complete.
Prioritize based on the team’s skillsets.
A cross-functional product team might also find itself constrained by the experience and expertise of its developers. If the product roadmap calls for functionality the team does not have the skills to build, this limiting factor will play into scoring those items in their MoSCoW analysis.
Prioritize based on competing needs at the company.
Cross-functional teams can also find themselves constrained by other company priorities. The team wants to make progress on a new product release, but the executive staff has created tight deadlines for further releases in the same timeframe. In this case, the team can use MoSCoW to determine which aspects of their desired release represent must-haves and temporarily backlog everything else.
What Are the Drawbacks of MoSCoW Prioritization?
Although many product and development teams have prioritized MoSCoW, the approach has potential pitfalls. Here are a few examples.
1. An inconsistent scoring process can lead to tasks placed in the wrong categories.
One common criticism against MoSCoW is that it does not include an objective methodology for ranking initiatives against each other. Your team will need to bring this methodology to your analysis. The MoSCoW approach works only to ensure that your team applies a consistent scoring system for all initiatives.
Pro tip: One proven method is weighted scoring, where your team measures each initiative on your backlog against a standard set of cost and benefit criteria. You can use the weighted scoring approach in ProductPlan’s roadmap app .
2. Not including all relevant stakeholders can lead to items placed in the wrong categories.
To know which of your team’s initiatives represent must-haves for your product and which are merely should-haves, you will need as much context as possible.
For example, you might need someone from your sales team to let you know how important (or unimportant) prospective buyers view a proposed new feature.
One pitfall of the MoSCoW method is that you could make poor decisions about where to slot each initiative unless your team receives input from all relevant stakeholders.
3. Team bias for (or against) initiatives can undermine MoSCoW’s effectiveness.
Because MoSCoW does not include an objective scoring method, your team members can fall victim to their own opinions about certain initiatives.
One risk of using MoSCoW prioritization is that a team can mistakenly think MoSCoW itself represents an objective way of measuring the items on their list. They discuss an initiative, agree that it is a “should have,” and move on to the next.
But your team will also need an objective and consistent framework for ranking all initiatives. That is the only way to minimize your team’s biases in favor of items or against them.
When Do You Use the MoSCoW Method for Prioritization?
MoSCoW prioritization is effective for teams that want to include representatives from the whole organization in their process. You can capture a broader perspective by involving participants from various functional departments.
Another reason you may want to use MoSCoW prioritization is it allows your team to determine how much effort goes into each category. Therefore, you can ensure you’re delivering a good variety of initiatives in each release.
What Are Best Practices for Using MoSCoW Prioritization?
If you’re considering giving MoSCoW prioritization a try, here are a few steps to keep in mind. Incorporating these into your process will help your team gain more value from the MoSCoW method.
1. Choose an objective ranking or scoring system.
Remember, MoSCoW helps your team group items into the appropriate buckets—from must-have items down to your longer-term wish list. But MoSCoW itself doesn’t help you determine which item belongs in which category.
You will need a separate ranking methodology. You can choose from many, such as:
- Weighted scoring
- Value vs. complexity
- Buy-a-feature
- Opportunity scoring
For help finding the best scoring methodology for your team, check out ProductPlan’s article: 7 strategies to choose the best features for your product .
2. Seek input from all key stakeholders.
To make sure you’re placing each initiative into the right bucket—must-have, should-have, could-have, or won’t-have—your team needs context.
At the beginning of your MoSCoW method, your team should consider which stakeholders can provide valuable context and insights. Sales? Customer success? The executive staff? Product managers in another area of your business? Include them in your initiative scoring process if you think they can help you see opportunities or threats your team might miss.
3. Share your MoSCoW process across your organization.
MoSCoW gives your team a tangible way to show your organization prioritizing initiatives for your products or projects.
The method can help you build company-wide consensus for your work, or at least help you show stakeholders why you made the decisions you did.
Communicating your team’s prioritization strategy also helps you set expectations across the business. When they see your methodology for choosing one initiative over another, stakeholders in other departments will understand that your team has thought through and weighed all decisions you’ve made.
If any stakeholders have an issue with one of your decisions, they will understand that they can’t simply complain—they’ll need to present you with evidence to alter your course of action.
Related Terms
2×2 prioritization matrix / Eisenhower matrix / DACI decision-making framework / ICE scoring model / RICE scoring model
Prioritizing your roadmap using our guide
Try productplan free for 14 days, share on mastodon.
Home PowerPoint Templates Models MoSCoW Method PowerPoint Template
MoSCoW Method PowerPoint Template
The MoSCoW Method PowerPoint Template is a matrix presentation of prioritizing technique. It is a business analysis concept use in project management and product development processes. The project development team works with all stakeholders to analyze importance of multiple deliverables. This placement of deliverables based on priority is known as MoSCoW method. Further, the term MoSCow is an acronym for Must have, Should Have, Could Have, Won’t Have). These are the four priority categories with additional O’s to make pronounceable terminology.
The MoSCoW method PowerPoint provides an eye-catching layout of 4 category segments. Each of these segments further displays the progress status of activity line. The status types include Complete, in progress, and not yet started. These three status are symbols derived from Harvey balls concept chart Therefore, the users can change these activity status symbols as see fit.
The MoSCoW Method PowerPoint Template helps present the immediate business benefits to the audience. Because this template highlights the most important deliverables that client can expect to receive first. For example, the Must have and Should have processes are priority initially. But tasks in Could have and Won’t have categories may also change according to time. The MoSCow method basically enables stakeholders to understand impact of priorities on performance and speed.
MoSCoW priority model present following processes and activities under each category.
- Must have : Critical to current delivery timebox .
- Should have : Important but not necessary for current delivery timebox.
- Could have : If there are time and resources available to improve user experience.
- Won’t have : Least critical deliverables that are not appropriate for current delivery time.

You must be logged in to download this file.
Favorite Add to Collection
Details (2 slides)

Supported Versions:
Subscribe today and get immediate access to download our PowerPoint templates.
Related PowerPoint Templates

Project Life Cycle PowerPoint Template

6-Milestone Hanging Platforms Timeline PowerPoint Template

Project Management Dashboard PowerPoint Template

4-Item Recommendations Slide PowerPoint Template
City holds Downtown South Bend 2045 Plan presentations during 'Design Week'

SOUTH BEND — Residents and other stakeholders are invited to review preliminary design concepts and share their ideas for the next stage in the development of the Downtown South Bend 2045 Plan during a series of public meetings through June 6.
Design Week presentations take place at the following locations and times:
• Design Week Public Kickoff: 5:30 to 7:30 p.m. June 3 at the Howard Park Event Center, 219 S. St. Louis Blvd.
Overview of the week’s activities, review of input received during the February/March visioning workshops and through the online survey, opportunity to comment on key themes that will help form the downtown plan.
• Open House: noon to 1 p.m. Tuesday, June 4 at the Howard Park Event Center, 219 S. St. Louis Blvd.
A brief presentation of initial design ideas, opportunity to comment on initial plan direction.
• Final Presentation: 6 p.m. Thursday, June 6 at the Leighton Auditorium, St. Joseph County Public Library’s Community Learning Center, 305 S. Michigan St.
Full presentation of draft downtown plan concepts and priorities.
Downtown to the Dome: Seven ways that this new trail could unite Notre Dame, South Bend and other trails
In a press release, Mayor James Mueller asked for the public’s input in designing the future of downtown South Bend, which, he said, “is on the cusp of transformational growth” because of the multi-billion-dollar investments announced by GM-Samsung and Amazon Web Services west of the city in the Indiana Enterprise Center.
“The UDA team is excited to be back in South Bend spending the week designing with the community and stakeholders,” Megan O’Hara, principal at Urban Design Associates, said in the press release. “We look forward to building on the ideas we’ve heard through surveys, public meetings, and workshops to facilitate a collaborative vision for the future of Downtown South Bend."
For more information on the Downtown South Bend 2045 plan process, visit together.southbendin.gov/downtownplan .
Webinars
Tune in to upcoming and past webinars
Upcoming Events

Consensus heads to Hong Kong to facilitate crucial discussions between industry leaders East and West.

We're taking the Consensus flagship event north to Toronto.
What are you interested in?
By submitting, you agree to receive email communications from CoinDesk, including upcoming promotions and discounted tickets, news, and access to exclusive invite-only events.

- International
Claudia Sheinbaum projected to be Mexico's first woman president
By Kathleen Magramo, Maureen Chowdhury, Matt Meyer, Antoinette Radford and Melissa Macaya, CNN
Mexico's outgoing president says he will not try to influence Sheinbaum in naming future officials
From CNN's Abel Alvarado in Atlanta

Mexico’s President Andrés Manuel López Obrador said he will not influence newly elected president Claudia Sheinbaum in naming future officials for the country after Sunday’s landslide victory.
“She (Sheinbaum) is the one empowered to make all the decisions. I am not going to influence anything,” López Obrador said during his morning presser on Monday.
“She is going to choose her team,” he added.
However, he suggested that changes would come with the new president because it was part of the “transformation” he started for the country when he took office nearly six years ago.
López Obrador also said he may discuss constitutional reforms with Sheinbaum during the transition period but made it clear that he didn’t “want to impose anything.”
Sheinbaum will take office on October 1. Her term will last six years.
López Obrador, who is Sheinbaum’s political mentor, congratulated her on the win.
“We already spoke yesterday (Sunday); I congratulated her. I am very happy because imagine what it means to hand over the presidency to a woman after 200 years of only men ruling Mexico,” the president said.
The president said that once he hands over the presidential band, he plans to retire from political life entirely and will do so with “a lot of satisfaction.”
“Let it be heard loud and clear: after I finish my term in office, I will retire, and I will never again participate in any public or political act,” he said.
Biden congratulates Sheinbaum for her historic win

US President Joe Biden congratulated Claudia Sheinbaum on her historic presidential win as Mexico's first woman to lead the country's government.
"I look forward to working closely with President-elect Sheinbaum in the spirit of partnership and friendship that reflects the enduring bonds between our two countries," he said in a statement Monday. "I expressed our commitment to advancing the values and interests of both our nations to the benefit of our peoples."
Read Biden's full statement:
"I congratulate Claudia Sheinbaum on her historic election as the first woman President of Mexico. I look forward to working closely with President-elect Sheinbaum in the spirit of partnership and friendship that reflects the enduring bonds between our two countries. I expressed our commitment to advancing the values and interests of both our nations to the benefit of our peoples. I also congratulate the Mexican people for conducting a nationwide successful democratic electoral process involving races for more than 20,000 positions at the local, state, and federal levels."
Mexican peso falls against the US dollar
From CNN's Krystal Hur

The Mexican peso slipped roughly 3% against the US dollar Monday morning.
It comes after Claudia Sheinbaum's projected landslide victory, which has raised concerns that the ruling Morena party will be able to pass more ambitious constitutional reforms, many of which had been sought by outgoing President Andrés Manuel López Obrador.
"Sheinbaum is perceived as more of a technocrat than AMLO, and she also has a background in climate science. Both offer potential shifts in Mexican policy," wrote Bespoke Investment Group researchers in a Monday note.
Latin American leaders celebrate Claudia Sheinbaum's projected win
From CNN's Abel Alvarado

Latin American leaders are celebrating Claudia Sheinbaum's projected win as Mexico's president with leaders referencing a common theme — that her appointment would hopefully see strengthened relationships between countries on the continent.
Sheinbaum will face several challenges, including security, organized crime, energy and immigration, and would also set the tone for the pivotal US-Mexico bilateral relationship .
- Cuban President Miguel Diaz-Canel said in a post on X: "We wish her success in her management, the first for a woman in that position."
- Honduran President Xiomara Castro extended her "sincere congratulations" to Sheinbaum, "as the first female president of Honduras" on X . Castro said she spoke to Sheinbaum following her victory and agreed "to work together for the unity of Latin America and the Caribbean."
- Venezuelan President Nicolas Maduro called her win a "great victory for the Great Homeland. I hug you! Long live Mexico!"
- Bolivian President Luis Arce congratulated her on X and added that they "salute salute all the Mexican people for their democratic vocation and broad participation in the electoral process."
- Colombian President Gustavo Petro described Sheinbaum's appointment as "a triumph for the Mexican people and for their democracy."
- Costa Rica 's presidency referred to the two countries as "brother countries" and congratulated Sheinbaum on her appointment.
Millions turn out for largest election in Mexico's history
From CNN's Tara John and CNN en Español

Sunday’s poll was the largest election in the country’s history. More than 98 million voters were registered to cast a ballot, and 1.4 million Mexicans were eligible to vote abroad.
In addition to the presidency, more than 20,000 positions were being contested by an estimated 70,000 candidates vying to become senators, mayors and governors.
But the elections were plagued by immense violence . There have been more than 20 political killings since September, according to the Mexican government. By some estimates though, that number is even higher. According to Mexican consultancy firm Integralia, at least 34 candidates were murdered in the run-up to the vote.
Voting was suspended for several hours on Sunday in the southeastern Mexican town of Coyomeapan due to violence at the polling centers, according to state electoral authorities.
And while the murder rate fell in Mexico between 2019 and 2022 , in absolute numbers the country is still reeling from historically high levels of around 30,000 homicides each year. The true number is likely higher, experts say.
The violence appeared to have been a top concern for voters as cartels extend their grip through Mexico.
Claudia Sheinbaum has been coy about her security proposals but has pointed to her record as Mexico City mayor, when, according to her team, she improved the police force’s working conditions and intelligence-gathering abilities.
The count: Mexico Elections 2024
Outgoing mexican president congratulates sheinbaum.
From CNN's Mia Alberti

Mexico's President Andres Manuel López Obrador has congratulated Claudia Sheinbaum on her expected win in Sunday's presidential election.
"With all my affection and respect I congratulate Claudia Sheinbaum who came out victorious with an ample margin. She will be the first (female) President of Mexico... but also the President, possibly, with most votes obtained in all of the history of our country," he said in a video posted on X.
López Obrador also congratulated the other presidential candidates and the Mexican people, saying he was proud of the large turnout.
Mexico's expected president Sheinbaum pledges to govern all Mexicans "without distinction"
From CNN's Michael Rios

Claudia Sheinbaum has responded to the announcement of her projected victory in Mexico's presidential election early Monday morning, saying her administration would govern all Mexicans “without distinction,” even though not everyone supports her policies.
“Our duty is and will always be to look after every single Mexican without distinction. So even though many Mexicans do not fully agree with our project, we will have to walk in peace and harmony to continue building a fair and more prosperous Mexico,” she told supporters in a speech.
She also spoke about the historical significance of becoming the first female president of the country.
Sheinbaum said her two rivals in the race, Xóchitl Gálvez and Jorge Álvarez Máynez, had called to congratulate her on her projected victory.
Sheinbaum, the candidate from the ruling party, received the most votes in Sunday's elections, according to preliminary results from the National Electoral Institute.
The Electoral Court must validate the presidential election, and if confirmed, Sheinbaum will start her presidency on October 1.
Sheinbaum's large margin shows power of Mexico's ruling party, CNN journalist says
From CNN's Kathleen Magramo

Even though Claudia Sheinbaum was expected to win during campaign polls, her large margin in the votes came as a shock, CNN’s Gustavo Valdes reports from Mexico City.
Sheinbaum might get up to 60% of the vote, which is even higher than outgoing President Andrés Manuel López Obrador when he was elected six years ago, Valdes said.
Sheinbaum is the candidate for the ruling Morena party.
"That gives you an idea of the political power that López Obrador has amassed over the past six years," Valdes told CNN's Rosemary Church.
Valdes said voters told CNN that a woman president would help change Mexico's image of being a "macho" country, where patriarchal culture impedes women's advancements.
"Mexico has actually changed its laws to encourage and actually force the parties to have more female candidates. So so there's a very equal division of power between many woman in congress and the governorships," Valdes said.
Please enable JavaScript for a better experience.
- Use Presenter View Video
- Add speaker notes Video
- Practice and time your presentation Video
- Record a presentation Video
- Print a presentation Video
Use Presenter View

PowerPoint Presenter View shows you the current slide, the next slide, and your speaker notes, to help you focus while presenting and connect with your audience.
Select the Slide Show tab.
Select the Use Presenter View checkbox.

Select which monitor to display Presenter View on.

In Presenter View , you can:
See your current slide, next slide, and speaker notes.
Select the arrows next to the slide number to go between slides.
Select the pause button or reset button to pause or reset the slide timer in the upper left.
See the current time to help you pace your presentation.
Select the font icons to make the speaker notes larger or smaller.
Select the annotations pen icon to draw on the screen in real time, or select a laser pointer.
Select the thumbnail icon to see all the slides in your presentation and quickly jump to another slide.
Select the magnifying glass icon to zoom in on a particular part of a slide.
The screen icon let's you make the screen temporarily black to focus the attention on you.
Select END SLIDESHOW when you're done presenting.
Start the presentation and see your notes in Presenter view

Need more help?
Want more options.
Explore subscription benefits, browse training courses, learn how to secure your device, and more.

Microsoft 365 subscription benefits

Microsoft 365 training

Microsoft security

Accessibility center
Communities help you ask and answer questions, give feedback, and hear from experts with rich knowledge.

Ask the Microsoft Community

Microsoft Tech Community

Windows Insiders
Microsoft 365 Insiders
Was this information helpful?
Thank you for your feedback.
Jill Biden declares election 'not about age,' says 'it's about character' on 'The View'
by JACKSON WALKER | The National Desk

NEW YORK CITY (TND) — First Lady Jill Biden in an appearance on “The View” Wednesday said voters in the upcoming November election should not be concerned with her 81-year-old husband’s age.
President Joe Biden has faced substantial criticism over his age and mental fitness. A speech he delivered in Detroit earlier this month garnered nine corrections by the White House, including one aimed at President Biden's claim he was vice president “during the pandemic.”
Speaking on the daytime talk show, Jill Biden said voters should not be too concerned with President Biden’s age.
This election is not about age because Donald Trump is going to be 78 and Joe’s 81,” she said. “They’re basically the same age.”
Voters, the first lady said, should be concerned with each candidate’s character, somewhere she predicts President Biden will flourish.
READ MORE | Democrats in 'full-blown freakout' mode over 2024 election, report says
“It’s about character,” she said. “You have two choices -- my husband Joe, who you all know, who has integrity, he’s strong, he’s steady, he’s a leader, he’s smart, he’s energetic, or you have chaos.”
Jill Biden also touched on the state of the Supreme Court. She predicted Americans can expect the high court to take away their rights with the addition of several new conservative justices if Trump is reelected.
"Can you imagine if we put any more Republicans on the Supreme Court?” she asked . “No, we will lose all of our rights!"
Follow Jackson Walker on X at @_jlwalker_ for the latest trending national news. Have a news tip? Send it to [email protected].
IMAGES
VIDEO
COMMENTS
Select the Use Presenter View checkbox. Select which monitor to display Presenter View on. Select From Beginning or press F5. In Presenter View, you can: See your current slide, next slide, and speaker notes. Select the arrows next to the slide number to go between slides. Select the pause button or reset button to pause or reset the slide ...
Take advantage of the PowerPoint Presenter View to practice and present your PowerPoint speaker notes. This view also helps you as a presenter by showing you...
Learn how to present a PowerPoint slideshow with Presenter View, a feature that gives you a private screen with tools like speaker notes, slide previews, and drawing tools. See how to enable Presenter View, adjust its settings, and use it to improve your presentation skills.
Check the box beside the "Use Presenter View." Select from the "Start Slide Show" section to start your presentation "From the Beginning." Click the three dots menu on your full-screen slideshow view and select "Show Presenter View." When your presentation displays "Presenter View," you can scroll and use it for your speech.
Enter Presenter View in PowerPoint, a feature designed to make presenting smoother and more professional. In essence, Presenter View is a special mode in PowerPoint that allows the presenter to see their speaker notes on one screen, while the audience views the note-free presentation on another screen. This dual-screen setup means you can have ...
A simple method for switching to Presenter View on a single monitor is to click the three dots ( More slideshow options) at the bottom in SlideShow mode and select Show Presenter View. You can also switch to Presenter View on a single monitor anytime using the ALT+F5 hotkey. The presenter can easily manage a PPT in presentation mode, with the ...
In this screencast, you'll learn how to present a PowerPoint slideshow with Presenter View. Download unlimited PPT templates with Envato Elements: https://...
Start Presenter View. Click the Options button. Select Show Presenter View . The Presenter view fills the screen. The same presentation tools are available below the slide, and it also shows the current time and a thumbnail of the upcoming slide. At the bottom of the screen, use the arrows to move forward or backward in the presentation.
To see the full course that this video came from, go here: ️https://www.simonsezit.com/courses/microsoft/powerpoint-2021-online-course/In this Microsoft Pow...
To open Presenter view in PowerPoint, click the Slide Show tab and select the Use Presenter View check box. 2. Start your slide show. 3. Click the Notes pane in the lower right corner of the PowerPoint window, then start typing. NOTE: You can also press the F6 key to select the Notes pane in Presenter view. When a white outline appears around ...
If you want to customize your Presenter View experience, follow these steps: On the 'Slide Show' tab, click 'Set Up Slide Show.'. Under 'Multiple Monitors,' select the 'Use Presenter View' checkbox. If you're using a single monitor, select the 'Display slide show on' option and choose your primary monitor.
Start Presenter View Preview by pressing Alt+F5. In Zoom, share a portion of the screen from the Advanced sharing options. Make the current slide larger in Presenter View and adjust the sharing rectangle so you just share the current slide portion of the screen in Zoom. Deliver your presentation. Full detailed article.
If you click the "Slideshow" button or press Ctrl/Cmd + F5, your presentation will start directly without any speaker notes. This is the most widely used and the simplest option. Next to the "Slideshow" button, there's a drop-down arrow. Click on it to see the different presentation modes: Presenter View.
Hi all, when trying to share a Powerpoint presentation in a Teams call using Powerpoint Live, it opens the incorrect file, or more to the point, an incorrect or previous version of the file. I have renamed the file by adding 'v2' to the file name (to allow for easier navigation), saved the file and closed Powerpoint.
Try the AI Menti Builder today! This is the first version of the AI Menti Builder, and we are committed to continually enhancing our AI-generated content to ensure it becomes more accurate. Try it out and let us know what you think! Add a prompt and watch as it instantly crafts an interactive draft of a presentation, fully customizable by you.
Moscow - A City Beyond Imagination - Get an insider's view of Moscow life - have lunch at one of the most popular city's restaurants or just have free time for lunch at a place of your choice, ride the Moscow subway and see a few of its most beautiful stations, go shopping for famous Moscow chocolate and vodka at the most elegant grocery store in the country, walk down some of the oldest ...
What to see in Red Square Moscow - See all of Moscow's main sights in one tour. Admire the beauty of the city. Get an insider's view of Moscow life - have lunch at one of the most popular city's restaurants or just have free time for lunch at a place of your choice, ride the Moscow subway and see a few of its most beautiful stations, go shopping for famous Moscow chocolate and vodka at the ...
Present slideshows with confidence. With easy-to-use presenter view, speaker notes, and live captions, Slides makes presenting your ideas a breeze. You can even present to Google Meet video calls ...
MoSCoW prioritization, also known as the MoSCoW method or MoSCoW analysis, is a popular prioritization technique for managing requirements. The acronym MoSCoW represents four categories of initiatives: must-have, should-have, could-have, and won't-have, or will not have right now. Some companies also use the "W" in MoSCoW to mean "wish.".
The MoSCoW Method PowerPoint Template is a matrix presentation of prioritizing technique. It is a business analysis concept use in project management and product development processes. The project development team works with all stakeholders to analyze importance of multiple deliverables. This placement of deliverables based on priority is ...
• Open House: noon to 1 p.m. Tuesday, June 4 at the Howard Park Event Center, 219 S. St. Louis Blvd. A brief presentation of initial design ideas, opportunity to comment on initial plan direction.
Scams Stop Here: A Presentation for Older Adults - Cleveland. July 17, 2024, from 10:00 am to 11:00 am EDT. Event. July 17, 2024 10:00 am to 11:00 am EDT Location. Cleveland Senior Activity Center 230 Urbane Road NW Cleveland, TN 37312. Contact. [email protected].
Crypto State 2021. Bitcoin for Advisors. Bitcoin for Advisors. Invest: Ethereum Economy. Consensus: Distributed. NYC 2019. Stay updated on CoinDesk's upcoming crypto events, virtual and live ...
Hepatic portal venous gas is rare but when present is associated with a number of life-threatening pathologies, some of which include intestinal ischemia and necrosis, hollow viscous perforation, and intraabdominal abscess. 4 The diagnosis of thyrotoxicosis in our patient was delayed, but given his presentation, ischemic bowel had to be ruled ...
Mexico is expected to elect its first woman president Sunday as millions head to the polls to vote for national and local candidates. Follow here for the latest live news updates, results and more.
Select the Use Presenter View checkbox. Select which monitor to display Presenter View on. Select From Beginning or press F5. In Presenter View, you can: See your current slide, next slide, and speaker notes. Select the arrows next to the slide number to go between slides. Select the pause button or reset button to pause or reset the slide ...
NEW YORK CITY (TND) — First Lady Jill Biden in an appearance on "The View" Wednesday said voters in the upcoming November election should not be concerned with her 81-year-old husband's age. President Joe Biden has faced substantial criticism over his age and mental fitness. A speech he delivered in Detroit earlier this month garnered nine corrections by the White House, including one ...