Using Graphic Organizers for Writing Essays, Summaries and Research

Ask any student – essay writing is one of the most despised tasks of their educational career. Perhaps there is so much displeasure associated with the task because it’s perceived as too linear – there isn’t enough visual and creative appeal. But if you use graphic organizer for writing essays then you can make writing enjoyable – or at least less terrible.
Not only enjoyable but graphic organizers (or diagrams) can make the writing process a snap. They’ll help you think outside the box, draw conclusions you wouldn’t normally observe, and make the entire process faster and more efficient.

Why Use Graphic Organizers for Writing
The phrase “graphic organizer” is just a fancy way of saying “diagram” or “visual aid.” Basically, they are a visual representation of the information you’ve acquired in the research process. There are quite a few reasons why you should use them when writing essays or summaries.
- Helps you visualize your research and how elements connect with each other
- Enhance your essays, summaries and research papers with visual elements
- Track correlations between your thoughts, observations, facts or general ideas
When it comes to essay writing, the most common graphic organizers are webs, mind maps, and concept maps .
Using Webs for Brainstorming
Webbing is a great way to see how various topics are interrelated. This graphic organizer is particularly useful during the brainstorming step of the writing process.
A web can sometimes get a bit messy. Usually, there are lots of arrows to connect overlapping ideas. However, even with lines crisscrossing every which way, it is still a great way to visualize your thoughts. If you’re using an online diagramming software like Creately you can overcome some of this because we automatically arrange the object for you.
Once you’ve created a map to document all your ideas and establish connections, you can easily transition to other forms of diagramming to better organize the information.
For example if you’re writing a research paper about the food web of the Australian bushes you can start creating a food web diagram similar to the one below. This way you can easily visualize the web while writing the paper. This is a simple example but graphic organizers become even more important when the subject gets complex.

Although simple this example shows the importance of using graphic organizers for writing summaries. A comprehensive diagram pretty much does the summation for you.
Using Mind Maps as Graphic Organizers
Mind maps are a great way to depict a hierarchy. What is hierarchical organization ? The concept is simple: a singular topic dominates with each subsequent idea decreasing in importance.
Usually, the mind map starts with the thesis (or main idea) at the center. From there, you can branch out with your supporting evidence.
Use this process to replace your traditional note taking technique – note cards, outlines, whatever. You’ll quickly realize a mind map is a great way to formulate the structure of your essay. The thing to note here is that the nature of the mind maps force you think about sub topics and how to organize your ideas. And once the ideas are organized writing the essay become very easy.

Above is a mind map of a research proposal. Click on it to see the full image or you can see the fully editable template via this link . As you can see in this mind map the difference areas of the research proposal is highlighted. Similarly when your writing the research paper you can use a mind map to break it down to sub topics. We have more mind map templates for you to get started.
Concept Maps
A concept map will help you visualize the connection between ideas. You can easily see cause and effect – how one concept leads to another. Often times, concept mapping includes the use of short words or phrases to depict the budding relationship between these concepts.
If you look closely you can see that its very similar to a mind map. But a concept maps gives more of a free reign compares to the rigid topic structure of a mind map. I’d say it’s the perfect graphic organizer for writing research papers where you have the license to explore.
By creating a concept map , you can also see how a broad subject can be narrowed down into specific ideas. This is a great way to counter writers block. Often, we look at the big picture and fail to see the specifics that lead to it. Identifying contributing factors and supporting evidence is difficult. But with a concept map, you can easily see how the smaller parts add up to the whole.

Why Bother With Graphic Organizers?
If you already detest the writing process, adding another step might seem insane. However, there really are several advantages of using them. If you haven’t already accepted the benefits of each individual diagram style, here are some more perks of graphic organizers in general:
- Quality essays are based on detail. No one is going to accept your opinions and reasoning just because you say so. You’ll need proof. And organizing that proof will require attention to detail. Graphic organizers can help you see that detail and how it contributes to the overall concept.
- Graphic organizers are flexible. You don’t need one of those giant pink erasers. You don’t need to restructure your outline. All you have to do is draw a few arrows and bam – the relationship has totally changed.
- No matter what you are writing about, a graphic organizer can help. They can be used to structure an essay on the Great Wall, theoretical physics, or Spanish speaking countries.
- If you write an outline, can you easily see how point A influences point X? Probably not. But if little thought bubble A is sitting out there all by itself, you can visualize the way it ties into point R, T and X.
- Some of us find it difficult to put our opinions, thoughts, and ideas into writing. However, communicating our feelings with little doodles and sketches is far less threatening.
- As a writer, our brain often feels like a 2-year-old’s toy box – a big jumbled mess. Taking that mess and putting it onto paper with some semblance of organization is challenging. Rather than trying to take your thoughts from total chaos to a perfectly structured list, just try to get them out of your brain and onto paper in the form of a diagram.
- A graphic organizer helps you establish validity and relevance. You can easily nix the ideas that don’t support or enhance your thesis.
The next time you are faced with a writing project, take a few minutes to explore the efficiency of graphic organizers. You can find a wealth of templates here.
Have you ever used a graphic organizer to structure an essay? How did it go? Do you have a diagram suggestion for the writing process that wasn’t mentioned here? Let us know!
Join over thousands of organizations that use Creately to brainstorm, plan, analyze, and execute their projects successfully.
More Related Articles

These are awesome guest posts contributed by our users and technology enthusiasts. Do you have something interesting to share? Want to get exposed to a massive tech audience? Check out our Guest Posting Guidelines to how to proceed.

Visual Representation of Texts
In-class exercise.
Many students find working in the visual mode a productive change. Thes two related exercises help students better understand challenging texts and prepare to write a paper on them. You may find that one or another works better in your class, or you may choose to use both, at different points in the semester. This activity also works well with online tools such as Jamboard and may be of special interest when teaching remotely; see a Jamboard variation handout here .
multimodality; metacognition; reading strategies; audience; visual mode; creativity; group activity; collaboration; mind map; concept map; research question
Exercise 1: Creating Visual Schema for Texts
Students create a list of best practices for understanding a text and then apply these strategies to a challenging text to represent it visually for an audience that is interested in but unfamiliar with it. This exercise helps students to better understand a challenging text by simplifying its abstract concepts into images. It also makes explicit reading strategies that students can transfer to other contexts.
To apply effective systems of thinking from a previous text as a way to formalize analytical habits
- Individual Reflections
- What in-class activities (discussions, small group activities, writing prompts) helped you to organize your understanding of our previous texts? Why?
- How can you generalize these activities so that you can apply them to any text?
- Group Discussion : Share your answers with your small group and create a list of “best practices” for understanding a challenging text. Consider the following questions to begin organizing your ideas:
- What general key terms/concepts need defining? (Your reader is unfamiliar but interested.)
- What background information needs to be summarized to provide context?
- What structural information (how the book is organized, sections, etc.) is necessary?
- What kinds of evidence does the text draw on?
- Creative Activity
- Create a visual schema for our text to help an unfamiliar reader understand it.
- As you create your visual schema, try to balance general and particular information.
- Be creative with your schema; you have complete freedom.
- After your group has finalized your schema, you will present it on the chalkboard, poster board, or via a free idea mapping tool like MindMup or LucidChart or another program and share it with the class.
Student Samples
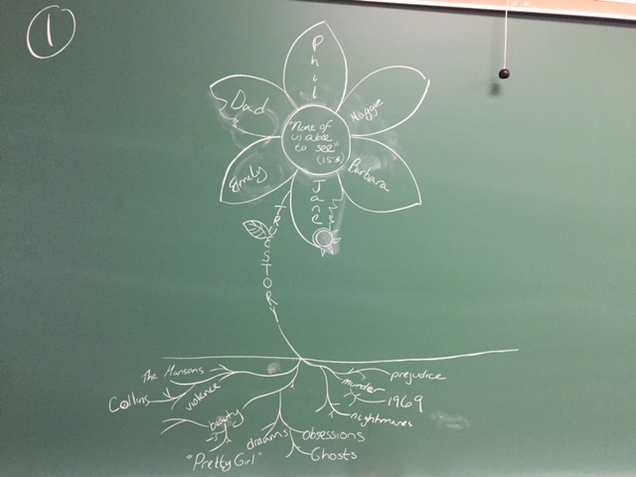
The image above shows a chalk-drawn flower on a classroom blackboard, with words written on the parts of the flower representing different elements of the text.
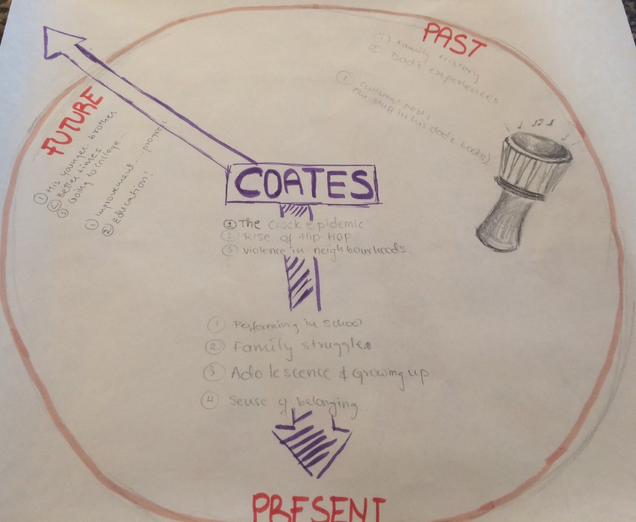
The image above shows a pencil and marker sketch on a large sheet of paper, with symbols and quotes from the text.
Here’s a downloadable version of this activity to distribute to students.
Exercise 1.5: Creating Visual Schema for Texts (Jamboard edition)
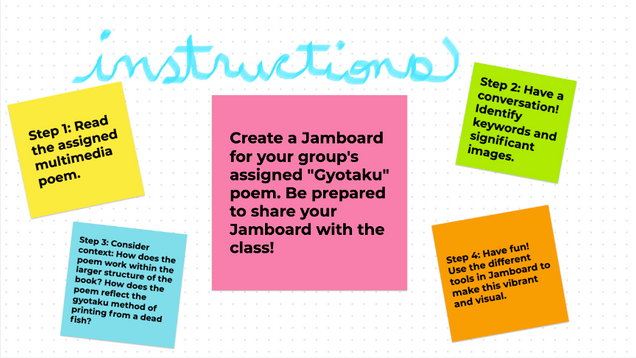
The images above show an image of a “sticky note” Jamboard with directions (directions text also available here ) and a sample of a Jamboard schema with sticky notes, images, and words to represent a text
Exercise 2: New Perspectives on Interpreting and Connecting Texts
This brainstorming activity asks students to visually represent class readings in order to generate a research question and potential ways to answer it. It ends by asking students to write an elevator story about their essay’s possible direction.
To spark new ways of thinking about how to generate a research question; to visualize connections between various texts; to strengthen concepts of narrative in argumentative writing
- Visualize : In any pictorial form you’d like, without using words other than the title of each text, express the main issues/themes for 1-2 of our texts. Ideas: comic strips, symbols and numbers, maps, stick figures, etc.
- Make Connections : Look at the story-images you created for the text(s):
- What larger themes/problems surfaced?
- Which images resonate most strongly for the text(s)?
- Are there patterns and repetitions in your images?
- Consider one issue that appears in your visualization: What is the text saying about this issue?
- Create a Research Question and Answer
- What question do you want to ask about one problem/issue found in the text(s)?
- What is the text’s response? (As in, what is/are the text(s) saying about this problem?)
- Write an Elevator Story : Finally, imagine telling a 15-second story of the ideas you’ve generated in this activity. This is all hypothetical for now, but that’s fine; it will help you begin to imagine your paper.
Want to create or adapt books like this? Learn more about how Pressbooks supports open publishing practices.
14.1 Organizing a Visual Presentation
Learning objectives.
- Identify key ideas and details to create a concise, engaging presentation.
- Identify the steps involved in planning a comprehensive presentation.
Until now, you have interacted with your audience of readers indirectly, on the page. You have tried to anticipate their reactions and questions as all good writers do. Anticipating the audience’s needs can be tough, especially when you are sitting alone in front of your computer.
When you give a presentation, you connect directly with your audience. For most people, making a presentation is both exciting and stressful. The excitement comes from engaging in a two-way interaction about your ideas. The stress comes from the pressure of presenting your ideas without having a delete button to undo mistakes. Outside the classroom, you may be asked to give a presentation, often at the last minute, and the show must go on. Presentations can be stressful, but planning and preparation, when the time and opportunity are available, can make all the difference.
This chapter covers how to plan and deliver an effective, engaging presentation. By planning carefully, applying some time-honored presentation strategies, and practicing, you can make sure that your presentation comes across as confident, knowledgeable, and interesting—and that your audience actually learns from it. The specific tasks involved in creating a presentation may vary slightly depending on your purpose and your assignment. However, these are the general steps.
Follow these steps to create a presentation based on your ideas:
- Determine your purpose and identify the key ideas to present.
- Organize your ideas in an outline.
- Identify opportunities to incorporate visual or audio media, and create or locate these media aids.
- Rehearse your presentation in advance.
- Deliver your presentation to your audience.
Getting Started: Identifying and Organizing Key Ideas
To deliver a successful presentation, you need to develop content suitable for an effective presentation. Your ideas make up your presentation, but to deliver them effectively, you will need to identify key ideas and organize them carefully. Read the following considerations, which will help you first identify and then organize key ideas:
- Be concise. You will include the most important ideas and leave out others. Some concepts may need to be simplified.
- Employ more than one medium of expression. You should incorporate other media, such as charts, graphs, photographs, video or audio recordings, or websites.
- Prepare for a face-to-face presentation. If you must deliver a face-to-face presentation, it is important to project yourself as a serious and well-informed speaker. You will often speak extemporaneously, or in a rehearsed but not memorized manner, which allows for flexibility given the context or audience. You will need to know your points and keep your audience engaged.
Determine Your Purpose
As with a writing assignment, determining the purpose of your presentation early on is crucial. You want to inform your readers about the topic, but think about what else you hope to achieve.
Are you presenting information intended to move your audience to adopt certain beliefs or take action on a particular issue? If so, you are speaking not only to inform but also to persuade your listeners. Do you want your audience to come away from your presentation knowing how to do something they that they did not know before? In that case, you are not only informing them but also explaining or teaching a process.
Writing at Work
Schoolteachers are trained to structure lessons around one or more lesson objectives. Usually the objective, the mission or purpose, states what students should know or be able to do after they complete the lesson. For example, an objective might state, “Students will understand the specific freedoms guaranteed by the First Amendment” or “Students will be able to add two three-digit numbers correctly.”
As a manager, mentor, or supervisor, you may sometimes be required to teach or train other employees as part of your job. Determining the desired outcome of a training session will help you plan effectively. Identify your teaching objectives. What, specifically, do you want your audience to know (for instance, details of a new workplace policy) or be able to do (for instance, use a new software program)? Plan your teaching or training session to meet your objectives.
Identify Key Ideas
To plan your presentation, think in terms of three or four key points you want to get across. In a paper, you have the space to develop ideas at length and delve into complex details. In a presentation, however, you must convey your ideas more concisely.
One strategy you might try is to create an outline. What is your main idea? Would your main idea work well as key points for a brief presentation? How would you condense topics that might be too lengthy, or should you eliminate topics that may be too complicated to address in your presentation?
1. Revisit your presentation assignment, or think of a topic for your presentation. On your own sheet of notebook paper, write a list of at least three to five key ideas. Keep the following questions in mind when listing your key ideas:
- What is your purpose?
- Who is your audience?
- How will you engage your audience?
2. On the same paper, identify the steps you must complete before you begin creating your presentation.
Use an Outline to Organize Ideas
After you determine which ideas are most appropriate for your presentation, you will create an outline of those ideas. Your presentation, like a written assignment, should include an introduction, body, and conclusion. These components serve much the same purpose as they do in a written assignment.
- The introduction engages the audience’s attention, introduces the topic, and sets the tone for what is to come.
- The body develops your point of view with supporting ideas, details, and examples presented in a logical order.
- The conclusion restates your point of view, sums up your main points, and leaves your audience with something to think about.
Jorge, who wrote the research paper featured in Chapter 11 “Writing from Research: What Will I Learn?” , developed the following outline. Jorge relied heavily on this outline to plan his presentation, but he adjusted it to suit the new format.

Planning Your Introduction
In Chapter 12 “Writing a Research Paper” , you learned techniques for writing an interesting introduction, such as beginning with a surprising fact or statistic, a thought-provoking question or quotation, a brief anecdote that illustrates a larger concept or connects your topic to your audience’s experiences. You can use these techniques effectively in presentations as well. You might also consider actively engaging your audience by having members respond to questions or complete a brief activity related to your topic. For example, you may have your audience respond to a survey or tell about an experience related to your topic.
Incorporating media can also be an effective way to get your audience’s attention. Visual images such as a photograph or a cartoon can invoke an immediate emotional response. A graph or chart can highlight startling findings in research data or statistical information. Brief video or audio clips that clearly reinforce your message and do not distract or overwhelm your audience can provide a sense of immediacy when you plan to discuss an event or a current issue. A PowerPoint presentation allows you to integrate many of these different media sources into one presentation.
With the accessibility provided by the Internet, you can find interesting and appropriate audio and video with little difficulty. However, the clip alone will not sustain the presentation. To keep the audience interested and engaged, you must frame the beginning and end of the clip with your own words.
Jorge completed the introduction part of his outline by listing the key points he would use to open his presentation. He also planned to show various web links early on to illustrate the popularity of the low-carbohydrate diet trend.

Planning the Body of Your Presentation
The next step is to work with the key ideas you identified earlier. Determine the order in which you want to present these ideas, and flesh them out with important details. Chapter 10 “Rhetorical Modes” discusses several organizational structures you might work with, such as chronological order, comparison-and-contrast structure, or cause-and-effect structure.
How much detail you include will depend on the time allotted for your presentation. Your instructor will most likely give you a specific time limit or a specific slide limit, such as eight to ten slides. If the time limit is very brief (two to three minutes, for instance), you will need to focus on communicating your point of view, main supporting points, and only the most relevant details. Three minutes can feel like an eternity if you are speaking before a group, but the time will pass very quickly. It is important to use it well.
If you have more time to work with—ten minutes or half an hour—you will be able to discuss your topic in greater detail. More time also means you must devote more thought into how you will hold your audience’s interest. If your presentation is longer than five minutes, introduce some variety so the audience is not bored. Incorporate multimedia, invite the audience to complete an activity, or set aside time for a question-and-answer session.
Jorge was required to limit his presentation to five to seven minutes. In his outline, he made a note about where he would need to condense some complicated material to stay within his time limit. He also decided to focus only on cholesterol and heart disease in his discussion of long-term health outcomes. The research on other issues was inconclusive, so Jorge decided to omit this material. Jorge’s notes on his outline show the revisions he has made to his presentation.

You are responsible for using your presentation time effectively to inform your audience. You show respect for your audience by following the expected time limit. However, that does not mean you must fill all of that time with talk if you are giving a face-to-face presentation. Involving your audience can take some of the pressure off you while also keeping them engaged. Have them respond to a few brief questions to get them thinking. Display a relevant photograph, document, or object and ask your classmates to comment. In some presentations, if time allows, you may choose to have your classmates complete an individual or group activity.
Planning Your Conclusion
The conclusion should briefly sum up your main idea and leave your audience with something to think about. As in a written paper, you are essentially revisiting your thesis. Depending on your topic, you may also ask the audience to reconsider their thinking about an issue, to take action, or to think about a related issue. If you presented an attention-getting fact or anecdote in your introduction, consider revisiting it in your conclusion. Just as you have learned about an essay’s conclusion, do not add new content to the presentation’s conclusion.
No matter how you choose to structure your conclusion, make sure it is well planned so that you are not tempted to wrap up your presentation too quickly. Inexperienced speakers, in a face-to-face presentation, sometimes rush through the end of a presentation to avoid exceeding the allotted time or to end the stressful experience of presenting in public. Unfortunately, a hurried conclusion makes the presentation as a whole less memorable.
Time management is the key to delivering an effective presentation whether it is face-to-face or in PowerPoint. As you develop your outline, think about the amount of time you will devote to each section. For instance, in a five-minute face-to-face presentation, you might plan to spend one minute on the introduction, three minutes on the body, and one minute on the conclusion. Later, when you rehearse, you can time yourself to determine whether you need to adjust your content or delivery.
In a PowerPoint presentation, it is important that your presentation is visually stimulating, avoids information overload by limiting the text per slide, uses speaker notes effectively, and uses a font that is visible on the background (e.g., avoid white letters on a light background or black letters on a dark background).
Work with the list you created in Note 14.4 “Exercise 1” to develop a more complete outline for your presentation. Make sure your outline includes the following:
- An introduction that uses strategies to capture your audience’s attention
- A body section that summarizes your main points and supporting details
- A conclusion that will help you end on a memorable note
- Brief notes about how much time you plan to spend on each part of the presentation (you may adjust the timing later as needed)
Identifying Opportunities to Incorporate Visual and Audio Media
You may already have some ideas for how to incorporate visual and audio media in your presentation. If not, review your outline and begin thinking about where to include media. Presenting information in a variety of formats will help you keep your audience’s interest.
Use Presentation Software
Delivering your presentation as a slideshow is one way to use media to your advantage. As you speak, you use a computer and an attached projector to display a slideshow of text and graphics that complement the speech. Your audience will follow your ideas more easily, because you are communicating with them through more than one sense. The audience hears your words and also sees the corresponding visuals. A listener who momentarily loses track of what you are saying can rely on the slide to cue his or her memory.
To set up your presentation, you will need to work with the content of your outline to develop individual slides. Each slide should focus on just a few bullet points (or a similar amount of content presented in a graphic). Remember that your audience must be able to read the slides easily, whether the members sit in the front or the back of the room. Avoid overcrowding the slides with too much text.
Using presentation software, such as PowerPoint, allows you to incorporate graphics, sounds, and even web links directly into your slides. You can also work with available styles, color schemes, and fonts to give your presentation a polished, consistent appearance. Different slide templates make it easy to organize information to suit your purpose. Be sure your font is visible to you audience. Avoid using small font or colored font that is not visible against your background.
Use PowerPoint as a Visual Aid
PowerPoint and similar visual representation programs can be effective tools to help audiences remember your message, but they can also be an annoying distraction to your speech. How you prepare your slides and use the tool will determine your effectiveness.
PowerPoint is a slideware program that you have no doubt seen used in class, seen in a presentation at work, or perhaps used yourself to support a presentation. PowerPoint and similar slideware programs provide templates for creating electronic slides to present visual information to the audience, reinforcing the verbal message. You will be able to import or cut and paste words from text files, images, or video clips to create slides to represent your ideas. You can even incorporate web links. When using any software program, it is always a good idea to experiment with it long before you intend to use it; explore its many options and functions, and see how it can be an effective tool for you.
At first, you might be overwhelmed by the possibilities, and you might be tempted to use all the bells, whistles, and sound effects, not to mention the tumbling, flying, and animated graphics. If used wisely, a dissolve or key transition can be like a well-executed scene from a major motion picture and lead your audience to the next point. But if used indiscriminately, it can annoy the audience to the point where they cringe in anticipation of the sound effect at the start of each slide. This danger is inherent in the tool, but you are in charge of it and can make wise choices that enhance the understanding and retention of your information.
The first point to consider is which visual aid is the most important. The answer is you, the speaker. You will facilitate the discussion, give life to the information, and help the audience correlate the content to your goal or purpose. You do not want to be in a position where the PowerPoint presentation is the focus and you are on the side of the stage simply helping the audience follow along. Slides should support you in your presentation, rather than the other way around. Just as there is a number one rule for handouts (do not pass them out at the start of your presentation), there is also one for PowerPoint presentations: do not use PowerPoint slides as a read-aloud script for your speech. The PowerPoint slides should amplify and illustrate your main points, not reproduce everything you are going to say.
Your pictures are the second area of emphasis you will want to consider. The tool will allow you to show graphs, charts and illustrate relationships that words may only approach in terms of communication, but your verbal support of the visual images will make all the difference. Dense pictures or complicated graphics will confuse more than they clarify. Choose clear images that have an immediate connection to both your content and the audience, tailored to their specific needs. After the images, consider using only key words that can be easily read to accompany your pictures. The fewer words the better. Try to keep each slide to a total word count of less than ten words. Do not use full sentences. Using key words provides support for your verbal discussion, guiding you as well as your audience. The key words can serve as signposts or signal words related to key ideas.
A natural question at this point is, How do I communicate complex information simply? The answer comes with several options. The visual representation on the screen is for support and illustration. Should you need to communicate more technical, complex, or in-depth information in a visual way, consider preparing a handout to distribute at the conclusion of your speech. You may also consider using a printout of your slide show with a section for taking notes, but if you distribute it at the beginning of your speech, you run the risk of turning your presentation into a guided reading exercise and possibly distracting or losing members of the audience. Everyone reads at a different pace and takes notes in their own way. You do not want to be in the position of going back and forth between slides to help people follow along.
Another point to consider is how you want to use the tool to support your speech and how your audience will interpret its presentation. Most audiences wouldn’t want to read a page of text—as you might see in this book—on the big screen. They will be far more likely to glance at the screen and assess the information you present in relation to your discussion. Therefore, it is key to consider one main idea, relationship, or point per slide. The use of the tool should be guided with the idea that its presentation is for the audience’s benefit, not yours. People often understand pictures and images more quickly and easily than text, and you can use this to your advantage, using the knowledge that a picture is worth a thousand words.
Incorporate Visual Media
Even if you do not use a slideshow to complement your presentation, you can include visual media to support and enhance your content. Visual media are divided into two major categories: images and informational graphics.
Image-based media, such as photographs or videos, often have little or no accompanying text. Often these media are more powerful than words in getting a message across. Within the past decade, the images associated with major news stories, such as the Indian Ocean tsunami of 2004, the Abu Ghraib prison abuses from 2004 to 2006, and the 2010 earthquake in Haiti, have powerfully affected viewers’ emotions and drawn their attention to these news stories.
Figure 14.1

Even if your presentation addresses a less dramatic subject, you can still use images to draw in your audience. Consider how photographs, an illustration, or a video might help your audience connect with a particular person or place or bring a historical event to life. Use visual images to support descriptions of natural or man-made phenomena. What ideas lend themselves to being explained primarily through images?
In addition, consider how you might incorporate informational graphics in your presentation. Informational graphics include diagrams, tables, pie charts, bar and line graphs, and flow charts. Informational graphics usually include some text and often work well to present numerical information. Consider using them if you are presenting statistics, comparing facts or data about several different groups, describing changes over time, or presenting a process.
Incorporate Audio Media
Although audio media are not as versatile as visual media, you may wish to use them if they work well with your particular topic. If your presentation discusses trends in pop music or analyzes political speeches, playing an audio clip is an obvious and effective choice. Clips from historical speeches, radio talk shows, and interviews can also be used, but extended clips may be ineffective with modern audiences. Always assess your audience’s demographics and expectations before selecting and including audio media.
Review the outline you created in Note 14.11 “Exercise 2” . Complete the following steps:
- Identify at least two to three places in your presentation where you might incorporate visual or audio media. Brainstorm ideas for what media would be effective, and create a list of ideas. (In Chapter 14 “Creating Presentations: Sharing Your Ideas” , Section 14.2 “Incorporating Effective Visuals into a Presentation” , you will explore different media options in greater depth. For now, focus on coming up with a few general ideas.)
- Determine whether you will use presentation software to deliver your presentation as a slideshow. If you plan to do so, begin using your outline to draft your slides.
Figure 14.2

Source: http://www.agenciabrasil.gov.br/media/imagens/2010/01/14/14.01.10RP5978.jpg/view
Planning Ahead: Annotating Your Presentation
When you make a presentation, you are giving a performance of sorts. It may not be as dramatic as a play or a movie, but it requires smooth coordination of several elements—your words, your gestures, and any media you include. One way to ensure that the performance goes smoothly is to annotate your presentation ahead of time.
To annotate means to add comments or notes to a document. You can use this technique to plan how the different parts of your presentation will flow together. For instance, if you are working with slides, add notes to your outline indicating when you will show each slide. If you have other visual or audio media to include, make a note of that, too. Be as detailed as necessary. Jotting “Start video at 3:14” can spare you the awkwardness of searching for the right clip during your presentation.
In the workplace, employees are often asked to deliver presentations or conduct a meeting using standard office presentation software. If you are using presentation software, you can annotate your presentation easily as you create your slides. Use the notes feature at the bottom of the page to add notes for each slide. As you deliver your presentation, your notes will be visible to you on the computer screen but not to your audience on the projector screen.
In a face-to-face presentation, make sure your final annotated outline is easy to read. It will serve to cue you during your presentation, so it does not need to look polished, as long as it is clear to you. Double space the text. Use a larger-than-normal font size (14 or 16 points) if that will make it easier for you to read. Boldface or italics will set off text that should be emphasized or delivered with greater emotion. Write out main points, as well as your opening and closing remarks, in complete sentences, along with any material you want to quote verbatim. Use shorter phrases for supporting details. Using your speaker notes effectively will help you deliver an effective presentation. Highlighting, all capital letters, or different-colored font will help you easily distinguish notes from the text of your speech. Read Jorge’s annotated outline.

Some students prefer to write out the full text of their face-to-face presentation. This can be a useful strategy when you are practicing your delivery. However, keep in mind that reading your text aloud, word for word, will not help you capture and hold your audience’s attention. Write out and read your speech if that helps you rehearse. After a few practice sessions, when you are more comfortable with your material, switch to working from an outline. That will help you sound more natural when you speak to an audience.
In a PowerPoint presentation, remember to have your slides in logical sequential order. Annotating your presentation before submitting it to your audience or your instructor will help you check for order and logical transitions. Too much text or data may confuse your audience; strive for clarity and avoid unnecessary details. Let the pictures or graphics tell the story but do not overload your slideshow with visuals. Be sure your font is visible. Look for consistency in the time limit of your presentation to gauge your level of preparedness.
Begin to annotate your outline. (You will probably add more notes as you proceed, but including some annotations now will help you begin pulling your ideas together.) Mark your outline with the following information:
- Write notes in brackets to any sections where you definitely plan to incorporate visual or audio media.
- If you are presenting a slideshow, add notes in brackets indicating which slides go with each section of your outline.
- Identify and set off any text that should be emphasized.

Key Takeaways
- An effective presentation presents ideas more concisely than a written document and uses media to explain ideas and hold the audience’s interest.
- Like an essay, a presentation should have a clear beginning, middle, and end.
- Good writers structure their presentations on the thesis, or point of view; main ideas; and key supporting details and create a presentation outline to organize their ideas.
- Annotating a presentation outline is a useful way to coordinate different parts of the presentation and manage time effectively.
Writing for Success Copyright © 2015 by University of Minnesota is licensed under a Creative Commons Attribution-NonCommercial-ShareAlike 4.0 International License , except where otherwise noted.
Popular Posts
- Contact Amy ==>
WEB RESOURCES – Visual Representation of the Writing Process
(Originally posted on the blog for my section of WRTG 3035: Technical Communication and Design.)
I just came across yet another infographic that’s relevant to our class. This one uses a comic style to illustrate the many different paths we can take to get from “idea” to “end product.”
Its purpose is to illustrate the creative process, but it works equally well to illustrate the writing process in general. However, one thing we might discuss is whether the infographic is too packed with details to effectively communicate its message. You definitely have to study it for a bit to “get” it all, and I’m not sure how well the designer succeeded at enticing viewers to do that.
I found the infographic on this article: Infographic Of The Day: The Magic And Madness Of The Creative Process Click on the image below to see the full-size version.
- Search for:
WHAT IS THIS SITE? See the About tab in the top menu.
UNDER PERPETUAL REVISION : All materials on this site are subject to ongoing revision and improvement!
© 2017 - Amy Goodloe - All Rights Reserved
HELP & HOW-TO
- HOW TO: Capture & Edit Video (18)
- HOW TO: Find & Edit Images (13)
- HOW TO: Make Screen Recordings (7)
- HOW TO: Record & Edit Audio (16)
- HOW TO: Use Google Drive (19)
- HOW TO: Use iMovie (13)
- HOW TO: Use Social Media Tools for Class (3)
- HOW TO: Use the Class Blog (Wordpress) (35)
- HOW TO: Use Your WordPress.com Blog (12)
- INSPIRATIONS & FYI'S (21)
- NIFTY APPS & TOOLS (7)
- PLANNING & DRAFTING New Media Projects (23)
- RESOURCES: About New Media Writing (7)
- RESOURCES: Animations & Comics (9)
- RESOURCES: Apps for Creating New Media Projects (22)
- RESOURCES: Digital Storytelling (17)
- RESOURCES: Presentations & Information Design (6)
- RESOURCES: Storytelling Prompts (14)
- RESOURCES: Writing for the Web (4)
- TECH TIPS (28)
STUDENT SAMPLES
- SAMPLES – Academic Analyses (9)
- SAMPLES – Audio Narratives & Essays (16)
- SAMPLES – CDS-Style Digital Storytelling (30)
- SAMPLES – Educational Presentations & Web Sites (9)
- SAMPLES – Educational Visuals (14)
- SAMPLES – Graphic Storytelling (16)
- SAMPLES – Mini-Documentary (15)
- SAMPLES – Multimedia Commentary (8)
- SAMPLES – Pop Culture Artifact Analyses (13)
- SAMPLES – Turning Points & Epiphanies (7)
- SAMPLES – WRTG 3020: Rhetoric of G&S (96)
- SAMPLES – WRTG 3090: New Media Storytelling (33)
- HOW TO – Format papers in standard academic format (using Microsoft Word) 118,207 views
- HOW TO – Put your file into a shared folder on Google Drive 85,097 views
- HOW TO – Make Preview the Default PDF Reader on a Mac 52,499 views
- HOW TO – Create a Hyperlink (Turn a Word into a Link) 42,916 views
- HOW TO – Export an mp3 out of GarageBand 29,446 views
- HOW TO – Add a shortcut to a shared folder to My Drive (for easy access) 22,366 views
- Creative non-fiction writing exercises 19,161 views
- TROUBLESHOOTING – Audio problems when recording with QuickTime X 12,247 views
- TIPS – Camera Angles and Shooting Tips for Digital Storytelling 9,993 views
- HOW TO – Save a Google Docs document 9,927 views
- Reviews / Why join our community?
- For companies
- Frequently asked questions
Visual Representation
What is visual representation.
Visual Representation refers to the principles by which markings on a surface are made and interpreted. Designers use representations like typography and illustrations to communicate information, emotions and concepts. Color, imagery, typography and layout are crucial in this communication.
Alan Blackwell, cognition scientist and professor, gives a brief introduction to visual representation:
- Transcript loading…
We can see visual representation throughout human history, from cave drawings to data visualization :
Art uses visual representation to express emotions and abstract ideas.
Financial forecasting graphs condense data and research into a more straightforward format.
Icons on user interfaces (UI) represent different actions users can take.
The color of a notification indicates its nature and meaning.

Van Gogh's "The Starry Night" uses visuals to evoke deep emotions, representing an abstract, dreamy night sky. It exemplifies how art can communicate complex feelings and ideas.
© Public domain
Importance of Visual Representation in Design
Designers use visual representation for internal and external use throughout the design process . For example:
Storyboards are illustrations that outline users’ actions and where they perform them.
Sitemaps are diagrams that show the hierarchy and navigation structure of a website.
Wireframes are sketches that bring together elements of a user interface's structure.
Usability reports use graphs and charts to communicate data gathered from usability testing.
User interfaces visually represent information contained in applications and computerized devices.

This usability report is straightforward to understand. Yet, the data behind the visualizations could come from thousands of answered surveys.
© Interaction Design Foundation, CC BY-SA 4.0
Visual representation simplifies complex ideas and data and makes them easy to understand. Without these visual aids, designers would struggle to communicate their ideas, findings and products . For example, it would be easier to create a mockup of an e-commerce website interface than to describe it with words.

Visual representation simplifies the communication of designs. Without mockups, it would be difficult for developers to reproduce designs using words alone.
Types of Visual Representation
Below are some of the most common forms of visual representation designers use.
Text and Typography
Text represents language and ideas through written characters and symbols. Readers visually perceive and interpret these characters. Typography turns text into a visual form, influencing its perception and interpretation.
We have developed the conventions of typography over centuries , for example, in documents, newspapers and magazines. These conventions include:
Text arranged on a grid brings clarity and structure. Gridded text makes complex information easier to navigate and understand. Tables, columns and other formats help organize content logically and enhance readability.
Contrasting text sizes create a visual hierarchy and draw attention to critical areas. For example, headings use larger text while body copy uses smaller text. This contrast helps readers distinguish between primary and secondary information.
Adequate spacing and paragraphing improve the readability and appearance of the text. These conventions prevent the content from appearing cluttered. Spacing and paragraphing make it easier for the eye to follow and for the brain to process the information.
Balanced image-to-text ratios create engaging layouts. Images break the monotony of text, provide visual relief and illustrate or emphasize points made in the text. A well-planned ratio ensures neither text nor images overwhelm each other. Effective ratios make designs more effective and appealing.
Designers use these conventions because people are familiar with them and better understand text presented in this manner.

This table of funerals from the plague in London in 1665 uses typographic conventions still used today. For example, the author arranged the information in a table and used contrasting text styling to highlight information in the header.
Illustrations and Drawings
Designers use illustrations and drawings independently or alongside text. An example of illustration used to communicate information is the assembly instructions created by furniture retailer IKEA. If IKEA used text instead of illustrations in their instructions, people would find it harder to assemble the furniture.

IKEA assembly instructions use illustrations to inform customers how to build their furniture. The only text used is numeric to denote step and part numbers. IKEA communicates this information visually to: 1. Enable simple communication, 2. Ensure their instructions are easy to follow, regardless of the customer’s language.
© IKEA, Fair use
Illustrations and drawings can often convey the core message of a visual representation more effectively than a photograph. They focus on the core message , while a photograph might distract a viewer with additional details (such as who this person is, where they are from, etc.)
For example, in IKEA’s case, photographing a person building a piece of furniture might be complicated. Further, photographs may not be easy to understand in a black-and-white print, leading to higher printing costs. To be useful, the pictures would also need to be larger and would occupy more space on a printed manual, further adding to the costs.
But imagine a girl winking—this is something we can easily photograph.
Ivan Sutherland, creator of the first graphical user interface, used his computer program Sketchpad to draw a winking girl. While not realistic, Sutherland's representation effectively portrays a winking girl. The drawing's abstract, generic elements contrast with the distinct winking eye. The graphical conventions of lines and shapes represent the eyes and mouth. The simplicity of the drawing does not draw attention away from the winking.

A photo might distract from the focused message compared to Sutherland's representation. In the photo, the other aspects of the image (i.e., the particular person) distract the viewer from this message.
© Ivan Sutherland, CC BY-SA 3.0 and Amina Filkins, Pexels License
Information and Data Visualization
Designers and other stakeholders use data and information visualization across many industries.
Data visualization uses charts and graphs to show raw data in a graphic form. Information visualization goes further, including more context and complex data sets. Information visualization often uses interactive elements to share a deeper understanding.
For example, most computerized devices have a battery level indicator. This is a type of data visualization. IV takes this further by allowing you to click on the battery indicator for further insights. These insights may include the apps that use the most battery and the last time you charged your device.

macOS displays a battery icon in the menu bar that visualizes your device’s battery level. This is an example of data visualization. Meanwhile, macOS’s settings tell you battery level over time, screen-on-usage and when you last charged your device. These insights are actionable; users may notice their battery drains at a specific time. This is an example of information visualization.
© Low Battery by Jemis Mali, CC BY-NC-ND 4.0, and Apple, Fair use
Information visualization is not exclusive to numeric data. It encompasses representations like diagrams and maps. For example, Google Maps collates various types of data and information into one interface:
Data Representation: Google Maps transforms complex geographical data into an easily understandable and navigable visual map.
Interactivity: Users can interactively customize views that show traffic, satellite imagery and more in real-time.
Layered Information: Google Maps layers multiple data types (e.g., traffic, weather) over geographical maps for comprehensive visualization.
User-Centered Design : The interface is intuitive and user-friendly, with symbols and colors for straightforward data interpretation.

The volume of data contained in one screenshot of Google Maps is massive. However, this information is presented clearly to the user. Google Maps highlights different terrains with colors and local places and businesses with icons and colors. The panel on the left lists the selected location’s profile, which includes an image, rating and contact information.
© Google, Fair use
Symbolic Correspondence
Symbolic correspondence uses universally recognized symbols and signs to convey specific meanings . This method employs widely recognized visual cues for immediate understanding. Symbolic correspondence removes the need for textual explanation.
For instance, a magnifying glass icon in UI design signifies the search function. Similarly, in environmental design, symbols for restrooms, parking and amenities guide visitors effectively.

The Interaction Design Foundation (IxDF) website uses the universal magnifying glass symbol to signify the search function. Similarly, the play icon draws attention to a link to watch a video.
How Designers Create Visual Representations
Visual language.
Designers use elements like color , shape and texture to create a communicative visual experience. Designers use these 8 principles:
Size – Larger elements tend to capture users' attention readily.
Color – Users are typically drawn to bright colors over muted shades.
Contrast – Colors with stark contrasts catch the eye more effectively.
Alignment – Unaligned elements are more noticeable than those aligned ones.
Repetition – Similar styles repeated imply a relationship in content.
Proximity – Elements placed near each other appear to be connected.
Whitespace – Elements surrounded by ample space attract the eye.
Texture and Style – Users often notice richer textures before flat designs.
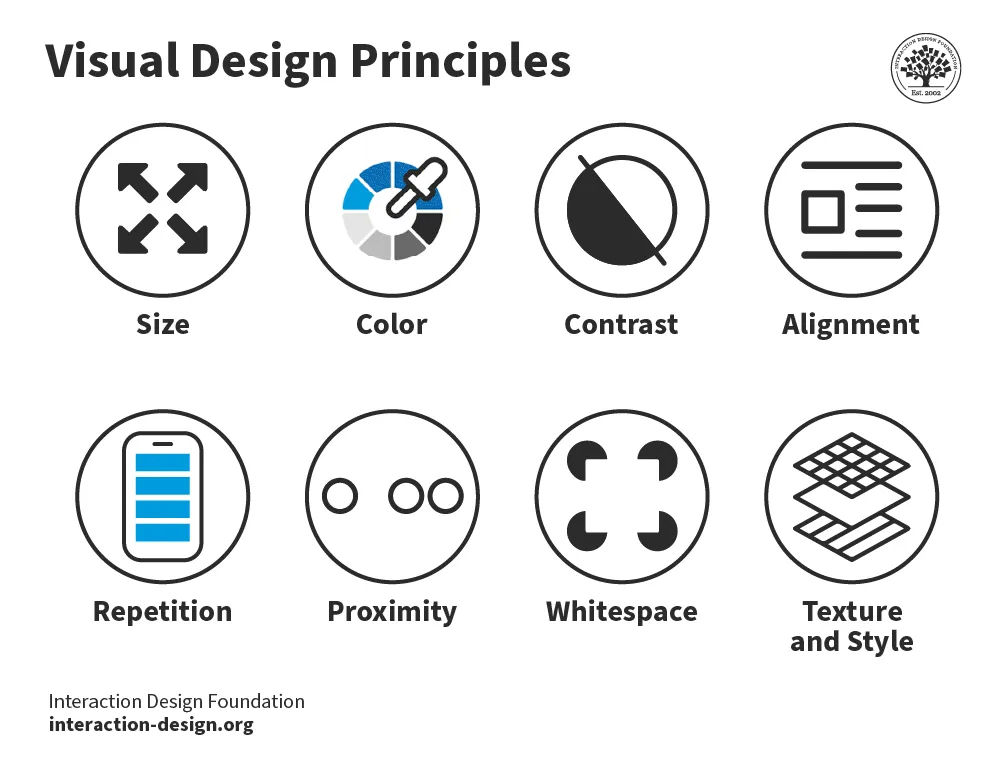
The 8 visual design principles.
In web design , visual hierarchy uses color and repetition to direct the user's attention. Color choice is crucial as it creates contrast between different elements. Repetition helps to organize the design—it uses recurring elements to establish consistency and familiarity.
In this video, Alan Dix, Professor and Expert in Human-Computer Interaction, explains how visual alignment affects how we read and absorb information:
Correspondence Techniques
Designers use correspondence techniques to align visual elements with their conceptual meanings. These techniques include color coding, spatial arrangement and specific imagery. In information visualization, different colors can represent various data sets. This correspondence aids users in quickly identifying trends and relationships .

Color coding enables the stakeholder to see the relationship and trend between the two pie charts easily.
In user interface design, correspondence techniques link elements with meaning. An example is color-coding notifications to state their nature. For instance, red for warnings and green for confirmation. These techniques are informative and intuitive and enhance the user experience.

The IxDF website uses blue for call-to-actions (CTAs) and red for warnings. These colors inform the user of the nature of the action of buttons and other interactive elements.
Perception and Interpretation
If visual language is how designers create representations, then visual perception and interpretation are how users receive those representations. Consider a painting—the viewer’s eyes take in colors, shapes and lines, and the brain perceives these visual elements as a painting.
In this video, Alan Dix explains how the interplay of sensation, perception and culture is crucial to understanding visual experiences in design:
Copyright holder: Michael Murphy _ Appearance time: 07:19 - 07:37 _ Link: https://www.youtube.com/watch?v=C67JuZnBBDc
Visual perception principles are essential for creating compelling, engaging visual representations. For example, Gestalt principles explain how we perceive visual information. These rules describe how we group similar items, spot patterns and simplify complex images. Designers apply Gestalt principles to arrange content on websites and other interfaces. This application creates visually appealing and easily understood designs.
In this video, design expert and teacher Mia Cinelli discusses the significance of Gestalt principles in visual design . She introduces fundamental principles, like figure/ground relationships, similarity and proximity.
Interpretation
Everyone's experiences, culture and physical abilities dictate how they interpret visual representations. For this reason, designers carefully consider how users interpret their visual representations. They employ user research and testing to ensure their designs are attractive and functional.

Leonardo da Vinci's "Mona Lisa", is one of the most famous paintings in the world. The piece is renowned for its subject's enigmatic expression. Some interpret her smile as content and serene, while others see it as sad or mischievous. Not everyone interprets this visual representation in the same way.
Color is an excellent example of how one person, compared to another, may interpret a visual element. Take the color red:
In Chinese culture, red symbolizes luck, while in some parts of Africa, it can mean death or illness.
A personal experience may mean a user has a negative or positive connotation with red.
People with protanopia and deuteranopia color blindness cannot distinguish between red and green.
In this video, Joann and Arielle Eckstut, leading color consultants and authors, explain how many factors influence how we perceive and interpret color:
Learn More about Visual Representation
Read Alan Blackwell’s chapter on visual representation from The Encyclopedia of Human-Computer Interaction.
Learn about the F-Shaped Pattern For Reading Web Content from Jakob Nielsen.
Read Smashing Magazine’s article, Visual Design Language: The Building Blocks Of Design .
Take the IxDF’s course, Perception and Memory in HCI and UX .
Questions related to Visual Representation
Some highly cited research on visual representation and related topics includes:
Roland, P. E., & Gulyás, B. (1994). Visual imagery and visual representation. Trends in Neurosciences, 17(7), 281-287. Roland and Gulyás' study explores how the brain creates visual imagination. They look at whether imagining things like objects and scenes uses the same parts of the brain as seeing them does. Their research shows the brain uses certain areas specifically for imagination. These areas are different from the areas used for seeing. This research is essential for understanding how our brain works with vision.
Lurie, N. H., & Mason, C. H. (2007). Visual Representation: Implications for Decision Making. Journal of Marketing, 71(1), 160-177.
This article looks at how visualization tools help in understanding complicated marketing data. It discusses how these tools affect decision-making in marketing. The article gives a detailed method to assess the impact of visuals on the study and combination of vast quantities of marketing data. It explores the benefits and possible biases visuals can bring to marketing choices. These factors make the article an essential resource for researchers and marketing experts. The article suggests using visual tools and detailed analysis together for the best results.
Lohse, G. L., Biolsi, K., Walker, N., & Rueter, H. H. (1994, December). A classification of visual representations. Communications of the ACM, 37(12), 36+.
This publication looks at how visuals help communicate and make information easier to understand. It divides these visuals into six types: graphs, tables, maps, diagrams, networks and icons. The article also looks at different ways these visuals share information effectively.
If you’d like to cite content from the IxDF website , click the ‘cite this article’ button near the top of your screen.
Some recommended books on visual representation and related topics include:
Chaplin, E. (1994). Sociology and Visual Representation (1st ed.) . Routledge.
Chaplin's book describes how visual art analysis has changed from ancient times to today. It shows how photography, post-modernism and feminism have changed how we see art. The book combines words and images in its analysis and looks into real-life social sciences studies.
Mitchell, W. J. T. (1994). Picture Theory. The University of Chicago Press.
Mitchell's book explores the important role and meaning of pictures in the late twentieth century. It discusses the change from focusing on language to focusing on images in cultural studies. The book deeply examines the interaction between images and text in different cultural forms like literature, art and media. This detailed study of how we see and read visual representations has become an essential reference for scholars and professionals.
Koffka, K. (1935). Principles of Gestalt Psychology. Harcourt, Brace & World.
"Principles of Gestalt Psychology" by Koffka, released in 1935, is a critical book in its field. It's known as a foundational work in Gestalt psychology, laying out the basic ideas of the theory and how they apply to how we see and think. Koffka's thorough study of Gestalt psychology's principles has profoundly influenced how we understand human perception. This book has been a significant reference in later research and writings.
A visual representation, like an infographic or chart, uses visual elements to show information or data. These types of visuals make complicated information easier to understand and more user-friendly.
Designers harness visual representations in design and communication. Infographics and charts, for instance, distill data for easier audience comprehension and retention.
For an introduction to designing basic information visualizations, take our course, Information Visualization .
Text is a crucial design and communication element, transforming language visually. Designers use font style, size, color and layout to convey emotions and messages effectively.
Designers utilize text for both literal communication and aesthetic enhancement. Their typography choices significantly impact design aesthetics, user experience and readability.
Designers should always consider text's visual impact in their designs. This consideration includes font choice, placement, color and interaction with other design elements.
In this video, design expert and teacher Mia Cinelli teaches how Gestalt principles apply to typography:
Designers use visual elements in projects to convey information, ideas, and messages. Designers use images, colors, shapes and typography for impactful designs.
In UI/UX design, visual representation is vital. Icons, buttons and colors provide contrast for intuitive, user-friendly website and app interfaces.
Graphic design leverages visual representation to create attention-grabbing marketing materials. Careful color, imagery and layout choices create an emotional connection.
Product design relies on visual representation for prototyping and idea presentation. Designers and stakeholders use visual representations to envision functional, aesthetically pleasing products.
Our brains process visuals 60,000 times faster than text. This fact highlights the crucial role of visual representation in design.
Our course, Visual Design: The Ultimate Guide , teaches you how to use visual design elements and principles in your work effectively.
Visual representation, crucial in UX, facilitates interaction, comprehension and emotion. It combines elements like images and typography for better interfaces.
Effective visuals guide users, highlight features and improve navigation. Icons and color schemes communicate functions and set interaction tones.
UX design research shows visual elements significantly impact emotions. 90% of brain-transmitted information is visual.
To create functional, accessible visuals, designers use color contrast and consistent iconography. These elements improve readability and inclusivity.
An excellent example of visual representation in UX is Apple's iOS interface. iOS combines a clean, minimalist design with intuitive navigation. As a result, the operating system is both visually appealing and user-friendly.
Michal Malewicz, Creative Director and CEO at Hype4, explains why visual skills are important in design:
Learn more about UI design from Michal in our Master Class, Beyond Interfaces: The UI Design Skills You Need to Know .
The fundamental principles of effective visual representation are:
Clarity : Designers convey messages clearly, avoiding clutter.
Simplicity : Embrace simple designs for ease and recall.
Emphasis : Designers highlight key elements distinctively.
Balance : Balance ensures design stability and structure.
Alignment : Designers enhance coherence through alignment.
Contrast : Use contrast for dynamic, distinct designs.
Repetition : Repeating elements unify and guide designs.
Designers practice these principles in their projects. They also analyze successful designs and seek feedback to improve their skills.
Read our topic description of Gestalt principles to learn more about creating effective visual designs. The Gestalt principles explain how humans group elements, recognize patterns and simplify object perception.
Color theory is vital in design, helping designers craft visually appealing and compelling works. Designers understand color interactions, psychological impacts and symbolism. These elements help designers enhance communication and guide attention.
Designers use complementary , analogous and triadic colors for contrast, harmony and balance. Understanding color temperature also plays a crucial role in design perception.
Color symbolism is crucial, as different colors can represent specific emotions and messages. For instance, blue can symbolize trust and calmness, while red can indicate energy and urgency.
Cultural variations significantly influence color perception and symbolism. Designers consider these differences to ensure their designs resonate with diverse audiences.
For actionable insights, designers should:
Experiment with color schemes for effective messaging.
Assess colors' psychological impact on the audience.
Use color contrast to highlight critical elements.
Ensure color choices are accessible to all.
In this video, Joann and Arielle Eckstut, leading color consultants and authors, give their six tips for choosing color:
Learn more about color from Joann and Arielle in our Master Class, How To Use Color Theory To Enhance Your Designs .
Typography and font choice are crucial in design, impacting readability and mood. Designers utilize them for effective communication and expression.
Designers' perception of information varies with font type. Serif fonts can imply formality, while sans-serifs can give a more modern look.
Typography choices by designers influence readability and user experience. Well-spaced, distinct fonts enhance readability, whereas decorative fonts may hinder it.
Designers use typography to evoke emotions and set a design's tone. Choices in font size, style and color affect the emotional impact and message clarity.
Designers use typography to direct attention, create hierarchy and establish rhythm. These benefits help with brand recognition and consistency across mediums.
Read our article to learn how web fonts are critical to the online user experience .
Designers create a balance between simplicity and complexity in their work. They focus on the main messages and highlight important parts. Designers use the principles of visual hierarchy, like size, color and spacing. They also use empty space to make their designs clear and understandable.
The Gestalt law of Prägnanz suggests people naturally simplify complex images. This principle aids in making even intricate information accessible and engaging.
Through iteration and feedback, designers refine visuals. They remove extraneous elements and highlight vital information. Testing with the target audience ensures the design resonates and is comprehensible.
Michal Malewicz explains how to master hierarchy in UI design using the Gestalt rule of proximity:
Answer a Short Quiz to Earn a Gift
Why do designers use visual representation?
- To guarantee only a specific audience can understand the information
- To replace the need for any form of written communication
- To simplify complex information and make it understandable
Which type of visual representation helps to compare data?
- Article images
- Line charts
- Text paragraphs
What is the main purpose of visual hierarchy in design?
- To decorate the design with more colors
- To guide the viewer’s attention to the most important elements first
- To provide complex text for high-level readers
How does color impact visual representation?
- It has no impact on the design at all.
- It helps to distinguish different elements and set the mood.
- It makes the design less engaging for a serious mood.
Why is consistency important in visual representation?
- It limits creativity, but allows variation in design.
- It makes sure the visual elements are cohesive and easy to understand.
- It makes the design unpredictable yet interesting.
Better luck next time!
Do you want to improve your UX / UI Design skills? Join us now
Congratulations! You did amazing
You earned your gift with a perfect score! Let us send it to you.
Check Your Inbox
We’ve emailed your gift to [email protected] .
Literature on Visual Representation
Here’s the entire UX literature on Visual Representation by the Interaction Design Foundation, collated in one place:
Learn more about Visual Representation
Take a deep dive into Visual Representation with our course Perception and Memory in HCI and UX .
How does all of this fit with interaction design and user experience? The simple answer is that most of our understanding of human experience comes from our own experiences and just being ourselves. That might extend to people like us, but it gives us no real grasp of the whole range of human experience and abilities. By considering more closely how humans perceive and interact with our world, we can gain real insights into what designs will work for a broader audience: those younger or older than us, more or less capable, more or less skilled and so on.
“You can design for all the people some of the time, and some of the people all the time, but you cannot design for all the people all the time.“ – William Hudson (with apologies to Abraham Lincoln)
While “design for all of the people all of the time” is an impossible goal, understanding how the human machine operates is essential to getting ever closer. And of course, building solutions for people with a wide range of abilities, including those with accessibility issues, involves knowing how and why some human faculties fail. As our course tutor, Professor Alan Dix, points out, this is not only a moral duty but, in most countries, also a legal obligation.
Portfolio Project
In the “ Build Your Portfolio: Perception and Memory Project ”, you’ll find a series of practical exercises that will give you first-hand experience in applying what we’ll cover. If you want to complete these optional exercises, you’ll create a series of case studies for your portfolio which you can show your future employer or freelance customers.
This in-depth, video-based course is created with the amazing Alan Dix , the co-author of the internationally best-selling textbook Human-Computer Interaction and a superstar in the field of Human-Computer Interaction . Alan is currently a professor and Director of the Computational Foundry at Swansea University.
Gain an Industry-Recognized UX Course Certificate
Use your industry-recognized Course Certificate on your resume , CV , LinkedIn profile or your website.
All open-source articles on Visual Representation
Data visualization for human perception.

The Key Elements & Principles of Visual Design

- 1.1k shares
Guidelines for Good Visual Information Representations

- 4 years ago
Philosophy of Interaction
Information visualization – an introduction to multivariate analysis.

- 8 years ago
Aesthetic Computing
How to represent linear data visually for information visualization.

- 5 years ago
Open Access—Link to us!
We believe in Open Access and the democratization of knowledge . Unfortunately, world-class educational materials such as this page are normally hidden behind paywalls or in expensive textbooks.
If you want this to change , cite this page , link to us, or join us to help us democratize design knowledge !
Privacy Settings
Our digital services use necessary tracking technologies, including third-party cookies, for security, functionality, and to uphold user rights. Optional cookies offer enhanced features, and analytics.
Experience the full potential of our site that remembers your preferences and supports secure sign-in.
Governs the storage of data necessary for maintaining website security, user authentication, and fraud prevention mechanisms.
Enhanced Functionality
Saves your settings and preferences, like your location, for a more personalized experience.
Referral Program
We use cookies to enable our referral program, giving you and your friends discounts.
Error Reporting
We share user ID with Bugsnag and NewRelic to help us track errors and fix issues.
Optimize your experience by allowing us to monitor site usage. You’ll enjoy a smoother, more personalized journey without compromising your privacy.
Analytics Storage
Collects anonymous data on how you navigate and interact, helping us make informed improvements.
Differentiates real visitors from automated bots, ensuring accurate usage data and improving your website experience.
Lets us tailor your digital ads to match your interests, making them more relevant and useful to you.
Advertising Storage
Stores information for better-targeted advertising, enhancing your online ad experience.
Personalization Storage
Permits storing data to personalize content and ads across Google services based on user behavior, enhancing overall user experience.
Advertising Personalization
Allows for content and ad personalization across Google services based on user behavior. This consent enhances user experiences.
Enables personalizing ads based on user data and interactions, allowing for more relevant advertising experiences across Google services.
Receive more relevant advertisements by sharing your interests and behavior with our trusted advertising partners.
Enables better ad targeting and measurement on Meta platforms, making ads you see more relevant.
Allows for improved ad effectiveness and measurement through Meta’s Conversions API, ensuring privacy-compliant data sharing.
LinkedIn Insights
Tracks conversions, retargeting, and web analytics for LinkedIn ad campaigns, enhancing ad relevance and performance.
LinkedIn CAPI
Enhances LinkedIn advertising through server-side event tracking, offering more accurate measurement and personalization.
Google Ads Tag
Tracks ad performance and user engagement, helping deliver ads that are most useful to you.
Share Knowledge, Get Respect!
or copy link
Cite according to academic standards
Simply copy and paste the text below into your bibliographic reference list, onto your blog, or anywhere else. You can also just hyperlink to this page.
New to UX Design? We’re Giving You a Free ebook!

Download our free ebook The Basics of User Experience Design to learn about core concepts of UX design.
In 9 chapters, we’ll cover: conducting user interviews, design thinking, interaction design, mobile UX design, usability, UX research, and many more!
Freshmen Screen Play
Visual Screenwriting: How to Write like a Professional

Welcome to a complete guide on writing visually in screenplays.
I created this guide because I wanted a step by step blueprint on how to use visuals.
The whole process seemed elusive to me. After analyzing the top ten scripts known for their visual writing like A Quiet Place and Lights Out, I’ve come up with this guide.
In this post, you will learn:
- What visual screenwriting is
- Visual script exercises
- Practical ways to incorporate visuals
- Mistakes to avoid
- Examples from real scripts
Trought this post, I will be using examples from my first script , where I first learned how to write with images with help from a professional writer.
Let’s begin…
What is Visual Screenwriting?
Visual screenwriting is the process of using words and specific detail to communicate your script in a way that the reader can see the entire film.
Like any good piece of writing, you’re able to see in images what’s precisely going on.
Have you ever read anything and your imagination ran with it?
You were able to see the coffee shop or the living room or the situation the writer was describing in real-time.
If you have, you have experienced visual writing.
Where You can Incorporate Visuals
Below are the only four places in your screenplay you’re able to use visual writing.
1.) Location Descriptions
The first place you will able to write using images is in the location descriptions.
Think about the energy around your location.
Joker (2019)
This room seems like a place the government doesn’t particularly care about. And I picture it messy and dirty.
- What’s unique about this location?
- What does this location feel like?
2.) Scene Descriptions
It can be considered the same as location descriptions. The difference being is the actions happening inside the script.
Little Men (2016)
From this example, you can see the energy in the classroom.
What are people doing? They are slacking off in school.
Plenty of noise . Even though they didn’t say, people were screaming, that’s the image I got.
- What are people doing around your scene?
- What does it feel like?
3.) Character Descriptions
A character introduction is one of the most critical places to write visually. These words are the first thing the reader is going to think about the character.
This is a short description, but short ones aren’t bad for side characters.
What can we tell from this one line? Shes focused on that piano for sure.
What else? She’s warm and good looking for her age.
- What are the character’s strengths?
- How are they responding emotionally to what’s happening?
What a character does and how they respond shows more about them than anything.
4.) Character Action
A Prayer Before Dawn
What do you see? An angry man. A man is getting ready for battle.
- What is my character doing?
- How does that show who they are?
The Two Senses of Visual Screenwriting
Primarily there are two senses people use when writing. Things you can see with your eyes and something you can hear in the location.
1.) What do you see?
Think of a wide shot in a film.
What things are visible?
What is happening that someone could see if they were above everything?
Are people running? An empty street? If so, write that.
2.) What do you hear?
The sounds we hear help people see better.
I know that sounds weird, but it’s true.
Scream? Laughter? Breathing? Car sounds?
Whatever you would hear in your scene, write that.
Five Ways to Write More Visually
Below I’ve compiled five exercises you can use while writing your script that you can use today to become a more image-based screenwriter.
1.) Complete Visual Write of Your Script First
What is a visual write? Its when you write your whole script just using descriptions and action lines.
I know it sounds weird.
But trust me if you do this every scene. Before you write the dialogue , it will show you that you don’t need as much talking to communicate as you think.
Only after you finished the scene with things we see and hear as well as what characters do then and only then you should write what they say.
Think to yourself:
What haven’t I communicated that I need to make this scene work?
2.) Put Your Characters in Motion
Next, what you should do is put your characters in motion when they are talking.
What does this look like?
Have your characters doing things while they talk.
For example, walk down a hallway going somewhere. Or if they are at a table, one could be eating and the other listening.
I call this the “ walk and talk method. “
Every time I have more than a page of dialogue, I t hink what they could be doing to advance the story other than talking.
Naturally, having your actions in action while talking makes them appear more visual in the reader’s head because you’re able to picture them doing the thing.
It’s a cheap trick, but it works.
3.) Choose visual Locations
Most writers think when writing visually, they need the right wording. More on that later.
But the location is the first image in the writer’s mind.
When writing any scene, think of the energy your location brings to the scene.
Having two kids chase each other around a house is perfectly fine.
But if you want to show how reckless they are, having them chase each other around a supermarket sounds better. Right?
More space + more people + more opportunities = more visual
You could have that heated conversation in a living room, but it becomes more visual in a fancy restaurant.
Imagine them trying to keep their voices down while getting there points across.
4.) Create More Obstacles
The more obstacles in a character’s way, the more visual the writing becomes.
But not just the obstacles you set up in the story, we are talking about physical barriers in the scene.
Simple stuff.
The purpose is to create energy.
For example:
“Greg runs to Rubin.”
This is fine but boring. How do we make a world? A world where Rubin and Greg aren’t in an all-white room.
“Greg hustles to Rubin, pushing people out his way.”
That’s better.
5.) Use active Verbs
What does this mean?
Any word you’re going to use to describe what a character does write something that that pops it off the page.
Don’t use walk use Stride.
Don’t use look use, Leer.
Think to yourself, how is my character doing this activity, are they upset? Angry? Happy?
Then use words that express that.
Now, this doesn’t have to bee for every verb. Only when the occasion suits it.
Do this only after you finished writing your scene.
Only after then go back and change out common everyday verbs to words that can describe more in detail what the character is doing.
Visual Writing Exercise
One way to get better at screenwriting with images is to practice.
How do you do that?
Well, I have an exercise for you.
I call it, “Write what you feel.”
For this exercise, we are going to use the two screenwriting senses we talked about above. What you see and hear.
Go to these four locations:
- Your room
- A coffee shop
- A grocery store
- A park at 3 am
Write everything you see and hear.
Determine the energy of the environment. Or the tone if that makes more sense.
Calm, busy, happy, energetic.
Repeat this exercise with as many places as you want, especially if you can find a place that you’re going to write in your script.
Visual Screenwriting Mistakes
Below I’m going to name the mistakes I’ve made when trying to write visually.
I found these mistakes by getting my scripts checked out by professional screenwriters.
Take a look and correct anything you might be doing wrong.
1.) Using Adverbs
Stay away from descriptions like:
“She “ neatly laid her sheets out.”
“He gently lifted the man.”
You’re not writing a book you’re writing a script. If you want someone to do something gently, then write it. in dialogue
Yes, adverbs are visual, but they clog up the reader and takes away from their imagination.
You want the reader to imagine his or her view of your story with your words as a guide.
2.) Writing Passively
Never write passively.
You want your character’s actions to be happening as people are reading it.
The purpose is it adds to the vision of things happening as we are reading it.
3.) Directing on the Page
Directing on the page consists of telling the actors exactly how something is done. Kind of like using adverbs, but it goes much deeper than that.
For example, writing facial movements micro things like that.
“Her eyebrows raise in disagreement.”
“He raises his hands while yelling.”
You are the screenwriter, not the actor. So don’t tell them how to act.
In closing this section…
Ultimately you want their imagination to be doing most of the work.
And using adverbs, directing on the page takes away from that imagination.
Excellent Examples of Visual Screenwriting
So now, let’s look at ways professional screenwriters have done it.
1.) Blade Runner 2049 (2017)
Blade Runner because of its cinematography. The second movie is no different.
What I also like about this one is their description of how someone fights through pain.
Writing, “He feels his wounds. “
So simple yet, we can all visually see what they mean.
2.) A Quiet Place (2018)
A quiet place is a visual writing gold mind.
Every scene has to be as vivid as possible, giving the reader image after image, with no dialogue at all.
What I like about this is the writer-actor breaks some of the guidelines I laid out in this post.
Why am I showing this example then?
To show that these methods aren’t exactly what I mean.
Guidelines.
For a film such as this or a scene with virtually no dialogue, you do need some sort of deeper explanation.
Let’s see a script to screen example on how it’s done below.
Why is Visual Screenwriting Important?
Film is a visual medium.
So we the screenwriters have to be visual.
The producer needs to see the world we are creating—the only way to do that to write visually.
Imagine if we didn’t, and we wrote what happened and not what the characters are experiencing.
The script would be bland.
The movie industry is dependent on us to see things before the actors and directors and production designer does.
This is why it’s essential.
Okay, people!
You now have all the keys to take what you write and pop it off the page.
It’s not the easiest thing to do at first, but after the exercises I gave you. After a couple of attempts, at least you’re be doing some version of it correctly.
In this post, you learned a lot.
- The reason we write using visuals
- Every way possible, to do it.
- Also, some killer examples from some top scripts.
If you remember anything from this, remember to describe a world around your characters.
You can’t go wrong by doing this.
I also want to tell you all the scripts mentioned except mine can be read on imsdb.com .
Please let that be your resource for any scripts you need as study material.
Now it’s time to hear from you:
Did I miss anything?
What did you learn about visual screenwriting you didn’t know before?
What exercises are you going to use to get better?
Whatever your answers are, let’s talk about it together in the comments below.
The Writing Process in a Multimedia Environment
Abstract Multimedia environments have changed each of the stages of the writing process-- pre-writing, writing, re-writing, and post-writing. Writing is not a linear process but the focal point of many other processes. Writing can be facilitated by an environment that is non-linear and rich in connecting together many different abstractions and occurrences. This is where multimedia will aid this connected but diverse assembly of phenomena. A visual representation of the model using the Snake and Ladder board game depicts this connected and non-linear approach to the writing process in a multimedia environment.
We use essential cookies to make Venngage work. By clicking “Accept All Cookies”, you agree to the storing of cookies on your device to enhance site navigation, analyze site usage, and assist in our marketing efforts.
Manage Cookies
Cookies and similar technologies collect certain information about how you’re using our website. Some of them are essential, and without them you wouldn’t be able to use Venngage. But others are optional, and you get to choose whether we use them or not.
Strictly Necessary Cookies
These cookies are always on, as they’re essential for making Venngage work, and making it safe. Without these cookies, services you’ve asked for can’t be provided.
Show cookie providers
- Google Login
Functionality Cookies
These cookies help us provide enhanced functionality and personalisation, and remember your settings. They may be set by us or by third party providers.
Performance Cookies
These cookies help us analyze how many people are using Venngage, where they come from and how they're using it. If you opt out of these cookies, we can’t get feedback to make Venngage better for you and all our users.
- Google Analytics
Targeting Cookies
These cookies are set by our advertising partners to track your activity and show you relevant Venngage ads on other sites as you browse the internet.
- Google Tag Manager
- Infographics
- Daily Infographics
- Popular Templates
- Accessibility
- Graphic Design
- Graphs and Charts
- Data Visualization
- Human Resources
- Beginner Guides
Blog Data Visualization 28 Process Infographic Examples with Design Tips
28 Process Infographic Examples with Design Tips
Written by: Sara McGuire May 08, 2020

Have you ever tried to summarize a complex process, or break one down into clear, concise steps for others to follow? It’s not always easy, but visuals can help. Specifically, designing a process infographic.
In this guide, we’ll share 28 customizable process infographic templates and design tips to help you get started, even if you’re a total beginner.
What is a process infographic?
Process infographics are a specific type of infographic , designed to visualize, summarize and simplify processes. They’re perfect for visualizing marketing strategies, new employee onboarding, customer journey maps, product guides, recipes and more.

Process infographic examples & design tips
- Use a circle layout to show a cyclical process
- Follow a simple step-by-step layout for straightforward processes
- Save space in your process infographic template by using an S-shaped layout
- Visualize steps with icons and illustrations
- Incorporate images to visualize your process
- Create a mind map for processes that don’t follow a specific order
- Color code phases of your process
- Pick fonts that reflect the theme of your process infographic
- Use arrows to give your process infographic template flow
- Use a flow chart to visualize a workflow or a process with multiple paths
- Create an infographic that lists the tools needed for a process
How to use a process infographic template:
- Click the infographic template that fits the process you want to visualize. Some templates are free, some require a small fee to use.
- You’ll enter our process infographics maker, an online drag and drop tool that’s perfect for design newbies.
- Add, remove, and rearrange steps in the infographic.
- Paste your own text and import your own images into the infographic.
- Customize the colors , fonts and icons to make the infographic design your own.
Here’s a sneak peak of what the Venngage infographic editor looks like:

Keep reading for our 28 process infographic templates you can customize right now using Venngage’s intuitive online tool.
1. Use a circle layout to show a cyclical process

If you have a process that repeats, or one that involves regular iteration and improvement, then a circle infographic layout can work well. Clearly indicate where the “starting” point it and use numbered steps or arrows to indicate that direction the process follows.
For example, take a look at this circular process infographic template for product design:

If your process is more of a chicken-and-egg situation, then a circle with no break makes more sense. Take a look at how this cyclical process infographic template uses different colors to help each step stand out on its own:

This process infographic template is another example of using circles as a guide for your clients:

2. Follow a simple step-by-step layout for straightforward processes

Sometimes, it’s best to not overcomplicate your design. If you want to visualize a straightforward process, then a simple infographic with numbered steps can be very effective.
Use a clear, bold header for your infographic. Then, clearly number your steps. To emphasize each step, you may want to use a different color for the numbers. Take a look at how the orange numbers stand out against the blue background in this process infographic template:

Brand your infographic using Venngage’s in-editor My Brand Kit tool–just click any of our templates to access this feature. Add your brand colors with one click or import your business or consulting logo.

Or take a look at how this writing process infographic template uses a simple color gradient to visualize progress. Color should be used strategically in your infographic to make the information easier to understand:

At times, your infographic may have a lot of information. The easiest way to simplify the information so that it’s not overwhelming is to add clear steps. This infographic uses colors, sections, and numbered steps to create a seamless infographic:

Another example is using color shades to flip between each step of the infographic. This keeps the infographic more engaging and easy to follow:

3. Save space in your process infographic template by using an S-shaped layout
You only have so much space on your page. A hack for fitting more steps into one infographic is to use an S-shaped layout (you could also call this a road layout or a snake layout).
The S layout in this process infographic template looks like a winding road. Perfect for visualizing a customer journey:

Click the template above to enter our online customer journey map maker. Customize the template to your liking–no design experience required.
4. Visualize steps with icons and illustrations
At Venngage, we’re big fans of icons. In fact, we have a library of over 40,000 icons which you can use in your infographics. In the process infographic template below, icons are used to illustrate each step of a lengthy process. This not only adds visual interest, it prevents the design from becoming too text heavy.

The recipe infographic below similarly showcases its ingredients with illustrated icons:

In addition to using icons on their own, you can also combine icons to create your own custom illustrations. Take this job hiring process infographic template, for example, which uses icon illustrations to visualize what each phase of the process entails:

If you don’t have to resources to hire a graphic designer, you might be at a loss for how you can create your own illustrations.
That’s where icons can be a lifesaver. Simply search for icons depicting the different pieces of the scene you have in mind. Then, arrange them into a scene the way you would arrange pieces of a collage.
For example, look at how convincing the illustrations are in this hack infographic:

This process infographic highlights the best technology practices in the classroom. The 3D looking icons jump off the infographic and grab your attention before anything else:

5. Incorporate images to visualize your process
While icons are awesome visuals to include in your infographics, sometimes they aren’t quite realistic enough. That’s why you may want to include more realistic images to illustrate important information.
To incorporate images into your design, look for images that have a transparent background. That way, the background of the image won’t stick out from the background of your infographic.
If an image you want to use doesn’t have a transparent background, you can incorporate it into you design by using a border around the image or an image frame .
For example, this recipe infographic uses images to illustrate what each of the ingredients are:

It’s also useful to include a picture of the results of your process. Here’s another example of a recipe infographic, this time with a shot of the finished dish:

But this tip doesn’t just have to apply to a recipe. You could include a a mock-up of a finished product or an image of a picture depicting your goals being hit.
This process infographic uses stock photos to help stress its points:

6. Create a mind map for processes that don’t follow a specific order

A mind map connects ideas and shows where different ideas branch out.
Maybe you want to show a broad overview of a process. Or maybe the process you’re visualizing doesn’t follow a specific order. In both cases, a mind map can show readers options for steps they can take. (Plus, Venngage makes it easy to create a mind map in a pinch).
For example, this social media marketing infographic template shows multiple options you could tackle first. A brief description under the mind map offers some important contextual information:

A mind map infographic is also a great way to share key information that readers should keep top-of-mind as they carry out a process. For example, this infographic visualizes six important tips for writing compelling emails:

7. Color code phases of your process

When it comes to visualizing information, your color choices should be about more than just looking nice. You should think about how colors can make information easier to understand.
For example, you can color code different phases or steps in your process. This will help make your process easier to follow, and will show how particular steps are grouped together.
For example, this hiring process infographic template uses different colors to sort the process into three sections:

You could also customize the above template to visualize your company’s employee onboarding process.
Using bright colors to brighten an otherwise boring process is a good way to highlight each step of a process. This hiring process infographic is grey but uses color to bring out each step to draw your attention:

Here’s another example of color coding steps in a process:

8. Pick fonts that reflect the theme of your process infographic
The fonts you choose can affect how the information in your infographic is perceived. Certain fonts look more old fashioned, like serif fonts or script fonts. Meanwhile, certain fonts look more modern and forward-thinking.
Think about who the audience of your infographic will be, and what mood you want your infographic to convey.
For example, are you visualizing a process for your customers? In that case, you may want to use a font that looks friendly and approachable. Or perhaps you want to use a more traditional font to show that your company is reliable.
The header font for each step in this design process infographic template is friendly and a bit playful. In this case, this reflects the idea of making clients happy:

This infographic looks more innovative and technical, doesn’t it?
9. Use arrows to give your process infographic template flow

In design, visual cues are things like arrows, images of fingers pointing, or images where someone is looking in a specific direction. Visual cues help to direct how people read your infographic.
When designing your process infographic, think about how you want your information to flow on the page. You can create flow by connecting steps in a process with a line, or by using arrows to point readers towards the next step.
Take a look at how arrows help the information in this process infographic flow:

The arrows used in this process infographic guides your eyes visually without needing to read the information, the text is used adds details to the information:

Here’s another example of an infographic that uses arrows. The arrows make it possible for the steps to jump back and forth across the page while still making sense:

Or, for a more subtle approach, you could incorporate an arrow shape into your section backgrounds. Like in this process infographic template, where each section “points” to the next:

Another subtle example of arrows being used to guide the eyes is with this e-learning infographic:

10. Use a flow chart to visualize a workflow or a process with multiple paths
Here’s an example of a simplified process flow chart for inbound marketing :

A flow chart can make processes with multiple paths and supporting processes easier to follow. They’re also handy for simplifying workflows and breaking complex processes down into steps.
Typically, a flow chart uses a box (or other shape) to visualize a step in a process, with lines or arrows pointing to the next step.
11. Create an infographic that lists the tools needed for a process
Infographics make for great cheat sheets. Why not also create an infographic to remind readers about tools they will need to successfully see a process through?
A simple list infographic layout works well for this. You can use icons or images to illustrate each tool, to help eliminate confusion. Here’s one example:

Here’s another beginner-friendly infographic template you can use to show a list. Here’s a creative design hack: use icons in the place of bullet points:

Process infographic templates
If you’re working within a tight design budget–and you don’t have much design experience yourself–designing an infographic might seem kind of intimidating.
That’s why it’s a good idea to start with a process infographic template , like this one:

More infographic design guides for your everyday needs:
- 40+ Timeline Templates, Examples and Design Tips
- 30+ Comparison Infographic Templates for Product, Marketing & More (+ Design Tips)
- 12 Survey Infographic Templates and Essential Data Visualization Tips
- 25+ Statistical Infographic Templates To Help Visualize Your Data
Discover popular designs

Infographic maker

Brochure maker

White paper online

Newsletter creator

Flyer maker

Timeline maker

Letterhead maker

Mind map maker

Ebook maker
- Business Essentials
- Leadership & Management
- Credential of Leadership, Impact, and Management in Business (CLIMB)
- Entrepreneurship & Innovation
- Digital Transformation
- Finance & Accounting
- Business in Society
- For Organizations
- Support Portal
- Media Coverage
- Founding Donors
- Leadership Team

- Harvard Business School →
- HBS Online →
- Business Insights →
Business Insights
Harvard Business School Online's Business Insights Blog provides the career insights you need to achieve your goals and gain confidence in your business skills.
- Career Development
- Communication
- Decision-Making
- Earning Your MBA
- Negotiation
- News & Events
- Productivity
- Staff Spotlight
- Student Profiles
- Work-Life Balance
- AI Essentials for Business
- Alternative Investments
- Business Analytics
- Business Strategy
- Business and Climate Change
- Design Thinking and Innovation
- Digital Marketing Strategy
- Disruptive Strategy
- Economics for Managers
- Entrepreneurship Essentials
- Financial Accounting
- Global Business
- Launching Tech Ventures
- Leadership Principles
- Leadership, Ethics, and Corporate Accountability
- Leading Change and Organizational Renewal
- Leading with Finance
- Management Essentials
- Negotiation Mastery
- Organizational Leadership
- Power and Influence for Positive Impact
- Strategy Execution
- Sustainable Business Strategy
- Sustainable Investing
- Winning with Digital Platforms
17 Data Visualization Techniques All Professionals Should Know

- 17 Sep 2019
There’s a growing demand for business analytics and data expertise in the workforce. But you don’t need to be a professional analyst to benefit from data-related skills.
Becoming skilled at common data visualization techniques can help you reap the rewards of data-driven decision-making , including increased confidence and potential cost savings. Learning how to effectively visualize data could be the first step toward using data analytics and data science to your advantage to add value to your organization.
Several data visualization techniques can help you become more effective in your role. Here are 17 essential data visualization techniques all professionals should know, as well as tips to help you effectively present your data.
Access your free e-book today.
What Is Data Visualization?
Data visualization is the process of creating graphical representations of information. This process helps the presenter communicate data in a way that’s easy for the viewer to interpret and draw conclusions.
There are many different techniques and tools you can leverage to visualize data, so you want to know which ones to use and when. Here are some of the most important data visualization techniques all professionals should know.
Data Visualization Techniques
The type of data visualization technique you leverage will vary based on the type of data you’re working with, in addition to the story you’re telling with your data .
Here are some important data visualization techniques to know:
- Gantt Chart
- Box and Whisker Plot
- Waterfall Chart
- Scatter Plot
- Pictogram Chart
- Highlight Table
- Bullet Graph
- Choropleth Map
- Network Diagram
- Correlation Matrices
1. Pie Chart

Pie charts are one of the most common and basic data visualization techniques, used across a wide range of applications. Pie charts are ideal for illustrating proportions, or part-to-whole comparisons.
Because pie charts are relatively simple and easy to read, they’re best suited for audiences who might be unfamiliar with the information or are only interested in the key takeaways. For viewers who require a more thorough explanation of the data, pie charts fall short in their ability to display complex information.
2. Bar Chart

The classic bar chart , or bar graph, is another common and easy-to-use method of data visualization. In this type of visualization, one axis of the chart shows the categories being compared, and the other, a measured value. The length of the bar indicates how each group measures according to the value.
One drawback is that labeling and clarity can become problematic when there are too many categories included. Like pie charts, they can also be too simple for more complex data sets.
3. Histogram

Unlike bar charts, histograms illustrate the distribution of data over a continuous interval or defined period. These visualizations are helpful in identifying where values are concentrated, as well as where there are gaps or unusual values.
Histograms are especially useful for showing the frequency of a particular occurrence. For instance, if you’d like to show how many clicks your website received each day over the last week, you can use a histogram. From this visualization, you can quickly determine which days your website saw the greatest and fewest number of clicks.
4. Gantt Chart

Gantt charts are particularly common in project management, as they’re useful in illustrating a project timeline or progression of tasks. In this type of chart, tasks to be performed are listed on the vertical axis and time intervals on the horizontal axis. Horizontal bars in the body of the chart represent the duration of each activity.
Utilizing Gantt charts to display timelines can be incredibly helpful, and enable team members to keep track of every aspect of a project. Even if you’re not a project management professional, familiarizing yourself with Gantt charts can help you stay organized.
5. Heat Map

A heat map is a type of visualization used to show differences in data through variations in color. These charts use color to communicate values in a way that makes it easy for the viewer to quickly identify trends. Having a clear legend is necessary in order for a user to successfully read and interpret a heatmap.
There are many possible applications of heat maps. For example, if you want to analyze which time of day a retail store makes the most sales, you can use a heat map that shows the day of the week on the vertical axis and time of day on the horizontal axis. Then, by shading in the matrix with colors that correspond to the number of sales at each time of day, you can identify trends in the data that allow you to determine the exact times your store experiences the most sales.
6. A Box and Whisker Plot

A box and whisker plot , or box plot, provides a visual summary of data through its quartiles. First, a box is drawn from the first quartile to the third of the data set. A line within the box represents the median. “Whiskers,” or lines, are then drawn extending from the box to the minimum (lower extreme) and maximum (upper extreme). Outliers are represented by individual points that are in-line with the whiskers.
This type of chart is helpful in quickly identifying whether or not the data is symmetrical or skewed, as well as providing a visual summary of the data set that can be easily interpreted.
7. Waterfall Chart

A waterfall chart is a visual representation that illustrates how a value changes as it’s influenced by different factors, such as time. The main goal of this chart is to show the viewer how a value has grown or declined over a defined period. For example, waterfall charts are popular for showing spending or earnings over time.
8. Area Chart

An area chart , or area graph, is a variation on a basic line graph in which the area underneath the line is shaded to represent the total value of each data point. When several data series must be compared on the same graph, stacked area charts are used.
This method of data visualization is useful for showing changes in one or more quantities over time, as well as showing how each quantity combines to make up the whole. Stacked area charts are effective in showing part-to-whole comparisons.
9. Scatter Plot

Another technique commonly used to display data is a scatter plot . A scatter plot displays data for two variables as represented by points plotted against the horizontal and vertical axis. This type of data visualization is useful in illustrating the relationships that exist between variables and can be used to identify trends or correlations in data.
Scatter plots are most effective for fairly large data sets, since it’s often easier to identify trends when there are more data points present. Additionally, the closer the data points are grouped together, the stronger the correlation or trend tends to be.
10. Pictogram Chart

Pictogram charts , or pictograph charts, are particularly useful for presenting simple data in a more visual and engaging way. These charts use icons to visualize data, with each icon representing a different value or category. For example, data about time might be represented by icons of clocks or watches. Each icon can correspond to either a single unit or a set number of units (for example, each icon represents 100 units).
In addition to making the data more engaging, pictogram charts are helpful in situations where language or cultural differences might be a barrier to the audience’s understanding of the data.
11. Timeline

Timelines are the most effective way to visualize a sequence of events in chronological order. They’re typically linear, with key events outlined along the axis. Timelines are used to communicate time-related information and display historical data.
Timelines allow you to highlight the most important events that occurred, or need to occur in the future, and make it easy for the viewer to identify any patterns appearing within the selected time period. While timelines are often relatively simple linear visualizations, they can be made more visually appealing by adding images, colors, fonts, and decorative shapes.
12. Highlight Table

A highlight table is a more engaging alternative to traditional tables. By highlighting cells in the table with color, you can make it easier for viewers to quickly spot trends and patterns in the data. These visualizations are useful for comparing categorical data.
Depending on the data visualization tool you’re using, you may be able to add conditional formatting rules to the table that automatically color cells that meet specified conditions. For instance, when using a highlight table to visualize a company’s sales data, you may color cells red if the sales data is below the goal, or green if sales were above the goal. Unlike a heat map, the colors in a highlight table are discrete and represent a single meaning or value.
13. Bullet Graph

A bullet graph is a variation of a bar graph that can act as an alternative to dashboard gauges to represent performance data. The main use for a bullet graph is to inform the viewer of how a business is performing in comparison to benchmarks that are in place for key business metrics.
In a bullet graph, the darker horizontal bar in the middle of the chart represents the actual value, while the vertical line represents a comparative value, or target. If the horizontal bar passes the vertical line, the target for that metric has been surpassed. Additionally, the segmented colored sections behind the horizontal bar represent range scores, such as “poor,” “fair,” or “good.”
14. Choropleth Maps

A choropleth map uses color, shading, and other patterns to visualize numerical values across geographic regions. These visualizations use a progression of color (or shading) on a spectrum to distinguish high values from low.
Choropleth maps allow viewers to see how a variable changes from one region to the next. A potential downside to this type of visualization is that the exact numerical values aren’t easily accessible because the colors represent a range of values. Some data visualization tools, however, allow you to add interactivity to your map so the exact values are accessible.
15. Word Cloud

A word cloud , or tag cloud, is a visual representation of text data in which the size of the word is proportional to its frequency. The more often a specific word appears in a dataset, the larger it appears in the visualization. In addition to size, words often appear bolder or follow a specific color scheme depending on their frequency.
Word clouds are often used on websites and blogs to identify significant keywords and compare differences in textual data between two sources. They are also useful when analyzing qualitative datasets, such as the specific words consumers used to describe a product.
16. Network Diagram

Network diagrams are a type of data visualization that represent relationships between qualitative data points. These visualizations are composed of nodes and links, also called edges. Nodes are singular data points that are connected to other nodes through edges, which show the relationship between multiple nodes.
There are many use cases for network diagrams, including depicting social networks, highlighting the relationships between employees at an organization, or visualizing product sales across geographic regions.
17. Correlation Matrix

A correlation matrix is a table that shows correlation coefficients between variables. Each cell represents the relationship between two variables, and a color scale is used to communicate whether the variables are correlated and to what extent.
Correlation matrices are useful to summarize and find patterns in large data sets. In business, a correlation matrix might be used to analyze how different data points about a specific product might be related, such as price, advertising spend, launch date, etc.
Other Data Visualization Options
While the examples listed above are some of the most commonly used techniques, there are many other ways you can visualize data to become a more effective communicator. Some other data visualization options include:
- Bubble clouds
- Circle views
- Dendrograms
- Dot distribution maps
- Open-high-low-close charts
- Polar areas
- Radial trees
- Ring Charts
- Sankey diagram
- Span charts
- Streamgraphs
- Wedge stack graphs
- Violin plots

Tips For Creating Effective Visualizations
Creating effective data visualizations requires more than just knowing how to choose the best technique for your needs. There are several considerations you should take into account to maximize your effectiveness when it comes to presenting data.
Related : What to Keep in Mind When Creating Data Visualizations in Excel
One of the most important steps is to evaluate your audience. For example, if you’re presenting financial data to a team that works in an unrelated department, you’ll want to choose a fairly simple illustration. On the other hand, if you’re presenting financial data to a team of finance experts, it’s likely you can safely include more complex information.
Another helpful tip is to avoid unnecessary distractions. Although visual elements like animation can be a great way to add interest, they can also distract from the key points the illustration is trying to convey and hinder the viewer’s ability to quickly understand the information.
Finally, be mindful of the colors you utilize, as well as your overall design. While it’s important that your graphs or charts are visually appealing, there are more practical reasons you might choose one color palette over another. For instance, using low contrast colors can make it difficult for your audience to discern differences between data points. Using colors that are too bold, however, can make the illustration overwhelming or distracting for the viewer.
Related : Bad Data Visualization: 5 Examples of Misleading Data
Visuals to Interpret and Share Information
No matter your role or title within an organization, data visualization is a skill that’s important for all professionals. Being able to effectively present complex data through easy-to-understand visual representations is invaluable when it comes to communicating information with members both inside and outside your business.
There’s no shortage in how data visualization can be applied in the real world. Data is playing an increasingly important role in the marketplace today, and data literacy is the first step in understanding how analytics can be used in business.
Are you interested in improving your analytical skills? Learn more about Business Analytics , our eight-week online course that can help you use data to generate insights and tackle business decisions.
This post was updated on January 20, 2022. It was originally published on September 17, 2019.

About the Author
Table of Contents
Ai, ethics & human agency, collaboration, information literacy, writing process, charts, figures, graphs, tables.
- © 2023 by Joseph M. Moxley - University of South Florida

Charts and graphs are methods of data visualization:
- Tables plot data or information in rows and columns
- Charts, Figures, and Graphs visually represent data or information. Common examples of charts include pie charts, bar charts, and line charts
Key Concepts: Text & Intertextuality ; Design
Tables and graphs enable you to reach visual learners. When you select information for graphical representation, you are highlighting its significance. In some disciplines, particularly the sciences, readers expect authors to condense complicated information into charts and graphs. Many readers will scan a document’s charts, tables, and graphs before reading any text.
Today’s modern word processors offer powerful tools for developing attractive charts and graphs.
Use Charts and Graphs to Emphasize Important Information
Graphs and tables can be used to emphasize important information. For example, in a report on population growth, you could explain that according to the United Nations, the rate of population growth has decreased since the 1970s. Worried that you are luring your readers into a false sense of security, you could nonetheless report that by 2030 the world population may expand from 6 to 8 billion. In contrast, though, imagine a visual that represents this trend–i.e., declining birth rates in contrast to the percentage increase of the world population:
Organizational Charts

Use charts to clarify complicated points, to emphasize significant results, and to offer a shorthand version of the gist of the information you are reporting. For example, Michael Bain uses the following visual to clarify his purpose and give his readers a visual way to read his text, How MP3 Players Work

Comparison Charts
Charts can be used to illustrate key points. For example, in Fatality Facts: Teenagers as of 2001, the Insurance Institute for Highway Safety provides a graph that summarizes the gist of its report:
“Teenagers drive less than all but the oldest people, but their numbers of crashes and crash deaths are disproportionately high.”
Beneath the above graph, the Insurance Institute for Highway Safety provides a link to the plot points so that viewers can see exactly what numbers are illustrated in the graph. They also provide a detailed narrative discussion of the results and enable users to select tables that pop open the results presented in table formats.

Recommended Readings
- Figures and Charts
- Review of Best Practices in Data Visualization

Brevity - Say More with Less

Clarity (in Speech and Writing)

Coherence - How to Achieve Coherence in Writing

Flow - How to Create Flow in Writing

Inclusivity - Inclusive Language

The Elements of Style - The DNA of Powerful Writing

Suggested Edits
- Please select the purpose of your message. * - Corrections, Typos, or Edits Technical Support/Problems using the site Advertising with Writing Commons Copyright Issues I am contacting you about something else
- Your full name
- Your email address *
- Page URL needing edits *
- Name This field is for validation purposes and should be left unchanged.
Other Topics:

Citation - Definition - Introduction to Citation in Academic & Professional Writing
- Joseph M. Moxley
Explore the different ways to cite sources in academic and professional writing, including in-text (Parenthetical), numerical, and note citations.

Collaboration - What is the Role of Collaboration in Academic & Professional Writing?
Collaboration refers to the act of working with others or AI to solve problems, coauthor texts, and develop products and services. Collaboration is a highly prized workplace competency in academic...

Genre may reference a type of writing, art, or musical composition; socially-agreed upon expectations about how writers and speakers should respond to particular rhetorical situations; the cultural values; the epistemological assumptions...

Grammar refers to the rules that inform how people and discourse communities use language (e.g., written or spoken English, body language, or visual language) to communicate. Learn about the rhetorical...

Information Literacy - Discerning Quality Information from Noise
Information Literacy refers to the competencies associated with locating, evaluating, using, and archiving information. In order to thrive, much less survive in a global information economy — an economy where information functions as a...

Mindset refers to a person or community’s way of feeling, thinking, and acting about a topic. The mindsets you hold, consciously or subconsciously, shape how you feel, think, and act–and...

Rhetoric: Exploring Its Definition and Impact on Modern Communication
Learn about rhetoric and rhetorical practices (e.g., rhetorical analysis, rhetorical reasoning, rhetorical situation, and rhetorical stance) so that you can strategically manage how you compose and subsequently produce a text...

Style, most simply, refers to how you say something as opposed to what you say. The style of your writing matters because audiences are unlikely to read your work or...

The Writing Process - Research on Composing
The writing process refers to everything you do in order to complete a writing project. Over the last six decades, researchers have studied and theorized about how writers go about...

Writing Studies
Writing studies refers to an interdisciplinary community of scholars and researchers who study writing. Writing studies also refers to an academic, interdisciplinary discipline – a subject of study. Students in...
Featured Articles

Academic Writing – How to Write for the Academic Community

Professional Writing – How to Write for the Professional World

Credibility & Authority – How to Be Credible & Authoritative in Speech & Writing
IMAGES
VIDEO
COMMENTS
The best visuals balance the use of thoughtful images and words, and the best writing balances thorough explanation and visualization. Writers that use visuals to describe their ideas help their readers better understand the frameworks of thinking that inform what the writer is seeking to convey, and they make it easier for readers to share ...
Outlining throughout the writing process; Download Video Transcripts. Video 1: The Purpose of Outlining: Creating a Visual Representation of a Text. ... You will then share the outlines with other teams, and review and evaluate each outline's effectiveness as a visual representation of the reading material.
The phrase "graphic organizer" is just a fancy way of saying "diagram" or "visual aid.". Basically, they are a visual representation of the information you've acquired in the research process. There are quite a few reasons why you should use them when writing essays or summaries. Helps you visualize your research and how elements ...
Outlining throughout the writing process Video 1: The Purpose of Outlining: Creating a Visual Representation of a Text One of the benefits of creating an outline is that it gives you a visual representation of the ideas contained within a text. At a glance, you can see from an outline which ideas are most central
Exercise 1: Creating Visual Schema for Texts. Students create a list of best practices for understanding a text and then apply these strategies to a challenging text to represent it visually for an audience that is interested in but unfamiliar with it. This exercise helps students to better understand a challenging text by simplifying its ...
What is Data Visualization? Data visualization refers to the practice of transforming information/data into visual representations to simplify and communicate complex information clearly and effectively. Designers strategically use colors, shapes, and symbols to bridge the gap between raw data and human understanding, empowering viewers to ...
Because they highlight the passage of time, timelines and flow charts offer a visual representation of how ideas, people, inventions, or processes evolve.Readers can glance at your timeline while reading your story, whether it's about an inventor, or the emergence of a new technology. Use visual brainstorming to develop and organize your ideas.
8.5 The Writing Process: End-of-Chapter Exercises. Chapter 9: Writing Essays: From Start to Finish. 9.2 Writing Body Paragraphs. ... The visual representation on the screen is for support and illustration. Should you need to communicate more technical, complex, or in-depth information in a visual way, consider preparing a handout to distribute ...
Digital Writing 101. WEB RESOURCES - Visual Representation of the Writing Process. (Originally posted on the blog for my section of WRTG 3035: Technical Communication and Design.) I just came across yet another infographic that's relevant to our class. This one uses a comic style to illustrate the many different paths we can take to get ...
writing class, either assessed or non-assessed, as a means to help "jump start" the writing process for your students. In terms of the visual medium as a means to help teach academic writing, I begin by stating that the visual medium has been a staple of the classroom, all classes and all levels, for centuries.
Visual Representation refers to the principles by which markings on a surface are made and interpreted. Designers use representations like typography and illustrations to communicate information, emotions and concepts. Color, imagery, typography and layout are crucial in this communication. Alan Blackwell, cognition scientist and professor ...
Visual representations provide many particular advantages for learning, for example: ... This is true even when people spend the same amount of time semantically elaborating by writing and for both longer and shorter time frames. ... not only is a peer's understanding improved, but also the process of coordinating a drawing with a verbal ...
Download scientific diagram | Visual representation of the writing process (Lonka et al., 2013). from publication: Writing a Doctoral Dissertation: A Qualitative Study of Education Doctoral ...
Furthermore, writing often involves translating mental visual and spatial representations into text, and written text can be represented in visual-spatial forms (Olive & Passerault, 2012). ...
Visual Representation refers to the use of visual elements -- e.g., drawings, graphs, illustrations, tables, or models -- to represent something or someone the use of drawing and diagramming as a way to encourage imaginative thinking. Synonymous Terms Model Blueprint Graph Figure Table Drawing Illustration Related Concepts: Elements of Art; Principles of Design; Visual Literacy
Naturally, having your actions in action while talking makes them appear more visual in the reader's head because you're able to picture them doing the thing. It's a cheap trick, but it works. 3.) Choose visual Locations. Most writers think when writing visually, they need the right wording.
A visual representation of the model using the Snake and Ladder board game depicts this connected and non-linear approach to the writing process in a multimedia environment. A computer's multimedia environment, an enlargement of the writing process in French, presents new and innovative potentials for learners and teachers.
Keep reading for our 28 process infographic templates you can customize right now using Venngage's intuitive online tool. 1. Use a circle layout to show a cyclical process. If you have a process that repeats, or one that involves regular iteration and improvement, then a circle infographic layout can work well.
Visual Brainstorming is. the process of using elements of visual language to develop, organize, and communicate ideas. V isual language refers to a writers', speakers', knowledge workers' . . . use of design elements, design principles, design tools, and data visualization methods to draft ideas for a text.
Writing is a visual representation of speech and, quite recently, of sign language. There are three basic types of writing; each shows a different intimacy to language. Logographic writing uses symbols that represent whole words or morphemes. The same logogram, having the same meaning, could be pronounced entirely differently in different ...
Data visualization is the process of creating graphical representations of information. This process helps the presenter communicate data in a way that's easy for the viewer to interpret and draw conclusions. There are many different techniques and tools you can leverage to visualize data, so you want to know which ones to use and when. Here ...
Darrel is writing a report about how a bill becomes a law in the United States Congress. One of the requirements of the assignment is that he create a visual representation of the process, such as a diagram or a flow chart. Which word-processing tools would Darrel use to best create this visual representation?
Charts and graphs are methods of data visualization: Tables plot data or information in rows and columns. Charts, Figures, and Graphs visually represent data or information. Common examples of charts include pie charts, bar charts, and line charts. Key Concepts: Text & Intertextuality; Design. Tables and graphs enable you to reach visual learners.