
MLA 9th Edition Formatting
A Simple, Step-by-Step Guide + Free Template
By: Derek Jansen (MBA) | Reviewer: Eunice Rautenbach (DTech) | July 2023
Formatting your paper in MLA style can feel like a pretty daunting task . In this post, we’ll show you exactly how to set up your paper for MLA (9th edition), as quickly and easily as possible. We’ll also share our popular free MLA template , to help you fast-track your writing.
Overview: MLA 9th Edition Formatting
- Structure and layout
- General page setup
- The opening section
- The main body
- Works cited (reference list)
- Free MLA 9 template
MLA Structure and Layout
Let’s start by looking at the overall structure of a typical student paper formatted for MLA 9th edition, before diving into the details of each section. For the most part, MLA papers follow a standardised structure, consisting of the following parts:
The opening section : While MLA doesn’t require a dedicated title page (unlike APA ), it does require an opening section that details some important information about yourself, your university and the paper itself.
The main body : The main body begins directly after the opening section on the first page. This is the “heart” of your paper and there are a very specific requirements regarding how you present and format this content.
The appendix (or appendices): While using an appendix in a student paper is relatively uncommon, you’ll place this section directly after the main body section, if required by your university.
The “Works Cited” list : This section is equivalent to what we’d usually call a references page and it’s where you’ll detail all the reference information corresponding to the in-text citations in the main body of your paper.
These four sections form the standard structure and order of a student paper using MLA 9th edition. As we mentioned, not all sections are always required , so be sure to double check what your university expects from you before submitting. Also, it’s always a good idea to ask your university if they have any style requirements in addition to the standard MLA specification.
Now that we’ve got a big-picture view of the typical paper structure, let’s look at the specific formatting requirements for each of these sections.
Generic Page Setup
Before you jump into writing up your paper, you’ll first need to set up your document to align with MLA’s generic page requirements. Alternatively, you can download our MLA paper template (which comes fully preformatted).
MLA 9th edition requires a 1-inch margin on all sides , for all pages. That said, if you’re writing a dissertation, thesis or any document that will ultimately be printed and bound, your university will likely require a larger left margin to accommodate for physical binding.
Fonts & sizing
MLA does not require that you use any specific font, but we do recommend sticking to the tried and tested , well-accepted fonts. For example, you might consider using one of the following:
- Sans serif fonts : Calibri (11), Arial (11), or Lucida Sans Unicode (10)
- Serif fonts : Times New Roman (12), Georgia (11), or Computer Modern (10)
Whichever font you opt for, be sure to use it consistently throughout your paper . Don’t chop and change, or use different fonts for different parts of the document (e.g., different fonts for the body text and the headings). Also, keep in mind that while MLA does not have a specific font requirement, your university may have its own preference or requirement. So, be sure to check with them beforehand regarding any additional specifications they may have.
In general, all text throughout your document needs to be left-aligned and should not be justified (i.e., leave an uneven right edge). You might consider using a different alignment for section headings, but in general, it’s best to keep things simple .
Line spacing
MLA 9th edition requires double line spacing throughout the document . There should also be no extra space before and after paragraphs . This applies to all sections of the paper, including the “Works Cited” page (more on this later).
Page header
Last but not least, you’ll need to set up a running header for your document. This should contain your last name, followed by the page number. Both of these should be positioned in the top right corner of all pages (even the first page). On a related note, there’s no need for you to include any footer content unless your university specifically requests it.
Now that we’ve looked at the generic formatting considerations, let’s dive into the specific requirements for each section of your paper.
The Opening Section
While MLA-formatted papers typically don’t require a title page, there are very specific requirements regarding the opening section of the first page .
Here’s how you can set your first page up for MLA 9th edition.
- On the first line, write your full name (flush left)
- On a new line, write your professor or instructor’s full name
- On a new line, write the course code and course name
- On a new line, write the full date spelt out (e.g., 15 June 2023)
- On a new line, write the full title of your paper , centre-aligned and using title case (consider using a title case converter if you’re not familiar with this)
- On a new line, begin your body content
All of the above should be in plain, unformatted font – in other words, you don’t need to apply any boldfacing, underlining , etc. That said, you should use italics whenever you’re writing out the titles of other works (for example, titles of books or articles).
To make it all a little more tangible, below is an example of a first page formatted according to the MLA specifications that we just covered.

The Main Body
While the formatting requirements for the body section are relatively light for MLA (at least when compared to APA ), there are still quite a few important things to pay attention to. Here’s what you need to know to get started.
Each of your paragraphs needs to start on a new line , and the first sentence of each paragraph requires a half-inch indent (while the rest of the paragraph is flush left aligned). Note that each paragraph simply starts on a new line and doesn’t require an additional blank line.
MLA 9th edition is fairly flexible in terms of heading formatting. There is no specified formatting, so you can decide what works best for you. However, there are still a few basic rules you need to follow:
- All your headings should be written in title case – never use all caps
- There should be no period following a heading
- Each heading level needs to be uniquely formatted and easily distinguishable from other levels (for example, a distinct difference in terms of boldfacing, underlining or italicisation)
- You can have as many heading levels as you need, but each level must have at least two instances
Abbreviations
When using abbreviations, you’ll need to make sure that you’re using the MLA version of the abbreviation . Below we’ve listed a few common ones you should be aware of:
- Appendix: app.
- Circa: c. or ca.
- Chapter: ch.
- Column: col.
- Definition: def.
- Department: dept.
- Example: e.g.
- Edition: ed.
- Figure: fig.
- Foreword: fwd.
- That is: i.e.
- Journal: jour.
- Library: lib.
- Manuscript(s): MS
- Number: no.
- Quoted in: qtd. in
- Revised: rev.
- Section: sec. or sect.
- Series: ser.
- Translation: trans.
- Version: vers.
- Variant: var.
- Volume: vol.
If you’re interested, you can find a more comprehensive list here . Alternatively, if you have access to the MLA 9th edition handbook, you can find the full list in the first appendix.

In-text citations
MLA 9 has a very specific set of requirements regarding how to cite your sources within the body of your paper. Here are some of the most important things to help you get started with MLA citations.
Author-page number system: in-text citations consist of (at a minimum) the lead author’s last name, followed by the page number of the paragraph you are citing. There is no comma between the two components (only a space).
Types of citations: MLA allows two types of in-text citations: parenthetical and narrative . Parenthetical citations feature the author and page number in parentheses (brackets) at the end of the respective sentence. Here’s an example:
MLA 9th edition is easy to grasp if you visit the Grad Coach blog (Jansen 13).
Narrative citations, on the other hand, weave the author’s name into the flow of the sentence and then present the publication date in parentheses at the end of the sentence. Here’s an example:
Jansen states that MLA 9th edition is easy for students to grasp if they visit the Grad Coach blog (13).
In general, it’s a good idea to utilise a mix of both in your writing. Narrative citations are particularly useful when you want to highlight or contrast authors or their viewpoints, while parenthetical citations are useful when you want to strengthen your own academic voice. In other words, both formats have their respective strengths and weaknesses, so try to use citation format strategically in your writing.
Quotations: when quoting text verbatim from a source, there is no need to do anything differently in terms of the citation itself, but do remember to wrap the verbatim text in quotation marks. Here’s an example:
Jansen proposes that MLA 9th edition is “easy to grasp if you visit the Grad Coach blog” (13).
Multiple authors: when citing resources that were authored by three or more people, you only need to list the lead author, followed by “et al.”. Here’s an example:
MLA 9th edition is easy to grasp if you visit the Grad Coach blog (Jansen et al. 13).
Below are a few more examples from our free MLA template .

Please keep in mind that this is not an exhaustive list of all the MLA 9th edition citation-related requirements – just a shortlist of the most commonly relevant ones. If you’d like to learn more, consult the MLA handbook .
The Works Cited (Reference List)
The final section that you’ll need to pay close attention to is the “Works Cited” page, which should contain a list of reference information for all the sources cited in the body of the paper. Again, MLA has a quite a meaty set of specifications regarding the content and formatting of this list, but we’ll cover the basics here to get your started on the right foot.
Basic setup
Your reference list needs to start on a new page and should be titled “Works Cited”. The title should be unformatted and centred . The reference list should then start on the next line. As with the rest of your document, you should use double line spacing throughout.
When it comes to the reference list itself, you’ll need to keep the following in mind:
- All the sources that you cited in the body of your document should feature in the reference list. Make sure that every citation is accounted for .
- The references should be ordered alphabetically , according to the lead author’s last name .
- The exact information required within each entry depends on the type of content being referenced (e.g., a journal article, web page, etc.)
- Components that may need to feature (other than the author) include the title of the source, the title of the container, other contributors, the article version or number, the publisher, the publication date, and the location.
- All references should be left-aligned and should use a hanging indent – i.e., the second line of any given reference (if it has one) should be indented a half inch.
We have to stress that these are just the basics. MLA 9th edition requires that your references be structured and formatted in a very specific way , depending on the type of resource. If you plan to draft your reference list manually, it’s important to consult your university’s style guide or the MLA manual itself. This leads us to our next point…
In general, it’s a bad idea to write your reference list manually . Given the incredibly high level of intricacy involved, it’s highly likely that you’ll make mistakes if you try to craft this section yourself. A better solution is to use (free) reference management software such as Mendeley or Zotero . Either of these will take care of the formatting and content for you, and they’ll do a much more accurate job of it too.
If you’re not familiar with any sort of reference management software, be sure to check out our easy-to-follow Mendeley explainer video below.
Wrapping Up
In this post, we’ve provided a primer covering how to format your paper according to MLA 9th edition. To recap, we’ve looked at the following:
- The structure and layout
- The general page setup
- The “Works Cited” page (reference list)
Remember to always check your university’s style guide to familiarise yourself with any additional requirements they may. Also, if your university has specified anything that contrasts what we’ve discussed here, please do follow their guidance .
If you need any help formatting your paper for MLA 9, take a look at our “done for you” language editing and proofreading service . Simply send us your document and we’ll take care of all the MLA formatting intracies on your behalf.
You Might Also Like:

Very well recounted!
Submit a Comment Cancel reply
Your email address will not be published. Required fields are marked *
Save my name, email, and website in this browser for the next time I comment.
- Print Friendly
Stay in touch
BeeStudent.com provides professional, original and high-quality assignment writing services that are aimed at helping students with their research and writing needs.
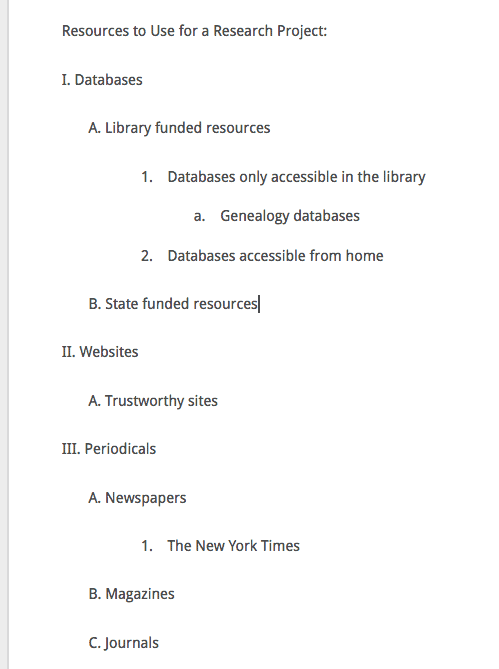
How to Write an Outline of a Research Paper in MLA Style
Table of contents
- 1.1 Thesis Statement of Research MLA Paper Outline
- 1.2 Headings and Subheadings of Research MLA Paper Outline
- 1.3 Time and Date
- 1.4 Alphanumeric Format
- 2.1 Choose a Topic and Define Your Thesis Statement
- 2.2 Determine Main Headings Based on Key Points of Your Research
- 2.3 Use Roman numerals (I, II, III) for Main Headings
- 2.4 Identify Sub-Points for Each Main Heading
- 2.5 Use Capital Letters (A, B, C) For Subheadings
- 2.6 Provide Additional Details or Supporting Points for Sub-Points
- 2.7 Use Arabic numerals (1, 2, 3) for detailed points
- 2.8 Use Consistent Punctuation and Parallel Structure for All Points
- 2.9 The Templates of MLA Research Paper Outline
- 2.10 Alphanumeric outline example
- 2.11 Decimal outline example
- 2.12 Checklist of a Good MLA Outline for a Research Paper
- 3 Prepare For Easy Writing
- We will explore the essential features that make for a great MLA outline.
- We will walk you through the process of drafting your paper, outlining the necessary components and steps.
- You’ll learn how to organize your paragraphs and sections and structure your work.
- After reading this article, you’ll better understand how your outline can help you compose an outstanding research paper in MLA format.
Let’s now look into the features of MLA style outline and discuss how you can write yours.
Key Components of an MLA Outline
Every MLA outline requires certain components. If you begin with these key components in mind, you will be done in no time. Let’s discuss what should be included in your MLA outline.
Thesis Statement of Research MLA Paper Outline
Before you even start with the MLA paper, you need to write a thesis. It is important for any paper, and it is essential. It goes before the research paper outline and explains the paper, the ideas, and the main elements you will use. It should be 6–7 lines, but you can shorten it. You can proceed to the research paper outline once you have them. It is essential to add that the thesis is not an introduction for an MLA-style outline, essay, or anything similar. Rather, it is a summary that explains the point of your paper.
Headings and Subheadings of Research MLA Paper Outline
Now, you will have to organize the ideas you will use. In simple terms, do not use vague or unimportant pieces of information. You will create headings, and then you will create subheadings. A structured research paper outline will have as many headings/subheadings as you need to explain the topic in detail.
MLA format may be beneficial in this case scenario. An outline in MLA format should present all main ideas. The goal is to stay accurate and detailed but not extreme. Remember to use Times New Roman as it is the standard for an MLA research paper.
Creating an MLA outline for a research paper is essential to writing. An outline helps to ensure that your work remains focused and organized throughout the writing process. If you struggle to create an outline, an online paper writer can help you create a comprehensive, and effective one.
Time and Date
In an MLA research paper outline, you typically do not include specific dates or times as part of the outline structure. The primary purpose of an outline in MLA format is to organize the content of your paper into a hierarchical structure with headings and subheadings
You may include dates or times within the body of your research paper when discussing events, studies, or historical context relevant to your topic. However, these should be incorporated within the paragraphs and not as part of the outline itself.
Here’s an example of how you might incorporate a date within the body of your paper:
- Background and Historical Context
- Early Developments in the Field (Late 19th Century)
Alphanumeric Format
An alphanumeric system is required for MLA format. It involves alternating between alphabets and numerals, depending on the sections. You may have to use Roman or Arabic numerals and upper or lower case letters.
Step-by-Step Guide to Writing an MLA Research Paper Outline
If you are still lost on how to write an outline in MLA format, there is no need to worry. We have provided MLA guidelines and rules for writing a research paper . The steps below will provide a guide to structuring your paper.
Choose a Topic and Define Your Thesis Statement
Consider the assignment requirements and pick a topic that interests you. Ensure the scope is neither too broad nor narrow; you can ask your professor for guidance.
Once your topic has been finalized, the next step to beginning your MLA format outline for speech is to define your thesis statement. You do not have to get it right the first time. Instead, see it as a preliminary to help you structure your assignment. You can adjust it to suit your preferences while drafting your MLA outline format.
Determine Main Headings Based on Key Points of Your Research
Your main headings should reflect the main scope of your MLA format research paper. You can outline these headings by looking at the key points of your paper. Other sublevel headings can signal the scope of the main headings.
Use Roman numerals (I, II, III) for Main Headings
Differentiate the main headings in your paper from other headings using Roman numerals in front.
Identify Sub-Points for Each Main Heading
The sub-points of the main headings in an MLA outline sample are necessary for determining other headings. An example of this importance is the sublevel headings these points will represent.
Use Capital Letters (A, B, C) For Subheadings
The MLA outline for your research paper requires subheadings. You should always present these sublevel headings in capitals to emphasize them in the assignment.
Provide Additional Details or Supporting Points for Sub-Points
Your research outline should include additional details with MLA formatting. These details should serve as supporting sentences for the sub-points you identified for each heading.
Use Arabic numerals (1, 2, 3) for detailed points
Structure the detailed points with Arabic numerals to differentiate them from other information in the outline.
Use Consistent Punctuation and Parallel Structure for All Points
When using the MLA style outline for your research paper, ensure all points in the outline are properly punctuated and formatted with the right structure.
The Templates of MLA Research Paper Outline
Since you now have an appreciable knowledge of how to structure a research paper, here are a few MLA format outline examples.
Alphanumeric outline example

Decimal outline example

Checklist of a Good MLA Outline for a Research Paper
The MLA format outline of every good research paper should follow a certain structure. An example of the ideal research paper layout contains all the necessary details. Drafting with a checklist would help ensure its structure follows the standard procedure. The best way to avoid skipping any of these details is a checklist. You can cross all the items and headings off your list once you have added them to the MLA format outline for your research paper. Use the checklist below to vet your work.
- The topic meets the assignment requirements.
- The entire text in the MLA outline follows the right format.
- The correct alphanumeric structure is used for the outline (e.g., I, II, III for main headings; A, B, C for subheadings; 1, 2, 3 for details).
- Parallel structure is used for all points (e.g., if using verbs, they are in the same tense and form).
- Double-spaced with a legible font (usually Times New Roman), 12-point size.
- The MLA research paper outlines One-inch margins on all sides.
- Header with page numbers in the upper-right corner.
- Points are organized logically, progressing from general to specific.
- Main headings correspond to main ideas/sections.
- The writer’s name, instructor’s name, course, and date are listed on separate lines (double-spaced) below the title.
Prepare For Easy Writing
It is necessary to draft a research paper outline before you begin writing in MLA format. This simple task would provide a foundation and guide you as you tackle your assignment. The basic sections of your outline are the introduction, body, and conclusion, so work your way around these, and you’ll be done in no time. Remember to select the appropriate MLA edition for your paper and read its manual before starting the outline. You should check out our MLA paper outline template for an idea of what is expected of you.
What is an MLA outline?
An outline in MLA format is precise as you think. It is a plan you will use to write the assignment. It consists of the headings, subheadings, and ideas you will have to use. Basically, this is a path you will take while writing, and it will reflect how your complete task will look at the end.
According to the modern language association, this is mandatory, and something all of you need to complete first. It eliminates mistakes and makes the whole task easier. Now you have a plan. You may want to follow these steps here and get the job done in less time and expect a better grade.
How to write an outline for a research paper MLA?
You will have to start by explaining the main idea of your essay. Then you will start with defining the headings. Add all the subheadings now and try to focus each one on an important part of the writing. Each one should explain the idea. This is the guide on what you will write later on. The idea must be relevant, accurate, and simple if possible. Do not use ideas that are inaccurate, have flaws, or are completely irrelevant to the essay. These can make a reader get bored and not interested.
When does the page numbering of the MLA research title page begin?
It should start with the first page. It always uses Arabic numbers, and all pages should be numbered. The numbers will have to be present in the upper right corner of the page, and there are no exceptions. The only expectation is that some professors will ask you not to number the first page. If that is mandatory, you will start from the second page using number 2 and move on. Numbers must be 0.5 inches from the top, and they must be flush with the proper margin.
How to set the outline of a research paper in MLA Style in Google Docs?
Formatting your research in this case scenario is simple. You will have to start a new document and click on the file/new/template. From there, you will have to search for the MLA template and open it when you find it. Then start with the main idea at the top. You will now have to write the headings followed by or containing the subheadings.
As you can see, the whole process is super easy and far easier than when using other platforms. There is no need to adjust all the settings and optimize the content manually. Keep in mind that you should use font sizes 12, 11.5, or 11.
How to set the outline of a research paper in MLA style in Word?
To start with your research paper outline in Word, start a new document. Click on no spacing and choose font and size. Write the main idea. Click on multi-level numbering and define multiple-level numbering then. Change the values. They should be A., I., 1. and so on (enter formatting for number). Choose the number style for this number in I, II, III for the first level, A, B, C for the third level, and 1, 2, 3 for the third level. Now you can start writing.
Readers also enjoyed

WHY WAIT? PLACE AN ORDER RIGHT NOW!
Just fill out the form, press the button, and have no worries!
We use cookies to give you the best experience possible. By continuing we’ll assume you board with our cookie policy.

Formatting and Outlining in MLA: Outlining in MLA
- Outlining in MLA
Developing an Outline
Purdue's OnlIne Writing Lab recommendations for developing an outline
Using Word to Create an Outline in MLA
Sample Outline

- << Previous: Home
- Last Updated: Aug 14, 2020 9:41 AM
- URL: https://uhigh-ilstu.libguides.com/mla_format
Using MLA Format

Document Sources
Works cited quick guide.
Learn how to use the MLA format template.
Digital Citation Tool
Build citations with our interactive template.
In-Text Citations
Get help with in-text citations.
Endnotes and Footnotes
Read our guide about using notes in MLA style.

Set Up Your Paper
Setting up a research paper.
Get our guidelines for setting up academic research papers.
Formatting Captions
Learn how to format captions.
Sample Papers
Read sample papers written in MLA style.
Annotated Bibliographies
Learn how to set up an annotated bibliography.

Get Writing and Teaching Tips
Ask the mla.
Browse answers and ask MLA editors questions.
Writing Tips
Improve your writing with these suggestions.
Teaching Resources and Advice
Get teaching advice, lesson plans, and activities.
Test your knowledge with these fun quizzes.
Recent questions from Ask the MLA
How do i alphabetize a works-cited-list entry that begins with a hashtag or another symbol.
The MLA recommends that writers should “ignore symbols when alphabetizing” (“How”). This includes hashtags. Thus, if an entry begins with a hashtag or another symbol,… Read More
How do I cite a work accessed through Wayback Machine ?
Wayback Machine is an archive of websites that lives on the Internet Archive ’s site, so you would treat the Internet Archive as the container of… Read More
How do I style the title of a fairy tale?
Fairy tales are typically enclosed in quotation marks, in the style of other short-form works. Some people may not know that Disney’s 1989 film The … Read More
How do I cite an anonymously translated poem?
If a translator’s name is not provided in the source, then skip that element in your works-cited-list entry. Follow the MLA template of core elements,… Read More
How do I cite a work that has incorrect citation information on its cover sheet?
Some works, especially works contained in databases, may list citation information for the work on a cover sheet or in a footer. If that citation… Read More
How do I cite Twitter now that its name has changed to X?
In 2023 the social media platform Twitter changed its name to X . What does this change mean for citations? When you cite a post published… Read More
How to Write an Essay Outline with MLA and APA Styles

Got a great essay idea, but feel like sorting out your thoughts is as tough as untying knotted headphones from your backpack? No worries! We've all felt that way.
Whether you're staring down a blank page or drowning in a sea of scattered thoughts, we've got your back. In this article, we're going to break down the writing process of an essay outline into simple, easy-to-follow steps. Plus, we'll cover specific formatting guidelines for both MLA and APA styles, making sure your essay looks polished and professional.
What Is an Outline?
Let's start from the basics. An essay outline helps you arrange your thoughts and plan your essay before you begin writing. It can be your strategy guide to beat writer's block. Instead of wandering around in your paragraphs, hoping everything falls into place, an outline gives your essay format a clear path.
Here's how it works: You write down your main ideas, arguments, and supporting details in a logical order. This keeps you focused and ensures your essay flows smoothly from start to finish. It also makes writing much easier.
Now, you might wonder, 'Why do I need essay outlines? Can't I just write and see where it goes?' Well, you could, but it's risky. Without a format plan, you might stray off-topic, get lost in unrelated ideas, or end up with a confusing mess that confuses your readers.
So, whether you're writing a persuasive essay, a personal story, or an APA or MLA research paper, a good outline is essential. It saves time and frustration and helps you create a well-organized and clear essay that gets your message across.
Wanting a Perfectly Polished Essay?
Let’s breeze through your writing assignments with ease!
How to Write an Essay Outline in 4 Simple Steps
Now, before you start outlining, let our coursework writing service give you some extra help to begin. Just follow these four steps to create an outline format that makes the rest of your writing easy. These steps break down the process into simple parts, making it easier for you to understand and follow along.
.webp "how to do an essay outline mla format")
Set Your Goal Clearly
When setting your goal, ask yourself: What do I want to achieve with this essay? Is it to convince the reader of a certain viewpoint, educate them on a topic, or perhaps entertain them with a captivating story? Clarifying your goal helps you stay focused throughout the writing process and ensures that every part of your essay works towards achieving that goal.
It's also important to consider your audience and what you aim for them to grasp from reading your essay. For example, if you're working on the Divine Comedy summary , think about whether your audience is familiar with the text or if they're approaching it for the first time. Consider their interests—are they more interested in literary analysis, historical context, or thematic exploration? Additionally, be mindful of any potential biases they might have based on their background or prior knowledge.
Remove Unnecessary Details
In this step, it's time to prioritize and trim down your ideas. Take a close look at all the points you've brainstormed and ask yourself: Which ones are absolutely crucial for supporting my main argument or thesis statement? Anything that doesn't directly contribute to your goal should be cut. This streamlines your essay, keeping it focused and concise. Remember, clarity is key. Readers shouldn't have to sift through irrelevant information to understand your main points. So, be ruthless in eliminating anything that doesn't serve your purpose.
List the Main Ideas for Each Paragraph
Here, you're breaking down your essay format into manageable chunks. For each paragraph, identify the main idea or point you want to convey. These main ideas serve as the backbone of your essay, guiding the flow of your argument and ensuring that each paragraph contributes meaningfully to the overall narrative.
Consider how each point relates to your thesis statement and supports your overall goal. By clearly listing the main points of each paragraph in your essay outline, you'll create a roadmap for your writing that makes it easier for both you and your readers to follow along.
Organize Your Outline with a Simple Template
Now that you have identified your main ideas, it's time to put everything together in a structured format. Use a simple template by our business essay writing services to organize your outline in a way that flows logically from start to finish.
Begin with an introduction to set the stage and grab the reader's attention. Then, outline your body paragraphs to present your arguments or ideas in a clear and organized manner. Each paragraph should focus on one main point, supported by evidence or examples. Finally, conclude your format with a summary that wraps everything up neatly and reinforces your main thesis.
By organizing your format in this way, you'll create a roadmap for your essay that makes it easier to write and ensures that your ideas are presented cohesively.
MLA Outline Format
The MLA format essay outline serves as the skeleton upon which your ideas will flesh out into a cohesive narrative. Here's a breakdown of the key components and formatting rules to keep in mind:
- Paper Specifications : Your MLA paper should be standard letter size (8.5x11 inches), with one-inch margins around the entire page. The running head, if included, should be within the margin. This ensures uniformity and readability across different platforms.
- Indentation and Spacing : Start each sentence with an indentation that's half an inch from the left margin. Maintaining double spacing throughout your MLA outline enhances readability and leaves ample space for annotations and revisions. The recommended font size is 12-point, though 11-point or 11.5-point is acceptable. Consistency is key here.
- Securing Your Outline : While it might seem trivial, ensuring your MLA outline is securely fastened in the upper left corner—be it with a stapler, paper clip, or binder clip—helps maintain professionalism and organization.
- Title and Thesis Statement : Center the title of your MLA paper at the top of the outline. Directly below, write your thesis statement, setting it apart by capitalizing the first letter of each word and ending with a colon. This establishes the overarching argument or main point of your essay.
- Headings and Subheadings : Use a hierarchical system for headings and subheadings to denote the structure of your MLA essay. Major sections are indicated with Roman numerals (I, II, III), while subcategories are marked with uppercase letters (A, B, C). Further subdivisions follow a pattern of Arabic numbers (1, 2, 3) and lowercase letters (a, b, c), each ending with a period for clarity.
APA Outline Format
Understanding the structure of the APA outline format is key to organizing your ideas effectively. Here's a closer look at the various formats:
Basic APA Format :
- Roman numerals denote main headings.
- Capital letters signify first-level subheadings.
- Arabic numerals (1-9) are used within those subheadings.
- Lowercase letters are utilized beneath Arabic numeral subheadings.
- Arabic numerals within parentheses further delineate sub-points.
The full sentence outline mirrors this structure, replacing sentence fragments with complete sentences at each level.
APA Decimal Outline :
- This APA format is simpler, breaking headings into paragraphs and numbering them with Arabic numerals.
- Each heading is numbered sequentially, starting with 1.0.
- Paragraphs within headings are indicated by a decimal followed by a sequential number (e.g., 1.1, 1.2).
- Points or sentences within paragraphs are further delineated by additional decimals (e.g., 1.1.1, 1.1.2).
For instance, under the first heading, the first paragraph's first sentence would be numbered 1.1.1, with subsequent sentences following suit.
Outline Examples
Below are the sample outlines for both formatting styles. You'll notice that the MLA outline has a more narrative style, while the APA outline follows a structured format with distinct headings and subheadings.
In MLA, main sections are marked with Roman numerals and subsections with capital letters, whereas APA uses numbers and letters for different heading levels. Additionally, APA includes sections for methods and results, which are typical in scientific research papers, while MLA format typically omits these sections.
Meanwhile, if you're tempted to pay someone to write my paper , remember we're here to whip up stellar samples in any format you desire!
MLA Outline Example
Apa outline example, final recap.
That's all there is to it! We hope you now have a solid grasp of APA and MLA format outlines. Despite their apparent similarities, there are some notable differences between the two. Now that you're armed with this knowledge, go ahead and tackle your outline assignments like a pro!
Struggling to Wrangle Your Thoughts into a Coherent Essay?
Let us do the heavy lifting for you!
is an expert in nursing and healthcare, with a strong background in history, law, and literature. Holding advanced degrees in nursing and public health, his analytical approach and comprehensive knowledge help students navigate complex topics. On EssayPro blog, Adam provides insightful articles on everything from historical analysis to the intricacies of healthcare policies. In his downtime, he enjoys historical documentaries and volunteering at local clinics.
Related Articles
%20(3).webp "how to do an essay outline mla format")
Home / Guides / Citation Guides / MLA Format
MLA Format: Everything You Need to Know Here
Welcome to an overview of “What is MLA Format?” in relation to paper formatting. You’ll find in-depth guidelines, examples, and visual samples to help you easily format your paper. This guide does not serve as a reference for MLA citation format.
For help determining the proper structure for citing, refer to the other guides on EasyBib.com. Here is another informative site which may help with further understanding of MLA citation format.
Guidelines for Formatting a Paper in MLA
- Use white 8 ½ x 11” paper.
- Make 1 inch margins on the top, bottom, and sides.
- The first word in every paragraph should be indented one half inch.
- Indent set-off or block quotations one half inch from the left margin.
- Use any type of font that is easy to read, such as Times New Roman. Make sure that italics look different from the regular typeface.
- Use 12-point size.
- Double space the entire research paper, even the Works Cited page.
- Leave one space after periods and other punctuation marks, unless your instructor tells you to leave two spaces.
These guidelines come from the MLA Style Center’s web page “Formatting a Research Paper.”
MLA Guide Overview
There are various sections in this guide. Each section provides an in-depth overview of the different components to keep in mind when developing an MLA paper.
This guide includes the following sections:
- Format background
- General paper formatting
- MLA heading format & title page instructions
- Running head & page numbers
- Paraphrases
- Abbreviations
- Numbers (includes the use of numbers in MLA outline format)
- Images, tables, and musical scores
- MLA works cited format
- MLA citation format (for in-depth citation rules visit this MLA citation guide or MLA in-text citation guide)
- Edits & proofreading
If you need more guidance, a website like EasyBib.com usually has guides and tools to help you out. There’s also resources on other styles, like our guide on “ APA reference page ”, otherwise known as a “References” page.
MLA Format Background
The Modern Language Association (MLA) is an organization responsible for developing MLA format. It was developed as a means for researchers, students, and scholars in the literature and language fields to uniformly format their papers and assignments. This uniform, or consistent, method to developing a paper or assignment allows for easy reading. Today, MLA is not only used in literature and language subject areas; many others have adopted it as well.
The Modern Language Association released the 9th and most current edition of their MLA Handbook in April 2021. The Handbook provides thorough instructions on citing, as well as guidelines for submitting work that adheres to the Modern Language Association’s rules and standards. Although we’re not affiliated with the MLA, our citation specialists bring you this thoughtful and informative guide on the format.
Looking for information about previous editions to the Handbook ? Want to learn more about the origin of “What is MLA format?” Click here to learn about the previous editions to the Handbook .
Actually, are you looking for help on using another style? See how to cite an APA journal , learn to create an APA book citation , and more!
Formatting the Header in MLA
To create a header for your first page, follow these steps:
- Begin one inch from the top of the first page and flush with the left margin.
- Type your name, your instructor’s name, the course name and number, and the date on separate lines, using double spaces between each.
- Double space once more and center the title. Do NOT underline, bold, or type the title in all capital letters. Only italicize words that would normally be italicized in the text. Example: Character Development in The Great Gatsby
- Do not place a period after the title or after any headings
- Double space between the title and first lines of the text

General Paper Formatting
Paper choice.
While many professors, instructors, and publications allow electronic submission, some prefer printed, hard copies of papers. This section focuses on the type of paper to use for printed submission.
If you choose to print your paper, use white paper only. Do not use ivory, off-white, or any other shades or colors.
Choose a standard, high quality paper to print your project on. Do not use cardstock. It is not necessary to use resum é paper. Use typical, high quality printer or copy paper.
When it comes to size, 8 ½-by-11-inch paper is the recommended size. If you’d like to use a different size, ask your teacher prior to submission.
Use One-Inch Margins in MLA
Use one-inch margins around the entire page. The running head should be the only item seen in the one inch margin (see below for more on running heads).
Most word processing programs automatically default to using one inch margins. Check the page settings section of the program to locate the margin size.
Indenting Paragraphs in MLA
Indent the first word in every paragraph. Sentences should begin one half inch from the left margin.
It is not necessary to manually measure half an inch. Use the “tab” button on the keyboard to create a half inch space.
Double Space Paragraphs in MLA
MLA research paper format requires that the entire research paper or MLA format essay includes double-spaced lines. Double-spaced lines should be found in between the written body of the work, in the heading, and also on the MLA reference page.
While it may seem tempting to place a few extra lines between the heading, title, and beginning of the paper, lines should all be double spaced.
Font and Font Size in MLA
In an MLA paper, it is acceptable to use any font type that is easy to read. Many source types, such as books and articles, use fonts that are easy to read, so if you’re seeking an appropriate font style, look at other sources for guidance. Two of the most commonly used fonts are Arial and Times New Roman.
It is important for the reader to be able to distinguish the difference between italicized and regular font, so if you choose a font style different than Arial or Times New Roman, make sure the difference between the two type styles is evident.
The use of a 12-point font size is recommended as this is the default size for many word processing programs. It is acceptable to use another standard size, such as 11-point or 11.5-point.
Some professors or instructors will provide guidance on how to secure hard copies of projects. If your instructor does not provide you with any expectations or guidance, a simple staple in the top left corner should suffice. If a stapler is not available, some instructors allow paper or binder clips.
Do not fold the top left corner down to secure the pages together. The page could easily unfold, causing a mess of papers. While binders and plastic holders are cute, in reality, they add bulk to a professor or instructor who may like to take the papers home for grading purposes. Keep the binding simple and clean. Staples work best, and binder and paper clips are the next best option.
As always, follow any instructions your professor or teacher may provide. The guidelines found here are simply recommendations.
MLA Heading & Title Page Instructions
The web page “Formatting a Research Paper” gives two options when it comes to creating the header for your project:
- An MLA format heading can be placed at the top of the first page
- A title page can grace the front of the assignment. If you choose to create a title page, keep in mind that there aren’t any official title page or cover page guidelines in MLA format. See more information below.
If choosing option one, creating an MLA heading, you’ll need to include four main components:
- Your full name
- Your instructor’s name
- The name and number of the course or class
- The assignment’s due date
The first item typed on the paper should be your full name.
- Position your name one inch from the top and left margins of the page.
- Add a double space beneath your name, and type the name of your instructor.
- Below the professor or instructor’s name should be a double space, followed by the name of the course, class, or section number (if available).
- Below it, include another double space and add the assignment’s due date (Day Month Year).
Here’s an example:

The assignment’s title should be placed below the due date, after a double space. Align the title so it sits in the center of the MLA format paper. The title should be written in standard lettering, without underlines, bold font, italicized font, or any quotation marks. Only include italics or quotation marks if your title includes the title of another source.
Here is an example of an MLA header for an MLA format essay, paper, or assignment:
Neal E. Bibdarsh
Professor Haujeemoto
English 201
The Trials and Tribulations of Lincoln’s Reciting of “The Gettysburg Address”
*Note: The quotation marks here are around the title of a speech included in the paper’s title.
Most research papers use a standard MLA format heading, like the one seen above. If your instructor requires you to create a standalone title page, ask him or her for specifications. MLA does not have specific instructions for developing an MLA title page. We recommend you use an MLA header for your project.
If your teacher or professor requires a standalone title page, but has not provided any guidance or specifications, here are a few suggestions from EasyBib.com and this MLA guide :
- Center and double space all of the text on your page.
- Place the name of your school at the top of the page.
- Skip down to about the center of the page and type the title of your paper. Do not bold the title, italicize the entire title, place quotation marks around it, or type the title out in capital letters.
- Use italics for the titles of any sources in the title of your paper. Example: An Analysis of Mythical Creatures in Harry Potter and the Goblet of Fire
- first letter of the title
- first letter of the last word
- first letter of any adjectives, adverbs, nouns, pronouns, and verbs
- If your paper has a subtitle, include on the next line below your title.
- Skip down to the bottom third of the page and add your name, the the name of your instructor, the name/number of the course or class, and the assignment’s due date on four separate lines.
- Keep the font size at 12 pt., or a size close to it, to make it look professional.
- Use the same font as the text of the paper. The Modern Language Association recommends any font that is easy to read and has a clear distinction between italics and standard font. Times New Roman and Arial are recommended, but many other fonts work as well.
- Include a page number in the top right corner of the paper. For more information on how to style page numbers, check out the next section, “Running Head and Page Numbers.”
- We do not recommend adding any images or cover art to the title page.
Click additional information about essays to see an example of a formatted header.
You can either create a title page using the EasyBib Title Page creator or omit the title page completely and use a header.
Running Head & Page Numbers in MLA
A running head is a brief heading that is placed in the top right corner of every page in a project. The Modern Language Association Style Center (online) states that the running head consists of:
- Last name of the paper’s author
- Page number
General tips to keep in mind:
- The running head is placed in the upper right-hand corner, half an inch from the top margin and one inch from the right margin of the page.
- Type your last name before the page number.
- The last name and page number should be separated by a single space.
- Do not place the word “page” or use an abbreviation, such as p. or pg., before the page number.
- Quite often, the running head begins on the second page, but your instructor may ask you to include the running head on the first page of the assignment. As always, if your instructor provides you with specific directions, follow his or her guidelines.

Before adding this information manually onto every single page, check to see if the word processor you’re using has the capability to automatically add this information for you. Try looking in the settings area where page numbers or headers can be added or modified.
Google Docs: Adding a header
- Go to the menu section “Insert.”
- Select “Page numbers” and select the option that places the page number in the upper-right corner.
- A page number will appear; your cursor will blink next to it.
- Move your cursor to the left of the page number.
- Type your last name. Add a space between your name and the page number.
- You should now have a properly formatted header on every page!
Microsoft Word Document: Adding a header
- Double-click in the space at the top of the page (where the page number is).
- OR Go to the “Insert” menu, select “Header,” and select “Edit Header.”
- Type your last name next to page number. If it isn’t already right-aligned, go to the “Home” menu and right-align your name.
Quotations in MLA
Quotes are added into assignments to help defend an argument, prove a point, add emphasis, or simply liven up a project.
Quotes should not take up the majority of your paper or assignment. Quotes should be sprinkled sparingly throughout, and quotes longer than 4 lines should be formatted as MLA block quotes . Use direct quotes from outside sources to enhance and expand on your own writing and ideas.
Words from quotes belong to the individual who spoke or wrote them, so it is essential to credit that individual’s work. Credit him or her by adding what is called an “in-text citation” into the body of the project.
There are three ways to add quotes: 1. With the author’s name in the sentence (a citation in prose).
Dan Gutman shares a glimpse into the overall plot by stating, “I didn’t know it at the time, but a baseball card—for me—could function like a time machine” (5).
In the above example, Dan Gutman is the author of the book that this quote is pulled from.
2. Without the author’s name in the sentence (a parenthetical citation).
The main character’s confusing experience is realized and explained when he states “I didn’t know it at the time, but a baseball card—for me—could function like a time machine” (Gutman 5).
In the above example, Dan Gutman’s name isn’t included in the sentence. It’s included in the parentheses at the end of the sentence. This is an example of a proper MLA style citation in the body of a project.
3. In a block quote, which is used when a large quote, of 4 lines or more, is added into a project.
Using footnotes and endnotes
The Modern Language Association generally promotes the use of references as described in the sections above, but footnotes and endnotes are also acceptable forms of references to use in your paper.
Footnotes and endnotes are helpful to use in a variety of circumstances. Here are a few scenarios when it may seem appropriate to use this type of referencing:
- When you are referring to a number of various sources, by various authors, in a section of your paper. In this situation, it is a good idea to use a footnote or endnote to share information for parenthetical references. This will encourage the reader to stay focused on the text of the research paper, instead of having to read through all of the reference information.
- When you are sharing additional information that doesn’t quite fit into the scope of the paper, but is beneficial for the reader. These types of footnotes and endnotes are helpful when explaining translations, adding background information, or sharing counterexamples to research.
To include a footnote or endnote, add a superscript number at the end of the sentence the footnote or endnote refers to. They can be included mid-sentence if necessary, but be sure to add it after any punctuation, such as commas or periods. Find a location that doesn’t distract the reader from the content and flow of the paper.
Within the text example:
Numerous well-known children’s books include characters from a wide range of races and ethnicities, thus promoting diversity and multiculturalism.¹
At the bottom of the page (footnote) or at the end of the section (endnote):
¹See Isadora, Parr, and Velazquez. While Parr’s work features characters of various colors, such as pink or blue, children easily correlate it with individuals of different races and ethnicities.
On the last page of the assignment, the writer includes the full references for the books by Isadora, Parr, and Velazquez.
For more on block quotes and a further, detailed explanation on the use of quotes, including MLA footnotes, refer to our MLA In-Text Citation and Parenthetical Citations Guide. In this guide you’ll find further information including directions for the use of quotes without an author, page numbers, and how to properly credit work from electronic sources.
For guides on citations in another style, check out APA parenthetical citation and APA in-text citation .
Paraphrases in MLA
Paraphrases are created when text or speech from another source are added into a project, but the writer chooses to summarize them and weave in his or her own writing and writing style.
Even though the writer modifies the information from another source, it is still necessary to credit the source using proper format ( Handbook 98). Paraphrased information uses the same MLA reference format as stated in the section directly above this one.
Here is an acceptable paraphrase:
Original text:
“Stay hungry. Stay foolish.” Steve Jobs
Paraphrase:
Steve Jobs encouraged students at Stanford to continue with their determination, drive, and ambitious behavior. They should never be simply satisfied with the status quo. They should continue to push themselves despite possible obstacles and failures.
To develop a well-written paraphrase, follow these simple, step-by-step instructions.
- Find a phrase, sentence, paragraph, or section of original text you’d like to turn into a paraphrase.
- Read the text carefully and make sure you fully comprehend its meaning. A writer can only develop a well-written paraphrase if the information has been fully grasped and understood. If you’re having difficulty understanding the information, take a few minutes to read up on tricky words and background information. If all else fails, ask a friend to see if they’re able to make sense of the concepts.
- After analyzing and completely understanding the original text, put it to the side. Take a moment to think about what you’ve read and connect the idea to your own assignment.
- Now that the information is completely understood, take a moment to rewrite what you’ve read, in your own words and writing style. Do not simply substitute words in the original text with synonyms. That’s plagiarism! Show off and demonstrate your ability to process the original information, connect it to the content in your paper, and write it in your own individual and unique writing style.
- Include an in-text reference next to the paraphrase. All paraphrases include references, similar to direct quotes. See the “Quotations” section of this guide to learn how to properly attribute your paraphrased information.
- Give yourself a pat on the back! Paraphrasing is an important part of the research and writing process.
Wondering if it’s better to quote or paraphrase?
An essential part of the research process involves adding direct quotes and paraphrases into projects. Direct quotes provide word-for-word evidence and allow writers to use another author’s eloquent words and language in their own projects. When it comes to paraphrases, writers are able to take a block of text and shrink the scope of it into the their papers. Paper writers can also use paraphrases to demonstrate their ability to analyze and reiterate information in a meaningful and relevant way.
If you’re wondering which one is better to consistently use, quotes or paraphrases, there’s a clear winner. Paraphrases come out on top. Sure, direct quotes are incredibly beneficial, but copying and pasting too many of these into a project can cause a reader to lose sight of the writer’s own voice. Mixing your own voice with another author’s too much can make for choppy and disjointed reading.
The ultimate goal of a research project is to have your voice and research merged together as one. Paraphrases allow just that. When you combine information from outside sources with your own writing style, it demonstrates your ability as a researcher to showcase your understanding and analyzation of a topic.
Remember, whether you’re adding direct quotes or paraphrases into a project, both types of additions need references. References are placed after the quotes and paraphrases, and also at the end of an assignment.
If you’re looking for additional help with your punctuation or grammar, check out the EasyBib plagiarism checker !
Using Abbreviations in MLA
Abbreviations are commonly used in many source types including websites, blog posts, books, and journal articles. It is acceptable to use abbreviations in all of these sources.
When it comes to school and research assignments, however, the MLA Handbook states that abbreviations should be used rarely in the prose of your paper (293). Spelling out abbreviations into their full words and meanings is recommended. This ensures understanding and avoids any confusion from your reader.
There are times when you may feel it is perfectly acceptable to use an abbreviation rather than its typed out counterpart in a paper. If you do abbreviate, be sure you are using commonly accepted abbreviations, which you can find in the dictionary. You can also review Appendix 1 in the MLA Handbook .
General Abbreviation Tips
- Human Immunodeficiency Virus can be abbreviated to HIV, not H.I.V.
- United States should be US, not U.S.
- Digital video disc should be DVD, not D.V.D.
- For lower case abbreviations, it is acceptable to include periods between the letters.
- The abbreviation, “For example” = e.g.
- If there is a mix of lower case and upper case letters, do not use periods if the majority of the letters are upper case. Examples include PhD and EdD
Abbreviating Months
Type out entire month names when being used in the body of a research paper or assignment.
She rented out the beach house from May through September
When it comes to references, MLA bibliography format requires months longer than four letters to be abbreviated.
- July = July
- November = Nov.
Other abbreviations that are perfectly acceptable to use in a bibliography (not the body of a project) include:
- p. or pp. for page and page numbers
- ch. for chapter
- ed. for edition
- trans. for translation or translated
- vol. for volume
- no. for number
- rev. for revised
Again, these abbreviations should only be used in the final page(s) of a project, the MLA Works Cited list. They should not be used in the body of a project.
For more information on bibliographies, see our MLA format Works Cited List page.
Abbreviating Publishers
One of the quirkiest things about this particular style is how publisher names are structured on the final page of references. Certain words are abbreviated, some words are omitted, and other words are written in full.
Words describing what type of business the publisher is are omitted from the works cited. Here’s a breakdown of the words that should be excluded:
- Co. (Company)
- Corp. (Corporation)
- Inc. (Incorporated)
- Ltd. (Limited)
- The (when at the beginning of the name)
If a publisher’s name contains the words “University” and “Press” (or the equivalent in another language), the words should be abbreviated to the letters “U” and “P” in your citation. But if only one of the words appears, it should be written out normally.
Here are a few examples:
- University of Delaware
- U College of London P
All other words related to the names of publishers should be written out in full.
Abbreviating Titles
Certain classical and biblical works are abbreviated in a bibliography, but also in any parenthetical references in the text.
The official handbook provides a lengthy list, spanning over multiple pages, of the preferred abbreviations to use for classical and biblical works ( Handbook 295-301), but here’s a quick snapshot of some of the commonly used ones:
Hebrew Bible or Old Testament = OT
- Deut. = Deuteronomy
- Gen. = Genesis
- Lev. = Leviticus
- Num. = Numbers
- Ps. = Psalms
New Testament = NT
- 1 Cor. = 1 Corinthians
- Jas. = James
- Matt. = Matthew
Shakespeare:
- Ado = Much Ado about Nothing
- 3H6 = Henry VI, Part 3
- JC = Julius Caesar
- Mac. = Macbeth
- MND = A Midsummer Night’s Dream
- Oth. = Othello
- Rom. = Romeo and Juliet
Again, the titles above are allowed to be abbreviated both in references in parentheses in the body of a project and also on the final page of references. If you’re wondering why, it’s because they’re cited often and it’s unnecessary to type out the entire title names.
Formatting Numbers in MLA
Use of numerals.
If the project calls for frequent use of numbers (such as a scientific study or statistics), use numerals that precede measurements.
- 247 milligrams
Other items to keep in mind:
In divisions, use numbers, ex: In page 5 of the study
Arabic Numbers
When including a number in a paper, spell out the number if it can be written as one word (such as six ) or two words (such as sixty-two ). For fractions, decimals, or longer numbers, type them out using digits. For larger numbers, write the number itself ( Handbook 82-84).
- twenty-seven
- one hundred
If the number comes before a unit of measurement or label, type the number using digits.
- 8 tablespoons
- 3 July 2018
- 25 King Street
More on Numbers
Starting a sentence with a number is generally frowned upon. Try modifying the sentence so that the number, or number word, is found elsewhere.
Instead of:
225 children were found in the warehouse, some malnourished and diseased.
Use this sentence:
A total of 225 children were found in the warehouse, some malnourished and diseased.
If modifying the sentence is not possible or does not work well with the flow of the assignment or paper, type out the written number:
Two hundred twenty five children were found in the warehouse, some malnourished and diseased.
Do not include any ISBN numbers in your paper.
Outline Format
The Modern Language Association does not have any requirements regarding the structure of an outline. If your teacher asks you to create an MLA outline, we recommend using roman numerals, capital and lowercase letters, and numbers.
Here is an example of a recommended outline structure:
In addition to outlines, use roman numerals for suffixes.
- King George IV
Using Images, Tables, & Musical Scores in MLA
Photographs, data sets, tables, graphs, and other images are often added into projects or papers to promote or aid understanding. They provide meaningful visuals for the reader. If the illustration or visual image does not enhance the quality of the paper, do not include it in the project.
Tables and illustrations should be placed as close as possible to the text that they most closely refer to.
For an image to be significant and easily identifiable, place it as close as possible to the text in the project where it is discussed.
It is not acceptable to simply place an image in a project without including identifiable information. All images must include information about its origin.
Here are the directions to properly attribute an image:
- Assign an Arabic number. The image closest to the beginning of the project should be labeled as Fig. 1. The next image in the project should be Fig. 2. and so on.
- Provide a caption. The caption should be a brief explanation or the title of the contents of the image. Place the caption directly next to the label.
- Immediately following the caption, it is acceptable to include attribution information. If the image is not discussed further in the rest of the paper or project, it is acceptable to include the MLA bibliography format citation below the image and omit it from the bibliography or MLA format works cited page.
In the text of the project or paper where the figure is discussed, include the label in parentheses to ensure the reader knows where to find the figure in your paper.
In the text:
Sarah’s tattoo design was filled with two of her favorite flowers: lilies and daffodils along a thinly curved vine (fig. 1).
Image formatting:
(Image Would Be Here) Fig. 1. Sarah’s Tattoo. barneyWILLIAMSable, Deviant Art , 2011, barneywilliamsable.deviantart.com/art/Sarah-s-Tattoo-design-193048938.

Fig. 1. White Studio. “Houdini and Jennie, the Elephant, Performing at the Hippodrome, New York.” Library of Congress , www.loc.gov/item/96518833/.
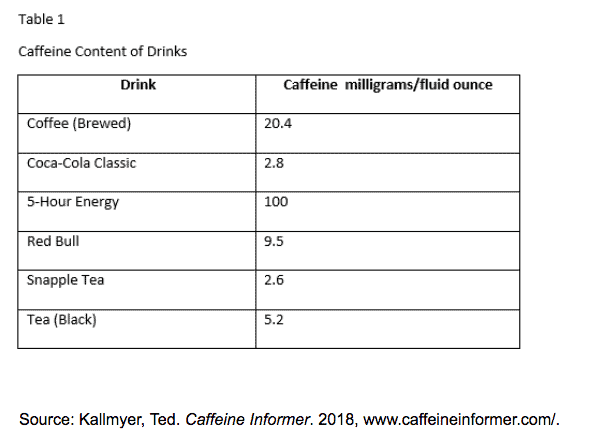
When adding a table or data set into a project, it is formatted a little differently. Above the data set, include the label “Table” with an Arabic numeral, and title it. The table number and title should be located flush left and on separate lines. The first table seen in the project is labeled as Table 1. The second table in the project is Table 2, and so on. The table’s title should be written in title case form (the first letter of each word is capitalized, except for small, insignificant words).
Underneath the table, provide the source and any notes. Notes should be labeled with a letter, rather than a numeral, so the reader is able to differentiate between the notes of the text and the notes of the table.
International Scholars from India Enrolled at Yale University a
Source: “International Scholars Academic Year 2015-2016.” Yale University , Office of International Students and Scholars, yale.app.box.com/v/scholar-2015-2016. a. The numbers reflect students who are enrolled full-time.
The information included above and below any images or table should be double spaced, similar to the rest of the project or paper.
Musical Scores
Musical scores need to be labeled as well. When including a musical score in a project, label musical scores with “Ex.” which is short for example. This label should be placed below the musical score. Next to the abbreviation “Ex.”, assign the score an Arabic numeral. The first musical score in the project should be labeled as Ex. 1. The second musical score found in an assignment should be labeled as Ex. 2., and so on.
If possible, provide a caption after to the label. If the caption below the sheet music includes enough information about the source, it is not necessary to include the full reference at the end of the assignment.
Here is an example of a possible label and caption:
Ex. 4. Scott Joplin, The Entertainer, piano, C major.
Another example:

Here’s more on tables and illustrations.
Using Lists in MLA
It’s appropriate to add lists into an MLA format essay as long as the proper rules are followed.
Lists created using MLA essay format look different than a grocery list or any other type of vertical listing of items. Items in a list are included in your prose, rather than the traditional vertical style.
Often, you will use a colon between the introductory sentence and the list. But you should not include a colon if the first item in the list is part of the sentence.
List Example #1
Here is an example of how a list may look incorporated into the prose of a research project or assignment:
William Shakespeare wrote numerous plays, many of which were considered tragedies: Romeo and Juliet , Hamlet , Macbeth , Othello , Julius Caesar , and King Lear .
List Example #2 Here is an example of how a list may look in a research project or assignment when the list is part of the introductory sentence:
Many of William Shakespeare’s were tragedies. Some of his most popular tragedies include Romeo and Juliet , Hamlet , Macbeth , Othello , Julius Caesar , and King Lear.
MLA Works Cited Format
EasyBib.com has a full, comprehensive guide to creating a proper works cited MLA format , but here are a few items to keep in mind when developing this portion of a project:
- The list of citations should be the very last page of a research project or essay.
- The top of the page should include the running head and the page number.
- All entries should be placed in alphabetical order by the first item in the MLA format citation.
- The entire page should be double spaced.
For more detailed information, make sure to check out the EasyBib guide to MLA format Works Cited pages.
MLA Citation Format
The majority of this guide focuses on MLA formatting in regards to MLA paper format rules and guidelines. If you’re seeking information related to the proper formatting of an MLA citation, refer to our individual pages and posts on various types of citations.
If you’re simply looking for the general structure for full references, which are found on the final pages of projects, here’s the proper order:
Author’s Last name, Author’s First name. “Title of Source.”* Title of Container , Names of other contributors along with their specific roles, version of the source (if it differs from the original or is unique), any key numbers associated with the source that aren’t dates (such as journal issue numbers or volume numbers), Name of the Publisher, publication date, location (such as the URL or page numbers).
*Note: A title may be in italics instead of quotation marks, depending of the type of source. The general rule is that works that are self-contained (like books, journals, or television shows) are formatted in italics. Works that are part of a larger work (like articles, chapters, or specific episodes) are formatting in quotation marks.
MLA Format Citing FAQs:
“What in the world are containers?”
Containers are what hold the source. If you’re creating a reference for a chapter in a book, the title of the chapter is the title of the source , and the container is the title of the book . The book holds the chapter, so it’s the container. If you’re searching for how to cite a website, here’s a tip: the title of the source is the name of the individual page and the title of the container is the name of the full website.
“This seems like a lot of information for a reference. Is it all necessary?”
The short answer is “No!” When citing, only include the components that help the reader locate the exact same source themselves.
It isn’t necessary to go digging for items such as numbers, version types, or names of other individuals or contributors associated with the source if they aren’t applicable. If you think it’s beneficial for the reader, then include it.
Related to citations, here are helpful pages on:
- MLA citation website format
- Citing a book
- Citing a journal
- What is a DOI ?
- More on PDFs
If you’re looking for an MLA citation generator, head to the EasyBib homepage. Our formatter will help you create citations quickly and easily!
Need APA, too? There are also EasyBib tools and an APA citation website reference guide to help you learn the basics.
Edits and Proofreading
Editing and proofreading your assignment prior to submission is an incredibly important step in the research process. Editing involves checking the paper for the following items:
- Spelling : Are all words spelled correctly? Review all proper names, places, and other unique words to ensure correct spelling. When finished, run the project through a spell checker. Many word processing programs, such as Microsoft Word and Google Drive, provide a free spell checking feature. While spell checks are beneficial, they do not always spot every mistake, so make sure you take the time to read through the assignment carefully. If you’re still not sure if your project contains proper spelling, ask a friend to read through it. They may find a mistake you missed!
- Grammar : Check your assignment to make sure you’ve included proper word usage. There are numerous grammar checkers available to review your project prior to submission. Again, take the time to review any recommendations from these programs prior to accepting the suggestions and revisions.
- Punctuation : Check to make sure the end of every sentence has an ending punctuation mark. Also make sure commas, hyphens, colons, and other punctuation marks are placed in the appropriate places.
- Attribution : Do all quotes and paraphrases include a citation? Did you create an in-text citation for each individual piece of information?
Smart idea: running your paper through a paper checker before you turn it in. EasyBib Plus offers a checker that scans for grammar errors and unintentional plagiarism.
Check out our MLA sample papers . Also, check out the EasyBib MLA Annotated Bibliography Guide.
Don’t forget to use the EasyBib citation generator to develop your Modern Language Association style references.EasyBib.com also has helpful guides on APA format and more styles . Lastly, stay up-to-date on what’s coming by following our EasyBib Twitter account.
Works Cited
“Formatting a Research Paper.” The MLA Style Center , Modern Language Association of America, style.mla.org/formatting-papers/.
MLA Handbook. 9th ed., Modern Language Association of America, 2021.
Published October 31, 2011. Updated July 25, 2021.
Written and edited by Michele Kirschenbaum and Elise Barbeau . Michele Kirschenbaum is a school library media specialist and the in-house librarian at EasyBib.com. You can find her here on Twitter. Elise Barbeau is the Citation Specialist at Chegg. She has worked in digital marketing, libraries, and publishing.
MLA Formatting Guide
MLA Formatting
- Annotated Bibliography
- Bibliography
- Block Quotes
- et al Usage
- In-text Citations
- Paraphrasing
- Page Numbers
- Sample Paper
- MLA 8 Updates
- MLA 9 Updates
- View MLA Guide
Citation Examples
- Book Chapter
- Journal Article
- Magazine Article
- Newspaper Article
- Website (no author)
- View all MLA Examples
How useful was this post?
Click on a star to rate it!
We are sorry that this post was not useful for you!
Let us improve this post!
Tell us how we can improve this post?
The works-cited list provides the reader full information so that a reader can locate the source for further use.
Basic formatting
The works-cited list appears at the end of the paper, after any endnotes if they are present.
Page margins
All margins (top, bottom, left, and right) should be set at 1 inch.
Running head
Write the running head in the top right of the page at 0.5 inch from the top. Use the running head “Surname Page #.”
The font should be clear enough to read. For example, Times New Roman font set to 12 points.
Formatting entries
Entries should be double-spaced, including a double-space between the heading and the first entry. If any entry runs over more than a line, indent the subsequent line(s) 0.5 inch from the left margin.
Formatting the title
The title should be “Works Cited.” Center the title. Do not bold, italicize, or underline the title. If you cite only one source in the list, the title should be “Work Cited.” If you include sources that you only consulted and didn’t cite directly, the title should be changed accordingly to “Works Cited and Consulted.”
Arranging works cited
Works-cited-list entries are arranged alphabetically by the author’s last name (or the editor’s last name for entire edited collections). Double-space all entries. Begin each entry flush with the left margin. If any entry runs over more than one line, indent the subsequent line(s) 0.5 inch from the left margin (sometimes called a hanging indent).
Example works cited
Damasio, Antonio. The Feeling of What Happens: Body, Emotion and the Making of Consciousness . Vintage, 2000.
Hill, R. T. “Legitimizing Colonial Privilege: Native Americans at a Quincentenary of Discourse.” Text and Performance Quarterly , vol. 16, no. 1, 1996, pp. 92–100.
MacDonald, Shauna M. “Performance as Critical Posthuman Pedagogy.” Text and Performance Quarterly , vol. 34, no. 2, 2014, pp. 164–81.
Zilio, M. “Canada Will Not Move Embassy to Jerusalem, Federal Government Says.” The Globe and Mail . 7 Sept. 2017, www.theglobeandmail.com/news/politics/canada-will-not-move-embassy-to-jerusalem-federal-government-says/article37219576/ .
An in-text citation is a short citation that is placed in the text. It is styled in two ways: a citation in prose or a parenthetical citation.
The basic element needed for an in-text citation is the author’s name . The publication year is not required in in-text citations. Sometimes, page numbers or line numbers are also included, especially when directly quoting text from the source being cited. When including a page number, do not include a comma or any other punctuation mark between the author’s surname and the page number.
Parenthetical citations usually add only the author’s surname at the end of the sentence in parentheses. Sometimes they include a page number or other locator. An example of a parenthetical citation is given below:
The spiritual geography of the landscape is explained (Cooper).
If you want to cite a chapter number, a scene, or a line number, follow the abbreviation guidelines below:
When including a more specific locator number rather than a page number, place a comma between the author’s surname and the label.
(Cooper, ch. 2).
Here are a few examples of in-text citations for sources with different numbers or types of authors:
Use only the surname of the author in parenthetical citations. If you want to add a page number (or another indicator of the place in a work), add it after the author’s surname without any punctuation between the surname and the page number.
(Abraham 7).
Two authors
Add only the surnames of the authors. Use “and” to separate the two authors.
(Langmuir and Einstein).
Three or more authors
Add only the surname of the first author followed by “et al.”
(Low et al.).
Corporate author
Shorten the organization name wherever possible, excluding any initial articles and using the shortest noun phrase (e.g., shorten Literary Society of Tamil Culture to Literary Society).
(Literary Society).
If there is no author for the source, use the source title in place of the author’s surname.
When you add such in-text citations, italicize the text of the title. If the source title is longer than a noun phrase, use a shortened version of the title. For example, the title Fantastic Beasts and Where to Find Them is shortened to Fantastic Beasts .
( Fantastic Beasts 160).
MLA Citation Examples
Writing Tools
Citation Generators
Other Citation Styles
Plagiarism Checker
Upload a paper to check for plagiarism against billions of sources and get advanced writing suggestions for clarity and style.
Get Started

How to Write a Research Paper
- Smodin Editorial Team
- Updated: May 17, 2024
Most students hate writing research papers. The process can often feel long, tedious, and sometimes outright boring. Nevertheless, these assignments are vital to a student’s academic journey. Want to learn how to write a research paper that captures the depth of the subject and maintains the reader’s interest? If so, this guide is for you.
Today, we’ll show you how to assemble a well-organized research paper to help you make the grade. You can transform any topic into a compelling research paper with a thoughtful approach to your research and a persuasive argument.
In this guide, we’ll provide seven simple but practical tips to help demystify the process and guide you on your way. We’ll also explain how AI tools can expedite the research and writing process so you can focus on critical thinking.
By the end of this article, you’ll have a clear roadmap for tackling these essays. You will also learn how to tackle them quickly and efficiently. With time and dedication, you’ll soon master the art of research paper writing.
Ready to get started?
What Is a Research Paper?
A research paper is a comprehensive essay that gives a detailed analysis, interpretation, or argument based on your own independent research. In higher-level academic settings, it goes beyond a simple summarization and includes a deep inquiry into the topic or topics.
The term “research paper” is a broad term that can be applied to many different forms of academic writing. The goal is to combine your thoughts with the findings from peer-reviewed scholarly literature.
By the time your essay is done, you should have provided your reader with a new perspective or challenged existing findings. This demonstrates your mastery of the subject and contributes to ongoing scholarly debates.
7 Tips for Writing a Research Paper
Often, getting started is the most challenging part of a research paper. While the process can seem daunting, breaking it down into manageable steps can make it easier to manage. The following are seven tips for getting your ideas out of your head and onto the page.
1. Understand Your Assignment
It may sound simple, but the first step in writing a successful research paper is to read the assignment. Sit down, take a few moments of your time, and go through the instructions so you fully understand your assignment.
Misinterpreting the assignment can not only lead to a significant waste of time but also affect your grade. No matter how patient your teacher or professor may be, ignoring basic instructions is often inexcusable.
If you read the instructions and are still confused, ask for clarification before you start writing. If that’s impossible, you can use tools like Smodin’s AI chat to help. Smodin can help highlight critical requirements that you may overlook.
This initial investment ensures that all your future efforts will be focused and efficient. Remember, thinking is just as important as actually writing the essay, and it can also pave the wave for a smoother writing process.
2. Gather Research Materials
Now comes the fun part: doing the research. As you gather research materials, always use credible sources, such as academic journals or peer-reviewed papers. Only use search engines that filter for accredited sources and academic databases so you can ensure your information is reliable.
To optimize your time, you must learn to master the art of skimming. If a source seems relevant and valuable, save it and review it later. The last thing you want to do is waste time on material that won’t make it into the final paper.
To speed up the process even more, consider using Smodin’s AI summarizer . This tool can help summarize large texts, highlighting key information relevant to your topic. By systematically gathering and filing research materials early in the writing process, you build a strong foundation for your thesis.
3. Write Your Thesis
Creating a solid thesis statement is the most important thing you can do to bring structure and focus to your research paper. Your thesis should express the main point of your argument in one or two simple sentences. Remember, when you create your thesis, you’re setting the tone and direction for the entire paper.
Of course, you can’t just pull a winning thesis out of thin air. Start by brainstorming potential thesis ideas based on your preliminary research. And don’t overthink things; sometimes, the most straightforward ideas are often the best.
You want a thesis that is specific enough to be manageable within the scope of your paper but broad enough to allow for a unique discussion. Your thesis should challenge existing expectations and provide the reader with fresh insight into the topic. Use your thesis to hook the reader in the opening paragraph and keep them engaged until the very last word.
4. Write Your Outline
An outline is an often overlooked but essential tool for organizing your thoughts and structuring your paper. Many students skip the outline because it feels like doing double work, but a strong outline will save you work in the long run.
Here’s how to effectively structure your outline.
- Introduction: List your thesis statement and outline the main questions your essay will answer.
- Literature Review: Outline the key literature you plan to discuss and explain how it will relate to your thesis.
- Methodology: Explain the research methods you will use to gather and analyze the information.
- Discussion: Plan how you will interpret the results and their implications for your thesis.
- Conclusion: Summarize the content above to elucidate your thesis fully.
To further streamline this process, consider using Smodin’s Research Writer. This tool offers a feature that allows you to generate and tweak an outline to your liking based on the initial input you provide. You can adjust this outline to fit your research findings better and ensure that your paper remains well-organized and focused.
5. Write a Rough Draft
Once your outline is in place, you can begin the writing process. Remember, when you write a rough draft, it isn’t meant to be perfect. Instead, use it as a working document where you can experiment with and rearrange your arguments and evidence.
Don’t worry too much about grammar, style, or syntax as you write your rough draft. Focus on getting your ideas down on paper and flush out your thesis arguments. You can always refine and rearrange the content the next time around.
Follow the basic structure of your outline but with the freedom to explore different ways of expressing your thoughts. Smodin’s Essay Writer offers a powerful solution for those struggling with starting or structuring their drafts.
After you approve the outline, Smodin can generate an essay based on your initial inputs. This feature can help you quickly create a comprehensive draft, which you can then review and refine. You can even use the power of AI to create multiple rough drafts from which to choose.
6. Add or Subtract Supporting Evidence
Once you have a rough draft, but before you start the final revision, it’s time to do a little cleanup. In this phase, you need to review all your supporting evidence. You want to ensure that there is nothing redundant and that you haven’t overlooked any crucial details.
Many students struggle to make the required word count for an essay and resort to padding their writing with redundant statements. Instead of adding unnecessary content, focus on expanding your analysis to provide deeper insights.
A good essay, regardless of the topic or format, needs to be streamlined. It should convey clear, convincing, relevant information supporting your thesis. If you find some information doesn’t do that, consider tweaking your sources.
Include a variety of sources, including studies, data, and quotes from scholars or other experts. Remember, you’re not just strengthening your argument but demonstrating the depth of your research.
If you want comprehensive feedback on your essay without going to a writing center or pestering your professor, use Smodin. The AI Chat can look at your draft and offer suggestions for improvement.
7. Revise, Cite, and Submit
The final stages of crafting a research paper involve revision, citation, and final review. You must ensure your paper is polished, professionally presented, and plagiarism-free. Of course, integrating Smodin’s AI tools can significantly streamline this process and enhance the quality of your final submission.
Start by using Smodin’s Rewriter tool. This AI-powered feature can help rephrase and refine your draft to improve overall readability. If a specific section of your essay just “doesn’t sound right,” the AI can suggest alternative sentence structures and word choices.
Proper citation is a must for all academic papers. Thankfully, thanks to Smodin’s Research Paper app, this once tedious process is easier than ever. The AI ensures all sources are accurately cited according to the required style guide (APA, MLA, Chicago, etc.).
Plagiarism Checker:
All students need to realize that accidental plagiarism can happen. That’s why using a Plagiarism Checker to scan your essay before you submit it is always useful. Smodin’s Plagiarism Checker can highlight areas of concern so you can adjust accordingly.
Final Submission
After revising, rephrasing, and ensuring all citations are in order, use Smodin’s AI Content Detector to give your paper one last review. This tool can help you analyze your paper’s overall quality and readability so you can make any final tweaks or improvements.
Mastering Research Papers
Mastering the art of the research paper cannot be overstated, whether you’re in high school, college, or postgraduate studies. You can confidently prepare your research paper for submission by leveraging the AI tools listed above.
Research papers help refine your abilities to think critically and write persuasively. The skills you develop here will serve you well beyond the walls of the classroom. Communicating complex ideas clearly and effectively is one of the most powerful tools you can possess.
With the advancements of AI tools like Smodin , writing a research paper has become more accessible than ever before. These technologies streamline the process of organizing, writing, and revising your work. Write with confidence, knowing your best work is yet to come!
Purdue Online Writing Lab Purdue OWL® College of Liberal Arts
MLA Works Cited Page: Basic Format

Welcome to the Purdue OWL
This page is brought to you by the OWL at Purdue University. When printing this page, you must include the entire legal notice.
Copyright ©1995-2018 by The Writing Lab & The OWL at Purdue and Purdue University. All rights reserved. This material may not be published, reproduced, broadcast, rewritten, or redistributed without permission. Use of this site constitutes acceptance of our terms and conditions of fair use.
According to MLA style, you must have a Works Cited page at the end of your research paper. All entries in the Works Cited page must correspond to the works cited in your main text.
Basic rules
- Begin your Works Cited page on a separate page at the end of your research paper. It should have the same one-inch margins and last name, page number header as the rest of your paper.
- Only the title should be centered. The citation entries themselves should be aligned with the left margin.
- Double space all citations, but do not skip spaces between entries.
- Indent the second and subsequent lines of citations by 0.5 inches to create a hanging indent.
- List page numbers of sources efficiently, when needed. If you refer to a journal article that appeared on pages 225 through 250, list the page numbers on your Works Cited page as pp. 225-50 (Note: MLA style dictates that you should omit the first sets of repeated digits. In our example, the digit in the hundreds place is repeated between 2 25 and 2 50, so you omit the 2 from 250 in the citation: pp. 225-50). If the excerpt spans multiple pages, use “pp.” Note that MLA style uses a hyphen in a span of pages.
- If only one page of a print source is used, mark it with the abbreviation “p.” before the page number (e.g., p. 157). If a span of pages is used, mark it with the abbreviation “pp.” before the page number (e.g., pp. 157-68).
- If you're citing an article or a publication that was originally issued in print form but that you retrieved from an online database, you should type the online database name in italics. You do not need to provide subscription information in addition to the database name.
- For online sources, you should include a location to show readers where you found the source. Many scholarly databases use a DOI (digital object identifier). Use a DOI in your citation if you can; otherwise use a URL. Delete “http://” from URLs. The DOI or URL is usually the last element in a citation and should be followed by a period.
- All works cited entries end with a period.
Additional basic rules new to MLA 2021
New to MLA 2021:
- Apps and databases should be cited only when they are containers of the particular works you are citing, such as when they are the platforms of publication of the works in their entirety, and not an intermediary that redirects your access to a source published somewhere else, such as another platform. For example, the Philosophy Books app should be cited as a container when you use one of its many works, since the app contains them in their entirety. However, a PDF article saved to the Dropbox app is published somewhere else, and so the app should not be cited as a container.
- If it is important that your readers know an author’s/person’s pseudonym, stage-name, or various other names, then you should generally cite the better-known form of author’s/person’s name. For example, since the author of Alice's Adventures in Wonderland is better-known by his pseudonym, cite Lewis Carroll opposed to Charles Dodgson (real name).
- For annotated bibliographies , annotations should be appended at the end of a source/entry with one-inch indentations from where the entry begins. Annotations may be written as concise phrases or complete sentences, generally not exceeding one paragraph in length.
Capitalization and punctuation
- Capitalize each word in the titles of articles, books, etc, but do not capitalize articles (the, an), prepositions, or conjunctions unless one is the first word of the title or subtitle: Gone with the Wind, The Art of War, There Is Nothing Left to Lose .
- Use italics (instead of underlining) for titles of larger works (books, magazines) and quotation marks for titles of shorter works (poems, articles)
Listing author names
Entries are listed alphabetically by the author's last name (or, for entire edited collections, editor names). Author names are written with the last name first, then the first name, and then the middle name or middle initial when needed:
Do not list titles (Dr., Sir, Saint, etc.) or degrees (PhD, MA, DDS, etc.) with names. A book listing an author named "John Bigbrain, PhD" appears simply as "Bigbrain, John." Do, however, include suffixes like "Jr." or "II." Putting it all together, a work by Dr. Martin Luther King, Jr. would be cited as "King, Martin Luther, Jr." Here the suffix following the first or middle name and a comma.
More than one work by an author
If you have cited more than one work by a particular author, order the entries alphabetically by title, and use three hyphens in place of the author's name for every entry after the first:
Burke, Kenneth. A Grammar of Motives . [...]
---. A Rhetoric of Motives . [...]
When an author or collection editor appears both as the sole author of a text and as the first author of a group, list solo-author entries first:
Heller, Steven, ed. The Education of an E-Designer .
Heller, Steven, and Karen Pomeroy. Design Literacy: Understanding Graphic Design.
Work with no known author
Alphabetize works with no known author by their title; use a shortened version of the title in the parenthetical citations in your paper. In this case, Boring Postcards USA has no known author:
Baudrillard, Jean. Simulacra and Simulations. [...]
Boring Postcards USA [...]
Burke, Kenneth. A Rhetoric of Motives . [...]
Work by an author using a pseudonym or stage-name
New to MLA 9th edition, there are now steps to take for citing works by an author or authors using a pseudonym, stage-name, or different name.
If the person you wish to cite is well-known, cite the better-known form of the name of the author. For example, since Lewis Carroll is not only a pseudonym of Charles Dodgson , but also the better-known form of the author’s name, cite the former name opposed to the latter.
If the real name of the author is less well-known than their pseudonym, cite the author’s pseudonym in square brackets following the citation of their real name: “Christie, Agatha [Mary Westmacott].”
Authors who published various works under many names may be cited under a single form of the author’s name. When the form of the name you wish to cite differs from that which appears on the author’s work, include the latter in square brackets following an italicized published as : “Irving, Washington [ published as Knickerbocker, Diedrich].”.
Another acceptable option, in cases where there are only two forms of the author’s name, is to cite both forms of the author’s names as separate entries along with cross-references in square brackets: “Eliot, George [ see also Evans, Mary Anne].”.
COMMENTS
Outlines themselves have a structure and format that should be followed for the best results. An outline in MLA format should have the following: 1-inch margins, with double spacing. 12-point font, left-aligned text. center-aligned title with capitalized words using headline case. For help writing your essay, research paper, or other project ...
Here's how you can set your first page up for MLA 9th edition. On the first line, write your full name (flush left) On a new line, write your professor or instructor's full name. On a new line, write the course code and course name. On a new line, write the full date spelt out (e.g., 15 June 2023)
Cite your MLA source. Start by applying these MLA format guidelines to your document: Use an easily readable font like 12 pt Times New Roman. Set 1 inch page margins. Use double line spacing. Include a ½" indent for new paragraphs. Include a four-line MLA heading on the first page. Center the paper's title.
Each line must be double-spaced with the font being 12-point. However, the font can also be 11-point or 11.5-point. The upper left corner should be secured with a stapler, paper clip or binder clip. As with all papers in MLA format, your outline should be double-spaced, 12 pt. The title of the paper should be centered.
2 Step-by-Step Guide to Writing an MLA Research Paper Outline. 2.1 Choose a Topic and Define Your Thesis Statement. 2.2 Determine Main Headings Based on Key Points of Your Research. 2.3 Use Roman numerals (I, II, III) for Main Headings. 2.4 Identify Sub-Points for Each Main Heading.
MLA (Modern Language Association) style is most commonly used to write papers and cite sources within the liberal arts and humanities. This resource, updated to reflect the MLA Handbook (9th ed.), offers examples for the general format of MLA research papers, in-text citations, endnotes/footnotes, and the Works Cited page.
Examples of essay outlines. Examples of outlines for different types of essays are presented below: an argumentative, expository, and literary analysis essay. Argumentative essay outline. This outline is for a short argumentative essay evaluating the internet's impact on education. It uses short phrases to summarize each point.
Do not use a period after your title or after any heading in the paper (e.g., Works Cited). Begin your text on a new, double-spaced line after the title, indenting the first line of the paragraph half an inch from the left margin. Fig. 1. The top of the first page of a research paper.
Standardized formatting for papers and outlines. Formatting and Outlining in MLA: Outlining in MLA
Get started with MLA style. Learn how to document sources, set up your paper, and improve your teaching and writing. Document Sources Works Cited Quick Guide Learn how to use the MLA format template. Digital Citation Tool Build citations with our interactive template. In-Text Citations Get help with in-text citations. Endnotes and Footnotes Read our …
MLA Outline Format. The MLA format essay outline serves as the skeleton upon which your ideas will flesh out into a cohesive narrative. Here's a breakdown of the key components and formatting rules to keep in mind: Paper Specifications: Your MLA paper should be standard letter size (8.5x11 inches), with one-inch margins around the entire page ...
Formatting the Header in MLA. To create a header for your first page, follow these steps: Begin one inch from the top of the first page and flush with the left margin. Type your name, your instructor's name, the course name and number, and the date on separate lines, using double spaces between each.
In the case of a group project, list all names of the contributors, giving each name its own line in the header, followed by the remaining MLA header requirements as described below. Format the remainder of the page as requested by the instructor. In the upper left-hand corner of the first page, list your name, your instructor's name, the ...
MLA style is most commonly used to cite sources within the language arts, cultural studies, and other humanities disciplines. This resource, revised according to the 9th edition of the MLA manual published in April 2021, offers examples for the general format of MLA research papers, in-text citations, and the Works Cited page.
Revised on March 5, 2024. The first page of your MLA format paper starts with a four-line left-aligned header containing: Your full name. Your instructor's name. The course name and number. The date of submission. After the header, the title of the paper is centred on a new line, in title case. The header and title do not take any special ...
It gives full details of every source that you cited in an MLA in-text citation. Like the rest of an MLA format paper, the Works Cited should be left-aligned and double-spaced with 1-inch margins. You can use our free MLA Citation Generator to create and manage your Works Cited list. Choose your source type and enter the URL, DOI or title to ...
MLA Sample Argumentative Papers (Note: these sample papers are in MLA 7th ed. format). For sample papers in MLA 8th or 9th ed., please ask a librarian or check the Documenting Sources in MLA Style: 2016 Update: A Bedford/St. Martin's Supplement pp. 30-41, at Skyline College Library's Ready Reference shelf.
MLA General Format MLA Formatting and Style Guide; MLA In-Text Citations: The Basics; MLA Formatting Lists MLA Formatting Quotations; MLA Endnotes and Footnotes; MLA Works Cited Page: Basic Format; MLA Works Cited Page: Books; MLA Works Cited Page: Periodicals; MLA Works Cited: Electronic Sources (Web Publications) MLA Works Cited: Other Common ...
Alphanumeric Outlines. This is the most common type of outline and usually instantly recognizable to most people. The formatting follows these characters, in this order: Roman Numerals. Capitalized Letters. Arabic Numerals. Lowercase Letters. If the outline needs to subdivide beyond these divisions, use Arabic numerals inside parentheses and ...
Here's how to effectively structure your outline. Introduction: List your thesis statement and outline the main questions your essay will answer. Literature Review: Outline the key literature you plan to discuss and explain how it will relate to your thesis. Methodology: Explain the research methods you will use to gather and analyze the ...
A report writing format includes a title, table of contents, summary, introduction, body, conclusion, recommendations and appendices. Top report writing tips include writing a report outline, creating the body of the report before the introduction or conclusion, sticking to facts, and keeping your appendix at a reasonable size.
In-text citations: Author-page style. MLA format follows the author-page method of in-text citation. This means that the author's last name and the page number (s) from which the quotation or paraphrase is taken must appear in the text, and a complete reference should appear on your Works Cited page. The author's name may appear either in the ...
To create an MLA format title page, list the following on separate lines, left-aligned at the top of the page: Then leave a few blank lines and list the title of the paper, centered and in title case, halfway down the page. All text should be double-spaced and in the same font as the rest of the paper. Note: If you're using a title page ...
Begin your Works Cited page on a separate page at the end of your research paper. It should have the same one-inch margins and last name, page number header as the rest of your paper. Label the page Works Cited (do not italicize the words Works Cited or put them in quotation marks) and center the words Works Cited at the top of the page.