Critical PowerPoint Shortcuts – Claim Your FREE Training Module and Get Your Time Back!

How to Make a PowerPoint Presentation (Step-by-Step)
- PowerPoint Tutorials
- Presentation Design
- January 22, 2024
In this beginner’s guide, you will learn step-by-step how to make a PowerPoint presentation from scratch.
While PowerPoint is designed to be intuitive and accessible, it can be overwhelming if you’ve never gotten any training on it before. As you progress through this guide, you’ll will learn how to move from blank slides to PowerPoint slides that look like these.

Table of Contents
Additionally, as you create your presentation, you’ll also learn tricks for working more efficiently in PowerPoint, including how to:
- Change the slide order
- Reset your layout
- Change the slide dimensions
- Use PowerPoint Designer
- Format text
- Format objects
- Play a presentation (slide show)
With this knowledge under your belt, you’ll be ready to start creating PowerPoint presentations. Moreover, you’ll have taken your skills from beginner to proficient in no time at all. I will also include links to more advanced PowerPoint topics.
Ready to start learning how to make a PowerPoint presentation?
Take your PPT skills to the next level
Start with a blank presentation.
Note: Before you open PowerPoint and start creating your presentation, make sure you’ve collected your thoughts. If you’re going to make your slides compelling, you need to spend some time brainstorming.
For help with this, see our article with tips for nailing your business presentation here .
The first thing you’ll need to do is to open PowerPoint. When you do, you are shown the Start Menu , with the Home tab open.
This is where you can choose either a blank theme (1) or a pre-built theme (2). You can also choose to open an existing presentation (3).
For now, go ahead and click on the Blank Presentation (1) thumbnail.

Doing so launches a brand new and blank presentation for you to work with. Before you start adding content to your presentation, let’s first familiarize ourselves with the PowerPoint interface.
The PowerPoint interface

Here is how the program is laid out:
- The Application Header
- The Ribbon (including the Ribbon tabs)
- The Quick Access Toolbar (either above or below the Ribbon)
- The Slides Pane (slide thumbnails)
The Slide Area
The notes pane.
- The Status Bar (including the View Buttons)
Each one of these areas has options for viewing certain parts of the PowerPoint environment and formatting your presentation.
Below are the important things to know about certain elements of the PowerPoint interface.
The PowerPoint Ribbon

The Ribbon is contextual. That means that it will adapt to what you’re doing in the program.
For example, the Font, Paragraph and Drawing options are greyed out until you select something that has text in it, as in the example below (A).

Furthermore, if you start manipulating certain objects, the Ribbon will display additional tabs, as seen above (B), with more commands and features to help you work with those objects. The following objects have their own additional tabs in the Ribbon which are hidden until you select them:
- Online Pictures
- Screenshots
- Screen Recording
The Slides Pane

This is where you can preview and rearrange all the slides in your presentation.
Right-clicking on a slide in the pane gives you additional options on the slide level that you won’t find on the Ribbon, such as Duplicate Slide , Delete Slide , and Hide Slide .

In addition, you can add sections to your presentation by right-clicking anywhere in this Pane and selecting Add Section . Sections are extremely helpful in large presentations, as they allow you to organize your slides into chunks that you can then rearrange, print or display differently from other slides.

The Slide Area (A) is where you will build out your slides. Anything within the bounds of this area will be visible when you present or print your presentation.
Anything outside of this area (B) will be hidden from view. This means that you can place things here, such as instructions for each slide, without worrying about them being shown to your audience.

The Notes Pane is the space beneath the Slide Area where you can type in the speaker notes for each slide. It’s designed as a fast way to add and edit your slides’ talking points.
To expand your knowledge and learn more about adding, printing, and exporting your PowerPoint speaker notes, read our guide here .
Your speaker notes are visible when you print your slides using the Notes Pages option and when you use the Presenter View . To expand your knowledge and learn the ins and outs of using the Presenter View , read our guide here .

You can resize the Notes Pane by clicking on its edge and dragging it up or down (A). You can also minimize or reopen it by clicking on the Notes button in the Status Bar (B).
Note: Not all text formatting displays in the Notes Pane, even though it will show up when printing your speaker notes. To learn more about printing PowerPoint with notes, read our guide here .
Now that you have a basic grasp of the PowerPoint interface at your disposal, it’s time to make your presentation.
Adding Content to Your PowerPoint Presentation
Notice that in the Slide Area , there are two rectangles with dotted outlines. These are called Placeholders and they’re set on the template in the Slide Master View .
To expand your knowledge and learn how to create a PowerPoint template of your own (which is no small task), read our guide here .

As the prompt text suggests, you can click into each placeholder and start typing text. These types of placeholder prompts are customizable too. That means that if you are using a company template, it might say something different, but the functionality is the same.

Note: For the purposes of this example, I will create a presentation based on the content in the Starbucks 2018 Global Social Impact Report, which is available to the public on their website.
If you type in more text than there is room for, PowerPoint will automatically reduce its font size. You can stop this behavior by clicking on the Autofit Options icon to the left of the placeholder and selecting Stop Fitting Text to this Placeholder .
Next, you can make formatting adjustments to your text by selecting the commands in the Font area and the Paragraph area of the Home tab of the Ribbon.

The Reset Command: If you make any changes to your title and decide you want to go back to how it was originally, you can use the Reset button up in the Home tab .

Insert More Slides into Your Presentation
Now that you have your title slide filled in, it’s time to add more slides. To do that, simply go up to the Home tab and click on New Slide . This inserts a new slide in your presentation right after the one you were on.

You can alternatively hit Ctrl+M on your keyboard to insert a new blank slide in PowerPoint. To learn more about this shortcut, see my guide on using Ctrl+M in PowerPoint .
Instead of clicking the New Slide command, you can also open the New Slide dropdown to see all the slide layouts in your PowerPoint template. Depending on who created your template, your layouts in this dropdown can be radically different.

If you insert a layout and later want to change it to a different layout, you can use the Layout dropdown instead of the New Slide dropdown.
After inserting a few different slide layouts, your presentation might look like the following picture. Don’t worry that it looks blank, next we will start adding content to your presentation.

If you want to follow along exactly with me, your five slides should be as follows:
- Title Slide
- Title and Content
- Section Header
- Two Content
- Picture with Caption
Adding Content to Your Slides
Now let’s go into each slide and start adding our content. You’ll notice some new types of placeholders.

On slide 2 we have a Content Placeholder , which allows you to add any kind of content. That includes:
- A SmartArt graphic,
- A 3D object,
- A picture from the web,
- Or an icon.
To insert text, simply type it in or hit Ctrl+C to Copy and Ctrl+V to Paste from elsewhere. To insert any of the other objects, click on the appropriate icon and follow the steps to insert it.
For my example, I’ll simply type in some text as you can see in the picture below.

Slides 3 and 4 only have text placeholders, so I’ll go ahead and add in my text into each one.

On slide 5 we have a Picture Placeholder . That means that the only elements that can go into it are:
- A picture from the web

To insert a picture into the picture placeholder, simply:
- Click on the Picture icon
- Find a picture on your computer and select it
- Click on Insert
Alternatively, if you already have a picture open somewhere else, you can select the placeholder and paste in (shortcut: Ctrl+V ) the picture. You can also drag the picture in from a file explorer window.

If you do not like the background of the picture you inserted onto your slide, you can remove the background here in PowerPoint. To see how to do this, read my guide here .
Placeholders aren’t the only way to add content to your slides. At any point, you can use the Insert tab to add elements to your slides.
You can use either the Title Only or the Blank slide layout to create slides for content that’s different. For example, a three-layout content slide, or a single picture divider slide, as shown below.

In the first example above, I’ve inserted 6 text boxes, 3 icons, and 3 circles to create this layout. In the second example, I’ve inserted a full-sized picture and then 2 shapes and 2 text boxes.
The Reset Command: Because these slides are built with shapes and text boxes (and not placeholders), hitting the Reset button up in the Home tab won’t do anything.
That is a good thing if you don’t want your layouts to adjust. However, it does mean that it falls on you to make sure everything is aligned and positioned correctly.
For more on how to add and manipulate the different objects in PowerPoint, check out our step-by-step articles here:
- Using graphics in PowerPoint
- Inserting icons onto slides
- Adding pictures to your PowerPoint
- How to embed a video in PowerPoint
- How to add music to your presentation
Using Designer to generate more layouts ideas
If you have Office 365, your version of PowerPoint comes with a new feature called Designer (or Design Ideas). This is a feature that generates slide layout ideas for you. The coolest thing about this feature is that it uses the content you already have.
To use Designer , simply navigate to the Design tab in your Ribbon, and click on Design Ideas .

NOTE: If the PowerPoint Designer is not working for you (it is grey out), see my troubleshooting guide for Designer .
Change the Overall Design (optional)
When you make a PowerPoint presentation, you’ll want to think about the overall design. Now that you have some content in your presentation, you can use the Design tab to change the look and feel of your slides.
For additional help thinking through the design of your presentation, read my guide here .
A. Picking your PowerPoint slide size
If you have PowerPoint 2013 or later, when you create a blank document in PowerPoint, you automatically start with a widescreen layout with a 16:9 ratio. These dimensions are suitable for most presentations as they match the screens of most computers and projectors.
However, you do have the option to change the dimensions.
For example, your presentation might not be presented, but instead converted into a PDF or printed and distributed. In that case, you can easily switch to the standard dimensions with a 4:3 ratio by selecting from the dropdown (A).
You can also choose a custom slide size or change the slide orientation from landscape to portrait in the Custom Slide Size dialog box (B).

To learn all about the different PowerPoint slide sizes, and some of the issues you will face when changing the slide size of a non-blank presentation, read my guide here .
B. Selecting a PowerPoint theme
The next thing you can do is change the theme of your presentation to a pre-built one. For a detailed explanation of what a PowerPoint theme is, and how to best use it, read my article here .
In the beginning of this tutorial, we started with a blank presentation, which uses the default Office theme as you can see in the picture below.

That gives you the most flexibility because it has a blank background and quite simple layouts that work for most presentations. However, it also means that it’s your responsibility to enhance the design.
If you’re comfortable with this, you can stay with the default theme or create your own custom theme ( read my guide here ). But if you would rather not have to think about design, then you can choose a pre-designed theme.
Microsoft provides 46 other pre-built themes, which include slide layouts, color variants and palettes, and fonts. Each one varies quite significantly, so make sure you look through them carefully.
To select a different theme, go to the Design tab in the Ribbon, and click on the dropdown arrow in the Themes section .

For this tutorial, let’s select the Frame theme and then choose the third Variant in the theme. Doing so changes the layout, colors, and fonts of your presentation.

Note: The theme dropdown area is also where you can import or save custom themes. To see my favorite places to find professional PowerPoint templates and themes (and recommendations for why I like them), read my guide here .
C. How to change a slide background in PowerPoint
The next thing to decide is how you want your background to look for the entire presentation. In the Variants area, you can see four background options.

For this example, we want our presentation to have a dark background, so let’s select Style 3. When you do so, you’ll notice that:
- The background color automatically changes across all slides
- The color of the text on most of the slides automatically changes to white so that it’s visible on the dark background
- The colors of the objects on slides #6 and #7 also adjust, in a way we may not want (we’ll likely have to make some manual adjustments to these slides)

Note: If you want to change the slide background for just that one slide, don’t left-click the style. Instead, right-click it and select Apply to Selected Slides .
After you change the background for your entire presentation, you can easily adjust the background for an individual slide.

Inside the Format Background pane, you can see you have the following options:
- Gradient fill
- Picture or texture fill
- Pattern fill
- Hide background
You can explore these options to find the PowerPoint background that best fits your presentation.
D. How to change your color palette in PowerPoint
Another thing you may want to adjust in your presentation, is the color scheme. In the picture below you can see the Theme Colors we are currently using for this presentation.

Each PowerPoint theme comes with its own color palette. By default, the Office theme includes the Office color palette. This affects the colors you are presented with when you format any element within your presentation (text, shapes, SmartArt, etc.).

The good news is that the colors here are easy to change. To switch color palettes, simply:
- Go to the Design tab in the Ribbon
- In the Variants area, click on the dropdown arrow and select Colors
- Select the color palette (or theme colors) you want
You can choose among the pre-built color palettes from Office, or you can customize them to create your own.
As you build your presentation, make sure you use the colors from your theme to format objects. That way, changing the color palette adjusts all the colors in your presentation automatically.
E. How to change your fonts in PowerPoint
Just as we changed the color palette, you can do the same for the fonts.

Each PowerPoint theme comes with its own font combination. By default, the Office theme includes the Office font pairing. This affects the fonts that are automatically assigned to all text in your presentation.

The good news is that the font pairings are easy to change. To switch your Theme Fonts, simply:
- Go to the Design tab in the Ribbon
- Click on the dropdown arrow in the Variants area
- Select Fonts
- Select the font pairing you want
You can choose among the pre-built fonts from Office, or you can customize them to create your own.
If you are working with PowerPoint presentations on both Mac and PC computers, make sure you choose a safe PowerPoint font. To see a list of the safest PowerPoint fonts, read our guide here .
If you receive a PowerPoint presentation and the wrong fonts were used, you can use the Replace Fonts dialog box to change the fonts across your entire presentation. For details, read our guide here .
Adding Animations & Transitions (optional)
The final step to make a PowerPoint presentation compelling, is to consider using animations and transitions. These are by no means necessary to a good presentation, but they may be helpful in your situation.
A. Adding PowerPoint animations
PowerPoint has an incredibly robust animations engine designed to power your creativity. That being said, it’s also easy to get started with basic animations.
Animations are movements that you can apply to individual objects on your slide.

To add a PowerPoint animation to an element of your slide, simply:
- Select the element
- Go to the Animations tab in the Ribbon
- Click on the dropdown arrow to view your options
- Select the animation you want
You can add animations to multiple objects at one time by selecting them all first and then applying the animation.
B. How to preview a PowerPoint animation

There are three ways to preview a PowerPoint animation:
- Click on the Preview button in the Animations tab
- Click on the little star next to the slide
- Play the slide in Slide Show Mode
To learn other ways to run your slide show, see our guide on presenting a PowerPoint slide show with shortcuts .
To adjust the settings of your animations, explore the options in the Effect Options , Advanced Animation and the Timing areas of the Animation tab .

Note: To see how to make objects appear and disappear in your slides by clicking a button, read our guide here .
C. How to manage your animations in PowerPoint

The best way to manage lots of animations on your slide is with the Animation Pane . To open it, simply:
- Navigate to the Animations tab
- Select the Animation Pane
Inside the Animation Pane, you’ll see all of the different animations that have been applied to objects on your slide, with their numbers marked as pictured above.
Note: To see examples of PowerPoint animations that can use in PowerPoint, see our list of PowerPoint animation tutorials here .
D. How to add transitions to your PowerPoint presentation
PowerPoint has an incredibly robust transition engine so that you can dictate how your slides change from one to the other. It is also extremely easy to add transitions to your slides.
In PowerPoint, transitions are the movements (or effects) you see as you move between two slides.

To add a transition to a PowerPoint slide, simply:
- Select the slide
- Go to the Transitions tab in the Ribbon
- In the Transitions to This Slide area, click on the dropdown arrow to view your options
- Select the transition you want
To adjust the settings of the transition, explore the options in the Timing area of the Transitions tab.
You can also add the same transition to multiple slides. To do that, select them in the Slides Pane and apply the transition.
E. How to preview a transition in PowerPoint

There are three ways to preview your PowerPoint transitions (just like your animations):
- Click on the Preview button in the Transitions tab
- Click on the little star beneath the slide number in the thumbnail view
Note: In 2016, PowerPoint added a cool new transition, called Morph. It operates a bit differently from other transitions. For a detailed tutorial on how to use the cool Morph transition, see our step-by-step article here .
Save Your PowerPoint Presentation
After you’ve built your presentation and made all the adjustments to your slides, you’ll want to save your presentation. YOu can do this several different ways.

To save a PowerPoint presentation using your Ribbon, simply:
- Navigate to the File tab
- Select Save As on the left
- Choose where you want to save your presentation
- Name your presentation and/or adjust your file type settings
- Click Save
You can alternatively use the Ctrl+S keyboard shortcut to save your presentation. I recommend using this shortcut frequently as you build your presentation to make sure you don’t lose any of your work.

This is the standard way to save a presentation. However, there may be a situation where you want to save your presentation as a different file type.
To learn how to save your presentation as a PDF, see our guide on converting PowerPoint to a PDF .
How to save your PowerPoint presentation as a template
Once you’ve created a presentation that you like, you may want to turn it into a template. The easiest – but not technically correct – way, is to simply create a copy of your current presentation and then change the content.
But be careful! A PowerPoint template is a special type of document and it has its own parameters and behaviors.
If you’re interested in learning about how to create your own PowerPoint template from scratch, see our guide on how to create a PowerPoint template .
Printing Your PowerPoint Presentation
After finishing your PowerPoint presentation, you may want to print it out on paper. Printing your slides is relatively easy.

To open the Print dialog box, you can either:
- Hit Ctrl+P on your keyboard
- Or go to the Ribbon and click on File and then Print

Inside the Print dialog box, you can choose from the various printing settings:
- Printer: Select a printer to use (or print to PDF or OneNote)
- Slides: Choose which slides you want to print
- Layout: Determine how many slides you want per page (this is where you can print the notes, outline, and handouts)
- Collated or uncollated (learn what collated printing means here )
- Color: Choose to print in color, grayscale or black & white
There are many more options for printing your PowerPoint presentations. Here are links to more in-depth articles:
- How to print multiple slides per page
- How to print your speaker notes in PowerPoint
- How to save PowerPoint as a picture presentation
So that’s how to create a PowerPoint presentation if you are brand new to it. We’ve also included a ton of links to helpful resources to boost your PowerPoint skills further.
When you are creating your presentation, it is critical to first focus on the content (what you are trying to say) before getting lost inserting and playing with elements. The clearer you are on what you want to present, the easier it will be to build it out in PowerPoint.
If you enjoyed this article, you can learn more about our PowerPoint training courses and other presentation resources by visiting us here .
🔒 Unlock the PowerPoint Shortcuts Trusted by Industry Leaders KKR, American Express, HSBC, and More!
Join over 114,880 professionals from diverse fields including consulting, investment banking, advertising, marketing, sales, and business development who have supercharged their PowerPoint game with our proven methods.
✅ Customize compelling presentations effortlessly.
✅ Master time-saving techniques for faster deck creation.
✅ Boost your career prospects with top-notch PowerPoint skills.
Get FREE access to the Critical PowerPoint Shortcuts module of our premium training course by entering your name and email below.
DISCLAIMER: PC Users Only!
We respect your privacy and will keep your info safe and confidential.
About The Author

Popular Tutorials
- How to Strikethrough Text (l̶i̶k̶e̶ ̶t̶h̶i̶s̶) in Word, Excel & PowerPoint
- How to Make Animated Fireworks in PowerPoint (Step-by-Step)
- Strikethrough Shortcut (l̶i̶k̶e̶ ̶t̶h̶i̶s̶) for Word, Excel & PowerPoint
- How to Create a Flash Card Memory Game in PowerPoint (Like Jeopardy)
- Keyboard Shortcuts Not Working: Solved
PowerPoint Tutorial Categories
- Strategies & Opinions
- Shortcuts & Hacks
- Pictures, Icons, Videos, Etc.
- New Features
- Miscellaneous
- Charts & Data Viz
We help busy professionals save hours and gain peace of mind, with corporate workshops, self-paced courses and tutorials for PowerPoint and Word.
Work With Us
- Corporate Training
- Presentation & Template Design
- Courses & Downloads
- PowerPoint Articles
- Word Articles
- Productivity Resources
Find a Tutorial
- Free Training
- For Businesses
We help busy office workers save hours and gain peace of mind, with tips, training and tutorials for Microsoft PowerPoint and Word.
Master Critical PowerPoint Shortcuts – Secure Your FREE Training Module and Save Valuable Time!
⌛ Master time-saving expert techniques.
🔥 Create powerful presentations.
🚀 Propel your career to new heights.
We value your privacy – we keep your info safe.
Discover PowerPoint Hacks Loved by Industry Giants - KKR, AmEx, HSBC!
Over 114,880 professionals in finance, marketing and sales have revolutionized their PPT skills with our proven methods.
Gain FREE access to a full module of our premium PowerPoint training program – Get started today!
We hate spam too and promise to keep your information safe.
You are currently viewing a placeholder content from Facebook . To access the actual content, click the button below. Please note that doing so will share data with third-party providers.

- Get started with computers
- Learn Microsoft Office
- Apply for a job
- Improve my work skills
- Design nice-looking docs
- Getting Started
- Smartphones & Tablets
- Typing Tutorial
- Online Learning
- Basic Internet Skills
- Online Safety
- Social Media
- Zoom Basics
- Google Docs
- Google Sheets
- Career Planning
- Resume Writing
- Cover Letters
- Job Search and Networking
- Business Communication
- Entrepreneurship 101
- Careers without College
- Job Hunt for Today
- 3D Printing
- Freelancing 101
- Personal Finance
- Sharing Economy
- Decision-Making
- Graphic Design
- Photography
- Image Editing
- Learning WordPress
- Language Learning
- Critical Thinking
- For Educators
- Translations
- Staff Picks
- English expand_more expand_less
PowerPoint Tips - Simple Rules for Better PowerPoint Presentations
Powerpoint tips -, simple rules for better powerpoint presentations, powerpoint tips simple rules for better powerpoint presentations.

PowerPoint Tips: Simple Rules for Better PowerPoint Presentations
Lesson 17: simple rules for better powerpoint presentations.
/en/powerpoint-tips/embed-excel-charts-in-a-slide/content/
Simple rules for better PowerPoint presentations
Have you ever given a PowerPoint presentation and noticed that something about it just seemed a little … off? If you’re unfamiliar with basic PowerPoint design principles, it can be difficult to create a slide show that presents your information in the best light.
Poorly designed presentations can leave an audience feeling confused, bored, and even irritated. Review these tips to make your next presentation more engaging.
Don't read your presentation straight from the slides
If your audience can both read and hear, it’s a waste of time for you to simply read your slides aloud. Your audience will zone out and stop listening to what you’re saying, which means they won’t hear any extra information you include.
Instead of typing out your entire presentation, include only main ideas, keywords, and talking points in your slide show text. Engage your audience by sharing the details out loud.
Follow the 5/5/5 rule
To keep your audience from feeling overwhelmed, you should keep the text on each slide short and to the point. Some experts suggest using the 5/5/5 rule : no more than five words per line of text, five lines of text per slide, or five text-heavy slides in a row.

Don't forget your audience
Who will be watching your presentation? The same goofy effects and funny clip art that would entertain a classroom full of middle-school students might make you look unprofessional in front of business colleagues and clients.
Humor can lighten up a presentation, but if you use it inappropriately your audience might think you don’t know what you’re doing. Know your audience, and tailor your presentation to their tastes and expectations.
Choose readable colors and fonts
Your text should be easy to read and pleasant to look at. Large, simple fonts and theme colors are always your best bet. The best fonts and colors can vary depending on your presentation setting. Presenting in a large room? Make your text larger than usual so people in the back can read it. Presenting with the lights on? Dark text on a light background is your best bet for visibility.

Don't overload your presentation with animations
As anyone who’s sat through a presentation while every letter of every paragraph zoomed across the screen can tell you, being inundated with complicated animations and exciting slide transitions can become irritating.
Before including effects like this in your presentation, ask yourself: Would this moment in the presentation be equally strong without an added effect? Does it unnecessarily delay information? If the answer to either question is yes—or even maybe—leave out the effect.
Use animations sparingly to enhance your presentation
Don’t take the last tip to mean you should avoid animations and other effects entirely. When used sparingly, subtle effects and animations can add to your presentation. For example, having bullet points appear as you address them rather than before can help keep your audience’s attention.
Keep these tips in mind the next time you create a presentation—your audience will thank you. For more detailed information on creating a PowerPoint presentation, visit our Office tutorials .
/en/powerpoint-tips/three-tips-for-beautiful-powerpoint-presentations/content/
How-To Geek
8 tips to make the best powerpoint presentations.
Want to make your PowerPoint presentations really shine? Here's how to impress and engage your audience.
Quick Links
Table of contents, start with a goal, less is more, consider your typeface, make bullet points count, limit the use of transitions, skip text where possible, think in color, take a look from the top down, bonus: start with templates.
Slideshows are an intuitive way to share complex ideas with an audience, although they're dull and frustrating when poorly executed. Here are some tips to make your Microsoft PowerPoint presentations sing while avoiding common pitfalls.
It all starts with identifying what we're trying to achieve with the presentation. Is it informative, a showcase of data in an easy-to-understand medium? Or is it more of a pitch, something meant to persuade and convince an audience and lead them to a particular outcome?
It's here where the majority of these presentations go wrong with the inability to identify the talking points that best support our goal. Always start with a goal in mind: to entertain, to inform, or to share data in a way that's easy to understand. Use facts, figures, and images to support your conclusion while keeping structure in mind (Where are we now and where are we going?).
I've found that it's helpful to start with the ending. Once I know how to end a presentation, I know how best to get to that point. I start by identifying the takeaway---that one nugget that I want to implant before thanking everyone for their time---and I work in reverse to figure out how best to get there.
Your mileage, of course, may vary. But it's always going to be a good idea to put in the time in the beginning stages so that you aren't reworking large portions of the presentation later. And that starts with a defined goal.
A slideshow isn't supposed to include everything. It's an introduction to a topic, one that we can elaborate on with speech. Anything unnecessary is a distraction. It makes the presentation less visually appealing and less interesting, and it makes you look bad as a presenter.
This goes for text as well as images. There's nothing worse, in fact, than a series of slides where the presenter just reads them as they appear. Your audience is capable of reading, and chances are they'll be done with the slide, and browsing Reddit, long before you finish. Avoid putting the literal text on the screen, and your audience will thank you.
Related: How to Burn Your PowerPoint to DVD
Right off the bat, we're just going to come out and say that Papyrus and Comic Sans should be banned from all PowerPoint presentations, permanently. Beyond that, it's worth considering the typeface you're using and what it's saying about you, the presenter, and the presentation itself.
Consider choosing readability over aesthetics, and avoid fancy fonts that could prove to be more of a distraction than anything else. A good presentation needs two fonts: a serif and sans-serif. Use one for the headlines and one for body text, lists, and the like. Keep it simple. Veranda, Helvetica, Arial, and even Times New Roman are safe choices. Stick with the classics and it's hard to botch this one too badly.
There reaches a point where bullet points become less of a visual aid and more of a visual examination.
Bullet points should support the speaker, not overwhelm his audience. The best slides have little or no text at all, in fact. As a presenter, it's our job to talk through complex issues, but that doesn't mean that we need to highlight every talking point.
Instead, think about how you can break up large lists into three or four bullet points. Carefully consider whether you need to use more bullet points, or if you can combine multiple topics into a single point instead. And if you can't, remember that there's no one limiting the number of slides you can have in a presentation. It's always possible to break a list of 12 points down into three pages of four points each.
Animation, when used correctly, is a good idea. It breaks up slow-moving parts of a presentation and adds action to elements that require it. But it should be used judiciously.
Adding a transition that wipes left to right between every slide or that animates each bullet point in a list, for example, starts to grow taxing on those forced to endure the presentation. Viewers get bored quickly, and animations that are meant to highlight specific elements quickly become taxing.
That's not to say that you can't use animations and transitions, just that you need to pick your spots. Aim for no more than a handful of these transitions for each presentation. And use them in spots where they'll add to the demonstration, not detract from it.
Sometimes images tell a better story than text can. And as a presenter, your goal is to describe points in detail without making users do a lot of reading. In these cases, a well-designed visual, like a chart, might better convey the information you're trying to share.
The right image adds visual appeal and serves to break up longer, text-heavy sections of the presentation---but only if you're using the right images. A single high-quality image can make all the difference between a success and a dud when you're driving a specific point home.
When considering text, don't think solely in terms of bullet points and paragraphs. Tables, for example, are often unnecessary. Ask yourself whether you could present the same data in a bar or line chart instead.
Color is interesting. It evokes certain feelings and adds visual appeal to your presentation as a whole. Studies show that color also improves interest, comprehension, and retention. It should be a careful consideration, not an afterthought.
You don't have to be a graphic designer to use color well in a presentation. What I do is look for palettes I like, and then find ways to use them in the presentation. There are a number of tools for this, like Adobe Color , Coolors , and ColorHunt , just to name a few. After finding a palette you enjoy, consider how it works with the presentation you're about to give. Pastels, for example, evoke feelings of freedom and light, so they probably aren't the best choice when you're presenting quarterly earnings that missed the mark.
It's also worth mentioning that you don't need to use every color in the palette. Often, you can get by with just two or three, though you should really think through how they all work together and how readable they'll be when layered. A simple rule of thumb here is that contrast is your friend. Dark colors work well on light backgrounds, and light colors work best on dark backgrounds.
Spend some time in the Slide Sorter before you finish your presentation. By clicking the four squares at the bottom left of the presentation, you can take a look at multiple slides at once and consider how each works together. Alternatively, you can click "View" on the ribbon and select "Slide Sorter."
Are you presenting too much text at once? Move an image in. Could a series of slides benefit from a chart or summary before you move on to another point?
It's here that we have the opportunity to view the presentation from beyond the single-slide viewpoint and think in terms of how each slide fits, or if it fits at all. From this view, you can rearrange slides, add additional ones, or delete them entirely if you find that they don't advance the presentation.
The difference between a good presentation and a bad one is really all about preparation and execution. Those that respect the process and plan carefully---not only the presentation as a whole, but each slide within it---are the ones who will succeed.
This brings me to my last (half) point: When in doubt, just buy a template and use it. You can find these all over the web, though Creative Market and GraphicRiver are probably the two most popular marketplaces for this kind of thing. Not all of us are blessed with the skills needed to design and deliver an effective presentation. And while a pre-made PowerPoint template isn't going to make you a better presenter, it will ease the anxiety of creating a visually appealing slide deck.
17 PowerPoint Presentation Tips From Pro Presenters [+ Templates]
Published: April 26, 2024
PowerPoint presentations can be professional, attractive, and really help your audience remember your message.

If you don’t have much experience, that’s okay — I’m going to arm you with PowerPoint design tips from pro presenters, the steps you need to build an engaging deck, and templates to help you nail great slide design.
![→ Free Download: 10 PowerPoint Presentation Templates [Access Now]](https://no-cache.hubspot.com/cta/default/53/2d0b5298-2daa-4812-b2d4-fa65cd354a8e.png "powerpoint presentation guide")
Download Now
Buckle up for a variety of step-by-step explanations as well as tips and tricks to help you start mastering this program. There are additional resources woven in, and you’ll find expert perspectives from other HubSpotters along the way.
Table of Contents
How to Make a PowerPoint Presentation
Powerpoint presentation tips.
Microsoft PowerPoint is like a test of basic professional skills, and each PowerPoint is basically a presentation made of multiple slides.
Successful PowerPoints depend on three main factors: your command of PowerPoint's design tools, your attention to presentation processes, and being consistent with your style.
Keep those in mind as we jump into PowerPoint's capabilities.
Getting Started
1. open powerpoint and click ‘new.’.
A page with templates will usually open automatically, but if not, go to the top left pane of your screen and click New . If you’ve already created a presentation, select Open and then double-click the icon to open the existing file.

10 Free PowerPoint Templates
Download ten free PowerPoint templates for a better presentation.
- Creative templates.
- Data-driven templates.
- Professional templates.
You're all set!
Click this link to access this resource at any time.
Creating PowerPoint Slides
3. insert a slide..
Insert a new slide by clicking on the Home tab and then the New Slide button. Consider what content you want to put on the slide, including heading, text, and imagery.

- Finally, PowerPoint Live is a new tool that enables you to do more seamless presentations during video calls and may be a better overall match for doing presentations remotely. Check out this video:
11. Try Using GIFs.

12 Free Customizable Resume Templates
Fill out this form to access your free professionally-designed templates, available on:
- Microsoft Word
- Google Docs
- Microsoft PowerPoint
- Google Slides
15. Embed multimedia.
PowerPoint allows you to either link to video/audio files externally or to embed the media directly in your presentation. For PCs, two great reasons for embedding are:
- Embedding allows you to play media directly in your presentation. It will look much more professional than switching between windows.
- Embedding also means that the file stays within the PowerPoint presentation, so it should play normally without extra work (except on a Mac).
If you use PowerPoint for Mac it gets a bit complicated, but it can be done:
- Always bring the video and/or audio file with you in the same folder as the PowerPoint presentation.
- Only insert video or audio files once the presentation and the containing folder have been saved on a portable drive in their permanent folder.
- If the presentation will be played on a Windows computer, then Mac users need to make sure their multimedia files are in WMV format.
- Consider using the same operating system for designing and presenting, no matter what.
16. Bring your own hardware.
Between operating systems, PowerPoint is still a bit jumpy. Even between differing PPT versions, things can change. The easiest fix? Just bring along your own laptop when you're presenting.
The next easiest fix is to upload your PowerPoint presentation into Google Slides as a backup option — just make sure there is a good internet connection and a browser available where you plan to present.
Google Slides is a cloud-based presentation software that will show up the same way on all operating systems.
To import your PowerPoint presentation into Google Slides:
- Navigate to slides.google.com . Make sure you’re signed in to a Google account (preferably your own).
- Under Start a new presentation , click the empty box with a plus sign. This will open up a blank presentation.
- Go to File , then Import slides .
- A dialog box will come up. Tap Upload.
- Click Select a file from your device .
- Select your presentation and click Open .
- Select the slides you’d like to import. If you want to import all of them, click All in the upper right-hand corner of the dialog box.
- Click Import slides.
When I tested this out, Google Slides imported everything perfectly, including a shape whose points I had manipulated. This is a good backup option to have if you’ll be presenting across different operating systems.
17. Use Presenter View.
In most presentation situations, there will be both a presenter’s screen and the main projected display for your presentation.
PowerPoint has a great tool called Presenter View, which can be found in the Slide Show tab of PowerPoint. Included in the Presenter View is an area for notes, a timer/clock, and a presentation display.
For many presenters, this tool can help unify their spoken presentation and their visual aid. You never want to make the PowerPoint seem like a stack of notes that you’re reading off of.
Use the Presenter View option to help create a more natural presentation.
Pro Tip: At the start of the presentation, you should also hit CTRL + H to make the cursor disappear. Hitting the “A” key will bring it back if you need it.
Your Next Great PowerPoint Presentation Starts Here
Now that you have these style, design, and presentation tips under your belt, you should feel confident to create your PowerPoint presentation.
But if you can explore other resources to make sure your content hits the mark. After all, you need a strong presentation to land your point and make an impression.
With several templates to choose from — both in PowerPoint and available for free download — you can swiftly be on your way to creating presentations that wow your audiences.
Editor's note: This post was originally published in September 2013 and has been updated for comprehensiveness.
![Blog - Beautiful PowerPoint Presentation Template [List-Based]](https://no-cache.hubspot.com/cta/default/53/013286c0-2cc2-45f8-a6db-c71dad0835b8.png "powerpoint presentation guide")
Don't forget to share this post!
Related articles.
![How to Create the Best PowerPoint Presentations [Examples & Templates]](https://blog.hubspot.com/hubfs/powerpoint.webp "powerpoint presentation guide")
How to Create the Best PowerPoint Presentations [Examples & Templates]
![How to Write an Ecommerce Business Plan [Examples & Template]](https://blog.hubspot.com/hubfs/ecommerce%20business%20plan.png "powerpoint presentation guide")
How to Write an Ecommerce Business Plan [Examples & Template]
![How to Create an Infographic in Under an Hour — the 2024 Guide [+ Free Templates]](https://blog.hubspot.com/hubfs/Make-infographic-hero%20%28598%20%C3%97%20398%20px%29.jpg "powerpoint presentation guide")
How to Create an Infographic in Under an Hour — the 2024 Guide [+ Free Templates]
![20 Great Examples of PowerPoint Presentation Design [+ Templates]](https://blog.hubspot.com/hubfs/powerpoint-presentation-examples.webp "powerpoint presentation guide")
20 Great Examples of PowerPoint Presentation Design [+ Templates]

Get Buyers to Do What You Want: The Power of Temptation Bundling in Sales

How to Create an Engaging 5-Minute Presentation
![How to Start a Presentation [+ Examples]](https://blog.hubspot.com/hubfs/how-to-start-presenting.webp "powerpoint presentation guide")
How to Start a Presentation [+ Examples]

120 Presentation Topic Ideas Help You Hook Your Audience

The Presenter's Guide to Nailing Your Next PowerPoint
![How to Create a Stunning Presentation Cover Page [+ Examples]](https://blog.hubspot.com/hubfs/presentation-cover-page_3.webp "powerpoint presentation guide")
How to Create a Stunning Presentation Cover Page [+ Examples]
Marketing software that helps you drive revenue, save time and resources, and measure and optimize your investments — all on one easy-to-use platform

5 golden rules of PowerPoint design
april 30, 2024
by Deb Ashby
Wondering how to design the perfect PowerPoint presentation? It's easier than you think–just follow five simple rules to get started:
1. Consider using templates
When building a slide deck, it’s important to maintain consistency throughout. We want to ensure we are using consistent font styles, colors and themes. This can be tricky when designing from scratch, so why not start from a template?
Microsoft Create contains hundreds of pre-made, customizable PowerPoint templates, which means you don’t have to start from scratch and the fonts and colors are already set for you.
Simply choose a template from the gallery, customize it as needed, and you are done!

2. No walls of text
We’ve all seen PowerPoint presentations where slides contain too much text. The human brain struggles to listen and read at the same time. If you are presenting to an audience, keep the text on slides to a minimum.
Consider employing the “5-5-5" rule. No more than 5 lines, no more than 5 words, no more than 5 minutes. Think short and sharp memory joggers instead of rambling paragraphs.
Where possible, consider replacing text with visuals to represent your point. People remember images more than words.

3. Be mindful of colors and fonts
No one wants their audience to leave with a headache after an hour of straining to read slides. We need to ensure that our presentation is easy to read for everyone – even for those in the nosebleed seats at the back! Think about the font you are using. Is it appropriate for the presentation? What about the font size? Can people at the back easily read? What about people with visual impairment? Ensure all text is at least 24pts.
When it comes to color, ensure all slides have good contrast. Dark backgrounds should have light font and vice versa.
4. Use animation sparingly
Animation can really liven up an otherwise flat presentation. However, it should be used thoughtfully and sparingly. Too much of the wrong type of animation with objects flying in and zooming around the screen, while fun, can look confusing and unprofessional.
Animation should be subtle (especially for pitch decks and other formal presentations). With every animation you add, ask yourself, "Is this going to enhance my presentation or distract from it?"
5. Engage your audience
When presenting to an audience, there is usually an awkward time before the presentation begins while the speaker waits for everyone to arrive. During this time, people may start scrolling on their phones or get distracted with work emails, and it can be hard to pull the audience back.
To avoid this issue, work to grab your audience's attention before the presentation even starts. Instead of just having the title slide on the screen, consider creating "kiosk slides." These are a series of slides that contain a combination of interesting things for the audience to look at or engage with. Maybe you have an interesting image? A funny quote or fun facts? Or maybe there is a question you want them to think about prior to the session?
Create these slides and have them automatically cycle round before the presentation starts.

Related topics
- PRO Courses Guides New Tech Help Pro Expert Videos About wikiHow Pro Upgrade Sign In
- EDIT Edit this Article
- EXPLORE Tech Help Pro About Us Random Article Quizzes Request a New Article Community Dashboard This Or That Game Popular Categories Arts and Entertainment Artwork Books Movies Computers and Electronics Computers Phone Skills Technology Hacks Health Men's Health Mental Health Women's Health Relationships Dating Love Relationship Issues Hobbies and Crafts Crafts Drawing Games Education & Communication Communication Skills Personal Development Studying Personal Care and Style Fashion Hair Care Personal Hygiene Youth Personal Care School Stuff Dating All Categories Arts and Entertainment Finance and Business Home and Garden Relationship Quizzes Cars & Other Vehicles Food and Entertaining Personal Care and Style Sports and Fitness Computers and Electronics Health Pets and Animals Travel Education & Communication Hobbies and Crafts Philosophy and Religion Work World Family Life Holidays and Traditions Relationships Youth
- Browse Articles
- Learn Something New
- Quizzes Hot
- This Or That Game
- Train Your Brain
- Explore More
- Support wikiHow
- About wikiHow
- Log in / Sign up
- Computers and Electronics
- Presentation Software
- PowerPoint Presentations
Simple Steps to Make a PowerPoint Presentation
Last Updated: April 28, 2024 Fact Checked
Creating a New PowerPoint
Creating the title slide, adding a new slide, adding content to slides, adding transitions, testing and saving your presentation.
This article was co-authored by wikiHow staff writer, Darlene Antonelli, MA . Darlene Antonelli is a Technology Writer and Editor for wikiHow. Darlene has experience teaching college courses, writing technology-related articles, and working hands-on in the technology field. She earned an MA in Writing from Rowan University in 2012 and wrote her thesis on online communities and the personalities curated in such communities. This article has been fact-checked, ensuring the accuracy of any cited facts and confirming the authority of its sources. This article has been viewed 4,327,756 times. Learn more...
Do you want to have your data in a slide show? If you have Microsoft 365, you can use PowerPoint! PowerPoint is a program that's part of the Microsoft Office suite (which you have to pay for) and is available for both Windows and Mac computers. This wikiHow teaches you how to create your own Microsoft PowerPoint presentation on a computer.
How to Make a PowerPoint Presentation
- Open the PowerPoint app, select a template and theme, then like “Create.”
- Click the text box to add your title and subtitle to create your title slide.
- Click the “Insert” tab, then “New Slide” to add another slide.
- Choose the type of slide you want to add, then add text and pictures.
- Rearrange slides by dragging them up or down in the preview box.
Things You Should Know
- Templates make it easy to create vibrant presentations no matter your skill level.
- When adding photos, you can adjust their sizes by clicking and dragging in or out from their corners.
- You can add animated transitions between slides or to individual elements like bullet points and blocks of text.

- If you don't have a Microsoft Office 365 subscription, you can use the website instead of the desktop app. Go to https://powerpoint.office.com/ to use the website version.
- You can also use the mobile app to make presentations, though it's easier to do this on a computer, which has a larger screen, a mouse, and a keyboard.

- If you don't want to use a template, just click the Blank option in the upper-left side of the page and skip to the next part.

- Skip this step if your selected template has no themes available.

- If you're creating a PowerPoint presentation for which an elaborate title slide has been requested, ignore this step.

- You can change the font and size of text used from the Home tab that's in the orange ribbon at the top of the window.

- You can also just leave this box blank if you like.

- You can also click and drag in or out one of a text box's corners to shrink or enlarge the text box.

- On a Mac, you'll click the Home tab instead. [1] X Research source

- Clicking the white slide-shaped box above this option will result in a new text slide being inserted.

- Title Slide
- Title and Content
- Section Header
- Two Content
- Content with Caption
- Picture with Caption

- Naturally, the title slide should be the first slide in your presentation, meaning that it should be the top slide in the left-hand column.

- Skip this step and the next two steps if your selected slide uses a template that doesn't have text boxes in it.

- Text boxes in PowerPoint will automatically format the bulk of your text for you (e.g., adding bullet points) based on the context of the content itself.
- You can add notes that the Presentation will not include (but you'll still be able to see them on your screen) by clicking Notes at the bottom of the slide.

- You can change the font of the selected text by clicking the current font's name and then clicking your preferred font.
- If you want to change the size of the text, click the numbered drop-down box and then click a larger or smaller number based on whether you want to enlarge or shrink the text.
- You can also change the color, bolding, italicization, underlining, and so on from here.

- Photos in particular can be enlarged or shrunk by clicking and dragging out or in one of their corners.

- Remember to keep slides uncluttered and relatively free of distractions. It's best to keep the amount of text per slide to around 33 words or less. [2] X Research source

- Slide content will animate in the order in which you assign transitions. For example, if you animate a photo on the slide and then animate the title, the photo will appear before the title.
- Make your slideshow progress automatically by setting the speed of every transition to align with your speech as well as setting each slide to Advance . [3] X Trustworthy Source Microsoft Support Technical support and product information from Microsoft. Go to source

- If you need to exit the presentation, press Esc .

- Windows - Click File , click Save , double-click This PC , select a save location, enter a name for your presentation, and click Save .
- Mac - Click File , click Save As... , enter the presentation's name in the "Save As" field, select a save location by clicking the "Where" box and clicking a folder, and click Save .
Community Q&A
- If you save your PowerPoint presentation in .pps format instead of the default .ppt format, double-clicking your PowerPoint presentation file will prompt the presentation to open directly into the slideshow view. Thanks Helpful 5 Not Helpful 0
- If you don't have Microsoft Office, you can still use Apple's Keynote program or Google Slides to create a PowerPoint presentation. Thanks Helpful 0 Not Helpful 0

- Your PowerPoint presentation (or some features in it) may not open in significantly older versions of PowerPoint. Thanks Helpful 1 Not Helpful 2
- Great PowerPoint presentations avoid placing too much text on one slide. Thanks Helpful 0 Not Helpful 0
You Might Also Like

- ↑ https://onedrive.live.com/view.aspx?resid=DBDCE00C929AA5D8!252&ithint=file%2cpptx&app=PowerPoint&authkey=!AH4O9NxcbehqzIg
- ↑ https://www.virtualsalt.com/powerpoint.htm
- ↑ https://support.microsoft.com/en-us/office/set-the-timing-and-speed-of-a-transition-c3c3c66f-4cca-4821-b8b9-7de0f3f6ead1#:~:text=To%20make%20the%20slide%20advance,effect%20on%20the%20slide%20finishes .
About This Article

- Send fan mail to authors
Reader Success Stories
Artis Holland
Sep 22, 2016
Is this article up to date?

Oct 18, 2016
Jul 23, 2016
Margery Niyi
Sep 25, 2017
Jul 21, 2016

Featured Articles

Trending Articles

Watch Articles

- Terms of Use
- Privacy Policy
- Do Not Sell or Share My Info
- Not Selling Info
Keep up with tech in just 5 minutes a week!
How to Get Started with PowerPoint + Guide and Resources
- Share on Facebook
- Share on Twitter
By Al Boicheva
in Freebies , How-To Tutorials
3 years ago
Viewed 3,924 times
Spread the word about this article:

PowerPoint is a presentation tool that’s been around for speakers ever since its initial release in 1990. It’s still relevant and still allows speakers from educators to sales executives to catch their audience’s attention. In this article we will review how to get started with PowerPoint, why is the tool still effective, and why you should use it.
Article overview: 1. Why use PowerPoint? 2. Why is PowerPoint still popular? 3. What are the main features? 4. Less known but valuable features 5. How to get started? 6. Benefits of using templates 7. More PowerPoint resources
1. Why use PowerPoint?
This tool is for each and every one of us who finds presentations stressful and needs our audience to focus on the visuals instead of focusing on us. However, this is just barely scratching the surface of PowerPoint’s importance in business and education.
- Setting the flow through your visuals: When you make a PowerPoint presentation, by planning each slide you plan the flow of the entire presentation. You control which slides to focus on, the tempo, and the performance.
- Visualizing your concept: The core purpose of your presentation is to help your audience visualize your message. When you put the right infographics, images, and videos, your viewers can create the full picture in their minds.
- Use it as a tool of persuasion: You can sell an idea to your audience way easier by visualizing the benefits.
2. Why is PowerPoint Still Popular?
You’ve probably come across articles by popular media websites of the sort “ Why are you still using PowerPoint? “, “ Why do you still live in the 90s? “, “ Stop Using PowerPoint ” and others of the sort. To some degree, it is true that with the rising popularity of explainer videos for online presentations and other tools, PowerPoints come as too classic, linear, and basic.
However, despite it all, speakers still choose PowerPoint for their presentations. Why is that?
Benefits of using PowerPoint:
- Accessible: the tool doesn’t need monthly subscriptions, it comes for free for Windows and Mac users, as well as for Android and iOS.
- Easy to Learn: The learning curve is minimal, as the tool is very intuitive and it’s very easy to master basic features.
- Easy to Use: Most people refuse to drop PowerPoint because of the convenience of its simplicity. It’s the most useful, accessible way to create and present concepts. You navigate your slides with a simple keystroke. The drag and drop option also allows you to modify and re-order your slides.
- Customizable: For software that’s been around for decades, the community offers thousands of presentation templates, free and paid, all of them customizable. No matter how do you imagine your presentation in terms of slides, colors, sections; there are templates for you. You can also build your own templates from scratch.
- Organized: The whole mindset of PowerPoint pushes you to organize your concept into chapters and bullet points. This way it reminds you to stay focused on your main points. You will have an organized presentation even you aren’t putting effort to organize it.
- Easy to Deliver: PowerPoint slides are easy to see and read by a large audience and easy to navigate without breaking eye contact with the viewers.
In short, presenters still use PowerPoint for its convenient nature. Anyone can put a presentation together, it replaces note cards and keeps your subject flowing and versatile. It’s easily accessible and works on every device. It gives you control over your presentation and engages the audience.
And, last, everything can look good if it’s on a slide.
3. What are the Main Features
Despite being user-friendly and basic, PowerPoint has a lot of power hiding beneath the surface.
🎨 Design Features
The tool offers design features to help you customize your slides the way you want. You can start creating your layouts and templates from scratch or use a pre-made template and adapt it to your concept. Everything is editable from images and colors to fonts.
You can also use the page setup to optimize your presentation for the display size. It all depends on where you’ll be presenting. If you do it via projector, it means to use a larger screen ratio in comparison to when you present on a computer screen.
🎬 Animation Features
PowerPoint also has animations for different elements and slide transitions. These are also customizable, as you can edit the transition effects, their timing or set an on-click or auto transition between the slides. You can also arrange slides for a slide show and add audio.
📽️ Presentation Features
The tool packs built-in notes so when you’re printing your presentation slides you can ass presenter notes beside each slide. This is a very useful feature for the speaker to clarify points without putting too much text to the slides, that were meant for the audience. You can also pre-record narration for your presentation and make it perfect through the rehearsal function.
✔️ Compatibility
Besides the obvious integration with other Microsoft Office tools, PowerPoint has image, audio, and video support if you wish to embed videos to play within the program. It also supports exporting presentation files for online multi-user editing.
4. Less Used but Valuable Features
Here I will list less known features that are extremely valuable and can save a lot of headaches.
- Live subtitles: The tool allows you to activate subtitles for Presenter mode so you can make your presentation more accessible. Click Slideshow Tab/ Check "Always use subtitles"/ Choose mic and languages settings/ Go to Presenter View
- Accessibility Checker : Just like in content writing, you can put alt text to all your images, object, and graphs. This is for viewers who use a screen reader due to a disability. You also need to make sure your information order is correct, add slide titles, and so on. This tool helps you find slides that don’t check out in these areas.
- Built-In Visuals: Unlike the ancient PowerPoint SmartArt, these built-in icons, photos, and illustrations are modern and on point. You can easily find these galleries in the Insert menu. Double Click Photo/ Click Photo Tab/ Crop
- Crop: You can actually trim a photo that doesn’t fit well in your space instead of distorting it.
- Remove Background: To save time from manually removing background from images in your photo-editing software, you can do that quickly in PowerPoint with one click. Double Click Photo/ click Photo tab/ Remove Background
- PowerPoint Zoom: This feature allows you to jump to and from specific slides and sections on the go during the presentation. Insert/ Zoom
- Clean-Up: It takes the manual work of removing metadata, speaker notes, sensitive info, annotations, and others before you need to send your presentation out.
- Stretch to Align Shapes: The first object you select becomes the reference for the other selected shapes. Meaning, this feature allows you to align all of them in one click.
- Convert Word Document to PowerPoint: You can do that with a single click.
Sounds good to you? In this case, you seem ready to make your first PowerPoint presentation.
5. How to Get Started with PowerPoint?
There are numerous splendid free video tutorials for you to look at. However, before you get to any of that, it’s important to first know the key elements of the program itself.
There are a few main things, or key actions, you will do when creating your presentation.
- Creating your slides: these are the pages to your presentation.
- Adding content: you’ll be filling your slides with text content, data viz, images and videos.
- Setting a theme: you’ll either make your own theme or customize an existing template to best fit your preferences.
- Getting ready: the last thing before presenting is to prepare your notes and presenter view.
In order to do perform all of these actions, you will use the menu. Here I’ll list and explain the tabs you’ll be working with.

Menus and Toolbars
- File: This is the menu where you save, share and export your presentation files.
- Home: The home of all the tools you need. Here you can start a new slide, change the layout, add sections, change text and paragraph settings.
- Insert: The menu you will use to add content to your slide: images, shapes, screenshots, tables, charts, links, and more.
- Design: Here is where your design options are. You can change themes, color schemes, and styles from this menu. As well as change the slide background.
- Transitions: Here’s the library of the traditions you can use and set up how your slides will change from one to another.
- Animations: In this tab, you can choreograph movements of elements on your slides.
- Slide Show: This menu helps you set up what will your presentation look like to your audience.
- Review: Here you can add comments, compare presentations, and even run spell checks.
- View: In this tab, you have the options to look at your presentation in various ways. It depends on where you are in the creation or delivery process.
- Tools: This tab changes depending on the elements you’re working on. For example, if you click a shape, you will get the Drawing Tools tab. If you click on an image, the Picture Tools tab will appear. Other tabs include Chart Tools, Table Tools, Video Tools, and SmartArt Tools.
How to Make Your First PowerPoint Presentation: The Short Version

Now let’s have a look at the basics of how to create a presentation.
1. Open PowerPoint
2. Select one of the options :
- Blank Presentation: select this option to create a presentation from scratch
- Select a Template: Choose one of the templates to work with
That’s it. Now you can add new slides by clicking Home/New Slide . You can also select the layout of each slide via the dropdown Layout menu.
3. Add and format text. You can start adding your text content simply by placing your cursor on the slide to start typing. To format your text, select it, and then go to the Home tab where you’ll find options for font, font size, and font style. By selecting the text, you can also make each line a bullet point with the Bullets and Numbering options in the same menu.
4. Add your visuals. Go to the Insert tab and choose what element you need to add. If you want an image, select Picture and browse for the image you wish to insert. The same goes for Shapes , Chart . Icons and SmartArt .
And there you have it. A very simple presentation that covers the basics.
From there, you can advance your skills by watching this complete guide to PowerPoint:
Or get familiar with some cool techniques that will make your work with PowerPoint even easier:
6. The Benefits of Using PowerPoint Templates
PowerPoint is an absolute powerhouse in the right hands despite its seemingly limited nature. Especially if you have the advantage of templates. The blank title slide can look very menacing for non-designers. Where exactly to start with it? You have to plan your content and the flow of your presentation AND to make it look good and modern. Here’s where pre-made editable templates come into action.
- If you aren’t an experienced designer, you can adjust an already designed by professionals template.
- Adapting a pre-made template is really easy for branding . You simply change the colors, fonts, and graphics to match those of your brand, business, school, or university and Woolah! There’s your brand presentation.
- It’s very quick to make as you don’t need to start inventing the entire presentation design from scratch.
- And on top of that, you will keep the design consistent .

Some Free PowerPoint Templates
Hey! We added a brand new presentation templates category to our collection of graphics! Our creative designers rolled up their sleeves to prove PowerPoint presentation templates are still relevant. This is why they re-imagined the whole concept and crafted their own take on ultra-modern and trendy multipurpose templates suitable for the ever-changing design standards.
Below you will see part of the templates, some are completely free for personal and commercial use. You can download them now and test them for your own presentation. It would be our pleasure.
Free Educational Presentation Templates for Online Lessons

This pack of templates by our designers at GraphicMama comes for free with 30 lesson slides and 2 color themes. Ideal for educational purposes.
- Slides : 30
- Theme : Education
- Fonts : Free web fonts
- Files : PPTX, PDF, as well as PNG/SVG files of all image assets.
- License : Royalty-free
Free Business PowerPoint Presentation Template

This free PowerPoint template had 6 business-related slides. Perfect for reports, business plans, analysis, or product introduction. This PPT template is designed in a modern style, giving the feeling of a more professional presentation.
Including a total of 6 presentation slide designs, all in HQ quality (1920×1080 resolution), this free business PowerPoint template will give you the opportunity to create amazing, professional presentations.
- Theme : Business
Free Hand-Drawn PowerPoint Presentation

Including a total of 8 different slides, all in HD quality and 16:9 aspect ratio. This free Powerpoint template will give you an excellent base to make a lasting impression.
Free Corporate Presentation Template

This PPT template is designed in a modern style, giving the feeling of a more professional presentation. Including a total of 6 presentation slide designs, all in HQ quality.
Ultimate Infographic Template Collection – Mega Bundle

The one we call “the big boy”. This multipurpose collection is our best-seller infographic bundle. It includes 539 infographic templates with steps, processes, cycles, flowcharts, timelines, lists, maps, and basically everything. In addition, the infographics are made in different graphic styles, which will help you easily select the ones that suit the exact design you need to present your concept best.
- Subjects: Slides for over 20 different subjects, including ecology, business, education, technology, office life, statistics, medicine, marketing, science.
- Infographics: steps, statistical, informational, timeline, process, geographic, comparison infographics, hierarchical, list, tables, conceptual illustrations.
- Styles: Flat, 3D, gradients, minimalistic, cartoons, full illustrations, paper cutout style, dark mode, futuristic, isometric.
This collection of templates is suitable for both designers and non-professionals to create beautiful infographics fast and easily. All infographic templates come as fully editable vector Ai, Eps, Photoshop (.psd), and PowerPoint (.pptx) file formats, also compatible with Google Slides and there are 20 free-to-download infographic templates .
7. More PowerPoint Resources
To end on a high note, here is a list of collections with valuable resources for your future PowerPoint presentations.
Valuable materials and insights for better PowerPoint presentations:
- 10 PowerPoint Tutorials to Help You Master PowerPoint
- How to Make an Infographic in PowerPoint: The Beginners’ Guide
- 12 PowerPoint Presentation Tips To Dramatically Boost Your Efficiency
- Graphic Mama’s Modern Templates for New Era of PowerPoint Presentations
- How to Add Audio to PowerPoint: The Quick Step-by-Step Guide
Articles with free PowerPoint resources:
- The Best Free PowerPoint Templates to Download in 2022
- 25 Free Education PowerPoint Templates For Lessons, Thesis, and Online Lectures
- 100+ Free PowerPoint Graphics For Better Presentations [Free PPT]
- Need PowerPoint Backgrounds? The Best Places to Check Out [+ Freebies]
In Conclusion
PowerPoint is old as time and ever-changing to match modern times and stay trendy. The default power tool for presentations isn’t going anywhere soon as it’s easy to learn and adapt, intuitive, and familiar. Due to its large community that’s been growing for decades, there are thousands of resources, tutorials, and templates to use to your advantage. Ready to get started with PowerPoint?

Add some character to your visuals
Cartoon Characters, Design Bundles, Illustrations, Backgrounds and more...
Like us on Facebook
Subscribe to our newsletter
Be the first to know what’s new in the world of graphic design and illustrations.
- [email protected]
Browse High Quality Vector Graphics
E.g.: businessman, lion, girl…
Related Articles
100+ very merry free christmas vectors, backpack of free school vectors: characters, graphic elements, icons, patterns and more, top 20 free fonts for 2020: trendy & evergreen, the best free icon packs everyone must download in 2020, get started with adobe illustrator: 12 tutorials to step up your game [2022], 500+ free and paid powerpoint infographic templates:, enjoyed this article.
Don’t forget to share!
- Comments (0)

Al Boicheva
Al is an illustrator at GraphicMama with out-of-the-box thinking and a passion for anything creative. In her free time, you will see her drooling over tattoo art, Manga, and horror movies.

Thousands of vector graphics for your projects.
Hey! You made it all the way to the bottom!
Here are some other articles we think you may like:

How-To Tutorials
8 google classroom tutorials for teachers to start online lessons.
by Lyudmil Enchev

Create with GraphicMama
How to create a character profile for your brand mascot [+ free character design template].
by Al Boicheva

Free Vectors
Free vector graphics on freepik by graphicmama.
by Iveta Pavlova
Looking for Design Bundles or Cartoon Characters?
A source of high-quality vector graphics offering a huge variety of premade character designs, graphic design bundles, Adobe Character Animator puppets, and more.
PowerPoint Presentation Best Practices: Tips & Resources
- Slide Content
- The Presentation: Public Speaking
- Tips & Resources
Watch your timing, both while speaking and going through your slides. You don't want to go too fast, but make sure you don't go over your allotted time, either. (This is where practice comes in!) You might want to leave a few minutes at the end for questions.
Sort Your Slides
Try breaking your slides into smaller chunks or segments, and make sure they flow. But don’t use too many slides, either; find a nice middle ground. If you look at all of them in the slide sorter, do they seem to flow logically without your speech backing them up?
The "B" Key
During your presentation (on either PowerPoint or Keynote) you can press the "B" key on the keyboard, and the screen will go blank. This is useful if you need to go off topic for a minute, or you want people to focus on you while you say something extremely important. Press "B" again and your presentation will reappear.
- Keep it simple, but not simplistic
- Have a theme and be consistent
- Be smart with colors
- Choose fonts wisely
- Use high-quality graphics, not clip art
- Try using video or audio
- Minimize distractions in your slides
- Pace yourself
- Break up your slides into small chunks
- Check your spelling and grammar
- Don’t use stale built-in templates
- Don’t throw off your audience with fancy fonts
- Don’t use distracting animations and transitions
- Don’t use clip art
- Don’t put an entire paragraph in your slide
- Don’t go too fast
- Don't read from cue cards word-for-word
- Don’t stress—act relaxed and natural, and your audience will be more receptive
- "Design Tips" - Garr Reynolds Tips and slide examples from a communication expert.
- "10 PowerPoint Tips to Make Your Slides More Effective" - iSpring Top 10 tips, written by Ferry Pereboom, the co-founder of a design agency.
- Presentation Zen: "What is good presentation design?" - Garr Reynolds Tips and slide examples from a communication expert.
- "Top 10 Tips to Make Your PowerPoint Suck Way Less" - Your PowerPoint Sucks Top 10 tips, other articles, examples, and resources.
- "Speak up: Preparing an Engaging Presentation" - Amherst College Tips on presenting a public speech from Amherst College's Writing Center.
- “Basic tasks for creating a PowerPoint presentation” - Microsoft A guide for getting started with PowerPoint, with tips for creating an effective presentation at the bottom.
- "Delivery Tips" - Garr Reynolds Public speaking tips from a communication expert.
- "Preparation Tips" - Garr Reynolds Preparation tips for presenting from a communication expert.
- Canva Slide builder with professional and artistic templates.
- SlideModel Professional slide and theme templates.
- PresentationGO Free templates, slides, graphics, diagrams, tables, etc.
- << Previous: The Presentation: Public Speaking
- Last Updated: Dec 8, 2023 12:36 PM
- URL: https://libguides.hccfl.edu/powerpoint
© 2024 | All rights reserved

PowerPoint for Windows training

Other versions
PowerPoint for Mac Help
Additional help
PowerPoint help
PowerPoint keyboard shortcuts
LinkedIn Learning
PowerPoint templates
Microsoft 365 templates
Accessible Microsoft 365 templates

Need more help?
Want more options.
Explore subscription benefits, browse training courses, learn how to secure your device, and more.

Microsoft 365 subscription benefits

Microsoft 365 training

Microsoft security

Accessibility center
Communities help you ask and answer questions, give feedback, and hear from experts with rich knowledge.

Ask the Microsoft Community

Microsoft Tech Community

Windows Insiders
Microsoft 365 Insiders
Find solutions to common problems or get help from a support agent.

Online support
Was this information helpful?
Thank you for your feedback.
Working With Slides in PowerPoint [A Complete Guide!]
By: Author Shrot Katewa
![Working With Slides in PowerPoint [A Complete Guide!]](https://artofpresentations.com/wp-content/uploads/2021/08/Featured-Image-How-to-Work-with-Slides-in-PowerPoint-Optimized.jpg "powerpoint presentation guide")
To create a powerful presentation – the kind that resonates with your audiences, you need to create great slides! But, all this work really starts with knowing how to work with slides in PowerPoint!
In this article, I will share with you all the basic details of working with slides such as adding, deleting, duplicating slides, and much more! Plus, in the end, I will also help you understand how you can design your slides to make your presentation visually appealing with great ease!
So, let’s get started!
1. How to Add or Insert a Slide in PowerPoint?
Let’s start with the basics first. Adding or inserting a slide in your PowerPoint presentation is as easy as a click of a button.
To add a slide in PowerPoint, first, click on any slide in the slide navigation panel on the left part of your screen. Then, click on the “Home” tab, and select the “New Slide” option. A new slide will be added. Alternatively, you can also use the keyboard shortcut “Ctrl+M”.
To learn this part in further detail, make sure to check out my other article on how to add a slide in PowerPoint !
Nevertheless, the process is described below in detail –
Step-1: Place the cursor in your preferred sequence
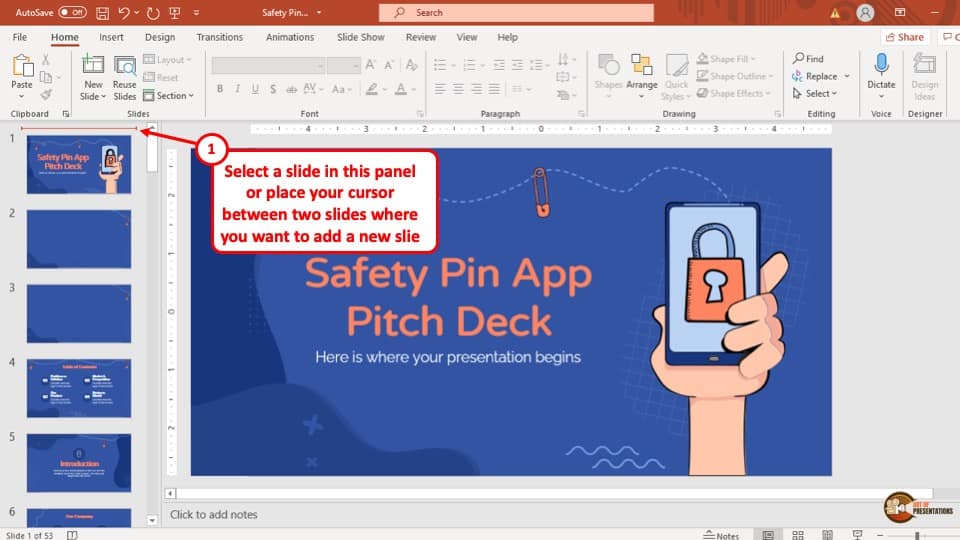
The first step is to click on your preferred sequence in the “ Slide Navigation ” bar, which is the sidebar to the left of your screen showing thumbnails of all the slides in your PowerPoint presentation. There will be an orange line indicating the selected sequence.
Step-2: Click on the “New Slides” icon
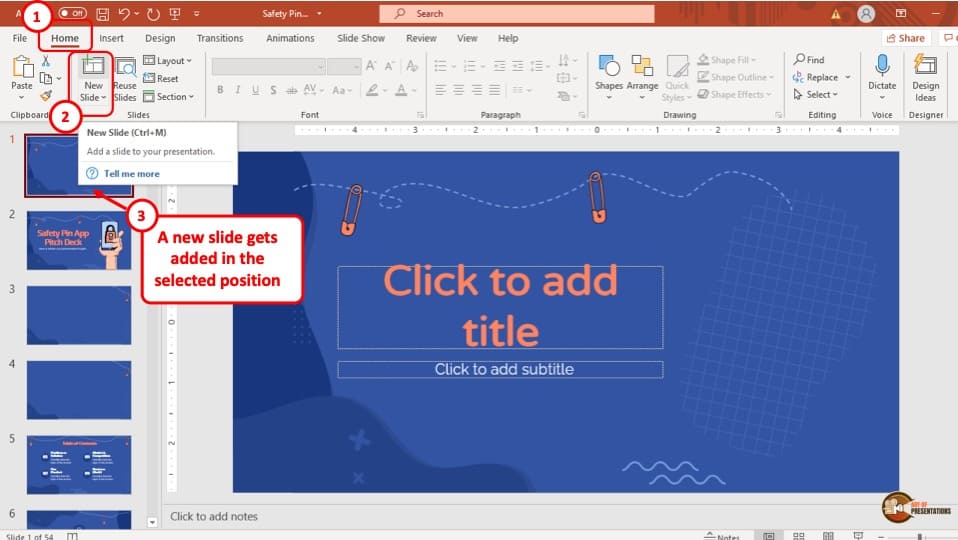
In this step, all you have to do is first click on the “ Home” tab to click on the “ New Slides ” icon. It is the icon above the button that says, “ New Slides ”. The icon looks like a plus ‘+’ sign over a square with comparative tables on it. This will immediately add a slide in the sequence of the selected area in the “ Slide Navigation ” sidebar.
2. How to Create Slides in PowerPoint?
Creating a new slide is very easy in PowerPoint. Open a new PowerPoint file and follow the two simple steps described below, to create a slide of your preferred layout in your PowerPoint presentation.
Step-1: Click on the “New Slides” button
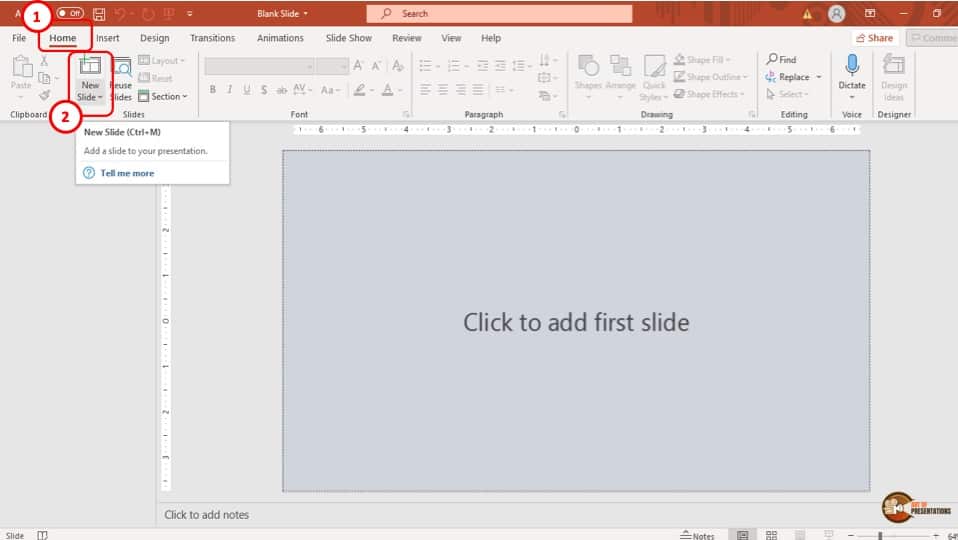
The first step of the process is to click on the “ New Slides ” button, which is below the icon that looks like a plus ‘+’ sign over a square as described in the previous step. This will open a drop-down menu.
Step-2: Select your preferred layout
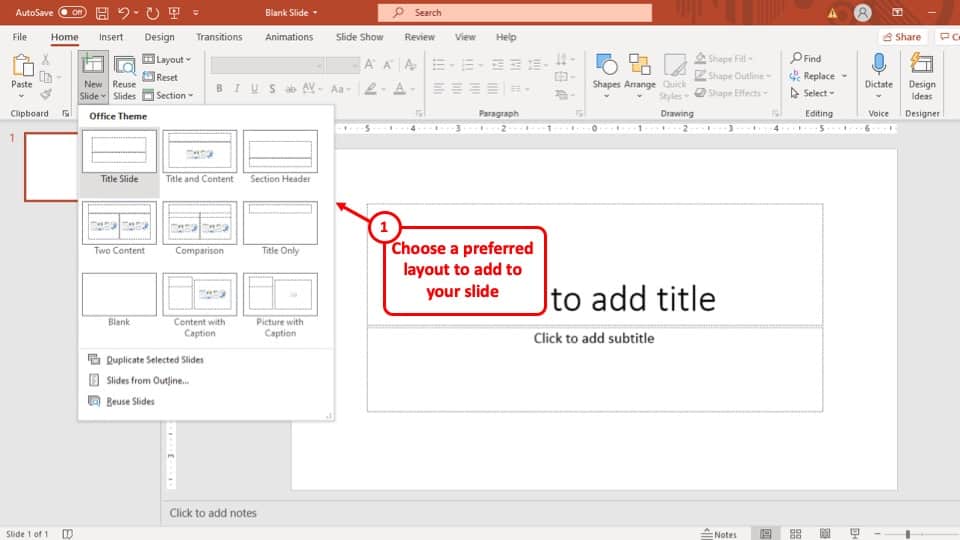
In this step, simply select your preferred layout for the new slide. Once you click on the preferred layout, the new slide will be added to your PowerPoint presentation with the selected layout.
3. How to Copy Slides in PowerPoint?
I covered this topic in complete detail in my other article on how to copy and paste in PowerPoint . You may want to check that out for more methods and secret tips!
But, in a nutshell, there are two ways in which you can copy a slide from your PowerPoint presentation. One way is to use the mouse and the other is to use the keyboard. The two methods are described below.
Method-1: Using the Mouse
You can use the mouse to copy the slide on your presentation.
Step 1 – Copy the Slide
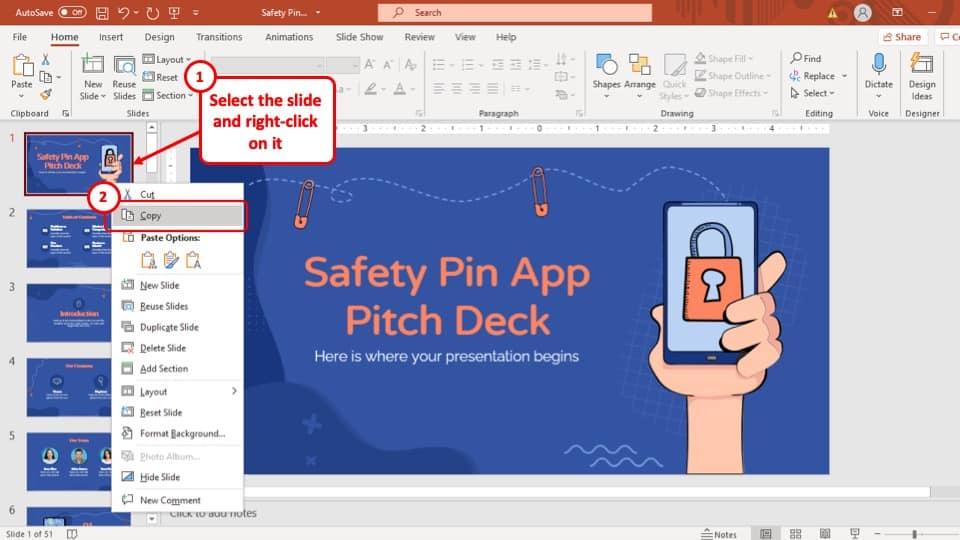
“ Right-click ” on the slide that you want to copy, and it will open the drop-down menu. From the drop-down menu, click on the “ Copy ” option.
Once you’ve clicked on the “ Copy ” option, the slide will be temporarily saved in the clipboard of your computer.
Step 2 – Paste the Slide
Just how you managed to copy a slide, you can paste the slide as well. Navigate to the location where you want to paste the slide. Then, right-click on the slide, and from the dropdown, click on “ Paste “.
Method-2: Using the keyboard
You can also use the keyboard shortcut keys to copy the slides. Let’s take a look at how it’s done.
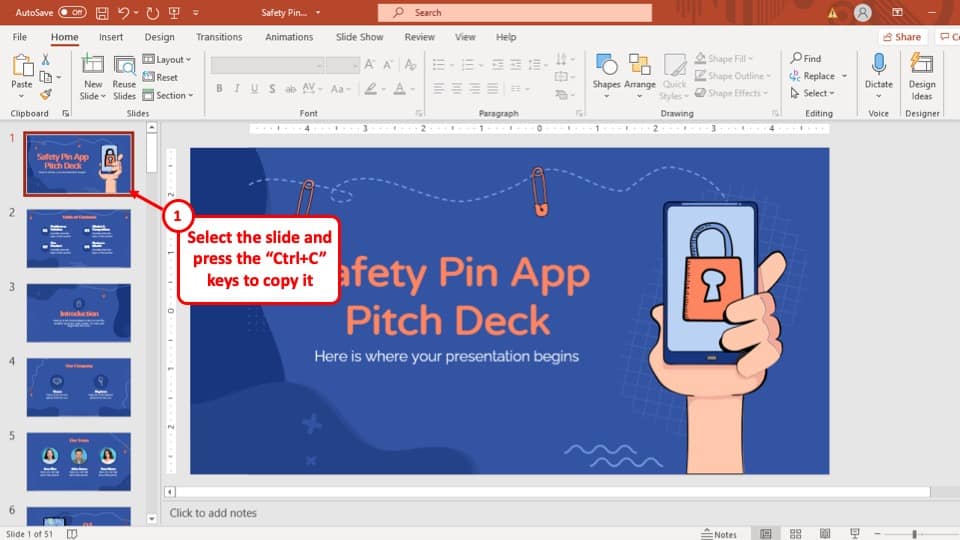
In this method, all you have to do is to select the slide that you want to copy and while the slide is selected, click on the two buttons “ Ctrl + C ” together on your keyboard.
Once you’ve copied the slide, you can paste it to a destination location. Simply use the “ Ctrl+V ” keyboard shortcut for the same.
4. How to Delete Slides in PowerPoint?
Similar to copying a slide, there are two methods that you can use to delete a slide in your PowerPoint presentation. Both of these methods are described in the section below.
Method 1: Using the Mouse
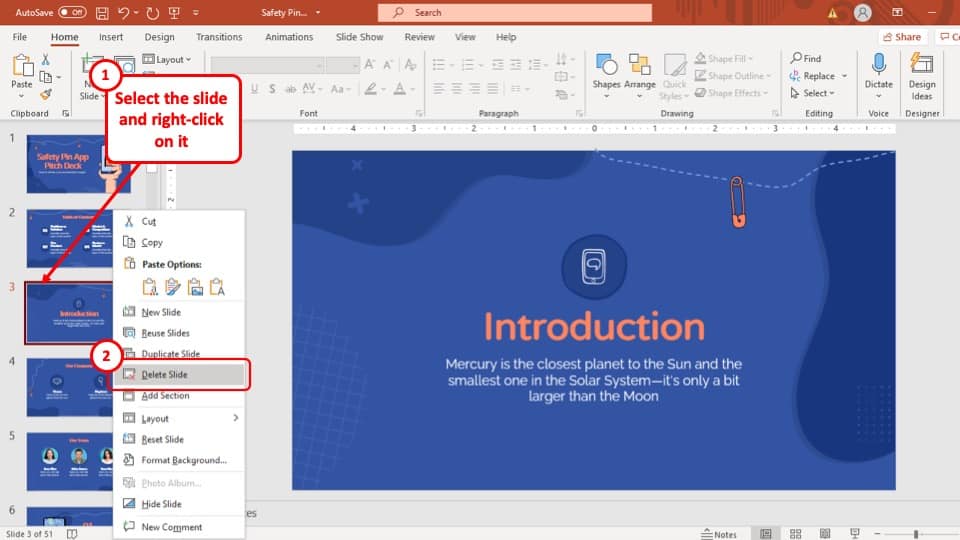
In this method, you have to “ Right Click ” on the slide that you want to remove and then select the “ Delete Slide ” option from the drop-down menu.
After you click on the “ Delete Slide ” option, the selected slide will be removed from your PowerPoint presentation.
Method-2: Using the Keyboard
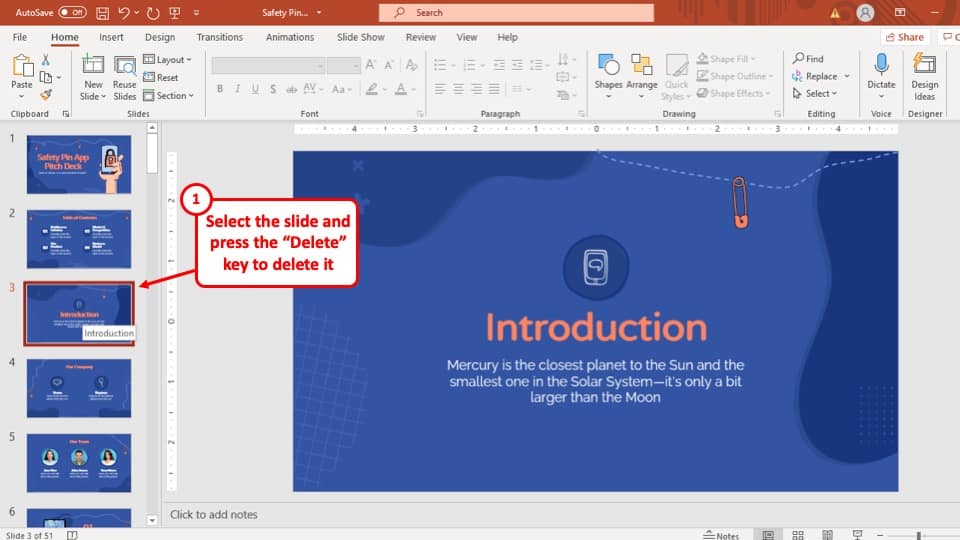
This method is simpler than using the dropdown menu. All you have to do is select the slide that you want to delete and then hit the “ Delete ” button or the “ Back Space ” button on the keyboard of your computer and the slide will be removed from your PowerPoint presentation immediately.
5. How to Group Slides in PowerPoint?
Grouping slides together is a very effective way of keeping your PowerPoint presentation organized. To group slides with different purposes into a different collection of slides, you have to add sections to the “ Slide Navigation ” sidebar.
The whole process is described in 5 easy steps below.
Step-1: “Right-click” above the first slide of the group
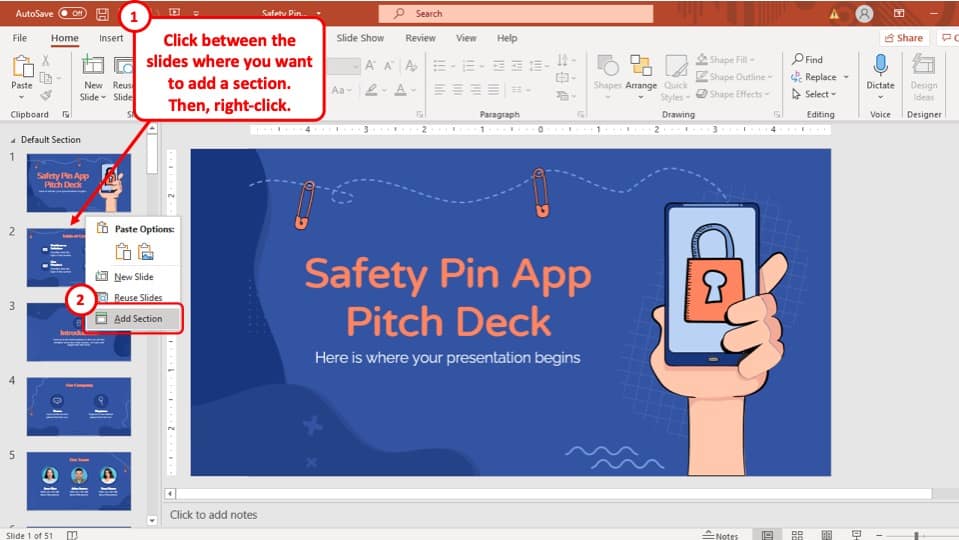
The first step is to move your cursor right above the first slide of the group that you are trying to make and then “ Right-click ” on that area. This will open a drop-down menu.
Step-2: Select the “Add Section” option
In this second step, you have to click on the “ Add Section ” option from the drop-down menu. It is the last option in that drop-down menu. After clicking on it a pop-up window will appear on your screen.
Step-3: Rename the section
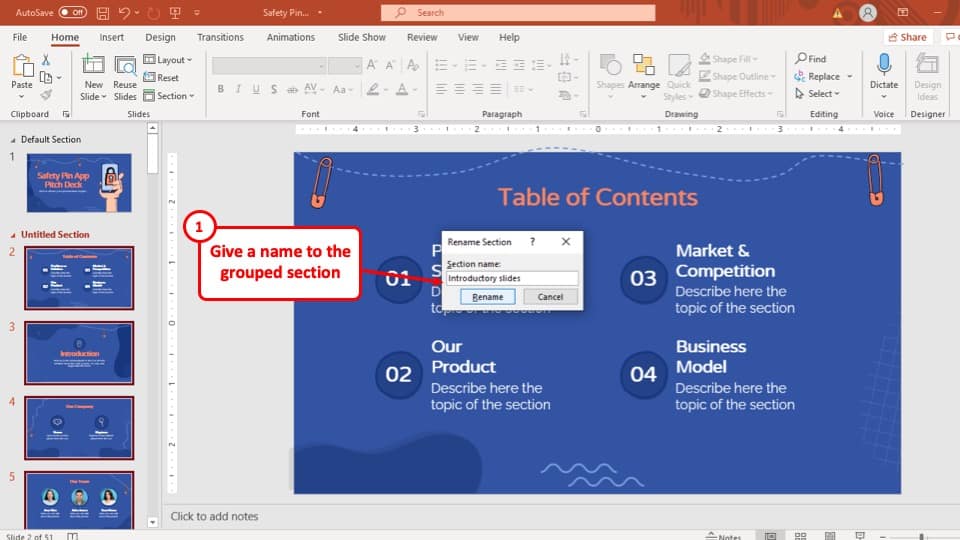
In the pop-up window, you opened in the last step, rename the group with an appropriate title, and hit the “ Rename ” button which is the button to the left of the two buttons at the bottom of the pop-up window.
This will add the starting point and the title of the group you are making.
Step-4: Make another section under the last slide of the group
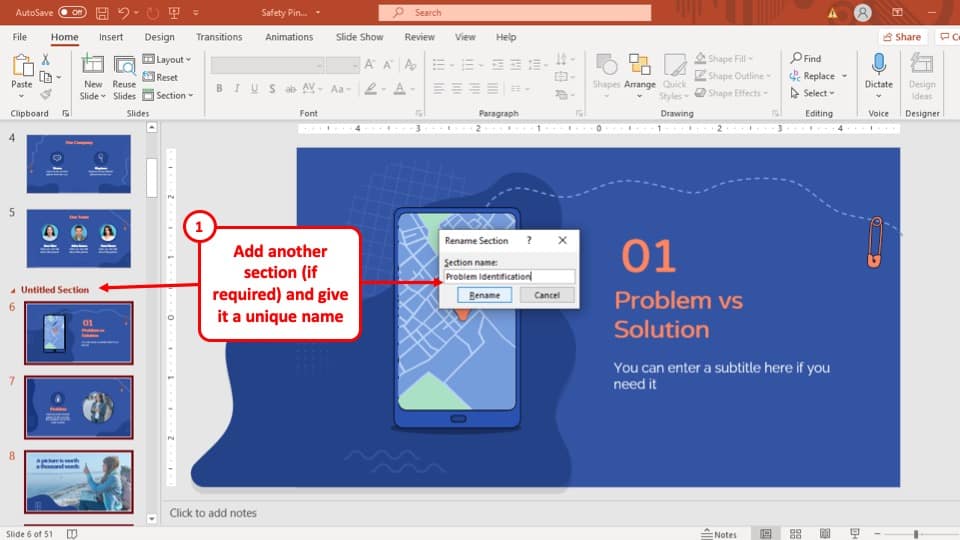
After you have created the title section of the group, make another group under the last slide of your preferred group of slides. This will set the parameter for which slides are to be grouped together.
Step-5: Collapse the group
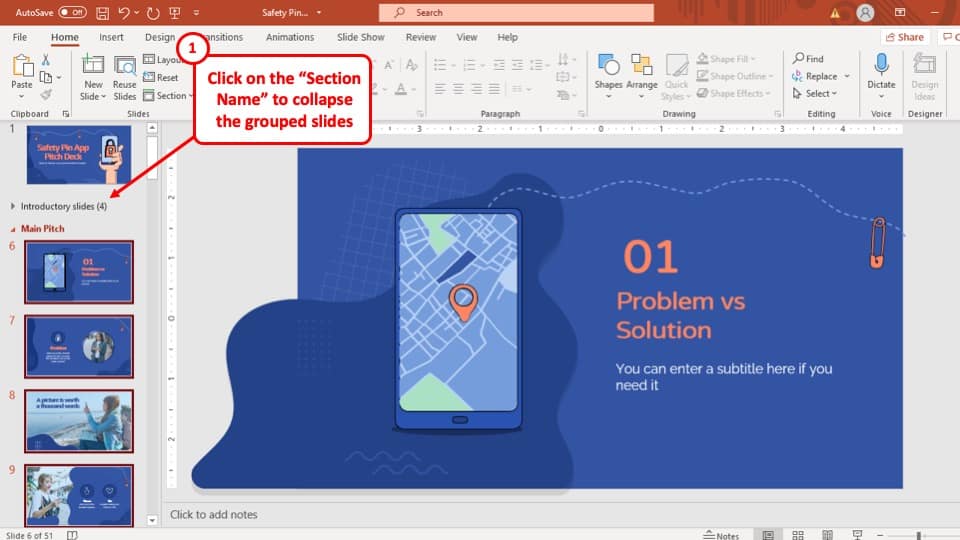
Click on the small arrow pointing to the right, just before the name of the group of slides. After you do so, you will see that the slides have been grouped together under the newly added section and the number in the bracket beside it indicates how many slides are in that group.
6. How to Hide Slides in PowerPoint?
To hide a slide in your presentation your PowerPoint presentation, you have to use the “ Slide Sorter ” view and hide the slide from there. The whole process is described step-by-step below.
Step-1: Select the “Slide Sorter” view
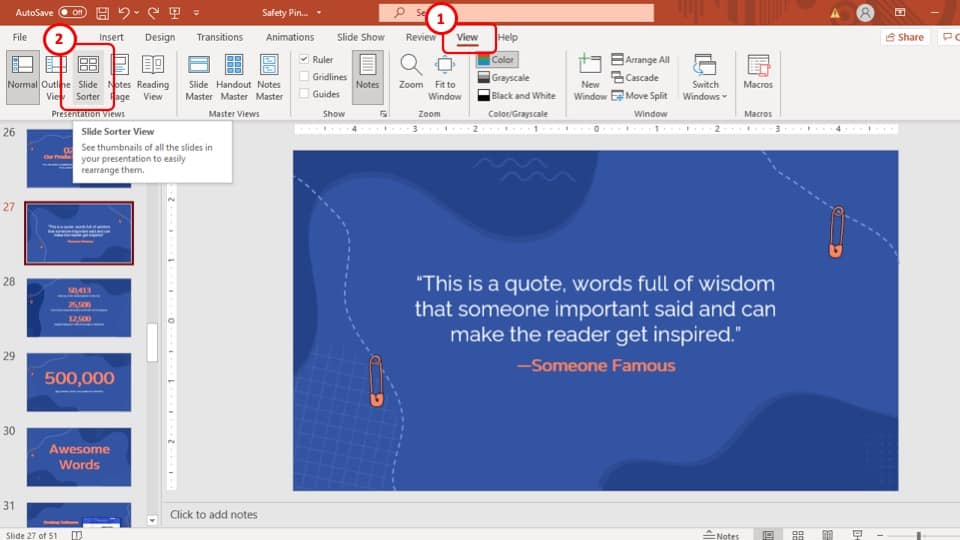
The first step of the process is to go to the “ View ” tab. In the “ View ” tab, click on the “ Slide Sorter ” view from the “ Presentation ” views of the tab. This will change the viewing mode of your PowerPoint presentation and you will be able to see all the slides in smaller thumbnails grouped together.
Step-2: “Right-click” on the slide
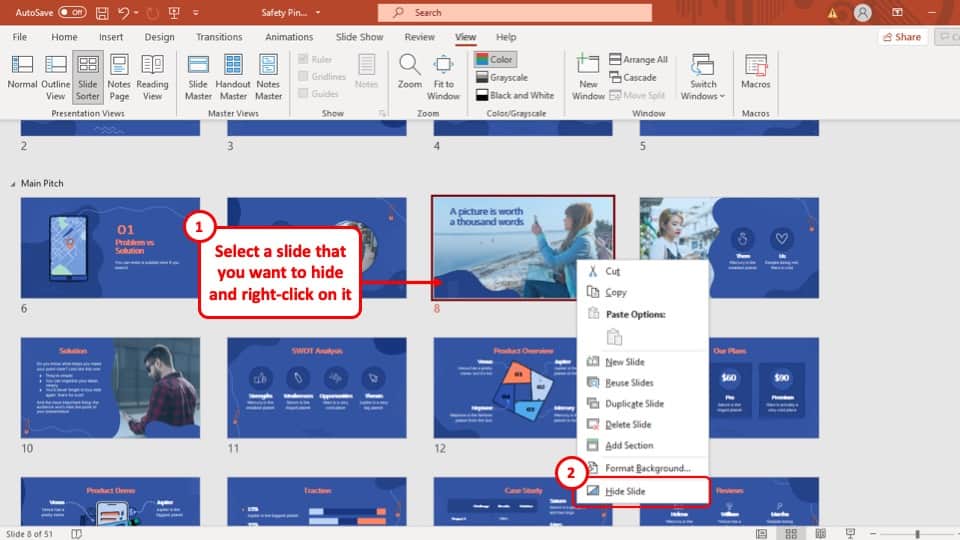
In this step, find the slide that you want to hide in the “ Slide Sorter ” view and then “ Right-click ” on it. This will open a drop-down menu.
Step-3: Select the “Hide Slide” option
After you have opened the drop-down menu, select the “ Hide Slide ” option. This will immediately hide the slide from your PowerPoint presentation. The thumbnail of the slide will be greyed out and the slide number will also be crossed, indicating that the slide is hidden.
7. How to Number Slides in PowerPoint?
To number the sequence of the slides in your PowerPoint presentation, you have to go to the “ Slide Master ” view and checkmark the slide number from the “ Header and Footer ” option. The whole process is described in easy steps below.
Step-1: Open the “Slide Master” view
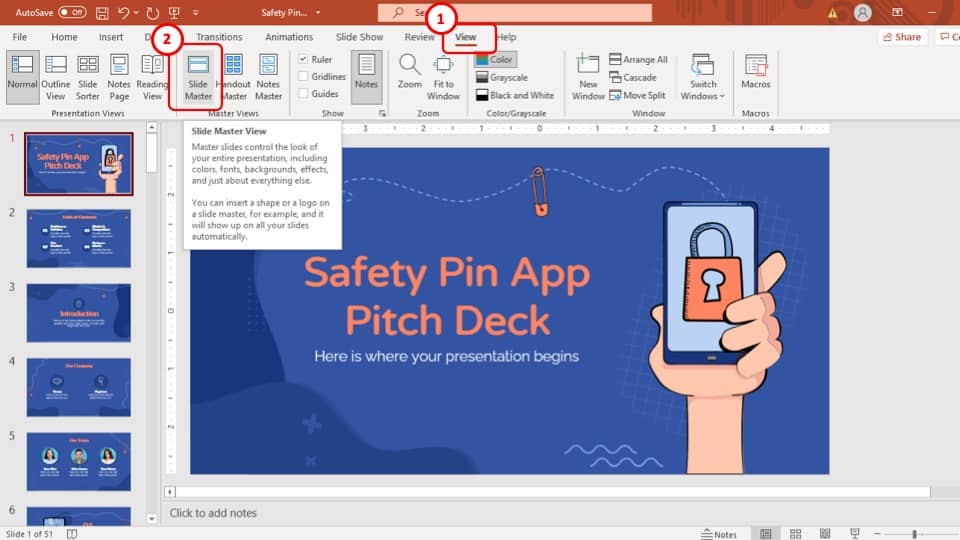
The first step is to go to the “ View ” tab which is the second to last tab of the ribbon. In the “ View ” tab, click on the “ Slide Master ” view in the “ Master Views ” section. This will change the PowerPoint view to the “ Slide Master ” view.
Step-2: Select the “Header & Footer” option
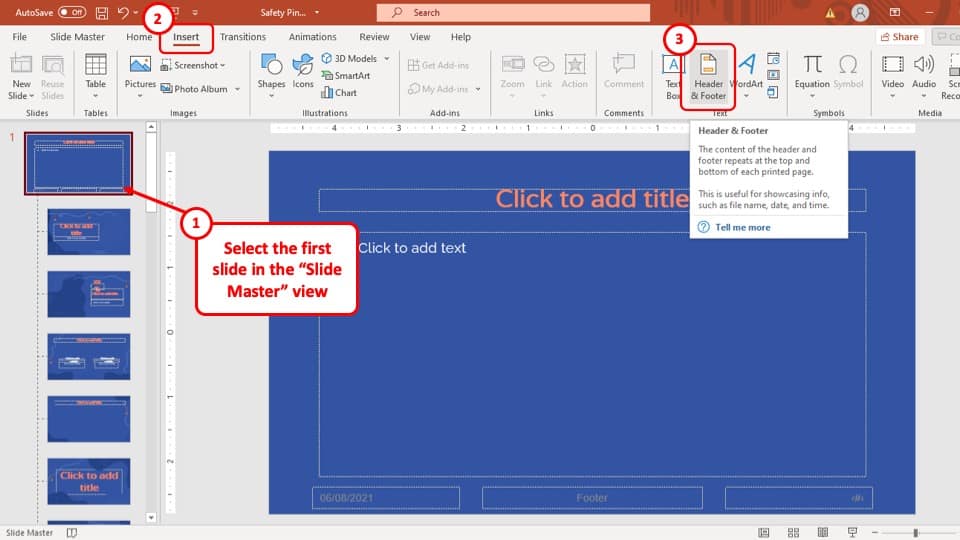
In this step, select the “ Master Slide ”. The “ Master Slide ” is the first slide in the “ Slide Master ” view and you will notice that it is the only slide that is a little bigger and to the right than the rest of the slides in the navigation bar.
After selecting the “ Master Slide ”, go to the “ Insert ” tab on the ribbon and select the “ Header & Footer ” option, which is located in the “ Text ” section of the tab. A pop-up window will appear on your screen.
Step-3: Tick mark the “Slide number” option
In this step, select the box of the “ Slide Number ” option and then hit the “ Apply to all ” button which is the second button of the 3 buttons at the bottom right corner of the pop-up window.
Step-4: Exit the Slide Master
Make sure that you exit the slide master. To do that, first, go back to the “ Slide Master ” tab. Then, from the ribbon, click on “ Close Slide Master “.
After that, the slide number of all the slides will be added to your PowerPoint presentation.
8. How to Link Slides in PowerPoint?
To link different slides in your PowerPoint presentation to each other, you have to type in a text, that can be hyperlinked to the slide in your PowerPoint presentation.
Type in a text that you can click to go to the linked slide and then follow the process described in easy steps below.
Step-1: Select the “Link” option
To begin, “ Right-click ” on the word that will lead you to the linked slide. A drop-down menu will appear on your screen. From the drop-down menu, select the “ Link ” option. This will open a pop-up window.
Step-2: Select the “Place in this document” option

After you have opened the “ Insert Hyperlink ” pop-up window, select the “ Place in this document ” option in the sidebar. This will take you to another page in the pop-up window.
Step-3: Select the slide you want to link
On this page of the pop-up window, select the slide that you want to link the current slide to and then hit the “ Ok ” button at the bottom right corner of your screen.
This will add a link to the word in the slide and upon clicking on the word while holding the “ Ctrl ” key on your keyboard, you will be taken to the linked slide.
9. How to Design Slides in PowerPoint?
Designing your slide to fit the theme of your message will make your presentations more engaging. There are two ways in which you can design the slides in your PowerPoint presentation. Both of the methods are explained in the following section.
9a. Using Design Ideas
By using the “ Design Ideas ” tool in Microsoft PowerPoint, you can instantly and seamlessly design slides to make them more attractive and engaging.
To use the “ Design Ideas ” tool, you have to go to the “ Design ” tab and click on the “ Design Ideas ” feature which is located in the “ Designer ” section. It is the last option in the “ Design ” tab.
I’ve covered the “Design Ideas” tool in great detail in another article where I also provide you tips on how to use it to automatically design your slides in PowerPoint! So, make sure you check out the article on how to use design ideas in PowerPoint !
However, a quick glance will remind you that these templates provided by default in PowerPoint are quite old-fashioned. I will not recommend using the built-in themes and templates in PowerPoint if you want to make your presentation look professional!
9b. Using Presentation Templates
Another method of designing a presentation is using templates.
Templates in PowerPoint are pre-designed sets of slide layouts that can be adapted to the content on your slide and make your presentation look visually appealing!
You can use the presentation templates provided by the PowerPoint software from the “ Design ” tab to instantly design the slide in your PowerPoint presentation.
Simply go to the design tab, expand the themes section and choose a theme. This will help your slides look different from the plain and simple presentation.
Instead, I would suggest choosing a platform like Envato that provides you with ton of different options that are very affordable! I personally use templates from Envato all the time. (in fact, the images that you see in this article are also from a template!)
I’ve listed some of my personal favorite templates for your presentations. Check them out in the next section!
10. Top 5 Templates for Amazing Presentations
Our recommended templates have been chosen to give you a set of all the necessary types of slide designs that you might need. These will be helpful not just to get you started, but also with multiple presentation that you may want to design later on as these templates are quite versatile.
Here is a list of our top 5 picks of templates to make your presentations amazing!
1. Startup X - Perfect Pitch Deck Template
Startup X – Perfect Pitch Deck Powerpoint Template includes all the necessary infographics, charts, icons and hundreds of slide templates that you can use to make your business pitch more elegant and professional.
2. Massive X Presentation Template

The Massive X Presentation Template v.5.5 Fully Animated includes 760 ready-to-use slide templates and more than 930 fonts and vectors. You can use this template for virtually all purposes, but it is best for business proposals, pitch decks, portfolios, agency presentations, marketing presentations, and more!
3. Business Proposal PowerPoint Template
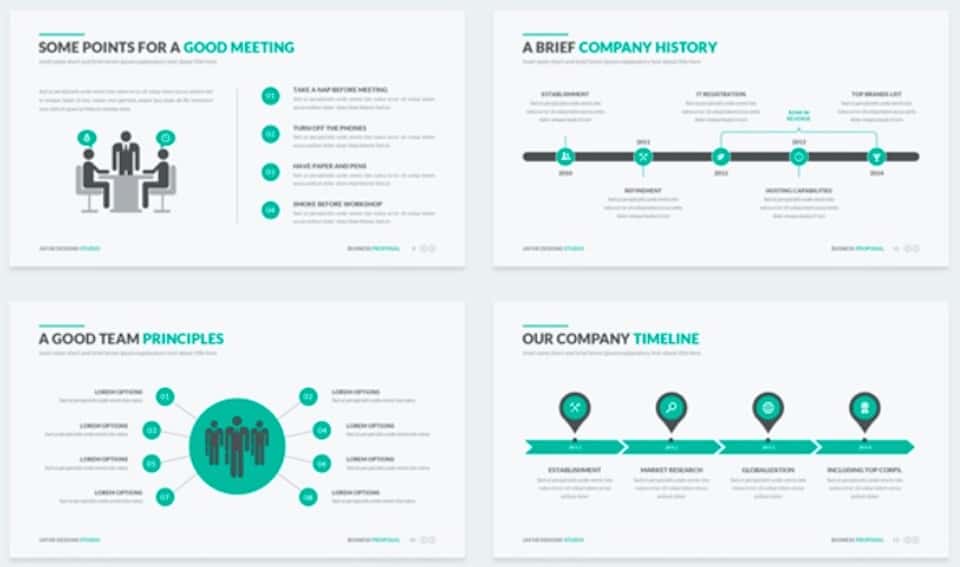
The Business Proposal PowerPoint Template is fully focused on giving your business presentations an edge and making them look more professional. It uses attractive infographics, charts, and messages and its soft turquoise color makes it easier on the eyes.
4. Multipurpose Infographic PowerPoint Template
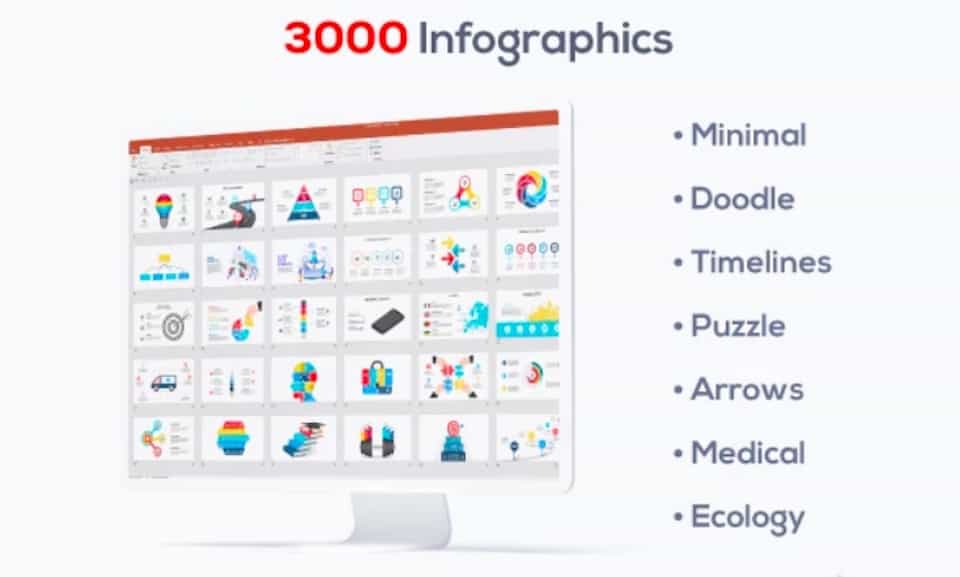
Multipurpose Infographics PowerPoint Template provides you with a bundle of more than 3000 designed slides with over 50 color variations to make the information in your PowerPoint presentation more engaging.
These templates are great to represent the data in a particular fashion, and you will find it extremely useful for your presentations.
5. Clean PowerPoint Template

We chose the Clean PowerPoint Template mainly for its aesthetics. The template provides over 700 very simple yet beautifully designed slides with over 5 color variations that make your PowerPoint presentation look more professional.
If you are looking for a minialistic look, go for this template!
Credit to cookie_studio (on Freepik) for the featured image of this article (further edited)
Follow Polygon online:
- Follow Polygon on Facebook
- Follow Polygon on Youtube
- Follow Polygon on Instagram
Site search
- Dragon’s Dogma 2
- Zelda: Tears of the Kingdom
- Baldur’s Gate 3
- Summer Game Fest schedule
- PlayStation
- Dungeons & Dragons
- Magic: The Gathering
- Board Games
- All Tabletop
- All Entertainment
- What to Watch
- What to Play
- Buyer’s Guides
- Really Bad Chess
- All Puzzles
Filed under:
Summer Game Fest 2024 and not-E3 2024 schedule: All conference dates and times
E3 is dead, but that won’t stop a week filled with announcements
Share this story
- Share this on Facebook
- Share this on Reddit
- Share All sharing options
Share All sharing options for: Summer Game Fest 2024 and not-E3 2024 schedule: All conference dates and times
/cdn.vox-cdn.com/uploads/chorus_image/image/73376114/summer_game_fest.0.jpeg "powerpoint presentation guide")
Summer Game Fest 2024 returns to take up the mantle of E3, now that the annual expo is gone for good after a run of almost two decades.
The good news, however, is gaming’s biggest conference season isn’t going anywhere. Though the Summer Game Fest showcase is headlining, the likes of Xbox, Ubisoft, and Devolver are all returning to offer a week-long burst of news and announcements.
In this guide, we’ll run down the Summer Game Fest 2024 conference schedule , with dates and times across time zones in North America and Europe, and what to expect from each one.
Summer Game Fest 2024 schedule and all conference times
Here is when every conference will go live over the “E3” conference period. The bulk of the shows will take place around the second weekend of June, headlined by Summer Game Fest on Friday, June 7, and continuing until Monday with the likes of Ubisoft.
By the time Summer Game Fest starts, Sony’s annual summer State of Play will have happened (on Thursday, May 30). We are still waiting for Nintendo to set a date for its June direct ( as confirmed on a post on X ). Based on previous years, they should fall within the same week as the below – unless it wants to take the spotlight later in the month.
Summer Game Fest 2024 schedule
Thursday, june 6 conferences.
:no_upscale()/cdn.vox-cdn.com/uploads/chorus_asset/file/25469184/guerrila_collective.jpeg "powerpoint presentation guide")
Though Friday is technically the start of Summer Game Fest, props to Guerrilla Collective (10 a.m. PDT / 1 p.m. EDT, streaming on YouTube / Twitch ) for stealing a march on Geoff Keighley with an indie-focused showcase that’s now in its fifth year. Expect “big new game announcements, reveals, trailer premieres, fresh gameplay,” with the likes of Slime Heroes from Whitehorn Games, Neon Blood from ChaoticBrain Studios, and Deathbound from Trialforge Studio confirmed to be showing up.
Friday, June 7 conferences
:no_upscale()/cdn.vox-cdn.com/uploads/chorus_asset/file/25469234/polygon_background.jpg "powerpoint presentation guide")
Friday is technically the start of Summer Game Fest, with the Access-Ability Summer Showcase (8 a.m. PDT / 11 a.m. EDT, streaming on YouTube / Twitch ) beginning proceedings to highlight games by game developers with disabilities, and games with features and settings designed with players with disabilities in mind.
Whitethorn Games (publisher of Botany Manor ), Playtonic ( Yooka-Laylee creator and publisher of upcoming rogue-like Elsie ), and Fiction Factory Games ( Arcade Spirits ) are all confirmed to be in the mix so far, with showrunner Laura Kate Dale explaining that “our aim is to make sure that if a game looks exciting, you don’t have to worry about getting hyped, only to learn later that a game doesn’t support your needs as a player.”
Following that a few hours later is the big one: the Summer Game Fest showcase (2 p.m. PDT / 5 p.m. EDT, streaming on YouTube / Twitch ). There are 55 partners signed up; how many of these will actually appear in the conference is uncertain, but since previous iterations of this event have run for at least a couple of hours, expect a fair few to show up. While specific reveals are under wraps at the time of this writing, we know 2K will at least “reveal the next iteration” in one of its franchises during the show. Any guesses?
As tradition, the Summer Game Fest stream will immediately run into Double Fine and 8bit’s Day of the Devs (exact time TBC, streaming through the same feed as Summer Game Fest). Karma: The Dark World , Phoenix Spring , and Derek Yu’s UFO 50 will make an appearance, among various new reveals.
Finally, Friday ends with Devolver Direct (5 p.m. PDT / 8 p.m. EDT, streaming on YouTube / Twitch ). Once famously hosted in a parking lot across the street from E3 (to physically emphasize the contrast between events), the oddball developer eschewed that stunt last year — and there’s no word yet on if it’ll revive this year. With E3 dead, though, it’s unlikely. Anyway, expect lots of offbeat indies at this showcase.
Saturday, June 8 conferences
:no_upscale()/cdn.vox-cdn.com/uploads/chorus_asset/file/25469193/future_of_play.png "powerpoint presentation guide")
The Saturday of not-E3 2024 is packed with back-to-back shows. Let’s break it down:
- First up is the Future of Play Direct (8 a.m. PDT / 11 p.m. EDT, streaming on YouTube ). Hosted by the V-tuber A.I. broadcaster Melios, no games have been announced yet. But if you miss the showcase, Glitch, the organizer of the event, said a setlist will be available via its social media channels after the event wraps.
- That’s immediately followed by Wholesome Direct (9 a.m. PDT / 12 p.m. EDT, streaming on YouTube / Twitch ), a showcase focused on cozy games. For an example of what to expect, in previous years, Wholesome Direct has featured the likes of Moonglow Bay , Bear and Breakfast , and Pupperazzi .
- The Latin America Games Showcase (10 a.m. PDT / 1 p.m. EDT, streaming on YouTube / Twitch ) comes right on the heels of Wholesome Direct, and puts a spotlight on games developed in Latin America. More than 45 games are planned to appear at the event; you can see the whole list here .
- Shortly after that comes Women-led Games Summer Games Fest (11:30 a.m. PDT / 2.30 p.m. EDT, streaming on YouTube / Twitch ). With a focus on games developed studios that are either led by or are majority staffed by women, Women-Led Games hosts a number of showcases per year. You can see the one from March 2024 here .
- Finally, the day wraps with the Future Games Show (12 p.m. PDT / 3 p.m. EDT, streaming on YouTube / Twitch ). Unaffiliated with the earlier Future of Play event, the Future Games Show is GamesRadar’s annual not-E3 event. This year, it’s hosted by Red Dead Redemption 2 ’s Arthur Clark and Final Fantasy 7 Rebirth ’s Britt Baron.
Sunday, June 9 conferences
:no_upscale()/cdn.vox-cdn.com/uploads/chorus_asset/file/25469174/xbox_showcase.jpeg "powerpoint presentation guide")
Headlining Sunday is the Xbox Games Showcase (9 a.m. PDT / 12 p.m. EDT, streaming on YouTube / Twitch ). This is Microsoft’s first showcase since its nearly $70 billion acquisition of Activision Blizzard was finalized. Since then, Microsoft has closed studios and laid off nearly 2,000 employees across its gaming department. This, of course, is the giant elephant in the room. While the matter likely won’t be addressed during the show, it will no doubt overshadow rumored announcements of things like a new entry in the Doom series or a potential reveal of an all-digital Xbox Series X .
Following the Xbox Games Showcase, Microsoft will host the Black Ops 6 Direct (exact time TBC, streaming through the same feed as Xbox). Immediately after its 2023 showcase, Microsoft held a 45-minute, in-depth stream for Bethesda’s Starfield ; it’s safe to assume the Black Ops 6 Direct will be along the same lines. As with all of Microsoft’s first-party games to date, Black Ops 6 will launch “day one” on Game Pass .
The Xbox-centric series of events is followed by the PC Gaming Show (1 p.m. PDT / 4 p.m. EDT, streaming on YouTube / Twitch ). Hosted by PC Gamer , the show will feature 50 games plus interviews with developers, though the publication hasn’t yet announced who will be partaking.
Monday, June 10 conferences
:no_upscale()/cdn.vox-cdn.com/uploads/chorus_asset/file/25469176/ubisoft_forward.png "powerpoint presentation guide")
As of this writing, not-E3 wraps up with Ubisoft Forward (pre-show at 11:30 a.m. PDT / 2:30 p.m. EDT, with main show at 12 p.m. PDT / 3 p.m. EDT, streaming on YouTube / Twitch ). The purveyor of icon-saturated map games already has a heavy slate in the fall, with the likes of Star Wars Outlaws and Assassin’s Creed Shadows .
Both tent poles will be part of the show, Ubisoft said in a press release. Also expect details about XDefiant , Ubisoft’s recently launched multiplayer shooter, and “more” games. Less likely? An update on Beyond Good & Evil 2 , which has been infamously (and very publicly) mired in development hell for years. But hey, anything can happen!
The next level of puzzles.
Take a break from your day by playing a puzzle or two! We’ve got SpellTower, Typeshift, crosswords, and more.
Sign up for the newsletter Patch Notes
A weekly roundup of the best things from Polygon
Just one more thing!
Please check your email to find a confirmation email, and follow the steps to confirm your humanity.
Oops. Something went wrong. Please enter a valid email and try again.
Loading comments...

Pokémon Go ‘Stadium Sights’ event and Timed Research tasks

Doctor Who goes full Black Mirror only to set up its most shocking twist

Disney’s Jim Henson doc, Boy Kills World, and every movie new to streaming this week

Everything we know about Infinity Nikki, the upcoming fashion RPG produced by a BOTW alum

What to spend Legendary Shards on in Destiny 2 before they go away

EA Sports College Football 25’s unique features make it look like way more than a Madden reskin
IMAGES
VIDEO
COMMENTS
Microsoft PowerPoint is a presentation design software that is part of Microsoft 365. This software allows you to design presentations by combining text, images, graphics, video, and animation on slides in a simple and intuitive way. Over time, PowerPoint has evolved and improved its accessibility to users.
Select the text. Under Drawing Tools, choose Format. Do one of the following: To change the color of your text, choose Text Fill, and then choose a color. To change the outline color of your text, choose Text Outline, and then choose a color. To apply a shadow, reflection, glow, bevel, 3-D rotation, a transform, choose Text Effects, and then ...
Tips for creating an effective presentation. Tip. Details. Choose a font style that your audience can read from a distance. Choosing a simple font style, such as Arial or Calibri, helps to get your message across. Avoid very thin or decorative fonts that might impair readability, especially at small sizes. Choose a font size that your audience ...
Open PowerPoint. In the left pane, select New. Select an option: To create a presentation from scratch, select Blank Presentation. To use a prepared design, select one of the templates. To see tips for using PowerPoint, select Take a Tour, and then select Create, . Add a slide.
To do that, simply go up to the Home tab and click on New Slide. This inserts a new slide in your presentation right after the one you were on. You can alternatively hit Ctrl+M on your keyboard to insert a new blank slide in PowerPoint. To learn more about this shortcut, see my guide on using Ctrl+M in PowerPoint.
The PowerPoint presentation tips we share below will help you make a good presentation. Guide to Making Great Presentations (Free eBook Download) Also, download our Free eBook: The Complete Guide to Making Great Presentations. It's the deepest resource for learning effective presentation skills for a PPT.
Get your main point into the presentation as early as possible (this avoids any risk of audience fatigue or attention span waning), then substantiate your point with facts, figures etc and then reiterate your point at the end in a 'Summary'. 2. Practice Makes Perfect. Also, don't forget to practice your presentation.
Follow the 5/5/5 rule. To keep your audience from feeling overwhelmed, you should keep the text on each slide short and to the point. Some experts suggest using the 5/5/5 rule: no more than five words per line of text, five lines of text per slide, or five text-heavy slides in a row.
To select multiple slides, click a slide and then press and hold CTRL while you click the other slides. Next, click the "Themes" tab at the top of your screen. In the "Theme Options" group, click "Background," then "Format Background." In the window that appears, click "Fill," then "Picture or Texture."
By adding boxes, you'll create a visually pleasing structure that guides your audience through the content. In the "Insert" menu, select "Table" and opt for a one-by-one table. Change the table color to a light gray shade, elongate it, and position it neatly to the left of your text. To improve readability and aesthetics, increase the spacing ...
Once you've get your presentation planned out, it's time to tackle the design part of creating a presentation. When designing your presentation, keep the following guidelines in mind: 1. Keep the Text to a Minimum. When it comes to your presentation, PowerPoint should assist you in delivering the presentation.
A good presentation needs two fonts: a serif and sans-serif. Use one for the headlines and one for body text, lists, and the like. Keep it simple. Veranda, Helvetica, Arial, and even Times New Roman are safe choices. Stick with the classics and it's hard to botch this one too badly.
Getting Started. 1. Open PowerPoint and click 'New.'. A page with templates will usually open automatically, but if not, go to the top left pane of your screen and click New. If you've already created a presentation, select Open and then double-click the icon to open the existing file. Image Source.
Be mindful of colors and fonts. 4. Use animation sparingly. See more. Wondering how to design the perfect PowerPoint presentation? It's easier than you think-just follow five simple rules to get started: 1. Consider using templates. When building a slide deck, it's important to maintain consistency throughout.
Open the PowerPoint app, select a template and theme, then like "Create.". Click the text box to add your title and subtitle to create your title slide. Click the "Insert" tab, then "New Slide" to add another slide. Choose the type of slide you want to add, then add text and pictures. Rearrange slides by dragging them up or down in ...
• The following 37 slides present guidelines and suggestions for the use of fonts, colors, and graphics when preparing PowerPoint presentations for Sessions and Seminars. • This media (PPT) is designed to ENHANCE your presentation, not BE the presentation. • Remember, only you can prevent "Death by PowerPoint"
Double Click Photo/ Click Photo Tab/ Crop. Crop: You can actually trim a photo that doesn't fit well in your space instead of distorting it. Remove Background: To save time from manually removing background from images in your photo-editing software, you can do that quickly in PowerPoint with one click.
To keep your colors consistent and easy to access, save a color palette in PowerPoint. Click the Design tab and under Variants, click the down arrow (1). On the dropdown menu click Colors (2) and Customize Colors (3). In the Create New Theme colors dialogue click one of the color slots (4).
Guide to Making Great Presentations (Free eBook Download) Before you read on, be sure to grab our free eBook: The Complete Guide to Making Great Presentations . It'll help you master the presentation process, from initial idea through to writing, design, and delivering with impact.
Keep the background consistent and subtle. Use only enough text when using charts or graphs to explain the concept. Clearly label the graphic. Keep the design clean and uncluttered. Leave empty space around the text and graphics. Use quality clipart and use it sparingly. The graphic should relate to and enhance the topic of the slide.
A guide to layout, design, best practices, and tips for creating a great PowerPoint presentation for your class. Home; Design; Slide Content; The Presentation: Public Speaking; Tips & Resources; Timing. Watch your timing, both while speaking and going through your slides. You don't want to go too fast, but make sure you don't go over your ...
Training: Watch and learn how to use PowerPoint in Windows. Explore PowerPoint training guides, articles, and how-to videos.
Step-1: Click on the "New Slides" button. The first step of the process is to click on the " New Slides " button, which is below the icon that looks like a plus '+' sign over a square as described in the previous step. This will open a drop-down menu. Step-2: Select your preferred layout.
I Coach Speakers at the World's Largest Brands. The Best Speakers Follow This 5-Step Rehearsal Guide Great speakers put in the work to make their presentations look effortless.
Misinformation is false or inaccurate information—getting the facts wrong. Disinformation is false information which is deliberately intended to mislead—intentionally misstating the facts. The spread of misinformation and disinformation has affected our ability to improve public health, address climate change, maintain a stable democracy ...
In this guide, we'll run down the Summer Game Fest 2024 conference schedule, with dates and times across time zones in North America and Europe, and what to expect from each one.
Award submitals are due Friday, May 17, 2024, to Gloria Strong, TAMC Departmental Technician, [email protected]. Please refer to the atached criteria and instructions documents to assist you with your nominations. Questions can be directed to Gloria at 517-402-3599. Pending the amount of award nominations, recognition may be part of the ...