This browser is no longer supported.
Upgrade to Microsoft Edge to take advantage of the latest features, security updates, and technical support.

Assign Azure roles using the Azure portal
- 4 contributors
Azure role-based access control (Azure RBAC) is the authorization system you use to manage access to Azure resources. To grant access, you assign roles to users, groups, service principals, or managed identities at a particular scope. This article describes how to assign roles using the Azure portal.
If you need to assign administrator roles in Microsoft Entra ID, see Assign Microsoft Entra roles to users .
Prerequisites
To assign Azure roles, you must have:
- Microsoft.Authorization/roleAssignments/write permissions, such as Role Based Access Control Administrator or User Access Administrator
Step 1: Identify the needed scope
When you assign roles, you must specify a scope. Scope is the set of resources the access applies to. In Azure, you can specify a scope at four levels from broad to narrow: management group , subscription, resource group , and resource. For more information, see Understand scope .

Sign in to the Azure portal .
In the Search box at the top, search for the scope you want to grant access to. For example, search for Management groups , Subscriptions , Resource groups , or a specific resource.
Click the specific resource for that scope.
The following shows an example resource group.

Step 2: Open the Add role assignment page
Access control (IAM) is the page that you typically use to assign roles to grant access to Azure resources. It's also known as identity and access management (IAM) and appears in several locations in the Azure portal.
Click Access control (IAM) .
The following shows an example of the Access control (IAM) page for a resource group.

Click the Role assignments tab to view the role assignments at this scope.
Click Add > Add role assignment .
If you don't have permissions to assign roles, the Add role assignment option will be disabled.

The Add role assignment page opens.
Step 3: Select the appropriate role
Follow these steps:
On the Role tab, select a role that you want to use.
You can search for a role by name or by description. You can also filter roles by type and category.

If you want to assign a privileged administrator role, select the Privileged administrator roles tab to select the role.
For best practices when using privileged administrator role assignments, see Best practices for Azure RBAC .

In the Details column, click View to get more details about a role.

Click Next .
Step 4: Select who needs access
On the Members tab, select User, group, or service principal to assign the selected role to one or more Microsoft Entra users, groups, or service principals (applications).

Click Select members .
Find and select the users, groups, or service principals.
You can type in the Select box to search the directory for display name or email address.

Click Select to add the users, groups, or service principals to the Members list.
To assign the selected role to one or more managed identities, select Managed identity .
In the Select managed identities pane, select whether the type is user-assigned managed identity or system-assigned managed identity .
Find and select the managed identities.
For system-assigned managed identities, you can select managed identities by Azure service instance.

Click Select to add the managed identities to the Members list.
In the Description box enter an optional description for this role assignment.
Later you can show this description in the role assignments list.
Step 5: (Optional) Add condition
If you selected a role that supports conditions, a Conditions tab will appear and you have the option to add a condition to your role assignment. A condition is an additional check that you can optionally add to your role assignment to provide more fine-grained access control.
The Conditions tab will look different depending on the role you selected.
Delegate condition
Delegating Azure role assignment management with conditions is currently in PREVIEW. See the Supplemental Terms of Use for Microsoft Azure Previews for legal terms that apply to Azure features that are in beta, preview, or otherwise not yet released into general availability.
If you selected one of the following privileged roles, follow the steps in this section.
- Role Based Access Control Administrator
- User Access Administrator
On the Conditions tab under What user can do , select the Allow user to only assign selected roles to selected principals (fewer privileges) option.

Click Select roles and principals to add a condition that constrains the roles and principals this user can assign roles to.
Follow the steps in Delegate Azure role assignment management to others with conditions .
Storage condition
If you selected one of the following storage roles, follow the steps in this section.
- Storage Blob Data Contributor
- Storage Blob Data Owner
- Storage Blob Data Reader
- Storage Queue Data Contributor
- Storage Queue Data Message Processor
- Storage Queue Data Message Sender
- Storage Queue Data Reader
Click Add condition if you want to further refine the role assignments based on storage attributes.

Follow the steps in Add or edit Azure role assignment conditions .
Step 6: Assign role
On the Review + assign tab, review the role assignment settings.

Click Review + assign to assign the role.
After a few moments, the security principal is assigned the role at the selected scope.

If you don't see the description for the role assignment, click Edit columns to add the Description column.
Related content
- Assign a user as an administrator of an Azure subscription
- Remove Azure role assignments
- Troubleshoot Azure RBAC
Coming soon: Throughout 2024 we will be phasing out GitHub Issues as the feedback mechanism for content and replacing it with a new feedback system. For more information see: https://aka.ms/ContentUserFeedback .
Submit and view feedback for
Additional resources
DEV Community
Posted on May 10, 2023
HOW TO ASSIGN A ROLE TO USER MEMBERS IN AZURE PORTAL AND CONTROL ACCESS TO THE RESOURCES WITHIN IT
Role-based access control (RBAC) is a primary authorization mechanism in Azure that enables you to define who has access to Azure resources and what they can do with those resources. For example, if yours is a large organization, you likely have a team responsible for networking, another team for managing VMs, another for databases and database servers, and so on. RBAC enables you to apply that role-based governance to your Azure resources. For example, you could use RBAC to enable the members of your SQL team to: Manage SQL Server VMs and Azure SQL Databases. Or, you might use RBAC to enable a Linux team to manage your Linux servers but not Windows servers, and vice versa. You can use RBAC in many ways to control Azure management functions, including managing users, resources, VNets, and so on. Following is a list of some examples of how you might use RBAC: • Allow your server team to manage VMs in a subscription and your network team to manage the virtual networks. • Allow your DBA team to manage database VMs and databases in one or more resource groups. • Allow a user to manage all resources in a particular resource group. • Allow an application to access specific resources in a resource group. • Allow a small group of users to manage users in Azure. To apply RBAC, you first create a role assignment, which consists of three elements that effectively translate to who, what, and where: • Security principal: Specifies the individual user, group, or managed identity to which the role assignment will apply. • Role definition: A collection of permissions that specifies the operations that can be performed, such as read, write, and delete. • Scope: Specifies the resources to which the role assignment applies. Below are the steps on how to assign role to a user in an Azure Login into Azure portal and click on the search bar to search for Azure Active Directory to create a user account

Click on Azure Active Directory and you will a page displayed where you will now click on user. See below image

After clicking on the user, the next is to fill the necessary information in new user page that displayed and click on create as seen below

At this stage, the user's name and Password has been created. The next step is to assign role to the user by going back to portal Home, then search for Resources Group. After this, you can create new Resources group by clicking on create and fill the information therein OR you can select from the one you have created before as shown in the image below

After selecting, click on the Resources group and click on Access control (IAM) at the right-hand side of the Resource group page. See below image for clarification

After clicking on next, the next page is Members where you will the member that you want to give access to selected resource

Then click on select

After clicking on select, the next you will see is a page that shows the details of the role you assigned, the user's name, the role. Seen the image below

THANK YOU FOR READING AND I HOPE THIS WILL SERVE AS A GUIDE ON HOW TO ASSIGN ROLE IN AZURE.
Top comments (1)
Templates let you quickly answer FAQs or store snippets for re-use.
- Education Nnamdi Azikiwe University, Awka, Anambra State, Nigeria
- Work Territorial Technical Head at Globacom
- Joined Apr 8, 2023
Detailed article ,good one
Are you sure you want to hide this comment? It will become hidden in your post, but will still be visible via the comment's permalink .
Hide child comments as well
For further actions, you may consider blocking this person and/or reporting abuse

How to debug a Remix V2 (Vite) application with VSCode
Jose - May 19

Video: Using Material 3 (M3) with Angular
Dharmen Shah - May 19

Building a To-Do App with RTK Query
Himanshu Gupta - May 19

Phoenix Liveview components for Shadcn UI
Dung Nguyen - May 19

We're a place where coders share, stay up-to-date and grow their careers.
Azure RBAC: role assignments and ARM templates

This post is about Azure's role assignments and ARM templates. Role assignments can be thought of as "permissions for Azure".
If you're deploying to Azure, there's a good chance you're using ARM templates to do so. Once you've got past "Hello World", you'll probably find yourself in a situation when you're deploying multiple types of resource to make your solution. For instance, you may be deploying an App Service alongside Key Vault and Storage .
One of the hardest things when it comes to deploying software and having it work, is permissions. Without adequate permissions configured, the most beautiful code can do nothing . Incidentally, this is a good thing. We're deploying to the web; many people are there, not all good. As a different kind of web-head once said:

Azure has great power and suggests you use it wisely .
Access management for cloud resources is critical for any organization that uses the cloud. Azure role-based access control (Azure RBAC) helps you manage who has access to Azure resources, what they can do with those resources, and what areas they have access to. Designating groups or individual roles responsible for specific functions in Azure helps avoid confusion that can lead to human and automation errors that create security risks. Restricting access based on the need to know and least privilege security principles is imperative for organizations that want to enforce security policies for data access.
This is good advice. With that in mind, how can we ensure that the different resources we're deploying to Azure can talk to one another?
Role (up for your) assignments
The answer is roles. There's a number of roles that exist in Azure that can be assigned to users, groups, service principals and managed identities. In our own case we're using managed identity for our resources. What we can do is use "role assignments" to give our managed identity access to given resources. Arturo Lucatero gives a great short explanation of this:
Whilst this explanation is delightfully simple, the actual implementation when it comes to ARM templates is a little more involved. Because now it's time to talk "magic" GUIDs. Consider the following truncated ARM template, which gives our managed identity (and hence our App Service which uses this identity) access to Key Vault and Storage:
Let's take a look at these three variables:
The three variables above contain the subscription resource ids for the roles Storage Blob Data Contributor , Key Vault Secrets Officer and Key Vault Crypto Officer . The first question on your mind is likely: "what is ba92f5b4-2d11-453d-a403-e96b0029c9fe and where does it come from?" Great question! Well, each of these GUIDs represents a built-in role in Azure RBAC. The ba92f5b4-2d11-453d-a403-e96b0029c9fe represents the Storage Blob Data Contributor role.
How can I look these up? Well, there's two ways; there's an article which documents them here or you could crack open the Cloud Shell and look up a role by GUID like so:
Or by name like so:
As you can see, the Actions section of the output above (and in even more detail on the linked article ) provides information about what the different roles can do. So if you're looking to enable one Azure resource to talk to another, you should be able to refer to these to identify a role that you might want to use.
Creating a role assignment
So now we understand how you identify the roles in question, let's take the final leap and look at assigning those roles to our managed identity. For each role assignment, you'll need a roleAssignments resource defined that looks like this:
Let's go through the above, significant property by significant property (it's also worth checking the official reference here ):
- type - the type of role assignment we want to create, for a key vault it's "Microsoft.KeyVault/vaults/providers/roleAssignments" , for storage it's "Microsoft.Storage/storageAccounts/providers/roleAssignments" . The pattern is that it's the resource type, followed by "/providers/roleAssignments" .
- dependsOn - before we can create a role assignment, we need the service principal we desire to permission (in our case a managed identity) to exist
- properties.roleDefinitionId - the role that we're assigning, provided as an id. So for this example it's the keyVaultCryptoOfficer variable, which was earlier defined as [subscriptionResourceId('Microsoft.Authorization/roleDefinitions', 'ba92f5b4-2d11-453d-a403-e96b0029c9fe')] . (Note the use of the GUID)
- properties.principalId - the id of the principal we're adding permissions for. In our case this is a managed identity (a type of service principal).
- properties.scope - we're modifying another resource; our key vault isn't defined in this ARM template and we want to specify the resource we're granting permissions to.
- properties.principalType - the type of principal that we're creating an assignment for; in our this is "ServicePrincipal" - our managed identity.
There is an alternate approach that you can use where the type is "Microsoft.Authorization/roleAssignments" . Whilst this also works, it displayed errors in the Azure tooling for VS Code . As such, we've opted not to use that approach in our ARM templates.
Many thanks to the awesome John McCormick who wrangled permissions with me until we bent Azure RBAC to our will.
- Role (up for your) assignments
- Creating a role assignment
Navigation Menu
Search code, repositories, users, issues, pull requests..., provide feedback.
We read every piece of feedback, and take your input very seriously.
Saved searches
Use saved searches to filter your results more quickly.
To see all available qualifiers, see our documentation .
- Notifications
delegate-role-assignments-examples.md
Latest commit, file metadata and controls, examples to delegate azure role assignment management with conditions.
This article lists examples of how to delegate Azure role assignment management to other users with conditions.
Prerequisites
For information about the prerequisites to add or edit role assignment conditions, see Conditions prerequisites .
Example: Constrain roles
This condition allows a delegate to only add or remove role assignments for the Backup Contributor or Backup Reader roles.
You must add this condition to any role assignments for the delegate that include the following actions.
- Microsoft.Authorization/roleAssignments/write
- Microsoft.Authorization/roleAssignments/delete
:::image type="content" source="./media/shared/roles-constrained.png" alt-text="Diagram of role assignments constrained to Backup Contributor or Backup Reader roles." lightbox="./media/shared/roles-constrained.png":::
Here are the settings to add this condition using the Azure portal and a condition template.
[!div class="mx-tableFixed"] Condition Setting Template Constrain roles Roles Backup Contributor Backup Reader
Condition editor
Here are the settings to add this condition using the Azure portal and the condition editor.
To target both the add and remove role assignment actions, notice that you must add two conditions. You must add two conditions because the attribute source is different for each action. If you try to target both actions in the same condition, you won't be able to add an expression. For more information, see Symptom - No options available error .
[!div class="mx-tableFixed"] Condition #1 Setting Actions Create or update role assignments Attribute source Request Attribute Role definition ID Operator ForAnyOfAnyValues:GuidEquals Comparison Value Roles Backup Contributor Backup Reader
[!div class="mx-tableFixed"] Condition #2 Setting Actions Delete a role assignment Attribute source Resource Attribute Role definition ID Operator ForAnyOfAnyValues:GuidEquals Comparison Value Roles Backup Contributor Backup Reader
Azure PowerShell
Here's how to add this condition using Azure PowerShell.
Example: Constrain roles and principal types
This condition allows a delegate to only add or remove role assignments for the Backup Contributor or Backup Reader roles. Also, the delegate can only assign these roles to principals of type user or group.
:::image type="content" source="./media/shared/principal-types-constrained.png" alt-text="Diagram of role assignments constrained Backup Contributor or Backup Reader roles and user or group principal types." lightbox="./media/shared/principal-types-constrained.png":::
[!div class="mx-tableFixed"] Condition Setting Template Constrain roles and principal types Roles Backup Contributor Backup Reader Principal types Users Groups
[!div class="mx-tableFixed"] Condition #1 Setting Actions Create or update role assignments Attribute source Request Attribute Role definition ID Operator ForAnyOfAnyValues:GuidEquals Comparison Value Roles Backup Contributor Backup Reader Operator And Expression 2 Attribute source Request Attribute Principal type Operator ForAnyOfAnyValues:StringEqualsIgnoreCase Value User Group
[!div class="mx-tableFixed"] Condition #2 Setting Actions Delete a role assignment Attribute source Resource Attribute Role definition ID Operator ForAnyOfAnyValues:GuidEquals Comparison Value Roles Backup Contributor Backup Reader Operator And Expression 2 Attribute source Resource Attribute Principal type Operator ForAnyOfAnyValues:StringEqualsIgnoreCase Value User Group
Example: Constrain roles and specific groups
This condition allows a delegate to only add or remove role assignments for the Backup Contributor or Backup Reader roles. Also, the delegate can only assign these roles to specific groups named Marketing (28c35fea-2099-4cf5-8ad9-473547bc9423) or Sales (86951b8b-723a-407b-a74a-1bca3f0c95d0).
:::image type="content" source="./media/shared/groups-constrained.png" alt-text="Diagram of role assignments constrained to Backup Contributor or Backup Reader roles and Marketing or Sales groups." lightbox="./media/shared/groups-constrained.png":::
[!div class="mx-tableFixed"] Condition Setting Template Constrain roles and principals Roles Backup Contributor Backup Reader Principals Marketing Sales
[!div class="mx-tableFixed"] Condition #1 Setting Actions Create or update role assignments Attribute source Request Attribute Role definition ID Operator ForAnyOfAnyValues:GuidEquals Comparison Value Roles Backup Contributor Backup Reader Operator And Expression 2 Attribute source Request Attribute Principal ID Operator ForAnyOfAnyValues:GuidEquals Comparison Value Principals Marketing Sales
[!div class="mx-tableFixed"] Condition #2 Setting Actions Delete a role assignment Attribute source Resource Attribute Role definition ID Operator ForAnyOfAnyValues:GuidEquals Comparison Value Roles Backup Contributor Backup Reader Operator And Expression 2 Attribute source Resource Attribute Principal ID Operator ForAnyOfAnyValues:GuidEquals Comparison Value Principals Marketing Sales
Example: Constrain virtual machine management
This condition allows a delegate to only add or remove role assignments for the Virtual Machine Administrator Login or Virtual Machine User Login roles. Also, the delegate can only assign these roles to a specific user named Dara (ea585310-c95c-4a68-af22-49af4363bbb1).
This condition is useful when you want to allow a delegate to assign a virtual machine login role to themselves for a virtual machine they've just created.
:::image type="content" source="./media/delegate-role-assignments-examples/virtual-machines-constrained.png" alt-text="Diagram of role assignments constrained to Virtual Machine Administrator Login or Virtual Machine User Login roles and a specific user." lightbox="./media/delegate-role-assignments-examples/virtual-machines-constrained.png":::
[!div class="mx-tableFixed"] Condition Setting Template Constrain roles and principals Roles Virtual Machine Administrator Login Virtual Machine User Login Principals Dara
[!div class="mx-tableFixed"] Condition #1 Setting Actions Create or update role assignments Attribute source Request Attribute Role definition ID Operator ForAnyOfAnyValues:GuidEquals Comparison Value Roles Virtual Machine Administrator Login Virtual Machine User Login Operator And Expression 2 Attribute source Request Attribute Principal ID Operator ForAnyOfAnyValues:GuidEquals Comparison Value Principals Dara
[!div class="mx-tableFixed"] Condition #2 Setting Actions Delete a role assignment Attribute source Resource Attribute Role definition ID Operator ForAnyOfAnyValues:GuidEquals Comparison Value Roles Virtual Machine Administrator Login Virtual Machine User Login Operator And Expression 2 Attribute source Resource Attribute Principal ID Operator ForAnyOfAnyValues:GuidEquals Comparison Value Principals Dara
Example: Constrain AKS cluster management
This condition allows a delegate to only add or remove role assignments for the Azure Kubernetes Service RBAC Admin , Azure Kubernetes Service RBAC Cluster Admin , Azure Kubernetes Service RBAC Reader , or Azure Kubernetes Service RBAC Writer roles. Also, the delegate can only assign these roles to a specific user named Dara (ea585310-c95c-4a68-af22-49af4363bbb1).
This condition is useful when you want to allow a delegate to assign Azure Kubernetes Service (AKS) cluster data plane authorization roles to themselves for a cluster they've just created.
:::image type="content" source="./media/delegate-role-assignments-examples/aks-cluster.png" alt-text="Diagram of role assignments constrained to Azure Kubernetes Service RBAC Admin, Azure Kubernetes Service RBAC Cluster Admin, Azure Kubernetes Service RBAC Reader, or Azure Kubernetes Service RBAC Writer roles and a specific user." lightbox="./media/delegate-role-assignments-examples/aks-cluster.png":::
[!div class="mx-tableFixed"] Condition Setting Template Constrain roles and principals Roles Azure Kubernetes Service RBAC Admin Azure Kubernetes Service RBAC Cluster Admin Azure Kubernetes Service RBAC Reader Azure Kubernetes Service RBAC Writer Principals Dara
[!div class="mx-tableFixed"] Condition #1 Setting Actions Create or update role assignments Attribute source Request Attribute Role definition ID Operator ForAnyOfAnyValues:GuidEquals Comparison Value Roles Azure Kubernetes Service RBAC Admin Azure Kubernetes Service RBAC Cluster Admin Azure Kubernetes Service RBAC Reader Azure Kubernetes Service RBAC Writer Operator And Expression 2 Attribute source Request Attribute Principal ID Operator ForAnyOfAnyValues:GuidEquals Comparison Value Principals Dara
[!div class="mx-tableFixed"] Condition #2 Setting Actions Delete a role assignment Attribute source Resource Attribute Role definition ID Operator ForAnyOfAnyValues:GuidEquals Comparison Value Roles Azure Kubernetes Service RBAC Admin Azure Kubernetes Service RBAC Cluster Admin Azure Kubernetes Service RBAC Reader Azure Kubernetes Service RBAC Writer Operator And Expression 2 Attribute source Resource Attribute Principal ID Operator ForAnyOfAnyValues:GuidEquals Comparison Value Principals Dara
Example: Constrain ACR management
This condition allows a delegate to only add or remove role assignments for the AcrPull role. Also, the delegate can only assign these roles to principals of type service principal.
This condition is useful when you want to allow a developer to assign the AcrPull role to a managed identity themselves so that it can pull images from the Azure Container Registry (ACR).
:::image type="content" source="./media/delegate-role-assignments-examples/acr-constrained.png" alt-text="Diagram of role assignments constrained to the AcrPull role and service principal type." lightbox="./media/delegate-role-assignments-examples/acr-constrained.png":::
[!div class="mx-tableFixed"] Condition Setting Template Constrain roles and principal types Roles AcrPull Principal types Service principals
[!div class="mx-tableFixed"] Condition #1 Setting Actions Create or update role assignments Attribute source Request Attribute Role definition ID Operator ForAnyOfAnyValues:GuidEquals Comparison Value Roles AcrPull Operator And Expression 2 Attribute source Request Attribute Principal type Operator ForAnyOfAnyValues:StringEqualsIgnoreCase Value ServicePrincipal
[!div class="mx-tableFixed"] Condition #2 Setting Actions Delete a role assignment Attribute source Resource Attribute Role definition ID Operator ForAnyOfAnyValues:GuidEquals Comparison Value Roles Backup Contributor Backup Reader Operator And Expression 2 Attribute source Resource Attribute Principal type Operator ForAnyOfAnyValues:StringEqualsIgnoreCase Value ServicePrincipal
Example: Constrain add role assignments
This condition allows a delegate to only add role assignments for the Backup Contributor or Backup Reader roles. The delegate can remove any role assignments.
You must add this condition to any role assignments for the delegate that include the following action.
:::image type="content" source="./media/shared/actions-constrained.png" alt-text="Diagram of add and remove role assignments constrained to Backup Contributor or Backup Reader roles." lightbox="./media/shared/actions-constrained.png":::
Example: Allow most roles, but don't allow others to assign roles
This condition allows a delegate to add or remove role assignments for all roles except the Owner , Role Based Access Control Administrator , and User Access Administrator roles.
This condition is useful when you want to allow a delegate to assign most roles, but not allow the delegate to allow others to assign roles.
This condition should be used with caution. If a new built-in or custom role is later added that includes the permission to create role assignments, this condition would not prevent the delegate from assigning roles. The condition would have to be updated to include the new built-in or custom role.
:::image type="content" source="./media/delegate-role-assignments-examples/roles-all-except-specific-roles.png" alt-text="Diagram of add and remove role assignments for all roles except Owner, Role Based Access Control Administrator, and User Access Administrator." lightbox="./media/delegate-role-assignments-examples/roles-all-except-specific-roles.png":::
[!div class="mx-tableFixed"] Condition Setting Template Allow all except specific roles Exclude roles Owner Role Based Access Control Administrator User Access Administrator
[!div class="mx-tableFixed"] Condition #1 Setting Actions Create or update role assignments Attribute source Request Attribute Role definition ID Operator ForAnyOfAllValues:GuidNotEquals Comparison Value Roles Owner Role Based Access Control Administrator User Access Administrator
[!div class="mx-tableFixed"] Condition #2 Setting Actions Delete a role assignment Attribute source Resource Attribute Role definition ID Operator ForAnyOfAllValues:GuidNotEquals Comparison Value Roles Owner Role Based Access Control Administrator User Access Administrator
- Authorization actions and attributes
- Azure role assignment condition format and syntax
- Troubleshoot Azure role assignment conditions

Manage Azure Role Assignments Like a Pro with PowerShell

Today’s blog post is a little bit different. I have a couple of examples of how you can use PowerShell snippets and simple commandlets to get or set role assignmnets in your Azure Subscriptions.
PowerShell examples for managing Azure Role assignments
List all role assignments in a subscription, get all role assignments for a specific resource group, get all role assignments for a specific user, add a role assignment to a user, remove a role assignment for a user, remove all role assignments for a specific user, list all built-in roles, list all custom roles, create a custom role, update a custom role, delete a custom role, list all users or groups assigned to a specific role, list all permissions granted by a specific role, list all resource groups that a user has access to, create a role assignment for a service principal, powershell script to manage azure role assignments.
And now there is a script that combines some of these examples into one usable function:
I hope this was useful. Let me know if you liked the format of this blog and if you want me to include more of these examples.
Vukasin Terzic
Recent Update
- Writing your first Azure Terraform Configuration
- Transition from ARM Templates to Terraform with AI
- Getting started with Terraform for Azure
- Terraform Configuration Essentials: File Types, State Management, and Provider Selection
- Dynamically Managing Azure NSG Rules with PowerShell
Trending Tags
Retrieve azure resource group cost with powershell api.
The Future Of Azure Governance: Trends and Predictions
Further Reading
In my previous blog posts, I wrote about how simple PowerShell scripts can help speed up daily tasks for Azure administrators, and how you can convert them to your own API. One of these tasks is...
Azure Cost Optimization: 30 Ways to Save Money and Increase Efficiency
As organizations continue to migrate their applications and workloads to the cloud, managing and controlling cloud costs has become an increasingly critical issue. While Azure provides a robust s...
Custom PowerShell API for Azure Naming Policy
To continue our PowerShell API series, we have another example of a highly useful API that you can integrate into your environment. Choosing names for Azure resources can be a challenging task. ...
- Role Assignment using Azure Portal
Return to AZ-104 Tutorial
Before you learn to add or remove Azure role assignments using the Azure portal, it is very important to understand Azure Role-Based Access Control (RBAC). We may define Azure role-based access control (RBAC) is an authorization system that can be used to manage access to Azure resources. Now in order to grant access, you are required to assign roles to users, groups, service principals, or managed identities at a particular scope.
Prerequisites of Assigning Roles :
In order to add or remove role assignments, we are required are –
- Microsoft.Authorization/roleAssignments/write
- Microsoft.Authorization/roleAssignments/delete permissions (From User Access Administrator or Owner)
Access control (IAM)
IAM (Identity and Access Management) is a specified page for assigning roles and granting access to Azure resources. In the Azure portal, Access Control is also known as identity and access management.

Steps to Add a Role Assignment
In Azure role-based access control (RBAC), in order to grant access to an Azure resource, you must add a role assignment. We shall now discuss the steps to add a role assignment.

- First Step – In the Azure portal, we will click on All services and then select the scope that we want to grant access to namely, Management groups, Subscriptions, Resource groups, or a resource.
- Second Step – We should then Click the specific resource for that scope.
- Third Step – Now Click Access control (IAM).
- Fourth Step – In this step we will click the Role assignments tab to view the role assignments at this scope.
- Fifth Step – Now Click Add > Add role assignment. But in case you do not have permissions to assign roles, the Add role assignment option will be disabled.
- Sixth Step – In the Role drop-down list, select a role such as Virtual Machine Contributor.
- Seventh Step – In this step we will select a user, group, service principal, or managed identity. Then in the Select list, in case, we do not find the security principal in the list, next we can type in the Select box to search the directory for display names, email addresses, and object identifiers.
- Eighth Step – Click Save to assign the role. After a few moments, the security principal is assigned the role at the selected scope.
Steps to Add a role assignment for a managed identity
In this topic, we will describe an alternate way to add role assignments for a managed identity. Thereby, using these steps, you start with the managed identity and then select the scope and role.

- Firstly, in the Azure portal, open a system-assigned managed identity.
- Then, in the left menu, click Identity.
- Next, under Permissions, click Azure role assignments. If roles are already assigned to the selected system-assigned managed identity, you see the list of role assignments. This list includes all role assignments you have permission to read.
- Now, to change the subscription, click the Subscription list.
- Then click Add role assignment (Preview).
- In this step, use the drop-down lists to select the set of resources that the role assignment applies to such as Subscription, Resource Group, or resource. But in case you do not have role assignment write permissions for the selected scope, then an inline message will be displayed.
- Select a role such as Virtual Machine Contributor, in the Role drop-down list.
- Lastly, Click Save to assign the role.

Steps to Remove a Role Assignment
In order to remove access from an Azure resource, in Azure RBAC we must remove a role assignment.
- The first step we will first Open Access control (IAM) at a scope, such as management group, subscription, resource group, or resource, where you want to remove access.
- In the second step, click the Role assignments tab to view all the role assignments for this subscription.
- Next in the list of role assignments, add a checkmark next to the security principal with the role assignment you want to remove.
- Now Click Remove.
- Lastly, in the remove role assignment message that appears, click Yes.
Note – Any message displaying that inherited role assignments cannot be removed, indicates that you are trying to remove a role assignment at a child scope. In this case, you must open Access control (IAM) at the scope where the role was assigned and then try again.

Reference: Microsoft Documentation
Prepare for Assured Success
Colin Beveridge
Azure role assignments at root.
I was working on tidying up role assignments in Azure recently and thought it would be worth blog post to run through how to do it via powershell which is required if you are removing assignments which have been set at the root in management groups.
The screenshot below shows the permissions have been set for a user at the root level.
If you try and remove these permissions through the Azure portal you will be met with the following notification.

You can user Azure CLI or PowerShell to achieve this. I opted for PowerShell.
In order to remove the permissions you will require to have appropriate permissions set on your own account such as owner at the root level or User Access Administrator at the root.
Open PowerShell and use Connect-AzAccount. This will popup a modern authentication login box to login to Azure.
Once connected run the following command to confirm the account you wish to remove the role assignment.
Get-AzRoleAssignment | where {$_.RoleDefinitionName -eq "Owner" ` -and $_.SignInName -eq "<[email protected]>" -and $_.Scope -eq "/"}
The command above lists the accounts set with owner permissions at the root level. You can modify this command to show you other permissions and also change the scope if required. I got the results below.
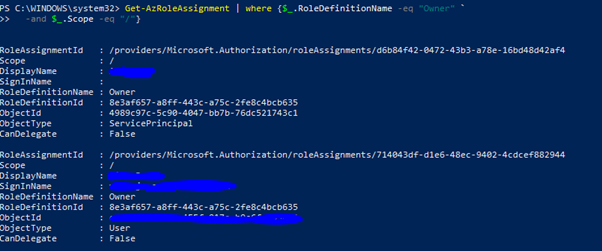
I have obfuscated the actual details for privacy reasons but the second account in the list is the user account I wish to remove the assignment from. In order to remove the assignment I run the following command in Powershell.
Remove-AzRoleAssignment -SignInName <[email protected]> -RoleDefinitionName "Owner" -Scope "/"
And that’s it, the role assignment should now be removed. You can re run the previous command to confirm. This is the only way you can remove assignments at root as its not available through the portal but you can also remove or add other assignments using PowerShell at different scopes.
Share this:
Leave a comment cancel reply.
This site uses Akismet to reduce spam. Learn how your comment data is processed .
- Already have a WordPress.com account? Log in now.
- Subscribe Subscribed
- Copy shortlink
- Report this content
- View post in Reader
- Manage subscriptions
- Collapse this bar
Stefanos Cloud
How to manage Microsoft 365 user role assignments and administrative units
- Role assignments
- Administrative Units
This article provides guidance on how to manage Microsoft 365 user role assignments and administrative units. The article is also available on my podcast and Youtube channel .
View this article as a how-to video on Youtube.
You need to manage existing user roles, create new custom user roles and assign users and groups to existing roles in Microsoft 365 . You need to also manage Microsoft 365 administrative units.
In this how-to article, we will show you how to manage Microsoft 365 user role assignments and administrative units.
Role assignments #
From within the Microsoft 365 Admin Center portal, you can assign Azure AD built-in roles to users who need access to other admin centers and resources in Azure Active Directory, such as users, groups, and apps which use Microsoft Graph API. The following groups of user role assignments can be made from the Admin Center portal.
- Azure AD role assignments
- Exchange Online role assignments
- Intune role assignments

In the next steps, we will show you how to assign the Global Administrator Azure AD role to a user and group. Follow the steps below to assign the Global Administrator role to a user or group.
- Navigate to https://admin.microsoft.com and authenticate as a global admin user.
- On the left pane, expand the "Roles" section and click on "Role assignments". On the main section click on the "Global Administrator" role. On the popup form on the right, you should be able to review the general properties of the role in question. On the permissions tab, the system lists details of the permissions which are assigned with the role in question.
- On the "Assigned" tab, you can assign users or groups to the role in question. Click on "Add Users" and then "Add Groups" to add a user and group respectively to the specific role.
- To run the Azure portal as a specific Azure AD user role, tick on the checkbox next to the role and click "Run As". This will show you the view of the Azure portal as if you had logged in via a user with the role in question.
- To compare permissions of user roles, tick on two or more roles and then click on "Compare Roles". In the next screen, you should see a tabular comparison of the permissions assigned to each of the compared roles. You can also click on "Export comparison" to export the comparison matrix of the selected roles.
In the next steps, we will show you how to assign the Or gan ization Management Exchange Online role to a user and group, as well as how to create a new custom Exchange Online role. Follow the steps below.
- Navigate to the "Exchange" tab under the "Role Assignments" section.
- Click on the "Or gan ization Management" role. On the popup form on the right, you can review the general settings of the role under the "general" tab. Under the "Permissions" tab, you can review in detail the available permissions of the role in question.
- Under the "Assigned" tab, you can assign a user or group to the role in question. Click "Add" and choose the user or group to assign to the role.
- You can also create a custom Exchange Online role by ticking the checkbox next to the role which will be used as the template for the new role. Then click on "Copy role group". This will take you to a wizard to create your new custom role. On the "Set up the b asic s" page, fill-in the name, description and write scope of the new role and click Next.
- Select the roles to add to the new custom role group. Roles define the scope of the tasks that the members assigned to this role group have permission to manage.
- Select the users to assign to this role group. They'll have permissions to manage the roles that you assigned in the previous step.
- Review your selections and click Finish.
In the next steps, we will show you how to assign Intune roles. Assign Intune roles to specialists who need to view or manage Intune data, devices, or services. These roles can only be assigned to users who have a license that includes Intune. Follow the steps below.
- Under the "Role assignments" section, navigate to the "Intune" tab. If you need to export existing assignments, click on the "Export assignments" button.
- Click on the Intune role you wish to edit assignments of. On the "General tab" you can review the general settings of the role in question. On the "Permissions" tab you can see in detail all permissions of the role in question.
- To assign users to the Intune role, under the "Assigned" tab click on "Add". This will take you to the "Set up the b asic s" wizard. Fill-in a name and description and click Next.
- Select the security groups that contain the users you want to become admins for the role. Click Next.
- Select a built-in security group like 'All users', or search for and select security groups which contain the users and devices that the Intune role can manage.
- You can optionally add tabs which limit the specific Intune policies, apps and devices that the admins can see. Click "Next".
- Review all your assignment settings and click "Finish".
Administrative Units #
Now we will move on to show you how to create and manage Microsoft 365 Administrative Units. Units let you sub-divide your or gan ization into any unit that you want, and then assign specific administrators that can only manage that unit. For example, you can assign the Helpdesk Administrator role to a regional support specialist, so they can manage users only in that region.

Carry out the following steps:
- Under the "Roles" section, click on "Administrative Units". Click on "Add Unit" to add a new administrative unit.
- Provide a name and Description of the new administrative unit and click "Next". Administrative units let you limit admins to manage users for a specific department, region, or any segment that your or gan ization defines. Start by giving the administrative unit a name and description that will let other admins know its purpose.
- Choose "Add up to 20 users and groups" or "Upload users" if you need to bulk upload a large number of users to be linked to the new administrative unit. If you choose "Add up to 20 users and groups", then click on "Add Users" or "Add Groups" to add the desired users to the administrative unit and click Next. The administrators assigned to this unit will manage the settings for these users and groups. Adding groups doesn't add users to the unit, it lets the assigned admins manage group settings. You can only add up to 20 members individually or you can bulk upload up to 200 users. If you need to add more, you can edit this unit to add them.
- Assign admins to scoped roles. The following roles are the only roles that support administrative units. Authentication Administrator Cloud Device Administrator Groups Administrator Helpdesk Administrator License Administrator Password Administrator SharePoint Administrator Teams Administrator Teams Device Administrator User Administrator.
Select a role and then assign admins to it. The admins that you assign to roles in this step will manage the members of this administrative unit.
- Review your selections and click "Finish". The new administrative unit has been created. You can always edit its properties by clicking on the Administrative Unit name. From that page you can edit the administrative unit's members and role assignments.
- You can also edit the name and description of an administrative unit by ticking the checkbox next to the administrative unit name and clicking on "Edit name and description".
What are your Feelings
Share this article :, how can we help.
Powered by BetterDocs

How to implement Principle of Least Privilege(Cloud Security) in AWS, Azure, and GCP cloud
The Principle of Least Privilege (PoLP) is a foundational concept in cybersecurity, aimed at minimizing the risk of security breaches. By granting users and applications the minimum levels of access—or permissions—needed to perform their tasks, organizations can significantly reduce their attack surface. In the context of cloud computing, implementing PoLP is critical. This article explores how to enforce PoLP in the three major cloud platforms( cloud security ): Amazon Web Services (AWS), Microsoft Azure, and Google Cloud Platform (GCP).

AWS (Amazon Web Services)
1. Identity and Access Management (IAM)
AWS IAM is the core service for managing permissions. To implement PoLP:
- Create Fine-Grained Policies : Define granular IAM policies that specify exact actions allowed on specific resources. Use JSON policy documents to customize permissions precisely.
- Use IAM Roles : Instead of assigning permissions directly to users, create roles with specific permissions and assign these roles to users or services. This reduces the risk of over-permissioning.
- Adopt IAM Groups : Group users with similar access requirements together. Assign permissions to groups instead of individual users to simplify management.
- Enable Multi-Factor Authentication (MFA) : Require MFA for all users, especially those with elevated privileges, to add an extra layer of security.
2. AWS Organizations and Service Control Policies (SCPs)
- Centralized Management : Use AWS Organizations to manage multiple AWS accounts. Implement SCPs at the organizational unit (OU) level to enforce PoLP across accounts.
- Restrict Root Account Usage : Ensure the root account is used sparingly and secure it with strong MFA.
3. AWS Resource Access Manager (RAM)
- Share Resources Securely : Use RAM to share AWS resources securely across accounts without creating redundant copies, adhering to PoLP.
Azure (Microsoft Azure)
1. Azure Role-Based Access Control (RBAC)
Azure RBAC enables fine-grained access management:
- Define Custom Roles : Create custom roles tailored to specific job functions, limiting permissions to only what is necessary.
- Use Built-in Roles : Start with built-in roles which already follow PoLP principles for common scenarios, then customize as needed.
- Assign Roles at Appropriate Scope : Assign roles at the narrowest scope possible (management group, subscription, resource group, or resource).
2. Azure Active Directory (Azure AD)
- Conditional Access Policies : Implement conditional access policies to enforce MFA and restrict access based on conditions like user location or device compliance.
- Privileged Identity Management (PIM) : Use PIM to manage, control, and monitor access to important resources within Azure AD, providing just-in-time privileged access.
3. Azure Policy
- Policy Definitions : Create and assign policies to enforce organizational standards and PoLP. For example, a policy to restrict VM sizes to specific configurations.
- Initiative Definitions : Group multiple policies into initiatives to ensure comprehensive compliance across resources.
GCP (Google Cloud Platform)
GCP IAM allows for detailed access control:
- Custom Roles : Define custom roles to grant only the necessary permissions.
- Predefined Roles : Use predefined roles which provide granular access and adhere to PoLP.
- Least Privilege Principle in Service Accounts : Create and use service accounts with specific roles instead of using default or highly privileged accounts.
2. Resource Hierarchy
- Organization Policies : Use organization policies to enforce constraints on resources across the organization, such as restricting who can create certain resources.
- Folder and Project Levels : Apply IAM policies at the folder or project level to ensure permissions are inherited appropriately and follow PoLP.
3. Cloud Identity
- Conditional Access : Implement conditional access using Cloud Identity to enforce MFA and restrict access based on user and device attributes.
- Context-Aware Access : Use context-aware access to allow access to apps and resources based on a user’s identity and the context of their request.
Implementing Principle of Least Privilege in AWS, Azure, and GCP
As a Cloud Security Analyst, ensuring the Principle of Least Privilege (PoLP) is critical to minimizing security risks. This comprehensive guide will provide detailed steps to implement PoLP in AWS, Azure, and GCP.
Step 1: Review IAM Policies and Roles
- Navigate to the AWS IAM Console.
- Review existing policies under the “Policies” section.
- Look for policies with wildcards ( * ), which grant broad permissions, and replace them with more specific permissions.
- In the IAM Console, go to “Roles.”
- Check each role’s attached policies. Ensure that each role has the minimum required permissions.
- Remove or update roles that are overly permissive.
Step 2: Use IAM Access Analyzer
- In the IAM Console, select “Access Analyzer.”
- Create an analyzer and let it run. It will provide findings on resources shared with external entities.
- Review the findings and take action to refine overly broad permissions.
Step 3: Test Policies with IAM Policy Simulator
- Go to the IAM Policy Simulator.
- Simulate the policies attached to your users, groups, and roles to understand what permissions they actually grant.
- Adjust policies based on the simulation results to ensure they provide only the necessary permissions.
Step 4: Monitor and Audit
- In the AWS Management Console, go to “CloudTrail.”
- Create a new trail to log API calls across your AWS account.
- Enable logging and monitor the CloudTrail logs regularly to detect any unauthorized or suspicious activity.
- Navigate to the AWS Config Console.
- Set up AWS Config to monitor and evaluate the configurations of your AWS resources.
- Implement AWS Config Rules to check for compliance with your least privilege policies.
Step 5: Utilize Automated Tools
- Access Trusted Advisor from the AWS Management Console.
- Review the “Security” section for recommendations on IAM security best practices.
- Enable Security Hub from the Security Hub Console.
- Use Security Hub to get a comprehensive view of your security posture, including IAM-related findings.
Step 1: Review Azure AD Roles and Permissions
- Navigate to the Azure Active Directory.
- Under “Roles and administrators,” review each role and its assignments.
- Ensure users are assigned only to roles with necessary permissions.
- Go to the “Resource groups” or individual resources in the Azure portal.
- Under “Access control (IAM),” review role assignments.
- Remove or modify roles that provide excessive permissions.
Step 2: Check Resource-Level Permissions
- For each resource (e.g., storage accounts, VMs), review the access policies to ensure they grant only necessary permissions.
- Navigate to “Network security groups” in the Azure portal.
- Review inbound and outbound rules to ensure they allow only necessary traffic.
Step 3: Monitor and Audit
- Access the Activity Logs.
- Monitor logs for changes in role assignments and access patterns.
- Open Azure Security Center.
- Regularly review security recommendations and alerts, especially those related to IAM.
Step 4: Utilize Automated Tools
- Create and assign policies using the Azure Policy portal.
- Enforce policies that require the use of least privilege access.
- Use Azure Blueprints to define and deploy resource configurations that comply with organizational standards.
- In Azure AD, go to “Privileged Identity Management” under “Manage.”
- Enable PIM to manage, control, and monitor privileged access.
- Access the IAM & admin console.
- Review each policy and role for overly permissive permissions.
- Avoid using predefined roles with broad permissions; prefer custom roles with specific permissions.
- In the IAM console, navigate to “Roles.”
- Create custom roles that provide the minimum necessary permissions for specific job functions.
Step 2: Check Resource-Based Policies
- In the IAM & admin console, go to “Service accounts.”
- Review the permissions granted to each service account and ensure they are scoped to the least privilege.
- Navigate to the VPC network section and select “Firewall rules.”
- Review and restrict firewall rules to allow only essential traffic.
- Enable and configure Cloud Audit Logs for all services.
- Regularly review logs to monitor access and detect unusual activities.
- In the IAM console, use the IAM Recommender to get suggestions for refining IAM policies based on actual usage patterns.
- Enable Access Transparency to get logs of Google Cloud administrator accesses.
- Access the Security Command Center for a centralized view of your security posture.
- Use it to monitor and manage security findings and recommendations.
- Deploy Forseti Security for continuous monitoring and auditing of your GCP environment.
- Use tools like Policy Troubleshooter to debug access issues and Policy Analyzer to compare policies.
Step 5: Conduct Regular Reviews
- Regularly review IAM roles, policies, and access patterns across your GCP projects.
- Use the Resource Manager to organize resources and apply IAM policies efficiently.
By following these detailed steps, you can ensure that the Principle of Least Privilege is effectively implemented across AWS, Azure, and GCP, thus maintaining a secure and compliant cloud environment.
Implementing the Principle of Least Privilege in AWS, Azure, and GCP requires a strategic approach to access management. By leveraging the built-in tools and services provided by these cloud platforms, organizations can enhance their security posture, minimize risks, and ensure compliance with security policies. Regular reviews, continuous monitoring, and automation are key to maintaining an effective PoLP strategy in the dynamic cloud environment.
The 11 Essential Falco Cloud Security Rules for Securing Containerized Applications at No Cost
April 12, 2024
Hack-Proof Your Cloud: The Step-by-Step Continuous Threat Exposure Management CTEM Strategy for AWS & AZURE
March 19, 2024
Web-Based PLC Malware: A New Technique to Hack Industrial Control Systems
March 8, 2024
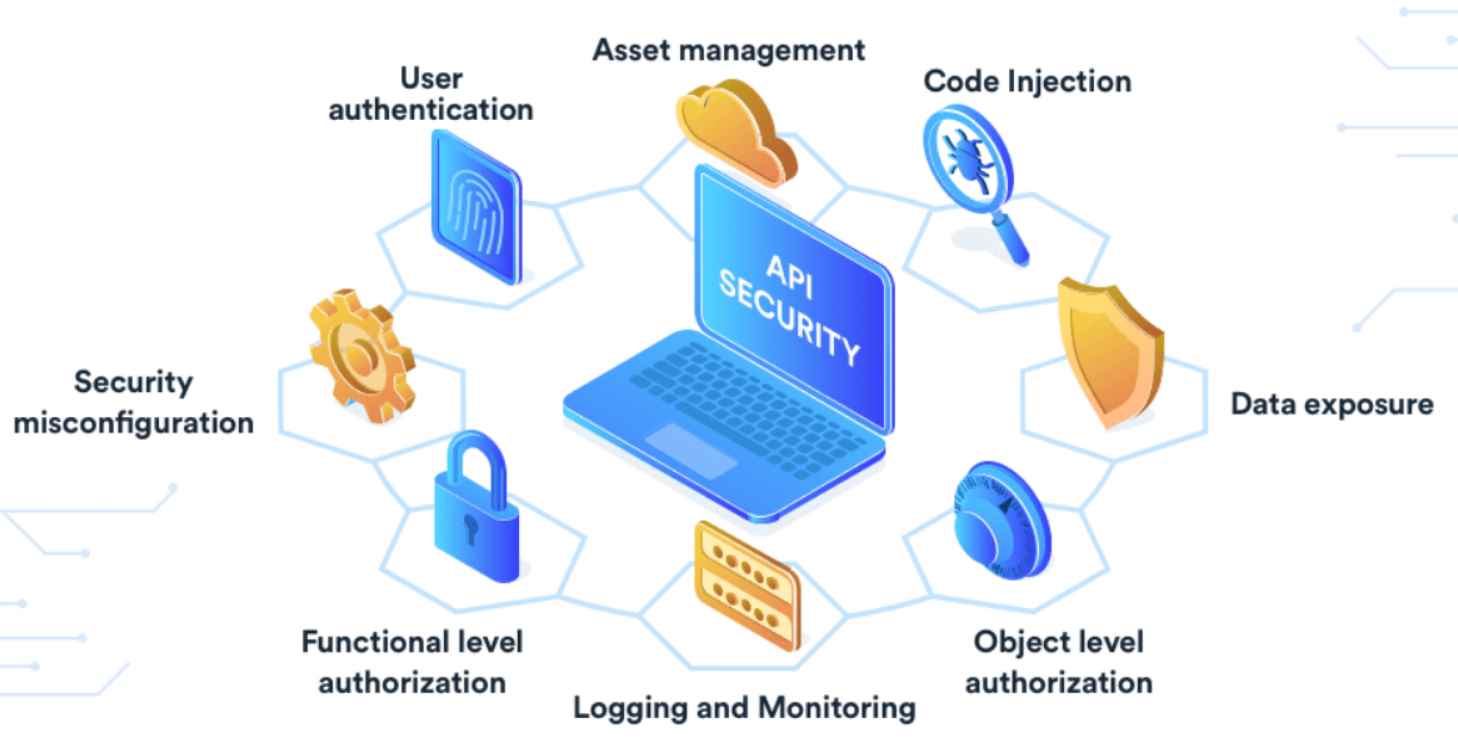
The API Security Checklist: 10 strategies to keep API integrations secure
March 6, 2024

11 ways of hacking into ChatGpt like Generative AI systems
January 8, 2024
How to send spoof emails from domains that have SPF and DKIM protections?
December 20, 2023

Silent Email Attack CVE-2023-35628 : How to Hack Without an Email Click in Outlook
December 15, 2023

How to Bypass EDRs, AV with Ease using 8 New Process Injection Attacks
December 11, 2023

Information security specialist, currently working as risk infrastructure specialist & investigator. 15 years of experience in risk and control process, security audit support, business continuity design and support, workgroup management and information security standards.
Cyber Security Channel

US Govt wants new label on secure IoT devices or wants to discourage use of Chinese IoT gadgets

24,649,096,027 (24.65 billion) account usernames and passwords have been leaked by cyber criminals till now in 2022

How Chinese APT hackers stole Lockheed Martin F-35 fighter plane to develop its own J-20 stealth fighter aircraft [VIDEO]
IMAGES
VIDEO
COMMENTS
On the Role tab, select a role that you want to use.. You can search for a role by name or by description. You can also filter roles by type and category. If you want to assign a privileged administrator role, select the Privileged administrator roles tab to select the role.. For best practices when using privileged administrator role assignments, see Best practices for Azure RBAC.
Navigate to the resource/resource group/subscription in the portal -> Access control (IAM) -> Role assignments, you can filter with the parameters you want. Or you can use the Azure powershell Get-AzRoleAssignment or REST API, it depends on your requirement. Sample: 1.You have a list of ObjectIds of the users, you can use the script as below.
• Scope: Specifies the resources to which the role assignment applies. Below are the steps on how to assign role to a user in an Azure Login into Azure portal and click on the search bar to search for Azure Active Directory to create a user account. Click on Azure Active Directory and you will a page displayed where you will now click on user ...
Once you know the security principal, role, and scope, you can assign the role. You can assign roles using the Azure portal, Azure PowerShell, Azure CLI, Azure SDKs, or REST APIs. You can have up to 4000 role assignments in each subscription. This limit includes role assignments at the subscription, resource group, and resource scopes.
John Reilly. OSS Engineer - TypeScript, Azure, React, Node.js, .NET. This post is about Azure's role assignments and ARM templates. Role assignments can be thought of as "permissions for Azure". If you're deploying to Azure, there's a good chance you're using ARM templates to do so. Once you've got past "Hello World", you'll probably find ...
This condition allows a delegate to only add or remove role assignments for the Azure Kubernetes Service RBAC Admin, Azure Kubernetes Service RBAC Cluster Admin, Azure Kubernetes Service RBAC Reader, or Azure Kubernetes Service RBAC Writer roles. Also, the delegate can only assign these roles to a specific user named Dara (ea585310-c95c-4a68 ...
Adding a role assignment. Firstly, in the Azure portal, click All services and then select the scope that you want to grant access to. Secondly, click the specific resource for that scope. Then, Click Access control (IAM). Fourthly, click the Role assignments tab for viewing the role assignments at this scope. After that, click Add > Add role ...
Learn how to manage Azure Role assignments using PowerShell snippets and simple commandlets. Discover examples for listing all role assignments, adding and removing assignments for users or service principals, creating custom roles, and more. Plus, check out a script that combines some of these examples into a single function. Written by Vukasin Terzic.
Firstly, in the Azure portal, open a system-assigned managed identity. Then, in the left menu, click Identity. Next, under Permissions, click Azure role assignments. If roles are already assigned to the selected system-assigned managed identity, you see the list of role assignments. This list includes all role assignments you have permission to ...
Open PowerShell and use Connect-AzAccount. This will popup a modern authentication login box to login to Azure. Once connected run the following command to confirm the account you wish to remove the role assignment. The command above lists the accounts set with owner permissions at the root level. You can modify this command to show you other ...
Follow the steps below to assign the Global Administrator role to a user or group. Navigate to https://admin.microsoft.com and authenticate as a global admin user. On the left pane, expand the "Roles" section and click on "Role assignments". On the main section click on the "Global Administrator" role.
1. You need to use the Azure Blueprints, you can't directly create your own deny assignments, deny assignments are created and managed by Azure, e.g. Azure Blueprints. The doc explains that: Deny assignments are created and managed by Azure to protect resources. For example, Azure Blueprints and Azure managed apps use deny assignments to ...
Navigate to the Azure Active Directory. Under "Roles and administrators," review each role and its assignments. Ensure users are assigned only to roles with necessary permissions. Role-Based Access Control (RBAC): Go to the "Resource groups" or individual resources in the Azure portal. Under "Access control (IAM)," review role ...
But when I want to "add a role assignment for an Application" I noticed that my account for adding roles has been disable, see image. ... As I mentioned in the comments, to assign roles to any resource in Azure Portal, you should have either Owner or User Access Administrator roles on your Azure subscription.
I am trying to grant a permissions (RBAC, role-based access control) to Azure resource groups using C# code. I.e., I want to grant permissions to the resource group itself not just the individual resources under it (storage accounts, app services and whatnot). This is easy to do in the Azure portal (GUI), but I struggle with it in code.