- PRO Courses Guides New Tech Help Pro Expert Videos About wikiHow Pro Upgrade Sign In
- EDIT Edit this Article
- EXPLORE Tech Help Pro About Us Random Article Quizzes Request a New Article Community Dashboard This Or That Game Popular Categories Arts and Entertainment Artwork Books Movies Computers and Electronics Computers Phone Skills Technology Hacks Health Men's Health Mental Health Women's Health Relationships Dating Love Relationship Issues Hobbies and Crafts Crafts Drawing Games Education & Communication Communication Skills Personal Development Studying Personal Care and Style Fashion Hair Care Personal Hygiene Youth Personal Care School Stuff Dating All Categories Arts and Entertainment Finance and Business Home and Garden Relationship Quizzes Cars & Other Vehicles Food and Entertaining Personal Care and Style Sports and Fitness Computers and Electronics Health Pets and Animals Travel Education & Communication Hobbies and Crafts Philosophy and Religion Work World Family Life Holidays and Traditions Relationships Youth
- Browse Articles
- Learn Something New
- Quizzes Hot
- This Or That Game
- Train Your Brain
- Explore More
- Support wikiHow
- About wikiHow
- Log in / Sign up
- Computers and Electronics
- Presentation Software
- PowerPoint Insertions

6 Easy Steps to Make Bullet Lists in a PowerPoint Presentation
Last Updated: September 27, 2023 Fact Checked
This article was co-authored by wikiHow staff writer, Darlene Antonelli, MA . Darlene Antonelli is a Technology Writer and Editor for wikiHow. Darlene has experience teaching college courses, writing technology-related articles, and working hands-on in the technology field. She earned an MA in Writing from Rowan University in 2012 and wrote her thesis on online communities and the personalities curated in such communities. This article has been fact-checked, ensuring the accuracy of any cited facts and confirming the authority of its sources. This article has been viewed 401,826 times. Learn more...
Do you want to add bullet points to your PowerPoint so it's easier to read? Luckily, you can insert bullet points easily with just a few clicks of the mouse. This wikiHow article teaches you how to add a bullet point in a PowerPoint presentation using a Mac and Windows computer.
Things You Should Know
- Select the text you want to bullet, then go to "Home > Bullet".
- If you're trying to make a bullet list from scratch, and you're in a "Title" box, only the first line will be bulleted. Pressing "Enter" will create a new unbulleted line.
- Use the "Text" box to create multiple bulleted lines.

- Alternatively, you can create a new slide .
- If you don't see the slides of your PowerPoint on the left side of your screen, go to "View > Normal."

- For example, you might click the "Title" box or the "Click to add text" box.
- If there's text that you want to add bullet points to, select that text instead.

- If you're using a Mac, the Home tab is different than the Home menu item that's in the top-left side of your Mac's screen.

- If you have an existing list of items you want to turn into bullet points, highlight them before selecting a bullet point format. This will add a bullet point to each individual line.

- If you're in a "Text" box, a new bulleted line will be created when you press "Enter/Return" but not if you're in a "Title" box. [1] X Trustworthy Source Microsoft Support Technical support and product information from Microsoft. Go to source
- Press the Backspace key while your cursor is next to a new bullet point to stop using bullet points.
- *You can use different PowerPoint bullet formats to differentiate sub-points from main points. To do this, use the "Increase List Level" or press Tab on your keyboard.
Community Q&A
- Using too many bullet points may detract from the visual appeal of your PowerPoint presentation. Thanks Helpful 0 Not Helpful 0
You Might Also Like

- ↑ https://support.microsoft.com/en-us/office/add-bullets-or-numbers-to-text-a6f1b87e-fca8-47da-ade9-5d99b7f41f04
About This Article

- Send fan mail to authors
Is this article up to date?

Featured Articles

Trending Articles

Watch Articles

- Terms of Use
- Privacy Policy
- Do Not Sell or Share My Info
- Not Selling Info
wikiHow Tech Help Pro:
Level up your tech skills and stay ahead of the curve
- Slidesgo School
- PowerPoint Tutorials
How to Add a Bulleted or Numbered List in PowerPoint

A good way to have your content well organized in your presentation to make it look clean and nicely arranged is to add lists. In this tutorial, you’ll learn how to add bulleted or numbered lists to your PowerPoint presentations and how to customize them to adapt them to your needs .
Creating a List
Changing the format of a list.
- Select the text or text box where you want to add a list.
- Go to the toolbar and click the Bullets or Numbering button to create a list of that respective type.

- Once you’ve created a list, to close it just press Enter and then Backspace.
- If you want to start a sublist inside a list, press Tab. To go back to the main list, create a new line and reduce the indent.
- You can take any line to a sublist or return it to the main list by pressing the Increase List Level or Decrease List Level button respectively.

- Select the text in a list.
- Go to the toolbar and click either the Bullets or Numbering drop-down arrow. Then, click Bullets and Numbering…
- On the Bulleted tab, choose any of the presets or click Customize to select a symbol.

- If you want to use an icon or an image as bullets, click Picture… and select the file from your computer, PowerPoint’s collection of icons or from the web (some of these options might not appear depending on the version of PowerPoint you’re using). Remember that it must be a PNG file if you don’t want the background of that picture to appear too. If you need PNG icons, we recommend visiting Flaticon.
- On the Numbered tab, you can choose the format of the list and the starting number.

- On both tabs you’ll find options to set the size and the color of the bullets or numbers. Please note that you won’t be able to change the color of the bullets if you use custom icons.
Do you find this article useful?
Related tutorials.

New feature available: edit our templates with Canva
Whenever you need to create, Slidesgo is there. We’re continually enhancing your presentation design process with templates that are primed to impress for any occasion. And in order to let your ideas flow best, comfort is key. How could Slidesgo help you with this? By making you feel right at home with our resources, no matter your preferred platform.You spoke, and we listened. Now, your favorite slides can be accessed on a new platform: Canva! This new format adds to our existing options (PowerPoint and Google Slides), expanding your ways to utilize our first-rate presentation content. We’ve started with a selection of Canva-ready...

How to print PowerPoint notes
Crafting an impactful PowerPoint slideshow and delivering a captivating presentation are distinct skills. The first focuses on designing appealing visuals to convey a clear message, while the second involves employing effective presentation techniques to ensure the audience grasps the idea. The content of this article will help you with the latter part of this process, guiding future presenters on how to print PowerPoint with speaker notes to enhance your presentations success and effectiveness.

Discover Our Online Presentation Software for Free
We have great news for you today! If you’ve been a Slidesgo fan for years (or months, or weeks, or days, or mere hours, we welcome everyone!), you’ll probably know for now that our templates are available mostly in two formats: for use in Google Slides and PowerPoint.Google Slides is a free tool, since you only need a Google account in order to use it. PowerPoint, on the other hand, is part of the Microsoft Office suite, so it’s not a free program, but that didn’t stop it from being one of the most popular options in the world!What if we...

Webinar: Presentation Audit
With more than 15,000 templates released on Slidesgo and a user base composed of millions of people, we estimate that the total number of presentations created adds up to… um, a lot! Our team of professional designers work very hard to provide you with editable slides so that the only thing you need to do is, well, customize the elements to your liking. Starting from any given template, the results may vary a lot depending on the person who edited the contents.Have you ever wondered “Is my presentation good enough?” and wished that an expert on presentations looked at your template...
How to Customize Bullet Points in PowerPoint? An Easy Way!
By: Author Shrot Katewa

I remember the first time that I wanted to customize bullet points in Powerpoint, I felt it was quite difficult. But, that is not necessarily the case especially if you have someone explaining the nuances of it. So, I decided to put together this helpful article to explain it to you.
To customize bullet points in PowerPoint, first, highlight an existing bullets list. Then on the home tab, select the bullets dropdown option. Next, select the bullets and numbering from the pop-up window, and choose a different bullet point design. You can also upload an image to use as bullet points from here.
In order to understand exactly how this works, I’ll make use of some reference images and also give you a step-by-step breakdown of how to go about changing the bullet points in PowerPoint.
A Quick Note Before We Begin – if you want to make jaw-dropping presentations, I would recommend using one of these Presentation Designs . The best part is – it is only $16.5 a month, but you get to download and use as many presentation designs as you like! I personally use it from time-to-time, and it makes my task of making beautiful presentations really quick and easy!
How to Change the Default Bullet Points in PowerPoint?
This article assumes that you know how to add bullets to your text in PowerPoint. If you don’t, then make sure to check out my other article which provides you with a complete tutorial on how to add bullet points in PowerPoint !
So there are multiple ways in which you can make changes to the type of bullet points that you use. Additionally, there are some really cool things that you can do with bullet points. We’ll talk about all these in this section.
Customizing Bullet Points (Step-by-Step)
Changing the type of bullet points that you would like to use is easy. Here’s what you need to do –
Step 1 – Highlight the Existing Bullet Points
The first and foremost thing that needs to be done is to make sure that the section of the presentation where you want to change the bullet points is highlighted.
If you haven’t added the bullet points, I would recommend first creating a bulleted list and then make the changes as described in the next steps. This way, you can make sure that only the specific section of the presentation has these bullet points.
Step 2 – Open the Bullets and Numbering Option
There are a couple of ways you can open the bullets and numbering option in PowerPoint.
Typical method of opening the bullets and numbering is by –
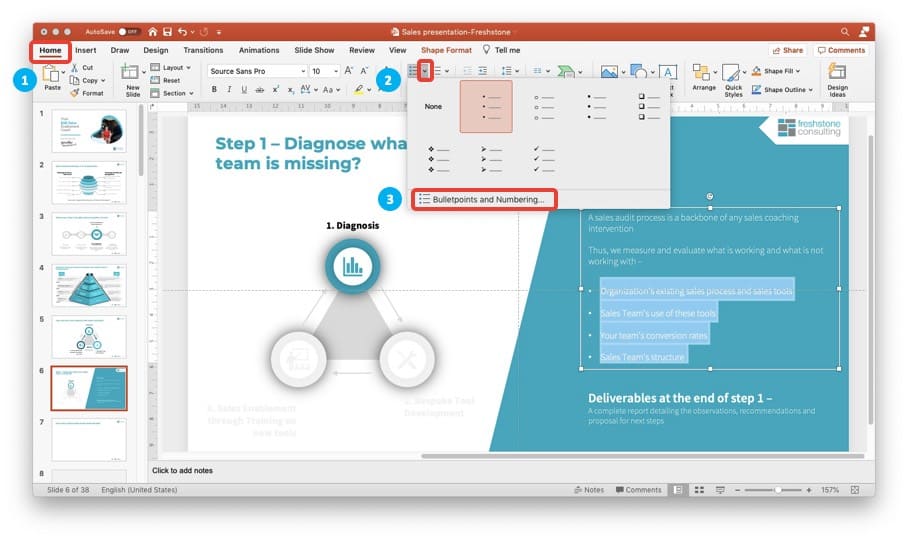
- Click on the “Home” tab in your PowerPoint
- Next, click on the small arrow next to the bullets option on the home tab.
- Finally, click on the “Bullets and Numbering” option from the pop-up window.
A faster way to reach this Bullet and Numbering window is also by using the mouse –
- Select the existing bullet list
- Right-click on the selected text
- Click on Bullet Points to open up the Bullets and Numbering option window.
Step 3 – Choose a Different Bullet Point Design
From this window, there are a number of things that you can do to your bullet points. Here are some of the things that you can do –
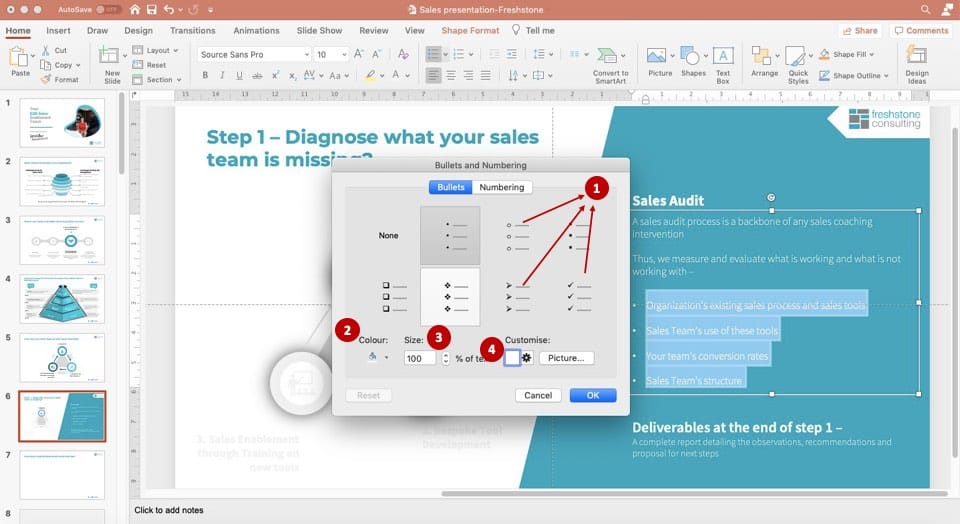
1. Choose Predefined set of Bullet Points
PowerPoint, by default, provides you with a handful of options to choose from if you don’t like the existing bullet points. You can easily choose a different bullet point with a single-click. Various options provided are indicated as point 1 in the above image.
2. Change the Color and Size of the Bullet Points
You can also change the color of the existing bullet points by using the color option as indicated by point 2 in the image above.
Likewise, by clicking on the size (as indicated by point 3 in the image above), you can also make the bullet point big or small.
3. Using a Customized Bullet Point
If you don’t like the predefined options presented by PowerPoint, you can also choose to go with several different options by clicking on the customize button.
I have attached a screenshot below with various options presented to customize the bullet points in PowerPoint –
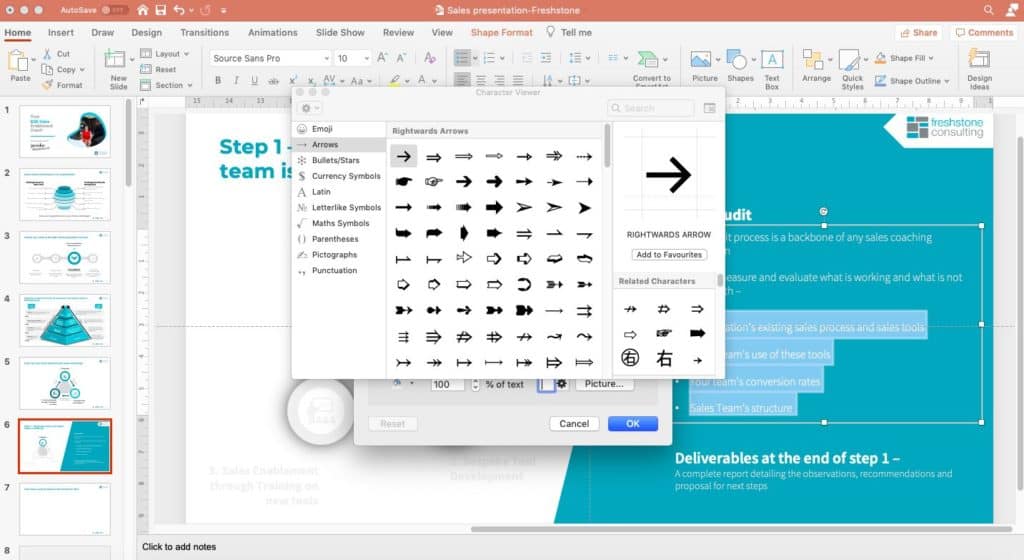
From this option, you can select from a few different default options. These are solid circles, solid squares, tick marks, arrows, open circles, and open squares.
You can further choose from all the symbols which come with Powerpoint. There are many, but some have an accepted meaning, and should not be used for bullet points. This is because it will confuse your audience if you use them.
Some of the symbols that you should not be using as bullet points are *, †, ‡, §, |, ¶. These symbols are often used to denote footnotes.
They are used when you write something that has a reference or a caveat. After the sentence, you put one of these symbols, and then at the bottom of the document, you use the same symbol and write the reference or caveat.
Just remember that you are creating a bullet point, and that the purpose of it is to separate out points to make them easier to read and understand. So, use that as your evaluating criteria when you are selecting a custom bullet point.
Using Images for Bullet Points in Powerpoint
In PowerPoint, there is also an option to upload an image file.
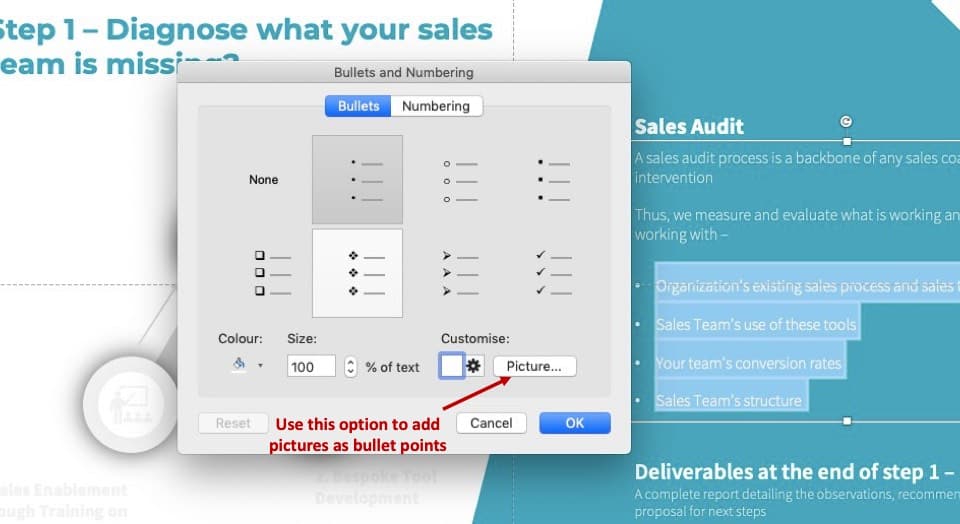
As indicated in the above image, all you need to do is click on the pictures option on the Bullets and Numbering options window. A new pop-up window will open up. Then, simply select the image that you want to use to add as a bullet point and click OK.
You will notice that you now have the image that you selected as a bullet point!
However, one should keep in mind that, often when using images for bullet points the resolution of the image makes it difficult to showcase the image clearly. This often defeats the purpose of using an image in most cases. This is because Powerpoint scales it to the document, and the image will become pixelated , and look blurry.
So, it is often tedious and time-consuming to do this, and you will want to go with one of the bullets that come with Powerpoint.
How to Customize Bullet Points in Other Presentation Software
The growing popularity of other Powerpoint-like software such as Google Slides, has meant that it can be a bit frustrating to find the setting when switching between different software.
But, they are almost always located in the formatting tab, or by right clicking on the bullet points.
For Google Slides, specifically, you can customize your bullet points by selecting Format -> Bullets and numbering -> List options , this gives you the option to add custom bullet points. They only give you the option to add the default symbols, and not images.
But, you can draw a symbol you want to use with your mouse directly into a window they provide. Then use it as a symbol, very cool.
For each of the lesser known presentation software you should do a Google search for the specific software and how to edit the bullet points.
How do you create multiple lists of bullets in a single shape in Powerpoint?
To do this you need to add columns to the shape. Have the shape selected by clicking on it, and then click the columns icon at the top of the page to select how many columns you need.
This will separate your text into columns. This will work if you want two columns, three columns or more.
Another option is to create separate shapes for your bullet points, and then arrange them on the page.
Once this is done you can highlight the text of a specific column and then click the bullet icon to add your desired bullets.
It is usually easier to write all the points and then add the bullets rather than doing them one by one. If you write the text for the first bullet point, and then make it a bullet.
When you hit enter after the first bullet point, the next line of text will be automatically formatted as a bullet and is another easier way of doing it.
How do you put a bullet point closer to text in Powerpoint?
How close a bullet point is to the bullet point text is changed by using the indent setting. To adjust it you need to enable the Ruler, if it isn’t already enabled.
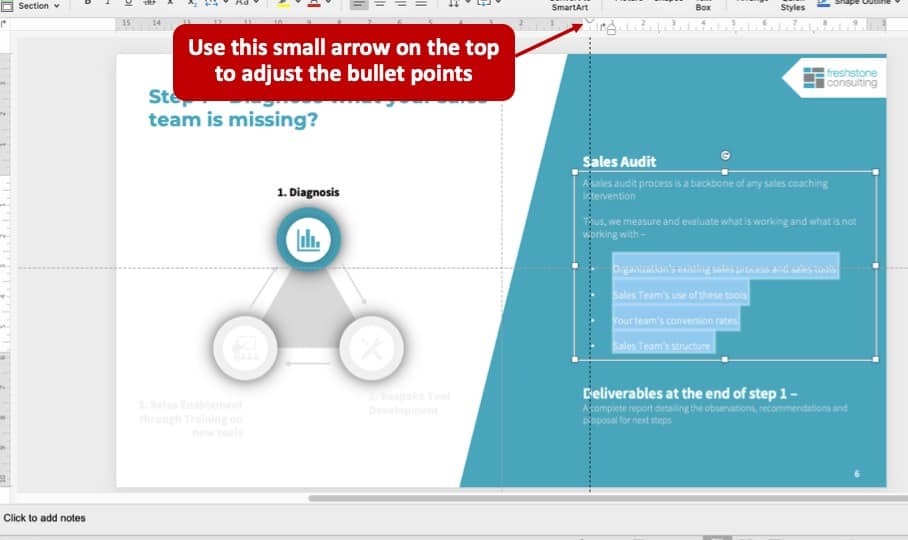
To do this click on View -> Show/Hide Ruler . Once you can see the indent marker which is a small triangle. From there you can drag it to where you want it to be.
Kindly have a look at how we have indicated this in the image above to get a better understanding of the visual explanation.
Alternatives to Displaying Bullet Points in a PowerPoint Presentation?
Although, the standard solid dot for a bullet point is simple, and separates out the different points you are trying to make. Sometimes other ways of displaying your points can make for a better looking Powerpoint presentation that will impress your audience. I will discuss these below:
Drawing a Diagram
Sometimes, your points can be better conveyed by using a diagram such as a mindmap. A mind map has one central topic in the middle with sub points as branches.
This makes your points easier to understand by your audience and provides another angle on your presentation that mixes it up and creates variety.
These can be made very quickly and easily using online mindmapping software such as mindmeister.com . From there, you can save it as an image and upload it to your Powerpoint presentation.
Putting your points in separate boxes
You can put each separate point into its own box and then arrange them on the slide. This makes each point stand on its own and makes the information easier to understand. When people understand your presentation more, they enjoy it more.
You can then add different colors to the points or add images in the boxes to emphasise your points. This is a visually appealing way to present your data, and makes it more interesting for your audience.
To customize bullet points in Powerpoint you need to highlight your point and then click the bullet icon. There are then four to five different options by default. You can add additional icons that you can select from a list.
Care should be taken not to use icons that already have a meaning, because this will confuse your audience. Also, you can add custom images as bullet points, though, this generally, detracts from your presentation.
There are some ways to improve lists of points in Powerpoint presentations, these are using a diagram which you can make with a mind mapping software. You can also put each point into its own box, and use different colors and images in the boxes to add emphasis.
How to Create a Multi Level Bulleted List in PowerPoint 2013

Bulleted lists are a powerful way to present complex information in a visually compelling and easy-to-understand format. In PowerPoint 2013, you can take your presentations to the next level by creating a multi level bulleted list that adds depth and structure to your content. In this article, we’ll explore the ins and outs of creating a multi level bulleted list in PowerPoint 2013, including why you should use one, how to customize its appearance, and various tips and tricks for making the most of this powerful tool.
Table of Contents
Understanding Bulleted Lists in PowerPoint 2013
Bulleted lists are a popular way to present information in PowerPoint 2013. Simply put, a bulleted list is a series of items that are separated by bullets or other visual elements. Bulleted lists are ideal for breaking up large chunks of text and making complex information more digestible for your audience.
One of the benefits of using bulleted lists in PowerPoint 2013 is that they can help you to stay organized and on track during your presentation. By breaking up your information into smaller, more manageable chunks, you can ensure that you cover all of your key points without overwhelming your audience with too much information at once.
Another advantage of using bulleted lists in PowerPoint 2013 is that they can help to improve the overall visual appeal of your presentation. By using different bullet styles, colors, and sizes, you can create a more dynamic and engaging slide that captures your audience’s attention and keeps them focused on your message.
Why Use a Multi Level Bulleted List in PowerPoint 2013?
A multi level bulleted list takes the concept of a simple bulleted list one step further by allowing you to create a hierarchy of information, with different levels of importance and detail. This is useful when you have a lot of information to present and want to organize it into logical groups or subtopics. Multi level bulleted lists also make it easier for your audience to scan through your content and find the information they need more quickly.
Step by Step Guide to Creating a Multi Level Bulleted List in PowerPoint 2013
Here’s how to create a multi level bulleted list in PowerPoint 2013:
- Open a new or existing PowerPoint presentation and navigate to the slide where you want to add the multi level bulleted list.
- Click on the placeholder text box where you want to add the bulleted list.
- Click on the “Home” tab in the PowerPoint ribbon and then click on the “Bullets” dropdown menu.
- Select the first level bullet from the dropdown menu.
- Type the text for your first bullet point and then press “Enter” to create a new line.
- To create a second level bullet point, press the “Tab” key on your keyboard. Type the text for your second level bullet point and then press “Enter” to create a new line.
- Repeat step 6 to create as many levels as you need.
- To return to a higher level, press “Shift” + “Tab”.
- Once you have added all of your bullet points, you can customize the appearance of your multi level bulleted list using the techniques that we’ll explore in the next section.
Choosing the Right Slide Layout for Your Bulleted List
When creating a multi level bulleted list in PowerPoint 2013, it’s important to choose the right slide layout for the type of content you want to present. PowerPoint offers a variety of slide layouts to choose from, each of which has its own unique features and benefits. For example, if you want to display a lot of text on the slide, you may want to choose a layout with a large text box. If you want to include graphics or multimedia on your slide, you may want to choose a layout with image or video placeholders.
Customizing the Appearance of Your Multi Level Bulleted List
Once you’ve created your multi level bulleted list, you can customize its appearance in a variety of ways to make it more visually appealing and engaging for your audience. Here are some customization options to consider:
- Change the bullet style: PowerPoint offers a variety of bullet styles to choose from, including squares, arrows, and stars. Experiment with different styles to find the one that best fits the tone and style of your presentation.
- Change the font: You can change the font, size, and color of your text to make it more readable and eye-catching. Be careful not to use too many fonts or make the text too small, as this can make the slide difficult to read.
- Use color strategically: Adding pops of color to your bulleted list can help draw attention to important points or make the slide more visually appealing. However, be careful not to use too many colors or make the slide too busy.
- Add images or icons: Consider adding images or icons to your bulleted list to help illustrate your points or break up large sections of text. Icons are particularly useful for creating a visual hierarchy within your list.
Adding Icons or Images to Your Bulleted List in PowerPoint 2013
To add an icon or image to a bullet point, simply follow these steps:
- Click on the bullet point where you want to add the icon or image.
- Click on the “Insert” tab in the PowerPoint ribbon and then click on the “Pictures” or “Icons” button.
- Select the image or icon you want to use, and then click “Insert”.
- The image or icon will now appear next to the bullet point.
Tips for Effectively Using a Multi Level Bulleted List in Your Presentation
Here are some tips for making the most of your multi level bulleted list in your PowerPoint presentation:
- Keep it simple: Don’t try to cram too much information into each bullet point. Instead, focus on presenting one idea per point.
- Use parallel structure: Make sure your bullet points follow a consistent format or structure, such as starting with a verb or using the same grammatical tense.
- Highlight important information: Use bold or colored text to highlight important information or make key points stand out.
- Use animation sparingly: While adding animations to your bulleted list can make it more engaging, be careful not to go overboard. Too many animations can be distracting or take away from the message you’re trying to convey.
Editing and Formatting Your Multi Level Bulleted List in PowerPoint 2013
If you need to make changes to your multi level bulleted list, simply click on the list and make your edits. You can also use the formatting options in the PowerPoint ribbon to make additional changes to the appearance of your list, such as changing the font or bullet style.
Troubleshooting Common Issues with Multi Level Bulleted Lists in PowerPoint 2013
If you’re having trouble creating or formatting your multi level bulleted list in PowerPoint 2013, here are some common issues and solutions:
- List won’t indent: If your list won’t indent when you press “Tab”, make sure you have selected the text box and not just a single bullet point.
- Missing bullet points: If your bullet points are disappearing or appearing as plain text, make sure you have selected a bullet style for each level of the list.
- Inconsistent formatting: If your list is not formatting consistently across levels, double-check your use of tabs and spaces, and make sure you are using the same formatting for each level of the list.
Best Practices for Creating Professional-Looking Bulleted Lists in PowerPoint 2013
Finally, here are some best practices to keep in mind when creating your multi level bulleted list in PowerPoint 2013:
- Keep it concise: Remember that your bulleted list is meant to simplify complex information. Keep your points short and to the point.
- Choose the right structure: Make sure your list follows a logical order that makes sense to your audience.
- Use visuals sparingly: While images and icons can enhance your list, too many can be overwhelming or distracting.
- Preview and test your presentation: Make sure to preview your presentation in slide show mode and test your bulleted list to ensure that it looks and functions correctly.
Using Animations to Enhance Your Multi Level Bulleted List in PowerPoint 2013
If you want to add some extra pizzazz to your bulleted list, you can use animations to bring it to life. Try adding animations such as entrance effects, exit effects, and motion paths to your list to make it more engaging and dynamic. Just be sure not to overdo it – too many animations can be distracting or take away from the message you’re trying to convey.
Advanced Techniques for Creating Dynamic and Engaging Bullet Lists in PowerPoint 2013
If you’re an experienced PowerPoint user and want to take your multi level bulleted lists to the next level, try experimenting with advanced techniques such as custom animations, master slides, and integrated multimedia. These techniques require more skill and experience, but they can help you create truly dynamic and engaging presentations that stand out from the crowd.
Designing Effective Presentations Using Multi-Level Bullet Points in PowerPoint 2013.
Multi-level bullet points are a powerful tool for designing effective presentations in PowerPoint 2013. By organizing your information into a logical and visually appealing format, you can engage your audience more effectively and help them better understand the information you’re presenting. Remember to keep your points concise, use visuals sparingly, and preview and test your presentation before delivering it.
Best Free Add-Ins for Creating Bullet Point Presentations on Powerpoint
There are many free add-ins available online that can help you create professional-looking bullet point presentations in PowerPoint. Some top-rated free add-ins include:
- Office Timeline: This add-in makes it easy to create timelines and Gantt charts in PowerPoint.
- SlideModel: This add-in provides access to a wide range of pre-designed PowerPoint templates and graphics.
- Canva for PowerPoint: This add-in integrates Canva’s powerful design tools into PowerPoint.
Overall, multi level bulleted lists are a valuable tool for creating engaging and effective presentations in PowerPoint 2013. By following the steps outlined in this article and experimenting with different customization options and techniques, you’ll be able to create eye-catching and informative bullet lists that are sure to impress your audience.
By humans, for humans - Best rated articles:
Excel report templates: build better reports faster, top 9 power bi dashboard examples, excel waterfall charts: how to create one that doesn't suck, beyond ai - discover our handpicked bi resources.
Explore Zebra BI's expert-selected resources combining technology and insight for practical, in-depth BI strategies.

We’ve been experimenting with AI-generated content, and sometimes it gets carried away. Give us a feedback and help us learn and improve! 🤍
Note: This is an experimental AI-generated article. Your help is welcome. Share your feedback with us and help us improve.

Blog – Creative Presentations Ideas
infoDiagram visual slide examples, PowerPoint diagrams & icons , PPT tricks & guides

Get rid of bullet points! 7 creative list presentation ideas
Last Updated on February 26, 2023 by Peter Z
Do you use lists and agendas often in your presentations? I bet the answer is yes. What is more: we use them every day, and not only at work. There are project plans, TODO lists, priority checklists, agendas, principles, and lots of others. Let’s get creative, go a little bit further than creating default SmartArt diagrams, and explore innovative list presentation ideas.
Here are a few fresh alternatives you can use to replace default bullet point enumerations in your presentations and make your notes more structured.
Editable PowerPoint graphic for bullet-points replacement is available in this Universal Diagrams Collection PPT Slide-Deck .
I believe you are tired of bullet points and simple lists as same as I do, so why don’t put a touch of originality to our slides? That way it is possible to create more attractive designs and, of course, impress your audience.
Here are several approaches you can use instead of bullet point enumerations:
- represent list by graphical metaphor , for example, a lighthouse graphics: when you need to illustrate strategy direction, leadership, or vision concepts. Or use a puzzle shape if your list should express points that create a strongly connected idea.
- replace bullets with a set of shapes with text inside e.g. arrows, circles, hexagons or rectangles. Using standard PowerPoint shapes is enough.
- use iconography to illustrate points , assigning a theme-related icon for a specific item.
Let’s explore several slide examples below.
7 Creative Ways of Illustrating a List
The general idea is to replace each item in bullet points with a visually more attractive design element. Below you’ll find several options of shapes you can consider. I suggest using shape types and colors that fit the most your brand or the graphical style you use in your business materials (every shape and symbol from our collection is editable).
1. Lighthouse Graphics
In a situation where the list has an even number of points, it is worth spreading them evenly on both sides of the slide, and in the middle put a graphic or illustration (in our case it is a lighthouse).

The lighthouse metaphor is also useful when you want to illustrate strategy direction, leadership, or vision concepts in an attractive way. Here are more examples of using these graphics:

You can explore the full collection of lighthouse infographics here:
Lighthouse Infographics Template
2. Arrow-shaped Templates – Dynamic Style
One idea is to replace bullet points with a series of arrows. You can use one color or several ones for each item. These arrow-shaped lists are good for expressing dynamic style. They quickly grab attention to a certain point:
You can apply your brand colors to the lists, as the arrows are PowerPoint editable shapes. Additionally, you can enrich the main points by adding a symbol for each item. Download the collection here:
Arrows Lists Collection
If you are looking for concept visualization ideas, check this article: One Picture to Rule Them All – Concept Visualization List .
Here’s an example of a project plan checklist, illustrated with icons:
It’s quite a dense list so with help of the icons you can visualize your content better. Symbols make it easier to read and remember.
3. Key Components Hexagon List
Lists with an odd number of points are a bit more problematic to create because they are harder to spread out symmetrically on the slide. Think about some shapes in which you can type the text and distribute it so that it forms an attractive whole (such as the shape of a honeycomb). If the points do not have a lot of content, you can additionally enrich them with icons. Here’s an example of such a list:

This slide is included in the HR Talent Management presentation deck .
4. List with Numerous Strongly Related Points
When you need to present more points on the list, you can try the wheel layout. The individual elements of the list are distributed evenly around some circular element, in the following case it is a diagram consisting of three puzzles.

You can see more templates to illustrate actions against climate change here .
5. Road Signs as Bullets
Road signs are assigned to each point and affixed with the corresponding icon on the slides below. We chose the graphics of the road sign because we are talking about the rules of the workplace in this example and this visualization seems to be an interesting metaphor here. It’s good practice to find a metaphor for the content and visualize it graphically.

How to create such a sign? If you take a good look, you will see that it consists of the simple shapes that are in PowerPoint (circle and rectangle, seriously, there are no simpler shapes 😉 ) just fold them properly and you’re done.

See more slides from the road signs infographics deck here:
Road Signs Infographics
6. Circle Strip Lists for Smooth, Perfection Style
Okay, but what if we will get through pretty standard arrows to something more original but at the same time professional-looking? Our designers were experimenting a lot and here’s the result:
Looks more attractive than a standard bullet-point list, doesn’t it? 🙂 Such circles don’t steal attention from the content and add a modern touch to the slide.
Replace default bullet points in your agenda with colorful or mono-color lists with circles aside, see the full deck here . These rounded shapes can be used to represent values of something stable, friendly, something ideally shaped, and perfect.
7. Teardrops List Presentation Ideas to Combine Dynamics and Perfection
“Okay, – you would say, – but if I want to use arrows, but also like the idea of ideal round shapes?” Then I have to advise you on teardrops – a combination of arrows and circles together. This is a really good way to design eye-catchy slides without special knowledge and effort:

You can use teardrop lists for your investor pitches, market research reports, HR, strategy, and planning presentations .
Apply list diagrams for comparisons or longer agendas, and place as many items as you need. Check the teardrop lists set here .
Attractive lists can greatly refresh the overall slides’ look. A collection of design ideas by hand will help you create highly visual and elegant presentation content, and support your storyline.
More Creative Design Ideas
If you search for more ideas, here are some interesting articles you can check:
- 4 Steps for Good-looking Tables in a Presentation
- 6 bullet points ideas by Connie Malamed
- Simplify Complex Presentation in Three Steps article
- 6 Creative Alternatives for Pie Charts in PowerPoint
Stay updated
Get new presentation ideas and updates sent directly to you! Plus, if you sign up for our newsletter now, you’ll receive a Creative slide design guide at no cost, as well as hand-drawn shapes you can start using right now.
How To Create a Multilevel List in PowerPoint

A multi-level list can be useful in a PowerPoint Presentation to showcase related data. You’ve come to the right place if you’re trying to figure out how to make a multilevel list in PowerPoint.. Check out the exact steps below:
Step 1: Select The Slide
Step 2: add/select the list, step 3: choose between bullet or number, step 4: select the items for the sub-list then press tab.
Launch PowerPoint and open the slide where you want to add the multi-level list.
Add and select all the items that you want to format as multilevel by dragging the cursor over them.

Create a bulleted or numbered list based on your preference by pressing the perspective button on the Paragraph section.

Now, select the items that will go under the sub-list and press Tab. If you will be needing another layer, you just have to repeat the same process: select the text then press Tab.

That’s it! You have just created a multi-level list in PowerPoint. The sample above shows a multi-level list with bullets. You can also do it with the numbers following the same process.
As you see, it’s extremely easy to create a multilevel list in MS PowerPoint. You can do this with just a few clicks within a few minutes. We hope the article has been helpful for you. Thanks for reading!
Related Posts:
")
How-To Geek
How to align text after a bullet in powerpoint.
Bulleted lists are standard fare in PowerPoint presentations, and sometimes you want to tweak those bullets to look just right.
Quick Links
Aligning the bulleted text horizontally in its text box, align bulleted text horizontally by adjusting the indention, align bulleted text vertically in its text box.
Bulleted lists are standard fare in PowerPoint presentations, and sometimes you want to tweak those bullets to look just right. PowerPoint gives you a fair amount of control by letting you align and adjust the text after a bullet point. Here's how.
First, open your PowerPoint presentation and go to the slide that contains the bulleted text. Highlight the text on the bullet you want to adjust.
On the "Home" tab, you'll see four different alignment options---the same ones you use for aligning regular text.
From left to right, these options are:
- Align Left (Ctrl+L)
- Center (Ctrl+E)
- Align Right (Ctrl+R)
- Justify (Ctrl+J)
Hovering over each option with your mouse gives you the alignment type, respective shortcut key, and alignment description.
Select the alignment option you want. In this example, we'll select "Center."
Now you'll notice the highlighted text center itself within the text box.
If you need to align more than one bullet point at a time to the same alignment settings, you can select multiple bullet points at once and then select the alignment. If you want bullet points to have different alignments, you'll have to set each one individually.
Related: How to Insert a Check Mark or Checkbox in PowerPoint
Another method for aligning bulleted text horizontally is to use the ruler feature to adjust both the bullet point and the text that follows. To use this feature, you must first enable the ruler by heading over to the "View" tab and turning on the "Ruler" checkbox.
Now you'll notice a ruler appear at the top and left side. Next, select the bulleted text with which you want to work. We'll use the same text.
Once you select the text, three line indent markers appear on the ruler:
- First Line Indent: This is the top marker (the downward pointing triangle), and you can use it to adjust the position of the bullet graphic itself.
- Hanging Indent: This is the middle marker (the upward pointing triangle), and you can use it to adjust the position of the text.
- Left Indent: This is the bottom marker (the rectangle), and you can use it to adjust the position of the bullet and text at the same time.
Just to the right of the regular alignment options, you'll see an "Align Text" button that you can use to align text vertically. This one affects all the text in the box, so you won't be able to set different bullet points individually.
Clicking the "Align Text" button opens a menu with a few different options and, of course, you can also explore some of the additional options available, including alignment and text rotation, by selecting "More Options."
Follow these simple rules, and you'll be able to draw attention to specific points by using unique text and bullet placement.
Bullet Point / Text Layouts
Discover our comprehensive selection of Bullet Point and Text Layout templates for PowerPoint and Google Slides. These templates are designed to help you present your content in an organized, clear, and visually appealing manner.
Bullet Point and Text Layout templates offer different layouts and styles to showcase your content effectively. From simple bullet points to more elaborate text designs, these templates help you convey your message clearly and keep your audience engaged.

Hexagon Checklist for PowerPoint and Google Slides
Google Slides , PPTX

Calculator List for PowerPoint and Google Slides

Check List Template for PowerPoint and Google Slides

Vertical Hierarchy List for PowerPoint and Google Slides

Infographic Numbered List for PowerPoint and Google Slides

Simple Table of Contents for PowerPoint and Google Slides

Horizontal Numbered List for PowerPoint

List with Folders for PowerPoint

4 Text Boxes for PowerPoint

Numbered List and 3 Banners for PowerPoint

6 Numbers List and Text Boxes for PowerPoint
Search templates by categories, search templates by colors.
Love our templates? Show your support with a coffee!
Thank you for fueling our creativity.
Charts & Diagrams
Text & Tables
Graphics & Metaphors
Timelines & Planning
Best-Ofs & Tips
Terms and Conditions
Privacy Statement
Cookie Policy
Digital Millennium Copyright Act (DMCA) Policy
© Copyright 2024 Ofeex | PRESENTATIONGO® is a registered trademark | All rights reserved.

To provide the best experiences, we and our partners use technologies like cookies to store and/or access device information. Consenting to these technologies will allow us and our partners to process personal data such as browsing behavior or unique IDs on this site and show (non-) personalized ads. Not consenting or withdrawing consent, may adversely affect certain features and functions.
Click below to consent to the above or make granular choices. Your choices will be applied to this site only. You can change your settings at any time, including withdrawing your consent, by using the toggles on the Cookie Policy, or by clicking on the manage consent button at the bottom of the screen.
Thank you for downloading this template!
Remember, you can use it for free but you have to attribute PresentationGO . For example, you can use the following text:
If you really like our free templates and want to thank/help us, you can:
Thank you for your support

May 16, 2024
Create accessible PDFs with Microsoft 365 apps
- Add our blog to your RSS feed reader" href="/rss/blog.xml" data-bi-name="RSS Subscription" data-bi-id="rss_feed" data-bi-bhvr="120" data-bi-socchn="RSSSubscription" title="Microsoft 365 Insider Blog RSS" target="blank" class="d-inline-block">
Howdy, Microsoft 365 insiders! My name is Peter Wu, and I’m a Principal Engineer on the PowerPoint team. I’m here to explain how to use several Microsoft 365 apps to create accessible PDFs, so that everyone can access and enjoy the content of your creations.
Create accessible PDFs with Microsoft 365
Global Accessibility Awareness Day occurs every May, and this year we’re reminding you to make sure that your documents, presentations, spreadsheets, and other content remains accessible by the more than 1 billion people in the world with disabilities.
Many people who you communicate with could have disabilities that you are not aware of (studies show more than 70% of disabilities are invisible). Making your content accessible can help empower them to understand your message and fully participate in whatever activity or concept you are communicating. Practice and make it a habit !
We know many of you distribute your content in PDF format, which is why we’ve been continually making improvements to the way Microsoft 365 apps preserve the accessibility of content when exporting to PDF. In most cases, you can do all your accessibility work within your favorite Microsoft 365 apps, without costly add-ins or other remediation steps.
How it works
- Start with a template or theme that has good semantics and color palette, such as the new default theme in Office . All six of the accent colors in this theme contrast well with the default text color and font size in PowerPoint, and three of the six accent colors contrast well when using smaller font sizes.
- By default, the Accessibility Checker runs while you work. A notification is displayed in the Status Bar. If any accessibility issues are detected, simply click the notification to open the Accessibility Assistant pane and review the list of issues found.
- In PowerPoint , Excel , and Outlook for Windows , after you have the Accessibility Checker open, the Accessibility ribbon tab also appears at the top of the window providing the tools that help you make your content accessible all in one place.
- Beta Channel users can also access a preview of the new Accessibility Assistant in Word and Outlook for Windows by selecting Review > Check Accessibility . This tool makes it even easier to create accessible documents in those apps.
- Tip: Don’t use Print as PDF , since that command doesn’t produce an accessible PDF.
- If there are accessibility issues in the content, a notification appears when saving or exporting it as a PDF in Word, Excel, and PowerPoint for Windows, reminding you to make it accessible.
PDF accessibility improvements in Microsoft 365
Recent improvements to PDF accessibility in Word, Excel, and PowerPoint include:
- Exporting accessible PDF on iOS and Mac (when using the Best for electronic distribution and accessibility option) in Excel as well as Word. This feature is also available in PowerPoint to all Current Channel (Preview) users.
- Bookmarks for sections and slides in PowerPoint and headings or bookmarks in Word to help people more easily navigate PDF content.
- Over 100 improvements to PDF/UA tags, which provide essential information for people who rely on a screen reader to read and understand PDF content.
- The most suitable tags for Shapes with text, Alt Text, and Equations
- <Formula> with Alt Text for Equations in Excel and PowerPoint
- <Figure> with Alt Text for every other type of graphical object
- Flat <Figure> (no nesting) for SmartArts and Groups in PowerPoint
- WordArt preserved as text
- Hyperlinks aren’t nested in <Figure> in PowerPoint
- Artifact and no tags for Decorative objects, objects on slide master, headers, footers, cell borders, and more
- Removed unnecessary <Span> and <P> tags
- <Span> tags for different languages and no Actual Text
- <THead> and <TH> for table headers
- Merged table cells have rowspan and colspan in PowerPoint
- Lists have proper nesting and <Lbl> for the bullet
- Footnote and Endnote <Link>s
- <BlockQuote> for Word Paragraph Quote and Intense Quote styles
- <Quote> for Word Quote style
- <Title> for Word Title style
- Heading levels beyond <H6>
Availability
These features are generally available in the latest releases of Microsoft 365, except where noted above. Availability may vary by product.
We want to hear from you! Please click Help > Feedback in any Microsoft 365 product to submit your thoughts about a PDF accessibility feature.
Sorry, JavaScript must be enabled to use this app.
- Add bullets to text Video
- Change font size, spacing, and indents Video
- Change list formatting Video

Add bullets to text

Format your text as bullets; change font size, line spacing, and indentation; and change list formatting on the slide master to change all of your slides at once.
Add bullets or numbers to text
Use bullets or numbers to present lots of text or a sequential process in a PowerPoint 2013 presentation.
On the VIEW tab, in the Presentation Views group, click Normal .
On the left-hand side of the PowerPoint window, click a slide thumbnail that you want to add bulleted or numbered text to.
On the slide, select the lines of text in a text placeholder or table that you want to add bullets or numbering to.
On the HOME tab, in the Paragraph group, click Bullets or Numbering .
To change all lines of text, select the outline of the text object, and then apply the bullet or numbering.
To increase or decrease the indent, to change spacing between a bullet or number and the text, to change the style, color, or size of bullets or numbers, to manually change the number that you want to start from, and so on, see Adjust the indent in a bulleted or numbered list on the ruler .
Use slide masters to customize a presentation
Apply and change a theme
In PowerPoint, add bullets to a list of text items to emphasize the key points of information.
For a list to be most effective, you’ll keep it moderate in length, and the list items will be brief and scannable.
Another aspect of lists concerns their formatting — font size, line spacing, margins, indentation of bullets and text, and bullet type.
So, as you create bulleted lists, think of their effectiveness in terms of both what they say and how they look.
Let’s go over some list basics.
All the content layouts in PowerPoint include bulleted-list formatting.
To remove the bullets or add them, you select the content placeholder and click Bullets on the HOME tab.
To add a new item and drop down another level, press Enter, and click Increase List Level . Or, press Enter+Tab.
To move an item one level up, place the insertion point at the start of the text and click Decrease List Level . Or, press Shift+Tab.
Be careful in the use of text levels. For example, this Agenda list, with first and second-level items is much easier for an audience to take in, if you limit it to the top-level points, as in the list here.
As you create a list, you’ll want to work with how it looks.
If you want a certain theme, apply it early, so you know what its list styles look like.
Then make other adjustments.
To learn more, see the other movies in this course, called Change font size, line spacing, and indentation, and Change list formatting on the slide master.
Up next: Change font size, line spacing, and indentation .

Need more help?
Want more options.
Explore subscription benefits, browse training courses, learn how to secure your device, and more.

Microsoft 365 subscription benefits

Microsoft 365 training

Microsoft security

Accessibility center
Communities help you ask and answer questions, give feedback, and hear from experts with rich knowledge.

Ask the Microsoft Community

Microsoft Tech Community

Windows Insiders
Microsoft 365 Insiders
Was this information helpful?
Thank you for your feedback.
IMAGES
VIDEO
COMMENTS
On the View tab, in the Presentation Views group, click Normal. On the left side of the PowerPoint window, click a slide thumbnail that you want to add bulleted or numbered text to. On the slide, select the lines of text in a text placeholder or table that you want to add bullets or numbering to. On the Home tab, in the Paragraph group, click ...
Double-click an existing PowerPoint presentation, or open PowerPoint and create a new presentation . 2. Select the slide you want to type on. Click a slide on the left side of the window to open the slide you want to place your bullet point on. Alternatively, you can create a new slide.
Go to the toolbar and click the Bullets or Numbering button to create a list of that respective type. Bulleted lists and numbered lists in PowerPoint. Once you've created a list, to close it just press Enter and then Backspace. If you want to start a sublist inside a list, press Tab. To go back to the main list, create a new line and reduce ...
Step-1: Click on the text box. In the open PowerPoint slide, the first step is to click on the text box containing the bullet points. Then click on the "Home" tab in the menu ribbon. Step-2: Click on the "Bullets and Numbering" option.
Step-1: Click on the "Numbering" icon. In the text box in the PowerPoint slide, select the numbered list that you want to format. Then click on the "Numbering" option in the "Paragraph" group of the "Home" menu. Step-2: Click on the "Bullets and Numbering" option.
This is on PowerPoint's ribbon, the list of menu options across the top of your screen. Go to Home > Bullets to add your very first PPT bullet point list. It's how to create a multilevel list in PowerPoint quickly. With the Home tab open, find the Paragraph group just left of center.
You can also use sub-lists by pressing tab. Do this to maintain hierarchy in your lists. By using bullet points and numbered lists in PowerPoint, you can enhance the clarity and organization of your presentations. Well-formatted lists improve audience comprehension and engagement, allowing you to deliver your message effectively. Try these ...
Click on the "Home" tab in your PowerPoint. Next, click on the small arrow next to the bullets option on the home tab. Finally, click on the "Bullets and Numbering" option from the pop-up window. A faster way to reach this Bullet and Numbering window is also by using the mouse -. Select the existing bullet list.
Look at your sentences carefully and cut out any filler words that don't add value to the sentence. Remember, bullet points are supposed to be notes that help guide your presentation. As such, keep them concise. The best way to do this is to focus on using nouns and verbs.
Open a new or existing PowerPoint presentation and navigate to the slide where you want to add the multi level bulleted list. Click on the placeholder text box where you want to add the bulleted list. Click on the "Home" tab in the PowerPoint ribbon and then click on the "Bullets" dropdown menu. Select the first level bullet from the ...
In this video, I demonstrate how to create individual slides for each bullet point in a list. I show you how to navigate to the outline view, copy and paste ...
Here are more examples of using these graphics: You can explore the full collection of lighthouse infographics here: Lighthouse Infographics Template. 2. Arrow-shaped Templates - Dynamic Style. One idea is to replace bullet points with a series of arrows. You can use one color or several ones for each item.
Step 4: Select The Items For The Sub-list Then Press Tab. Now, select the items that will go under the sub-list and press Tab. If you will be needing another layer, you just have to repeat the same process: select the text then press Tab. That's it! You have just created a multi-level list in PowerPoint. The sample above shows a multi-level ...
Bulleted lists are standard fare in PowerPoint presentations, and sometimes you want to tweak those bullets to look just right. PowerPoint gives you a fair amount of control by letting you align and adjust the text after a bullet point. Here's how. Aligning the Bulleted Text Horizontally in Its Text Box First, open your PowerPoint presentation ...
Bullet Point / Text Layouts. Discover our comprehensive selection of Bullet Point and Text Layout templates for PowerPoint and Google Slides. These templates are designed to help you present your content in an organized, clear, and visually appealing manner. Bullet Point and Text Layout templates offer different layouts and styles to showcase ...
2 Be Minimal. Using a minimal design composition is one of the unique presentation ideas. The trick is to have just enough information and visual details for the viewer to feel comfortable seeing the slides. A minimal design can instill calm and awe in your audience when done right.
This tool makes it even easier to create accessible documents in those apps. When you're ready to publish your content, use the Save or Export as PDF command to ensure that your content stays accessible. Tip: Don't use Print as PDF, since that command doesn't produce an accessible PDF. If there are accessibility issues in the content, a ...
On the VIEW tab, in the Presentation Views group, click Normal. On the left-hand side of the PowerPoint window, click a slide thumbnail that you want to add bulleted or numbered text to. On the slide, select the lines of text in a text placeholder or table that you want to add bullets or numbering to. On the HOME tab, in the Paragraph group ...