Home Blog PowerPoint Tutorials How to Create a Presentation with PowerPoint Online

How to Create a Presentation with PowerPoint Online
An online version of PowerPoint was introduced in 2010, a few years after the Google Docs release, which came out as early as 2007. Over the years, the product, along with other Microsoft Office apps, underwent major changes, making it more user-friendly and feature-rich for end users.
Given the rise of inter-device connectivity and cloud support, tools like Microsoft 365, particularly its Word, Excel, and PowerPoint web-based counterparts, have considerably increased their capabilities, matching the performance of desktop versions. In this article, we will talk about PowerPoint Online, also called PowerPoint for Web, and how it can help presenters craft presentations and access them on the go wherever they log in.
Table of Contents
What is PowerPoint Online
Advantages of powerpoint online, getting started with powerpoint for the web, how to create a powerpoint online presentation, collaboration and sharing, saving and exporting, tips for creating high-quality slides in powerpoint online, troubleshooting common issues in powerpoint online.
- Conclus i on
PowerPoint for the Web, which was previously called PowerPoint Online, is a web-based version of PowerPoint that enables creating, viewing, editing, and sharing PowerPoint presentations online. Unlike Google Slides, PowerPoint for the Web provides better native support for PowerPoint files. It makes it possible to seamlessly work with PowerPoint files and features through a web-based browser, with OneDrive support to share and store your data. PowerPoint for the web is free to use but has limited features. However, if you are a Microsoft 365 subscriber, you can get better features when using the web-based version of PowerPoint.
PowerPoint for the web provides the same benefits as the desktop version of PowerPoint, with the added advantage of accessing these features anywhere using an Internet browser. Below is a list of advantages of using PowerPoint Online.
Easy Accessibility
You can access PowerPoint features anywhere using an Internet-connected browser without installing the PowerPoint app on your device. Furthermore, you can also upload and access files from your device anytime, anywhere, via the web.
Support for Native PowerPoint Features
Be it online collaboration, cloud storage, or access to version history, you can get native PowerPoint features via a web-based version of PowerPoint without the need to worry about compatibility issues. Furthermore, unlike Google Slides or other web-based variants of PowerPoint, PowerPoint for the web helps access native PowerPoint features without causing compatibility issues such as incorrect display of certain themes or support for various animations available in the offline version.
OneDrive Integration
The integration of PowerPoint for the web with OneDrive allows instantly storing, sharing, and accessing different versions of a file using the cloud storage support of OneDrive.
Easy Sharing
The OneDrive integration enables the online version of PowerPoint to be used for instantly sharing presentations online using a link with a specific access level (view only or editing privileges).
Online Collaboration
While PowerPoint’s offline version also provides collaboration features, using PowerPoint for the web can provide a smoother experience when looking for real-time changes to a PowerPoint file.
Version History
PowerPoint files saved with the web version come with a version history, where you can access older file versions to restore according to need. This feature is also available for the offline version, which you must turn on upload to OneDrive. In other words, version history is only supported for PowerPoint files that are saved online.
Cross-Platform Compatibility
Since you only need a web browser and a Microsoft account to access PowerPoint Online, there are no issues with having a compatible device to use the app. This means you can access PowerPoint Online using any device that can run a modern Internet browser.
Accessibility Features
PowerPoint for the web is among the few platforms that provide accessibility features for persons with disabilities, such as image ALT text and support for screen readers.
PowerPoint for the web is regularly updated, providing access to the latest features for end users.
To get started, go to Office.com or powerpoint.office.com and select the PowerPoint icon to access PowerPoint for the web. You will require a Microsoft account to log in.
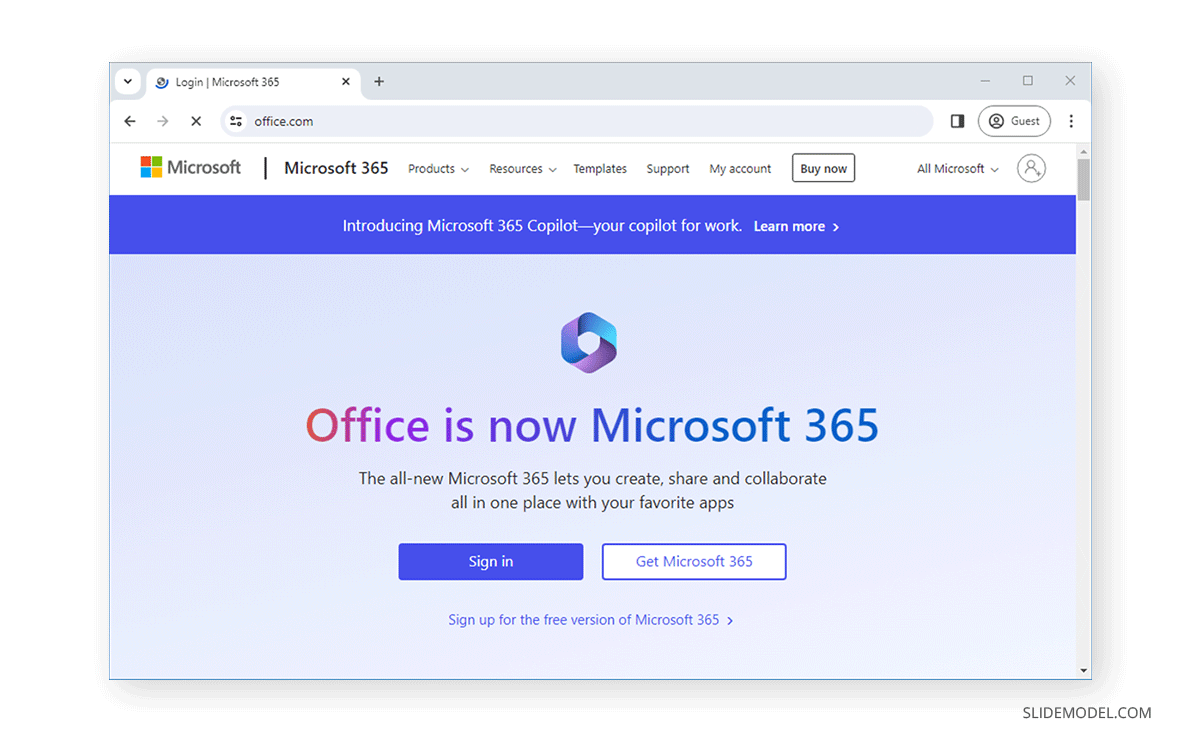
Once logged in, you can create a new PowerPoint presentation or upload one from your device. All you need for accessing the web version of PowerPoint is a modern Internet browser and a device that can support it. This web-based version of PowerPoint works with all commonly used browsers and their variants, including Chrome, Mozilla Firefox, Microsoft Edge, Safari, Opera, and others.
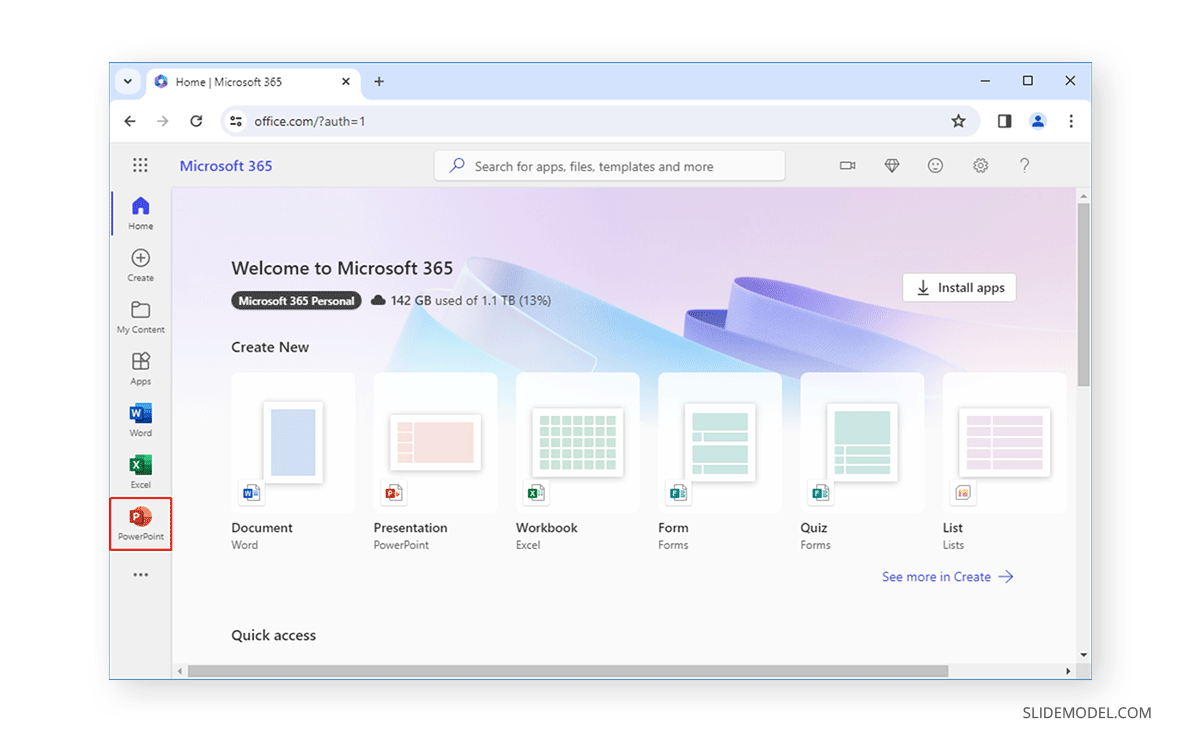
From Office.com, you can create new PowerPoint presentations from scratch or via a template, upload new ones, or open an existing one saved to OneDrive.
Create a New Presentation with PowerPoint for the Web
Click Create or use a PowerPoint template from the options to create a new PowerPoint presentation. You can start with a specific theme or use a blank template. You can also browse through themes via Office.com to find one that best suits your needs.
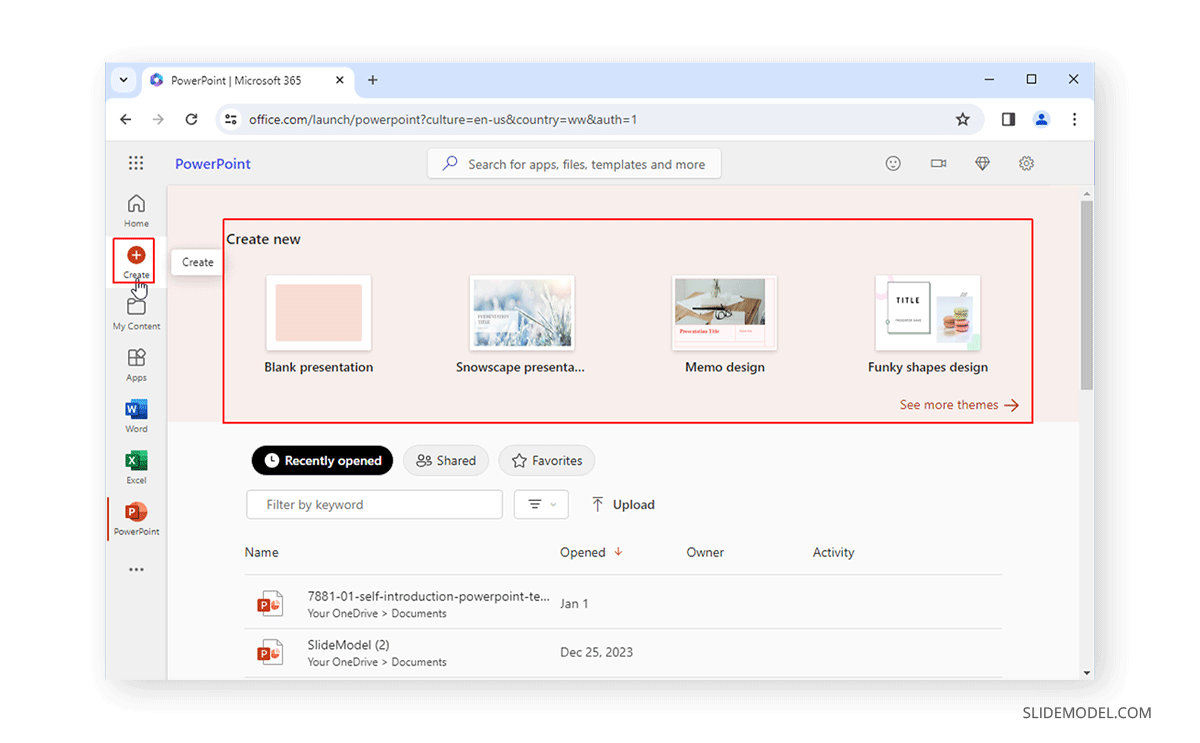
Upload a PowerPoint Presentation
To upload a PowerPoint presentation, click Upload after logging into Office.com and select a file from your device.
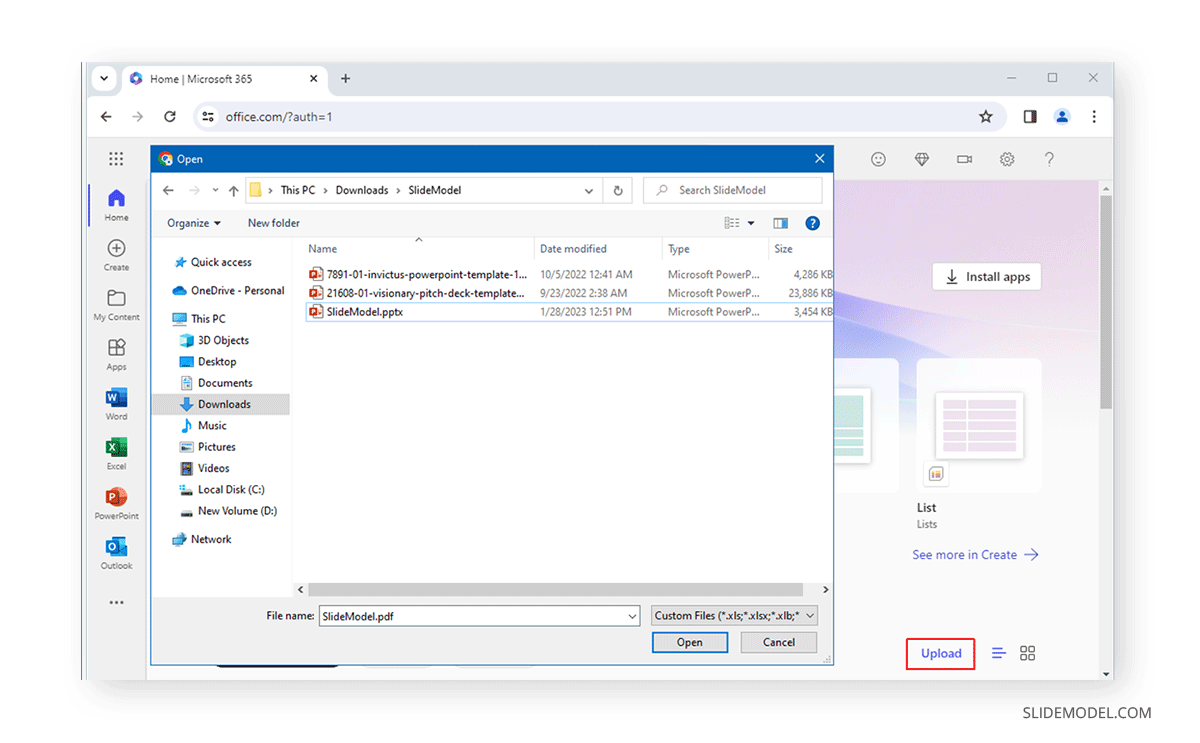
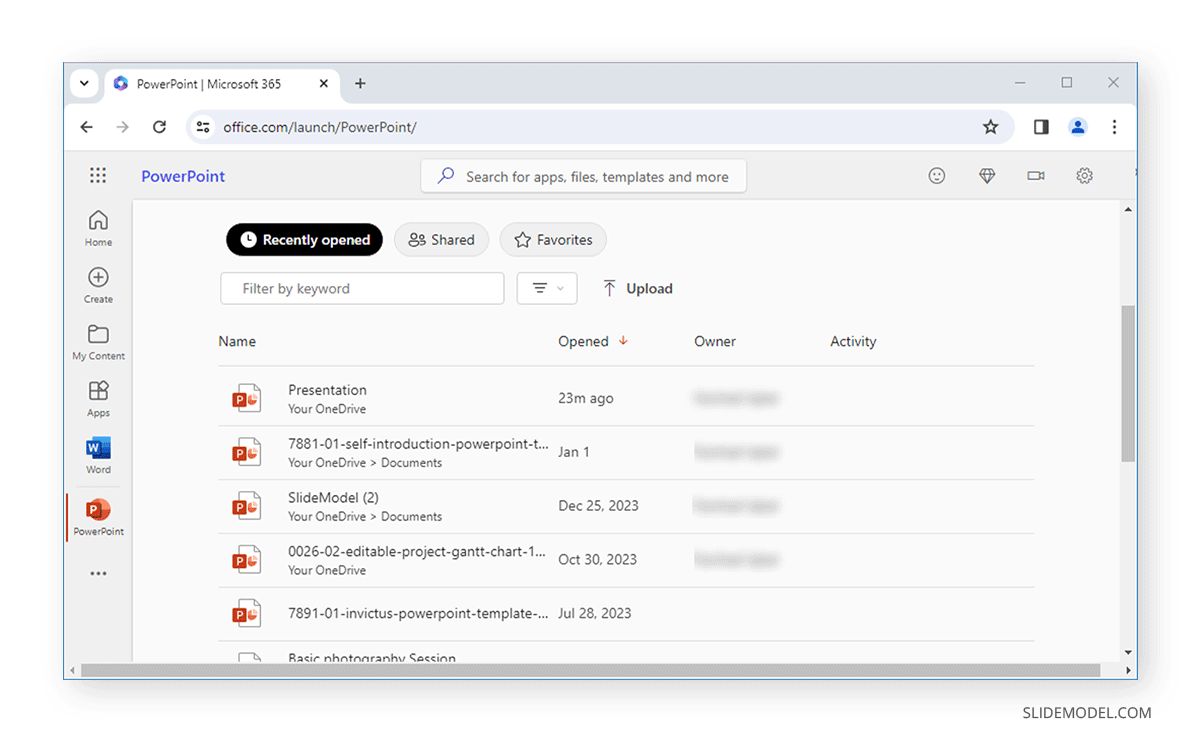
Open an Existing PowerPoint Presentation Online
All PowerPoint presentations saved from a device are automatically uploaded to OneDrive and can be accessed via PowerPoint’s online version. As mentioned earlier, you can upload and save presentations and access them anytime.
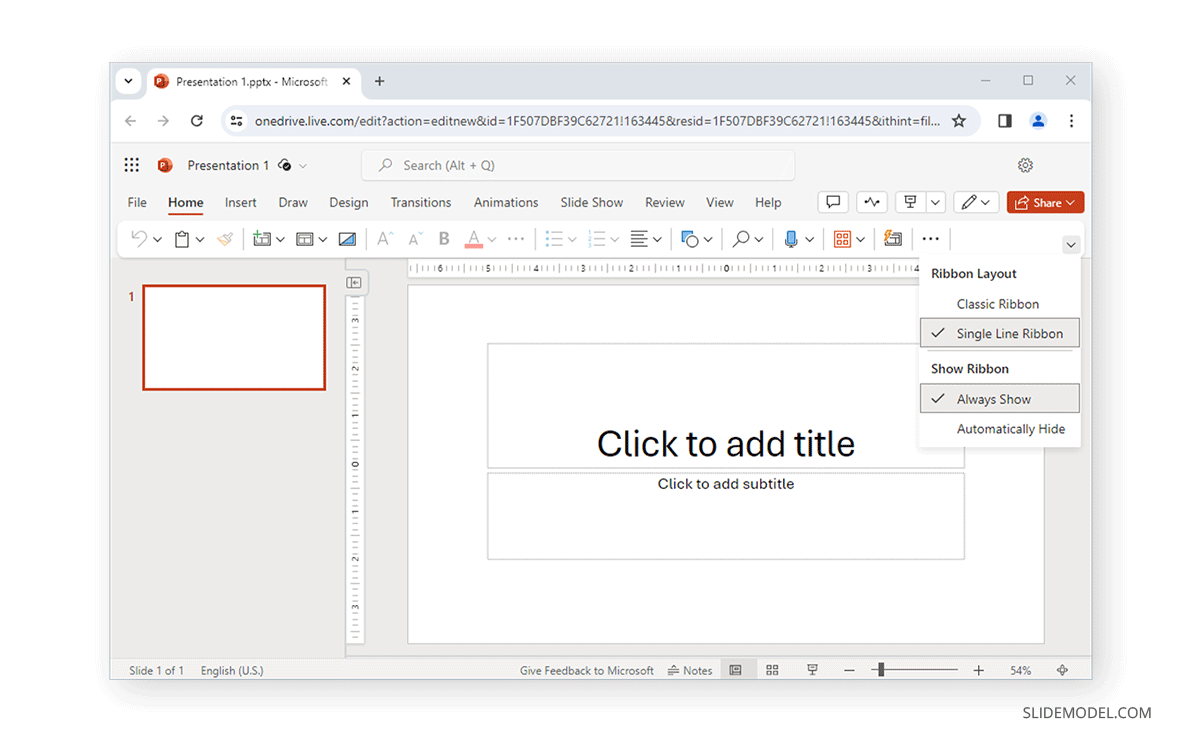
Adjusting the Ribbon Menu Layout
You can toggle between the classic and single-line ribbon interface to suit your preferences. The Ribbon menu can also be adjusted to stay available or hidden periodically.
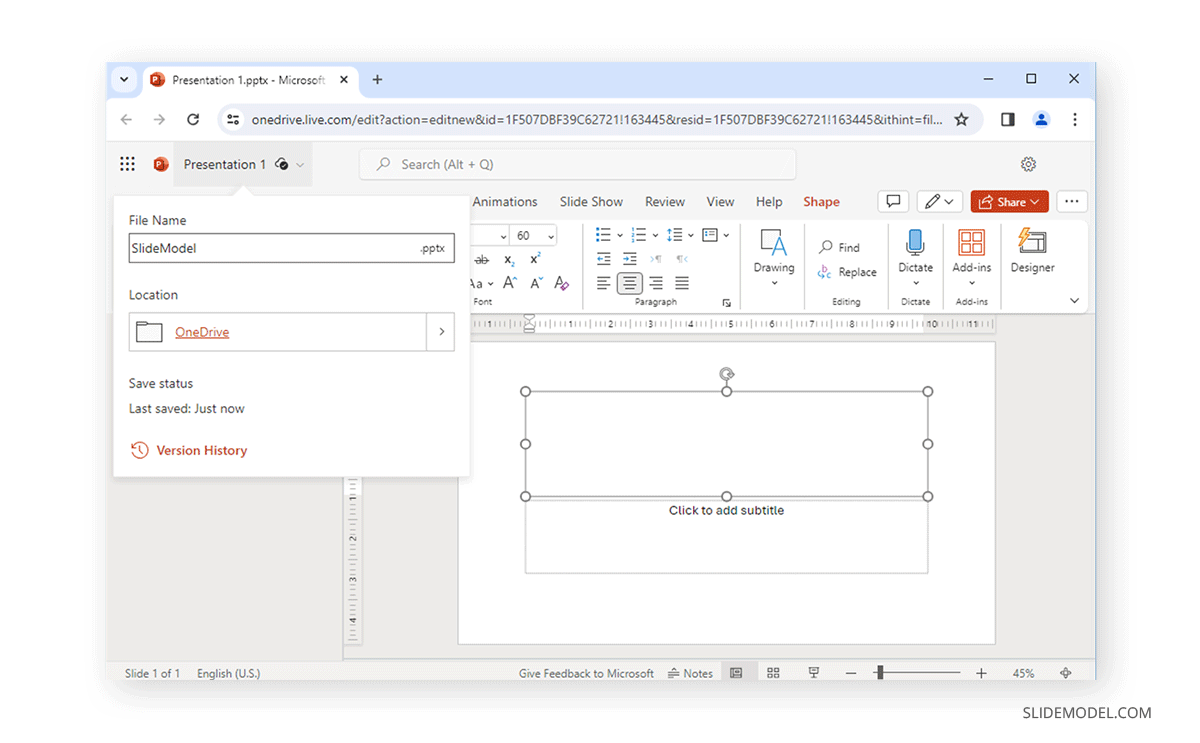
Naming Your Presentation
It is best to name your presentation to ensure it is easy to search and open later via OneDrive. Otherwise, a generic name will be assigned to the presentation (e.g., Presentation 1). To name your presentation, click on the generic name at the top and type in the new name.
Formatting and Design
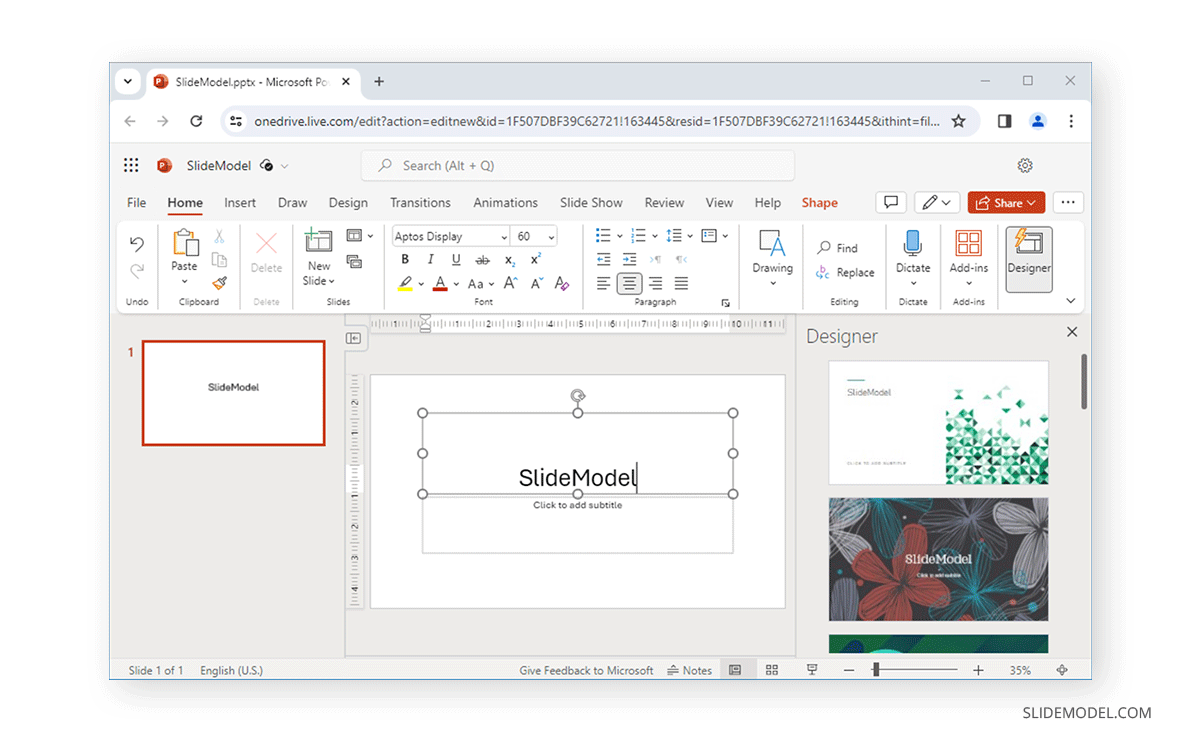
As you start formatting your slides, the Designer feature will provide you with options to create layouts for your slides. You can optionally use this feature to get started with the basic design for your slides or use the Design tab to select design elements.
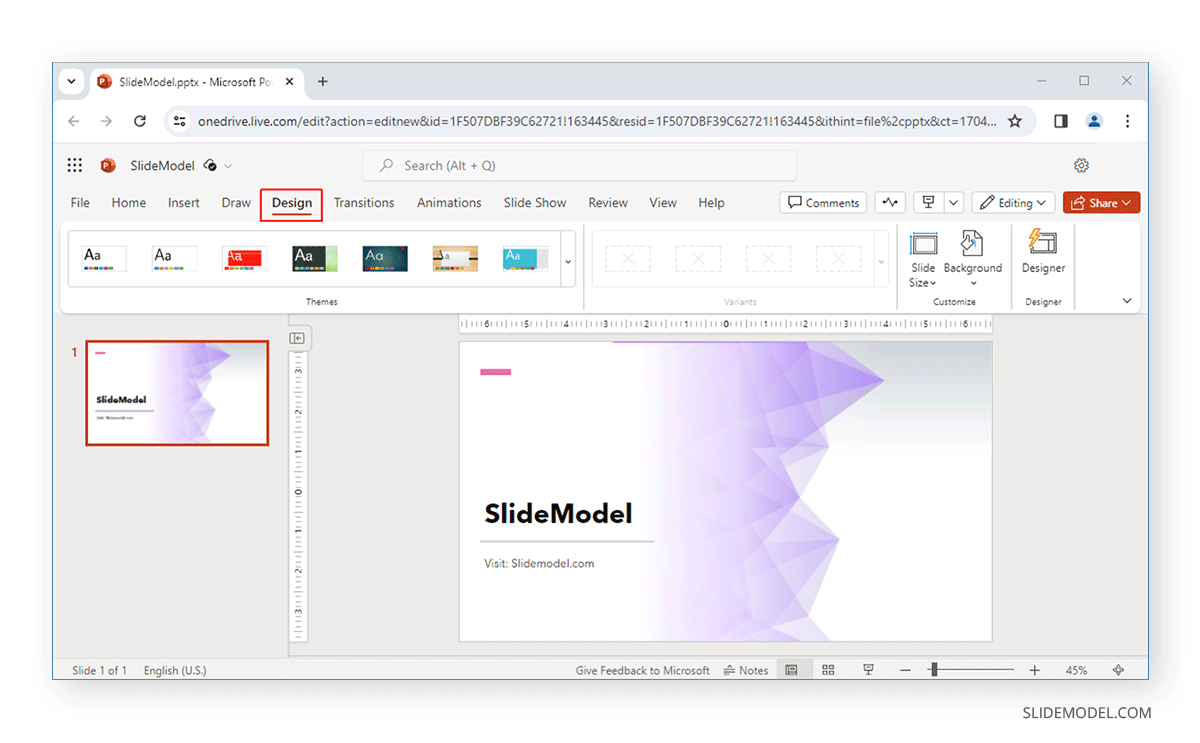
Like the desktop app, the Design tab in PowerPoint Online provides access to themes, background and slide size adjustment options, and theme variants to help you design your slides.
Adding Content
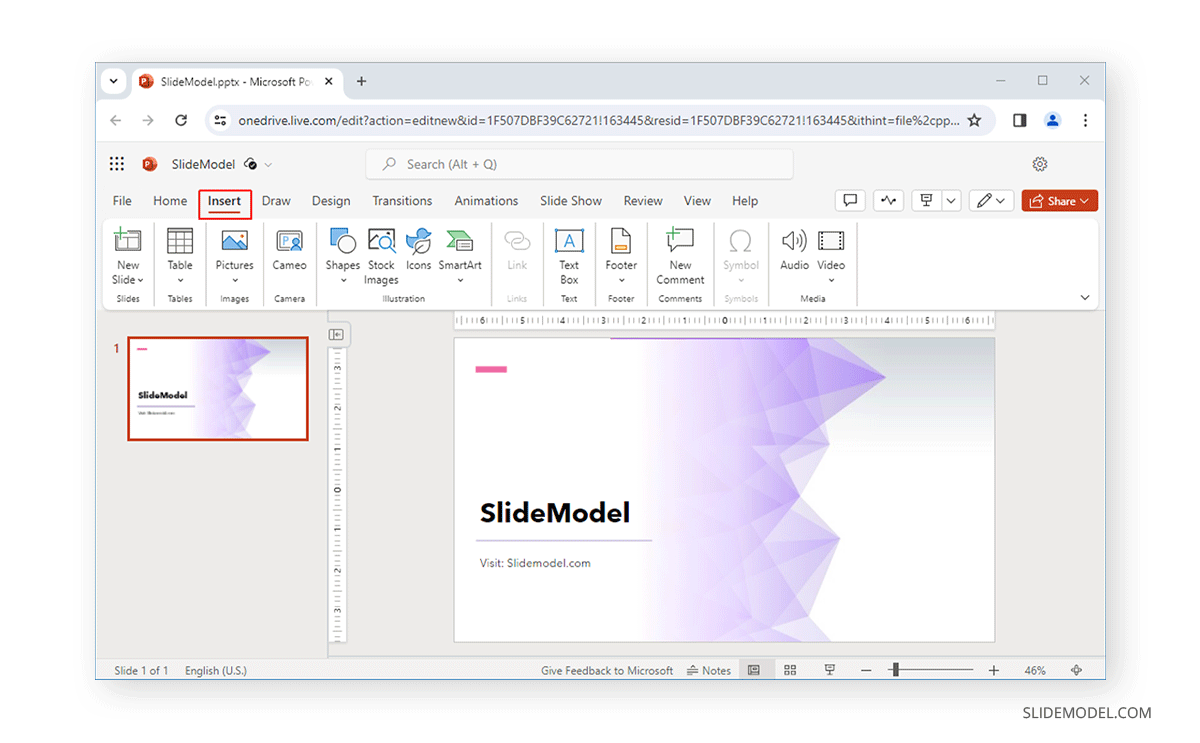
The Insert tab provides all the necessary options to add new slides, tables, pictures, shapes, icons, SmartArt, text boxes, audio, video, cameo to insert Live camera feed, and other options.
Formatting Pictures
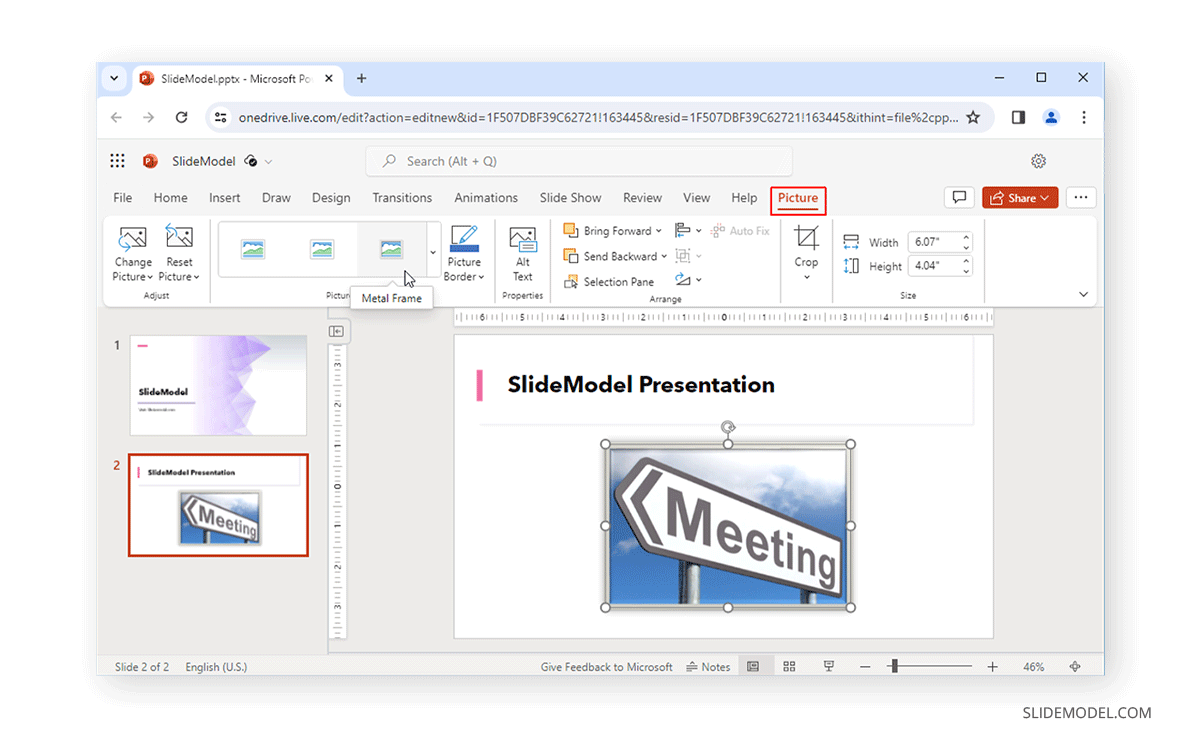
Like the desktop version of PowerPoint, pictures can be added from your device, stock images, or via Bing search. The Picture tab can be used to format added pictures after selecting them. Various options in this tab allow you to crop, add a picture frame, and adjust the picture on the slide.
You can also access Format Options via the right-click menu.
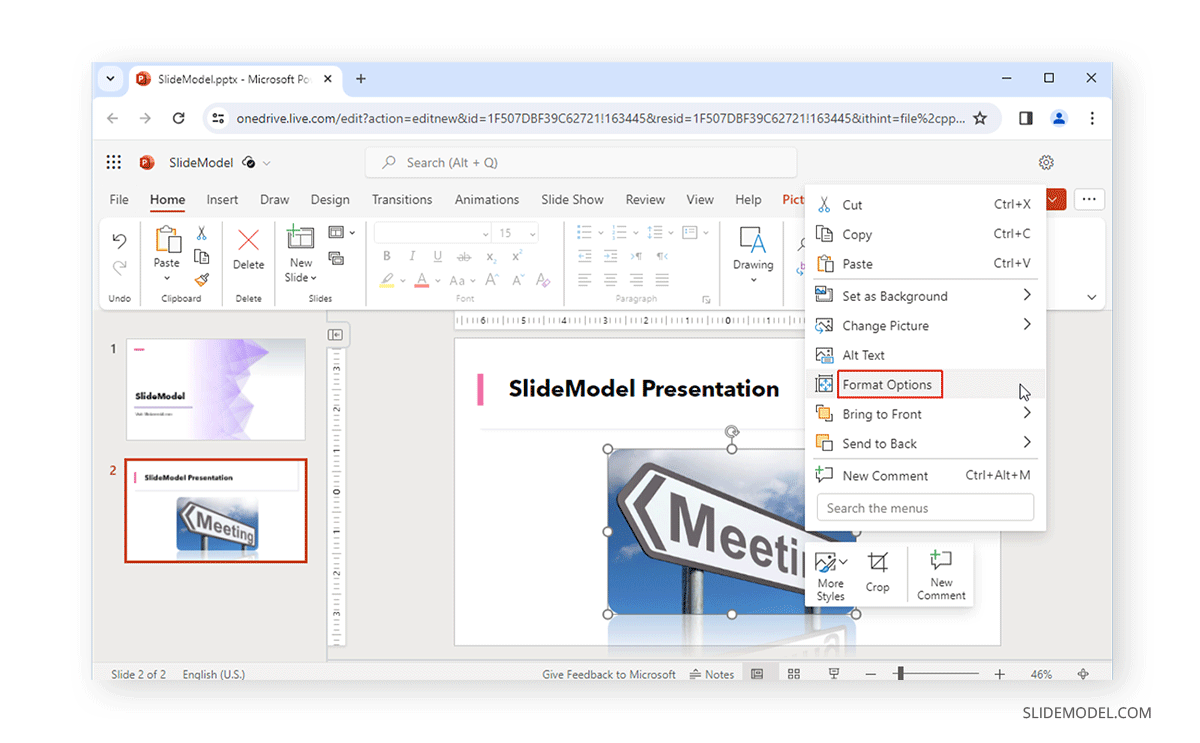
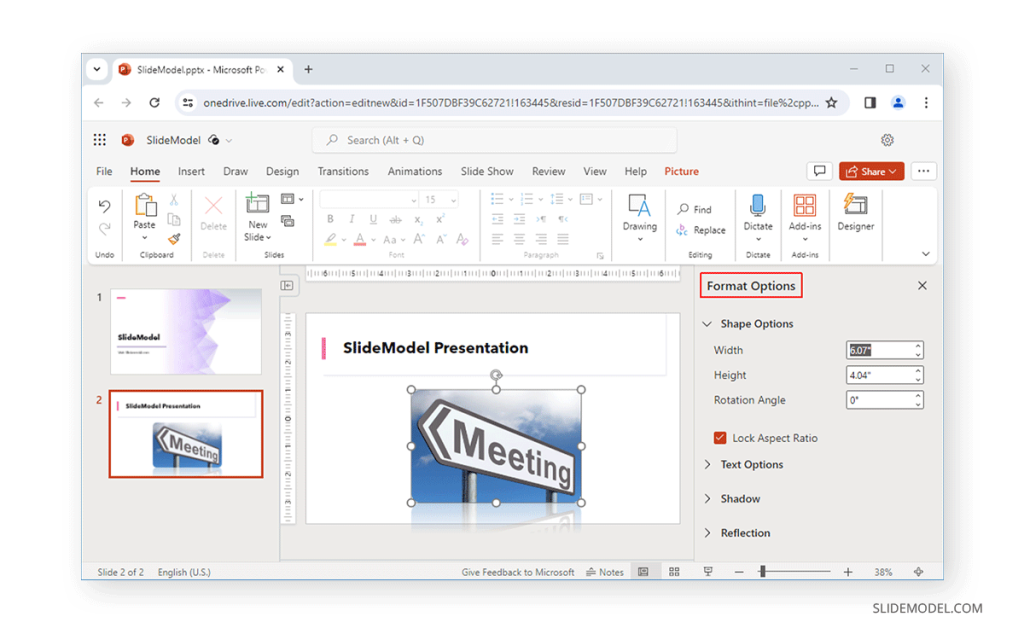
This will open a sidebar providing options to adjust the selected image’s width, height, angle, shadow, reflection, and text margins.
Formatting Videos
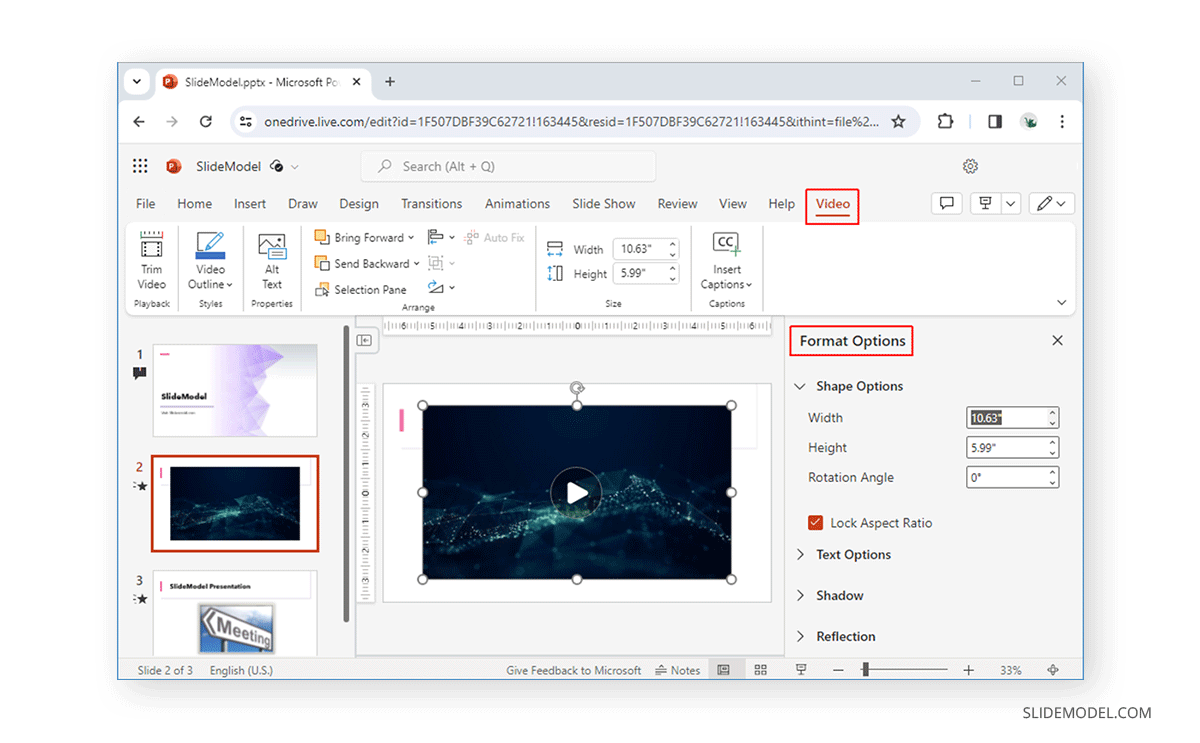
PowerPoint for the web allows formatting videos via the Shape tab and Format Options via the right-click menu. The Shape tab can give a frame or shape to the video, adjust the outline, manage how it is displayed on the slide, and adjust the size of the video. Sometimes, the Shape tab might be replaced with the Video tab to show editing options. This change is particularly visible if the user is not logged in and is editing the presentation as a Guest user. The Format Options enable editing the video’s width, height, angle, text margins, shadow, and reflection.
Formatting Audio
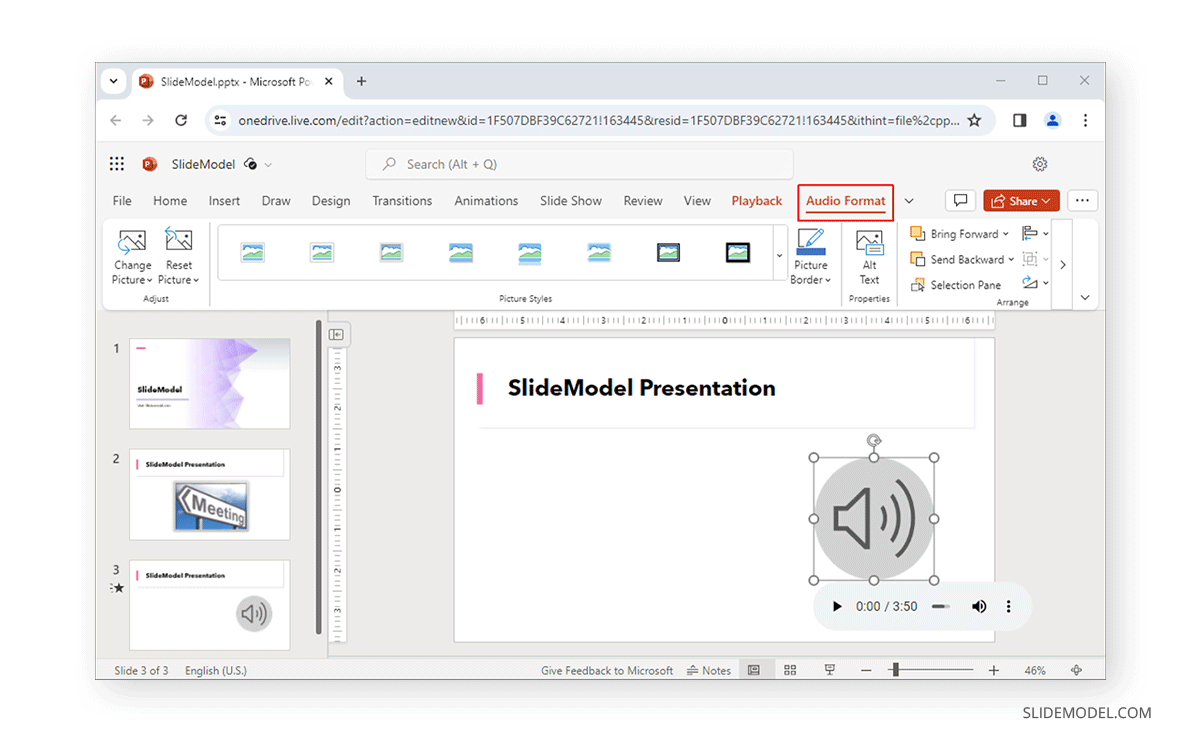
Two major options for formatting added audio clips include the Playback tab and Audio Format tab. The Playback tab can adjust the volume, playback trigger, and other related options.
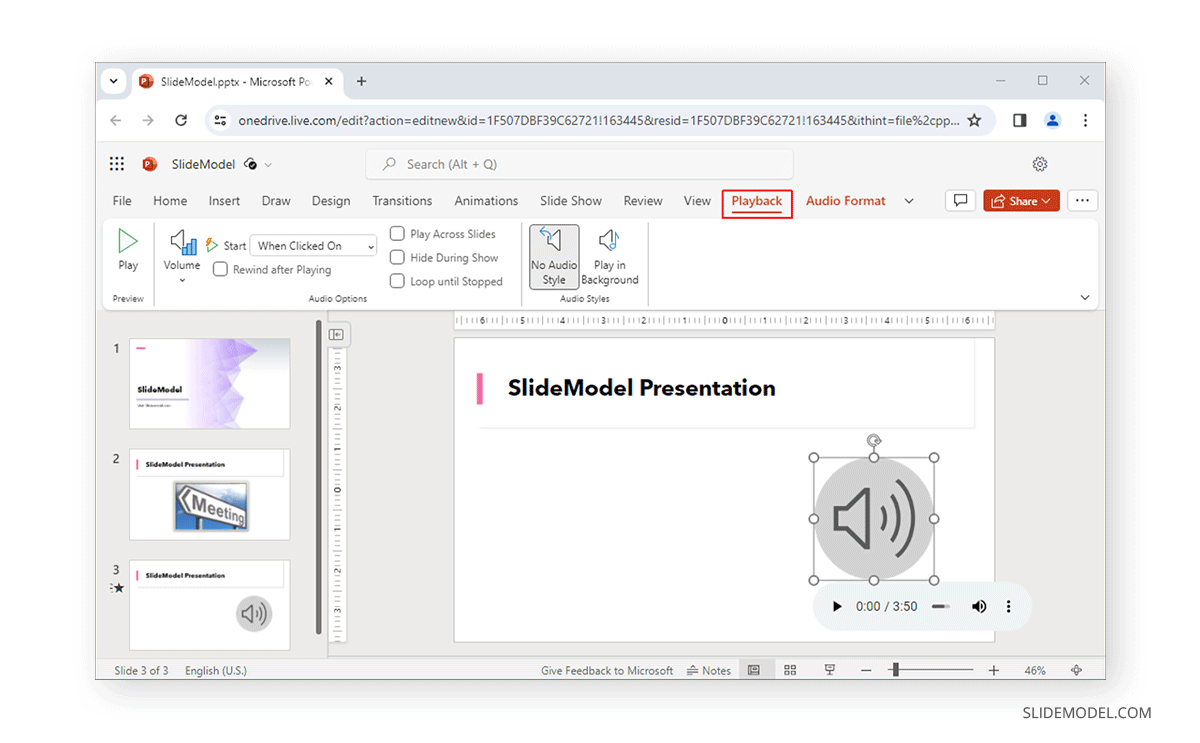
The Audio Format tab includes picture styles for the audio icon, border stylizing, rotation, and other formatting options to adjust how the audio clip appears on the slide.
Annotation Options
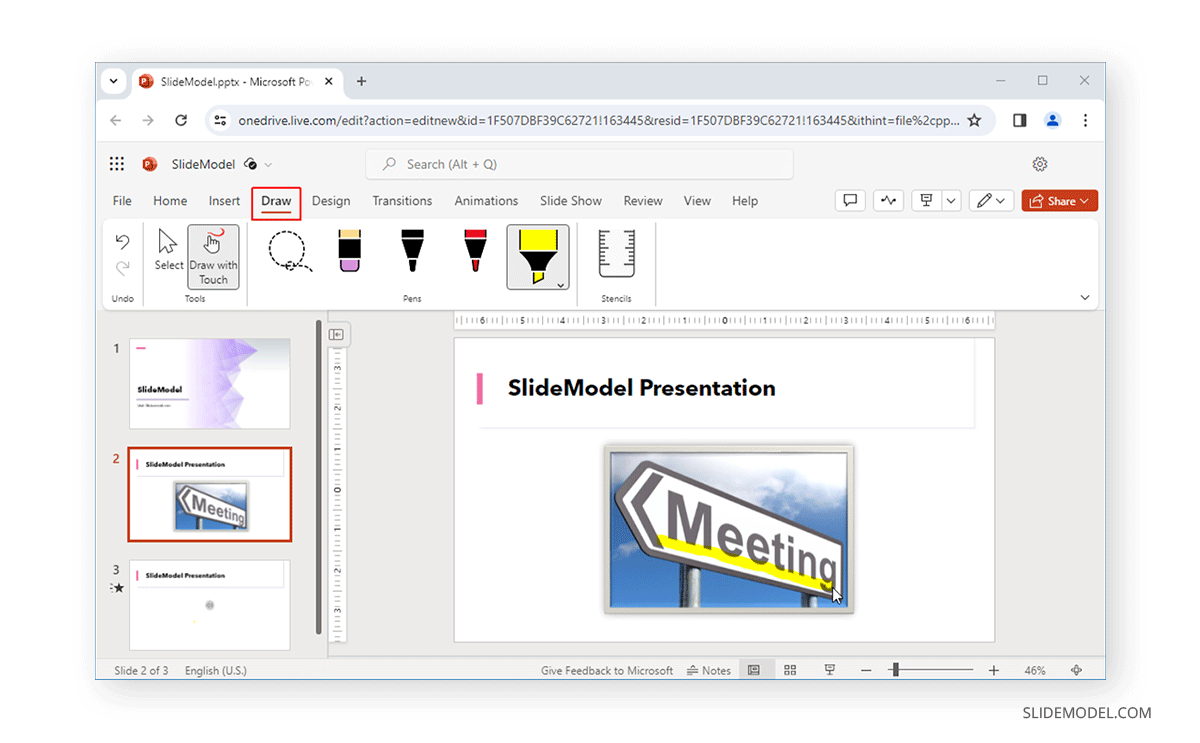
The Draw tab gives various tools like pens and highlighters to annotate slides or draw on the screen. Other tools include an eraser, lasso, draw with touch, and stencil.
Transitions and Animations
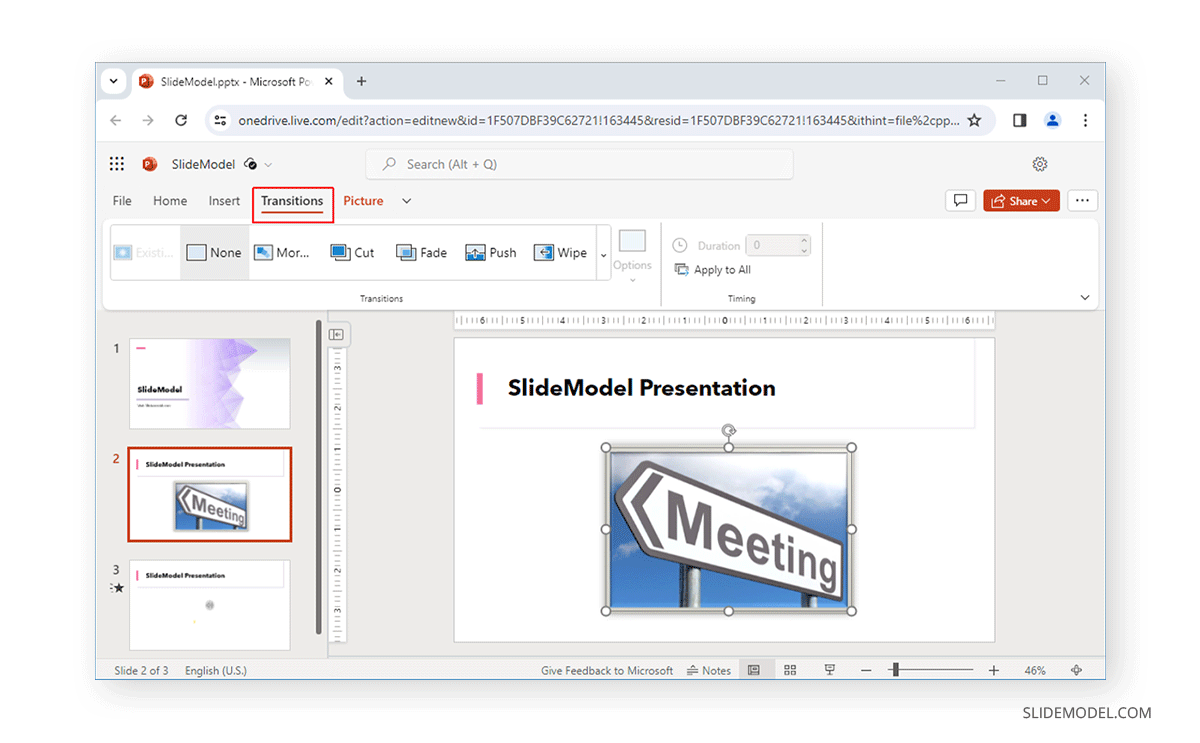
Like the desktop version of PowerPoint, the Transitions tab for the web version gives transitions to use for your slides. You can adjust the effects of added transitions and duration once you have added a transition for a slide.
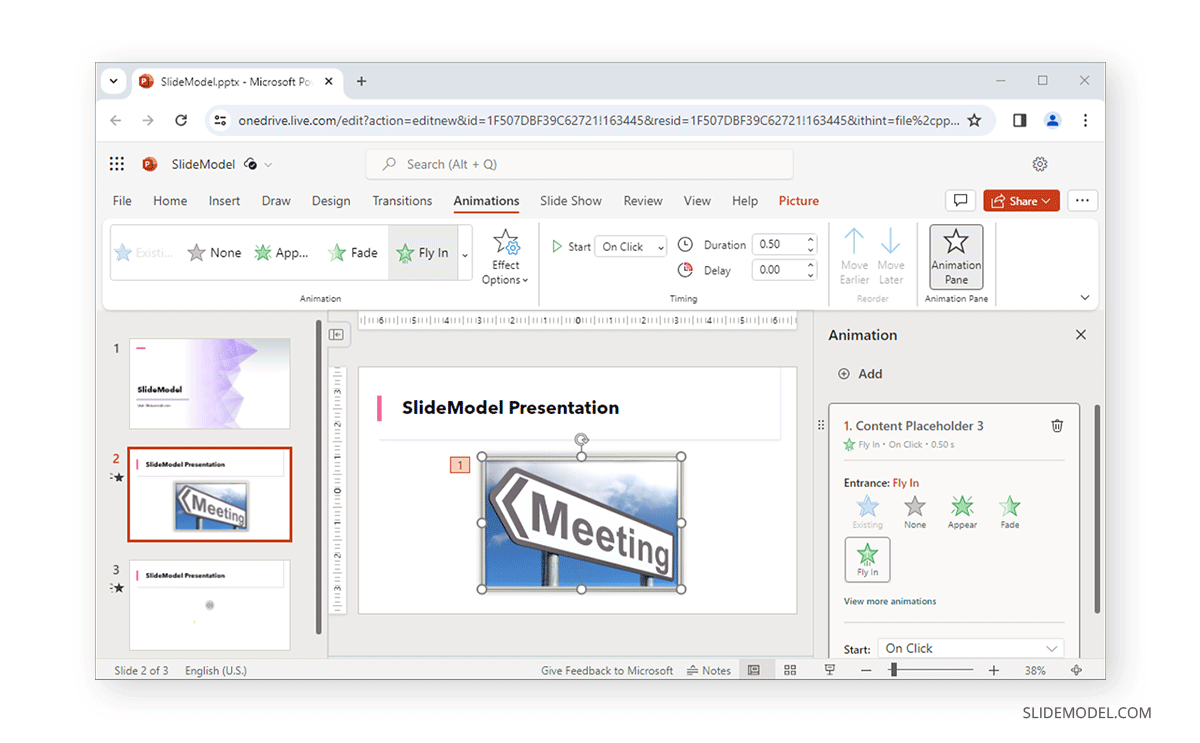
The Animations tab can be used to apply standard transitions and adjust effects, triggers, and duration for the animations according to need.
SlideShow, Review, and View
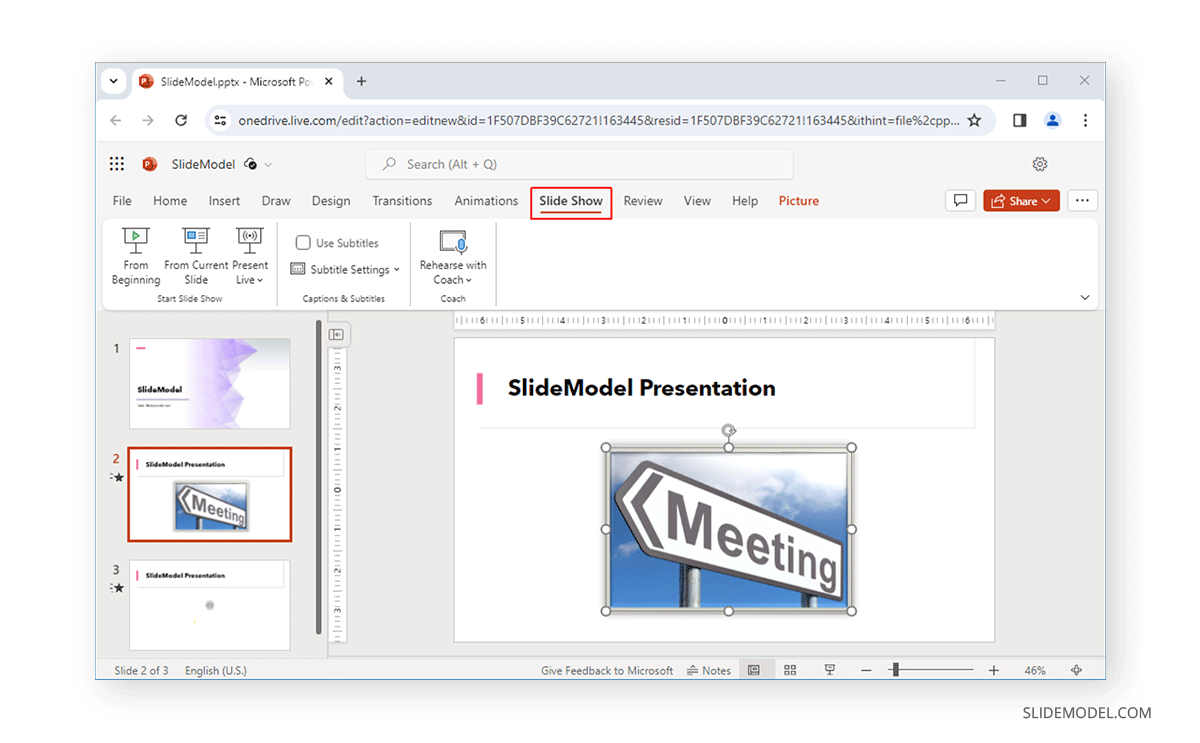
The SlideShow tab is used to start the SlideShow from the beginning of the current slide or to initiate a Live presentation with a QR code and link for viewing the presentation Live. You can also use Rehearse with Coach, use subtitles, and edit subtitle settings. You can also learn more about some of these features from our post about how to present a PowerPoint Online .
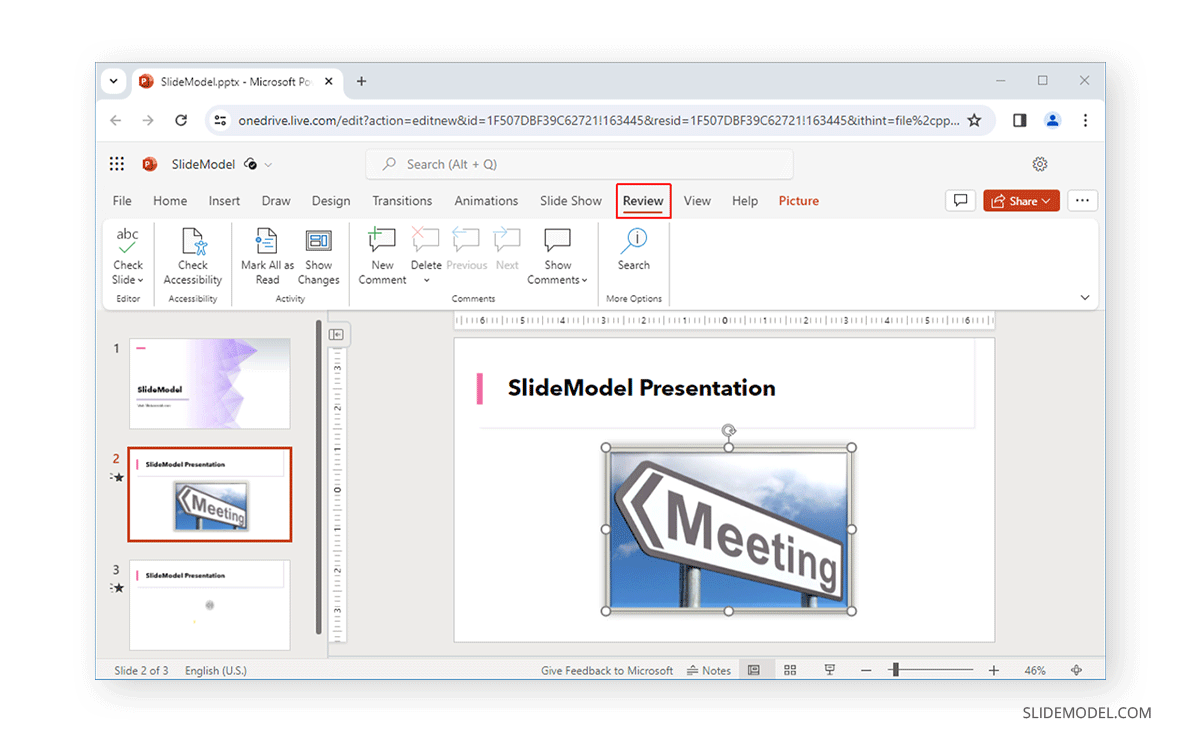
If you are searching for the features to check spelling and grammar, comments, changes, and accessibility options, head to the Review tab.
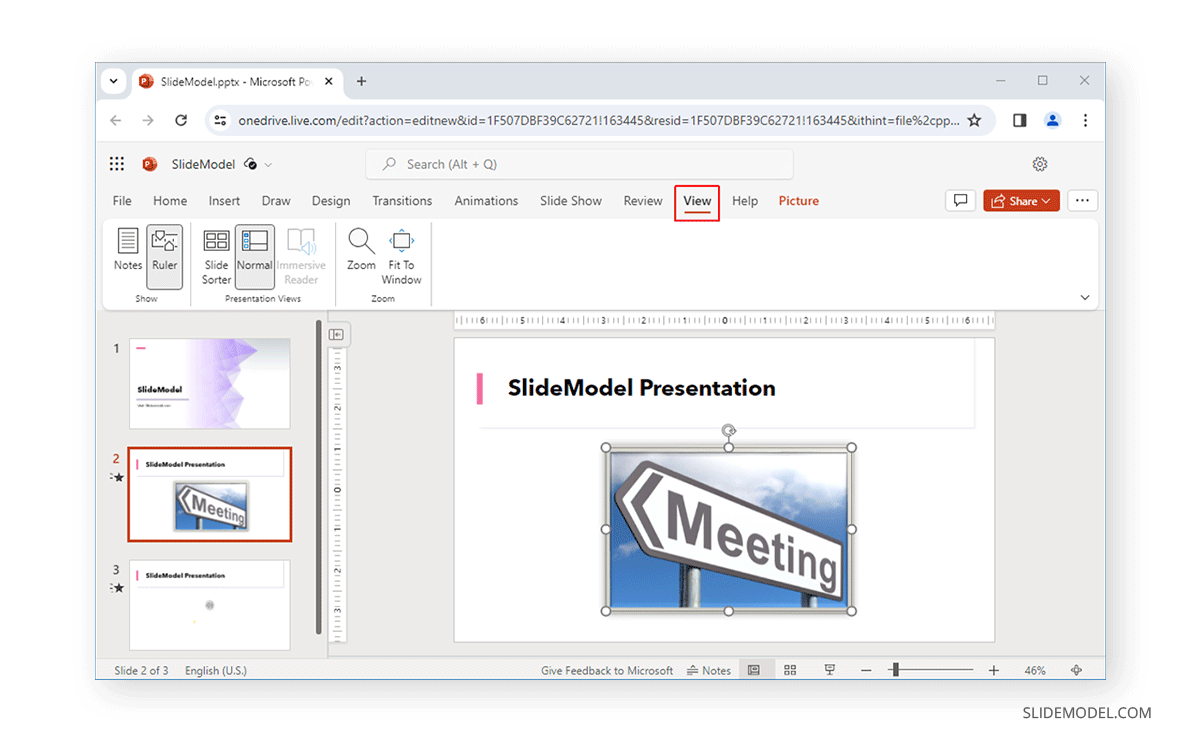
Most PowerPoint users know that the viewing options are available at the bottom of the PowerPoint interface. However, you can also access them from the View tab in PowerPoint. The same features are available for PowerPoint for the web. This includes options like switching between Slide Sorter, Immersive Reader, and Normal View and access to Notes, Zoom, and Fit to Window options.
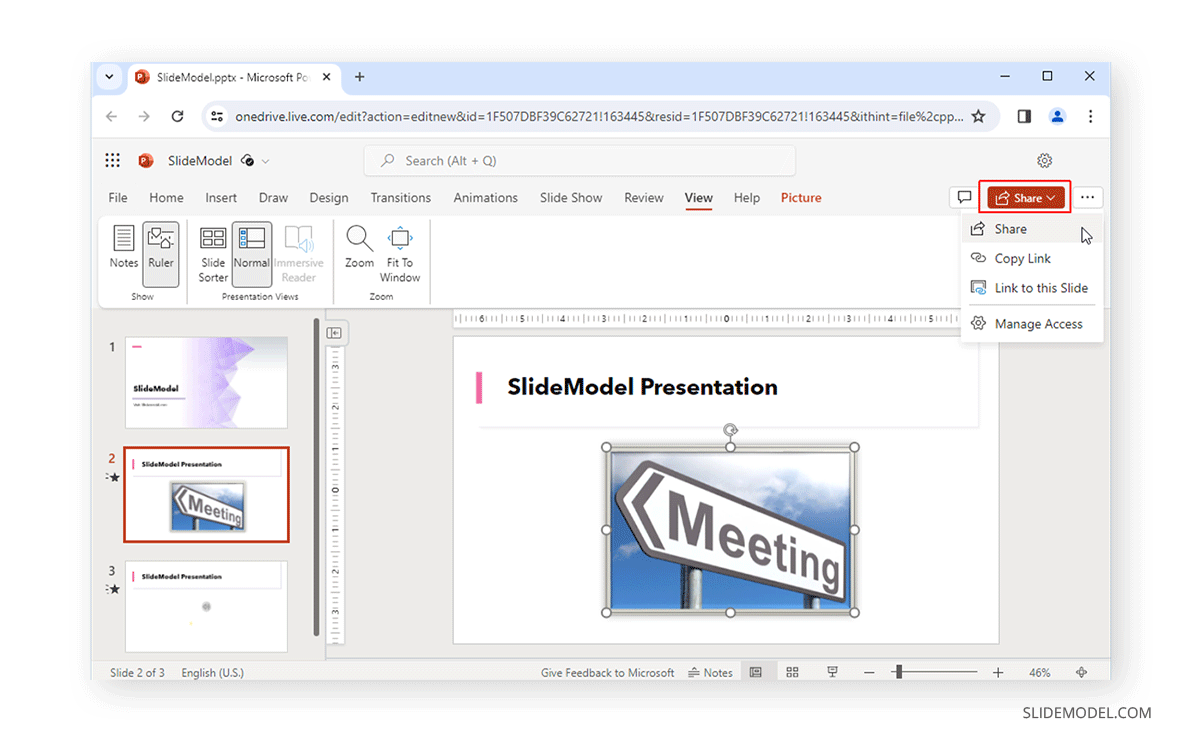
To share your PowerPoint presentation, click Share from the top left corner of PowerPoint Online. You can create a sharing link according to specific settings, copy the existing link, link to a slide, or view and manage access to the presentation.
Collaborators can be invited via email or link by adjusting whether a user has view-only or editing privileges.
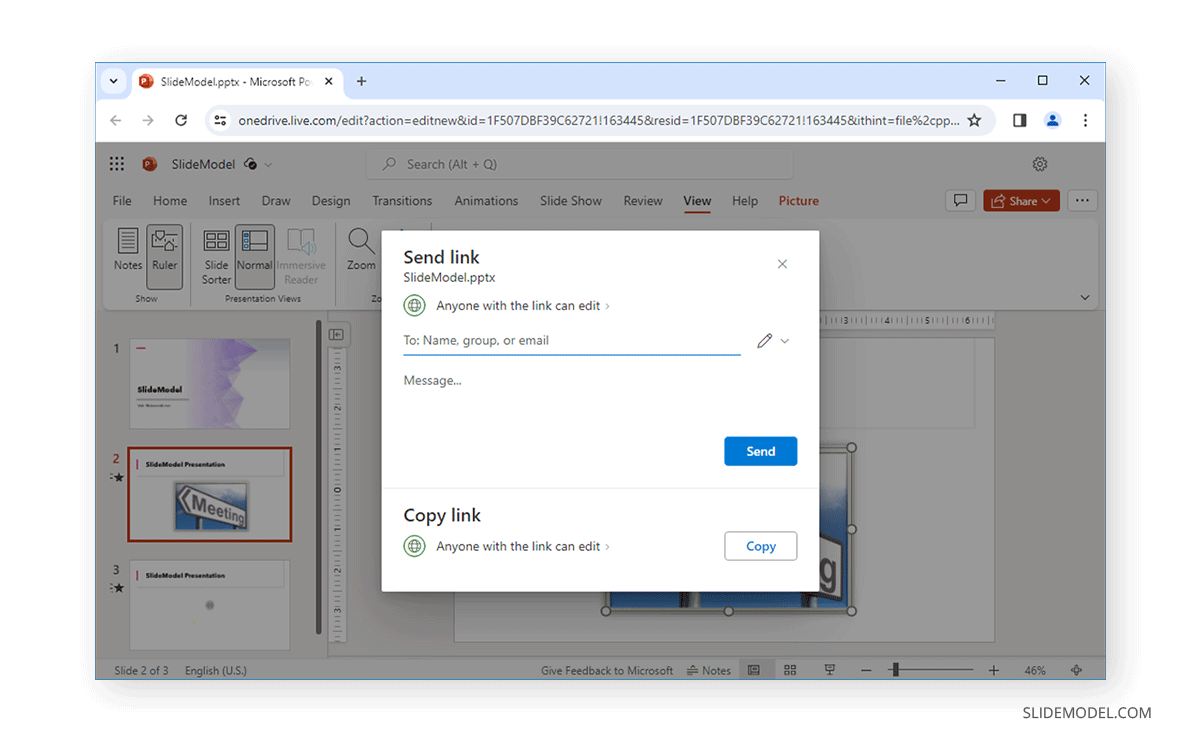
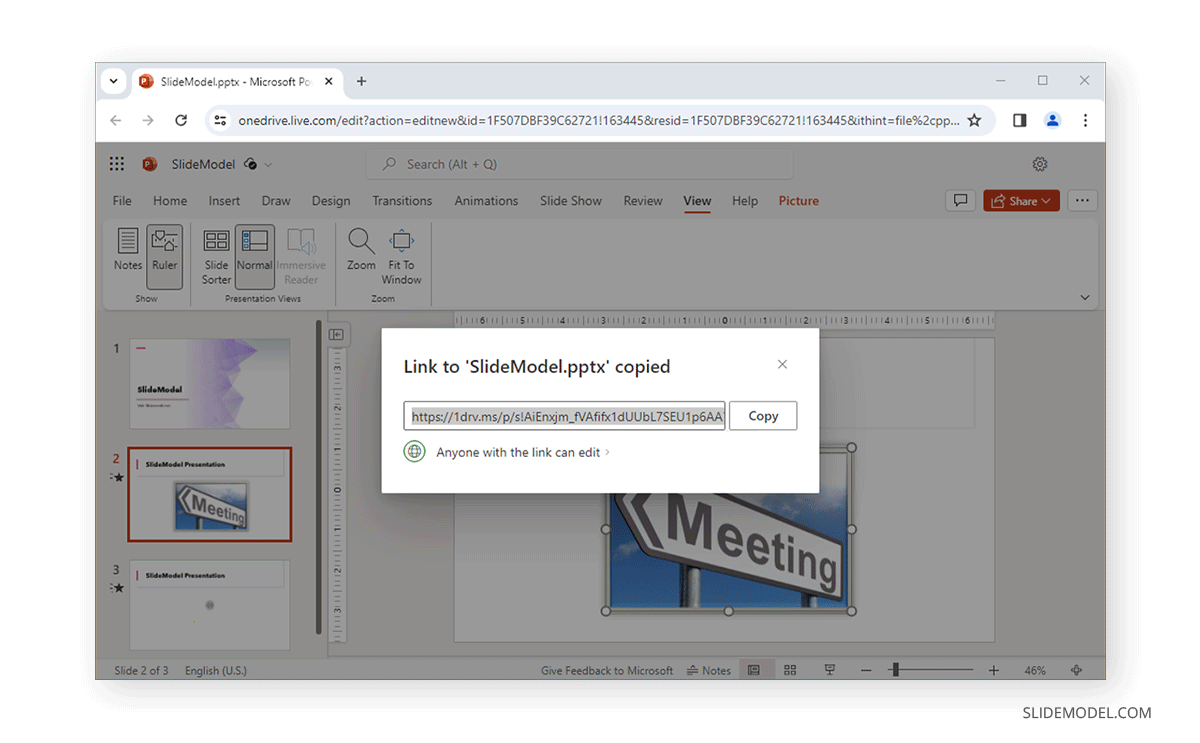
Once the settings have been configured, a link can be generated to copy and share with users. When configuring settings, you can also directly send the link with a message to an end user.
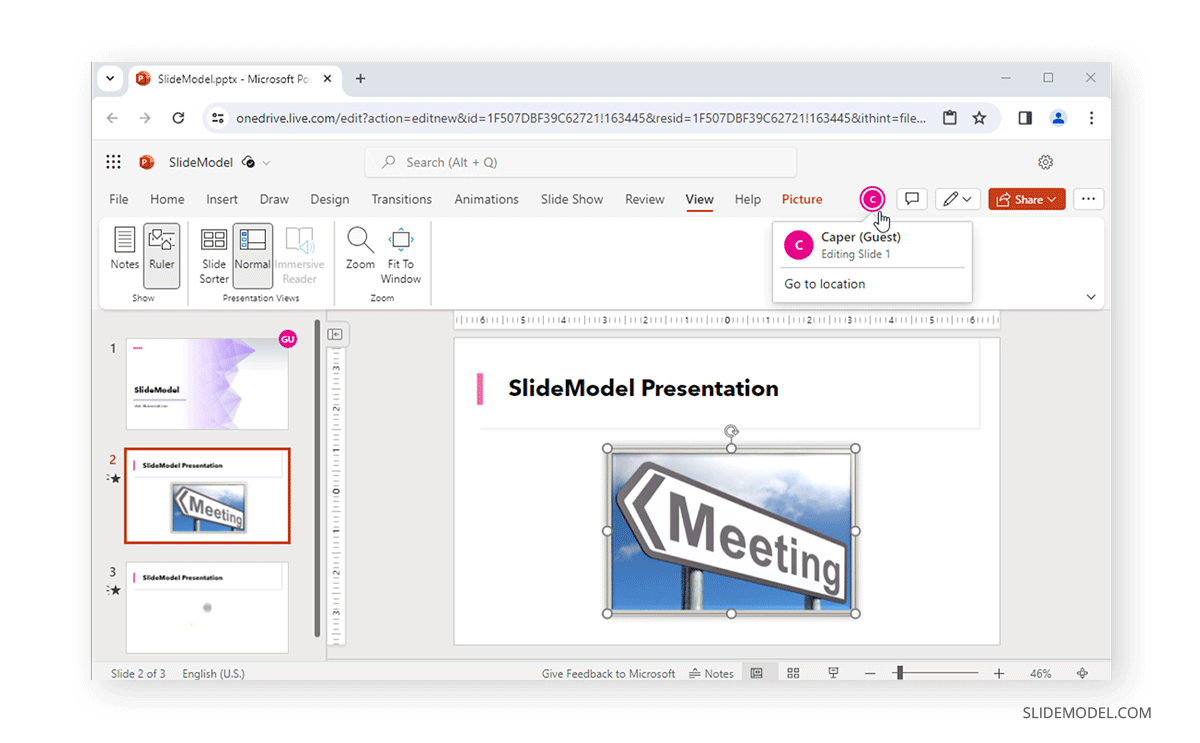
Users collaborating on the slide deck with their names are shown at the top. A generic name is assigned to the collaborator if it’s a guest.
You can see the comments added by collaborators on the presentation by going to Comments.
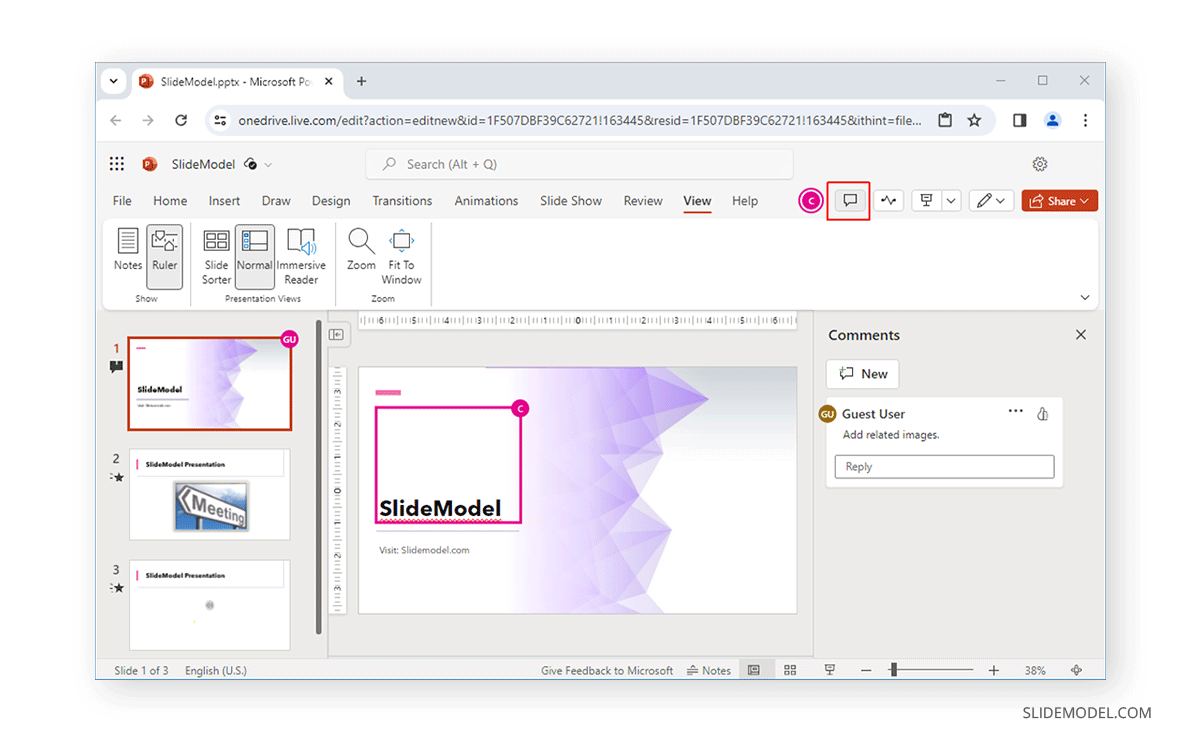
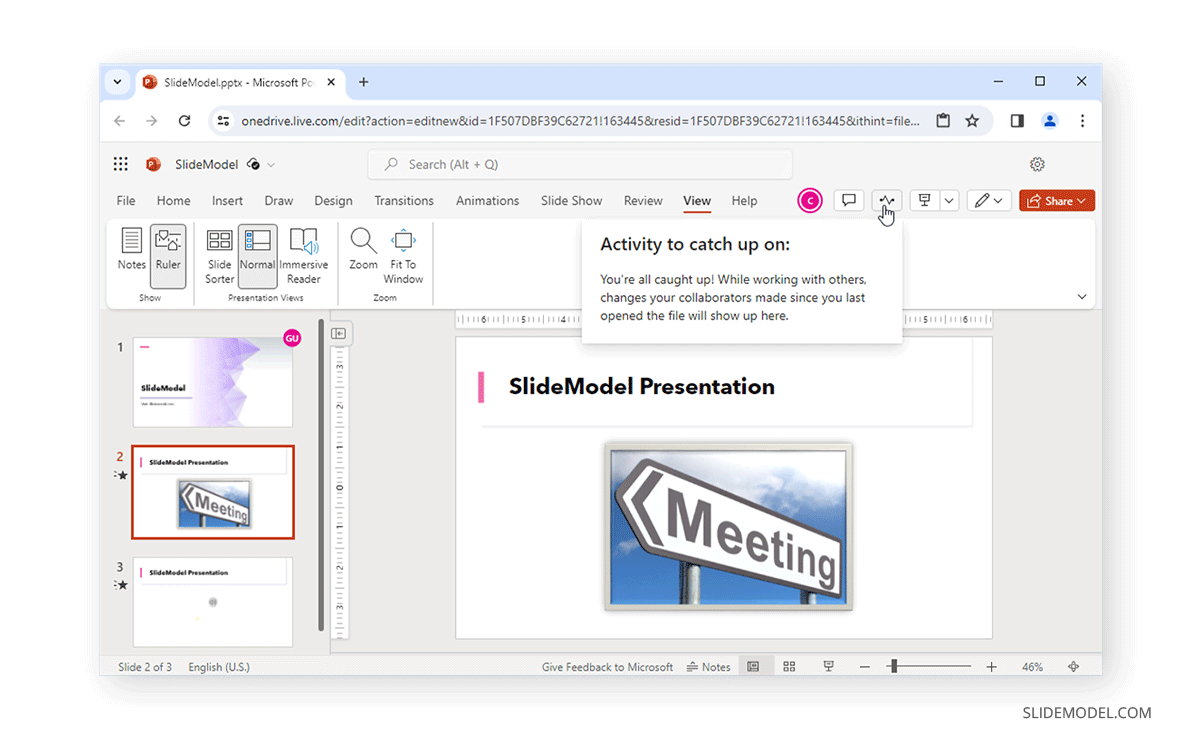
Next to the Comments button is the Catch-up button that tracks and shows the changes made by real-time collaborators as you work on the presentation.
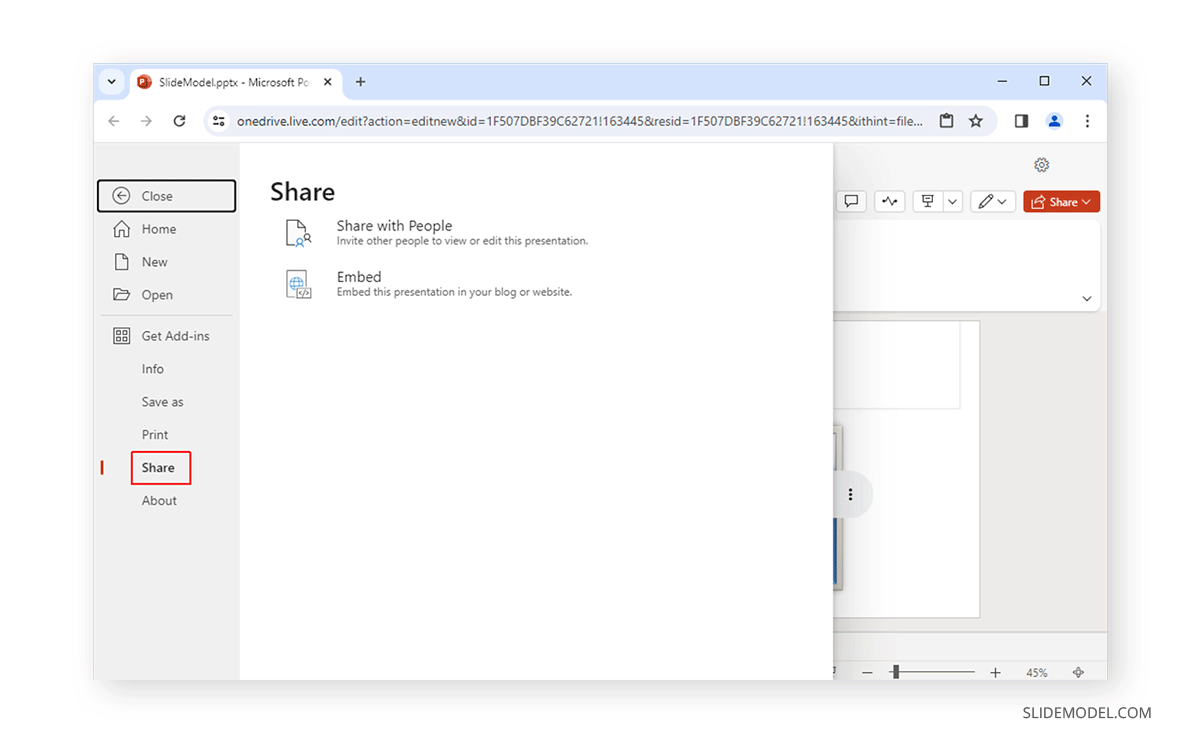
You can also access sharing options via File -> Share . You can open sharing options or generate an embed code for the presentation from here.
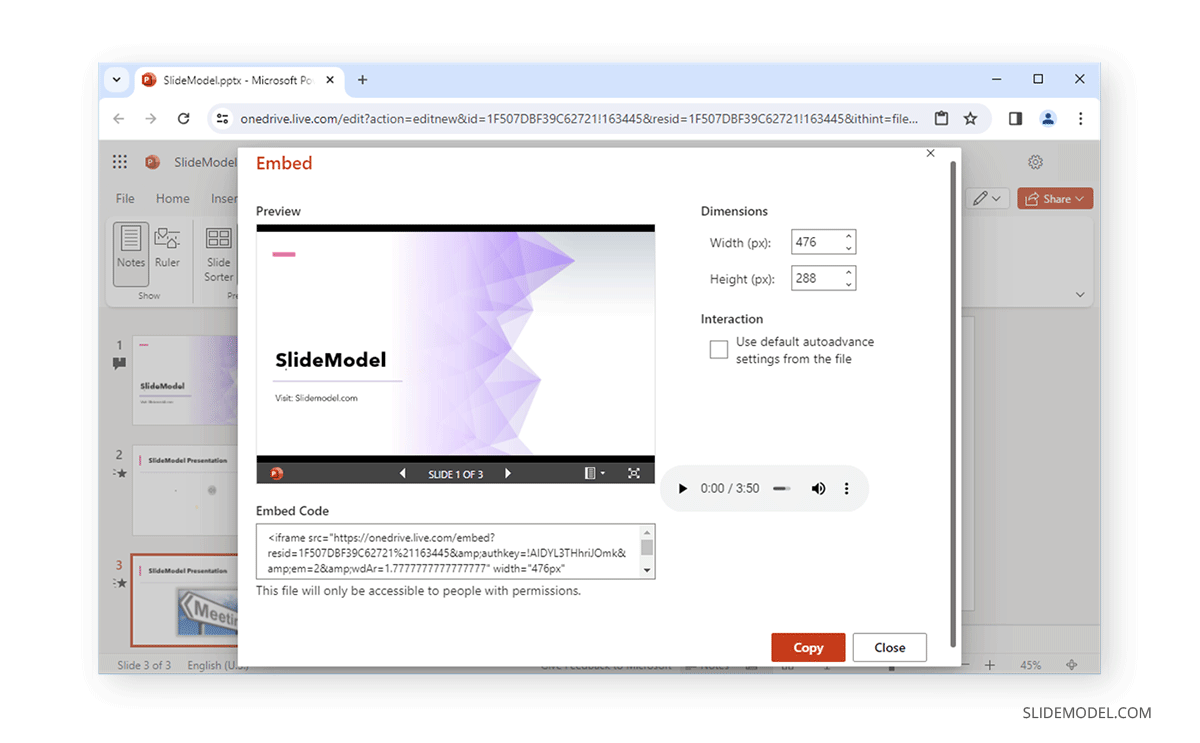
When generating an embed code, you can adjust the width, height, and slide advancement options and generate a code for a website.
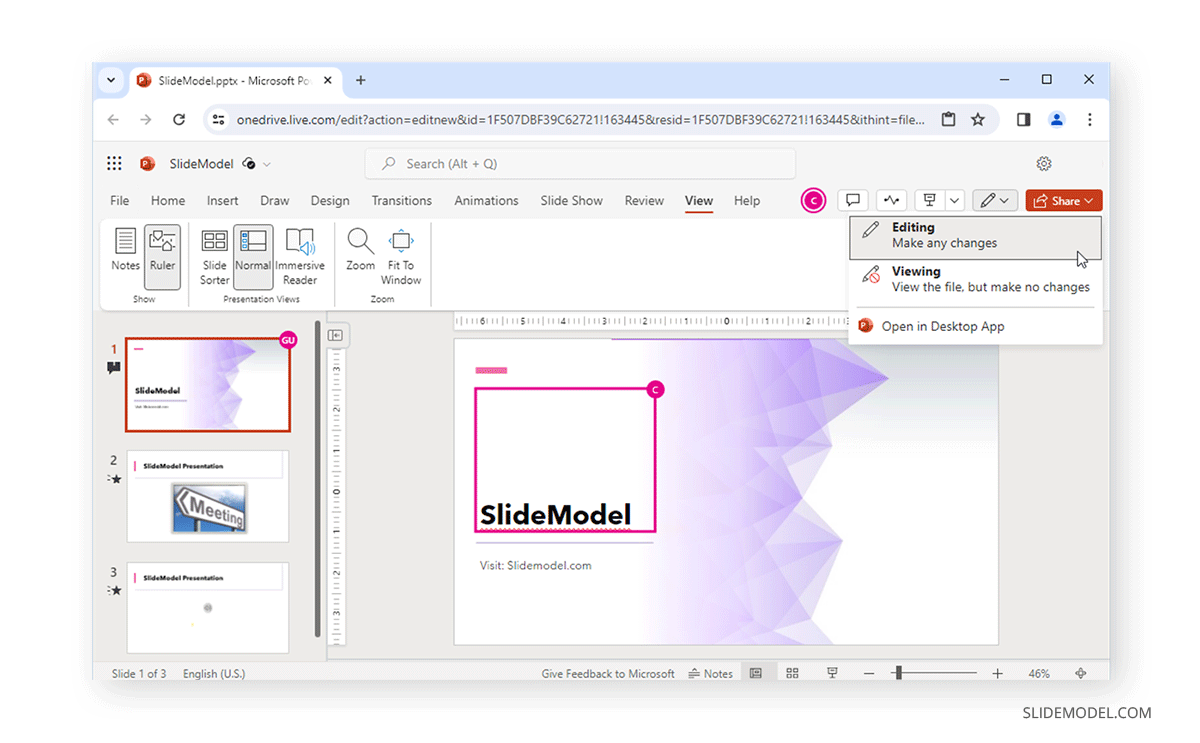
To switch between viewing modes, you can change to view only and editing options as you collaborate or open the presentation in the desktop app. These options can be helpful for you to adjust how you wish to work or review the presentation.
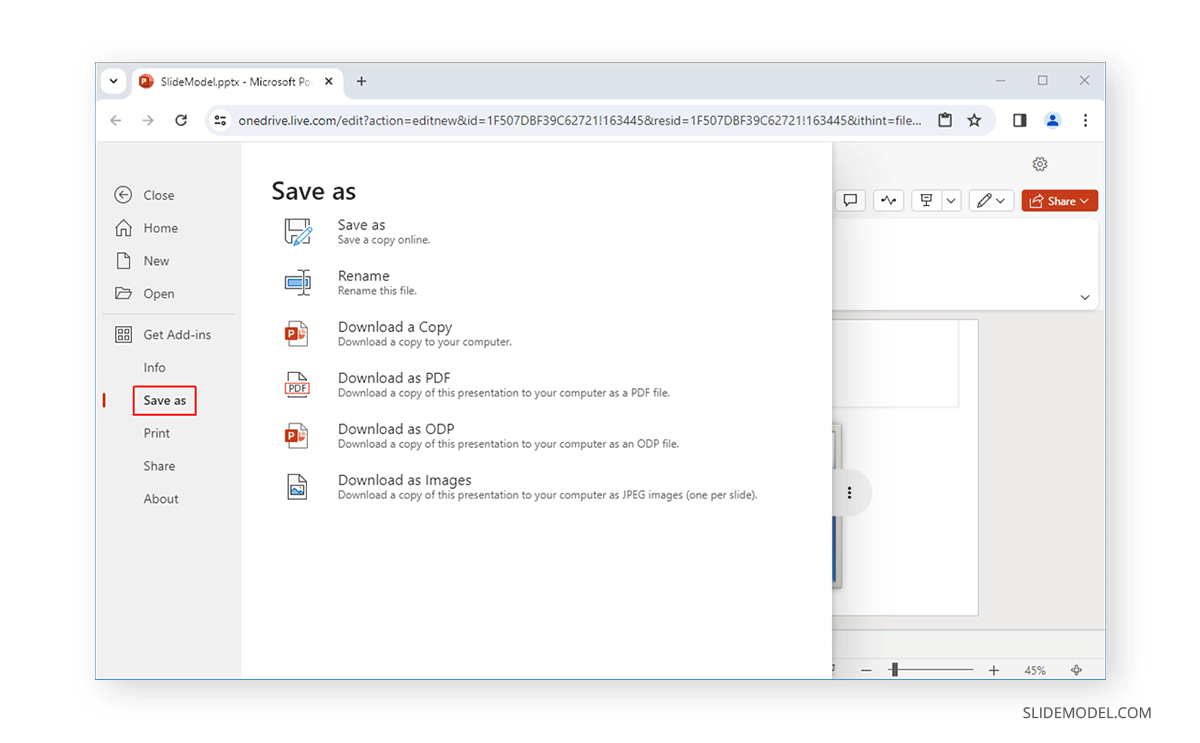
To save your presentation, go to File -> SaveAs to save a copy to OneDrive, download a copy of the PowerPoint presentation, rename the file, or download the file in an alternative format such as PDF, ODP, or image.
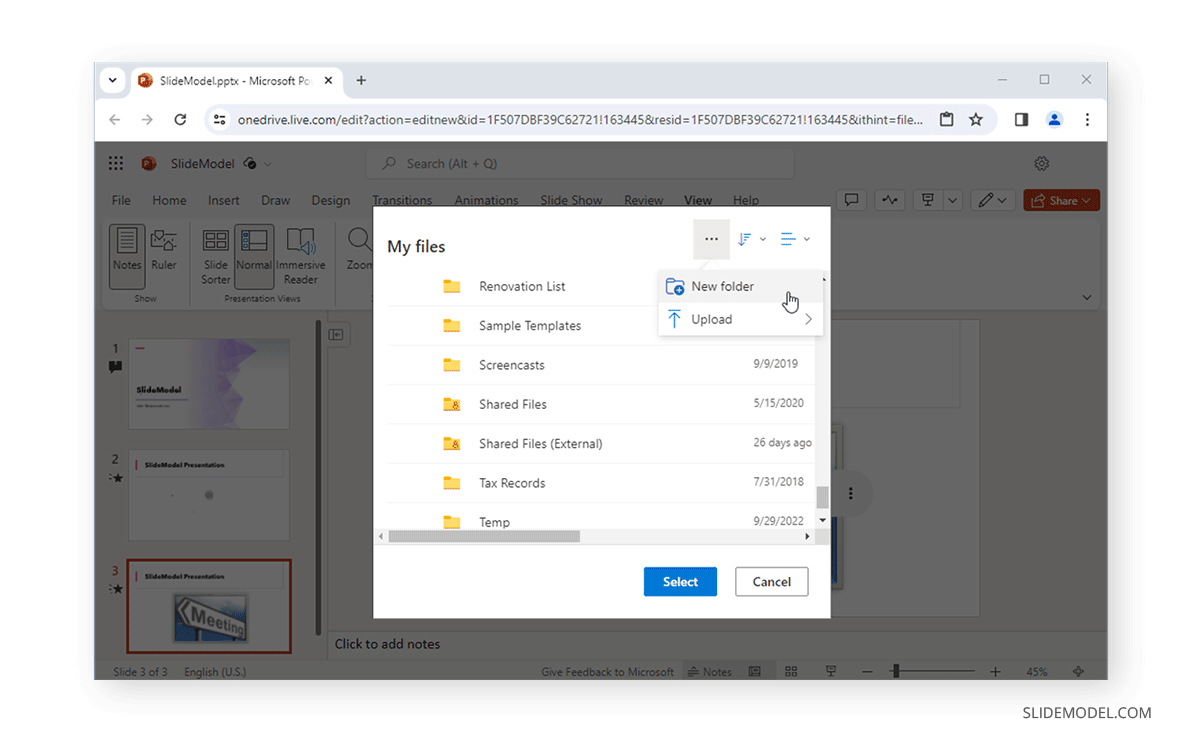
When saving a copy of the presentation on OneDrive, you can select an existing folder or create a new one to select the file location.
You can consider the tips below to create visually appealing slides with PowerPoint Online.
Focus on Design Consistency
Use a consistent design with a color scheme, fonts, alignment, and graphics tailored to a specific format. Don’t use too many changes that might make the content appear muddled.
Avoid Heavy Multimedia
Since PowerPoint for the Web is an online platform, not everyone might have the required Internet bandwidth or hardware to run heavy presentations smoothly. Using multimedia content in moderation can help avoid such issues.
Uncluttered Slides
Cluttered slides on an online interface will likely cause compatibility issues for some viewers or the slides might not appear properly on some browsers and devices. To avoid this, try to create uncluttered slides. Using minimalist slides might just be the best way to go.
Even the Distribution of Slide Elements
By evenly distributing slide elements with proper alignment, you should be able to create online slides that are easy for the eyes to follow.
Choose Imagery Carefully
When selecting icons, graphical elements, and pictures, try not to use imagery that is too flashy and might cause issues when opened across different browsers and devices. You can use icons from the built-in icons library in PowerPoint and select pictures that don’t visually overpower the viewer.
Get Design Ideas
You can get design ideas using PowerPoint Designer to adjust your design for visual appeal and design consistency.
Productivity Shortcuts
PowerPoint for the web primarily provides most of the features in the desktop app. Below are some tips and tricks for productivity when using the web version of PowerPoint. For some shortcuts listed below, PC users must use CTRL, whereas Mac users will use Command.
- Insert New Slide using CTRL+M hotkey (Command+M for Mac)
- Use F5 to start the slideshow and Esc to end the slideshow
- CTRL+D duplicates the slide (Command+D for Mac)
- CTRL+Shift+D deletes the slide (Command+Shift+D for Mac)
- Use CTRL+S to save slide (Command+S for Mac)
- Use CTRL+W to close the presentation (Command+W for Mac)
- To open printing options, use CTRL+P (Command+P for Mac)
- Zoom in with CTRL+Plus button (Command+Plus button for Mac)
- Zoom out with CTRL+Minus button (Command+Minus button for Mac)
- Insert a table with CTRL+T (Command+T for Mac)
- Insert a hyperlink with CTRL+K (Command+K for Mac)
- Align text with CTRL+L for left, CTRL+E for center, and CTRL+R for right (Replace CTRL with Command for Mac)
Screen Freezes When Working with PowerPoint for the Web
If your screen freezes while you’re working, the web version of PowerPoint is likely encountering an issue when saving the file, showing elements, or inserting content. You can wait a while, and the issue should be resolved. Also, check your Internet connection to see that you are connected. You might want to close additional tabs and review your system usage to see if your hardware is overwhelmed due to resource-intensive apps or multiple browser tabs.
Slide Elements Don’t Appear Properly
If your browser isn’t compatible or uses a browser plugin that blocks slide elements, you might encounter issues viewing slides. Use a compatible browser and turn off any plugins that might interfere with PowerPoint’s online interface.
File Upload or Download Issues
When you are unable to upload or download files, it is likely that your Internet connection is unstable or disconnected. Check your connection to resolve the issue.
Unable to Login
This is likely caused by incorrect credentials or a recent change in credentials, such as a password. If you cannot log in despite no apparent issues, try to clear your browser’s cache or switch to another browser to see if you can log in.
PowerPoint for the web provides most features available for the desktop version and some sharing and collaboration features that require uploading the file online for use. You will notice that some of these features are smoother when used with the online version compared to the desktop version. Furthermore, the online version of PowerPoint provides access regardless of whether you have PowerPoint installed on your device. If you are someone who does not have a Microsoft 365 subscription and needs to access a PowerPoint file, you can log in for free with a Microsoft account with limited features. Alternatively, if the online version is not an option for you, you can still learn how to create a PowerPoint presentation in the installed version of Office.
Like this article? Please share
Microsoft PowerPoint, PowerPoint Online Filed under PowerPoint Tutorials
Related Articles
Filed under Google Slides Tutorials , PowerPoint Tutorials • April 17th, 2024
Google Slides vs. PowerPoint: A Detailed Comparison
Contrast and pick with presentation software suits your best. Check our guide on how the Google Slides vs. PowerPoint eternal debate.
Filed under PowerPoint Tutorials • April 16th, 2024
How to Insert an Equation in PowerPoint
Learn how to create easy-to-understand science slides by mastering how to insert an equation in PowerPoint. Step-by-step guide.
Filed under PowerPoint Tutorials • April 9th, 2024
How to Remove Notes from PowerPoint
Make alternative versions of your presentation files by learning how to remove notes from PowerPoint. Step-by-step guide with screeshots.
Leave a Reply
Cloud Storage
Custom Business Email
Video and voice conferencing
Shared Calendars
Word Processing
Spreadsheets
Presentation Builder
Survey builder
Google Workspace
An integrated suit of secure, cloud-native collaboration and productivity apps powered by Google AI.
Tell impactful stories, with Google Slides
Create, present, and collaborate on online presentations in real-time and from any device.
- For my personal use
- For work or my business
Jeffery Clark
T h i s c h a r t h e l p s b r i d g i n g t h e s t o r y !
E s t i m a t e d b u d g e t
Make beautiful presentations, together
Stay in sync in your slides, with easy sharing and real-time editing. Use comments and assign action items to build your ideas together.
Present slideshows with confidence
With easy-to-use presenter view, speaker notes, and live captions, Slides makes presenting your ideas a breeze. You can even present to Google Meet video calls directly from Slides.
Seamlessly connect to your other Google apps
Slides is thoughtfully connected to other Google apps you love, saving you time. Embed charts from Google Sheets or reply to comments directly from Gmail. You can even search the web and Google Drive for relevant content and images directly from Slides.
Extend collaboration and intelligence to PowerPoint files
Easily edit Microsoft PowerPoint presentations online without converting them, and layer on Slides’ enhanced collaborative and assistive features like comments, action items, and Smart Compose.
Work on fresh content
With Slides, everyone’s working on the latest version of a presentation. And with edits automatically saved in version history, it’s easy to track or undo changes.
Make slides faster, with built-in intelligence
Assistive features like Smart Compose and autocorrect help you build slides faster with fewer errors.
Stay productive, even offline
You can access, create, and edit Slides even without an internet connection, helping you stay productive from anywhere.
Security, compliance, and privacy
Secure by default
We use industry-leading security measures to keep your data safe, including advanced malware protections. Slides is also cloud-native, eliminating the need for local files and minimizing risk to your devices.
Encryption in transit and at rest
All files uploaded to Google Drive or created in Slides are encrypted in transit and at rest.
Compliance to support regulatory requirements
Our products, including Slides, regularly undergo independent verification of their security, privacy, and compliance controls .
Private by design
Slides adheres to the same robust privacy commitments and data protections as the rest of Google Cloud’s enterprise services .
You control your data.
We never use your slides content for ad purposes., we never sell your personal information to third parties., find the plan that’s right for you, google slides is a part of google workspace.
Every plan includes
Collaborate from anywhere, on any device
Access, create, and edit your presentations wherever you are — from any mobile device, tablet, or computer — even when offline.
Get a head start with templates
Choose from a variety of presentations, reports, and other professionally-designed templates to kick things off quickly..
Photo Album
Book Report
Visit the Slides Template Gallery for more.
Ready to get started?
Productivity
The PowerPoint Online Guide: How to Make and Present Slideshows Anywhere
Over the past thirty years, PowerPoint has become synonymous with presentations. Give a speech, present a new product, share finances in a board meeting—all are typically done with a PowerPoint presentation. That’s easy enough if you’re presenting from your laptop and have Microsoft Office installed.
Or it can be far more difficult. You might need to email your slide deck to the event organizer—and hope they have the same version of PowerPoint installed. Or you may carry your PowerPoint file around on a flash drive to open it on the presentation computer. Neither are great solutions, especially for all the times you need to make a last-minute change to your slides or if you don’t typically use Microsoft Office.
A Quick Guide to Office Online
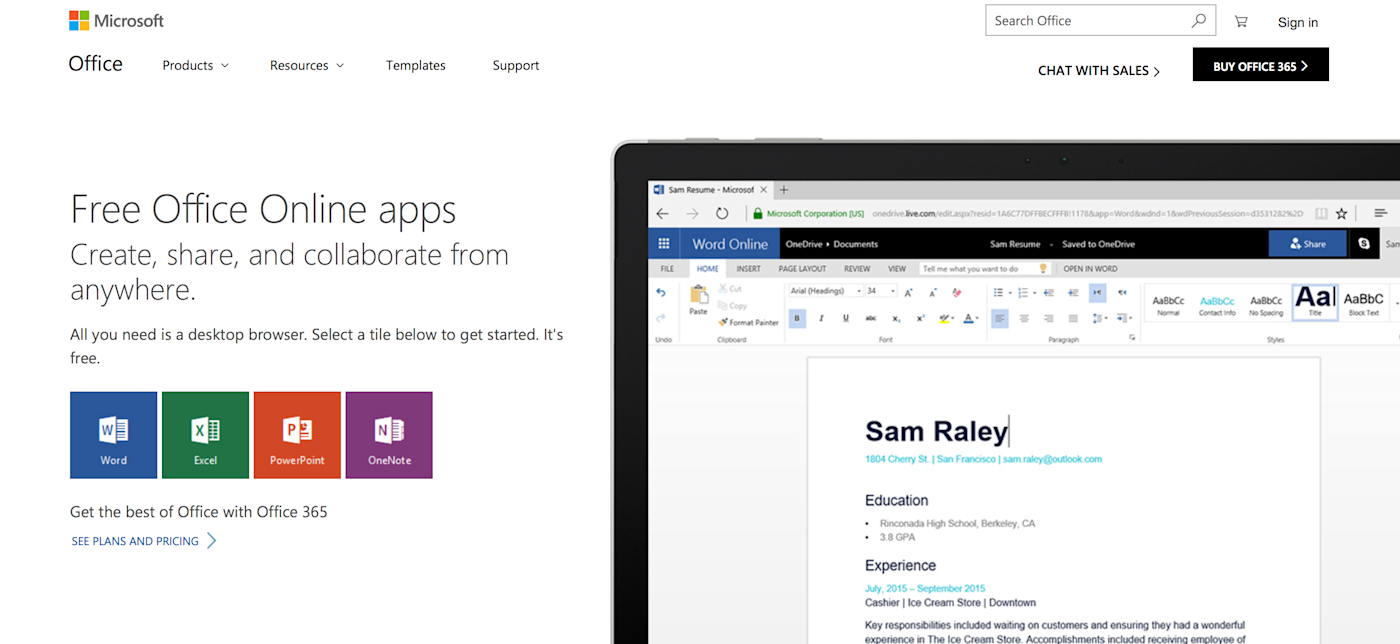
It starts with Office Online . Launched in 2010 as Office Web Apps , Office Online today includes simplified, free versions of Microsoft Office’s most popular apps: Word, Excel, PowerPoint, and OneNote.
If you’ve ever used the iPad or Android tablet versions of Office, Office Online will feel instantly familiar. The basics are the same. Each Office Online app includes an Office-style toolbar with Home , Insert , Design , and other tabs to organize core editing tools. Office Online apps don’t include all of their Windows features. They include instead a focused set of editing tools that, for most documents, spreadsheets, and presentations, are all you need.
The big difference is that the apps are online. Instead of emailing files back and forth, or syncing changes via OneDrive or Dropbox then sending messages to colleagues when something’s finished, changes happen automatically in Office Online. Your team can open files at the same time, make changes or add comments, and Office will save and sync it to all your OneDrive accounts automatically. Office Online apps also work everywhere. Open any browser, go to Office.com, and your work is ready to pick up where you left off.
Office Online is free for personal use—log into Office.com with a Microsoft account and fill up OneDrive’s free 5GB of storage with all your Office files. A business version is included with Office 365 for business and enterprise accounts as well.
The basics are the same. If you’ve used PowerPoint before, you’ll feel at home in PowerPoint online. Here are the things to keep in mind, the tips to help you work efficiently in your browser, and ways to work around Office Online’s limitations.
For your number crunching needs, check our Excel Online Guide to learn everything you need about Microsoft’s free Excel.
A Quick PowerPoint Online Tour
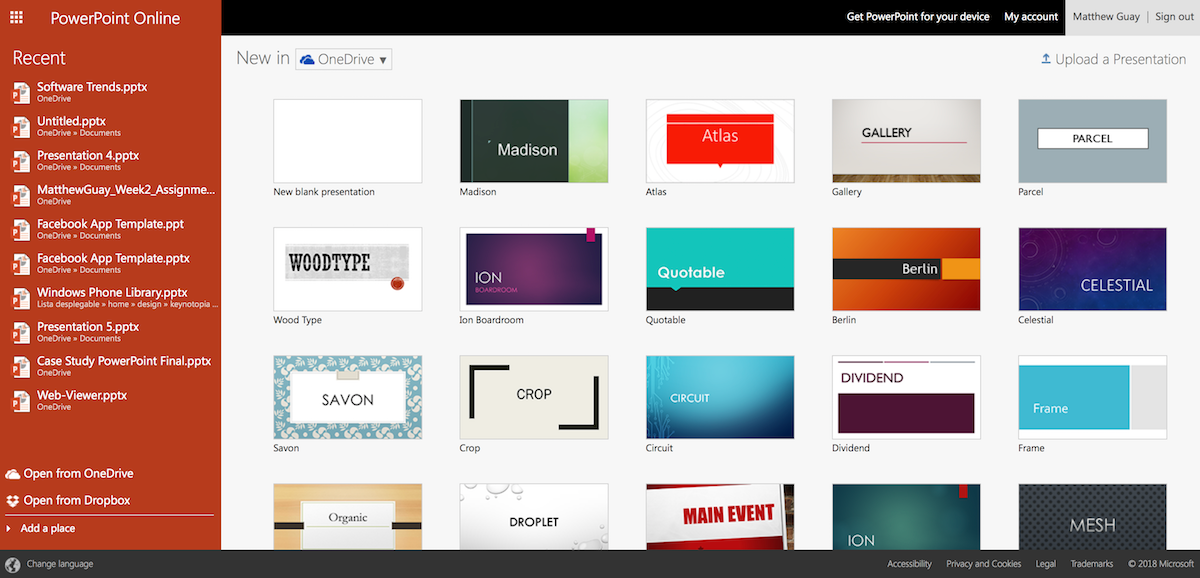
Ready to make a new presentation? Open PowerPoint Online at office.live.com/start/PowerPoint.aspx , and sign in with your Microsoft account (including Outlook.com, Xbox Live, and Office 365 accounts). You’ll then see the Office template picker with many of the presentation templates from desktop PowerPoint—with your recently opened presentations on the left sidebar.
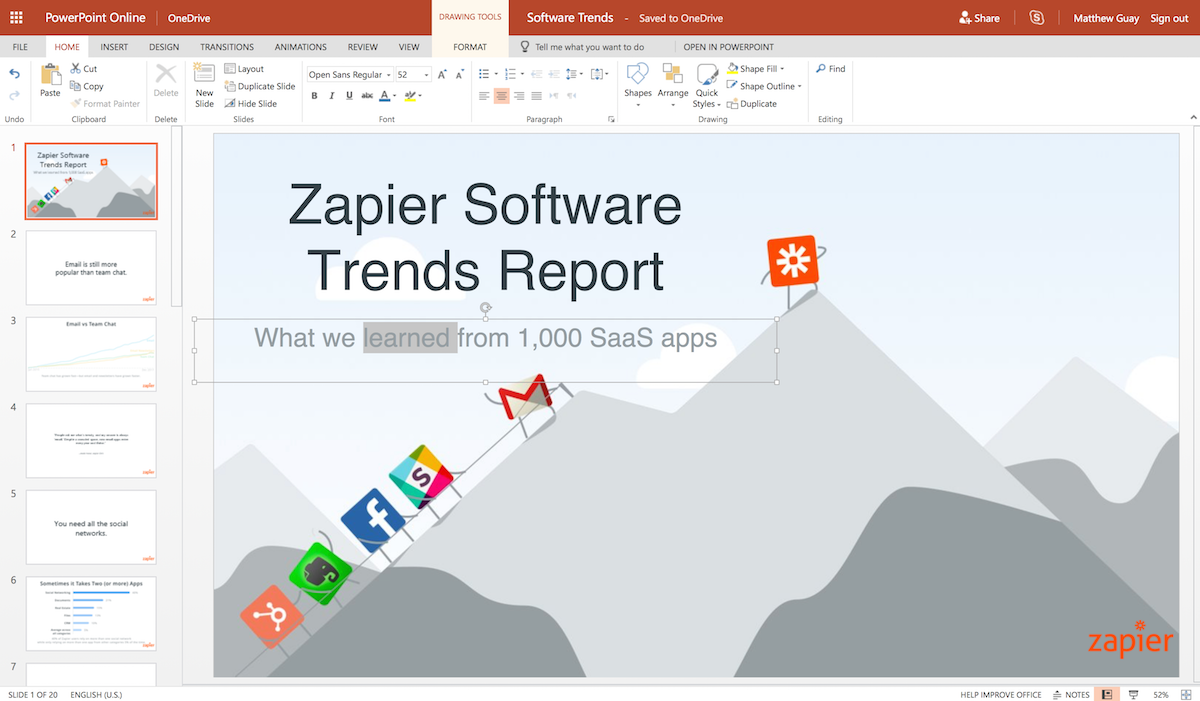
Select a template or open an existing presentation to open it in PowerPoint Online. With a similar design to recent versions of PowerPoint for Mac and Windows, you’ll find the core text and design tools on the main Home tab, options to add images and embedded videos and tables in the Insert tab, slide and template options in the Design tab, animations in the Transitions and Animations tab, and so on. If you can’t find the feature you need, type what you need in the Tell me what you want to do box to search through PowerPoint’s features and documentation.
Need to edit a picture or tweak a SmartArt graph? Select it, and a new Format tab will appear with additional tools as in desktop PowerPoint.
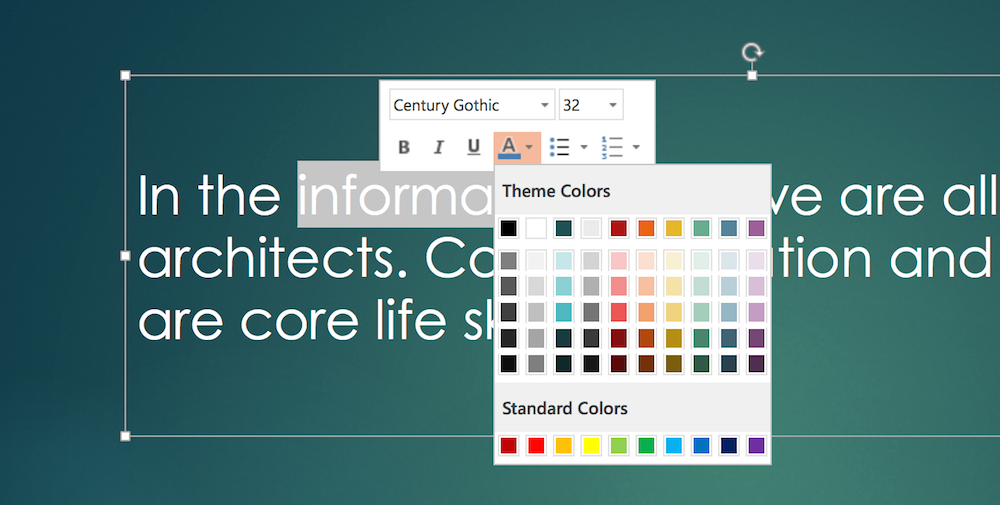
You may not need to look through the toolbars for tools, though. Select text in a slide and PowerPoint shows quick formatting options in a pop-over to change the font, color, and more. Or right-click on most other elements to find their quick editing options. You can then double-click on the toolbar to hide it and increase your workspace, if you’d like, relying on the popover tools to work faster.
Add a new slide: Ctrl + M or CMD + M
Move slides up or down: Ctrl + arrow or CMD + arrow
Add a comment: Alt + N
Go to next slide in Slideshow view: N
Go to previous slide in Slideshow view: P
Go to a specific slide in Slideshow view: G , then type slide number
Exit Slideshow view: Esc
Check Microsoft PowerPoint Online keyboard shortcut list for more details.
How to Add Presentations to PowerPoint Online
PowerPoint Online is part of Microsoft’s OneDrive file storage. Open a PowerPoint file in OneDrive, and it’ll first show a preview with the option to edit it online.
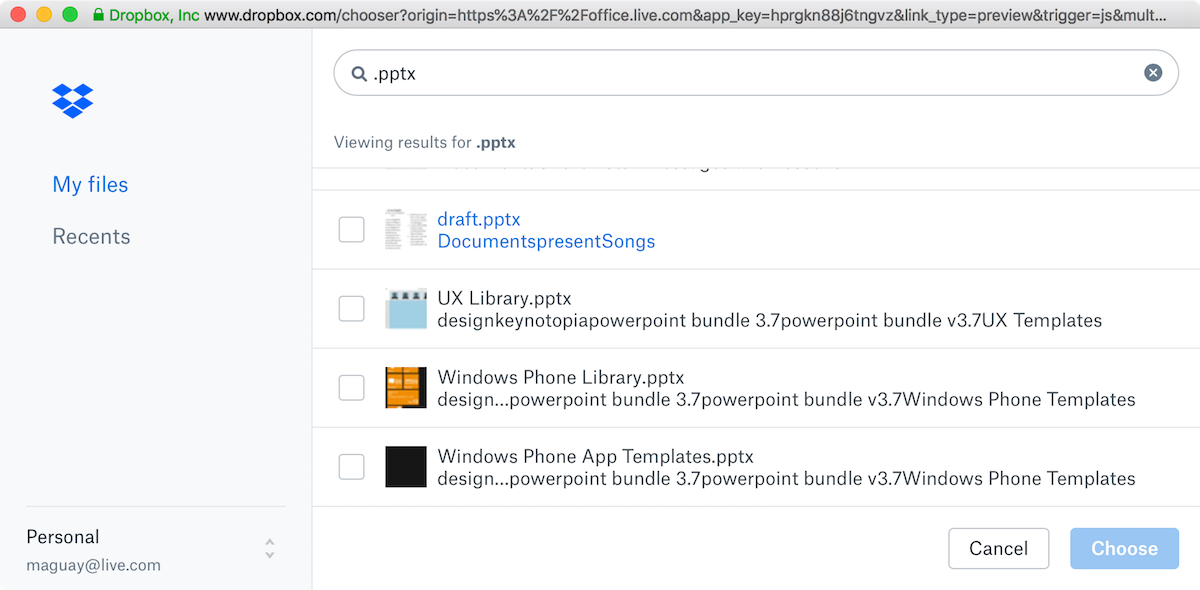
But surprisingly, PowerPoint Online also works with Dropbox. That gives you another way to open your presentations online. You can save your presentations to either OneDrive or Dropbox, and then when you open PowerPoint Online, you can search through your presentations from both services. Either way, any change you make will automatically be saved to the original file.
The Dropbox integration only works for newer .pptx files. To open .ppt files, download them first, then upload them to PowerPoint Online or OneDrive. When you open them there, PowerPoint will automatically make a copy then convert the presentation to the new format so you can edit it online.
Or, if you have a PowerPoint file on your computer, open PowerPoint Online first, click the Upload a Presentation button, then select your presentation to upload it to OneDrive and open it for editing in PowerPoint Online at the same time.
How to Collaborate on PowerPoint Presentations
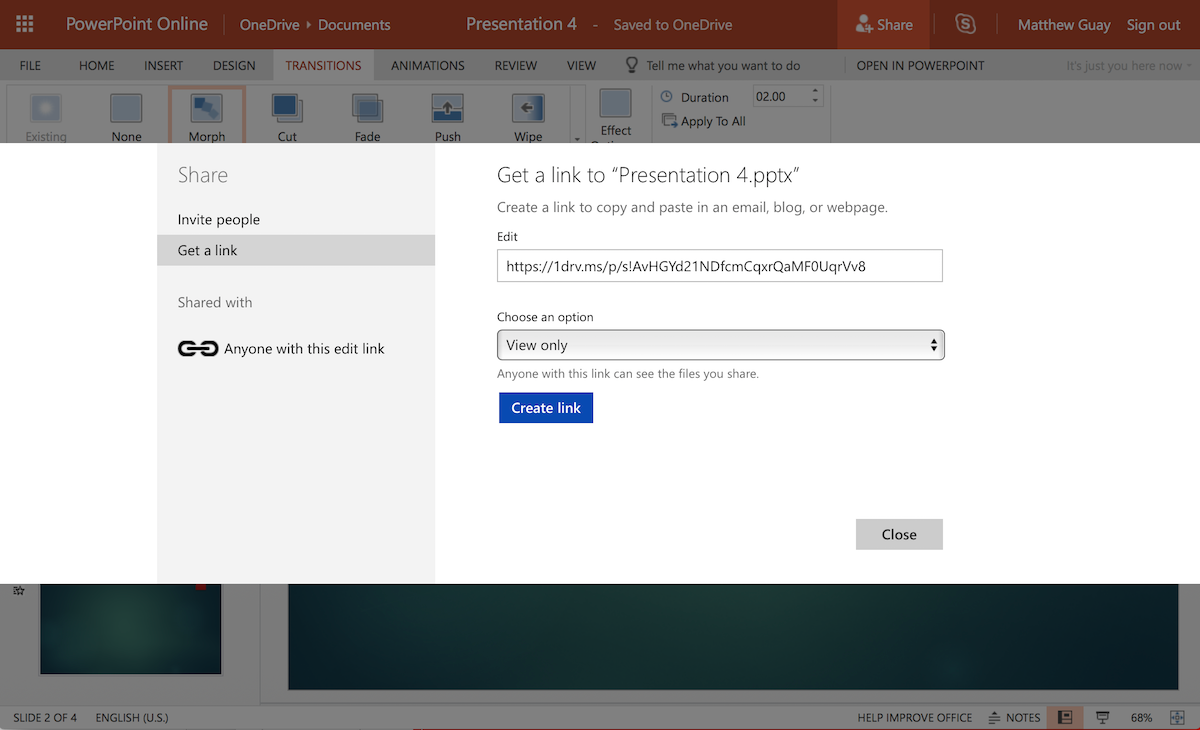
Want someone else to proofread your slides, or add their research to a team presentation? That’s easy in PowerPoint Online. From your presentation, click the Share button in the top right toolbar.
The default option is to email an invite link along with a message to your collaborators. You can choose to make the presentation editable or view only and can require a Microsoft account or not.
Or, you can copy a share link to send to anyone or share publicly online if you’d like. Select the Get a link tab to copy a link to your presentation—again, as a view-only presentation or with permission to edit. Here, if you make an editing link, anyone can tweak the presentation without signing into an account.
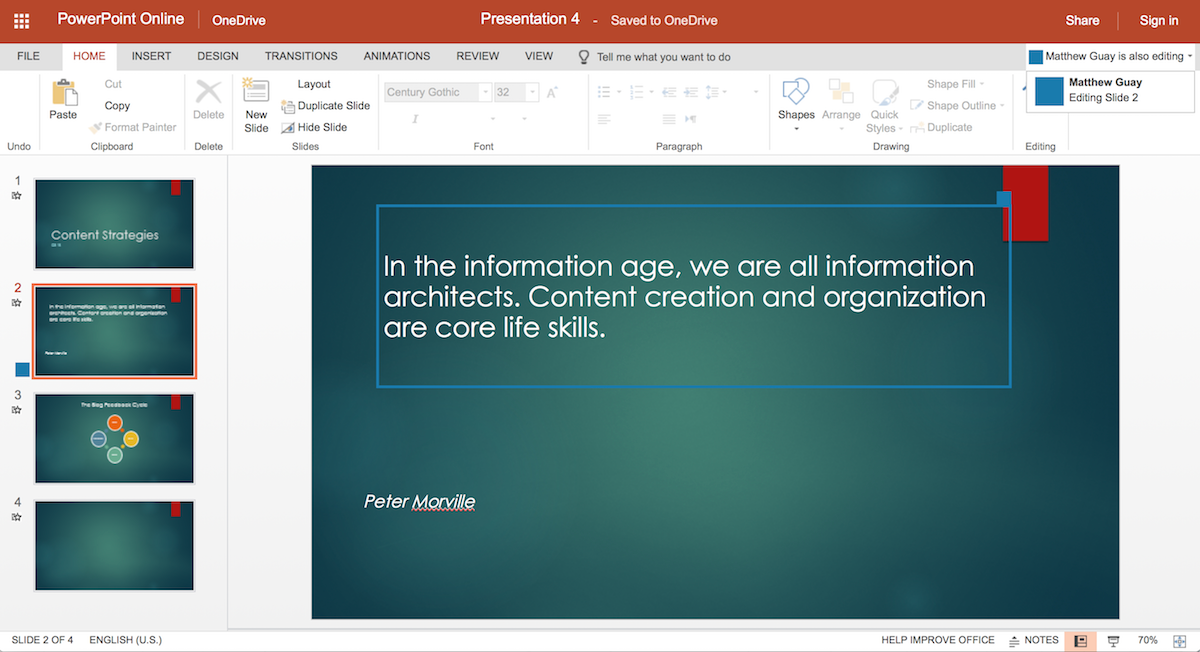
PowerPoint Online will show an icon beside the slide your collaborator is currently editing and will mark the section they’re working on in the same color. You can’t see the exact changes they make while they’re editing—changes take a few seconds to sync—so it’s best not to edit the same slide others are editing at the same time.
Want to chat with your collaborators? As long as everyone has a Skype account, you can open a Skype sidebar and talk with them in your PowerPoint presentation.
What’s Not In PowerPoint Online?
The core editing features are all here. You can add and edit text, photos, shapes, and SmartArt in PowerPoint online, add core transitions and animations to slides and elements, and present your presentation all from PowerPoint Online.
One of the main differences from PowerPoint’s desktop apps are the embedding options. In desktop versions of PowerPoint, you can embed video and audio from your computer, along with data from other Office apps and macros. In PowerPoint Online, you can embed online videos from YouTube—along with graphs and data from PowerBI and other add-ins in the Office Add-ins pane.
Animations are also more limited in PowerPoint Online. It includes only eight transitions, including Fade and Push , with animations that don’t require graphics acceleration. If you add a presentation that uses other animations from PowerPoint for Windows or Mac, you’ll need to select others or present without animations.
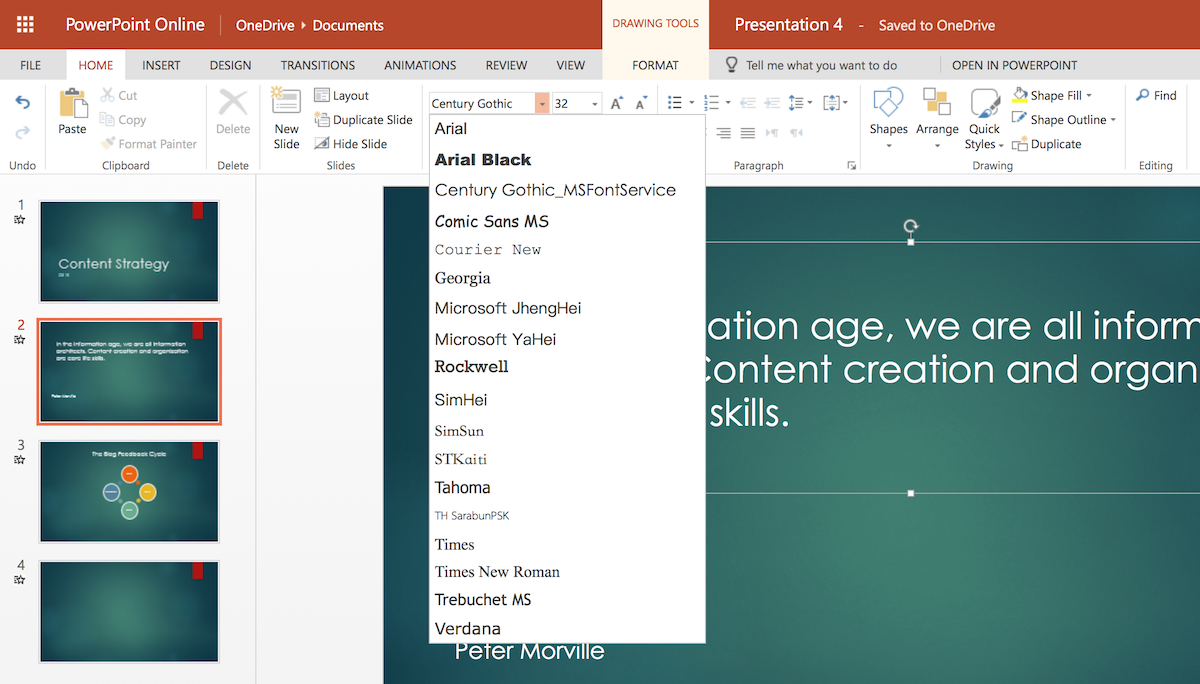
Fonts are another core difference. PowerPoint Online includes 18 fonts, including Arial, Comic Sans, Courier New, Garamond, Georgia, Rockwell, Tahoma, Times New Roman, and Verdana. You can’t install 3rd party fonts or choose fonts you have installed on your computer.
So, to make sure your PowerPoint presentations look great everywhere, stick with the fonts included with PowerPoint Online. That’s easy as they’re the only options in PowerPoint Online, but if you use another PowerPoint app, try using the Web fonts as they’re mainly fonts that work everywhere.
If you upload a presentation that uses a font not included in PowerPoint Online, you can still view the text in the correct font in PowerPoint Online on your computer or another computer with that font installed. If you don’t have the font installed, PowerPoint Online will replace that font with another similar font.
Beyond that, though, PowerPoint Online is surprisingly full-featured. It includes everything you need for making and showing presentations online—as long as you don’t need to use custom fonts, embed non-YouTube videos, or build advanced animations.
How to Present PowerPoint Presentations From Your Browser
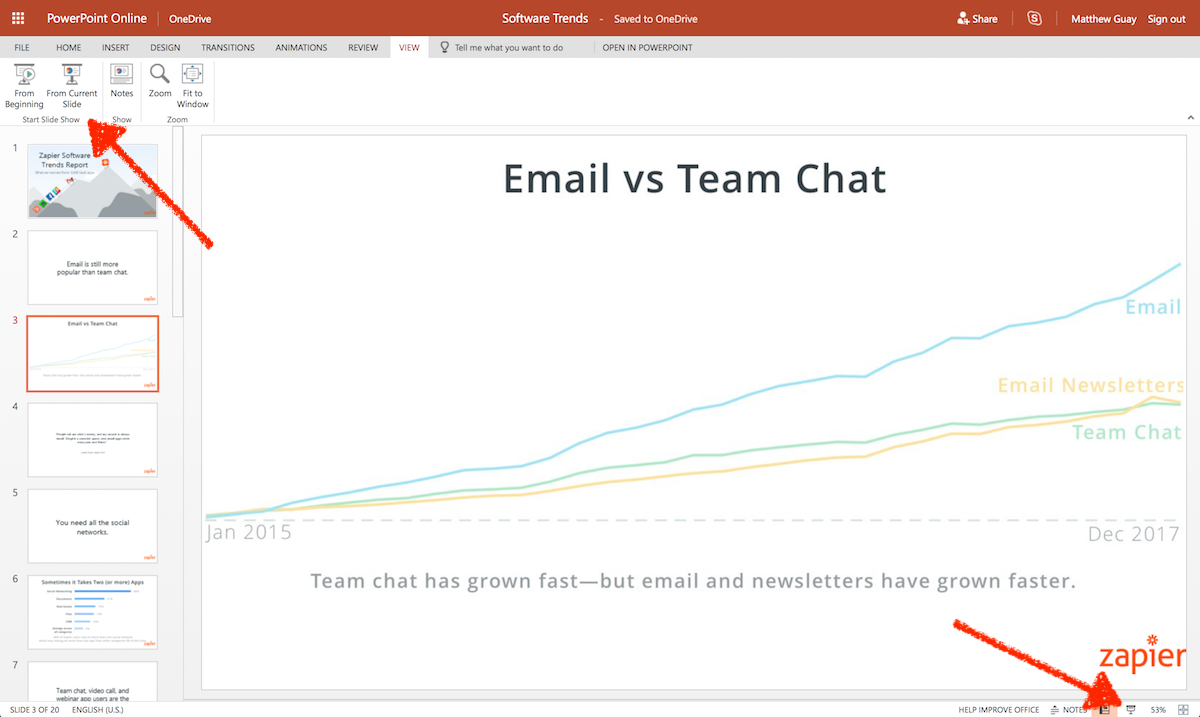
Once you’ve finished creating your presentation, it’s time to present it. That’s as easy in PowerPoint Online as in the desktop apps. You can start the slideshow from the slide you’re currently editing via the Slide View button in the lower right-hand corner. Or, click the View tab and select to start the slideshow from the beginning or current slide.
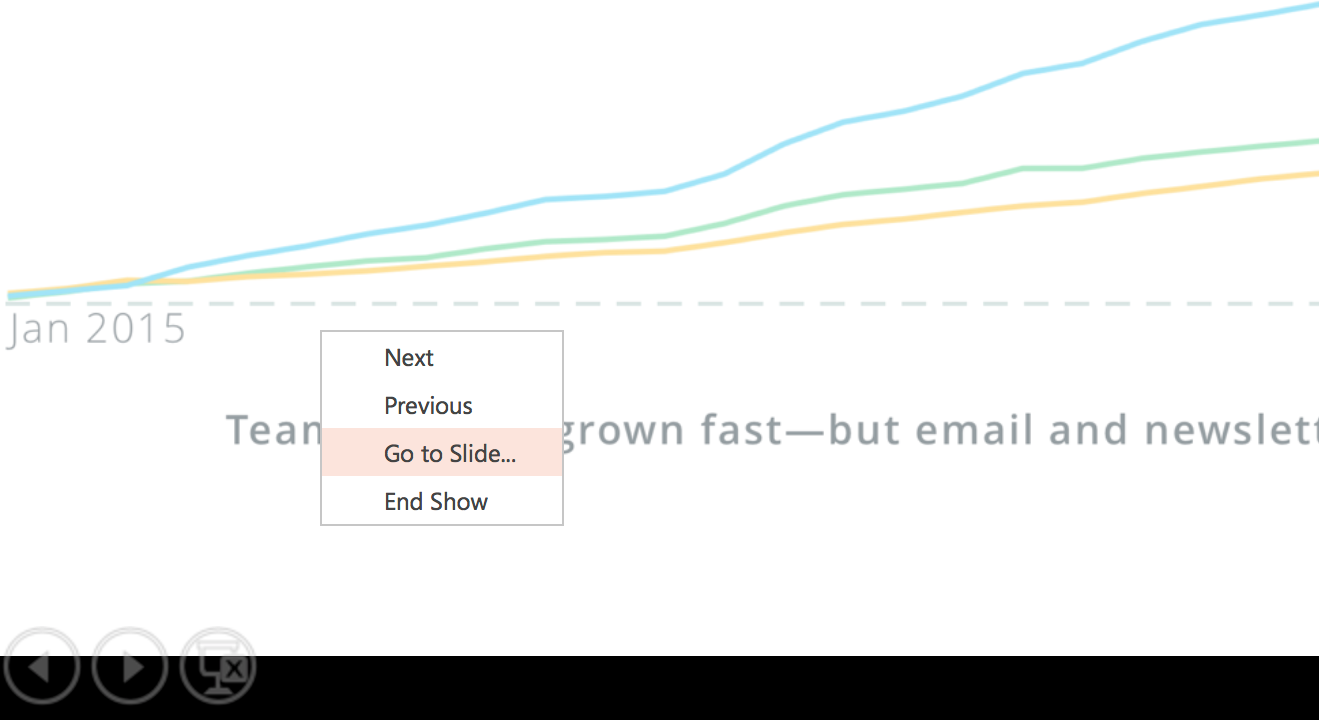
PowerPoint Online will switch your browser to a full-screen preview mode. Click anywhere on the screen to go to the next slide, or tap your right and left arrows on your keyboard to navigate between slides. When finished, click again at the end of the presentation or press the Esc key to exit the slideshow and switch back to the windowed editor mode.
PowerPoint also includes controls on the lower left of the slideshow view, along with options in the right-click menu to switch slides or jump to a specific slide.
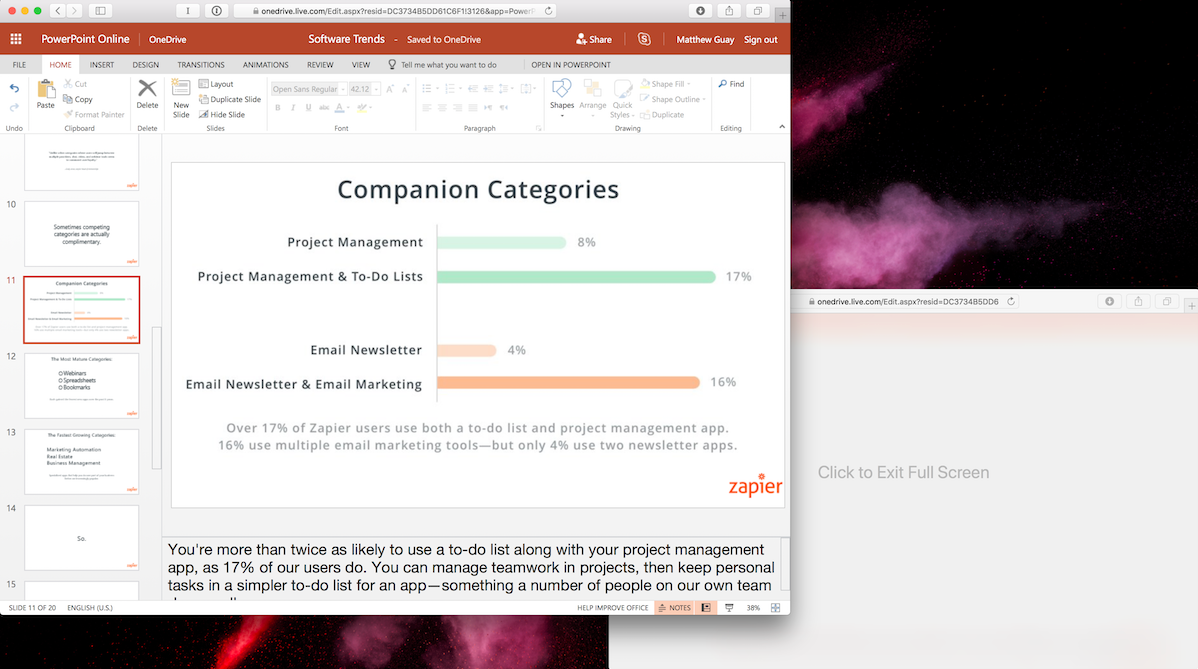
PowerPoint Online doesn’t include presenter view to show lecture notes on one screen while presenting your presentation on another—but there’s a workaround. While you’re giving your presentation full-screen, your browser with the original PowerPoint Online tab won’t show your slide content (Chrome hides the original window; Safari shows a Exit Full Screen placeholder). Instead, you can open a new tab or window and open your presentation there as well.
When you switch slides, move your mouse to your projection screen and click to advance—then move your mouse back to your laptop’s screen and select the next slide in your other PowerPoint Online window. Another option is to open your presentation in PowerPoint’s mobile apps and use your phone or tablet to view lecture notes while presenting from your laptop.
How to Convert PowerPoint Presentations Online
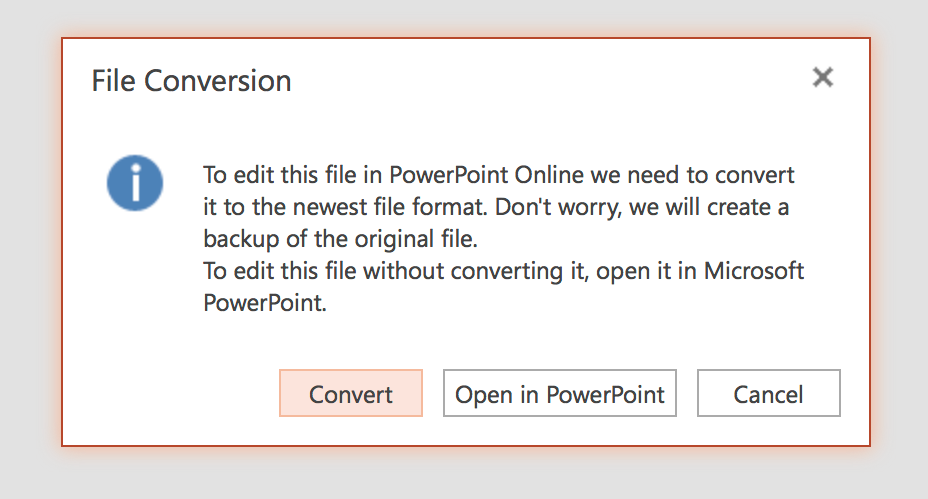
PowerPoint Online—unlike PowerPoint for Windows or Mac—can only open .pptx presentation files made with a newer version of PowerPoint. If you open an older .ppt file or a .odp presentation from another app, PowerPoint Online can convert the file to .pptx on the fly so you can edit the presentation.
But once you’ve opened the presentation, you can export it in 3 formats: PowerPoint, ODP (used with OpenOffice), or PDF. Click the File tab in the toolbar to open the core PowerPoint menu, select Download As , then choose the file format you want. PowerPoint Online will convert your presentation and save it to your computer so that you can share the original file with others.
The best option is to share the PowerPoint presentation directly in PowerPoint Online—but when you need a traditional presentation file, that’s a handy way to get it.
How to Save All Your Presentations to PowerPoint Online
There’s one trick to make PowerPoint Online the presentation app that’s always ready when you need it is: Save all your presentations to OneDrive or Dropbox. That way, whenever you need to present something, it’ll be a few clicks away inside PowerPoint Online.
If you already use OneDrive or Dropbox to sync your files, you’re halfway there. Save every new presentation there, every time. Whenever someone sends you a presentation, save it there also.
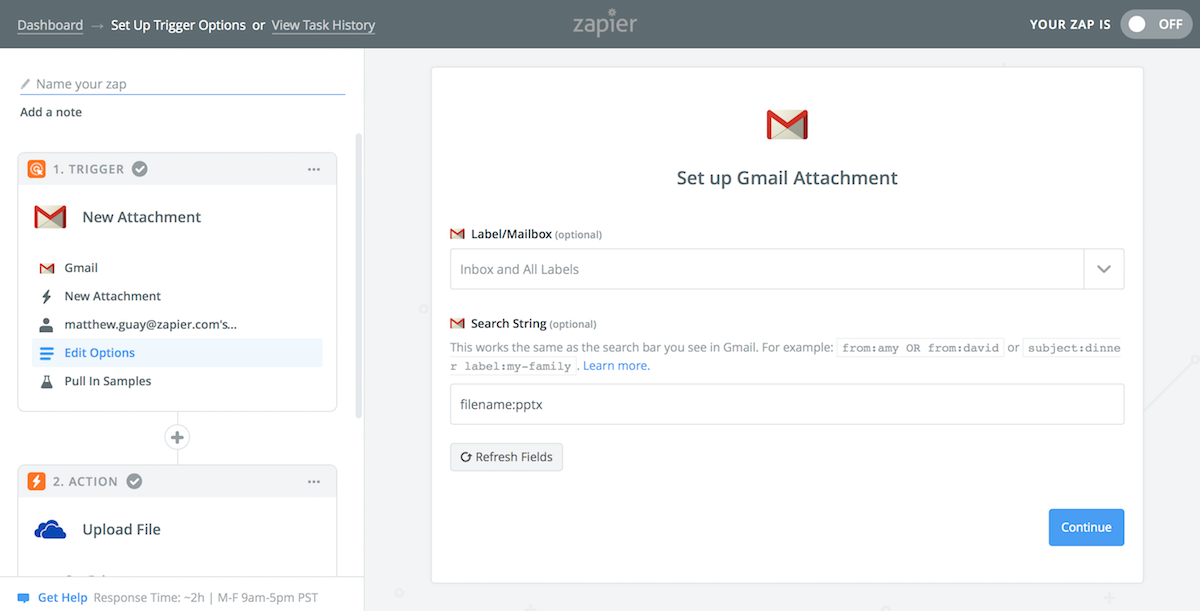
App automation tool Zapier can do that for you automatically. One of the most common ways to share presentations is through email—so Zapier can watch your Gmail or IMAP-powered email account for new presentation files. With Gmail, you can include a search to watch for presentation files. Use has:presentation to watch for any presentation—though note that this will also include Google Slides presentations which won’t work with PowerPoint Online. Or, use filename:pptx OR filename:ppt to watch for all PowerPoint attachments.
With IMAP email—or any other app where colleagues may send you presentations— add a Filter step to your Zap to watch the filename for .pptx or .ppt extensions.
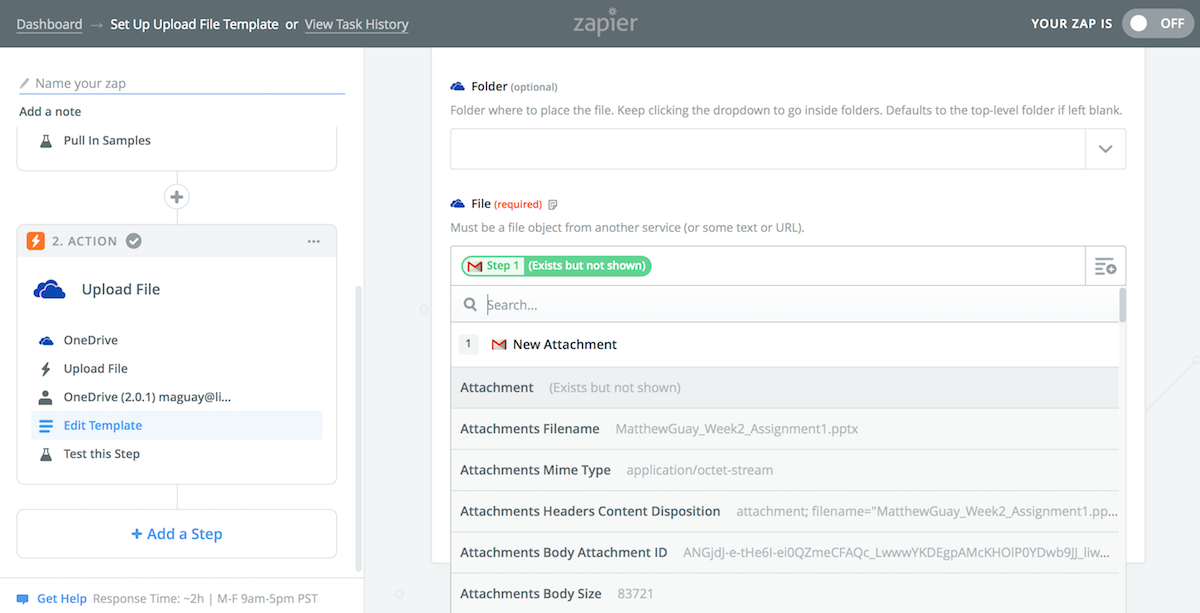
Then, Zapier can save the presentation file to online storage to open and edit it in PowerPoint Online. The simplest is OneDrive since it’s PowerPoint Online’s core storage, though you could use Dropbox instead as it only takes a few extra clicks to open your presentations there.
You can save the presentation in any folder, and add a customized file name if you’d like. Then select the attachment from Gmail or your IMAP email and have Zapier copy that file to OneDrive or Dropbox. Next time you need to present something someone emailed you, don’t open your email app—instead, open PowerPoint Online and open the presentation there directly.
Ready to save any presentation you get emailed to PowerPoint Online? These Zaps will help you get started in a few clicks—remember to set up your search or filter to watch only for PowerPoint files:
Save new Gmail attachments to OneDrive
Save new email attachments to OneDrive
Save new attachments in Gmail to Dropbox
Back up new IMAP email attachments to Dropbox
That’s PowerPoint Online. It’s a handy way to tweak and present your presentation, even if you don’t have a copy of PowerPoint installed. And it just might be the new presentation app you need for a more focused, free way to make presentations anywhere.
Need more presentation tips and tools? Check out these other Zapier guides:
Want a different presentation app? Check out our roundup of the best PowerPoint alternatives for a dozen new ways to present your ideas.
Can’t figure out what to say? Here are tips to make every word count and nail your next presentation .
Once you’ve made a slide deck, here are the best ways to share your presentation online .
Then, get ready to present it with these 5 tips to overcome the fear of public speaking .
Auditorium photo by Nathan Dumlao via Unsplash .
Get productivity tips delivered straight to your inbox
We’ll email you 1-3 times per week—and never share your information.
Matthew Guay
Matthew Guay is an editor and writer in Bangkok. When he's not writing, he's likely reading a new book or exploring random streets in a new city. Follow Matthew at @maguay.
- Technology trends
Related articles

The best large language models (LLMs) in 2024
The best large language models (LLMs) in...

How to get a transcript of a YouTube video (on desktop and mobile)
How to get a transcript of a YouTube video...

How to create a group in Gmail

How to land your dream clients with LinkedIn Sales Navigator
How to land your dream clients with LinkedIn...
Improve your productivity automatically. Use Zapier to get your apps working together.

Critical PowerPoint Shortcuts – Claim Your FREE Training Module and Get Your Time Back!

How to Make a PowerPoint Presentation (Step-by-Step)
- PowerPoint Tutorials
- Presentation Design
- January 22, 2024
In this beginner’s guide, you will learn step-by-step how to make a PowerPoint presentation from scratch.
While PowerPoint is designed to be intuitive and accessible, it can be overwhelming if you’ve never gotten any training on it before. As you progress through this guide, you’ll will learn how to move from blank slides to PowerPoint slides that look like these.

Table of Contents
Additionally, as you create your presentation, you’ll also learn tricks for working more efficiently in PowerPoint, including how to:
- Change the slide order
- Reset your layout
- Change the slide dimensions
- Use PowerPoint Designer
- Format text
- Format objects
- Play a presentation (slide show)
With this knowledge under your belt, you’ll be ready to start creating PowerPoint presentations. Moreover, you’ll have taken your skills from beginner to proficient in no time at all. I will also include links to more advanced PowerPoint topics.
Ready to start learning how to make a PowerPoint presentation?
Take your PPT skills to the next level
Start with a blank presentation.
Note: Before you open PowerPoint and start creating your presentation, make sure you’ve collected your thoughts. If you’re going to make your slides compelling, you need to spend some time brainstorming.
For help with this, see our article with tips for nailing your business presentation here .
The first thing you’ll need to do is to open PowerPoint. When you do, you are shown the Start Menu , with the Home tab open.
This is where you can choose either a blank theme (1) or a pre-built theme (2). You can also choose to open an existing presentation (3).
For now, go ahead and click on the Blank Presentation (1) thumbnail.

Doing so launches a brand new and blank presentation for you to work with. Before you start adding content to your presentation, let’s first familiarize ourselves with the PowerPoint interface.
The PowerPoint interface

Here is how the program is laid out:
- The Application Header
- The Ribbon (including the Ribbon tabs)
- The Quick Access Toolbar (either above or below the Ribbon)
- The Slides Pane (slide thumbnails)
The Slide Area
The notes pane.
- The Status Bar (including the View Buttons)
Each one of these areas has options for viewing certain parts of the PowerPoint environment and formatting your presentation.
Below are the important things to know about certain elements of the PowerPoint interface.
The PowerPoint Ribbon

The Ribbon is contextual. That means that it will adapt to what you’re doing in the program.
For example, the Font, Paragraph and Drawing options are greyed out until you select something that has text in it, as in the example below (A).

Furthermore, if you start manipulating certain objects, the Ribbon will display additional tabs, as seen above (B), with more commands and features to help you work with those objects. The following objects have their own additional tabs in the Ribbon which are hidden until you select them:
- Online Pictures
- Screenshots
- Screen Recording
The Slides Pane

This is where you can preview and rearrange all the slides in your presentation.
Right-clicking on a slide in the pane gives you additional options on the slide level that you won’t find on the Ribbon, such as Duplicate Slide , Delete Slide , and Hide Slide .

In addition, you can add sections to your presentation by right-clicking anywhere in this Pane and selecting Add Section . Sections are extremely helpful in large presentations, as they allow you to organize your slides into chunks that you can then rearrange, print or display differently from other slides.

The Slide Area (A) is where you will build out your slides. Anything within the bounds of this area will be visible when you present or print your presentation.
Anything outside of this area (B) will be hidden from view. This means that you can place things here, such as instructions for each slide, without worrying about them being shown to your audience.

The Notes Pane is the space beneath the Slide Area where you can type in the speaker notes for each slide. It’s designed as a fast way to add and edit your slides’ talking points.
To expand your knowledge and learn more about adding, printing, and exporting your PowerPoint speaker notes, read our guide here .
Your speaker notes are visible when you print your slides using the Notes Pages option and when you use the Presenter View . To expand your knowledge and learn the ins and outs of using the Presenter View , read our guide here .

You can resize the Notes Pane by clicking on its edge and dragging it up or down (A). You can also minimize or reopen it by clicking on the Notes button in the Status Bar (B).
Note: Not all text formatting displays in the Notes Pane, even though it will show up when printing your speaker notes. To learn more about printing PowerPoint with notes, read our guide here .
Now that you have a basic grasp of the PowerPoint interface at your disposal, it’s time to make your presentation.
Adding Content to Your PowerPoint Presentation
Notice that in the Slide Area , there are two rectangles with dotted outlines. These are called Placeholders and they’re set on the template in the Slide Master View .
To expand your knowledge and learn how to create a PowerPoint template of your own (which is no small task), read our guide here .

As the prompt text suggests, you can click into each placeholder and start typing text. These types of placeholder prompts are customizable too. That means that if you are using a company template, it might say something different, but the functionality is the same.

Note: For the purposes of this example, I will create a presentation based on the content in the Starbucks 2018 Global Social Impact Report, which is available to the public on their website.
If you type in more text than there is room for, PowerPoint will automatically reduce its font size. You can stop this behavior by clicking on the Autofit Options icon to the left of the placeholder and selecting Stop Fitting Text to this Placeholder .
Next, you can make formatting adjustments to your text by selecting the commands in the Font area and the Paragraph area of the Home tab of the Ribbon.

The Reset Command: If you make any changes to your title and decide you want to go back to how it was originally, you can use the Reset button up in the Home tab .

Insert More Slides into Your Presentation
Now that you have your title slide filled in, it’s time to add more slides. To do that, simply go up to the Home tab and click on New Slide . This inserts a new slide in your presentation right after the one you were on.

You can alternatively hit Ctrl+M on your keyboard to insert a new blank slide in PowerPoint. To learn more about this shortcut, see my guide on using Ctrl+M in PowerPoint .
Instead of clicking the New Slide command, you can also open the New Slide dropdown to see all the slide layouts in your PowerPoint template. Depending on who created your template, your layouts in this dropdown can be radically different.

If you insert a layout and later want to change it to a different layout, you can use the Layout dropdown instead of the New Slide dropdown.
After inserting a few different slide layouts, your presentation might look like the following picture. Don’t worry that it looks blank, next we will start adding content to your presentation.

If you want to follow along exactly with me, your five slides should be as follows:
- Title Slide
- Title and Content
- Section Header
- Two Content
- Picture with Caption

Adding Content to Your Slides
Now let’s go into each slide and start adding our content. You’ll notice some new types of placeholders.

On slide 2 we have a Content Placeholder , which allows you to add any kind of content. That includes:
- A SmartArt graphic,
- A 3D object,
- A picture from the web,
- Or an icon.
To insert text, simply type it in or hit Ctrl+C to Copy and Ctrl+V to Paste from elsewhere. To insert any of the other objects, click on the appropriate icon and follow the steps to insert it.
For my example, I’ll simply type in some text as you can see in the picture below.

Slides 3 and 4 only have text placeholders, so I’ll go ahead and add in my text into each one.

On slide 5 we have a Picture Placeholder . That means that the only elements that can go into it are:
- A picture from the web

To insert a picture into the picture placeholder, simply:
- Click on the Picture icon
- Find a picture on your computer and select it
- Click on Insert
Alternatively, if you already have a picture open somewhere else, you can select the placeholder and paste in (shortcut: Ctrl+V ) the picture. You can also drag the picture in from a file explorer window.

If you do not like the background of the picture you inserted onto your slide, you can remove the background here in PowerPoint. To see how to do this, read my guide here .
Placeholders aren’t the only way to add content to your slides. At any point, you can use the Insert tab to add elements to your slides.
You can use either the Title Only or the Blank slide layout to create slides for content that’s different. For example, a three-layout content slide, or a single picture divider slide, as shown below.

In the first example above, I’ve inserted 6 text boxes, 3 icons, and 3 circles to create this layout. In the second example, I’ve inserted a full-sized picture and then 2 shapes and 2 text boxes.
The Reset Command: Because these slides are built with shapes and text boxes (and not placeholders), hitting the Reset button up in the Home tab won’t do anything.
That is a good thing if you don’t want your layouts to adjust. However, it does mean that it falls on you to make sure everything is aligned and positioned correctly.
For more on how to add and manipulate the different objects in PowerPoint, check out our step-by-step articles here:
- Using graphics in PowerPoint
- Inserting icons onto slides
- Adding pictures to your PowerPoint
- How to embed a video in PowerPoint
- How to add music to your presentation
Using Designer to generate more layouts ideas
If you have Office 365, your version of PowerPoint comes with a new feature called Designer (or Design Ideas). This is a feature that generates slide layout ideas for you. The coolest thing about this feature is that it uses the content you already have.
To use Designer , simply navigate to the Design tab in your Ribbon, and click on Design Ideas .

NOTE: If the PowerPoint Designer is not working for you (it is grey out), see my troubleshooting guide for Designer .
Change the Overall Design (optional)
When you make a PowerPoint presentation, you’ll want to think about the overall design. Now that you have some content in your presentation, you can use the Design tab to change the look and feel of your slides.
For additional help thinking through the design of your presentation, read my guide here .
A. Picking your PowerPoint slide size
If you have PowerPoint 2013 or later, when you create a blank document in PowerPoint, you automatically start with a widescreen layout with a 16:9 ratio. These dimensions are suitable for most presentations as they match the screens of most computers and projectors.
However, you do have the option to change the dimensions.
For example, your presentation might not be presented, but instead converted into a PDF or printed and distributed. In that case, you can easily switch to the standard dimensions with a 4:3 ratio by selecting from the dropdown (A).
You can also choose a custom slide size or change the slide orientation from landscape to portrait in the Custom Slide Size dialog box (B).

To learn all about the different PowerPoint slide sizes, and some of the issues you will face when changing the slide size of a non-blank presentation, read my guide here .
B. Selecting a PowerPoint theme
The next thing you can do is change the theme of your presentation to a pre-built one. For a detailed explanation of what a PowerPoint theme is, and how to best use it, read my article here .
In the beginning of this tutorial, we started with a blank presentation, which uses the default Office theme as you can see in the picture below.

That gives you the most flexibility because it has a blank background and quite simple layouts that work for most presentations. However, it also means that it’s your responsibility to enhance the design.
If you’re comfortable with this, you can stay with the default theme or create your own custom theme ( read my guide here ). But if you would rather not have to think about design, then you can choose a pre-designed theme.
Microsoft provides 46 other pre-built themes, which include slide layouts, color variants and palettes, and fonts. Each one varies quite significantly, so make sure you look through them carefully.
To select a different theme, go to the Design tab in the Ribbon, and click on the dropdown arrow in the Themes section .

For this tutorial, let’s select the Frame theme and then choose the third Variant in the theme. Doing so changes the layout, colors, and fonts of your presentation.

Note: The theme dropdown area is also where you can import or save custom themes. To see my favorite places to find professional PowerPoint templates and themes (and recommendations for why I like them), read my guide here .
C. How to change a slide background in PowerPoint
The next thing to decide is how you want your background to look for the entire presentation. In the Variants area, you can see four background options.

For this example, we want our presentation to have a dark background, so let’s select Style 3. When you do so, you’ll notice that:
- The background color automatically changes across all slides
- The color of the text on most of the slides automatically changes to white so that it’s visible on the dark background
- The colors of the objects on slides #6 and #7 also adjust, in a way we may not want (we’ll likely have to make some manual adjustments to these slides)

Note: If you want to change the slide background for just that one slide, don’t left-click the style. Instead, right-click it and select Apply to Selected Slides .
After you change the background for your entire presentation, you can easily adjust the background for an individual slide.

Inside the Format Background pane, you can see you have the following options:
- Gradient fill
- Picture or texture fill
- Pattern fill
- Hide background
You can explore these options to find the PowerPoint background that best fits your presentation.
D. How to change your color palette in PowerPoint
Another thing you may want to adjust in your presentation, is the color scheme. In the picture below you can see the Theme Colors we are currently using for this presentation.

Each PowerPoint theme comes with its own color palette. By default, the Office theme includes the Office color palette. This affects the colors you are presented with when you format any element within your presentation (text, shapes, SmartArt, etc.).

The good news is that the colors here are easy to change. To switch color palettes, simply:
- Go to the Design tab in the Ribbon
- In the Variants area, click on the dropdown arrow and select Colors
- Select the color palette (or theme colors) you want
You can choose among the pre-built color palettes from Office, or you can customize them to create your own.
As you build your presentation, make sure you use the colors from your theme to format objects. That way, changing the color palette adjusts all the colors in your presentation automatically.
E. How to change your fonts in PowerPoint
Just as we changed the color palette, you can do the same for the fonts.

Each PowerPoint theme comes with its own font combination. By default, the Office theme includes the Office font pairing. This affects the fonts that are automatically assigned to all text in your presentation.

The good news is that the font pairings are easy to change. To switch your Theme Fonts, simply:
- Go to the Design tab in the Ribbon
- Click on the dropdown arrow in the Variants area
- Select Fonts
- Select the font pairing you want
You can choose among the pre-built fonts from Office, or you can customize them to create your own.
If you are working with PowerPoint presentations on both Mac and PC computers, make sure you choose a safe PowerPoint font. To see a list of the safest PowerPoint fonts, read our guide here .
If you receive a PowerPoint presentation and the wrong fonts were used, you can use the Replace Fonts dialog box to change the fonts across your entire presentation. For details, read our guide here .
Adding Animations & Transitions (optional)
The final step to make a PowerPoint presentation compelling, is to consider using animations and transitions. These are by no means necessary to a good presentation, but they may be helpful in your situation.
A. Adding PowerPoint animations
PowerPoint has an incredibly robust animations engine designed to power your creativity. That being said, it’s also easy to get started with basic animations.
Animations are movements that you can apply to individual objects on your slide.

To add a PowerPoint animation to an element of your slide, simply:
- Select the element
- Go to the Animations tab in the Ribbon
- Click on the dropdown arrow to view your options
- Select the animation you want
You can add animations to multiple objects at one time by selecting them all first and then applying the animation.
B. How to preview a PowerPoint animation

There are three ways to preview a PowerPoint animation:
- Click on the Preview button in the Animations tab
- Click on the little star next to the slide
- Play the slide in Slide Show Mode
To learn other ways to run your slide show, see our guide on presenting a PowerPoint slide show with shortcuts .
To adjust the settings of your animations, explore the options in the Effect Options , Advanced Animation and the Timing areas of the Animation tab .

Note: To see how to make objects appear and disappear in your slides by clicking a button, read our guide here .
C. How to manage your animations in PowerPoint

The best way to manage lots of animations on your slide is with the Animation Pane . To open it, simply:
- Navigate to the Animations tab
- Select the Animation Pane
Inside the Animation Pane, you’ll see all of the different animations that have been applied to objects on your slide, with their numbers marked as pictured above.
Note: To see examples of PowerPoint animations that can use in PowerPoint, see our list of PowerPoint animation tutorials here .
D. How to add transitions to your PowerPoint presentation
PowerPoint has an incredibly robust transition engine so that you can dictate how your slides change from one to the other. It is also extremely easy to add transitions to your slides.
In PowerPoint, transitions are the movements (or effects) you see as you move between two slides.

To add a transition to a PowerPoint slide, simply:
- Select the slide
- Go to the Transitions tab in the Ribbon
- In the Transitions to This Slide area, click on the dropdown arrow to view your options
- Select the transition you want
To adjust the settings of the transition, explore the options in the Timing area of the Transitions tab.
You can also add the same transition to multiple slides. To do that, select them in the Slides Pane and apply the transition.
E. How to preview a transition in PowerPoint

There are three ways to preview your PowerPoint transitions (just like your animations):
- Click on the Preview button in the Transitions tab
- Click on the little star beneath the slide number in the thumbnail view
Note: In 2016, PowerPoint added a cool new transition, called Morph. It operates a bit differently from other transitions. For a detailed tutorial on how to use the cool Morph transition, see our step-by-step article here .
Save Your PowerPoint Presentation
After you’ve built your presentation and made all the adjustments to your slides, you’ll want to save your presentation. YOu can do this several different ways.

To save a PowerPoint presentation using your Ribbon, simply:
- Navigate to the File tab
- Select Save As on the left
- Choose where you want to save your presentation
- Name your presentation and/or adjust your file type settings
- Click Save
You can alternatively use the Ctrl+S keyboard shortcut to save your presentation. I recommend using this shortcut frequently as you build your presentation to make sure you don’t lose any of your work.

This is the standard way to save a presentation. However, there may be a situation where you want to save your presentation as a different file type.
To learn how to save your presentation as a PDF, see our guide on converting PowerPoint to a PDF .
How to save your PowerPoint presentation as a template
Once you’ve created a presentation that you like, you may want to turn it into a template. The easiest – but not technically correct – way, is to simply create a copy of your current presentation and then change the content.
But be careful! A PowerPoint template is a special type of document and it has its own parameters and behaviors.
If you’re interested in learning about how to create your own PowerPoint template from scratch, see our guide on how to create a PowerPoint template .
Printing Your PowerPoint Presentation
After finishing your PowerPoint presentation, you may want to print it out on paper. Printing your slides is relatively easy.

To open the Print dialog box, you can either:
- Hit Ctrl+P on your keyboard
- Or go to the Ribbon and click on File and then Print

Inside the Print dialog box, you can choose from the various printing settings:
- Printer: Select a printer to use (or print to PDF or OneNote)
- Slides: Choose which slides you want to print
- Layout: Determine how many slides you want per page (this is where you can print the notes, outline, and handouts)
- Collated or uncollated (learn what collated printing means here )
- Color: Choose to print in color, grayscale or black & white
There are many more options for printing your PowerPoint presentations. Here are links to more in-depth articles:
- How to print multiple slides per page
- How to print your speaker notes in PowerPoint
- How to save PowerPoint as a picture presentation
So that’s how to create a PowerPoint presentation if you are brand new to it. We’ve also included a ton of links to helpful resources to boost your PowerPoint skills further.
When you are creating your presentation, it is critical to first focus on the content (what you are trying to say) before getting lost inserting and playing with elements. The clearer you are on what you want to present, the easier it will be to build it out in PowerPoint.
If you enjoyed this article, you can learn more about our PowerPoint training courses and other presentation resources by visiting us here .
🔒 Unlock the PowerPoint Shortcuts Trusted by Industry Leaders KKR, American Express, HSBC, and More!
Join over 114,880 professionals from diverse fields including consulting, investment banking, advertising, marketing, sales, and business development who have supercharged their PowerPoint game with our proven methods.
✅ Customize compelling presentations effortlessly.
✅ Master time-saving techniques for faster deck creation.
✅ Boost your career prospects with top-notch PowerPoint skills.
Get FREE access to the Critical PowerPoint Shortcuts module of our premium training course by entering your name and email below.
DISCLAIMER: PC Users Only!
We respect your privacy and will keep your info safe and confidential.
About The Author
Popular Tutorials
- How to Strikethrough Text (l̶i̶k̶e̶ ̶t̶h̶i̶s̶) in Word, Excel & PowerPoint
- How to Make Animated Fireworks in PowerPoint (Step-by-Step)
- Strikethrough Shortcut (l̶i̶k̶e̶ ̶t̶h̶i̶s̶) for Word, Excel & PowerPoint
- How to Create a Flash Card Memory Game in PowerPoint (Like Jeopardy)
- Keyboard Shortcuts Not Working: Solved
PowerPoint Tutorial Categories
- Strategies & Opinions
- Shortcuts & Hacks
- Pictures, Icons, Videos, Etc.
- New Features
- Miscellaneous
- Charts & Data Viz
We help busy professionals save hours and gain peace of mind, with corporate workshops, self-paced courses and tutorials for PowerPoint and Word.
Work With Us
- Corporate Training
- Presentation & Template Design
- Courses & Downloads
- PowerPoint Articles
- Word Articles
- Productivity Resources
Find a Tutorial
- Free Training
- For Businesses
We help busy office workers save hours and gain peace of mind, with tips, training and tutorials for Microsoft PowerPoint and Word.
Master Critical PowerPoint Shortcuts – Secure Your FREE Training Module and Save Valuable Time!
⌛ Master time-saving expert techniques.
🔥 Create powerful presentations.
🚀 Propel your career to new heights.
We value your privacy – we keep your info safe.
Discover PowerPoint Hacks Loved by Industry Giants - KKR, AmEx, HSBC!
Over 114,880 professionals in finance, marketing and sales have revolutionized their PPT skills with our proven methods.
Gain FREE access to a full module of our premium PowerPoint training program – Get started today!
We hate spam too and promise to keep your information safe.
You are currently viewing a placeholder content from Facebook . To access the actual content, click the button below. Please note that doing so will share data with third-party providers.

Microsoft 365 Basic now includes ransomware protection for your files and photos at no extra cost.

Use Word, Excel, PowerPoint and more for free on the web
Office is now Microsoft 365
Get the free Microsoft 365 mobile app*
Start using Microsoft 365 today

Anywhere access
Whether you’re at work or on the go, create your best work on your favorite browser.
Familiar experience
The familiar Microsoft 365 experience you know and trust, so there’s nothing new to learn.
Work with anyone
Share your documents with anyone and work together in real-time.
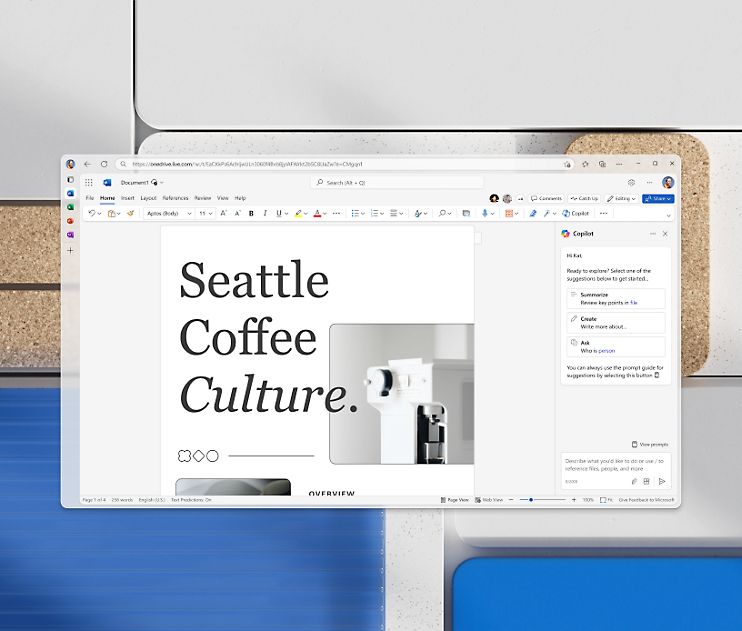
Word for the web
Craft great-looking resumes, newsletters, and documents while inviting others to review and coauthor in real time. Plus, access free Word templates, formatting tools for APA, MLA, and Chicago style, and add functionality with free add-ins.
Excel for the web
Organize your data in familiar spreadsheets and workbooks, with all changes saved automatically. Create modern visuals that turn numbers into valuable insights. Work together in real time knowing that everyone is on the same page.
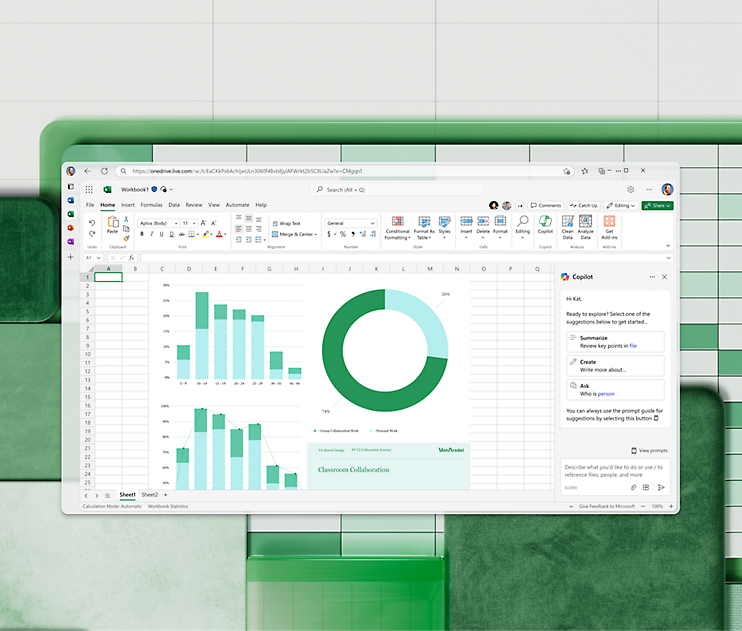
PowerPoint for the web
Turn your ideas into compelling presentations using professional-looking templates. Use animations, transitions, photos, and videos to tell one-of-a-kind stories. Co-author team presentations at the same time, from anywhere.
Start now at Microsoft365.com
No installation required. It's free.
* Availability of mobile apps varies by country/region.
Follow Microsoft 365
- Chat with sales
- Contact sales
Available M-F 9 AM to 6 PM.
How-To Geek
6 ways to create more interactive powerpoint presentations.
Engage your audience with cool, actionable features.
Quick Links
- Add a QR code
- Embed Microsoft Forms (Education or Business Only)
- Embed a Live Web Page
- Add Links and Menus
- Add Clickable Images to Give More Info
- Add a Countdown Timer
We've all been to a presentation where the speaker bores you to death with a mundane PowerPoint presentation. Actually, the speaker could have kept you much more engaged by adding some interactive features to their slideshow. Let's look into some of these options.
1. Add a QR code
Adding a QR code can be particularly useful if you want to direct your audience to an online form, website, or video.
Some websites have in-built ways to create a QR code. For example, on Microsoft Forms , when you click "Collect Responses," you'll see the QR code option via the icon highlighted in the screenshot below. You can either right-click the QR code to copy and paste it into your presentation, or click "Download" to add it to your device gallery to insert the QR code as a picture.
In fact, you can easily add a QR code to take your viewer to any website. On Microsoft Edge, right-click anywhere on a web page where there isn't already a link, and left-click "Create QR Code For This Page."
You can also create QR codes in other browsers, such as Chrome.
You can then copy or download the QR code to use wherever you like in your presentation.
2. Embed Microsoft Forms (Education or Business Only)
If you plan to send your PPT presentation to others—for example, if you're a trainer sending step-by-step instruction presentation, a teacher sending an independent learning task to your students, or a campaigner for your local councilor sending a persuasive PPT to constituents—you might want to embed a quiz, questionnaire, pole, or feedback survey in your presentation.
In PowerPoint, open the "Insert" tab on the ribbon, and in the Forms group, click "Forms". If you cannot see this option, you can add new buttons to the ribbon .
As at April 2024, this feature is only available for those using their work or school account. We're using a Microsoft 365 Personal account in the screenshot below, which is why the Forms icon is grayed out.
Then, a sidebar will appear on the right-hand side of your screen, where you can either choose a form you have already created or opt to craft a new form.
Now, you can share your PPT presentation with others , who can click the fields and submit their responses when they view the presentation.
3. Embed a Live Web Page
You could always screenshot a web page and paste that into your PPT, but that's not a very interactive addition to your presentation. Instead, you can embed a live web page into your PPT so that people with access to your presentation can interact actively with its contents.
To do this, we will need to add an add-in to our PPT account .
Add-ins are not always reliable or secure. Before installing an add-in to your Microsoft account, check that the author is a reputable company, and type the add-in's name into a search engine to read reviews and other users' experiences.
To embed a web page, add the Web Viewer add-in ( this is an add-in created by Microsoft ).
Go to the relevant slide and open the Web Viewer add-in. Then, copy and paste the secure URL into the field box, and remove https:// from the start of the address. In our example, we will add a selector wheel to our slide. Click "Preview" to see a sample of the web page's appearance in your presentation.
This is how ours will look.
When you or someone with access to your presentation views the slideshow, this web page will be live and interactive.
4. Add Links and Menus
As well as moving from one slide to the next through a keyboard action or mouse click, you can create links within your presentation to direct the audience to specific locations.
To create a link, right-click the outline of the clickable object, and click "Link."
In the Insert Hyperlink dialog box, click "Place In This Document," choose the landing destination, and click "OK."
What's more, to make it clear that an object is clickable, you can use action buttons. Open the "Insert" tab on the ribbon, click "Shape," and then choose an appropriate action button. Usefully, PPT will automatically prompt you to add a link to these shapes.
You might also want a menu that displays on every slide. Once you have created the menu, add the links using the method outlined above. Then, select all the items, press Ctrl+C (copy), and then use Ctrl+V to paste them in your other slides.
5. Add Clickable Images to Give More Info
Through PowerPoint's animations, you can give your viewer the power to choose what they see and when they see it. This works nicely whether you're planning to send your presentation to others to run through independently or whether you're presenting in front of a group and want your audience to decide which action they want to take.
Start by creating the objects that will be clickable (trigger) and the items that will appear (pop-up).
Then, select all the pop-ups together. When you click "Animations" on the ribbon and choose an appropriate animation for the effect you want to achieve, this will be applied to all objects you have selected.
The next step is to rename the triggers in your presentation. To do this, open the "Home" tab, and in the Editing group, click "Select", and then "Selection Pane."
With the Selection Pane open, select each trigger on your slide individually, and rename them in the Selection Pane, so that they can be easily linked to in the next step.
Finally, go back to the first pop-up. Open the "Animations" tab, and in the Advanced Animation group, click the "Trigger" drop-down arrow. Then, you can set the item to appear when a trigger is clicked in your presentation.
If you want your item to disappear when the trigger is clicked again, select the pop-up, click "Add Animation" in the Advanced Animation group, choose an Exit animation, and follow the same step to link that animation to the trigger button.
6. Add a Countdown Timer
A great way to get your audience to engage with your PPT presentation is to keep them on edge by adding a countdown timer. Whether you're leading a presentation and want to let your audience stop to discuss a topic, or running an online quiz with time-limit questions, having a countdown timer means your audience will keep their eye on your slide throughout.
To do this, you need to animate text boxes or shapes containing your countdown numbers. Choose and format a shape and type the highest number that your countdown clock will need. In our case, we're creating a 10-second timer.
Now, with your shape selected, open the "Animations" tab on the ribbon and click the animation drop-down arrow. Then, in the Exit menu, click "Disappear."
Open the Animation Pane, and click the drop-down arrow next to the animation you've just added. From there, choose "Timing."
Make sure "On Click" is selected in the Start menu, and change the Delay option to "1 second," before clicking "OK."
Then, with this shape still selected, press Ctrl+C (copy), and then Ctrl+V (paste). In the second box, type 9 . With the Animation Pane still open and this second shape selected, click the drop-down arrow and choose "Timing" again. Change the Start option to "After Previous," and make sure the Delay option is 1 second. Then, click "OK."
We can now use this second shape as our template, as when we copy and paste it again, the animations will also duplicate. With this second shape selected, press Ctrl+C and Ctrl+V, type 8 into the box, and continue to do the same until you get to 0 .
Next, remove the animations from the "0" box, as you don't want this to disappear. To do this, click the shape, and in the Animation Pane drop-down, click "Remove."
You now need to layer them in order. Right-click the box containing number 1, and click "Bring To Front." You will now see that box on the top. Do the same with the other numbers in ascending order.
Finally, you need to align the objects together. Click anywhere on your slide and press Ctrl+A. Then, in the Home tab on the ribbon, click "Arrange." First click "Align Center," and then bring the menu up again, so that you can click "Align Middle."
Press Ctrl+A again to select your timer, and you can then move your timer or copy and paste it elsewhere.
Press F5 to see the presentation in action, and when you get to the slide containing the timer, click anywhere on the slide to see your countdown timer in action!
Now that your PPT presentation is more interactive, make sure you've avoided these eight common presentational mistakes before you present your slides.
- What is PowerPoint? Video
- Create a presentation Video
- Choose the right view for the task Video
- Add and format text Video

Create a presentation

Create a presentation from scratch, or from a theme. All themes have a palate of colors and fonts designed to work together.
Create a blank presentation
Open PowerPoint.
Select one of the Blank Presentation and start typing.
Note: Microsoft 365 subscribers will find Design Ideas based on the words you type. You can browse and select a new look.
Create a presentation from a theme
Select File > New .
Double-click a theme in the gallery to create a presentation in that theme. Or search for more templates.
Apply or change a slide layout
Apply a template to your presentation
Create and save a PowerPoint template
Get Microsoft presentation templates

Need more help?
Want more options.
Explore subscription benefits, browse training courses, learn how to secure your device, and more.

Microsoft 365 subscription benefits

Microsoft 365 training

Microsoft security

Accessibility center
Communities help you ask and answer questions, give feedback, and hear from experts with rich knowledge.

Ask the Microsoft Community

Microsoft Tech Community

Windows Insiders
Microsoft 365 Insiders
Was this information helpful?
Thank you for your feedback.
Got any suggestions?
We want to hear from you! Send us a message and help improve Slidesgo
Top searches
Trending searches

memorial day
12 templates

21 templates

summer vacation
23 templates

17 templates
20 templates

11 templates
School Presentation templates
Use the best school powerpoint templates and google slides themes to engage your students and educators with your presentations. all slide designs are easy to edit and 100% free to use..

Premium template
Unlock this template and gain unlimited access
Project Evaluation in Pre-K and Elementary
Download the "Project Evaluation in Pre-K and Elementary" presentation for PowerPoint or Google Slides and prepare to receive useful information. Even though teachers are responsible for disseminating knowledge to their students, they also embarked on a learning journey since the day they decided to dedicate themselves to education. You might...

Elementary Activities to Celebrate National Poetry Month
Download the "Elementary Activities to Celebrate National Poetry Month" presentation for PowerPoint or Google Slides and easily edit it to fit your own lesson plan! Designed specifically for elementary school education, this eye-catching design features engaging graphics and age-appropriate fonts; elements that capture the students' attention and make the learning...
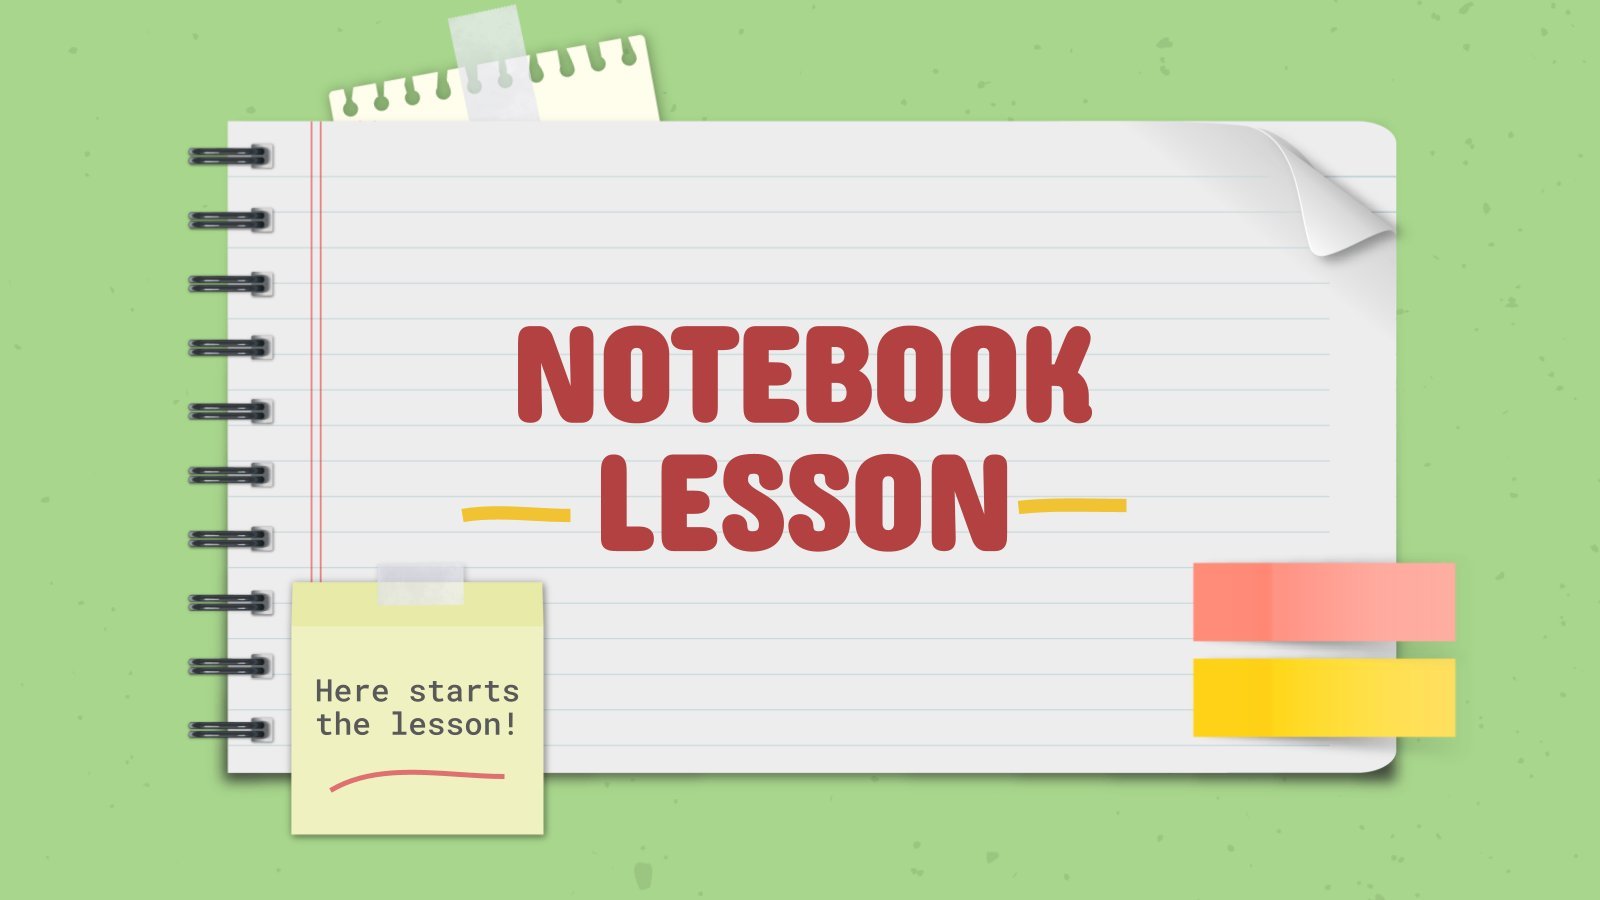
Notebook Lesson
These are the last days before the Summer break! We know that there are some pending lessons that you need to prepare for your students. As they may be thinking about their friends and their holidays, catch their attention with this cool template!

Ballpoint Pen Planner
The ballpoint pen is considered one of the most important inventions of history. Did you know that Ladislao Biro, its inventor, got the idea from a group of children that were playing in the street? They were rolling a ball trough a puddle, and it would leave a trace. That...

Dividing Integers
Download the "Dividing Integers" presentation for PowerPoint or Google Slides and teach with confidence. Sometimes, teachers need a little bit of help, and there's nothing wrong with that. We're glad to lend you a hand! Since Slidesgo is committed to making education better for everyone, we've joined hands with educators....
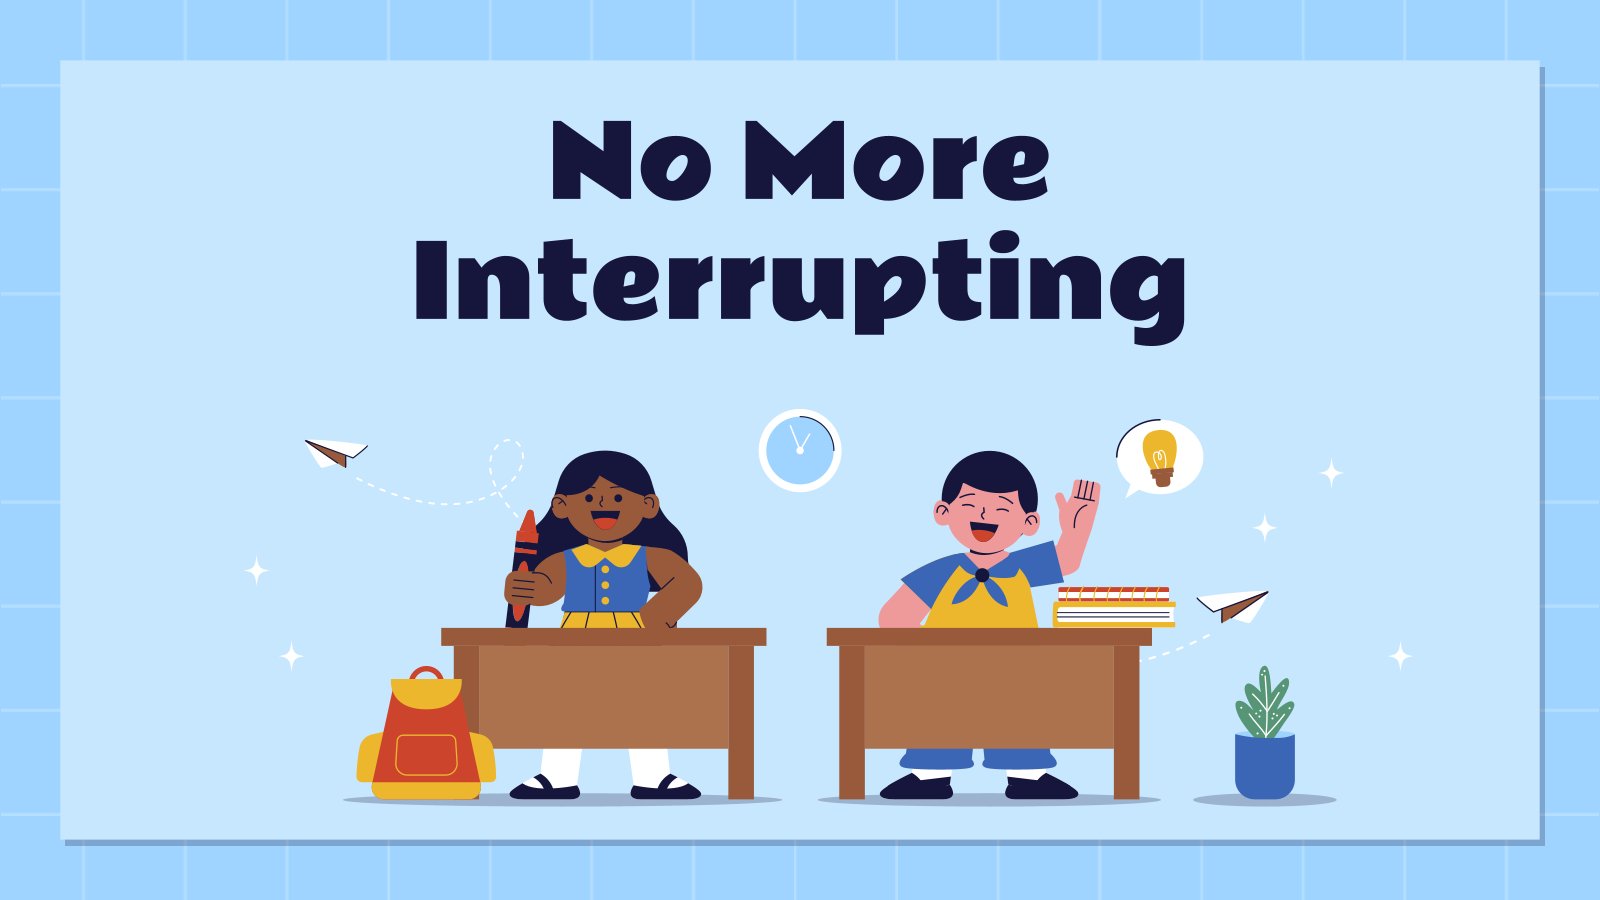
No More Interrupting
Download the "No More Interrupting" presentation for PowerPoint or Google Slides and teach with confidence. Sometimes, teachers need a little bit of help, and there's nothing wrong with that. We're glad to lend you a hand! Since Slidesgo is committed to making education better for everyone, we've joined hands with...

Team Building Class for Elementary
Your students spend most of their days at school, so building a good atmosphere in the class is vital for their happiness. Why don’t you dedicate a day to team building activities? This will help new students make friends and older students create deeper relationships with their classmates. It that...

Pretty Aesthetic Notes for School
You've seen many notebooks. Now, you'll see the ultimate one! Well, we may be exaggerating a bit, but we're very proud of the aesthetics of this new template! Each slide looks like a page of a notebook, complete with doodles, some stickers and a handwritten font for the titles. It's...

World Health Day Activities for Middle School
Download the "World Health Day Activities for Middle School" presentation for PowerPoint or Google Slides. If you’re looking for a way to motivate and engage students who are undergoing significant physical, social, and emotional development, then you can’t go wrong with an educational template designed for Middle School by Slidesgo!...

Ideas for Incorporating Movement in the Classroom
Download the "Ideas for Incorporating Movement in the Classroom" presentation for PowerPoint or Google Slides and teach with confidence. Sometimes, teachers need a little bit of help, and there's nothing wrong with that. We're glad to lend you a hand! Since Slidesgo is committed to making education better for everyone,...

Multiplying Integers
Download the "Multiplying Integers" presentation for PowerPoint or Google Slides and teach with confidence. Sometimes, teachers need a little bit of help, and there's nothing wrong with that. We're glad to lend you a hand! Since Slidesgo is committed to making education better for everyone, we've joined hands with educators....

Music Record Studio
Download the Music Record Studio presentation for PowerPoint or Google Slides. Are you looking for a way to make your school or academy stand out among the competition? This template is designed to showcase all the fantastic aspects of your center. With perfect slides that allow you to easily add...

Middle School Activities to Celebrate National Poetry Month
Download the "Middle School Activities to Celebrate National Poetry Month" presentation for PowerPoint or Google Slides. If you’re looking for a way to motivate and engage students who are undergoing significant physical, social, and emotional development, then you can’t go wrong with an educational template designed for Middle School by...

Salsa Academy
Download the Salsa Academy presentation for PowerPoint or Google Slides. Are you looking for a way to make your school or academy stand out among the competition? This template is designed to showcase all the fantastic aspects of your center. With perfect slides that allow you to easily add information...

Elegant Education Pack for Students
The way in which we study has changed drastically in the last year, that's why we need to be more organized than ever. In Slidesgo we want to help your students and have designed this elegant template full of resources for your classes. We added everything you could possibly ask...

Science Subject for Elementary: Human Digestive System
Download the Science Subject for Elementary: Human Digestive System presentation for PowerPoint or Google Slides and easily edit it to fit your own lesson plan! Designed specifically for elementary school education, this eye-catching design features engaging graphics and age-appropriate fonts; elements that capture the students' attention and make the learning...

World Art Day Activities for Elementary
Download the "World Art Day Activities for Elementary" presentation for PowerPoint or Google Slides and easily edit it to fit your own lesson plan! Designed specifically for elementary school education, this eye-catching design features engaging graphics and age-appropriate fonts; elements that capture the students' attention and make the learning experience...

Meet Our Professors
The beginning of the school year is always synonymous with nerves for teachers and students. To break the ice, why not introduce your professors in a different way? We propose you this original template with a dark background and abstract and colorful shapes. It features doodle-style illustrations related to teaching,...
- Page 1 of 157
New! Make quick presentations with AI
Slidesgo AI presentation maker puts the power of design and creativity in your hands, so you can effortlessly craft stunning slideshows in minutes.

Register for free and start editing online
- Weird But True
- Sex & Relationships
- Viral Trends
- Human Interest
- Fashion & Beauty
- Food & Drink
trending now in Lifestyle

TikTokker reveals little-known detail in the 7-Eleven logo: 'How...

Dear Abby: I spent a decade faithful to my wife just to find she...

My husband said he wants to divorce because I breastfed my son:...

Brazen couple has sex romp in packed NYC park in full view of...

I caught my dad watching my OnlyFans and that's not even the...

Dear Abby: My husband is ungrateful and his behavior makes me...

Space laser transmission strikes Earth from 140 million miles...

School hopes to reverse Gen Z's bad habits with 12-hour days:...
Breaking news, gen z thinks the best kind of party is to make powerpoint presentations together.
- View Author Archive
- Email the Author
- Follow on Twitter
- Get author RSS feed
Contact The Author
Thanks for contacting us. We've received your submission.
Thanks for contacting us. We've received your submission.
PowerPoints are all the rager.
Gen Z’s idea of “work-life balance” was stifled during the COVID-19 lockdown — and now their parties even feature PowerPoint presentations.
A PowerPoint party is pretty self-explanatory: People get together and show each other PP presentations on a topic of their choosing for “fun.”
The, um, point is for friends to get to know each other’s silly, niche interests and funny thoughts.

The get-togethers rose in popularity during the pandemic, but they’re still a big hit among Gen Z today — despite utilizing something seen regularly in corporate environments.
Searching for PowerPoint parties on TikTok will bring up an endless stream of examples, with topics including A-list actor Pedro Pascal , “ Things that give me the ick ” and a meta presentation of “guessing what PowerPoint everyone prepared.”
It’s such a common occurrence that Cosmopolitan even put out a list of “55 PowerPoint Night Ideas to Spice Up Your Next at-Home Hang.” Some examples include Disney Channel movie supremacy, the most iconic set of twins in history, and the best chain restaurant and why.
People tend to be quite split on whether they find PowerPoint parties fun.

McCall Mirabella told CNN that she asked all her friends to prepare a PowerPoint for her recent 21st birthday celebration — and she loved it.
“They’re so unserious,” she told the outlet of PP nights she’s attended and hosted. “Most of the time, people are left crying from laughing so hard, or bent over wheezing.”
Others disagree, thinking we should leave the PowerPoints in the office — and not bring them into the home.
“I love my friends, and also I absolutely do not want to do this with any of them,” Emily Stewart of Business Insider wrote about the “weird” craze. “Must we turn something we do at work into something we do in our personal lives? Just hanging out without a plan is fine and pleasant.”
Why Gen Z is so infatuated with PowerPoints as a fun pastime isn’t exactly clear.
Perhaps their work and personal lives are blurred due to remote work, or maybe they’re just used to interacting via technology rather than in person.
Share this article:

COMMENTS
And when you need more functionality, you can work on the presentation together in the PowerPoint desktop app and all of your changes will be saved online. To convert your Google Slides to PowerPoint, go to File > Download > Microsoft PowerPoint (.pptx). Then open the file in PowerPoint. See more at Get started with Sheets.
Create a New Presentation with PowerPoint for the Web. Click Create or use a PowerPoint template from the options to create a new PowerPoint presentation. You can start with a specific theme or use a blank template. You can also browse through themes via Office.com to find one that best suits your needs.
Easily edit Microsoft PowerPoint presentations online without converting them, and layer on Slides' enhanced collaborative and assistive features like comments, action items, and Smart Compose. ...
Select a template or open an existing presentation to open it in PowerPoint Online. With a similar design to recent versions of PowerPoint for Mac and Windows, you'll find the core text and design tools on the main Home tab, options to add images and embedded videos and tables in the Insert tab, slide and template options in the Design tab, animations in the Transitions and Animations tab ...
To create presentations online, start with creating an account so that you can save your PPTX file online. 2. Save Your Presentation to OneDrive. At this point, your path to creating the best online PowerPoint presentation depends on whether you've already created a presentation. Here's how to move forward:
Free online presentation maker. Try our new tool to edit this selection of templates for people that want to let their creativity run free. Create interactive resources easily, quickly and without the need for any software. A really useful tool for teachers and students. Move the content, add images, change colors and fonts or, if you prefer ...
Microsoft PowerPoint is a presentation design software that is part of Microsoft 365. This software allows you to design presentations by combining text, images, graphics, video, and animation on slides in a simple and intuitive way. Over time, PowerPoint has evolved and improved its accessibility to users.
In PowerPoint, you can create a presentation from scratch, or from a theme with built-in graphics, fonts, and placeholders for your text, images, and content...
To do that, simply go up to the Home tab and click on New Slide. This inserts a new slide in your presentation right after the one you were on. You can alternatively hit Ctrl+M on your keyboard to insert a new blank slide in PowerPoint. To learn more about this shortcut, see my guide on using Ctrl+M in PowerPoint.
Learn everything you need to know to get started using Microsoft PowerPoint! You'll learn all the basics plus more, including: how to choose a design theme...
PowerPoint for the web. Turn your ideas into compelling presentations using professional-looking templates. Use animations, transitions, photos, and videos to tell one-of-a-kind stories. Co-author team presentations at the same time, from anywhere. Start using PowerPoint for free Learn more about PowerPoint.
Turn your ideas into compelling presentations using professional-looking templates. Use animations, transitions, photos, and videos to tell one-of-a-kind stories. Co-author team presentations at the same time, from anywhere.
Click the upload button next to Create to import your PPTX file. Select your Powerpoint file (PPTX) from your computer and import it into Visme. Your presentation will now appear in your dashboard for you to jump in and make changes right inside Visme. Add photos, vector icons, new text blocks, animations and more until your PowerPoint is complete.
While PowerPoint long dominated the presentation industry, Visme's free online presentation maker allows you to create even more beautiful and engaging content. With Visme's engaging presentation maker, you can start with a template, dive into one of our themes with various slide ideas, or mix and match slides from different templates to ...
Save and present. Save and download your presentation as PNG, JPEG, PDF, or PPTX files. Share your work with colleagues and collaborate in real-time. Present confidently with "standard" or "presenter view" presentation modes. Create your own stunning presentation design for free with Canva's impressively easy to use online presentation ...
Then, with this shape still selected, press Ctrl+C (copy), and then Ctrl+V (paste). In the second box, type 9. With the Animation Pane still open and this second shape selected, click the drop-down arrow and choose "Timing" again. Change the Start option to "After Previous," and make sure the Delay option is 1 second.
Here's how: Open Microsoft365.com on your preferred browser. Click on Sign up for the free version of Office option under the Sign in button. Log in with your Microsoft account. Select the ...
Create a presentation from a theme. Select File > New. Double-click a theme in the gallery to create a presentation in that theme. Or search for more templates.
AI presentation maker. When lack of inspiration or time constraints are something you're worried about, it's a good idea to seek help. Slidesgo comes to the rescue with its latest functionality—the AI presentation maker! With a few clicks, you'll have wonderful slideshows that suit your own needs. And it's totally free!
Download the Anatomy Poster for High School presentation for PowerPoint or Google Slides. High school students are approaching adulthood, and therefore, this template's design reflects the mature nature of their education. Customize the well-defined sections, integrate multimedia and interactive elements and allow space for research or group ...
Searching for PowerPoint parties on TikTok will bring up an endless stream of examples, with topics including A-list actor Pedro Pascal, "Things that give me the ick" and a meta presentation ...
people make decisions, can be different depending on the context and how people are used to working within a particular environment. If these different meanings and expectations are conflated and confused, they can act as a barrier to appropriate information sharing when decisions have to be made about sharing information for safeguarding purpose.