

Tips for creating and delivering an effective presentation
In this article.
Creating an effective presentation
Delivering an effective presentation
Tips for creating an effective presentation
Top of Page
Tips for delivering an effective presentation

Need more help?
Want more options.
Explore subscription benefits, browse training courses, learn how to secure your device, and more.

Microsoft 365 subscription benefits

Microsoft 365 training

Microsoft security

Accessibility center
Communities help you ask and answer questions, give feedback, and hear from experts with rich knowledge.

Ask the Microsoft Community

Microsoft Tech Community

Windows Insiders
Microsoft 365 Insiders
Was this information helpful?
Thank you for your feedback.

An official website of the United States government
The .gov means it’s official. Federal government websites often end in .gov or .mil. Before sharing sensitive information, make sure you’re on a federal government site.
The site is secure. The https:// ensures that you are connecting to the official website and that any information you provide is encrypted and transmitted securely.
- Publications
- Account settings
Preview improvements coming to the PMC website in October 2024. Learn More or Try it out now .
- Advanced Search
- Journal List
- PLoS Comput Biol
- v.17(12); 2021 Dec
Ten simple rules for effective presentation slides
Kristen m. naegle.
Biomedical Engineering and the Center for Public Health Genomics, University of Virginia, Charlottesville, Virginia, United States of America
Introduction
The “presentation slide” is the building block of all academic presentations, whether they are journal clubs, thesis committee meetings, short conference talks, or hour-long seminars. A slide is a single page projected on a screen, usually built on the premise of a title, body, and figures or tables and includes both what is shown and what is spoken about that slide. Multiple slides are strung together to tell the larger story of the presentation. While there have been excellent 10 simple rules on giving entire presentations [ 1 , 2 ], there was an absence in the fine details of how to design a slide for optimal effect—such as the design elements that allow slides to convey meaningful information, to keep the audience engaged and informed, and to deliver the information intended and in the time frame allowed. As all research presentations seek to teach, effective slide design borrows from the same principles as effective teaching, including the consideration of cognitive processing your audience is relying on to organize, process, and retain information. This is written for anyone who needs to prepare slides from any length scale and for most purposes of conveying research to broad audiences. The rules are broken into 3 primary areas. Rules 1 to 5 are about optimizing the scope of each slide. Rules 6 to 8 are about principles around designing elements of the slide. Rules 9 to 10 are about preparing for your presentation, with the slides as the central focus of that preparation.
Rule 1: Include only one idea per slide
Each slide should have one central objective to deliver—the main idea or question [ 3 – 5 ]. Often, this means breaking complex ideas down into manageable pieces (see Fig 1 , where “background” information has been split into 2 key concepts). In another example, if you are presenting a complex computational approach in a large flow diagram, introduce it in smaller units, building it up until you finish with the entire diagram. The progressive buildup of complex information means that audiences are prepared to understand the whole picture, once you have dedicated time to each of the parts. You can accomplish the buildup of components in several ways—for example, using presentation software to cover/uncover information. Personally, I choose to create separate slides for each piece of information content I introduce—where the final slide has the entire diagram, and I use cropping or a cover on duplicated slides that come before to hide what I’m not yet ready to include. I use this method in order to ensure that each slide in my deck truly presents one specific idea (the new content) and the amount of the new information on that slide can be described in 1 minute (Rule 2), but it comes with the trade-off—a change to the format of one of the slides in the series often means changes to all slides.

Top left: A background slide that describes the background material on a project from my lab. The slide was created using a PowerPoint Design Template, which had to be modified to increase default text sizes for this figure (i.e., the default text sizes are even worse than shown here). Bottom row: The 2 new slides that break up the content into 2 explicit ideas about the background, using a central graphic. In the first slide, the graphic is an explicit example of the SH2 domain of PI3-kinase interacting with a phosphorylation site (Y754) on the PDGFR to describe the important details of what an SH2 domain and phosphotyrosine ligand are and how they interact. I use that same graphic in the second slide to generalize all binding events and include redundant text to drive home the central message (a lot of possible interactions might occur in the human proteome, more than we can currently measure). Top right highlights which rules were used to move from the original slide to the new slide. Specific changes as highlighted by Rule 7 include increasing contrast by changing the background color, increasing font size, changing to sans serif fonts, and removing all capital text and underlining (using bold to draw attention). PDGFR, platelet-derived growth factor receptor.
Rule 2: Spend only 1 minute per slide
When you present your slide in the talk, it should take 1 minute or less to discuss. This rule is really helpful for planning purposes—a 20-minute presentation should have somewhere around 20 slides. Also, frequently giving your audience new information to feast on helps keep them engaged. During practice, if you find yourself spending more than a minute on a slide, there’s too much for that one slide—it’s time to break up the content into multiple slides or even remove information that is not wholly central to the story you are trying to tell. Reduce, reduce, reduce, until you get to a single message, clearly described, which takes less than 1 minute to present.
Rule 3: Make use of your heading
When each slide conveys only one message, use the heading of that slide to write exactly the message you are trying to deliver. Instead of titling the slide “Results,” try “CTNND1 is central to metastasis” or “False-positive rates are highly sample specific.” Use this landmark signpost to ensure that all the content on that slide is related exactly to the heading and only the heading. Think of the slide heading as the introductory or concluding sentence of a paragraph and the slide content the rest of the paragraph that supports the main point of the paragraph. An audience member should be able to follow along with you in the “paragraph” and come to the same conclusion sentence as your header at the end of the slide.
Rule 4: Include only essential points
While you are speaking, audience members’ eyes and minds will be wandering over your slide. If you have a comment, detail, or figure on a slide, have a plan to explicitly identify and talk about it. If you don’t think it’s important enough to spend time on, then don’t have it on your slide. This is especially important when faculty are present. I often tell students that thesis committee members are like cats: If you put a shiny bauble in front of them, they’ll go after it. Be sure to only put the shiny baubles on slides that you want them to focus on. Putting together a thesis meeting for only faculty is really an exercise in herding cats (if you have cats, you know this is no easy feat). Clear and concise slide design will go a long way in helping you corral those easily distracted faculty members.
Rule 5: Give credit, where credit is due
An exception to Rule 4 is to include proper citations or references to work on your slide. When adding citations, names of other researchers, or other types of credit, use a consistent style and method for adding this information to your slides. Your audience will then be able to easily partition this information from the other content. A common mistake people make is to think “I’ll add that reference later,” but I highly recommend you put the proper reference on the slide at the time you make it, before you forget where it came from. Finally, in certain kinds of presentations, credits can make it clear who did the work. For the faculty members heading labs, it is an effective way to connect your audience with the personnel in the lab who did the work, which is a great career booster for that person. For graduate students, it is an effective way to delineate your contribution to the work, especially in meetings where the goal is to establish your credentials for meeting the rigors of a PhD checkpoint.
Rule 6: Use graphics effectively
As a rule, you should almost never have slides that only contain text. Build your slides around good visualizations. It is a visual presentation after all, and as they say, a picture is worth a thousand words. However, on the flip side, don’t muddy the point of the slide by putting too many complex graphics on a single slide. A multipanel figure that you might include in a manuscript should often be broken into 1 panel per slide (see Rule 1 ). One way to ensure that you use the graphics effectively is to make a point to introduce the figure and its elements to the audience verbally, especially for data figures. For example, you might say the following: “This graph here shows the measured false-positive rate for an experiment and each point is a replicate of the experiment, the graph demonstrates …” If you have put too much on one slide to present in 1 minute (see Rule 2 ), then the complexity or number of the visualizations is too much for just one slide.
Rule 7: Design to avoid cognitive overload
The type of slide elements, the number of them, and how you present them all impact the ability for the audience to intake, organize, and remember the content. For example, a frequent mistake in slide design is to include full sentences, but reading and verbal processing use the same cognitive channels—therefore, an audience member can either read the slide, listen to you, or do some part of both (each poorly), as a result of cognitive overload [ 4 ]. The visual channel is separate, allowing images/videos to be processed with auditory information without cognitive overload [ 6 ] (Rule 6). As presentations are an exercise in listening, and not reading, do what you can to optimize the ability of the audience to listen. Use words sparingly as “guide posts” to you and the audience about major points of the slide. In fact, you can add short text fragments, redundant with the verbal component of the presentation, which has been shown to improve retention [ 7 ] (see Fig 1 for an example of redundant text that avoids cognitive overload). Be careful in the selection of a slide template to minimize accidentally adding elements that the audience must process, but are unimportant. David JP Phillips argues (and effectively demonstrates in his TEDx talk [ 5 ]) that the human brain can easily interpret 6 elements and more than that requires a 500% increase in human cognition load—so keep the total number of elements on the slide to 6 or less. Finally, in addition to the use of short text, white space, and the effective use of graphics/images, you can improve ease of cognitive processing further by considering color choices and font type and size. Here are a few suggestions for improving the experience for your audience, highlighting the importance of these elements for some specific groups:
- Use high contrast colors and simple backgrounds with low to no color—for persons with dyslexia or visual impairment.
- Use sans serif fonts and large font sizes (including figure legends), avoid italics, underlining (use bold font instead for emphasis), and all capital letters—for persons with dyslexia or visual impairment [ 8 ].
- Use color combinations and palettes that can be understood by those with different forms of color blindness [ 9 ]. There are excellent tools available to identify colors to use and ways to simulate your presentation or figures as they might be seen by a person with color blindness (easily found by a web search).
- In this increasing world of virtual presentation tools, consider practicing your talk with a closed captioning system capture your words. Use this to identify how to improve your speaking pace, volume, and annunciation to improve understanding by all members of your audience, but especially those with a hearing impairment.
Rule 8: Design the slide so that a distracted person gets the main takeaway
It is very difficult to stay focused on a presentation, especially if it is long or if it is part of a longer series of talks at a conference. Audience members may get distracted by an important email, or they may start dreaming of lunch. So, it’s important to look at your slide and ask “If they heard nothing I said, will they understand the key concept of this slide?” The other rules are set up to help with this, including clarity of the single point of the slide (Rule 1), titling it with a major conclusion (Rule 3), and the use of figures (Rule 6) and short text redundant to your verbal description (Rule 7). However, with each slide, step back and ask whether its main conclusion is conveyed, even if someone didn’t hear your accompanying dialog. Importantly, ask if the information on the slide is at the right level of abstraction. For example, do you have too many details about the experiment, which hides the conclusion of the experiment (i.e., breaking Rule 1)? If you are worried about not having enough details, keep a slide at the end of your slide deck (after your conclusions and acknowledgments) with the more detailed information that you can refer to during a question and answer period.
Rule 9: Iteratively improve slide design through practice
Well-designed slides that follow the first 8 rules are intended to help you deliver the message you intend and in the amount of time you intend to deliver it in. The best way to ensure that you nailed slide design for your presentation is to practice, typically a lot. The most important aspects of practicing a new presentation, with an eye toward slide design, are the following 2 key points: (1) practice to ensure that you hit, each time through, the most important points (for example, the text guide posts you left yourself and the title of the slide); and (2) practice to ensure that as you conclude the end of one slide, it leads directly to the next slide. Slide transitions, what you say as you end one slide and begin the next, are important to keeping the flow of the “story.” Practice is when I discover that the order of my presentation is poor or that I left myself too few guideposts to remember what was coming next. Additionally, during practice, the most frequent things I have to improve relate to Rule 2 (the slide takes too long to present, usually because I broke Rule 1, and I’m delivering too much information for one slide), Rule 4 (I have a nonessential detail on the slide), and Rule 5 (I forgot to give a key reference). The very best type of practice is in front of an audience (for example, your lab or peers), where, with fresh perspectives, they can help you identify places for improving slide content, design, and connections across the entirety of your talk.
Rule 10: Design to mitigate the impact of technical disasters
The real presentation almost never goes as we planned in our heads or during our practice. Maybe the speaker before you went over time and now you need to adjust. Maybe the computer the organizer is having you use won’t show your video. Maybe your internet is poor on the day you are giving a virtual presentation at a conference. Technical problems are routinely part of the practice of sharing your work through presentations. Hence, you can design your slides to limit the impact certain kinds of technical disasters create and also prepare alternate approaches. Here are just a few examples of the preparation you can do that will take you a long way toward avoiding a complete fiasco:
- Save your presentation as a PDF—if the version of Keynote or PowerPoint on a host computer cause issues, you still have a functional copy that has a higher guarantee of compatibility.
- In using videos, create a backup slide with screen shots of key results. For example, if I have a video of cell migration, I’ll be sure to have a copy of the start and end of the video, in case the video doesn’t play. Even if the video worked, you can pause on this backup slide and take the time to highlight the key results in words if someone could not see or understand the video.
- Avoid animations, such as figures or text that flash/fly-in/etc. Surveys suggest that no one likes movement in presentations [ 3 , 4 ]. There is likely a cognitive underpinning to the almost universal distaste of pointless animations that relates to the idea proposed by Kosslyn and colleagues that animations are salient perceptual units that captures direct attention [ 4 ]. Although perceptual salience can be used to draw attention to and improve retention of specific points, if you use this approach for unnecessary/unimportant things (like animation of your bullet point text, fly-ins of figures, etc.), then you will distract your audience from the important content. Finally, animations cause additional processing burdens for people with visual impairments [ 10 ] and create opportunities for technical disasters if the software on the host system is not compatible with your planned animation.
Conclusions
These rules are just a start in creating more engaging presentations that increase audience retention of your material. However, there are wonderful resources on continuing on the journey of becoming an amazing public speaker, which includes understanding the psychology and neuroscience behind human perception and learning. For example, as highlighted in Rule 7, David JP Phillips has a wonderful TEDx talk on the subject [ 5 ], and “PowerPoint presentation flaws and failures: A psychological analysis,” by Kosslyn and colleagues is deeply detailed about a number of aspects of human cognition and presentation style [ 4 ]. There are many books on the topic, including the popular “Presentation Zen” by Garr Reynolds [ 11 ]. Finally, although briefly touched on here, the visualization of data is an entire topic of its own that is worth perfecting for both written and oral presentations of work, with fantastic resources like Edward Tufte’s “The Visual Display of Quantitative Information” [ 12 ] or the article “Visualization of Biomedical Data” by O’Donoghue and colleagues [ 13 ].
Acknowledgments
I would like to thank the countless presenters, colleagues, students, and mentors from which I have learned a great deal from on effective presentations. Also, a thank you to the wonderful resources published by organizations on how to increase inclusivity. A special thanks to Dr. Jason Papin and Dr. Michael Guertin on early feedback of this editorial.
Funding Statement
The author received no specific funding for this work.
Microsoft 365 Life Hacks > Presentations > Implementing The 10-20-30 Rule of PowerPoint
Implementing The 10-20-30 Rule of PowerPoint
If you’re not used to making a PowerPoint presentation , it can be tough to know how long to make it and how to format the slides. On the other side of the coin: you might overthink your presentation and put too much information on too many slides.

With help from the 10-20-30 rule, you can make a PowerPoint presentation that’s engaging and efficient . The guidelines for this rule are as follows:
- No more than 10 slides.
- No longer than 20 minutes.
- No larger than 30-point font.
Let’s look deeper at the 10-20-30 PowerPoint rule, why it’s a good rule to follow and things to do to follow this guideline.

Tell your story with captivating presentations
Powerpoint empowers you to develop well-designed content across all your devices
Don’t use more than 10 slides. A good presenter shouldn’t have to (or want to) lean heavily on their PowerPoint slides. The slides should be a supplement for your presentation, not the headliner. Limiting to 10 slides will ensure that you’re not going over the top with the length of your presentation and keeps it moving. Your slide count should include both your title and conclusion. A presentation that goes on any longer than 10 slides will distract from what you’re saying and starts to feel like an information overload.
Keep your presentation 20 minutes MAX. During a presentation, people start tuning out after about 10 minutes.Limiting your presentation to this length will ensure that your audience will remember much of what you’re saying. If you’re covering a more complex topic and need more time, stick to the 20-minute MAX rule—it’s much easier to schedule your presentation by timing each slide down to about two minutes. That feels like a much more manageable timeframe, doesn’t it?
Don’t use fonts smaller than size 30. A 30-point font is a great minimum size because it ensures that your text is easy to read from a distance. The recommended guideline to make your presentation accessible to those who might be visually impaired is a 24-point font. Upping the size to 30 is a significant difference, and you can be confident that your audience can see what you’ve written. In addition, choose a font that’s easy to read. For years it was recommended that you stick solely to sans-serif fonts with digital media because serifs could blur together, making certain fonts hard to read. High-resolution screens have nearly eliminated this problem, so some serif fonts can be used and are easy to read in PowerPoint presentations.

Tips for sticking to these guidelines. It’s not always easy to cut down your presentation to fit the 30-20-10 rule if you’re presenting a lot of information. Follow these tips while putting together your presentation to make the entire process easier on yourself:
- Limit text to the 6×6 rule. It can feel like there are a lot of rules for making a PowerPoint presentation, but they’re all there to help you make a well-organized and engaging presentation. The 6×6 rule suggests that you don’t use more than six lines or bullet points on each slide and limit each line or bullet point to six words. Following the 6×6 rule helps to ensure that you’re limiting the amount of information on your slides so you can continue to present it rather than have your audience read it.
- Use visuals instead. Visuals like graphics, animated gifs, and videos can help to keep your audience engaged . Including visuals with your presentation will also help you limit the amount of time and content on each slide. A graph or illustration on the right side of your slide limits the amount of space you have on the left side. This can help to minimize the amount of text you have.
- Practice makes perfect. There’s a very cool, free tool called PowerPoint Speaker Coach , which leverages AI to help you nail your presentation. Speaker coach gives you feedback on your pace, pitch, use of filler words, poor grammar, lack of originality, use of sensitive phrases, and more as you rehearse your presentation. You’ll get a Summary Report at the end—with key pieces of feedback to help you become a confident presenter .
Use the 10-20-30 PowerPoint rule and these other tips to keep your presentation simple. Whether you’re a college student presenting a class project or a teen making the case for a new car, following these guidelines will help.
Get started with Microsoft 365
It’s the Office you know, plus the tools to help you work better together, so you can get more done—anytime, anywhere.
Topics in this article
More articles like this one.

How to create an educational presentation
Use PowerPoint to create dynamic and engaging presentations that foster effective learning.

Five tips for choosing the right PowerPoint template
Choose an appropriate PowerPoint template to elevate your presentation’s storytelling. Consider time length, audience and other presentation elements when selecting a template.

How you can use AI to help you make the perfect presentation handouts
Learn how AI can help you organize and create handouts for your next presentation.

How to use AI to help improve your presentations
Your PowerPoint presentations are about to get a boost when you use AI to improve a PowerPoint presentation.
Everything you need to achieve more in less time
Get powerful productivity and security apps with Microsoft 365

Explore Other Categories
How-To Geek
8 tips to make the best powerpoint presentations.
Want to make your PowerPoint presentations really shine? Here's how to impress and engage your audience.
Quick Links
Table of contents, start with a goal, less is more, consider your typeface, make bullet points count, limit the use of transitions, skip text where possible, think in color, take a look from the top down, bonus: start with templates.
Slideshows are an intuitive way to share complex ideas with an audience, although they're dull and frustrating when poorly executed. Here are some tips to make your Microsoft PowerPoint presentations sing while avoiding common pitfalls.
It all starts with identifying what we're trying to achieve with the presentation. Is it informative, a showcase of data in an easy-to-understand medium? Or is it more of a pitch, something meant to persuade and convince an audience and lead them to a particular outcome?
It's here where the majority of these presentations go wrong with the inability to identify the talking points that best support our goal. Always start with a goal in mind: to entertain, to inform, or to share data in a way that's easy to understand. Use facts, figures, and images to support your conclusion while keeping structure in mind (Where are we now and where are we going?).
I've found that it's helpful to start with the ending. Once I know how to end a presentation, I know how best to get to that point. I start by identifying the takeaway---that one nugget that I want to implant before thanking everyone for their time---and I work in reverse to figure out how best to get there.
Your mileage, of course, may vary. But it's always going to be a good idea to put in the time in the beginning stages so that you aren't reworking large portions of the presentation later. And that starts with a defined goal.
A slideshow isn't supposed to include everything. It's an introduction to a topic, one that we can elaborate on with speech. Anything unnecessary is a distraction. It makes the presentation less visually appealing and less interesting, and it makes you look bad as a presenter.
This goes for text as well as images. There's nothing worse, in fact, than a series of slides where the presenter just reads them as they appear. Your audience is capable of reading, and chances are they'll be done with the slide, and browsing Reddit, long before you finish. Avoid putting the literal text on the screen, and your audience will thank you.
Related: How to Burn Your PowerPoint to DVD
Right off the bat, we're just going to come out and say that Papyrus and Comic Sans should be banned from all PowerPoint presentations, permanently. Beyond that, it's worth considering the typeface you're using and what it's saying about you, the presenter, and the presentation itself.
Consider choosing readability over aesthetics, and avoid fancy fonts that could prove to be more of a distraction than anything else. A good presentation needs two fonts: a serif and sans-serif. Use one for the headlines and one for body text, lists, and the like. Keep it simple. Veranda, Helvetica, Arial, and even Times New Roman are safe choices. Stick with the classics and it's hard to botch this one too badly.
There reaches a point where bullet points become less of a visual aid and more of a visual examination.
Bullet points should support the speaker, not overwhelm his audience. The best slides have little or no text at all, in fact. As a presenter, it's our job to talk through complex issues, but that doesn't mean that we need to highlight every talking point.
Instead, think about how you can break up large lists into three or four bullet points. Carefully consider whether you need to use more bullet points, or if you can combine multiple topics into a single point instead. And if you can't, remember that there's no one limiting the number of slides you can have in a presentation. It's always possible to break a list of 12 points down into three pages of four points each.
Animation, when used correctly, is a good idea. It breaks up slow-moving parts of a presentation and adds action to elements that require it. But it should be used judiciously.
Adding a transition that wipes left to right between every slide or that animates each bullet point in a list, for example, starts to grow taxing on those forced to endure the presentation. Viewers get bored quickly, and animations that are meant to highlight specific elements quickly become taxing.
That's not to say that you can't use animations and transitions, just that you need to pick your spots. Aim for no more than a handful of these transitions for each presentation. And use them in spots where they'll add to the demonstration, not detract from it.
Sometimes images tell a better story than text can. And as a presenter, your goal is to describe points in detail without making users do a lot of reading. In these cases, a well-designed visual, like a chart, might better convey the information you're trying to share.
The right image adds visual appeal and serves to break up longer, text-heavy sections of the presentation---but only if you're using the right images. A single high-quality image can make all the difference between a success and a dud when you're driving a specific point home.
When considering text, don't think solely in terms of bullet points and paragraphs. Tables, for example, are often unnecessary. Ask yourself whether you could present the same data in a bar or line chart instead.
Color is interesting. It evokes certain feelings and adds visual appeal to your presentation as a whole. Studies show that color also improves interest, comprehension, and retention. It should be a careful consideration, not an afterthought.
You don't have to be a graphic designer to use color well in a presentation. What I do is look for palettes I like, and then find ways to use them in the presentation. There are a number of tools for this, like Adobe Color , Coolors , and ColorHunt , just to name a few. After finding a palette you enjoy, consider how it works with the presentation you're about to give. Pastels, for example, evoke feelings of freedom and light, so they probably aren't the best choice when you're presenting quarterly earnings that missed the mark.
It's also worth mentioning that you don't need to use every color in the palette. Often, you can get by with just two or three, though you should really think through how they all work together and how readable they'll be when layered. A simple rule of thumb here is that contrast is your friend. Dark colors work well on light backgrounds, and light colors work best on dark backgrounds.
Spend some time in the Slide Sorter before you finish your presentation. By clicking the four squares at the bottom left of the presentation, you can take a look at multiple slides at once and consider how each works together. Alternatively, you can click "View" on the ribbon and select "Slide Sorter."
Are you presenting too much text at once? Move an image in. Could a series of slides benefit from a chart or summary before you move on to another point?
It's here that we have the opportunity to view the presentation from beyond the single-slide viewpoint and think in terms of how each slide fits, or if it fits at all. From this view, you can rearrange slides, add additional ones, or delete them entirely if you find that they don't advance the presentation.
The difference between a good presentation and a bad one is really all about preparation and execution. Those that respect the process and plan carefully---not only the presentation as a whole, but each slide within it---are the ones who will succeed.
This brings me to my last (half) point: When in doubt, just buy a template and use it. You can find these all over the web, though Creative Market and GraphicRiver are probably the two most popular marketplaces for this kind of thing. Not all of us are blessed with the skills needed to design and deliver an effective presentation. And while a pre-made PowerPoint template isn't going to make you a better presenter, it will ease the anxiety of creating a visually appealing slide deck.
Loading metrics
Open Access
Ten simple rules for effective presentation slides
* E-mail: [email protected]
Affiliation Biomedical Engineering and the Center for Public Health Genomics, University of Virginia, Charlottesville, Virginia, United States of America
- Kristen M. Naegle
Published: December 2, 2021
- https://doi.org/10.1371/journal.pcbi.1009554
- Reader Comments
Citation: Naegle KM (2021) Ten simple rules for effective presentation slides. PLoS Comput Biol 17(12): e1009554. https://doi.org/10.1371/journal.pcbi.1009554
Copyright: © 2021 Kristen M. Naegle. This is an open access article distributed under the terms of the Creative Commons Attribution License , which permits unrestricted use, distribution, and reproduction in any medium, provided the original author and source are credited.
Funding: The author received no specific funding for this work.
Competing interests: The author has declared no competing interests exist.
Introduction
The “presentation slide” is the building block of all academic presentations, whether they are journal clubs, thesis committee meetings, short conference talks, or hour-long seminars. A slide is a single page projected on a screen, usually built on the premise of a title, body, and figures or tables and includes both what is shown and what is spoken about that slide. Multiple slides are strung together to tell the larger story of the presentation. While there have been excellent 10 simple rules on giving entire presentations [ 1 , 2 ], there was an absence in the fine details of how to design a slide for optimal effect—such as the design elements that allow slides to convey meaningful information, to keep the audience engaged and informed, and to deliver the information intended and in the time frame allowed. As all research presentations seek to teach, effective slide design borrows from the same principles as effective teaching, including the consideration of cognitive processing your audience is relying on to organize, process, and retain information. This is written for anyone who needs to prepare slides from any length scale and for most purposes of conveying research to broad audiences. The rules are broken into 3 primary areas. Rules 1 to 5 are about optimizing the scope of each slide. Rules 6 to 8 are about principles around designing elements of the slide. Rules 9 to 10 are about preparing for your presentation, with the slides as the central focus of that preparation.
Rule 1: Include only one idea per slide
Each slide should have one central objective to deliver—the main idea or question [ 3 – 5 ]. Often, this means breaking complex ideas down into manageable pieces (see Fig 1 , where “background” information has been split into 2 key concepts). In another example, if you are presenting a complex computational approach in a large flow diagram, introduce it in smaller units, building it up until you finish with the entire diagram. The progressive buildup of complex information means that audiences are prepared to understand the whole picture, once you have dedicated time to each of the parts. You can accomplish the buildup of components in several ways—for example, using presentation software to cover/uncover information. Personally, I choose to create separate slides for each piece of information content I introduce—where the final slide has the entire diagram, and I use cropping or a cover on duplicated slides that come before to hide what I’m not yet ready to include. I use this method in order to ensure that each slide in my deck truly presents one specific idea (the new content) and the amount of the new information on that slide can be described in 1 minute (Rule 2), but it comes with the trade-off—a change to the format of one of the slides in the series often means changes to all slides.
- PPT PowerPoint slide
- PNG larger image
- TIFF original image
Top left: A background slide that describes the background material on a project from my lab. The slide was created using a PowerPoint Design Template, which had to be modified to increase default text sizes for this figure (i.e., the default text sizes are even worse than shown here). Bottom row: The 2 new slides that break up the content into 2 explicit ideas about the background, using a central graphic. In the first slide, the graphic is an explicit example of the SH2 domain of PI3-kinase interacting with a phosphorylation site (Y754) on the PDGFR to describe the important details of what an SH2 domain and phosphotyrosine ligand are and how they interact. I use that same graphic in the second slide to generalize all binding events and include redundant text to drive home the central message (a lot of possible interactions might occur in the human proteome, more than we can currently measure). Top right highlights which rules were used to move from the original slide to the new slide. Specific changes as highlighted by Rule 7 include increasing contrast by changing the background color, increasing font size, changing to sans serif fonts, and removing all capital text and underlining (using bold to draw attention). PDGFR, platelet-derived growth factor receptor.
https://doi.org/10.1371/journal.pcbi.1009554.g001
Rule 2: Spend only 1 minute per slide
When you present your slide in the talk, it should take 1 minute or less to discuss. This rule is really helpful for planning purposes—a 20-minute presentation should have somewhere around 20 slides. Also, frequently giving your audience new information to feast on helps keep them engaged. During practice, if you find yourself spending more than a minute on a slide, there’s too much for that one slide—it’s time to break up the content into multiple slides or even remove information that is not wholly central to the story you are trying to tell. Reduce, reduce, reduce, until you get to a single message, clearly described, which takes less than 1 minute to present.
Rule 3: Make use of your heading
When each slide conveys only one message, use the heading of that slide to write exactly the message you are trying to deliver. Instead of titling the slide “Results,” try “CTNND1 is central to metastasis” or “False-positive rates are highly sample specific.” Use this landmark signpost to ensure that all the content on that slide is related exactly to the heading and only the heading. Think of the slide heading as the introductory or concluding sentence of a paragraph and the slide content the rest of the paragraph that supports the main point of the paragraph. An audience member should be able to follow along with you in the “paragraph” and come to the same conclusion sentence as your header at the end of the slide.
Rule 4: Include only essential points
While you are speaking, audience members’ eyes and minds will be wandering over your slide. If you have a comment, detail, or figure on a slide, have a plan to explicitly identify and talk about it. If you don’t think it’s important enough to spend time on, then don’t have it on your slide. This is especially important when faculty are present. I often tell students that thesis committee members are like cats: If you put a shiny bauble in front of them, they’ll go after it. Be sure to only put the shiny baubles on slides that you want them to focus on. Putting together a thesis meeting for only faculty is really an exercise in herding cats (if you have cats, you know this is no easy feat). Clear and concise slide design will go a long way in helping you corral those easily distracted faculty members.
Rule 5: Give credit, where credit is due
An exception to Rule 4 is to include proper citations or references to work on your slide. When adding citations, names of other researchers, or other types of credit, use a consistent style and method for adding this information to your slides. Your audience will then be able to easily partition this information from the other content. A common mistake people make is to think “I’ll add that reference later,” but I highly recommend you put the proper reference on the slide at the time you make it, before you forget where it came from. Finally, in certain kinds of presentations, credits can make it clear who did the work. For the faculty members heading labs, it is an effective way to connect your audience with the personnel in the lab who did the work, which is a great career booster for that person. For graduate students, it is an effective way to delineate your contribution to the work, especially in meetings where the goal is to establish your credentials for meeting the rigors of a PhD checkpoint.
Rule 6: Use graphics effectively
As a rule, you should almost never have slides that only contain text. Build your slides around good visualizations. It is a visual presentation after all, and as they say, a picture is worth a thousand words. However, on the flip side, don’t muddy the point of the slide by putting too many complex graphics on a single slide. A multipanel figure that you might include in a manuscript should often be broken into 1 panel per slide (see Rule 1 ). One way to ensure that you use the graphics effectively is to make a point to introduce the figure and its elements to the audience verbally, especially for data figures. For example, you might say the following: “This graph here shows the measured false-positive rate for an experiment and each point is a replicate of the experiment, the graph demonstrates …” If you have put too much on one slide to present in 1 minute (see Rule 2 ), then the complexity or number of the visualizations is too much for just one slide.
Rule 7: Design to avoid cognitive overload
The type of slide elements, the number of them, and how you present them all impact the ability for the audience to intake, organize, and remember the content. For example, a frequent mistake in slide design is to include full sentences, but reading and verbal processing use the same cognitive channels—therefore, an audience member can either read the slide, listen to you, or do some part of both (each poorly), as a result of cognitive overload [ 4 ]. The visual channel is separate, allowing images/videos to be processed with auditory information without cognitive overload [ 6 ] (Rule 6). As presentations are an exercise in listening, and not reading, do what you can to optimize the ability of the audience to listen. Use words sparingly as “guide posts” to you and the audience about major points of the slide. In fact, you can add short text fragments, redundant with the verbal component of the presentation, which has been shown to improve retention [ 7 ] (see Fig 1 for an example of redundant text that avoids cognitive overload). Be careful in the selection of a slide template to minimize accidentally adding elements that the audience must process, but are unimportant. David JP Phillips argues (and effectively demonstrates in his TEDx talk [ 5 ]) that the human brain can easily interpret 6 elements and more than that requires a 500% increase in human cognition load—so keep the total number of elements on the slide to 6 or less. Finally, in addition to the use of short text, white space, and the effective use of graphics/images, you can improve ease of cognitive processing further by considering color choices and font type and size. Here are a few suggestions for improving the experience for your audience, highlighting the importance of these elements for some specific groups:
- Use high contrast colors and simple backgrounds with low to no color—for persons with dyslexia or visual impairment.
- Use sans serif fonts and large font sizes (including figure legends), avoid italics, underlining (use bold font instead for emphasis), and all capital letters—for persons with dyslexia or visual impairment [ 8 ].
- Use color combinations and palettes that can be understood by those with different forms of color blindness [ 9 ]. There are excellent tools available to identify colors to use and ways to simulate your presentation or figures as they might be seen by a person with color blindness (easily found by a web search).
- In this increasing world of virtual presentation tools, consider practicing your talk with a closed captioning system capture your words. Use this to identify how to improve your speaking pace, volume, and annunciation to improve understanding by all members of your audience, but especially those with a hearing impairment.
Rule 8: Design the slide so that a distracted person gets the main takeaway
It is very difficult to stay focused on a presentation, especially if it is long or if it is part of a longer series of talks at a conference. Audience members may get distracted by an important email, or they may start dreaming of lunch. So, it’s important to look at your slide and ask “If they heard nothing I said, will they understand the key concept of this slide?” The other rules are set up to help with this, including clarity of the single point of the slide (Rule 1), titling it with a major conclusion (Rule 3), and the use of figures (Rule 6) and short text redundant to your verbal description (Rule 7). However, with each slide, step back and ask whether its main conclusion is conveyed, even if someone didn’t hear your accompanying dialog. Importantly, ask if the information on the slide is at the right level of abstraction. For example, do you have too many details about the experiment, which hides the conclusion of the experiment (i.e., breaking Rule 1)? If you are worried about not having enough details, keep a slide at the end of your slide deck (after your conclusions and acknowledgments) with the more detailed information that you can refer to during a question and answer period.
Rule 9: Iteratively improve slide design through practice
Well-designed slides that follow the first 8 rules are intended to help you deliver the message you intend and in the amount of time you intend to deliver it in. The best way to ensure that you nailed slide design for your presentation is to practice, typically a lot. The most important aspects of practicing a new presentation, with an eye toward slide design, are the following 2 key points: (1) practice to ensure that you hit, each time through, the most important points (for example, the text guide posts you left yourself and the title of the slide); and (2) practice to ensure that as you conclude the end of one slide, it leads directly to the next slide. Slide transitions, what you say as you end one slide and begin the next, are important to keeping the flow of the “story.” Practice is when I discover that the order of my presentation is poor or that I left myself too few guideposts to remember what was coming next. Additionally, during practice, the most frequent things I have to improve relate to Rule 2 (the slide takes too long to present, usually because I broke Rule 1, and I’m delivering too much information for one slide), Rule 4 (I have a nonessential detail on the slide), and Rule 5 (I forgot to give a key reference). The very best type of practice is in front of an audience (for example, your lab or peers), where, with fresh perspectives, they can help you identify places for improving slide content, design, and connections across the entirety of your talk.
Rule 10: Design to mitigate the impact of technical disasters
The real presentation almost never goes as we planned in our heads or during our practice. Maybe the speaker before you went over time and now you need to adjust. Maybe the computer the organizer is having you use won’t show your video. Maybe your internet is poor on the day you are giving a virtual presentation at a conference. Technical problems are routinely part of the practice of sharing your work through presentations. Hence, you can design your slides to limit the impact certain kinds of technical disasters create and also prepare alternate approaches. Here are just a few examples of the preparation you can do that will take you a long way toward avoiding a complete fiasco:
- Save your presentation as a PDF—if the version of Keynote or PowerPoint on a host computer cause issues, you still have a functional copy that has a higher guarantee of compatibility.
- In using videos, create a backup slide with screen shots of key results. For example, if I have a video of cell migration, I’ll be sure to have a copy of the start and end of the video, in case the video doesn’t play. Even if the video worked, you can pause on this backup slide and take the time to highlight the key results in words if someone could not see or understand the video.
- Avoid animations, such as figures or text that flash/fly-in/etc. Surveys suggest that no one likes movement in presentations [ 3 , 4 ]. There is likely a cognitive underpinning to the almost universal distaste of pointless animations that relates to the idea proposed by Kosslyn and colleagues that animations are salient perceptual units that captures direct attention [ 4 ]. Although perceptual salience can be used to draw attention to and improve retention of specific points, if you use this approach for unnecessary/unimportant things (like animation of your bullet point text, fly-ins of figures, etc.), then you will distract your audience from the important content. Finally, animations cause additional processing burdens for people with visual impairments [ 10 ] and create opportunities for technical disasters if the software on the host system is not compatible with your planned animation.
Conclusions
These rules are just a start in creating more engaging presentations that increase audience retention of your material. However, there are wonderful resources on continuing on the journey of becoming an amazing public speaker, which includes understanding the psychology and neuroscience behind human perception and learning. For example, as highlighted in Rule 7, David JP Phillips has a wonderful TEDx talk on the subject [ 5 ], and “PowerPoint presentation flaws and failures: A psychological analysis,” by Kosslyn and colleagues is deeply detailed about a number of aspects of human cognition and presentation style [ 4 ]. There are many books on the topic, including the popular “Presentation Zen” by Garr Reynolds [ 11 ]. Finally, although briefly touched on here, the visualization of data is an entire topic of its own that is worth perfecting for both written and oral presentations of work, with fantastic resources like Edward Tufte’s “The Visual Display of Quantitative Information” [ 12 ] or the article “Visualization of Biomedical Data” by O’Donoghue and colleagues [ 13 ].
Acknowledgments
I would like to thank the countless presenters, colleagues, students, and mentors from which I have learned a great deal from on effective presentations. Also, a thank you to the wonderful resources published by organizations on how to increase inclusivity. A special thanks to Dr. Jason Papin and Dr. Michael Guertin on early feedback of this editorial.
- View Article
- PubMed/NCBI
- Google Scholar
- 3. Teaching VUC for Making Better PowerPoint Presentations. n.d. Available from: https://cft.vanderbilt.edu/guides-sub-pages/making-better-powerpoint-presentations/#baddeley .
- 8. Creating a dyslexia friendly workplace. Dyslexia friendly style guide. nd. Available from: https://www.bdadyslexia.org.uk/advice/employers/creating-a-dyslexia-friendly-workplace/dyslexia-friendly-style-guide .
- 9. Cravit R. How to Use Color Blind Friendly Palettes to Make Your Charts Accessible. 2019. Available from: https://venngage.com/blog/color-blind-friendly-palette/ .
- 10. Making your conference presentation more accessible to blind and partially sighted people. n.d. Available from: https://vocaleyes.co.uk/services/resources/guidelines-for-making-your-conference-presentation-more-accessible-to-blind-and-partially-sighted-people/ .
- 11. Reynolds G. Presentation Zen: Simple Ideas on Presentation Design and Delivery. 2nd ed. New Riders Pub; 2011.
- 12. Tufte ER. The Visual Display of Quantitative Information. 2nd ed. Graphics Press; 2001.
- SUGGESTED TOPICS
- The Magazine
- Newsletters
- Managing Yourself
- Managing Teams
- Work-life Balance
- The Big Idea
- Data & Visuals
- Reading Lists
- Case Selections
- HBR Learning
- Topic Feeds
- Account Settings
- Email Preferences
What It Takes to Give a Great Presentation
- Carmine Gallo

Five tips to set yourself apart.
Never underestimate the power of great communication. It can help you land the job of your dreams, attract investors to back your idea, or elevate your stature within your organization. But while there are plenty of good speakers in the world, you can set yourself apart out by being the person who can deliver something great over and over. Here are a few tips for business professionals who want to move from being good speakers to great ones: be concise (the fewer words, the better); never use bullet points (photos and images paired together are more memorable); don’t underestimate the power of your voice (raise and lower it for emphasis); give your audience something extra (unexpected moments will grab their attention); rehearse (the best speakers are the best because they practice — a lot).
I was sitting across the table from a Silicon Valley CEO who had pioneered a technology that touches many of our lives — the flash memory that stores data on smartphones, digital cameras, and computers. He was a frequent guest on CNBC and had been delivering business presentations for at least 20 years before we met. And yet, the CEO wanted to sharpen his public speaking skills.
- Carmine Gallo is a Harvard University instructor, keynote speaker, and author of 10 books translated into 40 languages. Gallo is the author of The Bezos Blueprint: Communication Secrets of the World’s Greatest Salesman (St. Martin’s Press).
Partner Center

25 rules for a highly effective PowerPoint presentation
- Uncategorized
This is an extract from a book called ‘Don’t say I never told you’.
Create a story
Deliver the experience
Refine and rehearse
Comments are closed.
Recent Posts
- Choosing the right competing job offer
- Reporting progress to your manager – and why it should be done fortnightly
- The basics of reporting – getting to “YES”
- How to write a report that people read and leads to a “Yes” #2 of 20
- How to write a report that people read and leads to a “Yes” #1 of 20
Recent Comments
- October 2021
- January 2020
- January 2019
- December 2018
- February 2018
- January 2018
- September 2017
- January 2017
- November 2015
- October 2014
- September 2014
- August 2014
- February 2014
- November 2013
- September 2013
- August 2013
- January 2013
- November 2012
- October 2012
- September 2012
- February 2012
- January 2012
- December 2011
- November 2011
- October 2011
- September 2011
- August 2011
- September 2010
- September 2009
- February 2009
- October 2007
- Finance Team Issues
- KPIs and CSFs
- Management and Leadership
- Official Blog
- Planning and Forecasting
- Testimonial
- Time Management
- Entries RSS
- Comments RSS
- WordPress.org
Master productivity and efficiency with interactive think-cell courses. Get started >
- 7 steps to building a compelling PowerPoint presentation
- Content hub

7 min read — by Amos Wong
How many times have you sat through a PowerPoint presentation that raised more questions than it answered? For instance, just look at the image shown above. Or how often have you seen slides so packed with information that you can’t even read them before the presenter has moved onto the next slide? If you have been in such situations, this blog is for you.
Avoiding these problems isn’t as simple as it seems when you’re creating a presentation from scratch and have a lot of information to present. The trick is to break it down into manageable pieces, starting with the broad overview and then circling in on the details. To help you do it, this article examines a 7-step process for building a compelling PowerPoint presentation, including how to structure it, lay out slides and create charts that support your message.
Learn more about how to build a better slide deck with our free eBook on PowerPoint best practices
1. Determine your presentation type
The first step in building your PowerPoint presentation is determining which type of presentation you’re giving. This helps clarify your overarching goal, while also influencing how you structure your slides.
Presentations typically fall under one or more of the following categories representing a continuum from light to heavy content:
- Key message presentations: This type of presentation is usually lighter in content and tells a persuasive story, such as a TED talk or pitch deck.
- Recurring reports: Recurring reports include more repetitive presentations like monthly reports or slide decks for team meetings. They often include more detail to document results, trends or activities.
- Insights and research outcomes: Presentations such as survey data or market trend reports distill information from large datasets into high-level conclusions.
- Documentation: This type of presentation provides detailed summaries of findings, typically with many charts and limited commentary depending on the audience.
2. Build your story
Your next step is to ask what message or story you want the audience to walk away with. With your top-level message in hand, you can then begin to structure your slide deck around it.
This is the essence of the Pyramid Principle , a strategy for creating effective business communications ubiquitous in the consulting world. With the Pyramid Principle, you lead with your most important idea, followed by supporting ideas and facts. If your conclusion is that Acme Company should enter a new market, say it up front. Then go through each supporting argument in order of relative strength.
An important corollary to the above is the MECE Principle , which stands for mutually exclusive and collectively exhaustive.

Compared with presenting a laundry list of ideas, MECE is a way to group them in a way that covers all relevant points without overlap. Using MECE to organize and group your ideas ensures a logically sound argument, while making the information easier for your audience to absorb.
3. Write your action titles
Once you have a defined structure for your PowerPoint presentation, you can get down to creating your slides. One of the most important things to remember as you do this is that each slide should present exactly one idea summarized in a single action title. All information presented on the slide must support the action title, including any charts. It is also important to avoid including any visual or textual elements that may convey or imply a different or conflicting message apart from the one in the action title.
One common strategy is to first write action titles for each slide to ensure they tell a complete story on their own. From there, you can go back to each slide and add details such as bullet points and charts.
4. Use a clean layout and formatting
When creating slides, it is crucial to avoid overcrowding them with excessive information or elements that can create visual confusion. One way to approach this is to visualize your slide as a table, laying out elements in columns and rows. Commonly used slide layouts consist of either two to three or four quadrants, depending on the nature of the content and the desired visual representation. You’ll also want to consider:
- The rule of thirds: Placing elements at one-third or two-thirds from the edge of the slide, and particularly where these gridlines intersect, is a universal rule for building a visually appealing slide.
- White space: Resist the temptation to pack too much into your slides. Leaving sufficient white space is essential for readability and helping the audience take in each slide’s main point.
- Presentation type: Key message presentations will have less content on each slide, compared with documentation presentations that include more detail.
- Fonts: Use the same font color and size for titles and body text throughout your slide deck, ideally in a sans serif font like Arial. Titles should be 20 to 24 point size, with body text 12 to 18 point based on the amount of content on the slides.
5. Organize your bullet points
A long list of bullet points is confusing and hard for audiences to digest. Instead, stick to three or five bullets, with a maximum of seven. Again, avoid packing in too much information, and all text should support the action title.
To improve clarity, write bullet points using parallel structure. In other words, if one bullet is a sentence, all of them should be in sentence form. The same goes for using sentence fragments or individual words. Each bullet should start with the same part of speech (e.g., noun, verb, adjective).
6. Choose the right chart
All chart data should be relevant to the slide’s action title. Say It with charts by Gene Zelazny offers a useful approach to choosing your chart in three steps:
- Identify which aspect of the data your chart will highlight
- Determine what you’re comparing, whether it’s components, change over time or correlation
- Select your chart according to the comparison you’re trying to make

7. Format your chart
Once you create a basic chart, you’ll want to format and annotate it in a way that conveys your message without confusion. This means:
- Including a chart title that summarizes the data and aligns with the slide’s action title
- Labeling both the x-axis and the y-axis with measurement units
- Using color sparingly to highlight the chart’s conclusion, for example using muted tones with one key vertical bar highlighted in a bolder color
- Adding trendlines to charts that can visually indicate patterns or trends in the data, for example, CAGRs
- Displaying legends to help viewers understand the meaning of different colors, symbols, or patterns used in the chart
A PowerPoint add-in like think-cell can help you create better slide decks and charts faster. Dynamic charts, process flows, annotations and text boxes all help organize complex information into visually sophisticated presentations, so you can spend less time struggling with formatting and more time on building a compelling story.
Building a PowerPoint presentation from scratch can seem like a tall order. By breaking it down into manageable steps, however, you can streamline the process while ensuring your audience leaves with a clear understanding of your message.

How to apply the MECE principle to PowerPoint presentations
Learn about the MECE principle and examples of how to apply it, plus how to use it to create stronger PowerPoint presentations faster.
May 17, 2023 | 11 min read

Using the Pyramid Principle to build better PowerPoint presentations
Learn how to use the Pyramid Principle to create more effective PowerPoint presentations, including how to organize ideas, present data and clarify your message.
February 07, 2023 | 6 min read

Why you should change the way you think about PowerPoint
Presentations shape the conversations and decisions that move business forward. And by approaching them this way, you can accelerate your growth.
February 07, 2023 | 3 min read

Role of data visualization in business decision-making
Understanding the rapid processing of visual information by the brain has significant implications in the business world, particularly for decision makers. In this blog, we will delve into the pivotal role data visualization plays in business decision-making.
July 25, 2023 | 8 min read
- Why think-cell?
- All features
- Continuous improvement
- Customer references
- New customer
- Renew licenses
- Find a reseller
- Academic program
- Startup program
- Existing customer
- Video tutorials
- Tips and tricks
- User manual
- Knowledge base
- think-cell academy
- C++ Developer (f/m/d)
- C++ Internship (f/m/d)
- All job offers
- Talks and publications
- Developer blog

5 golden rules of PowerPoint design
april 30, 2024
by Deb Ashby
Wondering how to design the perfect PowerPoint presentation? It's easier than you think–just follow five simple rules to get started:
1. Consider using templates
When building a slide deck, it’s important to maintain consistency throughout. We want to ensure we are using consistent font styles, colors and themes. This can be tricky when designing from scratch, so why not start from a template?
Microsoft Create contains hundreds of pre-made, customizable PowerPoint templates, which means you don’t have to start from scratch and the fonts and colors are already set for you.
Simply choose a template from the gallery, customize it as needed, and you are done!

2. No walls of text
We’ve all seen PowerPoint presentations where slides contain too much text. The human brain struggles to listen and read at the same time. If you are presenting to an audience, keep the text on slides to a minimum.
Consider employing the “5-5-5" rule. No more than 5 lines, no more than 5 words, no more than 5 minutes. Think short and sharp memory joggers instead of rambling paragraphs.
Where possible, consider replacing text with visuals to represent your point. People remember images more than words.

3. Be mindful of colors and fonts
No one wants their audience to leave with a headache after an hour of straining to read slides. We need to ensure that our presentation is easy to read for everyone – even for those in the nosebleed seats at the back! Think about the font you are using. Is it appropriate for the presentation? What about the font size? Can people at the back easily read? What about people with visual impairment? Ensure all text is at least 24pts.
When it comes to color, ensure all slides have good contrast. Dark backgrounds should have light font and vice versa.
4. Use animation sparingly
Animation can really liven up an otherwise flat presentation. However, it should be used thoughtfully and sparingly. Too much of the wrong type of animation with objects flying in and zooming around the screen, while fun, can look confusing and unprofessional.
Animation should be subtle (especially for pitch decks and other formal presentations). With every animation you add, ask yourself, "Is this going to enhance my presentation or distract from it?"
5. Engage your audience
When presenting to an audience, there is usually an awkward time before the presentation begins while the speaker waits for everyone to arrive. During this time, people may start scrolling on their phones or get distracted with work emails, and it can be hard to pull the audience back.
To avoid this issue, work to grab your audience's attention before the presentation even starts. Instead of just having the title slide on the screen, consider creating "kiosk slides." These are a series of slides that contain a combination of interesting things for the audience to look at or engage with. Maybe you have an interesting image? A funny quote or fun facts? Or maybe there is a question you want them to think about prior to the session?
Create these slides and have them automatically cycle round before the presentation starts.

Related topics
Center for Teaching
Making better powerpoint presentations.
Print Version
Baddeley and Hitch’s model of working memory.
Research about student preferences for powerpoint, resources for making better powerpoint presentations, bibliography.
We have all experienced the pain of a bad PowerPoint presentation. And even though we promise ourselves never to make the same mistakes, we can still fall prey to common design pitfalls. The good news is that your PowerPoint presentation doesn’t have to be ordinary. By keeping in mind a few guidelines, your classroom presentations can stand above the crowd!
“It is easy to dismiss design – to relegate it to mere ornament, the prettifying of places and objects to disguise their banality. But that is a serious misunderstanding of what design is and why it matters.” Daniel Pink
One framework that can be useful when making design decisions about your PowerPoint slide design is Baddeley and Hitch’s model of working memory .
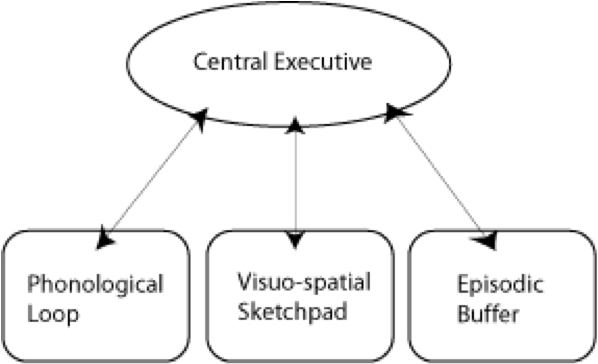
As illustrated in the diagram above, the Central Executive coordinates the work of three systems by organizing the information we hear, see, and store into working memory.
The Phonological Loop deals with any auditory information. Students in a classroom are potentially listening to a variety of things: the instructor, questions from their peers, sound effects or audio from the PowerPoint presentation, and their own “inner voice.”
The Visuo-Spatial Sketchpad deals with information we see. This involves such aspects as form, color, size, space between objects, and their movement. For students this would include: the size and color of fonts, the relationship between images and text on the screen, the motion path of text animation and slide transitions, as well as any hand gestures, facial expressions, or classroom demonstrations made by the instructor.
The Episodic Buffer integrates the information across these sensory domains and communicates with long-term memory. All of these elements are being deposited into a holding tank called the “episodic buffer.” This buffer has a limited capacity and can become “overloaded” thereby, setting limits on how much information students can take in at once.
Laura Edelman and Kathleen Harring from Muhlenberg College , Allentown, Pennsylvania have developed an approach to PowerPoint design using Baddeley and Hitch’s model. During the course of their work, they conducted a survey of students at the college asking what they liked and didn’t like about their professor’s PowerPoint presentations. They discovered the following:
Characteristics students don’t like about professors’ PowerPoint slides
- Too many words on a slide
- Movement (slide transitions or word animations)
- Templates with too many colors
Characteristics students like like about professors’ PowerPoint slides
- Graphs increase understanding of content
- Bulleted lists help them organize ideas
- PowerPoint can help to structure lectures
- Verbal explanations of pictures/graphs help more than written clarifications
According to Edelman and Harring, some conclusions from the research at Muhlenberg are that students learn more when:
- material is presented in short phrases rather than full paragraphs.
- the professor talks about the information on the slide rather than having students read it on their own.
- relevant pictures are used. Irrelevant pictures decrease learning compared to PowerPoint slides with no picture
- they take notes (if the professor is not talking). But if the professor is lecturing, note-taking and listening decreased learning.
- they are given the PowerPoint slides before the class.
Advice from Edelman and Harring on leveraging the working memory with PowerPoint:
- Leverage the working memory by dividing the information between the visual and auditory modality. Doing this reduces the likelihood of one system becoming overloaded. For instance, spoken words with pictures are better than pictures with text, as integrating an image and narration takes less cognitive effort than integrating an image and text.
- Minimize the opportunity for distraction by removing any irrelevant material such as music, sound effects, animations, and background images.
- Use simple cues to direct learners to important points or content. Using text size, bolding, italics, or placing content in a highlighted or shaded text box is all that is required to convey the significance of key ideas in your presentation.
- Don’t put every word you intend to speak on your PowerPoint slide. Instead, keep information displayed in short chunks that are easily read and comprehended.
- One of the mostly widely accessed websites about PowerPoint design is Garr Reynolds’ blog, Presentation Zen . In his blog entry: “ What is Good PowerPoint Design? ” Reynolds explains how to keep the slide design simple, yet not simplistic, and includes a few slide examples that he has ‘made-over’ to demonstrate how to improve its readability and effectiveness. He also includes sample slides from his own presentation about PowerPoint slide design.
- Another presentation guru, David Paradi, author of “ The Visual Slide Revolution: Transforming Overloaded Text Slides into Persuasive Presentations ” maintains a video podcast series called “ Think Outside the Slide ” where he also demonstrates PowerPoint slide makeovers. Examples on this site are typically from the corporate perspective, but the process by which content decisions are made is still relevant for higher education. Paradi has also developed a five step method, called KWICK , that can be used as a simple guide when designing PowerPoint presentations.
- In the video clip below, Comedian Don McMillan talks about some of the common misuses of PowerPoint in his routine called “Life After Death by PowerPoint.”
- This article from The Chronicle of Higher Education highlights a blog moderated by Microsoft’s Doug Thomas that compiles practical PowerPoint advice gathered from presentation masters like Seth Godin , Guy Kawasaki , and Garr Reynolds .
Presenting to Win: The Art of Telling Your Story , by Jerry Weissman, Prentice Hall, 2006
Presentation Zen: Simple Ideas on Presentation Design and Delivery , by Garr Reynolds, New Riders Press, 2008
Solving the PowerPoint Predicament: using digital media for effective communication , by Tom Bunzel , Que, 2006
The Cognitive Style of Power Point , by Edward R. Tufte, Graphics Pr, 2003
The Visual Slide Revolution: Transforming Overloaded Text Slides into Persuasive Presentations , by Dave Paradi, Communications Skills Press, 2000
Why Most PowerPoint Presentations Suck: And How You Can Make Them Better , by Rick Altman, Harvest Books, 2007

Teaching Guides
- Online Course Development Resources
- Principles & Frameworks
- Pedagogies & Strategies
- Reflecting & Assessing
- Challenges & Opportunities
- Populations & Contexts
Quick Links
- Services for Departments and Schools
- Examples of Online Instructional Modules
7 Simple rules to help you create effective powerpoint presentations
Make effective presentations by following simple but important presentation rules.
Supriya Sarkar
Building presentations

Presentations are powerful tools for conveying information and at the same time engaging the audience so that they retain the information that is shared. However, creating an impactful and engaging PowerPoint presentation requires adherence to certain rules. In this guide, we'll explore key principles to help you craft presentations that captivate your audience. Also, we will discuss some tips and common mistakes in creating an effective presentation.
Implementing effective presentation techniques
To create an effective presentation, you need to know the basic techniques first. Think of these techniques as the building blocks for your presentation. Once you have these basics in place, you can then make improvements to make your presentation even better. This might mean adjusting things as you go based on how your audience is reacting, being open to changing your content on the spot and adding interactive elements to keep everyone engaged.
Rule 1: Engaging and memorable in just one slide
When you present one idea per slide, you allow your audience to focus on a single concept, making it easier for them to comprehend and remember. Complex ideas can be overwhelming, so breaking them down into smaller, digestible pieces helps your audience follow your message more effectively.
Rule 2: Following the 5 rules for creating effective presentation slides
Spend only one minute or less on each slide to keep things lively and avoid overwhelming your audience. The 5/5/5 rule is a simple guide to keep things short and sweet. Stick to five words per line, no more than five lines per slide, and steer clear of having five slides in a row with lots of text. This way, your audience won't feel bombarded with too much information, and you can share details in manageable bits. This helps keep your audience engaged and paying attention.
Rule 3: Avoiding slide overload for clear messages
Putting too much stuff on slides can make it hard for people to read and listen. To follow Rule 1 (about having one idea per slide), limit your elements to six or fewer on each slide. This keeps things focused. Also, use short text, add some space (white space), and include images or graphics smartly. Doing this helps you deliver your message effectively, making it easier for the audience to remember what you're sharing.
Rule 4: Mastering slide design to get your message across efficiently
The title at the top of each slide is like a signpost for your message. A clear and meaningful heading acts as a cue, helping your audience understand what's coming up. Make sure your heading is a short and clear summary of what you'll talk about on that slide. Everything on the slide should support that heading, like a team working together. This makes it easy for your audience to follow your message smoothly. Keep it concise and to the point!
How to create engaging slides?
Visuals are crucial for creating engaging slides. Think of making presentations like crafting art, where colors, fonts, and images play pivotal roles. Let's delve into each of these factors to understand their significance and technique in detail.
Rule 5: Utilizing effective slide design
Picking the correct font and its color is crucial. It doesn't just make things easier to read but also boosts how well your presentation works. To make words clearer, go for colors that stand out, keep backgrounds simple, and use big fonts. This helps everyone see and understand your slides better. Stay away from italics, underlining, or all caps because they might take attention away from your main message. Keep it simple and easy on the eyes!
Rule 6: Using appropriate animation and transitions
Try to steer clear of using too many animations. Studies indicate that people generally don't enjoy a lot of movement in a presentation. While animations can make things interesting, it's important to use them sparingly. Small, subtle animations can help highlight key points and make your audience remember things better. But, if you use too many flashy movements, it might distract people and make your presentation less effective.
Rule 7: Implementing visual presentations such as graphs and images
Visual elements, such as images and graphs, add interest and engagement to your presentation. However, it's essential to strike a balance. Avoid overly complex graphics that may confuse your audience. When you decide to use a graph or chart, make sure to explain what it shows so everyone understands the information you're sharing. Keeping things clear and simple ensures your visuals add to the presentation without making it confusing.

Tips for delivering successful PowerPoint presentations
Adhering to the presentation rules will help you enhance the audience experience, but also ensure the efficient delivery of your PowerPoint presentation. There are a few presentation tips that will not only assist you in following the rules discussed above but will also develop the necessary skills to keep your audience engaged.
Strategies for engaging content:
To make your presentation more engaging try to craft a compelling narrative that resonates with your audience. You can share relatable stories to evoke emotions that can help in making your topic more relatable and interesting. Choose visually appealing slides and break down complex concepts into digestible bits that can be easily understood and retained. Enhance interactivity by incorporating questions, polls, and activities to infuse life into your presentation. This dynamic approach ensures your audience stays not just informed but actively involved throughout your talk.
Know your audience:
Tailor your presentation to the needs, interests, and knowledge level of your audience. Understanding your audience allows you to adjust your content and tone accordingly.
Developing presentation skills:
Refine your presentation skills to captivate your audience. Practice confident body language, maintain consistent eye contact, and modulate your voice for emphasis. These practices not only boost your credibility but also amplify your persuasive impact. Engage with your audience to build a connection, intensifying the impact of your message.
Enhancing understanding with simple rules:
Adhere to straightforward presentation rules to enhance audience comprehension. Utilize clear and concise headings, limit the text on each slide, and incorporate visuals strategically. Ensure that your message is easy to follow and doesn't overwhelm the audience with unnecessary details.
Maximizing slide impact:
Each slide should contribute significantly to your message. Highlight key points, use visually striking elements, and maintain a clean design. Colors and fonts play a very important role. Eliminate unnecessary clutter, ensuring that every component on the slide serves a specific purpose.
Efficient presentation delivery:
Focus on delivering your presentation with efficiency. Practice your timing to ensure a smooth flow, avoid unnecessary technical jargon, and actively encourage audience participation. Keep the presentation dynamic and engaging to sustain interest from the beginning to the end.
Common mistakes to avoid in PowerPoint presentations
Let's take a closer look at the common mistakes we often see and find the best ways to avoid them.
Avoiding overloaded slides and complicated visuals:
Resist the temptation to overload a single slide with excessive information or complex data charts. Keep it simple and focused to ensure your audience easily grasps the key points without feeling overwhelmed. The "Rule of One Slide, One Idea" emphasizes steering clear of overstuffed slides, allowing for a more effective and digestible presentation.
Minimizing the use of text-heavy slides for maximum impact:
Presenters sometimes put too much text on slides to help them remember what to say. However, this can make the audience lose interest and the message isn't as clear. Don't drown your slides in text. Use short and impactful messages. Use visuals, bullet points, and brief text to convey your message effectively, keeping your audience's attention intact.
Avoiding ineffective presentation design elements:
Every visual and layout choice should enhance your message and not distract or confuse your audience. Therefore, stay clear of design elements that don't contribute meaningfully to your presentation.
Avoiding fonts that are difficult to read or understand:
Choose fonts wisely. Select clear, readable fonts that ensure your audience can easily comprehend your content. Avoid italics or complex fonts that may hinder rather than aid understanding. Consider using a font size of 30 points or larger. This ensures readability for people sitting at a distance and those with vision impairments, enhancing the overall accessibility of your presentation.
Benefits of following the presentation rules
Following these presentation rules results in more engaging, comprehensible, and impactful presentations that effectively convey messages to the audience.
Audience engagement:
Following the rules maintains audience engagement by preventing information overload. Limiting each slide's content ensures details are shared in manageable bits, adding interest with visuals while ensuring clarity. Explaining visuals contributes to better audience understanding.
Impactful delivery:
Basic guidelines, such as limiting elements per slide and employing clear headings, enhance message delivery. These rules facilitate focused communication, progressive build-up on complex topics, and seamless audience guidance, resulting in improved understanding.
Visually appealing:
By following rules to enhance visual appeal in your presentation, such as choosing readable fonts, high-contrast colors, and simple backgrounds, you not only improve the aesthetics but also facilitate better information retention for your audience. This is supported by data indicating that individuals process images at a rate 60,000 times faster than text, with 90% of information transmitted to the brain being visual.
Improves retention:
Emphasizing a single, digestible idea per slide enables focused comprehension and better retention. The use of subtle animations to highlight key points enhances audience retention, avoiding excessive movements that may distract from the presentation's effectiveness.
How Prezent help you make an effective presentation in less time?
Understanding the challenges faced by businesses to adhere to the presentation rules, Prezent brings in features that makes the task easier for presenters.
Hyper-personalized presentation: Prezent’s Fingerprint feature helps you understand your audience's preferences, allowing you to customize your presentation accordingly. This ensures resonance with the audience, enhancing its overall effectiveness.
Slide library for visual appeal: You can access the Slide Library to choose background images, layouts, and graphical charts for your data. Prezent facilitates easy audience engagement with compelling imagery, elevating the visual appeal of your presentation.
Compelling narratives with storyline: You can leverage Prezent's Storyline builder , which offers over 35,000 pre-built narratives. These structured storylines assist in breaking down complex topics into easily understandable information, creating an impactful and engaging presentation experience.
Real-time collaboration: The real-time collaboration feature facilitates seamless teamwork, allowing multiple contributors to work on the presentation simultaneously. This collaborative approach fosters efficiency, ensuring that the collective efforts result in a well-coordinated and polished final product.
Brand compliance: Prezent enables swift alignment with established brand standards, ensuring 100% brand compliance in just a few minutes. Transform your slides seamlessly to achieve a harmonious blend of colors, fonts, and visuals. This ensures a consistent reflection of your brand's standards, guaranteeing a professional presentation every time.
Follow these essential presentation rules to ensure your message has a lasting impact. To enhance efficiency in your business communication and presentation creation process, explore Prezent with a free trial . Schedule a demo to experience all the product features and understand the value it can add to your business.
More zenpedia articles

Effective presentation design guide with tips and sample template

Storytelling in sales: How the power of storytelling can increase success rate?

How to write a problem statement slide for PowerPoint
Get the latest from Prezent community
Join thousands of subscribers who receive our best practices on communication, storytelling, presentation design, and more. New tips weekly. (No spam, we promise!)
Purdue Online Writing Lab Purdue OWL® College of Liberal Arts
Designing an Effective PowerPoint Presentation: Quick Guide

Welcome to the Purdue OWL
This page is brought to you by the OWL at Purdue University. When printing this page, you must include the entire legal notice.
Copyright ©1995-2018 by The Writing Lab & The OWL at Purdue and Purdue University. All rights reserved. This material may not be published, reproduced, broadcast, rewritten, or redistributed without permission. Use of this site constitutes acceptance of our terms and conditions of fair use.
This presentation is designed to quickly introduce you into the world of PowerPoint creation. It covers concepts of visual rhetoric, design, and good presentation skills.

- Get started with computers
- Learn Microsoft Office
- Apply for a job
- Improve my work skills
- Design nice-looking docs
- Getting Started
- Smartphones & Tablets
- Typing Tutorial
- Online Learning
- Basic Internet Skills
- Online Safety
- Social Media
- Zoom Basics
- Google Docs
- Google Sheets
- Career Planning
- Resume Writing
- Cover Letters
- Job Search and Networking
- Business Communication
- Entrepreneurship 101
- Careers without College
- Job Hunt for Today
- 3D Printing
- Freelancing 101
- Personal Finance
- Sharing Economy
- Decision-Making
- Graphic Design
- Photography
- Image Editing
- Learning WordPress
- Language Learning
- Critical Thinking
- For Educators
- Translations
- Staff Picks
- English expand_more expand_less
PowerPoint Tips - Three Tips for Beautiful PowerPoint Presentations
Powerpoint tips -, three tips for beautiful powerpoint presentations, powerpoint tips three tips for beautiful powerpoint presentations.

PowerPoint Tips: Three Tips for Beautiful PowerPoint Presentations
Lesson 18: three tips for beautiful powerpoint presentations.
/en/powerpoint-tips/simple-rules-for-better-powerpoint-presentations/content/
Three tips for beautiful PowerPoint presentations
In an earlier lesson , we gave you some tips for improving PowerPoint presentations . These simple rules covered the basics of making your PowerPoint slides readable and interesting. If you know how to do this, your presentations are probably already pretty strong.
That said, for a presentation to really stand out it also has to look great . Don't worry, you don't have to be a graphic designer to create something that looks sharp. These simple tips will make a big difference in any presentation—and all three are pretty easy to follow.
Highlight large images
Many PowerPoint slides include placeholders for inserting images. Most of these placeholders are pretty small in comparison to the entire slide. While using these placeholders lets you place text alongside your pictures, it can also detract from the power of your images and make all of your slides look the same.
If your presentation includes important images, try making them cover the entire slide . While you won't be able to include much text on these slides, displaying the right image can be an effective tool to reinforce an important point in your presentation.

One word of warning : This only works if your images are large enough . In order for the image to display at full quality, it has to have the same resolution —or number of pixels—as your display. Otherwise, the image may look stretched or blurry.
Use interesting fonts
You might already be familiar with PowerPoint's theme fonts . Each PowerPoint theme includes a pair of fonts—one for headings and titles , and another for bullet points and paragraph text . Including more than one font is key to making your slides look well-designed . However, many of the default font pairs are a little bland. Why not use some different fonts?
Websites like DaFont and Font Squirrel have thousands of beautiful fonts you can download for free, and the Internet is filled with resources to help you learn how to choose which fonts to use. You can even find plenty of suggestions for font pairings that work well (Google font pairings for more ideas). Once you've found some fonts you like, you can even customize PowerPoint theme fonts to include your favorites.
Create your own color scheme
PowerPoint themes also include premade sets of colors . Like the fonts pairings, many of these color sets are a little bland. Why not use some colors you really like? Colour Lovers is a great resource for modern color palettes that looks great.
You can also copy the colors in an ad or illustration that you like. Don't use more than four or five main colors, or your presentation will look busy and disorganized. Just like with theme fonts, you can also create custom theme colors . Here are some color combinations we've used for presentations at our office:

/en/powerpoint-tips/theme-and-transition-options/content/
Maximum Number of Slides in PowerPoint: What You Need to Know
- Recent Posts

- How to Color Code Folders in Outlook 365: A Step-by-Step Guide - May 23, 2024
- Tech Tips: How to Quickly Locate Folders for Emails in Outlook - May 23, 2024
- How to Easily Delete Templates in Outlook - May 23, 2024
As someone who has created countless PowerPoint presentations, I know firsthand the importance of keeping your audience engaged with concise and visually appealing slides. One question that often comes up when creating presentations is: what is the maximum number of slides that PowerPoint can handle?

After conducting some research, I found that the answer is not as straightforward as one might think. According to Microsoft, PowerPoint does not have a specific limit on the number of slides that can be included in a presentation. However, there are practical limitations to consider, such as the amount of memory on your computer and the size of the presentation file.
It’s important to keep in mind that the number of slides in a presentation should not be the sole focus. The content and information presented on each slide is equally important. It’s essential to strike a balance between the amount of information provided on each slide and the number of slides in the presentation. In this article, I will explore the practical limitations of PowerPoint and provide tips on creating effective presentations with an appropriate number of slides and engaging content.
JUMP TO TOPIC
Designing Effective Slides
Incorporating visuals and graphics, mastering the art of storytelling, applying the 10/20/30 rule, rehearsal techniques, utilizing stories and anecdotes, effective question and answer sessions, concluding your presentation, crafting your presentation.

When it comes to creating a PowerPoint presentation, the number of slides you use is just one of many factors to consider. To create a truly effective presentation, you need to think about the design, visuals, and storytelling elements. In this section, I will cover some tips and tricks to help you craft a presentation that engages your audience and delivers your message effectively.
The design of your slides is crucial to the success of your presentation. You want to create a consistent look and feel throughout your presentation, so your audience can focus on your message instead of being distracted by inconsistent design elements. One way to achieve this is by using a theme or template that matches your brand or message. You can also use color schemes, font styles, and layouts to create a cohesive look.
Another important aspect of slide design is the use of white space. Too much information on a slide can overwhelm your audience and make it difficult for them to focus on the key points. By using white space effectively, you can create a clean and uncluttered look that draws attention to your message.
Visuals and graphics can be powerful tools to help convey your message and engage your audience. When choosing images and graphics, make sure they align with your message and are of high quality. Low-quality images can detract from the professional look of your presentation.
In addition to images, you can also use charts, graphs, and other visual aids to help illustrate your points. These can be especially useful when presenting data or statistics.
Finally, storytelling is a key element of any effective presentation. By telling a story that relates to your message, you can engage your audience on an emotional level and make your message more memorable. To do this, you can use anecdotes, metaphors, and other storytelling techniques to help bring your message to life.
Overall, crafting an effective PowerPoint presentation takes time and effort. By considering the design, visuals, and storytelling elements, you can create a presentation that engages your audience and delivers your message effectively. Remember, the number of slides you use is just one piece of the puzzle.
Timing and Practice
When it comes to creating a PowerPoint presentation, one of the most important factors to consider is timing. You don’t want your presentation to be too short or too long. The 10/20/30 rule is a popular guideline that suggests that a presentation should have 10 slides, last 20 minutes, and have no font smaller than 30 points.
While this rule may not work for every presentation, it is a good starting point. It forces you to focus on the most important information and avoid overwhelming your audience with too much detail. However, it’s important to remember that the rule is just a guideline, and you should adjust it to fit your specific needs.
Once you have created your PowerPoint presentation, it’s important to practice your delivery. Rehearsing your presentation will help you become more comfortable with the material and ensure that you stay within your allotted time frame.
One technique that can be helpful is to time yourself as you practice. This will give you an idea of how long your presentation will take and allow you to adjust the timing as needed. As a general rule, you should aim for about 1-2 minutes per slide, depending on the complexity of the information.
Another helpful technique is to practice in front of a mirror or a small group of friends or colleagues. This will help you become more comfortable with speaking in front of an audience and allow you to receive feedback on your delivery and content.
In conclusion, timing and practice are essential components of creating a successful PowerPoint presentation. By applying the 10/20/30 rule and using rehearsal techniques, you can ensure that your presentation is engaging, informative, and delivered within the allotted time frame.
Engaging Your Audience
As a presenter, one of the most important things you can do is engage your audience. Engaged audiences are more likely to remember your message and take action on it. There are a few techniques you can use to keep your audience engaged throughout your presentation.
One of the most effective ways to engage your audience is by telling stories and anecdotes. Stories are a powerful tool for capturing your audience’s attention and keeping them engaged. They can help illustrate your message and make it more relatable to your audience. When telling a story, make sure it is relevant to your message and keep it short and to the point.
Another way to keep your audience engaged is by having an effective question and answer session. This gives your audience the opportunity to ask questions and provide feedback. It also allows you to clarify any points that may have been unclear. When conducting a question and answer session, make sure to repeat the question so everyone can hear it and keep your answers concise and to the point.
To ensure that your audience is engaged, you need to have high energy and be engaging yourself. This means you need to be confident and knowledgeable about your subject matter. You should also be clear and concise in your delivery, using natural dialogue and avoiding jargon or technical terms that may be unfamiliar to your audience.
In conclusion, engaging your audience is key to a successful presentation. By utilizing stories and anecdotes and having an effective question and answer session, you can keep your audience engaged and ensure that your message is remembered. Remember to have high energy and be engaging yourself to keep your audience focused and interested.
As I wrap up my PowerPoint presentation, I want to make sure that my audience leaves with a clear understanding of my message. A strong closing can help reinforce the main points and motivate them to take action. Here are some tips for concluding your presentation:
Restate the main message: In the closing slide, I like to restate the main message of my presentation. This helps to reinforce the message and ensures that the audience leaves with a clear understanding of what I was trying to convey.
Call to action: A call to action is a powerful way to motivate your audience to take action. Whether it’s signing up for a newsletter, making a purchase, or joining a cause, a call to action can help you achieve your goals.
Closing slide: The closing slide is an excellent opportunity to summarize the key points of your presentation. I like to use bullet points or a table to summarize the main ideas, making it easy for the audience to remember the key takeaways.
Question and answer session: A question and answer session can help to engage your audience and address any concerns or questions they may have. I like to encourage my audience to ask questions and provide feedback, as this can help me improve my presentation for future audiences.
In conclusion, ending a PowerPoint presentation is just as important as the opening and body of the presentation. By following these tips, you can ensure that your audience leaves with a clear understanding of your message and is motivated to take action.
Related posts:
- Unfortunately, PowerPoint Cannot Read: Troubleshooting Tips
- How to Highlight Important Slides in PowerPoint: A Step-by-Step Guide
- How to Easily Display Document Properties in PowerPoint
- Access Excel, PowerPoint, Word and More for Less Than 1 Euro: A Tech-Savvy Guide
- Mastering Bullet Points in PowerPoint: A Step-by-Step Guide
- Adding a Slide to an Existing PowerPoint Presentation: A Step-by-Step Guide
- PowerPoint This Picture Can’t Be Displayed: Troubleshooting Tips for Techies
- How to Add Copilot to PowerPoint: Step-by-Step Guide
- .POTX File Extension: Understanding the Type of PowerPoint File Created When Saving a Presentation
- Create a Timeline in PowerPoint 2010: Step-by-Step Guide
- Add a Slide to an Existing PowerPoint Presentation: A Step-by-Step Guide
- Troubleshooting: Why Can’t I Indent in PowerPoint?
Leave a Comment Cancel reply
Save my name, email, and website in this browser for the next time I comment.
Home Blog PowerPoint Tutorials PowerPoint Slide Size: What is the Best Size for a Presentation
PowerPoint Slide Size: What is the Best Size for a Presentation

Whether you’re a business professional, educator, or public speaker, understanding what are the optimal slide dimensions can enhance the impact of your presentation. This guide will walk you through everything you need to know about the size of your PowerPoint presentation, from the basics to advanced tips.
What is the PowerPoint Slide Size?
PowerPoint slide size refers to the dimensions of the slides within your PowerPoint presentation. These dimensions determine how your content is displayed in a monitor or projector, and can significantly affect the overall look and feel of your presentation.
The most common slide sizes in PowerPoint are 16:9 (widescreen) and 4:3 (standard).
Choosing the right slide size is essential as it impacts how your content is perceived and ensures compatibility with various display devices. Once you define the optimal slide size for your next presentation, you can change the slide dimensions in PowerPoint following the steps described in our article.

It is important to understand the differences between Aspect Ratio and Pixel Dimensions.
The specific pixel dimensions for a standard 16:9 slide are 1920 pixels in width by 1080 pixels in height.
Understanding Aspect Ratio vs. Pixel Dimensions
Aspect ratio vs. pixel dimensions: what’s the difference.
When defining the optimal slide size for your presentation, it’s important to understand the difference between aspect ratio and pixel dimensions, as these terms often cause confusion but are critical for creating well-designed presentations.
Aspect Ratio
The aspect ratio refers to the proportional relationship between the width and height of your slide. It’s expressed as two numbers separated by a colon, such as 4:3 or 16:9. The aspect ratio defines the shape of your slide and how it will appear on different screens.
Pixel Dimensions:
Pixel dimensions, on the other hand, specify the total number of pixels in the width and height of your slide. This measurement determines the resolution and quality of your images and text in your PowerPoint slide size. For example:
- 1920 x 1080 pixels: This is a common dimension for a 16:9 aspect ratio, known as Full HD. It provides high clarity and detail, making it suitable for large screens and high-resolution displays.
- 1024 x 768 pixels: This dimension matches a 4:3 aspect ratio and is often used for smaller screens or lower resolution displays. It’s less detailed than 1920 x 1080 but can be effective for standard printouts or older projectors.
Why both slide size definitions matter? Understanding both aspect ratio and pixel dimensions is important because they impact how your PowerPoint slide size is viewed across different devices and formats. Here’s why:
- Consistency Across Devices: Ensuring your aspect ratio is compatible with the display device prevents issues like black bars on the sides (letterboxing) or content being cut off (cropping).
- Clarity and Detail: Choosing appropriate pixel dimensions ensures that your images and text appear sharp and clear, avoiding pixelation or blurriness.
- Professional Appearance: Matching the right aspect ratio and pixel dimensions helps maintain a polished and professional look, whether you’re presenting on a large screen, sharing a PDF handout (as we will see later), or displaying your slides online.
The Impact of Slide Size on Different Industries
Different industries have unique needs when it comes to presentation slide sizes. For instance:
- Business: Corporate presentations often require widescreen formats (16:9 slide size) to showcase detailed charts and data on modern projectors and screens. However, in some environments there are still projectors using the traditional 4:3 aspect ratio format for slide sizes.
- Education: Lectures and workshops benefit from both 16:9 and 4:3 formats, depending on the teaching aids and screen setups used.
- Design: Creative professionals need to create visually appealing slides that may require custom dimensions to stand out and effectively communicate their ideas.
Best Practices for Choosing a Proper Slide Size for your Presentation
When selecting an optimal PowerPoint slide size, consider the following:
- Audience and Venue: Tailor your slide size to the screen size and setup of your presentation venue. Widescreen (16:9) is typically best for large screens, while standard (4:3) works well for print distributions.
- Presentation Type: Webinars and online presentations held via Zoom or Teams , for example, often benefit from widescreen formats, while in-person meetings might require flexibility.
- Aesthetics vs. Functionality: Balance visual appeal with readability and content integrity.
When creating PDF handouts from your PowerPoint presentation, it’s also important to choose a convenient slide size that ensures readability and clarity in print.
The 4:3 aspect ratio is generally preferred for printed handouts as it aligns well with standard paper sizes such as A4 or Letter. This format ensures that your content fits neatly onto the page without excessive margins or cropping.
Additionally, using 4:3 for print ensures that text and graphics are appropriately scaled, maintaining the legibility and professional appearance of your handouts. This consideration is essential for creating effective printed materials that complement your live presentations.
Overcoming Challenges with Slide Size
Adapting content for different slide sizes.
Resizing images and adjusting layouts can be challenging. Here are some tips:
- Resizing Images: Ensure that images maintain their aspect ratio to avoid distortion.
- Text Adjustments: Modify font sizes and text boxes to fit the new slide dimensions without compromising readability.
- Consistency: Keep a consistent layout throughout your presentation to maintain a professional look.
Dealing with Mixed Slide Sizes in a Presentation
Sometimes, you may need to integrate slides with different dimensions. Here’s how:
- Transition Techniques: Use smooth transitions to blend slides of varying sizes seamlessly.
- Tools and Add-Ins: You can use PowerPoint add-ins that help manage and standardize slide sizes across your presentation.
Advanced Tips for Custom Slide Sizes
When it is time to innovate, the PowerPoint slide size can also play an important role. If you are considering to create a presentation for digital signage, or non traditional devices, choosing a custom PowerPoint slide size can help to achieve this. Here are some ideas and ways you can innovate by choosing a different slide size:
- Unique Dimensions: Create custom slide sizes for branding or special events.
- Custom Branding: Use non-standard slide sizes to align with your brand identity and marketing materials.
- Innovative Uses: Experiment with different dimensions to create unique visual experiences.
For example, to create high-quality digital signage content, you’d need to set the PowerPoint slides to a 1920×1080 resolution in vertical (portrait) or horizontal (landscape) mode, which are the typical digital sign screen sizes.
Understanding what is the optimal slide size and how to configure it is essential for creating effective and engaging presentations. By optimizing your slides, and overcoming common challenges, you can ensure your visual aids are impactful and professional. Keep experimenting with different sizes and formats to find what works best for your needs. Remember, the key to a successful presentation lies in the details—choosing the right slide size is one of them.

Like this article? Please share
Presentation Tips Filed under PowerPoint Tutorials
Related Articles

Filed under Google Slides Tutorials • May 17th, 2024
How to Import Google Slides Themes
Importing Google Slides Themes is an easy task that can bring life into your presentations. Learn how to reuse old slides to create new cool themes here.

Filed under PowerPoint Tutorials • May 17th, 2024
How to Edit Background Graphics in PowerPoint
You don’t have to stick with template designs that don’t appeal to your intended message. Learn how to edit background graphics in PowerPoint to become a master user.

How to Make Google Slides Vertical
Power up your presentation skills by learning how to make google slides go vertical. Step-by-step instructions with examples.
Leave a Reply
The world is getting “smarter” every day, and to keep up with consumer expectations, companies are increasingly using machine learning algorithms to make things easier. You can see them in use in end-user devices (through face recognition for unlocking smartphones) or for detecting credit card fraud (like triggering alerts for unusual purchases).
Within artificial intelligence (AI) and machine learning , there are two basic approaches: supervised learning and unsupervised learning. The main difference is that one uses labeled data to help predict outcomes, while the other does not. However, there are some nuances between the two approaches, and key areas in which one outperforms the other. This post clarifies the differences so you can choose the best approach for your situation.
Supervised learning is a machine learning approach that’s defined by its use of labeled data sets. These data sets are designed to train or “supervise” algorithms into classifying data or predicting outcomes accurately. Using labeled inputs and outputs, the model can measure its accuracy and learn over time.
Supervised learning can be separated into two types of problems when data mining : classification and regression:
- Classification problems use an algorithm to accurately assign test data into specific categories, such as separating apples from oranges. Or, in the real world, supervised learning algorithms can be used to classify spam in a separate folder from your inbox. Linear classifiers, support vector machines, decision trees and random forest are all common types of classification algorithms.
- Regression is another type of supervised learning method that uses an algorithm to understand the relationship between dependent and independent variables. Regression models are helpful for predicting numerical values based on different data points, such as sales revenue projections for a given business. Some popular regression algorithms are linear regression, logistic regression, and polynomial regression.
Unsupervised learning uses machine learning algorithms to analyze and cluster unlabeled data sets. These algorithms discover hidden patterns in data without the need for human intervention (hence, they are “unsupervised”).
Unsupervised learning models are used for three main tasks: clustering, association and dimensionality reduction:
- Clustering is a data mining technique for grouping unlabeled data based on their similarities or differences. For example, K-means clustering algorithms assign similar data points into groups, where the K value represents the size of the grouping and granularity. This technique is helpful for market segmentation, image compression, and so on.
- Association is another type of unsupervised learning method that uses different rules to find relationships between variables in a given data set. These methods are frequently used for market basket analysis and recommendation engines, along the lines of “Customers Who Bought This Item Also Bought” recommendations.
- Dimensionality reduction is a learning technique that is used when the number of features (or dimensions) in a given data set is too high. It reduces the number of data inputs to a manageable size while also preserving the data integrity. Often, this technique is used in the preprocessing data stage, such as when autoencoders remove noise from visual data to improve picture quality.
The main distinction between the two approaches is the use of labeled data sets. To put it simply, supervised learning uses labeled input and output data, while an unsupervised learning algorithm does not.
In supervised learning, the algorithm “learns” from the training data set by iteratively making predictions on the data and adjusting for the correct answer. While supervised learning models tend to be more accurate than unsupervised learning models, they require upfront human intervention to label the data appropriately. For example, a supervised learning model can predict how long your commute will be based on the time of day, weather conditions and so on. But first, you must train it to know that rainy weather extends the driving time.
Unsupervised learning models, in contrast, work on their own to discover the inherent structure of unlabeled data. Note that they still require some human intervention for validating output variables. For example, an unsupervised learning model can identify that online shoppers often purchase groups of products at the same time. However, a data analyst would need to validate that it makes sense for a recommendation engine to group baby clothes with an order of diapers, applesauce, and sippy cups.
- Goals: In supervised learning, the goal is to predict outcomes for new data. You know up front the type of results to expect. With an unsupervised learning algorithm, the goal is to get insights from large volumes of new data. The machine learning itself determines what is different or interesting from the data set.
- Applications: Supervised learning models are ideal for spam detection, sentiment analysis, weather forecasting and pricing predictions, among other things. In contrast, unsupervised learning is a great fit for anomaly detection, recommendation engines, customer personas and medical imaging.
- Complexity: Supervised learning is a simple method for machine learning, typically calculated by using programs like R or Python. In unsupervised learning, you need powerful tools for working with large amounts of unclassified data. Unsupervised learning models are computationally complex because they need a large training set to produce intended outcomes.
- Drawbacks: Supervised learning models can be time-consuming to train, and the labels for input and output variables require expertise. Meanwhile, unsupervised learning methods can have wildly inaccurate results unless you have human intervention to validate the output variables.
Choosing the right approach for your situation depends on how your data scientists assess the structure and volume of your data, as well as the use case. To make your decision, be sure to do the following:
- Evaluate your input data: Is it labeled or unlabeled data? Do you have experts that can support extra labeling?
- Define your goals: Do you have a recurring, well-defined problem to solve? Or will the algorithm need to predict new problems?
- Review your options for algorithms: Are there algorithms with the same dimensionality that you need (number of features, attributes, or characteristics)? Can they support your data volume and structure?
Classifying big data can be a real challenge in supervised learning, but the results are highly accurate and trustworthy. In contrast, unsupervised learning can handle large volumes of data in real time. But, there’s a lack of transparency into how data is clustered and a higher risk of inaccurate results. This is where semi-supervised learning comes in.
Can’t decide on whether to use supervised or unsupervised learning? Semi-supervised learning is a happy medium, where you use a training data set with both labeled and unlabeled data. It’s particularly useful when it’s difficult to extract relevant features from data—and when you have a high volume of data.
Semi-supervised learning is ideal for medical images, where a small amount of training data can lead to a significant improvement in accuracy. For example, a radiologist can label a small subset of CT scans for tumors or diseases so the machine can more accurately predict which patients might require more medical attention.
Machine learning models are a powerful way to gain the data insights that improve our world. To learn more about the specific algorithms that are used with supervised and unsupervised learning, we encourage you to delve into the Learn Hub articles on these techniques. We also recommend checking out the blog post that goes a step further, with a detailed look at deep learning and neural networks.
- What is Supervised Learning?
- What is Unsupervised Learning?
- AI vs. Machine Learning vs. Deep Learning vs. Neural Networks: What’s the difference?
To learn more about how to build machine learning models, explore the free tutorials on the IBM® Developer Hub .
Get the latest tech insights and expert thought leadership in your inbox.
The Data Differentiator: Learn how to weave a single technology concept into a holistic data strategy that drives business value.
Get our newsletters and topic updates that deliver the latest thought leadership and insights on emerging trends.
IMAGES
VIDEO
COMMENTS
Follow the 5/5/5 rule. To keep your audience from feeling overwhelmed, you should keep the text on each slide short and to the point. Some experts suggest using the 5/5/5 rule: no more than five words per line of text, five lines of text per slide, or five text-heavy slides in a row.
Tips for creating an effective presentation. Tip. Details. Choose a font style that your audience can read from a distance. Choosing a simple font style, such as Arial or Calibri, helps to get your message across. Avoid very thin or decorative fonts that might impair readability, especially at small sizes. Choose a font size that your audience ...
Rule 2: Spend only 1 minute per slide. When you present your slide in the talk, it should take 1 minute or less to discuss. This rule is really helpful for planning purposes—a 20-minute presentation should have somewhere around 20 slides. Also, frequently giving your audience new information to feast on helps keep them engaged.
Here are a handful of PowerPoint presentation tips and tricks to help you avoid missteps. 37. Stop With the Sound Effects. Sound effects are distracting and outdated. In most cases avoid it. Skip sound effects if you want to learn how to make your PowerPoint stand out without distractions. (Image source: Envato Elements.)
On the other side of the coin: you might overthink your presentation and put too much information on too many slides. With help from the 10-20-30 rule, you can make a PowerPoint presentation that's engaging and efficient. The guidelines for this rule are as follows: No more than 10 slides. No longer than 20 minutes. No larger than 30-point font.
Rule 1: Keep It Simple. One of the cardinal sins in PowerPoint presentations is overcrowding your slides with text, bullet points, and too many visuals. The first rule is to keep it simple. Each slide should have a single, clear message. Use concise language, bullet points, and minimal text to convey your points.
1. Galaxi PowerPoint Presentation Template. The Galaxi PowerPoint template has a clean and modern design. It's versatile enough to use for all kinds of presentations and comes with five premade color schemes. The template comes with 30 premade slides based on master slides, image placeholders, and editable shapes. 2.
A good presentation needs two fonts: a serif and sans-serif. Use one for the headlines and one for body text, lists, and the like. Keep it simple. Veranda, Helvetica, Arial, and even Times New Roman are safe choices. Stick with the classics and it's hard to botch this one too badly.
7) Limit bullet points. Keep your bullet points to a maximum of 5-6 per slide. In addition, the words per bullet point should also be limited to 5-6 words. It's also wise to vary what you present in each slide, such as alternating between bullet points, graphics, and graph slides, in order to sustain the interest and focus of your audience.
Rule 2: Spend only 1 minute per slide. When you present your slide in the talk, it should take 1 minute or less to discuss. This rule is really helpful for planning purposes—a 20-minute presentation should have somewhere around 20 slides. Also, frequently giving your audience new information to feast on helps keep them engaged.
10 Tips for Effective PowerPoint Presentations. Tip #1: Choose an Interesting Topic. Tip #2: Do Some Deep Research. Tip #3: Use an Amazing Presentation Tool. Tip #4: Pick Out a Presentation Template. Tip #5: Keep Your Audience in Mind. Tip #6: Add Eye-Catching Headings and Text. Tip #7: Keep it Engaging With Animations.
Here are a few tips for business professionals who want to move from being good speakers to great ones: be concise (the fewer words, the better); never use bullet points (photos and images paired ...
This develops further rapport between presenter and audience. By | March 23rd, 2020 | 0 Comments. 1. Always prepare a paper for the audience 2.Limit every slide to 35 words 3.3. Last-minute slide presentations are a career-limiting activity. 4.4. Create time.
The rule of thirds: Placing elements at one-third or two-thirds from the edge of the slide, and particularly where these gridlines intersect, is a universal rule for building a visually appealing slide. ... Learn how to use the Pyramid Principle to create more effective PowerPoint presentations, including how to organize ideas, present data and ...
Best Practice PowerPoint Presentation Tips. Use A Consistent Presentation Design. One Topic Per Slide. Avoid information overwhelm by using the "Rule of Three". Display one bullet at a time. Presentation Blunders To Avoid. Avoid unnecessary animations. Only add content that supports your main points.
Get your main point into the presentation as early as possible (this avoids any risk of audience fatigue or attention span waning), then substantiate your point with facts, figures etc and then reiterate your point at the end in a 'Summary'. 2. Practice Makes Perfect. Also, don't forget to practice your presentation.
Be mindful of colors and fonts. 4. Use animation sparingly. See more. Wondering how to design the perfect PowerPoint presentation? It's easier than you think-just follow five simple rules to get started: 1. Consider using templates. When building a slide deck, it's important to maintain consistency throughout.
Keep the background consistent and subtle. Use only enough text when using charts or graphs to explain the concept. Clearly label the graphic. Keep the design clean and uncluttered. Leave empty space around the text and graphics. Use quality clipart and use it sparingly. The graphic should relate to and enhance the topic of the slide.
Designing Effective PowerPoint Presentations Problem The purpose of a PowerPoint presentation is to aid comprehension. However, traditional PowerPoint slide design is flawed: slides packed with unfocused and text-heavy bulleted lists can confuse or disengage your audience. You may have endured one of these ineffective presentations yourself.
Advice from Edelman and Harring on leveraging the working memory with PowerPoint: Leverage the working memory by dividing the information between the visual and auditory modality. Doing this reduces the likelihood of one system becoming overloaded. For instance, spoken words with pictures are better than pictures with text, as integrating an ...
Rule 2: Following the 5 rules for creating effective presentation slides. Spend only one minute or less on each slide to keep things lively and avoid overwhelming your audience. The 5/5/5 rule is a simple guide to keep things short and sweet. Stick to five words per line, no more than five lines per slide, and steer clear of having five slides ...
Designing an Effective PowerPoint Presentation: Quick Guide. This presentation is designed to quickly introduce you into the world of PowerPoint creation. It covers concepts of visual rhetoric, design, and good presentation skills. This powerpoint resource, broken up into four parts, provides an excellent overview of how to design effective ...
If your presentation includes important images, try making them cover the entire slide. While you won't be able to include much text on these slides, displaying the right image can be an effective tool to reinforce an important point in your presentation. One word of warning: This only works if your images are large enough.
You don't want your presentation to be too short or too long. The 10/20/30 rule is a popular guideline that suggests that a presentation should have 10 slides, last 20 minutes, and have no font smaller than 30 points. While this rule may not work for every presentation, it is a good starting point.
The most common slide sizes in PowerPoint are 16:9 (widescreen) and 4:3 (standard). Choosing the right slide size is essential as it impacts how your content is perceived and ensures compatibility with various display devices. Once you define the optimal slide size for your next presentation, you can change the slide dimensions in PowerPoint ...
The main difference between supervised and unsupervised learning: Labeled data. The main distinction between the two approaches is the use of labeled data sets. To put it simply, supervised learning uses labeled input and output data, while an unsupervised learning algorithm does not. In supervised learning, the algorithm "learns" from the ...