Home Blog Business How To Create a Project Presentation: A Guide for Impactful Content

How To Create a Project Presentation: A Guide for Impactful Content

Corporate, academic, and business meetings share one common factor: successfully delivering project presentations. This is one skill professionals should harness in terms of articulating ideas, presenting plans, and sharing outcomes through an effective project presentation.
In this fast-paced reality where new tools and frameworks make us question the human factor value, we believe there’s much to be said about how working towards building presentation skills can make a difference, especially for making a project stand out from the crowd and have a lasting impact on stakeholders. We can no longer talk about simply disclosing information, the manner in which the narrative is built, how data is introduced, and several other factors that speak of your expertise in the subject.
This article will explore the art of project presentation, giving insights to presenters to deliver a memorable project plan presentation. Whether you are new to this experience or a seasoned presenter, this article promises to give you valuable information on how to build and present a project presentation that resonates with your target audience and will convert into your expected results for the project. Let’s get started.
Table of Contents
- Who is the audience of a project presentation?
Executive Summary
Project overview, the project process model, the project scope, the project resources, the project roadmap, the project activities plan, the project risks, quality control, project execution and monitoring.
- The Project Team
What Is a Project Presentation?
A project presentation is a business activity that brings together stakeholders and team members to oversee a project from execution to completion. During a project presentation, one or two people present a document or slide deck with an overview of all the project’s details.
During a project presentation, the project manager highlights key data about the project initiation and planning activities, like the project scope, requirements gathering, a deliverable list, timelines, and milestones.
The first instance of a project presentation is right before the execution of the project itself. Then, during the project process life cycle, you present it again with timely updates and news about the progress.
Who is the audience of a project presentation?
A project-related audience is made up of stakeholders – all individuals and entities that affect or are affected by the project’s existence.
Discuss the project presentation with team members that’ll work on the project so they know what’s at stake and what’s expected of them. They’ll need information like requirements, the roadmap, the work breakdown structure, and deliverables.
Stakeholders
Present your project to the stakeholders that can authorize resources and expenditures. Show them how the project will offer the solutions they want under the conditions they impose in a set amount of time.
Stakeholders want to know details like project scope, budget breakdowns, timing calculations, risk assessments, and how you plan to confront these risks and be ready for changes.
The Structure of a Project Presentation
Project presentations follow a standard structure covering all critical elements. Follow this guideline to ensure that you cover everything with the slides, the speech, and the discussion.
In the next section, we describe a project presentation structure you can build with SlideModel templates or working with our AI PowerPoint generator . As you will see, most sections in the structure are summaries or overviews of project management practices completed during initiation and planning.
At the start of your presentation, add an executive summary slide . This section is meant to welcome the viewer to the presentation and give an idea of what’s to come. To differentiate your executive summary from the project overview that comes right after it, use the opportunity to place the project into context.
In an executive summary , show how this particular project fits into the overall strategy for the company or the section it belongs to. If, for example, your project is about TikTok Marketing, offer information as to how it fits in the overall marketing strategy.
Continue the presentation with a project overview to show the audience what to expect. This section covers one slide or a combination of slides depending on the layout. The project overview slide serves as the introduction to a project presentation and what’s inside.
Include these items:
- An Introduction with a brief background about the project.
- A short explanation of the project’s objectives and completion goals.
- A quick overview of the timeline with start and end dates.

The project life cycle is the series of phases that a project goes through from its inception to its completion. The project process model is the group of knowledge areas, processes, and their relationships that will guide the activities along the project lifecycle. The next slide should display the chosen project process model and explain how it’ll be carried out along the different lifecycle phases. Project process models examples include Waterfall, Scrum, and V Model for software development, and Business Process Modeling Notation (BPMN) and Swimlane for general business-related projects.
Process models are important for the team to understand execution processes. Stakeholders need to see the process model to understand the systematic process of activities and how long they will take.
Use one slide for the model, show only high-level components, and offer details during the presentation if the audience asks for them.
The scope is a crucial element of any project and needs its own section in the presentation. The scoping process begins with requirements gathering and includes the creation of a work breakdown structure , an analysis of what’s in and out of scope, plus validation and scope management plans.
One or two slides are enough to highlight key scope details in a dashboard-style layout mirroring the information on your project scope statement. Preferably, place the scope slides towards the start of the project presentation close to the process model and project resources.

Every project needs resources, and that assessment must be included in the project presentation as well. In a general sense, all resources are what make up the overall budget for the project. In turn, you’ll need to show a budget breakdown that shows high-level resources.
Like many aspects of a project presentation, what you include depends on the industry you’re working for. Construction projects use constructors, materials, machinery, etc. Software projects use programmers, designers, software licenses, computers, etc.

Time is the main resource of any project. During project planning, the project management team estimates the required effort needed to complete the defined scope. Using the Project Process Model, Scope, and Resources, a plan is built. Present a roadmap to highlight the expected time for project completion and where each milestone falls along that line.
Roadmaps can be constructed with an infinite variety of visual layouts, from highly creative and illustrative to structured formats resembling spreadsheets and tables with color-coded roadmaps across the cells. Use one slide to show the roadmap highlighting time estimates, constraints, and projections. For updated project presentations, mark where the project is on the roadmap at that particular moment in time.

Every phase of the roadmap is broken down into action plans . Action plans list activities, their duration, allocated resources (human, material, and financial), and the relationship between activities.
Present your project activities plan with a Gantt Chart and a Costs Report. The Gantt Chart will show the activities to execute, how long they will take, and who (person or team) will be responsible for them. The costs reports will show how much the execution of activities will cost.
During the presentation, you’ll spend the most time on this section, as this is when and where your entire plan is outlined. To show more detail than the roadmap overview, use a few slides to show specific sections of the main Gantt chart and show key activities per phase or milestone.

All projects present risks, and to control them, they must be identified, assessed, evaluated, and mitigated . Visualize your risk assessment with a risk matrix and include it in the project presentation.
Use this slide to explain to stakeholders how you plan to mitigate the identified risks. Share with team members what’s expected of them in order to keep the risks under control. Risk management is a critical component of project management and something stakeholders will always be looking at.

Controlling the quality of project deliverables is critical for positive project outcomes and continued success with the deliverable. This process is called quality control or quality assurance.
The project process model includes which quality control techniques the team will use and when. Some quality assurance (QA) techniques include statistical process control (SPC), Six Sigma, ISO 9000, and Total Quality Management (TQM). Use one slide to visualize the process and your plan to execute it.
Once the project starts, the project plan is a living entity and evolves over time. This section will need to be regularly updated with progress reports, performance KPIs, and status updates.
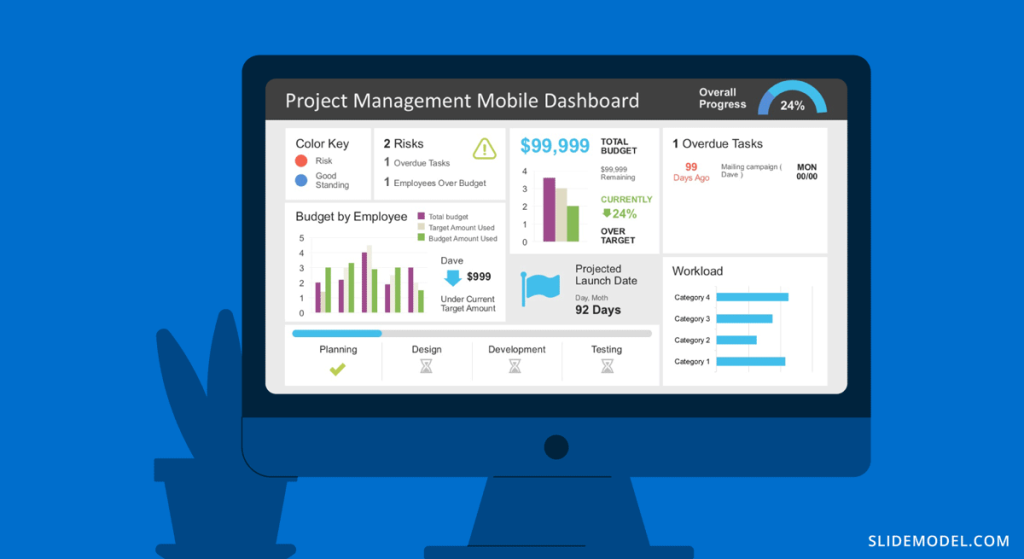
Across these slides, explain how activities will be monitored and deliverable outcomes measured. Show exactly how you will determine if the project is on course or has deviations. Visualize all execution activities with a Gantt chart to show the current progress. Use big numbers and data points to highlight performance metrics. Use a comparison slide to visualize the completeness percentage vs. planned progress and budget consumption vs. planned budget.
Explain all monitoring activities for the execution phase using a calendar or schedule that shows on what days activities will take place and who is involved.
The Project Team
When presenting a project, include a stakeholder map to describe the management team, the sponsors, the main stakeholders, and the implementation team or teams. Depending on the size of the project, this will be an org chart or multiple org charts across a few slides.
Why is it important to present the project team to the stakeholders and vice versa? So that everyone involved knows the other parties and their responsibilities.
Another use for the team slide or slides is to present the next person who will speak during the project presentation. This gives the audience some background on that person’s role in the project.

Case Study – Project Presentation Example
Using the structure we present above, we outlined a case study of a realistic project and how the project manager puts together the project presentation using SlideModel templates. The project presentation example is based on a complex project of building a bridge (Cline Avenue Bridge). For the educational purpose of this article, we are not delivering all the elements of the project presentation, as it is out of scope. Still, we illustrate the more representative slides of each section, show how to prepare a PowerPoint Presentation for a project and how simple it is to adapt the templates to the content that needs to be presented. As a disclaimer, all information we present is an adaptation and reinterpretation of the real project, modified by SlideModel to fit the use case learning goals. This information and presentation should not be considered a source of information related to the Cline Avenue Bridge Project.
In this slide, the presenter summarises the project highlights in a project charter style. The Project Manager can extend this introduction all over the project lifecycle, and the speech can jump from different knowledge areas without the need to change slides or get deeper into details. Specifically, in the Cline Bridge Project, the objective is narrated, the location is just mentioned and linked to a map for further details, and a set of important facts are presented (Building Information Modelling Process, Budget, Duration, Sponsor, and Constructor). Key Highlights of the final deliverable are listed (Segmental Bridge, Material Concrete, 1.7 miles of length and 46 feet of width)

Process Model
The Process Model slide illustrates the framework for the project lifecycle, processes, planning, and execution. In this slide, the Project Manager will describe the model and how it is tailored to the specifics of the project. In this case, for the development and construction of the Cline Bridge, the builder has defined the use of BIM (Building Information Modelling) as the process model. During this slide, the presenter can describe the lifecycle phases (Design, Production, Construction, Operation, and Planning) and drill down one level over the knowledge practices involved. For example, the initial stage consists of “Design”, which has two main knowledge areas, Conceptual Design, and Detailed Design. The project manager is able to explain this definition without the need to outline detailed processes and activities within them.

The Scope section of the presentation generally involves several slides, as the content layout is a list of “requirements.” Based on this fact, a table layout is suggested to make good use of space. It is important to avoid abusing the “list” and present the group of requirements rather than specific requirements. Otherwise, the project manager ends up transcribing the requirements document.
In this project presentation example, we present 10 groups of requirements traversing different stages of the project lifecycle.
- Design Standards: Bridge design must comply with local, national, and international design standards, including relevant engineering and safety codes
- Load Capacity: The bridge must be designed to safely carry a specific maximum load, which would include the weight of the bridge itself, traffic, pedestrians, wind, and other factors.
- Seismic Design: The design must account for seismic loads.
- Aesthetic Design: The bridge must be designed to meet certain aesthetic criteria aligned with the artists and architects.
- Accessibility and Use Requirements: Requirements for pedestrian walkways, bike lanes, vehicle lanes, load restrictions for vehicles, clearance heights for boats if over a waterway, etc.
- Regulatory Approvals: The project must secure all necessary permits and approvals from relevant local and national regulatory bodies.
- Environmental Impact: The project must take steps to minimize its environmental impact during construction and the operation of the bridge, including implementing erosion and sediment controls.
- Materials Simulation: Materials should comply with regulations and usage expectations for current and future expected requirements.
- Site Preparation: The project must include preparation of the construction site, including any necessary land clearing or grading.
- Foundations Construction: Foundations will need to support materials weight and traffic expected for the next 30 years.
- Site Acquisition: Acquire site and terrain for building and logistics.

Building a bridge involves a high level of resource usage. In an executive meeting of a project presentation, the recommendation is to structure this section as a Financial table with only one level of detail. Further details are delegated to specific resources and cost analysis presentations.
The resources list presented is:
- Professional Services
- Construction Labour
- Quality Assurance
- Contingency
- Waste Disposal and Cleanup
- Subcontractors
In order to break the style of table after table during the project presentation, we suggest using visual elements as icons and colors metaphorically related to each of the elements listed.

Project Roadmap
As explained earlier in the article, the project roadmap serves to offer a comprehensive overview of the significant milestones that will happen over the course of time. Given the magnitude of a bridge construction project and its prolonged duration, it is advisable, particularly for such extensive endeavours, to present a roadmap that aligns milestones with corresponding lifecycle phases in a discernible manner. This approach enables the audience to mentally envision the sequential progression of the construction process.
Aligned with previous slides, in the example we created a roadmap with the following high level milestones, and sub componentes:
- Project Budgeting and Financing
- Land Purchase & Renting
- Conceptual Design
- Detailed Design
- Access Routes
- Waste Disposal
- Simulations
- Materials Tests
- Seismic Tests
- Fabrication
- Preparation of Modular Pieces
- Build and Assembly
- Test under Acceptance Criteria
- Stress Test
- Operation and Maintenance
As you can see, the Project Manager decided over a sequential roadmap, presented with little detail in timings, with start and end dates to picture dimension over the diagram.

Action Plan
In the bridge construction project of the example, there will be plenty of activity plans. All along the project several of these slides will be created and updated. The most suitable option for presentation tasks, durations, precedence relationship and resource allocation is the Gantt Chart Template. We present the first Quarter of the project, over the Conceptual Design Activities.
As displayed in the PowerPoint Slide , the subtitle clarifies the number of slides that will be used for this purpose.
The activities presented are:
- Site Analysis
- Feasibility Analysis
- Design Concepts
- BIM Model Creation
- Model Revision
- Environmental Impact
- Present Design

Project Risks
Risk management is an iterative process all over the project life cycle. When presenting your projects, the risks will vary depending on the progress over the roadmap. For this specific example we decided to present the risks being discussed during the Ideation stage, where the developer is exchanging risks with contractors and the company that will build the bridge.
Our suggested layout for this kind of information is a simple table, where the risks are clearly readable and visible, while the description is a hint for discussion rather than an in depth explanation.
It is very important to classify the presented risks, at least with two dimensions; “Impact” and “Probability”. This will generate quality conversations around them.
Outlined Risks during the Initiation Phase:
- Design Errors
- Construction Delays
- Budget Overruns
- Regulatory Changes
- Site Conditions
- Equipment Failures
- Health and Safety Incidents
As the reader can spot, the risks outlined, are very high level, and each of them will trigger specific Risk Analysis Reports.

The quality control section of the project presentation may vary depending on the quality process adopted. For large scale companies with a uniform portfolio of projects , it is common to see a continuous improvement quality model, which iteratively builds quality over the different projects (for example software companies) For construction companies like the example, the situation is not different, and the quality control model is aligned with the specific building process model. In this specific case, the project manager is presenting the quality control process to be applied over the BIM model and the Quality Control process to be followed for the physical construction of the bridge:

Execution and Monitoring
During the project, several status meetings will be carried out. During the project presentation the manager can establish the pattern to be used along the project.
For this example, we set a basic progress dashboard where the project manager can present :
- The current timeline
- Top 5 issues
- Current Burndown
- Top 5 risks.

The art of project presentation goes beyond listing data in random slides. A project presentation is a powerful tool to align stakeholders and foster an environment of trust and collaboration over factual information.
With a structured approach, all members involved in the project design and execution can understand the direction that’s being taken and the importance behind certain decisions. We hope these insights can turn your project into a powerful presentation that inspires and deliver results.

Like this article? Please share
Project Management, Project Planning Filed under Business
Related Articles

Filed under Business • April 24th, 2024
How to Create and Present a Project Timeline
Building a project timeline is an essential aspect of project management. Stay tuned to our detailed guide with examples and templates.

Filed under PowerPoint Tutorials • November 8th, 2023
How To Present an Action Plan
An Action Plan is a sequence of steps that must be performed for a strategy to succeed. Learn how to present your Action plan to an Executive Audience.

Filed under Business • September 15th, 2023
How to Conduct a SWOT Analysis (Examples + Templates)
Bring value to your business and to potential customers by learning how to conduct a SWOT analysis. Detailed guide with examples + suggested templates.
Leave a Reply
Improve your practice.
Enhance your soft skills with a range of award-winning courses.
How to Structure your Presentation, with Examples
August 3, 2018 - Dom Barnard
For many people the thought of delivering a presentation is a daunting task and brings about a great deal of nerves . However, if you take some time to understand how effective presentations are structured and then apply this structure to your own presentation, you’ll appear much more confident and relaxed.
Here is our complete guide for structuring your presentation, with examples at the end of the article to demonstrate these points.
Why is structuring a presentation so important?
If you’ve ever sat through a great presentation, you’ll have left feeling either inspired or informed on a given topic. This isn’t because the speaker was the most knowledgeable or motivating person in the world. Instead, it’s because they know how to structure presentations – they have crafted their message in a logical and simple way that has allowed the audience can keep up with them and take away key messages.
Research has supported this, with studies showing that audiences retain structured information 40% more accurately than unstructured information.
In fact, not only is structuring a presentation important for the benefit of the audience’s understanding, it’s also important for you as the speaker. A good structure helps you remain calm, stay on topic, and avoid any awkward silences.
What will affect your presentation structure?
Generally speaking, there is a natural flow that any decent presentation will follow which we will go into shortly. However, you should be aware that all presentation structures will be different in their own unique way and this will be due to a number of factors, including:
- Whether you need to deliver any demonstrations
- How knowledgeable the audience already is on the given subject
- How much interaction you want from the audience
- Any time constraints there are for your talk
- What setting you are in
- Your ability to use any kinds of visual assistance
Before choosing the presentation’s structure answer these questions first:
- What is your presentation’s aim?
- Who are the audience?
- What are the main points your audience should remember afterwards?
When reading the points below, think critically about what things may cause your presentation structure to be slightly different. You can add in certain elements and add more focus to certain moments if that works better for your speech.

What is the typical presentation structure?
This is the usual flow of a presentation, which covers all the vital sections and is a good starting point for yours. It allows your audience to easily follow along and sets out a solid structure you can add your content to.
1. Greet the audience and introduce yourself
Before you start delivering your talk, introduce yourself to the audience and clarify who you are and your relevant expertise. This does not need to be long or incredibly detailed, but will help build an immediate relationship between you and the audience. It gives you the chance to briefly clarify your expertise and why you are worth listening to. This will help establish your ethos so the audience will trust you more and think you’re credible.
Read our tips on How to Start a Presentation Effectively
2. Introduction
In the introduction you need to explain the subject and purpose of your presentation whilst gaining the audience’s interest and confidence. It’s sometimes helpful to think of your introduction as funnel-shaped to help filter down your topic:
- Introduce your general topic
- Explain your topic area
- State the issues/challenges in this area you will be exploring
- State your presentation’s purpose – this is the basis of your presentation so ensure that you provide a statement explaining how the topic will be treated, for example, “I will argue that…” or maybe you will “compare”, “analyse”, “evaluate”, “describe” etc.
- Provide a statement of what you’re hoping the outcome of the presentation will be, for example, “I’m hoping this will be provide you with…”
- Show a preview of the organisation of your presentation
In this section also explain:
- The length of the talk.
- Signal whether you want audience interaction – some presenters prefer the audience to ask questions throughout whereas others allocate a specific section for this.
- If it applies, inform the audience whether to take notes or whether you will be providing handouts.
The way you structure your introduction can depend on the amount of time you have been given to present: a sales pitch may consist of a quick presentation so you may begin with your conclusion and then provide the evidence. Conversely, a speaker presenting their idea for change in the world would be better suited to start with the evidence and then conclude what this means for the audience.
Keep in mind that the main aim of the introduction is to grab the audience’s attention and connect with them.
3. The main body of your talk
The main body of your talk needs to meet the promises you made in the introduction. Depending on the nature of your presentation, clearly segment the different topics you will be discussing, and then work your way through them one at a time – it’s important for everything to be organised logically for the audience to fully understand. There are many different ways to organise your main points, such as, by priority, theme, chronologically etc.
- Main points should be addressed one by one with supporting evidence and examples.
- Before moving on to the next point you should provide a mini-summary.
- Links should be clearly stated between ideas and you must make it clear when you’re moving onto the next point.
- Allow time for people to take relevant notes and stick to the topics you have prepared beforehand rather than straying too far off topic.
When planning your presentation write a list of main points you want to make and ask yourself “What I am telling the audience? What should they understand from this?” refining your answers this way will help you produce clear messages.
4. Conclusion
In presentations the conclusion is frequently underdeveloped and lacks purpose which is a shame as it’s the best place to reinforce your messages. Typically, your presentation has a specific goal – that could be to convert a number of the audience members into customers, lead to a certain number of enquiries to make people knowledgeable on specific key points, or to motivate them towards a shared goal.
Regardless of what that goal is, be sure to summarise your main points and their implications. This clarifies the overall purpose of your talk and reinforces your reason for being there.
Follow these steps:
- Signal that it’s nearly the end of your presentation, for example, “As we wrap up/as we wind down the talk…”
- Restate the topic and purpose of your presentation – “In this speech I wanted to compare…”
- Summarise the main points, including their implications and conclusions
- Indicate what is next/a call to action/a thought-provoking takeaway
- Move on to the last section
5. Thank the audience and invite questions
Conclude your talk by thanking the audience for their time and invite them to ask any questions they may have. As mentioned earlier, personal circumstances will affect the structure of your presentation.
Many presenters prefer to make the Q&A session the key part of their talk and try to speed through the main body of the presentation. This is totally fine, but it is still best to focus on delivering some sort of initial presentation to set the tone and topics for discussion in the Q&A.

Other common presentation structures
The above was a description of a basic presentation, here are some more specific presentation layouts:
Demonstration
Use the demonstration structure when you have something useful to show. This is usually used when you want to show how a product works. Steve Jobs frequently used this technique in his presentations.
- Explain why the product is valuable.
- Describe why the product is necessary.
- Explain what problems it can solve for the audience.
- Demonstrate the product to support what you’ve been saying.
- Make suggestions of other things it can do to make the audience curious.
Problem-solution
This structure is particularly useful in persuading the audience.
- Briefly frame the issue.
- Go into the issue in detail showing why it ‘s such a problem. Use logos and pathos for this – the logical and emotional appeals.
- Provide the solution and explain why this would also help the audience.
- Call to action – something you want the audience to do which is straightforward and pertinent to the solution.
Storytelling
As well as incorporating stories in your presentation , you can organise your whole presentation as a story. There are lots of different type of story structures you can use – a popular choice is the monomyth – the hero’s journey. In a monomyth, a hero goes on a difficult journey or takes on a challenge – they move from the familiar into the unknown. After facing obstacles and ultimately succeeding the hero returns home, transformed and with newfound wisdom.
Storytelling for Business Success webinar , where well-know storyteller Javier Bernad shares strategies for crafting compelling narratives.
Another popular choice for using a story to structure your presentation is in media ras (in the middle of thing). In this type of story you launch right into the action by providing a snippet/teaser of what’s happening and then you start explaining the events that led to that event. This is engaging because you’re starting your story at the most exciting part which will make the audience curious – they’ll want to know how you got there.
- Great storytelling: Examples from Alibaba Founder, Jack Ma
Remaining method
The remaining method structure is good for situations where you’re presenting your perspective on a controversial topic which has split people’s opinions.
- Go into the issue in detail showing why it’s such a problem – use logos and pathos.
- Rebut your opponents’ solutions – explain why their solutions could be useful because the audience will see this as fair and will therefore think you’re trustworthy, and then explain why you think these solutions are not valid.
- After you’ve presented all the alternatives provide your solution, the remaining solution. This is very persuasive because it looks like the winning idea, especially with the audience believing that you’re fair and trustworthy.
Transitions
When delivering presentations it’s important for your words and ideas to flow so your audience can understand how everything links together and why it’s all relevant. This can be done using speech transitions which are words and phrases that allow you to smoothly move from one point to another so that your speech flows and your presentation is unified.
Transitions can be one word, a phrase or a full sentence – there are many different forms, here are some examples:
Moving from the introduction to the first point
Signify to the audience that you will now begin discussing the first main point:
- Now that you’re aware of the overview, let’s begin with…
- First, let’s begin with…
- I will first cover…
- My first point covers…
- To get started, let’s look at…
Shifting between similar points
Move from one point to a similar one:
- In the same way…
- Likewise…
- Equally…
- This is similar to…
- Similarly…
Internal summaries
Internal summarising consists of summarising before moving on to the next point. You must inform the audience:
- What part of the presentation you covered – “In the first part of this speech we’ve covered…”
- What the key points were – “Precisely how…”
- How this links in with the overall presentation – “So that’s the context…”
- What you’re moving on to – “Now I’d like to move on to the second part of presentation which looks at…”
Physical movement
You can move your body and your standing location when you transition to another point. The audience find it easier to follow your presentation and movement will increase their interest.
A common technique for incorporating movement into your presentation is to:
- Start your introduction by standing in the centre of the stage.
- For your first point you stand on the left side of the stage.
- You discuss your second point from the centre again.
- You stand on the right side of the stage for your third point.
- The conclusion occurs in the centre.
Key slides for your presentation
Slides are a useful tool for most presentations: they can greatly assist in the delivery of your message and help the audience follow along with what you are saying. Key slides include:
- An intro slide outlining your ideas
- A summary slide with core points to remember
- High quality image slides to supplement what you are saying
There are some presenters who choose not to use slides at all, though this is more of a rarity. Slides can be a powerful tool if used properly, but the problem is that many fail to do just that. Here are some golden rules to follow when using slides in a presentation:
- Don’t over fill them – your slides are there to assist your speech, rather than be the focal point. They should have as little information as possible, to avoid distracting people from your talk.
- A picture says a thousand words – instead of filling a slide with text, instead, focus on one or two images or diagrams to help support and explain the point you are discussing at that time.
- Make them readable – depending on the size of your audience, some may not be able to see small text or images, so make everything large enough to fill the space.
- Don’t rush through slides – give the audience enough time to digest each slide.
Guy Kawasaki, an entrepreneur and author, suggests that slideshows should follow a 10-20-30 rule :
- There should be a maximum of 10 slides – people rarely remember more than one concept afterwards so there’s no point overwhelming them with unnecessary information.
- The presentation should last no longer than 20 minutes as this will leave time for questions and discussion.
- The font size should be a minimum of 30pt because the audience reads faster than you talk so less information on the slides means that there is less chance of the audience being distracted.
Here are some additional resources for slide design:
- 7 design tips for effective, beautiful PowerPoint presentations
- 11 design tips for beautiful presentations
- 10 tips on how to make slides that communicate your idea
Group Presentations
Group presentations are structured in the same way as presentations with one speaker but usually require more rehearsal and practices. Clean transitioning between speakers is very important in producing a presentation that flows well. One way of doing this consists of:
- Briefly recap on what you covered in your section: “So that was a brief introduction on what health anxiety is and how it can affect somebody”
- Introduce the next speaker in the team and explain what they will discuss: “Now Elnaz will talk about the prevalence of health anxiety.”
- Then end by looking at the next speaker, gesturing towards them and saying their name: “Elnaz”.
- The next speaker should acknowledge this with a quick: “Thank you Joe.”
From this example you can see how the different sections of the presentations link which makes it easier for the audience to follow and remain engaged.
Example of great presentation structure and delivery
Having examples of great presentations will help inspire your own structures, here are a few such examples, each unique and inspiring in their own way.
How Google Works – by Eric Schmidt
This presentation by ex-Google CEO Eric Schmidt demonstrates some of the most important lessons he and his team have learnt with regards to working with some of the most talented individuals they hired. The simplistic yet cohesive style of all of the slides is something to be appreciated. They are relatively straightforward, yet add power and clarity to the narrative of the presentation.
Start with why – by Simon Sinek
Since being released in 2009, this presentation has been viewed almost four million times all around the world. The message itself is very powerful, however, it’s not an idea that hasn’t been heard before. What makes this presentation so powerful is the simple message he is getting across, and the straightforward and understandable manner in which he delivers it. Also note that he doesn’t use any slides, just a whiteboard where he creates a simple diagram of his opinion.
The Wisdom of a Third Grade Dropout – by Rick Rigsby
Here’s an example of a presentation given by a relatively unknown individual looking to inspire the next generation of graduates. Rick’s presentation is unique in many ways compared to the two above. Notably, he uses no visual prompts and includes a great deal of humour.
However, what is similar is the structure he uses. He first introduces his message that the wisest man he knew was a third-grade dropout. He then proceeds to deliver his main body of argument, and in the end, concludes with his message. This powerful speech keeps the viewer engaged throughout, through a mixture of heart-warming sentiment, powerful life advice and engaging humour.
As you can see from the examples above, and as it has been expressed throughout, a great presentation structure means analysing the core message of your presentation. Decide on a key message you want to impart the audience with, and then craft an engaging way of delivering it.
By preparing a solid structure, and practising your talk beforehand, you can walk into the presentation with confidence and deliver a meaningful message to an interested audience.
It’s important for a presentation to be well-structured so it can have the most impact on your audience. An unstructured presentation can be difficult to follow and even frustrating to listen to. The heart of your speech are your main points supported by evidence and your transitions should assist the movement between points and clarify how everything is linked.
Research suggests that the audience remember the first and last things you say so your introduction and conclusion are vital for reinforcing your points. Essentially, ensure you spend the time structuring your presentation and addressing all of the sections.
We use essential cookies to make Venngage work. By clicking “Accept All Cookies”, you agree to the storing of cookies on your device to enhance site navigation, analyze site usage, and assist in our marketing efforts.
Manage Cookies
Cookies and similar technologies collect certain information about how you’re using our website. Some of them are essential, and without them you wouldn’t be able to use Venngage. But others are optional, and you get to choose whether we use them or not.
Strictly Necessary Cookies
These cookies are always on, as they’re essential for making Venngage work, and making it safe. Without these cookies, services you’ve asked for can’t be provided.
Show cookie providers
- Google Login
Functionality Cookies
These cookies help us provide enhanced functionality and personalisation, and remember your settings. They may be set by us or by third party providers.
Performance Cookies
These cookies help us analyze how many people are using Venngage, where they come from and how they're using it. If you opt out of these cookies, we can’t get feedback to make Venngage better for you and all our users.
- Google Analytics
Targeting Cookies
These cookies are set by our advertising partners to track your activity and show you relevant Venngage ads on other sites as you browse the internet.
- Google Tag Manager
- Infographics
- Daily Infographics
- Popular Templates
- Accessibility
- Graphic Design
- Graphs and Charts
- Data Visualization
- Human Resources
- Beginner Guides
Blog Beginner Guides How To Make a Good Presentation [A Complete Guide]
How To Make a Good Presentation [A Complete Guide]
Written by: Krystle Wong Jul 20, 2023

A top-notch presentation possesses the power to drive action. From winning stakeholders over and conveying a powerful message to securing funding — your secret weapon lies within the realm of creating an effective presentation .
Being an excellent presenter isn’t confined to the boardroom. Whether you’re delivering a presentation at work, pursuing an academic career, involved in a non-profit organization or even a student, nailing the presentation game is a game-changer.
In this article, I’ll cover the top qualities of compelling presentations and walk you through a step-by-step guide on how to give a good presentation. Here’s a little tip to kick things off: for a headstart, check out Venngage’s collection of free presentation templates . They are fully customizable, and the best part is you don’t need professional design skills to make them shine!
These valuable presentation tips cater to individuals from diverse professional backgrounds, encompassing business professionals, sales and marketing teams, educators, trainers, students, researchers, non-profit organizations, public speakers and presenters.
No matter your field or role, these tips for presenting will equip you with the skills to deliver effective presentations that leave a lasting impression on any audience.
Click to jump ahead:
What are the 10 qualities of a good presentation?
Step-by-step guide on how to prepare an effective presentation, 9 effective techniques to deliver a memorable presentation, faqs on making a good presentation, how to create a presentation with venngage in 5 steps.
When it comes to giving an engaging presentation that leaves a lasting impression, it’s not just about the content — it’s also about how you deliver it. Wondering what makes a good presentation? Well, the best presentations I’ve seen consistently exhibit these 10 qualities:
1. Clear structure
No one likes to get lost in a maze of information. Organize your thoughts into a logical flow, complete with an introduction, main points and a solid conclusion. A structured presentation helps your audience follow along effortlessly, leaving them with a sense of satisfaction at the end.
Regardless of your presentation style , a quality presentation starts with a clear roadmap. Browse through Venngage’s template library and select a presentation template that aligns with your content and presentation goals. Here’s a good presentation example template with a logical layout that includes sections for the introduction, main points, supporting information and a conclusion:

2. Engaging opening
Hook your audience right from the start with an attention-grabbing statement, a fascinating question or maybe even a captivating anecdote. Set the stage for a killer presentation!
The opening moments of your presentation hold immense power – check out these 15 ways to start a presentation to set the stage and captivate your audience.
3. Relevant content
Make sure your content aligns with their interests and needs. Your audience is there for a reason, and that’s to get valuable insights. Avoid fluff and get straight to the point, your audience will be genuinely excited.
4. Effective visual aids
Picture this: a slide with walls of text and tiny charts, yawn! Visual aids should be just that—aiding your presentation. Opt for clear and visually appealing slides, engaging images and informative charts that add value and help reinforce your message.
With Venngage, visualizing data takes no effort at all. You can import data from CSV or Google Sheets seamlessly and create stunning charts, graphs and icon stories effortlessly to showcase your data in a captivating and impactful way.

5. Clear and concise communication
Keep your language simple, and avoid jargon or complicated terms. Communicate your ideas clearly, so your audience can easily grasp and retain the information being conveyed. This can prevent confusion and enhance the overall effectiveness of the message.
6. Engaging delivery
Spice up your presentation with a sprinkle of enthusiasm! Maintain eye contact, use expressive gestures and vary your tone of voice to keep your audience glued to the edge of their seats. A touch of charisma goes a long way!
7. Interaction and audience engagement
Turn your presentation into an interactive experience — encourage questions, foster discussions and maybe even throw in a fun activity. Engaged audiences are more likely to remember and embrace your message.
Transform your slides into an interactive presentation with Venngage’s dynamic features like pop-ups, clickable icons and animated elements. Engage your audience with interactive content that lets them explore and interact with your presentation for a truly immersive experience.

8. Effective storytelling
Who doesn’t love a good story? Weaving relevant anecdotes, case studies or even a personal story into your presentation can captivate your audience and create a lasting impact. Stories build connections and make your message memorable.
A great presentation background is also essential as it sets the tone, creates visual interest and reinforces your message. Enhance the overall aesthetics of your presentation with these 15 presentation background examples and captivate your audience’s attention.
9. Well-timed pacing
Pace your presentation thoughtfully with well-designed presentation slides, neither rushing through nor dragging it out. Respect your audience’s time and ensure you cover all the essential points without losing their interest.
10. Strong conclusion
Last impressions linger! Summarize your main points and leave your audience with a clear takeaway. End your presentation with a bang , a call to action or an inspiring thought that resonates long after the conclusion.
In-person presentations aside, acing a virtual presentation is of paramount importance in today’s digital world. Check out this guide to learn how you can adapt your in-person presentations into virtual presentations .

Preparing an effective presentation starts with laying a strong foundation that goes beyond just creating slides and notes. One of the quickest and best ways to make a presentation would be with the help of a good presentation software .
Otherwise, let me walk you to how to prepare for a presentation step by step and unlock the secrets of crafting a professional presentation that sets you apart.
1. Understand the audience and their needs
Before you dive into preparing your masterpiece, take a moment to get to know your target audience. Tailor your presentation to meet their needs and expectations , and you’ll have them hooked from the start!
2. Conduct thorough research on the topic
Time to hit the books (or the internet)! Don’t skimp on the research with your presentation materials — dive deep into the subject matter and gather valuable insights . The more you know, the more confident you’ll feel in delivering your presentation.
3. Organize the content with a clear structure
No one wants to stumble through a chaotic mess of information. Outline your presentation with a clear and logical flow. Start with a captivating introduction, follow up with main points that build on each other and wrap it up with a powerful conclusion that leaves a lasting impression.
Delivering an effective business presentation hinges on captivating your audience, and Venngage’s professionally designed business presentation templates are tailor-made for this purpose. With thoughtfully structured layouts, these templates enhance your message’s clarity and coherence, ensuring a memorable and engaging experience for your audience members.
Don’t want to build your presentation layout from scratch? pick from these 5 foolproof presentation layout ideas that won’t go wrong.

4. Develop visually appealing and supportive visual aids
Spice up your presentation with eye-catching visuals! Create slides that complement your message, not overshadow it. Remember, a picture is worth a thousand words, but that doesn’t mean you need to overload your slides with text.
Well-chosen designs create a cohesive and professional look, capturing your audience’s attention and enhancing the overall effectiveness of your message. Here’s a list of carefully curated PowerPoint presentation templates and great background graphics that will significantly influence the visual appeal and engagement of your presentation.
5. Practice, practice and practice
Practice makes perfect — rehearse your presentation and arrive early to your presentation to help overcome stage fright. Familiarity with your material will boost your presentation skills and help you handle curveballs with ease.
6. Seek feedback and make necessary adjustments
Don’t be afraid to ask for help and seek feedback from friends and colleagues. Constructive criticism can help you identify blind spots and fine-tune your presentation to perfection.
With Venngage’s real-time collaboration feature , receiving feedback and editing your presentation is a seamless process. Group members can access and work on the presentation simultaneously and edit content side by side in real-time. Changes will be reflected immediately to the entire team, promoting seamless teamwork.

7. Prepare for potential technical or logistical issues
Prepare for the unexpected by checking your equipment, internet connection and any other potential hiccups. If you’re worried that you’ll miss out on any important points, you could always have note cards prepared. Remember to remain focused and rehearse potential answers to anticipated questions.
8. Fine-tune and polish your presentation
As the big day approaches, give your presentation one last shine. Review your talking points, practice how to present a presentation and make any final tweaks. Deep breaths — you’re on the brink of delivering a successful presentation!
In competitive environments, persuasive presentations set individuals and organizations apart. To brush up on your presentation skills, read these guides on how to make a persuasive presentation and tips to presenting effectively .

Whether you’re an experienced presenter or a novice, the right techniques will let your presentation skills soar to new heights!
From public speaking hacks to interactive elements and storytelling prowess, these 9 effective presentation techniques will empower you to leave a lasting impression on your audience and make your presentations unforgettable.
1. Confidence and positive body language
Positive body language instantly captivates your audience, making them believe in your message as much as you do. Strengthen your stage presence and own that stage like it’s your second home! Stand tall, shoulders back and exude confidence.
2. Eye contact with the audience
Break down that invisible barrier and connect with your audience through their eyes. Maintaining eye contact when giving a presentation builds trust and shows that you’re present and engaged with them.
3. Effective use of hand gestures and movement
A little movement goes a long way! Emphasize key points with purposeful gestures and don’t be afraid to walk around the stage. Your energy will be contagious!
4. Utilize storytelling techniques
Weave the magic of storytelling into your presentation. Share relatable anecdotes, inspiring success stories or even personal experiences that tug at the heartstrings of your audience. Adjust your pitch, pace and volume to match the emotions and intensity of the story. Varying your speaking voice adds depth and enhances your stage presence.

5. Incorporate multimedia elements
Spice up your presentation with a dash of visual pizzazz! Use slides, images and video clips to add depth and clarity to your message. Just remember, less is more—don’t overwhelm them with information overload.
Turn your presentations into an interactive party! Involve your audience with questions, polls or group activities. When they actively participate, they become invested in your presentation’s success. Bring your design to life with animated elements. Venngage allows you to apply animations to icons, images and text to create dynamic and engaging visual content.
6. Utilize humor strategically
Laughter is the best medicine—and a fantastic presentation enhancer! A well-placed joke or lighthearted moment can break the ice and create a warm atmosphere , making your audience more receptive to your message.
7. Practice active listening and respond to feedback
Be attentive to your audience’s reactions and feedback. If they have questions or concerns, address them with genuine interest and respect. Your responsiveness builds rapport and shows that you genuinely care about their experience.

8. Apply the 10-20-30 rule
Apply the 10-20-30 presentation rule and keep it short, sweet and impactful! Stick to ten slides, deliver your presentation within 20 minutes and use a 30-point font to ensure clarity and focus. Less is more, and your audience will thank you for it!
9. Implement the 5-5-5 rule
Simplicity is key. Limit each slide to five bullet points, with only five words per bullet point and allow each slide to remain visible for about five seconds. This rule keeps your presentation concise and prevents information overload.
Simple presentations are more engaging because they are easier to follow. Summarize your presentations and keep them simple with Venngage’s gallery of simple presentation templates and ensure that your message is delivered effectively across your audience.

1. How to start a presentation?
To kick off your presentation effectively, begin with an attention-grabbing statement or a powerful quote. Introduce yourself, establish credibility and clearly state the purpose and relevance of your presentation.
2. How to end a presentation?
For a strong conclusion, summarize your talking points and key takeaways. End with a compelling call to action or a thought-provoking question and remember to thank your audience and invite any final questions or interactions.
3. How to make a presentation interactive?
To make your presentation interactive, encourage questions and discussion throughout your talk. Utilize multimedia elements like videos or images and consider including polls, quizzes or group activities to actively involve your audience.
In need of inspiration for your next presentation? I’ve got your back! Pick from these 120+ presentation ideas, topics and examples to get started.
Creating a stunning presentation with Venngage is a breeze with our user-friendly drag-and-drop editor and professionally designed templates for all your communication needs.
Here’s how to make a presentation in just 5 simple steps with the help of Venngage:
Step 1: Sign up for Venngage for free using your email, Gmail or Facebook account or simply log in to access your account.
Step 2: Pick a design from our selection of free presentation templates (they’re all created by our expert in-house designers).
Step 3: Make the template your own by customizing it to fit your content and branding. With Venngage’s intuitive drag-and-drop editor, you can easily modify text, change colors and adjust the layout to create a unique and eye-catching design.
Step 4: Elevate your presentation by incorporating captivating visuals. You can upload your images or choose from Venngage’s vast library of high-quality photos, icons and illustrations.
Step 5: Upgrade to a premium or business account to export your presentation in PDF and print it for in-person presentations or share it digitally for free!
By following these five simple steps, you’ll have a professionally designed and visually engaging presentation ready in no time. With Venngage’s user-friendly platform, your presentation is sure to make a lasting impression. So, let your creativity flow and get ready to shine in your next presentation!
Discover popular designs

Infographic maker

Brochure maker

White paper online

Newsletter creator

Flyer maker

Timeline maker

Letterhead maker

Mind map maker

Ebook maker

< Go back to Login
Forgot Password
Please enter your registered email ID. You will receive an email message with instructions on how to reset your password.

How to Create a Successful Project Presentation?
In any business, project managers need to be able to communicate a project strategy to clients effectively. It can bring in new, long-term clients to your agency if done correctly. However, doing so incorrectly could seriously undermine your efforts to acquire or retain clients. One thing that unites business, academic, and corporate meetings is making a project presentation look good.
Professionals need this skill when effectively communicating ideas, outlining goals, and sharing project results. Creating and delivering a project presentation that connects with your target audience will lead to the project’s anticipated outcomes, regardless of your level of presentation experience. This blog will walk you through the art of presenting a project and offer business professionals advice on making their project plan presentation stand out.
What is a Project Presentation?
A project presentation is a business activity where team members and stakeholders come together to supervise a project from start to finish. It is a formal submission of a project to stakeholders for discussion of a topic and acceptance. One or more business professionals provide a document or slide deck summarizing every project detail during a presentation.
The project manager presents essential information regarding the start of the project and its preparation, including the project scope, requirements collection, deliverables list, schedule, and milestones. A project management presentation is typically made for the first time before the project’s implementation. Then, as the project progresses, you reintroduce it to the stakeholders with timely updates and news.

Who is the Audience for Your Project Presentation?
Team members and organizations involved in the project’s success or failure comprise stakeholders and other team members:
Show the project presentation to the team members who will be working on the project so they are aware of the expectations and the risks involved. Information such as the requirements, the work breakdown structure, the plan, and the deliverables will be required.
Stakeholders
Show your project to the people who can approve funds and resources, i.e., the stakeholders. Demonstrate to them how the project will provide the desired solutions for the problems they raise within the specified time frame.
The stakeholders are interested in the project’s scope , budget breakdowns , scheduling computations, risk assessments, and your plans for mitigating those risks and adapting to changes. Hence, they are the ideal audience for your project management presentation.
How to Successfully Create a Project Presentation?
Before jumping onto how to present a project, let us see what steps you should follow to create a successful project presentation:
Establish Objectives for Your Project
- Layout your Plan
- Outline the Problem and Solution
- Keep the Slides in your Presentation Brief
- Use More Images and Less Text
Utilize Good Quality Diagrams, Presentation Aids, and Visuals
- Pay Attention to Design
- Begin with a Template for your Presentation

Before delving into the essentials of your project presentation, you should respond to the following queries:
- What goals does your project aim to accomplish?
- Why is it crucial that you and your group meet your objectives?
- How are you going to let your audience know what your objectives are?
Your project is already doomed to failure if it lacks specific goals. It’s common for project managers to skip the goal-setting stage. However, this is not advised. That’s because you can make things easier for yourself to fail. Stakeholder buy-in can be achieved once project goals are well-defined.
The question now is: How do you set and accomplish project goals? Using the SMART goal-setting process is one way to do that.
SMART project goal-setting:
- “SMART” is an abbreviation for the words “specific, measurable, achievable, relevant, and time-bound”.
- Setting and carrying out effective project plans need the use of SMART targets . It requires a closer examination of the more minor elements that matter most to your audience.

Layout Your Plan
Outlining your strategy for achieving your goals is a crucial next step after setting them. Putting your idea into an executable plan with steps for execution is a great place to start.
You may be wondering why this is a necessary stage in making a project presentation that works. Well, p lanning a project , no matter how big or small, is easier when you have a thorough strategy, structure, and layout. It eliminates ambiguity and makes it easier for your audience to understand the project roadmap without missing anything.
Both technical and non-technical project aspects should be included in your plan layout. As a result, you should use a project presentation template that outlines all the procedures and activities in detail to offer yourself an advantage. Additionally, the structure of your PowerPoint or Google Slides presentation should be straightforward and understandable.
Depending on the kind of project, your plan might contain important information like:
- The earlier-described aims and objectives
- Your project’s framework, technique, and scope
- Project deliverables, acceptance criteria, and milestones
- Timeline and schedule for the project
- Estimates of resources and budget, etc.
You can use a pre-made customizable project management presentation template available online, like SlideUpLift . You can make this presentation template uniquely yours by modifying it.
When creating a project plan, there are no hard and fast rules. However, you should divide it into three sections if you want to develop an engaging approach that will stick with your audience:
- Introduction
- Conclusion and key takeaways
Outline the Problem and its Solution
You have just finished drafting your project action plan . It’s time to let your audience know about your project’s objectives and plan. It’s your responsibility to hold your audience’s attention from the beginning to the end, whether you’re pitching a project plan to clients or an investor deck.
Emphasizing your audience’s problems is one of the best strategies to get their attention. Having stunning slides highlighting your outstanding product features and project activities is insufficient. Ensure that your project presentation is set up to:
- List the problems that your audience is facing.
- Stress how your initiative, offering, or service helps them with their problems.
- Describe the advantages of using your product or contributing to your project for them.
- Simply put, your audience should understand how your project improves their lives. As soon as they know this, they will pay attention to your suggestions and act accordingly.
- Avoid assuming anything about your audience in general.
If you want the audience on board, discuss their issues and potential solutions in a separate presentation. Make sure they know how your initiative will help them.
Keep the Slides in Your Presentation Brief
Prioritize quality over quantity while designing project presentations. Make sure your slides are brief and easy to understand. Your audience will appreciate that you respect their time when you do this.
The following justify why you should keep your presentation short:
- Not only may concise presentation slides be effective, but they may also be memorable.
- There is a noticeable decline in attention span after 30 minutes during project or business presentations. You run the risk of losing the interest of your audience midway through if you make long speeches.
- No one wants to spend hours watching you flip a ton of slides. Focus your audience’s attention and get them to pay attention to the material by using shorter slides.
Use More Images and Less Text
Using more images and less text in your presentations is another excellent method to keep them engaging but succinct. Recall that your slide show should support, not take the place of, your spoken presentation. Therefore, you want to avoid cramming too much data onto a single presentation.
Adding too much text to your presentation could:
- Bore and overwhelm your audiences.
- Draw the audience’s focus to the text, which will lessen the impact of your presentation.
When information is presented visually and in bite-sized portions, people remember it better. This holds for corporate leaders, project managers, both B2B and B2C audiences.
Presenting projects successfully requires the use of visuals. Visual aids help viewers retain 95% of a message, drawing them in and holding their interest. However, they maintain just approximately 10% when exchanged by text.
You can employ a wide range of visual aids in your presentations, such as:
- Pictures Videos
- Charts and graphs
- Maps of heat and choropleth
- Dispersion charts
Your chances of gaining audience engagement and encouraging answers to your call-to-action (CTA) will increase if you include images and videos. Mind maps, Gantt charts , and whiteboard drawings are excellent tools for visualizing project plans in their early stages. Using maps, graphs, charts , and trees, you can display the architecture for projects, including technology.

Pay Attention to Design
Your project presentation may succeed or fail based on its design. Whether you are a rookie or an expert designer, design tools offer you an advantage. In minutes, you can produce visually striking presentation designs for your company.
The good news is that creating eye-catching project presentations doesn’t have to break the cash. Millions of breathtaking royalty-free photos and lovely pre-made layouts are available for your slides.
These are some pointers to keep in mind when creating your slides.
- Make Use of a Proper Color Scheme
Use color sparingly in your presentations if you want them to look appealing. Everyone loves color, so we get it. However, using too many colors may make your presentations disorganized and unpleasant.
- Make Use of Clearly Identifiable Typography
Changing your font can influence readers’ understanding of your words. Therefore, ensure that your slides convey the intended content and look professional and well-organized.
Begin With a Template for Your Presentation
Making powerful project presentations can take much time, regardless of experience level. Suppose you are facing an impending deadline. Writing your project plan, making your slide notes, creating your slides, finding and including images, and other tasks would be on your plate. Creating these things from scratch could take longer and result in messy presentations.
Using presentation templates might relieve all of your worries. They make it quick and simple for you to create project presentations that appear professional. Because the slides are pre-designed, there will be space for you to add any type of content you would require. The design is present in every form—progress bar, chart, graph, table , video , or image. All you have to do is enter text, add data, or add an image. And just like that, your presentation is set to go.
Case Study For a Project Presentation
The Cline Avenue Bridge is an example of a difficult project that serves as the basis for the project presentation example. Since it is outside the purview of this article, we are not providing all of the presentation’s components for instructional purposes. Nevertheless, we demonstrate how to create a PowerPoint presentation for a project, how to customize the templates to the content to be presented, and how to show the more typical slides of each component.
This is a case study of a real project and how the project manager uses templates to put together the project presentation using the structure we presented above. Here’s how to create a PowerPoint presentation for a project, along with some project presentation ideas.

Project Overview:
The presenter provides a project charter-style summary of the project’s highlights on this slide. The project manager can expand upon the introduction throughout the project lifespan, and the speech can seamlessly transition across several knowledge domains without requiring a slide change or in-depth discussion.
In particular, the Cline Bridge Project narrates its goal, briefly mentions its location, provides a link to a map for additional information, and presents several key statistics (Building Information Modelling Process, Budget, Duration, Sponsor, and Constructor). The final deliverable’s salient features—a concrete segmental bridge measuring 1.7 miles in length and 46 feet in width—are enumerated.
Process Model:
The framework for the project lifecycle, processes, planning, and execution is shown in the Process Model presentation. In this slide, the project manager will discuss how the model is customized to the project’s particulars. In this instance, the builder has specified the use of BIM (Building Information Modelling) as the process model for the design and construction of the Cline Bridge.
During this slide, the presenter might further detail the knowledge practices involved in each lifecycle phase—Design, Production, Construction, Operation, and Planning. Conceptual and detailed design are the two primary knowledge areas that make up the first stage, for instance, “Design.”
Since the content arrangement for the scope section of the presentation consists of a list of “requirements,” it typically consists of multiple slides. This information leads to a recommended table arrangement that maximizes available space. It’s crucial to portray the set of needs rather than the individual requirements and to refrain from misusing the “list.” If not, the requirements document is transcribed by the project manager.
This example project presentation shows ten categories of requirements covering various project lifecycle stages.
- Conceptual Design
- Construction
- Construction Logistics
Utilizing a lot of resources is necessary when building a bridge. Organizing this component of a project presentation as a single-level financial table at an executive meeting is advised. Specific resources and cost analysis presentations are tasked with providing more information.
The list of available resources is as follows:
- Expert Services
- Construction labor, land machinery, materials, and quality assurance
- Backup Subcontractors for Waste Disposal and Cleaning
We recommend incorporating visual elements, such as icons and colors that are symbolically tied to each of the items stated, to break up the monotony of table after table throughout the project presentation.
Project Schedule:
The purpose of the project roadmap , as previously mentioned in the article, is to provide a thorough overview of the critical turning points that will occur over time. Owing to the size of a bridge-building project and its extended duration, it is recommended to provide a roadmap that clearly matches milestones with relevant lifespan stages, especially for such large-scale undertakings. This method helps the viewers visualize the step-by-step development of the building process.
In keeping with earlier slides, we developed a roadmap in the example that included the following high-level benchmarks and subcomponents:
- Project Start-Up
- Contracts, Clearances, Budgeting, and Financing for Projects
- Buying and Renting of Land
- Initial Design Detailed Design Conceptual Design
- Site Setup: Clearing, Grading, and Access Routes
- Waste Management Examination
- Tests of Materials
- Site Evaluations
- Tests for seismic activity
- Manufacturing Fabrication
- Assembly of Modular Components
- Building, Assembling, and Construction
- Test of Quality under Acceptance Standards
- Stress Exam
- Management and Upkeep
As you can see, the project manager chose a step-by-step plan that was given with minimal scheduling specifics and start and end dates to provide context for the diagram.
Project Hazards:
Throughout a project, risk management is an iterative process. The risks you face while presenting your initiatives will change based on how well they proceed along the roadmap. In this particular instance, we have chosen to showcase the risks deliberated about at the ideation phase, wherein the developer trades risks with contractors and the bridge construction business.
Our recommended structure for this type of material is a straightforward table with easily readable and visible risks and a description that serves more as a starting point for conversation than a thorough explanation.
It is crucial to categorize the risks given, if just in terms of their “impact” and “probability.” This will lead to some really interesting discussions about them.
Risks outlined in the first phase:
- Mistakes in Design
- Building Hold-Ups
- Overspending on the Budget
- Modifications to Regulations
- Conditions of the Site Equipment Failures
- Incidents about health and safety
The hazards listed are highly serious, as the reader can see, and each will result in a different Risk Analysis Report.
The project presentation’s quality control component may change depending on the quality process used. A continuous improvement quality approach, which iteratively improves quality over many projects, is typical for large organizations with a consistent portfolio of projects (for example, software businesses). The scenario is the same for construction organizations , such as the example, and the quality control model aligns with the building process model. In this instance, the project manager is outlining the quality control procedure to be used on the BIM model as well as the procedure to be adhered to during the bridge’s actual construction:
Using a simple dashboard, we created in this example, allowing the project manager to show:
- The Existing Chronology
- Top 5 Problems
- Present-Day Burnout
- Top 5 Risks
How to Present a Project Management Presentation?
A project plan is an official document that follows a set format and flow. Your presentation should follow this flow for maximum impact.
To present a project plan , you should go over the following eight steps:
- Give an overview. Provide a brief overview of the project, outlining its goals and rationale.
- Examine the key results and objectives, or OKRs. Talk about the main deliverables and anticipated deadlines. Before starting a project, what crucial information should you obtain from a client? Think about this before engaging in conversation.
- Describe the exclusions and expectations. Make assumptions clear and restate anything that is outside the project’s scope. You might be wondering when to show a client the project cost. This is the right moment to ensure both of you have clear expectations.
- Give a high-level timetable. Use a Gantt chart to show the important milestones and dependencies in the project schedule.
- Give a brief introduction of your group. Present the customer to coworkers with whom they will be working closely, as well as anyone whose experience will strengthen your reputation (such as a seasoned subject matter expert.)
- Explain communications. Make sure your client is aware of the collaborative process. Mention how they can contact you with any queries or issues and how they will be updated.
- Talk about the unexpected. Examine the procedure you’ll use to address requests for changes and problems when they come up.
- Q&A. To make sure nothing was missed, conclude with a Q&A session.
Top 5 Project Management Presentation Templates From Slideuplift
Here are some templates which will help you make your desired presentations. These will also give you project presentation ideas. Feel free to click on the images to download SlideUpLift’s templates.
- WBS Project Management PowerPoint Template:

Streamline project planning with this template focused on Work Breakdown Structure (WBS) , offering clear visual guidance for breaking down complex projects into manageable tasks.
- Scrum Agile Project Management PowerPoint Template:

Perfect for Agile enthusiasts, SlideUpLift’s Scrum Agile Project Management template provides visually engaging slides explaining the Scrum framework, roles, ceremonies, and critical components to enhance Agile project communication.
- Circular Project Management PowerPoint Template:

Enhance project visualization with this template featuring circular diagrams and charts, ideal for representing project cycles, feedback loops, and continuous improvement processes.
- SIPOC Project Management PowerPoint Template:

Optimize process mapping using this template designed for SIPOC (Supplier, Input, Process, Output, Customer) models, facilitating the illustration of information and resource flows in projects or processes.
- Risk Management PowerPoint Template:

Navigate project uncertainties seamlessly with this template tailored for Risk Management . Expect insightful slides on identifying, assessing, and mitigating risks, providing a comprehensive overview to keep your projects on track.
Questions To Ask The Client Before Starting The Project Management Presentation
The client project focus ensures that your client’s business goals are sufficiently handled and that transparency is maintained throughout the project. Objectives, milestones, acceptance criteria, etc., are frequently discussed beforehand.
You might still need to ask a few questions, though, and these are the top five:
- Who are the project stakeholders in your organization? What authority and interest levels do the people who intend to be associated with the project have?
- Have you already worked on projects similar to this one? How did you overcome the obstacles, if any?
- What characteristics, outputs, or specifications should we constantly focus on?
- Are you having trouble sleeping at night because of anything related to this project? If yes, what would it be?
- Do you have any questions about risks, difficulties, or other project parts we haven’t yet covered?
Questions the Client Might Ask During a Project Presentation and How To Answer Them
For new speakers, the Q&A section can often be their biggest worry. The most difficult part of being ready for this is that you never know what queries a client may have.
Client inquiries frequently revolve around their worries about potential problems. You’ll be able to anticipate their questions more accurately when you know about their priorities. Assume that your client has a tight deadline for finishing the project. Among the queries they might have are:
- How are you going to guarantee that the project is completed on time?
- How would you respond if deadlines begin to elude you?
- Which risks could cause the project to be delayed?
You can prepare well-reasoned responses to their questions by considering their priorities and potential issues beforehand. But what about those unexpected queries that come out of nowhere?
Three pointers to help you handle unforeseen queries from clients during a project presentation are as follows:
- Firstly, thank them for raising the question. Encourage your client to speak with you and express their worries upfront.
- Find out what motivates the question. Ask why a question is being asked if it appears pointless or strange. Perhaps the client possesses knowledge that you are unaware of. You will also have extra time to consider your response as a result.
- Put it on the table for later. Inform the customer that you will investigate and get back to them if you are unsure of the response. Give your client a timeframe during which they can anticipate receiving your response.
Establishing objectives and having a well-thought-out plan to reach them are the first steps in producing an effective project presentation. It also calls for effective delivery, careful attention to design, and the creation of captivating content.
A strong pitch deck that explains the specifics of your idea and its potential for success is essential if you want to seal those transactions. Using a user-friendly project presentation program such as SlideUpLift can be a game changer.
The ideal design tool for producing eye-catching and captivating project presentations is something SlideUpLift specializes in. You can use various features and tools with SlideUpLift to assist you in achieving your ideas for your projects.
To help your presentation succeed, SlideUpLift offers hundreds of presentation templates , graphic components, font styles, data visualization tools, and pre-installed stock photos and videos.
You now have all the advice and resources you need to ace the project presentations for the future. With the presentation templates from SlideUpLift, get tips and tricks on standing out when presenting, go ahead and amaze your audience!
How do I effectively present my project?
To present your project effectively, focus on clear communication, use visuals, and tailor your message to your audience’s level of understanding.
How can I present my project as a project manager?
As a project manager, presenting a project involves clear communication of goals, methodologies, and outcomes while addressing potential risks and solutions.
What are the best ways to present a project?
The best ways to present a project include engaging visuals, storytelling, and addressing key points such as objectives, timelines, and potential challenges.
Are there templates for project management presentations?
Several platforms, including SlideUpLift, offer templates specifically designed for project manager presentations .
What are effective ways to present my project to clients?
Effective ways to present your project to clients include emphasizing value, addressing their specific concerns, and showcasing project outcomes.
Table Of Content
Related presentations.

Project Management Presentations Collection PowerPoint Template

Project Kick Off Presentation PowerPoint Template

Project Status Review Deck PowerPoint Template
Related posts from the same category.

18 Dec, 2023 | SlideUpLift
How To Write A Project Proposal Presentation?
Presenting your ideas well is essential to gaining quick approval for projects, whether internal or external. Even the strongest elevator pitch is not going to work by itself. Writing a

20 Dec, 2023 | SlideUpLift
How to Introduce Project Members In a Team Presentation?
The introduction of a project team in a team presentation is not only a formality but a deliberate undertaking with significant consequences in the ever-changing field of project management. It

21 Dec, 2023 | SlideUpLift
Top 10 Project Management Presentation Topics
Project Management Presentation Topics are a range of subjects related to efficiently managing projects. The topics cover different aspects. These include planning methods, team collaboration, risk management, leadership, and emerging

22 May, 2020 | SlideUpLift
How to Create a Project Charter Presentation?
A project charter serves as the foundational document that officially initiates a project and grants authority to the project manager. This concise yet comprehensive document outlines the project's purpose, objectives,

31 Oct, 2022 | SlideUpLift
The Savvy Project Manager Series: 5 Steps To Successful Project Planning
We encounter projects in our everyday lives. You might be building or contributing to a deliverable like a report, a website, a tool, or a product. These are real projects

24 Jan, 2024 | SlideUpLift
What Is A Project Roadmap? Here’s How To Create It!
For startups and businesses, delving into the specifics of project implementation can take an extraordinary amount of time. Typically, this results from inadequate project planning at the outset. It usually

21 Jan, 2022 | SlideUpLift
Project Kickoff Meeting – Crucial Step To Start Project On The Right Foot
You’ve put in a lot of time and effort to get your project off the ground—yet so frequently, it might feel like a project is off course before it even

12 Aug, 2021 | SlideUpLift
8 Project Management KPIs For Project Managers
Sometimes the best-managed projects fall apart because they are not working towards specific and measurable goals. Or they are working with too broad or too narrow objectives that do not

16 Dec, 2021 | SlideUpLift
Breaking Down Work Breakdown Structure in Easy Steps : Must Have Resource For Project Managers
Project management is complex. It necessitates keeping track of multiple – sometimes geographically dispersed – teams, coordinating tasks, and holding everyone accountable to a common goal. Fortunately, there are a

8 Jul, 2021 | SlideUpLift
Avoid Making These 7 Project Management Mistakes
Making mistakes is not a bad thing; tons of lessons can be learned from them. And in the field of Project Management, lessons abound. Projects, unfortunately, seldom go smoothly. There
Related Tags And Categories
Forgot Password?
Privacy Overview
Necessary cookies are absolutely essential for the website to function properly. This category only includes cookies that ensures basic functionalities and security features of the website. These cookies do not store any personal information
Any cookies that may not be particularly necessary for the website to function and is used specifically to collect user personal data via ads, other embedded contents are termed as non-necessary cookies. It is mandatory to procure user consent prior to running these cookies on your website.
How to make a great presentation
Stressed about an upcoming presentation? These talks are full of helpful tips on how to get up in front of an audience and make a lasting impression.

The secret structure of great talks

The beauty of data visualization

TED's secret to great public speaking

How to speak so that people want to listen

How great leaders inspire action
How to Design a Professional PowerPoint Presentation
Our series of tips on presentation design outlined some generic rules and ideas that you can live by to create better, more professional presentations. Today we want to follow that up by taking you through the actual process of designing a presentation from start to finish.
We’ll break down every step of the design process, from choosing colors and images to using whitespace properly. After reading through this you should be all set to design your own beautiful presentation slides that will put your coworkers to shame.
Using a pre-built PowerPoint template can be a good starting point for many people (we collected some of the best PowerPoint templates for you!). But if you’re wanting to design your own from start-to-finish, you’re in the right place!
How Does Unlimited PowerPoint Templates Sound?
Download thousands of PowerPoint templates, and many other design elements, with a monthly Envato Elements membership. It starts at $16 per month, and gives you unlimited access to a growing library of over 2,000,000 presentation templates, fonts, photos, graphics, and more.

Modern PPT Templates
New & innovative.

BeMind Minimal Template
Explore PowerPoint Templates
A Word About Content
I usually make a big deal about content preceding design, and presentations are no exception. Ideally, you’ll have the topic and much or all of the content outlined before you even think about design. This will in every way shape the appearance of your design, which is why working from pre-built templates isn’t always the best move (though generic templates can and do work great in some circumstances).
The reason that I bring this up is that I don’t really have an actual presentation in mind for this project. I’ll be running with a basic theme, but the textual information will be entirely placeholder copy. Your image, font, color and layout selection shouldn’t necessarily match mine but instead reflect the topic and content you’re working with.
Choosing A Color Scheme
Before I even open Photoshop (yes, I design PowerPoint/Keynote slides in Photoshop and drop them in), I want to find a color scheme on which to base my entire design. When I need to quickly find several colors that go together I usually start with Adobe Color CC . Not only is it a great way to build your own color schemes, it’s an outstanding source to find schemes built by others that you can just grab for your projects.
As luck would have it, I liked the very first color scheme I saw upon opening Color. This scheme was featured on the home page and looked like a great place to start for our presentation design.

Now, if you wanted to get everything exactly right, you could make a list of the RGB or Hex values, but I prefer a quicker, more direct route. What I usually do is snap a screenshot of the color scheme, paste it into my document and stretch it across the canvas on its own layer for easy access. This way I can quickly activate the layer, eyedropper the color I want, then hide the layer and get back to work. It’s a bit like having a palette of colors to dip your paintbrush in.
Designing Your Cover Slide
Now that we have a color scheme, the design work is going to be much simpler. One trick that designers often use in presentations is to leverage the color scheme as heavily as possible. If you’re new to design, you’ll likely think that this is too easy, too plain or even that it’s cheating somehow, but trust me, it’ll be much more attractive and professional than that horrid Microsoft clipart library you love so much.
To start, simply grab one of your colors from the scheme you chose and flood the background of your slide with it (I chose #631c25). Good job, there’s your background. Don’t freak out. It’ll look great. Now let’s throw in some typography.
Choosing a Font
Font choice is a major issue for non-designers. The tendency is to think that most fonts are “boring” and to look around for something exciting and fun. This inevitably leads to the use of Comic Sans or some other equally hideous font.

Unless you’re an elementary school teacher, your presentations should never look like this. Instead, why don’t you try one of those “boring” fonts to see if you can come up with something you like.
Combining fonts can be a tricky task and can take a trained eye to pull off. Fortunately, font designers have already created collections that work well together and if you’re not a designer, they make it easy to pull off great typography. The trick is to just stay in a family. Again, I know this sounds lame, but it works really well if you make sure the two styles you choose are very different.
For instance, I chose a Helvetica Bold Condensed and a Helvetica Light for my cover slide. Notice how different the fonts are from each other in terms of thickness. Choosing two styles that are relatively close causes visual confusion and should be avoided as a general rule of thumb. Instead, what you want is contrast and plenty of it.

Alignment and Layout
Notice a few things about the way I set up this slide. First, I used a strong left alignment for the text. As I say in just about every design article I write, center alignment should be a last resort, not a first. It tends to be the weakest text alignment that you can choose, having a hard edge increases readability considerably (notice that book pages aren’t center-aligned).
Also, notice the generous whitespace that I used. Remember that you don’t have to eat up every inch of space. Giving your text room to breathe helps your layout immensely and gives the design a clean look.
Adding an Image
At this point you might be wondering why you wasted your time reading so I could give you such plain advice. The truth is, most people that create presentations could improve them by 100% from following the advice above. However, I realize minimalism may be too extreme for some folks so let’s throw in an image to make it look nice.
Since our text is on the left, I wanted to find something a little heavy on the right. The general theme that I’ll go for is “City photos” assuming I had some sort of architecture or city-centric presentation to give. Again, you’ll have to choose iamges relevant to your own topic.
I grabbed this Flickr Creative Commons image from photographer Ben Spreng .

Now, if we just made this image our background, the text would become unreadable and we would be ditching our color scheme. What we’re going to do instead is set it on top of the colored slide and set our blending mode to Overlay. Then throw your opacity to around 45%.

As you can see, this helps the slide look much more interesting but keeps the text and colors fairly intact. It’s a simple solution that adds a lot of interest to an otherwise plain design.
Adding Content Slides
The cover may seem like it’s only a tiny part of the battle, but you’ve actually already set the tone for the entire presentation. You’ve got your theme, color scheme and fonts already in place. Now you just need to set up a few different layouts for your content.
The thing to keep in mind is to keep everything extremely simple, and that includes the level of content that you include. Apart from design, these are just good presentation tactics that you’ll learn in every public speaking class. Filling your slides with everything you’re going to say makes you unnecessary. You could just email everyone the slides and shut up.
Instead, the slides are merely meant to be a visual aid. Show a slide with your overall topic or main point, then speak the rest, without reading. Nothing is worse than watching a guy read his note cards word-for-word for thirty minutes, except perhaps watching a guy turn his back to the audience so he can actually read his slides out loud to you the whole time! You may laugh, but I’ve seen it happen folks.
For our first content slide, we’ll grab another Flickr photo and set it to the bottom portion of our slide at full bleed. Then we’ll set the top to another color from our scheme and toss in some text using the same exact formatting that we used on the cover.

See how this closely resembles the theme we’ve already established while still looking significantly different? This is they key to good presentation design: cohesiveness without redundancy.
Now for our third slide, we can simply do the inverse of the second slide with a new color and a new image .

Adding Informational Elements
It would be nice if every slide ever presented could work in a full bleed image, but the truth is that this simply isn’t practical. It will often be the case that you’re presenting graphical information or some other item that isn’t necessarily a photo.
My advice here is to try to stick as close to your theme as possible. For the slide below I flooded the entire background with a solid color from our original scheme and made a quick 3D graph with white columns (I drew a few flat boxes in Illustrator and applied a 3D effect).

As you can see, this slide is very information-focused and yet it doesn’t sacrifice the aesthetics and simplicity we’ve already established.
You’re All Set
From here you might come up with one or two more alternate slide designs and then rotate between them for the duration of your speech. The result is a presentation that is beautiful, very readable and highly professional. The bonus is that the simple, straightforward design will probably result in less work than a clip-art-filled horror show.
Most of the time, great design doesn’t mean being particularly artistic or knowing how to create amazing complex layouts. Instead, it’s about presenting information in an attractive and user-friendly way. With this goal in mind you realize that you’re probably trying way too hard if your end result is ugly. Try cutting out half or more of the elements on one of your slides and giving what’s left a strong left or right alignment with plenty of whitespace.
I hope this article has convinced you to abandon that clip art gallery once and for all. The benefits of clean, minimal design in presentations are clear: the information is easier to take in and the end result is more professional than the mess of information you typically see in presentation slides.
Of course, if you’re looking to get started quickly, flick through our collection of the best PowerPoint templates to find a beautiful set of pre-made designs!

Tips for creating and delivering an effective presentation
In this article.
Creating an effective presentation
Delivering an effective presentation
Tips for creating an effective presentation
Top of Page
Tips for delivering an effective presentation

Need more help?
Want more options.
Explore subscription benefits, browse training courses, learn how to secure your device, and more.

Microsoft 365 subscription benefits

Microsoft 365 training

Microsoft security

Accessibility center
Communities help you ask and answer questions, give feedback, and hear from experts with rich knowledge.

Ask the Microsoft Community

Microsoft Tech Community

Windows Insiders
Microsoft 365 Insiders
Was this information helpful?
Thank you for your feedback.

- Get started with computers
- Learn Microsoft Office
- Apply for a job
- Improve my work skills
- Design nice-looking docs
- Getting Started
- Smartphones & Tablets
- Typing Tutorial
- Online Learning
- Basic Internet Skills
- Online Safety
- Social Media
- Zoom Basics
- Google Docs
- Google Sheets
- Career Planning
- Resume Writing
- Cover Letters
- Job Search and Networking
- Business Communication
- Entrepreneurship 101
- Careers without College
- Job Hunt for Today
- 3D Printing
- Freelancing 101
- Personal Finance
- Sharing Economy
- Decision-Making
- Graphic Design
- Photography
- Image Editing
- Learning WordPress
- Language Learning
- Critical Thinking
- For Educators
- Translations
- Staff Picks
- English expand_more expand_less
PowerPoint Tips - Simple Rules for Better PowerPoint Presentations
Powerpoint tips -, simple rules for better powerpoint presentations, powerpoint tips simple rules for better powerpoint presentations.

PowerPoint Tips: Simple Rules for Better PowerPoint Presentations
Lesson 17: simple rules for better powerpoint presentations.
/en/powerpoint-tips/embed-excel-charts-in-a-slide/content/
Simple rules for better PowerPoint presentations
Have you ever given a PowerPoint presentation and noticed that something about it just seemed a little … off? If you’re unfamiliar with basic PowerPoint design principles, it can be difficult to create a slide show that presents your information in the best light.
Poorly designed presentations can leave an audience feeling confused, bored, and even irritated. Review these tips to make your next presentation more engaging.
Don't read your presentation straight from the slides
If your audience can both read and hear, it’s a waste of time for you to simply read your slides aloud. Your audience will zone out and stop listening to what you’re saying, which means they won’t hear any extra information you include.
Instead of typing out your entire presentation, include only main ideas, keywords, and talking points in your slide show text. Engage your audience by sharing the details out loud.
Follow the 5/5/5 rule
To keep your audience from feeling overwhelmed, you should keep the text on each slide short and to the point. Some experts suggest using the 5/5/5 rule : no more than five words per line of text, five lines of text per slide, or five text-heavy slides in a row.

Don't forget your audience
Who will be watching your presentation? The same goofy effects and funny clip art that would entertain a classroom full of middle-school students might make you look unprofessional in front of business colleagues and clients.
Humor can lighten up a presentation, but if you use it inappropriately your audience might think you don’t know what you’re doing. Know your audience, and tailor your presentation to their tastes and expectations.
Choose readable colors and fonts
Your text should be easy to read and pleasant to look at. Large, simple fonts and theme colors are always your best bet. The best fonts and colors can vary depending on your presentation setting. Presenting in a large room? Make your text larger than usual so people in the back can read it. Presenting with the lights on? Dark text on a light background is your best bet for visibility.

Don't overload your presentation with animations
As anyone who’s sat through a presentation while every letter of every paragraph zoomed across the screen can tell you, being inundated with complicated animations and exciting slide transitions can become irritating.
Before including effects like this in your presentation, ask yourself: Would this moment in the presentation be equally strong without an added effect? Does it unnecessarily delay information? If the answer to either question is yes—or even maybe—leave out the effect.
Use animations sparingly to enhance your presentation
Don’t take the last tip to mean you should avoid animations and other effects entirely. When used sparingly, subtle effects and animations can add to your presentation. For example, having bullet points appear as you address them rather than before can help keep your audience’s attention.
Keep these tips in mind the next time you create a presentation—your audience will thank you. For more detailed information on creating a PowerPoint presentation, visit our Office tutorials .
/en/powerpoint-tips/three-tips-for-beautiful-powerpoint-presentations/content/
The Golden Rules of Presentation Design

You don’t have to be a professional graphic designer to master the ins and outs of what makes a visually enticing presentation. While building a super-polished template from scratch might seem daunting, all you really need to know are a few basic principles of presentation design to take your slides from messy and unprofessional to clean, informative, and on-brand.
These days, presentation slide templates and tools abound – from the default options in Powerpoint and Google Slides , to services like SlidesCarnival , Canva , Envato and more that specialize in compiling eclectic template options. While these resources can take the guesswork out of creating sleek and professional deck designs, it’s still up to you to optimize each slide to communicate your ideas as clearly as possible. Furthermore, just because a presentation template looks nice, doesn’t necessarily mean it fits your brand aesthetic and message – and seeing the same common templates reused repeatedly can make yours more forgettable.
No matter what program you use to build your presentations, there are a few principles of presentation design you should always bear in mind.
The Most Important Rule: Less is More
We’ve all heard this one before, yet it’s still tempting to try and cram as much information as you can onto a slide. Remember that the focus should always remain on the presenter and the story they’re telling – your presentation is an accompaniment to help you illustrate the ideas you’re communicating, not a textbook to be studied.
Let’s break down a few of the easiest ways to declutter your slides:
- Use key words, not full sentences What’s the main idea for each slide? Try to distill it into a single word or short phrase, rather than spelling out the complete thought as a sentence. When in doubt, use the 6×6 rule: no more than 6 bullet points per slide, with less than 6 words per line.
- Utilize white space – balance is your friend! Afraid that you’re wasting real estate by not filling every corner of your slide? The eye naturally needs a place of rest, so don’t be afraid of white space. This also helps funnel and direct the viewer’s attention where you want it to go. Avoid the temptation to blow your content up to fill all the available space on your slide. Even if it’s still just a couple sentences of information, this can make it look overwhelming.
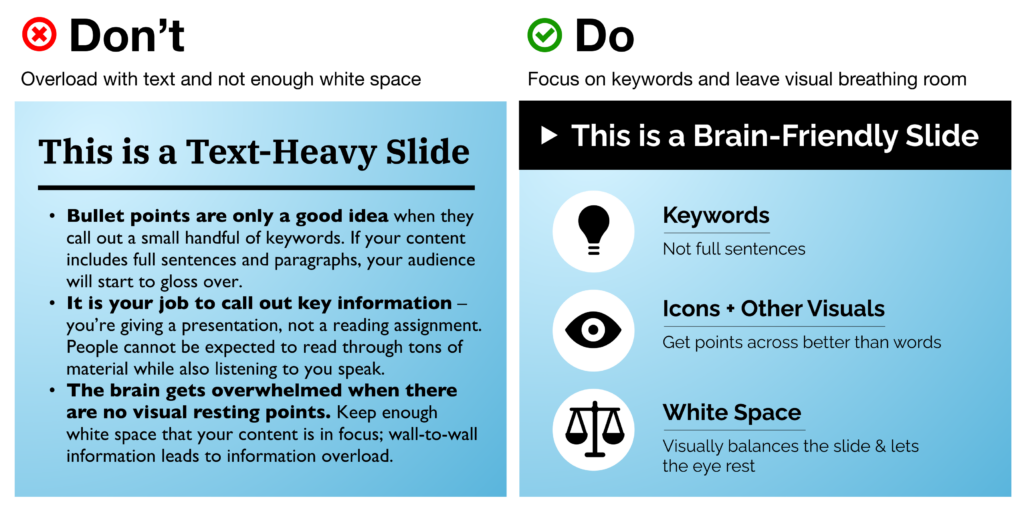
- Break up your ideas if needed Don’t be shy about spreading out information between multiple slides, and pace yourself! A “title slide” to introduce a new topic can provide a nice (and necessary) breather that balances out the pace of your presentation, preventing audience exhaustion.
- Use fewer fonts (aim for 2 or maybe 3 max) Mixing and matching typefaces takes a fairly well-trained eye, but there are a couple of handy resources on the web to help: FontJoy and Typ.io will both auto-generate a pairing of fonts that go well together visually. Other rules of thumb: keep body copy typefaces simple and sans-serif (using too much of a display typeface hurts legibility), use caps lock only for emphasis and visual contrast, and understand how typefaces can help convey brand sentiments.
- Choose colors and fonts wisely You may be designing a presentation for work, in which case you likely have a couple established brand colors to use throughout your presentation. If you’re making up a color scheme from scratch, bear in mind: (A) Don’t use too many colors. Using too many different colors will make the presentation look messy, busy, or incoherent – so focus on one or two key, recurring colors that’ll lend a sense of cohesion throughout all your slides. (B) Try to get one or two vibrant, saturated colors to energize your presentation with a more youthful energy – muted and neutral tones run the risk of boring your audience or looking overly corporate.
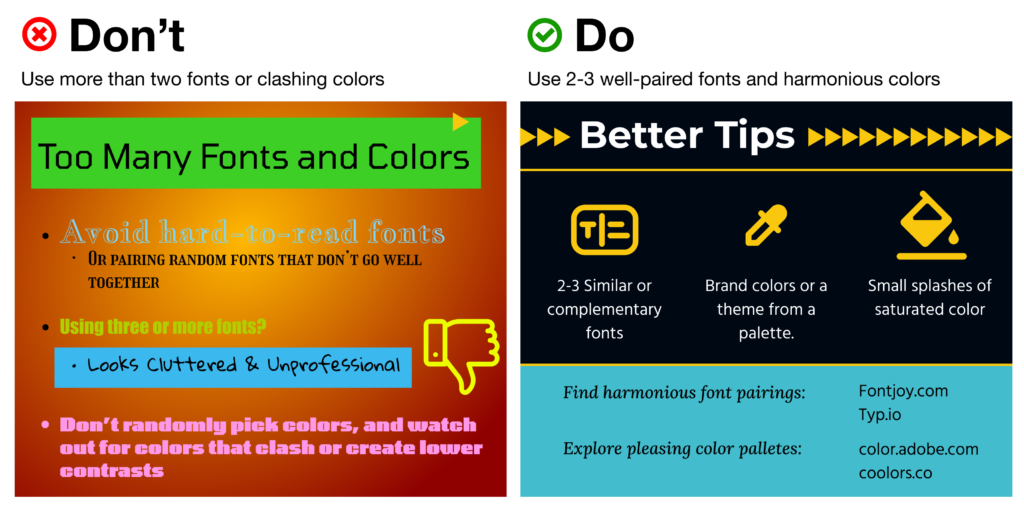
Use Visual Hierarchy
Create a clear delineation between the most and the least important information. This can be done in a few ways:
- Contrast Don’t let your text or other elements disappear in a monochromatic fog; up the contrast to make things pop off the page.
- Background vs. Foreground images If you want to overlay text on top of an image, make sure to use photos with copy space and more subtle, uncluttered background elements. Can’t find enough white space in the pic to give your text breathing room? Consider adding a photo filter, color block, or even a gentle and more subtle gradient block to put beneath your text.
- Size Use 30+ pt. text sizes to keep your copy legible even from a distance – and keep it bolder for titles, headings, and key words. Be sure that the size you use for headings is at least 50% larger than the size you’re using for body text to better call out your main ideas.
- Alignment One of the single biggest threats to legibility – and your professional credibility – is a “scattershot” slide with text and images thrown together with no rhyme or reason. Instead of combining alignments (center-aligned with left-aligned headers or body copy, for example), stick with left-alignment for quick scanning. Your best bet? Use a grid system instead of plopping elements on the page and hoping for the best. Align similar elements along vertical and horizontal lines to give each slide a sense of rhythm and repetition. Tidy groupings of similar items (e.g. having all your headings, descriptions, pictures and icons along the same lines) bolsters scannability.

Use Icons to Get Your Message Across Faster (and More Beautifully)
Icons are a critical component of presentation design, as they help your audience digest the ideas you’re covering quicker than words alone. In fact, studies have shown that audiences will remember an image paired with a verbal cue 55% better than a verbal cue alone – a phenomenon known as the Picture Superiority Effect (and a critical component of Dual Coding Theory ).
Some may even argue that icons can (and should!) take the place of bullet points.
It’s especially critical to bring in visual aids like icons when you’re covering topics that are more abstract or technologically complex – consider how much words on a page can fall flat and fail to “click” in your audience’s minds, vs. bringing in a quick and concise visual that will help people place the key ideas in a clear, real-world context.
Visual cues like this “deliver the punchline” for your viewers before you even need to – so your ideas can not only jump off the page, but stay in your audience’s memories for longer.
Nonetheless, you’ll need to make sure you’re using your icons as effectively as possible.
Using Noun Project Icons in Your Presentations
- Search Icons Get all the icons you could ever need from Noun Project . Our collection is literally millions of icons deep – and each one can be customized, colored, and downloaded as a PNG or SVG.
- Use Apps & Plugins Instantly insert icons without leaving your workflow – Noun Project has apps and plugins for Google Slides , Powerpoint , Adobe Products and more. (Plus, Noun Project apps now support SVG icons – so you can use and customize vectors directly inside apps like Powerpoint).
- Go Pro for Royalty-Free Downloads Customize and insert unlimited icons royalty-free with a Noun Pro account. When you go Pro, you can instantly recolor and click-and-drag icons straight from the Noun Project window without needing to worry about attributions.
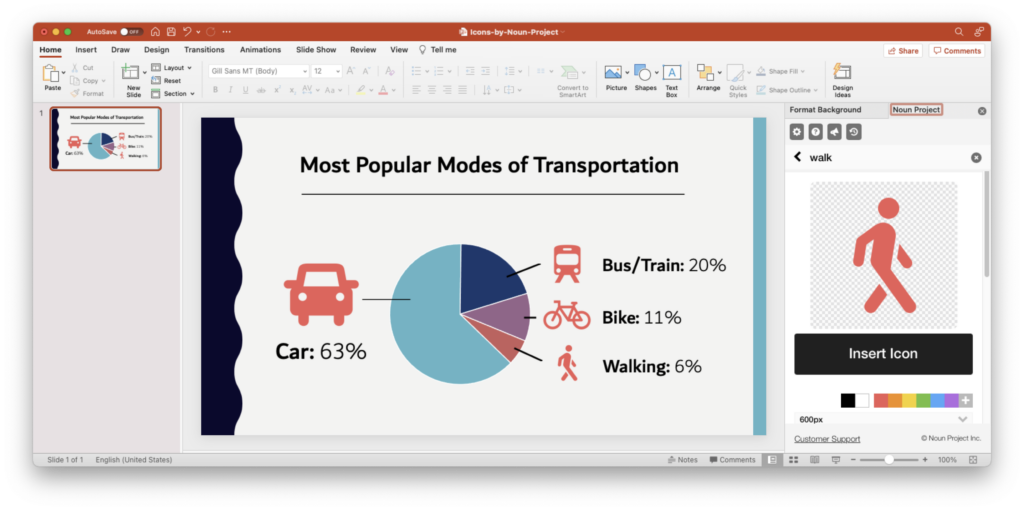
Tip: Icons are essential to help an important point “click” in people’s brains more quickly. The Noun Project Add-On for Powerpoint lets you instantly search, recolor, click and drag icons instantly all without having to leave your window (and a Noun Pro account lets you insert unlimited icons).
Use Icons to Make Your (Bullet) Point
- Condense & Summarize Your Big Ideas with Icons Use icons as a direct translation of your information – or an obvious metaphor that won’t leave people guessing. Noun Project offers a dazzling range of icons, from the extremely literal (bar graphs, money, medical icons and more) to more broad and abstract concepts (gerrymandering, sanctuary city defunding, you name it)…. But with any icon you need, choose one that doesn’t need too much deciphering, or provide an explanatory caption where necessary. As with all things design, go by the famous maxim “ Don’t Make Me Think .”
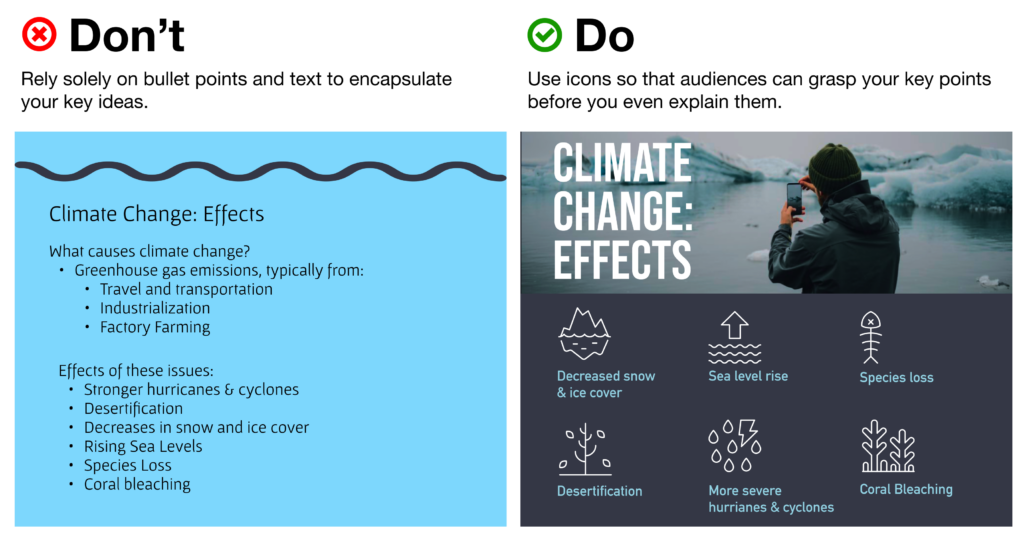
- Aim for Visual Consistency Icons come in numerous styles: thin line icons, thick “glyph”-style icons, sharp, rounded, pixel-perfect or hand-drawn. Pick a style that suits your brand and message, then stick with it. Selecting icons from the same collection, or the same creator, will help maintain visual consistency – whereas a mixing and matching of styles will appear messier and less professional.
Tip: Try to select icons from the same collection so that they have a consistent visual style. ( Basic Interface icon collection by Caesar Rizky Kurniawan ).
- Use Icons to Accentuate Your Theme Icons don’t need to be used merely to reinforce your statistics – they can usher people through your narrative and play off your visual theme as well. Think about the stylistic possibilities of your overall presentation – e.g., bringing in a nostalgic ‘80s theme with 8-bit pixel icons or discussing holistic health with naturalistic, ecological icon collections.

Tip: Browse the latest topical icon collections on Noun Project .
Use Photos to Suit the Mood
Icons aren’t the only must-have in packing a visual punch. While we’ve already written dedicated articles about the best ways to use stock photos in Powerpoint or even in social media campaigns , here are a few quick rules of thumb:
- Use photos that are natural, authentic, diverse, and inclusive Ditch the overly-posed and unnatural corporate stock photoshoots of bygone eras. It’s important to make sure your photos feature a variety of ages, ethnicities, body types, sexualities and more so that no matter who your audience, they’ll feel included (Hint: check out photo collections like Diversity in Tech and Empowered Women on Noun Project).

Tip: Search for diverse stock photos that don’t feel too “stock-y.” Relaxed poses and natural lighting and textures will look more suitable than the overly staged corporate photo shoots of yore. Explore the Diversity in Tech or Empowered Women collections on Noun Project for inspiration.
- Focus on single background images – not a whole album. Usually one supporting image is enough – there’s no need to include multiple images on a single slide as this muddles your message. If, perhaps, you want to show multiple photos to recap an event or show steps in a process, be sure to align your photos, use a grid system, or give each one even dimensions through thoughtful cropping.
- Visually unify your photos using color overlays Apps like Powerpoint will typically let you adjust brightness and hue or overlay a color so that multiple disparate photos can appear unified – and reinforce your brand.

Tip: While a full-color photo may be eye-catching, consider using a color overlay (at right) with your brand or theme colors to give a stronger air of sophistication and cohesion to disparate photos. (In Powerpoint, with an image selected, go to Picture Format > Color > More Variations to set your own color).
Get Started on Your Next Presentation Design With Noun Project.
Explore icon and photo collections, and unlock unlimited royalty-free icon downloads with Noun Pro .
Ready to try out different types of presentation design apps? If you’re looking for friendly, web-based alternatives to the classic Powerpoint, try out free options like Google Slides or even Canva .
Hungry for more design tips? View more on our blog at blog.thenounproject.com .

Marketing Communications Manager at Noun Project, Designer and Illustrator.
Related Articles

Graphic Design Principles: Rhythm, Repetition, and Pattern
by Jeremy Elliott | May 21, 2024 | Graphic Design , Creative Inspiration , DIY , Featured
Learn how rhythm, repetition, and pattern can make your designs both more digestible and more dynamic.

Design Icons: Dan Goods, Artist & Creative Director
by Lindsay Stuart | May 7, 2024 | Featured , Creative Inspiration , Graphic Design
In this series, we’re sharing conversations about work, life, and the future with some of today’s most influential designers and artists.

How to Use Inclusive Language for Image Titles and Tags
by Suzanne Strong | Apr 30, 2024 | Featured , Photography Tips
Learn how we approach photo tagging at Noun Project and get tips for implementing inclusive language in your work.
How-To Geek
8 tips to make the best powerpoint presentations.
Want to make your PowerPoint presentations really shine? Here's how to impress and engage your audience.
Quick Links
Table of contents, start with a goal, less is more, consider your typeface, make bullet points count, limit the use of transitions, skip text where possible, think in color, take a look from the top down, bonus: start with templates.
Slideshows are an intuitive way to share complex ideas with an audience, although they're dull and frustrating when poorly executed. Here are some tips to make your Microsoft PowerPoint presentations sing while avoiding common pitfalls.
It all starts with identifying what we're trying to achieve with the presentation. Is it informative, a showcase of data in an easy-to-understand medium? Or is it more of a pitch, something meant to persuade and convince an audience and lead them to a particular outcome?
It's here where the majority of these presentations go wrong with the inability to identify the talking points that best support our goal. Always start with a goal in mind: to entertain, to inform, or to share data in a way that's easy to understand. Use facts, figures, and images to support your conclusion while keeping structure in mind (Where are we now and where are we going?).
I've found that it's helpful to start with the ending. Once I know how to end a presentation, I know how best to get to that point. I start by identifying the takeaway---that one nugget that I want to implant before thanking everyone for their time---and I work in reverse to figure out how best to get there.
Your mileage, of course, may vary. But it's always going to be a good idea to put in the time in the beginning stages so that you aren't reworking large portions of the presentation later. And that starts with a defined goal.
A slideshow isn't supposed to include everything. It's an introduction to a topic, one that we can elaborate on with speech. Anything unnecessary is a distraction. It makes the presentation less visually appealing and less interesting, and it makes you look bad as a presenter.
This goes for text as well as images. There's nothing worse, in fact, than a series of slides where the presenter just reads them as they appear. Your audience is capable of reading, and chances are they'll be done with the slide, and browsing Reddit, long before you finish. Avoid putting the literal text on the screen, and your audience will thank you.
Related: How to Burn Your PowerPoint to DVD
Right off the bat, we're just going to come out and say that Papyrus and Comic Sans should be banned from all PowerPoint presentations, permanently. Beyond that, it's worth considering the typeface you're using and what it's saying about you, the presenter, and the presentation itself.
Consider choosing readability over aesthetics, and avoid fancy fonts that could prove to be more of a distraction than anything else. A good presentation needs two fonts: a serif and sans-serif. Use one for the headlines and one for body text, lists, and the like. Keep it simple. Veranda, Helvetica, Arial, and even Times New Roman are safe choices. Stick with the classics and it's hard to botch this one too badly.
There reaches a point where bullet points become less of a visual aid and more of a visual examination.
Bullet points should support the speaker, not overwhelm his audience. The best slides have little or no text at all, in fact. As a presenter, it's our job to talk through complex issues, but that doesn't mean that we need to highlight every talking point.
Instead, think about how you can break up large lists into three or four bullet points. Carefully consider whether you need to use more bullet points, or if you can combine multiple topics into a single point instead. And if you can't, remember that there's no one limiting the number of slides you can have in a presentation. It's always possible to break a list of 12 points down into three pages of four points each.
Animation, when used correctly, is a good idea. It breaks up slow-moving parts of a presentation and adds action to elements that require it. But it should be used judiciously.
Adding a transition that wipes left to right between every slide or that animates each bullet point in a list, for example, starts to grow taxing on those forced to endure the presentation. Viewers get bored quickly, and animations that are meant to highlight specific elements quickly become taxing.
That's not to say that you can't use animations and transitions, just that you need to pick your spots. Aim for no more than a handful of these transitions for each presentation. And use them in spots where they'll add to the demonstration, not detract from it.
Sometimes images tell a better story than text can. And as a presenter, your goal is to describe points in detail without making users do a lot of reading. In these cases, a well-designed visual, like a chart, might better convey the information you're trying to share.
The right image adds visual appeal and serves to break up longer, text-heavy sections of the presentation---but only if you're using the right images. A single high-quality image can make all the difference between a success and a dud when you're driving a specific point home.
When considering text, don't think solely in terms of bullet points and paragraphs. Tables, for example, are often unnecessary. Ask yourself whether you could present the same data in a bar or line chart instead.
Color is interesting. It evokes certain feelings and adds visual appeal to your presentation as a whole. Studies show that color also improves interest, comprehension, and retention. It should be a careful consideration, not an afterthought.
You don't have to be a graphic designer to use color well in a presentation. What I do is look for palettes I like, and then find ways to use them in the presentation. There are a number of tools for this, like Adobe Color , Coolors , and ColorHunt , just to name a few. After finding a palette you enjoy, consider how it works with the presentation you're about to give. Pastels, for example, evoke feelings of freedom and light, so they probably aren't the best choice when you're presenting quarterly earnings that missed the mark.
It's also worth mentioning that you don't need to use every color in the palette. Often, you can get by with just two or three, though you should really think through how they all work together and how readable they'll be when layered. A simple rule of thumb here is that contrast is your friend. Dark colors work well on light backgrounds, and light colors work best on dark backgrounds.
Spend some time in the Slide Sorter before you finish your presentation. By clicking the four squares at the bottom left of the presentation, you can take a look at multiple slides at once and consider how each works together. Alternatively, you can click "View" on the ribbon and select "Slide Sorter."
Are you presenting too much text at once? Move an image in. Could a series of slides benefit from a chart or summary before you move on to another point?
It's here that we have the opportunity to view the presentation from beyond the single-slide viewpoint and think in terms of how each slide fits, or if it fits at all. From this view, you can rearrange slides, add additional ones, or delete them entirely if you find that they don't advance the presentation.
The difference between a good presentation and a bad one is really all about preparation and execution. Those that respect the process and plan carefully---not only the presentation as a whole, but each slide within it---are the ones who will succeed.
This brings me to my last (half) point: When in doubt, just buy a template and use it. You can find these all over the web, though Creative Market and GraphicRiver are probably the two most popular marketplaces for this kind of thing. Not all of us are blessed with the skills needed to design and deliver an effective presentation. And while a pre-made PowerPoint template isn't going to make you a better presenter, it will ease the anxiety of creating a visually appealing slide deck.
Microsoft 365 Life Hacks > Presentations > Implementing The 10-20-30 Rule of PowerPoint
Implementing The 10-20-30 Rule of PowerPoint
If you’re not used to making a PowerPoint presentation , it can be tough to know how long to make it and how to format the slides. On the other side of the coin: you might overthink your presentation and put too much information on too many slides.

With help from the 10-20-30 rule, you can make a PowerPoint presentation that’s engaging and efficient . The guidelines for this rule are as follows:
- No more than 10 slides.
- No longer than 20 minutes.
- No larger than 30-point font.
Let’s look deeper at the 10-20-30 PowerPoint rule, why it’s a good rule to follow and things to do to follow this guideline.

Tell your story with captivating presentations
Powerpoint empowers you to develop well-designed content across all your devices
Don’t use more than 10 slides. A good presenter shouldn’t have to (or want to) lean heavily on their PowerPoint slides. The slides should be a supplement for your presentation, not the headliner. Limiting to 10 slides will ensure that you’re not going over the top with the length of your presentation and keeps it moving. Your slide count should include both your title and conclusion. A presentation that goes on any longer than 10 slides will distract from what you’re saying and starts to feel like an information overload.
Keep your presentation 20 minutes MAX. During a presentation, people start tuning out after about 10 minutes.Limiting your presentation to this length will ensure that your audience will remember much of what you’re saying. If you’re covering a more complex topic and need more time, stick to the 20-minute MAX rule—it’s much easier to schedule your presentation by timing each slide down to about two minutes. That feels like a much more manageable timeframe, doesn’t it?
Don’t use fonts smaller than size 30. A 30-point font is a great minimum size because it ensures that your text is easy to read from a distance. The recommended guideline to make your presentation accessible to those who might be visually impaired is a 24-point font. Upping the size to 30 is a significant difference, and you can be confident that your audience can see what you’ve written. In addition, choose a font that’s easy to read. For years it was recommended that you stick solely to sans-serif fonts with digital media because serifs could blur together, making certain fonts hard to read. High-resolution screens have nearly eliminated this problem, so some serif fonts can be used and are easy to read in PowerPoint presentations.

Tips for sticking to these guidelines. It’s not always easy to cut down your presentation to fit the 30-20-10 rule if you’re presenting a lot of information. Follow these tips while putting together your presentation to make the entire process easier on yourself:
- Limit text to the 6×6 rule. It can feel like there are a lot of rules for making a PowerPoint presentation, but they’re all there to help you make a well-organized and engaging presentation. The 6×6 rule suggests that you don’t use more than six lines or bullet points on each slide and limit each line or bullet point to six words. Following the 6×6 rule helps to ensure that you’re limiting the amount of information on your slides so you can continue to present it rather than have your audience read it.
- Use visuals instead. Visuals like graphics, animated gifs, and videos can help to keep your audience engaged . Including visuals with your presentation will also help you limit the amount of time and content on each slide. A graph or illustration on the right side of your slide limits the amount of space you have on the left side. This can help to minimize the amount of text you have.
- Practice makes perfect. There’s a very cool, free tool called PowerPoint Speaker Coach , which leverages AI to help you nail your presentation. Speaker coach gives you feedback on your pace, pitch, use of filler words, poor grammar, lack of originality, use of sensitive phrases, and more as you rehearse your presentation. You’ll get a Summary Report at the end—with key pieces of feedback to help you become a confident presenter .
Use the 10-20-30 PowerPoint rule and these other tips to keep your presentation simple. Whether you’re a college student presenting a class project or a teen making the case for a new car, following these guidelines will help.
Get started with Microsoft 365
It’s the Office you know, plus the tools to help you work better together, so you can get more done—anytime, anywhere.
Topics in this article
More articles like this one.

How to create an educational presentation
Use PowerPoint to create dynamic and engaging presentations that foster effective learning.

Five tips for choosing the right PowerPoint template
Choose an appropriate PowerPoint template to elevate your presentation’s storytelling. Consider time length, audience and other presentation elements when selecting a template.

How you can use AI to help you make the perfect presentation handouts
Learn how AI can help you organize and create handouts for your next presentation.

How to use AI to help improve your presentations
Your PowerPoint presentations are about to get a boost when you use AI to improve a PowerPoint presentation.
Everything you need to achieve more in less time
Get powerful productivity and security apps with Microsoft 365

Explore Other Categories
Roles and responsibilities presentation: A comprehensive guide
Learn how to create a roles and responsibilities presentation that is clear, concise, and informative.
Raja Bothra
Building presentations

Hey there, fellow presenters and content creators!
Today, we're diving deep into the world of roles and responsibilities presentations.
Whether you're a manager, team leader, or just someone looking to create an impactful presentation, understanding the ins and outs of this essential tool can make a world of difference in your communication.
In this comprehensive guide, we'll explore what roles and responsibilities presentations are, why they matter, what to include in them, how to structure them effectively, and the do's and don'ts to keep in mind. Plus, we'll provide some key takeaways to help you create engaging and informative presentations.
So, let's get started!
What are roles and responsibilities?
Before we delve into the specifics of creating a roles and responsibilities presentation, let's ensure we're on the same page regarding the concept itself. Roles and responsibilities refer to the division of tasks and duties within a team, organization, or project. It's the cornerstone of effective teamwork and communication.
In any group setting, it's crucial for individuals to know who does what, who to turn to for specific tasks, and how their contributions fit into the bigger picture. Roles and responsibilities provide clarity, streamline operations, and prevent confusion. Without them, chaos can ensue, leading to missed deadlines, overlapping duties, and frustrated team members.
What are the uses of roles and responsibilities presentation?
Now that we've established what roles and responsibilities are, let's delve into the multifaceted world of roles and responsibilities presentations. These presentations serve a plethora of invaluable purposes, ensuring clarity, efficiency, and effective communication within your organization or project. Here are some of the key uses:
1. Providing a clear blueprint for new team members
Roles and responsibilities presentations can be instrumental when introducing new team members to your organization. Imagine them as newcomers embarking on a journey, and your presentation acts as the map. It helps them navigate the complex terrain of who does what and how they fit into the team puzzle.
2. Defining roles and responsibilities for new projects
Starting a new project is like setting sail into uncharted waters. To avoid getting lost in the vast sea of tasks and responsibilities, a roles and responsibilities presentation becomes your compass. It ensures that every team member knows their role, which direction to steer, and how to avoid collisions along the way.
3. Effectively communicating changes in roles and responsibilities
Change is the only constant, especially in dynamic work environments. When roles and responsibilities evolve, it's essential to communicate these changes clearly to all team members. A presentation serves as a beacon, guiding everyone through the turbulent waters of transition.
4. Accelerating new employee onboarding
The onboarding process can be a steep learning curve for new employees. A roles and responsibilities presentation simplifies this process by providing a structured path for new hires to quickly grasp their specific roles and contributions. It's like giving them a head start in the race towards productivity.
5. Enhancing team communication and collaboration
In the fast-paced world of today's organizations, efficient team communication and collaboration are essential. Roles and responsibilities presentations facilitate this by ensuring that every team member comprehends their part in the collective effort. Think of it as the conductor's baton, orchestrating a harmonious team performance.
6. Educating stakeholders on organizational dynamics
Roles and responsibilities presentations are not just for internal use. They can also serve as a valuable tool to educate external stakeholders on the intricacies of your organization. By providing a clear picture of who does what, you help external partners understand how they can contribute to your success.
7. Fostering teamwork and collaboration
Promoting teamwork and collaboration is a cornerstone of organizational success. Roles and responsibilities presentations increase awareness of the different roles and duties within your organization, ultimately strengthening the bonds between team members.
8. Identifying and addressing gaps
Sometimes, organizations may encounter gaps or overlaps in roles and responsibilities. A well-structured presentation can serve as a magnifying glass, helping you identify these issues and take the necessary steps to address them.
Roles and responsibilities presentations are versatile and invaluable tools. They can be applied to a wide range of scenarios, from onboarding new team members to explaining complex project structures, and from enhancing teamwork to educating stakeholders. These presentations are the glue that holds together the intricate dynamics of modern organizations, ensuring everyone is on the same page and working towards a common goal.
How to structure an effective roles and responsibilities presentation
Structuring your presentation is crucial for clarity and engagement. You can use powerpoint templates to help you create an organized structure. Here's a recommended format:
Title slide: Begin with a title slide that prominently displays "Roles and Responsibilities Presentation" along with the presenter's name and the date of the presentation.
Introduction: In the introduction, set the stage by explaining the purpose of the presentation. Emphasize the significance of understanding roles and responsibilities in the context of your organization or project.
Agenda: Outline the main sections that you'll cover in the presentation to give your audience a roadmap of what to expect.
Context and background: Provide essential context regarding the organization or project for which roles and responsibilities are being presented. This might include the organization's mission, goals, and objectives.
Roles: Define and describe each role within the organization or project, specifying job titles, positions, or functional areas. Consider using visual aids like organizational charts to illustrate the hierarchy.
Responsibilities: For each role, clearly outline their primary responsibilities and duties, typically in the form of bullet points or concise sentences.
Interactions and collaborations: Explain how these roles interact and collaborate with one another. Highlight key touchpoints and dependencies between roles.
Examples or case studies: Use real-world examples or case studies to make the roles and responsibilities more concrete, enabling the audience to grasp their practical implications.
Accountability and authority: Clarify the level of authority and accountability associated with each role. Mention reporting structures or relevant hierarchies.
Challenges and problem-solving: Address potential challenges or conflicts that may arise due to overlapping or unclear responsibilities. Offer practical solutions or strategies to resolve these issues.
Training and development: If relevant, discuss how individuals can develop the skills and knowledge required for their roles. Share information about available training programs or resources.
Communication and feedback: Explain how communication flows within the organization or project and the significance of feedback loops for role improvement.
Expectations and performance metrics: Detail the expectations and performance metrics associated with each role, emphasizing the criteria used to evaluate each role's success.
Q&A session: Invite questions from the audience, encouraging them to seek clarification or additional information.
Conclusion: Summarize the key points you've covered, reinforcing the importance of clear roles and responsibilities within the organization or project.
Next steps: Discuss what actions will follow this presentation, such as when the defined roles and responsibilities will be implemented or reviewed.
Thank you slide: End with a slide expressing gratitude to your audience for their time and attention.
Appendix (if necessary): If there's additional data, charts, documents, or supplementary information, provide these in an appendix for reference.
In your presentation, make use of visuals and graphics to aid understanding. Keep the content concise, engaging, and well-organized, and practice your delivery to ensure a smooth and confident presentation.
Do’s and don'ts on a roles and responsibilities presentation
To make sure your roles and responsibilities presentation is top-notch, here are some do's and don'ts to keep in mind:
- Use templates : Templates ensure consistency and a professional look.
- Be concise : Keep your content clear and to the point.
- Incorporate visuals : Visual aids enhance understanding.
- Emphasize clarity : Make sure everyone understands their roles.
- Encourage questions : Invite feedback and questions.
- Provide contact information : Share how team members can reach out for clarification.
Don'ts:
- Overwhelm with text : Avoid dense paragraphs; opt for bullet points.
- Lack of interactivity : Encourage discussion and questions.
- Forgetting editability : Mention that the presentation can be edited when roles change.
Summarizing key takeaways
- Roles and responsibilities clarify tasks within a team or project.
- Presentations serve various purposes, like onboarding and teamwork.
- Structure presentations with an agenda, examples, and Q&A.
- Do's: Use templates, be concise, incorporate visuals, encourage questions.
- Don'ts: Avoid dense text, ensure interactivity, remember editability.
1. What is a roles and responsibilities presentation?
A roles and responsibilities presentation is a visual representation of the duties and functions of individuals within a team or organization. It helps HR in conveying the various roles and responsibilities of team members, facilitating effective communication, and ensuring clarity in day-to-day work. These presentations are typically created using powerpoint and google slides and can be customized to suit specific needs.
For more insights into HR presentations, visit our dedicated page on HR presentations .
2. How can I create a roles and responsibilities presentation?
To create a roles and responsibilities ppt, you can either design it from scratch or download editable templates from various sources, search for ; roles and responsibilities template, roles and responsibilities slide, team roles and responsibilities ppt, roles and responsibilities powerpoint slides, etc. These templates are available in both powerpoint (ppt) and google slides formats, making it easy for you to customize and distribute them as needed.
3. Are there specific templates for roles and responsibilities presentations?
Yes, there are roles and responsibilities powerpoint templates and google slides templates available for download. These ppt templates often include infographic and diagrams which is easily editable and can be used to showcase the roles and responsibilities of various team members, making it easier to convey information effectively.
4. What are the advantages of using roles and responsibilities presentation templates?
Roles and responsibilities presentation templates offer several advantages. They are customizable, making it easy to edit and assign roles as needed. The templates also feature professional designs, including infographics, which help in analyzing and communicating the organizational structure, roles, and responsibilities. This can be particularly useful for project managers, as well as in training sessions and client presentations.
5. How do roles and responsibilities presentations help in project management and marketing strategies?
Roles and responsibilities presentations are commonly used by project managers to clearly convey the various roles and responsibilities within a project team. They aid in understanding individual roles, ensuring that tasks are distributed effectively, and that everyone understands their part in the project. In the context of marketing strategies , these presentations can be used to communicate the roles and responsibilities of the marketing team, ensuring everyone is on the same page.
6. What should I consider when choosing a roles and responsibilities presentation template?
When selecting a template, consider whether it is completely customizable to suit your specific needs. Look for designs that are editable, as this allows you to customize the layout, add or remove information, and convey the roles and responsibilities in a way that is clearer and more engaging. Additionally, templates that feature a RACI matrix and infographics can help in assigning and describing roles effectively. Finally, make sure the template is available for download in your preferred format, whether it's powerpoint or google slides, so you can easily get started on your presentation.
Create your roles and responsibilities presentation with prezent
Looking to create a stunning roles and responsibilities presentation without the hassle? Consider using Prezent.
Prezent offers invaluable support in crafting your roles and responsibilities presentation. Leveraging its AI presentation tool, you can streamline the creation process by saving up to 70% of your time. With access to a vast library of over 35,000 brand-approved slides, you can effortlessly compile a visually cohesive and professional presentation.
Additionally, Prezent empowers you with a wealth of structured storytelling templates, with 50+ storylines commonly employed by business leaders, ensuring that your message is not only clear but also engaging. This platform is the key to maintaining brand compliance, as every element is approved by your corporate brand and marketing team, making it easy to be 100% on-brand in your presentations.
With Prezent, you can effectively replace expensive agencies with its efficient software and services, saving your organization up to 60% in communication costs. Whether you seek personalization tailored to your audience's preferences or require a professional touch, Prezent has you covered with its range of services, including overnight delivery, presentation specialists, and enterprise-grade security, ensuring the utmost protection of your data.
So, get started, and empower your team with clear roles and responsibilities presentations that foster effective communication and collaboration.
Sign up for our free trial or book a demo today!
Happy presenting!
More zenpedia articles

How to write a problem statement slide for PowerPoint
.webp)
Storytelling in sales: How the power of storytelling can increase success rate?

How to present a Pricing Plan?
Get the latest from Prezent community
Join thousands of subscribers who receive our best practices on communication, storytelling, presentation design, and more. New tips weekly. (No spam, we promise!)
- SUGGESTED TOPICS
- The Magazine
- Newsletters
- Managing Yourself
- Managing Teams
- Work-life Balance
- The Big Idea
- Data & Visuals
- Reading Lists
- Case Selections
- HBR Learning
- Topic Feeds
- Account Settings
- Email Preferences
8 Ground Rules for Great Meetings
- Roger Schwarz

Focus on behaviors, not procedures.
If you want your team to be effective, you need meeting ground rules — and you need agreement about how to use them. Many teams that have ground rules don’t regularly use them. But having rules in place that you consistently enforce can significantly improve how your team solves problems and makes decisions.
- Roger Schwarz is an organizational psychologist, speaker, leadership team consultant, and president and CEO of Roger Schwarz & Associates . He is the author of Smart Leaders, Smarter Teams: How You and Your Team Get Unstuck to Get Results . LeadSmarter
Partner Center
Fact Sheet | Building for the Future Through Electric Regional Transmission Planning and Cost Allocation
FERC’s new transmission and cost allocation rule, Order No. 1920, continues the essential work of the Commission – ensuring a reliable grid – by requiring the nation’s transmission providers to plan for the transmission we know we will need in the future.
This rule adopts specific requirements addressing how transmission providers must conduct long-term planning for regional transmission facilities and determine how to pay for them, so needed transmission is built. The final rule reflects more than 15,000 pages of comments from nearly 200 stakeholders representing all sectors of the electric power industry; environmental, consumer and other advocacy groups; and state and other government entities.
The grid rule contains these major elements:
- Requirement to conduct and periodically update long-term transmission planning to anticipate future needs.
- Requirement to consider a broad set of benefits when planning new facilities.
- Requirement to identify opportunities to modify in-kind replacement of existing transmission facilities to increase their transfer capability, known as “right-sizing.”
- Customers pay only for projects from which they benefit.
- Expands states’ pivotal role throughout the process of planning, selecting, and determining how to pay for transmission facilities.
Long-Term Regional Transmission Planning
More specifically, the rule requires each transmission operator to:
- Produce a regional transmission plan of at least 20 years to identify long-term needs and the facilities to meet them.
- Conduct this long-term planning at least once every five years using a plausible and diverse set of at least three scenarios that incorporate specific factors and use best available data.
- Apply seven specific benefits to determine whether any identified regional proposals will efficiently and cost-effectively address long-term transmission needs.
- Include an evaluation process to identify long-term regional transmission facilities for potential selection in the regional plan.
- Include a process giving states and interconnection customers the opportunity to fund all, or a portion, of the cost of a long-term regional transmission facilities that otherwise would not meet the transmission provider’s selection criteria.
- In the event of delays or cost overruns, reevaluate long-term regional transmission facilities that previously were selected in a regional transmission plan.
- Consider transmission facilities that address interconnection-related needs identified multiple times in existing generator interconnection processes, but that have not been built.
- Consider the use of Grid Enhancing Technologies such as dynamic line ratings, advanced power flow control devices, advanced conductors and transmission switching.
How to Pay for Transmission
The grid rule contains these cost-allocation provisions:
- Before applicants submit compliance filings, they must open a six-month engagement period with relevant state entities.
- Applicants must propose a default method of cost allocation to pay for selected long-term regional transmission facilities.
- Applicants may propose, a state agreement process that lasts for up to six months after a project is selected for participants to determine, and transmission providers to file, a cost allocation method for the selected facilities.
Enhanced Transparency, “Right-Sizing” and Interregional Transmission Coordination
The grid rule requires transmission providers to:
- Be transparent regarding local transmission planning information and conduct stakeholder meetings during the regional transmission planning cycle about the local process.
- Identify opportunities to modify in-kind replacement of existing transmission facilities to increase their transfer capability, known as “right-sizing,” when needed.
- Give incumbent transmission owners a right of first refusal to develop these “right-sized” replacement facilities.
- Revise existing interregional transmission coordination processes to reflect the new long-term regional transmission planning reforms.
Order No. 1920 takes effect 60 days after publication in the Federal Register . Compliance filings with respect to most of the rule’s requirements are due within 10 months of the effective date, while filings to comply with the interregional transmission coordination requirements are due within 12 months of the effective date.
Contact Information
- News Media Email: [email protected]
Latest News
May highlights | ferc insight | volume 5, ferc staff issues draft environmental impact statement for the ridgeline expansion project (cp23-516-000, cp23-516-001), ferc summer assessment presages emerging long-term analysis underpinning order no. 1920.
IMAGES
VIDEO
COMMENTS
The Project Risks. All projects present risks, and to control them, they must be identified, assessed, evaluated, and mitigated. Visualize your risk assessment with a risk matrix and include it in the project presentation. Use this slide to explain to stakeholders how you plan to mitigate the identified risks.
This clarifies the overall purpose of your talk and reinforces your reason for being there. Follow these steps: Signal that it's nearly the end of your presentation, for example, "As we wrap up/as we wind down the talk…". Restate the topic and purpose of your presentation - "In this speech I wanted to compare…". 5.
Apply the 10-20-30 rule. Apply the 10-20-30 presentation rule and keep it short, sweet and impactful! Stick to ten slides, deliver your presentation within 20 minutes and use a 30-point font to ensure clarity and focus. Less is more, and your audience will thank you for it! 9. Implement the 5-5-5 rule. Simplicity is key.
Rule 2: Spend only 1 minute per slide. When you present your slide in the talk, it should take 1 minute or less to discuss. This rule is really helpful for planning purposes—a 20-minute presentation should have somewhere around 20 slides. Also, frequently giving your audience new information to feast on helps keep them engaged.
2 Lay Out Your Project Plan. Once you've set your goals, the next big step is to outline how you'll achieve them. An excellent place to start is by organizing your project into an actionable plan and steps for execution. You might wonder why this step is important for creating a successful project presentation.
Here are a few tips for business professionals who want to move from being good speakers to great ones: be concise (the fewer words, the better); never use bullet points (photos and images paired ...
1. Galaxi PowerPoint Presentation Template. The Galaxi PowerPoint template has a clean and modern design. It's versatile enough to use for all kinds of presentations and comes with five premade color schemes. The template comes with 30 premade slides based on master slides, image placeholders, and editable shapes. 2.
Take a pause after you ask a question or make a strong statement. Spare your audience a moment to think, reflect, and ponder. Or leave a gap of silence right before you present something exciting to build suspense and anticipation. No one expects you to go on talking for 10-15 minutes without a pause.
A project plan is an official document that follows a set format and flow. Your presentation should follow this flow for maximum impact. To present a project plan, you should go over the following eight steps: Give an overview. Provide a brief overview of the project, outlining its goals and rationale.
The secret structure of great talks. From the "I have a dream" speech to Steve Jobs' iPhone launch, many great talks have a common structure that helps their message resonate with listeners. In this talk, presentation expert Nancy Duarte shares practical lessons on how to make a powerful call-to-action. 18:00.
2 Million+ PowerPoint Templates, Themes, Graphics + More. Download thousands of PowerPoint templates, and many other design elements, with a monthly Envato Elements membership. It starts at $16 per month, and gives you unlimited access to a growing library of over 2,000,000 presentation templates, fonts, photos, graphics, and more.
Tips for creating an effective presentation. Tip. Details. Choose a font style that your audience can read from a distance. Choosing a simple font style, such as Arial or Calibri, helps to get your message across. Avoid very thin or decorative fonts that might impair readability, especially at small sizes. Choose a font size that your audience ...
Follow the 5/5/5 rule. To keep your audience from feeling overwhelmed, you should keep the text on each slide short and to the point. Some experts suggest using the 5/5/5 rule: no more than five words per line of text, five lines of text per slide, or five text-heavy slides in a row.
If you're making up a color scheme from scratch, bear in mind: (A) Don't use too many colors. Using too many different colors will make the presentation look messy, busy, or incoherent - so focus on one or two key, recurring colors that'll lend a sense of cohesion throughout all your slides.
Presentation skills are the abilities and qualities necessary for creating and delivering a compelling presentation that effectively communicates information and ideas. They encompass what you say, how you structure it, and the materials you include to support what you say, such as slides, videos, or images. You'll make presentations at various ...
Get your main point into the presentation as early as possible (this avoids any risk of audience fatigue or attention span waning), then substantiate your point with facts, figures etc and then reiterate your point at the end in a 'Summary'. 2. Practice Makes Perfect. Also, don't forget to practice your presentation.
A good presentation needs two fonts: a serif and sans-serif. Use one for the headlines and one for body text, lists, and the like. Keep it simple. Veranda, Helvetica, Arial, and even Times New Roman are safe choices. Stick with the classics and it's hard to botch this one too badly.
On the other side of the coin: you might overthink your presentation and put too much information on too many slides. With help from the 10-20-30 rule, you can make a PowerPoint presentation that's engaging and efficient. The guidelines for this rule are as follows: No more than 10 slides. No longer than 20 minutes. No larger than 30-point font.
To decide which of the two visual project management charts serves you best, check out our case study on the benefits of using timelines in project presentations or our article on the do's and don'ts of creating a Gantt chart.. Next, let's take a comparative look at two frequently used alternatives for visually rendering a project charter, Excel and PowerPoint.
Roles and responsibilities clarify tasks within a team or project. Presentations serve various purposes, like onboarding and teamwork. Structure presentations with an agenda, examples, and Q&A. Do's: Use templates, be concise, incorporate visuals, encourage questions. Don'ts: Avoid dense text, ensure interactivity, remember editability. FAQ ...
CS 294-5. Final Project Presentation Guidelines. On the last class meeting, we will have final project presentations. You will have around 6 minutes to describe your projects to the rest of the class, and a minute or two for questions. You can do this on the whiteboard or with slides, depending on how you prefer to do the presentation.
8 Ground Rules for Great Meetings. If you want your team to be effective, you need meeting ground rules — and you need agreement about how to use them. Many teams that have ground rules don't ...
Applicants may propose, a state agreement process that lasts for up to six months after a project is selected for participants to determine, and transmission providers to file, a cost allocation method for the selected facilities. Enhanced Transparency, "Right-Sizing" and Interregional Transmission Coordination