How to Create and Add Mockups to Your Figma Designs Using Plugins
Want to make your Figma designs look more realistic? Add a mockup. You can do it right in Figma with the help of plugins.
If you’re a designer who likes to showcase your designs by using mockups, it can be easy to create them in Figma.
Instead of saving your Figma designs and moving to another program to create a mockup, you can easily download mockup plugins in Figma. There are many plugin options in various styles, but they’re all simple to use and integrate into larger designs.

How to Find and Download Figma Plugins
Downloading and installing a plugin in Figma is the same whether you’re using the app or the browser version. From Figma’s browser homepage , click Community > Plugins and Widgets , and search through the list or use the search bar.
From Figma’s app , the homepage will offer the same option as the browser to get to the community page. But if you’re on a design page, you can click the Figma logo, then Plugins . If you’ve already got plugins installed, you’ll see them listed here.
To find more, choose Browse Plugins in Community. This will take you to the community page within the app where you can search for other plugins.
On the community page, you’ll find a small blurb for each plugin, date of the last update, and how often each plugin has been downloaded. For more information about each plugin—such as comments from users and usage guides—clicking its name will take you to that plugin’s information page.
Once you’ve found a plugin you’d like to download, click the blue Install button.
If you’re not sure what to look for, here are our top five favorite mockup plugins. There are many more, but it’s good to start somewhere.
Clay Mockups 3D
Angle mockups.
- MockRocket - 3D Mockups
Vectary 3D Elements
How to use mockup plugins in figma.
The process of installing plugins is the same regardless of the type of plugin you’re using, but there may be some differences in how they are used. That’s why it’s always best to read the individual plugin’s community page for extra details.
In Figma, you can choose ready-made frame sizes for specific screens, like the iPhone 13 or a large or small Android. You should create your design for its intended device size rather than trying to resize the designs later to fit your mockup, but some mockups will allow for slightly different sizes with no distortion.
You could even use a screenshot from your device, which will be perfectly sized for a mockup of the same device.
Mockups are usually for static screen designs, although you can make a video mockup in Photoshop . We're going to focus on Figma mockups for handheld devices, but you can create a mockup from scratch in Photoshop for other devices. With your screen design finalized, you can move on to creating the product mockup.
We’re going to show you how to use three of our suggested plugins: Clay Mockups 3D, Angle Mockups, and Vectory 3D Elements. Let’s jump right in.
With your design open, select the frame and then go to Plugins and choose Clay Mockups 3D . This opens a window where you can choose the device for the mockup. Your design should show on the screen of the mockup in this window.
You can change the angle of the mockup as well as the color in this window. Once you’re happy with how it looks, click Save as Image .
You can go back and change the color or other aspects at any time by clicking Edit Mockup under Plugin in the right-hand menu. Now you can add your plugin to larger designs like presentations or your portfolio.
To use Angle Mockups, you need to create an Angle account to download the mockup library from their website. On Angle’s website , click Sign In , which will bring up a popup where you can click Sign Up and add your details to make a free account.
Once signed in, to download the mockups, click Mockups > Download Sample . For a more comprehensive set of mockups, you can pay for premium access, but the sample offered with the free account is good enough.
Once downloaded, unzip the file. This contains samples you can use in Figma, Sketch, and Adobe XD, as well as some free wallpapers. Open Angle Figma . You’ll find two videos to help with using the mockups, as well as four sets of Figma files with various mockups.
To import the files to your Figma account, go to the Figma browser and click on your profile. You can access this from the app by going to File > Open File Browser . Drag and drop each Angle file into Figma. Then open the Angle file by double-clicking on it from the Figma browser page.
Find the device angle you want to use for your mockup and copy it ( C md + C for Mac or C trl + C for Windows). Paste it ( C md + V for Mac or C trl + V for Windows) into the same artboard as your main design.
In the layer palette, expand the layers of the mockup screen until you see the layer with a picture icon titled Place Artboard Here . Select that layer. Then go to Plugins > Angle Mockups and select your original design in the popup window.
This should show in the preview window in the angle of your mockup, but it will not show the device of the mockup. Click Apply and your screen should now be on the device mockup at the correct angle.
Vectary 3D works similarly to Clay Mockups 3D, although it has fewer options for device mockups as it also offers a variety of 3D assets. Open your design, select the frame, and go to Plugins > Vectary 3D Elements .
Find the mockup you’d like to use in the popup library, then click Load Frame . Once your design has appeared on the device’s screen, click Export Image .
Now you have a 3D mockup of your design on the device you choose. You can add it to another design easily.
Once your mockup is complete, you can save it as a PNG file to easily use in another design. Click File > Export . Select your chosen image to export, then click Export for your final PNG.
Add Realism to Your Designs With Figma Mockups
There are countless uses for creating mockups for your designs. With various Figma plugins, you can find a large variety of styles to work with that you can add to your presentations, portfolio, or create just for fun to show off your design work.
With a few differences in application, Figma mockup plugins are easy to access and use, so why not try it?
Resources and tips around creating and designing slide decks, general presentation guidance, and tool workflows and pro-tips.
Using Figma for Presentations: 2021 Update
January 23, 2021

In 2017, I published Using Figma for Presentations . At the time, Figma was still in beta (and didn’t even have prototyping yet!), and most design teams I knew were skeptical about it as a tool — and of collaborative designing as a concept.
Since then, Figma has grown to hundreds of thousands of users, with design teams from some of the most recognizable brands in the world using it daily. Also, since then, I joined and left Figma as a design education manager and community advocate, and have started my presentation design agency, Zacht Studios .
I’m still betting on Figma to be a significant player in the presentation tool game. I wanted to update that 2017 article with the new strategies I’ve learned and the new Figma features added since to create and present with Figma even better.
First, I like to set up a new Figma file with the intention of creating a presentation:
Template Slides
I like to stick these on a separate page in my Figma file to keep my documents tidy.
Using Figma Components, create the base of each slide type. For example, a title slide, a section break, a top title, and a blank slide with just a footnote.

Since I am setting these as Components, I can use them in this file, and I will also publish them to the Team Library, so anyone at Zacht Studios can access them.
The next step is to go back to that original page and start making a deck. I create a new Frame of the same size and place an Instance of one of my Template Components inside it. The reason I do this, instead of just placing an Instance on the canvas by itself, is because I’m going to want to layer other content on top of it.
Figma Instances support Overrides. An override is changing a property of an object that is part of the Component. In this case, that could be changing the title of a slide, or it could be something like changing the color or typeface of an element just in one instance. The benefit here is, for example, having a 30 slide presentation created, with each slide having unique content, and then being able to make changes to the template layout rather than each individual slide separately.
You can also set Styles in your file — or use existing Styles from your Team Library — to adjust type and color choices (among other things) across multiple slides at once, including the template slides.
Before I get too far in the content-creation process, I like to set up some additional structure for my slides:
Figma’s grids are powerful. For me, they help maintain consistency, a critical piece of good presentation design . I usually use just one grid layout of columns for an entire project, but there is a lot of flexibility in Figma if you feel comfortable using multiple grid systems. You can pick any Frame to start with and then save your grid layout as a Style. Then you can use it on any Frame.
Auto Layout
Figma’s auto layout helps maintain spacing rules that you create. Much like Grids, it is another structure that can help maintain consistency.

Now that I have foundational structures in place to lay my content out with confidence, I can use these additional Figma features to mimic more traditional presentation tool features:
Any text or text box in Figma can become a hyperlink. Select the text you want to add a link to and the chain icon appears in the toolbar at the top-center of the interface. These are clickable in the Presentation view (more on that in a second) and in exported PDFs. You can also add hyperlinks in Comments.
You can export your deck as a single PDF file by going to File > Export frames to PDF. Figma will generate a PDF with every Frame on the current Page — another reason to set up your Template Slides on a separate page. Figma organizes Frames left-to-right, top-to-bottom and your PDF pages will follow that order (so will your slideshow in Presentation view, unless you adjust with the Prototype panel).
Sharing/Collaborating
This hasn’t changed much since my original article: “By clicking the share button in the top right corner, you can enter an email address to invite others to collaborate, or generate a shareable link.”
Some of my favorite Figma collaborative features, that eclipse presentation tools like Google Slides, are Observation Mode and Embedding .
When in Presentation mode, using the keyboard shortcut "⌘\" on macOS or "^\" on Chrome OS and Windows hides the toolbar and footer.
If you are going to embed a Figma file on a webpage or share the Presentation mode link with someone else, you can add "&hide-ui=1" to the end of the URL to keep the toolbar and footer hidden there as well.
Alternatively, you can use the Prototype panel to do this by setting the Device to "Presentation".
Animation (aka Prototyping)
Figma is, first and foremost, an UI design tool. With it being flexible enough to do other types of design work, like presentation design, it’s many features can be used beyond their original intention. Prototyping app screens is a core competency, but using that to animate slides and create Keynote-like transitions is more than possible. Smart animate is the Figma equivalent of Keynote's Magic Move.

Community: Files
Via the Share menu, you can publish your file to the Figma Community . Check out our resources, available for free at figma.com/@zach (me) and figma.com/@zacht (Zacht Studios). Other Figma users will be able to create a duplicate of your file to make their own (they will not be able to edit your original file).

Community: Plugins
As of writing this article, there are hundreds of plugins for Figma .
Here are a few of my favorites:
- Stark , contrast checker and colorblind simulator
- Unsplash , free stock photography
- Material Design Icons , Google's icon library
- LottieFiles , use Lotti animations in Figma
- Brandfetch , easily find and place company logos (great for deck making)
- Map Maker , for generating maps directly on the canvas
Additional Tips
Open your file again in another window with Presentation mode so you can see what your audience is going to see in the presented version of the slide.

Use Swap Instance to quickly try out your other layouts for a slide or build out additional slides quickly.
All that to say, there are a lot of great features intended initially for screen design that extend to making great slides fast.
If you have questions or additional tips to share, please reach out: [email protected]
presentation.design is a resource hub by Zacht Studios , The Presentation Design Agency.
Need help creating that presentation template or pitch deck for your company? Zacht Studios is a team of skilled creatives focused on company storytelling and fundraising.
We’ve crafted pitch decks, marketing materials, and unforgettable stories for some of your favorite companies like Adobe, Square, Etsy, and SpaceX. Plus, we’ve supported startups in raising more than $1.41B to date.
Curious to learn more? Reach us at [email protected]

Made by Zacht Studios , The Presentation Design Agency | Listen to our creative interview podcast, Bézier
Advisory boards aren’t only for executives. Join the LogRocket Content Advisory Board today →
- Product Management
- Solve User-Reported Issues
- Find Issues Faster
- Optimize Conversion and Adoption
Making a website mockup in Figma

Designers, take your mockups to the next level: learn how to create visually stunning mockups with Figma.

In this article, we will walk through the following points:
What is a mockup?
Why is a mockup important, three phases for building a website interface, the mockup structure, choosing a mockup tool, steps to build a mockup in figma, tip: figma plugins to create responsive mockups.
A website mockup is a visual representation of a website’s layout, design, and content. It is typically created using design software such as Figma or Sketch and is used to showcase the website’s design to stakeholders and clients, as well as to plan and organize the website’s development.
A mockup is not a functional website, but it allows designers, developers, and clients to get a sense of how the final website will look and feel and helps them to identify and solve any design problems before the website is built.

Now that we understand what a mockup is, let’s examine why it is important to create high-quality mockups.
Reason 1: Clients or stakeholders
Before a design is approved by a client or a company’s stakeholders, we need to show a mockup or prototype to demonstrate the results of our work. Typically, this presentation highlights the visual aspect of the website, as well as the primary tasks users will be able to do with the newly designed website. This is usually done in a meeting where a presentation is given to explain the entire design process, leading up to the final concept, which is a visual representation of the website.
Reason 2: Prototyping and user testing
A prototype can be a mockup brought to life by adding interactions, animations, and basic functionality to the static layout. It can be used for usability testing to gather feedback and make improvements before the final website is built. A prototype can be created with the same tools used to create mockups or with specialized prototyping software such as Adobe XD, Figma, or InVision.
A prototype is important for many reasons. The foremost reason is to showcase the website to developers, clients, and stakeholders, from which we can gather feedback. This feedback can be used to make improvements to the website or to validate the concept before moving on to the development stage of the process.
The second benefit of creating prototypes is to use them for usability testing. By checking with potential users, we can identify any usability issues with the concept. It’s better to find any issues with a prototype than with a fully built website because catching usability issues early can save a significant amount of time and money for the company in the long run.
Overall, a prototype is an essential step in the design process to ensure the creation of a high-quality and user-friendly final website.
Reason 3: Developers handoff
A mockup is the closest visual representation of a real website, which helps the architects of the ecosystem understand how to build it. Frontend developers need to know exactly what to bring to life, and having a detailed mockup will help them with the closest experience. Providing a prototype will also help backend developers understand the interactions they need to build through the website.
Think of a website as an ecosystem that has a visual aspect built by frontend engineers that connect some parts of the website to endpoints built by backend engineers. These connections make the website complete the actions taken by users.

When it comes to the visual representation of a website , there are three important steps to take in the process. First, we need to create the skeleton of the website, a concept that we call a wireframe. Second, we need to put skin to our skeleton, a concept that we call a mockup. Finally, we give life to this body with a concept we name prototypes.
- A wireframe is a low-fidelity representation of the content and layout, showing the placement of elements such as text, buttons, or images. Wireframes help to organize and visualize the website’s structure, navigation, and the organization of the content. Lastly, it is important to build them with usability in mind
- A mockup, as we explained above, is a high-fidelity representation of the content and layout with details, meaning we add elements such as styles and components and all the content needed, such as images or text
- A prototype showcases the functionality of the mockup. Using the high-fidelity visuals of the website, we add hotspots to create interactive components to generate a sense of interaction between the different screens of the website. Here is where users can experience and interact with the product
A website mockup is built on an artboard, a working area for creating and editing digital artwork. This artboard can be fictionally divided and structured with a layout and a grid.

Over 200k developers and product managers use LogRocket to create better digital experiences
A layout is the distribution of elements such as text, images, or buttons on an artboard. A layout can be responsive, meaning that all these elements change dynamically based on the size of the screen. A grid is a smaller division, a collection of vertical and horizontal lines used to structure all elements with consistent spacing.
Now we have an artboard that is divided by a layout and a grid to help us place elements across its borders. The elements we can place on it are the following:
- Text: written words, characters, or symbols formatted in multiple ways, such as font size or height, color, alignment, and so on
- Images and other media: imagery, gifs, or videos are typical elements found on a website mockup
- Components: a standardized UI element repeated across the artboards multiple times. There are smaller and simple components such as a button or more complex such as a card with an image, text, and a button
To all these elements (text, images, and components) we can apply styles, such as colors, icons, and effects. Styles allow consistency, helping users navigate easily across the website.
In summary, when choosing a mockup tool, it is important to consider the following factors:
- All-in-one capability to handle the different visual stages of website creation (wireframing, mockup, and prototyping)
- The ability to centralize and document styles and components in a design system library
- Real-time collaboration capabilities for remote work and multiple stakeholders
- Ease of development handoff, including access to code and assets for building the final website
Figma as a mockup tool
One tool that meets these criteria is Figma, a browser or desktop cloud-based software, vector graphics editor, and prototyping tool that allows for real-time collaboration and version control.
Figma is an all-in-one tool for creating wireframes, mockups, and prototypes with the help of design system libraries. It also includes a design system library for creating and managing styles and components. Figma offers a free version for up to three files, a free version for students and teachers, and different plans for individuals and organizations.
1. Create an artboard
Create a new design file in Figma and navigate to the top left tools panel where you will find a hashtag symbol. Click on it, and a list of artboards will appear on the right panel. As an alternative, press the A key on your keyboard to reveal the same panel.
This is the Frame section, where you will find multiple artboards to choose from such as phone, tablet, and desktop, but you can also find options such as smart watch and social media.
Unfold the Desktop section to reveal multiple options, including the most common sizes of 1280×832 and 1440×1024.
If you prefer to create an artboard with a different size, you can click and drag the mouse to freely create one. Note that you can also customize the size of the artboard even after creating or selecting one.
To create a responsive website, you will need to create a mockup for each of the breakpoints of your layout. Typically, designers have four different layouts: one for phones, another for tablets, and two for small and large desktops.

2. Apply the grid and the layout
To use the Layout Grid feature in Figma, select the artboard and press the plus button on the left-hand panel tool. After pressing the button, a standardized layout will be applied to the artboard.
To customize it, click the multiple squares button and a settings panel will appear. On the top, you have a dropdown where you can select whether you want a grid or a vertical or horizontal layout.
Here are some recommendations for creating grids and layouts:
The 8px grid system is widely recognized as the most popular, as it makes it simpler and more consistent to adjust designs. All elements on the web page align to an 8px square baseline grid for various devices such as mobile, tablet, and desktop.
Sizing and spacing of elements on the web page should be in increments of 8px; this includes any defined height or width, margin, or padding. Alternatively, you can use a 4px grid.
A layout consists of multiple columns separated by spaces called gutters. The outer edges of the layout are referred to as layout margins.
The structure of the layout is composed of content blocks, such as the header, navigation, and footer. These blocks of content can span multiple columns and adjust in size with the grid. Ideally, use 12 columns for desktop and 4 columns for mobile.

3. Add elements to the artboard
As you already have a wireframe, it’s time to use it as a reference to create the new website mockup. Some designers prefer to build the wireframe by replacing components one by one on the same artboard, while others prefer to do it in a new artboard. The choice is yours.
There are different options to approach this:
- If you don’t have a design system : In this case, you will need to put your design capabilities to work and spend time transforming the elements you created in the wireframe to high-fidelity components. For example, imagine you created a wireframe card to sell a trip; that component was made with a rectangle and inside has an image, a button, text, and a couple of icons. At this stage, you will need to beautify the component and later add styles to it
- If you have a design system : In this case, everything will be much easier. You just need to replace the elements from the wireframe with new components from your design system and finally add style to texts and other elements

4. Next steps
Now that you have a beautiful website in front of you, you are ready for the next steps.
If you are building a responsive website, remember to create the artboards for the other screen sizes. You will just need to reorganize the components across the columns to fit the new screen size.
Have in mind to prepare the assets for development, meaning you need to have images or icons ready to be exported, usually in the form of SVG or PDF.
Finally, remember that now is the time to create prototypes to turn your website into a lively place full of interactions.
Here’s a brief explanation of Breakpoints and Responsively, two Figma plugins for creating responsive mockups:
- Breakpoints : Breakpoints is a Figma plugin that allows you to easily manage and organize breakpoints for your design. You can create custom breakpoints for specific devices or screen sizes and then easily switch between them to preview how your design will look on different screens. With Breakpoints, you can also set constraints and properties for each breakpoint to ensure that your design remains consistent across all devices
- Responsively : Responsively is a Figma plugin that helps you quickly create responsive designs. It provides a simple interface that allows you to adjust the width and height of a frame and then see the changes in real-time on a preview screen. Responsively also has a set of predefined breakpoints that you can use to create a responsive design with just a few clicks. Additionally, you can use the plugin’s built-in constraints and properties to make sure your design stays consistent as you adjust it for different screens
Both of these plugins can be very useful for creating responsive designs in Figma, and the choice between them may depend on your personal preferences and the specific needs of your project.
The process of creating a website can be broken down into three distinct steps: wireframing, mockup creation, and prototyping.
By mapping out the user experience with a wireframe, you can establish a clear structure and layout for the website. Next, by creating a visually appealing mockup, you can refine the design and add polish styles to the overall look and feel. Finally, by prototyping the website, you can test and refine the functionality.
Now that you have learned the basic process of creating a mockup from scratch, you can put that knowledge into practice by opening Figma and experimenting with building your first website. Keep in mind that creating a website involves a lot of trial and error, so don’t be discouraged if things don’t turn out exactly as you planned. Instead, take it as an opportunity to learn and improve your skills. And remember, building a website should be fun, so enjoy the process!
LogRocket : Analytics that give you UX insights without the need for interviews
LogRocket lets you replay users' product experiences to visualize struggle, see issues affecting adoption, and combine qualitative and quantitative data so you can create amazing digital experiences.
See how design choices, interactions, and issues affect your users — get a demo of LogRocket today .
Share this:
- Click to share on Twitter (Opens in new window)
- Click to share on Reddit (Opens in new window)
- Click to share on LinkedIn (Opens in new window)
- Click to share on Facebook (Opens in new window)

Stop guessing about your digital experience with LogRocket
Recent posts:.

Color and culture: How color language changes by background
Color variance across cultures and perceptions can impact the way UX design is interpreted and how effective it is.

How to run one-on-one meetings with a design team
Let’s talk about the purpose of a one-on-one meeting, what makes a successful one, and strategies to plan and run one effectively.

Why you shouldn’t use vertical trim in Figma (yet)
Did you know about the vertical trim setting in Figma? Here’s what it does and why it’s awesome but why you shouldn’t use it yet.
Using the similarity matrix to surface card sorting insights (+template)
Analyzing a similarity matrix can help you identify patterns that tend to be grouped together by participants in card sorting.

Leave a Reply Cancel reply
- iPhone X, XS & XR
- iPhone 7, 8 & SE
- Apple Watch
- Google Pixel
- Galaxy S10, S20 & S21
- Galaxy Note
- Android Phones
- Android Tablets
- Phone Mockups
- Computer Mockups
- Laptop Mockups
- Tablet Mockups
- Smartwatch Mockups
- Social Media
- Productivity
- Real Estate
- iOS UI Kits
- Android UI Kits
- macOS UI Kits
- Other UI Kits
- Illustrations
- Figma Plugins
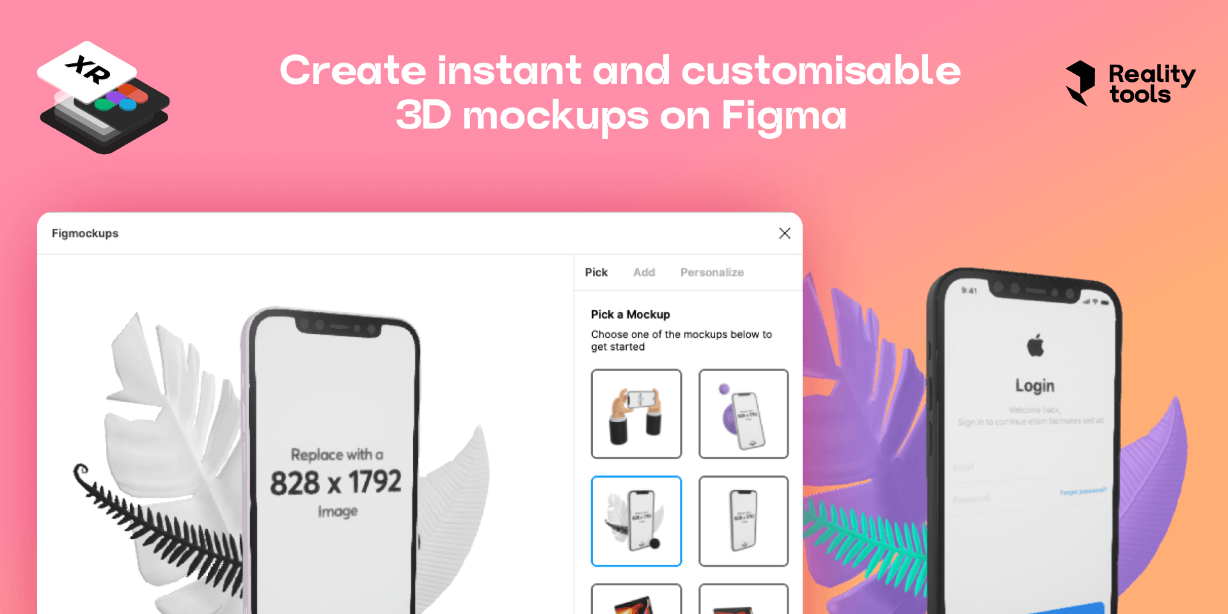
Figmockups Figma Plugin
Home / Figmockups
- December 3, 2020
Ever needed that one device mockup but you couldn’t find it or didn’t have enough time to create it? We’ve got you covered!
Just install our plugin and generate mockups for all your UI & presentation needs instantly.
Get started in 3 simple steps:
- Launch up our plugin
- Pick from our catalogue of 3D mockups
- Select a frame and hit export
Reverse Layers

Custom Frame Presets
Presentation Mockup PSD

- Add to collection
- Save to Pinterest
- yoga template
- fitness template

- presentation mockup
- website presentation

- website mockup
- screen mockup
- laptop mock

- marketing presentation
- technology presentation
- company presentation

- slides mockup

- page mockup

- minimalist card
- elegant business card
- minimalist business card

- website templates

- product box
- cardboard mockup

- customizable
- cute banner
- cute template

- company design
- business design
- business template

- card mockup
- branding mockup

- japanese restaurant
- japanese food
- sushi restaurant

- landing page template
- website theme

- web interface

- cards visiting card
- business card
- business card cards

- adventure banner
- business pack

- mobile mock

- laptop mockup
- computer mockup

- food landing page

- document mockup
- roll up stand
- flyer mockup

- chocolate template

- 3d rendering

- website homepage

- magazine poster

- interface design

- mockup template

- dance banner
- dance studio

- realistic mockup

- mockup marketing
- editable mockup

- business branding

- white laptop

- square business card
- square card

- save the date
- wedding date

- elegant mockup
- white mockup
- logo branding

- booklet mockup
- brochure mockup

- education landing page
- education website

- mockup design
- color mockup


Elektrostal
City in moscow oblast, russia / from wikipedia, the free encyclopedia, dear wikiwand ai, let's keep it short by simply answering these key questions:.
Can you list the top facts and stats about Elektrostal?
Summarize this article for a 10 year old
Image Unavailable

- To view this video download Flash Player

XL Flag Elektrostal Moscow oblast | landscape flag | 2.16m² | 23sqft | 120x180cm | 4x6ft - 100% Made in Germany - long lasting outdoor flag
Purchase options and add-ons, about this item.
- 100% Made in Germany » ... because the first impression last, quality flag for representative purposes *****
- State-of-the-art High-Tech Outdoor Fabric » One air-permeable 110 GSM Polyester to keep wind forces low and lifetime high
- Mirrored Back » Image printed on the front, mirrored image 100% visible on the rear side
- Landscape flag | 2.16m² | 23sqft | 120x180cm | 4x6ft
- Show your pride for your hometown with the Elektrostal flag! Made with quality materials and vibrant colors, this flag is the perfect way to display your patriotism and love for your city. Fly it proudly at home, at events, or even in your car. Get yours today and show your Elektrostal pride!
- The flag of Elektrostal, Moscow Oblast, is a striking combination of Old Glory red, representing strength and courage at 81%, complemented by a subtle touch of light grey at 5% for balance and harmony. The bold black stripe at 3% adds a touch of sophistication, while the shimmering gold stripes at 3% each symbolize prosperity and success. The flag is completed with a touch of very dark grey at 1%, representing the city s resilience and
- Elektrostal Moscow oblast
Product information
Warranty & support, looking for specific info, product description.
Flag: Elektrostal Moscow oblast landscape flag | 2.16m² | 23sqft | 120x180cm | 4x6ft Elektrostal Moscow oblast Elektrostal obwód moskiewski , flaga ???????????? ?????????? ??????? Since we know how important your external presentation is, we print our Elektrostal Moscow oblast flag for your representative appearance using the most modern machines in Germany. To ensure your maximum flexibility, we have equipped the flags with quality metal eyelets, to let you simply attach these flags to any flagpole. To let you use the flags for a long time, we have strengthened the flag using double safety seams and a tear proof strap at the side of the pole. Due to the quality of this business flag, you show a particular degree of the closeness to Elektrostal Moscow oblast. Details about this flag This landscape Elektrostal Moscow oblast flag is a quality product Made in Germany made of 110g/m² gloss polyester. This Elektrostal Moscow oblast flag is wind- and weather-resistant and highly durable. The flag colors are intensive and UV-resistant. This flag is specially made for outer space. This Elektrostal Moscow oblast flag will be delivered with a double safety-seam as well as with 2 metal eyelets to hoist at the flag pole. The metal eyelets give you great flexibility for placing this flag on any flagstaff. The mast side is reinforced with a white hem. The quality flag material and the metal eyelets will take care of a long endurance of this Elektrostal Moscow oblast flag. If required, the flag can be washed at 60 degrees Celsius. Recommended height of flag pole Elektrostal Moscow oblast flags of 2.16m² | 23sqft | 120x180cm | 4x6ft look best with flagpoles of around 6m | 18ft height. Need a bigger size or an other configuration? We can provide bigger sizes, other configurations, exclusive indoor ...
Customer reviews
Customer Reviews, including Product Star Ratings help customers to learn more about the product and decide whether it is the right product for them.
To calculate the overall star rating and percentage breakdown by star, we don’t use a simple average. Instead, our system considers things like how recent a review is and if the reviewer bought the item on Amazon. It also analyzed reviews to verify trustworthiness.
No customer reviews
- Amazon Newsletter
- About Amazon
- Accessibility
- Sustainability
- Press Center
- Investor Relations
- Amazon Devices
- Amazon Science
- Sell on Amazon
- Sell apps on Amazon
- Supply to Amazon
- Protect & Build Your Brand
- Become an Affiliate
- Become a Delivery Driver
- Start a Package Delivery Business
- Advertise Your Products
- Self-Publish with Us
- Become an Amazon Hub Partner
- › See More Ways to Make Money
- Amazon Visa
- Amazon Store Card
- Amazon Secured Card
- Amazon Business Card
- Shop with Points
- Credit Card Marketplace
- Reload Your Balance
- Amazon Currency Converter
- Your Account
- Your Orders
- Shipping Rates & Policies
- Amazon Prime
- Returns & Replacements
- Manage Your Content and Devices
- Recalls and Product Safety Alerts
- Conditions of Use
- Privacy Notice
- Consumer Health Data Privacy Disclosure
- Your Ads Privacy Choices
IMAGES
VIDEO
COMMENTS
Presently is a UI presentation mockup resource that gives you access to more than 30 free UI mockups. How to use (Method 1) Export your UIOpen presently and select your choice mockup frameSelect the shapes on the mockup frame and fill them with image you have exportedYou can also make adjustments...
Description. Welcome to this comprehensive Figma file that contains a collection of professionally designed and free-to-use mockups for both mobile and web projects, including iPhone mockups. Whether you're a designer, developer, or a business owner looking to visualize your ideas, this resource is here to help you streamline your design process.
For Figma. Last updated 2 years ago. Licensed under CC BY 4.0. Report resource. Hi Figmates👋 Showcase your presentation designs with ease! Just replace placeholders with your slides and choose any of the mockups. 🛠 You can edit all templates All mockups are made with auto layout, so you may easily change spacings.
Hello Everyone! Thanks for stopping by, in this tutorial you will learn how to design a simple app presentation mockup in Figma that you can use to present y...
Step 7: Add mockups. As a designer, your presentations will often involve mockups of your design. So, let's go over how to add mockups to your presentation slides. Go back to Design mode and add a new frame. This frame will be Slide 3. Next, create a mockup.
1. Set Up Your First Presentation Frame. Open Figma and click New design file. Click the Frame Tool ( F) to draw your frame or to choose a preset frame on the right using Presentation > Slide 16:9. You can create a master template to save time. Rename your frame by double-clicking the blue title on the top left.
🔥 Start using Figma for FREE → https://bit.ly/TryFigma🔗 Join our design community here → https://bit.ly/DX-CommunityHow to Create Mockups using Figma Plugi...
This series was updated on December 1, 2020. Watch the updated playlist here: https://www.youtube.com/playlist?list=PLXDU_eVOJTx7QHLShNqIXL1Cgbxj7HlN4Figma i...
In Figma, build prototypes directly on the canvas. Then, play them to see prototype interactions and animations in action. Before playing a prototype, prepare the design so that the prototype plays as desired. Then, choose how you'd like to play the prototype: Preview: Play the prototype directly in the editor, with an inline preview.
With your design open, select the frame and then go to Plugins and choose Clay Mockups 3D. This opens a window where you can choose the device for the mockup. Your design should show on the screen of the mockup in this window. You can change the angle of the mockup as well as the color in this window.
January 23, 2021. In 2017, I published Using Figma for Presentations. At the time, Figma was still in beta (and didn't even have prototyping yet!), and most design teams I knew were skeptical about it as a tool — and of collaborative designing as a concept. Since then, Figma has grown to hundreds of thousands of users, with design teams ...
Explore over 1000+ free presentation templates and elevate your slides with our impactful collection for every presentation need. Start creating stunning presentations today! ... Free iphone mockup - hand holding iPhone shan.design. 154. 14k. Figmation - Presentation UI Kit Art Grom. 476. ... Business Presentation Figma Template ...
3 Tips to Improve Your Prototype Presentation 1. Set Expectations. It never hurts to add context to the beginning of your prototype that explains what stage of the design process you're in. ... Instead of using one of these separate programs to create slides, try creating your slides in Figma or Sketch. By using your frames/artboards as ...
Steps to build a mockup in Figma. 1. Create an artboard. Create a new design file in Figma and navigate to the top left tools panel where you will find a hashtag symbol. Click on it, and a list of artboards will appear on the right panel. As an alternative, press the A key on your keyboard to reveal the same panel.
Ever needed that one device mockup but you couldn't find it or didn't have enough time to create it? We've got you covered! Just install our plugin and generate mockups for all your UI & presentation needs instantly. Get started in 3 simple steps: Launch up our plugin. Pick from our catalogue of 3D mockups. Select a frame and hit export.
Presentation Mockup PSD. Images 45.30k Collections 79. ADS. ADS. ADS. Page 1 of 100. Find & Download the most popular Presentation Mockup PSD on Freepik Free for commercial use High Quality Images Made for Creative Projects.
Paid on delivery. Project Duration: 1 Day Project Budget: $150 Project Type: Figma Number of Figma Projects: 2, Desktop & Mobile Project Overview: We have an existing React User Admin Dashboard. We would like a Designer to create a Figma mockup of both the Desktop & Mobile version of the Dashboard. We should be able to edit/modify all elements ...
This video tutorial is a complete step-by-step guide showing you how to add scrollable slides into Figma presentations created with the Pitchdeck plugin - ht...
#presentation mockup plugins and files from Figma. Explore, install and use files and plugins on Figma Community.
Moscow Oblast ( Russian: Моско́вская о́бласть, Moskovskaya oblast) is a federal subject of Russia. It is located in western Russia, and it completely surrounds Moscow. The oblast has no capital, and oblast officials reside in Moscow or in other cities within the oblast. [1] As of 2015, the oblast has a population of 7,231,068 ...
Elektrostal. Elektrostal ( Russian: Электроста́ль) is a city in Moscow Oblast, Russia. It is 58 kilometers (36 mi) east of Moscow. As of 2010, 155,196 people lived there.
Perspective Presentation Mockup - Will Teig FREE RESOURCE William Teig. 4.2k. Free Mobile Mockup Templates Daniel Koya. 2k. #presentation mockup plugins and files from Figma. Explore, install and use files and plugins on Figma Community.
Elektrostal , lit: Electric and Сталь , lit: Steel) is a city in Moscow Oblast, Russia, located 58 kilometers east of Moscow. Population: 155,196 ; 146,294 ...
Amazon.com : magFlags XL Flag Elektrostal Moscow oblast | landscape flag | 2.16m² | 23sqft | 120x180cm | 4x6ft - 100% Made in Germany - long lasting outdoor flag : Outdoor Flags : Patio, Lawn & Garden