

Turn your presentation into a video
When you make a recording of a presentation, all its elements (narration, animation, pointer movements, timings, and so on) are saved in the presentation itself. In essence, the presentation becomes a video that your audience can watch in PowerPoint.
So you have two options for turning your presentation into a video that's ready to view:
Save/export your presentation to a video file format (.mp4 or .wmv).
Save your presentation as a PowerPoint Show (.ppsx) file. (A PowerPoint Show appears full-screen in Slide Show, ready to view immediately.)
Save as a video file
After you've created your slides and recorded any timing and narrations and laser pointer gestures that you want to include, you're ready to create a video file.

On the File menu, select Save to ensure all your recent work has been saved in PowerPoint presentation format (.pptx).
Click File > Export > Create a Video . (Or, on the Recording tab of the ribbon, click Export to Video .)
In the first drop-down box under the Create a Video heading, select the video quality you want, which pertains to the resolution of the finished video. The higher the video quality, the larger the file size. (You may want to test them to determine which one meets your needs.)
* The Ultra HD (4K) option is only available if you're using Windows 10 or later.
The second drop-down box under the Create a Video heading tells whether your presentation includes narration and timings. (You may switch this setting if you like.)
If you haven't recorded timed narration, by default the value is Don't Use Recorded Timings and Narrations .
The default time spent on each slide is 5 seconds. You can change that timing in the Seconds to spend on each slide box. To the right of the box, click the up arrow to increase the duration, or click the down arrow to decrease the duration.
If you have recorded a timed narration, by default the value is Use Recorded Timings and Narrations .
Click Create Video .
In the File name box, enter a file name for the video, browse for the folder that will contain this file, and then click Save .
In the Save as type box, choose either MPEG-4 Video or Windows Media Video .
You can track the progress of the video creation by looking at the status bar at the bottom of your screen. The video creation process can take up to several hours depending on the length of the video and the complexity of the presentation.
Tip: For a long video, you can set it up to be created overnight. That way, it’ll be ready for you the following morning.
To play your newly-created video, go to the designated folder location, and then double-click the file.
Save as a PowerPoint Show
When someone opens a PowerPoint Show file, it appears full-screen in Slide Show, rather than in edit mode. The viewer begins watching the presentation immediately.
On the File menu, select Save As .
Choose the folder location where you want to store your PowerPoint Show file.
In the Save as type box, choose PowerPoint Show (*.ppsx) .

Select Save .
Why turn your presentation into a video?
When you want to give a high-fidelity version of your presentation to colleagues or customers (either as an e-mail attachment, published to the web, on a CD or DVD), save it and let it play as a video.
You can save your presentation as either an MPEG-4 video file (.mp4) or a .wmv file. Both formats are widely supported and can be streamed over the internet.
Some tips to remember when recording your presentation as a video:
You can record and time voice narration and laser pointer movements in your video.
You can control the size of the multimedia file and the quality of your video.
You can include animations and transitions in your movie.
Viewers do not need to have PowerPoint installed on their computers to watch it.
If your presentation contains an embedded video, the video will play correctly without your needing to control it.
Depending on the content of your presentation, creating a video may take some time. Lengthy presentations and presentations with animations, transitions, and media content will likely take longer to create. Fortunately, you can continue to use PowerPoint while the video is being created
What parts of a presentation won't be included in a video?
The following items won't be included in a video that you create using PowerPoint:
Media inserted in previous versions of PowerPoint. To include these, you can convert or upgrade the media object.
For example, if you inserted the media using PowerPoint 2007, it will be linked and it will play in the presentation. However, when you export the file as a video, the linked media will be dropped. You can convert the file to the new file format (click the File tab, and under Info , click Convert ), or you can right-click the media object and then click to upgrade; it will embed the file and export it correctly.
QuickTime media (unless you have a third-party QuickTime codec named ffdShow installed and you have optimized for compatibility)
OLE/ActiveX controls
What to do with your video after creating it
After you create a video, you can share it with others by using the following methods:
Email your presentation to others
Save to a file share or other location
Upload it to your organization's Microsoft Stream video-sharing site , as described in the next section, "Save to a video-sharing site."
Save to the Microsoft video-sharing site
After you've created the video file, you can upload it to a video-sharing site. Microsoft Stream is an enterprise video service where people in an organization can upload, view, and share videos. Microsoft 365 business or education subscribers have access to this service from within PowerPoint for Microsoft 365.
Select File > Export , and then select Publish to Microsoft Stream .

Type a title and a description for the video.
Set other options, including whether you want others in your organization to have permission to see the video:

Select the Publish button.
The upload process can take several minutes, depending on the length of the video. A status bar at the bottom of the PowerPoint window tracks the progress, and PowerPoint shows a message when the upload is finished:

Click the message to go directly to the video playback page on Microsoft Stream.
For more information about this service, begin reading with What is Microsoft Stream? It includes information about Office 365 Video vs. Microsoft Stream.
1 The Ultra HD (4K) option is only available if you're using Windows 10 or later. 2 In PowerPoint 2016, the Ultra HD (4K) option isn't available in the Volume License edition.
When someone opens a PowerPoint Show file, it appears full-screen in Slide Show, rather than in edit mode. The viewer begins watching the presentation immediately.
Burn your presentation to a disc
Click File > Export > Create a Video .
PowerPoint 2013 and newer versions can save your presentation as either an MPEG-4 video file (.mp4) or a .wmv file. Both formats are widely supported and can be streamed over the internet.

Need more help?
Want more options.
Explore subscription benefits, browse training courses, learn how to secure your device, and more.

Microsoft 365 subscription benefits

Microsoft 365 training

Microsoft security

Accessibility center
Communities help you ask and answer questions, give feedback, and hear from experts with rich knowledge.

Ask the Microsoft Community

Microsoft Tech Community

Windows Insiders
Microsoft 365 Insiders
Find solutions to common problems or get help from a support agent.

Online support
Convert PPT to Video. PowerPoint (PPT, PPTX, PPSX) to Video Converter.
Convert powerpoint to video. ppt to mp4. ppt to video. ppsx to mp4. powerpoint to mp4. powerpoint to video., powered by aspose.com and aspose.cloud ., * by uploading your files or using our service you agree with our terms of service and privacy policy ..
Send the download link to
Press Ctrl + D to save this page as a bookmark.
We've already processed ??? files with a total size of ??? Mbytes.

How to convert PPT to video
- Click Drop or upload your files .
- Select the PowerPoint file you want to convert to video on your computer.
- Specify your preferred parameters for the conversion—the slides to be converted, duration for each slide, video resolution, transition, and audio. Or you can use the default parameters.
- Click the CONVERT button.
- Wait for your presentation to get converted to an MP4 video.
- Click the DOWNLOAD NOW button. Or you can type in an email address and click the message icon. The email address will receive a download link.
Aspose.Slides PPT to Video converter is a free online service for converting PowerPoint presentations to videos. Slides : Convert all slides in your PowerPoint to video. Or you can select specific slides or a range of slides for conversion. Slide duration : Specify the time that is spent showing each slide in the video. Video resolution : Select the resolution that determines the amount of detail in the video. If you plan to display the video on a big screen, you will do well to select HD. However, in such case, FullHD or QHD is probably even better. Transition : Select the transition that is played between slides in the video. PowerPoint transitions give life to presentations. They provide additional on-screen movement and interest for your audience. Audio : Your presentation can seem brand-new with audio. You can use the audio from the original presentation, upload your own, or select it from the drop-down option. The presentation to video converter is a free service powered by Aspose.Slides .

Aspose.Slides PPT to Video
- Convert PPT to video.
- Export PPT to video.
- Save PowerPoint PPTX and PPT as video.
- Convert presentation to video.
- Create video from PowerPoint.
- Add audio and transition effects to your video.
- Convert PPTX to MP4.
- Convert PPT to MP4.
- Convert PowerPoint to MP4.
- Download PowerPoint video. Open video. Share video.
- How do I convert PPT to video? Upload your PowerPoint presentation, specify your preferred parameters for the conversion operation or leave the default options intact, and then click CONVERT .
- What are the advantages of converting PowerPoint to video? By converting your PowerPoint to video (MP4), you end up with a more convenient file. A video is easier to share than a PowerPoint. A video can be opened on any device or platform.
- Is Aspose PPT to Video Converter free? Yes. The PowerPoint PPT to video converter is completely free to use.
- How long does it take to convert PPT to video? The time required for the PowerPoint to video export operation is dependent on the number of slides involved.
- What is the format of the resulting PowerPoint video? MP4 is the resulting format.
- How do I save my PPT as MP4? Use the PPT to Video converter on this page.
- How can I open the video created from a PowerPoint? You can open the video in any video player. The MP4 video file can be played on any laptop (Windows, Mac, Linux) or smartphone (iPhone or Android device).
- How do I save my PowerPoint as a video? Use the PowerPoint to video converter on this page.
- How do I convert PowerPoint to MP4 for free? Use the converter on this page. It is FREE.
- Are there limits on uploaded files? For a single presentation, the maximum file size is 35 MB and the maximum number of slides is 50. If you must convert a presentation that exceeds 35 MB or contains more than 50 slides, we recommend you use Aspose PowerPoint Splitter to divide the slides into multiple presentations. You can then convert the presentations you obtained individually.
Fast, Easy, and Secure Conversion
Convert from Anywhere
High Quality Conversion
Other supported conversions.
You can use other tools to convert PPT, PPTX and PPSX files. Please see the list below.
- PDF to video (PDF to MP4)
- Images to Video (Images to Video Converter)
- PowerPoint to YouTube video (PowerPoint Presentation)
- MP4 to MP3 (MP4 to MP3 Converter)
- MP4 to WAV (MP4 to WAV Converter)
- MP4 to WEBM (MP4 to WEBM Converter)
Oops! An error has occurred.
Error has been reported successfully..
You have successfully reported the error, You will get the notification email when error is fixed. Click this link to visit the forums.
� Aspose Pty Ltd 2001-2022. All Rights Reserved.
PPT to Video
Convert PowerPoint presentations to video online; free

Free online PowerPoint to video converter
VEED lets you convert your PowerPoint presentations to videos in just a few clicks, straight from your browser. You can even record yourself while presenting your slides using our free screen and webcam recorder.
Upload your slides and record your webcam, audio, and screen. Easily customize your layout, background, and camera feed. Add annotations, scenes, and even soundwaves for audio recordings.
How to Convert PPT to Video:

Select layout
Select from our list of layouts; in this case—Slides or Slides and Camera (you may need to click to ‘Allow’ permission to access your screen, camera, or microphone). You can record just your screen, your webcam, or both at the same time!

Start recording
Click the red button to start recording! You'll see a countdown before the recording starts. Don't worry if you mess up. You have unlimited time and unlimited retakes. You can navigate to other pages, and don't worry, you are still recording.

Review, edit, and export
You can playback your recording to review it, click ‘Share’ to share with friends and colleagues, or ‘Edit’ to edit your video (perfect for adding text, subtitles, and professional touches to your screen recording)
‘PPT to Video’ Tutorial

A slide show presentation with multiple layouts
VEED features multiple layouts that you can choose from. Select one that best suits your PowerPoint presentation needs. You can record your screen and audio at the same time, record your slides and camera or slides only. After recording, give your PowerPoint presentations a new look! Add annotations, images, text, and more. You can download your PPT presentation as an MP4 video format so you can play it in different multimedia players.

Add scenes and personalize
Our powerful PowerPoint to video converter lets you add scenes so you can easily edit each clip when you’re done recording. How does it work? It’s really simple! When you click on the Stop button while recording, VEED automatically saves that clip and you have the option to pick up where you left off by adding another “scene” or recording. This helps you manage and edit your video clips later on. Personalize your presentation even more using our full suite of video editing tools!

Create professional-looking business videos
With a lot of businesses taking their operations online, there has never been a more important time for video editing software in all industries. Our screen and slides recorder allows your team to record important business messages, explainers, presentations, and more. Share, comment, review, and collaborate with videos online—no software to download. You can even add subtitles automatically and translate them to different languages! Our automatic translation tool is available to premium subscribers. Check our pricing page for more info.

Frequently Asked Questions
It’s super easy! Upload your PowerPoint slides to VEED and start recording. You can also choose to record your webcam while presenting your slides. Edit your recording and export it as an mp4 video!
To share the video, all you have to do is click ‘Copy Link’ and leave the Public Video toggle on. Then anyone with the link will be able to watch and comment on your video, like on google drive. (Note - they will NOT be able to edit the video. Only you will be able to edit.) You can also export your recording as MP4 and play it on Windows Media Player and other multimedia players.
Just click ‘Edit’ when the recording is finished, and you will be taken into VEED’s video editor. Here you will be able to add subtitles, text, annotations, music, sound effects, and much more. Just hit the ‘Export’ button when you’re finished, to save your new edited recording.
VEED gives you the option to record only your audio. Just select “Audio” in the layouts. If you want to record your audio with your webcam, it happens automatically! When you start using the screen recorder, you will need to click ‘Allow’ to give the recorder access to your microphone. That’s it. As soon as you start recording the video (screen, webcam, or both), the audio will also be recorded, so you can make awesome video presentations, explainer videos, team comms videos, and more!
VEED allows you to record your webcam along with your screen and audio. Just select “Screen & Webcam” when choosing a layout for your presentation recording.
VEED works with Windows and Mac. You can access our screen and presentation recorder straight from your browser. No software or plugins to install!
Discover more:
- Convert Slides to Video
- PowerPoint to MP4
What they say about VEED
Veed is a great piece of browser software with the best team I've ever seen. Veed allows for subtitling, editing, effect/text encoding, and many more advanced features that other editors just can't compete with. The free version is wonderful, but the Pro version is beyond perfect. Keep in mind that this a browser editor we're talking about and the level of quality that Veed allows is stunning and a complete game changer at worst.
I love using VEED as the speech to subtitles transcription is the most accurate I've seen on the market. It has enabled me to edit my videos in just a few minutes and bring my video content to the next level
Laura Haleydt - Brand Marketing Manager, Carlsberg Importers
The Best & Most Easy to Use Simple Video Editing Software! I had tried tons of other online editors on the market and been disappointed. With VEED I haven't experienced any issues with the videos I create on there. It has everything I need in one place such as the progress bar for my 1-minute clips, auto transcriptions for all my video content, and custom fonts for consistency in my visual branding.
Diana B - Social Media Strategist, Self Employed
More than a PPT to video converter
VEED is so much more than just a free PowerPoint to video converter. It lets you do more than just record your screen and presentation slides. You can resize your screen recordings to fit any video-sharing and social media platform. You can also edit your videos—add text and captions automatically, add music, sound effects, draw on your videos, and more! Try VEED and start creating powerful business videos for your company.


How to Make a PowerPoint into a Video in Under 5 Minutes
- how to make a powerpoint into a video

PowerPoint is, by far, the most popular tool people use to make presentations , whether for school projects or work-related activities, such as staff training or pitching a product idea to investors.
PowerPoint is genuinely a great tool. It’s simple and easy to use, offers hundreds of themes, and if you spend a bit of time playing around with all the different options inside the program, you can make professional presentations that will captivate your audience.
The only issue regarding PowerPoint—more specifically, presentations in general—is the limited usability of PPT files. You can’t upload a presentation on YouTube , for example. You could technically share it on your website or on social media, but a presentation without a presenter is just a random compilation of images.
Unless the person who created the presentation takes the time to weave the story, explain all the concepts, and expand on the bullet points the audience sees on the slides, the presentation won’t have the desired impact.
Does that mean that presentations are only viable in a face-to-face setting? Not exactly. There are a number of different ways to utilize presentations, but they all involve converting the PPT file into a video .
Now, the question begs itself— how do you make a video out of a presentation?
Turn PPTs into engaging videos
With InVideo’s online editor

Creating a Video from PowerPoint
The first thing that will go through most people’s minds is a webinar. When you stop to think about it, a webinar is nothing more than a glorified presentation. Someone takes the time to record themselves as they’re going through all the different slides and explaining everything in detail.
A webinar is a rather specific form of content, and it takes a lot of time and effort to put one together and to get enough people to watch it to make it worthwhile. Unless you’re an experienced salesperson who is adamant about selling a product and firmly believes that the best way to do so is to blabber about it for two hours, you’re probably looking for a faster, less painstaking way to turn a PowerPoint into a video.
Thankfully, there are a number of different ways to do so. In fact, PowerPoint itself gives you the option to convert the presentation into a video. In this article, we’ll walk you through the entire process step by step and show you how to make a video PPT using all the different versions of the program.
How to make a video from PowerPoint?(Office 365, PowerPoint 2019, PowerPoint 2016)
Although the option is there, keep in mind that it’s not as simple as clicking a Convert to video button. You do need to record narration and laser point gestures (mouse movement on-screen) beforehand.
The reason for that is simple and technical in nature—unless you record narration and timings beforehand, PowerPoint will default to five seconds per slide when creating a video.
You can change this by clicking the upward arrow next to the Timing under the Create a Video option, but keep in mind that you’ll be adjusting the time for all slides simultaneously. There is no option to adjust how long each individual slide will appear on the screen.
If you want to use different timings per slide, as well as record narration, select the Recording option inside PowerPoint and create a video.
Here’s how you’ll enable recording inside Office 365 PowerPoint, as well as PowerPoint 2019 and 2016:
1. Click on File and select Options on the left-hand side of the screen 2. Choose Customize Ribbon (A) from the drop-down menu 3. Check Recording (B) in the pop-up window and hit OK (C)

Image source: Microsoft
You’ll see a new option appear on your screen under the Recording tab, titled Record Slide Show. Clicking on the downward pointing arrow will allow you to choose whether you want to start recording the slideshow from the start or from the slide you’re currently on.
You can also choose to record the narration as audio or video, and you will be able to leverage a variety of different tools, such as pens and markers, to highlight certain elements on your slides.
As you’re recording, the red circle next to the Record Slide Show button will be blinking, indicating that the audio and/or video is being captured. Once you go through all the slides, you can either:
- Click on the square Stop button - Press S on your keyboard.
Exporting your video
The easiest way to export the video you just recorded is to navigate to the Recording tab and select Export to Video . This will open up a new menu, and PowerPoint will prompt you to choose the video quality.
One thing to keep in mind is that the Ultra HD option is available only on Windows 10 .
Next up, you’ll need to either set the timings for the slides or select the Use Recorded Timings and Narration option.
Then, click on Create a Video , name your file, and choose where you want to save it.
Finally, select the Save as Type option and choose between two available formats:
- MPEG-4 Video - Windows Media Video
PowerPoint will start converting the slideshow into a video automatically. Depending on the video quality and length, this process might take a while, so we suggest timing it so that you don’t have to use the computer during that time. For larger, Full HD or Ultra HD videos, it’s best to keep the program running overnight.
PowerPoint 2013
One notable difference with the 2013 version of PowerPoint is that the video quality options are slightly different. Ultra HD (4K) was just entering the scene, and not a lot of people owned devices that supported the 3840 × 2160 video resolution, so it’s no surprise that the option doesn’t exist in this version.
The interface didn’t change much over the years, so if you happen to be running PowerPoint 2013, you’ll go through the exact same process as with the newer versions of the program:
1. Navigate to File , click Export , and choose to Create a Video 2. Select the resolution 3. Set timing parameters or use recorded timings and narration 4. Click on Create Video 5. Choose Save as Type and select between MPEG-4 or Windows Media Video
PowerPoint 2010
If you are still using the 10-year-old version of PowerPoint, the options for creating a video out of your slideshow will be a bit different.
The first thing to keep in mind is that PowerPoint 2010 only supports .mp4 files and that the maximum resolution for the videos is 1290 x 720, which isn’t exactly ideal. If you want to create a professional-looking video from your PowerPoint presentation to share with business partners or your audience, you might want to consider a less restrictive alternative.
Here’s how you would turn your slideshow into a video in this outdated version of the program:
1. Select Save & Send under File 2. Choose the option Create a Video at the very bottom of the right-hand side of the screen 3. Find the Create a Video tab if you want to see the available video quality options 4. Click on the downward-pointing arrow next to the Computer & HD Displays option and choose from the three available options 5. Choose between Use and Don’t Use Recorded Timings and Narration depending on whether you want to use recorded timings and narration 6. Click on Create a Video , name it, choose the destination folder, and hit Save
PowerPoint Video Drawbacks
It’s always great when you can use the same tool for various different tasks. In the case of PowerPoint, you can both create the presentation within the program and convert it into a video on the spot.
That said, PowerPoint isn’t a video editing tool . What we mean by this is that you are severely limited in terms of what you can do with the video you create from your PPT. There are no transitions, you can’t leverage fade-ins and fade-outs, and there is no music, among other things.
No matter how you look at it, the videos created through PowerPoint will be bland. PowerPoint’s PPT to video conversion might get the job done if your only goal is to share a presentation internally with your team. Even then, it only makes sense in a remote work environment, where you can’t physically hold the presentation to your coworkers.
If you’re planning on using the presentation as a core part of your marketing strategy , then the video quality—and we don’t mean the resolution here—you’ll get from PowerPoint won’t suffice. No matter how professional you sound during the narration, the videos created through PowerPoint will still give off the impression that you didn’t try all that hard.
When you see the production value of the videos that businesses share on their websites, YouTube channels , and social media, it’s painfully obvious that PowerPoint videos can’t compete. This doesn’t mean you have to spend months learning video editing or spend a small fortune hiring a professional videographer to make and edit the videos for you.
With InVideo, a powerful yet easy-to-use online video editor , you can create stunning videos from your presentations in minutes! We’ll walk you through the whole process to show you how easy it is to create breathtaking videos from presentations with InVideo .
How to make a video from a PowerPoint Presentation using InVideo?
Videos are quickly becoming an integral part of every business’s marketing strategy. Whether you’re a startup, an enterprise, a medium-size business, or a solo entrepreneur, you will need to use videos if you want to attract as much traffic to your website as possible. The same goes for influencers and bloggers—videos beat any other type of content when it comes to user engagement.
InVideo makes video editing quick, easy, and fun. Thanks to our intuitive, drag-and-drop video editor , professionally designed video templates , and an extensive library of photos and audio tracks, you can create killer videos in no time, even if you have absolutely no video editing experience.
Our platform is cloud-based, meaning you can access it from any browser on your computer and laptop. This also means that your video editing capabilities won’t depend on how powerful your machine is, meaning you can create HD and Ultra HD videos even with a low-end PC or laptop.
The best part about InVideo is the fact that you can export up to 60 videos per month for free! With our free plan , you’ll have access to all of InVideo’s features so that you can play around with all the different options and learn video editing at your own pace. We also have dozens of video editing tutorials for different use-cases, so you can get started right away.
Creating videos from photos and PowerPoint presentations is one of many things you can do with InVideo.
Here’s are the simple steps you can follow to create a stunning video from your presentation with InVideo:
Step 1: Create an account
To get started, you’ll need to create an account.
Navigate to our website and click Sign Up in the top right corner. Input your email, set up your password, and you’re good to go. We’ll never ask you for your credit card information or phone number. We won’t bombard you with emails either—we hate spam as much as you do.
Step 2: Select a Template or start from scratch
Once you log in, you’ll see several different options on the homepage:

The Pre-made Templates option will be selected by default. While there are over 5000 stunning video templates in our library, we strongly suggest that you go with the Blank Template option for this purpose.
You will be starting from scratch, but it’s not as scary as it might sound. The blank template is the most convenient option since you’ll be treating each slide as a separate scene and editing them individually. Here’s how to do it:
- Choose how long each slide appears on the screen - Add the appropriate narration - Throw in effects , filters, transitions , etc.
Step 3: Upload your media
Assuming you are the one who created the presentation, you should have all the necessary media on your device—photos, slides, and the script . To add it to the video, you’ll first need to upload it through our video editor .
From the menu on the left, select the Uploads option and click on the Upload button at the bottom of the screen.

You can upload files up to 800MB at a time. If you have all the photos neatly sorted into a folder, you can upload the entire folder in one go. All the media you upload will be available immediately to the left of your video—for this and all future projects—and you can drag and drop images to the center of the screen to add them to the timeline.
Step 4: Add the photos
Let’s start with a single scene—the intro of your presentation. Drag and drop the desired image from the Uploads library onto the screen to add it to the scene.

The video editor will show you what the image will look like in the video. When you drop the photo, you’ll need to select one of the two options:
- Replace - Add as a layer

If the slide consists of a single image, choose Replace. Since we’re not using a pre-made template here, the image you chose will replace the black background.
If you would like to add additional images on top of it—such as graphs, screenshots, product photos, or lifestyle images—drag and drop them to the center of the screen once again, but this time select the Add as a Layer option. This will put the new image on top (in front) of the background one, making the first one act as a backdrop.
Step 5: Edit the Scenes and add text
By default, scenes will be about five to six seconds long, which probably isn’t sufficient for the narration. You can edit how long each slide—referred to as a scene in the video editor—will be on the screen for on the timeline.

The image above shows the basic timeline, which is great for having an overview of all your scenes. To edit a specific scene, click on it on the timeline and select the Advanced Timeline option in the top right corner.

On the left side, you’ll see all the different elements that make up the scene. Select each one you’d like to edit, whether it’s a logo, the text, or the image itself.
The middle of the timeline is reserved for the length of the scene. To adjust how long this scene will be in the video, move the sliders left or right. The duration of the scene will always be displayed in the center.
On the right side, you’ll be able to zoom in and out, so you can edit the timeline more easily.
As far as text editing is concerned, you can do so either from the timeline or by selecting the text box on the screen. You’ll be able to drag and drop the text box to adjust the positioning, rotate the text, change the colors and font, and more. To add multiple text boxes, select the Text option from the left-hand menu and drag and drop the new box onto the screen.

Step 6: Add narration
All that’s left to do is add narration. If you’ve recorded the audio already, you can add it through Uploads , the same way you did with photos. If not, you can add a voice-over to each individual scene. Select the Add VO option and import an existing voice-over or choose to record it on the spot.

Step 7: Export the Video
After you record or upload the VO, add the photos, and edit the length of each scene, you’re good to go. You can play around with filters, effects, and transitions if you’d like, but the base video is complete and ready to be shared with the world!
All that’s left to do is to click on Export in the top right corner and wait for the video to render. After a few minutes, depending on the video’s length, you’ll be able to download it, post it on YouTube and social media, or copy the shareable link and use the video in your marketing campaigns.
Turn your PPTs into epic videos
Without spending hours on editing

That’s how easy it is to create stunning videos with InVideo. Click here to get started today for free and turn your PowerPoint presentations into breathtaking videos in no time!
Let’s create superb videos
Critical PowerPoint Shortcuts – Claim Your FREE Training Module and Get Your Time Back!
How to Convert PowerPoint to Video (Step-by-Step)
- PowerPoint Tutorials
- Shortcuts & Hacks
- October 22, 2019
In this article you’ll learn how to convert PowerPoint to video, and the different options you have.

While most people know how to use PowerPoint to present their products and services live, few people know how to turn a PowerPoint into a video that runs on its own.
And while that might sound complicated, it’s in fact pretty easy, as you will see below.
There are two different ways to turn your PowerPoint presentations into video, the first of which gives you the most options, as discussed below.
But before you start the conversion process, here are some thoughts about why you should consider doing it in the first place.
Why Convert PowerPoint to Video?
It keeps your presentation the way it was intended.
Exporting your presentation as a video keeps all elements safely locked in place. That way you can email it to your colleagues or clients without worrying that something will shift, or that timings be messed up.
Video is more accessible and shareable
While most people have PowerPoint on their computer, we shouldn’t assume that they do. Convert your PowerPoint to video and the receiver can open it even if they don’t have a Microsoft subscription. They will have to have a media player though!
It’s also easier to view videos on a mobile device, so busy clients can check out your presentation while on the move.
Furthermore, it’s also easier to share videos on multiple platforms. They can be posted to YouTube, on your company blog, and on social media and video sharing networks.
People love videos!
With more than 75 million people watching online videos every day across the United States alone, you know you’re onto a good thing. According to marketing gurus, just mentioning the word ‘video’ in the subject line of an email increases the click-through rate by 19%.
We human beings naturally love a good story because it conveys a message on an emotional level; and videos are very effective for storytelling, especially in contrast to written text or even images.
Since people’s decision-making process is often based on emotions, turning your presentation into a video can be very convincing.
What is an MP4?
MP4 is short for MPEG-4 Video, and is a universal video format that plays on any device.
When converting PowerPoint to video, you can choose between the MPEG-4 Video file format (MP4) or the Windows Media Video file format (WMV), as discussed below.
The two main advantages of MP4 for your videos are:
- It’s a pre-compressed and compact file type format (so it’s small)
- It plays on just about any device
When converting PowerPoint to video, I highly recommend using the MP4 format unless you have a specific reason not to.
To learn more of the advantages of the MP4 format, see this Quora thread here .
Option #1. Convert PowerPoint to video

To convert your PowerPoint presentation into a video, simply:
- Click the File tab
- Select Export
- Select Create Video
- Choose your Video Quality and Recorded Timings and Narrations (see details below)
- Click Create Video
Choose where to save the video on your computer and click Save .

As a result, your PowerPoint presentation is converted into video, based on the Recorded Timings and Narrations you selected, or the preset seconds per slide you set (all discussed below).
You can even add music and loop it throughout your video if you want to. To learn how to add music to PowerPoint, read our guide here .
Video quality
Video quality determines not only the quality of your video output, but also how large the video file will be, as you can see in the image below.

For most situations, the Full HD (1080p) is a great choice.
That said, if you are showing your video on a large overhead projector and size isn’t an issue, you can improve the quality of your video by using the Ultra HD (4K) format.
Below you can see the different video quality options you have in the Create a Video dialog box.

If file size is an issue or you are just showing your video on a smaller laptop screen, you can save a lot of space with the HD (720p) or HD (480p) formats.
HD (720p) is supported on most websites and video platforms such as YouTube and Facebook. The HD (480p ) option is the best option for mobile devices.
Setting recorded timings and narrations

Recorded Timings and Narrations are important when converting PowerPoint to video as they not only dictate how long your video will be, but determine when things happen in your presentation.
There are a variety of ways you can set yourRecorded Timings or Narrations (all detailed below), but in short, your options are:
- Automatically set how many seconds you want per slide
- Set your own Rehearsal Timings (no audio or video) by clicking through your presentation
- Narrate your PowerPoint with voice and/or video, which automatically sets the slide timings for you
If you use the Record Slide Show dialog box to narrate your entire presentation, you can simply use the Save As dialog box (discussed next) to save your PowerPoint as a video, as your narrations will take care of everything in your video.
To learn everything you need to know about narrating a PowerPoint presentation, read our guide here .
Properly using PowerPoint animations
If you have animated sequences in your presentation and are going to use a pre-set number of seconds per slide, I recommend setting all your animations to After Previous.

To set an animation to trigger automatically as your slide changes, simply:
- Select your animated object
- Open the Animations tab
- Open the Start drop down
- Select After Previous
This ensures that your animations will trigger after the previous action, whether that is an animation or advancing to the next slide.
If you leave your animations set to On Click , they can add a delay of as much as 10 seconds to your video. This is especially if you are using the second conversion method (see the section below here on saving PowerPoint as a video).
Option #2. Save PowerPoint as Video
The fastest way to convert your PowerPoint presentations into a video format, is to use the Save As dialog box.
This works best when you have narrated your PowerPoint presentation using the Record Slide Show dialog box, and just want the Full HD (1080p) quality for your video.

That’s because all of your slide timings, actions and animated sequences are saved within your narration, so all PowerPoint then has to do is save itself as a video using the default settings.
If you are not narrating your presentation, then I recommend using the first method discussed above.

To save your presentation as a video from inside PowerPoint, simply:
- Hit F12 or Ctrl + Shift + S to open the Save As dialog box
- Choose a location to save your video
- Change the file type to either MPEG-4 Video (recommended) or Windows Media Video
- Click Save
Depending on the size of your presentation, it might take a minute or two to save your presentation as a video, so just hang tight.
When it is finished, your PowerPoint will be saved as a video in the Full HD (1080p) format. If you want a different video quality, you will need to use the Create a Video dialog box (see the first method discussed above).
After you save your presentation as a video, you can then embed it in other presentation if you want to. To learn how to embed a video in PowerPoint, read our guide here .
Note: I highly recommend saving your presentation in the MPEG-4 (MP4) file format as it is more universally accepted than the Windows Media Video (WMV) file format.
How to Record and Set Timings for Your Video
When converting PowerPoint to video, the timings not only determine the length of your video, they also determine the timing in which your animated sequences are triggered.
If you have a lot of animated sequences in your presentation, I don’t recommend using a set number of seconds per slide.
That’s because you can’t control the lag between the animated sequences and your content. Instead, I recommend using the Rehearse Timings command.
Here are the 4 different ways you can set and adjust slide timings for your presentation, from easiest to slowest.
1. Set a default number of seconds per slide

To use a standard number of seconds per slide for your slide timings, simply:
- Navigate to the File tab
- Click Export
- Select Create Video
- Set the number of seconds
The more seconds you set per slide, the longer your video will be in total.
2. Set transition timings to advance your slides
PowerPoint transitions are another great way to not only make flipping between your slides less abrupt, but also to automatically advance your slides.
Using the Transitions tab, you can both set a default number of seconds for all of your slides, as well as adjust the time spent on individual slides.

For example, to set a Fade transition and slide timings of 3 seconds per slide, simply:
- Navigate to the Transitions tab
- Click the Fade transition
- Under the Effect Options , choose Through Black
- Deselect On Mouse Click
- For After , input 3 seconds (and make sure there is a check mark next to After )
- Click Apply to All
As a result, all the slides in your presentation will now have a Fade transition and will automatically advance after 3 seconds.
You can also adjust the duration of the transitions between your slides if you want to get specific, but I think the default is usually fine.
3. Use the Rehearse Timings command
If you want to control the flow of your timings by manually clicking through your presentation, you can use the Rehearse Timings command.
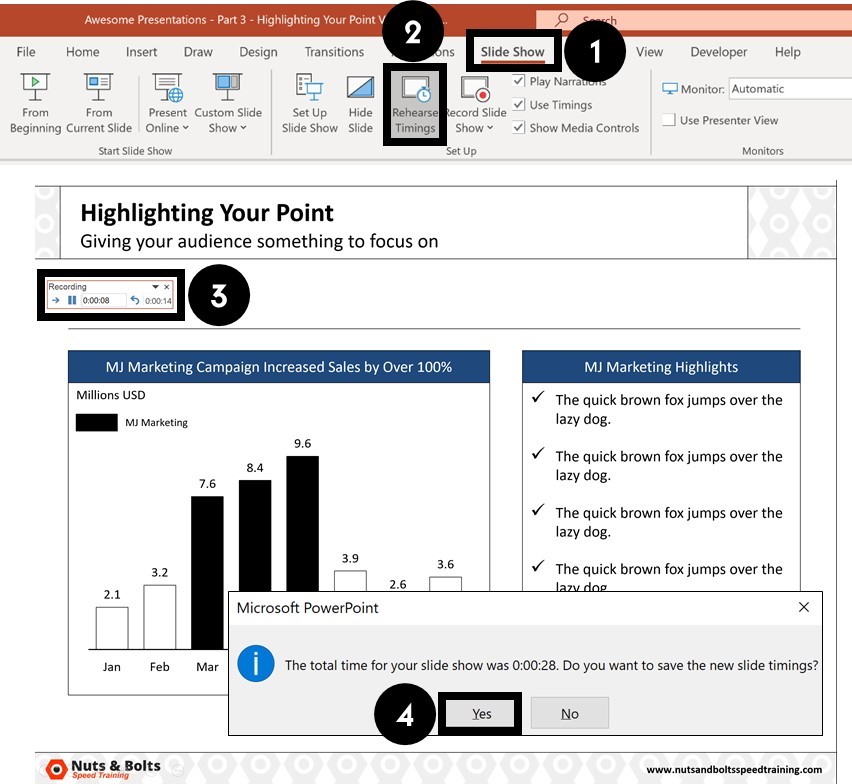
To set your slide timings with the Rehearse Timings command, simply:
- Navigate to the Slide Show tab
- Click the Rehearse Timings command
- Use the Rehearse Timings dialog box to click through your presentation
- When you are finished, click Yes to save the slide timings
Here is a quick run through of the commands on the Rehearse Timings dialog box.

Clicking Repeat starts the rehearsal timing over for the current slide you are on. That means you can restart the timing without having to start the presentation over from scratch.
4. Use the Record Slide Show command
The Record Slide Show command is the NEWEST and best way to add audio and video narrations to your presentations.
The advantage of using this tool to narrate your PowerPoint presentation, is that all of your slide timings, animations and actions are recorded for each slide.
That means you can simply use the Save As dialog box to quickly convert your narrated PowerPoint into a video.

To use the Record Slide Show command to narrate your presentation from the beginning, simply:
- Navigate to Slide Show tab
- Open the Record Slide Show drop down
- Select Record from Beginning
To learn how to use the Record Slide Show command to narrate your PowerPoint (and all the options you have), read our guide here.
Note: If you just click the Record Slide Show button (instead of opening the drop down), you will begin recording your narration from your current slide.
So that’s how to turn PowerPoint into a video, either by exporting your video using the Create a Video command, or by saving your PowerPoint presentation as a video using the Save As dialog box.
If you narrate you presentation using the Record Slide Show command, the Save As dialog box is the fastest way to turn your presentation into a video.
And while PowerPoint gives you two different video file types to choose from, I recommend using the universal MP4 video file format. That’s because it ensures that your video will play on any device (computer, tablet, or phone) that people may have.
If you enjoyed this article, you can learn more about our PowerPoint training courses and other presentation resources by visiting us here .
What’s Next?
Related articles, about the author.

This Post Has One Comment

Very useful tips. Many thanks!
Comments are closed.
Popular Tutorials
- How to Strikethrough Text (l̶i̶k̶e̶ ̶t̶h̶i̶s̶) in Word, Excel & PowerPoint
- How to Make Animated Fireworks in PowerPoint (Step-by-Step)
- Strikethrough Shortcut (l̶i̶k̶e̶ ̶t̶h̶i̶s̶) for Word, Excel & PowerPoint
- How to Create a Flash Card Memory Game in PowerPoint (Like Jeopardy)
- Keyboard Shortcuts Not Working: Solved
PowerPoint Tutorial Categories
- Strategies & Opinions
- Presentation Design
- Pictures, Icons, Videos, Etc.
- New Features
- Miscellaneous
- Charts & Data Viz
We help busy professionals save hours and gain peace of mind, with corporate workshops, self-paced courses and tutorials for PowerPoint and Word.
Work With Us
- Corporate Training
- Presentation & Template Design
- Courses & Downloads
- PowerPoint Articles
- Word Articles
- Productivity Resources
Find a Tutorial
- Free Training
- For Businesses
We help busy office workers save hours and gain peace of mind, with tips, training and tutorials for Microsoft PowerPoint and Word.
Master Critical PowerPoint Shortcuts – Secure Your FREE Training Module and Save Valuable Time!
⌛ Master time-saving expert techniques.
🔥 Create powerful presentations.
🚀 Propel your career to new heights.
We value your privacy – we keep your info safe.
Discover PowerPoint Hacks Loved by Industry Giants - KKR, AmEx, HSBC!
Over 114,880 professionals in finance, marketing and sales have revolutionized their PPT skills with our proven methods.
Gain FREE access to a full module of our premium PowerPoint training program – Get started today!
We hate spam too and promise to keep your information safe.
You are currently viewing a placeholder content from Facebook . To access the actual content, click the button below. Please note that doing so will share data with third-party providers.
Home Blog PowerPoint Tutorials How To Convert a PowerPoint Presentation to a HD Video in 3 Steps
How To Convert a PowerPoint Presentation to a HD Video in 3 Steps
There are many reasons why you may consider converting a PowerPoint presentation to a High-Definition video ; for example if you want to share a presentation online through YouTube or Vimeo, create a self-running presentation or save the slide show video to a DVD.

In this article we will guide you on how to convert a PowerPoint presentations to a High Definition video (as an MP4 video file,Windows Media Video .wmv file or QuickTime Video File .mov) using Microsoft PowerPoint.
PowerPoint lets you save presentations as videos directly from the File > Save As dialog box; however if you need to choose the output video quality while saving the presentation then it is recommended to use the File > Export > Create a Video option.
High Definition (HD) or high-quality presentation uses a higher resolution (1280×720 or 1920×1080) to save the video information. It can improve the overall experience while watching a presentation online or playing a PowerPoint slideshow in a kiosk. It would be the preferred format if you plan to upload your video presentation to YouTube or Vimeo, and have higher quality. The main drawback is that the presentation video file size will be bigger and more bandwidth may be required.

Why You Should Convert a PowerPoint to a Video Format?
Converting a PowerPoint to a video format can have several advantages. From making intuitive videos to engaging your audience to address complex topics in just a few minutes.
Create a Video Slideshow
You can use the converted video file to create a video slideshow for display at an event or edit the content of the video to generate a video presentation.
Create Presentations and Tutorials
PowerPoint enables users to export their videos with voice-over narration and animations. This can help create extensive presentations for an audience
Use Professional Editing Software to Create Engaging Videos
Adding a voice-over, additional graphics, and some footage can help create a professional-looking presentation by using a video editing application. Similar to how you use Instagram tools to convert images into a stunning video, some famous video editing apps that can help you make the most out of your converted PowerPoint file to a video format include Adobe Premiere Pro, Camtasia Studio, iMovie, Final Cut Pro, etc. If you are a Windows user, you can look into alternatives to Final Cut Pro like Lightworks, Movavi Video Editor, and Shotcut.
Create a Video Instead of Using PowerPoint
You can convert PowerPoint to video by simply letting your slides play out, making the presentation easy to play for end users without the need to have PowerPoint installed. This approach can also be helpful if you intend to present your slides using a video player instead of PowerPoint, as the latter might not be available everywhere, whereas video players often come with all types of desktop and mobile operating systems.
Upload a Video Online
Many presenters also like to upload their presentations online for an audience. A teacher might be interested in making his/her presentation available for students, or an industry expert might wish to share a concept with others in the industry by uploading a video to a YouTube channel. Either way, converting your PowerPoint to a video can help make the content easily shareable via video streaming platforms like YouTube and Vimeo. Such a video can also be shared privately via file-sharing apps like Box, Dropbox, OneDrive, Google Drive, etc.
How To Convert PowerPoint to Video (Windows)
Step 1 – go to file > export.
The first step to save a PowerPoint presentation as a HD video go to File -> Export and then click Create a Video button.

Step 2 – Choose Video Resolution
Now, select a resolution to export your video. Other than the Standard (825×480) resolution, the high-definition resolution options include HD (Medium 1280×720), Full HD (Large 1920×1080), or Ultra HD 4K (Largest file size 1920×1080). If you are using an older version of PowerPoint, you might have limited options to select between HD resolutions, since versions older than PowerPoint 2013 only supported HD videos (1280×720).

Optional Step: Save Narrations, Laser Pointer Gestures & Recorded Timings in the Video Exported from PowerPoint
Aside from saving the PowerPoint presentation as an HD video, you can also save a video file that incorporates all the recorded timings during a rehearsal, narrations, and even laser pointer gestures.
In case you have recorded narrations for your slides, you can use them or select Record a Video option to instantly start narrating your slides. The Preview Timings and Narrations option in the same drop-down menu does what it says, it enables you to check and ensure that your narrations are correctly timed with your slides, so you can make necessary edits before finalizing your video.

Optional Step: Select Slide Duration
Choose the default time spent on each slide (in seconds) and whether to save the narrations, timings, and gestures. By default, 5.00 seconds are spent on each slide unless you have a different timing recorded for the presentation slideshow.

Step 3 – Select Video Format and Create a Video Presentation
Click Create Video button and choose the destination folder and output file name. For end users wondering how to convert ppt to MP4, this is the step where you can select MP4 as your output format. PowerPoint supports saving slide decks to MP4 or WMV video formats. Once you confirm, wait a few seconds in order for the file is being saved on your hard disk. Presentations with a lot of slides may require a longer wait time.

Something good about saving presentations as a video file is that all animations, transitions, and media are preserved.

How to Convert PowerPoint to Video (Mac)
If you’re wondering how to make a PowerPoint into a video on Mac, the steps are quite similar to how you would export PowerPoint to video on a PC, with a few minor differences.
Step 1 – Go to File > Export
To convert PowerPoint to video on Mac, go to File -> Export.
Step 2 – Choose Video Format
If you have been wondering how to save PowerPoint as MP4 on Mac, this is the step where you can pick a video file format to save your presentation as a video, including MP4 and MOV.
The difference between the PC and Mac during this step is the difference in the availability of video conversion options. The PC version, along with MP4, allows saving a video in the Windows Media Video (WMV) format, unlike Mac, which offers QuickTime video format (MOV) instead.
Step 3 – Select Video Resolution and Create Video
The new version of PowerPoint for Mac allows saving a presentation in HD (Medium 1280×720), Full HD (1920×1080), or Ultra HD 4K (1920×1080) format. The higher the resolution, the higher the file format, so make sure you have enough disk space to save a very heavy file, especially if you opt for Ultra HD 4K resolution.
Save Narrations, Laser Pointer Gestures & Recorded Timings (Optional)
To save narrations, recorded timings, and laser point gestures, select the Use Recorded Timings and Narrations option.
Select Slide Duration (Optional)
To precisely time how long each slide is presented in the video, select the time duration. The default duration is 5.00 seconds, unless you have specified time for each slide separately in the presentation.
Select Export to create your video. Depending on the resolution you have selected, it might take several minutes before the video is converted. Higher resolutions take more time to conversion.
Saving videos from PowerPoint can help you at the time you need to share a presentation slideshow online (for example, uploading it via YouTube or Vimeo, or any other online video platform ), but you can also use this technique to prepare a PowerPoint presentation for a kiosk, make interactive PowerPoint presentations or create a self-running presentation. PowerPoint presentations saved as videos can also be easily run from mobile devices without the need for PowerPoint to be installed on the device. If you wish to save your PowerPoint to video in a format easily accessible, you can opt for PowerPoint save as MP4 instead of using WMV or MOV file formats that are not supported by all types of video players.

Like this article? Please share
mp4, Presentation Ideas, Presentation Videos, Video, Windows Media Video, wmv Filed under PowerPoint Tutorials
Related Articles

Filed under Presentation Ideas • February 15th, 2024
How to Create a 5 Minutes Presentation
Master the art of short-format speeches like the 5 minutes presentation with this article. Insights on content structure, audience engagement and more.

Filed under Design • January 24th, 2024
How to Plan Your Presentation Using the 4W1H & 5W1H Framework
The 4W1H and 5W1H problem-solving frameworks can benefit presenters who look for a creative outlook in presentation structure design. Learn why here.

Filed under Presentation Ideas • December 13th, 2023
How To Make a Presentation Interactive
In this article, we will explore the insights behind what makes a presentation interactive. Join us to discover techniques that guarantee a presentation success.
6 Responses to “How To Convert a PowerPoint Presentation to a HD Video in 3 Steps”
Can’t believe no one has commended you for this helpful tutorial! We want to mount several TVs in the lobby and exam rooms of our veterinary hospital to run informational presentations for our clients about pet care, our services, and helpful products. Recording a PowerPoint as a video and then putting it on a USB thumb drive to connect to the TV seems like it will be an effective, inexpensive way to get that accomplished. Thank you so much!
I second the above comment. Thank You
how to present a power point presentation on a smart tv..and having it loop over to continuous display..keep running.
This was very helpful. I had no clue that this could be done. I dedicated a PC to running the Power Point presentation for our lobby. Having it run on the TV via USB will free up that resource for us.
I haven’t dug into it yet, but is there a way to make it loop?
I keep getting this audio data not supported. Is there anyway to remove this?
Send us your issue to [email protected] we might be able to help you.
Leave a Reply
Convert PPT to VIDEO
You have the option to convert your ppt file to video, as well as a variety of other formats, using our free online converter.
How to convert ppt to video?
Upload ppt-file, select «to video», download your video file, best tool to convert ppt to video, ppt to video fast and easy, secure ppt to video conversion, no software installation required, microsoft powerpoint, faqs on ppt to video conversion, ppt converter, convert to video.
PPT to MP4 converter
Convert your file from Microsoft PowerPoint Presentation File to MPEG-4 Video Stream with this PPT to MP4 converter .
Enter the timestamps of where you want to cut your video. The format is HH:MM:SS. HH = hour, MM = minutes, SS = seconds.
Example: 00:02:23 for 2 minutes and 23 seconds.
How to convert a PPT to a MP4 file?
- Choose the PPT file you want to convert
- Change quality or size (optional)
- Click on "Start conversion" to convert your file from PPT to MP4
- Download your MP4 file
Not convinced? Click on the following link to convert our demo file from PPT to MP4 :
Stay connected:
Rate this tool 4.5 / 5
You need to convert and download at least 1 file to provide feedback
Feedback sent
Thank you for your vote
Convert to PPT
Convert from ppt, file format, ppt (microsoft powerpoint presentation file).
PPT is the binary file format for Microsoft Office PowerPoint 97-2007. Presentations using PowerPoint can include images, text, audio, video, charts, graphs, hyperlinks, and animation to provide presentations created for students and businesses. Mos...
MP4 (MPEG-4 Video Stream)
MPEG-4 Part 14 files (MP4) are capable of storing multimedia such as audio, video, and subtitles. This file type is commonly used by Apple and other producers of mobile products which allow audio, still images, or video. This includes but is not limi...
Specify a downloader that fits your task
How-To Geek
How to add a video to a microsoft powerpoint presentation.
If a picture speaks a thousand words, a video speaks a million words!
Quick Links
Embedding videos versus linking to videos, supported video formats in powerpoint, how to insert a video into a powerpoint presentation, manage an embedded video's playback in powerpoint.
Videos can make presentations even more interesting or exciting. If you're looking to add a video to your Microsoft PowerPoint presentation, it's easy to do so. We'll show you how.
In PowerPoint, you can either embed a video or link to a video from your presentation. If you embed a video, your video becomes part of the presentation, which increases the overall size of the presentation file.
Related: How to Send PowerPoint Presentations With an Embedded Video
If you link to a video, PowerPoint only adds a reference to that video in your presentation. The downside of this method is that you need to send the video file separately if you share your presentation with someone. We have written a guide on how to send PowerPoint presentations with videos , so check that out.
In this guide, we'll focus on embedding a video in your presentation so you don't have to worry about sending separate files. And, if you're looking to add a YouTube video to your presentation , there's a way to do that, too.
Related: How to Embed a YouTube Video in PowerPoint
PowerPoint supports multiple video formats, including ASF, AVI, MP4, M4V, MOV, MPG, MPEG, and WMV. If your video is already in one of these formats, you can quickly add that to your presentation.
If your video is in another format, you can convert it to a supported format and then add it to your presentation.
Related: How to Use Handbrake to Convert Any Video File to Any Format
First, make sure the video you want to add to your presentation is saved on your Windows or Mac computer. Then, open your presentation with PowerPoint on your computer.
On the PowerPoint window, in the left sidebar, click the slide in which you want to add a video.
At the top of the PowerPoint window, click the "Insert" tab.
In the "Insert" tab, under the "Media" section (which is to the extreme right side of the interface), click "Video."
You'll now see an "Insert Video From" menu. Here, select "This Device."
Your computer's standard "open" window will open. In this window, access the folder that has your video file. Then double-click your video file to add it to your presentation.
You'll see your selected video in your presentation. To resize this video, click it and use the handles around the video to change its size. Then drag the video to place it at its desired location in your slide.
If you'd like to test the video, at the bottom-left corner of the video, click the play icon.
And you're all set.
Now that you have added a video to your presentation, you might want to change how it plays in your slides. In PowerPoint, you have multiple ways to change your video's playback.
To access these playback options, first, click your video in your presentation. Then, at the top of the PowerPoint window, click "Playback."
In the "Playback" tab, under the "Video Options" section, you will find various options to manage your video's playback.
For example, to change how your video starts to play in your presentation, click the "Start" drop-down menu and select one of these options:
- In Click Sequence : This plays your video in the click sequence. This means if you press the button for the next slide, your video will play.
- Automatically : This option automatically plays your video when the slide with your video opens.
- When Clicked On : Select this option to play your video only when you click it.
The other options are "Play Full Screen," which opens your video in full screen, and "Loop Until Stopped" that plays your video over and over again until you manually stop it.
Before you close PowerPoint, make sure you save your presentation so that your embedded video is saved with it. Do this by clicking File > Save in PowerPoint's menu bar.
And that's how you make your PowerPoint presentations even more engaging by including videos in them. Exciting!
If you don't want to add a video but you do want audio, you can add music to your presentations . This also helps enhance your presentation quality.
Related: How to Add Music to Your PowerPoint Presentation

How to Record Customized Camera Feeds With Cameo in PowerPoint
T he widespread adoption of remote work and virtual meetings has led many people and organizations to realize they don't have to be physically present in the same conference room to make presentations. In fact, you don't even need to conduct them live.
However, recording your PowerPoint slides with your face on them requires technical know-how and third-party apps like OBS. This makes recording presentations a bit difficult and discourages people from doing it.
Thankfully, Microsoft has addressed this issue in PowerPoint 365 with the Cameo feature. Here's what it is and how to use it.
What Is Cameo in PowerPoint?
Cameo is a PowerPoint feature that lets you add your webcam or any other camera feed into your presentation. This makes it easier to present virtually, as your audience can see you from within your slides.
Previously, you needed a third-party app like OBS to overlay yourself on your presentation. You can also use a green screen overlay in Capcut or other similar apps to achieve the same effect. However, this takes a lot of effort and know-how.
But with this feature, you can do it from inside PowerPoint with just a few clicks. Here's how to insert a cameo into your slides.
- Go to Insert > Cameo .
- After clicking on Cameo, PowerPoint will insert a placeholder object on your current slide and open the Camera Format tab.
- You can edit the object as you wish, much like any other shape on PowerPoint. You can also click on the options in the Designer pane on the right side of the screen to help you work faster.
- Once you're happy with its placement on your slide, click on the Preview button to see your live video.
With that, you can start presenting your PowerPoint slides via screen sharing while still keeping yourself on the screen.
How to Record Your PowerPoint Presentation With Cameo
You can also insert a cameo from Record > Cameo . Clicking on this will bring you to the same menu tab and insert a placeholder object for your video. However, even if you didn't set up Cameo beforehand, you can insert it directly while recording your presentation. Here's how:
- Go to Record > From Beginning or Record > From Current Slide .
- In the recording screen, click on the Camera icon at the top. This will insert a round object containing your video in your slides' lower-right-hand section.
- Click on the Red icon to start recording your presentation.
- Go through your presentation as usual. For more information, check out our guide on turning your presentations into videos .
- Once you've finished, click the Red icon again to stop recording.
- Click Export to go to the Export to video screen .
- Change the File Name as needed, then click Browse to select the location where you will save your recorded video.
- Once done, click Export Video .
With that, you don't have to spend much effort to add your video feed to your PowerPoint presentation recording. However, the app only places your video at one location across every slide; it might cover some of your content. That's why it's better to use the Cameo feature when you're building or editing your PowerPoint presentation.
If you're unhappy with your recording, press the Retake Video on the left of the record icon. You can pick between On Current Slide or On All Slides .
What You Need to Record Customized Camera Feeds
You need a webcam and a Microsoft 365 account to record your customized camera feed. Furthermore, you cannot use Cameo or record presentations in the PowerPoint web app. You need to download and install it on your computer to use these features.
The Cameo feature is already available on Microsoft PowerPoint 365 in Windows and Mac. However, recording your presentation with Cameo is only available on Windows. As of the time of writing, this feature isn't available for the main PowerPoint 365 for Mac version.
If you're running macOS, you must be a Microsoft 365 Insider to get this feature. However, since the Cameo recording feature is already announced in the Microsoft 365 Insider blog , we hope it will be available in the mainstream PowerPoint for Mac version in a few months.
Recording Your Presentations Is Now Much Easier
The Cameo feature has made presenting PowerPoint slides in video calls easier. And with the recording function, you no longer need a third-party app to put your video over your presentation.
You can integrate it into each slide, allowing you to control where you are on your screen. And you also save a lot of time and effort, as you can record and save your presentation as a video from within Microsoft PowerPoint.


Apr 4, 2024
Trim videos in PowerPoint for the web
Aparna Jethani
Rishabh Singh
- Add our blog to your RSS feed reader" href="/rss/blog.xml" data-bi-name="RSS Subscription" data-bi-id="rss_feed" data-bi-bhvr="120" data-bi-socchn="RSSSubscription" title="Microsoft 365 Insider Blog RSS" target="blank" class="d-inline-block">
Hey there, Microsoft 365 Insiders! We are Aparna Jethani, a Product Manager, and Rishabh Singh, a Product Designer, on the PowerPoint team. We are excited to let you know that you can now trim videos you inserted in your presentations in PowerPoint for the web.
Trim video in PowerPoint for the web
Using the new Trim Video command, you can edit the videos you inserted in your presentation to show only the most important and engaging parts, and keep your audience focused on what is relevant. You can trim videos using frame or timestamp level accuracy, and preview them and fine-tune them until you achieve the perfect and precise outcome.
To make it easier to access the feature, we have also added a dedicated Video tab in the ribbon. Th e tab contains all the commands related to adjusting and formatting your videos, such as changing the video style, arrangement and more.
How it works
- Open an existing presentation or create a new one, and then insert a video.
- To begin trimming, select the video, and then either select Video > Trim Video on the new Video tab or right-click the video and select Trim Video .

3. To trim a video, drag and slide the end markers to set the start and end point for trimmed video segment marked by colored frames.
4. To preview the trimmed video, click the Play button.

5. When you’re done, click the Trim button to apply the trim selections.
Tips and Tricks
- Use a mouse cursor or keyboard shortcuts, to easily set the trim start and end points within the video frame timeline.
- Once you have dragged the markers to the desired frame, use the arrow keys to adjust timestamps (with standard HH:MM:SS:FF format) to trim and fine tune at precise points. Trimmed range duration is also displayed on the dialog for assistance.
- Use Play, Pause and Seek Bar time stamps to preview while you iterate. Additionally, use the Forward and Backward buttons for playback and forward.
Availability
The Trim Video feature is available to all PowerPoint for the web users.
NOTE: The Trim Video feature is only available for local and stock videos.
Feedback
We want to hear from you! Please click Help > Feedback to submit your thoughts about this feature.
Sorry, JavaScript must be enabled to use this app.
PowerPoint: How to Add Audio to Powerpoint on Windows 10 and Mac
Last Updated Thursday, August 31, 2023, at 5:00 am
Known Issue (August 14, 2023):
Some Windows 11 users are experiencing issues with PowerPoint exports when they are turned into .mp4 files. Visuals within the exported PowerPoint are appearing as flipped, or upside down. We are working with Microsoft to find a solution.
As a workaround, please convert the file as a .WMV file option and save it in My Media. The following are directions on how to convert a PowerPoint Presentation with audio to a .WMV file . For more support or to help troubleshoot issues, please reach out to the LTS Help Desk at [email protected] .
Microsoft PowerPoint offers features to record audio narration and export it as a video. PowerPoint records audio slide-by-slide rather than in one continuous file, allowing creators to easily re-record a slide if they make a mistake or need to change something later. Exporting as a video and uploading to Kaltura or Canvas for streaming is advantageous since it standardizes file types, doesn't require a download to view, is in a format that can be captioned, and allows viewers to navigate more efficiently.
A recent update has made the process comparable on a Mac, but the specifics vary. Windows 10 instructions follow; Mac users can click the link below to jump to the appropriate instructions.
- Instructions for Mac users
Windows 10 Instructions:
The following instructions explain how to add audio to your PowerPoint presentation on Windows 10 and export that PowerPoint as an MP4. The text instructions cover the same information as the embedded video below.
NOTE: If you have an older version of PowerPoint, you may need to update it to access the features described below. If you do not have PowerPoint, you can download it and other Microsoft Office products for free by going to office365.uwec.edu. If you have questions about updating or installing PowerPoint, contact the LTS Help Desk at [email protected] or 715-836-5711.
- Design your PowerPoint TIP: Use images and limit text to better engage viewers/listeners.
- Click Record Slide Show NOTE: Audio may start recording automatically if you have an older version of PowerPoint. It will still work, but this version offers reduced functionality.
- Record narration and avoid reading text on the slide out loud to viewers. Click the blue Replay button to listen to the recorded audio and ensure it was recording.
- Press [Escape] or the ‘X’ button located in the top right of the screen when the audio recordings are finished. You will see a speaker icon on slides that have audio.
- Select Export (steps 10-14 are shown in screenshot below).
- Select Create a Video .
- Optional: Select Full HD (1080p) for the video quality; it is unlikely a higher quality is needed.
- Select Use Recorded Timings and Narrations.
- Follow prompt/pop-up window to save the video in a memorable location.
- How to upload and share with Kaltura (Instructors should use Kaltura. Students will need to use it if the file is over 500 MB, which a PowerPoint probably won't be and they can use Canvas.)
- How to upload and share in a Canvas assignment (students)
- How to upload and share in a Canvas discussion (students) - the instructions refer to the "rich content editor" which is just the features in the top of the discussion post reply.
Elaboration on the Recording Features:
- Timing Feature – there is a rolling time feature for the individual slide and the overall presentation. Allows the speaker/presenter to monitor how long they are talking.
- Microphone Feature - Click on Settings and select Microphone and then the specific device to set up before recording.
- Replay Feature - Use to check that the audio is recording properly before starting additional slides.
- Clear Feature - Select Clear to delete/re-record audio.
- Don’t set the camera to record - Make sure this button has a diagonal slash through it to avoid the problem.
Mac Instructions:
The following instructions will teach you how to add audio to your PowerPoint presentation on a Mac and export that PowerPoint as an MP4. The text instructions cover the same information as the video embedded below.
NOTE: It is essential to have the Office 365 version of PowerPoint or you will not be able to save your PowerPoint as a video. If necessary, you can download it and other Microsoft Office products for free by going to office365.uwec.edu. If you have questions about updating or installing PowerPoint, contact the LTS Help Desk at [email protected] or 715-836-5711.
- TIP: Use images and limit text to better engage viewers/listeners.
- Click Record Slide Show
- TIP: Before you begin recording your full presentation, do a practice recording to verify your microphone and other settings are correct.
- NOTE: Avoid reading the text written directly on the slide; use the slide to elaborate on the material being presented.
- Stop speaking for a second to prevent the audio from cutting out as slides change. Resume speaking when the time starts moving again under the Current slide timing feature to the left of the recording button.
- Click Stop or Pause at the top of the screen and then End Show in the top left corner when all the audio recordings have been finished.
- Check the audio by clicking on Play from Start under the Slide Show tab or the presenter mode icon at the bottom of the screen.
- Edit the name of the file and where you would like to save the video following PowerPoint's prompts.
- Click Export
- Upload your mp4 video to Kaltura or Canvas to share it:
- How to upload and share to My Media (Instructors should use My Media. Students will need to use it if the file is over 500 MB, which a PowerPoint probably won't be and they can use Canvas.)
- How to upload and share in a Canvas discussion (students) - the instructions refer to the "rich content editor" which is the tool at the top of the discussion post reply.
Additional Video Tool Options
For more information about recording options available, click here to view a comparison of each tool's features.
- All about AI
- Google Bard
- Inflection AI Pi Chatbot
- Anthropic Claude
- Generative AI
- AI Image Generation
- AI Regulation
- AI Research
- Large Language Models (LLM)
- Surface Pro
- Surface Laptop
- Surface Book
- Surface Duo
- Surface Neo
- Surface Studio
- Surface Hub
- Surface Pen
- Surface Headphones
- Surface Earbuds
- About WinBuzzer
- Follow Us: PUSH, Feeds, Social
- Write for Us
- Cookie Policy and Privacy Policy
- Terms of Service
How to Embed a YouTube Video in PowerPoint
We show you how to embed a YouTube video in PowerPoint so that you can spice up your presentations and impress colleagues.

Table of Contents:
It can be difficult to keep an audience’s attention during a lengthy presentation. In fact, 4 out of 5 professionals admit to shifting their focus away from the presenter during the last presentation they attended. One way to combat this is interactive elements. You can embed a YouTube video in PowerPoint to break up long stints of talking and create a more fun environment. Though you can add a plain hyperlink to your presentation to open in the browser, that doesn’t look particularly professional. Instead, it makes sense to embed your video in PowerPoint so you can play it directly from the application. As an added benefit, the video’s thumbnail will appear for a more beautiful design. In this guide we show you how to embed a YouTube video in PowerPoint using two methods: its embed code and a URL. Both will give more or less the same results, so we recommend the latter unless you have a specific reason.
How to Embed a YouTube Video in PowerPoint Using Code
Embedding a YouTube video using its embed code is slightly more technical but offers additional customization options. This method is especially useful for those working with older versions of PowerPoint.
How to Insert a YouTube Video in PowerPoint Using a URL
You can speed up the process to embed video in PowerPoint from YouTube by using just its URL rather than the embed code. This should work so long as you have a modern version of PowerPoint.
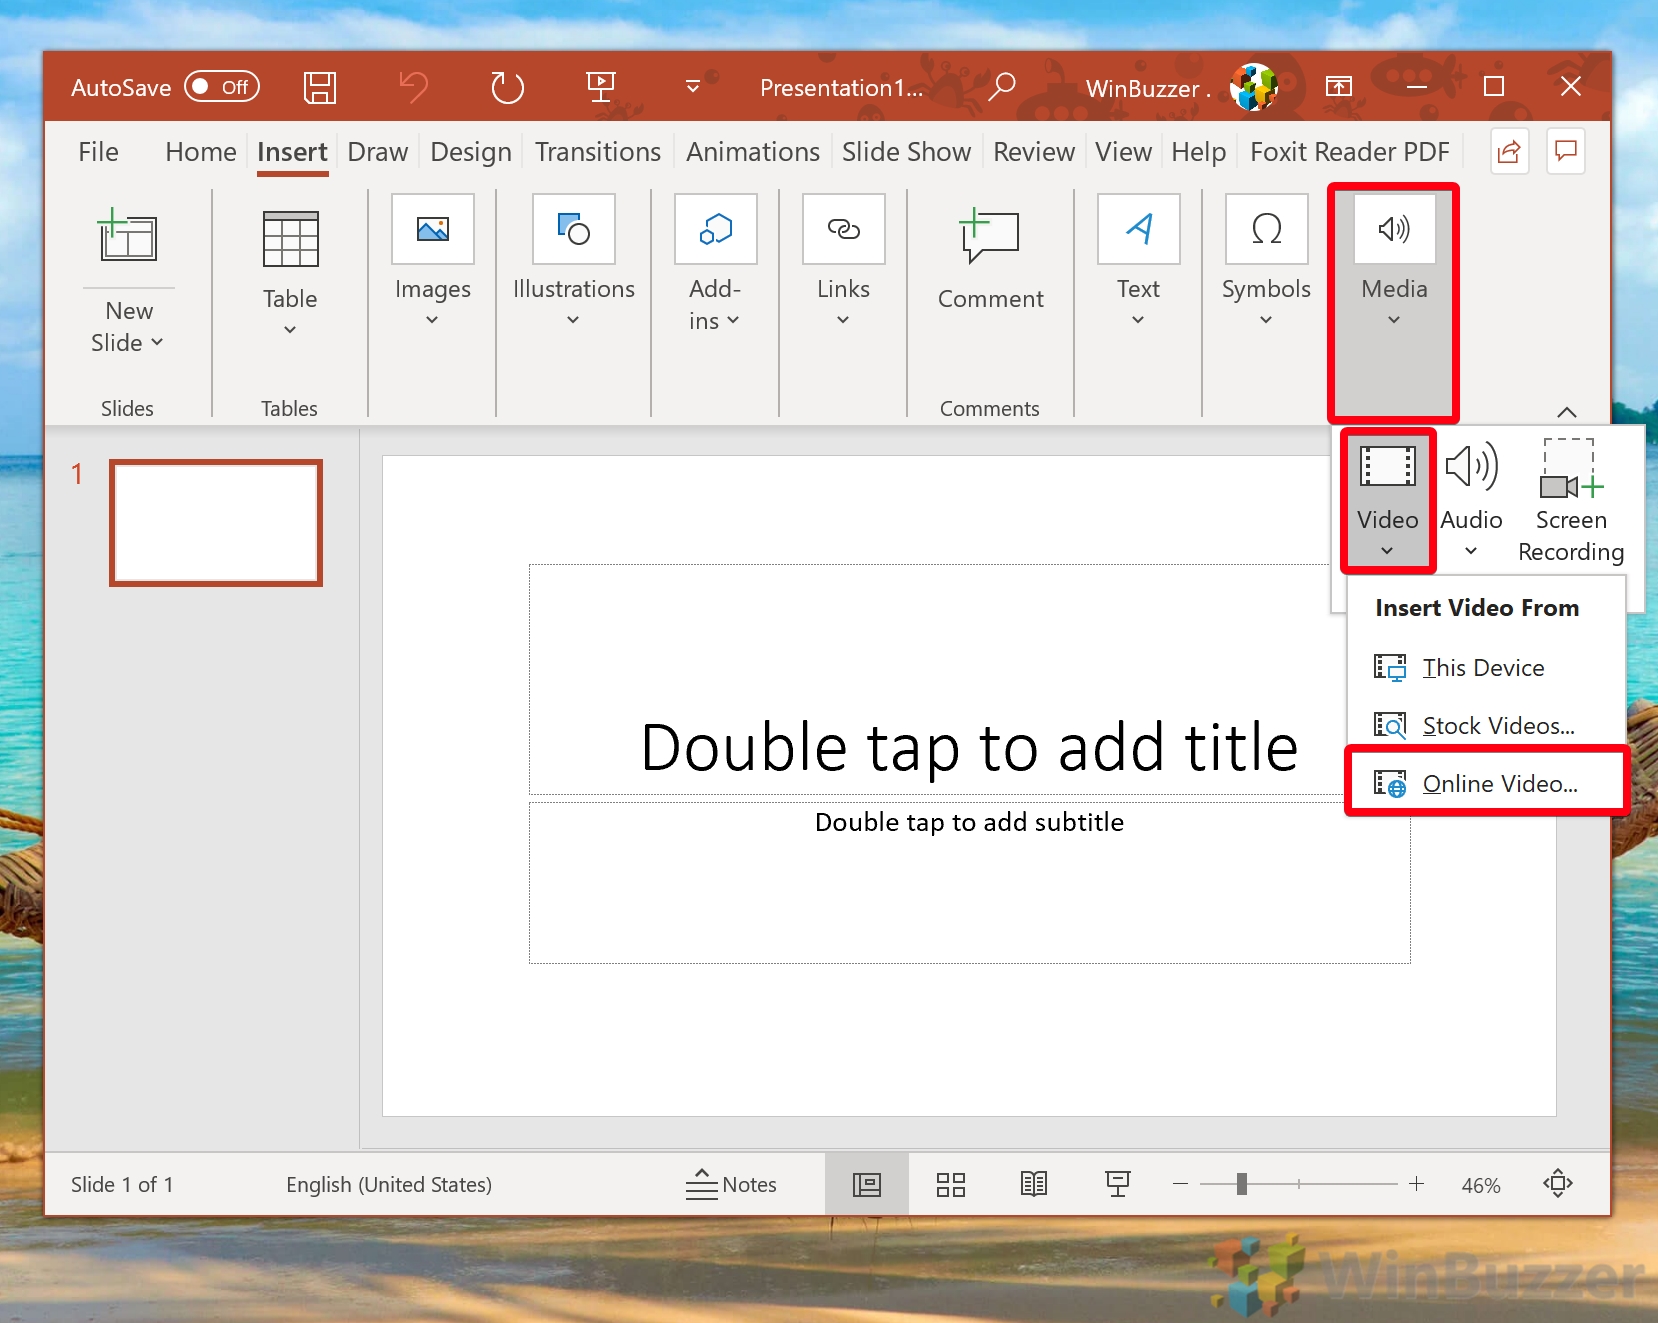
FAQ – Frequently Asked Questions About Videos in PowerPoint
Will embedded youtube videos in powerpoint work without an internet connection.
Embedded YouTube videos require an active internet connection to stream content from YouTube’s servers. If you plan to present in a location without internet, consider downloading the video (if permitted by copyright) and embedding the file directly into your PowerPoint presentation.
Can I embed a private YouTube video into my PowerPoint presentation?
Private YouTube videos cannot be embedded directly. For a video to be embeddable in PowerPoint, it must be either public or unlisted. If you are the owner of the video, you can change its privacy settings on YouTube to ‘Unlisted’ , which allows embedding while not making the video publicly searchable.
How can I make an embedded video autoplay when its slide comes up during the presentation?
To make an embedded YouTube video autoplay in PowerPoint, first embed the video into your slide. Then, right-click on the video, select ‘Playback’ , and then choose ‘Automatically’ under ‘Start’ . This setting ensures the video begins playing as soon as the slide is displayed without requiring a manual play action.
Is there a way to loop an embedded YouTube video in PowerPoint?
Direct looping of embedded YouTube videos within PowerPoint is not supported. An alternative would be to set the video to loop on YouTube’s platform before embedding, but this requires the loop setting to be available and set on YouTube. Another approach is to edit your video to include the repeat content and upload it as a new video for embedding.
What versions of PowerPoint support embedding YouTube videos?
Embedding YouTube videos is supported from PowerPoint 2010 onwards. Newer versions, such as PowerPoint 2019 and PowerPoint for Microsoft 365, provide enhanced support and a more user-friendly experience for embedding videos from YouTube using both the URL and embed code methods.
How can I embed videos from Vimeo or other services into PowerPoint?
For services like Vimeo, you can use the embed code provided by the video platform. Go to ‘Insert’ > ‘Video’ > ‘Online Video…’ in PowerPoint and paste the embed code. Compatibility and support can vary, so it’s recommended to test the embedded video before the presentation.
Can I insert videos from sources other than YouTube using these methods?
The URL method described in the tutorial is tailored for YouTube. However, PowerPoint allows embedding videos from other services through their embed codes. Always check the specific platform’s guidelines for embedding content and test the video in PowerPoint to ensure compatibility.
If I embed a YouTube video, will viewers of the presentation need a YouTube account to watch it?
Viewers do not need a YouTube account to watch an embedded YouTube video within PowerPoint. The requirement is for the video to be publicly accessible or unlisted. Private videos cannot be viewed without logging into the account that has access.
Can I control the playback volume of an embedded YouTube video in PowerPoint?
The embedded YouTube video’s volume controls are managed through YouTube’s built-in player controls during playback. PowerPoint does not offer separate volume control for embedded YouTube videos, so adjustments must be made using the video player’s volume slider or the computer’s volume settings.
What should I do if the ‘Online Video’ option is not available in my PowerPoint?
If the ‘Online Video’ option is missing, it’s likely that you are using an older version of PowerPoint that doesn’t support this feature. Consider updating to a newer version. As an alternative, you can download the video and insert it into your presentation as a local file through ‘Insert’ > ‘Media’ > ‘Video’ > ‘This Device’ .
Is it possible to embed a YouTube video so it plays in fullscreen automatically in PowerPoint?
PowerPoint doesn’t support automatic fullscreen playback for embedded videos. You would have to set the video to fullscreen manually during presentation mode or adjust the video frame size to fill the slide as a workaround.
Can I customize the playback quality of an embedded YouTube video?
The playback quality of an embedded YouTube video in PowerPoint is determined automatically by YouTube based on factors like internet speed. It’s not possible to preset a specific playback quality within PowerPoint. Viewers can manually adjust the quality during playback using the YouTube player controls if needed.
What happens if the YouTube video I embedded is removed from YouTube?
If an embedded YouTube video is removed from the platform or if the video’s URL changes, it will no longer be accessible in your PowerPoint presentation. You’ll see a blank frame or an error message in place of the video. It’s advised to regularly check embedded videos for availability, especially before important presentations.
How can I add annotations or comments to an embedded video in PowerPoint?
PowerPoint doesn’t support adding annotations directly to embedded online videos. As a workaround, you can overlay shapes, text boxes, or comments on or around the video frame on your slide. These can serve as annotations and are helpful for providing additional context or notes related to the video content.
Can an embedded video in PowerPoint be used as a clickable link to open a webpage?
While the video itself cannot be directly used as a hyperlink in PowerPoint, you can overlay a transparent shape or icon over the video frame and add a hyperlink to that shape. This setup can then direct users to a webpage or another slide within the presentation when clicked, effectively making the video or its part act as a clickable link.
Related: How to Insert an Animated GIF in PowerPoint

Related: How to Add Music / Audio to PowerPoint Slides

Related: How to Add Speaker Notes in PowerPoint

- Embed YouTube video
- Microsoft PowerPoint
- Video in PowerPoint
Recent News

Google’s Find My Device Now Locates Powered-Off Phones and Bluetooth-Tagged Items
Naver Unveils HyperCLOVA X: A Leap Forward in Multilingual AI Capabilities
Subscribe to WinBuzzer on Google News

Contribute to the Teams forum! Click here to learn more 💡
April 9, 2024
Contribute to the Teams forum!
Click here to learn more 💡
- Search the community and support articles
- Microsoft Teams
- Teams Free (classic)
- Search Community member
Ask a new question
My presentation had an embedded video which i was able to see but others only saw a black screen when video played
Was using teams in my 365 account. While I, the presented was able to see the slide with embedded video in it when I shared my screen the others on presentation only saw a black screen when the video was playing. How do i correct that?
- Subscribe to RSS feed
Report abuse
Replies (1) .
- Independent Advisor
Hi, It seems you've encountered a common issue in Microsoft Teams where participants see a black screen instead of the video you're playing during a screen share. Here are some steps to ensure that your video displays correctly to all participants in your Teams meeting: 1. **Include System Audio**: - Before sharing your screen, ensure you select the 'Include system audio' option. This is found in the screen sharing settings within Teams. 2. **Use PowerPoint Live for Presentations**: - Instead of sharing your entire screen, utilise PowerPoint Live in Teams. This feature is designed for seamless integration of PowerPoint presentations, including videos, within Teams. - When you're in a Teams meeting, choose 'Share content', then select 'PowerPoint Live', and pick your presentation. 3. **Check Video Format Compatibility**: - Make sure your video file in PowerPoint is in a format compatible with Teams, like MP4 format with H.264 video encoding. 4. **Update Your Applications**: - Having the latest versions of both Teams and PowerPoint can solve many such issues. Ensure you have updated these applications to their latest versions. 5. **Conduct a Test Run**: - Before your actual meeting, try a test presentation with a colleague to ensure that the video plays correctly for participants. 6. **Share Video Link**: - If the problem persists, as an alternative, you could upload the video to a platform like OneDrive or SharePoint and share the link in your presentation. 7. **Stable Internet Connection**: - A stable and strong internet connection is crucial for smooth video playback in meetings. For more information on screen sharing in Teams, you can visit the Microsoft support page: [Share content in a meeting in Teams]( https://support.microsoft.com/en-us/office/share-content-in-a-meeting-in-teams-fcc2bf59-aecd-4481-8f99-ce55dd836ce8). I hope these suggestions help you resolve the issue. If you continue to experience difficulties, please don’t hesitate to reach out to Microsoft Teams support for further assistance. Best regards, Saurabh
Was this reply helpful? Yes No
Sorry this didn't help.
Great! Thanks for your feedback.
How satisfied are you with this reply?
Thanks for your feedback, it helps us improve the site.
Thanks for your feedback.
Question Info
- Meetings and calls
- Audio and video
- Norsk Bokmål
- Ελληνικά
- Русский
- עברית
- العربية
- ไทย
- 한국어
- 中文(简体)
- 中文(繁體)
- 日本語
COMMENTS
51 seconds. On the File menu, select Save to ensure all your recent work has been saved in PowerPoint presentation format (.pptx). Click File > Export > Create a Video. (Or, on the Recording tab of the ribbon, click Export to Video .) In the first drop-down box under the Create a Video heading, select the video quality you want, which pertains ...
Aspose.Slides PPT to Video converter is a free online service for converting PowerPoint presentations to videos. Slides: Convert all slides in your PowerPoint to video.Or you can select specific slides or a range of slides for conversion. Slide duration: Specify the time that is spent showing each slide in the video. Video resolution: Select the resolution that determines the amount of detail ...
Learn how to publish your own video using Microsoft PowerPoint with narration, annotations, animations, and timings. As full disclosure, I work at Microsoft ...
To turn a PowerPoint presentation into a video, first, open your presentation with the PowerPoint app on your Windows or Mac computer. In the top-left corner of PowerPoint, click the "File" option. From the sidebar that opens after clicking the "File" option, select "Export." In the "Export" menu, click "Create a Video."
Free online PowerPoint to video converter. VEED lets you convert your PowerPoint presentations to videos in just a few clicks, straight from your browser. You can even record yourself while presenting your slides using our free screen and webcam recorder. Upload your slides and record your webcam, audio, and screen.
Join 400,000+ professionals in our courses here 👉 https://link.xelplus.com/yt-d-all-coursesLearn how to create a video using PowerPoint. I'll first show you...
Watch this video to learn how to convert your PowerPoint presentation into a video. When you make a recording of a presentation, all its elements (narration,...
Choose the option Create a Video at the very bottom of the right-hand side of the screen. 3. Find the Create a Video tab if you want to see the available video quality options. 4. Click on the downward-pointing arrow next to the Computer & HD Displays option and choose from the three available options.
To convert your PowerPoint presentation into a video, simply: Click the File tab. Select Export. . Select Create Video . Choose your Video Quality and Recorded Timings and Narrations (see details below) Click Create Video. Choose where to save the video on your computer and click Save.
Browse to the location where you want to save the file and give it a name then press "Save.". While the video is being created, you will see the small progress bar at the bottom of your PowerPoint window. Wait till this is done and then go to your video. Now you can double-click your video file and it will automatically play with your video ...
PowerPoint is by far the most popular presentation app, and it's easy to see why. There are many themes, layouts, and tools inside PowerPoint that help you build professional presentations quickly.. Two apps, one presentation: on the left, my presentation file is open in PowerPoint, while the Windows Media player on the right is playing a video person of the presentation.
Step 3 - Select Video Format and Create a Video Presentation. Click Create Video button and choose the destination folder and output file name. For end users wondering how to convert ppt to MP4, this is the step where you can select MP4 as your output format. PowerPoint supports saving slide decks to MP4 or WMV video formats.
🔵 The .ppt file format, used in Microsoft PowerPoint presentations, includes slides with text, images, animations, videos, and audio, often featuring embedded objects from other Office applications. Key points include: - File Type: ".ppt" stands for PowerPoint Presentation, used for creating slideshows.
Learn How to turn a PowerPoint Presentation into Video with the narration. Record your presentation going through the slides and PowerPoint will pick up the ...
PPT (Microsoft PowerPoint Presentation File) PPT is the binary file format for Microsoft Office PowerPoint 97-2007. Presentations using PowerPoint can include images, text, audio, video, charts, graphs, hyperlinks, and animation to provide presentations created for students and businesses.
Step 2: Select "Export" or "Share". Depending on the version of PowerPoint you're using on your Mac, choose either "Export" or "Share.". These options will guide you to the video conversion features PowerPoint offers, crucial for initiating the convert PowerPoint to video process.
Then, open your presentation with PowerPoint on your computer. On the PowerPoint window, in the left sidebar, click the slide in which you want to add a video. At the top of the PowerPoint window, click the "Insert" tab. In the "Insert" tab, under the "Media" section (which is to the extreme right side of the interface), click "Video."
Go to Record > From Beginning or Record > From Current Slide. In the recording screen, click on the Camera icon at the top. This will insert a round object containing your video in your slides ...
How it works. Open an existing presentation or create a new one, and then insert a video. To begin trimming, select the video, and then either select Video > Trim Video on the new Video tab or right-click the video and select Trim Video. 3. To trim a video, drag and slide the end markers to set the start and end point for trimmed video segment ...
In this step-by-step tutorial, learn how to record your PowerPoint presentation as video. Watch how to insert a narration, video, and then export your PowerP...
To save the PowerPoint as a video, click File and then select Export. We also recommend saving your file as a regular PowerPoint before following the next steps for exporting your PowerPoint. Edit the name of the file and where you would like to save the video following PowerPoint's prompts. Select MP4 from the File Format options list.
Navigate to the YouTube video you wish to embed in your PowerPoint presentation and click on the " Share " button below the video. This is the initial step to access the embed code. Select ...
Here are some steps to ensure that your video displays correctly to all participants in your Teams meeting: 1. **Include System Audio**: - Before sharing your screen, ensure you select the 'Include system audio' option. This is found in the screen sharing settings within Teams. 2. **Use PowerPoint Live for Presentations**: - Instead of sharing ...
CNN —. For McCall Mirabella's 21st birthday party last month, she asked guests to bring only one gift: A PowerPoint presentation. Mirabella, a TikTok and YouTube personality with over 1.3 ...
Learn everything you need to know to get started using Microsoft PowerPoint! You'll learn all the basics plus more, including: how to choose a design theme...