

Tips for creating and delivering an effective presentation
In this article.
Creating an effective presentation
Delivering an effective presentation
Tips for creating an effective presentation
Top of Page
Tips for delivering an effective presentation

Need more help?
Want more options.
Explore subscription benefits, browse training courses, learn how to secure your device, and more.

Microsoft 365 subscription benefits

Microsoft 365 training

Microsoft security

Accessibility center
Communities help you ask and answer questions, give feedback, and hear from experts with rich knowledge.

Ask the Microsoft Community

Microsoft Tech Community

Windows Insiders
Microsoft 365 Insiders
Was this information helpful?
Thank you for your feedback.

- SUGGESTED TOPICS
- The Magazine
- Newsletters
- Managing Yourself
- Managing Teams
- Work-life Balance
- The Big Idea
- Data & Visuals
- Reading Lists
- Case Selections
- HBR Learning
- Topic Feeds
- Account Settings
- Email Preferences
How to Make a “Good” Presentation “Great”
- Guy Kawasaki

Remember: Less is more.
A strong presentation is so much more than information pasted onto a series of slides with fancy backgrounds. Whether you’re pitching an idea, reporting market research, or sharing something else, a great presentation can give you a competitive advantage, and be a powerful tool when aiming to persuade, educate, or inspire others. Here are some unique elements that make a presentation stand out.
- Fonts: Sans Serif fonts such as Helvetica or Arial are preferred for their clean lines, which make them easy to digest at various sizes and distances. Limit the number of font styles to two: one for headings and another for body text, to avoid visual confusion or distractions.
- Colors: Colors can evoke emotions and highlight critical points, but their overuse can lead to a cluttered and confusing presentation. A limited palette of two to three main colors, complemented by a simple background, can help you draw attention to key elements without overwhelming the audience.
- Pictures: Pictures can communicate complex ideas quickly and memorably but choosing the right images is key. Images or pictures should be big (perhaps 20-25% of the page), bold, and have a clear purpose that complements the slide’s text.
- Layout: Don’t overcrowd your slides with too much information. When in doubt, adhere to the principle of simplicity, and aim for a clean and uncluttered layout with plenty of white space around text and images. Think phrases and bullets, not sentences.
As an intern or early career professional, chances are that you’ll be tasked with making or giving a presentation in the near future. Whether you’re pitching an idea, reporting market research, or sharing something else, a great presentation can give you a competitive advantage, and be a powerful tool when aiming to persuade, educate, or inspire others.
- Guy Kawasaki is the chief evangelist at Canva and was the former chief evangelist at Apple. Guy is the author of 16 books including Think Remarkable : 9 Paths to Transform Your Life and Make a Difference.
Partner Center
How to Design a Professional PowerPoint Presentation
Our series of tips on presentation design outlined some generic rules and ideas that you can live by to create better, more professional presentations. Today we want to follow that up by taking you through the actual process of designing a presentation from start to finish.
We’ll break down every step of the design process, from choosing colors and images to using whitespace properly. After reading through this you should be all set to design your own beautiful presentation slides that will put your coworkers to shame.
Using a pre-built PowerPoint template can be a good starting point for many people (we collected some of the best PowerPoint templates for you!). But if you’re wanting to design your own from start-to-finish, you’re in the right place!
2 Million+ PowerPoint Templates, Themes, Graphics + More
Download thousands of PowerPoint templates, and many other design elements, with a monthly Envato Elements membership. It starts at $16 per month, and gives you unlimited access to a growing library of over 2,000,000 presentation templates, fonts, photos, graphics, and more.

BeMind Minimal Template

Maximus Template

Minimal PPT Templates
Clean & clear.

Pitch PowerPoint

Ciri Template
Explore PowerPoint Templates
A Word About Content
I usually make a big deal about content preceding design, and presentations are no exception. Ideally, you’ll have the topic and much or all of the content outlined before you even think about design. This will in every way shape the appearance of your design, which is why working from pre-built templates isn’t always the best move (though generic templates can and do work great in some circumstances).
The reason that I bring this up is that I don’t really have an actual presentation in mind for this project. I’ll be running with a basic theme, but the textual information will be entirely placeholder copy. Your image, font, color and layout selection shouldn’t necessarily match mine but instead reflect the topic and content you’re working with.
Choosing A Color Scheme
Before I even open Photoshop (yes, I design PowerPoint/Keynote slides in Photoshop and drop them in), I want to find a color scheme on which to base my entire design. When I need to quickly find several colors that go together I usually start with Adobe Color CC . Not only is it a great way to build your own color schemes, it’s an outstanding source to find schemes built by others that you can just grab for your projects.
As luck would have it, I liked the very first color scheme I saw upon opening Color. This scheme was featured on the home page and looked like a great place to start for our presentation design.

Now, if you wanted to get everything exactly right, you could make a list of the RGB or Hex values, but I prefer a quicker, more direct route. What I usually do is snap a screenshot of the color scheme, paste it into my document and stretch it across the canvas on its own layer for easy access. This way I can quickly activate the layer, eyedropper the color I want, then hide the layer and get back to work. It’s a bit like having a palette of colors to dip your paintbrush in.
Designing Your Cover Slide
Now that we have a color scheme, the design work is going to be much simpler. One trick that designers often use in presentations is to leverage the color scheme as heavily as possible. If you’re new to design, you’ll likely think that this is too easy, too plain or even that it’s cheating somehow, but trust me, it’ll be much more attractive and professional than that horrid Microsoft clipart library you love so much.
To start, simply grab one of your colors from the scheme you chose and flood the background of your slide with it (I chose #631c25). Good job, there’s your background. Don’t freak out. It’ll look great. Now let’s throw in some typography.
Choosing a Font
Font choice is a major issue for non-designers. The tendency is to think that most fonts are “boring” and to look around for something exciting and fun. This inevitably leads to the use of Comic Sans or some other equally hideous font.

Unless you’re an elementary school teacher, your presentations should never look like this. Instead, why don’t you try one of those “boring” fonts to see if you can come up with something you like.
Combining fonts can be a tricky task and can take a trained eye to pull off. Fortunately, font designers have already created collections that work well together and if you’re not a designer, they make it easy to pull off great typography. The trick is to just stay in a family. Again, I know this sounds lame, but it works really well if you make sure the two styles you choose are very different.
For instance, I chose a Helvetica Bold Condensed and a Helvetica Light for my cover slide. Notice how different the fonts are from each other in terms of thickness. Choosing two styles that are relatively close causes visual confusion and should be avoided as a general rule of thumb. Instead, what you want is contrast and plenty of it.

Alignment and Layout
Notice a few things about the way I set up this slide. First, I used a strong left alignment for the text. As I say in just about every design article I write, center alignment should be a last resort, not a first. It tends to be the weakest text alignment that you can choose, having a hard edge increases readability considerably (notice that book pages aren’t center-aligned).
Also, notice the generous whitespace that I used. Remember that you don’t have to eat up every inch of space. Giving your text room to breathe helps your layout immensely and gives the design a clean look.
Adding an Image
At this point you might be wondering why you wasted your time reading so I could give you such plain advice. The truth is, most people that create presentations could improve them by 100% from following the advice above. However, I realize minimalism may be too extreme for some folks so let’s throw in an image to make it look nice.
Since our text is on the left, I wanted to find something a little heavy on the right. The general theme that I’ll go for is “City photos” assuming I had some sort of architecture or city-centric presentation to give. Again, you’ll have to choose iamges relevant to your own topic.
I grabbed this Flickr Creative Commons image from photographer Ben Spreng .

Now, if we just made this image our background, the text would become unreadable and we would be ditching our color scheme. What we’re going to do instead is set it on top of the colored slide and set our blending mode to Overlay. Then throw your opacity to around 45%.

As you can see, this helps the slide look much more interesting but keeps the text and colors fairly intact. It’s a simple solution that adds a lot of interest to an otherwise plain design.
Adding Content Slides
The cover may seem like it’s only a tiny part of the battle, but you’ve actually already set the tone for the entire presentation. You’ve got your theme, color scheme and fonts already in place. Now you just need to set up a few different layouts for your content.
The thing to keep in mind is to keep everything extremely simple, and that includes the level of content that you include. Apart from design, these are just good presentation tactics that you’ll learn in every public speaking class. Filling your slides with everything you’re going to say makes you unnecessary. You could just email everyone the slides and shut up.
Instead, the slides are merely meant to be a visual aid. Show a slide with your overall topic or main point, then speak the rest, without reading. Nothing is worse than watching a guy read his note cards word-for-word for thirty minutes, except perhaps watching a guy turn his back to the audience so he can actually read his slides out loud to you the whole time! You may laugh, but I’ve seen it happen folks.
For our first content slide, we’ll grab another Flickr photo and set it to the bottom portion of our slide at full bleed. Then we’ll set the top to another color from our scheme and toss in some text using the same exact formatting that we used on the cover.

See how this closely resembles the theme we’ve already established while still looking significantly different? This is they key to good presentation design: cohesiveness without redundancy.
Now for our third slide, we can simply do the inverse of the second slide with a new color and a new image .

Adding Informational Elements
It would be nice if every slide ever presented could work in a full bleed image, but the truth is that this simply isn’t practical. It will often be the case that you’re presenting graphical information or some other item that isn’t necessarily a photo.
My advice here is to try to stick as close to your theme as possible. For the slide below I flooded the entire background with a solid color from our original scheme and made a quick 3D graph with white columns (I drew a few flat boxes in Illustrator and applied a 3D effect).

As you can see, this slide is very information-focused and yet it doesn’t sacrifice the aesthetics and simplicity we’ve already established.
You’re All Set
From here you might come up with one or two more alternate slide designs and then rotate between them for the duration of your speech. The result is a presentation that is beautiful, very readable and highly professional. The bonus is that the simple, straightforward design will probably result in less work than a clip-art-filled horror show.
Most of the time, great design doesn’t mean being particularly artistic or knowing how to create amazing complex layouts. Instead, it’s about presenting information in an attractive and user-friendly way. With this goal in mind you realize that you’re probably trying way too hard if your end result is ugly. Try cutting out half or more of the elements on one of your slides and giving what’s left a strong left or right alignment with plenty of whitespace.
I hope this article has convinced you to abandon that clip art gallery once and for all. The benefits of clean, minimal design in presentations are clear: the information is easier to take in and the end result is more professional than the mess of information you typically see in presentation slides.
Of course, if you’re looking to get started quickly, flick through our collection of the best PowerPoint templates to find a beautiful set of pre-made designs!
Simon Sez IT
Online software training and video tutorials for Microsoft, Adobe & more
- Get Started
- Access 2021 Beginners
- Access 2021 Advanced
- Access 2019
- Access 2019 Advanced
- Access 2016
- Copilot Essentials in Microsoft Office
- Microsoft Excel 365 Intermediate
- Excel 365 for Beginners
- The Accountants Excel Toolkit
- Data Analytics in Excel
- Excel 2021 Advanced
- Microsoft 365
- PowerPoint 365 for Beginners
- Microsoft Word 365
- OneNote Desktop and Windows 10
- OneNote 2016
- Outlook 2021
- Outlook 2019
- Outlook 2016
- Outlook 2013
- Outlook 2010
- Introduction to Power Automate
- Power BI Essentials
- Power BI Training
- Power BI Intermediate
- PowerPoint 2021
- PowerPoint 2019
- PowerPoint 2016
- PowerPoint 2013
- Project 2021 Advanced
- Project 2021 Beginners
- Project for the Web
- Project 2019
- Project 2019 Advanced
- Microsoft Publisher 365
- Publisher 2013
- SharePoint Online: The Essential Guide (2023)
- SharePoint Online (2021)
- SharePoint Foundation 2013
- SharePoint Server 2013
- SharePoint Foundation 2010
- Microsoft Teams (2023 Update)
- Macros and VBA for Beginners
- VBA for Excel
- VBA Intermediate Training
- Microsoft Visio 2019
- Microsoft Visio 2010
- Windows 11 Advanced
- Windows 11 (2023 Update)
- Windows 10 (2020 Update)
- Word 2019 Advanced
- Dreamweaver CC
- Dreamweaver CS6
- Dreamweaver CS5
- Dreamweaver CS4
- Adobe Illustrator CC for Beginners
- Adobe InDesign CC for Beginners
- InDesign CS6
- InDesign CS5
- Adobe Photoshop CC Advanced
- Adobe Photoshop CC Intermediate
- Adobe Photoshop CC for Beginners
- Photoshop CS6
- Photoshop CS5
- Photoshop Elements 2022
- Photoshop Elements 2019
- Photoshop Elements 2018
- Photoshop Elements 15
- Photoshop Elements 14
- QuickBooks Desktop 2023
- QuickBooks Desktop Pro 2022
- QuickBooks Pro 2021
- QuickBooks Online Advanced
- QuickBooks Online
- AngularJS Crash Course
- Bootstrap Framework
- HTML/CSS Crash Course
- HTML5 Essentials
- Java for Beginners
- JavaScript for Beginners
- jQuery Crash Course
- MySQL for Beginners
- PHP for Beginners
- Advanced PHP Programming
- Matplotlib, Seaborn, and Plotly Python Libraries for Beginners
- Python Object-Oriented Programming
- Pandas for Beginners
- Introduction to Python
- SQL for Beginners
- SQL Server Integration Services for Beginners
- XML Crash Course
- Alteryx Advanced
- Introduction to Alteryx
- Introduction to Data Visualization and Business Intelligence Principles
- Analytical Methods for Effective Data Analysis
- Introduction to Analytics and Artificial Intelligence
- Financial Risk Management
- Financial Forecasting and Modeling
- Qlik Sense Advanced
- R Programming
- Tableau Desktop Advanced
- Tableau Desktop
- Advanced Agile Scrum
- Agile Scrum Training
- Using Generative AI for Images and Videos
- Generative AI and Cybersecurity
- Introduction to ChatGPT
- Artificial Intelligence Intermediate
- Asana for Employees and Managers
- Introduction to Asana
- Effective Communication Tactics for the Modern Workplace
- Introduction to Confluence
- HubSpot CRM for Beginners
- Introduction to Google Drive
- Gmail for Beginners and Pros
- Google Sheets for Beginners
- Getting Started in Jira
- Getting Started in Monday.com
- Cybersecurity Essentials: Stay Safe and Secure Online
- Cybersecurity Awareness Essentials
- Excel Efficiency and Data Management
- Excel Advanced Features and Customization
- Mastering PivotTables
- Microsoft Suite Productivity

Powerpoint Presentation Tips and Best Practices
(Note: S uitable for users of PowerPoint 2016, 2019, 2021, and PowerPoint for Microsoft 365 . )
Understand the dos and don’ts of effective PowerPoint design that adheres to best practice guidelines.
PowerPoint Presentation Tips and Design Explained
PowerPoint is a presentation application that helps us communicate our thoughts and ideas to an audience. It’s designed to assist the presenter, not to be a replacement for the presenter. However, simply ‘slapping’ together a few slides and adding some text and a couple of images doesn’t quite cut it in 2022.
PowerPoint has evolved in leaps and bounds over the last few years. No longer are we stuck with creating long, linear slide decks full of bulleted lists and text, inflicting ‘Death by PowerPoint’ on our audience.
Modern slide design tells a story. It allows the viewer to choose their own path through the presentation. We use animation sparingly and effectively. We think about color, font, and accessibility. We choose images over text and consider our audience before we begin our design.
The latest versions of PowerPoint (365, 2016, 2019, 2021) contain many new features to help us build a truly awesome PowerPoint presentation. However, the ‘rules’ with regard to effective design remain the same as ever. By knowing and employing a few basic best practice principles, we can create an attractive, modern presentation that communicates our message effectively.
1. What is the Goal?
2. know your audience, 3. create an outline, 4. decide on visuals.
- 5. Text. Less is More
6. Use Readable Fonts
7. be mindful of color, 8. design for wide screen, 9. be consistent with style.
- 10. Animation. Less is More
11. Consider Templates
12. end with action points.
Related reads:
How to Wrap Text in PowerPoint
How to Add a Watermark in PowerPoint
How to Add a Hyperlink to a PowerPoint
Best Practice Guidelines
Best Practice Guidelines give us a framework from which to work within. Much like a blueprint, we can follow these rules to ensure we are designing our slide deck in the best way for our audience.
Before we begin, it’s important to establish the goal of the presentation, as this will affect how we design our slides. What are we hoping to achieve? Is this a Sales pitch to a potential client? Are we trying to sell a product or service? Is this an internal presentation for our team? Work out what the goal is prior to creating slides.
For example, if this is a sales pitch to a potential client, it’s important to get to the relevant points quickly. Identify early where you see problems and then offer solutions. This helps get ‘buy-in’, and the client understands how we can benefit their organization. If we present data in charts, ensure the charts are simple to read and communicate key metrics important to that client.
It’s also worth thinking about how to end the presentation. Do we want our audience to take action on something? Do we want to encourage them to follow us on social media? Or maybe we need them to go to a website and register for a newsletter. Maybe we want them to think about certain key points and provide feedback at a later time. Remember to include clear calls to action.

Establishing who we are presenting to is vital. Different audiences will require different slide designs. For example, if we are presenting to a board of CEOs and stakeholders, we need to ensure the presentation is professional, business-like, focused on key metrics, and establishes our brand. Whereas, if we are putting together a presentation for our local tennis club, we can afford to be more relaxed with the design.
Our audience determines how we design a presentation. It affects the types of images we use, which fonts and colors we use, and the messaging we work into the slides.
The environment also plays a key role. Will they be in a meeting room viewing the presentation on a projector? Will they be sitting next to you at your desk? Will they be receiving an email copy of the presentation? Will the presentation be on large screens at an event? For example, if we present in a large auditorium, we must ensure that even the people at the back can see everything. We need to consider font size, font style, contrast, and the types of images we use.
NOTE : Many times, organizations will have their own PowerPoint template to use for all company presentations. Templates ensure that every presentation is consistent, uses branded colors, and contains items like the company logo. We should always ensure that we are working within our organization’s branding guidelines when designing.
Try and establish these three key factors:
- Who will be watching?
- What’s important to them?
- What’s the environment?

An outline is similar to a storyboard. We can plan out our slides ahead of time to establish flow, presentation length, and timings.
An outline can be something as simple as drawing out slides in a notepad and jotting down the key points to cover, or we can use PowerPoint to create a ‘wireframe’. A wireframe is simply a plan of how each slide will look and what content is to be included.
Establishing what needs to be included from the start means that we are less likely to forget to include important information, and we can plan our slide deck more effectively.
Visual elements are a huge part of PowerPoint. The phrase ‘a picture speaks 1000 words’ is true, with most people remembering infographics, charts, and other images over bulleted lists of text. It’s important to think about the types of visuals to include in the presentation ahead of time. Do we want to use photos? What about charts? Are we going to use icons? What about video?
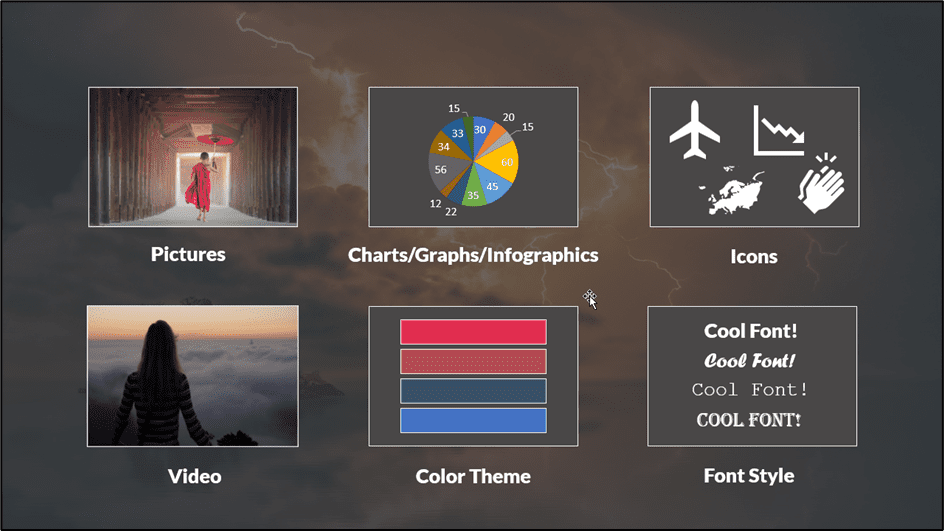
We can use multiple types of visual elements in our presentations, and we need to think about what will convey our message best. Also, think about the tone of the presentation and match any visual elements to that.
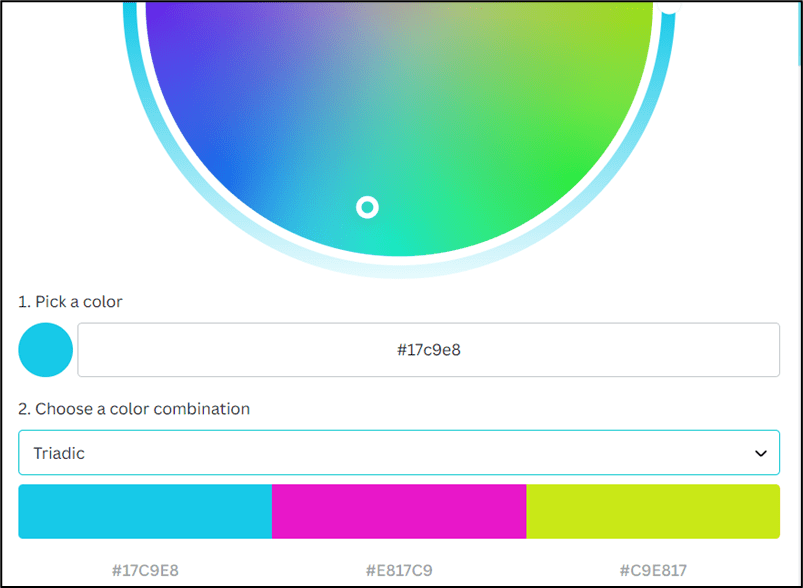
Color and font style are also very important. If company-branded colors do not restrict us, we need to think about the color palette of our presentation and ensure we use a selection of colors that complement one another.
If you struggle with color, the Canva Color Wheel is a great free tool for finding complementary colors based on a starting color.
5. Text. Less is More.
When it comes to text, less is definitely more. One mistake many presenters make is adding everything they want to say to the slide. Too much text renders the presenter redundant. PowerPoint is designed to be a presentation aid, not the entire presentation.
An audience should be focused on the presenter. Powerpoint can list some brief, key talking points, but the presenter should speak most of the information. If we have a ‘wall of words’ on a slide, it’s very difficult for the human brain to read and listen at the same time.
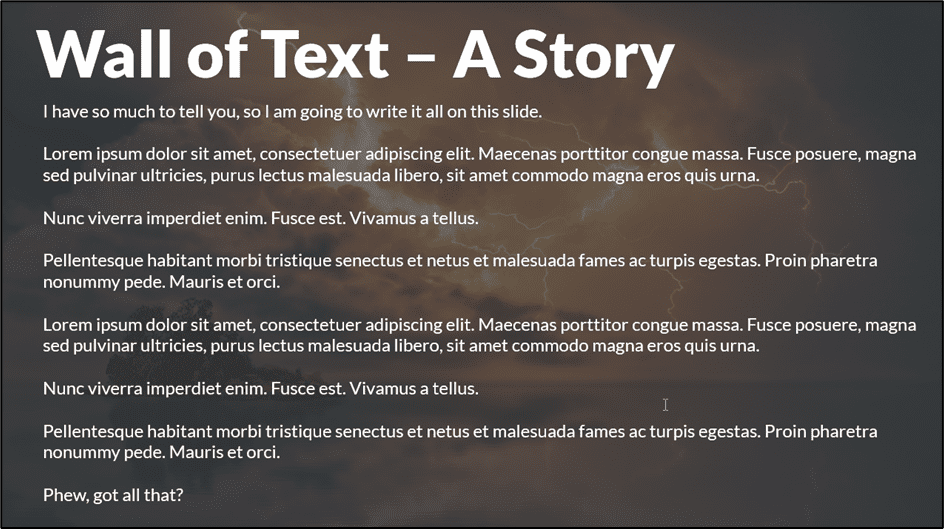
A good guide to stick to is ‘The Rule of 5/5/5’. No more than 5 words per line, no more than 5 lines per slide, and no more than 5 text-heavy slides in a row. Keep text to a minimum and break up text-based slides with images, charts, and other visuals.
Font selection is incredibly important, and not all fonts are created equally.
Over the years, I’ve seen many presentations ruined by crazy font choices. For business presentations, it’s best to stick to well-established, easy-to-read fonts: Arial, Tahoma, Calibri, Verdana, and Times New Roman are some of the most popular.
With that said, using the same font throughout the entire presentation can make our slide deck look a little stale and boring. Don’t be scared to use more than one font style, although try and stick to three or less. If we are going to use more than one font in the presentation, we should ensure that the fonts are from the same font family to keep things looking consistent and tied together.
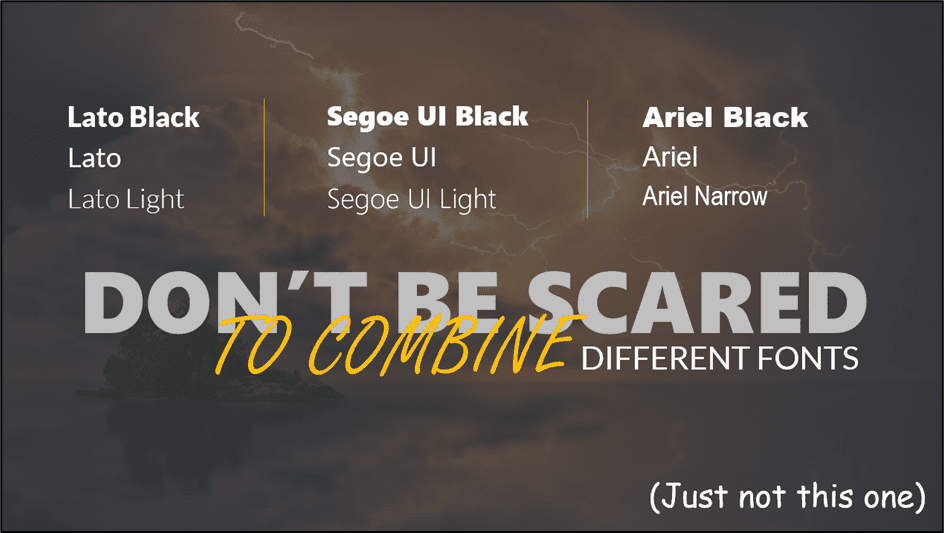
For example, we might use Lato font for the majority of the text in the presentation, Lato Black for the headings, and Lato Light for text boxes and sub-headings.
Stick to fonts that are easy to read even when the font size is relatively small.
A great website for finding complimentary font pairings is Fontjoy .
Suggested reads:
How to Change PowerPoint Slides to Portrait
How to Change Slide Size in PowerPoint
How to Save PowerPoint as Video
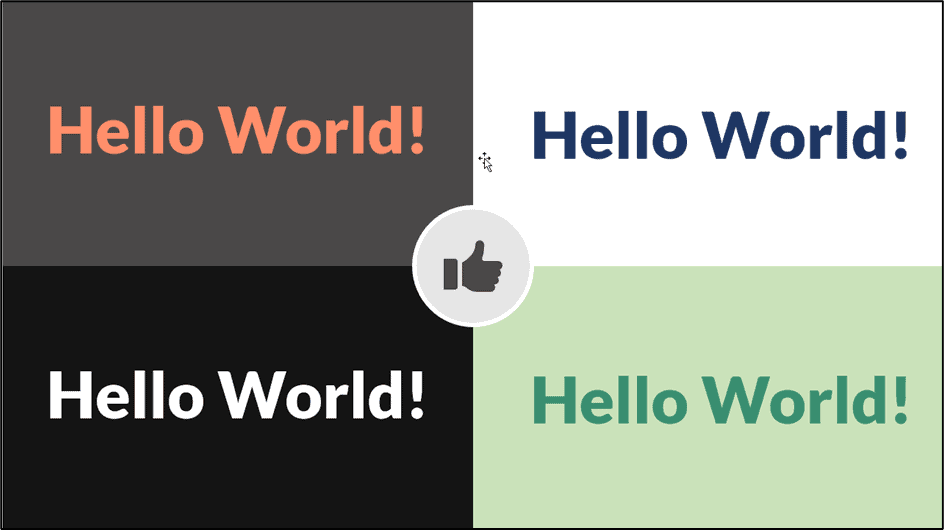
Color can make or break a presentation. Choose the wrong colors, and at best, the presentation will look unprofessional and, at worst, will give people a headache.
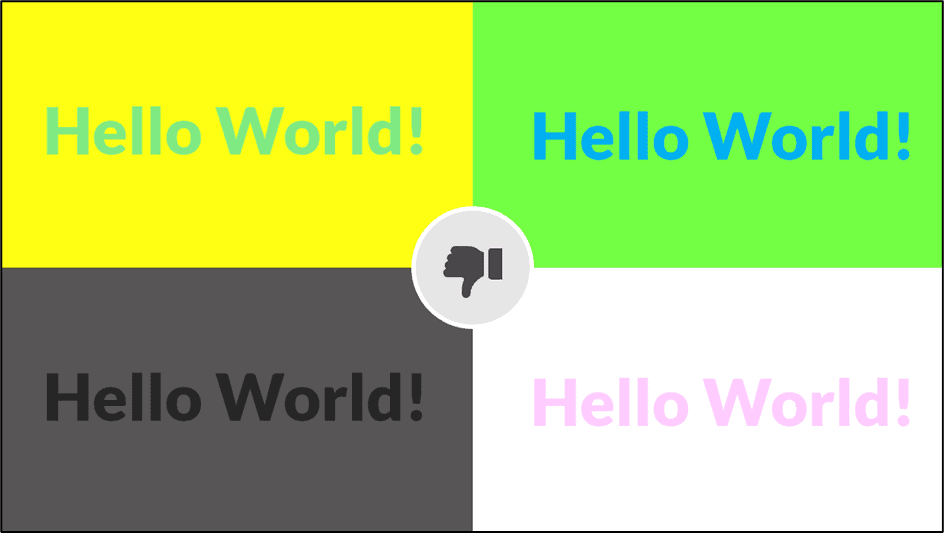
We need to think about our color choices carefully. Choose high-contrast colors like white text on a dark background or dark text on a light background.
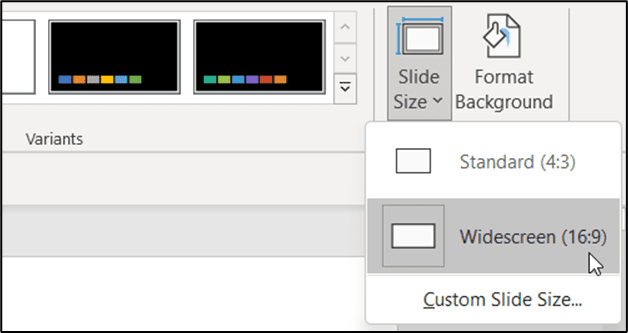
In PowerPoint 2021, we can choose between two slide sizes: Standard (4:3) and Widescreen (16:9).
Always design for widescreen! If we create a slide deck using the standard size and someone with a widescreen opens the presentation, PowerPoint needs to scale the presentation up, which can lead to problems, distortion, and misaligned objects. It’s much easier for PowerPoint to scale a presentation down.
- Click on the Design tab.
- From the Customize group, click Slide Size .
- Choose Widescreen from the menu.
It’s important that all slides in a deck look like they are part of that presentation. They should have a consistent look and feel. One of the best ways of tying slides together is to use color.
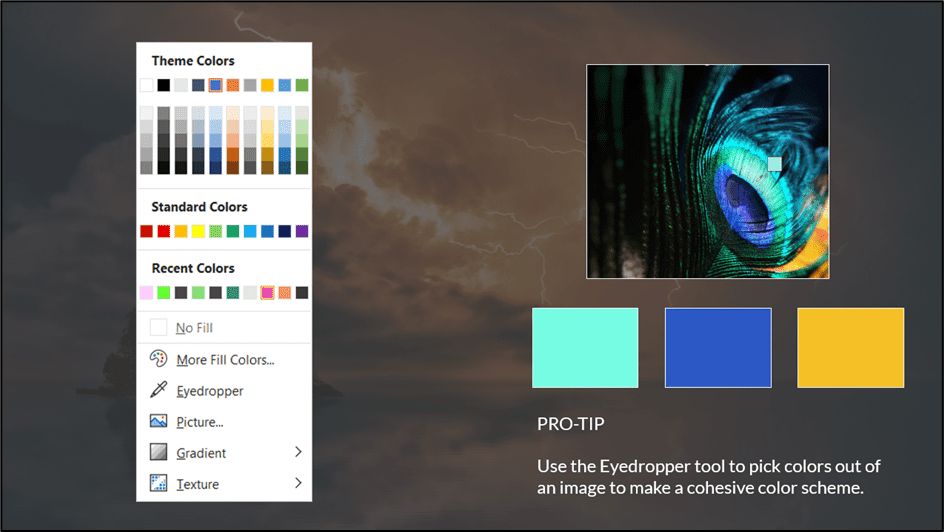
Choose a color palette of complementary colors and use them consistently throughout the presentation. Sticking to just a few colors prevents the presentation from looking like a rainbow.
In PowerPoint 2021, we have a great utility called ‘Eyedropper’, which helps us copy colors from one object to the next, ensuring that we are picking the exact same color every single time. If we have an image on our slide, we could use the eyedropper tool to pick a specific color from the image and then use that color to fill another shape or icon.
We could even use the colors in an image to help build our own color palette.
10. Animation. Less is More.
Much like text, when it comes to animation, less is more.
How many presentations have you seen where the author has been a bit too enthusiastic with their animation effects? Text boxes fly in from the top, bullet points spin in from the left, and images pulsing in different colors. It’s enough to make anyone go crazy.
Animation when used correctly can really elevate a presentation and emphasize important points. Animation can also make our presentation look slick and modern. The key point here is ‘when used correctly’. The animation should enhance and not distract.
The rule here is to try and stick to less than three different animation effects in the presentation. Subtle animation tends to work better than something more dynamic and ‘in your face’.
For example, if we have a list of bullet points and we want to speak about the first one before the next one is visible to the audience, we might add a ‘fade in’ animation to the bullets. The second bullet point will subtly fade in and won’t give anyone in the audience a seizure.
Templates give us a head start when creating a PowerPoint presentation. Instead of staring at a blank presentation, not knowing where to start, we could choose a template from PowerPoint’s template gallery and have a lot of the hard work done for us.
PowerPoint 2021 has hundreds of in-built templates available to use for free. All templates are divided into categories, and if we are looking for something specific, we can use the search bar.
- Click on the File tab.
- Click on New .
- In the templates section, type the search term into the search bar.
PowerPoint templates include pre-made slides, images, shapes, sample text, colors, fonts, and effects. Every element of the template can be customized to use your own colors and images.
If we can’t find a template that suits our needs, there are many websites that offer free and paid PowerPoint templates for download.
For free templates, check out Slides Carnival
For beautiful, high-quality paid templates, check out Envato Elements.
We always want to make sure we end our presentations on a high. Leave the audience with action points or a task to complete.
For example, we might want our audience to provide feedback or get their opinion on the topic discussed. Or maybe we need them to complete a survey. Maybe we want to get them to follow us on social media, or we want them to complete an exercise. Whatever the action points, provide all the details at the end.
Sometimes, it’s worth mentioning at the beginning of the presentation that there will be some calls to action at the end. This can prevent people from zoning out or not paying attention if they know they will be required to do something at the end.
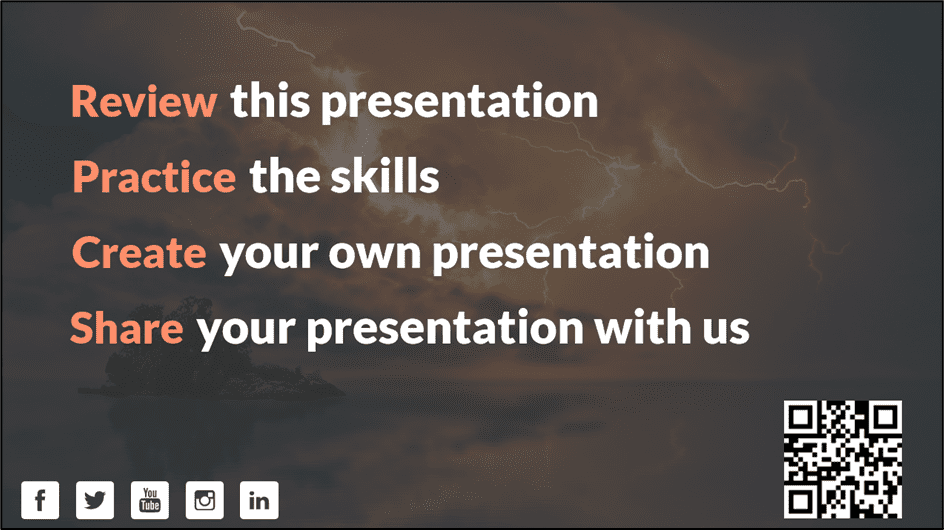
If we want to direct the audience to a specific website, we can utilize the QR Code add-in for PowerPoint 2021 so they can scan it with their phone.
How to Make a Flowchart in PowerPoint
How to Link Excel to PowerPoint
How to Add Slide Numbers in PowerPoint
Please visit our free resources center for more high-quality PowerPoint and Microsoft Suite application guides.
Ready to dive deep into PowerPoint? Click here for basic to advanced PowerPoint courses with in-depth training modules.
Simon Sez IT has been teaching PowerPoint and other business software for over ten years. You can access 160+ IT training courses for a low monthly fee.

Deborah Ashby

Deborah Ashby is a TAP Accredited IT Trainer, specializing in the design, delivery, and facilitation of Microsoft courses both online and in the classroom.She has over 11 years of IT Training Experience and 24 years in the IT Industry. To date, she's trained over 10,000 people in the UK and overseas at companies such as HMRC, the Metropolitan Police, Parliament, SKY, Microsoft, Kew Gardens, Norton Rose Fulbright LLP.She's a qualified MOS Master for 2010, 2013, and 2016 editions of Microsoft Office and is COLF and TAP Accredited and a member of The British Learning Institute.
Similar Posts
How to Count Unique Values in Excel? 3 Easy Ways to Count Unique and Distinct Values
The Most Used Microsoft Word Shortcuts – Download
How to Use the Basic Selection and Marquees Tools in Photoshop Elements 15
Formatting Objects in PowerPoint 2016 Part 2
Getting Started with Power Pivot: Advanced Excel
How to Create Jira Advanced Roadmaps? [2022]
- Privacy Policy

ADVANCE YOUR CAREER
Gain instant access to 200+ courses. Earn a CERTIFICATE each time you complete a course.

- Get started with computers
- Learn Microsoft Office
- Apply for a job
- Improve my work skills
- Design nice-looking docs
- Getting Started
- Smartphones & Tablets
- Typing Tutorial
- Online Learning
- Basic Internet Skills
- Online Safety
- Social Media
- Zoom Basics
- Google Docs
- Google Sheets
- Career Planning
- Resume Writing
- Cover Letters
- Job Search and Networking
- Business Communication
- Entrepreneurship 101
- Careers without College
- Job Hunt for Today
- 3D Printing
- Freelancing 101
- Personal Finance
- Sharing Economy
- Decision-Making
- Graphic Design
- Photography
- Image Editing
- Learning WordPress
- Language Learning
- Critical Thinking
- For Educators
- Translations
- Staff Picks
- English expand_more expand_less
PowerPoint Tips - Simple Rules for Better PowerPoint Presentations
Powerpoint tips -, simple rules for better powerpoint presentations, powerpoint tips simple rules for better powerpoint presentations.

PowerPoint Tips: Simple Rules for Better PowerPoint Presentations
Lesson 17: simple rules for better powerpoint presentations.
/en/powerpoint-tips/embed-excel-charts-in-a-slide/content/
Simple rules for better PowerPoint presentations
Have you ever given a PowerPoint presentation and noticed that something about it just seemed a little … off? If you’re unfamiliar with basic PowerPoint design principles, it can be difficult to create a slide show that presents your information in the best light.
Poorly designed presentations can leave an audience feeling confused, bored, and even irritated. Review these tips to make your next presentation more engaging.
Don't read your presentation straight from the slides
If your audience can both read and hear, it’s a waste of time for you to simply read your slides aloud. Your audience will zone out and stop listening to what you’re saying, which means they won’t hear any extra information you include.
Instead of typing out your entire presentation, include only main ideas, keywords, and talking points in your slide show text. Engage your audience by sharing the details out loud.
Follow the 5/5/5 rule
To keep your audience from feeling overwhelmed, you should keep the text on each slide short and to the point. Some experts suggest using the 5/5/5 rule : no more than five words per line of text, five lines of text per slide, or five text-heavy slides in a row.

Don't forget your audience
Who will be watching your presentation? The same goofy effects and funny clip art that would entertain a classroom full of middle-school students might make you look unprofessional in front of business colleagues and clients.
Humor can lighten up a presentation, but if you use it inappropriately your audience might think you don’t know what you’re doing. Know your audience, and tailor your presentation to their tastes and expectations.
Choose readable colors and fonts
Your text should be easy to read and pleasant to look at. Large, simple fonts and theme colors are always your best bet. The best fonts and colors can vary depending on your presentation setting. Presenting in a large room? Make your text larger than usual so people in the back can read it. Presenting with the lights on? Dark text on a light background is your best bet for visibility.

Don't overload your presentation with animations
As anyone who’s sat through a presentation while every letter of every paragraph zoomed across the screen can tell you, being inundated with complicated animations and exciting slide transitions can become irritating.
Before including effects like this in your presentation, ask yourself: Would this moment in the presentation be equally strong without an added effect? Does it unnecessarily delay information? If the answer to either question is yes—or even maybe—leave out the effect.
Use animations sparingly to enhance your presentation
Don’t take the last tip to mean you should avoid animations and other effects entirely. When used sparingly, subtle effects and animations can add to your presentation. For example, having bullet points appear as you address them rather than before can help keep your audience’s attention.
Keep these tips in mind the next time you create a presentation—your audience will thank you. For more detailed information on creating a PowerPoint presentation, visit our Office tutorials .
/en/powerpoint-tips/three-tips-for-beautiful-powerpoint-presentations/content/

An official website of the United States government
The .gov means it’s official. Federal government websites often end in .gov or .mil. Before sharing sensitive information, make sure you’re on a federal government site.
The site is secure. The https:// ensures that you are connecting to the official website and that any information you provide is encrypted and transmitted securely.
- Publications
- Account settings
Preview improvements coming to the PMC website in October 2024. Learn More or Try it out now .
- Advanced Search
- Journal List
- PLoS Comput Biol
- v.17(12); 2021 Dec
Ten simple rules for effective presentation slides
Kristen m. naegle.
Biomedical Engineering and the Center for Public Health Genomics, University of Virginia, Charlottesville, Virginia, United States of America
Introduction
The “presentation slide” is the building block of all academic presentations, whether they are journal clubs, thesis committee meetings, short conference talks, or hour-long seminars. A slide is a single page projected on a screen, usually built on the premise of a title, body, and figures or tables and includes both what is shown and what is spoken about that slide. Multiple slides are strung together to tell the larger story of the presentation. While there have been excellent 10 simple rules on giving entire presentations [ 1 , 2 ], there was an absence in the fine details of how to design a slide for optimal effect—such as the design elements that allow slides to convey meaningful information, to keep the audience engaged and informed, and to deliver the information intended and in the time frame allowed. As all research presentations seek to teach, effective slide design borrows from the same principles as effective teaching, including the consideration of cognitive processing your audience is relying on to organize, process, and retain information. This is written for anyone who needs to prepare slides from any length scale and for most purposes of conveying research to broad audiences. The rules are broken into 3 primary areas. Rules 1 to 5 are about optimizing the scope of each slide. Rules 6 to 8 are about principles around designing elements of the slide. Rules 9 to 10 are about preparing for your presentation, with the slides as the central focus of that preparation.
Rule 1: Include only one idea per slide
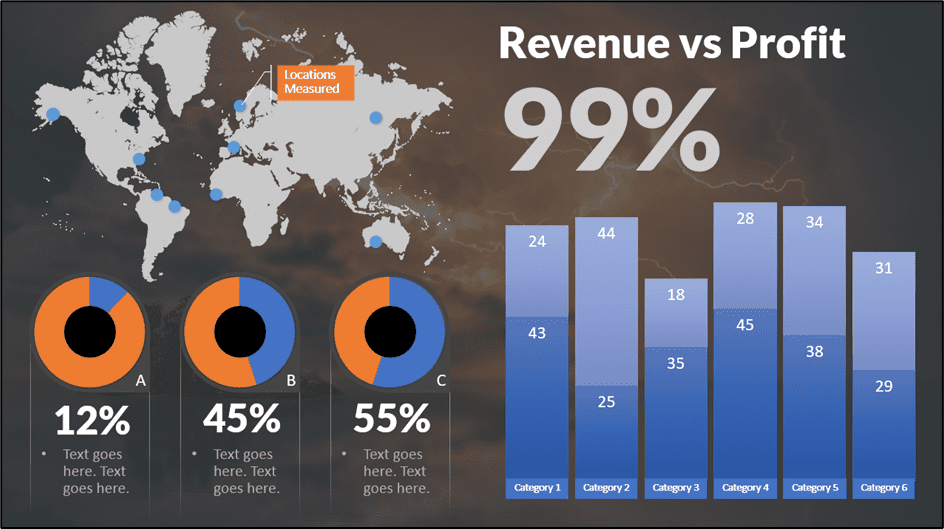
Each slide should have one central objective to deliver—the main idea or question [ 3 – 5 ]. Often, this means breaking complex ideas down into manageable pieces (see Fig 1 , where “background” information has been split into 2 key concepts). In another example, if you are presenting a complex computational approach in a large flow diagram, introduce it in smaller units, building it up until you finish with the entire diagram. The progressive buildup of complex information means that audiences are prepared to understand the whole picture, once you have dedicated time to each of the parts. You can accomplish the buildup of components in several ways—for example, using presentation software to cover/uncover information. Personally, I choose to create separate slides for each piece of information content I introduce—where the final slide has the entire diagram, and I use cropping or a cover on duplicated slides that come before to hide what I’m not yet ready to include. I use this method in order to ensure that each slide in my deck truly presents one specific idea (the new content) and the amount of the new information on that slide can be described in 1 minute (Rule 2), but it comes with the trade-off—a change to the format of one of the slides in the series often means changes to all slides.

Top left: A background slide that describes the background material on a project from my lab. The slide was created using a PowerPoint Design Template, which had to be modified to increase default text sizes for this figure (i.e., the default text sizes are even worse than shown here). Bottom row: The 2 new slides that break up the content into 2 explicit ideas about the background, using a central graphic. In the first slide, the graphic is an explicit example of the SH2 domain of PI3-kinase interacting with a phosphorylation site (Y754) on the PDGFR to describe the important details of what an SH2 domain and phosphotyrosine ligand are and how they interact. I use that same graphic in the second slide to generalize all binding events and include redundant text to drive home the central message (a lot of possible interactions might occur in the human proteome, more than we can currently measure). Top right highlights which rules were used to move from the original slide to the new slide. Specific changes as highlighted by Rule 7 include increasing contrast by changing the background color, increasing font size, changing to sans serif fonts, and removing all capital text and underlining (using bold to draw attention). PDGFR, platelet-derived growth factor receptor.
Rule 2: Spend only 1 minute per slide
When you present your slide in the talk, it should take 1 minute or less to discuss. This rule is really helpful for planning purposes—a 20-minute presentation should have somewhere around 20 slides. Also, frequently giving your audience new information to feast on helps keep them engaged. During practice, if you find yourself spending more than a minute on a slide, there’s too much for that one slide—it’s time to break up the content into multiple slides or even remove information that is not wholly central to the story you are trying to tell. Reduce, reduce, reduce, until you get to a single message, clearly described, which takes less than 1 minute to present.
Rule 3: Make use of your heading
When each slide conveys only one message, use the heading of that slide to write exactly the message you are trying to deliver. Instead of titling the slide “Results,” try “CTNND1 is central to metastasis” or “False-positive rates are highly sample specific.” Use this landmark signpost to ensure that all the content on that slide is related exactly to the heading and only the heading. Think of the slide heading as the introductory or concluding sentence of a paragraph and the slide content the rest of the paragraph that supports the main point of the paragraph. An audience member should be able to follow along with you in the “paragraph” and come to the same conclusion sentence as your header at the end of the slide.
Rule 4: Include only essential points
While you are speaking, audience members’ eyes and minds will be wandering over your slide. If you have a comment, detail, or figure on a slide, have a plan to explicitly identify and talk about it. If you don’t think it’s important enough to spend time on, then don’t have it on your slide. This is especially important when faculty are present. I often tell students that thesis committee members are like cats: If you put a shiny bauble in front of them, they’ll go after it. Be sure to only put the shiny baubles on slides that you want them to focus on. Putting together a thesis meeting for only faculty is really an exercise in herding cats (if you have cats, you know this is no easy feat). Clear and concise slide design will go a long way in helping you corral those easily distracted faculty members.
Rule 5: Give credit, where credit is due
An exception to Rule 4 is to include proper citations or references to work on your slide. When adding citations, names of other researchers, or other types of credit, use a consistent style and method for adding this information to your slides. Your audience will then be able to easily partition this information from the other content. A common mistake people make is to think “I’ll add that reference later,” but I highly recommend you put the proper reference on the slide at the time you make it, before you forget where it came from. Finally, in certain kinds of presentations, credits can make it clear who did the work. For the faculty members heading labs, it is an effective way to connect your audience with the personnel in the lab who did the work, which is a great career booster for that person. For graduate students, it is an effective way to delineate your contribution to the work, especially in meetings where the goal is to establish your credentials for meeting the rigors of a PhD checkpoint.
Rule 6: Use graphics effectively
As a rule, you should almost never have slides that only contain text. Build your slides around good visualizations. It is a visual presentation after all, and as they say, a picture is worth a thousand words. However, on the flip side, don’t muddy the point of the slide by putting too many complex graphics on a single slide. A multipanel figure that you might include in a manuscript should often be broken into 1 panel per slide (see Rule 1 ). One way to ensure that you use the graphics effectively is to make a point to introduce the figure and its elements to the audience verbally, especially for data figures. For example, you might say the following: “This graph here shows the measured false-positive rate for an experiment and each point is a replicate of the experiment, the graph demonstrates …” If you have put too much on one slide to present in 1 minute (see Rule 2 ), then the complexity or number of the visualizations is too much for just one slide.
Rule 7: Design to avoid cognitive overload
The type of slide elements, the number of them, and how you present them all impact the ability for the audience to intake, organize, and remember the content. For example, a frequent mistake in slide design is to include full sentences, but reading and verbal processing use the same cognitive channels—therefore, an audience member can either read the slide, listen to you, or do some part of both (each poorly), as a result of cognitive overload [ 4 ]. The visual channel is separate, allowing images/videos to be processed with auditory information without cognitive overload [ 6 ] (Rule 6). As presentations are an exercise in listening, and not reading, do what you can to optimize the ability of the audience to listen. Use words sparingly as “guide posts” to you and the audience about major points of the slide. In fact, you can add short text fragments, redundant with the verbal component of the presentation, which has been shown to improve retention [ 7 ] (see Fig 1 for an example of redundant text that avoids cognitive overload). Be careful in the selection of a slide template to minimize accidentally adding elements that the audience must process, but are unimportant. David JP Phillips argues (and effectively demonstrates in his TEDx talk [ 5 ]) that the human brain can easily interpret 6 elements and more than that requires a 500% increase in human cognition load—so keep the total number of elements on the slide to 6 or less. Finally, in addition to the use of short text, white space, and the effective use of graphics/images, you can improve ease of cognitive processing further by considering color choices and font type and size. Here are a few suggestions for improving the experience for your audience, highlighting the importance of these elements for some specific groups:
- Use high contrast colors and simple backgrounds with low to no color—for persons with dyslexia or visual impairment.
- Use sans serif fonts and large font sizes (including figure legends), avoid italics, underlining (use bold font instead for emphasis), and all capital letters—for persons with dyslexia or visual impairment [ 8 ].
- Use color combinations and palettes that can be understood by those with different forms of color blindness [ 9 ]. There are excellent tools available to identify colors to use and ways to simulate your presentation or figures as they might be seen by a person with color blindness (easily found by a web search).
- In this increasing world of virtual presentation tools, consider practicing your talk with a closed captioning system capture your words. Use this to identify how to improve your speaking pace, volume, and annunciation to improve understanding by all members of your audience, but especially those with a hearing impairment.
Rule 8: Design the slide so that a distracted person gets the main takeaway
It is very difficult to stay focused on a presentation, especially if it is long or if it is part of a longer series of talks at a conference. Audience members may get distracted by an important email, or they may start dreaming of lunch. So, it’s important to look at your slide and ask “If they heard nothing I said, will they understand the key concept of this slide?” The other rules are set up to help with this, including clarity of the single point of the slide (Rule 1), titling it with a major conclusion (Rule 3), and the use of figures (Rule 6) and short text redundant to your verbal description (Rule 7). However, with each slide, step back and ask whether its main conclusion is conveyed, even if someone didn’t hear your accompanying dialog. Importantly, ask if the information on the slide is at the right level of abstraction. For example, do you have too many details about the experiment, which hides the conclusion of the experiment (i.e., breaking Rule 1)? If you are worried about not having enough details, keep a slide at the end of your slide deck (after your conclusions and acknowledgments) with the more detailed information that you can refer to during a question and answer period.
Rule 9: Iteratively improve slide design through practice
Well-designed slides that follow the first 8 rules are intended to help you deliver the message you intend and in the amount of time you intend to deliver it in. The best way to ensure that you nailed slide design for your presentation is to practice, typically a lot. The most important aspects of practicing a new presentation, with an eye toward slide design, are the following 2 key points: (1) practice to ensure that you hit, each time through, the most important points (for example, the text guide posts you left yourself and the title of the slide); and (2) practice to ensure that as you conclude the end of one slide, it leads directly to the next slide. Slide transitions, what you say as you end one slide and begin the next, are important to keeping the flow of the “story.” Practice is when I discover that the order of my presentation is poor or that I left myself too few guideposts to remember what was coming next. Additionally, during practice, the most frequent things I have to improve relate to Rule 2 (the slide takes too long to present, usually because I broke Rule 1, and I’m delivering too much information for one slide), Rule 4 (I have a nonessential detail on the slide), and Rule 5 (I forgot to give a key reference). The very best type of practice is in front of an audience (for example, your lab or peers), where, with fresh perspectives, they can help you identify places for improving slide content, design, and connections across the entirety of your talk.
Rule 10: Design to mitigate the impact of technical disasters
The real presentation almost never goes as we planned in our heads or during our practice. Maybe the speaker before you went over time and now you need to adjust. Maybe the computer the organizer is having you use won’t show your video. Maybe your internet is poor on the day you are giving a virtual presentation at a conference. Technical problems are routinely part of the practice of sharing your work through presentations. Hence, you can design your slides to limit the impact certain kinds of technical disasters create and also prepare alternate approaches. Here are just a few examples of the preparation you can do that will take you a long way toward avoiding a complete fiasco:
- Save your presentation as a PDF—if the version of Keynote or PowerPoint on a host computer cause issues, you still have a functional copy that has a higher guarantee of compatibility.
- In using videos, create a backup slide with screen shots of key results. For example, if I have a video of cell migration, I’ll be sure to have a copy of the start and end of the video, in case the video doesn’t play. Even if the video worked, you can pause on this backup slide and take the time to highlight the key results in words if someone could not see or understand the video.
- Avoid animations, such as figures or text that flash/fly-in/etc. Surveys suggest that no one likes movement in presentations [ 3 , 4 ]. There is likely a cognitive underpinning to the almost universal distaste of pointless animations that relates to the idea proposed by Kosslyn and colleagues that animations are salient perceptual units that captures direct attention [ 4 ]. Although perceptual salience can be used to draw attention to and improve retention of specific points, if you use this approach for unnecessary/unimportant things (like animation of your bullet point text, fly-ins of figures, etc.), then you will distract your audience from the important content. Finally, animations cause additional processing burdens for people with visual impairments [ 10 ] and create opportunities for technical disasters if the software on the host system is not compatible with your planned animation.
Conclusions
These rules are just a start in creating more engaging presentations that increase audience retention of your material. However, there are wonderful resources on continuing on the journey of becoming an amazing public speaker, which includes understanding the psychology and neuroscience behind human perception and learning. For example, as highlighted in Rule 7, David JP Phillips has a wonderful TEDx talk on the subject [ 5 ], and “PowerPoint presentation flaws and failures: A psychological analysis,” by Kosslyn and colleagues is deeply detailed about a number of aspects of human cognition and presentation style [ 4 ]. There are many books on the topic, including the popular “Presentation Zen” by Garr Reynolds [ 11 ]. Finally, although briefly touched on here, the visualization of data is an entire topic of its own that is worth perfecting for both written and oral presentations of work, with fantastic resources like Edward Tufte’s “The Visual Display of Quantitative Information” [ 12 ] or the article “Visualization of Biomedical Data” by O’Donoghue and colleagues [ 13 ].
Acknowledgments
I would like to thank the countless presenters, colleagues, students, and mentors from which I have learned a great deal from on effective presentations. Also, a thank you to the wonderful resources published by organizations on how to increase inclusivity. A special thanks to Dr. Jason Papin and Dr. Michael Guertin on early feedback of this editorial.
Funding Statement
The author received no specific funding for this work.
A step-by-step guide to captivating PowerPoint presentation design
november 20, 2023
by Corporate PowerPoint Girl
Do you often find yourself stuck with a lackluster PowerPoint presentation, desperately seeking ways to make it more engaging and visually appealing? If your boss has ever told you to "please fix" a presentation and you didn't know where to start, you're not alone. In this article, we'll walk you through a straightforward method to transform your PowerPoint slides into a visually captivating masterpiece.
Let's dive right in!
Clean up your slides
The first step in this journey to presentation excellence is all about decluttering your slides and elevating their impact. Say goodbye to those uninspiring bullet points that often dominate presentations. Instead, focus on what truly matters – the key call-out numbers. By increasing the font size of these numbers, you ensure they take center stage, immediately drawing your audience's attention.
To make those numbers pop, consider breaking the text after the numbers into the next line and adding a touch of color. The contrast created by pairing a dark color with a lighter shade, like dark teal and light teal or burnt orange with peach, can work wonders. This simple adjustment makes your data more engaging , enhancing the overall impact of your presentation.
Add dimension with boxes
Now, let's introduce an element of depth and organization to your slides. By adding boxes, you'll create a visually pleasing structure that guides your audience through the content. In the "Insert" menu, select "Table" and opt for a one-by-one table. Change the table color to a light gray shade, elongate it, and position it neatly to the left of your text.
To improve readability and aesthetics, increase the spacing between text phrases. A small adjustment in the before spacing setting (setting it to 48) significantly enhances the visual appeal of your slides.
Insert circles
To further enhance the visual appeal and engagement of your slides, let's introduce circles. In the Insert menu, navigate to Shapes and choose the circle. Adjust the circle's height and width to 1.2, ensuring it complements your content seamlessly. Match the circle's shape fill color with the corresponding text color for a harmonious look.
Avoid using colored outlines for the circles, as they may distract from the overall aesthetic. This simple addition of circles adds an element of visual interest to your presentation, making it more captivating.
Choose icons
Now, it's time for a touch of creativity. Selecting icons to complement your text can elevate the clarity and appeal of your slides. In the "Insert" menu, you can search for relevant keywords to find the perfect icon from PowerPoint's extensive library .
For instance, if your text discusses investment portfolio yield, search for "growth" and choose an upward arrow growth icon. These icons add an extra layer of visual appeal and clarity to your content, making it more engaging and informative.
Final touches
To wrap up the transformation process, we come to the final touches that give your presentation a polished, professional finish. Align your icons with their corresponding circles and change the shape fill color to white. This simple adjustment creates a crisp, cohesive look that ties everything together seamlessly.
In conclusion, by following these steps, you've embarked on a journey to enhance your PowerPoint presentation . These initial steps are just the beginning of your exploration into the world of design elements and styles that can cater to your specific presentation needs. The key to a stunning PowerPoint presentation lies in the details. By following these steps, you can turn a lackluster set of slides into a visually engaging and dynamic presentation that will captivate your audience. So, the next time your boss says, "Please fix," you'll know exactly where to start. Happy presenting!
Related topics
Center for Teaching
Making better powerpoint presentations.
Print Version
Baddeley and Hitch’s model of working memory.
Research about student preferences for powerpoint, resources for making better powerpoint presentations, bibliography.
We have all experienced the pain of a bad PowerPoint presentation. And even though we promise ourselves never to make the same mistakes, we can still fall prey to common design pitfalls. The good news is that your PowerPoint presentation doesn’t have to be ordinary. By keeping in mind a few guidelines, your classroom presentations can stand above the crowd!
“It is easy to dismiss design – to relegate it to mere ornament, the prettifying of places and objects to disguise their banality. But that is a serious misunderstanding of what design is and why it matters.” Daniel Pink
One framework that can be useful when making design decisions about your PowerPoint slide design is Baddeley and Hitch’s model of working memory .
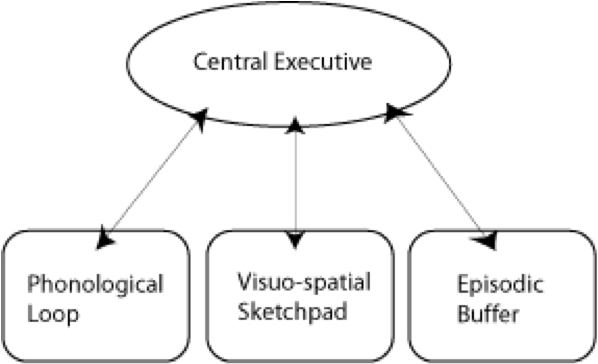
As illustrated in the diagram above, the Central Executive coordinates the work of three systems by organizing the information we hear, see, and store into working memory.
The Phonological Loop deals with any auditory information. Students in a classroom are potentially listening to a variety of things: the instructor, questions from their peers, sound effects or audio from the PowerPoint presentation, and their own “inner voice.”
The Visuo-Spatial Sketchpad deals with information we see. This involves such aspects as form, color, size, space between objects, and their movement. For students this would include: the size and color of fonts, the relationship between images and text on the screen, the motion path of text animation and slide transitions, as well as any hand gestures, facial expressions, or classroom demonstrations made by the instructor.
The Episodic Buffer integrates the information across these sensory domains and communicates with long-term memory. All of these elements are being deposited into a holding tank called the “episodic buffer.” This buffer has a limited capacity and can become “overloaded” thereby, setting limits on how much information students can take in at once.
Laura Edelman and Kathleen Harring from Muhlenberg College , Allentown, Pennsylvania have developed an approach to PowerPoint design using Baddeley and Hitch’s model. During the course of their work, they conducted a survey of students at the college asking what they liked and didn’t like about their professor’s PowerPoint presentations. They discovered the following:
Characteristics students don’t like about professors’ PowerPoint slides
- Too many words on a slide
- Movement (slide transitions or word animations)
- Templates with too many colors
Characteristics students like like about professors’ PowerPoint slides
- Graphs increase understanding of content
- Bulleted lists help them organize ideas
- PowerPoint can help to structure lectures
- Verbal explanations of pictures/graphs help more than written clarifications
According to Edelman and Harring, some conclusions from the research at Muhlenberg are that students learn more when:
- material is presented in short phrases rather than full paragraphs.
- the professor talks about the information on the slide rather than having students read it on their own.
- relevant pictures are used. Irrelevant pictures decrease learning compared to PowerPoint slides with no picture
- they take notes (if the professor is not talking). But if the professor is lecturing, note-taking and listening decreased learning.
- they are given the PowerPoint slides before the class.
Advice from Edelman and Harring on leveraging the working memory with PowerPoint:
- Leverage the working memory by dividing the information between the visual and auditory modality. Doing this reduces the likelihood of one system becoming overloaded. For instance, spoken words with pictures are better than pictures with text, as integrating an image and narration takes less cognitive effort than integrating an image and text.
- Minimize the opportunity for distraction by removing any irrelevant material such as music, sound effects, animations, and background images.
- Use simple cues to direct learners to important points or content. Using text size, bolding, italics, or placing content in a highlighted or shaded text box is all that is required to convey the significance of key ideas in your presentation.
- Don’t put every word you intend to speak on your PowerPoint slide. Instead, keep information displayed in short chunks that are easily read and comprehended.
- One of the mostly widely accessed websites about PowerPoint design is Garr Reynolds’ blog, Presentation Zen . In his blog entry: “ What is Good PowerPoint Design? ” Reynolds explains how to keep the slide design simple, yet not simplistic, and includes a few slide examples that he has ‘made-over’ to demonstrate how to improve its readability and effectiveness. He also includes sample slides from his own presentation about PowerPoint slide design.
- Another presentation guru, David Paradi, author of “ The Visual Slide Revolution: Transforming Overloaded Text Slides into Persuasive Presentations ” maintains a video podcast series called “ Think Outside the Slide ” where he also demonstrates PowerPoint slide makeovers. Examples on this site are typically from the corporate perspective, but the process by which content decisions are made is still relevant for higher education. Paradi has also developed a five step method, called KWICK , that can be used as a simple guide when designing PowerPoint presentations.
- In the video clip below, Comedian Don McMillan talks about some of the common misuses of PowerPoint in his routine called “Life After Death by PowerPoint.”
- This article from The Chronicle of Higher Education highlights a blog moderated by Microsoft’s Doug Thomas that compiles practical PowerPoint advice gathered from presentation masters like Seth Godin , Guy Kawasaki , and Garr Reynolds .
Presenting to Win: The Art of Telling Your Story , by Jerry Weissman, Prentice Hall, 2006
Presentation Zen: Simple Ideas on Presentation Design and Delivery , by Garr Reynolds, New Riders Press, 2008
Solving the PowerPoint Predicament: using digital media for effective communication , by Tom Bunzel , Que, 2006
The Cognitive Style of Power Point , by Edward R. Tufte, Graphics Pr, 2003
The Visual Slide Revolution: Transforming Overloaded Text Slides into Persuasive Presentations , by Dave Paradi, Communications Skills Press, 2000
Why Most PowerPoint Presentations Suck: And How You Can Make Them Better , by Rick Altman, Harvest Books, 2007

Teaching Guides
- Online Course Development Resources
- Principles & Frameworks
- Pedagogies & Strategies
- Reflecting & Assessing
- Challenges & Opportunities
- Populations & Contexts
Quick Links
- Services for Departments and Schools
- Examples of Online Instructional Modules
How-To Geek
8 tips to make the best powerpoint presentations.
Want to make your PowerPoint presentations really shine? Here's how to impress and engage your audience.
Quick Links
Table of contents, start with a goal, less is more, consider your typeface, make bullet points count, limit the use of transitions, skip text where possible, think in color, take a look from the top down, bonus: start with templates.
Slideshows are an intuitive way to share complex ideas with an audience, although they're dull and frustrating when poorly executed. Here are some tips to make your Microsoft PowerPoint presentations sing while avoiding common pitfalls.
It all starts with identifying what we're trying to achieve with the presentation. Is it informative, a showcase of data in an easy-to-understand medium? Or is it more of a pitch, something meant to persuade and convince an audience and lead them to a particular outcome?
It's here where the majority of these presentations go wrong with the inability to identify the talking points that best support our goal. Always start with a goal in mind: to entertain, to inform, or to share data in a way that's easy to understand. Use facts, figures, and images to support your conclusion while keeping structure in mind (Where are we now and where are we going?).
I've found that it's helpful to start with the ending. Once I know how to end a presentation, I know how best to get to that point. I start by identifying the takeaway---that one nugget that I want to implant before thanking everyone for their time---and I work in reverse to figure out how best to get there.
Your mileage, of course, may vary. But it's always going to be a good idea to put in the time in the beginning stages so that you aren't reworking large portions of the presentation later. And that starts with a defined goal.
A slideshow isn't supposed to include everything. It's an introduction to a topic, one that we can elaborate on with speech. Anything unnecessary is a distraction. It makes the presentation less visually appealing and less interesting, and it makes you look bad as a presenter.
This goes for text as well as images. There's nothing worse, in fact, than a series of slides where the presenter just reads them as they appear. Your audience is capable of reading, and chances are they'll be done with the slide, and browsing Reddit, long before you finish. Avoid putting the literal text on the screen, and your audience will thank you.
Related: How to Burn Your PowerPoint to DVD
Right off the bat, we're just going to come out and say that Papyrus and Comic Sans should be banned from all PowerPoint presentations, permanently. Beyond that, it's worth considering the typeface you're using and what it's saying about you, the presenter, and the presentation itself.
Consider choosing readability over aesthetics, and avoid fancy fonts that could prove to be more of a distraction than anything else. A good presentation needs two fonts: a serif and sans-serif. Use one for the headlines and one for body text, lists, and the like. Keep it simple. Veranda, Helvetica, Arial, and even Times New Roman are safe choices. Stick with the classics and it's hard to botch this one too badly.
There reaches a point where bullet points become less of a visual aid and more of a visual examination.
Bullet points should support the speaker, not overwhelm his audience. The best slides have little or no text at all, in fact. As a presenter, it's our job to talk through complex issues, but that doesn't mean that we need to highlight every talking point.
Instead, think about how you can break up large lists into three or four bullet points. Carefully consider whether you need to use more bullet points, or if you can combine multiple topics into a single point instead. And if you can't, remember that there's no one limiting the number of slides you can have in a presentation. It's always possible to break a list of 12 points down into three pages of four points each.
Animation, when used correctly, is a good idea. It breaks up slow-moving parts of a presentation and adds action to elements that require it. But it should be used judiciously.
Adding a transition that wipes left to right between every slide or that animates each bullet point in a list, for example, starts to grow taxing on those forced to endure the presentation. Viewers get bored quickly, and animations that are meant to highlight specific elements quickly become taxing.
That's not to say that you can't use animations and transitions, just that you need to pick your spots. Aim for no more than a handful of these transitions for each presentation. And use them in spots where they'll add to the demonstration, not detract from it.
Sometimes images tell a better story than text can. And as a presenter, your goal is to describe points in detail without making users do a lot of reading. In these cases, a well-designed visual, like a chart, might better convey the information you're trying to share.
The right image adds visual appeal and serves to break up longer, text-heavy sections of the presentation---but only if you're using the right images. A single high-quality image can make all the difference between a success and a dud when you're driving a specific point home.
When considering text, don't think solely in terms of bullet points and paragraphs. Tables, for example, are often unnecessary. Ask yourself whether you could present the same data in a bar or line chart instead.
Color is interesting. It evokes certain feelings and adds visual appeal to your presentation as a whole. Studies show that color also improves interest, comprehension, and retention. It should be a careful consideration, not an afterthought.
You don't have to be a graphic designer to use color well in a presentation. What I do is look for palettes I like, and then find ways to use them in the presentation. There are a number of tools for this, like Adobe Color , Coolors , and ColorHunt , just to name a few. After finding a palette you enjoy, consider how it works with the presentation you're about to give. Pastels, for example, evoke feelings of freedom and light, so they probably aren't the best choice when you're presenting quarterly earnings that missed the mark.
It's also worth mentioning that you don't need to use every color in the palette. Often, you can get by with just two or three, though you should really think through how they all work together and how readable they'll be when layered. A simple rule of thumb here is that contrast is your friend. Dark colors work well on light backgrounds, and light colors work best on dark backgrounds.
Spend some time in the Slide Sorter before you finish your presentation. By clicking the four squares at the bottom left of the presentation, you can take a look at multiple slides at once and consider how each works together. Alternatively, you can click "View" on the ribbon and select "Slide Sorter."
Are you presenting too much text at once? Move an image in. Could a series of slides benefit from a chart or summary before you move on to another point?
It's here that we have the opportunity to view the presentation from beyond the single-slide viewpoint and think in terms of how each slide fits, or if it fits at all. From this view, you can rearrange slides, add additional ones, or delete them entirely if you find that they don't advance the presentation.
The difference between a good presentation and a bad one is really all about preparation and execution. Those that respect the process and plan carefully---not only the presentation as a whole, but each slide within it---are the ones who will succeed.
This brings me to my last (half) point: When in doubt, just buy a template and use it. You can find these all over the web, though Creative Market and GraphicRiver are probably the two most popular marketplaces for this kind of thing. Not all of us are blessed with the skills needed to design and deliver an effective presentation. And while a pre-made PowerPoint template isn't going to make you a better presenter, it will ease the anxiety of creating a visually appealing slide deck.
10 PowerPoint Tips for Preparing a Professional Presentation
Use these Microsoft PowerPoint tips to avoid common mistakes, keep your audience engaged, and create a professional presentation.
Professional presentations are all about making an impact. Your slides should look the part. Once you know what makes a presentation look professional, you can customize any half-decent PowerPoint template or create your own custom slides.
Our PowerPoint tips will help you avoid common mistakes, keep your audience engaged, and create a professional presentation, in form and content.
PowerPoint Slide Design
The design can leave a first and lasting impression. Give it a professional touch to win your audience's trust and attention.
1. Carefully Compose Your Slides
Don't copy and paste slides from different sources. You don't want your presentation to look like a rag rug. What you're aiming for is a consistent look. This will help your audience focus on the essential; your speech and the key facts you're highlighting on your slides.
To that end, use a basic template or make your own . PowerPoint comes with a wide selection of professional PowerPoint presentation templates , but you can also find free ones online.
PowerPoint Tip: When you open PowerPoint, note the search field at the top. One of the suggested searches is "presentations". Click it to see all of PowerPoint's default presentation templates. Choose a category on the right to narrow down your search.
Pick an easy to read font face . It's hard to get this right, but these professional-looking Google fonts are a safe bet. Unless you're a designer, stick to a single font face and limit yourself to playing with safe colors and font sizes.
If you're unsure about fonts, refer to "The 10 Commandments of Typography" shown below for orientation.
Carefully select font sizes for headers and text. While you don't want to create a wall of text and lose your audience's attention, you do want them to be able to read what you've highlighted. So make your fonts large enough.
PowerPoint Tip: PowerPoint offers several different slide layouts. When you add a new slide, choose the right layout under Home > New Slide . To switch the layout of an existing slide, use Home > Layout . By using the default layouts, you can make coherent design changes across your presentation anytime you want.
Leave room for highlights, such as images or take home messages. Some elements should stand out. So try not to bury them in background noise but give them the space they need. This could be a single quote or a single image per page with nothing but a simple header and a plain background.
Decorate scarcely but well. If you have good content, you won't need decoration. Your template will be decoratively enough.
Note: Restrict the room your design takes up, and don't ever let the design restrict your message.
2. Use Consistency
Consistently use font face and sizes on all slides. This one goes back to using a template. If you chose a professional presentation template, the designer would have taken care of this aspect. Stick to it!
Match colors. This is where so many presentations fail. You might have chosen a funky template and stuck to the designer's color profile, then you ruin it all with ugly Excel charts .
Take the time to match your visuals to your presentation design.
Text and Background Colors
A poor choice of colors can ruin your presentation.
3. Use Contrast
Black text on a white background will always be the best, but also the most boring choice . You're allowed to use colors! But use them responsibly.
Keep it easy on the eyes and always keep good contrast in mind. If you're color-challenged, use one of the many online tools to select a good looking color palette. Or just use a template and stick to its default colors.
PowerPoint Tip: Use PowerPoint's Design menu to quickly change the font and color palette of your entire presentation using preset design layouts.
4. Apply Brilliance
Carefully use color to highlight your message! Colors are your friends. They can make numbers stand out or your Take Home Message pop.
Don't weaken the color effect by using too many colors in too many instances . The special effect only works if used scarcely. Try to limit pop colors to one per slide.
Make a brilliant choice: match colors for design and good contrast to highlight your message . Use a professional color palette, to find which color will work best with your theme. Use The 10 Commandments of Color Theory shown below to learn more about colors:
Text on PowerPoint Slides
K eep I t S traight and S imple. That means...
- Keywords only on your slides.
- Absolutely no full sentences!
- And never read your slides , talk freely.
Remember that your slides are only there to support, not to replace your talk! You want to tell a story, visualize your data, and demonstrate key points. If you read your slides, you risk losing your audience's respect and attention.
PowerPoint Tip: Afraid you'll lose your train of thoughts? Add notes to your slides. Go to View and under Show click Notes to make them show up under your slides while editing. When starting your presentation, use PowerPoint's presentation mode (go to Slide Show and under Monitors , check Use Presenter View ), so you can glance at your notes when needed.
6. Take Home Message
Always summarize your key point in a Take Home Message. Ask yourself, if your audience learned or remembered one single thing from your presentation, what would you like it to be? That's your Take Home Message.
The Take Home Message is your key message, a summary of your data or story. If you're giving an hour-long presentation, you might have several Take Home Messages. That's OK. Just make sure that what you think is key, really matters to your audience.
Make your Take Home Message memorable. It's your responsibility that your audience takes home something valuable. Help them "get it" by making your Take Home Message stand out, either visually or through how you frame it verbally.
Presentation Visuals
Images are key elements of every presentation. Your audience has ears and eyes, they want to see what you're talking about, and a good visual cue will help them understand your message much better.
7. Add Images
Have more images in your slides than text. Visuals are your friends. They can illustrate your points and support your message.
But do not use images to decorate! That's a poor use of visuals because it's just a distraction.
Images can reinforce or complement your message. So use images to visualize or explain your story.
Use a sufficient image resolution. Your visuals might look good on your desktop, but once blown up by a projector, low-resolution images will make your presentation look anything but professional. So choose a resolution that matches the projector's resolution. If in doubt, don't go below a resolution of 1024 x 768 pixels (XGA) and aim for 1920 x 1080 pixels (FullHD).
Always maintain your image's aspect ratio. Nothing looks more awkward than a distorted image. Whatever you do, don't stretch images. If you have to resize them, do so with the aspect ratio intact, even if that means dropping slightly above or below your target resolution.
PowerPoint Tip: Need a visual, but don't have one at hand? PowerPoint is connected to Bing's library of online images you can use for your presentations. Go to Insert and under Images select Online Images . You can browse by category or search the library. Be sure to set a checkmark for Creative Commons only , so you don't accidentally violate copyrights.
Note: Yes, a picture is worth a thousand words. In other words, if you don't have time for a thousand words, use a picture!
PowerPoint Animations and Media
In animations, there is a fine line between a comic and a professional impression. But animations can be powerful tools to visualize and explain complicated matters. A good animation can not only improve understanding, it can also make the message stick with your audience.
8. Don't Be Silly
Sparingly use animations and media. You should only use them in one of two cases:
- To draw attention, for example, to your Take Home Message.
- To clarify a model or emphasize an effect.
Embed the media in your presentation and make sure it works in presentation mode. Testing your presentation at home will save you time and avoid embarrassment.
Target Your Presentation Content
Your target, i.e. your audience, defines the content of your presentation. For example, you cannot teach school kids about the complicated matters of the economy, but you may be able to explain to them what the economy is in the first place and why it is important.
9. Keep Your Audience in Mind
When you compile your PowerPoint presentation, ask yourself these questions:
- What does my audience know?
- What do I need to tell them?
- What do they expect?
- What will be interesting to them?
- What can I teach them?
- What will keep them focused?
Answer these questions and boil your slides down to the very essentials. In your talk, describe the essentials colorfully and use your weapons, i.e. text, images, and animations wisely (see above).
Note: If you fail to hit the target, it won't matter how ingenious your design is or how brilliantly you picked colors and keywords. Nothing matters more than your audience's attention.
10. Practice Your Presentation Like a Professional
A well-practiced and enthusiastic talk will help you convince your audience and keep their attention. Here are some key points that define a good talk:
- Know your slides inside out.
- Speak freely.
- Speak with confidence, loud and clear.
- Speak at a steady pace, better too slow than too fast.
- Keep eye contact with your audience.
Bonus: Implement the 10/20/30 Rule
The 10/20/30 rule is a concept brought forward by Guy Kawasaki:
It’s quite simple: a PowerPoint presentation should have ten slides, last no more than twenty minutes, and contain no font smaller than thirty points.
A similar concept is PechaKucha , a storytelling format limited to 20 slides and 20 seconds per slide, i.e. less than seven minutes to conclude the presentation.
Now there's a challenge! Telling your story succinctly, might help you get through to some of the busiest and most distracted people on the planet.
One Final PowerPoint Presentation Tip
I've shown you how to think through your entire presentation, from choosing a design to speaking to your audience. Here's a mind trick: never try to interpret the looks on your listeners' faces. Chances are, you're wrong. Just assume they're focused and taking notes.
You've done your best to create a professional PowerPoint presentation that will help your audience focus on the content and learn new things. The looks on their faces aren't doubt or confusion. It's focus! Well, d'oh! Obviously, you're the expert, and they're the learners. If you can get into this mindset, you can relax and perform at your best.
Purdue Online Writing Lab Purdue OWL® College of Liberal Arts
APA PowerPoint Slide Presentation

Welcome to the Purdue OWL
This page is brought to you by the OWL at Purdue University. When printing this page, you must include the entire legal notice.
Copyright ©1995-2018 by The Writing Lab & The OWL at Purdue and Purdue University. All rights reserved. This material may not be published, reproduced, broadcast, rewritten, or redistributed without permission. Use of this site constitutes acceptance of our terms and conditions of fair use.
Note: This page reflects the latest version of the APA Publication Manual (i.e., APA 7), which released in October 2019. The equivalent resource for the older APA 6 style can be found here .
Media File: APA PowerPoint Slide Presentation
This resource is enhanced by a PowerPoint file. If you have a Microsoft Account, you can view this file with PowerPoint Online .
Select the APA PowerPoint Presentation link above to download slides that provide a detailed review of the APA citation style.

An official website of the United States government
Here's how you know
The .gov means it's official. Federal government websites often end in .gov or .mil. Before sharing sensitive information, make sure you’re on a federal government site.
The site is secure. The https:// ensures that you are connecting to the official website and that any information you provide is encrypted and transmitted securely.
What the New Overtime Rule Means for Workers

One of the basic principles of the American workplace is that a hard day’s work deserves a fair day’s pay. Simply put, every worker’s time has value. A cornerstone of that promise is the Fair Labor Standards Act ’s (FLSA) requirement that when most workers work more than 40 hours in a week, they get paid more. The Department of Labor ’s new overtime regulation is restoring and extending this promise for millions more lower-paid salaried workers in the U.S.
Overtime protections have been a critical part of the FLSA since 1938 and were established to protect workers from exploitation and to benefit workers, their families and our communities. Strong overtime protections help build America’s middle class and ensure that workers are not overworked and underpaid.
Some workers are specifically exempt from the FLSA’s minimum wage and overtime protections, including bona fide executive, administrative or professional employees. This exemption, typically referred to as the “EAP” exemption, applies when:
1. An employee is paid a salary,
2. The salary is not less than a minimum salary threshold amount, and
3. The employee primarily performs executive, administrative or professional duties.
While the department increased the minimum salary required for the EAP exemption from overtime pay every 5 to 9 years between 1938 and 1975, long periods between increases to the salary requirement after 1975 have caused an erosion of the real value of the salary threshold, lessening its effectiveness in helping to identify exempt EAP employees.
The department’s new overtime rule was developed based on almost 30 listening sessions across the country and the final rule was issued after reviewing over 33,000 written comments. We heard from a wide variety of members of the public who shared valuable insights to help us develop this Administration’s overtime rule, including from workers who told us: “I would love the opportunity to...be compensated for time worked beyond 40 hours, or alternately be given a raise,” and “I make around $40,000 a year and most week[s] work well over 40 hours (likely in the 45-50 range). This rule change would benefit me greatly and ensure that my time is paid for!” and “Please, I would love to be paid for the extra hours I work!”
The department’s final rule, which will go into effect on July 1, 2024, will increase the standard salary level that helps define and delimit which salaried workers are entitled to overtime pay protections under the FLSA.
Starting July 1, most salaried workers who earn less than $844 per week will become eligible for overtime pay under the final rule. And on Jan. 1, 2025, most salaried workers who make less than $1,128 per week will become eligible for overtime pay. As these changes occur, job duties will continue to determine overtime exemption status for most salaried employees.

The rule will also increase the total annual compensation requirement for highly compensated employees (who are not entitled to overtime pay under the FLSA if certain requirements are met) from $107,432 per year to $132,964 per year on July 1, 2024, and then set it equal to $151,164 per year on Jan. 1, 2025.
Starting July 1, 2027, these earnings thresholds will be updated every three years so they keep pace with changes in worker salaries, ensuring that employers can adapt more easily because they’ll know when salary updates will happen and how they’ll be calculated.
The final rule will restore and extend the right to overtime pay to many salaried workers, including workers who historically were entitled to overtime pay under the FLSA because of their lower pay or the type of work they performed.
We urge workers and employers to visit our website to learn more about the final rule.
Jessica Looman is the administrator for the U.S. Department of Labor’s Wage and Hour Division. Follow the Wage and Hour Division on Twitter at @WHD_DOL and LinkedIn . Editor's note: This blog was edited to correct a typo (changing "administrator" to "administrative.")
- Wage and Hour Division (WHD)
- Fair Labor Standards Act
- overtime rule
SHARE THIS:

IMAGES
VIDEO
COMMENTS
Once you've get your presentation planned out, it's time to tackle the design part of creating a presentation. When designing your presentation, keep the following guidelines in mind: 1. Keep the Text to a Minimum. When it comes to your presentation, PowerPoint should assist you in delivering the presentation.
Tips for creating an effective presentation. Tip. Details. Choose a font style that your audience can read from a distance. Choosing a simple font style, such as Arial or Calibri, helps to get your message across. Avoid very thin or decorative fonts that might impair readability, especially at small sizes. Choose a font size that your audience ...
Here are a few tips for business professionals who want to move from being good speakers to great ones: be concise (the fewer words, the better); never use bullet points (photos and images paired ...
Here's another one of our top PPT tips: tap into Envato Elements' unlimited stock photo library. People are more likely to take you seriously if your presentation is visually appealing. Users view attractive design as more usable. Similarly, they'll view a more attractive PowerPoint as more effective. 11.
Summary. A strong presentation is so much more than information pasted onto a series of slides with fancy backgrounds. Whether you're pitching an idea, reporting market research, or sharing ...
To keep your colors consistent and easy to access, save a color palette in PowerPoint. Click the Design tab and under Variants, click the down arrow (1). On the dropdown menu click Colors (2) and Customize Colors (3). In the Create New Theme colors dialogue click one of the color slots (4).
2 Million+ PowerPoint Templates, Themes, Graphics + More. Download thousands of PowerPoint templates, and many other design elements, with a monthly Envato Elements membership. It starts at $16 per month, and gives you unlimited access to a growing library of over 2,000,000 presentation templates, fonts, photos, graphics, and more.
To customize the text in this template, you can work with the built-in text placeholders. To start, click into any text box. Then, press Ctrl + A ( Cmd + A on Mac) to select all the text inside. Type over the text placeholders in a premium professional presentation so that the slides tell your story.
3. Create an Outline. An outline is similar to a storyboard. We can plan out our slides ahead of time to establish flow, presentation length, and timings. An outline can be something as simple as drawing out slides in a notepad and jotting down the key points to cover, or we can use PowerPoint to create a 'wireframe'.
Understanding different ways to encourage and entertain your audience, however, is crucial when making PowerPoint presentations. The following 6 tips to execute professional presentations are guidelines in presenting a topic to an audience successfully: 1. Timing. It's so cliché but it's true that "timing is everything". If you're ...
Follow the 5/5/5 rule. To keep your audience from feeling overwhelmed, you should keep the text on each slide short and to the point. Some experts suggest using the 5/5/5 rule: no more than five words per line of text, five lines of text per slide, or five text-heavy slides in a row.
Rule 2: Spend only 1 minute per slide. When you present your slide in the talk, it should take 1 minute or less to discuss. This rule is really helpful for planning purposes—a 20-minute presentation should have somewhere around 20 slides. Also, frequently giving your audience new information to feast on helps keep them engaged.
In the "Insert" menu, select "Table" and opt for a one-by-one table. Change the table color to a light gray shade, elongate it, and position it neatly to the left of your text. To improve readability and aesthetics, increase the spacing between text phrases. A small adjustment in the before spacing setting (setting it to 48) significantly ...
Advice from Edelman and Harring on leveraging the working memory with PowerPoint: Leverage the working memory by dividing the information between the visual and auditory modality. Doing this reduces the likelihood of one system becoming overloaded. For instance, spoken words with pictures are better than pictures with text, as integrating an ...
• The following 37 slides present guidelines and suggestions for the use of fonts, colors, and graphics when preparing PowerPoint presentations for Sessions and Seminars. • This media (PPT) is designed to ENHANCE your presentation, not BE the presentation. • Remember, only you can prevent "Death by PowerPoint"
A good presentation needs two fonts: a serif and sans-serif. Use one for the headlines and one for body text, lists, and the like. Keep it simple. Veranda, Helvetica, Arial, and even Times New Roman are safe choices. Stick with the classics and it's hard to botch this one too badly.
PowerPoint Slide Design. The design can leave a first and lasting impression. Give it a professional touch to win your audience's trust and attention. 1. Carefully Compose Your Slides. Don't copy and paste slides from different sources. You don't want your presentation to look like a rag rug.
10 Tips for Effective PowerPoint Presentations. Tip #1: Choose an Interesting Topic. Tip #2: Do Some Deep Research. Tip #3: Use an Amazing Presentation Tool. Tip #4: Pick Out a Presentation Template. Tip #5: Keep Your Audience in Mind. Tip #6: Add Eye-Catching Headings and Text. Tip #7: Keep it Engaging With Animations.
Designing an Effective PowerPoint Presentation: Quick Guide. This presentation is designed to quickly introduce you into the world of PowerPoint creation. It covers concepts of visual rhetoric, design, and good presentation skills. This powerpoint resource, broken up into four parts, provides an excellent overview of how to design effective ...
Microsoft PowerPoint is a presentation design software that is part of Microsoft 365. This software allows you to design presentations by combining text, images, graphics, video, and animation on slides in a simple and intuitive way. Over time, PowerPoint has evolved and improved its accessibility to users.
Get your main point into the presentation as early as possible (this avoids any risk of audience fatigue or attention span waning), then substantiate your point with facts, figures etc and then reiterate your point at the end in a 'Summary'. 2. Practice Makes Perfect. Also, don't forget to practice your presentation.
Cite your source automatically in APA. Media File: APA PowerPoint Slide Presentation. This resource is enhanced by a PowerPoint file. If you have a Microsoft Account, you can view this file with PowerPoint Online. Select the APA PowerPoint Presentation link above to download slides that provide a detailed review of the APA citation style.
Criteria for Professional Presentations. Appropriate font sizes for presentations Effective presentation skills. Titles - 32 point minimum. Text in bulleted lists - 20 point minimum. Appropriate colors for visibility. High contrast for rooms with ambient light. Best is dark background with light letters. Light background with dark letters OK.
Presentation Slides. The following Dietary Guidelines for Americans, 2020-2025 presentations are available for your download and use. Click the buttons below to download the full slide deck - including slides for each life stage! Download PDF Download PPT.
The employee primarily performs executive, administrative or professional duties. While the department increased the minimum salary required for the EAP exemption from overtime pay every 5 to 9 years between 1938 and 1975, long periods between increases to the salary requirement after 1975 have caused an erosion of the real value of the salary ...