The Tech Edvocate
- Advertisement
- Home Page Five (No Sidebar)
- Home Page Four
- Home Page Three
- Home Page Two
- Icons [No Sidebar]
- Left Sidbear Page
- Lynch Educational Consulting
- My Speaking Page
- Newsletter Sign Up Confirmation
- Newsletter Unsubscription
- Page Example
- Privacy Policy
- Protected Content
- Request a Product Review
- Shortcodes Examples
- Terms and Conditions
- The Edvocate
- The Tech Edvocate Product Guide
- Write For Us
- Dr. Lynch’s Personal Website
- The Edvocate Podcast
- Assistive Technology
- Child Development Tech
- Early Childhood & K-12 EdTech
- EdTech Futures
- EdTech News
- EdTech Policy & Reform
- EdTech Startups & Businesses
- Higher Education EdTech
- Online Learning & eLearning
- Parent & Family Tech
- Personalized Learning
- Product Reviews
- Tech Edvocate Awards
- School Ratings

How to Do Toe Raises: 9 Steps
3 ways to connect the ipod to itunes, how to say please in french: 7 steps, 3 easy ways to change your converge wifi password, 4 ways to prevent sweaty palms, 3 ways to celebrate dussehra at home, 3 ways to avoid misunderstandings with your partner, 5 ways to make a graphic organizer, how to survive being a teen, how to catch pompano: 10 steps, 5 ways to save a powerpoint presentation.

PowerPoint presentations are an essential tool for many businesses, educators, and students. Whether it’s presenting a sales pitch, showcasing a project, or delivering a lecture, having access to your PowerPoint file is crucial. In this article, we will explore five effective ways to save and back up your PowerPoint presentation to ensure you’re never caught off guard.
1.Save it Locally
The most basic way to save a PowerPoint presentation is directly on your computer’s hard drive or local storage device, such as a USB flash drive. To save your presentation locally, click “File” in the top left corner, then select “Save” or press Ctrl + S (Cmd + S for Mac). Be sure to choose an appropriate folder or location on your device and remember its whereabouts for easy access later.
2.Save it in Cloud Storage
Cloud storage services like Microsoft OneDrive, Google Drive, and Dropbox provide an additional layer of security by keeping your files safe and accessible from any device with internet access. To save your PowerPoint presentation to the cloud, click “File” > “Save As” > “OneDrive”, “Google Drive”, or “Dropbox.” Log in to your accounts if prompted and choose the folder in which you’d like to save your presentation.
3.Export as a PDF
Exporting your PowerPoint presentation as a PDF can make it easier to email or share without concerns about formatting issues that could arise from different versions of PowerPoint software. To export as a PDF, click “File” > “Export” > “Create PDF/XPS Document.” Choose the desired folder or location to save the document and click “Publish.” Remember that while this format is excellent for sharing purposes, you will not be able to edit it without converting it back into a PowerPoint format.
4.Save as an Image Sequence
Saving your PowerPoint presentation as an image sequence can help protect sensitive data or prevent unwanted editing. Each slide will be saved as a separate image file, which can be then be viewed by others without needing PowerPoint software. To save as an image sequence, click “File” > “Save As” > “BMP”, “JPEG”, PNG”, or “GIF”. Choose the desired folder or location and click “Save.” Each slide will now be saved as an individual image in your chosen format.
5.Package Presentation for CD
If you’re presenting in a location without internet access, packaging your PowerPoint presentation for CD can help you rest assured your presentation will be available when needed. This method saves not only the presentation but also the necessary PowerPoint Viewer software for those who don’t have Microsoft PowerPoint installed on their computer. To package your presentation for CD, click “File” > “Export” > “Package Presentation for CD.” Then, follow the prompts and burn the files to a CD.
In conclusion, there are several ways to save and back up your PowerPoint presentation to ensure it’s accessible whenever you need it. By utilizing one or more of these methods, you can minimize any potential issues and keep your work safe and secure.
How to Report Scam Emails: 13 Steps
4 ways to choose guitar strings.

Matthew Lynch
Related articles more from author.

6 Ways to Drape Your Lehenga Dupatta

How to Wire an Electric Dryer: 6 Steps

How to Buy a House in Whiterun

How to Stop a Seizure: 12 Steps

How to Tint Tail Lights

How to Roll Your Eyes: 6 Steps
How to Save a PowerPoint Presentation? [PPT & Other Formats!]
By: Author Shrot Katewa
![How to Save a PowerPoint Presentation? [PPT & Other Formats!]](https://artofpresentations.com/wp-content/uploads/2022/03/Featured-Image-How-to-Save-a-PowerPoint-Presentation.webp "powerpoint save my presentation")
Saving a PowerPoint presentation is one of the most important things that you need to do when you are creating a presentation using PowerPoint. Unlike some of the modern web-based presentation applications, you need to make sure that you save a PowerPoint presentation when you are using an offline version!
To save a PowerPoint presentation, click on the “File” tab. Then, from the backstage view, click on the “Save” option from the left panel. Choose the location or the folder where you want to save the presentation on your computer, and click on “Save”.
In this article, we shall not only understand how to save a standard PPT or PPTx file, but we shall also take a look at how to save a PowerPoint presentation in different file formats such as a PDF, video or an image!
So, let’s get started!
1. How to Save a PowerPoint Presentation?
Once you have saved a PowerPoint presentation, you can easily save it again with just one click. Furthermore, you can also save a PowerPoint presentation in other formats. However, the process of saving a PowerPoint presentation is slightly different on Windows and on Mac.
Let’s understand the process in further detail.
1a. Saving a PowerPoint Presentation on Windows
To save a PowerPoint Presentation on Windows PC, you can follow either of the 2 simple methods.
Method-1: Using the “Save” button on Quick Access Toolbar
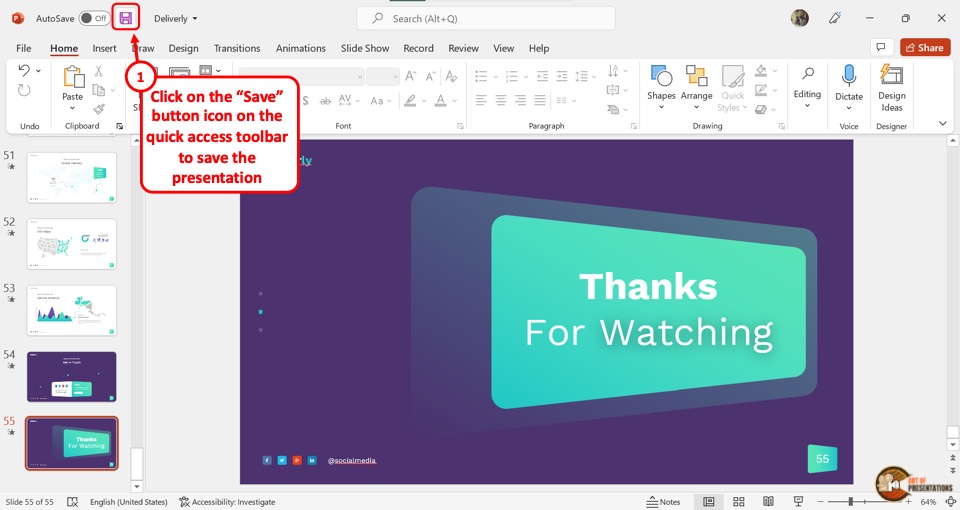
In the Quick Access Toolbar located at the very top of the screen, click on the “Save” icon.
The “Save” icon is located on the left side in the Quick Access Toolbar and looks like a floppy disk. Clicking on the “Save” button will immediately save the PowerPoint presentation in its current location as a “.pptx” file.
If you have opened a new presentation and you are saving it for the first time, clicking on the “Save” button will open a new explorer window. Simply navigate to the folder where you wish to save the new presentation on your computer, and click on “ Save “.
Method-2: Using the “File” tab
Another, more common method is to use the “File” tab in PowerPoint to save your PowerPoint presentation.
Here’s what you need to do –
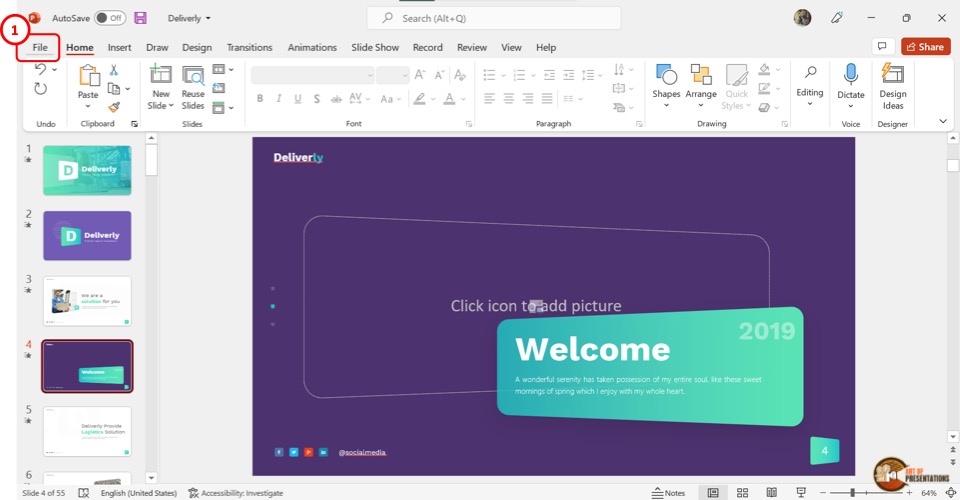
Step 1 – Click on the “File” Tab
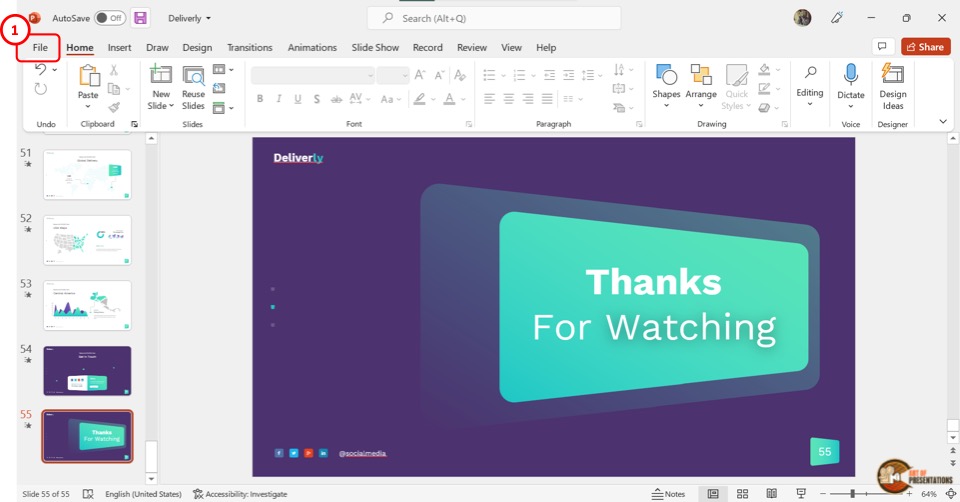
Another way to save a PowerPoint presentation is to use the “File” menu. You have to first click on the “File” tab located at the left corner of the menu ribbon at the top of the screen.
Step 2 – Click on the “Save” option
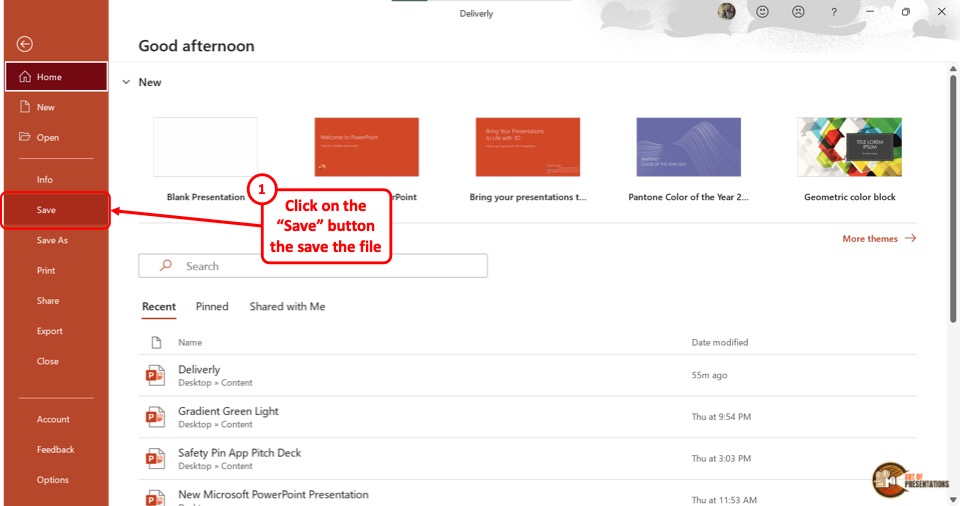
This will open the backstage view in PowerPoint. Now, click on the “Save” option from the sidebar on the left side of the screen. This will save the Microsoft PowerPoint as a “.pptx” file in the current location.
1b. Saving a PowerPoint Presentation on Mac
On a Mac computer, you can use the “File” menu as well to save the PowerPoint presentation.
The first step is to click on the “File” menu in the menu bar located at the top of the screen (above the PowerPoint window). This will open a dropdown menu. Click on the “Save” option from the dropdown menu to save the presentation as a “.pptx” file which is the standard format for presentations.
1c. Shortcut Keys to Save a PowerPoint Presentation
Microsoft PowerPoint also allows you to save a presentation with keyboard shortcuts. All you have to do is press the “Ctrl+S” keys on your keyboard in an open PowerPoint file. This will save the PowerPoint presentation.
1d. Best Format to Save a PowerPoint Presentation?
PowerPoint allows you to save a presentation in various different file formats! For instance, you can use the .ppt format if you wish to open the presentation file using PowerPoint 2007 or earlier. You can use .ppsx to open presentation directly as a PowerPoint Show file that opens it in the presentation mode.
In fact, there are several other formats you can save a presentation in. We shall explore how to save a PowerPoint presentation in several different formats later in the article.
However, the best format to save a PowerPoint Presentation is a “.pptx” file. This type can support all the latest as well as the older features of the PowerPoint presentation.
If you will be opening the presentation using a different software other than Microsoft PowerPoint, “.odp” is the best format. For printing, make sure to save the PowerPoint presentation as a PDF. That said, .pptx file format can help serve these purposes too.
2. How to Save a PowerPoint Presentation as PDF
Saving a PowerPoint presentation in PDF format is the suitable method for printing out your presentation. To save the PowerPoint presentation as a PDF file, follow the 4 easy steps.
Step-1: Click on the “File” Tab
First, click on the “ File ” tab in PowerPoint to open the back stage view of PowerPoint.
Step 2 – Click on the “Save As” option
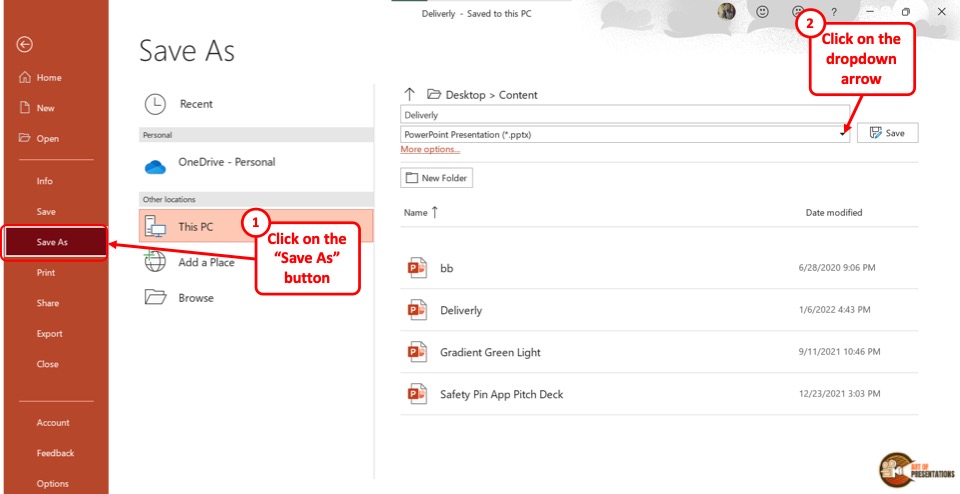
In the menu ribbon located at the top of the screen, click on the “File” tab. In the “File” menu, click on the “Save As” option from the sidebar on the left side of the screen.
Step-3: Click on the “PDF (*.pdf)” option
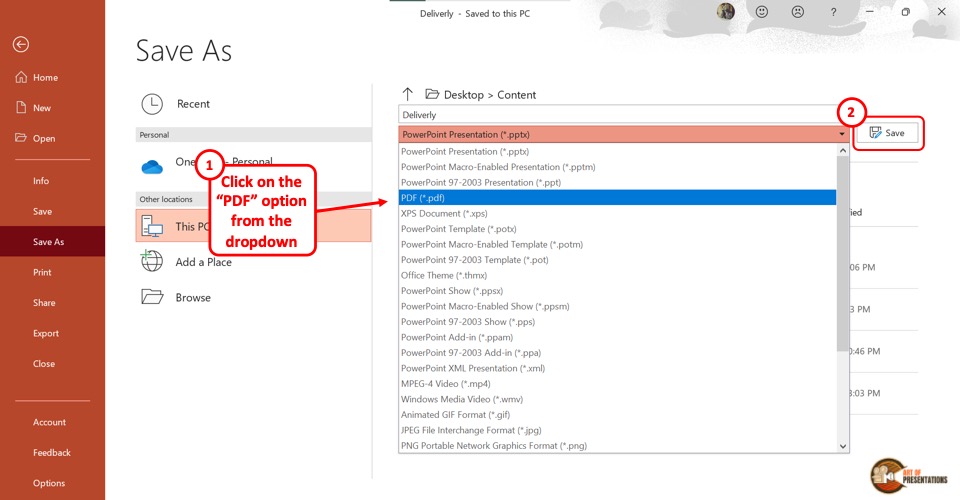
In the “Save As” screen, click on the box that shows “PowerPoint Presentation (*.pptx)” . This will open a dropdown menu. Click on the “PDF (*.pdf)” option from the dropdown menu.
Step-4: Click on the “Save” button
Now all you have to do is click on the “Save” button beside the box to save the PowerPoint presentation as a PDF file (as shown in the image in step 2).
3. How to Save a PowerPoint Presentation as a Video?
In Microsoft PowerPoint, you can also save a presentation as a video. This allows you to play the presentation slides as a video rather than a slide show.
3a. On Windows
To save a PowerPoint presentation as a video on a Windows PC, follow the 3 easy steps.
Step-1: Click on the “File” tab
The first step is to open the “Save As” screen. To do so, click on the “File” tab in the menu ribbon. In the “File” menu, click on the “Save As” option.
Step-2: Choose the “.mp4” file format from the “Save As” tab
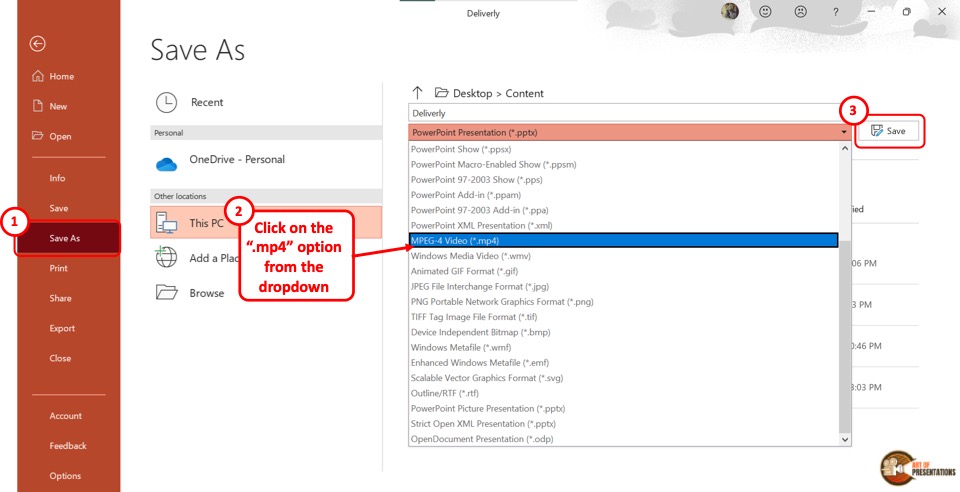
The next step is to click on the “Save As Options” box. It is the second box on the right side of the “Save As” screen. In the dropdown menu, click on either the “MPEG-4 Video (*.mp4)” option or the “Windows Media Video (*.wmv)” option.
Step-3: Click on the “Save” button
The final step is to click on the “Save” button (as indicated in step 2 above). It is located on the right side of the “Save As Options” box. This will save your PowerPoint presentation as a video.
To save a PowerPoint presentation as a video on a Mac device, follow the 3 simple steps.
Step-1: Click on the “Export” option
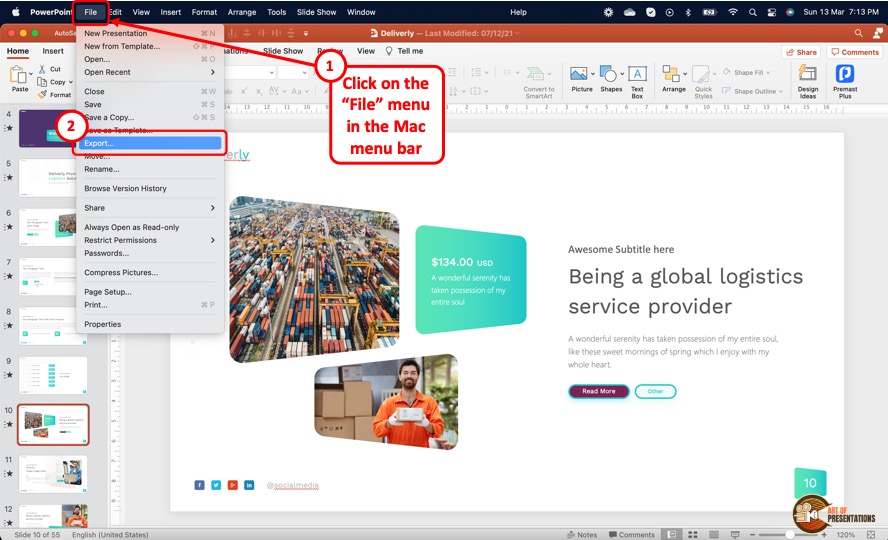
In the menu bar at the top of the screen, click on the “File” option. In the “File” dropdown menu, click on the “Export” option. This will open a dialog box.
Step-2: Click on the “File Format” box
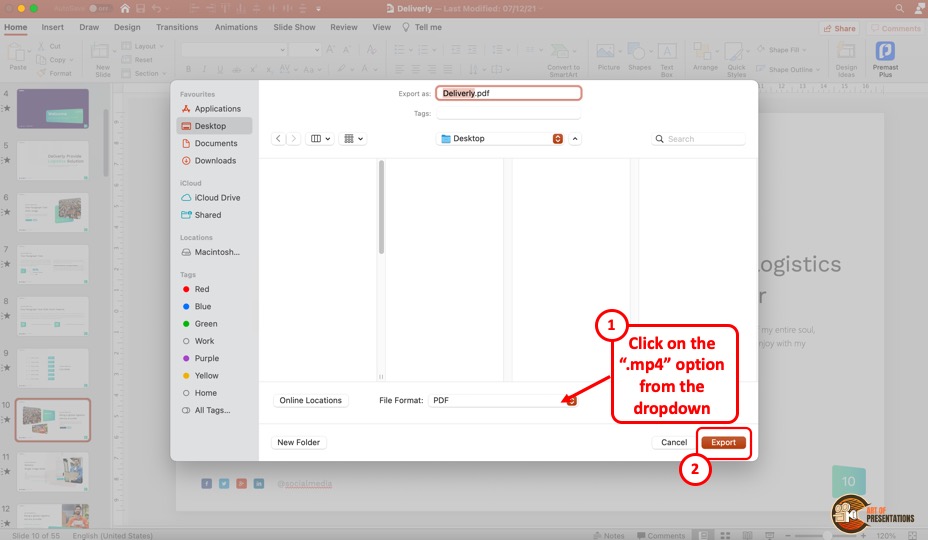
In the dialog box, click on the “File Format” box. This will open a dropdown menu. You can click on either the “MP4” option or the “MOV” option as you prefer.
Step-3: Click on the “Export” button
In the dialog box, you can also click on the “Quality” option to select the quality of the video. Once you are satisfied with the selections in the dialog box, click on the “Export” button at the bottom (as shown in the image in the previous step). This will save the presentation as a video.
4. How to Save a PowerPoint Presentation to Open in Slideshow Mode?
Microsoft PowerPoint allows you to save the PowerPoint presentation as a “PowerPoint Show” file. This opens directly as a slideshow. To save a PowerPoint presentation to open in slideshow mode, follow the 2 easy steps.
In the open PowerPoint file, click on the “File” tab from the menu ribbon which is located at the top of the screen. In the “File” menu, click on the “Save As” option.
Step-2: Click on the “PowerPoint Show (*.ppsx)” option
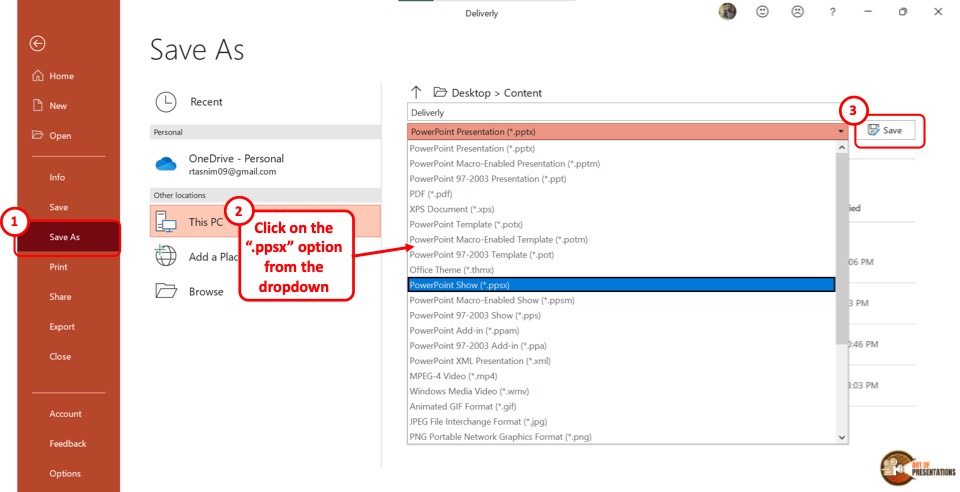
In the “Save As” screen, click on the “Save As Options” box which shows “PowerPoint Presentation (*.pptx)” . This will open a dropdown menu. Click on the “PowerPoint Show (*.ppsx)” option.
Now all you have to do is click on the “Save” button to save the PowerPoint presentation to open as a slideshow.
5. How to Save a PowerPoint Presentation as an Image?
In Microsoft PowerPoint, you can save the presentation as an image in five different formats: “Animated GIF Format (*.gif)” , “JPEG File Interchange Format (*.jpeg)” , “PNG Portable Network Graphics Format (*.png)” , “TIFF Tag Image File Format (*.tif)”, and “Scalable Vector Graphics Format (*.svg)” .
To save your presentation as an image, follow the 3 simple steps.
Step-1: Click on the “Save As” option from the “File” tab
The first step is to click on the “File” tab in the menu ribbon. Then click on the “Save As” option from the “File” menu.
Step-2: Select your preferred image format
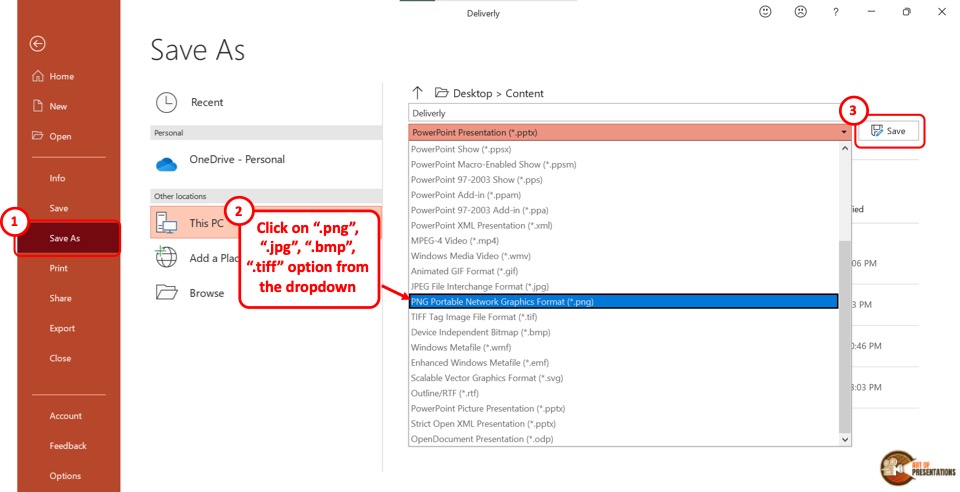
In the “Save As” screen, click on the “Save As Type” box which is the second box in the right column. From the dropdown menu, click on your preferred image format from the five available formats.
Now all you have to do is click on the “Save” button (as shown in the image in step 2) beside the “Save As Type” box. This will save your presentation in a folder containing each slide as a separate image file.
6. How to Save a PowerPoint Presentation as a Template?
A PowerPoint template is a predesigned presentation that you can edit to add your own content. To save a presentation as a template, follow the 3 easy steps.
The first step is to click on the “File” tab in the menu ribbon. Then click on the “Export” option from the sidebar in the “File” menu.
Step-2: Click on “Change File Type”
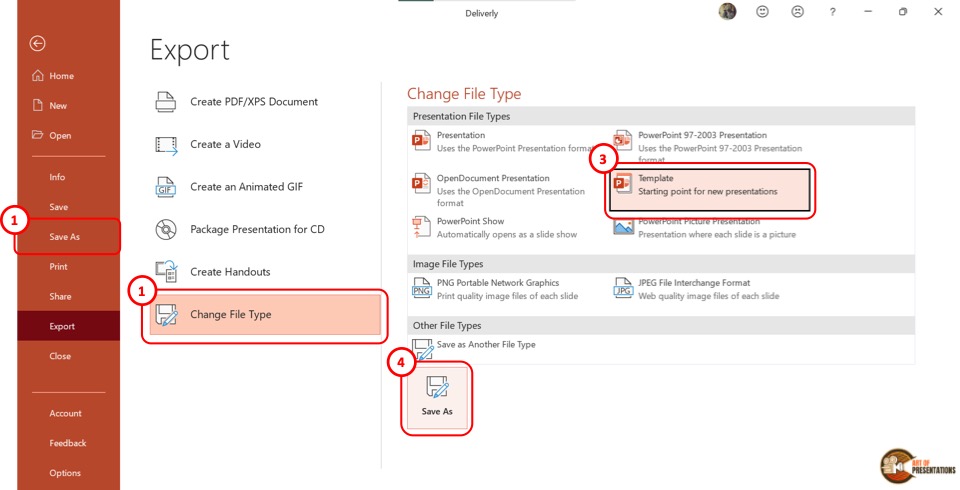
Now you have to click on the “Change File Type” option. Under the “Presentation File Types” group in the right column, click on the “Templates” option. Then click on the “Save As” button at the bottom of the screen.
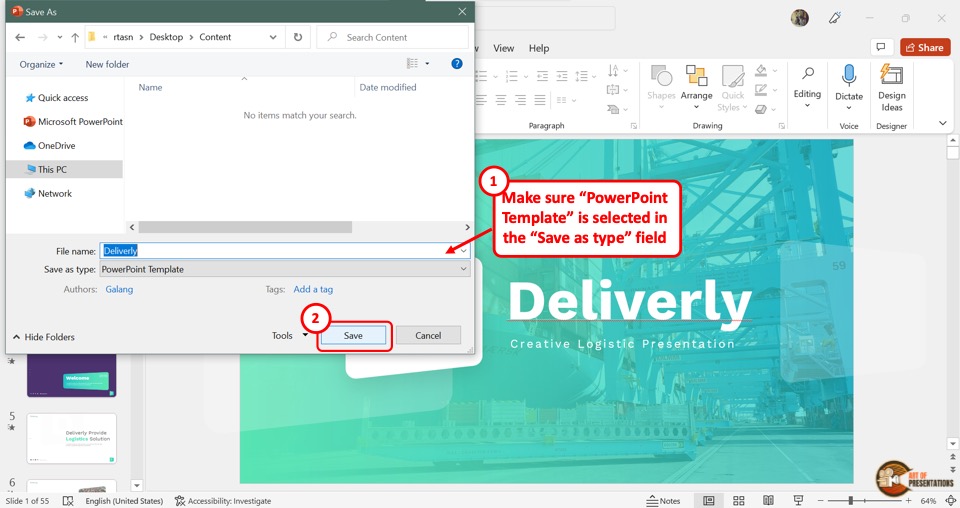
In the “Save As” dialog box, you will see that the “Save as type” box shows the “PowerPoint Template” format. Now all you have to do is click on the “Save” button.
7. How to Save PowerPoint Presentation as Google Slides?
Microsoft PowerPoint does not offer any feature to upload a presentation to Google Slides directly. However, Google Slides does offer you an option to upload your PowerPoint presentation and save it in Google Slides!
Step-1: Save Your PowerPoint Presentation
The first step is to save your PowerPoint presentation using any method described in the section 1 of this article.
Make sure that you note down the location of the folder in which you have save the PowerPoint file.
Step-2: Click on the “Open file picker” option in Google Slides
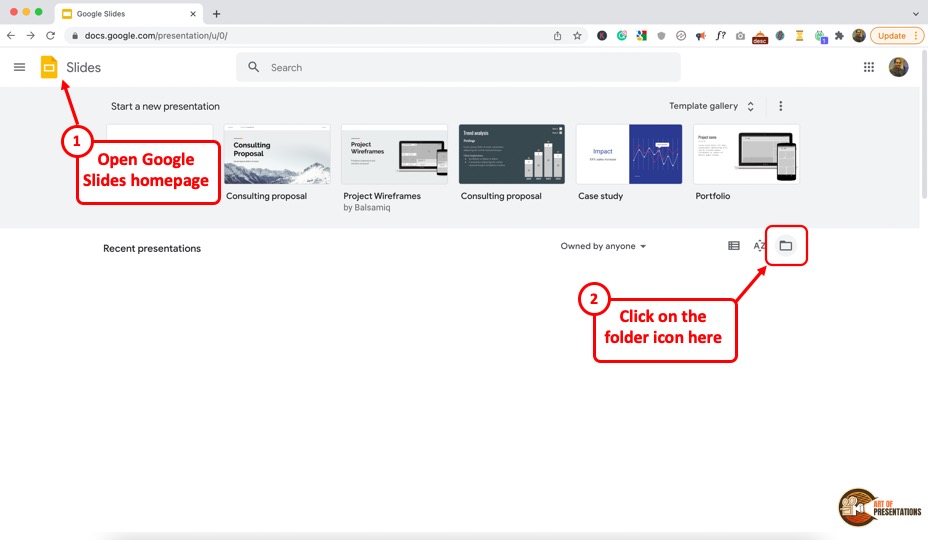
Now, the next thing you need to do is open your Google Slides account by visiting slides.google.com . If you aren’t logged in, make sure you sign in with your account credentials.
Next, you will be presented with Google Slides home screen (as shown in the image above). In Google Slides, click on the “Open file picker” icon which looks like a folder. This will open the “Open a file” dialog box.
Step-2: Click on “Upload”

In the “Open a file” dialog box, click on the “Upload” tab.
From your “File Explorer” window, drag and drop the PowerPoint presentation in the dialog box. Now the presentation will automatically open in Google Slides.
Also Read – How to “ Make a Copy of a Google Slides Presentation ” and how to “ Share a Google Slides Presentation Correctly ” with others!
You can also click on the “ Select a file from your device ” button (blue button in the center of the screen). This will open the file explorer window. Navigate to the folder in which you have saved your PowerPoint presentation, and click on “OK”. This will open and save the presentation file in Google Slides.
8. How to Save a PowerPoint Presentation to a Flash Drive?
To save a PowerPoint presentation on a flash drive or any external device, follow the 3 simple steps.
In the menu ribbon located at the top of the screen, click on the “File” tab. In the “File” menu, click on the “Save As” option.
Step-2: Click on “Browse”
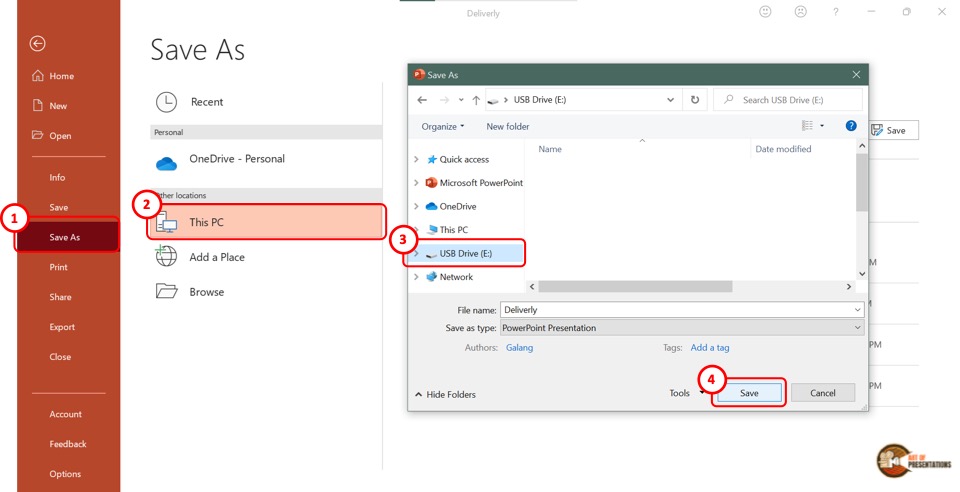
In the “Save As” screen, click on the “Browse” option which is the last option in the left column. This will open the “Save As” dialog box. In the sidebar on the left of the dialog box, click on the external disc.
Now all you have to do is click on the “Save” button at the bottom of the dialog box to save the PowerPoint presentation on the flash drive (as shown in the image in step 2).
9. How to Save a Copy of a PowerPoint Presentation?
The “Save A Copy” feature of Microsoft PowerPoint allows you to save changes in your presentation in a copied file without changing the original file.
Check out my article to learn detailed steps on how to save a copy of a PowerPoint presentation .
10. How to Save a Read-Only PowerPoint Presentation?
The “Read-Only” feature of Microsoft PowerPoint allows you to protect your PowerPoint presentation .
Using this feature, you can share your presentation with others without giving them the access to change your presentation. To save a read-only PowerPoint presentation, follow the steps mentioned below –
The first step is to click on the “File” tab in the menu ribbon. From the sidebar in the “File” menu, click on the “Info” option.
Step-2: Click on the “Protect Presentation” button

The next step is to click on the “Protect Presentation” option in the “Info” screen. This will open a dropdown menu. Click on the “Always Open Read-Only” option from the dropdown menu.
Step-3: Click on the “Save” option
Now all you have to do is save the presentation. To do so, click on the “Save” option in the sidebar right under the “Info” option. Alternatively, you can press the “Ctrl+S” keys on your keyboard.
If you have received a presentation that opens only in the read-only mode, but you don’t know how to work with it, check out my other article on “ How to Edit a Presentation in Read-Only Mode “.
11. How to Save a PowerPoint Presentation Without Notes?
When saving a PowerPoint presentation, you might want to remove the speaker notes. To do so, all you have to do is follow the 5 quick steps.
In the menu ribbon, click on the “File” tab. Then click on the “Info” option from the “File” menu.
Step-2: Click on “Check for Issues” on the “Info” tab
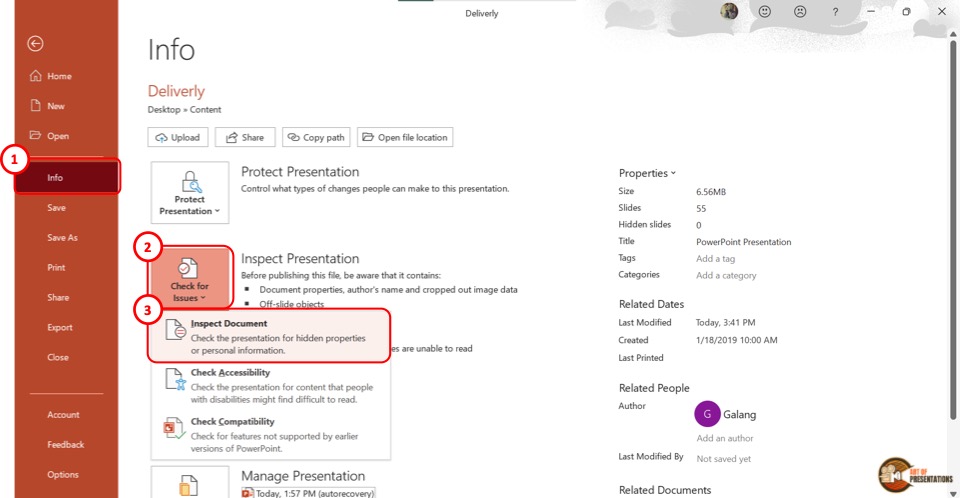
In the “Info” option, click on the “Check for Issues” button. Then click on the “Inspect Document” option from the dropdown menu. This will prompt a dialog box.
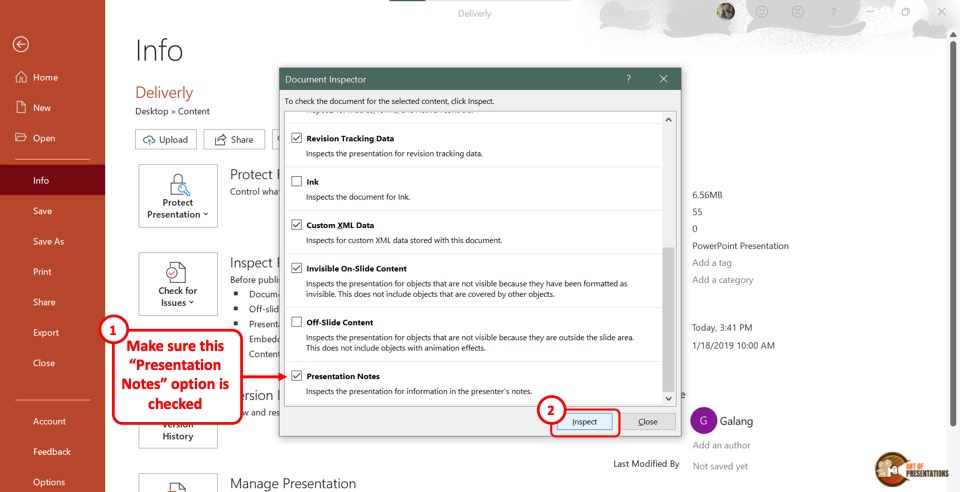
Step-3: Click on the “Inspect” option
In the “Document Inspector” dialog box, scroll all the way to the bottom and make sure the “Presentation Notes” option is selected. Then click on the “Inspect” button at the bottom of the dialog box.
Step-4: Click on the “Remove All” option
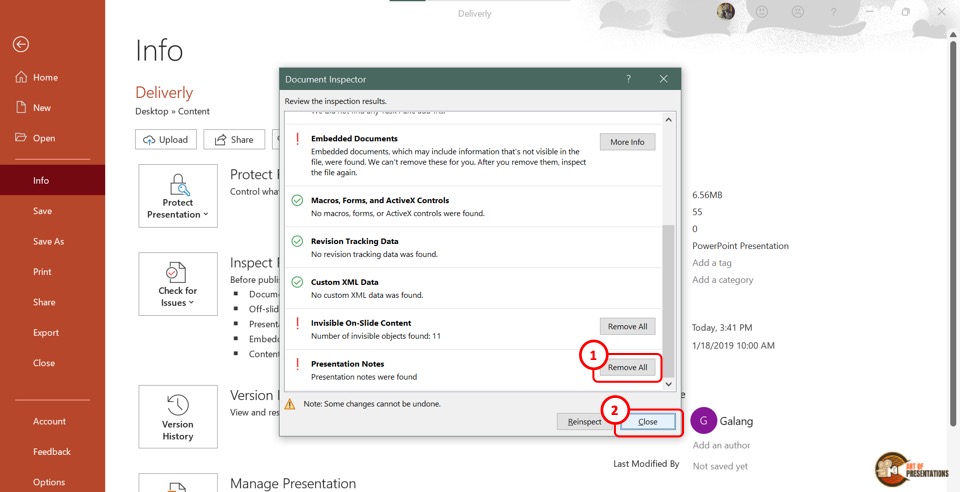
Once the inspection results are shown in the “Document Inspector” dialog, scroll to the bottom again to find the “Presentation Notes” option. Then click on the “Remove All” button at the right side of the “Presentation Notes” option.
Now all you have to do is click on the “Close” button at the bottom of the dialog box to finish the process.
Step-5: Click on the “Save” option
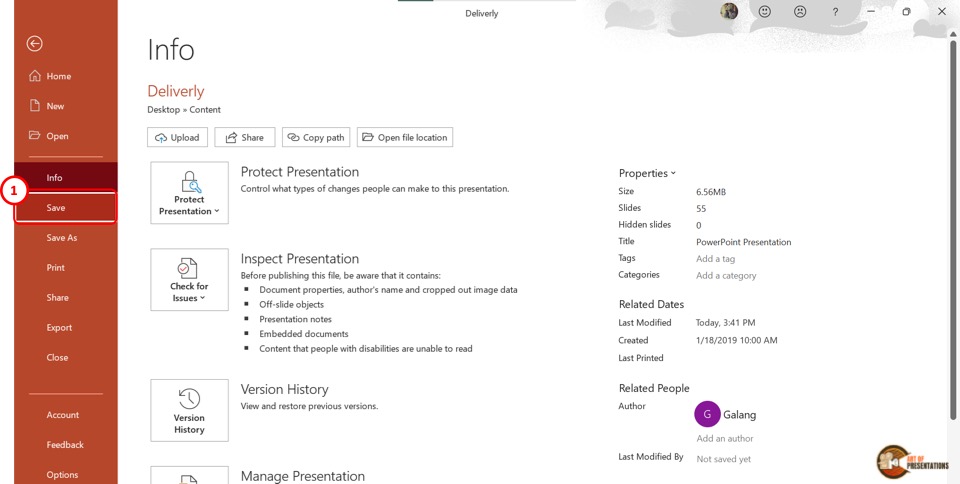
The final step is to click on the “ Save ” option in the sidebar of the “File” menu to save the presentation without notes. You can alternatively press the “Ctrl+S” keys on your keyboard.
12. How to Save PowerPoint Presentation Directly in Microsoft Teams?
If you are delivering a PowerPoint presentation to an audience using Microsoft teams, you can easily share a PowerPoint deck with your audience in the following steps –
- First, open the Microsoft Teams application and login to the meeting.
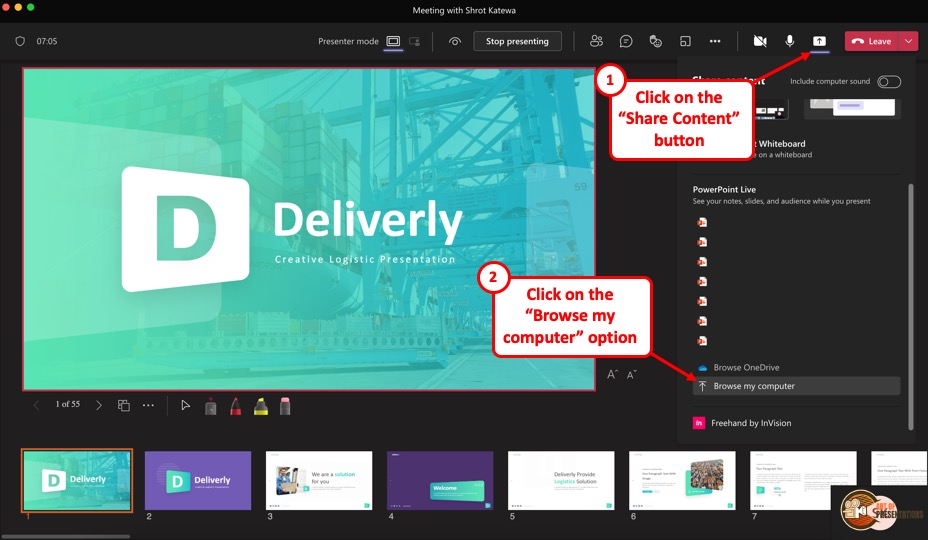
- On the “ Meeting Controls ” menu available in the top part of your meeting screen, locate the “ Share Content ” option.
- Click on the share content button. This will show the most recent PowerPoint files that you opened. You can either choose to click on one of the files visible. Alternatively, scroll down on the right panel and click on the “ Browse my computer ” option.
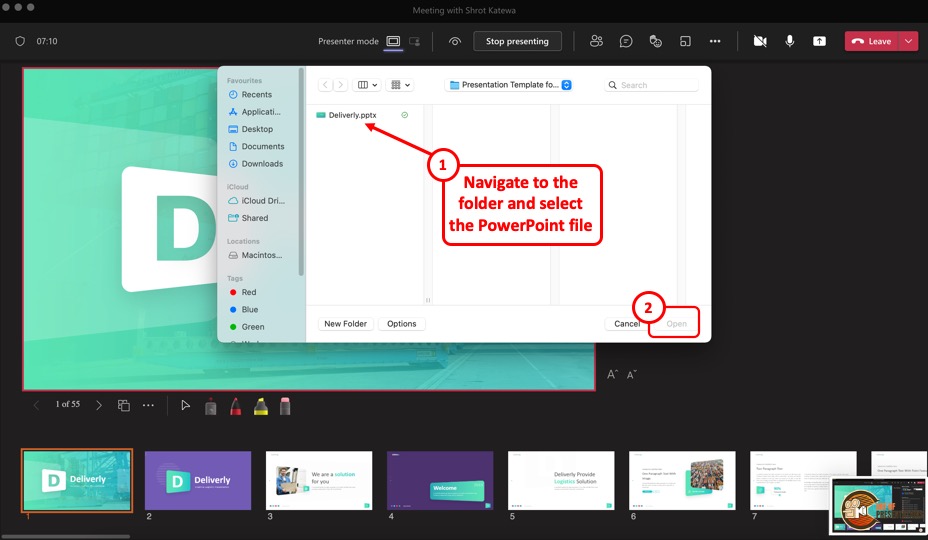
- This will open a new file browser window. Navigate to the respective location where your PowerPoint presentation is saved, click on it to select it. Then, click on “Open” to open the presentation in Microsoft Teams.
- The presentation will open by default in the presenter mode and shared with the audience of the meeting.
13. How to Enable Autosave in PowerPoint Presentation?
The autosave option is only available if you are using the Microsoft Office 365 version of PowerPoint . Other than that, you will have to manually save the PowerPoint file in all other versions.
You can autosave the PowerPoint presentation to the OneDrive cloud, and also autosave recovery files. To enable autosave in PowerPoint presentation, follow the 4 simple steps.
Step-1: Click on the “AutoSave” button
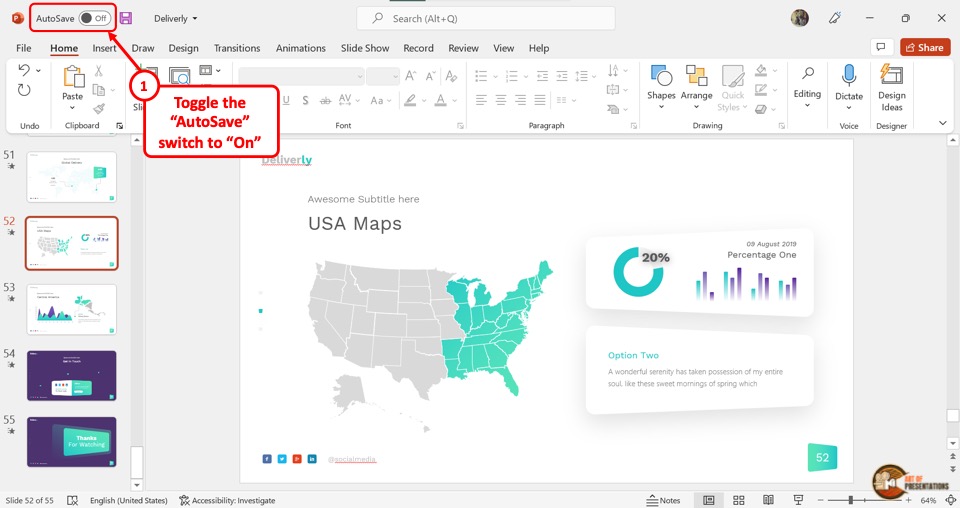
To simply turn on autosave in the OneDrive cloud for the PowerPoint presentation, all you have to do is click on the slider beside the “Autosave” option.
It is located in the left corner of the Quick Access Toolbar at the top of the screen.
Step-2: Click on “Options”
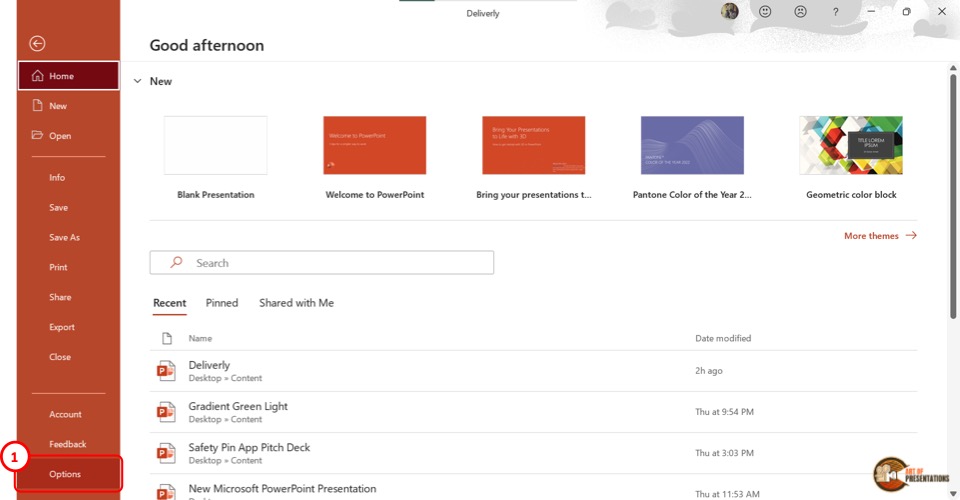
To access more autosave options, click on the “File” tab in the menu ribbon. Then click on the “Options” option which is the last option in the sidebar in the “File” menu. It will open a dialog box.
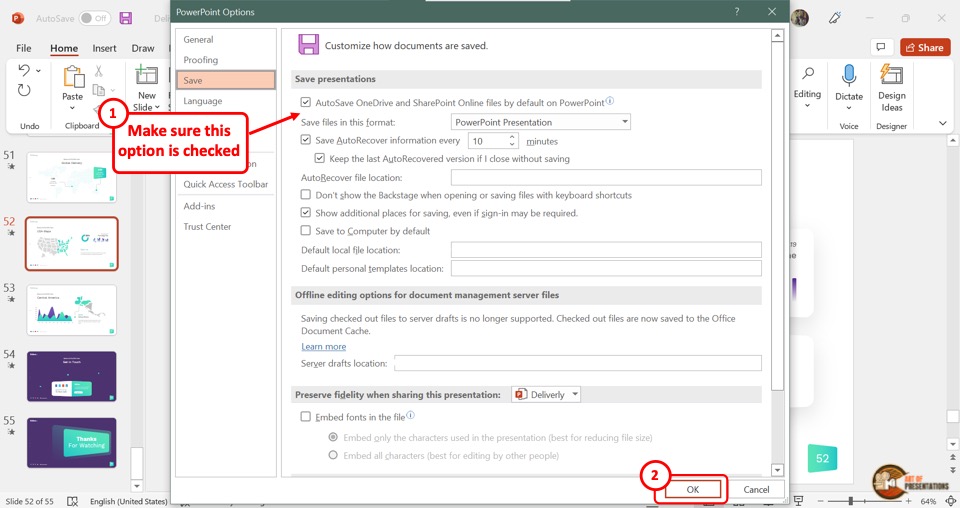
In the “PowerPoint Options” dialog, click on the “Save” option from the sidebar located on the left side. Now you can enable your preferred autosave options in the “Save presentations” section.
Click on the “Autosave OneDrive and SharePoint Online files by default on PowerPoint” for auto-saving on the cloud. You can also select how often the auto-recovery copy is saved by clicking on the box at the right side of the “Save Autorecover information” option.
Step-4: Click on the “OK” button
Now all you have to do is click on the “OK” button at the bottom of the “PowerPoint Options” dialog box to enable your autosave preference (as shown in the image in step 2).
Credit to Cookie_studio (on Freepik) for the featured image of this article (further edited).
How to Fix the “An error occurred while PowerPoint was saving the file” Error
Prevent yourself from losing hours of work
Do you see an “An error occurred while PowerPoint was saving the file” error message while trying to save a Microsoft PowerPoint presentation? There’s a good chance the location you’re saving your file in is not accessible . Here are a few ways to get around this problem.
Other reasons your presentation doesn’t save include a corrupt presentation file, the PowerPoint app experiencing a problem, your Microsoft Office login session having an issue, and more.

Close Your Presentation if It’s Open in Another App
One reason you can’t save your presentation in PowerPoint is that your presentation is open in another app. That other app may be preventing further changes from being made to your file, causing PowerPoint to display an error message.
In this case, check all your open apps and ensure none are using your PowerPoint file. If an app is using the file, close the file in that app and then retry saving the file in PowerPoint. That should resolve your PowerPoint error.
Save the File in Another Location
You may get the “An error occurred while PowerPoint was saving the file” error if the location you’re saving your file is inaccessible. This usually happens with the external storage devices (hard drives or the cloud) that you use with your computer.
In this case, you can resolve the issue by saving your presentation in a folder on your local storage. Later, you can copy the file to your external storage device using File Explorer if you want.
- While your presentation is open in PowerPoint , select the File menu in the app’s top-left corner.
- Choose Save As on the left and Browse in the middle column.

- Select a folder on your local storage and choose Save .
- If your file is saved successfully, open that folder using File Explorer , copy the file, and paste it to your external storage device.
If you fixed your issue using the above method, it’s worth running a disk checkup scan on your storage device to ensure it’s free from any errors.
- Open This PC , right-click your storage, and choose Properties .
- Access the Tools tab and select Check in the Error checking section.

- Follow the on-screen instructions to find and fix issues with your drive.
Fix PowerPoint’s Save Issue by Using a Different File Format
When you face issues saving a presentation, it’s worth using an alternate file format to see if your file is saved. For example, use the PPT format if you have trouble saving your file in the PPTX format.
- Launch your presentation with PowerPoint .
- Select File in the app’s top-left corner.
- Choose Save As on the left and select Browse in the middle column.
- Select the Save as type drop-down menu and choose a file format different from the current one. Then, select Save .

Repair Your PowerPoint Presentation
Your PowerPoint presentation may be corrupt, causing issues with the app’s save operation. Many reasons can cause your presentation file to get corrupted, including viruses and malicious apps.
To get around that, use PowerPoint’s built-in repair option. This option repairs your faulty presentation and then opens the file in the app.
- Open PowerPoint , select Open on the left and choose Browse in the middle column.
- Find and single-click your presentation.
- Select the down-arrow icon next to Open and choose Open and Repair .

- Allow PowerPoint to repair your file.
Create a New PowerPoint Presentation From Your Existing Slides
One way to recover the slides and their changes from your current presentation is to make a new presentation and paste all your current slides in it. This way, you’ll have a new presentation containing all the slides from your faulty one.
- Open your faulty presentation with PowerPoint .
- Select the first slide in the left sidebar.
- Choose all slides by pressing Ctrl + A on your keyboard.

- Copy all the slides by pressing Ctrl + C .
- Make a new presentation using Ctrl + N .
- Press Ctrl + V to paste all your copied slides in your new presentation.
- Save your new presentation by either pressing Ctrl + S or selecting File > Save .
Resolve Your Save File Error by Signing Out and Back Into Your Office Account
Your Office account’s login session may have an issue , causing your Office files not to save. You can refresh this session by logging out and back into your Office apps.
You’ll need your Office account login details, so keep those handy.
- Open PowerPoint on your computer.
- Select Account in the left sidebar.
- Choose Sign out in the User Information section on the right.

- Choose Yes in the prompt. Note that this will log you out of all your installed Office apps, including Word and Excel.
- Log back into your Office account in PowerPoint .
Repair Your Microsoft Office Installation
If your “An error occurred while PowerPoint was saving the file” error is still not resolved, PowerPoint’s core app files might be corrupt. You can’t fix these files yourself, so use Office’s built-in repair tool to fix any issues with your apps’ core files.
- Open Control Panel on your PC .
- Select Uninstall a program in the utility.
- Choose your Microsoft Office installation on the list and select Change at the top.

- Choose Yes in the User Account Control prompt.
- Select the Quick Repair option and choose Repair .

- If your issue persists, select the Online Repair option and choose Repair .
Reinstall Microsoft Office
If nothing else works, uninstall and reinstall the entire MS Office suite on your computer. Doing so removes all your Office apps, including PowerPoint, and reinstalls all these apps. This helps fix any issues with these programs.
- Open Windows Settings by pressing Windows + I .
- Select Apps in Settings.
- Find and choose Office on the list. Then, select Uninstall .

- Choose Uninstall in the prompt.
- Reinstall your version of Microsoft Office on your computer.
Resolve PowerPoint’s Save Issues on Your Computer
PowerPoint’s “An error occurred while PowerPoint was saving the file” error can make you lose all the changes you’ve made to your presentation. Luckily, this error is relatively easy to fix, and you can use the above methods to do just that.
Once you’ve gotten around the problem, use the usual save method, and PowerPoint will retain all your presentation changes .

Mahesh has been obsessed with technology since he got his first gadget a decade or so ago. Over the last few years, he's written a number of tech articles on various online publications including but not limited to MakeTechEasier and Android AppStorm. Read Mahesh's Full Bio
Read More Posts:

Leave a Reply
Your email address will not be published. Required fields are marked *
- PRO Courses Guides New Tech Help Pro Expert Videos About wikiHow Pro Upgrade Sign In
- EXPLORE Tech Help Pro About Us Random Article Quizzes Request a New Article Community Dashboard This Or That Game Popular Categories Arts and Entertainment Artwork Books Movies Computers and Electronics Computers Phone Skills Technology Hacks Health Men's Health Mental Health Women's Health Relationships Dating Love Relationship Issues Hobbies and Crafts Crafts Drawing Games Education & Communication Communication Skills Personal Development Studying Personal Care and Style Fashion Hair Care Personal Hygiene Youth Personal Care School Stuff Dating All Categories Arts and Entertainment Finance and Business Home and Garden Relationship Quizzes Cars & Other Vehicles Food and Entertaining Personal Care and Style Sports and Fitness Computers and Electronics Health Pets and Animals Travel Education & Communication Hobbies and Crafts Philosophy and Religion Work World Family Life Holidays and Traditions Relationships Youth
- Browse Articles
- Learn Something New
- Quizzes Hot
- This Or That Game New
- Train Your Brain
- Explore More
- Support wikiHow
- About wikiHow
- Log in / Sign up
- Computers and Electronics
- Presentation Software
- PowerPoint Presentations
How to Save a PowerPoint Presentation
Last Updated: May 26, 2022
wikiHow is a “wiki,” similar to Wikipedia, which means that many of our articles are co-written by multiple authors. To create this article, volunteer authors worked to edit and improve it over time. This article has been viewed 49,987 times. Learn more...
A PowerPoint presentation is an excellent way of presenting information or ideas to an audience. The software is easy to use and offers a lot of cool effects for your slideshows, too. But, what's all the use of this if you don't even know how to save your finished PowerPoint? This wikiHow will teach you how to save your file.
Design your PowerPoint presentation.

- You don't have to wait until you're totally finished to save your work. It can help to save along the way, too, to ensure you don't lose any progress.
Open the File menu when you're ready to save.

Choose the Save or Save As option.

Decide where to save the presentation.

Name and save your presentation.

Expert Q&A
You might also like.

About This Article
- Send fan mail to authors
Is this article up to date?

Featured Articles

Trending Articles

Watch Articles

- Terms of Use
- Privacy Policy
- Do Not Sell or Share My Info
- Not Selling Info
wikiHow Tech Help Pro:
Level up your tech skills and stay ahead of the curve
- Get Great Eclipse Photos with Your Phone
- The Best Noise-Canceling Headphones to Buy
How to Recover an Unsaved PowerPoint
Get that PowerPoint presentation back
:max_bytes(150000):strip_icc():format(webp)/ryanperiansquare-de5f69cde760457facb17deac949263e-180a645bf10845498a859fbbcda36d46.jpg "powerpoint save my presentation")
- Western Governors University
In This Article
Jump to a Section
- AutoRecover
- Alternate Method
- Recover Deleted Presentation
- Enable AutoSave
- Frequently Asked Questions
What to Know
- File > Open > Recover Unsaved Presentations .
- Or: File > Info > Manage Presentations > Recover Unsaved Presentations .
- Check your Recycle Bin and automatic backup folders for deleted presentations, or use recovery software.
This article explains how to recover an unsaved PowerPoint. These instructions apply to PowerPoint 2019, 2016, 2013, and Microsoft 365 .
How Do I Recover a PowerPoint That Was Not Saved?
There are a few ways to recover an unsaved PowerPoint. If one method doesn't work, you should try the other options outlined below.
PowerPoint has a feature called AutoRecover which periodically stores data from your presentations. In newer versions of PowerPoint, you can access AutoRecover files from within PowerPoint:
Go to the File tab.
Select Open .
Select Recover Unsaved Presentations at the bottom of the list of recent files.
Select your presentation to open it. If you don't see it, move on to the next section to try a different method.
Alternate Way to Recover an Unsaved PowerPoint
Depending on your version of PowerPoint, the steps for recovering unsaved presentations might be different:
Select Info .
Select Manage Presentations > Recover Unsaved Presentations .
Select your presentation to open it.
If you don't see the Recover Unsaved Presentations option in PowerPoint, you might find your presentation in the following folder on Windows:
On Mac, you can find AutoRecover data in this folder:
Copy and paste the above file path in the File Explorer or Finder address bar; then press Enter to open the folder. Replace User with your Windows or Mac username.
If you still don't see your file, try looking in the following folder on Windows:
Alternatively, press Windows key + R to bring up the Run command and enter %temp% in the Run prompt to open the Temp folder. To find your presentation, search for ppt files.
How Do I Get My Deleted PowerPoint Presentation Back?
If you previously saved a presentation and it got deleted, there are a few things you can try to recover your PowerPoint.
First, check your Windows Recycle Bin or Mac Trash folder. Depending on how long ago a user deleted it, you may be able to restore files from the Recycle Bin or recover files from the Trash on Mac . If successful, the file should return to its original folder.
If you use automatic backup software , check your backup folders. You can also restore your file using recovery software like Recuva or Disk Drill .
Enable PowerPoint AutoSave
PowerPoint includes an AutoSave feature that backs up your work every few seconds. Select the AutoSave toggle switch in the upper-left corner of your presentation to turn it On , or go to go to File > Options > Save and check the AutoSave box.
To recover an unsaved Word document , go to File > Manage Documents > Recover Unsaved Documents . If you see the document listed, select it. Or, search for a backup of the file by going to File > Open > Browse . You can also use Windows Explorer to search for recovered or temporary files.
To recover an unsaved Excel file , if you have AutoSave enabled, view the Document Recovery interface when you launch Excel. In the section called Available Files , you'll see all your autosaved workbooks and document files. To recover a file, select the arrow next to the file details and choose Open .
To recover a deleted or unsaved Notepad file, go to your Windows 10 search function, type %AppData% , and press Enter . The Roaming folder will open. Search for files that end in .txt to find your unsaved Notepad file.
Get the Latest Tech News Delivered Every Day
- How to Recover an Unsaved Word Document
- How to Use the Samsung My Files App to Find Your Downloads
- Tips for Solving Common PowerPoint Problems
- How to Find Trash on an Android
- EaseUS Data Recovery Wizard v17
- How to Recover an Excel File
- The 21 Best Free Data Recovery Software Tools of 2024
- How to Turn on AutoSave in Excel
- How to Recover Deleted Files (Easy, 5 to 25 Minutes)
- How to Save PowerPoint Presentations as PDF Files
- How to Merge PowerPoints
- How to Fix Corrupted Files in Windows 11
- How to Recover Deleted Files on a Mac
- How to Transfer Android Files to Macs, PCs, and Other Devices
- How to Use Microsoft's Free PowerPoint Viewers
- Why Doesn't the Music or Sound Play in My PowerPoint Presentation?
We explain and teach technology, solve tech problems and help you make gadget buying decisions.
Top 7 Ways to Fix Microsoft PowerPoint Not Saving Files on Windows
It can be annoying when you have spent hours working on an important presentation, and Microsoft PowerPoint fails to save the file on your Windows computer. When this happens, the app typically displays a somewhat ambiguous error that reads, ‘An error occurred while PowerPoint was saving the file.’ If you face the same problem, this guide can help.

This problem can arise from various factors, like insufficient permissions, corrupted slides, or an outdated app. Before switching to PowerPoint’s web version or look for an alternative presentation program, try out the following fixes to resolve the problem.
1. Make Sure the File Is Not Opened Elsewhere
Having a PowerPoint file open in multiple apps can prevent you from changing it. You need to first ensure that your PowerPoint file isn’t open in any other program.
Such issues can also arise if the file is opened in File Explorer’s Preview Pane. Several users on the Microsoft forums reported fixing the problem by disabling the Preview Pane in File Explorer . You can also give it a try.
Press the Windows + E keyboard shortcut to open File Explorer. Click the View menu at the top, go to Show, and deselect the Preview pane option. Try saving your file after this and see if it works.

2. Save the File in Another Location
A lack of relevant permissions to access a specific directory on Windows could prevent PowerPoint from saving files. To fix this, you can try saving the file in a different directory. In the PowerPoint app, press Ctrl + Shift + S keyboard shortcut to bring up the Save As dialog box. Select a new location for the file and hit Save.

If you can’t save the file in the PPTX format, use the ‘Save as type’ drop-down menu to select the PPT format and hit Save.

3. Copy Your Presentation to a New File
If PowerPoint can save only a specific PPT, there might be a problem with the file itself. In that case, you can resolve the issue by copying the slides from the problematic PowerPoint file and pasting them into a new file. Here are the steps for the same.
Step 1: Open your PowerPoint file and select any slide. Then, press Ctrl + A keyboard shortcut to select all the slides.

Step 2: Right-click on your selection and choose Copy.

Step 3: Press Ctrl + N keyboard shortcut to create a new PowerPoint file, and press Ctrl + V keyboard shortcut to paste your slides.

Step 4: Press Ctrl + S keyboard shortcut and then save your file.

4. Remove ActiveMovie Control From Microsoft Visual Basic Userform
Another thing you can do when PowerPoint displays ‘An error occurred while PowerPoint was saving the file’ message is to remove the ActiveMovie control from Microsoft Visual Basic Userform. Here’s how you can go about it.
Step 1: In the PowerPoint app, switch to the Developer tab and click the Visual Basic option.

Step 2: Click the Insert UserForm icon on the toolbar and select UserForm.

Step 3: Click the File menu at the top and select Remove UserForm.

Step 4: Select No to continue.

Step 5: Click the File menu again and select ‘Close and Return to Microsoft PowerPoint.’

Try to save your file once again and see if it works.
5. Sign Out and Sign Back In
Authentication problems with your Office account can sometimes prevent PowerPoint from saving your files. You can sign out of the app and sign back into the app to fix the problem.
Step 1: Open the PowerPoint app and click the File menu at the top.

Step 2: Switch to the Account tab and click the Sign out option.

Sign back into the app with your account and check if the issue persists.
6. Update the PowerPoint App
Using an outdated version of the PowerPoint app can also cause such problems. Hence, it’s a good idea to ensure that you are running the most recent version of PowerPoint, especially if you have disabled automatic Office updates .
Step 2: Select the Account tab. Click on Update Options and select Update Now.

7. Run the Office Repair Tool
Running the Microsoft Office repair tool is an effective way to fix issues with Office apps like PowerPoint. So, if nothing works, you can run the Office repair tool as a last resort.
Step 1: Right-click on the Start icon and select Installed apps from the list.

Step 2: Locate the Microsoft Office suite on the list. Click the menu icon next to it and select Modify.

Step 3: Select Quick Repair and click on Repair.

If PowerPoint still won’t save files, repeat the above steps and try an Online Repair instead. This will allow the Office repair tool to perform a thorough repair operation and download any files from the internet if required.

Preserve Your Work
Encountering errors while saving your PowerPoint files is the last thing you want after hours of work. Hopefully, one of the above solutions has proven useful, and you can save your PowerPoint files on Windows.
Was this helpful?
Last updated on 03 July, 2023
The above article may contain affiliate links which help support Guiding Tech. However, it does not affect our editorial integrity. The content remains unbiased and authentic.
Leave a Reply Cancel reply
Your email address will not be published. Required fields are marked *

The article above may contain affiliate links which help support Guiding Tech. The content remains unbiased and authentic and will never affect our editorial integrity.
DID YOU KNOW

Pankil Shah
Pankil is a Civil Engineer turned freelance writer from Ahmedabad, India. Since his arrival at Guiding Tech in 2021, he delves into the world of how-tos, and troubleshooting guides on Android, iOS, Windows, and the Web at Guiding Tech. When time permits, he also writes at MakeUseOf and Techwiser. Besides his new-found love for mechanical keyboards, he's a disciplined footfall fan and continues to plan his international travels with his wife.
More in Windows

Top 8 Ways to Fix Microsoft Teams Not Detecting Camera

3 Best Ways to Extract Images From a PowerPoint Presentation
Join the newsletter.
Get Guiding Tech articles delivered to your inbox.
How-To Geek
How to reduce the file size of a powerpoint presentation.
Need to chip off some KB from your presentation's file size? Try some of these handy tips.
Quick Links
Convert your presentation to the pptx format, insert your pictures—don’t copy and paste, do image edits in an image editor—not in powerpoint, compress all of the images in your presentation, don’t use embedded fonts, link to files instead of embedding them, don’t store a thumbnail for the presentation, remove personal and hidden information from your presentation, turn off autorecover, copy everything into a new presentation, a possibility: unzip the presentation and compress it.
Considering that Microsoft PowerPoint presentations are generally accompanied with tons of images, gifs , embedded videos , charts , graphs, and other content, it’s no surprise that you get some pretty big files. Here are a few steps you can take to reduce a presentation's file size.
Large files can be annoying. They take up loads of precious disk space, slow down playback performance, and can cause emails to bounce back due to exceeding the file size limit. You can prevent all of these things by reducing the file size of your presentation.
We’ve mentioned it before, but the first thing you’d think of when considering file size reduction is images—and for a good reason. Image files can be quite large. There are steps you can take to reduce the size, such as compressing the images in the presentation. If you suspect the reason your PowerPoint file is so large is due to images, then be sure to read the article we’ve written on how to reduce the size of Office documents that contain images .
Related: How to Reduce the Size of a Microsoft Word Document
We do have some additional tips to add if you followed these steps but still need to reduce your presentation’s file size.
Microsoft released the PPTX format in Office 2007. Still, it’s not uncommon to see PPT files floating around. So what’s the difference between a PPT and PPTX file? The PPTX version compresses all of the content within the presentation. If you have a PPT file and convert it into a PPTX file, you’ll notice a decrease in the file size.
Converting the file is as simple as pressing a button and choosing the file type. Go ahead and open your PPT file, head over to the “File” tab, and then click “Convert.”
Windows File Explorer will appear. You’ll notice the Save As type is set as "PowerPoint Presentation." This is the PPTX file type. Click “Save.”
Your PPT file will now be converted to a PPTX file. As you can see, the size of the file has been reduced.
HTG Presentation 2 is our PPT file, and HTG Presentation 3 is our PPTX file. Merely converting the file type reduced the size by 335 KB.
While this isn’t a breathtaking drop in file size, we managed to reduce a Word document file size from 6,001 KB to 721 KB. It all depends on what’s inside the file. With any luck, this will be the only step you need to take. If not, keep reading.
It’s tempting to copy and paste an image in PowerPoint instead of using the insert function. This won’t be an issue if you’re not concerned about file size, but if you are, then beware of copy and paste—it may reformat your image to BMP or PNG. Why is this an issue? Both of those file formats are larger than JPG.
You can see in the above screenshot that the PNG file is 153KB compared to the 120KB JPG file of the same image. Each time you copy and paste a JPG file to PowerPoint, and it gets converted to PNG, you’re adding a bit of unnecessary file size to the presentation. Using the insert function will ensure your images are inserted as intended.
When you insert an image in PowerPoint, it’s best to make sure that it doesn’t need any edits. If it does require edits, you’re better off doing it in an image editor. Why? When you use PowerPoint to edit your image, it stores all of those edits as part of the presentation. For example, when you change an image to black and white, PowerPoint retains the full-color image as well. That’s a lot of extra bites being stored.
If you don’t have an image editor ( you do ) or you simply must use PowerPoint, be sure to tell PowerPoint to discard all of that excess data saved from the edits . It won't save you as much space as working in a dedicated editor, but it will help.
You can compress images in PowerPoint one at a time or all at once. If you’re looking to do the latter, here’s how.
Open your presentation, head over to the “File” tab, and then select “Save As” in the left-hand pane.
Next, select “More Options,” which you'll find under the area where you would name your file and choose the file type.
The “Save As” window will appear—this time with a few extra options available to you. Next to the “Save” button, click “Tools.”
In the drop-down menu that appears, select “Compress Pictures.”
The “Compress Pictures” window will appear. Here, you can choose the resolution type of the images (based on PPI) in the presentation. You’ll also notice that you’re not able to select the “Apply only to this picture” option in the “Compression Options” group. That’s because, due to the way we accessed this tool, this option isn’t available.
Note: If you do want to compress a single picture, select it and then head to Picture Tools Format > Compress Pictures.
Once you’re happy with your selection, click “OK.”
Be sure to save your presentation afterward.
We get why you might want to embed fonts—you might be making a Star Wars themed presentation and, as a result, anyone you may be sharing the presentation with is not likely to have those special fonts available to them. Embedding the fonts in your presentation could prevent issues down the line, but it comes at the cost of increased file sizes.
In general, unless you are sure you need to display a particular font, we recommend turning off font embedding.
Head over to the “File” tab and select “Options” at the bottom of the left-hand pane.
On the “Save” tab, untick the “Embed fonts in the file” checkbox and then click “OK.”
We saved a copy of our presentation with all fonts embedded, without fonts embedded, and with only the fonts used in the presentation embedded. Look at the difference if file sizes:
Convinced yet?
Consider the difference in file size if you embed an entire YouTube video in your presentation instead of linking back to it. Embedding an entire video will significantly increase the size of your presentation. There are certainly some valuable benefits when embedding a file vs. linking to it (such as when the recipient might not have internet access to play the video), but if the file size is an issue, just don’t do it.
Way back when Office let you save thumbnail images of your presentation so that you could get a sneak preview of the file when searching for it in File Explorer. Windows has grown to be more sophisticated, so it no longer requires the help of Office applications to do this. But, the option is still available.
We ran a little test to see the difference in file size with and without this option enabled. Here are the results:
With the thumbnail option enabled, our file size was 2,660 KB. Without the option enabled, the file size was reduced to 2,662 KB, saving a total of 7 KB.
This is a pretty small save, but when we tested it with a Word document, the difference was significant, showing 721 KB without the option enabled, and 3,247 KB with the option enabled.
While this is a large gap between applications and it’s not exactly clear why the difference is so large, it’s still an option worth exploring. To disable the feature, open your presentation, head over to the “File” tab, and then select “Properties” found on the right-hand side, then “Advanced Properties.”
You’ll now be in the “Summary” tab of the “Properties” window. At the bottom of the window, uncheck the box next to “Save preview picture,” and then click “OK.”
Microsoft Office will store your personal information (such as author name) and hidden properties within your presentation. Getting rid of this information can save you a bit of space.
Open your presentation, head over to the “File” tab, select the “Check for Issues” option, then select “Inspect Document."
The “Document Inspector” window will appear. Make sure the “Document Properties and Personal Information” box is checked, and then click “Inspect."
In the next window, select “Remove All.” The information will now be removed, saving you a few KB of space.
We don’t necessarily recommend this, and it should only be used as a last resort effort. AutoRecover is an essential tool in Office, and if you’ve ever lost a document before saving, then you understand precisely what we mean.
Each time Office uses AutoRecover, it adds a little to the size of the file. To turn AutoRecover off, head over to the “File” tab and select “Options” found at the bottom of the left-hand pane.
In the “Save” tab of the “Options” window, uncheck the box next to “Save AutoRecover information ever xx minutes.”
If you save and exit out of the presentation immediately, you won’t notice a difference. Over time though, as you continue to progress through the presentation, the AutoRecover feature will add KB to your file.
While you’re creating your presentation, PowerPoint will save various things in the background to help you out. We’ve mentioned how to turn off a lot of these features, delete data PowerPoint saves, and so on, but there’s always a chance something slipped through the cracks, and PowerPoint stored some information you don’t need. Copying your content over to a new presentation may be a good solution to the problem.
This may be a bit of a hassle though as, with PowerPoint, you’ll need to copy and paste each slide (and master slides). Once you do though, the new presentation won’t have any of the previous background saves, AutoRecover information, or previous versions of the file. As a result, you should see a change in file size.
While we can’t tell you exactly how much this will reduce your file size since each presentation will be different, it’s worth a shot.
As we mentioned earlier, a PPTX file is a compressed file (which is why the size is much smaller than an old-school PPT file). This means you can open it with a tool such as 7-Zip or WinRar, extract all the files from your PPTX, add them to a compressed archive, and then rename the archive to a PPTX file extension.
We had some issues here, though.
In Rob’s testing with his Word document, it successfully reduced the size of the file from 721 KB to 72 KB. However, it corrupted the file in the process. In my testing with my 2,614 KB file, it didn’t corrupt it, but it only reduced it to 2,594KB—a total of only 20 KB. We’re unsure what’s at play here, so if you want to give this a go, be sure to have a backup copy of your file before doing so.
That’s all the tips we've got for reducing the size of your PowerPoint presentation. We’re always looking for new and interesting ways to reduce the size of our files, so if you have any tips, let us know in the comment section, and we’ll be happy to test them out!
- Domain Names
- Domain Name Search
- Free Domain Transfer
- .com Domain
- 1 Dollar Domain
- Cheap Domain
- Free Domain
- Buy SSL Certificate
- Website Builder
- Website Platforms
- Website Templates
- Web Design Services
- eCommerce Website Builder
- Local Business Listing
- Web Hosting
- WordPress Hosting
- 1 Dollar Hosting
- Windows Hosting
- Free Website Hosting
- Create Business Email
- HiDrive Cloud Storage
- Microsoft 365 Business
- Cloud Server
- VPS Hosting
- Dedicated Servers
- Rent a Server
- IONOS Cloud
- Business Name Generator
- Logo Creator
- Favicon Generator
- Whois Lookup
- Website Checker
- SSL Checker
- IP Address Check
- Online sales

How to recover an unsaved PowerPoint file: 5 different methods
If you’ve accidentally deleted a PowerPoint file or forgot to save your progress, you can recover PowerPoint in Microsoft 365, PowerPoint 2021, PowerPoint 2019 and PowerPoint 2016. Each version comes with built-in features that you can use to restore presentations.
- Step 1: Search for the file
- Step 2: Rename the file
- Step 3: Recover an unsaved PowerPoint file
- Step 1: Show last-used files
- Step 2: Recover a PowerPoint file that wasn’t saved
- Restoring previous versions of a PowerPoint file
- Recovering old versions from cloud storage
- Step 1: Open the recycle bin
- Step 2: Search for the unsaved PowerPoint file
- Step 3: Recover PowerPoint file
- Step 1: Save the file in a temporary location
- Step 2: Copy the file into another folder
- Step 3: Open the file
- Step 1: Open a new presentation
- Step 2: Recover unsaved PowerPoint
- Step 3: Save file
- The safe mode
- Option 1: Activation in the menu bar
- Option 2: Activation via Options
The easiest and fastest way to restore a PowerPoint is to use the built-in feature under Open > Recent > Restore Unsaved Presentation .
How to recover an unsaved PowerPoint file 
If you try to close an unsaved PowerPoint file, the program will display a warning message. This message lets you know that changes to the file still need to be saved. Despite this precaution, it can happen that open programs are closed without saving and data is lost. Unforeseen situations can also cause the program to close without saving. Luckily, there are various ways to recover a PowerPoint.
Recover a PowerPoint file with temporary files 
In the “temp” folder, Windows saves temporary files on an ongoing basis. There’s also a possibility that unsaved contents of your PowerPoint can be found in this folder.
Step 1: Search for the file 
Open File Explorer and enter the term “PPT*.tmp” into the search bar. Now wait and see if the search comes up with anything.
When saving, PowerPoint adds a random number to the filename. Since you don’t know this number, you can use * as a placeholder.

Step 2: Rename the file 
If a PowerPoint file shows up in File Explorer, you can now rename it with .ppt at the end.
Step 3: Recover an unsaved PowerPoint file 
Next, open the file to check whether it’s actually the unsaved PowerPoint file you want to recover. To recover the file, simply save it to another location on your computer.
Recover a PowerPoint presentation using the integrated PowerPoint feature 
PowerPoint provides a feature to recover an unsaved PowerPoint. To make use of this feature, proceed as follows:
Step 1: Show last-used files 
Open the presentation program, click on the menu point Open and then select Recent from the left menu bar.
Step 2: Recover a PowerPoint file that wasn’t saved 
Now, you can click on the button Recover Unsaved Presentations .

A folder will now open where you can find all saved drafts. If the file you’re looking for is there, left-click on it and select Open . Save the file. You can now continue to work on your presentation.
How to recover an old version of a PowerPoint file 
While working on a PowerPoint presentation, unwanted changes can quickly be reversed with the key combination [Ctrl] + [Z]. Using this shortcut, deleted paragraphs of text can be brought back with just a few clicks. But as soon as you save a file and close it, data that you have deleted will be lost. Follow the steps below to recover an old version of a PowerPoint file.
Restoring previous versions of a PowerPoint file 
Use the right side of your mouse to click on a file and select Previous Versions from the menu bar. A new window will open with the corresponding tab. In this window, previous versions of your PowerPoint file can be found, but only if a recovery point is marked. Select a previous version to restore an old version of your PowerPoint.

Recovering old versions from cloud storage 
If you automatically save your files to Dropbox, Google Drive, One Drive or another cloud storage service, you have another option for recovering an unsaved PowerPoint. Search for previous versions, manage your old files, and recover the file you’re looking for.
How to recover a deleted PowerPoint file 
It’s generally a good idea to delete files that you no longer use or that are outdated. This allows you to maintain a clear overview of your file system. But what if you accidentally delete an important PowerPoint file? No need to worry. When you delete a file, it’s not completely deleted from your computer.
Step 1: Open the recycle bin 
To recover a deleted file from your recycle bin , double-click on the waste bin icon.
Step 2: Search for the unsaved PowerPoint file 
Enter the name of your PowerPoint file into the search field of the recycle bin program.
Step 3: Recover PowerPoint file 
Now, use the right side of your mouse to click on the file and select the option Undo Delete from the menu. Your presentation will now automatically reappear in the folder where you deleted it.
Use the full Office suite Microsoft 365 for your business and enjoy benefits such as SSL/TLS encryption and secure storage.
How to recover a damaged PowerPoint file 
You’ve saved a PowerPoint file, but can’t to open it? We’ll show you different ways to recover a damaged PowerPoint.
Move a Presentation to recover a PowerPoint file 
In most cases, it’s not possible to tell whether the location or the file itself is damaged. If the file can be restored with the following instructions, the location is affected. In this case, it is best to restore and back up all files from this folder.
Step 1: Save the file in a temporary location 
Open the folder where the damaged file is located. Open the context menu with a right-click on the file. Select Copy option to save the file to the clipboard.
Step 2: Copy the file into another folder 
Next, open any folder or create a new one. Paste the file by right-clicking on a free area and selecting Paste from the context menu. You can also copy the file to the folder by using the key combination [Ctrl] + [V].
Step 3: Open the file 
Try to open the file by double-clicking it. If you can do this without encountering any problems, it may be the original location itself that is damaged.
Paste slides into a new presentation 
In many cases, however, it’s not the location that’s damaged, but the PowerPoint file itself. In this case, the program offers a handy function to insert the slides into a new and undamaged file.
Step 1: Open a new presentation 
Open up a blank PowerPoint document.
Step 2: Recover unsaved PowerPoint 
In the menu, select Start and select New Slide from the drop-down menu. Using the left side of the mouse, choose the option Reuse Slides .

A field with the same title will appear on the right. Click on the Browse button and select the file you want to restore in Explorer. A thumbnail preview of all slides will appear. Click on the slides with the left mouse button to insert them into the new presentation. To restore the entire unsaved PowerPoint file, right-click to open the context menu and click the Insert all slides option.
Step 3: Save file 
As soon as you’ve transferred all slides, make sure that you save the file in a new location.
The safe mode 
If a PowerPoint file cannot be opened in normal mode, try starting it in safe mode. To do this, hold down the control key [Ctrl] and then double-click on the PowerPoint file to select it. Click Yes in the confirmation window to open the presentation in safe mode.
Most Office programs can be opened in safe mode using this technique.

Now, you can look for any issues with the file before saving it under a new name.
How to avoid losing PowerPoint files 
Despite the many options to recover a PowerPoint file, a successful recovery isn’t guaranteed. That’s why it’s important to use the shortcut [Ctrl] + [S] throughout your work. With this shortcut, you can regularly save your file, ensuring your work isn’t lost.
PowerPoint comes with a function that automatically saves open presentations. We’ll show you how to activate the function and avoid losing your files.
Option 1: Activation in the menu bar 
Activate the feature in the PowerPoint menu bar by moving the switch to AutoSave On .

Option 2: Activation via Options 
If you activate the feature in the Options area, additional custom settings are available. Select the File button in the menu. Then click on Options followed by Save. Activate the function Save AutoRecover information every… and enter the desired time interval. If you enable the Keep the last AutoRecovered version if I close without saving option, you avoid losing data if you accidentally close the PowerPoint file without saving it. If necessary, you can also adjust the location of the file to make it easier to find the backed-up file.

Files from other Microsoft 365 programs can also be recovered. Find out more about “ How to recover an Excel file ” and “ How to recover unsaved Word documents ” in our dedicated tutorials.
Related articles

How to recover an Excel file
Recovering Excel files can be time-consuming and nerve-wracking. Windows and Excel offer a wide range of options for recovering unsaved or overwritten Excel documents if the program crashes or you accidentally close it without saving. In this tutorial, we’ll present helpful solutions and practical tips for recovering lost or unsaved Excel files.

Recover deleted files on Mac | How to
Have you ever accidentally deleted important data from your Mac? In this how-to article, we’ll explain how to find those files and show you three quick and easy methods of recovering deleted files on your Mac. In most cases, even files that you thought were permanently deleted can still be recovered.

How to recover deleted files from the Recycle Bin
Did you accidentally delete a file in Windows? Don’t worry, Windows initially moves deleted files to the Recycle Bin, which you can easily access. The files are not permanently deleted until you empty the Recycle Bin. In this step-by-step guide, we’ll show you how to recover files from the Recycle Bin or a deleted folder.
How to recover unsaved Word documents
If either Word or your PC crashes while working on a Word document, don’t panic! Recovering unsaved Word documents is easy to do; even damaged or deleted files are not always lost. Microsoft has numerous tools built into its popular text program which allow you to retrieve the edited or in-progress file. And if these tools don’t work, Windows and special repair and recovery tools offer plenty of…
Build or host a website, launch a server, or store your data and more with our most popular products for less.

Save your presentation file
As with any software program, it is a good idea to name and save your presentation immediately, and save your changes frequently while you work.
In PowerPoint, you can save your desktop presentation to your local drive (such as your laptop), a network location, a CD, a DVD, or a flash drive. You can also save it as a different file format.
On the File tab, select Save .

Do of the following:
To save to your local drive, such as your laptop, a flash drive, CD or DVD drive, select Computer .
To save to a SharePoint Library, select SharePoint .
Under Save As > Recent Folders , select Browse , pick a path and file folder, and then name the file.
Select Save .
Save your presentation file in a different file format
Note: To save files in PDF (.pdf) or XPS (.xps) file formats, see Save or convert to PDF or XPS .
On the File tab, select Save As .
Under Save As , do one of the following:
Under Recent Folders , select Browse , pick a path and file folder, and then name the file.
In the Save as type list, pick the file format that you want.
Save your presentation in an earlier version of PowerPoint
In PowerPoint 2013 and newer versions, you can save files to an earlier version of PowerPoint by selecting the version from the Save as type list in the Save As box. For example, you can save your PowerPoint presentation in the newest PowerPoint Presentation format (.pptx), or as a PowerPoint 97-2003 Presentation (.ppt).
PowerPoint 2013 and newer versions use an XML-based .pptx file format introduced in the 2007 Office release. These files can be opened in PowerPoint 2010 and PowerPoint 2007 without special add-ins or loss of functionality. For more information, see Open XML Formats and file name extensions .
Open Document format
Microsoft 365 supports the ability to save a presentation file in the OpenDocument Presentation format (.odp).
When you use the Save As or Save a Copy command, the option to save in .odp format is listed at the end of the Save as type list of options.

Need more help?
Want more options.
Explore subscription benefits, browse training courses, learn how to secure your device, and more.

Microsoft 365 subscription benefits

Microsoft 365 training

Microsoft security

Accessibility center
Communities help you ask and answer questions, give feedback, and hear from experts with rich knowledge.

Ask the Microsoft Community

Microsoft Tech Community

Windows Insiders
Microsoft 365 Insiders
Was this information helpful?
Thank you for your feedback.

- Outlook & Office 365 Help
How to Record My PowerPoint Presentation (and save it as MP4)?
I’m taking a class through the local junior college and my professor requires us to record our presentations and submit them as .mp4 movies. We’re also supposed to be on camera in an inset! How can I do that in PowerPoint on my PC?
There are actually a number of ways you can record yourself delivering a speech or presentation on your PC with an inset video from your Webcam. One straightforward option: Zoom . Open up a Zoom meeting in the Zoom app, share your presentation, press ‘record’ within Zoom, and you’re ready to go. Third-party apps like Loom offer similar functionality if you want to go that route too. But it turns out that Microsoft PowerPoint also has the ability for you to record a narrated slide show and can also record you on video and then export the resultant file as an mp4 video!
There are some caveats, however. Your computer needs a working webcam and microphone, and for best results, I recommend you position yourself in front of a blank wall or similar so you look good on camera. Light your face too, so you aren’t a dark silhouette (as too many people end up being on camera). Don’t worry, you can practice, test things out, record, and then re-record until you’re comfortable with this feature.
HOW TO RECORD YOUR POWERPOINT PRESENTATION
Let’s start by looking at how to find and prepare the presentation recording tools in Microsoft PowerPoint. I’m using the latest standalone app on a Gateway laptop running Windows 10. I’ve created just the first few slides of a presentation on Clubhouse, and want to practice recording my narration…

Your presentation probably looks similar. Along the top, just below the orange window frame, are the main categories of “ribbon”: choose “ Slide Show “, as shown. But where is the record presentation feature? If the window were only just a little bit wider, it’d be much more obvious:

The tiny square with the even smaller red dot is Record Slide Show , as you can now see. Click on the downward facing “V” adjacent to that button and you can set up some basic configuration:

Odds are good you want to record a full presentation starting with the first slide, so choose “ Record from Beginning… ” and PowerPoint rather dramatically takes over the entire screen. Here’s what you’ll see:

Notice along the top the standard record / stop / replay buttons, and that in the center you can choose to view your presentation notes (they won’t be part of the recording. PowerPoint is really smart about that!) and, on the right side of the top toolbar, the close “X” and audio/visual settings button. On the left is previous slide, the right is next slide and the bottom includes a running timer showing overall presentation time and time on this particular slide, followed by a long strip of annotation tools and colors. Finally, a mic, a video camera, and a tiny user icon. Want to record audio but not be on camera? Click on the user icon on the lower right corner and you can disable the camera, for example.
Start by making sure the camera and microphone are set correctly. That’s done by clicking on the A/V settings icon on the top right…

Looks good to me. Let’s do this!
RECORDING YOUR POWERPOINT SLIDE SHOW
To actually record yourself delivering the presentation in PowerPoint, take a deep breath, make sure you look good on camera in the little window, then press the red RECORD button on the top left. It’ll give you a 3… 2… 1… countdown and you’ll be recording!

A few things to notice on the above image: The RECORD button has become a PAUSE button, the timers on the lower left are both now tracking time, and there’s a tiny red dot on the top left of the video inset window. Now, you’ll need to say something smart about your first slide and when you’re ready, click on the “>” on the right side to move to the second slide. Keep talking, it’s still recording!
Done recording? Click on the STOP button on the top left and those buttons will change to reflect that there’s a recording saved:

Press REPLAY and watch. You’ll see exactly how it all works, hear the potentially loud CLICK of you moving to the next slide, and generally get a good sense of whether your presentation is engaging and lively or showing instead that you’re distracted. Try re-recording until you’re happy with the results, and don’t be discouraged if it takes a few times through to get a good slide show.
Once recorded, click on the “X” on the top right and you’ll go back to the main PowerPoint window:

Notice now that the slide has the video inset on the lower right and that the ribbon includes some slightly different options, including “Present Online”. You can click on the “From Beginning” if you want to watch your slides show again, and why not? You did a great job!
SAVE YOUR POWERPOINT SLIDE SHOW PRESENTATION
Now that you’ve recorded your presentation, it’s time to save it. I recommend you first save the presentation as a PPTX presentation, so you can open it later and edit it as needed. That’s done by going to File along the very top and choosing “ Save As… ” on the left side:

Notice that the filetype is still PPTX, the same as it would be with a regular presentation. This is confusing, but we’ll solve the problem by saving it as an MP4 movie a bit later…
I strongly encourage you to add “narrated” or “recording” or similar to the filename so you can know immediately which presentation is just the slides and which includes your narration recording. You can see at a glance the video and audio definitely adds to the file size:

My slide show is a modest 625K, but once I narrate it, the new version explodes up to 11.5MB. Surprisingly, the MP4 will prove to be smaller than the PPTX that includes the narration.
EXPORT YOUR NARRATED SLIDE SHOW AS MP4 MOVIE
To export your recorded slide show as an MP4 movie, go back to the FILE menu, but this time choose EXPORT, as shown:

Notice that I’ve chosen File > Export > Create a Video. On the right side are two critical settings before you proceed: Video size and presentation timing. Let’s start with output resolution, which defaults to “ Full HD “. Click and there are a lot of choices:

Unless you’ve been given explicit instructions to save as Full HD or Ultra HD by your professor, I strongly recommend you save in 720p. It’s good enough resolution it looks great full screen (or even on a TV or projected) but the file size is still modest. I recommend to my own students that they choose HD 720p for their presentations.
The second option to check relates to the timing of the presentation:

Rather long-winded options, but I definitely encourage you to choose “ Use Recorded Timings and Narrations ” to ensure that the recording you just made is the basis of the movie!
Once you’ve specified exactly what you want, choose “ Create Video “, the button on the bottom of the screen. You’ll be prompted for a file name, as usual:

Notice that the format is MPEG-4 Video, the long, fancy name for “MP4”. Pay attention to where you’re saving it and click “ Save ” to proceed. Now you’ll see a progress bar along the bottom as PowerPoint does its thing:
Depending on how long your presentation is, this could take upwards of a minute or two. Patience!
Finally, you’ll have the .mp4 file that your professor requires:

Notice that the original slides only file is 625KB, the saved PowerPoint presentation with narration is 11.5MB, but the MP4 movie is only 4.8MB. As I said earlier, it ends up being surprisingly smaller than the full PPTX file (if you choose 720p. Choose Ultra HD 4K and it’ll be quite a bit bigger!)
That’s it. Now you know how to record your presentation and turn it into a movie. Want to see the very beginning of my presentation? Here’s an excerpt of my Intro to Clubhouse:
(Don’t panic when I stop talking mid-sentence. I did that to keep the files small and easy to work with). Good luck with your class.
Pro Tip: I’ve been using and writing about Microsoft’s Office Suite for many years. Please check out my PowerPoint help library for plenty of useful tutorials, as well as additional Office help pages ! Thanks.
Leave a Reply Cancel reply
Your email address will not be published. Required fields are marked *
6 Quick Ways to Fix the PowerPoint Can't Save File Error in Windows 11
Keep running into errors when trying to save a PPT file on your Windows PC? Here's how to fix it.
Are you unable to save your PowerPoint presentation and getting the "An error occurred while PowerPoint was saving the file" error? Needless to say, it can be really frustrating, besides disrupting your workflow.
If you've already restarted your computer without success, it's time to explore more advanced solutions. Here are six quick solutions that will help you troubleshoot the PowerPoint can't save file error in no time.
1. Save the File to a Different Location
One simple solution to eliminate the PowerPoint can't save file error is to save your presentation to a different location. Doing this will solve the issue if the original location is inaccessible, doesn't have enough space, or has problems.
To do this, launch the PowerPoint file throwing the error message, and choose File from the top-right corner. Then, choose Save As from the left sidebar, choose a different location, and click Save .
If the file saves to the new location, you are good to go. However, if you still get the error message, try the next solution on the list.
2. Copy All Slides to a Different File
Sometimes, the problem might lie within the presentation file itself rather than your computer. In this case, you can transfer all slides to a new presentation.
To do this, copy all the slides from the presentation causing the issue, and then create a new presentation and paste them into it.
3. Sign Out and Into PowerPoint
A temporary bug or glitch in your Microsoft account can also be a prime reason behind the error message. Fortunately, you can quickly eliminate all such bugs and glitches by signing out and into your Microsoft account.
Here's how to do it:
- Open PowerPoint and choose Account from the left sidebar.
Then, enter your credentials to log in with your account. Check if you still get the error message on saving your presentation.
4. Remove Problematic Objects From the Slide
An unsupported object in your presentation can also prevent you from saving the file. In this case, you'll need to go through each slide in your presentation and look for the problematic object.
To find the problematic object, copy all inserted objects and paste them into a new slide. The object that is failing to copy and paste into the new slide is the culprit.
Remove that object from your presentation, and then try to save the file. If you still get the error, continue with the guide.
5. Repair PowerPoint
Microsoft Office offers a dedicated tool to fix all kinds of issues with Office apps, including the one discussed here. You can run this tool on your computer by following these instructions:
- Press the Win key to open the Start Menu, type Control Panel in the search bar, and press Enter . You can also check out other ways to launch Control Panel .
- Navigate to Programs > Uninstall a program .
- Right-click on Microsoft Office and choose Change.
Wait till the repair process is complete. Once done, check if you still face the issue. If yes, perform an online repair.
To do so, repeat the above steps, but choose the Online Repair option this time. This process may take some time, but it's likely to fix the underlying problem.
6. Reinstall Microsoft Office
If you still face the PowerPoint can't save file error, try reinstalling Microsoft Office as a last resort. Before getting into the steps, ensure you have your Microsoft Office product key or subscription details.
You can uninstall Microsoft Office as you would uninstall any application on Windows . After that, restart your computer and reinstall Office using the official installation package from Microsoft Office .
Save Your Presentation Without Any Issues
Such interruptions while saving your presentation can affect your productivity and leave you frustrated. Hopefully, one of the above solutions has helped you fix the PowerPoint can't save file error on Windows.
If this isn't the only issue you've had with PowerPoint, you can try plenty of PowerPoint alternatives.
How To Recover Unsaved PowerPoint
Losing unsaved work in PowerPoint can be frustrating, especially if you've spent a lot of time on it. But don’t stress, PowerPoint's AutoRecover feature can save the day.
The AutoRecover feature is designed to automatically recover files in the event of unexpected application shutdown, power failure, or crash .
It periodically saves a copy of the file in the background.
Before we get started, it’s important to note that while AutoRecover can help prevent data loss, it should not be used as a replacement for regularly saving your files using AutoSave or the Save button. Saving your files frequently is the most effective way to ensure that your work is saved.
How To Recover Unsaved PowerPoint 🤔
Frequently asked questions 🙋.
Important disclosure: we're proud affiliates of some tools mentioned in this guide. If you click an affiliate link and subsequently make a purchase, we will earn a small commission at no additional cost to you (you pay nothing extra). For more information, read our affiliate disclosure .
If you have accidentally closed a PowerPoint file without saving it or experienced a power outage, there are several steps you can take to recover your unsaved work:
- Open PowerPoint and go to the "File" tab.
2. Click on "Open" and select "Recent Documents".
3. Look for the "Recover Unsaved Presentations" button at the bottom of the window and click on it.
4. This will open the "Unsaved Presentations" folder. Look for the file you want to recover and double-click on it.
5. If none of these steps work, you can try using a third-party recovery tool such as Recuva or EaseUS Data Recovery to scan your computer for lost files.
How can I prevent losing unsaved work in PowerPoint? To prevent losing unsaved work in PowerPoint, it's important to save your work regularly and use the AutoSave feature , which automatically saves your changes every few minutes.
Can I recover an unsaved PowerPoint file if I didn't use AutoSave? Yes, you can still try to recover an unsaved PowerPoint file even if you didn't use AutoSave. Follow the steps above to recover an unsaved presentation.
What if the "Recover Unsaved Presentations" button is not available? If the "Recover Unsaved Presentations" button is not available, you can try searching your computer for PowerPoint files or using a third-party recovery tool.
How can I prevent losing my PowerPoint files due to computer or software issues? To prevent losing your PowerPoint files due to computer or software issues, it's important to regularly back up your files to an external hard drive or cloud storage service, such as OneDrive or Google Slides .
Subscribe to our newsletter
Subscribe to be notified of new content on marketsplash..

How an AI Powerpoint Generator Transforms Ordinary Presentations into Extraordinary Experiences
How to create high quality power point presentations - quickly - with AI

Say goodbye to dull and monotonous presentations and hello to extraordinary experiences that will leave a lasting impact!
AI PowerPoint Generators are revolutionizing the way ordinary slideshows captivate audiences. Whether you're a professional speaker, a student, or simply someone who wants to impress with their slides, an AI PowerPoint generator is here to take your presentations to the next level.
But what is the best free AI PowerPoint generator? How can you choose the best tool to use, and how can AI voiceovers bring your PowerPoint presentation to the next level using text-to-presentation processes?
Whether you're using Powerpoint or Google Slides, this article will delve into all you need to know about using AI to generate your next presentation. Let's dive in!
What is an AI PowerPoint Generator?
An AI PowerPoint Generator is a tool that uses artificial intelligence to automatically create presentations.
The tool takes input in the form of data, text, or images and generates slides with relevant content and visual elements. This eliminates the need for manual slide creation and saves time for users, making it a convenient solution for creating engaging presentations.
What is the best tool for generating AI presentations? In our opinion, Canva or ChatGPT are both fantastic options that you can try out.
5 Steps to Incorporating an AI PowerPoint Generator in Your Presentation
So, how can we use AI to generate a great presentation?
Step 1: Choose an Appropriate AI PowerPoint Generator
To start using AI in your presentations, you need to pick the right AI PowerPoint tool. It's important to choose one that works well for you, matches your needs, and has the features you want.
This initial decision sets the stage for a presentation that smoothly includes AI, fitting your style and needs.
Our favorite options include ChatGPT and Canva. With accessible price points and easy-to-use interfaces, these two options stand out as great tools. Whether you need a Microsoft PowerPoint presentation or an AI presentation maker for Google Slides, both these options are standouts.
Step 2: Get to Know the AI Tool Inside Out
After picking your AI tool, it's crucial to really understand how it works.
Take the time to learn about the algorithms it uses to create content, its design tips, and any special things it can do. This deep understanding helps you make the most of the AI tool so you can improve your presentation's content and visuals for a better experience.
When you're learning a new tool, our recommendation is to browse YouTube for tutorials and get acquainted with experts in that niche. There are hundreds of great creators out there who have fantastic tutorials, so get exploring!
Step 3: Pick the Right Presentation Style
Now, it's time to get started on the actual content generation.
At this step, it's critical to choose a presentation style that fits your content's theme and your audience's expectations.
But don't panic - AI PowerPoint tools usually offer various templates for different themes and purposes; whether you're looking for a corporate feel, a fun-friendly presentation, or even a video template, then your AI tool should have you covered.
Remember: Selecting the right template makes the creative process smoother, resulting in a polished and professional look.
Step 4: Customize Your Content with AI-Powered Suggestions
Now, you're ready to get to the meat of the presentation - the content. While you may already have a load of content that's ready to be slotted into your presentation, you may also take this time to get writing.
Remember, it's always possible to incorporate AI into your content creation process at this stage.
Content creation tools like ChatGPT can help refine your language, ensuring accuracy and impact and generating scripts and images.
Step 5: Add AI-Enhanced Visuals and Effects to Your Presentation
In the final step, use AI-generated visuals and effects to enhance your presentation.
Explore the AI tool's capabilities to create impactful visuals, sophisticated graphics, or interactive elements that grab your audience's attention. From data visualization to smooth transitions, AI elevates the visual appeal of your presentation, leaving a memorable impression on your audience.
As well as this, now's the time to add an AI voiceover to your presentation to allow your content to be shared and rewatched over and over again or even translated into multiple languages. Plus, having an AI voiceover makes a presentation more accessible to those with visual impairments or who use a screen reader.
ElevenLabs is a great tool for you to use here. With high-quality, human-like narration and an accessible, easy-to-use platform, ElevenLabs is the perfect tool for generating fantastic audio for your AI-generated presentations.
Ultimately, by following these five steps carefully, integrating AI into your presentation workflow becomes an efficient process that results in a professional and sophisticated presentation that resonates with your audience.
The Future of Presentations Using AI

Using AI in presentations has a bright future with lots of exciting possibilities. AI technology is changing the way we do presentations, making them more interactive and engaging. These AI tools can create cool visuals, understand data in real time, and even help with understanding what people say and translating languages. So, when people make presentations, they can use AI to make them more powerful and grab the audience's attention.
In the future, AI in presentations is likely to keep getting better. Experts think that AI will become even smarter, allowing for more advanced and personalized presentations. This means that presentations can be customized to fit what each person likes and how they learn best.
For businesses, using AI in presentations is increasingly important. It helps companies in many industries communicate better and engage employees and clients alike. These AI tools make it easier to create convincing presentations that engage clients, partners, and audiences and make content accessible to those with visual impairments or different learning abilities. Plus, AI can quickly and accurately analyze data and make it easier for businesses to make smart decisions.
In a nutshell, AI is changing the presentation game, making a Google Slide or PowerPoint presentation more exciting and personalized. As AI keeps improving, businesses are set to benefit from better communication and smarter decisions. It's an exciting future for presentations in the business world.
Final Thoughts

To sum it all up, we're on the brink of a big change in how we do presentations, thanks to the increasing use of an AI PowerPoint generator. AI is making presentations more engaging, interactive, and tailored to individual preferences, and the future holds even more exciting possibilities, with AI getting smarter and making presentations even more customized.
For businesses, using AI in presentations is not just a trend; it's a smart move. It helps companies communicate better and make informed decisions with data, reaching their employees and their clients with more curated content. For individuals, an AI PowerPoint generator saves time and makes creating engaging presentation content simple.
So, as we look ahead, embracing AI in presentations is more than just an option—it's an opportunity to excel in communication, engagement, and data-driven decision-making.
The combination of human creativity and AI innovation promises to redefine how we present information, creating a world where presentations are not only informative but also captivating and personalized.
Try ElevenLabs today

How To Get Free Access To Microsoft PowerPoint
E very time you need to present an overview of a plan or a report to a whole room of people, chances are you turn to Microsoft PowerPoint. And who doesn't? It's popular for its wide array of features that make creating effective presentations a walk in the park. PowerPoint comes with a host of keyboard shortcuts for easy navigation, subtitles and video recordings for your audience's benefit, and a variety of transitions, animations, and designs for better engagement.
But with these nifty features comes a hefty price tag. At the moment, the personal plan — which includes other Office apps — is at $69.99 a year. This might be the most budget-friendly option, especially if you plan to use the other Microsoft Office apps, too. Unfortunately, you can't buy PowerPoint alone, but there are a few workarounds you can use to get access to PowerPoint at no cost to you at all.
Read more: The 20 Best Mac Apps That Will Improve Your Apple Experience
Method #1: Sign Up For A Free Microsoft Account On The Office Website
Microsoft offers a web-based version of PowerPoint completely free of charge to all users. Here's how you can access it:
- Visit the Microsoft 365 page .
- If you already have a free account with Microsoft, click Sign in. Otherwise, press "Sign up for the free version of Microsoft 365" to create a new account at no cost.
- On the Office home page, select PowerPoint from the side panel on the left.
- Click on "Blank presentation" to create your presentation from scratch, or pick your preferred free PowerPoint template from the options at the top (there's also a host of editable templates you can find on the Microsoft 365 Create site ).
- Create your presentation as normal. Your edits will be saved automatically to your Microsoft OneDrive as long as you're connected to the internet.
It's important to keep in mind, though, that while you're free to use this web version of PowerPoint to create your slides and edit templates, there are certain features it doesn't have that you can find on the paid version. For instance, you can access only a handful of font styles and stock elements like images, videos, icons, and stickers. Designer is also available for use on up to three presentations per month only (it's unlimited for premium subscribers). When presenting, you won't find the Present Live and Always Use Subtitles options present in the paid plans. The biggest caveat of the free version is that it won't get any newly released features, unlike its premium counterparts.
Method #2: Install Microsoft 365 (Office) To Your Windows
Don't fancy working on your presentation in a browser? If you have a Windows computer with the Office 365 apps pre-installed or downloaded from a previous Office 365 trial, you can use the Microsoft 365 (Office) app instead. Unlike the individual Microsoft apps that you need to buy from the Microsoft Store, this one is free to download and use. Here's how to get free PowerPoint on the Microsoft 365 (Office) app:
- Search for Microsoft 365 (Office) on the Microsoft Store app.
- Install and open it.
- Sign in with your Microsoft account. Alternatively, press "Create free account" if you don't have one yet.
- Click on Create on the left side panel.
- Select Presentation.
- In the PowerPoint window that opens, log in using your account.
- Press Accept on the "Free 5-day pass" section. This lets you use PowerPoint (and Word and Excel) for five days — free of charge and without having to input any payment information.
- Create your presentation as usual. As you're using the desktop version, you can access the full features of PowerPoint, including the ability to present in Teams, export the presentation as a video file, translate the slides' content to a different language, and even work offline.
The only downside of this method is the time limit. Once the five days are up, you can no longer open the PowerPoint desktop app. However, all your files will still be accessible to you. If you saved them to OneDrive, you can continue editing them on the web app. If you saved them to your computer, you can upload them to OneDrive and edit them from there.
Method #3: Download The Microsoft PowerPoint App On Your Android Or iOS Device
If you're always on the move and need the flexibility of creating and editing presentations on your Android or iOS device, you'll be glad to know that PowerPoint is free and available for offline use on your mobile phones. But — of course, there's a but — you can only access the free version if your device is under 10.1 inches. Anything bigger than that requires a premium subscription. If your phone fits the bill, then follow these steps to get free PowerPoint on your device:
- Install Microsoft PowerPoint from the App Store or Google Play Store .
- Log in using your existing Microsoft email or enter a new email address to create one if you don't already have an account.
- On the "Get Microsoft 365 Personal Plan" screen, press Skip For Now.
- If you're offered a free trial, select Try later (or enjoy the free 30-day trial if you're interested).
- To make a new presentation, tap the plus sign in the upper right corner.
- Change the "Create in" option from OneDrive - Personal to a folder on your device. This allows you to save the presentation to your local storage and make offline edits.
- Press "Set as default" to set your local folder as the default file storage location.
- Choose your template from the selection or use a blank presentation.
- Edit your presentation as needed.
Do note that PowerPoint mobile comes with some restrictions. There's no option to insert stock elements, change the slide size to a custom size, use the Designer feature, or display the presentation in Immersive Reader mode. However, you can use font styles considered premium on the web app.
Method #4: Use Your School Email Address
Office 365 Education is free for students and teachers, provided they have an email address from an eligible school. To check for your eligibility, here's what you need to do:
- Go to the Office 365 Education page .
- Type in your school email address in the empty text field.
- Press "Get Started."
- On the next screen, verify your eligibility. If you're eligible, you'll be asked to select whether you're a student or a teacher. If your school isn't recognized, however, you'll get a message telling you so.
- For those who are eligible, proceed with creating your Office 365 Education account. Make sure your school email can receive external mail, as Microsoft will send you a verification code for your account.
- Once you're done filling out the form, press "Start." This will open your Office 365 account page.
You can then start making your PowerPoint presentation using the web app. If your school's plan supports it, you can also install the Office 365 apps to your computer by clicking the "Install Office" button on your Office 365 account page and running the downloaded installation file. What sets the Office 365 Education account apart from the regular free account is that you have unlimited personal cloud storage and access to other Office apps like Word, Excel, and Outlook.
Read the original article on SlashGear .

IMAGES
VIDEO
COMMENTS
Save your presentation in an earlier version of PowerPoint. In PowerPoint 2013 and newer versions, you can save files to an earlier version of PowerPoint by selecting the version from the Save as type list in the Save As box. For example, you can save your PowerPoint presentation in the newest PowerPoint Presentation format (.pptx), or as a PowerPoint 97-2003 Presentation (.ppt).
1.Save it Locally. The most basic way to save a PowerPoint presentation is directly on your computer's hard drive or local storage device, such as a USB flash drive. To save your presentation locally, click "File" in the top left corner, then select "Save" or press Ctrl + S (Cmd + S for Mac).
To save the PowerPoint presentation as a PDF file, follow the 4 easy steps. Step-1: Click on the "File" Tab. First, click on the " File " tab in PowerPoint to open the back stage view of PowerPoint. Step 2 - Click on the "Save As" option. In the menu ribbon located at the top of the screen, click on the "File" tab.
Fix PowerPoint's Save Issue by Using a Different File Format. When you face issues saving a presentation, it's worth using an alternate file format to see if your file is saved. For example, use the PPT format if you have trouble saving your file in the PPTX format. Launch your presentation with PowerPoint. Select File in the app's top ...
Choose the Save or Save As option. Download Article. Click Save to save to the current file, or Save as to create a new file. If you've already saved the file at some point, you'll have the option to click Save, which simply saves your changes to that file. Otherwise, choose Save as to create a brand new file. 4.
In newer versions of PowerPoint, you can access AutoRecover files from within PowerPoint: Go to the File tab. Select Open. Select Recover Unsaved Presentations at the bottom of the list of recent files. Select your presentation to open it. If you don't see it, move on to the next section to try a different method.
Here's how you can go about it. Step 1: In the PowerPoint app, switch to the Developer tab and click the Visual Basic option. Step 2: Click the Insert UserForm icon on the toolbar and select ...
Go to File → click on Account → click on the Sign out button. Then sign back in and check if that helped. 3. Repair PowerPoint. If the first workarounds did not work, try repairing PowerPoint. Go to Control Panel and navigate to Programs → Programs and Features. Select Office 355/ Microsoft 365 and click on Change.
Converting the file is as simple as pressing a button and choosing the file type. Go ahead and open your PPT file, head over to the "File" tab, and then click "Convert.". Windows File Explorer will appear. You'll notice the Save As type is set as "PowerPoint Presentation." This is the PPTX file type. Click "Save.".
Step 2: Recover a PowerPoint file that wasn't saved. Now, you can click on the button Recover Unsaved Presentations. The program has a function to recover an unsaved PowerPoint. A folder will now open where you can find all saved drafts. If the file you're looking for is there, left-click on it and select Open.
Save your presentation in an earlier version of PowerPoint. In PowerPoint 2013 and newer versions, you can save files to an earlier version of PowerPoint by selecting the version from the Save as type list in the Save As box. For example, you can save your PowerPoint presentation in the newest PowerPoint Presentation format (.pptx), or as a PowerPoint 97-2003 Presentation (.ppt).
Go to the PowerPoint Preferences > Output and Sharing > Save > Font Embedding. Tick the box that says, "Embed fonts in the file." On Windows: Go to File > Options > Save. In the section "Preserve fidelity when sharing this presentation," tick the box which says, "Embed fonts in the file.
Once you've specified exactly what you want, choose " Create Video ", the button on the bottom of the screen. You'll be prompted for a file name, as usual: Notice that the format is MPEG-4 Video, the long, fancy name for "MP4". Pay attention to where you're saving it and click " Save " to proceed.
Sometimes, the problem might lie within the presentation file itself rather than your computer. In this case, you can transfer all slides to a new presentation. To do this, copy all the slides from the presentation causing the issue, and then create a new presentation and paste them into it.
5. If none of these steps work, you can try using a third-party recovery tool such as Recuva or EaseUS Data Recovery to scan your computer for lost files.. Frequently Asked Questions 🙋. How can I prevent losing unsaved work in PowerPoint? To prevent losing unsaved work in PowerPoint, it's important to save your work regularly and use the AutoSave feature, which automatically saves your ...
In a nutshell, AI is changing the presentation game, making a Google Slide or PowerPoint presentation more exciting and personalized. As AI keeps improving, businesses are set to benefit from better communication and smarter decisions. It's an exciting future for presentations in the business world. Final Thoughts
Click on "Blank presentation" to create your presentation from scratch, or pick your preferred free PowerPoint template from the options at the top (there's also a host of editable templates you ...
PowerPoint parties task a group of friends with presenting a silly slideshow on niche interests, secret pastimes and frequently hilarious takes.