- I Tried Both: Apple Watch 9 vs Fitbit Charge 6
- Best Places to Print Photos Online

How to Use the Slide Sorter View in PowerPoint
The Slide Sorter view makes grouping and reorganizing slides a breeze
- Brock University
What to Know
- Select View > Slide Sorter or select Slide Sorter on the Task Bar in the bottom right.
- To reorder a slide, drag it into a new location.
This article explains how to use Slide Sorter view to reorder your slides by dragging and dropping them into a different sequence. Instructions apply to PowerPoint for Microsoft 365, PowerPoint 2019, 2016, 2013, and 2010.
Use the Slide Sorter in PowerPoint
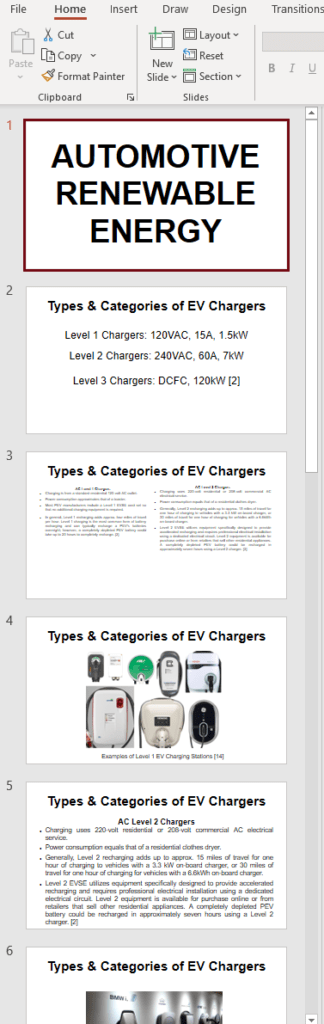
When you first open your PowerPoint presentation, all the slides are listed as thumbnails on the left side of the PowerPoint window. Drag slides up and down on this list to reorder them. If you have a long PowerPoint presentation , however, it’s easier to use the Slide Sorter to reorder them.
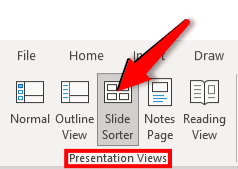
To access the Slide Sorter, select View > Slide Sorter . Or, select Slide Sorter on the Task Bar in the bottom-right corner of the PowerPoint window.
Drag Your Slides to Reorganize Them
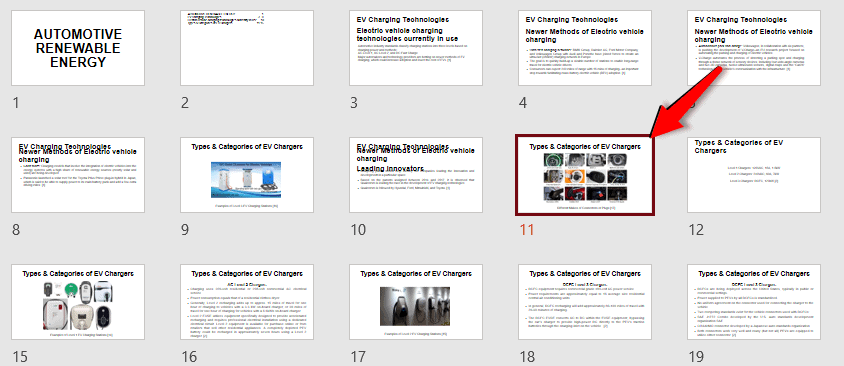
In Slide Sorter view, PowerPoint slides display as a series thumbnails. Each slide displays a number under the bottom-left corner to show which order they're in. To reorder a slide, drag it into a new location.
Break a Presentation into Sections
If you have different people creating or presenting different parts of the presentation, or if you have different topics within your presentation, organize your presentation into sections using the Slide Sorter view. Grouping your slides into sections is like using folders to organize your files in File Explorer.
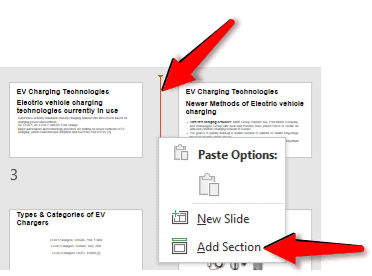
To create a section, right-click between the two slides where you want to split the presentation and select Add Section .
Each section starts on a new line in the Slide Sorter view. You can create as many sections as you like.
Rename a Section
When you create a new section, the Rename Section dialog box opens. In the Section name text box, enter a new name for the section and select Rename .
To change the section name later, right-click the section name in Slide Sorter view and select Rename Section .
In the Rename Section dialog box, enter a name in the Section name box and select Rename .
Move or Remove Sections
To reorder the sections in your presentation, move the sections. To move a section, right-click on the section name and select either Move Section Up or Move Section Down .
If it’s the first section, Move Section Up is grayed out and not available. If you right-click on the last section, Move Section Down is grayed out.
Return to the Normal View
When you’re finished reordering your slides , creating sections, and arranging your sections, select View > Normal .
In Normal view, slides display in the new order in the list of thumbnails on the left side of the PowerPoint window. If you added sections, you’ll see your section headings, as well.
Get the Latest Tech News Delivered Every Day
- Different Ways to View Slides in PowerPoint
- Outline View in PowerPoint or OpenOffice
- Add, Delete or Change the Order of PowerPoint Slides
- How to Use Speaker Notes in PowerPoint
- How to Select More Than One Slide in PowerPoint
- How to Use Google Duet in Slides
- How to Hide and Unhide a Slide in PowerPoint
- Slide Layouts in PowerPoint
- The 10 Most Common PowerPoint Terms
- Thumbnails Are Used for Navigation in Digital Files
- How to Copy a PowerPoint Design Template to Another Presentation
- How to Add Page Numbers in PowerPoint
- How to Print PowerPoint Slides
- How to Make a PowerPoint Presentation
- How to Use PowerPoint Slide Master Layouts
- Copy Slides to Another PowerPoint Presentation
PowerPoint Slide Sorter: What is it and How to use it?
Last updated on August 19th, 2023

Some PowerPoint slide decks contain dozens of slides. Sorting through those slides or rearranging them using drag and drop from the default ‘Normal’ view in PowerPoint can be difficult. If you have too many slides, you might even end up mixing them up when attempting to drag and drop them in the Normal view. This is why you should use PowerPoint Slide Sorter view to better manage your slides.
What is the Slide Sorter?
PowerPoint Slide Sorter is one of the views available in Microsoft PowerPoint that lets you view all your slides in the form of thumbnails sorted horizontally. This helps better organize the slides, as you can rearrange them using drag and drop. Furthermore, you can zoom your slides (in or out) to increase or reduce the size of the thumbnails according to your convenience. The definition of Slide Sorter by Microsoft is as follows:
Slide Sorter view gives you a view of your slides in thumbnail form. This view makes it easy for you to sort and organize the sequence of your slides as you prepare to print your slides.
How to use the Slide Sorter to Prepare Presentations in PowerPoint?
The following instructions regarding the use of PowerPoint Slide Sorter are applicable to all recent versions of PowerPoint, including PowerPoint 2019 (PC and Mac), PowerPoint for Microsoft 365 (PC and Mac), and PowerPoint for the web. These instructions are also applicable to older versions including PowerPoint 2016 for Mac, PowerPoint 2013 (PC), and PowerPoint 2010 (PC).
How to View PowerPoint Slides in Slide Sorter View?
Here are multiple ways to open and access the Slide Sorter view in Microsoft PowerPoint.
View Tab in PowerPoint: PowerPoint Slide Sorter button appears under Presentation Views from the View tab in the Ribbon menu via View -> Slide Sorter to access it. To switch back anytime, choose a different view from the View tab or the bottom of the presentation deck.
Keyboard Shortcut: You can also access Slide Sorter via a keyboard shortcut. In this case, in Windows, press Alt + V then D key. The Alt + V combination will highlight the View tab in the Ribbon, and then pressing the D key will open the Slide Sorter view.
Bottom of the Taskbar: You can also access the Slide Sorter view from the bottom of the taskbar via the slide sorter icon.

Use the Slide Sorter to Drag Your Slides in the Presentation to Find the Right Order
How to rearrange slides in PowerPoint using the Slide Sorter View? Go to Slide Sorter and drag the slides to organize how they appear along the presentation. The GIF animation below shows how you can easily rearrange your slides to better manage them in Slide Sorter view. For the purpose of this demo, we have used the free business proposal presentation template to demonstrate the Slide Sorter view and arrange some of the slides in the desired order.
Source: FPPT.com
Have a Better View of Your Slides
Do you know how to design and use PowerPoint Slide Sorter View for maximum effect? Unlike the Normal view or the Outline View, the Slide Sorter view provides a great interface for the presentation designer to view all the slide thumbnails in a single place. As a presentation designer or presenter, you can have a more cohesive view of your presentation. Moreover, using the zoom option, you can fit all the presentation slides within the same view, to zoom in or zoom out to view large or small thumbnails for your slides.
Organize Your Slides in Sections
Slide Sorter view also enables you to sort your slides in sections, similar to how you would organize them in folders. You can create a section via right-click context menu, name it and drag slides to organize it. These collapsible menus can then be used to organize your slides according to the subsections of your presentation, e.g. introduction, agenda, main topic, and conclusion. While you can also add sections from the Normal view the same way via right-click menu, you would be better off using Slide Sorter view to arrange them more conveniently.

Final Words
PowerPoint Slide Sorter can help you better organize your slides by improving the way you view and sort your slides. Whether you have a handful of slides or dozens that you need to sort through, using Slide Sorter can save you a lot of time and effort in getting control of your slides.
Leave a Comment Cancel reply
Your email address will not be published. Required fields are marked *
Save my name, email, and website in this browser for the next time I comment.
Sign up to our newsletter
We will send you our curated collections to your email weekly. No spam, promise!
Home » Microsoft Powerpoint » What Is Slide Sorter View in MS PowerPoint
What Is Slide Sorter View in MS PowerPoint
MS PowerPoint offers a slide sorter view with which to reorder your slides. You can drag and drop them into different sequences.
As you open a PowerPoint presentation, the left pane of the window holds the slides as thumbnails. To reorder them, you can drag the slides up and down in the left pane. But if you have many slides in your presentation, it is easier to use the slide sorter view to reorder them.
The slide sorter view is useful for:
- Viewing all slides at once
- Reordering slides
- Breaking a presentation into sections
- Modifying sections
We will show you how to use the slide sorter view to do all the above. We will use simple, step-by-step instructions.
Let us begin.
Method #1: Viewing All Slides at Once
Step #1: open powerpoint.
Open a PowerPoint presentation that has plenty of slides.
The left pane holds the thumbnails of slides.
Step #2: Change to Slide Sorter View
In the main menu bar, click on the View tab to change the ribbon.

On the View ribbon, in the section Presentation Views , click on the Slide Sorter icon.
The right pane now shows a collection of slides rather than one single slide.

Use the zoom slider in the bottom right corner to bring all the slides within the window.
Drag the slider control to the left to make each image smaller, allowing more images to fit into the window.

Method #2: Reorder Slides

The right pane now has a collection of slides rather than one single slide.

Step #3: Reorder Slides
Click on, hold, and drag the slide you want to a new position.
Other slides will move to accommodate the slide you are dragging.
Method #3: Create Sections

Step #3: Create Sections
Right-click between two slides where you would like to create a split.
A red line and a menu will appear.
Click on Add Section in that menu.
All slides after the split will move down to a new position named Untitled Section .
A dialog box will open, allowing you to rename the section.
Enter the new Section name: in the field, and click on the Rename button.
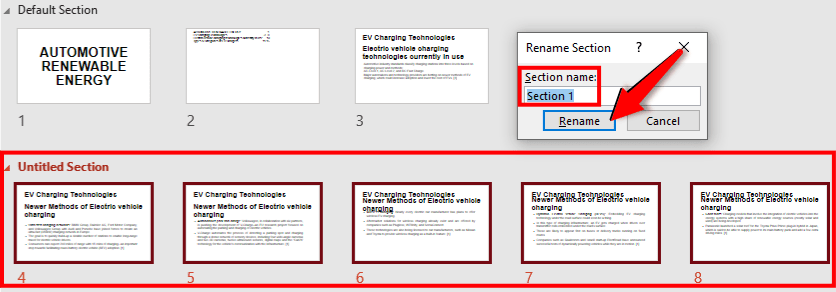
The slides are now divided into a Default Section and the new Section you have created.
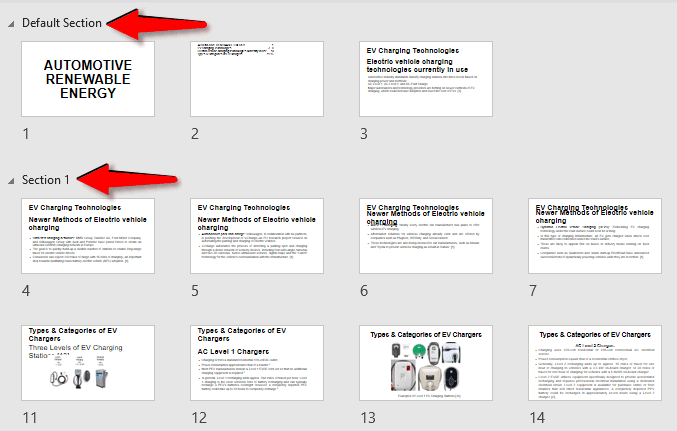
You can create as many new sections as necessary.
Method #4: Modify Sections

Step #3: Modify Sections
Right-click on the section name you want to change.
A menu will appear with several options:
- Rename section — Change the name of the selected section.
- Remove section — Delete the name of the section and merge all the slides inside with the section above it.
- Remove Section & Slides — Delete the name of the selected section, and also delete all slides within the section.
- Remove All Sections — Delete all section names.
- Move Section Up — Move the selected section up by one position.
- Move Section Down — Move the selected section down by one position.

Make the necessary choice for modifying the sections.
We have shown you in simple step-by-step instructions different ways of using the slide sorter view in PowerPoint to manage your slides.
Leave a Comment Cancel reply
Save my name, email, and website in this browser for the next time I comment.
How to Use the Slide Sorter View in PowerPoint

Whether you’re creating a simple photo slideshow or an in-depth business presentation, organization is key. The slide sorter view in PowerPoint is an invaluable yet underutilized tool to arrange your slides.
In this blog post, you’ll learn:
- What is slide sorter view and its benefits
- How to activate slide sorter view
- Core functions for organizing slides
- Tips for seamless slide arrangement
- Creative ways to use slide sorter view
I’ve been using PowerPoint professionally for over 10 years. With experience across various industries creating investor decks, sales presentations, training programs and more, I’ve mastered the slide sorter view to organize smooth-flowing and impactful presentations.
Keep reading as I share my best tips for unlocking the potential of slide sorter view.
What is Slide Sorter View?
Slide sorter view displays all slides in your PowerPoint presentation as thumbnails on one screen. This gives you an aerial view of the entire presentation layout to understand how ideas and concepts flow from one slide to the next.
Here are some key benefits of using slide sorter view:
- Visualize presentation structure : See the big picture instead of getting lost in individual slides.
- Rearrange slides easily : Click and drag thumbnails to rearrange them intuitively.
- Identify gaps or duplication : Spot missing or repetitive ideas at a high level.
- Apply global edits : Format multiple slides simultaneously by multi-selecting.
- Present with confidence : Confirm that your story flows logically before presenting.
Whether you’re building a presentation from scratch or inheriting a deck, slide sorter view is the fastest way to get organized. Let’s look at how to activate it.
Activating Slide Sorter View
Accessing slide sorter view is simple. Here are the steps:
- Open your PowerPoint presentation
- Select the View tab on the ribbon
- Click the Slide Sorter button in the Presentation Views group
Your slides will instantly transform into thumbnail previews spread across your screen.
Pro Tip : You can also toggle between normal and slide sorter view quickly using the shortcut Shift + F5 . This is handy when formatting individual slides but want to periodically check how the overall flow looks from above.
Core Functions for Organizing Slides
Once you enter slide sorter view, an array of options becomes available to organize your content. Here are the most helpful features:
Click and Drag to Reorder Slides
Simply click on a slide thumbnail and drag it to any position in your presentation. All subsequent slides will automatically shift accordingly. This makes restructuring your story arc seamless.
Multi-Select to Format Multiple Slides
If you want to apply formatting changes to various slides, hold down CTRL and select the desired thumbnails. Then use the ribbon to alter layouts, fonts, colors and more across multiple slides at once.
Insert New Slides
Don’t let a gap in your narrative ruin your flow. Click where you want to add new content and select the New Slide button on the ribbon. This efficiently inserts a new placeholder slide without having to exit slide sorter view.
Delete Slides
Spot repetitive or unnecessary slides? Select the thumbnail(s) and press Delete to remove them cleanly. This also automatically reconciles transitions and slide numbers.
Duplicate Slides
Find an impactful slide you want to re-use such as your main agenda? Right click the thumbnail and choose Duplicate to reuse the layout. Customize the copy with new content.
Learning these core functions allows you to shape a logically structured presentation. But slide arrangement requires an artistic eye too.
Tips for Seamless Slide Arrangement
Organizing a visually-appealing slide deck that flows smoothly takes some finesse. Apply these tips to take your presentations from good to great:
- Lead with your best slide – Grab attention immediately with a bold title slide.
- Start and end strong – Bookend your presentation with impact to leave a lasting impression.
- Funnel concepts – Open with broader ideas and funnel down to detailed points.
- Use section dividers – Visually separate key concepts and themes with dividers.
- Create narrative arcs – Shape mini-stories within your overarching storyline for momentum.
- Use mirroring – Create connections by reflecting layouts, imagery or phrases across slides.
- Employ contrasts – Maintain interest by varying slide designs, colors and content types.
- Simplify complex data – Break dense slides into digestible bite-sized visuals.
Thoughtfully arranging your slides using these tips will help your audience stay engaged from start to finish.
Creative Ways to Use Slide Sorter View
Beyond standard presentations, I often use slide sorter view to organize more visual content like:
Photo Collages
Compile related images to create a graphical story. The thumbnail previews make this easy.
Process Flows
Demonstrate a sequence of steps, timeline or workflow using a visual narrative.
Mood Boards
Collect color palettes, font styles and graphical concepts in one consolidated view.
Art Portfolios
Curate selections of visual art pieces in an orderly fashion to showcase breadth.
Get creative with how you use slide sorter view to organize any array of images or multi-faceted ideas!
Now Get Organizing!
As you can see, slide sorter view is an invaluable yet underutilized tool in PowerPoint.
Use it to visualize the big picture story arc, seamlessly rearrange concepts, format multiple slides and deliver presentations with confidence.
Here are a few key tips to remember:
- Access slide sorter view with Shift + F5
- Click and drag thumbnails to reorder easily
- Multi-select slides to format all at once
- Insert new slides to bridge content gaps
- Lead strong, funnel concepts and contrast ideas
So next time you build or inherit a PowerPoint presentation, don’t forget about slide sorter view.
Activating it can save hours of frustration and yield a logically structured narrative that captivates audiences from start to finish!
About The Author
Vegaslide staff, related posts.

How to Turn a Presentation into a Video in PowerPoint 2010

How to Blur Images in PowerPoint

Open PDF in PowerPoint

How to Make a Computer Screen Go Black With PowerPoint


How To Use The Slide Sorter View In PowerPoint
Published: August 26, 2023
What is Slide Sorter View in PowerPoint?
Slide Sorter View is one of the many viewing options available in Microsoft PowerPoint. It provides users with a convenient way to manage and organize their presentation slides. In this view, all the slides in a presentation are displayed as thumbnails, allowing users to easily rearrange them, apply transitions, and make other changes.
Unlike the default Normal View, where you can only see one slide at a time, Slide Sorter View provides a bird’s-eye view of your entire presentation. This makes it easier to get an overview of the structure and flow of your slides, and quickly identify any gaps or inconsistencies in your content.
Slide Sorter View is especially useful when working on larger presentations with many slides. It allows you to easily navigate through the slides, make bulk changes, and maintain a consistent visual theme throughout your presentation.
One of the key advantages of using Slide Sorter View is its versatility. It can be used for various tasks, including rearranging slides, selecting multiple slides, deleting slides, applying transitions, adding animation, and more. Whether you’re a student, a professional, or a speaker, Slide Sorter View can help you streamline your presentation creation process and create a visually appealing and engaging slideshow.
To access Slide Sorter View in PowerPoint, simply click on the “Slide Sorter” button located at the bottom of the screen, next to the Normal View and Outline View buttons. Alternatively, you can use the shortcut key “Alt + Shift + View” to switch to Slide Sorter View.
In the next sections, we will explore how to effectively navigate and utilize the various features of Slide Sorter View to optimize your PowerPoint presentations.
How to Access the Slide Sorter View
Accessing the Slide Sorter View in PowerPoint is a simple process. Follow the steps below to switch to Slide Sorter View and start managing your presentation slides.
- Open your PowerPoint presentation.
- Locate the navigation bar at the bottom of the PowerPoint window.
- Click on the “Slide Sorter” button, which is the middle button in the navigation bar. Alternatively, you can use the shortcut key “Alt + Shift + View” to switch to Slide Sorter View.
Once you have successfully accessed the Slide Sorter View, you will see all your slides displayed as thumbnails in a grid layout. Each thumbnail represents a slide in your presentation, allowing you to have a comprehensive overview of the entire presentation’s structure.
By default, PowerPoint displays a maximum of nine slides per row in the Slide Sorter View. If you have more slides than can fit in a single row, you can scroll horizontally to view the remaining slides.
The Slide Sorter View provides a wealth of options for managing and arranging your presentation slides. You can easily move slides around, duplicate them, delete unnecessary slides, and apply transitions or animations to individual slides or groups of slides.
Switching back to Normal View or any other view in PowerPoint is also a breeze. Just click on the corresponding view button in the navigation bar at the bottom of the PowerPoint window or use the appropriate keyboard shortcut.
Now that you know how to access the Slide Sorter View in PowerPoint, you can take full advantage of this powerful feature to better organize and enhance your presentations.
Navigating the Slide Sorter View
Navigating through the Slide Sorter View in PowerPoint is essential for efficiently managing and organizing your presentation slides. Here are some key techniques to help you navigate effortlessly in this view:
1. Scrolling: If you have more slides than can fit in the current view, PowerPoint allows you to scroll horizontally to see the additional slides. Use the scrollbar at the bottom or simply click and drag on the slide thumbnails to navigate through them.
2. Zooming: PowerPoint provides a zoom feature that allows you to adjust the size of the slide thumbnails in the Slide Sorter View. You can zoom in to get a closer look at individual slides or zoom out to see more slides on the screen. To zoom, go to the “View” tab, click on the “Zoom” button, and select the desired zoom level.
3. Slide Selection: As you navigate through the Slide Sorter View, you can select individual slides by clicking on their respective thumbnails. This allows you to make changes to specific slides or perform actions on selected slides, such as copying, deleting, or applying transitions.
4. Keyboard Shortcuts: Keyboard shortcuts can significantly speed up your navigation in the Slide Sorter View. For example, you can use the arrow keys to move between slides, the Ctrl key along with the arrow keys to extend the selection, and the Delete key to remove selected slides.
5. Slide Thumbnails: PowerPoint offers several options to enhance the visibility and organization of slide thumbnails. You can change the size of the thumbnails, add slide numbers, and even display additional slide information, such as slide titles or slide timings, to facilitate navigation.
6. Slide Sorting: The Slide Sorter View allows you to easily rearrange your slides by dragging and dropping the slide thumbnails to the desired position. This feature is particularly useful when you want to change the order of your slides or group related slides together.
By mastering these navigation techniques, you can efficiently move through your slides, make changes, and ensure a smooth flow for your presentation. Take advantage of these tools to create a visually appealing and well-organized slide deck.
Rearranging Slides in Slide Sorter View
The ability to rearrange slides is one of the key advantages of using Slide Sorter View in PowerPoint. This feature allows you to easily change the order of slides, group related slides together, and create a cohesive flow for your presentation. Here’s how you can rearrange slides in Slide Sorter View:
- Access the Slide Sorter View by clicking on the “Slide Sorter” button in the navigation bar at the bottom of the PowerPoint window.
- Once in Slide Sorter View, locate the slide thumbnails representing your presentation slides.
- To rearrange a slide, click and hold on its thumbnail and then drag it to the desired position. As you move the slide, you will see a preview of its new location highlighted in the slide grid.
- Release the mouse button to drop the slide into the new position. The other slide thumbnails will automatically adjust to accommodate the change.
- If you want to move multiple slides together, you can select them by holding down the Ctrl key and clicking on their respective thumbnails. Once selected, drag any of the selected slide thumbnails to move the entire group.
- You can also use the shortcut key combination Shift + Left-click to select a range of slides. This is particularly useful when you want to select a continuous range of slides for rearrangement.
By rearranging slides in Slide Sorter View, you can easily experiment with different sequencing options, test the flow of your presentation, and make adjustments as needed. This feature is particularly helpful when organizing complex presentations or when you need to adapt your slide order during a live presentation based on audience feedback or time constraints.
Remember to save your changes periodically to ensure that your slide arrangement is preserved. It’s also a good practice to review your slide order in Normal View to ensure a smooth and logical transition between slides.
Rearranging slides in Slide Sorter View provides you with the flexibility and control to create a compelling visual narrative for your presentation. Don’t be afraid to experiment and iterate until you find the perfect slide sequence that effectively conveys your message and engages your audience.
Selecting Multiple Slides in Slide Sorter View
Selecting multiple slides in Slide Sorter View allows you to perform actions on a group of slides simultaneously, such as applying transitions, changing slide layouts, or deleting slides. Here’s how you can easily select multiple slides in Slide Sorter View:
- To select individual slides, hold down the Ctrl key on your keyboard and click on the thumbnails of the slides you want to select. The selected slides will be highlighted.
- If you want to select a continuous range of slides, click on the first slide thumbnail, hold down the Shift key, and click on the last slide thumbnail in the range. All the slides between the first and last selection will be included in the range selection.
- To select all slides in the presentation at once, use the shortcut Ctrl + A. This will automatically select all slide thumbnails in the Slide Sorter View.
Once you have selected multiple slides, you can perform various actions on them simultaneously. Here are some examples:
- Apply Transitions: With the selected slides, you can easily apply transitions to all of them simultaneously. Go to the “Transitions” tab, choose the desired transition effect, and it will be applied to all selected slides.
- Change Slide Layouts: If you want to change the layout of multiple slides, select them and go to the “Home” tab. In the “Slides” group, click the “Layout” button, and choose a new layout. The selected slides will then adopt the new layout.
- Delete Slides: To remove multiple slides from your presentation, select them in Slide Sorter View and press the Delete key on your keyboard. Confirm the deletion in the dialog box that appears.
Selecting multiple slides in Slide Sorter View offers a quick and efficient way to manage and modify specific sets of slides in your presentation. It saves time and makes it easier to maintain consistency across your slides.
Remember to save your presentation after making changes to ensure that your modifications are preserved. Regularly reviewing the selected slides in Normal View or in the Slide Pane will help you to verify the changes you have made and ensure that the flow of your presentation remains intact.
Utilize the ability to select multiple slides in Slide Sorter View to streamline your editing process and create a cohesive and visually appealing presentation.
Deleting Slides in Slide Sorter View
Deleting slides is a common task when creating and refining PowerPoint presentations. In Slide Sorter View, you can quickly and easily delete slides to remove unnecessary or unwanted content. Here’s how you can delete slides in Slide Sorter View:
- Locate the slide thumbnail of the slide you want to delete.
- To delete a single slide, right-click on the slide thumbnail and select “Delete Slide” from the context menu. Alternatively, you can select the slide thumbnail and press the Delete key on your keyboard.
- If you want to delete multiple slides, hold down the Ctrl key on your keyboard and click on the thumbnails of the slides you want to delete. With the slides selected, right-click on any of the selected slides and choose “Delete Slide” from the context menu. Or, simply press the Delete key on your keyboard.
- A confirmation dialog will appear asking if you want to delete the selected slides. Click “Delete” to proceed with the deletion. Be cautious, as this action cannot be undone.
Deleting slides in Slide Sorter View provides a visual and efficient way to remove unnecessary content from your presentation. It is particularly useful when you want to remove slides that are repetitive, off-topic, or no longer relevant.
When deleting slides, be mindful of their impact on the overall flow and coherence of your presentation. Make sure that the deleted slides do not leave any gaps or result in a disjointed narrative. Reviewing your presentation in both Slide Sorter View and Normal View can help you assess the impact of deleting slides and make any necessary adjustments to maintain a seamless flow.
Remember to save your presentation after deleting slides to ensure that the changes are permanently applied. Regularly saving your work helps protect against any accidental deletions or modifications.
Deleting slides in Slide Sorter View is a simple and effective way to refine and streamline your PowerPoint presentation. Use this feature judiciously to create a clear and impactful message for your audience.
Applying Transitions in Slide Sorter View
Adding transitions to your PowerPoint slides can enhance the visual appeal and smoothness of your presentation. In the Slide Sorter View, you can conveniently apply transitions to individual slides or groups of slides. Here’s how you can apply transitions in Slide Sorter View:
- Select the slide or slides to which you want to apply a transition. You can do this by clicking on the slide thumbnails. To select multiple slides, hold down the Ctrl key and click on the desired slide thumbnails.
- With the slide(s) selected, go to the “Transitions” tab on the PowerPoint ribbon. Here you will find a wide variety of transition effects to choose from.
- Click on the transition effect that you want to apply. A preview of the selected transition will be shown on the selected slide(s) in Slide Sorter View.
- To further customize the transition, you can set options such as duration, sound, and behavior by clicking on the “Effect Options” button in the “Transitions” tab.
- By default, the transition will be applied to the selected slides. If you want to apply the same transition to all slides in your presentation, click on the “Apply to All” button in the “Transitions” tab.
Transitions in Slide Sorter View provide you with a quick and efficient way to add professional and engaging effects to your presentation. It is important to use transitions strategically and sparingly to avoid distracting the audience from the actual content of your slides.
When applying transitions, keep in mind the overall theme and tone of your presentation. Choose transitions that align with your message and enhance the visual storytelling aspect of your slides. It is also advisable to maintain consistency in the choice of transition effects throughout your presentation to ensure a cohesive experience for your audience.
Remember to save your presentation after applying transitions to ensure that your modifications are preserved. Regularly reviewing and editing the slide transitions in Slide Sorter View will help you fine-tune the timing and flow of your presentation.
By judiciously adding transitions in Slide Sorter View, you can elevate the visual impact of your PowerPoint presentation and captivate your audience with smooth and professional slide transitions.
Adding Animation to Slides in Slide Sorter View
Adding animation to your slides can bring them to life and make your PowerPoint presentation more engaging and dynamic. In Slide Sorter View, you can easily apply animation effects to individual slides or groups of slides. Here’s how you can add animation to slides in Slide Sorter View:
- Select the slide or slides to which you want to add animation. You can do this by clicking on the slide thumbnails. To select multiple slides, hold down the Ctrl key and click on the desired slide thumbnails.
- With the slide(s) selected, go to the “Animations” tab on the PowerPoint ribbon. Here you will find a wide range of animation effects to choose from.
- Click on the animation effect that you want to apply. A preview of the selected animation will be shown on the selected slide(s) in Slide Sorter View.
- To further customize the animation, you can set options such as timing, duration, and behavior by clicking on the “Animation Pane” button in the “Animations” tab.
- By default, the animation will be applied to the selected slides. If you want to apply the same animation to all slides in your presentation, click on the “Apply to All” button in the “Animations” tab.
Adding animation to slides in Slide Sorter View allows you to create impressive visual effects and capture your audience’s attention. However, it’s essential to use animation tastefully and purposefully to enhance your message rather than distract from it.
Consider the content and purpose of each slide when choosing the appropriate animation effects. Use animations to highlight key points, reveal information gradually, or add emphasis to specific elements on your slides. Avoid overusing animations, as it may result in a cluttered and distracting presentation.
Remember to save your presentation after adding animations to ensure that your changes are preserved. Regularly reviewing and editing the animations in Slide Sorter View will help you fine-tune the timing and synchronization of your presentation.
By strategically incorporating animation effects in Slide Sorter View, you can create a visually captivating PowerPoint presentation that engages your audience and effectively conveys your message.
Applying Slide Layouts in Slide Sorter View
Slide layouts play a crucial role in organizing the content and visual elements of your PowerPoint presentation. In Slide Sorter View, you can easily apply different slide layouts to individual slides or groups of slides. Here’s how you can apply slide layouts in Slide Sorter View:
- Select the slide or slides to which you want to apply a new layout. You can do this by clicking on the slide thumbnails. To select multiple slides, hold down the Ctrl key and click on the desired slide thumbnails.
- With the slide(s) selected, go to the “Home” tab on the PowerPoint ribbon. Here you will find various options for slide layouts.
- Click on the “Layout” button in the “Slides” group. A drop-down menu with different slide layout options will appear.
- Select the desired slide layout from the available options. The selected slide(s) will automatically adopt the new layout, updating the positioning of placeholders, text boxes, and other content elements.
Applying slide layouts in Slide Sorter View allows you to quickly modify the structure and design of your slides. Each slide layout is designed to accommodate specific types of content, such as titles, bullet points, images, or charts, ensuring consistency and ease of editing throughout your presentation.
When applying slide layouts, consider the content and purpose of each slide. Choose a layout that best suits the type of information you want to present on that particular slide. It’s also a good idea to maintain a consistent layout scheme throughout your presentation to establish a cohesive visual identity.
Remember to save your presentation after applying slide layouts to ensure that your changes are preserved. Regularly reviewing and adjusting the slide layouts in Slide Sorter View will help you maintain a clear and organized structure for your presentation.
By utilizing the slide layout features in Slide Sorter View, you can efficiently create and customize the structure and design of your PowerPoint slides, ensuring a visually appealing and well-organized presentation.
Changing Slide Orientation in Slide Sorter View
Changing the slide orientation can be necessary when you want to switch between portrait and landscape layouts for specific slides in your PowerPoint presentation. In Slide Sorter View, you can easily modify the slide orientation for individual slides or groups of slides. Here’s how you can change slide orientation in Slide Sorter View:
- Select the slide or slides for which you want to change the orientation. You can do this by clicking on the slide thumbnails. To select multiple slides, hold down the Ctrl key and click on the desired slide thumbnails.
- With the slide(s) selected, go to the “Slide Size” button in the “Design” tab on the PowerPoint ribbon.
- Click on the “Slide Size” button to open a drop-down menu with different slide size options.
- From the drop-down menu, select either “Standard (4:3)” or “Widescreen (16:9)” to set the slide orientation accordingly.
- The selected slide(s) will automatically adjust to the new slide orientation, resizing and repositioning elements as needed.
Changing slide orientation in Slide Sorter View allows you to accommodate different types of content and formats within your PowerPoint presentation. It provides flexibility in adapting your presentation to different display devices or aligning with specific design requirements.
When changing slide orientation, be mindful of the content and layout of each slide. Consider the visuals, text, and overall design, ensuring that they are optimized for the chosen orientation. Make any necessary adjustments to maintain a visually appealing and cohesive presentation.
Remember to save your presentation after changing the slide orientation to ensure that your modifications are preserved. Regularly reviewing and editing the slide orientation in Slide Sorter View will help you maintain a consistent and professional look for your slides.
By utilizing the slide orientation feature in Slide Sorter View, you can easily adapt your PowerPoint presentation to different layout requirements and create customized slides to suit your specific needs.
Using Slide Sorter View with Multiple Monitors
Using multiple monitors can significantly enhance your PowerPoint experience, providing extra space and flexibility for designing and delivering presentations. In Slide Sorter View, you can take advantage of multiple monitors to improve your workflow and deliver a seamless presentation. Here’s how you can utilize Slide Sorter View with multiple monitors:
Prepare your setup:
1. Connect the additional monitor(s) to your computer or laptop. Ensure that the monitors are properly detected and set up as an extended display.
2. Open your PowerPoint presentation and enter Slide Show mode.
3. In the Slide Show tab, click on the “Set Up Slide Show” button. In the dialogue box that appears, select “Browsed by an Individual (Window)” and choose “Use Slide Show on Monitor X” where X represents the number of the monitor you want to use for the Slide Show.
4. Click on the “OK” button to save and apply the changes.
Using Slide Sorter View on the second monitor:
1. With the extended display set up, enter Slide Sorter View by clicking on the “Slide Sorter” button in the navigation bar at the bottom of the PowerPoint window.
2. Drag the Slide Sorter window onto the second monitor. You can do this by clicking on the title bar of the Slide Sorter window and dragging it to the desired monitor.
3. In Slide Sorter View, you can now navigate and manage your slides on the second monitor. This allows you to have a dedicated space for organizing your slides, while keeping the active slide visible on the primary monitor during the presentation.
Performing actions on the second monitor:
1. In Slide Sorter View, you can make changes to your slides, such as rearranging the slide order, selecting multiple slides, applying transitions, or adding animations, directly on the second monitor.
2. Utilize the additional screen space to have a comprehensive view of your entire presentation and make adjustments as needed.
3. You can also use the second monitor to preview your presentation, ensuring that the slides are displayed as intended and any animations or transitions are seamlessly executed.
By using Slide Sorter View with multiple monitors, you can optimize your workflow, increase productivity, and deliver a polished and well-organized presentation. Having a separate monitor dedicated to Slide Sorter View allows for efficient slide management and a smoother presentation experience.
Using Slide Sorter View for Presentation Rehearsal
Slide Sorter View is a valuable tool for rehearsing your PowerPoint presentation and ensuring a smooth and well-timed delivery. It allows you to have a comprehensive overview of your slides, practice the flow of your presentation, and make necessary adjustments. Here’s how you can effectively use Slide Sorter View for presentation rehearsal:
Preparing for rehearsal:
1. Access Slide Sorter View by clicking on the “Slide Sorter” button in the navigation bar at the bottom of the PowerPoint window.
2. Familiarize yourself with the content and sequence of your slides. Take note of any crucial points, transitions, or animations that require special attention during the rehearsal.
Navigating and rehearsing in Slide Sorter View:
1. Start the presentation by clicking on the “From Beginning” button in the Slide Show tab or pressing the shortcut key “F5”.
2. As you go through each slide in the Slide Show mode, follow along in Slide Sorter View. Use the navigation tools, such as arrow keys or mouse clicks, to move forward or backward through the slides.
3. Observe the timing and pacing of your presentation. Pay attention to any slides that require more explanation or slides that need to be shown for a shorter duration.
4. Take note of any necessary adjustments, such as reordering slides, modifying animations, or refining transitions, that you identify during the rehearsal. You can make these changes directly in Slide Sorter View.
Gauging the overall timing:
1. After completing the rehearsal, review the timing of your presentation as shown in Slide Sorter View. Pay attention to the total duration, and assess whether it aligns with your intended time frame.
2. Identify any areas where you may need to speed up or slow down your delivery to ensure that you stay within the allotted time for your presentation.
3. Use Slide Sorter View to make necessary adjustments to the duration of slides, transitions, or animations to achieve a balanced and well-paced presentation.
Using Slide Sorter View for presentation rehearsal allows you to gain a deeper understanding of the flow and timing of your presentation. It helps you identify areas for improvement, refine your delivery, and ensure that your message is effectively conveyed to your audience.
Remember to save your presentation after making any adjustments in Slide Sorter View to ensure that your changes are preserved for future rehearsals or actual presentations.
By utilizing Slide Sorter View during presentation rehearsal, you can refine your delivery, improve timing, and deliver a polished and confident presentation that engages and captivates your audience.
Tips and Tricks for Using Slide Sorter View
Slide Sorter View in PowerPoint is a powerful tool that offers a range of features to enhance your presentation creation process. Here are some useful tips and tricks to make the most out of Slide Sorter View:
- Keyboard Shortcuts: Familiarize yourself with keyboard shortcuts to navigate and perform actions more efficiently in Slide Sorter View. For example, use the arrow keys to move between slides, Ctrl+click to select multiple slides, and Ctrl+A to select all slides.
- Drag and Drop: Take advantage of the drag and drop functionality in Slide Sorter View. You can easily rearrange slides by clicking and dragging the thumbnails to the desired position. This provides a quick and intuitive way to adjust the order of your slides.
- Thumbnail Zoom: Zooming in on slide thumbnails can help you get a closer look at the content and details. Use the zoom feature in Slide Sorter View to closely examine slides, especially when making adjustments to alignment, content placement, or fine-tuning animations.
- Slide Organizer: Utilize Slide Sorter View as a slide organizer. It allows you to see the flow and structure of your presentation at a glance. By visually analyzing the arrangement, you can identify any gaps, redundancies, or areas for improvement in your content.
- Grouping Slides: Group related slides together in Slide Sorter View. This can make it easier to manage and apply changes to specific sections of your presentation. Select and drag a group of slides to reposition them together or to apply transitions and animations to the entire group.
- Collaboration: Slide Sorter View is a useful mode for collaborating with others in a presentation workflow. It allows team members to easily review and provide feedback on slide order, content, and overall presentation flow. Share your Slide Sorter View with colleagues or stakeholders to gather valuable insights.
- Preview Transitions and Animations: Take advantage of Slide Sorter View to preview transitions and animations. This helps you fine-tune the timing and effects of each animation, ensuring they are visually appealing and seamlessly integrated into your presentation.
- Review Slide Content: Use Slide Sorter View as an opportunity to review and proofread your slide content. Seeing the content in a different layout can help you catch typos, formatting errors, or inconsistencies that may have been overlooked in other views.
Experiment and explore the various functionalities and features available in Slide Sorter View to discover your own tips and tricks that align with your presentation needs. Remember to save your presentation periodically to preserve any changes made in Slide Sorter View.
By leveraging these tips and tricks in Slide Sorter View, you can improve your workflow, enhance collaboration, and create visually compelling and well-organized presentations that leave a lasting impact on your audience.

Related Stories
How To Hide And Unhide A Slide In PowerPoint
How To Select Multiple Slides In PowerPoint
How To Share A PowerPoint On Zoom
Copy PowerPoint Slides To Another Presentation
How To Increase PowerPoint Slide Number Size
Create A Watermark On PowerPoint Slides
Using Multiple Design Themes In PowerPoint
How To Copy A PowerPoint Design Template To Another Presentation

Top Gold-Farming methods in WoW Dragonflight Fourth Season

I Had an Old Building and a Lot of Computers: How a Kazakhstan Businessman Risked Opening a Business in Miami

Best Cheapest Knives in CS2

The Magic of a Business Model: Successful Companies You Could Learn From

A Comprehensive Guide to Choosing the Right Method of MFA for Your Business

Top 100 Christmas Songs for the Best Christmas Music

The Life and Career of Dean Haglund: A Journey from Canada to the Paranormal and Beyond

16 Best Ad Blocker For Every Browser and Device

Different Types of Aesthetics: 30 Outfit Ideas to Step Up Your OOTD Game

Monopoly Man Monocle and 10 Other Popular Examples of the Mandela Effect

Choose the right view for the task in PowerPoint

You can view your PowerPoint file in a variety of ways, depending on the task at hand. Some views are helpful when you're creating your presentation, and some are most helpful for delivering your presentation.
You can find the different PowerPoint view options on the View tab, as shown below.

You can also find the most frequently used views on the task bar at the bottom right of the slide window, as shown below.

Note: To change the default view in PowerPoint, see Change the default view .
Views for creating your presentation
Normal view

Normal view is the editing mode where you’ll work most frequently to create your slides. Below, Normal view displays slide thumbnails on the left, a large window showing the current slide, and a section below the current slide where you can type your speaker notes for that slide.

Slide Sorter view

Slide Sorter view (below) displays all the slides in your presentation in horizontally sequenced, thumbnails. Slide show view is helpful if you need to reorganize your slides—you can just click and drag your slides to a new location or add sections to organize your slides into meaningful groups.

For more information about sections, see Organize your PowerPoint slides into sections .
Notes Page view

The Notes pane is located beneath the slide window. You can print your notes or include the notes in a presentation that you send to the audience, or just use them as cues for yourself while you're presenting.

For more information about notes, see Add speaker notes to your slides .
Outline view
You can get to Outline view from the View tab on the ribbon. (In PowerPoint 2013 and later, you can no longer get to Outline view from Normal view. You have to get to it from the View tab.)
Use Outline view to create an outline or story board for your presentation. It displays only the text on your slides, not pictures or other graphical items.

Master views
To get to a master view, on the View tab, in the Master Views group, choose the master view that you want.
Master views include Slide , Handout , and Notes . The key benefit to working in a master view is that you can make universal style changes to every slide, notes page, or handout associated with your presentation.
For more information about working with masters, see:
What is a slide master?
Use multiple slide masters in one presentation
Change, delete, or hide headers and footers on slides, notes, and handouts
Views for delivering and viewing a presentation
Slide show view.

Use Slide Show view to deliver your presentation to your audience. Slide Show view occupies the full computer screen, exactly the way your presentation will look on a big screen when your audience sees it.
Presenter view

Use Presenter view to view your notes while delivering your presentation. In Presenter view, your audience cannot see your notes.

For more information about using Presenter view, see View your speaker notes as you deliver your slide show .
Reading view

Most people reviewing a PowerPoint presentation without a presenter will want to use Reading view. It displays the presentation in a full screen like Slide Show view, and it includes a few simple controls to make it easy to flip through the slides.
The views in PowerPoint that you can use to edit, print, and deliver your presentation are as follows:
Master views: Slide, Handout, and Notes
You can switch between PowerPoint views in two places:
Use the View menu to switch between any of the views

Access the three main views (Normal, Slide Sorter, or Slide Show) on the bottom bar of the PowerPoint window

Views for creating or editing your presentation
Several views in PowerPoint can help you create a professional presentation.
Normal view Normal view is the main editing view, where you write and design your presentations. Normal view has three working areas:
Thumbnail pane
Slides pane

Slide Sorter view Slide Sorter view gives you a view of your slides in thumbnail form. This view makes it easy for you to sort and organize the sequence of your slides as you create your presentation, and then also as you prepare your presentation for printing. You can add sections in Slide Sorter view as well, and sort slides into different categories or sections.
Notes Page view The Notes pane is located under the Slide pane. You can type notes that apply to the current slide. Later, you can print your notes and refer to them when you give your presentation. You can also print notes to give to your audience or include the notes in a presentation that you send to the audience or post on a Web page.
Outline view (Introduced in PowerPoint 2016 for Mac) Outline view displays your presentation as an outline made up of the titles and main text from each slide. Each title appears on the left side of the pane that contains the Outline view, along with a slide icon and slide number. Working in Outline view is particularly handy if you want to make global edits, get an overview of your presentation, change the sequence of bullets or slides, or apply formatting changes.
Master views The master views include Slide, Handout, and Notes view. They are the main slides that store information about the presentation, including background, theme colors, theme fonts, theme effects, placeholder sizes, and positions. The key benefit to working in a master view is that on the slide master, notes master, or handout master, you can make universal style changes to every slide, notes page, or handout associated with your presentation. For more information about working with masters, see Modify a slide master .
Views for delivering your presentation
Slide Show view Use Slide Show view to deliver your presentation to your audience. In this view, your slides occupy the full computer screen.
Presenter view Presenter view helps you manage your slides while you present by tracking how much time has elapsed, which slide is next, and displaying notes that only you can see (while also allowing you to take meeting notes as you present).
Views for preparing and printing your presentation
To help you save paper and ink, you'll want to prepare your print job before you print. PowerPoint provides views and settings to help you specify what you want to print (slides, handouts, or notes pages) and how you want those jobs to print (in color, grayscale, black and white, with frames, and more).
Slide Sorter view Slide Sorter view gives you a view of your slides in thumbnail form. This view makes it easy for you to sort and organize the sequence of your slides as you prepare to print your slides.
Print Preview Print Preview lets you specify settings for what you want to print—handouts, notes pages, and outline, or slides.
Organize your slides into sections
Print your slides and handouts
Start the presentation and see your notes in Presenter view
In PowerPoint for the web, when your file is stored on OneDrive, the default view is Reading view. When your file is stored on OneDrive for work or school or SharePoint in Microsoft 365, the default view is Editing view.
View for creating your presentation
Editing view.
You can get to Editing View from the View tab or from the task bar at the bottom of the slide window.
Editing View is the editing mode where you’ll work most frequently to create your slides. Below, Editing View displays slide thumbnails on the left, a large window showing the current slide, and a Notes pane below the current slide where you can type speaker notes for that slide.

The slide sorter lets you see your slides on the screen in a grid that makes it easy to reorganize them, or organize them into sections, just by dragging and dropping them where you want them.

To add a section right click the first slide of your new section and select Add Section . See Organize your PowerPoint slides into sections for more information.

Views for delivering or viewing a presentation
Use Slide Show view to deliver your presentation to your audience. Slide Show view occupies the full computer screen, exactly the way your presentation looks on a big screen when your audience sees it.
Note: Reading View isn't available for PowerPoint for the web files stored in OneDrive for work or school/SharePoint in Microsoft 365.
Most people reviewing a PowerPoint presentation without a presenter will want to use Reading view. It displays the presentation in a full screen like Slide Show view, and it includes a few simple controls to make it easy to flip through the slides. You can also view speaker notes in Reading View.

Need more help?
Want more options.
Explore subscription benefits, browse training courses, learn how to secure your device, and more.

Microsoft 365 subscription benefits

Microsoft 365 training

Microsoft security

Accessibility center
Communities help you ask and answer questions, give feedback, and hear from experts with rich knowledge.

Ask the Microsoft Community

Microsoft Tech Community

Windows Insiders
Microsoft 365 Insiders
Was this information helpful?
Thank you for your feedback.
The Tech Edvocate
- Advertisement
- Home Page Five (No Sidebar)
- Home Page Four
- Home Page Three
- Home Page Two
- Icons [No Sidebar]
- Left Sidbear Page
- Lynch Educational Consulting
- My Speaking Page
- Newsletter Sign Up Confirmation
- Newsletter Unsubscription
- Page Example
- Privacy Policy
- Protected Content
- Request a Product Review
- Shortcodes Examples
- Terms and Conditions
- The Edvocate
- The Tech Edvocate Product Guide
- Write For Us
- Dr. Lynch’s Personal Website
- The Edvocate Podcast
- Assistive Technology
- Child Development Tech
- Early Childhood & K-12 EdTech
- EdTech Futures
- EdTech News
- EdTech Policy & Reform
- EdTech Startups & Businesses
- Higher Education EdTech
- Online Learning & eLearning
- Parent & Family Tech
- Personalized Learning
- Product Reviews
- Tech Edvocate Awards
- School Ratings
Benefits of a Boarding School Education: Everything You Need to Know
Transitioning from undergraduate to grad learner: everything you need to know, college textbooks costs: everything you need to know, what is an ahk file, keeping yourself safe in college: everything you need to know, myths about online high schools: everything you need to know, reasons you should study geography: everything you need to know, the vtoman jump 1800 portable power station: the best of the best, key roles of a school superintendent: everything you need to know, is earning a degree online worthwhile and beneficial, how to use the slide sorter view in powerpoint.
The Slide Sorter View in PowerPoint is a powerful tool that allows users to easily rearrange, delete, and manage multiple slides at once. This view displays thumbnail images of all the slides in a presentation, providing a quick and visual overview of the entire presentation.
Here’s how to use the Slide Sorter View in PowerPoint:
1. Open your PowerPoint presentation.
2. Click on the “View” tab from the top menu bar.
3. Click “Slide Sorter” from the Presentation Views group to switch to this view.
4. You will see a preview of all the slides in your presentation. You can navigate between them by clicking on the thumbnail image of the slide you want to view.
5. To reorder slides, click on the slide you want to move and drag it to a different position in the presentation.
6. To delete a slide, select it by clicking on the thumbnail image and then press the “Delete” key on your keyboard.
7. If you want to duplicate a slide, select it and then press “Ctrl” and “D”.
8. You can also select multiple slides by holding down the “Ctrl” key and clicking on each slide you want to select. You can then move or delete all of the selected slides at once.
9. To zoom in or out on the slide sorter view, use the slider located at the bottom right corner of the presentation.
10. Once you’re done editing your presentation, click the “Normal” view button to return to the default editing mode.
The Slide Sorter View is an incredibly useful tool for managing and organizing your PowerPoint presentations, making it much easier to quickly make changes or rearrange slides. By following these simple steps, you can take full advantage of the Slide Sorter View to create engaging and effective presentations.
How to Insert a Column Break in ...
What is tinder should you try it.

Matthew Lynch
Related articles more from author.

How to Revive the Windows 95 and XP Taskbars in Windows 11

How to Play Blu-rays on Windows 10

How to Check the Maximum RAM Capacity of a Computer

Ways You Can Customize Your Mac’s Keyboard Settings
How to Add a Secondary Axis in Excel

How to Verify Your YouTube Account and Why You Should
- Interface and Basics
Slide Sorter View in PowerPoint 2019 for Windows
Learn about the Slide Sorter view in PowerPoint 2019 for Windows. This is the view that lets you see all your slides in a sequence, and also allows you to easily select multiple slides, or locate hidden slides.
Author: Geetesh Bajaj
Product/Version: PowerPoint 2019 for Windows
OS: Microsoft Windows 10 and higher
Date Created: December 23, 2019 Last Updated: September 14, 2023
Learn PowerPoint
Learn how you can advance two PowerPoint presentations with a single click.
Most of the time, you may work on a single slide in your PowerPoint presentation, but there are times when you want to copy, duplicate, reorder, or even delete a bunch of slides. It's in scenarios like these that you will encounter PowerPoint 2019 's Slide Sorter view. Among the various views available in PowerPoint 2019 for Windows to play and edit your presentations, we have already covered both Normal view and Outline view . Although Slide Sorter view does not let you edit individual slide objects, it does let you work with whole slides. Any edits made will influence one or more slides, depending on your selection.
Within Slide Sorter view, you will see thumbnail sized representations of all slides in your presentation, as shown in Figure 1 , below. The best use of this view is when you have to select multiple slides, as you can quickly reorder, delete, or duplicate your slides. In addition, this view also clearly displays hidden slides .

Change to Slide Sorter View
To access Slide Sorter view, you can choose either of these options:
- Click the Slide Sorter button on the Status Bar , as shown highlighted in red within Figure 1 , above.
- Access the View tab of the Ribbon , and click the Slide Sorter button, as shown highlighted in red within Figure 2 , below.

Selecting Slides in Slide Sorter View
Here are some guidelines for selecting slides in Slide Sorter view:
- To select a single slide, just click on the slide.
- To select a range of slides, hold down the primary mouse button and drag across and over the slides like a marquee. Try to drag in a diagonal direction if you have more than one line of slides lined up.
- To select a contiguous range of slides, click the first slide, hold the Shift key on the keyboard and then click the last slide.
- To select multiple, noncontiguous slides, hold down the Ctrl key on your keyboard and then click the slides you want to select.
- To select all the slides in the presentation press the Ctrl + A keyboard shortcut.
- To select all but a few slides, first select all slides, and then Ctrl + click on the slides you want to deselect.
Tasks Suited for Slide Sorter View
Slide Sorter view works best when you have to select multiple slides (sequential or non-sequential slides) and perform tasks such as:
- Organize and reorder slides by dragging them in the proper sequence.
- Group slides into separate Sections .
- Easily copy, paste, or delete slides.
- Duplicate slides.
- Hide and show selected slides.
- Control transition effects that play when the presentation advances from one slide to the next.
- Set and adjust the slide timing of these transitions.
Rearrange Slides in Slide Sorter View
To change the slide order:
- Select the slide(s) you want to reorder, and drag them to a position where you want to place them.
Insert Slides in Slide Sorter View
To insert a new slide within Slide Sorter view, choose any of these three approaches:
- Use the Ribbon:
- Place the cursor where you want to insert a new slide.
- Select the Home tab of the Ribbon , and locate the Slides group.
- Click the New Slide button.
- Place the cursor where you want to insert a new slide, right-click and from the resultant menu choose New Slide option.
- Place the cursor where you want to insert a new slide and press the Ctrl + M shortcut key combination.

PowerPoint Keyboard Shortcuts
Do you want more keyboard shortcuts?
Explore our PowerPoint Keyboard Shortcuts and Sequences Ebook that is updated for all PowerPoint versions.
To copy, paste, and delete slides in Slide Sorter view, follow these guidelines:
- Copy: Select the slide(s) and press Ctrl + C shortcut key combination, or click the Copy button on the Home tab of the Ribbon .
- Paste: To paste copied and cut slide(s), click at the desired insertion point and then press Ctrl + V shortcut key combination, or click the Paste button on the Home tab of the Ribbon .
- Cut: Select the slide(s) and press Ctrl + X shortcut key combination, or click the Cut button on the Home tab of the Ribbon .
- Delete: To delete a slide (or slides), select and press the Delete key on your keyboard.
01 07 03 - Views: Slide Sorter View in PowerPoint (Glossary Page)
Slide Sorter View in PowerPoint 365 for Windows Slide Sorter View in PowerPoint 365 for Mac Slide Sorter View in PowerPoint 2016 for Windows Slide Sorter View in PowerPoint 2016 for Mac Slide Sorter View in PowerPoint 2013 for Windows Slide Sorter View in PowerPoint 2011 for Mac Slide Sorter View in PowerPoint 2010 for Windows
You May Also Like: Are You a Pusher or a Puller? | Concepts (Worldwide) PowerPoint Templates
Popular Posts

Night Sky Starlit Backgrounds
The ZIP file that you will download contains five Night Sky Starlit Backgrounds in three resolutions: Full Size: 4000x2250 pixels (16:9), Widescreen Size: 1365x768 pixels (16:9), and Standard Size: 1024x768 (4:3). Also included are five PowerPoint Presentations with Night Sky Starlit Backgrounds, set to work with the Morph transition. Yes, these background designs can also animate between slides using PowerPoint's Morph transition.
Go ahead and get this product! You’ll see the price on the order page
Microsoft and the Office logo are trademarks or registered trademarks of Microsoft Corporation in the United States and/or other countries.
Home | PowerPoint | Photoshop | PowerPoint Templates | PowerPoint Tutorials | Blog | Notes | Ezine | Media Kit | Feedback | Site Map | About Us | Contact Us Link to Us | Privacy | Testimonials PowerPoint Backgrounds | Christian PowerPoint Backgrounds | Business PowerPoint Presentation Templates
Plagiarism will be detected by Copyscape
The Tech Edvocate
- Advertisement
- Home Page Five (No Sidebar)
- Home Page Four
- Home Page Three
- Home Page Two
- Icons [No Sidebar]
- Left Sidbear Page
- Lynch Educational Consulting
- My Speaking Page
- Newsletter Sign Up Confirmation
- Newsletter Unsubscription
- Page Example
- Privacy Policy
- Protected Content
- Request a Product Review
- Shortcodes Examples
- Terms and Conditions
- The Edvocate
- The Tech Edvocate Product Guide
- Write For Us
- Dr. Lynch’s Personal Website
- The Edvocate Podcast
- Assistive Technology
- Child Development Tech
- Early Childhood & K-12 EdTech
- EdTech Futures
- EdTech News
- EdTech Policy & Reform
- EdTech Startups & Businesses
- Higher Education EdTech
- Online Learning & eLearning
- Parent & Family Tech
- Personalized Learning
- Product Reviews
- Tech Edvocate Awards
- School Ratings
10 Questions To Get Acquainted With Your Online Students
Best books for your children, public universities are failing the public, institutions must change how they handle sexual assaults, indications that your university is on the verge of shutting down, an age-by-age approach to disciplining your children, common elements of instructional systems design, great education leaders solicit feedback, great education leaders are instructional leaders, great education leaders are accomplished mediators and negotiators, how to use the slide sorter view in powerpoint.
The Slide Sorter View in PowerPoint is a powerful tool that allows users to easily rearrange, delete, and manage multiple slides at once. This view displays thumbnail images of all the slides in a presentation, providing a quick and visual overview of the entire presentation.
Here’s how to use the Slide Sorter View in PowerPoint:
1. Open your PowerPoint presentation.
2. Click on the “View” tab from the top menu bar.
3. Click “Slide Sorter” from the Presentation Views group to switch to this view.
4. You will see a preview of all the slides in your presentation. You can navigate between them by clicking on the thumbnail image of the slide you want to view.
5. To reorder slides, click on the slide you want to move and drag it to a different position in the presentation.
6. To delete a slide, select it by clicking on the thumbnail image and then press the “Delete” key on your keyboard.
7. If you want to duplicate a slide, select it and then press “Ctrl” and “D”.
8. You can also select multiple slides by holding down the “Ctrl” key and clicking on each slide you want to select. You can then move or delete all of the selected slides at once.
9. To zoom in or out on the slide sorter view, use the slider located at the bottom right corner of the presentation.
10. Once you’re done editing your presentation, click the “Normal” view button to return to the default editing mode.
The Slide Sorter View is an incredibly useful tool for managing and organizing your PowerPoint presentations, making it much easier to quickly make changes or rearrange slides. By following these simple steps, you can take full advantage of the Slide Sorter View to create engaging and effective presentations.
How to Insert a Column Break in ...
What is tinder should you try it.
Matthew Lynch
Related articles more from author.

How to Convert RAW Files to JPEG on a Mac

How to Factory Reset Windows 7
How to Remove Write Protection on a Micro SD Card

How to Use Twitch With Chromecast

Assistive Technology to Help Students with Behavioral Disabilities Succeed Academically

How to Set Up Your New Android Phone
- What is a slide master? Article
- Add, rearrange, duplicate, and delete slides in PowerPoint Article
- Apply a slide layout Article
- Add color and design to your slides with Themes Article
- Start with a template Article
- Get design ideas for slides Article
- Customize a slide master Article
- Change the page orientation in PowerPoint between landscape and portrait Article
- Organize your PowerPoint slides into sections Article
- Add a DRAFT watermark to the background of slides Article
- Create, merge, and group objects on a slide Article
- Guides for arranging things on a slide in PowerPoint Article
- Change the order in which stacked objects, placeholders, or shapes appear on a slide Article
- Rotate or flip an object Article
Organize your PowerPoint slides into sections
Much like you use folders to organize your files, you can use sections to organize your slides into meaningful groups.
Add a section
Right-click between slides and select Add Section .
An Untitled Section is added in the thumbnail pane, and the Rename Section dialog box opens.
Type a name in the Section name box.
Select Rename .
To collapse a section, click the triangle next to the section name. The numeral by the section name shows the number of slides in that section.
Move or delete a section
Select View > Slide Sorter .
From here, you can:
Move a section: Right-click and select Move Section Up or Move Section Down .
Delete a section: Right-click and select Remove Section .
You can also drag and drop sections.
You can assign each colleague a section to make slide ownership clear during collaboration. And if you’re starting with a blank slate, you can use sections to outline your presentation.
In Normal view, in the thumbnail pane, click the slide that will be the first slide of the section.

In the Section Name box, enter a name for the section, and then click Rename .
To add more sections, select a new starting slide for the new section and repeat steps 2 and 3.

The names you enter appear as headers above each section, followed by the number of slides in each section in parentheses.
Tip: Click the arrows next to the section names to collapse and expand sections.
Change the order of sections
In Normal view or Slide Sorter view, drag the section title to where you want it—for example, move the third section before the first section.
Change the name of a section
In Normal view or Slide Sorter view, double-click the section name and enter a new name in the Section Name box.
To rename, or remove, a section, select it, then right-click and choose the appropriate item from the context menu.

Need more help?
Want more options.
Explore subscription benefits, browse training courses, learn how to secure your device, and more.
Microsoft 365 subscription benefits
Microsoft 365 training
Microsoft security
Accessibility center
Communities help you ask and answer questions, give feedback, and hear from experts with rich knowledge.
Ask the Microsoft Community
Microsoft Tech Community
Windows Insiders
Microsoft 365 Insiders
Was this information helpful?
Thank you for your feedback.
Using Slide Sorter View to Rearrange a Presentation
Slide Sorter view (see Figure 8 ) gives you an opportunity to see the entire presentation all at once, move slides around, control the transition effects that bind the slides and animation together on an individual slide, and perform easy, one-click previews of animations and transitions.
Figure 8. Slide Sorter view makes it easy to check transitions and animations.

Move to Slide Sorter view by selecting the Slide Sorter view icon in the View bar, or by choosing View, Slide Sorter. Use the Zoom menu to configure the size of the thumbnails (and, by extension, the number of thumbnails visible on the screen).
PowerPoint transitions control how a slide makes its initial appearance on screen. Animations, on the other hand, control how components of the slide appear, after the slide is onscreen. For instance, you might use an animation to cause bullet points to "zoom" onto the slide, one after the other, with a brief delay between each bullet.
Bring up the Slide Transition task pane by clicking the Transition button on the Slide Sorter toolbar. To work with animations, choose Animation Schemes from the Slide Design task pane.
Slide Sorter view is the easiest place to perform the following common tasks:
Rearrange slides Click and drag any slide to a different position.
Add slides Right-click the space between two slides and choose New Slide from the shortcut menu.
Delete slides Select one or more slides and then press the Delete key. (To select multiple slides, hold down Control while clicking.)
Set transition effects Select one or more slides and then use the Slide Transition pane to pick and fine-tune the transition you like.
Preview transition effects Click the Preview button to the left of the slide number, or click Play at the bottom of the Slide Transition task pane.
Apply an animation to the contents of a slide Use the Animation Schemes list on the Slide Design task pane to pick one of PowerPoint's ready-made animations, or use the Custom Animation task pane to build your own animation from scratch.
- All-Access Subscriptions
- Business Licensing
- Lightroom Classic
- Photoshop Elements
- Crystal Reports
- Interview Skills
- Resume Skills
- Excel for Lawyers
- Outlook for Lawyers
- QuickBooks for Lawyers
- Word for Lawyers
- Microsoft Office Suite
- Outlook on the Web
- Microsoft Project
- Microsoft Teams
- QuickBooks Online
- QuickBooks Pro
- Video Course Options
- SUBSCRIPTIONS
- Photoshop Elements 2024
- Photoshop Elements 2023
- Photoshop Elements 2022
- Photoshop Elements 2021
- Photoshop Elements 2020
- Photoshop Elements 2019
- Photoshop Elements 2018
- Photoshop Elements 15
- Google Classroom for Teachers
- Google Docs
- Google Drive
- Google Forms
- Google Sheets
- Google Slides
- Mac OS Keyboard Shortcuts
- Excel Formulas and Functions
- Excel Keyboard Shortcuts
- Excel Tables PivotTables and Charts
- Access for Microsoft 365
- Excel for Microsoft 365
- Microsoft Office 365
- Outlook for Microsoft 365
- PowerPoint for Microsoft 365
- Publisher for Microsoft 365
- Word for Microsoft 365
- Access 2021
- Microsoft Office 2021
- Outlook 2021
- PowerPoint 2021
- Publisher 2021
- Access 2019
- Microsoft Office 2019
- Outlook 2019
- PowerPoint 2019
- Publisher 2019
- Access 2016
- Microsoft Office 2016
- OneNote 2016
- Outlook 2016
- PowerPoint 2016
- Publisher 2016
- Microsoft Office 2013
- OneNote 2013
- Outlook 2013
- PowerPoint 2013
- Microsoft Office for iPad
- QuickBooks Pro 2024
- QuickBooks Pro 2023
- QuickBooks Pro 2022
- QuickBooks Pro 2021
- QuickBooks Pro 2020
- QuickBooks Pro 2019
- QuickBooks Pro 2018
- QuickBooks Pro 2017
- QuickBooks Pro 2016
- QuickBooks Pro 2015
- QuickBooks Pro 2014
- Sage 50 Accounting
- Windows 11 and 10 Keyboard Shortcuts
- Chrome OS for Chromebooks
- Word and Excel (Mac) 2022
- Word and Excel (PC/Windows) 2021-2016 and 365
- QuickBooks Desktop (PC/Windows) 2024
- QuickBooks Desktop (PC/Windows) 2023
- QuickBooks Desktop (PC/Windows) 2022-2015
- Windows 11 and 10
- Our History
- Customer Service
- Testimonials
- Lost Password
- Register a Product
- Manage My Account
- Member Login
Try the PowerPoint Course for Free!
Slide sorter view in powerpoint- instructions, how to use slide sorter view in powerpoint: video.
This video lesson, titled “ Slide Sorter View ,” shows you how to use Slide Sorter view in PowerPoint. This video lesson is from our complete PowerPoint tutorial , titled “ Mastering PowerPoint Made Easy v.2019 and 365 .”
Overview of Slide Sorter View in PowerPoint:
Slide Sorter view in PowerPoint lets you view and sort the presentation slides. To switch to Slide Sorter view, click the “Slide Sorter” button in the presentation view buttons in the Status Bar. Alternatively, click the “Slide Sorter” button in the “Presentation Views” button group on the “View” tab of the Ribbon.
You use Slide Sorter view to reorganize, insert, delete and copy the presentation slides. Slide Sorter view in PowerPoint also shows the presentation’s visual flow. You can also add and preview slide transition animation here, as well.
In Slide Sorter view in PowerPoint, all the presentation slides appear as thumbnails. You cannot modify the slide content in this view. However, many of the features you can do in Slide Sorter view in PowerPoint you can also do within the slide thumbnails pane in Normal view. To select a slide in Slide Sorter view, click a slide thumbnail. To reorganize the sequence of slides in your presentation, click and drag the slide thumbnails in this view and then release them in the desired position.
If you double-click a slide thumbnail in Slide Sorter view in PowerPoint or select a slide thumbnail and then press the “Enter” key on your keyboard, you open the selected slide in Normal View, where you can modify its content. To delete a slide in Slide Sorter view, click to select the desired slide thumbnail. Then press the “Delete” key on your keyboard. Alternatively, right-click the slide thumbnail to delete. Then select the “Delete Slide” command in the pop-up menu that appears.

A picture of a presentation shown in Slide Sorter view in PowerPoint for Microsoft 365.
Instructions on using slide sorter view in powerpoint:.
- To switch to Slide Sorter view , click the “Slide Sorter” button in the presentation view buttons on the Status Bar.
- Alternatively , click the “Slide Sorter” button in the “Presentation Views” button group on the “View” tab of the Ribbon.
- In Slide Sorter view, all the presentation slides appear as thumbnails. You cannot modify the slide content in this view. However, many of the features you can do in Slide Sorter view in PowerPoint you can also do within the slide thumbnails pane in Normal view.
- If you want to select a slide in Slide Sorter view , click a slide thumbnail.
- To reorganize the sequence of slides in your presentation , click and drag the slide thumbnails in this view and then release them in the desired position.
- To open a selected slide in Normal View to edit its content , double-click a slide thumbnail in Slide Sorter view in PowerPoint.
- Alternatively , select a slide thumbnail and then press the “Enter” key on your keyboard.
- To delete a slide in Slide Sorter view , click to select the desired slide thumbnail.
- Then press the “Delete” key on your keyboard.
- Alternatively , right-click the slide thumbnail to delete.
- Then select the “Delete Slide” command in the pop-up menu that appears.

About Joseph Brownell

Living Social Voucher Redemption Information
- Sign up for an account on this page .
- Stop at the billing screen since you already paid for a voucher.
- Send us a message, via the contact page , that includes the email address that you used to sign up for an account and the Living Social voucher number.
Once we have verified the voucher number, we will update your account and the 30 days of access will begin. At this time, we will send you an email update that confirms the account update.
Change Presentation Slide Order Using the Slide Sorter
Start presentation from current slide, put pictures photos images into powerpoint slides, add speaker notes to powerpoint slides and presentations, add bullet points to speaker notes for slides, how to run a slide show - in depth overview.
TeachMsOffice.com provides HD Online Video Tutorials and Training for Microsoft Office programs such as Excel , Word , and PowerPoint . We use a specialized video player interface to teach a vast list of Microsoft Office Tutorials and we add new tutorials on a weekly or monthly basis.

- Web Development
How to Use the Slide Sorter View in Microsoft PowerPoint on Windows 11
Posted on 17th june 2023.
The Slide Sorter view is a way of viewing your PowerPoint presentation as a series of thumbnails. This can be useful when you want to see an overview of your presentation, or if you need to rearrange your slides. In this article, we’ll show you how to use the Slide Sorter view in Microsoft PowerPoint on Windows 11.
Viewing the Slide Sorter View
To view the Slide Sorter view, open your PowerPoint presentation and click the “View” tab. Then, click the “Slide Sorter” button.
Rearranging Slides in the Slide Sorter View
To rearrange slides in the Slide Sorter view, simply click and drag the thumbnail of the slide you want to move. You can also use the “Select” button to select multiple slides, and then use the “Move” button to move them as a group.
Viewing Slide Notes in the Slide Sorter View
If you want to view the notes for a slide, hover your mouse over the thumbnail of the slide. The notes for that slide will appear in a pop-up window.
Printing the Slide Sorter View
To print the Slide Sorter view, click the “File” tab and then click “Print”. In the “Settings” section, select the “Handouts” option and then choose the number of slides per page. Then, click the “Print” button.
How to Use the Slide Sorter View in Microsoft PowerPoint on Windows 10
Slide Sorter view is a PowerPoint feature that allows you to see all your slides at once, in thumbnail form. This can be helpful when you’re trying to get an overview of your presentation, or when you’re looking for a specific slide. Here’s how to use Slide Sorter view in PowerPoint on Windows 10.
How to Access Slide Sorter View
To access Slide Sorter view, open your PowerPoint presentation and click the “View” tab at the top of the window. Then, click the “Slide Sorter” button in the “Presentation Views” section of the ribbon.
How to Use Slide Sorter View
In Slide Sorter view, you’ll see thumbnails of all your slides. You can click and drag these thumbnails to rearrange your slides. To delete a slide, click the thumbnail and press the Delete key on your keyboard.
To add a new slide, click the “New Slide” button in the “Slides” section of the ribbon. You can also duplicate an existing slide by right-clicking its thumbnail and selecting “Duplicate Slide” from the contextual menu.
How to Exit Slide Sorter View
When you’re finished working in Slide Sorter view, click the “View” tab and then click the “Normal” button in the “Presentation Views” section. This will take you back to the standard view for PowerPoint.
The PowerPoint Slide Sorter view is a great way to see an overview of your presentation and to rearrange your slides. Here’s how to use it:
1. Open your presentation in PowerPoint.
2. Click the View tab.
3. Click the Slide Sorter button.
Your presentation will appear in the Slide Sorter view, with thumbnails of each slide.
4. To rearrange your slides, click and drag the thumbnails to the desired location.
5. To return to the normal PowerPoint view, click the Normal button.
Slide Sorter View
Slide Sorter View is a PowerPoint feature that allows you to see thumbnails of all your slides in one place. This can be helpful when you’re trying to reorganize your presentation or get an overview of what’s included.
To open Slide Sorter View, go to the View tab and select Slide Sorter.
Once you’re in Slide Sorter View, you’ll see thumbnails of all your slides in the order they appear in your presentation. To rearrange your slides, click and drag them to a new location.
If you have a lot of slides, you may want to zoom out to get a better view. To do this, go to the View tab and select Zoom Out. You can also use the slider at the bottom of the window to adjust the zoom level.
You can also use Slide Sorter View to delete slides from your presentation. To do this, select the slides you want to delete and press the Delete key on your keyboard.
When you’re finished making changes, go to the View tab and select Normal View to return to your presentation.
The is a view in Microsoft PowerPoint on Windows 11 that allows you to see thumbnails of all the slides in your presentation at once. This can be helpful when you’re trying to rearrange your slides or get an overview of your presentation.
To access the Slide Sorter View, click the tab on the Ribbon and then click the button.
Once you’re in the Slide Sorter View, you can rearrange your slides by clicking and dragging them around. You can also delete slides by selecting them and pressing the key on your keyboard.
To add a new slide, click the button on the Ribbon. You can also duplicate slides by selecting them and clicking the button.
When you’re finished making changes, click the tab and then click the button to return to the Normal View.
If you have a lot of slides, the Slide Sorter view can help you organize them. To open Slide Sorter view, go to the View tab and click Slide Sorter.
In Slide Sorter view, you can see thumbnails of all your slides. To rearrange your slides, click and drag them to a new location.
To select multiple slides, click the first slide, then press and hold the Shift key while you click the other slides. Or, click the first slide, then press and hold the Ctrl key (Windows) or Command key (Mac) while you click the other slides.
If you need to delete a slide, click it to select it, then press the Delete key on your keyboard.
To continue viewing your presentation in Slide Sorter view:
1. On the View tab, in the Presentation Views group, click Slide Sorter.
2. To return to Normal view, on the View tab, in the Presentation Views group, click Normal.

Previous Post - Adding Custom Fields to WordPress Post Editor

Next Post - How to Use the Suggestions Feature in Microsoft To Do on Windows 11
- Uncategorized
View Options in PowerPoint – A Complete Beginner’s Guide!
By: Author Shrot Katewa

There are many different types of presentations view available in PowerPoint including Normal View, Outline View, Presenter View, and Slide Show View to name a few. All these views serve different purposes and it is important to know how to use them appropriately to get the most out of PowerPoint!
In this article, we will talk about what each type of view does in PowerPoint and how to access them so that you can choose the best for your needs! So, let’s get started!
[ A Quick Note Before We Begin – for this article, I will be using one of the presentation templates from Envato Elements . With Envato Elements, you get access to thousands of presentation designs with unlimited downloads so you never run out of options again. Plus, you get free previews so you know exactly what you’re getting before buying! It is also very affordable. Check out their pricing here ]
1. What are the Different Type of View Options Available in PowerPoint?
Microsoft PowerPoint is equipped with a variety of Slide View options that can be used for different purposes.
These are the different view options available in PowerPoint –
- Normal View
- Slide Sorter View
- Notes Page View
- Reading View
- Outline View
- Slide Show View
- Presenter View
- Slide Master View
2. How to Access the Different View Modes in PowerPoint?
To access the different view modes in PowerPoint, you have to click on the ‘View’ tab in the ribbon. The 2-step process is described below.
Step-1: Click on the ‘View’ tab
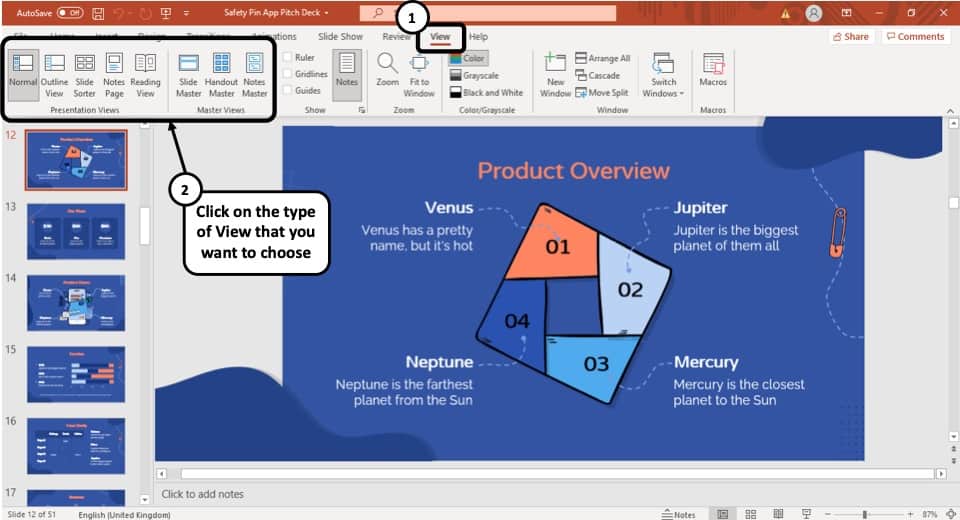
At first, select the ‘View’ tab, which is the second to last tab in the ribbon section of your PowerPoint Window.
Step-2: Select your preferred ‘View Mode’
Once you have access to the ‘View’ tab, you can select your preferred view mode such as the Outline View , Slide Sorter view, Slide Master view, etc. from the Presentation View section or the Master View section. (as shown in the image in step 1)
3. What is the Purpose of Various View Modes in PowerPoint?
Each view mode in PowerPoint has its own purpose. Let’s go through the purposes of the different slide view options one by one below –
1. Normal View
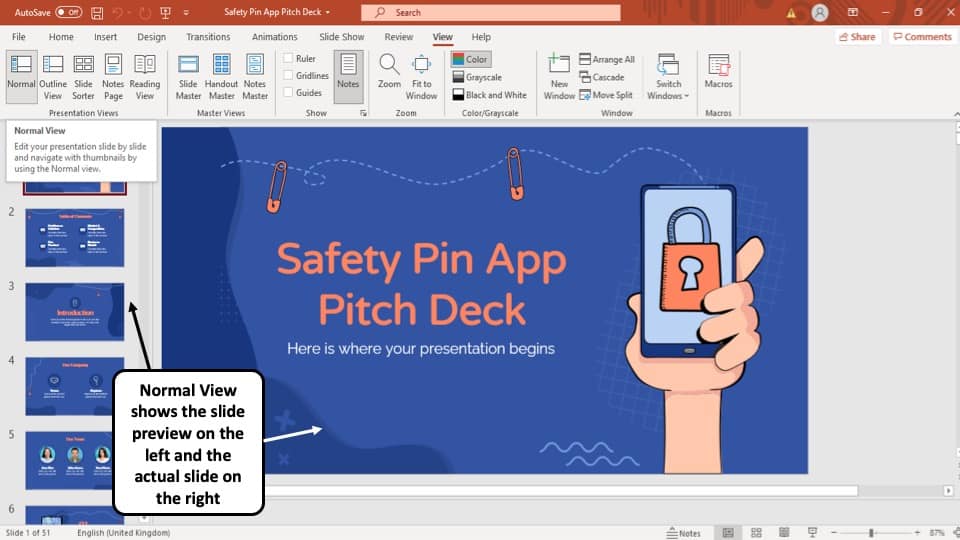
The ‘Normal View’ option is the first option in the ‘Presentation Views’ section of the ‘View’ tab. It is the most commonly used viewing option and is also the default slide view for PowerPoint.
The slides appear on the left of the PowerPoint window in the ‘Slide Navigation’ bar. Thumbnails of the slide are represented as boxes in the ‘Slide Navigation’ bar with its consecutive serial number to the left of it.
The main function of normal view mode in PowerPoint is to navigate through slides in a vertical grid while allowing you to add, design, or edit the slides while getting a preview of the slides on the left.
2. Slide Sorter View
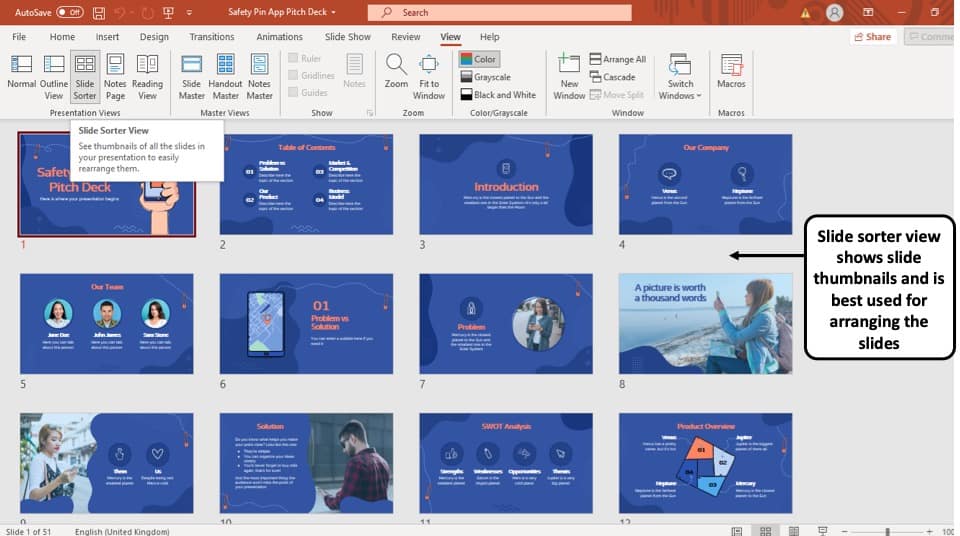
The ‘Slide Sorter’ option gives you an overview of all the slides in your PowerPoint presentation.
The slides are represented as thumbnails as a grid of boxes arranged side by side. The serial number of the slide is given on the bottom left corner of the slide thumbnail.
This option serves the purpose of viewing the slides together in one window making it easier to rearrange and organize them in a quick fashion.
3. Notes Page View

The ‘Notes Page View’ option gives you the view of each slide and its speaker notes in one page.
In this view, the slides appear at the top and the speaker notes are given on the bottom of the two sections. The serial number of the slide is not shown in this view. You can also edit speaker notes from here.
The main purpose of the notes page view in PowerPoint is to preview what each page will look like before you print the slides with speaker notes.
4. Reading View:
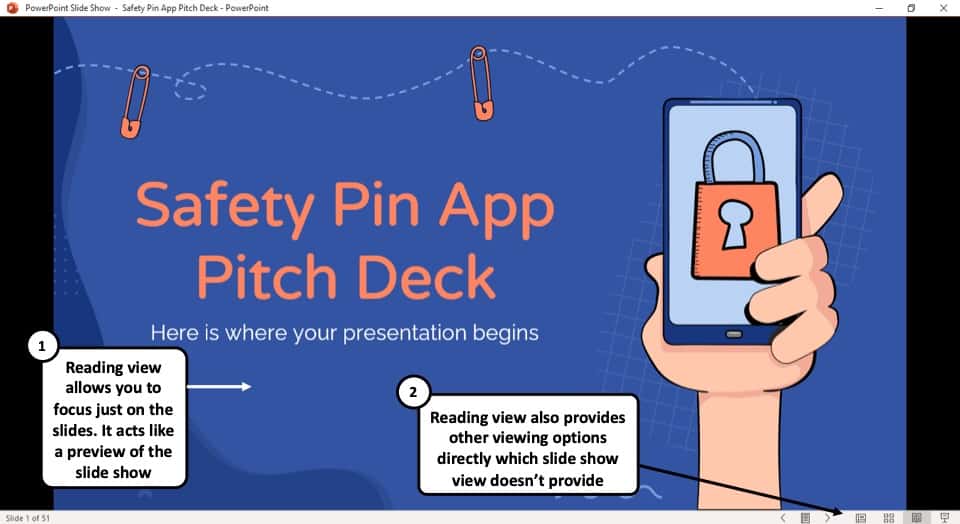
The Reading View option allows you to view your PowerPoint presentation without going into Full Screen mode. All the transitions and animations can be seen in this view. The serial number of the slide is given at the bottom right corner of the window.
It is used to preview the slide and review the slides with full focus. This mode also makes other view options easily accessible, which is not the case in ‘Slide Show’ mode where the presentation is shown in the full screen, and the options are not visible on screen.
The reading mode is actually more useful for word documents, as it allows the reader to focus just on the text. In my opinion, it adds little value to a PowerPoint presentation.
5. Outline View:
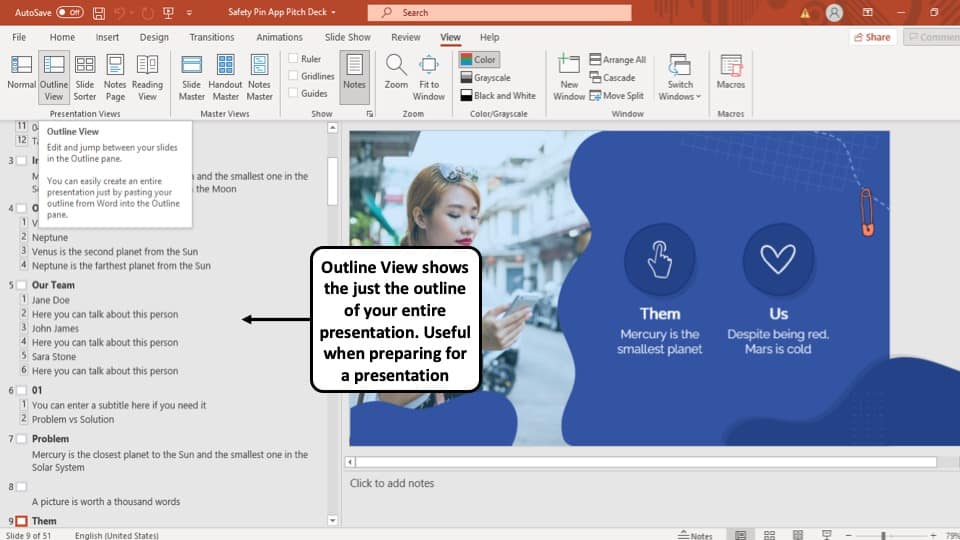
The ‘Outline View’ shows you the entire outline of your PowerPoint presentation in the ‘Slide Navigation’ bar.
In this view, there is no thumbnail of the presentation. Instead, there is an outline of all the data present in that slide. The serial number of the slide is at the left followed by a small white box that represents a slide and then the outline of that slide.
You can also create an entire slide in the pane of this view by copy and pasting data from Microsoft Word. However, you will have to design the slide separately once the data has been added to each slide.
6. Slide Show View:

The Slide Show View is the view that your audiences are going to see. This view shows each slide of your PowerPoint presentation in full screen.
All the transitions, animation, and multimedia files in your PowerPoint presentation are played here. Consecutive slides can be accessed using the direction keys on your keyboard or by clicking once on the slide.
7. Presenter View:
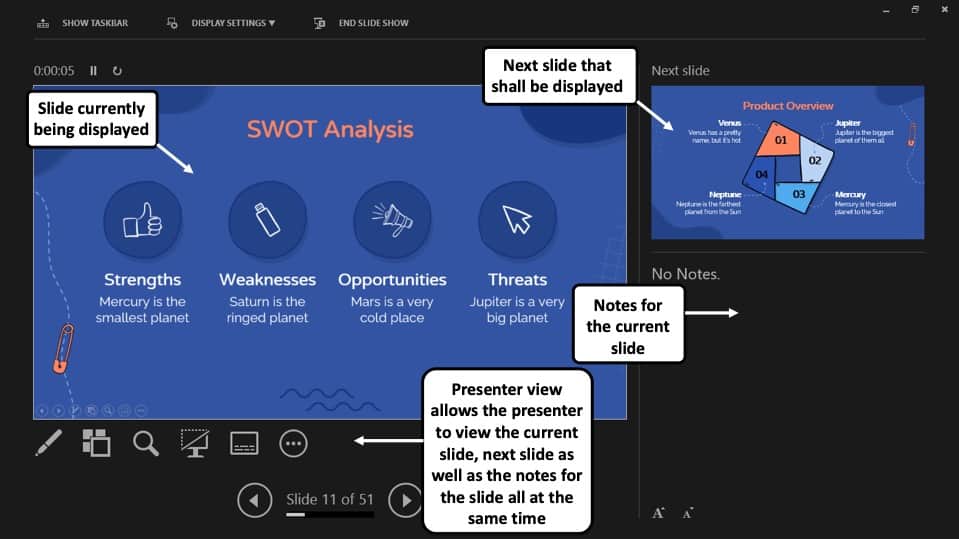
This is the view that you as a presenter are going to see while the audience is seeing the ‘Slide Show’ view.
Although you can give a presentation even in the slide show view, but it is always recommend to deliver the presentation using the “Presenter View” mode in PowerPoint as it provides you with additional features and benefits!
This view mode in PowerPoint will split the screen in multiple windows. The window on the left represents the current slide that is being displayed (the one that is visible to your audience).
The window in the top right section indicates the next slide in the queue. Whereas, the notes section displays the notes or key points made by each slide. Both, the notes section as well as the next slides window are only visible to the presenter and not to the audience!
The purpose of the “ Presenter View ” is to give the presenter all the aids to be prepared for the next slide and highlight the key points to be made on the current slide while delivering the presentation.
8. Slide Master View:
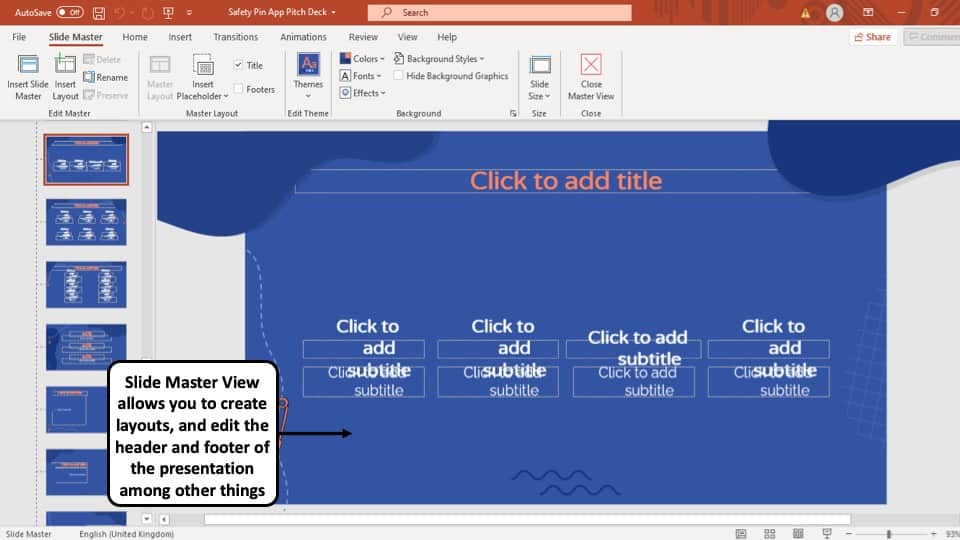
This view gives you a view of all the layouts used on the slides of your PowerPoint presentation.
The ‘ Slide Master View ’ option allows you to edit all the aspects of the layouts in your presentation such as fonts, background, color, and pretty much everything you can think of.
You can edit all the slide layouts of the presentation. Furthermore, you can also edit the header and footer of the presentation using the “ Slide Master View ” in PowerPoint.
4. How to Open the Presenter View in PowerPoint?
There are 2 different ways you can enter into Presenter View in PowerPoint –
- Using Slide Show View
- Using the short cut key i.e. Alt+F5
If you are using the Office 365 version of PowerPoint , you can actually directly access the “Presenter View” in the View section. Simply click on “View”. Then, click on “Presenter View”
Let’s look at both the methods quickly –
Method 1 – Using the Slide Show View
Step-1: Click on the ‘Slide Show’ button at the bottom right corner of the screen
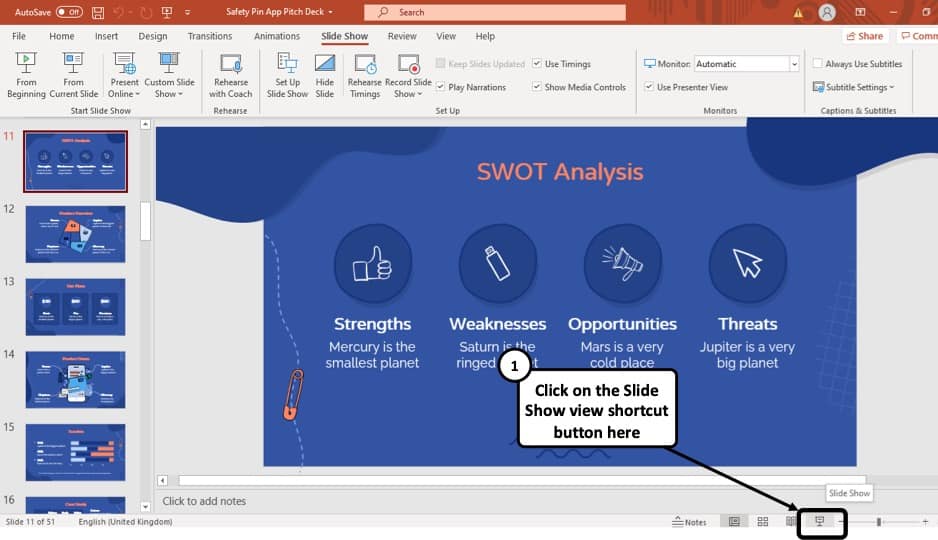
At first, you have to click on the ‘Slide Show’ button that looks like a projector screen which is located at the bottom right corner of your PowerPoint window. (as indicated in the image above)
Step-2: Right-click and choose “Show Presenter View”

Once you are in the ‘Slide Show’ mode, using your mouse right-click anywhere on the screen. From the menu that appears, choose the “ Show Presenter View ” option
Method 2 – Using the Keyboard Shortcut
Alternatively, you can press ‘ Alt + F5 ’ on your keyboard and that will immediately open the ‘Presenter View’ mode.
The keyboard shortcut to open the “Presenter View” in PowerPoint on Mac is “Option+Enter” key.
5. How to Change PowerPoint Back to Normal View?
To change your PowerPoint back to ‘Normal View’ from ‘Slide Show’ mode, ‘Presenter View’ option or the ‘Reading View’ option, all you have to do is simply press the ‘ESC’ button on the keyboard of your computer. This will take you back to Normal View.
If you are using any other view apart from these 3 view modes in PowerPoint, you need to do the following –
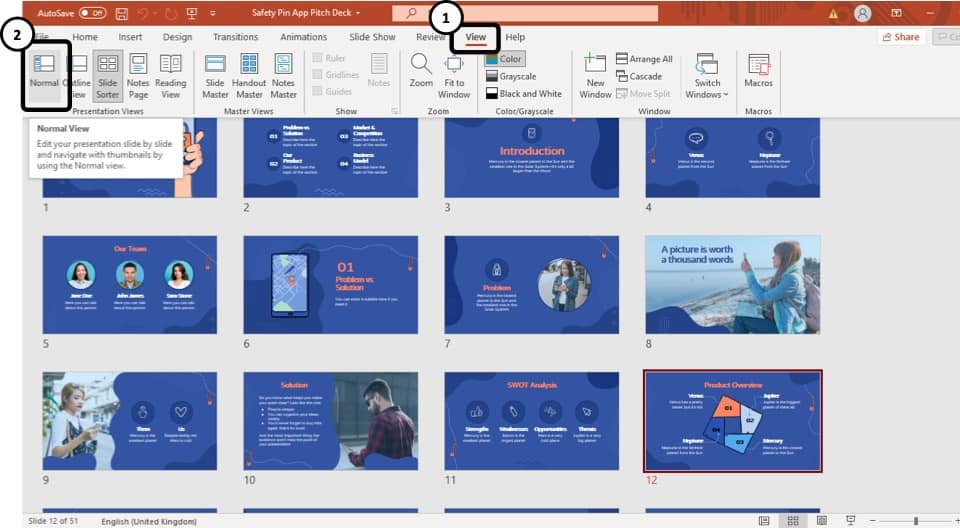
If you are in a different viewing option, such as ‘Slide Sorter’ option, or the ‘Reading View’ option then you have to select the ‘Normal View’ option from the ‘View’ tab instead of the ‘Slide Sorter’ option or the different slide view option you are currently on.
More PowerPoint Related Topics
- How to Crop a Picture in PowerPoint? [Complete Step-by-Step Tutorial!]
- How to Give a Presentation on Zoom? A Helpful Resource!
- What is a Presentation Clicker? [And How to Use it!]
- How to Convert a PowerPoint to PDF? [A Simple Guide!]
- PowerPoint vs Google Slides: Which is Better? [ULTIMATE Test!]
- How to Change Bullet Style in PowerPoint? A Complete Guide
Credit to Pressahotkey (via Freepik) for the featured image of this article
What are the different views of a presentation?
- Slide Sorter
Copyright 1997 by the Curators of the University of Missouri
Stack Exchange Network
Stack Exchange network consists of 183 Q&A communities including Stack Overflow , the largest, most trusted online community for developers to learn, share their knowledge, and build their careers.
Q&A for work
Connect and share knowledge within a single location that is structured and easy to search.
PowerPoint slide sorter / editor keyboard shortcut
whats the keyboard shortcut to go to (and from?) the slide sorter and the editor?
- keyboard-shortcuts
- microsoft-powerpoint
7 Answers 7
Alt + 5 in PowerPoint 2010 will switch you from Normal to Slide Sorter View and back again.
With PowerPoint 2010, you can do Alt + W then:
- I to go to the slide sorter
- L to go back to the normal view
You could also add the slide sorter and normal view to the "quick access toolbar", and then access them with Alt + 3 , Alt + 4 (depends on the order of the toolbar).
Pressing CTRL + S in "Slide Show" mode will bring up a modal window with the list of slides. You can then select the slide you wish to jump to. Pressing F1 in "Slide Show" mode will bring up a modal window with the list of shortcuts (including this one). I hope this helps.
- i want to move between the slide sorter and the slide editing view at design time - not during a presentation! – GreyCloud Apr 13, 2011 at 15:14
There's a two step solution to adding a keyboard shortcut for toggling between Slide Sorter View and back to Normal View .
Select View > and right click Slide Sorter. Select Add to Quick Access Toolbar. This adds the Slide Sorter key to your Quick Access Toolbar, obviously!
Once step 1 is completed, you can then initiate the new quick access button by using Alt + 'x' (where x stands for the position of the Slide Sorter Quick Access button in the Quick Access Toolbar). For example Alt + 4.
Hope this helps.
Just to avoid confusion Alt + 5 DOES NOT switch to slide sorter view. It starts the fifth item on the QAT. This MAY be slide sorter view.
You're pretty much restricted to F6 and Shift + F6 to move clockwise and counter-clockwise through the various panes.
You could perhaps look at defining an action for this with AutoHotKey .
- these keys dont seem to change the view. Is it possible to create such a shortcut key? – GreyCloud Apr 13, 2011 at 15:14
- Edited my answer - you could perhaps look into AutoHotKey. – Gareth Apr 17, 2011 at 3:42
PowerPoint 2016: Press Alt + V , you should see a prompt for the next key for old-fashion drop-down menu command. Then press D to switch to the Slide Sorter view or back to Normal view.
You must log in to answer this question.
Not the answer you're looking for browse other questions tagged keyboard-shortcuts microsoft-powerpoint ..
- The Overflow Blog
- OverflowAI and the holy grail of search
- The Good, the Bad, and the Disruptive: Let us know where you stand in the...
- Featured on Meta
- Our Partnership with OpenAI
- What deliverables would you like to see out of a working group?
Hot Network Questions
- Why would academics spend funds on an apparently unnecessary publishing fee?
- Does an object approaching a black hole ever cross the combined event horizon of the black hole and itself?
- How can my blue and black deck return enchantments from the graveyard?
- Why "guilty" or "not guilty"and not "guilty" or "innocent"?
- 1 Corinthians 15:4-7 a physical, or spiritual heavenly appearance
- Where do I create my first circuit
- Can I bring fish products from Indonesia to Germany?
- Cost Minimization and Karush-Kuhn-Tucker
- Would the equatorial region on an alternative Earth spinning on two axes still be +/- 5° above the median "equator?"
- Cylinder shape has pinching edges
- Are there any dangerous consequences when allowing spending inspiration on rerolls?
- Did a doctor Helen Zhu warn about a mounting epidemic in the US and receive a gag order?
- Does suspending judgment require judgment?
- Why do electric arcs rise?
- Why GLM don't have an error term and why shouldn't residuals be i.i.d?
- Rename files to random filenames (but not to checksums)
- Could ghosts be an airborne species of octopus?
- Which duplo digit is 6 or 9?
- депутат followed by a feminine name
- Tikz, font in nodes and node (background) color using LaTeX macro/command
- How do photons have temperature?
- Reasons for implementing op-amps which are not unity-gain stable
- Gamma regression with XGBoost
- Why does Windows command prompt command chaining not short circuit when a batch file returns non-zero?
IMAGES
VIDEO
COMMENTS
The Slide Sorter view makes grouping and reorganizing slides a breeze. Select View > Slide Sorter or select Slide Sorter on the Task Bar in the bottom right. To reorder a slide, drag it into a new location. This article explains how to use Slide Sorter view to reorder your slides by dragging and dropping them into a different sequence.
Master PowerPoint: Unveiling the Power of Slide Sorter View • Master PowerPoint: Unveiling the Power of Slide Sorter View. Discover the often overlooked but ...
PowerPoint Slide Sorter is one of the views available in Microsoft PowerPoint that lets you view all your slides in the form of thumbnails sorted horizontally. This helps better organize the slides, as you can rearrange them using drag and drop. Furthermore, you can zoom your slides (in or out) to increase or reduce the size of the thumbnails ...
Open a PowerPoint presentation that has plenty of slides. The left pane holds the thumbnails of slides. Step #2: Change to Slide Sorter View. In the main menu bar, click on the View tab to change the ribbon. On the View ribbon, in the section Presentation Views, click on the Slide Sorter icon.
Your slides are ordered on the left of your PowerPoint presentation. 2. Click on the Slide Sorter View in PowerPoint. To check the sequencing on my slides I'm going to go ahead and find the View tab on the ribbon. There are a number of presentation views and we're going to learn Slide Sorter View, let's enter it by clicking on it.
Accessing slide sorter view is simple. Here are the steps: Open your PowerPoint presentation. Select the View tab on the ribbon. Click the Slide Sorter button in the Presentation Views group. Your slides will instantly transform into thumbnail previews spread across your screen. Pro Tip: You can also toggle between normal and slide sorter view ...
Open your PowerPoint presentation. Locate the navigation bar at the bottom of the PowerPoint window. Click on the "Slide Sorter" button, which is the middle button in the navigation bar. Alternatively, you can use the shortcut key "Alt + Shift + View" to switch to Slide Sorter View.
You can get to Slide Sorter view from the task bar at the bottom of the slide window, or from the View tab on the ribbon. Slide Sorter view (below) displays all the slides in your presentation in horizontally sequenced, thumbnails. Slide show view is helpful if you need to reorganize your slides—you can just click and drag your slides to a ...
Unlocking PowerPoint: Exploring the Slide Sorter View • the power of Slide Sorter view and how it can take your PowerPoint presentations to the next level. S...
Open your PowerPoint presentation. 2. Click on the "View" tab from the top menu bar. 3. Click "Slide Sorter" from the Presentation Views group to switch to this view. 4. You will see a preview of all the slides in your presentation. You can navigate between them by clicking on the thumbnail image of the slide you want to view.
To access Slide Sorter view, you can choose either of these options: Click the Slide Sorter button on the Status Bar, as shown highlighted in red within Figure 1, above. Access the View tab of the Ribbon, and click the Slide Sorter button, as shown highlighted in red within Figure 2, below. Figure 2: Slide Sorter button within the Presentation ...
Spread the loveThe Slide Sorter View in PowerPoint is a powerful tool that allows users to easily rearrange, delete, and manage multiple slides at once. This view displays thumbnail images of all the slides in a presentation, providing a quick and visual overview of the entire presentation. Here's how to use the Slide Sorter View in PowerPoint: 1. Open your PowerPoint presentation. 2. Click ...
Add a section. Right-click between slides and select Add Section. An Untitled Section is added in the thumbnail pane, and the Rename Section dialog box opens. Type a name in the Section name box. Select Rename. To collapse a section, click the triangle next to the section name. The numeral by the section name shows the number of slides in that ...
Rearrange slides Click and drag any slide to a different position. Add slides Right-click the space between two slides and choose New Slide from the shortcut menu. Delete slides Select one or more slides and then press the Delete key. (To select multiple slides, hold down Control while clicking.) Set transition effects Select one or more slides ...
Rearranging the slides in your presentation using just the side pane can be a pain. Thankfully, the Slide Sorter view lets. Have you ever realized that a number of slides in your PowerPoint presentation would actually do much better all the way at the end, or the entire structure of the presentation just feels off? ...
A picture of a presentation shown in Slide Sorter view in PowerPoint for Microsoft 365. Instructions on Using Slide Sorter View in PowerPoint: To switch to Slide Sorter view, click the "Slide Sorter" button in the presentation view buttons on the Status Bar.; Alternatively, click the "Slide Sorter" button in the "Presentation Views" button group on the "View" tab of the Ribbon.
Learn how to change the PowerPoint slide order or presentation order using the Slide Sorter. The Slide Sorter view allows you to quickly arrange a large number of slides in a presentation. You will also learn how to change the slide order using the slide pane in the Normal view. Tutorial Length (mm:ss):
The following list tells you how to rearrange, add, or delete slides from Slide Sorter View: Move a slide: To move a slide, click and drag it to a new location. Point to the slide and then hold down the mouse button. Drag the slide to its new location and release the button. PowerPoint adjusts the display to show the new arrangement of slides.
To open Slide Sorter view, go to the View tab and click Slide Sorter. In Slide Sorter view, you can see thumbnails of all your slides. To rearrange your slides, click and drag them to a new location. To select multiple slides, click the first slide, then press and hold the Shift key while you click the other slides.
The Slide Sorter view is the best view for when you are wanting to arrange your slides in your presentation. You can move individual slides around by clicking ... You can change your presentation view to slide sorter using the shortcut button available in the taskbar at the bottom of the window (see the below image).
The 'Slide Sorter' option gives you an overview of all the slides in your PowerPoint presentation. The slides are represented as thumbnails as a grid of boxes arranged side by side. The serial number of the slide is given on the bottom left corner of the slide thumbnail. This option serves the purpose of viewing the slides together in one ...
In PowerPoint you can work with presentations in five different views: Slide. Outline. Slide Sorter. Notes Page. Slide Show. Each view is optimized for a specific purpose. (In the lower left-hand corner of the images below, notice how the view icons change for each view.
Select View > and right click Slide Sorter. Select Add to Quick Access Toolbar. This adds the Slide Sorter key to your Quick Access Toolbar, obviously! Once step 1 is completed, you can then initiate the new quick access button by using Alt + 'x' (where x stands for the position of the Slide Sorter Quick Access button in the Quick Access ...