All Formats
Resource types, all resource types.
- Rating Count
- Price (Ascending)
- Price (Descending)
- Most Recent

Free 3rd grade oral communication rubrics

End of the Year Memory Book 2nd 3rd 4th 5th Grade Last Week of School Activities

The Shocking Truth About Betta Fish Informational Reading Passage & Test Prep Qs

*End of the Year Book- KEEP THEM BUSY!!! *No Prep!*

Jazz: A comprehensive & engaging Music History PPT (links, handouts & google)

FREEBIE Oral Presentation Rubric

How are you Feeling? Morning Meeting Anchor Chart

Presentation Rubric
Elementary Rubric for Presentations

EDITABLE Oral Communication Rubric
Show and Tell Speaking Rubric (Memento)

Peer Evaluation Form: Presenting

Lead With Lit: Complete SEL and Community Building Mini-Lesson

Paper Bag Book Report

Grade 1-3 Oral Communication - Single Point Rubric (Ontario Curriculum)

Show You Know: A Check for Understanding

Speaking and Listening Checklist for Upper Grade Discussions

- Word Document File

Book Report/Celebration Rubric

Poetry Party Bundle

Grab & Go Artic-Quick Speech Directions & Forms

Discussion Self - Evaluation Rubric/Checklist

SOLE (Self-Organized Learning Environment) presentation rubric

Fluency Rubric K-5

Show and Tell Activity Distance Learning and Print and Go for Speech Therapy

Oral Communication Descriptive Toy Presentation

Participation Tracker (Rubric)

PowerPoint Presentation Score Sheet

Rubrica de colaboracion grupal (Spanish)

- We're hiring
- Help & FAQ
- Privacy policy
- Student privacy
- Terms of service
- Tell us what you think
How to give a presentation
Does the thought of public speaking start your stomach churning like a tornado? Would you rather get caught in an avalanche than give a speech? Giving an oral report does not have to be a natural disaster. There are two main elements—the writing and the presentation. Find out how to put it all together with tips from the Nat Geo Kids Almanac .
Writing Your Material
Try to keep your sentences short and simple. Long, complex sentences are harder to follow. Limit yourself to just a few key points. You don’t want to overwhelm your audience with too much information. To be most effective, hit your key points in the introduction, elaborate on them in the body, and then repeat them once again in your conclusion.
The three basic parts
• Introduction—This is your chance to engage your audience and really capture their interest in the subject you are presenting. Use a funny personal experience or a dramatic story, or start with an intriguing question.
• Body—This is the longest part of your report. Here you elaborate on the facts and ideas you want to convey. Give information that supports your main idea, and expand on it with specific examples or details. In other words, structure your oral report in the same way you would a written essay so that your thoughts are presented in a clear and organized manner.
• Conclusion—This is the time to summarize the information and emphasize your most important points to the audience one last time.
Preparing Your Delivery
Practice makes perfect. Confidence, enthusiasm, and energy are key to delivering an effective oral report, and they can best be achieved through rehearsal. Ask family and friends to be your practice audience and give you feedback when you’re done. Were they able to follow your ideas? Did you seem knowledgeable and confident? Did you speak too slowly or too fast, too softly or too loudly? The more times you practice giving your report, the more you’ll master the material. Then you won’t have to rely so heavily on your notes or papers, and you will be able to give your report in a relaxed and confident manner.
Present with everything you’ve got
Be as creative as you can. Incorporate videos, sound clips, slide presentations, charts, diagrams, and photos. Visual aids help stimulate your audience’s senses and keep them intrigued and engaged. They can also help to reinforce your key points. And remember that when you’re giving an oral report, you’re a performer. Take charge of the spotlight and be as animated and entertaining as you can. Have fun with it.
Keep your nerves under control
Everyone gets a little nervous when speaking in front of a group. That’s normal. But the more preparation you’ve done—meaning plenty of researching, organizing, and rehearsing—the more confident you’ll be. Preparation is the key. And if you make a mistake or stumble over your words, just regroup and keep going. Nobody’s perfect, and nobody expects you to be.
Download the pdf.
Homework help
Science lab, (ad) national geographic kids almanac.
- Terms of Use
- Privacy Policy
- Your California Privacy Rights
- Children's Online Privacy Policy
- Interest-Based Ads
- About Nielsen Measurement
- Do Not Sell My Info
- National Geographic
- National Geographic Education
- Shop Nat Geo
- Customer Service
- Manage Your Subscription
Copyright © 1996-2015 National Geographic Society Copyright © 2015-2024 National Geographic Partners, LLC. All rights reserved
EL Education Curriculum
You are here.
- ELA G2:M3:U3:L8
High-Quality Oral Presentations: Speaking in Complete Sentences
In this lesson, daily learning targets, ongoing assessment.
- Technology and Multimedia
Supporting English Language Learners
Universal design for learning, closing & assessments, you are here:.
- ELA Grade 2
- ELA G2:M3:U3
Like what you see?
Order printed materials, teacher guides and more.
How to order
Help us improve!
Tell us how the curriculum is working in your classroom and send us corrections or suggestions for improving it.
Leave feedback
These are the CCS Standards addressed in this lesson:
- SL.2.3: Ask and answer questions about what a speaker says in order to clarify comprehension, gather additional information, or deepen understanding of a topic or issue.
- SL.2.4: Tell a story or recount an experience with appropriate facts and relevant, descriptive details, speaking audibly in coherent sentences.
- SL.2.6: Produce complete sentences when appropriate to task and situation in order to provide requested detail or clarification.
- I can speak in complete sentences when using my notecards to present to an audience. ( SL.2.4, SL.2.6 )
- I can show empathy when I give feedback to my peers. ( SL.2.3 )
- During Work Time B, circulate and observe as students practice presenting and giving empathic feedback to peers. Consider using the Speaking and Listening Checklist to document progress toward SL.2.3, SL.2.4 , and SL.2.6 (see Assessment Overview and Resources).
- Pre-distribute Materials for Work Time B at students? pre-determined workspaces.
- Post: Learning targets and applicable anchor charts (see Materials list)
Tech and Multimedia
Consider using an interactive white board or document camera to display lesson Materials.
- Continue to use the technology tools recommended throughout Modules 1 and 2 to create anchor charts to share with families; to record students as they participate in discussions and protocols to review with students later and to share with families; and for students to listen to and annotate text, record ideas on note-catchers, and word-process writing.
Supports guided in part by CA ELD Standard 2.I.C.9
Important points in the lesson itself
- The basic design of this lesson supports ELLs with opportunities to hone their speaking skills with grammatically correct syntax by identifying complete and incomplete sentences.
- ELLs may find it challenging to extrapolate complete sentences from the words and phrases in their notes. During or after Work Time A, provide additional practice with this skill. If necessary, consider helping them transcribe complete sentences based on their notes for them to temporarily use during this lesson.
Levels of support
For lighter support:
- During Work Time A, challenge students to add on to the incomplete sentences to make them complete.
- During Work Time B, consider designating confident speakers as "coaches." Encourage them to circulate and support students who need additional support.
For heavier support:
- During Work Time B, consider allowing students to work in heterogenous triads. Students can observe two models of the presentation feedback before contributing themselves.
- Multiple Means of Representation (MMR): Continue to support comprehension by activating prior knowledge and scaffold connections for students. Continue to provide visual display of questions and student responses on a chart or a board during discussions.
- Multiple Means of Action & Expression (MMAE): Continue to support students in setting appropriate goals for their effort and the level of difficulty expected.
- Multiple Means of Engagement (MME): Continue to support sustained engagement and effort for students who benefit from consistent reminders of learning goals and their value or relevance.
Key: Lesson-Specific Vocabulary (L); Text-Specific Vocabulary (T); Vocabulary Used in Writing (W)
- empathy, feedback, audience (L)
- Complete or Incomplete sentence strips (one to display)
- Criteria for High-Quality Oral Presentations anchor chart (begun in Lesson 6)
- Oral Presentation Notecards: Bee Model (from Lesson 2; one to display)
- What Does Peer Feedback Look and Sound Like? anchor chart (begun in Lesson 4)
- Peer Feedback Protocol anchor chart (begun in Lesson 4)
- Oral presentation notecards (from Lesson 2; one set per student)
- Specific, Positive Feedback sentence starters (from Lesson 6; one per pair and one to display)
- Speaking and Listening Checklist (for teacher reference; see Assessment Overview and Resources)
- Sandwich bag (from Lesson 2; one per student)
- Pinky Partners Protocol anchor chart (begun in Module 1)
Each unit in the K-2 Language Arts Curriculum has one standards-based assessment built in. The module concludes with a performance task at the end of Unit 3 to synthesize their understanding of what they accomplished through supported, standards-based writing.
Copyright © 2013-2024 by EL Education, New York, NY.
Get updates about our new K-5 curriculum as new materials and tools debut.
Help us improve our curriculum..
Tell us what’s going well, share your concerns and feedback.
Terms of use . To learn more about EL Education, visit eleducation.org

Creating an Oral Presentation Rubric
In-class activity.
This activity helps students clarify the oral presentation genre; do this after distributing an assignment–in this case, a standard individual oral presentation near the end of the semester which allows students to practice public speaking while also providing a means of workshopping their final paper argument. Together, the class will determine the criteria by which their presentations should–and should not–be assessed.
Guide to Oral/Signed Communication in Writing Classrooms
To collaboratively determine the requirements for students’ oral presentations; to clarify the audience’s expectations of this genre
rhetorical situation; genre; metacognition; oral communication; rubric; assessment; collaboration
- Ask students to free-write and think about these questions: What makes a good oral presentation? Think of examples of oral presentations that you’ve seen, one “bad” and one “good.” They can be from any genre–for example, a course lecture, a museum talk, a presentation you have given, even a video. Jot down specific strengths and weaknesses.
- Facilitate a full-class discussion to list the important characteristics of an oral presentation. Group things together. For example, students may say “speaking clearly” as a strength; elicit specifics (intonation, pace, etc.) and encourage them to elaborate.
- Clarify to students that the more they add to the list, the more information they have in regards to expectations on the oral presentation rubric. If they do not add enough, or specific enough, items, they won’t know what to aim for or how they will be assessed.
- Review the list on the board and ask students to decide what they think are the most important parts of their oral presentations, ranking their top three components.
- Create a second list to the side of the board, called “Let it slide,” asking students what, as a class, they should “let slide” in the oral presentations. Guide and elaborate, choosing whether to reject, accept, or compromise on the students’ proposals.
- Distribute the two lists to students as-is as a checklist-style rubric or flesh the primary list out into a full analytic rubric .
Here’s an example of one possible rubric created from this activity; here’s another example of an oral presentation rubric that assesses only the delivery of the speech/presentation, and which can be used by classmates to evaluate each other.
Impromptu Speech Activities
Oral Presentation Topics for Elementary Students
- Assessments & Tests
- Becoming A Teacher
- Elementary Education
- Secondary Education
- Special Education
- Homeschooling
- M.S., Education, Buffalo State College
- B.S., Education, Buffalo State College
Learning how to deliver an impromptu speech is part of meeting the oral communications standards. Use the following activities to help students practice their presentation skills.
Activity 1: Speech Fluency
The purpose of this exercise is for students to practice speaking clearly and fluently. To begin the activity, pair students together and have them choose a topic from the list below. Next, give students about thirty to sixty seconds to think about what they are going to say in their speech. Once they have gathered their thoughts, have students take turns presenting their speech to one another.
Tip - To keep students on track, give each group a timer and have them set it for one minute for each presentation. Also, create a handout that students must fill out after their speech to give their partner feedback on the positives and negatives of their presentation.
Possible Questions to Include in the Handout
- Was the message clear?
- Were the ideas organized?
- Did they speak fluently?
- Was their audience engaged?
- What can they do better next time?
Topics to Choose From
- Favorite book
- Favorite food
- Favorite animal
- Favorite sport
- Favorite school subject
- Favorite vacation
- Favorite holiday
Activity 2: Impromptu Practice
The purpose of this activity is for students to gain experience delivering one to two-minute impromptu speech presentations. For this activity, you can put students into groups of two or three. Once the group is chosen, have each group select a topic from the list below. Then allow each group five minutes to prepare for their task. After the five minutes is up, each individual from the group takes turns delivering their speech to the group.
Tip - A fun way for students to get feedback is to have them record their presentation and watch (or hear) themselves on tape. The iPad is an excellent tool to use, or any video or audio recorder will work just fine.
- Any of the above
- Explain the rules of your favorite game
- Explain how to make your favorite meal
- Explain your daily routine
Activity 3: Persuasive Speech
The purpose of this activity is for students to gain knowledge on how to give a persuasive speech . First, use the list of persuasive language techniques to give students examples of what should be included in their speech. Then, group students into pairs and have them each choose a topic from the list below. Give students five minutes to brainstorm a sixty-second speech that will persuade their partner to their point of view. Have students take turns delivering their speeches and then fill out the feedback form from Activity 1.
Tip - Allow students to jot down notes or key words on an index card.
- Any current event
- Convince listeners why you should be the president
- Try to sell the listeners the clothes you are wearing
- Convince the teacher to not give homework for a week
- Try to convince the school board why they should have better food in the cafeteria
Persuasive Language Techniques
- Emotional appeal : The speaker plays on people's emotions, can manipulate the reader by triggering an emotional response.
- Descriptive language : The speaker uses words that are lively and vivid and engages the reader by inducing an emotion or producing a picture for them.
- Emotive language : The speaker uses language that plays on peoples feelings. There is a deliberate use of words to provoke an emotional response.
- Inclusive Language : The speaker uses language that engages the audience and sounds friendly.
- Alliteration : The speaker uses the same letter in two or more words to persuade by adding emphasis and reinforcing the meaning. (ex. cruel, calculating, and crooked)
- 100 Persuasive Speech Topics for Students
- Best Apps to Learn French
- Fun Field Day Activities for Elementary Students
- How to Give an Impromptu Speech
- 5 Successful Review Activities for Elementary Students
- Stage a Debate in Class
- Practice Speaking Skills With Impromptu Speeches
- How to Write a Persuasive Essay
- Christmas and Winter Holiday Vocabulary 100 Word List
- 13 Creative Examples of Informal Assessments for the Classroom
- Persuasion and Rhetorical Definition
- 5 Minute Activities for Elementary School Teachers
- 10 Fun Team-Building Activities for Middle School
- Methods for Presenting Subject Matter
- 50 Topics for Impromptu Student Speeches
- 4 Fast Debate Formats for the Secondary Classroom
ORAL PRESENTATION CHECKLIST
Introduction.
- Speaker engages audience attention and interest (relevance, importance, timeliness, etc.).
- Speaker clearly identifies thesis, purpose or central question (focus).
- Speaker clearly previews presentation's structure or content (scope and sequence). (If thesis or preview is withheld, is this appropriate and effective?)
Development
- Points are clear and arranged in logical order.
- Speaker provides appropriate transitions between points.
- Speaker adequately clarifies terms and concepts.
- Speaker adequately explains points and supports arguments.
- Speaker restates or summarizes points as needed.
- Speaker cites sources appropriately (orally or on visuals).
Audiovisual Media
- Media make sense and enhance the presentation.
- Speaker effectively integrates media with what is being said.
- Speaker provides appropriate transitions between media clips or PowerPoint slides.
- Slides are effectively designed (clear, uncluttered, adequate size, good contrast, consistent).
- Slides are correct in terms of spelling, grammar, citations, etc.
- Speaker summarizes as needed.
- Speaker reinforces or re-establishes the thesis, purpose or central question.
- Speaker closes appropriately.
Overall Delivery
- Speaker uses clear, appropriate language.
- Speaker uses appropriate rate and volume.
- Speaker uses few “uhs” and “ums.”
- Speaker uses voice expressively.
- Speaker makes sufficient eye contact.
- Speaker uses nonverbal behavior that supports the message.
Office / Department Name
Oral Communication Center
Contact Name
Amy Gaffney
Oral Communication Center Director

Help us provide an accessible education, offer innovative resources and programs, and foster intellectual exploration.
Site Search
- Skip to Nav
- Skip to Main
- Skip to Footer
How to Use Oral Presentations to Help English Language Learners Succeed
Please try again

Excerpted from “ The ELL Teacher’s Toolbox: Hundreds of Practical Ideas to Support Your Students ,” by Larry Ferlazzo and Katie Hull Sypnieski, with permission from the authors.
Having the confidence to speak in front of others is challenging for most people. For English Language Learners, this anxiety can be heightened because they are also speaking in a new language. We’ve found several benefits to incorporating opportunities for students to present to their peers in a positive and safe classroom environment. It helps them focus on pronunciation and clarity and also boosts their confidence. This type of practice is useful since students will surely have to make presentations in other classes, in college, and/or in their future jobs. However, what may be even more valuable is giving students the chance to take these risks in a collaborative, supportive environment.
Presentations also offer students the opportunity to become the teacher—something we welcome and they enjoy! They can further provide valuable listening practice for the rest of the class, especially when students are given a task to focus their listening.
Research confirms that in order for ELLs to acquire English they must engage in oral language practice and be given the opportunity to use language in meaningful ways for social and academic purposes (Williams & Roberts, 2011). Teaching students to design effective oral presentations has also been found to support thinking development as “the quality of presentation actually improves the quality of thought, and vice versa” (Živković, 2014, p. 474). Additionally, t he Common Core Speaking and Listening Standards specifically focus on oral presentations. These standards call for students to make effective and well-organized presentations and to use technology to enhance understanding of them.
GUIDELINES AND APPLICATION
Oral presentations can take many different forms in the ELL classroom—ranging from students briefly presenting their learning in small groups to creating a multi-slide presentation for the whole class. In this section, we give some general guidelines for oral presentations with ELLs. We then share ideas for helping students develop their presentation skills and describe specific ways we scaffold both short and long oral presentations.
We keep the following guidelines in mind when incorporating oral presentations into ELL instruction:
Length —We have students develop and deliver short presentations (usually 2-4 minutes) on a regular basis so they can practice their presentation skills with smaller, less overwhelming tasks. These presentations are often to another student or a small group. Once or twice a semester, students do a longer presentation (usually 5-8 minutes), many times with a partner or in a small group.
Novelty —Mixing up how students present (in small groups, in pairs, individually) and what they use to present (a poster, a paper placed under the document camera, props, a slide presentation, etc.) can increase engagement for students and the teacher!
Whole Class Processing -- We want to avoid students “tuning out” during oral presentations. Not only can it be frustrating for the speakers, but students also miss out on valuable listening practice. During oral presentations, and in any activity, we want to maximize the probability that all students are thinking and learning all the time. Jim Peterson and Ted Appel, administrators with whom we’ve worked closely, call this “whole class processing” (Ferlazzo, 2011, August 16) and it is also known as active participation. All students can be encouraged to actively participate in oral presentations by being given a listening task-- taking notes on a graphic organizer, providing written feedback to the speaker, using a checklist to evaluate presenters, etc.
Language Support —It is critical to provide ELLs, especially at the lower levels of English proficiency, with language support for oral presentations. In other words, thinking about what vocabulary, language features and organizational structures they may need, and then providing students with scaffolding, like speaking frames and graphic organizers. Oral presentations can also provide an opportunity for students to practice their summarizing skills. When students are presenting information on a topic they have researched, we remind them to summarize using their own words and to give credit when using someone else’s words.
Technology Support —It can’t be assumed that students have experience using technology tools in presentations. We find it most helpful using simple tools that are easy for students to learn (like Powerpoint without all the “bells and whistles” or Google Slides). We also emphasize to students that digital media should be used to help the audience understand what they are saying and not just to make a presentation flashy or pretty. We also share with our students what is known as “The Picture Superiority Effect”-- a body of research showing that people are better able to learn and recall information presented as pictures as opposed to just being presented with words (Kagan, 2013).
Groups -- Giving ELLs the opportunity to work and present in small groups is helpful in several ways. Presenting as a group (as opposed to by yourself) can help students feel less anxious. It also offers language-building opportunities as students communicate to develop and practice their presentations. Creating new knowledge as a group promotes collaboration and language acquisition--an ideal equation for a successful ELL classroom!
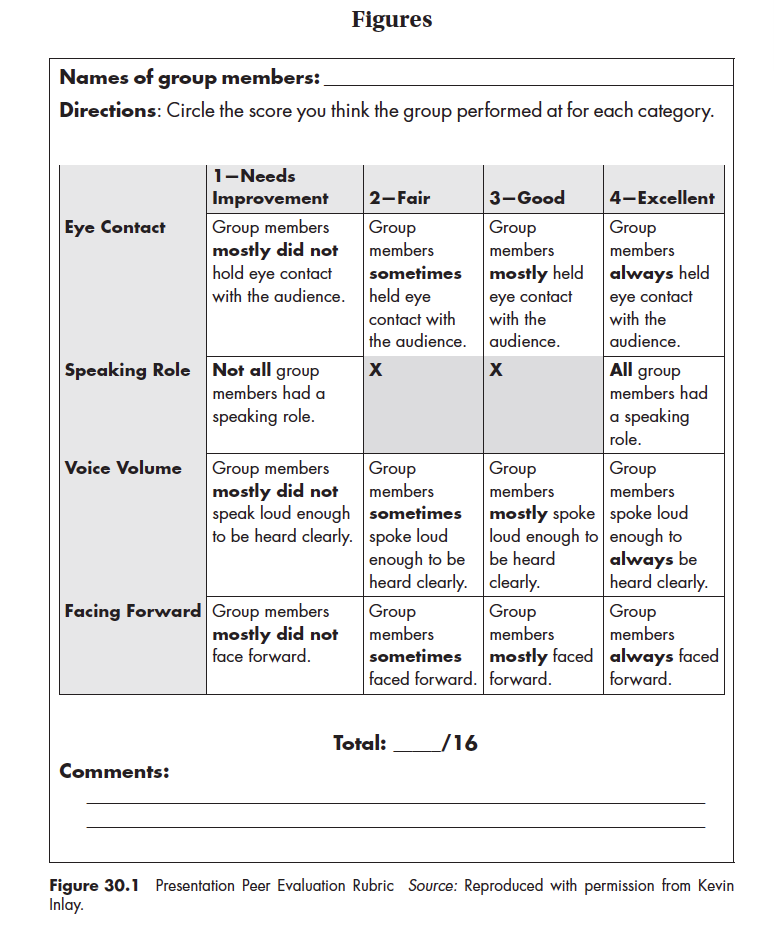
Teacher feedback/student evaluation --The focus of oral presentations with ELL students should be on the practice and skills they are gaining, not on the grade or “score” they are earning. Teachers can give out a simple rubric before students create their presentations. Then students can keep these expectations in mind as they develop and practice their presentations. The teacher, or classmates, can then use the rubric to offer feedback to the speaker. We also often ask students to reflect on their own presentation and complete the rubric as a form of self-assessment. Figure 30.1 – “Presentation Peer Evaluation Rubric” , developed by talented student teacher Kevin Inlay (who is now a teacher in his own classroom), is a simple rubric we used to improve group presentations in our ELL World History class.
Teaching Presentation Skills
We use the following two lesson ideas to explicitly teach how to develop effective presentation skills:
LESSON ONE: Speaking and Listening Do’s and Don’ts
We help our students understand and practice general presentation skills through an activity we call Speaking and Listening “Do’s and Don’ts.” We usually spread this lesson out among two class periods.
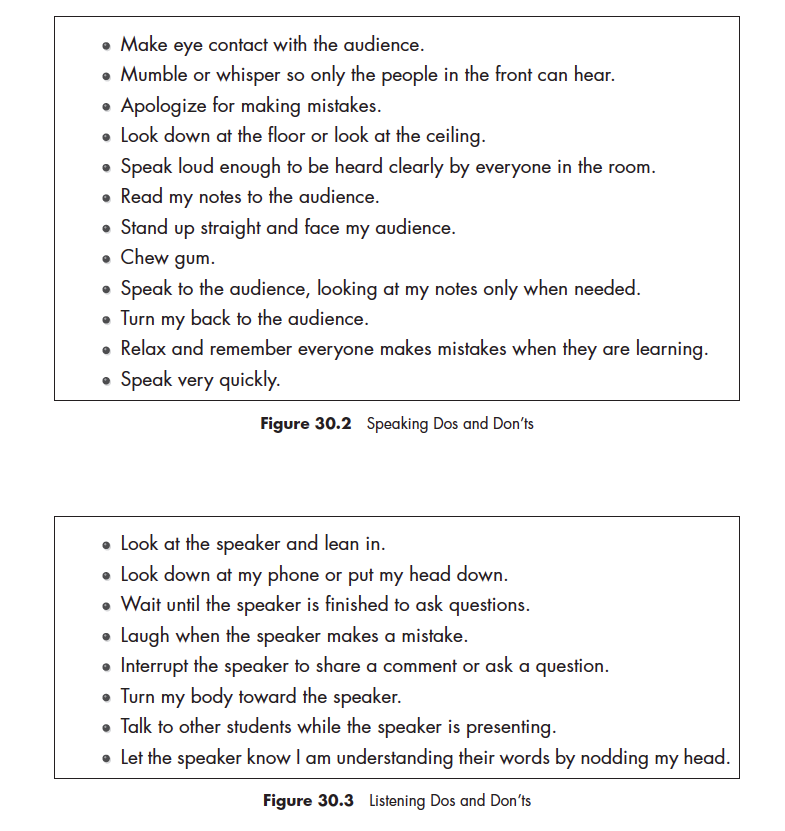
We first ask students to create a simple T-chart by folding a piece of paper in half and labeling one side “Do” and the other side “Don’t.” We then post Figure 30.2 “Speaking Do’s and Don’ts” on the document camera and display the first statement (the rest we cover with a blank sheet of paper).
We read the first statement, “Make eye contact with the audience,” and ask students if this is something they want to do when they are giving a presentation or if it is something they don’t want to do. Students write the statement where they think it belongs--under the “Do” column or “Don’t” Column. Students then share their answer with a partner and discuss why they put it in that column. After calling on a few pairs to share with the class, we move down the list repeating the same process of categorizing each statement as a “Do” or a “Don’t.” Students write it on their chart and discuss why it should be placed there.
After categorizing the statements for speaking, we give students Figure 30.3 “Listening Do’s and Don’ts .” We tell students to work in pairs to categorize the statements as something they do or something they don’t want to do when listening to a student presentation. This time, we ask students to make a quick poster with the headings “Do’s” and “Don’ts” for Listening. Under each heading students must list the corresponding statements--the teacher can circulate to check for accuracy. Students are asked to talk about why each statement belongs in each category and should be prepared to share their reasoning with the class. Students must also choose one “do” statement and one “don’t” statement to illustrate on their poster. Students can present their posters in small groups or with the whole class. This serves as a great opportunity to apply the speaking and listening “do’s” they just reviewed and heightens their awareness of the “don’ts!”
A fun twist, that also serves as a good review on a subsequent day, is to ask groups of students to pick two or three “do’s” and “don’ts” from both Speaking and Listening to act out in front of the class.
LESSON TWO Slide Presentations Concept Attainment
We periodically ask students to make slide presentations using PowerPoint or Google Slides to give them practice with developing visual aids (see the Home Culture activity later in this section). We show students how to make better slides, along with giving students the language support they may need in the form of an outline or sentence starters. An easy and effective way to do this is through Concept Attainment.
Concept Attainment involves the teacher identifying both "good" and "bad" examples of the intended learning objective. In this case, we use a PowerPoint containing three “good” slides and three “bad” ones (see them at The Best Resources For Teaching Students The Difference Between A Good and a Bad Slide ).
We start by showing students the first example of a “good” or “yes” slide (containing very little text and two images) and saying, “This is a yes.” However, we don’t explain why it is a “yes.” Then we show a “bad” or “no” example of a slide (containing multiple images randomly placed with a very “busy background”), saying, “This is a no” without explaining why. Students are then asked to think about them, and share with a partner why they think one is a "yes" and one is a "no."
At this point, we make a quick chart on a large sheet of paper (students can make individual charts on a piece of paper) and ask students to list the good and bad qualities they have observed so far. For example, under the “Good/Yes” column it might say “Has less words and the background is simple” and under the “Bad/No” column “Has too many pictures and the background is distracting.”
We then show the second “yes” example (containing one image with a short amount of text in a clear font) and the “no” example (containing way too much text and using a less clear font style). Students repeat the “think-pair-share” process and then the class again discusses what students are noticing about the “yes” and “no” examples. Then they add these observations to their chart.
Students repeat the whole process a final time with the third examples. The third “yes” example slide contains one image, minimal text and one bullet point. The third “no” example, on the other hand, contains multiple bullet points.
To reinforce this lesson at a later date, the teacher could show students more examples, or students could look for more “yes” and “no” examples online. They could continue to add more qualities of good and bad slides to their chart. See the Technology Connections section for links to good and bad PowerPoint examples, including the PowerPoint we use for this Concept Attainment lesson.
You can learn more about other presentations that support public speaking, such as home culture presentations, speed dating, talking points, top 5 and PechaKucha Book talks in our book, “ The ELL Teacher’s Toolbox: Hundreds of Practical Ideas to Support Your Students .”

Larry Ferlazzo has taught English Language Learners, mainstream and International Baccalaureate students at Luther Burbank High School in Sacramento for 15 years. He has authored eight books on education, hosts a popular blog for educators, and writes a weekly teacher advice column for Education Week Teacher . He was a community organizer for 19 years prior to becoming a high school teacher.

Katie Hull Sypnieski has worked with English Language Learners at the secondary level for over 20 years. She currently teaches middle school ELA and ELD at Rosa Parks K-8 School in Sacramento, California. She is a teaching consultant with the Area 3 Writing Project at the University of California, Davis and has leads professional development for teachers of ELLs. She is co-author (with Larry Ferlazzo) of The ESL/ELL Teacher’s Survival Guide and Navigating the Common Core with English Language Learners .
- Professional development
- Planning lessons and courses
Student presentations
In this article I would like to give you a few tips and some advice on what I've learned from helping students prepare and deliver presentations.

- Why I get students to do presentations
- Syllabus fit
- Planning a presentation lesson
- Classroom Management
Why I get students to do presentations Presentations are a great way to have students practise all language systems areas (vocabulary, grammar, discourse and phonology) and skills (speaking, reading, writing and listening). They also build confidence, and presenting is a skill that most people will need in the world of work. I find that students who are good presenters are better communicators all round, since they are able to structure and express their ideas clearly.
- Presentation skills are extremely useful both in and outside the classroom. After completing a project, a presentation is a channel for students to share with others what they have learned. It is also a chance to challenge and expand on their understanding of the topic by having others ask questions. And in the world of work, a confident presenter is able to inform and persuade colleagues effectively.
- Presentations can also form a natural part of task based learning. By focussing on a particular language point or skill, the presentation is a very practical way to revise and extend book, pair and group work. The audience can also be set a task, for example, a set of questions to answer on the presentation, which is a way of getting students to listen to each other.
Syllabus fit Normally the presentation will come towards the end of a lesson or series of lessons that focus on a particular language or skill area. It is a type of freer practice. This is because the students need to feel relatively confident about what they are doing before they stand up and do it in front of other people. If I have been teaching the past simple plus time phrases to tell a story, for example, I give my students plenty of controlled and semi controlled practice activities, such as gapfills, drills and information swaps before I ask them to present on, say, an important event in their country's history, which involves much freer use of the target grammar point.
Planning a presentation lesson Normally a presentation lesson will have an outline like this:
- Revision of key language areas
- Example presentation, which could be from a textbook or given by the teacher
- Students are given a transcript or outline of the presentation
- Students identify key stages of the example presentation – greeting, introduction, main points in order of importance, conclusion
- Focus on linking and signalling words ('Next…', 'Now I'd like you to look at…', etc.). Students underline these in the transcript/place them in the correct order
- Students are put into small groups and write down aims
- Students then write down key points which they order, as in the example
- Students decide who is going to say what and how
- Students prepare visuals (keep the time for this limited as too many visuals become distracting)
- Students practise at their tables
- Students deliver the presentations in front of the class, with the audience having an observation task to complete (see 'Assessment' below)
- The teacher takes notes for feedback later
It is important that the students plan and deliver the presentations in groups at first, unless they are extremely confident and/or fluent. This is because:
- Shy students cannot present alone
- Students can support each other before, during and after the presentation
- Getting ready for the presentation is a practice task in itself
- When you have a large class, it takes a very long time for everyone to present individually!
I find it's a good idea to spend time training students in setting clear aims. It is also important that as teachers we think clearly about why we are asking students to present.
Aims Presentations normally have one or more of the following aims:
- To inform/ raise awareness of an important issue
- To persuade people to do something
- Form part of an exam, demonstrating public speaking/presentation skills in a first or second language
I set students a task where they answer these questions:
- Why are you making the presentation?
- What do you want people to learn?
- How are you going to make it interesting?
Let's say I want to tell people about volcanoes. I want people to know about why volcanoes form and why they erupt. This would be an informative/awareness-raising presentation. So by the end, everyone should know something new about volcanoes, and they should be able to tell others about them. My plan might look like this:
- Introduction - what is a volcano? (2 minutes)
- Types of volcano (5 minutes)
- Volcanoes around the world (2 minutes)
- My favourite volcano (2 minutes)
- Conclusion (2-3 minutes)
- Questions (2 minutes)
Classroom Management I find that presentation lessons pass very quickly, due the large amount of preparation involved. With a class of 20 students, it will probably take at least 3 hours. With feedback and follow-up tasks, it can last even longer. I try to put students into groups of 3 or 4 with classes of up to 20 students, and larger groups of 5 or 6 with classes up to 40. If you have a class larger than 40, it would be a good idea to do the presentation in a hall or even outside.
Classroom management can become difficult during a presentations lesson, especially during the final presenting stage, as the presenters are partly responsible for managing the class! There are a few points I find effective here:
- Training students to stand near people who are chatting and talk 'through' the chatter, by demonstration
- Training students to stop talking if chatter continues, again by demonstration
- Asking for the audience's attention ('Can I have your attention please?')
- Setting the audience an observation task, which is also assessed by the teacher
- Limiting the amount of time spent preparing visuals
- Arranging furniture so everyone is facing the front
Most of these points are self-explanatory, but I will cover the observation task in more detail in the next section, which deals with assessment.
Assessment The teacher needs to carefully consider the assessment criteria, so that s/he can give meaningful feedback. I usually run through a checklist that covers:
- Level - I can't expect Elementary students to use a wide range of tenses or vocabulary, for example, but I'd expect Advanced students to have clear pronunciation and to use a wide range of vocabulary and grammar
- Age - Younger learners do not (normally) have the maturity or general knowledge of adults, and the teacher's expectations need to reflect this
- Needs - What kind of students are they? Business English students need to have much more sophisticated communication skills than others. Students who are preparing for an exam need to practise the skills that will be assessed in the exam.
I write a list of language related points I'm looking for. This covers:
- Range / accuracy of vocabulary
- Range / accuracy of grammar
- Presentation / discourse management- is it well structured? What linking words are used and how?
- Use of visuals- Do they help or hinder the presentation?
- Paralinguistic features
'Paralinguistics' refers to non-verbal communication. This is important in a presentation because eye contact, directing your voice to all parts of the room, using pitch and tone to keep attention and so on are all part of engaging an audience.
I find it's a good idea to let students in on the assessment process by setting them a peer observation task. The simplest way to do this is to write a checklist that relates to the aims of the lesson. A task for presentations on major historical events might have a checklist like this:
- Does the presenter greet the audience? YES/NO
- Does the presenter use the past tense? YES/NO
And so on. This normally helps me to keep all members of the audience awake. To be really sure, though, I include a question that involves personal response to the presentation such as 'What did you like about this presentation and why?'. If working with young learners, it's a good idea to tell them you will look at their answers to the observation task. Otherwise they might simply tick random answers!
Conclusion Presentations are a great way to practise a wide range of skills and to build the general confidence of your students. Due to problems with timing, I would recommend one lesson per term, building confidence bit by bit throughout the year. In a school curriculum this leaves time to get through the core syllabus and prepare for exams.
Presentations - Adult students
- Log in or register to post comments
Presentation Article
Research and insight
Browse fascinating case studies, research papers, publications and books by researchers and ELT experts from around the world.
See our publications, research and insight
Search form
- Speaking exams
- Typical speaking tasks
Oral presentation
Giving an oral presentation as part of a speaking exam can be quite scary, but we're here to help you. Watch two students giving presentations and then read the tips carefully. Which tips do they follow? Which ones don’t they follow?
Instructions
Watch the video of two students doing an oral presentation as part of a speaking exam. Then read the tips below.
Melissa: Hi, everyone! Today I would like to talk about how to become the most popular teen in school.
Firstly, I think getting good academic results is the first factor to make you become popular since, having a good academic result, your teacher will award you in front of your schoolmates. Then, your schoolmates will know who you are and maybe they would like to get to know you because they want to learn something good from you.
Secondly, I think participating in school clubs and student unions can help to make you become popular, since after participating in these school clubs or student union, people will know who you are and it can help you to make friends all around the school, no matter senior forms or junior forms.
In conclusion, I think to become the most popular teen in school we need to have good academic results and also participate in school clubs and student union. Thank you!
Kelvin: Good evening, everyone! So, today I want to talk about whether the sale of cigarettes should be made illegal.
As we all know, cigarettes are not good for our health, not only oneself but also other people around. Moreover, many people die of lung cancer every year because of smoking cigarettes.
But, should the government make it illegal? I don’t think so, because Hong Kong is a place where people can enjoy lots of freedom and if the government banned the sale of cigarettes, many people would disagree with this and stand up to fight for their freedom.
Moreover, Hong Kong is a free market. If there's such a huge government intervention, I think it’s not good for Hong Kong’s economy.
So, if the government wants people to stop smoking cigarettes, what should it do? I think the government can use other administrative ways to do so, for example education and increasing the tax on cigarettes. Also, the government can ban the smokers smoking in public areas. So, this is the end of my presentation. Thank you.
It’s not easy to give a good oral presentation but these tips will help you. Here are our top tips for oral presentations.
- Use the planning time to prepare what you’re going to say.
- If you are allowed to have a note card, write short notes in point form.
- Use more formal language.
- Use short, simple sentences to express your ideas clearly.
- Pause from time to time and don’t speak too quickly. This allows the listener to understand your ideas. Include a short pause after each idea.
- Speak clearly and at the right volume.
- Have your notes ready in case you forget anything.
- Practise your presentation. If possible record yourself and listen to your presentation. If you can’t record yourself, ask a friend to listen to you. Does your friend understand you?
- Make your opinions very clear. Use expressions to give your opinion .
- Look at the people who are listening to you.
- Write out the whole presentation and learn every word by heart.
- Write out the whole presentation and read it aloud.
- Use very informal language.
- Only look at your note card. It’s important to look up at your listeners when you are speaking.
Useful language for presentations
Explain what your presentation is about at the beginning:
I’m going to talk about ... I’d like to talk about ... The main focus of this presentation is ...
Use these expressions to order your ideas:
First of all, ... Firstly, ... Then, ... Secondly, ... Next, ... Finally, ... Lastly, ... To sum up, ... In conclusion, ...
Use these expressions to add more ideas from the same point of view:
In addition, ... What’s more, ... Also, ... Added to this, ...
To introduce the opposite point of view you can use these words and expressions:
However, ... On the other hand, ... Then again, ...
Example presentation topics
- Violent computer games should be banned.
- The sale of cigarettes should be made illegal.
- Homework should be limited to just two nights a week.
- Should school students be required to wear a school uniform?
- How to become the most popular teen in school.
- Dogs should be banned from cities.
Check your language: ordering - parts of a presentation
Check your understanding: grouping - useful phrases, worksheets and downloads.
Do you think these tips will help you in your next speaking exam? Remember to tell us how well you do in future speaking exams!

Sign up to our newsletter for LearnEnglish Teens
We will process your data to send you our newsletter and updates based on your consent. You can unsubscribe at any time by clicking the "unsubscribe" link at the bottom of every email. Read our privacy policy for more information.
COMMENTS
Oral Presentation Rubric 4—Excellent 3—Good 2—Fair 1—Needs Improvement Delivery • Holds attention of entire audience with the use of direct eye contact, seldom looking at notes • Speaks with fluctuation in volume and inflection to maintain audience interest and emphasize key points • Consistent use of direct eye contact with ...
Use this elementary level rubric to support, instruct, and assess your students as they prepare and make a presentation. This can be used for various subjects and is easy to read and understand. Subjects: English Language Arts, For All Subject Areas, Oral Communication. Grades: 3 rd - 5 th.
The three basic parts. • Introduction—This is your chance to engage your audience and really capture their interest in the subject you are presenting. Use a funny personal experience or a dramatic story, or start with an intriguing question. • Body—This is the longest part of your report. Here you elaborate on the facts and ideas you ...
arrive prior to the presentation . check audio-visual equipment . demonstration models . dress appropriately . provide handouts at the beginning . Opening Remarks . greeting the audience and introduce yourself . grab attention: do this with a visual or statement, but make it relevant . state the topic directly: what the presentation is about
2. Work Time. A.Engaging the Speaker: Using Complete Sentences (25 minutes) B. Oral Presentation Practice: Using Complete Sentences (20 minutes) 3. Closing and Assessment. A. Pinky Partners Protocol: Reflecting on Empathy (10 minutes) Purpose of lesson and alignment to standards: This is the second lesson in a series of three during which ...
A rubric designed to help teachers to assess students' oral presentations. This assessment rubric for oral presentations can be used to determine whether students are working below expectations, to expectations or above expectations in the following areas: volume. A section for the teacher to add a personal comment is also provided.
Create a second list to the side of the board, called "Let it slide," asking students what, as a class, they should "let slide" in the oral presentations. Guide and elaborate, choosing whether to reject, accept, or compromise on the students' proposals. Distribute the two lists to students as-is as a checklist-style rubric or flesh ...
This guide will highlight some of the basics of giving a good oral presentation, dissecting it into three simple parts: preparation, presentation and feedback. Preparation: • Two repetitive actions underpin this phase: preparation and practice! • First prepare, then practice, then do the same again a few more times!
Checklist for High School: Grades 9-12. Content. Resources. Organization. Presentation Aids. Delivery. I used an effective and appropriate attention-getting device. I used vocabulary that the audience could understand, or I defined unfamiliar terms. My vocabulary was strong and unambiguous.
Have students practice their presentation in small groups and have other group mates give targeted feedback based on content, organization and presentation skills. Provide a checklist of expectations for the others in the group to use to provide specific, targeted feedback to the presenter.
Use this checklist to assess whether your students can present a speech using the required skills. This makes a great peer-review activity. Alternatively, you might want to take a look at this Year 1 Oral Language Presentation Rubric.If you want to further develop your children's public speaking skills this Public Speaking Resources - Hints and Tips PowerPoint is a great next step ...
Activity 2: Impromptu Practice. The purpose of this activity is for students to gain experience delivering one to two-minute impromptu speech presentations. For this activity, you can put students into groups of two or three. Once the group is chosen, have each group select a topic from the list below. Then allow each group five minutes to ...
Media make sense and enhance the presentation. Speaker effectively integrates media with what is being said. Speaker provides appropriate transitions between media clips or PowerPoint slides. Slides are effectively designed (clear, uncluttered, adequate size, good contrast, consistent). Slides are correct in terms of spelling, grammar ...
Research confirms that in order for ELLs to acquire English they must engage in oral language practice and be given the opportunity to use language in meaningful ways for social and academic purposes (Williams & Roberts, 2011). Teaching students to design effective oral presentations has also been found to support thinking development as "the ...
Three minutes is a good starting point. Elementary and middle school students have limited attention spans, so it is crucial to keep their speeches concise and engaging. This will also encourage students to express their ideas effectively in a short amount of time. Keeping speeches short will foster clarity and concise expression of thoughts.
Giving Presentations in Elementary Schools: Best Practices. General Tips: Length of Presentation-‐. • K-‐2: Generally these younger students have a fairly short attention span. Usually a 30-‐minute presentation length is a good rule of thumb. Plan on a. 25-‐minute presentation and leave 5-‐minutes at the end for questions.
Students identify key stages of the example presentation - greeting, introduction, main points in order of importance, conclusion. Focus on linking and signalling words ('Next…', 'Now I'd like you to look at…', etc.). Students underline these in the transcript/place them in the correct order.
Personal online tutoring. EnglishScore Tutors is the British Council's one-to-one tutoring platform for 13- to 17-year-olds. Giving an oral presentation as part of a speaking exam can be quite scary, but we're here to help you. Watch two students giving presentations and then read the tips carefully.
Stand. up tall, take a deep breath, and practice speaking more loudly. Watch your. mannerisms in the mirror and continue to practice your poem until you are speaking louder. Then, practice reciting to your parents, and tomorrow I would like you to present again to me with a louder voice. Title. Oral Presentation Observation Checklist-SAMPLE.
GENERAL INSTRUCTIONS TO STUDENTS FOR ORAL PRESENTATIONS. Preparation for your talk: -. -. Know your topic; read background information; talk to your mentor, other faculty, etc. Be prepared to answer questions. Organization of visual aids: Organize your slides with the following in mind: Title, affiliations, awards, etc.
Oral presentations typically involve three important steps: 1) planning, 2) practicing, and 3) presenting. 1. Planning Oral presentations require a good deal of planning. Scholars estimate that approximately 50% of all mistakes in an oral presentation actually occur in the planning stage (or rather, lack of a planning stage). Make sure to ...
Checklist for oral presentations 1 Checklist for oral presentations A checklist for preparing, designing and delivering your next oral presentation. Preparing to write my presentation Presentation Purpose o Have I analysed the assignment criteria so I am clear about the purpose of my