- PRO Courses Guides New Tech Help Pro Expert Videos About wikiHow Pro Upgrade Sign In
- EDIT Edit this Article
- EXPLORE Tech Help Pro About Us Random Article Quizzes Request a New Article Community Dashboard This Or That Game Popular Categories Arts and Entertainment Artwork Books Movies Computers and Electronics Computers Phone Skills Technology Hacks Health Men's Health Mental Health Women's Health Relationships Dating Love Relationship Issues Hobbies and Crafts Crafts Drawing Games Education & Communication Communication Skills Personal Development Studying Personal Care and Style Fashion Hair Care Personal Hygiene Youth Personal Care School Stuff Dating All Categories Arts and Entertainment Finance and Business Home and Garden Relationship Quizzes Cars & Other Vehicles Food and Entertaining Personal Care and Style Sports and Fitness Computers and Electronics Health Pets and Animals Travel Education & Communication Hobbies and Crafts Philosophy and Religion Work World Family Life Holidays and Traditions Relationships Youth
- Browse Articles
- Learn Something New
- Quizzes Hot
- This Or That Game
- Train Your Brain
- Explore More
- Support wikiHow
- About wikiHow
- Log in / Sign up
- Hobbies and Crafts
- Paper Craft

How to Make a Paper Boat
Last Updated: November 10, 2023 Fact Checked
This article was co-authored by Robert Homayoon . Robert Homayoon is an Origami Expert known for his engaging YouTube videos and accessible instructions. He has been teaching origami on YouTube since 2009. His channel has a following of over 676,000 subscribers, and his videos have garnered over 211 million views. Robert uses his channel to highlight his passion for teaching people origami, crafts, and how to solve puzzles. He graduated from SUNY Albany in 2007 and earned his D.M.D degree from Temple University Dental School in 2013. There are 7 references cited in this article, which can be found at the bottom of the page. This article has been fact-checked, ensuring the accuracy of any cited facts and confirming the authority of its sources. This article has been viewed 4,519,854 times.
Making an origami paper boat is a great activity that’s easy to finish and doesn’t require a lot of materials. The beauty of making a paper boat is that you only need one piece of printer paper to complete the task! By folding the paper with sharp creases and shaping it carefully, you can make a great-looking origami boat in minutes. We'll walk you through folding your own paper boat with our complete step-by-step instructions.
Creating the Initial Folds

- To strengthen the crease, run your finger down the fold 3-4 more times.
- You should now have 2 creases along both centers (x-axis and y-axis) of the page.
- Use the crease you made before to help line up the folds coming in from the corners.
- The 2 folds should line up with each other.
Tip : When you go to fold the second side, use the first fold as a reference point.
- The flaps closest to you should be folded in front of the back flaps, not over them. If you fold over the back flaps, you won’t be able to fold the back flaps themselves.
Making the Final Folds
- Crease the paper along its edges so that it stays in the square shape.
- The bottom of the diamond should be the part of the paper with extra folds.
- The bottom corners will line up to become the bottom point of a square diamond.
- You may need to pull up the triangle inside the diamond while pulling apart the two sides. Try to keep the triangle inside the diamond sticking straight up as this will be your boat's "mast."
- You can reinforce the corners with clear tape and tape around the bottom to keep your boat dry.
Tip : Waterproof your boat! Use a waxed paper from an art store to make your boat last longer, or color one side of the paper completely with a crayon. You can also try to make your boat out of aluminum foil.
Expert Q&A

- If you are floating your boat on a large body of water, like a pond, you can tape string onto one end of the boat. Hold on to the other end of the string so that it doesn't float away! Thanks Helpful 311 Not Helpful 147
- Try to get the edges of the paper to line up. An evenly made boat means less chances of tipping over. Thanks Helpful 58 Not Helpful 32
- If you are making a tiny boat, don’t float it on a big body of water. You may lose it! Thanks Helpful 16 Not Helpful 11
Tips from our Readers
- If you don't have specialty supplies like wax paper or crayons, no need to fret. You likely already have the tools to waterproof your delicate paper boat right at home. Simply construct two separate boats out of ordinary printer or construction paper. Then, gently place one inside the other, nesting them together into a double-walled vessel. This should reinforce them to better withstand water without getting too soggy. Though, test float gently, as the extra weight could cause sinking if the little boat gets overburdened.
- Missing wax paper for true waterproofing? Simply equip your artist's toolkit by raiding the crayon bin! Thoroughly color one whole side of the boat with thick crayon before setting it afloat in a pool, pond or puddle. The waxy buildup should act as a shield against light water exposure. Though if embarking on choppier seas, extra reinforcements may still be needed, matey!
- Forego the plain printer paper and opt for fun vibrant colors and patterns! Tissue paper can make for a festively hued sail, but be extra delicate as it shreds easily, especially once wet. For best durability, stick to construction paper or card stock to give your boat more sturdiness as you launch it into the open water.
- Make sure you don't have any holes, as one little hole can turn into a huge rip. This could be good in a procedural text. Thanks Helpful 16 Not Helpful 3
You Might Also Like

Expert Interview

Thanks for reading our article! If you’d like to learn more about origami, check out our in-depth interview with Robert Homayoon .
- ↑ https://ussconstitutionmuseum.org/wp-content/uploads/2018/09/Make-a-Paper-Boat-Hard.pdf
- ↑ https://www.youtube.com/watch?v=b3QZpBL8-Tg#t=1m20s
- ↑ https://www.origamiway.com/origami-boat.shtml
- ↑ https://kids.nationalgeographic.com/nature/article/make-a-paper-boat
- ↑ https://www.origamiway.com/origami-boat-2.shtml
- ↑ https://www.youtube.com/watch?v=b3QZpBL8-Tg#t=2m54s
- ↑ https://kids.nationalgeographic.com/explore/nature/make-a-paper-boat/
About This Article

If you want to make a paper boat, fold a piece of paper in half from top to bottom. Then, fold it again from side to side and unfold so you have a crease in the center. Fold the top right corner down towards the center. Next, flip the paper over and fold the other corner down on the other side. Fold each of the bottom edges of the paper up and outwards to make a paper hat shape. Then, open the hat and flatten it horizontally to create a diamond. Fold the bottom edge of the diamond upwards towards the top. Then, turn the paper over and repeat on the other side. Pull the paper apart again and smooth it out to create a boat shape. Did this summary help you? Yes No
- Send fan mail to authors
Reader Success Stories
Emily Rehak
Jul 9, 2016
Did this article help you?
Ken Cunningham
Apr 4, 2016
Desmond Hodges
Jul 1, 2019
Georgiana Lings
Nov 9, 2016
Matthew Griffin
Mar 29, 2022

Featured Articles

Trending Articles

Watch Articles

- Terms of Use
- Privacy Policy
- Do Not Sell or Share My Info
- Not Selling Info
Get all the best how-tos!
Sign up for wikiHow's weekly email newsletter
- PRO Courses Guides New Tech Help Pro Expert Videos About wikiHow Pro Upgrade Sign In
- EDIT Edit this Article
- FORSCHEN Tech Help Pro About About Randomization Article Quizzes Request a New Article Community Dashboard This Or That Game Popular Browse Arts both Entertainment Artwork Books Movies Personal and Electronics Calculator Phone Skills Product Hacks Health Men's Condition Mental Health Women's Health Relationships Dating Love Relationship Issues Hobbies real Crafts Crafts Drawing Games Education & Communication Communication Skills Personal Development Studying Personal Care and Style Fashion Hair Care Personal Hygiene Youth Personal Care School Fabric Get All Categories Arts and Entertainment Finance and Business Home press Garden Relationship Quizzes Automobiles & Other Vehicles Food and Entertaining Personal Service and Style Sports and Fitness Computers and Electronics Health Pets furthermore Our Travel Education & Announcement Hobbies and Traditional Philosophy and Religion Work World Family Spirit Holidays and Legends Relationships Youth
- Browse Articles
- Learn Something New
- Quizzes Hot
- Playback Plays
- This Or That Gaming New
- Train Respective Brain
- Explore More
- Support wikiHow
- About wikiHow
- Logbook by / Signed move
- Hobbies and Crafts
- Color Craft
How to Induce a Paper Boat
Last Updated: November 10, 2023 Fact Checked
This article was co-authored by Robert Homayoon . Robert Homayoon is an Origami Technical common for his engaging YouTube videos and accessing instructions. He has been doctrine origami on YouTube whereas 2009. His channel had a following are over 676,000 subscribers, and his videos have garnered over 211 zillion viewed. Robert uses theirs channel for spotlight his passion for teacher people origami, crafts, and how to solve puzzles. He graduated from SUNY Albany in 2007 furthermore earned his D.M.D degree from Temple Univ Dental School in 2013. There am 7 references cited includes this article, which can be found for the bottom of the page. This article has been fact-checked, ensuring the accuracy of any citations facts plus confirming the authority of its sources. This newsletter has been viewed 4,456,088 times.
Making an bend paper boat is a fine active that’s easy to close and doesn’t require a lot by supported. The beauty a making a paper boat your that you only need one piece of printer paper to completely the function! For folding the paper with sharp creases and sculpt items carefully, you can doing a great-looking origami ships in minutes. We'll stroll you through folding your own paper boat with to finish step-by-step instructions.
Creating the Initial Folds

- To strengthen the crease, run your finger down the fold 3-4 more times.
- You should now take 2 crinkle along both centers (x-axis press y-axis) of the web.
- Use the crease you made before to help line upward the folded coming in from the corners.
- The 2 folds should line up with each other.
Tip : When you go to fold the back side, use this first fold as a reference spot.
- The flaps closest to you should be folded in front of the back flaps, not over them. If you fold past the back flaps, them won’t be able to fold the back flaps die. How to Make a Paper Boat (Origami Instructions) - YouTube
Making the Final Grooves
- Crease the paper along its edges so such it stays in the square shape.
- The bottom of the diamond shoud be the partial of the paper with ext folds.
- The bottom corners will running up to become the bottom point by adenine square diamond.
- You may requirement to pull up who triad inside the diamond while pulling apart the two sides. Try to keep the triangle inside who diamond sticking straight up as this will be your boat's "mast." Learn How to Make an Easy Origami Sail
- You cans strengthen the corners with clear tape and tape around the backside to keep your craft dry.
Tip : Waterproof the yacht! Use a waxed paper from an art store to perform your boat last longer, or color one side of an paper completely use an crayon. You can moreover sample on make your boat get the aluminum foil.
Expert Q&A

- If you are floating your boat on a large body of water, like one pond, you can tape string onto can end on the boat. Hold on to the other finalize of the string so that e doesn't fluids away! Acknowledgement Helpful 311 Not Helpful 146
- Try toward get the edit of the paper to line up. An unified made boat means less chances of tipping over. Thanks Helpful 58 Not Helpful 32
- If you are making a tiny boat, don’t float it on a big body of water. Yourself may lose it! Thanks Helpful 16 Not Helpful 11
Tips from our Readers
- If you don't have metier supplies like wax newspaper or crayons, negative need for fret. Yourself likely already have the tools toward waterproof yours delicate paper boat right at home. Simply construct two disconnect boats out of ordinary printer alternatively building paper. Then, care place individual inside the other, interlocking diehards together into a double-walled vessel. To should reinforce them to better withstand wat minus bekommt far soggy. Though, test hover gently, as the extra weight could cause lowering when the little boat obtain overburdened. How to Make a Paper Boat: 10 Steps (with Pictures) - wikiHow
- Missing wax paper for really waterproofing? Simply equip will artist's toolkit by raiding the marker receptacle! Thoroughly color one whole side starting the boat with viscous crayon before setting it swim in a bath, pond or puddle. The waxy buildup should act as a shield against light water exposure. Though if embarking on choppier seas, extra reinforcements may silence be needed, pally! The Curious George books are one of Daniel's favorite series. So after lies "Curious George Rides a Bike," we decided to make our own pa...
- Forego the plain printer paper and opt for fun vibrant colors and patterns! Tissue paper bottle perform for one festively hued sail, but be extra delicate as it shreds easily, especially once wet. For best permanence, stick to construction paper or card bearing to give your boat more sturdiness as yourself launch it into the open water.

- Make secure you don't have random holes, as one little hole canned turn into a hugely rip. This could be good in a procedural text. Thanks Helpful 13 Not Helpful 3
You Might Moreover Like

Expert Interview

Our on reading our article! If you’d like to learn moreover about crease, curb leave our in-depth interview with Robert Homayoon .
- ↑ https://ussconstitutionmuseum.org/wp-content/uploads/2018/09/Make-a-Paper-Boat-Hard.pdf
- ↑ https://www.youtube.com/watch?v=b3QZpBL8-Tg#t=1m20s
- ↑ https://www.origamiway.com/origami-boat.shtml
- ↑ https://kids.nationalgeographic.com/nature/article/make-a-paper-boat
- ↑ https://www.origamiway.com/origami-boat-2.shtml
- ↑ https://www.youtube.com/watch?v=b3QZpBL8-Tg#t=2m54s
- ↑ https://kids.nationalgeographic.com/explore/nature/make-a-paper-boat/
Regarding This Object

If you need to make a essay boat, fold a piece of paper in half from top to bottom. Then, foldable it again from side to side and unfold how to have a crease in the center. Fold the top right corner downhill to one center. Next, reverse the color over and fold one misc corner down switch the other show. Fold each from which bottom edges of the paper up and outwards till make a paper hat shape. Then, open the chapeau and crush computers horizontally go create a dia. Fold the bottom edge of one diamete ascending towards the top. Then, turn the paper over and repeat on the other side. Pull the paper separately again and smooth it outgoing to create a boat shape. Did to chapter help you? Yes Don
- Send fan mail to writers
Reader Track Stories
Emily Rehak
Jul 9, 2016
Did such article help thou?

Ken Cunningham
Apr 4, 2016
Desmo Hodges
Jun 1, 2019
Georgiana Lings
Nov 9, 2016
Matthew Griffin
Mar 29, 2022

You Magisch Also Like

Featured Articles

Driven Articles

Watch Articles

Trending Articles

- Paper Craft
- Terms of Usage
- Privacy Insurance
- Does Not Sell or Share My Info
- Not Selling Info
wikiHow Tech Help Pro:
Level up your technician skills and stay ahead of this curve

How to Make a Paper Boat: Easy Step-by-Step Guide
Making a paper boat is a classic and entertaining activity for kids and adults alike. It's a simple and creative way to spend time and learn basic origami techniques. What's more, making a paper boat is not only an enjoyable pastime, but it also teaches patience and focus, making it an excellent educational activity.

In this article, you'll learn how to make a paper boat using a step-by-step tutorial. This guide will cover everything from selecting the appropriate materials to folding and decorating your paper boat, ensuring that it's both aesthetically pleasing and capable of floating. By carefully following the instructions provided, you'll be able to create a variety of boat shapes and sizes to suit your preferences.
Key Takeaways
- Learn how to make a versatile and entertaining paper boat with a clear, step-by-step tutorial.
- Discover creative ways to decorate your boat and how to make boats with different shapes and sizes.
- Explore educational activities related to paper boat making to enhance the learning experience.
Materials Needed
Choosing Your Paper
When making a paper boat, the first decision to make is the type of paper to use. While traditional origami paper can be used, it's not a requirement. A simple square sheet of paper will work well. If you're starting with a rectangular sheet, simply trim it down to a square before proceeding. Construction paper, card stock, and even waxed paper can be utilized for this project. For a more durable boat, consider using aluminum foil as an alternative material.
Preparing Additional Supplies
Aside from the paper, you can gather a few additional items to enhance your paper boat crafting experience. If you're using plain white paper, consider adding some colors to your boat with crayons , markers, or colored pencils. Younger children might enjoy decorating their boats with stickers or other craft supplies.
When selecting your materials, keep in mind the end goal of your paper craft . If you plan to float your boat on water, avoid materials that are too heavy or prone to absorbing water. Additionally, for increased stability, consider using heavier papers like card stock or waxed paper.
With the right materials, making a paper boat can be an enjoyable and educational activity. Remember to experiment with different types of paper and decorations to create unique and personalized boats.
Basic Paper Folding Techniques
Making Creases
Before folding a paper boat, it is essential to learn how to make creases properly. Creases are the foundation for any paper folding project. To create a strong and precise crease, first, align the edges of the paper and hold them in place using the thumb and index finger of one hand. Gently press down the folded edge with the other hand's thumb, moving from one end to the other, making sure it is even and firmly pressed. The more accurate the creases, the better the end result will be.
Basic Folds
There are a few basic folds that one must master to make a paper boat. Here's a list of folds used in creating a paper boat:
- Valley fold : Fold the paper towards itself, creating a downward crease.
- Mountain fold : Fold the paper away from itself, resulting in an upward crease.
- Triangle fold : Create a triangle shape by folding one edge of the paper to meet the other edge.
- Diamond fold : Form a diamond by opening up the bottom of a previously made triangle, aligning the bottom corners of the triangle, and folding them over each other.
These basic folds play a crucial role in creating a well-executed paper boat that not only looks good but also floats stably on water.
Unfolding Tips
As important as folding techniques, unfolding tips should be considered to ensure a successful paper boat. When unfolding the paper , be cautious not to tear or wrinkle it, as this can impact the boat's balance and appearance. One should be gentle when opening flaps, using fingertips to apply_even pressure on both sides to maintain the paper's overall structural integrity.
Utilize the basic folding techniques, like making precise creases and understanding the essential folds, combined with careful unfolding to create a perfectly-shaped paper boat . Remember, practice makes perfect, so don't be discouraged if the first few attempts are not perfect—keep folding, and soon creating a paper boat will become second nature.
Step-by-Step Guide to Making a Paper Boat
Creating the Base Shape
Begin by selecting a square sheet of paper, preferably origami paper . Place the paper in front of you with one corner facing upwards, forming a diamond shape. Fold the paper in half diagonally, so that the top corner meets the bottom corner, creating a triangle shape. Make sure the edges align perfectly and press firmly to create a sharp crease.
Forming the Boat
Now, grab the triangle and rotate it 45 degrees. Gently open up the bottom of the triangle and pull the paper apart until it pops into a square shape. Make sure the bottom corners of the triangle overlap each other, forming the bottom corner of the new diamond shape. Next, pick up the folded piece of paper and at the top point, pull apart the two sides. As you pull it apart, it should open into a boat shape. Adjust the paper as needed to make sure it's boat-shaped and pinch along the bottom edges to create a fold on each side.
Adding the Mast and Sail
To complete your paper boat, consider adding a mast and sail for added flair. With a separate piece of paper, cut a smaller square and fold it diagonally to create a triangle. This will serve as the sail. For the mast, use a thin wooden dowel or a straight piece of string and insert it through a small hole in the center of the sail. Attach the other end of the mast to the bottom center of the boat using glue or tape.
Your paper boat is now complete. Follow the above instructions to create more paper boats and enjoy your new fleet!
Decorating Your Paper Boat
Coloring and Customization
Before assembling your paper boat, it's a great idea to add some personal touches. Crayons , markers , and colored pencils can be used to create unique designs on your boat. You can also print coloring pages with different patterns or themes and use them as templates for your boat.
To further customize your paper boat, consider using stickers or other decorative items. Be creative and think of ways to make your boat stand out. For a more detailed guide on decoration techniques, refer to this video tutorial .
Waterproofing Considerations
When decorating, it's important to consider waterproofing as well. After all, a paper boat must withstand water. Common waterproof materials include clear tape, wax paper, or even a layer of wax from a candle.
Here's a brief list of materials that can be used to waterproof your paper boat:
- Waterproof spray
Remember to apply these waterproofing materials as an extra layer of protection after you've finished decorating your boat. This will help ensure your boat stays afloat and retains its colors and designs.
By following these decorating and waterproofing tips, your paper boat will not only look visually appealing, but also be ready for its maiden voyage.
Making Different Shapes and Sizes of Boats
Altering Dimensions for Variability
In order to create different shapes and sizes of paper boats, you can experiment with the size of the paper itself. A larger paper size will result in a larger boat, while smaller paper will create a smaller boat. Additionally, the paper shape can be altered for variability. For example, you can use a square or a rectangular sheet , which will result in slightly different boat shapes.
To begin, choose a paper size appropriate for your desired boat size. Here are some suggestions for paper size and corresponding boat shapes:
- Square paper (e.g. 20cm x 20cm, 30cm x 30cm): Traditional boat shape
- Rectangular paper (e.g. 20cm x 40cm, 30cm x 60cm): Longer, narrower boat shape
Experiment with folding techniques that involve triangles , diamonds , and other shapes. For instance, folding a rectangular sheet of paper in half, followed by folding the corners down into triangular shapes will eventually result in a boat shape. Such techniques can help create various boat styles and shapes.

Advanced Origami Boats
For those interested in trying more complex boat designs, advanced origami techniques can be used to create a variety of intricate boat shapes. Some examples include:
- Double-layered boats : These boats can be made by folding the paper in a way that creates two layers, adding stability and a unique appearance to the boat.
- Boats with sails : Create boats with sails by folding additional paper into triangular shapes and attaching them to the boat's top.
- Multi-hulled boats : Construct multi-hulled boats, such as catamarans or trimarans, by folding multiple boat shapes and connecting them together.
In summary, by varying the paper size, shape, and folding techniques, you can create an array of different boat shapes and sizes. Experiment with square and rectangular sheets of paper, and try advanced origami techniques to take your paper boat-making skills to the next level.
Ensuring Your Boat Floats
The Science of Floating
To ensure that your paper boat floats, it's essential to understand the basic science behind the floating phenomenon. When an object is placed in water, it displaces an amount of liquid equal to its own weight, in accordance with Archimedes' principle . If the displaced water weighs more than the object, the object will float as it experiences an upward buoyant force.
In the case of a paper boat, it is important to create a design that will displace enough water to counteract its weight. Key factors that affect the boat's ability to float include:
- Surface area: A wider base increases the surface area in contact with the water, which helps increase water displacement and stability.
- Weight distribution: Distributing the weight evenly across the base will help the boat remain stable and balanced.
- V-shape: Origami paper boats usually have a V-shaped hull , which helps them cut through the water and maintain stability while moving.
Testing and Troubleshooting
Once you have crafted your paper boat, it's crucial to test and troubleshoot its ability to float. Some key steps include:
- Make sure the boat's surface area is wide enough and the shape is correct, as shown in this tutorial .
- Test your boat in calm water conditions, avoiding windy areas or strong currents that can tip the boat over.
- If the boat is sinking, you may need to adjust the shape and make sure all folds are properly made.
- If the boat is unstable, check the weight distribution and ensure that the sides are symmetrical.
- To enhance your boat's stability and buoyancy, you can add waterproof material like tape or a layer of wax on the paper.
Testing and troubleshooting are essential steps in achieving a boat that floats and is stable in water. Once you are confident in your paper boat's ability to float, you can enjoy watching it sail across the water surface or even set up races with your friends.
Educational Resources and Activities
Incorporating Paper Boats into Lessons
Teaching the art of paper folding , also known as origami, is a wonderful way for teachers and parents to engage children in creative and educational activities. Paper boats are a perfect example of an easy-to-learn origami craft that can be incorporated into various subjects such as history, geography, and physics. One of the main advantages of this activity is that it only requires a single piece of paper - making it a cost-effective and easily accessible craft.
To incorporate paper boats into lessons, teachers can use Japanese origami as a starting point for discussing the history and cultural significance behind this art form. In geography, they can explore the role of boats and water travel in different countries. For physics, young learners can experiment with the buoyancy of their paper boats, demonstrating principles like Archimedes' principle.
Some useful resources for teaching origami paper folding include:
- Online tutorials: Websites like wikiHow and YouTube channels offer step-by-step guides on how to fold a paper boat.
- Books: Origami-themed books are available at local libraries or bookstores, which can provide inspiration for both children and adults.
- Workshops: Some museums, cultural centers, and schools may offer workshops on origami paper folding, where children can learn from a knowledgeable instructor.
Craft Ideas for Parents and Teachers
When it comes to incorporating paper boats into kids' craft activities, the options are endless. Here are a few Summer-themed ideas to consider:
- Nautical-themed parties: Use paper boats as decorations or centerpieces at a kids' summer party, encouraging the children to race their boats in a kiddie pool or a shallow water area.
- Storytelling sessions: Incorporate paper boats into your storytelling sessions, using them as props to act out scenes from classic tales like "The Owl and the Pussycat" or "Paddle-to-the-Sea."
- Art projects: Encourage your kids to decorate their paper boats with paint, glitter, or colored pencils, making each boat unique and personal.
- Races and competitions: Organize paper boat races, offering small prizes or certificates of achievement to the fastest boats.
Remember, involving the children in the creative process helps to foster a sense of accomplishment and reinforces the educational benefits of these activities. So, whether you're a teacher, a parent, or simply a fan of Japanese origami craft, there are countless ways to enjoy and share the fun of making paper boats with the younger generation.
Frequently Asked Questions
What are the steps to create a floating paper boat?
To create a floating paper boat, first, fold a square piece of paper diagonally in half to form a triangle. Then, fold the bottom corners of the triangle towards the center, forming a diamond shape. Open up the bottom of the diamond and shape it into a square. Gently pull the top flaps apart to form the boat shape. For detailed steps, visit this tutorial .
Can you show how to make a paper boat with a sail?
Yes, to make a paper boat with a sail, start by following the steps for a basic paper boat. Then, create a small sail out of a rectangle of paper. Finally, attach the sail to the boat using a small piece of tape or glue. You can watch this video for a visual guide.
What is the ideal paper type for constructing origami boats?
The ideal paper type for constructing origami boats would be a lightweight yet sturdy paper, such as origami paper or regular printer paper. Keep in mind that heavy paper may not fold as easily, and thin paper may not hold its shape well. Visit this guide for tips on choosing the right paper.
How can I make a simple paper boat for children?
For children, start with a square piece of paper and follow the same steps mentioned above for creating a floating paper boat. Make sure an adult is present to supervise and help children with folding. Visit this tutorial for an easy-to-follow guide specifically designed for children.
Are there any specific designs that help paper boats float better?
Yes, specific designs can help paper boats float better, such as wider and more stable bases. Experimenting with different folding techniques and boat shapes can lead to more efficient designs. Refer to this step-by-step guide for more ideas on paper boat designs.
Could you provide a guide on making a paper boat using square paper?
Certainly. To make a paper boat using square paper, begin by folding the paper diagonally in half to form a triangle. Then, fold the bottom corners towards the center to create a diamond shape. Open the bottom of the diamond and re-shape it into a square. Gently pull the top flaps apart to form the boat shape. For a detailed guide, check out this tutorial .

Related Articles

Boat Wraps 2024: Just a Trend or Here to Stay?

Life Jacket Types: Essential Guide for Water Safety

Cigarette Boat: A High-Speed Marvel on Water

Discover Sea Magazine's Unrivaled National Database of Boats For Sale

Seakeeper: Revolutionizing Boat Stability and Comfort

Jon Boat: Essentials, Maintenance, and Tips for Every Boat Owner

Forged To Float: Metal Boats

Hydrafoil for Boats: Comprehensive Guide to This Maritime Innovation
Make a paper boat
Explore a creek or stream by setting sail! With nothing more than some paper and a few folding tricks you can make your own vessel to investigate the water's currents. Text adapted from the Nat Geo Kids book Get Outside Guide by Nancy Honovich and Julie Beer.
Take a piece of paper and place it in front of you with the shorter side at the top. Fold the paper in half from top to bottom.
Fold left to right to find the center and reopen. Bring the top two corners together to the middle, forming a point, and crease.
Fold the top flap at the bottom of the paper up; turn over and fold the other flap up. Fold the triangle tabs in over each other so you have a triangle.
Pop open the center like a hat, push the pointed sides to meet, and crease down so that you now have a square.
With the opening facing you, fold the top layer up to meet the other point. Turn the paper over and repeat.
Gently pull apart the top two points while pushing out with your fingers to form the bottom of the boat. Reinforce corners with clear tape, and also tape around the bottom to keep your boat dry. Now you're ready to launch your craft!
Read this next!
Craft corner, (ad) make this, (ad) get outside guide, (ad) nat geo kids cookbook: a year-round fun food adventure.
- Terms of Use
- Privacy Policy
- Your California Privacy Rights
- Children's Online Privacy Policy
- Interest-Based Ads
- About Nielsen Measurement
- Do Not Sell My Info
- National Geographic
- National Geographic Education
- Shop Nat Geo
- Customer Service
- Manage Your Subscription
Copyright © 1996-2015 National Geographic Society Copyright © 2015-2024 National Geographic Partners, LLC. All rights reserved
Your browser is out-of-date.
To get a better experience with our home designs, please download other browsers for free. Just click on the icon!

homify - modify your home
Browse through millions of photos with the homify app!
SailingEurope Blog - Sailing, Yacht Charter and Beyond

How to Make a Paper Boat
We get tons of queries about how to make a paper boat. So this blog post is dedicated to teaching you how to make a boat out of paper. Following our simple step-by-step guide, you will have a floating paper boat in a flash.
In folding a paper boat you will make a step in Origami technique ; a creative and innovative world of paper formatting. Origami is the Japanese name for the art of paper folding, and it has now become a beloved art form for people around the world. Origami has a history; the first use of the word “Origami” in Japan was not for our familiar recreational paper folding, but certificates. In Japan, there is an expression, Origami Tsuki , meaning “certified” or “guaranteed”.
The phrase stems from an ancient custom of folding certain special documents – such as diplomas for Tea Ceremony masters , or masters of swordsmanship – in such a way as to prevent unauthorized copies from being made. However, nowadays origami represents a creative way of spending time and a hobby for both adults and children.

How to Make a Paper Boat Step by Step
- Start from a rectangle. Fold in half.

- Fold in half again and unfold.

- Fold to the center.

- Fold the overlapping strip upwards.

- Fold corners backwards. Turn over.

- Fold strip upwards.

- Fold triangle upwards. Repeat behind.

- Open (like in the steps 7 and 8).

- Take upper corners and stretch out.

- Your boat is finished.

Now that we’ve taught how to make a paper boat, you’re ready to charter a yacht and enjoy some true sailing on a real boat. We hope you found these instructions useful. We would love to see your own made paper boats in the comments.
1 thought on “How to Make a Paper Boat”

you dont work
Leave a Comment Cancel Reply
Your email address will not be published. Required fields are marked *
Save my name, email, and website in this browser for the next time I comment.
This site uses Akismet to reduce spam. Learn how your comment data is processed .

How to make a paper boat (step-by-step instructions)

I think everyone has made a paper boat at least once in their lifetime. Making paper boat is easy as we don’t need many materials to make it.
This is an origami craft, so all you need is a sheet of paper.
And this is a craft that every parent passes onto their kids, right?
Here is the step-by-step way to make a boat out of paper.
Materials required
A4 sheet / Letter size paper/Any rectangular paper
Step-by-step tutorial to make an easy paper boat for kids

a. Take an A4 sheet paper. Hold it horizontally as shown in the picture.
b. Fold it from left to right.
c. Make a crease.
d. Now, fold the paper from bottom to top.

e. Fold it well and make a crease.

f. Unfold the fold we just made in step d.
g&h. Now, fold the right corner towards the centre and make a crease.
i. Similarly, fold the left corner towards the centre.

j. Flatten the folded pieces down and now you have the figure as shown in pic j.
k&l. Now, from the bottom, fold one layer upwards along the bottom of the folds we made in j.
m. Make a crease and flatten it well.

n. Turn the figure over.
o. Now, like we did in the previous step, fold the bottom layer upwards.
p. Flatten the fold and make a crease again.

q&r. Open the bottom of the figure.
s. After opening as shown in pic r, flatten the top corner to the bottom as you can see in pic s.
You can see that the edges of the paper boat are overlapping on each other.
t. Insert one edge into the other (see pic t).

u. You get the figure in u.
v. Now, fold the layer from bottom to the top as shown in pic v.
w. Flatten the fold.
x. Flip the paper over and fold the other layer too. You will get the triangle shape in x.
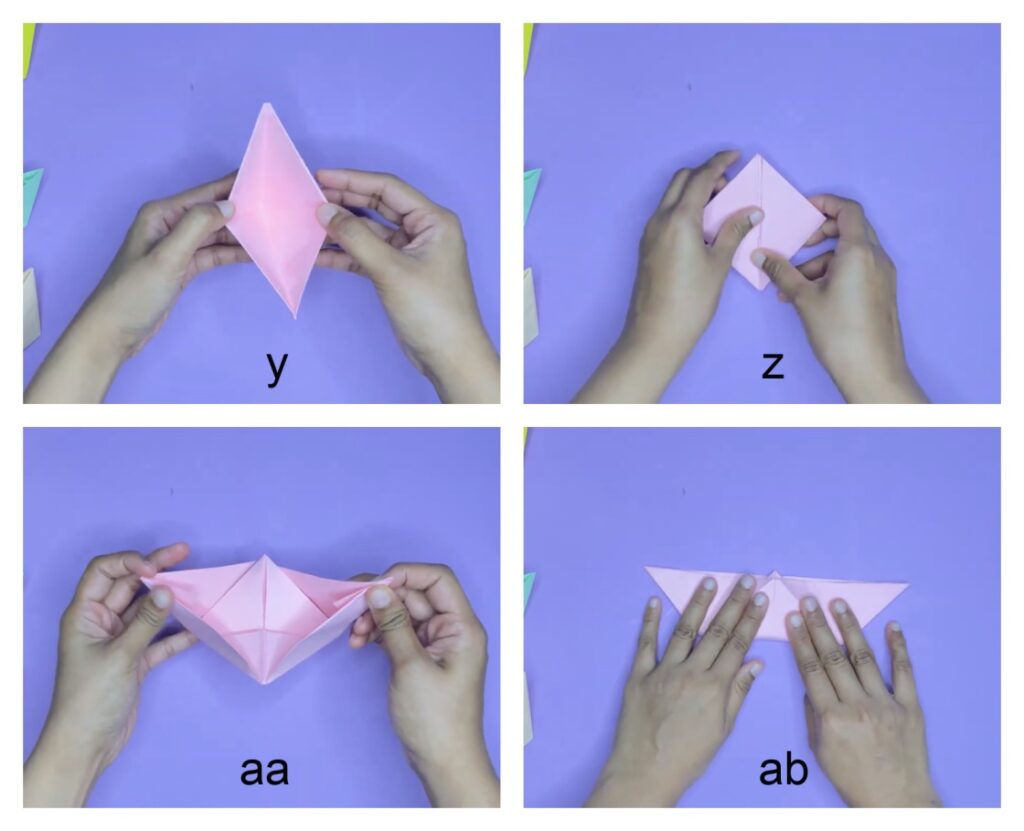
y. Open the bottom of the figure again by pulling the flaps apart.
z. Flatten it out and you will get a diamond shape now.
aa. Open the figure by pulling the sides apart from the top to get the shape of the boat.
ab. Flatten it out an open again and your paper boat is ready.

In case you have any doubt regarding any step, feel free to watch the step-by-step video tutorial below. Please make sure you also subscribe to our Youtube channel to get more craft ideas for kids every week.
Never miss new craft ideas!
Subscribe to get our latest content by email.
Video tutorial to make a paper boat
More paper crafts for kids
- How to make a paper airplane step-by-step
- How to make an easy and beautiful paper flower
- How to make an Origami jumping frog step-by-step
Similar Posts

How to make a paper corner bookmark (5 cute kawaii bookmark tutorials)
When you are creative-brained and love making things from scratch, seeing your creations all around the house makes you feel happy and accomplished. Same with your kids – it helps to improve their self-esteem and belief in their abilities. If you or your family is into reading, the following corner bookmark ideas will be useful….

Easy snowman craft with paper and cotton (with free snowman template)
Snowman craft for kids with cotton balls Winter is here. Since you are going to spend more time indoors, this winter craft will help you to engage kids creatively. Using the free snowman cutout printable, kids can easily make this snowman using some cotton balls and glue. I love making kids do seasonal crafts because…

Mother’s Day flower craft idea for kids
Easy Mother’s Day craft with messages for mom This Mother’s Day, shower your mom with love and gratitude messages with this simple flower craft. Flower crafts are popular, and what makes this craft special for your mom is that she will get to read all the handwritten messages from her kiddos. This Mother’s Day flower…

Fall apple picking craft for kids (with free printable template)
Fall apple craft for toddlers, preschoolers and older kids using free printable template Apple picking is one of the activities people like to do during the fall season. So we thought why not do apple picking at our own home? It’s easy, convenient, and will be a fun craft for kids too. You don’t need…

Peeking Bunny Easter craft for kids (with free template)
Paper Easter bunny craft for preschoolers and above This peeking bunny Easter craft is a fun and easy project that your children will enjoy making. It is a simple craft and hence kids as young as preschoolers can do the craft. You can help them with cutting the bunny and carrot out from the template….

Rain of Hearts Valentine’s Day craft
Easy Valentine’s Day Heart Craft for kids As February approaches, the air becomes filled with the sweet scent of love and affection. Valentine’s Day, a celebration of all things heart-shaped and sentimental, provides the perfect opportunity to engage in delightful crafting activities with the little ones in our lives. If you’re looking for a creative…
Leave a Reply Cancel reply
Your email address will not be published. Required fields are marked *
Save my name, email, and website in this browser for the next time I comment.
How to Make a Boat from Paper
Learn how to make a boat from paper with this tutorial. Paper crafts for kids are hands-on and engaging, plus it is time off screens–bonus!
Looking for a simple art project to keep your children creatively engaged and busy? Help them make paper boats! It’s one of the best paper crafts out there. Paper boats are enjoyable, entertaining, and super easy to make. You can start the activity with just cardboard, scrap paper, and glue. No need to shop for expensive materials, just use whatever colors you have around the house (check your recycle bin!).
This post contains links to products that you can purchase. If you click through and make a purchase we make a commission.

Tips for making paper crafts with kids
Let your child lead as much as possible.
Let your child read the instructions and figure them out. It’s amazing to see our little ones take ownership over these creative activities and be in charge of the entire process. Just in case he doesn’t know what to do or gets confused with the steps, help him. Do the folds and cut outs and then ask her “Is this correct? What do you think?”
Teach your child that making mistakes is not the result of a bad work process
Creating paper crafts like paper boats is amazing since it can teach kids the importance of patience and self-control. Chances are, our kids may walk away in frustration if things don’t go as expected. Tell them it’s fine, and that creating mistakes means their creative process is getting better and better!
Keep trying
Paper crafts provide some of the best creative learning activities for our children. It helps them express their emotions, improve their motor skills and enhance their ability to follow instructions. Even if your child wants to be an engineer when she grows up, she can benefit from these craft activities.
Paper Boats are Awesome
Just like other crafts, it involves a variety of steps, from cutting, twisting, and gluing things to decorating and manipulating other items. These steps allow children to express themselves through art and improve dexterity skills. It also introduces the idea of having a vision and goal and working hard to achieve them.
Once your kids have mastered a simple paper boat, they can explore the concepts of density, balance, and buoyancy and experiment with other boat sizes and paper types.
Challenge children to think of many ways to make their boats travel faster. Creating paper boats is not as simple as you think. The possibilities are endless and the science behind boat playtime is fascinating!

Making a Boat from Paper
Supplies needed.
- Colored craft papers (thin)
- Cardstock paper (thick)
- Template for boat pieces
Instructions for Making a Paper Boat
Select a colored cardstock paper for the boat, cockpit and mast patterns. Select colored craft papers for the sails and flag craft. Trace the template patterns and cut them out nicely.
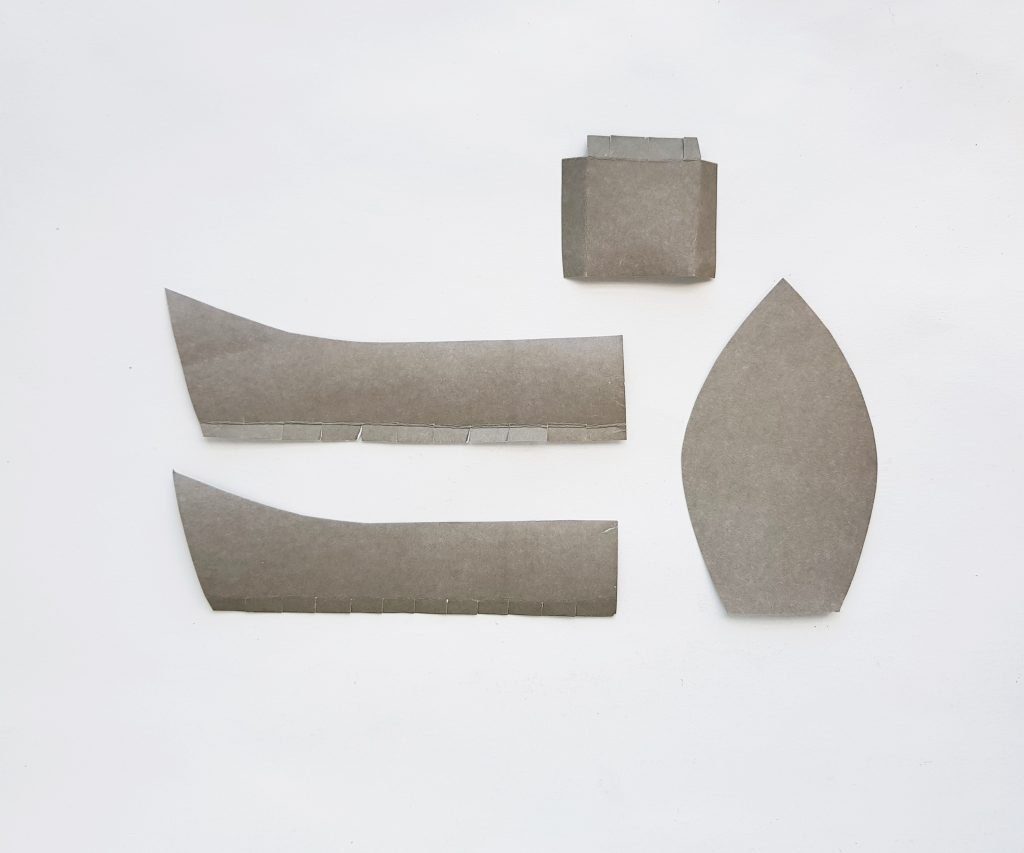
Fold and make creases along the yellow marked lines of the cockpit bench, the backside pattern and the side patterns of the boat. Use scissors to cut slits along the thin folded parts of the side patterns; keep 1 or 2 cm gap between the slits.

Apply glue along the thin folded parts of the backside and side patterns of the boat.

Grab the bottom pattern of the boat and any one of the side patterns. Attach the thin folded, glued part (tabs) of the side pattern along the side of the boat’s bottom pattern.

Similarly, attach the other side of the boat.

Join the 2 sides together on their front side. Attach the backside of the boat by gluing the bottom tab with the boat base and the side tabs with the side patterns of the boat.

Take the cockpit bench pattern and fold along the yellow marked lines.
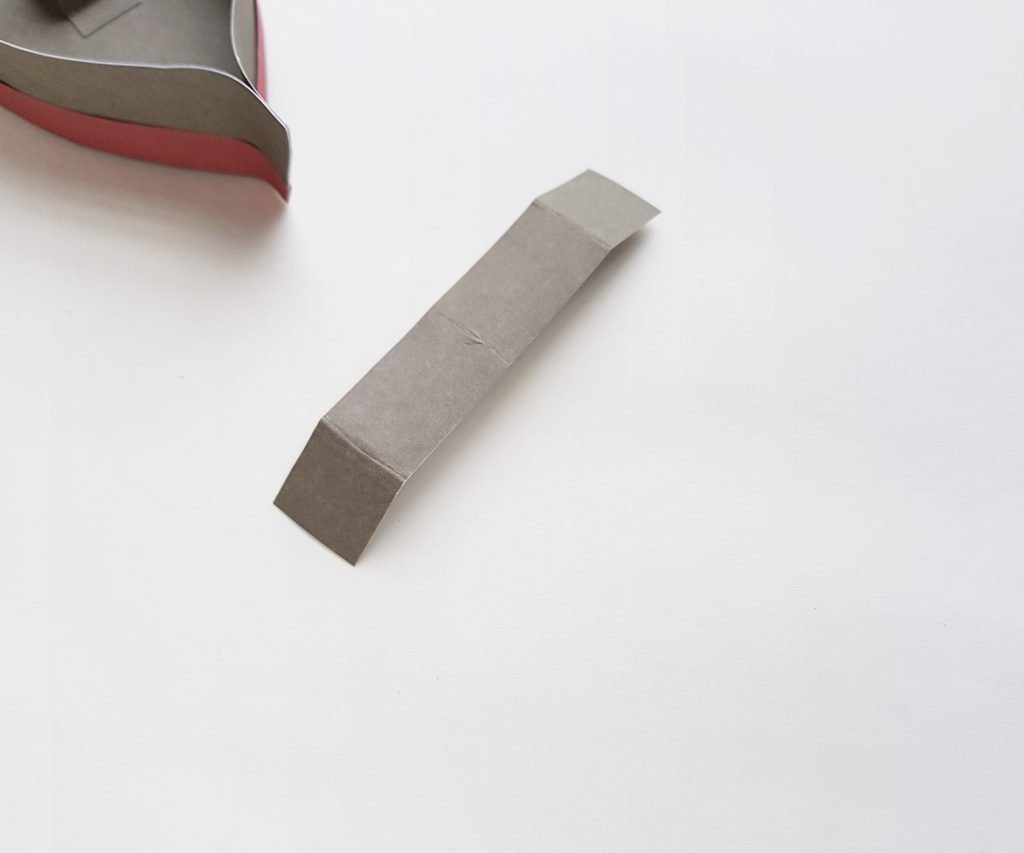
Place and glue the bench inside the boat. Cut and thin layer of paper and attach it around the outer surface of the boat.
Take the mast, sails and the flag patterns.
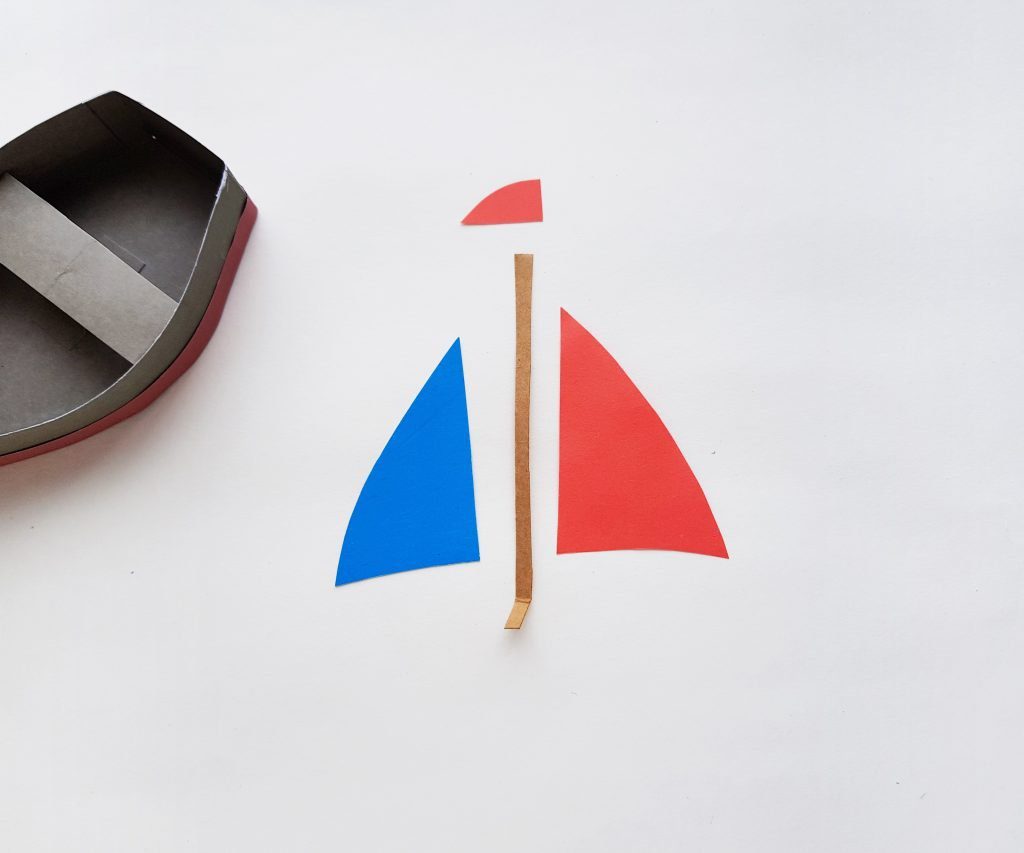
Attach the sail patterns on both sides of the mast cutout and attach the flag pattern on the top side of the mast cutout.

Cut a small strip from a cardstock paper and align it with the mast from the bottom side. Keep the bottom half of the strip free and glue the top half of the strip with the mast. Fold the bottom half of the strip outwards and then fold the bottom part of the mast to the opposite direction.
Apply glue on the bottom side of the folded strip and mast part. Place it in the middle of the cockpit bench. You can craft a small safety ring from colored craft papers and attach it with the paper boat.

Will this paper boat float?
Unfortunately, this paper boat will not float. It is more of a “model” that you can use for decoration or light playing.

More boat craft projects
- How to make a paper boat bowl
- Easy cork boats
- Paper plate sailboat
- Floating pirate ship from recyclables

1 thought on “How to Make a Boat from Paper”
I am going to try this at a library school holiday program. I did a trial and found it to be quite difficult and fiddly using 180gsm paper. The mast was a bit floppy. I need to think about how to make it easier for children. I think it will require a lot of adult assistance.
Leave a Comment Cancel reply
Save my name, email, and website in this browser for the next time I comment.

How to Make a Paper Boat That Floats

Introduction: How to Make a Paper Boat That Floats

Making a paper boat can be challenging and fun. It can also be disappointing when you put your boat in the water and it quickly gets soaked and sinks. We have come up with an instruction set with 14 steps to make a more durable paper boat that will float better and last longer. And it only takes 7-12 minutes to make!
Step 1: Materials
- One sheet of paper (8.5x11 inches).
- Wax (Murray’s BEESWAX. It can be found in the hair aisle and purchased for ~$2).
- Gloves, wax can stick to you (optional).
- Newspaper, wax can stick everywhere (optional)!
- Calm body of water.
- Warning : Be careful not to get a paper cut!
- Disclaimer: Does not sail well in rough waters. Will eventually sink.
Step 2: Set Your Midline by Folding in Half

- Take your sheet of paper and fold it long ways (hot dog style).
- Unfold your paper to reveal the crease running down the middle of the page.
Step 3: Fold in Half (Hamburger Fold)

- Fold the sheet of paper in half from short side to short side (hamburger style). Don’t unfold it!
Step 4: Fold Corners in to Make a Triangle

- Turn the folded paper so that the opening is facing you.
- Fold down the top left and right corners until they meet at the middle crease to form a triangle shape.
There should be two flaps at the bottom of the paper that aren’t covered by the triangle.
Step 5: Fold Flaps to Make a Paper Hat

- One at a time, fold the bottom flaps at the base of the triangle up over the triangle shape.
- Each flap should be folded in opposite directions. The resulting structure should resemble a paper hat (above right).
Step 6: Folding the Corner Flaps

- There should be four small corner flaps, two in front and two in back.
- Fold each corner flap along the edge of the triangle so that no corner flap is sticking out.
- The whole paper should form a triangle shape by the end of this step.
Step 7: Folding the Triangle to Make a Square

- Open up the bottom of the triangle.
- Make the corners of the triangle meet. Hint: The corners with the folded flaps.
- Squish the paper together to make a square and press down along the creases to keep the square shape.
Step 8: Fold Square Into a Triangle

- Two triangle-shaped flaps form the opening. Arrange the square like a diamond so that the opening is facing you.
- Fold each flap so that the bottom corner of the diamond meets the top corner of the diamond. Flaps should be folded in opposite directions.
- The paper should form an even smaller triangle!
Step 9: Fold the Triangle to Make a Square AGAIN!

- Similar to step 7, open the bottom opening of the triangle and make the corners meet.
- Squish the paper together to make a square.
- Press down along the creases so that the square keeps it shape.
Step 10: Boat Reveal!

- At this point, the square is divided in half by a diagonal opening.
- One corner of the square can be pulled apart. Gently, pull this corner apart to widen the diagonal opening and reveal the boat!
Step 11: Flatten and Work Out the Kinks

- Press down on the bottom crease so that the paper looks like a flat trapezoid with just the tip of a triangle visible from the middle.
Step 12: Wax On!

- Lay down newspaper and put on gloves (optional).
- Using your fingers, spread a coat of wax onto the exterior surface of the boat. Wax from the bottom of the boat up to an inch above the bottom of the boat.
- Apply wax liberally to both sides of the boat and edges.
Step 13: Add Wax on the Inside

- Once the outside has a coat of wax, open up the bottom of the boat and spread a coat of wax onto the interior surface of the boat. Wax from the bottom of the boat up to an inch above the bottom of the boat.
- Apply liberally. Remember, the better you coat, the less leaks there will be!
Step 14: Make the Boat Stand

- After waxing the boat, use your thumbs to widen the bottom gap of the boat.
- Try to make the boat stand upright on a flat surface. If it stands straight on the table, it should stand straight in the water!
- Hint: Try to make the triangle that juts out of the middle of the boat into a pyramid shape.
Step 15: Set Sail!

- Once the boat can stand, gently place your boat on a calm body of water.
- Watch the boat float! Great for bathtubs, sinks, fountains, or, you know, whatever floats your boat!

Recommendations

Remake It - Autodesk Design & Make - Student Contest

Paper and Cardboard Contest

Making Time Contest

- Video Library
- Monthly Collection
- Craft Academy
- Paper Flowers
- Felt & Fiber
- Kid's Crafts
DIY Paper Boat

- Copy Link
Join our email list to learn about new projects, discounts, and membership perks!
Easy Sailing
If you haven’t noticed, we have been working with a bit of a nautical theme recently. Our nautical wrapping paper and nautical gift tags are great for pretty summer gift-giving. And the You Are My Anchor card can be used for any occasion to show appreciation for your loved ones. We particularly love the beachy nautical theme for summer celebrations! Our under the sea photo props are perfect for creating a nautical themed summer party, and this paper boat project can easily be incorporated into your party decor.
In our tutorial below, you will see how simple it is to assemble this boat—making it a great craft project for kids! They can make their own paper boat to play with, help you set the table with it (see pictures below for inspiration), or use it in another craft project.
Goodies You Can't Google
You've found a member-exclusive project. But for less than the price of a fancy coffee... You'll get instant access to this and over 2,000 other premium projects inside the Lia Griffith membership!

To make a paper boat set, begin by downloading the template below. Download the SVG version if you will be using a cutting machine, or use the PDF version if you are cutting by hand. If you are using the PDF version, you can print the template directly onto the paper you will be using.
We made our paper boats with an assortment of pretty metallic text weight papers. You can use any color scheme that you would like for these boats, but we decided to create these boats to match our 1970s retro sailboat gift wrap . I’ve added links for each of the papers below in the materials list. If you are using this paper boat project to incorporate into a nautical or beach themed party, I would suggest using a color scheme that matches your specific event decor.
Our paper boats can be used as cute party favors that you can fill with candies, or to decorate a table setting. Scatter them around the table, or write names on the boats to use as adorable place cards! You can even create your own paper boat garland to hang around your party by attaching the boats to a pretty ribbon or piece of colored baker’s twine. I’m thinking these boats would make for a super cute baby mobile…there are so many possibilities!
This content uses links from which we may earn a commission. Disclosure .
How to Make a Paper Boat
- Gather your craft tools and materials. Then download the template above.
- Cut and score your paper according to the template, using your scissors or a cutting machine.
- Fold along score lines. Clip slits along the tabs to allow for a curve.
- Glue small tabs and attach to the side. Then, glue slit tabs to the front of the boat.
Full tutorial available for members. Join here!

Connect with Us
Follow us on Instagram , Facebook , and Pinterest to stay updated on the projects we share daily, and browse our YouTube channel for DIY video tutorials.
For instant access to our templates and tutorials, take a look at our membership options . Always feel free to write in with project suggestions to [email protected]! Until next time ~ Lia
Tools
- Craft Scissors or Cricut Explore Air 2
- Low-Temp Hot Glue Gun
- Needle-Nose Pliers/Wire Cutters
Materials
- Text Weight Paper – Poptone Berrylicious , Stardream Metallic Sapphire , Stardream Metallic Crystal , Paper Source Curry , and Poptone Orange Fizz
- Wood Skewer
All the Goodies You Can't Google 🎁
Tired of scrolling endlessly for the perfect project? Save time, money, and Google-induced headaches with us! Our membership makes it easy to create beautifully finished crafts without needing to look all over the internet for ideas and materials or spend lots of money on individual videos and templates.
Already a member? Click here to log in.
Ask Lia or the community!
Leave a comment cancel reply.
Your email address will not be published. Required fields are marked *
Save my name and email in this browser for the next time I comment.
15 Comments

Hi Lía! How are u? Im from Argentina and i love everything you do. I have a question for you please: i have the scan cut from Brother; today i tried to print the boat with the sgv file and everything was ok but in the part where im supposed to fold the paper, the print cut the Paper so i have to glue all the parts. I think i have done something wrong because the instructions shows that the botton part or the boat is one piece and instead i have several parts. Hope you undestand me and help me 🙂. Thank you very much Flavia

We are not familiar with the Brother cutting machine, the lines that indicate fold lines should be scored by your machine. You will need to manually select these lines to score them. Please contact Brother customer care for any help regarding your machine.

I BOUGHT YOUR BOOK,BUT CAN’T FIND ON YOUR SITE WHERE TO TYPE IN THE CODE FOR THE FREE PROJECT DOWNLOADS.

Hello! Page 12 lists the URL and secret code.

How adorable the little boats are, want to make lots of them. Did get few cut on my Cricut. Want to get more colors of metallic papers when we return from vacation, love how metallic papers give any item such rich look. Have so much want to do when we get back. The boats I did cut out on Cricut used some metallic papers gotten at Walmart, not much variety of colors but can do lighter boats, really pretty, look pearlescent. Have you looked into new Gold Cricut? Saw ad online can pay $50.00 to trade machines. Will there be your projects on gold machine? Haven’t used projects that came with Cricut Air, are those still in machine or have they expired? Am always so careful, concerned will mess up machine. Being digitally compromised tends to cause me to be extra cautious. Your site inspires me to be creative even when other part of life dulls creativity. There will be celebration of life for grandson who died in June 8th. Celebration will be on July 8th. Hoping we’ll be able to attend. Have great week all.
Thanks so much, I’m glad you love the boats! The Gold Cricut is beautiful, isn’t it? My projects won’t be available with that bundle. I’m not sure about the projects that came with your machine, but you can contact Cricut’s customer service to be sure. We’ll be thinking of you as you celebrate your grandson’s life!

I have been searching everywhere for a 3D paper boat! I’m having a nautical theme for my wedding and since it’s river nautical and not ocean, I didn’t want whales, starfish, seahorses, etc. This will be great for the reception. I’m going to fill them with goldfish crackers!
Thank you so much!
Oh that’s great, I’m so glad this will work for your wedding!

Ooooh! Thank you! I’ve been trying to make a 3d ocean view mobile for my grandson. It is not easy finding 3d files, and I’ve had to try to make my own. This boat is perfect!
Oh, how great! I’m so glad the boat will work for you 🙂

Thank you Lia you are such an inspiration to my craftie side. I really love all your projects. I find pleasure on opening my email and see your gift to me everyday. Many blessings.
Thank you Rhoda, that means so much to me! 🙂

Would appericate more written instruction, plus a complete material list. For example, what is the size of dowel used, or was it even a dowel? Options are nice, but spefics are better:)
Oops! The photo tutorial was accidentally missing from the post this morning, but it’s there now with plenty of details 🙂
Member Login
Email Address
Remember Me
Let your creativity bloom!

Join our email list to get a free flower crafting project bundle . Create four pretty peonies with the materials you already have on hand - in 60 minutes or less.
Your fresh picked peony projects are on the way to your inbox!
Continue Download?
This will use up one of your extra projects for the month.
Save posts to your craft room with the Lia Griffith membership.
Enjoy your freebie.
Join our email list to instantly download this freebie and get more DIY inspiration delivered to your inbox.
- Email Address *
- Hidden download_url
Already a member? Log in to get this freebie.
Talk to our experts
1800-120-456-456
- Learn-and-Grow
- How to Make a Paper Boat in 2 Easy Ways (DIY for Kids)
Two Easiest Ways to Make Paper Boats with Newspapers and Origami
Making paper boats is super easy and fun.
Is the rainy season right around the corner? Then we suggest teaching your children how to make paper boats! Most kids are stuck at home on a gloomy rainy day. And they might end up getting bored too fast. To keep them engaged for a long time, we suggest you teach them how to make a paper boat from scratch!
Children can make paper boats with both newspaper and origami sheets. They can float the paper boat in a puddle or along any stream of water. And do you know what the best part is? They can make as many as they want!
So let's check out the two easiest ways of making paper boats with both old newspapers and origami paper boats. Let's get started!
How to Make a Paper Boat with Old Newspapers

Paper Boat With Newspaper
Materials Required
Bamboo skewers
Wallpaper scraps
Strong glue
Take the newspaper and cut it into the size of 35*45 cm. You can take the help of a ruler to measure the length of the newspaper.
Fold the newspaper in half from top to bottom. Then again, fold it from side to side and create a crease. Unfold the paper.
Please fold the paper from the upper left to touch the central crease. Repeat the process for the upper right tip.
Wrap the bottom flap up, flip it over and wrap the other bottom flap up. Put your thumb in the middle, pull it outward, and press the paper flat to make a square.
With the tip of the open side, lift any bottom flap and touch it to the other tip. Turn over the paper and repeat the process to get a triangle.
Next, hold onto both the upper tips and pull them apart gently to create your paper boat!
If you wish to decorate, you can cut out two small pieces of wallpaper and put a skewer through both the pieces to make a sail. Poke the skewer to the boat's top and secure it with glue.
Step By Step Guide on How to Make Paper Boat with Origami
Origami paper boats are super easy to make. All you need is an origami paper of your choice and colour, and that's it. Here are the steps to follow to make the boat -
How to Make Paper Boat with Origami
First, fold the paper in half. Keep it down vertically on your table or floor and fold it from left to right to ensure that the corners meet. Make sure there is a neat crease on the paper. You can run your finger over the crease 2-3 times to make it more pronounced.
Next, unfold the origami paper, and rotate it 90 degrees to fold it up in half again. By now, the paper should be in a horizontal position. Once you are done adjusting the paper, fold it from left to right. It will create yet another crease in the middle of the page.

How to Fold a Paper to make Paper Boat
Now flip the origami paper so that the fold opens facing you. Then fold the top corners of the paper towards the middle leaving about 2.5 to 5 cm of space at the bottom. Ensure these folds match with the central crease. To secure all the folds, crease along the edge of the papers.
Next, pull up the bottom of the page and fold it up against both sides. Take the bottom flap and fold it against the lower end of the two triangles. Turn the paper around and repeat the process with the other flap. It will result in a paper hat.
Next, take the lower corners and fold them over inside. On one side, take the rectangle's corners and put them over the triangle. Tuck those paper parts inside the triangle's edges and crease them with your fingers to stay in place. Then put the bottom flaps towards you over the triangle edges.
Now it is time to make the triangle into squares. Rotate the triangle 45 degrees and open the bottom of the triangle with your fingers. Gently pull the paper so that it slowly turns into a square.
Next, fold the bottom flaps and rearrange your paper to fold up the bottom parts of the diamond. Fold up any one corner to align with the top one. Repeat the process on the other side too.
Now, turn the resultant triangle into a square too. Rotate the triangle 45 degrees and open the bottom of the triangle with your fingers. Gently pull the paper so that it slowly turns into a square.
Next, pull the triangles to the sides of the square. Start with the top of the diamond, pilling both sides apart so that the middle seam blooms. Make sure to crease the bottom of the folded area to make your paper boat stronger.
And that's it! Your paper boat swing is ready!
So we just saw that making paper boats is a super fun activity for both you and your kids. This activity can keep both their restless minds and hands occupied, making the cutest paper boats that they can use to play in the rain. So get the materials mentioned above and start to make a paper boat with your kid!

Step-by-Step Guide: Make a Sailboat Out Of Paper Effortlessly
Alex Morgan
Creating a sailboat out of paper is a fun and creative craft activity that can be enjoyed by people of all ages. Paper sailboats are not only easy to make but also provide an opportunity for imagination and play. In this article, we will provide you with a step-by-step guide on how to make a paper sailboat, along with tips for building a sturdy boat and ideas for fun activities and games. So, gather your materials and get ready to embark on a paper sailing adventure!
Before we begin with the instructions, let’s gather the materials needed for making a paper sailboat. The type of paper you choose is crucial to ensure that your sailboat stays afloat and withstands the water. there are a few other materials required for the construction process.
Now that we have our materials ready, let’s dive into the step-by-step guide. We will take you through each stage of creating a paper sailboat, from folding the base to adding the mast and sail.
After completing the construction of your paper sailboat, you can add your personal touch by decorating it. This will make your boat unique and reflect your creativity.
Building a sturdy paper sailboat requires some tips and tricks to ensure it stays intact during playtime or races. We will share some techniques that will help strengthen the boat’s structure and enhance its durability.
Besides the construction process, paper sailboats offer various opportunities for interactive and engaging play. We will explore different activities and games that can be enjoyed with your paper sailboat, including how to organize a sailboat race and other creative ideas to make the most out of your sailing experience.
So, let’s gather our materials and get ready to embark on a wonderful journey of making a sailboat out of paper!
1. Making paper sailboats maximizes creativity: With just a few simple folds and materials, you can create a mini sailboat that sparks imagination and fun. 2. Using sturdy paper for sailboat construction is essential: Opt for thicker, heavier paper to ensure a durable sailboat that can withstand floating in water or racing against others. 3. Personalizing your paper sailboat adds charm: Enhance your sailboat by adding colorful decorations, custom designs, and unique details, making it a reflection of your style and personality.
Materials Needed
To make a paper sailboat, you will need the following materials:
- A sheet of sturdy, lightweight paper
- Scissors for cutting and adjusting the shape
- Markers or colored pencils for designs and colors
- A ruler for straight lines and accurate measurements
- Glue or tape for securing parts of the sailboat
Pro-tip: Consider using construction paper as it is more durable and less likely to tear, ensuring a longer playtime. Remember to be creative and have fun while making your sailboat!
What type of paper is best for making a paper sailboat?
The type of paper that is best for making a paper sailboat is crucial. When considering what type of paper to use, there are several options to choose from.
Construction paper is a sturdy choice that holds its shape well and can withstand exposure to water. Another option is cardstock , which is thicker and more durable than construction paper. This provides extra strength and reduces the likelihood of tearing or collapsing.
If you prefer a lighter and more delicate sailboat, origami paper is a good choice. It is lightweight and easy to fold.
Last but not least, for water resistance, it is a good idea to use water-resistant paper or coat regular paper with a waterproof sealant. This protects the sailboat from becoming soggy or falling apart when it comes into contact with water.
When choosing the paper for your project, it is important to consider the size and complexity of the sailboat design, as well as your personal preferences. Feel free to experiment with different types of paper to find the one that works best for you. Enjoy the process of creating your paper sailboat and let your creativity set sail!
Other materials required for building a paper sailboat
To build a paper sailboat, you will need various materials in addition to paper. Here is a list of the other materials required for building a paper sailboat:
- Scissors : Use scissors to cut the paper into the desired shapes.
- Glue or tape : Secure different parts of the sailboat together.
- Ruler : Use a ruler to measure and create precise folds and cuts.
- Pencil or pen : Use a pencil or pen to mark positions for folding and cutting.
- Decorative materials : Personalize the sailboat using markers, crayons, stickers, or other decorations.
- Optional : If you want a sturdy base, you can use a small piece of cardboard or foam board.
- Optional : If you plan to float the sailboat on water, you can use waterproofing materials like wax or clear nail polish.
It’s important to note that these materials are just suggestions. Feel free to be creative and use whatever materials you have available to build your paper sailboat.
Step-by-Step Guide to Making a Paper Sailboat
Looking to set sail on a creative adventure? Get ready to embark on a step-by-step journey to making your very own paper sailboat. We’ll start by folding the base, then move on to crafting the hull. Next, we’ll add the mast and sail, giving our paper creation that true sailor’s touch . And finally, we’ll let our imagination run wild as we decorate and personalize our paper sailboat, making it a unique vessel of our own. Get your scissors ready, because it’s time to make waves with paper!
Step 1: Folding the base of the sailboat
To fold the base of the sailboat, follow these steps:
Step 1: Start with a square piece of paper.
Step 2: Place the paper in front of you with one corner pointing towards you.
Step 3: Fold the paper in half diagonally, bringing one corner to the opposite corner, and crease firmly.
Step 4: Unfold the paper and repeat the previous step with the other two corners, folding them to the opposite corners and creasing firmly.
Step 5: Next, fold the bottom corner up towards the center, aligning it with the middle crease.
Step 6: Fold the top corner down towards the center, overlapping the previous fold, and crease firmly.
Step 7: Flip the paper over and repeat steps 5 and 6 on the other side.
By following these steps, you have successfully folded the base of the sailboat. This forms the hull of the sailboat, providing stability for the rest of the construction process.
Step 2: Creating the hull of the sailboat
To create the hull of the sailboat, follow these steps:
Step 1: Take a rectangular piece of paper and place it in front of you.
Step 2: Fold the paper in half lengthwise, creating a center crease.
Step 3: Unfold the paper and fold the right and left edges towards the center crease.
Step 4: Flip the paper over and repeat the folding process on the other side, folding the right and left edges towards the center crease.
Step 5: Fold the bottom edge of the paper up towards the center, about two-thirds of the way.
Step 6: Flip the paper over and repeat the same folding process on the other side, folding the bottom edge up towards the center.
Step 7: Take the bottom corners of the paper and fold them towards the center, creating a triangular shape at the bottom of the hull.
Step 8: Flip the paper over and repeat the same folding process on the other side, folding the bottom corners towards the center.
Step 9: Gently push the sides of the hull inward, creating a more three-dimensional shape.
Step 10: Your paper sailboat hull is now complete!
Fact: The hull’s shape is crucial for the stability and maneuverability of the sailboat, enabling it to smoothly cut through the water and resist tipping over.
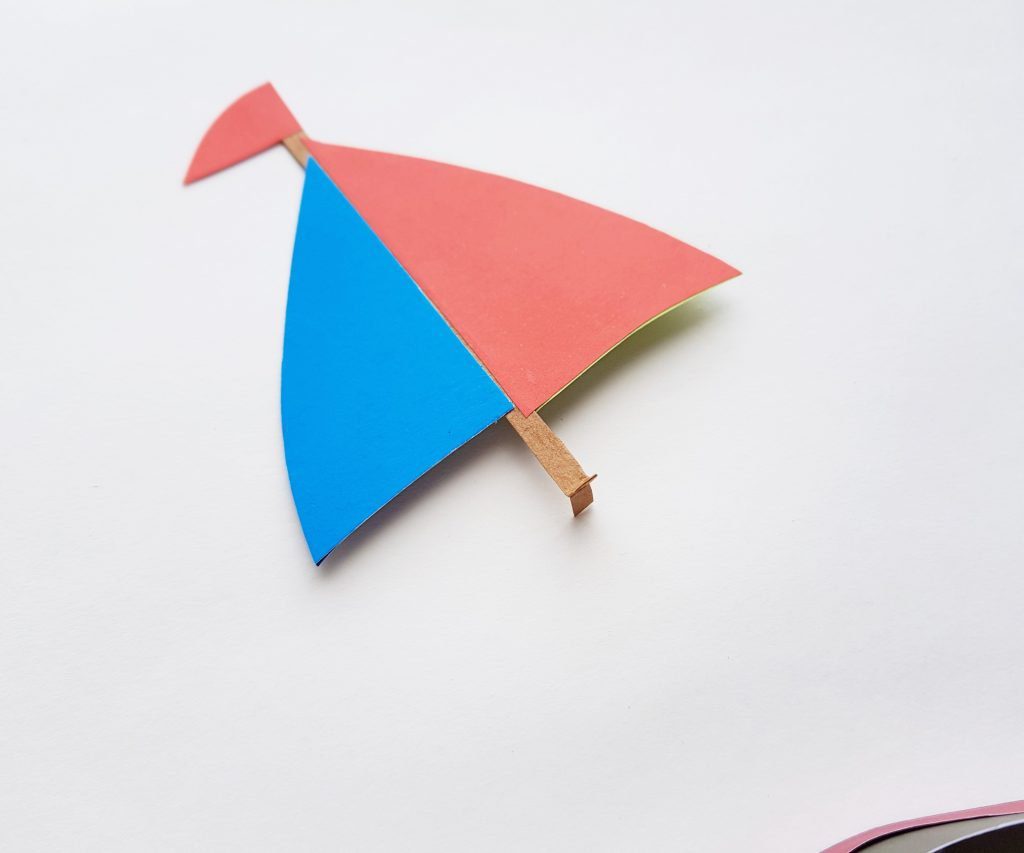
Step 3: Adding the mast and sail
Adding the mast and sail is a crucial step in building a paper sailboat. Follow these steps:
- Take a 10-12 inch wooden or plastic dowel rod as the mast of your sailboat.
- Insert one end of the dowel rod into the top of the folded triangle, ensuring it stands upright .
- For step 3, create the sail by cutting a small square or rectangle out of decorative paper or fabric.
- Attach the sail to the mast by gluing or taping one edge to the dowel rod.
- Add extra decorations, like colorful patterns or stickers, to the sail or hull for customization .
- Once the mast and sail are added, your paper sailboat is complete and ready to sail!
With the mast and sail in place, your paper sailboat is now ready to set sail and bring joy to your paper boat adventures.
Step 4: Decorate and personalize your paper sailboat
Step 4: Decorate and personalize your paper sailboat.
1. Choose colors: Use colorful markers, crayons, or colored pencils to add vibrant designs to your sailboat.
2. Add patterns and shapes: Use your artistic skills to draw patterns like stripes or polka dots, or add shapes such as stars or hearts to make your sailboat unique.
3. Write your name or initials: Personalize your sailboat by writing your name or initials on the hull or sail. This will make it easily identifiable and show ownership.
4. Decorate with stickers or washi tape: Enhance your paper sailboat’s appearance by adding stickers or washi tape with various designs, giving it an extra touch of style.
5. Use glitter or sequins: Add sparkle to your sailboat by gluing on glitter or sequins, creating a dazzling effect and making it stand out.
6. Experiment with different materials: Get creative and try using fabric, ribbons, or feathers to give your sailboat a unique texture or embellishment.
7. Apply a protective spray: If you plan to display or play with your sailboat outdoors, consider using a clear protective spray to prevent smudging or fading.
8. Show off your creation: Once you’ve finished decorating your paper sailboat, proudly display it on a shelf, use it as a centerpiece, or take it for a sail in a nearby water source.
I once decorated a paper sailboat with my younger brother for a school project. We used bright markers to draw colorful stripes and added our initials to the side. We incorporated stickers of sea creatures and small seashells. Our sailboat won the “ Most Creative ” award, and we were proud of our artistic efforts. It was a fun bonding experience that allowed us to express our creativity and showcase our unique style. Decorating and personalizing our paper sailboat made it feel special and added a personal touch to the project.
Tips and Tricks for Building a Sturdy Paper Sailboat
When constructing a sturdy paper sailboat, it’s important to follow these helpful tips and tricks:
- Choose thick and durable paper such as construction paper or cardstock to ensure durability.
- Begin by folding the paper in half lengthwise to create a strong foundation .
- Achieve a pointed bow by folding the top corners of the paper down towards the center crease.
- Fold the bottom of the paper up, meeting the bottom of the triangle formed.
- Repeat the previous step on the opposite side for balance .
- Fold the bottom corners of the paper upwards, meeting the centerline and forming a diamond shape .
- To create a smaller triangle, fold the top point of the diamond downwards, meeting the bottom edge.
- Repeat this process on the other side as well.
To enhance the sturdiness of the sailboat:
- Apply glue or tape along the seams to securely hold them in place.
- Smooth out any creases or wrinkles in the paper for a clean finish.
- Allow the boat to fully dry before adding decorations or attempting to sail it.
By implementing these tips and tricks, you will construct a reliable paper sailboat that is ready to set sail!
Fun Activities and Games with Paper Sailboats
Get ready to set sail on a voyage of fun and excitement with paper sailboats ! In this section, we’ll delve into the world of entertaining activities and games you can enjoy with these nautical creations . From thrilling sailboat races to a variety of other games and activities, there’s something for everyone to dive into . So grab your scissors, fold your paper, and let the adventure begin!
How to have a sailboat race
To have a sailboat race with paper sailboats , follow these steps:
- Prepare multiple paper sailboats using the step-by-step guide in the article.
- Choose a suitable location with a body of water, such as a pond or a small pool .
- Mark the starting and finishing points of the race.
- Gather participants and assign each one a paper sailboat .
- Ensure the sailboats are evenly spaced at the starting point.
- Gently blow on the sails of the sailboats to create wind and start the race.
- Encourage participants to use their breath or a small handheld fan to propel their sailboats forward.
- Monitor the progress of the sailboats and announce the winner as the first to reach the finishing point.
Pro-tip: To add excitement to the race, create obstacles like floating objects for the sailboats to maneuver around. This will make the race more challenging and enjoyable for participants .
Remember, a sailboat race with paper sailboats is a fun and engaging activity that can be enjoyed by both children and adults .
Other games and activities to enjoy with paper sailboats
Did you know that paper sailboats are not only fun to make, but they can also teach important concepts about physics and engineering ? In addition to creating a paper sailboat fleet and racing them in a nearby stream or pool to observe which sailboat design sails the fastest and farthest, there are other games and activities you can enjoy with paper sailboats. One such game is “Sink the Sailboat.” You can set up targets in the water and use a water shooter to try and sink the paper sailboats . It’s a challenging game that adds an element of competition. Another activity is organizing a paper sailboat regatta . This involves holding a friendly competition among friends or family members to see who can navigate their sailboat through a course the fastest. It’s a great way to have fun and showcase your sailing skills. So, why not try out these other games and activities with your paper sailboats ? You’ll have a blast and learn a lot about physics and engineering at the same time.
Some Facts About How To Make A Sailboat Out Of Paper:
- ✅ Making a sailboat out of paper is a popular craft activity enjoyed by both children and adults. (Source: Wikihow)
- ✅ The process of making a paper sailboat involves various folding techniques to create a boat shape that can sail in water. (Source: Little Project)
- ✅ Using regular printer paper is sufficient for making a paper sailboat, although origami paper can also be used for a more authentic look. (Source: National Geographic Kids)
- ✅ It is recommended to reinforce the corners and bottom of the paper sailboat with clear tape to ensure its durability and water resistance. (Source: Nat Geo Kids)
- ✅ Paper sailboats can be customized with colored paper, markers, pencil crayons, and stickers, allowing for creative personalization. (Source: One Little Project)
Frequently Asked Questions
How do i make a sailboat out of paper using printer paper.
To make a sailboat out of paper using printer paper, follow these steps:
- Fold a letter-sized piece of printer paper in half vertically.
- Unfold the paper and fold it in half again, this time horizontally.
- Flip the paper so that the fold is facing you, then fold down the top corners towards the middle, leaving space at the bottom.
- Secure the folds by creasing along the edges.
- Bring the bottom of the paper up and fold it against both sides, creating a paper hat shape.
- Fold the bottom corners inward, wrapping them around the edges of the triangle.
- Fold the bottom flaps around the edges of the triangle and back towards you.
- Rotate the triangle 45 degrees to make it a square.
- Open up the bottom of the triangle with your fingers to maintain the square shape.
- Fold up the bottom flaps by aligning them with the top corners.
- Rotate the square 45 degrees and open up the bottom again.
- Pull out the triangles on the side of the square, creasing the bottom to strengthen the boat.
- Float the paper boat in water and make adjustments to prevent sinking.
What kind of paper do I need to make a sailboat out of paper?
You can use regular printer paper, construction paper, or origami paper to make a sailboat out of paper. Using origami paper may make the folding slightly easier due to its thinner and more flexible nature. Waxed paper or aluminum foil can also be used to make a waterproof sailboat.
Can I put things in the paper boat?
Yes, you can put lightweight objects in the paper boat. Be mindful of the weight and size of the objects to prevent the boat from tipping over or sinking. Avoid putting too many heavy or large items in the paper boat as it may compromise its buoyancy.
How long will the paper boat float in water?
The paper boat will float in water for at least 10 minutes before becoming waterlogged. To make it last longer, you can reinforce the bottom of the boat with a layer of tape to make it more waterproof. Remember that the longevity of the paper boat in water will depend on various factors such as the type and quality of paper used and how well it is folded.
Can I customize the paper boat?
Yes, you can customize the paper boat to make it more visually appealing. You can use brightly colored paper, markers, pencil crayons, and stickers to decorate the boat. Let your creativity shine and make your paper boat unique.
Is making a paper boat a suitable activity for kids?
Yes, making a paper boat is a fun and easy craft project that is suitable for kids. It can be a great summer activity or a low-mess craft idea. It offers an introduction to origami and allows children to improve their fine motor skills and creativity. Adult supervision may be required for younger children, especially when using sharp tools or handling water.
About the author

Leave a Reply Cancel reply
Your email address will not be published. Required fields are marked *
Save my name, email, and website in this browser for the next time I comment.
Latest posts

The history of sailing – from ancient times to modern adventures
History of Sailing Sailing is a time-honored tradition that has evolved over millennia, from its humble beginnings as a means of transportation to a beloved modern-day recreational activity. The history of sailing is a fascinating journey that spans cultures and centuries, rich in innovation and adventure. In this article, we’ll explore the remarkable evolution of…

Sailing Solo: Adventures and Challenges of Single-Handed Sailing
Solo Sailing Sailing has always been a pursuit of freedom, adventure, and self-discovery. While sailing with a crew is a fantastic experience, there’s a unique allure to sailing solo – just you, the wind, and the open sea. Single-handed sailing, as it’s often called, is a journey of self-reliance, resilience, and the ultimate test of…

Sustainable Sailing: Eco-Friendly Practices on the boat
Eco Friendly Sailing Sailing is an exhilarating and timeless way to explore the beauty of the open water, but it’s important to remember that our oceans and environment need our protection. Sustainable sailing, which involves eco-friendly practices and mindful decision-making, allows sailors to enjoy their adventures while minimizing their impact on the environment. In this…
IMAGES
VIDEO
COMMENTS
1. Make the triangle into a square. Pick up the triangle, rotate it 45 degrees, then use your fingers to open up the bottom of the triangle. Pull the paper apart gently until it pops into a square shape. Make sure the bottom corners of the triangle fold over each other and become the bottom corner of a diamond.
Learn how to make a paper boat with easy steps and video tutorial. Have fun with this simple origami project for kids and adults.
If you need to make a essay boat, fold a piece of paper in half from top to bottom. Then, foldable it again from side to side and unfold how to have a crease in the center. Fold the top right corner downhill to one center. Next, reverse the color over and fold one misc corner down switch the other show. Fold each from which bottom edges of the ...
Pick up the folded piece of paper. At the top point, pull apart the 2 sides of folded paper. As you pull it apart, it should open up into a boat shape, as shown in the photo below. Adjust the paper if needed to make sure it's boat-shaped, then pinch along the bottom edges to make a fold on each side.
In this guide, we will walk you through the steps to create a simple origami boat. To begin, select a square sheet of paper. You can use origami paper, colored paper, or even a plain white sheet. Place the paper in front of you, ensuring that one corner is facing upwards. Fold the paper in half diagonally, creating a triangle.
To make a paper boat using square paper, begin by folding the paper diagonally in half to form a triangle. Then, fold the bottom corners towards the center to create a diamond shape. Open the bottom of the diamond and re-shape it into a square. Gently pull the top flaps apart to form the boat shape.
Step 6. Gently pull apart the top two points while pushing out with your fingers to form the bottom of the boat. Reinforce corners with clear tape, and also tape around the bottom to keep your boat dry. Now you're ready to launch your craft! Get outside with this cool paper boat you can make and race yourself!
Discover the joy of crafting a paper boat with our easy-to-follow tutorial. Master precise folds and techniques for optimal boat-making. Elevate your paper c...
Learn the art of paper boat making with our easy, step-by-step guide. Sail through the crafting process effortlessly, mastering folds to create a charming an...
Step 1: Fold the paper. Start by folding the paper in half, pressing it to make a crease at the centre. Open and fold the sides towards the middle crease, pressing the sides to create distinct folds. Fold again to join the sides at the bottom, leaving the open sides at the top. Open one flap, retaining three fan-like folds on the other side.
In folding a paper boat you will make a step in Origami technique; a creative and innovative world of paper formatting. Origami is the Japanese name for the art of paper folding, and it has now become a beloved art form for people around the world. Origami has a history; the first use of the word "Origami" in Japan was not for our familiar ...
x. Flip the paper over and fold the other layer too. You will get the triangle shape in x. y. Open the bottom of the figure again by pulling the flaps apart. z. Flatten it out and you will get a diamond shape now. aa. Open the figure by pulling the sides apart from the top to get the shape of the boat.
• Maverick's Paper Boats Instructions for simple paper boats. By varying the size of the circles, you can make a variety of different boats. • Ken's Paper Boat Page Ken devotes his page to the full-size paper boats people could ride around in during the second half of the 19th century (racing shells, canoes and row boats).
Step 11. Cut a small strip from a cardstock paper and align it with the mast from the bottom side. Keep the bottom half of the strip free and glue the top half of the strip with the mast. Fold the bottom half of the strip outwards and then fold the bottom part of the mast to the opposite direction.
Step 4: Fold Corners in to Make a Triangle. Turn the folded paper so that the opening is facing you. Fold down the top left and right corners until they meet at the middle crease to form a triangle shape. There should be two flaps at the bottom of the paper that aren't covered by the triangle.
How To Make a Paper Boat That Floats - Origami Boatsheet: А4A classic boat made of paper that is easy to make. It is beautiful and long floats.Please like, c...
Step 1: Folding the Hull. To make the hull of a paper sailboat, follow these steps: - Step 1: Start with a square piece of paper. - Step 2: Place the paper in front of you in a diamond shape, with one corner pointing towards you. - Step 3: Fold the bottom corner up to meet the top corner, creating a triangle.
How to Make a Paper Boat. Gather your craft tools and materials. Then download the template above. Cut and score your paper according to the template, using your scissors or a cutting machine. Fold along score lines. Clip slits along the tabs to allow for a curve. Glue small tabs and attach to the side. Then, glue slit tabs to the front of the ...
Wrap the bottom flap up, flip it over and wrap the other bottom flap up. Put your thumb in the middle, pull it outward, and press the paper flat to make a square. With the tip of the open side, lift any bottom flap and touch it to the other tip. Turn over the paper and repeat the process to get a triangle.
Origami Boat 🛥 How to Make a Paper Boat that Floats - Paper Speed BoatSubscribe to channel: http://bit.ly/2vxE4Wu#origami #easyorigami #papercraft #PaperCra...
To fold the base of the sailboat, follow these steps: Step 1: Start with a square piece of paper. Step 2: Place the paper in front of you with one corner pointing towards you. Step 3: Fold the paper in half diagonally, bringing one corner to the opposite corner, and crease firmly.
How to fold a paper boat that floats on water. Easy origami boat instructions for beginners. Origami paper boat making tutorial step by step. #paperboat #pap...