
How to Copy a PowerPoint Design Template to Another Presentation

Creating visually appealing and professional PowerPoint presentations takes time and effort. An easy way to give your presentation a cohesive and polished look is by applying a design template. PowerPoint comes with many built-in design templates to choose from. However, you may want to copy and reuse a custom template from another presentation rather than start from scratch.
In this blog post, I’ll walk you through the quick and simple steps to copy a design template from one PowerPoint presentation to another.
Why Use Design Templates
Using PowerPoint design templates provides several key benefits:
- Saves time – The slides are pre-designed so you don’t have to format each one individually. You can focus on adding content.
- Looks professional – Templates apply visual design principles like color schemes, fonts, and layouts.
- Consistent branding – Maintain your organization’s brand identity by reusing the same template.
Additionally, templates can be customized and updated to create a presentation specific to your needs.
How To Copy a Design Template
Copying a design template between PowerPoint presentations only takes a few clicks. Follow these steps:
- Open both PowerPoint presentations – the one with the design template you want to copy and the one you want to paste it into.
- In the presentation with the template go to View > Slide Master .
- In the left pane, right-click on the Slide Master thumbnail image and select Copy . Copy slide master
- Switch to the other PowerPoint presentation and go to View > Slide Master .
- Right-click on the thumbnail pane on the left and click Paste .
- Use Destination Theme applies the theme colors, fonts, and effects of the presentation you’re pasting into.
- Keep Source Formatting maintains the original theme formatting.
And you’re done! The design template is now copied over to the new presentation.
Customizing the Copied Template
Once you’ve copied over the template, you can customize it further to meet your needs:
- Edit Slide Masters – Make changes like adding logo, changing colors or fonts.
- Modify Layouts – Resize, add, or delete individual layout placeholders.
- Alter Theme – Adjust theme colors, fonts, and effect styles.
- Create New Slides – Design additional layouts and slides based on the template.
Taking the time to personalize the template will help you build a presentation that aligns with your brand and content goals.
Fixing Common Copy and Paste Issues
Sometimes when copying slides between presentations there may be formatting or content issues. Here are some troubleshooting tips:
- If colors, fonts, or effects change, choose Keep Source Formatting on paste to maintain the original look.
- Check for broken media links like videos and update the file paths if needed.
- Delete extra slide master layouts carried over to avoid multiple redundant masters.
- For text content, copy just the text itself not the entire slide placeholder frames to avoid layout shifting.
- Reapply animations/transitions manually if they don’t copy over.
Spending a minute to fix any of these problems will ensure your copied slides retain their original appearance.
Key Takeaways
Copying a PowerPoint design template to another presentation is simple:
- Using templates saves time and gives a professional look.
- In Slide Master view, copy and paste the Slide Master between presentations.
- Customize the template further to meet specific needs.
- Troubleshoot issues like formatting changes or broken links.
Reusing well-designed templates boosts productivity and gives your presentations a cohesive aesthetic. With just a few clicks, you can copy over visual and branding elements to enhance your next PowerPoint deck.
Try out these template copying tips the next time you want your presentations to share the same great format and style. Maintaining this consistency across your slides has never been easier.
Let me know in the comments if you have any other questions!
About The Author
Vegaslide staff, related posts.

How to Select All Slides in PowerPoint
How to Create a Curved Arrow in PowerPoint

How to Fade Picture and Music in PowerPoint

How to Save a PowerPoint Presentation on a Thumbdrive


Powerpoint Assist
Tips for Powerpoint by Regina Griffin
How To Copy Design From One Slide To Another In PowerPoint
Enhance your PowerPoint presentations with visually appealing designs by copying designs from one slide to another.
We discuss the benefits of this technique, step-by-step instructions on how to do it effectively, common mistakes to avoid, and valuable tips and tricks to make the process seamless.
Join teacher Regina Griffin from Oregon, US, as she shares her expertise on this essential PowerPoint skill. Let’s dive in!
Key Takeaways:
- Copying designs in PowerPoint can save time and effort in creating presentations.
- Steps to copy design: select, copy, navigate, paste, and adjust.
- Common mistakes: copying too much, not adjusting, and not checking for errors. Tips: Use Format Painter, duplicate slides, and save custom designs as templates.
Why Copy Designs in PowerPoint?
Copying designs in PowerPoint serves as a time-saving technique to maintain consistency and efficiency in your presentations.
By utilizing predefined templates or duplicating layouts, users can quickly apply a cohesive theme across slides, ensuring a polished and professional look. This streamlined approach not only saves valuable time but also eliminates the need to create designs from scratch, allowing presenters to focus more on content delivery.
Consistency in design elements such as fonts, colors, and graphical styles is crucial for establishing a visually appealing and coherent presentation. It helps to guide the audience’s focus, enhance readability, and create a lasting impression. Incorporating design consistency throughout the slides enhances the overall flow and professionalism of your content, making it easier for viewers to follow and engage with the information.
What Are the Benefits of Copying Designs?
The benefits of copying designs in PowerPoint are numerous and impactful, ranging from maintaining visual coherence to saving time and effort.
Using the slide masters and themes in PowerPoint can significantly enhance the efficiency of your design process. When you copy designs, you ensure consistency throughout your presentation, giving it a professional look. This not only saves you time but also makes it easier to tweak and modify elements without starting from scratch. By utilizing these features, you can achieve a cohesive and polished presentation that captivates your audience. This streamlined approach boosts productivity and sets the stage for a successful delivery.
How To Copy Design from One Slide to Another in PowerPoint
Copying a design from one slide to another in PowerPoint can be easily accomplished using simple steps within the software.
To begin, open your PowerPoint presentation and navigate to the slide containing the design you want to copy. Next, locate the thumbnail of the slide design in the Slides Pane on the left-hand side of the screen. Click on the thumbnail to select the entire slide. Then, right-click on the selected slide and choose the ‘Copy’ option from the dropdown menu.
Now, move to the slide where you want to paste the design. Right-click on the slide thumbnail in the Slides Pane and select ‘Paste’ to transfer the design onto the new slide seamlessly. You can also use the ‘Paste Special’ function to adjust the formatting and layout of the pasted design to fit the new slide perfectly. Make sure to review the alignment and proportions of the copied design before finalizing the paste operation.
Step 1: Select the Design to be Copied
To initiate the design copying process, start by selecting the specific design element or slide layout you wish to replicate within your presentation.
When choosing the design element, ensure it aligns with the overall theme and aesthetics of your presentation. This crucial step sets the foundation for a cohesive and visually appealing slideshow. Navigate through the slide thumbnails or switch to the design view to have a comprehensive look at the available options. By carefully selecting the right design element, you pave the way for a polished and professional presentation that resonates with your audience.
Step 2: Copy the Design
Once the design element is selected, proceed to copy it by utilizing the designated commands such as right-click or keyboard shortcuts within PowerPoint.
To duplicate the chosen design element seamlessly, users can employ the convenient method of using right-click options or keyboard shortcuts for precision. When the chosen element is highlighted, press and hold the ‘Ctrl’ key on the keyboard and simultaneously click on the element; this action effectively duplicates the design. Maintaining the original formatting and structure, this technique ensures an efficient copying process in PowerPoint without altering any design attributes or layout elements.
Step 3: Navigate to the Slide to be Pasted
After copying the design, navigate to the target slide where you intend to paste the duplicated design element for seamless integration.
Look for the ‘Slides’ panel on the left-hand side of your screen. Scroll through the slide thumbnails until you find the one that matches your intended destination. Selecting the right slide is crucial to maintain the flow and cohesion of your presentation. Once you’ve identified the target slide, click on it to ensure it’s active. This step ensures that the pasted design element lands exactly where you envision it. Now that you have the correct slide selected, proceed to position the design element appropriately within the slide canvas for optimal visual impact.
Step 4: Paste the Design
Paste the copied design onto the selected slide , ensuring to choose the appropriate paste options and maintain consistency with the presentation theme.
To seamlessly integrate the design elements into your slide, consider using the ‘Paste Special’ option to retain the design’s original formatting. This step is crucial as it ensures that the copied content aligns perfectly with the destination slide’s layout and design elements.
Make sure to adjust the size and placement of the pasted design to fit harmoniously within the existing theme. By aligning the design with the presentation theme, you enhance the visual appeal of your slides and create a cohesive overall look.
Step 5: Adjust the Design to Fit the Slide
Adjust the pasted design element to fit seamlessly within the slide layout, ensuring proper alignment, font styles, and overall visual appeal.
To ensure the design element integrates harmoniously with the slide’s aesthetics, pay close attention to its dimensions and position relative to other elements. Utilize the alignment tools in your presentation software to fine-tune the placement.
Consistency in font choices across the slide is crucial for a polished look – consider adjusting the typography to maintain a cohesive visual identity.
Experiment with color schemes and graphic tweaks to enhance the design’s impact without overpowering the content. Remember, balance and coherence are key in creating a visually engaging presentation.
What Are the Common Mistakes When Copying Designs in PowerPoint?
While copying designs in PowerPoint can enhance efficiency, there are common mistakes to avoid that may compromise the overall quality and coherence of your presentation.
One prevalent error when copying designs in PowerPoint is copying excessive content , which can clutter your slides and overwhelm the audience. To prevent this, focus on transferring only essential elements and removing unnecessary details. Overlooking design adjustments can lead to inconsistencies in font styles, colors, and spacing, disrupting the visual appeal of your presentation. Always check and adjust these design elements after pasting to maintain a polished and professional look.
Copying Too Much Content
One common mistake when copying designs is replicating excessive content, leading to cluttered slides and visual overload that distracts the audience from the key message.
So, when you are working on PowerPoint presentations, it’s crucial to selectively choose what to duplicate to maintain a clear structure and visual hierarchy. To ensure your slides are impactful, focus on identifying the essential elements that must be replicated for consistency while eliminating redundant or non-essential parts. This strategic approach not only declutters your slides but also enhances the audience’s understanding of the information being presented.
Not Adjusting the Design to Fit the Slide
Failing to adjust the copied design to align with the slide layout can disrupt the visual flow and coherence of the presentation, detracting from its overall impact.
To ensure a polished and professional look, it is crucial to resize, position, and align the design elements appropriately within the slide. Start by adapting the size of images or graphics to fit neatly within designated areas without losing clarity. Make use of the ‘snap to grid’ feature to easily align objects with precision. Strategically place text boxes and titles to maintain a balanced composition. Review the design from afar and adjust any misplaced elements for optimal visual coherence and consistency.
Not Checking the Design for Errors
Neglecting to review the copied design for errors or inconsistencies can result in visual flaws and inaccuracies that diminish the overall quality of the presentation.
When duplicating design elements in PowerPoint, paying attention to quality checks becomes crucial. Skimming over this step might lead to a myriad of issues that can tarnish the entire presentation’s look and feel. To ensure that your copied design maintains its integrity, be vigilant for common errors such as mismatched fonts, distorted images, or misaligned elements.
Implementing a systematic review process involves verifying alignment, font types, colors, and image resolution. By scrutinizing each element post-copying, you can rectify any discrepancies before the final presentation, ensuring that your design upholds the professional standards expected.
Tips and Tricks for Copying Designs in PowerPoint
Enhance your design copying proficiency in PowerPoint with these valuable tips and tricks that streamline the process and elevate the quality of your presentations.
One helpful technique to speed up design copying is to utilize the Format Painter tool. This tool allows you to quickly apply the same formatting from one element to another, saving you time and ensuring consistency across your slides.
Another efficient method is duplicating slides that contain your desired design elements. By doing this, you maintain a cohesive look throughout your presentation without having to redesign each slide individually.
For long-term convenience, consider saving your custom designs as templates. This way, you can easily access and reuse them for future presentations, boosting your efficiency and maintaining a professional aesthetic.
By incorporating these strategies into your workflow, you can maximize your productivity and create visually appealing PowerPoint presentations effortlessly.
Use the “Format Painter” Tool
The Format Painter tool in PowerPoint is a powerful ally for swiftly copying and applying formatting styles across different design elements, ensuring visual consistency and coherence.
When you need to maintain a uniform look in your presentation slides, the Format Painter comes to the rescue, allowing you to seamlessly transfer attributes like font styles, colors, and borders from one object to another. This feature streamlines the process of applying consistent design themes throughout your slides, saving you valuable time and effort in adjusting each element individually.
- Imagine you have a set of slides with various text boxes but want to make sure all headings have the same font size and color. With the Format Painter, you can simply format one heading and then apply those styles to the rest with just a few clicks.
- Similarly, if you have different shapes on a slide that need to share the same fill color and outline, the Format Painter enables you to quickly synchronize their appearance, creating a polished and professional look.
Use the “Duplicate Slide” Feature
Leverage the Duplicate Slide feature in PowerPoint to quickly replicate entire slides with their design elements, saving time and effort in creating consistent presentations.
The Duplicate Slide feature in PowerPoint is an invaluable tool for maintaining coherence and consistency in your presentations. By utilizing this feature, you can effortlessly copy the entire structure and design of a slide, ensuring that your presentation maintains a professional look throughout. To make the most of this feature, follow these simple steps:
- Select the slide you want to duplicate in the slides pane on the left.
- Right-click on the slide thumbnail and choose ‘Duplicate Slide’ from the dropdown menu.
- You now have a replica of the original slide ready for customization.
Save Your Custom Designs as Templates
Preserve your unique design creations by saving them as templates in PowerPoint, allowing for easy access and reuse of custom styles across multiple presentations.
By converting your standout design elements into templates, you streamline the process of replicating your signature look without starting from scratch each time.
Creating and saving personalized templates not only saves time but also ensures a consistent visual identity throughout your presentations.
Templates in PowerPoint serve as a repository of your best design practices, making it effortless to maintain brand cohesion and professional aesthetics.
Frequently Asked Questions
1. how do i copy the design from one slide to another in powerpoint.
To copy the design from one slide to another in PowerPoint, simply select the slide you want to copy the design from and click on the “Format Painter” button in the Home tab. Then, click on the slide you want to paste the design onto and it will automatically apply the copied design.
2. Can I copy the design from one slide to multiple slides at once?
Yes, you can copy the design from one slide to multiple slides at once. Simply select the slide with the design, click on the “Format Painter” button, and then double-click on the slides you want to apply the design to. This will copy the design to all selected slides.
3. What if I only want to copy certain elements of the design to another slide?
If you only want to copy certain elements of the design to another slide, you can do so by selecting the elements you want to copy, clicking on the “Format Painter” button, and then clicking on the slide you want to paste the elements onto. This will only apply the selected elements to the new slide.
4. Is it possible to copy the design from one presentation to another in PowerPoint?
Yes, you can copy the design from one presentation to another in PowerPoint. Simply open the two presentations in separate windows, select the slide with the design in the first presentation, and then use the “Format Painter” button to apply it to the desired slide in the second presentation.
5. Can I copy the design from one slide to another using keyboard shortcuts?
Yes, you can copy the design from one slide to another using keyboard shortcuts. Simply select the slide with the design, press the “Ctrl+C” keys to copy, and then press “Ctrl+V” on the slide you want to paste the design onto.
6. What if I want to copy the design from one slide to another but maintain its original formatting?
If you want to copy the design from one slide to another while maintaining its original formatting, you can use the “Paste Special” function in PowerPoint. Simply select the slide with the design, click on the “Copy” button, then go to the slide you want to paste the design onto and click on the small arrow under the “Paste” button. Choose “Paste Special” and select “Picture (Enhanced Metafile)” to keep the original formatting.
Similar Posts
How to record video in powerpoint.
Are you looking to take your PowerPoint presentations to the next level? Recording video in PowerPoint can enhance your presentation, increase engagement, and save time. In this step-by-step guide, we will show you everything you need to know to successfully record a video in PowerPoint. From setting up your equipment to adding narration and annotations,…
How To Tick Mark In Powerpoint
Have you ever wondered how to make your PowerPoint presentations more engaging and interactive? Tick marks could be the solution you’re looking for! In this tutorial by Regina Griffin, a teacher from Oregon, US, we will explore the basics of PowerPoint, including creating a new presentation, adding text and images, and customizing slide layouts. We…
How To Link Slides In PowerPoint
Are you looking to take your PowerPoint presentations to the next level? Linking slides in PowerPoint can enhance your presentations by allowing for easy navigation, creating interactive experiences, and saving time during your presentation. In this article, we will show you how to link slides in PowerPoint, including creating the slides, inserting hyperlinks, and linking…
How To Cite Apa In PowerPoint
APA citation is a crucial aspect of creating PowerPoint presentations, ensuring that your work is properly credited and supported by reliable sources. We will explore the importance of APA citation in PowerPoint, the benefits of using this format, and the step-by-step process of citing APA in your slides. Additionally, we will discuss common mistakes to…
How To Make Text Appear One By One In PowerPoint
Are you looking to create engaging and organized presentations in PowerPoint? Explore the importance of using one-by-one text in PowerPoint and the various methods you can use to achieve this. From keeping your audience engaged to emphasizing important points, we provide a step-by-step guide on how to make text appear one by one using animations,…
How To Update Charts In PowerPoint From Excel Automatically
Are you tired of manually updating charts in PowerPoint from Excel every time your data changes? In this tutorial by Regina Griffin, a teacher from Oregon, US, we will explore the importance of automating this process. Learn how to save time, ensure data accuracy, and easily make updates and revisions with just a few simple…
- Tech Gift Ideas for Mom
- Hot Tech Deals at Target Right Now
Copy Slides to Another PowerPoint Presentation
- Brock University
What to Know
- Right-click the thumbnail of the slide to be copied, select Copy , then right-click a blank area of the Slides pane where you want to place it.
- Alternate method: Click-and-drag the thumbnail of the slide you want to copy to the Slides pane of the destination presentation.
- Note: When using the click-and-drag method, the copied slide takes on the design theme of the destination presentation.
This article explains how to copy a slide in PowerPoint from another PowerPoint presentation. Instructions in this article apply to PowerPoint 2019, 2016, 2013, 2010, 2007, 2003, and PowerPoint for Microsoft 365.
Copy and Paste Method in PowerPoint
A quick way to use slides from one presentation in another presentation is to copy the slides that you want to use and paste those slides into the new presentation.
Open both presentations to show them at the same time on the screen. The original presentation contains the slides you plan to copy , and the destination presentation is where they will go. The destination presentation may be an existing presentation or a new presentation.
On the ribbon , go to the View tab.
In the Window group, select Arrange All . In PowerPoint 2003, choose Window > Arrange All from the main menu.
In the Slides pane of the original presentation, right-click the thumbnail of the slide to be copied.
Choose Copy from the shortcut menu.
In the destination presentation, right-click a blank area of the Slides pane where you want to place the copied slide. It can be placed anywhere in the sequence of slides in the presentation.
Choose a Paste option. In PowerPoint 2019, 2016, 2013, and 2010, you have three options:
- Use Destination Theme (H) : The copied slide will use the same theme as the PowerPoint presentation it is pasted into.
- Use Source Formatting (K) : The copied slide will keep the original theme and formatting as the original presentation.
- Picture (U) : The copied slide will be pasted as a graphic into the active slide.
For PowerPoint 2007 and 2003, choose Paste from the shortcut menu.
Click and Drag Method in PowerPoint
If you'd rather use the mouse to copy slides from one presentation to another, follow these steps:
In the Slides pane of the original presentation, select the thumbnail of the desired slide.
Drag the thumbnail to the Slides pane of the destination presentation in the preferred location for the slide.
The pointer changes to indicate the placement of the slide.
Place the slide between two slides or at the end of the presentation.
When you use this method, you don't have the option to choose which theme the newly copied slide will use. The newly copied slide takes on the design theme in PowerPoint (or design template in PowerPoint 2003) of the second presentation.
If you started a new presentation and haven't applied a design theme or design template, the newly copied slide appears on the white background of the default design template.
Get the Latest Tech News Delivered Every Day
- How to Copy a PowerPoint Design Template to Another Presentation
- Use PowerPoint Slide Finder
- How to Merge PowerPoints
- Add, Delete or Change the Order of PowerPoint Slides
- How to Save Sounds From PowerPoint Slideshows
- Slide Layouts in PowerPoint
- How to Use Speaker Notes in PowerPoint
- PowerPoint Master Slide
- How to Select More Than One Slide in PowerPoint
- How to Make a PowerPoint Presentation
- How to Increase PowerPoint Slide Number Size
- End Powerpoint Presentations With a Black Slide
- How to Hide and Unhide a Slide in PowerPoint
- Paste Links for Data, Charts, and Formulas in Excel, Word, PowerPoint
- How to Print PowerPoint Slides
- Use This PowerPoint Template for a Multiple Choice Quiz

Copy and paste a slide master from one presentation to another
You can copy a slide master (and all its associated layouts) you like from one presentation into another.
Copy the slide master from the first presentation
Open both presentations: the one you want to copy a slide master from, and the one you want to paste the slide master into.
In the presentation that has the slide master you want to copy, on the View tab, select Slide Master .

In the slide thumbnail pane, right-click the slide master, and then select Copy .

In the thumbnail pane, the slide master is represented by the larger slide image with a numeral next to it, and the related layout masters are the smaller items subordinate to it (as illustrated above).
Many presentations contain more than one slide master, so you may have to scroll to find the one that you want.
Paste the slide master into the new presentation
On the View tab, select Switch Windows , and then select the presentation that you want to paste the slide master to.
On the View tab, select Slide Master .
In the thumbnail pane, right-click the slide master, and then, under Paste , do one of the following;

When you're finished, select Close Master View .

Need more help?
Want more options.
Explore subscription benefits, browse training courses, learn how to secure your device, and more.

Microsoft 365 subscription benefits

Microsoft 365 training

Microsoft security

Accessibility center
Communities help you ask and answer questions, give feedback, and hear from experts with rich knowledge.

Ask the Microsoft Community

Microsoft Tech Community

Windows Insiders
Microsoft 365 Insiders
Was this information helpful?
Thank you for your feedback.
The Tech Edvocate
- Advertisement
- Home Page Five (No Sidebar)
- Home Page Four
- Home Page Three
- Home Page Two
- Icons [No Sidebar]
- Left Sidbear Page
- Lynch Educational Consulting
- My Speaking Page
- Newsletter Sign Up Confirmation
- Newsletter Unsubscription
- Page Example
- Privacy Policy
- Protected Content
- Request a Product Review
- Shortcodes Examples
- Terms and Conditions
- The Edvocate
- The Tech Edvocate Product Guide
- Write For Us
- Dr. Lynch’s Personal Website
- The Edvocate Podcast
- Assistive Technology
- Child Development Tech
- Early Childhood & K-12 EdTech
- EdTech Futures
- EdTech News
- EdTech Policy & Reform
- EdTech Startups & Businesses
- Higher Education EdTech
- Online Learning & eLearning
- Parent & Family Tech
- Personalized Learning
- Product Reviews
- Tech Edvocate Awards
- School Ratings
8 Ways to Service an Air Conditioner
3 ways to stop a baby from vomiting, 3 ways to save instagram highlights, skills needed for reading comprehension: everything you need to know, how to change the language in android, 3 ways to permanently delete facebook messages, how to tie the sides of a shirt: 8 simple steps, phonics rules: everything you need to know, how to fill a flask: 8 steps, 3 ways to treat skin disease in hamsters, how to copy a powerpoint design template to another presentation.
As a frequent user of Microsoft PowerPoint, you may have come across a scenario where you need to copy a design template from one presentation to another. Doing so can save you valuable time and effort, especially if both presentations require a similar theme, color scheme, or layout.
In this article, we will guide you step-by-step on how to copy a PowerPoint design template to another presentation: Step 1: Open both presentations Firstly, open the PowerPoint presentation that contains the design template you wish to copy. Then, open (or create) the presentation to which you want to copy the design template. Step 2: Choose the slide that contains the design template
On the presentation with the desired design template, choose the slide that contains the template you want to copy. Typically, the first slide or cover slide contains the primary design elements. Step 3: Open the Design tab
Click on the Design tab located on the PowerPoint ribbon at the top of the screen. Step 4: Click on the drop-down arrow under the Themes section Under the Themes section, click on the down arrow to reveal additional options. Step 5: Choose “Browse for Themes” option Select the option “Browse for Themes” at the bottom of the dropdown list. Step 6: Browse and select the presentation with the desired design template Now, locate and choose the presentation that contains the design template you wish to copy. Step 7: Select the design template and click on “Apply”
Once you’ve selected the presentation with the desired design template, choose the template that suits your needs and click on the “Apply” button. Step 8: Verify the new design template Finally, verify that the new design template has been applied successfully. Check the slide master, fonts, and colors to ensure that they match the original presentation.
By following these simple steps, you can quickly copy a PowerPoint design template from one presentation to another with ease. This can save you a significant amount of time, especially when working on multiple presentations that require similar design elements. Use this handy tool to create visually appealing presentations effortlessly.
How to Make a Conference Call With ...
Why online ads follow you around the ....

Matthew Lynch
Related articles more from author.

Tips for Buying Refurbished Computers

How to Find the Sum of All Elements in an Array

How to Find Your Windows Laptop Model Number

How to Get More Bass in Your Car

How to Create and Share a Notebook in OneNote

Do Car Air Purifiers or Ionizers Really Work?
How to Copy a PowerPoint to a New PowerPoint: A Step-by-Step Guide
Copying a PowerPoint to a new PowerPoint is a straightforward task. You simply need to open the original presentation, save it with a new name, and then make the desired changes to the new copy. By doing this, you’ll have two separate PowerPoint files: the original and the copy.
After completing this action, you will have two PowerPoint presentations. The original will remain unchanged, while the copied version can be edited and customized without affecting the original file.
Introduction
Have you ever found yourself needing to duplicate a PowerPoint presentation, perhaps to create a similar one for a different audience or to make significant changes without losing the original? Whatever the reason, it’s a common need in the world of presentations. Copying a PowerPoint to a new PowerPoint can save you time and effort, especially if the new presentation will have similar content or structure. It’s also a valuable skill for anyone who often uses PowerPoint for work, school, or personal projects.
By understanding how to copy a PowerPoint presentation, you can more efficiently create multiple versions of a presentation, experiment with design changes, or prepare multiple presentations for different purposes. This guide will walk you through the simple steps to duplicate your PowerPoint presentation, as well as highlight the advantages and considerations of doing so.
Step by Step Tutorial on How to Copy a PowerPoint to a New PowerPoint
This section will guide you through the process of copying an existing PowerPoint presentation to create a new one.
Step 1: Open the Original PowerPoint Presentation
Open the PowerPoint application and the presentation you want to copy.
By opening the original presentation, you can ensure that all the content you want to duplicate is readily accessible before creating a copy.
Step 2: Save the Presentation with a New Name
Go to ‘File’ > ‘Save As’ and choose a new name and location for your copied presentation.
Saving the original presentation with a new name creates a separate file, allowing you to maintain the original while working on the new copy.
Step 3: Make the Desired Changes to the New Copy
Edit the newly copied presentation to suit your needs, whether it’s changing the content, design, or layout.
Once you’ve created the copy, you can freely make changes without worrying about altering the original presentation. This is the step where you can personalize the new PowerPoint for its intended purpose.
Additional Information
When you’re working on copying a PowerPoint to a new PowerPoint, there are some additional tips and tricks that can further streamline the process. For instance, if you’re looking to copy only specific slides rather than the entire presentation, you can use the ‘Duplicate Slide’ feature. This is particularly useful if the new presentation will only share certain parts with the original.
Another helpful tip is to use the ‘Slide Master’ to ensure that any changes you make to design elements like fonts, colors, and backgrounds are applied consistently across all slides in the new presentation. And remember, always double-check which file you’re working on to avoid accidentally overwriting your original presentation.
- Open the original PowerPoint presentation.
- Save the presentation with a new name.
- Make the desired changes to the new copy.
Frequently Asked Questions
Can i copy only selected slides from a powerpoint presentation.
Yes, you can select specific slides and use the ‘Duplicate Slide’ option to copy them into a new presentation.
Will copying a PowerPoint presentation also copy the animations and transitions?
Yes, copying a presentation preserves all elements, including animations, transitions, and media.
How do I ensure that I don’t overwrite the original presentation?
Always double-check the file name and save the copy with a distinct name in a different location.
Can I copy a PowerPoint presentation to a different version of PowerPoint?
Generally, yes, but some features may not be compatible if you’re moving between significantly different versions.
Is it possible to automate the copying process for multiple presentations?
While there’s no built-in feature for this, you could use macros or third-party tools to automate the copying process.
Copying a PowerPoint to a new PowerPoint is a useful skill that can greatly enhance your productivity and presentation management. Whether it’s for backing up your work, creating variations of a presentation, or simply experimenting with new ideas, understanding how to effectively duplicate your PowerPoint files is an asset.
With the simple steps outlined in this guide, you can confidently tackle this task and keep your presentations organized and efficient. Always remember to manage your files carefully to prevent confusion and to ensure that your original work remains intact. Now that you’ve learned how to copy a PowerPoint, you’re ready to tackle your next presentation project with ease.

Matthew Burleigh has been writing tech tutorials since 2008. His writing has appeared on dozens of different websites and been read over 50 million times.
After receiving his Bachelor’s and Master’s degrees in Computer Science he spent several years working in IT management for small businesses. However, he now works full time writing content online and creating websites.
His main writing topics include iPhones, Microsoft Office, Google Apps, Android, and Photoshop, but he has also written about many other tech topics as well.
Read his full bio here.
Share this:
Join our free newsletter.
Featured guides and deals
You may opt out at any time. Read our Privacy Policy
Related posts:
- How to Save Powerpoint as PDF with Notes
- How to Duplicate a Picture on an iPhone
- Can I Convert My Powerpoint to Google Slides?
- How to Make a Powerpoint Slide Vertical in Powerpoint 2013
- How to Duplicate a Slide in Powerpoint 2010
- How to Change Hyperlink Color in Powerpoint 2010 (An Easy 5 Step Guide)
- How to Loop a Slideshow on Powerpoint 2013
- Can You Save a Powerpoint as a Video in Powerpoint 2013?
- How to Insert Slides from Another Presentation in Powerpoint 2010
- How to Convert a PowerPoint to Word and Edit with Ease
- How to Find and Delete Duplicate Files on a MacBook Air
- How to Start PowerPoint: A Step-by-Step Guide for Beginners
- How to Set Time for Slides in Powerpoint
- How to End Powerpoint on Last Slide in Powerpoint 2010
- How to Change Line Spacing in Powerpoint for Every Slide at Once
- How to Put Embedded Youtube Video in Powerpoint 2010
- How to Make a Powerpoint Into a Video
- Can I Create a Timeline in Powerpoint?
- How to Check Word Count on Powerpoint 2010
- How to Add Page Numbers in Powerpoint 2010
- PC & Mobile
How to Copy Slides to a Different PowerPoint Presentation
Jessie Richardson Read more January 6, 2021
If you’ve created a fantastic PowerPoint presentation, you may want to reuse the slides in the future. Fortunately, this is a pretty straightforward task. With just a few simple clicks, you’ll be able to copy them.

However, there are various other options, like keeping the formatting, which you should know about. In this article, we’ll show you how to copy slides to a different PowerPoint presentation. Plus, we’ll show you some useful PowerPoint hacks.
Copying Slides and Keeping Formatting
The presentations you’re working on can have different styles and themes. Nonetheless, you want to copy slides from one presentation to another, but keep the same formatting. To do so, make sure you open both PowerPoint presentations. For a better view of all slides, under ‘View’ tap on ‘Slide Sorter.’ There you’ll see all the slides from the presentation. All you have to do is select the ones you want to copy.

Depending on what you want to do, you can either select all slides or just specific ones. The commands are different for Mac and Windows users. To select all files:
For Windows users : Ctrl + A
For Mac users : Cmd + A

If you want to select specific slides, this is what you need to do:
Windows users : Ctrl + click
Mac users : Cmd + click

Now that you’ve selected, you can copy by holding Ctrl and C, or Cmd and C for Mac users. Once you do that, head over to the other presentation. To keep the formatting, click on the ‘New slide’ under the ‘Home’ button. Then, click on ‘Reuse Slides.’ You’ll now see a box open on the right side of the presentation, where you can browse the slides from the old presentation and select the ones you want to copy.

The next step is crucial because it allows you to keep the formatting of the old presentation. By ticking the box next to ‘Keep source formatting,’ you ensure the old slides keep the same style and the theme, even though they’re now copied to a new presentation.

Copying Slides Without Source Formatting
If you want to merge slides from different PowerPoint presentations, while keeping the uniformed style and theme, the steps will be different.
As before, open both PowerPoint presentations and select the slides you want to copy. In the presentation where you want them inserted, open ‘Slide Sorter’ for a better view. Here, copy the slides – and that’s it! When you adopt this method, the slides will assume the new presentation style and lose their formatting.

PowerPoint Hacks
Besides being able to copy slides from one presentation to another, there are other hacks and tips you should know. Without further ado, let’s see what these are.
Hack #1: Embedding Fonts
Fonts are a huge part of any PowerPoint presentation as they draw the attention of the audience. If you choose a font that isn’t clear, your audience won’t be able to see the content of the presentation itself. However, another problem may arise when you share your presentation with someone who doesn’t have the font you’ve used in PowerPoint. To avoid this, here’s what you can do:

Now, when another person receives your presentation, they won’t have a problem seeing it, even if they don’t have the same font saved.
Hack #2: Adding Audio
If you want to get a little bit creative with your presentation, you can add audio. To do that, click on ‘Insert’ from the menu bar and then ‘Audio.’ You can now choose whether you want to use something from your computer or online. Once you insert the audio, you’ll see the ‘Playback’ tab. You can now select the starting point of the sound, or choose it to play in the background while you deliver the presentation.

Hack #3: Make Your Presentation a Video
Although PowerPoint presentations can be interesting, many people still prefer to watch videos on a particular topic. Luckily, you can easily turn your presentation into a video. Follow these steps:

Various PowerPoint Options
As you can see, PowerPoint comes with some fantastic options. If you’ve made a really great presentation and want to use some slides in the future, you can do it easily. Moreover, you can choose to keep the formatting if you want.
Besides that, there are some other unique PowerPoint features which can make a huge difference to your presentation. Make sure you check them out the next time you need help. How about you? Are you a fan of PowerPoint presentations? Do you know any other hacks? Why not share them with the rest of the community in the comments section below?
Related Posts

Disclaimer: Some pages on this site may include an affiliate link. This does not effect our editorial in any way.

Lee Stanton March 14, 2024

Digvijay Kumar March 8, 2024

Aman Kumar March 7, 2024
Send To Someone
Missing device.
Please enable JavaScript to submit this form.
How-To Geek
How to copy and paste formatting in microsoft powerpoint.
Use one of these three methods to copy and paste your formatting.
Quick Links
Apply the format painter, use a keyboard shortcut, access the pick up and apply style buttons, key takeaways.
Use the Format Painter tool to copy and paste formatting in PowerPoint. First, select the item you want to copy formatting from. Go to the "Home" tab on the ribbon and click the Format Painter button (it looks like a paintbrush) in the Clipboard section. Finally, click the item you want to apply the selected formatting to.
To keep your slideshow consistent, you may want to use the same formatting for fonts , images, and other slide elements. Rather than adjust every item each time, you can copy and paste formatting in PowerPoint in a few different ways.
We'll show you three methods for copying and pasting formatting for easier slideshow development. As a result, you'll have the flexibility to use the method that's easiest for you or most convenient for the item you're formatting at the time.
The first method for copying and pasting formatting is using the Format Painter . This handy tool is available in other Office applications too, such as Word and Excel.
Related: How to Use the Format Painter to Duplicate Formatting in PowerPoint
Apply the formatting you want to your text box, image, shape, or object. Then, select that item.
Go to the Home tab and the Clipboard section of the ribbon. Select the Format Painter button (a paintbrush).
You'll see your cursor change to include a paintbrush.
Select the item you want to format like the first one. It will update immediately with the same formatting.
To use this method for only certain portions of text, drag through the text with the formatting you want to copy and then select the Format Painter button (paintbrush) again.
Again, you'll see the paintbrush attached to your cursor. Drag through the portion of text you want to apply the formatting to.
You'll then see the text formatting automatically update.
If you're a fan of keyboard shortcuts in PowerPoint for getting things done quickly, you'll be happy to know you can use shortcuts to copy and paste formatting too.
Apply the formatting to your slide element. Then, select that item and press Ctrl+Shift+C on Windows or Shift+Command+C on Mac.
According to Microsoft, these keyboard shortcuts for Mac are available for Microsoft 365 subscribers as of PowerPoint version 16.24.
Next, select the element you want to format the same way and press Ctrl+Shift+V on Windows or Shift+Command+V on Mac.
For specific text, do the same as using the Format Painter. Format the text, drag your cursor through it, and then use the copy format keyboard shortcut.
Drag through the text you want to format the same way, and then use the paste format keyboard shortcut.
Maybe you plan to do a lot of copying and pasting of the formatting in your presentation. If so, we recommend adding the Pick Up and Apply Style buttons to your Quick Access Toolbar or your ribbon.
Related: How to Add New Buttons to the Microsoft Office Ribbon
Using these two buttons, you can pick up the formatting from one item and then apply it to another. A benefit of this method is that the style you pick up remains copied and available for you to apply to additional items. This is convenient for pasting the formatting to several elements or those on other slides.
The easiest spot to place the buttons is in the Quick Access Toolbar, which we'll walk through next. But you can add them to a group in the ribbon if you prefer.
Select the drop-down arrow on the right side of the Quick Access Toolbar to open the menu. Pick "More Commands."
When the PowerPoint Options window opens to the Quick Access Toolbar settings, select "All Commands" in the Choose Commands From drop-down menu.
Locate Pick Up Style in the list on the left and click "Add" to include it in the list on the right. Then, do the same for the Apply Style button. Select "OK" to save your changes.
When you return to your slideshow, you'll see these buttons in the Quick Access Toolbar.
Format your first item and then select the Pick Up Style button (a pen with an arrow pointing up).
Select the item you want to format and click the Apply Style button (a pen with an arrow pointing down).
Your items will then have matching formatting.
For portions of text, use the buttons the same way. Drag through the text you want to copy the formatting from, click the Pick Up Style button, drag through the text you want to paste the formatting onto, and select the Apply Style button.
Related: How to Change an Entire Presentation's Formatting in PowerPoint
When you want to create consistency in your presentation but need to format many elements identically , keep these methods in mind.
- Customer Help
- X (Twitter)
How to Copy Slides from One PowerPoint Presentation to Another?
You’ve just created a stellar PowerPoint presentation for an upcoming meeting. But wait – you remember another presentation with slides that would fit perfectly in this one. If only there was a way to integrate them! Oh, wait. There is. Wondering how to copy slides from one PowerPoint to another? Dive in, and let’s unravel the mystery together.
Step-by-Step Guide: How to Copy Slides from One PowerPoint to Another

- Shortcut: As a shortcut, press Ctrl+C after selecting the slides.
- Navigate to the Destination: Shift to your second presentation – this is your destination presentation.

- Mismatched Slide Numbers: Ensure continuity by adjusting slide numbers through the ‘Insert’ tab, selecting ‘Slide Number’.
- PowerPoint Versions: If you’re using older versions like PowerPoint 2007 or PowerPoint 2013, some methods may slightly vary. Check Microsoft Support for specific instructions.
- Feedback & Further Assistance: If you encounter any issues, remember to give feedback. For comprehensive guides, the “See Also” section in Microsoft Office support can be beneficial. Also, PowerPoint for the web offers a streamlined interface if you’re working online.
- Final Words: Mastering the art of moving slides from one presentation to another can save you time and effort, enhancing your productivity. Whether you use drag and drop, shortcut methods, or repurpose slides, you’ll find this knowledge invaluable.
Transferring PowerPoint slides between presentations is essential for efficient workflow. To copy a slide, start by selecting the slide that you want from one presentation and then paste it into another PowerPoint presentation. Always consider the design theme, and you might choose to use the destination theme for consistency. Utilize tools like SharePoint and OneDrive for streamlined collaboration and storage. By practicing these methods, managing your slides will become a breeze. Happy presenting!
Yes, but be aware that some formatting issues might arise due to version differences.
The animations should copy over, but always review to ensure they function as intended.
Yes, PowerPoint’s fundamental functions remain consistent across Windows and macOS.
It could be due to different design themes applied in each presentation. Adjust via the ‘Design’ tab.
There isn’t a set limit, but copying a vast number of slides may slow down the program temporarily.
You must be logged in to post a comment.
- Business articles (22)
- Google Slides (57)
- Keynote (27)
- PowerPoint (83)
- Support (2)

Copy PowerPoint Slides To Another Presentation
Published: September 11, 2023
Modified: January 8, 2024
Reasons to Copy PowerPoint Slides to Another Presentation
Copying PowerPoint slides from one presentation to another can be a handy tool in a variety of situations. Whether you’re creating a new presentation from scratch or updating an existing one, here are a few reasons why you might find it beneficial to copy slides to another presentation:
- Reusing existing content: If you have slides in a previous presentation that are relevant to your current topic, why start from scratch? By copying them over, you can save time and effort, especially when the content is still accurate and applicable.
- Consistency: Maintaining consistency across multiple presentations is important, particularly for branding purposes or when delivering similar information to different audiences. By copying slides, you can ensure a consistent look, feel, and messaging throughout your presentations.
- Customization: Sometimes, a presentation requires a mixture of new and old slides. By copying existing slides, you can easily customize them to fit the specific needs of your new presentation, making it more relevant and engaging for your audience.
- Team collaborations: When working on a group project or collaborating with colleagues, sharing and copying slides can streamline the process. Each team member can contribute their own slides to a master presentation, enabling everyone to work seamlessly together.
- Revision and updates: Presentations often need updates or revisions over time. Instead of starting from scratch, copying slides from a previous version allows you to retain valuable content while incorporating new information or making necessary changes.
These are just a few of the reasons why you might consider copying PowerPoint slides to another presentation. Now that we’ve explored the benefits, let’s dive into the step-by-step process of how to actually copy slides from one presentation to another.
Step 1: Open Both Presentations
Before you can start copying slides from one PowerPoint presentation to another, you need to have both presentations open on your computer. Follow the steps below to open the presentations:
- Locate the presentations: Find the original presentation from which you want to copy slides, as well as the new presentation where you want to paste the slides. Make sure you know the file names and their saved locations on your computer.
- Launch PowerPoint: Open Microsoft PowerPoint on your computer by double-clicking the PowerPoint icon on your desktop or searching for it in your computer’s applications menu.
- Open the original presentation: In PowerPoint, go to the “File” tab in the top left corner of the screen. Click on “Open” from the dropdown menu and navigate to the location where the original presentation is saved. Select the file and click “Open” to open it in PowerPoint.
- Open the new presentation: With the original presentation open in PowerPoint, go back to the “File” tab and click on “Open” again. This time, navigate to the location where the new presentation is saved. Select the file and click “Open” to open it alongside the original presentation.
By following these steps, you will have both the original presentation and the new presentation open, ready for you to copy slides from one to the other. Now that you have both presentations opened, we can move on to the next step in the process.
Step 2: Select the Slides to be Copied
Once you have both presentations open in PowerPoint, it’s time to select the specific slides that you want to copy from the original presentation. Follow these steps to select the slides:
- Navigate to the slide sorter: In PowerPoint, locate the slide sorter view. You can find it at the bottom of the PowerPoint window, represented by a series of small thumbnails of your slides. Click on the slide sorter view icon to switch to this view.
- Identify the slides: Scroll through the slide thumbnails in the slide sorter view to locate the slides you want to copy. Take note of the slide numbers or visually identify the slides based on their content or layout.
- Select multiple slides: To select multiple slides, click and hold the Ctrl key (or Command key on a Mac) while clicking on the slide thumbnails one by one. This allows you to select non-consecutive slides. If you want to select a consecutive range of slides, click on the first slide, hold down the Shift key, and click on the last slide in the range.
By following these steps, you will be able to select the desired slides from the original presentation. Once you have made the selection, you can move on to the next step, which involves copying the slides.
Step 3: Copy the Slides
After selecting the slides you want to copy from the original presentation, it’s time to make a copy of them. There are multiple methods you can use to copy the slides, depending on your preference and the desired outcome. Here are three common options:
- Option 1: Copy and Paste Method: Once you have selected the slides, you can use the traditional copy and paste method. Right-click on any of the selected slides and choose the “Copy” option from the context menu. Then, navigate to the new presentation, right-click on the desired location where you want to paste the slides, and choose “Paste” from the context menu to copy the slides into the new presentation.
- Option 2: Drag and Drop Method: Another way to copy the slides is by using the drag and drop method. With the selected slides still highlighted, click and hold on one of the selected slides, then drag and drop them onto the slide pane of the new presentation. The slides will be copied to the new presentation at the desired location.
- Option 3: Copy Slide Layout Method: If you only want to copy the layout of the selected slides and not the actual content, you can use the “Copy Slide Layout” method. Right-click on any of the selected slides, choose “Copy” from the context menu, then right-click on the desired location in the new presentation and choose “Paste” > “Paste Special” > “Paste Slide Layout”. This option is useful when you want to maintain a consistent design across multiple presentations.
Choose the method that best suits your needs and the desired outcome. Once you have copied the slides, you can proceed to the next step, which involves pasting the slides into the new presentation.
Option 1: Copy and Paste Method
One of the simplest and most straightforward methods to copy slides from one presentation to another is by using the copy and paste method. This method allows you to easily duplicate the selected slides into the desired location in the new presentation. Follow these steps:
- Select the slides to be copied: In the original presentation, locate and select the slides you want to copy. To select multiple slides, hold down the Ctrl (Command on Mac) key and click on each slide you want to include.
- Copy the slides: Right-click on any of the selected slides and click on “Copy” from the context menu. Alternatively, you can use the keyboard shortcut Ctrl+C (Command+C on Mac) to copy the slides.
- Paste the slides into the new presentation: Switch to the new presentation where you want to paste the slides. Right-click on the desired location or slide thumbnail where you want the copied slides to be inserted. Click on “Paste” from the context menu. Alternatively, you can use the keyboard shortcut Ctrl+V (Command+V on Mac) to paste the slides.
By following these steps, you will successfully copy the selected slides from the original presentation and paste them into the new presentation using the copy and paste method. This option is ideal when you want to transfer the exact content and formatting of the slides from one presentation to another.
Now that you have familiarized yourself with the copy and paste method, you can explore other methods like the drag and drop or copy slide layout methods to copy and customize slides in different ways. Remember to save your new presentation regularly to ensure that your work is not lost.
Option 2: Drag and Drop Method
If you prefer a more interactive approach to copying slides, the drag and drop method provides a convenient way to transfer selected slides from one presentation to another. This method allows you to visually move slides between presentations using your mouse. Follow these steps:
- Select the slides to be copied: Open the original presentation and navigate to the slide sorter view. Locate and select the slides you want to copy by clicking and dragging your mouse over them. You can select multiple slides at once by holding down the Ctrl (Command on Mac) key.
- Drag the selected slides: With the selected slides still highlighted, click and hold your mouse button on any of the selected slides. While holding the mouse button, drag the slides to the slide pane of the new presentation.
- Drop the slides in the new presentation: Release the mouse button to drop the selected slides into the new presentation. You can position them by dragging them to the desired location within the slide pane.
By following these steps, you will be able to copy the selected slides from the original presentation and insert them into the new presentation using the drag and drop method. This option offers an intuitive and visual way to transfer slides, making it easy to rearrange and organize your presentation as needed.
Remember to save your work regularly to ensure that your changes are preserved. Additionally, be mindful of any potential formatting inconsistencies, such as misaligned text or image positioning, that may occur when using the drag and drop method. Review and adjust the copied slides as necessary to maintain a polished and professional presentation.
Option 3: Copy Slide Layout Method
If you want to maintain a consistent design across multiple presentations but don’t necessarily need to copy the specific content of the slides, the “Copy Slide Layout” method is a useful option. This method allows you to copy the layout and formatting of selected slides to the new presentation. Follow these steps:
- Select the slides to copy the layout: Open the original presentation and select the slides whose layout you want to copy. You can select multiple slides by holding down the Ctrl (Command on Mac) key while clicking on the desired slides.
- Copy the slide layout: Right-click on any of the selected slides and click on “Copy” from the context menu. Alternatively, you can use the keyboard shortcut Ctrl+C (Command+C on Mac) to copy the slides.
- Paste the slide layout in the new presentation: Switch to the new presentation where you want to apply the copied slide layout. Right-click on the desired location or slide thumbnail and click on “Paste” > “Paste Special” > “Paste Slide Layout” from the context menu. Alternatively, you can use the keyboard shortcut Ctrl+Alt+V (Command+Option+V on Mac) to access the paste special options and choose “Paste Slide Layout.”
By following these steps, you will copy the layout and formatting of the selected slides from the original presentation to the new presentation. This method is particularly helpful when you want to maintain a consistent design scheme or template across various presentations.
After pasting the slide layout into the new presentation, you can customize the content of the slides according to your needs. Update the text, insert images or charts, and make any necessary adjustments to the layout to ensure that the slides align with the overall goal and content of your new presentation.
Remember to save your progress regularly to preserve your work and have a backup in case of any unexpected disruptions. Additionally, be aware that using the copy slide layout method may result in minor adjustments in position and formatting of the copied layout. It’s always a good practice to review and fine-tune the layout to ensure a polished and cohesive presentation.
Step 4: Paste the Slides to the New Presentation
Once you have selected and copied the desired slides from the original presentation, it’s time to paste them into the new presentation. Follow these steps to paste the slides:
- Switch to the new presentation: If you haven’t already, navigate to the new presentation in PowerPoint. You can do this by clicking on the new presentation’s tab on the taskbar or selecting it from the list of open presentations.
- Select the location to paste the slides: Decide where in the new presentation you want to place the copied slides. You can choose to paste them at the beginning, in the middle, or at the end of the presentation. Alternatively, you can select a specific slide where you want to insert the copied slides.
- Paste the slides: Right-click on the chosen location or the specific slide where you want to insert the copied slides. From the context menu, click on “Paste” or use the keyboard shortcut Ctrl+V (Command+V on Mac) to paste the slides into the new presentation.
- Review and adjust the pasted slides: Once the slides are pasted, take the time to review them and ensure that everything looks as desired in the new presentation. Make any necessary adjustments, such as reordering the slides or modifying the content as needed to fit the context of the new presentation.
By following these steps, you will successfully paste the copied slides into the new presentation. Remember to choose a suitable location to insert the slides and review them to ensure a smooth transition and a cohesive flow within the new presentation.
Now that the slides are successfully pasted into the new presentation, you can proceed to the next step, which involves rearranging and customizing the slides to create a cohesive and engaging presentation.
Step 5: Rearrange and Customize the Slides
After pasting the copied slides into the new presentation, it’s time to rearrange and customize them to create a seamless and engaging flow. Follow these steps to make adjustments:
- Review the order of the slides: Take a moment to assess the order in which the slides are pasted into the new presentation. Consider the logical flow of your content and whether any slides need to be rearranged for better coherence and understanding.
- Rearrange the slides: To rearrange the order of the slides, simply click and drag them to the desired location within the slide pane. You can also use the “Cut” (Ctrl+X or Command+X) and “Paste” (Ctrl+V or Command+V) commands to move slides to a different position.
- Customize the content: Edit the content of the pasted slides to make them relevant and aligned with the new presentation’s topic and objectives. Update text, replace images, modify charts, and make any necessary revisions to ensure consistency and coherence with the overall presentation.
- Modify the design and formatting: Adjust the design and formatting aspects of the slides to match the visual style of the new presentation. This includes updating fonts, colors, backgrounds, and applying consistent formatting across all slides for a cohesive appearance.
- Add transitions or animations: Enhance the visual appeal and flow of your presentation by adding appropriate slide transitions and animations. Use these effects sparingly and purposefully to avoid distractions and ensure that they complement the content.
By following these steps, you can effectively rearrange and customize the pasted slides to create a well-organized and visually appealing presentation. The goal is to ensure that the content and design of the slides align with the overall theme and message you want to convey to your audience.
Remember to take your time with this step, as it is crucial for developing a polished and impactful presentation. Regularly review your progress and make necessary adjustments to optimize the flow and visual coherence of your slides.
Now that you have rearranged and customized the slides, you can proceed to the final step—saving the new presentation.
Step 6: Save the New Presentation
After putting in the effort to copy, paste, rearrange, and customize the slides in the new presentation, it’s important to save your work to ensure that your progress is preserved. Follow these steps to save the new presentation:
- Go to the “File” menu: Click on the “File” tab located in the top left corner of the PowerPoint window. This will open the file menu with a variety of options.
- Select “Save As”: In the file menu, click on the “Save As” option. This will open the save dialog box.
- Choose a location: Navigate to the folder or directory where you want to save the new presentation. You can select an existing folder or create a new folder to keep your presentations organized.
- Provide a filename: Enter a descriptive and meaningful filename for the new presentation. This will help you easily identify and locate it in the future.
- Select a file format: Choose the appropriate file format for your presentation. The default format, .pptx (PowerPoint Presentation), is widely compatible and recommended for most situations.
- Click “Save”: Once you have chosen the location, filename, and file format, click on the “Save” button to save the new presentation.
By following these steps, you will successfully save the new presentation with all the copied, rearranged, and customized slides. It’s always a good idea to save your progress periodically throughout the creation process to avoid losing any changes or data.
Remember to regularly back up your presentations by saving them to external storage devices or cloud storage platforms for added security and peace of mind.
Now that you have saved the new presentation, you can confidently proceed to rehearsing and delivering your impactful slideshow.
Additional Tips and Tricks
While following the steps to copy PowerPoint slides to another presentation, here are some additional tips and tricks to enhance your workflow and optimize the overall process:
- Use slide layouts: Instead of copying entire slides, consider creating reusable slide layouts with placeholders for content. This way, you can easily apply consistent formatting and design elements to new slides in different presentations without the need for extensive copying and pasting.
- Check for compatibility: Before copying slides from one presentation to another, ensure that both presentations are using compatible versions of PowerPoint. This will prevent any potential formatting or content issues that may arise from compatibility conflicts.
- Trim unnecessary elements: When copying slides, you may encounter unnecessary elements like hidden slides or speaker notes. Take the time to trim out any extraneous content to keep your presentation streamlined and focused.
- Double-check formatting: After pasting the slides into the new presentation, review the formatting and ensure that elements such as fonts, colors, and alignment are consistent throughout. This attention to detail will contribute to a polished and professional presentation.
- Consider file size: If your presentation includes media files or large images, be mindful of the resulting file size. Compress images and optimize media to keep the file size manageable, which can be beneficial when sharing or delivering the presentation.
- Save a copy of the original presentation: Prior to making any changes or copying slides, it’s a good practice to save a copy of the original presentation as a backup. This way, you can always refer back to the original if needed.
- Proofread and edit: As you rearrange and customize the slides, take the opportunity to proofread and edit the content for clarity, grammar, and accuracy. A well-edited presentation will leave a positive impression on your audience.
By utilizing these additional tips and tricks, you can streamline the process of copying PowerPoint slides to another presentation and create impactful presentations efficiently.
Remember, practice makes perfect. Explore different methods, experiment with layouts and designs, and find what works best for your specific needs and style. With time and experience, you’ll become more proficient in copying and customizing slides, allowing you to create visually appealing and engaging presentations.

Related Stories
How To Insert A Copyright Symbol Or Emoji On A PowerPoint Slide
How To Copy A PowerPoint Design Template To Another Presentation
How To Print PowerPoint Slides With Notes
How To Use Microsoft’s Free PowerPoint Viewers
How To Select Multiple Slides In PowerPoint
How To Use Speaker Notes In PowerPoint
How To Print PowerPoint Slides
How To Share A PowerPoint On Zoom

Enhancing Employee Integration for Efficiency

Understanding SA Interest Rates

Revolutionizing Lead Generation: How Software Solutions Are Redefining Sales Strategies

The Benefits of E-Transfer Loans

Making The Right Choice While Buying A Property

Top 100 Christmas Songs for the Best Christmas Music

The Life and Career of Dean Haglund: A Journey from Canada to the Paranormal and Beyond

16 Best Ad Blocker For Every Browser and Device

Different Types of Aesthetics: 30 Outfit Ideas to Step Up Your OOTD Game

Watch Guide: 20 Best Limited Series on Netflix

- SUGGESTED TOPICS
- The Magazine
- Newsletters
- Managing Yourself
- Managing Teams
- Work-life Balance
- The Big Idea
- Data & Visuals
- Reading Lists
- Case Selections
- HBR Learning
- Topic Feeds
- Account Settings
- Email Preferences
How to Make a “Good” Presentation “Great”
- Guy Kawasaki

Remember: Less is more.
A strong presentation is so much more than information pasted onto a series of slides with fancy backgrounds. Whether you’re pitching an idea, reporting market research, or sharing something else, a great presentation can give you a competitive advantage, and be a powerful tool when aiming to persuade, educate, or inspire others. Here are some unique elements that make a presentation stand out.
- Fonts: Sans Serif fonts such as Helvetica or Arial are preferred for their clean lines, which make them easy to digest at various sizes and distances. Limit the number of font styles to two: one for headings and another for body text, to avoid visual confusion or distractions.
- Colors: Colors can evoke emotions and highlight critical points, but their overuse can lead to a cluttered and confusing presentation. A limited palette of two to three main colors, complemented by a simple background, can help you draw attention to key elements without overwhelming the audience.
- Pictures: Pictures can communicate complex ideas quickly and memorably but choosing the right images is key. Images or pictures should be big (perhaps 20-25% of the page), bold, and have a clear purpose that complements the slide’s text.
- Layout: Don’t overcrowd your slides with too much information. When in doubt, adhere to the principle of simplicity, and aim for a clean and uncluttered layout with plenty of white space around text and images. Think phrases and bullets, not sentences.
As an intern or early career professional, chances are that you’ll be tasked with making or giving a presentation in the near future. Whether you’re pitching an idea, reporting market research, or sharing something else, a great presentation can give you a competitive advantage, and be a powerful tool when aiming to persuade, educate, or inspire others.
- Guy Kawasaki is the chief evangelist at Canva and was the former chief evangelist at Apple. Guy is the author of 16 books including Think Remarkable : 9 Paths to Transform Your Life and Make a Difference.
Partner Center
How to Change PowerPoint to Portrait? A Step-by-Step Guide
Table of contents.
PowerPoint slides typically use a landscape orientation, where the width of the slide is wider than its height. This layout has become the norm for presentations because it matches the shape of many projectors and computer screens, ensuring that your content looks its best when displayed to your audience.
Landscape and Portrait Slide Sizes?
In PowerPoint, slides are typically set to Landscape orientation by default, coming in two sizes:
- Standard : 4:3 ratio (10×7.5 inches)
- Widescreen : 16:9 ratio (13.33×7.5 inches)
For Portrait slides, the default size is 10×5.626 inches.
Landscape orientation provides a wider space for your content, making it great for including visuals like images, charts, graphs, and tables. The text flows naturally from left to right, which is easier for viewers to read and understand.
On the other hand, Portrait orientation has a taller, narrower layout, with the height exceeding the width. While it’s not as common in presentations, Portrait orientation might be useful for specific situations where a different layout is needed.
How to Change PowerPoint to Portrait
On windows:.
Step 1 – Open your presentation: Launch Microsoft PowerPoint and open the presentation you want to modify.
Step 2 – Access the Design tab: Locate the ribbon at the top of the PowerPoint window. Click on the “Design” tab.
Step 3 – Find the Slide Size options: Within the “Design” tab, look for the “Customize” group on the right-hand side. Click the dropdown menu under the label “Slide Size.”
Step 4 – Choose “Custom Slide Size”: Several pre-defined sizes will appear. Instead of selecting one of those, choose the option at the very bottom: “Custom Slide Size.”
Step 5 – Set Orientation to Portrait: A new window titled “Slide Size” will pop up. Under the “Orientation” section, you’ll see two radio buttons: “Landscape” (which is the default) and “Portrait.” Click the radio button next to “Portrait” to switch the orientation.
Step 6 – Click “OK”: Once you’ve chosen “Portrait,” simply click the “OK” button at the bottom of the “Slide Size” window.
Step 7 – Choosing Between “Maximize” and “Ensure Fit”
After clicking “OK” in the previous step, PowerPoint might prompt you with a choice between two options:
- Maximize: This option enlarges your existing slide content to fill the entire portrait space. However, this may cause some elements to appear distorted or cut off.
- Ensure Fit: This option shrinks your slide content to fit proportionally within the portrait layout. This ensures everything stays visible but may leave extra blank space around the edges.
- Open your PowerPoint presentation.
- Go to the File menu and select Page Setup.
- In the “Page Setup” dialog box, under Orientation, choose Portrait. You can also adjust the width and height values here if needed.
Recommendations:
- For presentations intended to be shown on a screen: Choose “Maximize” to utilize the full portrait area. Text and images might need slight adjustments to avoid being cropped.
- For printing handouts or notes: Opt for “Ensure Fit” to guarantee all content remains visible on the printed page, even if there’s extra space.
Are you a Google Slides user? Check our guide on How To Make Google Slides Vertical here !
How to Make a Single Slide Portrait in PowerPoint?
While PowerPoint doesn’t directly support both orientations within a single file, you can achieve this by linking separate presentations. Here’s how:
Step 1: Open your landscape presentation.
Step 2: Navigate to the slide where you want to insert the link.
Step 3: Add a text box or select existing text to act as the link.
Step 4: Go to Insert > Action.
Step 5: Choose between “Mouse Click” (triggers when you click the text) or “Mouse Over” (triggers when you hover over the text).
Step 6: Select “Hyperlink to:” and choose “Other PowerPoint Presentation” from the dropdown.
Step 7: Locate and select your portrait presentation. Then in “Hyperlink to Slide”, select the slide you want to start from.
Step 8: Click “OK.”
Now, during your presentation, clicking (or hovering, if you chose Mouse Over) the designated text will seamlessly switch to your portrait presentation.
Remember these things while linking the presentation :
- Ensure both presentations are saved in the same folder to avoid broken links.
- Consider using a clear call to action on the linked text, like “Click here for details” or “View data in portrait mode.”
Benefits of Portrait Orientation
There are several reasons why you might need to change the orientation to portrait:
1. Enhanced Viewing Experience
- Vertical Content Suitability : Documents, articles, and social media feeds primarily consist of text, making portrait orientation more efficient in utilizing the screen’s height. This allows for better readability with fewer scrolls needed to view content.
- Focused Viewing : Portrait orientation gives a better view of vertical content like portraits or tall buildings, allowing you to focus on the details without distractions.
2. Considering Device Limits
- Comfortable Handheld Use : Holding a phone or tablet in portrait orientation is often more comfortable for long periods.
- Optimized Screen Space : On smaller screens, portrait orientation might be the only way to see everything without zooming or scrolling sideways.
3. Tailoring to Application Needs
- App-Specific Design : Certain applications are primarily designed for portrait orientation, and using them in landscape mode may result in functionality or display issues.
- Seamless Reading Experience : Many ebooks and webcomics are formatted for vertical scrolling, making portrait orientation preferable for a smooth and uninterrupted reading experience.
Tips for Creating Visually Appealing Portrait Slides
Choosing the Right Images:
- Pick clear, well-lit portraits without blurriness or pixelation.
- Make sure the images match the slide content, avoiding generic stock photos.
- Select portraits that convey emotions and resonate with the audience, considering facial expressions and mood.
- Aim for diversity by including various genders, ethnicities, ages, and backgrounds.
Composition and Design:
- Crop images strategically to highlight the subject’s face and remove distracting background elements.
- Position portraits carefully within the slide layout for balance.
- Use empty space effectively to avoid clutter and draw attention to the portrait.
- Coordinate the color scheme of the portrait with other slide elements.
Text and Content:
- Keep text brief on the portrait slide to avoid overshadowing the image.
- Choose a clear, readable font that matches the overall style.
- Place text thoughtfully to ensure important parts of the portrait are visible.
Additional Considerations:
- Use filters sparingly to enhance the mood without compromising image quality.
- Consider adding subtle overlays or textures for visual interest.
- Maintain a consistent visual style for a professional look.
Closing Thoughts
Changing PowerPoint to portrait orientation is a straightforward process that lets you customize your presentations to fit different purposes. Whether you’re making a vertical infographic or getting slides ready for a poster presentation, these steps will help you easily switch between landscape and portrait orientations in Microsoft PowerPoint.
Frequently Asked Questions
Why change slide orientation in powerpoint.
While landscape dominates presentations, switching to portrait in PowerPoint can be beneficial for showcasing tall content like portraits and infographics, creating handouts, adapting to specific screens, or adding visual variety. However, this format has limitations – you can’t mix orientations and content might require adjustments. Choose the orientation that best suits your content and presentation goals.
Can I mix Portrait and Landscape slides in one presentation?
While directly combining them isn’t possible, you can achieve a similar effect. Here’s how:
Create two separate presentations: One in landscape and another in portrait.
Link the presentations: Insert hyperlinks in your main presentation (landscape) to specific slides in the portrait presentation.
Does changing one slide’s orientation affect the whole presentation?
Yes. By default, all slides in a presentation share the same orientation (landscape or portrait). Changing one slide’s orientation will automatically adjust the entire presentation to match.
Can I revert my portrait PowerPoint back to landscape?
Yes, you can easily revert to landscape by adjusting the slide size settings.
Are there specific templates designed for portrait presentations?
Some templates are optimized for portrait mode, or you can customize existing ones.
Is there a quick way to switch between Landscape and Portrait in PowerPoint?
Unfortunately, there’s no single shortcut key to change the entire presentation’s orientation. However, you can access the orientation settings through the following methods:
- Go to the “Design” tab. In the “Customize” section, you’ll find the “Slide Size” option. Clicking the dropdown menu allows you to choose between Landscape and Portrait.
- Right-click on any slide. Select “Size and Layout” from the context menu. A window will appear where you can choose the desired orientation.
How to put PowerPoint in portrait mode for handouts?
In Print settings under “Handouts,” choose a portrait layout option like “2 Slides per Page (Portrait)” to display your slides in portrait on printed handouts.
What happens to my existing content if I change the orientation to portrait?
PowerPoint will attempt to scale your existing content to fit the new orientation. However, depending on the amount of content and its layout, adjustments might be necessary to ensure everything displays correctly.
Will my presentation work on all projectors if it’s in portrait orientation?
While most modern projectors can handle portrait presentations, some older models might have limitations. It’s recommended to test your presentation on the specific projector beforehand if unsure.
Save Time and Effortlessly Create Presentations with SlidesAI

Search for: Search Button
- Share a link to a specific PowerPoint slide
There’s a way to link someone to view a specific slide in a PowerPoint presentaion which is a lot faster than hunting through a big slide deck.
Requirements
Link to this slide, check the share permissions, sharing settings, edit / view only / no download, or there’s another way ….
Providing a direct link to a specific part of your slideshow not only streamlines the process of receiving feedback but also enables them to locate the content you want them to review more efficiently.
PowerPoint simplifies the process with its “Link to This Slide” feature, generating a direct link that opens the file at the specific slide in your presentation.
The presentation has to be saved in cloud storage that the receiver/s can also access it. If the presentation isn’t already saved online, modern Office will help you do that.
Launch PowerPoint presentation stored on your local drive. Next, navigate to the specific slide you wish to share. Then, right-click on the desired slide and a shortcut menu pops up. From this menu, select the option “Link To This Slide” to generate a direct link to the chosen slide within your presentation.

Selecting “Share Link To This Slide,” will prompt you to upload your presentation to OneDrive to allow sharing.

Office just dumps the file into your OneDrive account, you’ll probably want to choose a specific folder instead.
Once the presentation is saved in a cloud location, you can share it or a slide. Do that from PowerPoint on the web or modern PowerPoint for Windows/Mac. Click on the slide in the slide navigator and select the “Link To This Slide” option.

The system generates a direct link that is ready to be shared but before you copy , check what permissions you’re giving to access the presentation and to whom.
Under the link is a short note to indicate the sharing settings for the current link. Click on Settings to change or verify the sharing. Or select the copy option, and you’ll receive a notification confirming that the link has been copied.

For more specific access privileges, go to the Settings option to customize permissions for reviewers or audience. You can choose with whom you want to share your files. This typically involves setting access permissions or sharing settings with user or user groups.
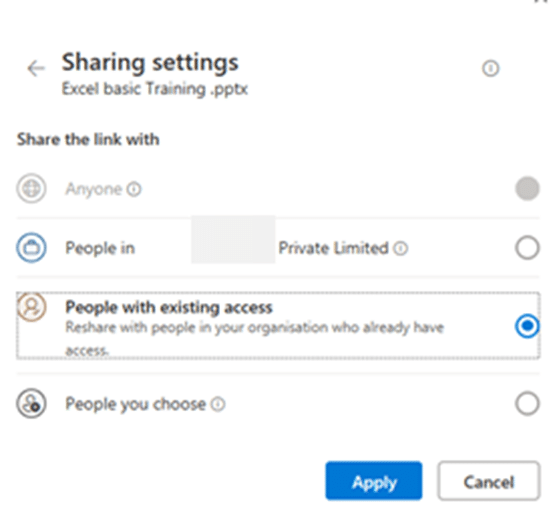
The sharing settings can include any of the following options, depending on the type of account (personal, business etc).
“Anyone With The Link Can Edit.” – permits anyone with access to the link to edit the slide’s content. This functionality facilitates effective collaboration and sharing among teams or groups. Opting for this setting grants editing privileges to anyone possessing the link.
“People in the Organization – accessible by the organization with the privileges to access the link.
“People you choose – selectively available.
Customize the access privileges more from the More Settings option, where you can define specific permissions, such as editing, viewing, and downloading for reviewers or audience.
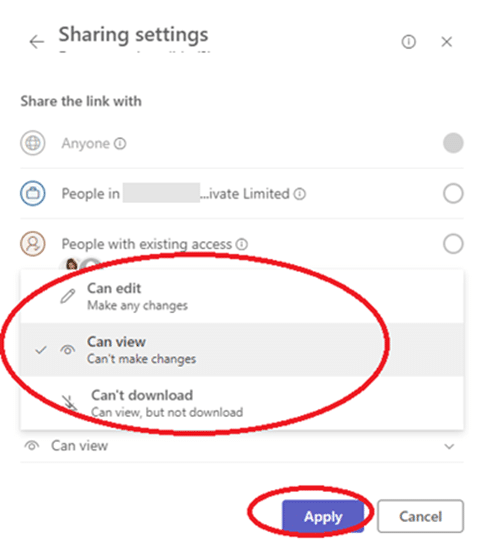
Finalize the process by clicking on the “Apply” button ensuring that the changes take effect according to your preferences.
Once you’ve configured the access privileges and applied the changes, you can proceed to share the link via email to the intended audience. Simply copy the link generated by the sharing feature and paste it into your email or other message.

At risk of stating the obvious, there’s another way to share a single slide with ‘read only’ access.

Take a screen shot of the slide and paste it into an email or message.
Using Designer for more eye-catching PowerPoint slides PowerPoint Cameo puts your video selfie into a slide Reuse slides in PowerPoint, the good and the annoying
About this author

Mayurakshi Mohapatra
Office 2021 - all you need to know . Facts & prices for the new Microsoft Office. Do you need it? Office LTSC is the enterprise licence version of Office 2021.
Office 2024 what's known so far plus educated guesses. Microsoft Office upcoming support end date checklist.
Latest from Office Watch
- Coin 🪙 emoji in Word, Excel, PowerPoint and Outlook
- Translate automatic or manual in Outlook
- Microsoft Mesh makes “magical” online meetings
- Why are Teams and Office divorcing?
- Pivotby – Excel’s new faster PivotTables
- More Excel on the web improvements
- All about editing an incoming Outlook message
- What “Update License” means on Microsoft 365 menus
- Excel’s warning about dates and centuries
- Write Excel formulas fast with free Copilot
- Easter images and icons in Microsoft Office
- Credit Card 💳 symbol in Word, Excel, PowerPoint and Outlook
- Yes, there will be a new version of Microsoft Office
- All about Office 2024 for Windows and Mac (so far)
- In person vs virtual event option coming to Outlook
- Checklists now in Microsoft Word
- Start Grouping in Excel for better looking sheets
- Three more Word features reach the web version
- Web link previews in Word for web
IMAGES
VIDEO
COMMENTS
Open both presentations: the one you want to copy a slide master from, and the one you want to paste the slide master into. In the presentation that has the slide master you want to copy, on the View tab, select Slide Master. In the slide thumbnail pane, right-click the slide master, and then select Copy. Notes: In the thumbnail pane, the slide ...
What to Know. In the source presentation, select View > Slide Master. In the Slide pane, right-click the Slide Master and select Copy. Go to View > Switch Windows and choose the second presentation. Go to View > Slide Master. Right-click the Slide pane and select Paste. Choose Use Destination Theme (keeps colors, fonts, and effects) or Keep ...
Follow these steps: Open both PowerPoint presentations - the one with the design template you want to copy and the one you want to paste it into. In the presentation with the template go to View > Slide Master. In the left pane, right-click on the Slide Master thumbnail image and select Copy. Copy slide master.
If you want to copy the design from one slide to another while maintaining its original formatting, you can use the "Paste Special" function in PowerPoint. Simply select the slide with the design, click on the "Copy" button, then go to the slide you want to paste the design onto and click on the small arrow under the "Paste" button.
Open the PowerPoint file that contains the slide you want to copy. Tap "View" and set the presentation view to "Normal" to see the thumbnails for each slide. Locate the slide that you'd ...
In PowerPoint 2003, choose Window > Arrange All from the main menu. In the Slides pane of the original presentation, right-click the thumbnail of the slide to be copied. Choose Copy from the shortcut menu. In the destination presentation, right-click a blank area of the Slides pane where you want to place the copied slide.
Right-click on the selected slides and choose "Copy" or press Ctrl+C. The slides are now saved in the clipboard, ready to be pasted into the destination. Inserting old slides into the new design. In the new presentation, position your cursor where you want to insert the copied slides. Right-click and select "Use Destination Theme (D).".
Open the PowerPoint presentation containing the slides you want to copy. Click View. Select Normal. To select consecutive slides, in the left-hand pane of thumbnails, click the first slide you ...
Step 3: Right-click on the selected slide (s) and choose "Copy". After selecting the slide (s) that have the desired design template in the source presentation, the next step is to copy them to the clipboard. This will allow you to transfer the design elements to the target presentation effortlessly. To copy the selected slide (s), right ...
On the left side, right click on the slide and click on Copy. Now go to your presentation. Right click on the space between the slides on the left side of PowerPoint, where you want to copy the slide. Under Paste Options. Select one of the 3 options:
Open both presentations: the one you want to copy a slide master from, and the one you want to paste the slide master into. In the presentation that has the slide master you want to copy, on the View tab, select Slide Master. In the slide thumbnail pane, right-click the slide master, and then select Copy. Notes: In the thumbnail pane, the slide ...
Step 5: Choose "Browse for Themes" option. Select the option "Browse for Themes" at the bottom of the dropdown list. Step 6: Browse and select the presentation with the desired design template. Now, locate and choose the presentation that contains the design template you wish to copy. Step 7: Select the design template and click on ...
Step 2: Save the Presentation with a New Name. Go to 'File' > 'Save As' and choose a new name and location for your copied presentation. Saving the original presentation with a new name creates a separate file, allowing you to maintain the original while working on the new copy.
Open the good Presentation you like. Navigate to View > Layouts. Select one or multiple slides in your master layout outline, right-click and choose "Copy". Open the not-so-good Presentation. Navigate to View > Layouts. Perform a paste (CTRL+V or ⌘ + V) and viola! Lastly, move the layout around as needed and delete out any unwanted ones.
For Windows users: Ctrl + A. For Mac users: Cmd + A. If you want to select specific slides, this is what you need to do: Windows users: Ctrl + click. Mac users: Cmd + click. Now that you've ...
Key Takeaways. Use the Format Painter tool to copy and paste formatting in PowerPoint. First, select the item you want to copy formatting from. Go to the "Home" tab on the ribbon and click the Format Painter button (it looks like a paintbrush) in the Clipboard section. Finally, click the item you want to apply the selected formatting to.
Executing the Copy Command. Right-Click Method: Simply right-click the highlighted slide or slides and select "Copy". Shortcut: As a shortcut, press Ctrl+C after selecting the slides. Pasting into the New Presentation. Navigate to the Destination: Shift to your second presentation - this is your destination presentation.
Option 3: Copy Slide Layout Method: If you only want to copy the layout of the selected slides and not the actual content, you can use the "Copy Slide Layout" method. Right-click on any of the selected slides, choose "Copy" from the context menu, then right-click on the desired location in the new presentation and choose "Paste ...
More on that in another article. How to Use and Change Layouts in PowerPoint. To use layouts in PowerPoint, first go to the Home tab in the PowerPoint ribbon. In the Slides section, you'll find the Layout button. ... Before adding a layout to your PowerPoint presentation, you can either select the slide where you want to change the layout, or ...
Summary. A strong presentation is so much more than information pasted onto a series of slides with fancy backgrounds. Whether you're pitching an idea, reporting market research, or sharing ...
Step 2 - Access the Design tab: Locate the ribbon at the top of the PowerPoint window. Click on the "Design" tab. Click on the "Design" tab. Step 3 - Find the Slide Size options: Within the "Design" tab, look for the "Customize" group on the right-hand side.
Launch PowerPoint presentation stored on your local drive. Next, navigate to the specific slide you wish to share. Then, right-click on the desired slide and a shortcut menu pops up. From this menu, select the option "Link To This Slide" to generate a direct link to the chosen slide within your presentation.