This browser is no longer supported.
Upgrade to Microsoft Edge to take advantage of the latest features, security updates, and technical support.

Assign Azure resource roles in Privileged Identity Management
- 19 contributors
With Microsoft Entra Privileged Identity Management (PIM), you can manage the built-in Azure resource roles, and custom roles, including (but not limited to):
- User Access Administrator
- Contributor
- Security Admin
- Security Manager
Users or members of a group assigned to the Owner or User Access Administrator subscription roles, and Microsoft Entra Global administrators that enable subscription management in Microsoft Entra ID have Resource administrator permissions by default. These administrators can assign roles, configure role settings, and review access using Privileged Identity Management for Azure resources. A user can't manage Privileged Identity Management for Resources without Resource administrator permissions. View the list of Azure built-in roles .
Privileged Identity Management support both built-in and custom Azure roles. For more information on Azure custom roles, see Azure custom roles .
Role assignment conditions
You can use the Azure attribute-based access control (Azure ABAC) to add conditions on eligible role assignments using Microsoft Entra PIM for Azure resources. With Microsoft Entra PIM, your end users must activate an eligible role assignment to get permission to perform certain actions. Using conditions in Microsoft Entra PIM enables you not only to limit a user's role permissions to a resource using fine-grained conditions, but also to use Microsoft Entra PIM to secure the role assignment with a time-bound setting, approval workflow, audit trail, and so on.
When a role is assigned, the assignment:
- Can't be assigned for a duration of less than five minutes
- Can't be removed within five minutes of it being assigned
Currently, the following built-in roles can have conditions added:
- Storage Blob Data Contributor
- Storage Blob Data Owner
- Storage Blob Data Reader
For more information, see What is Azure attribute-based access control (Azure ABAC) .
Assign a role
Follow these steps to make a user eligible for an Azure resource role.
Sign in to the Microsoft Entra admin center as at least a User Access Administrator .
Browse to Identity governance > Privileged Identity Management > Azure resources .
Select the resource type you want to manage. Start at either the Management group dropdown or the Subscriptions dropdown, and then further select Resource groups or Resources as needed. Click the Select button for the resource you want to manage to open its overview page.

Under Manage , select Roles to see the list of roles for Azure resources.
Select Add assignments to open the Add assignments pane.

Select a Role you want to assign.
Select No member selected link to open the Select a member or group pane.

Select a member or group you want to assign to the role and then choose Select .

On the Settings tab, in the Assignment type list, select Eligible or Active .

Microsoft Entra PIM for Azure resources provides two distinct assignment types:
Eligible assignments require the member to activate the role before using it. Administrator may require role member to perform certain actions before role activation, which might include performing a multi-factor authentication (MFA) check, providing a business justification, or requesting approval from designated approvers.
Active assignments don't require the member to activate the role before usage. Members assigned as active have the privileges assigned ready to use. This type of assignment is also available to customers that don't use Microsoft Entra PIM.
To specify a specific assignment duration, change the start and end dates and times.
If the role has been defined with actions that permit assignments to that role with conditions, then you can select Add condition to add a condition based on the principal user and resource attributes that are part of the assignment.

Conditions can be entered in the expression builder.

When finished, select Assign .
After the new role assignment is created, a status notification is displayed.

Assign a role using ARM API
Privileged Identity Management supports Azure Resource Manager (ARM) API commands to manage Azure resource roles, as documented in the PIM ARM API reference . For the permissions required to use the PIM API, see Understand the Privileged Identity Management APIs .
The following example is a sample HTTP request to create an eligible assignment for an Azure role.
Request body
Status code: 201
Update or remove an existing role assignment
Follow these steps to update or remove an existing role assignment.
Open Microsoft Entra Privileged Identity Management .
Select Azure resources .
Under Manage , select Roles to list the roles for Azure resources. The following screenshot lists the roles of an Azure Storage account. Select the role that you want to update or remove.

Find the role assignment on the Eligible roles or Active roles tabs.

To add or update a condition to refine Azure resource access, select Add or View/Edit in the Condition column for the role assignment. Currently, the Storage Blob Data Owner, Storage Blob Data Reader, and Storage Blob Data Contributor roles in Microsoft Entra PIM are the only roles that can have conditions added.
Select Add expression or Delete to update the expression. You can also select Add condition to add a new condition to your role.

For information about extending a role assignment, see Extend or renew Azure resource roles in Privileged Identity Management .
- Configure Azure resource role settings in Privileged Identity Management
- Assign Microsoft Entra roles in Privileged Identity Management
Coming soon: Throughout 2024 we will be phasing out GitHub Issues as the feedback mechanism for content and replacing it with a new feedback system. For more information see: https://aka.ms/ContentUserFeedback .
Submit and view feedback for
Additional resources
- Privacy Policy

Select Page
Step-by-Step guide to setup temporally privilege access using Azure AD Privileged Identity Management
Posted by Dishan M. Francis | Sep 13, 2018 | Azure , Azure Active Directory | 1 |
Last Updated on September 26, 2018 by Dishan M. Francis
Just-in-Time Administrations protects high-privileged accounts been compromised. Administrators will have their privileges when they “ required ”. It minimizes the lateral movements of identity attack. Azure AD PIM allows to create time-based temporally admin accounts. In this demo I am going to demonstrate how to create time-based admin accounts in azure using PIM. If you are new to privilege identity management, I highly recommend to check my previous blog post about it. you can access it using https://www.rebeladmin.com/2016/07/step-step-guide-azure-ad-privileged-identity-management-part-1/
In my demo environment I have a user called Isaiah Langer from finance department. At the end of every month this user runs some reports which required admin privileges. I do not want to make this user a permanent global administrator. I like to give these privileges when “required”. Let’s see how we can configure it.
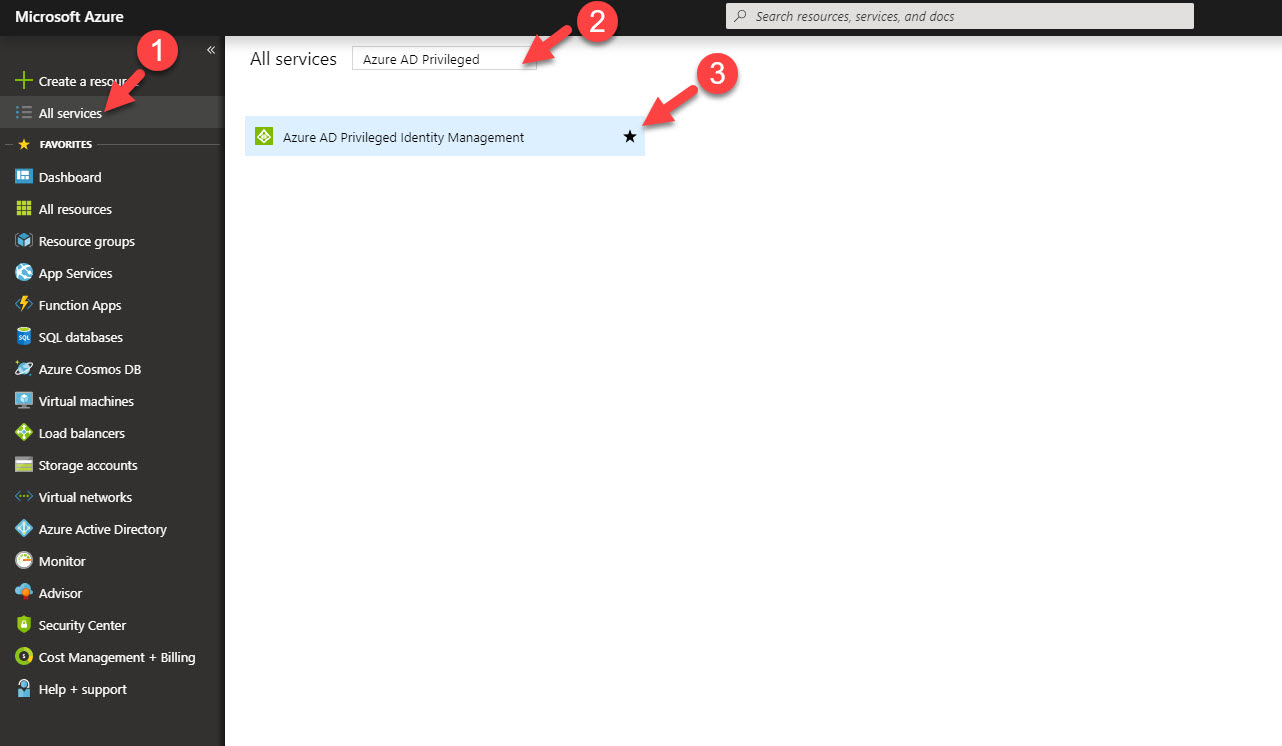
1. Log in to Azure portal https://portal.azure.com as global admin.
2. Click on More Services from the left-hand panel and search for Azure AD PIM .
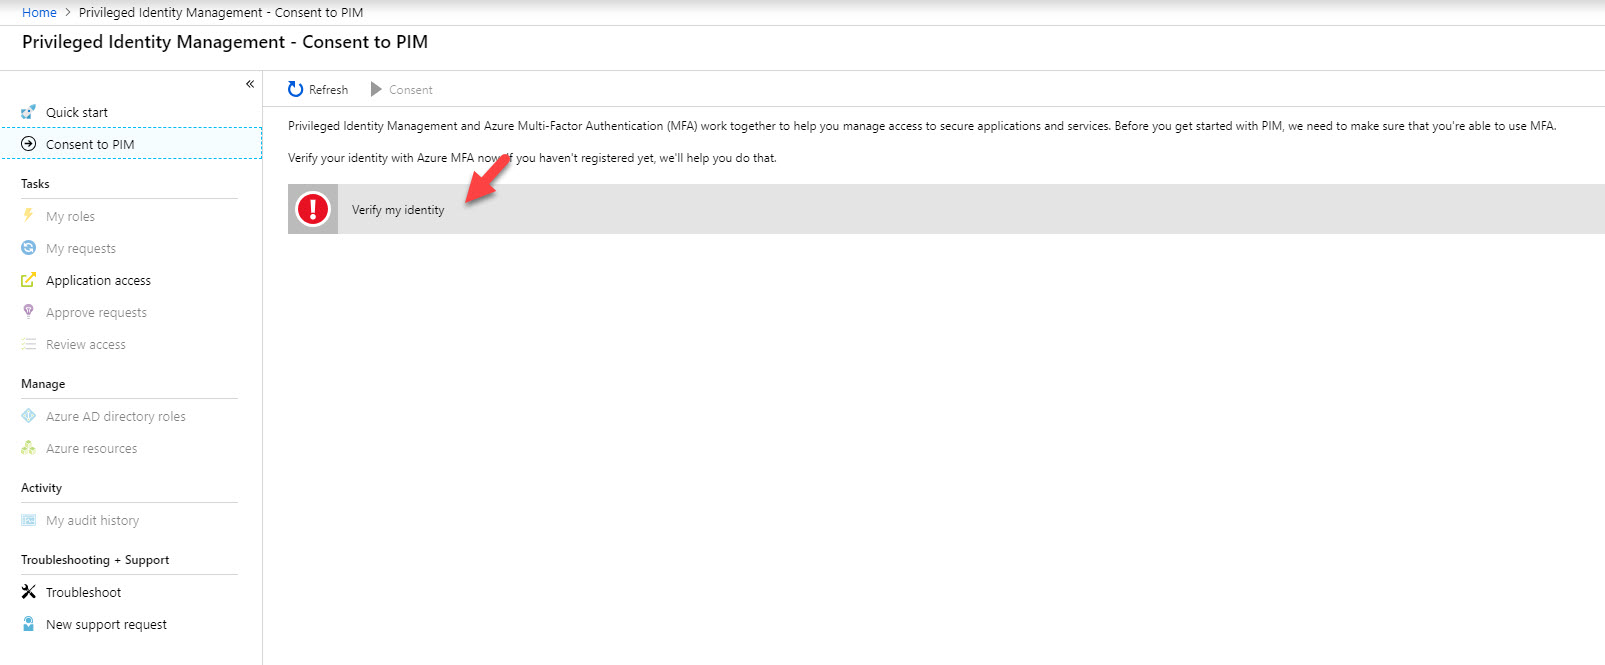
3. In first window it asks me to verify my MFA before proceed. This is because I do not have MFA setup for my account. Click on verify my identity option.
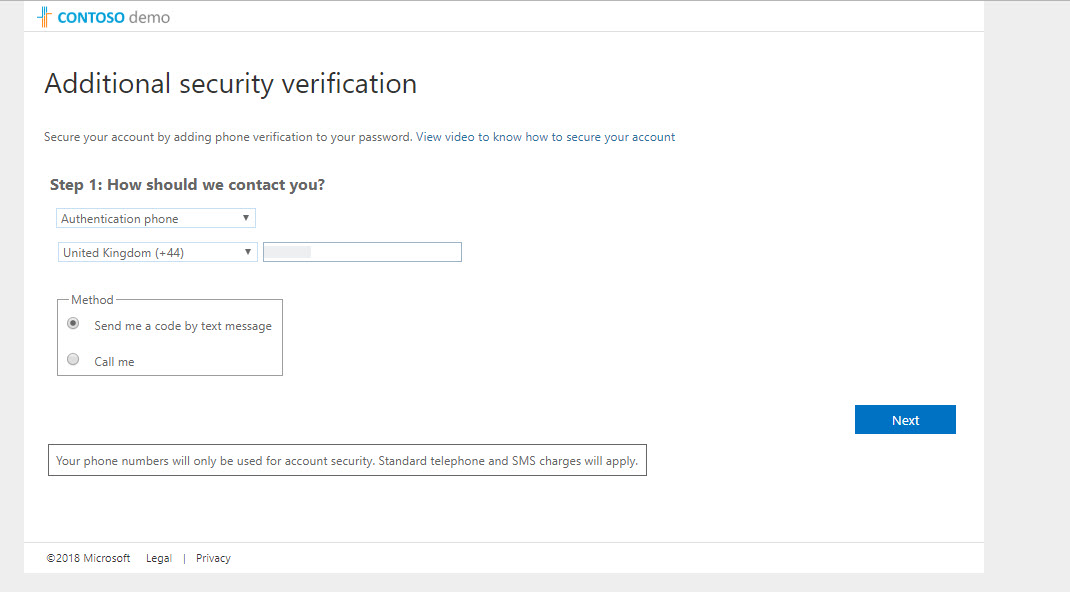
4. Then it goes through MFA setup process. Please complete sign up process to continue.
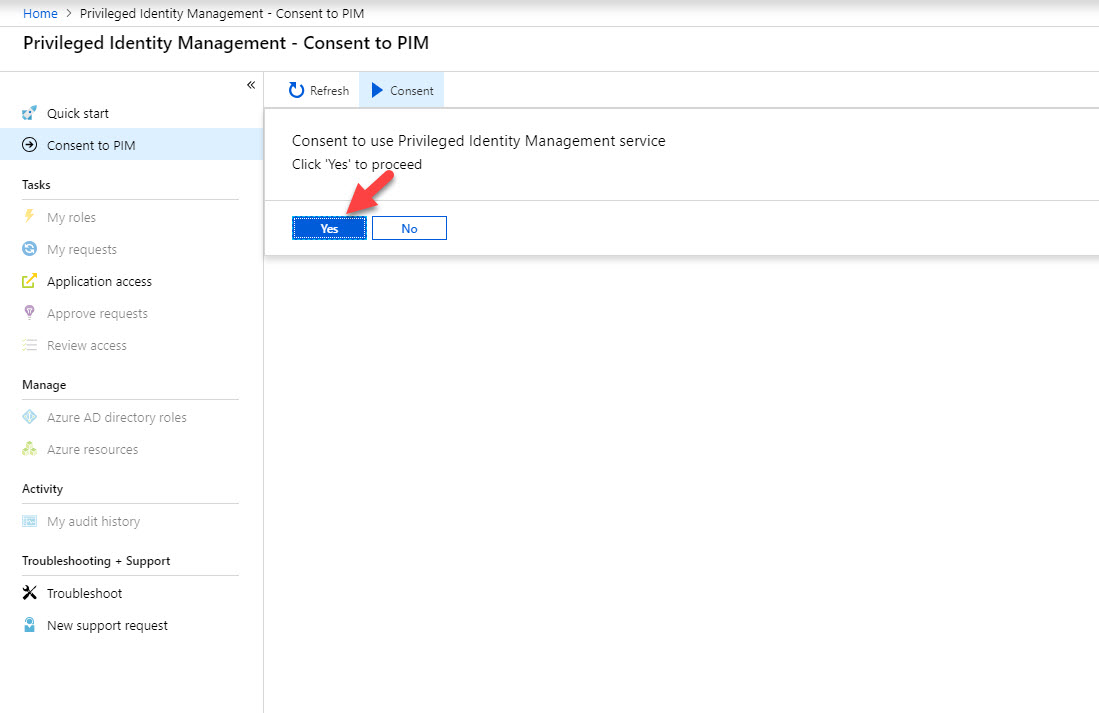
5. Once process is completed it will load the PIM page again. Click on Consent to proceed.
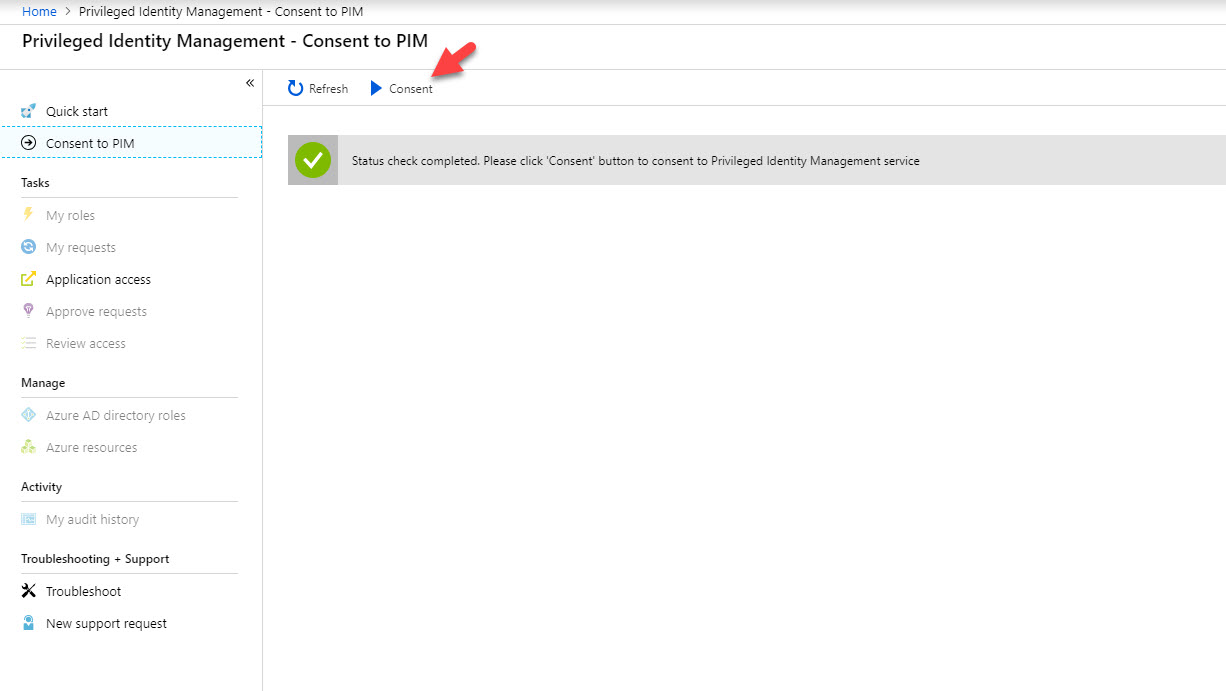
6. Then click on Yes to proceed.
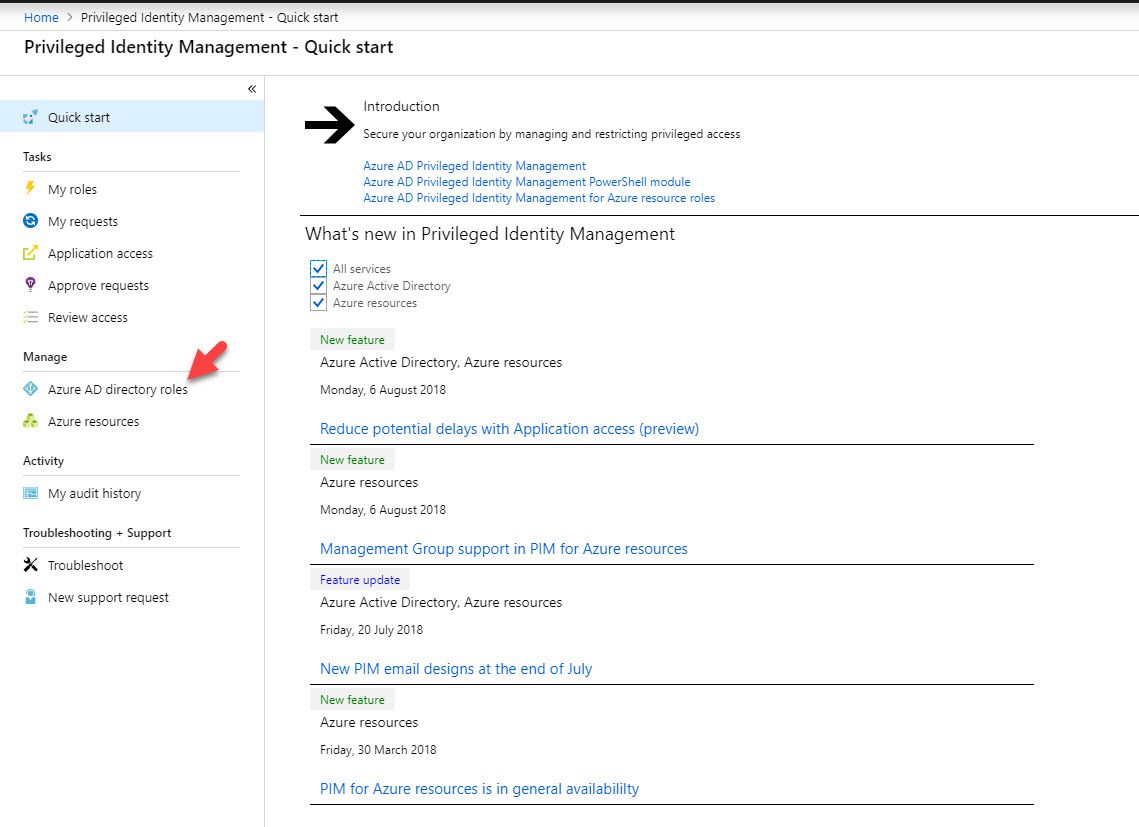
7. After service is initiated, click on Azure AD directory roles .
8. Then click on Sign up to proceed.
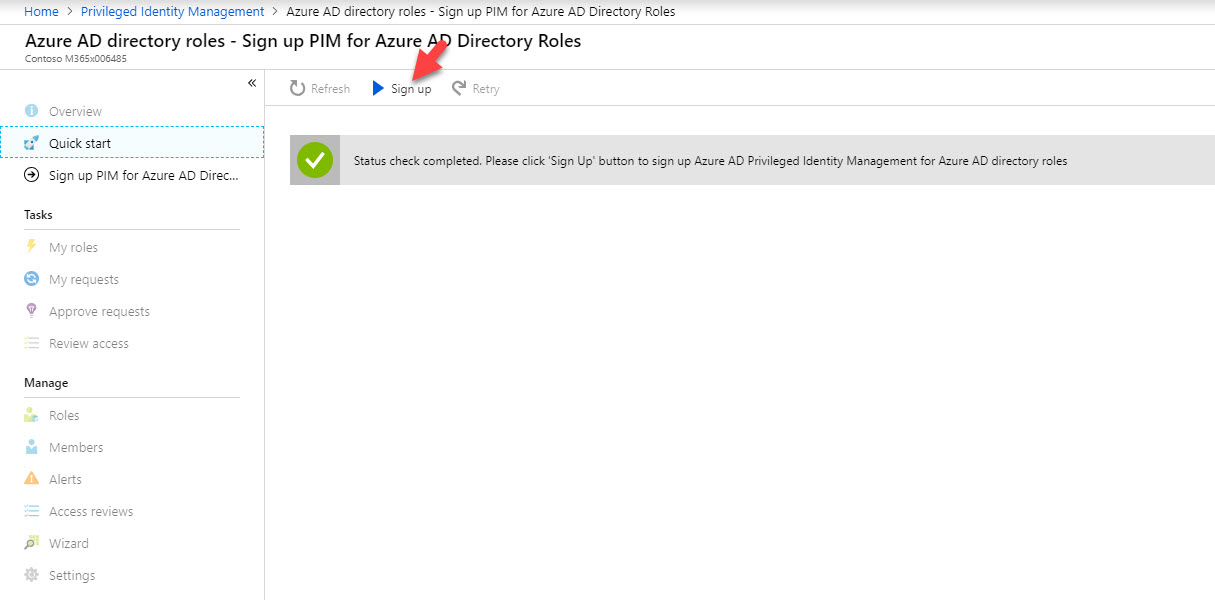
9. Click Yes to proceed

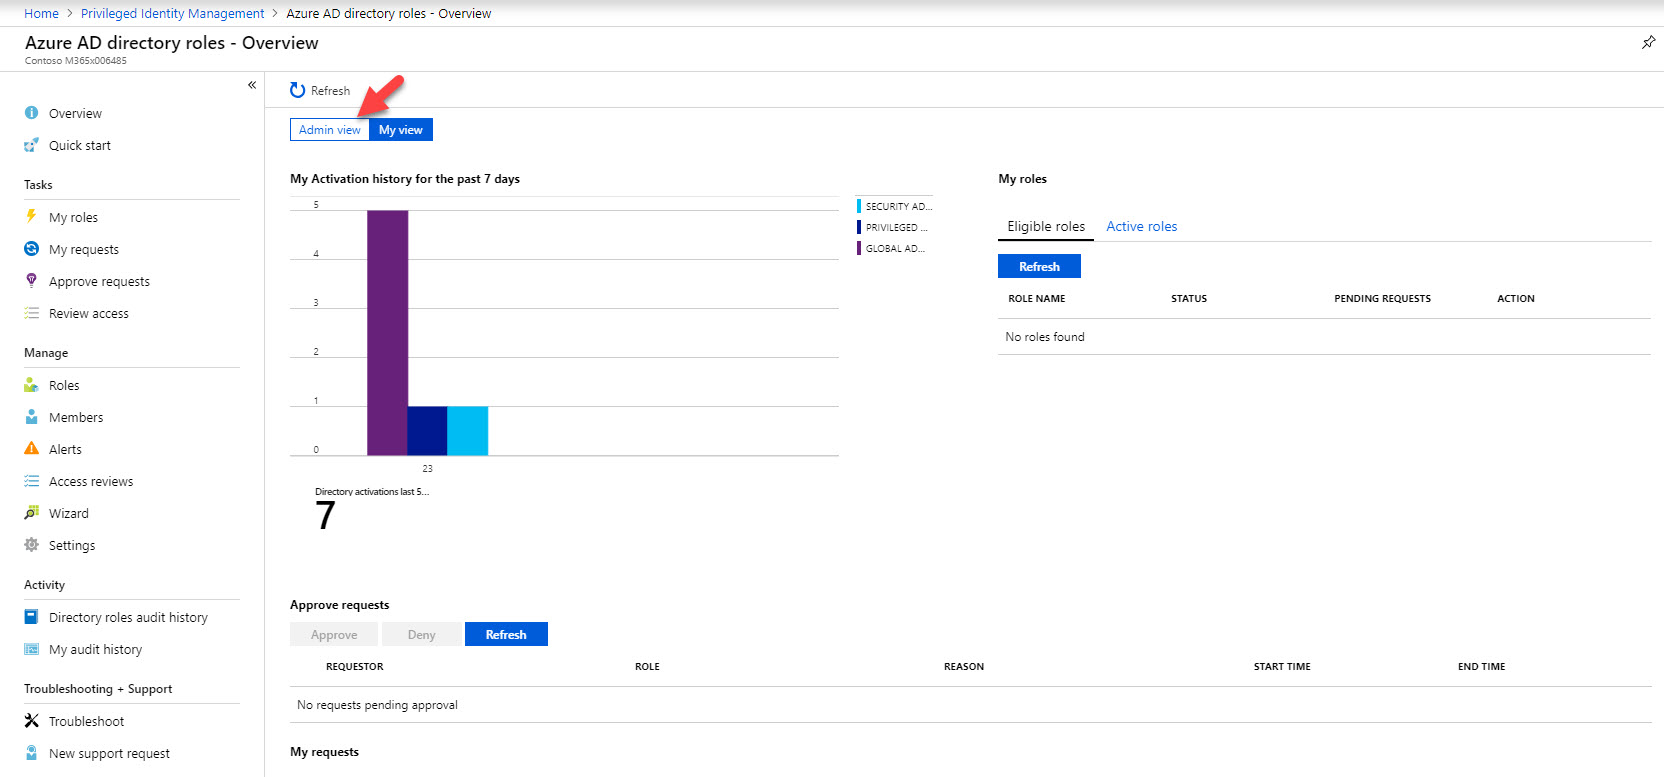
10. In new page, click on Admin View
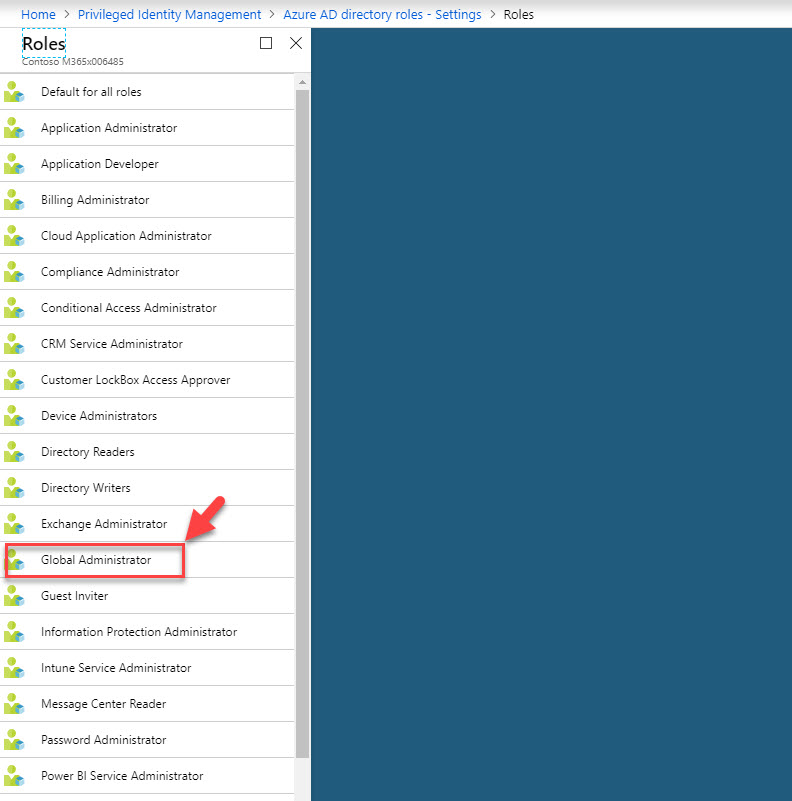
11. Then under directory roles click on Global Administrator .
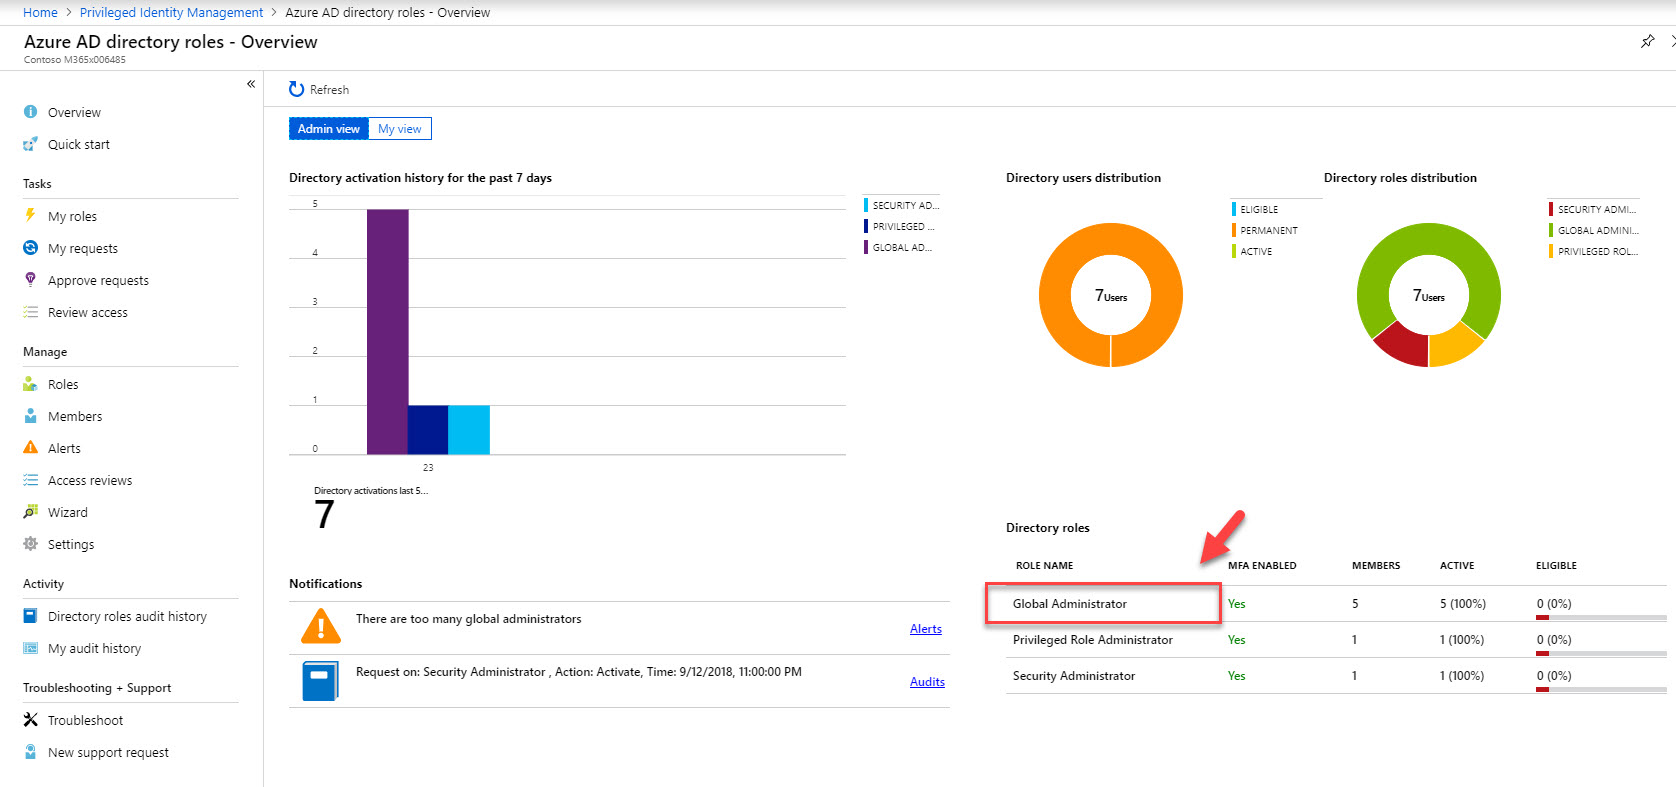
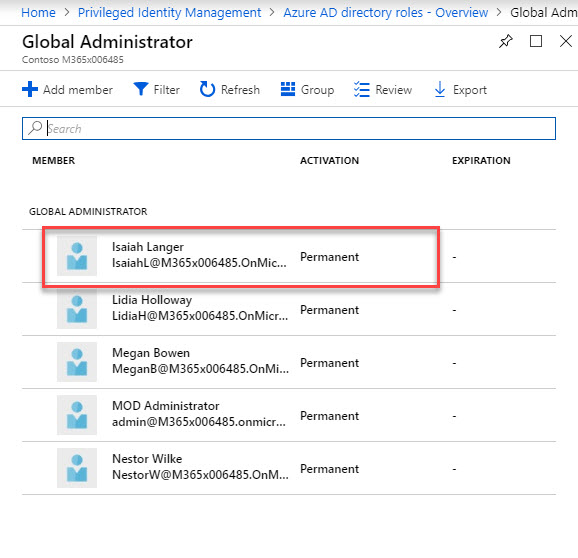
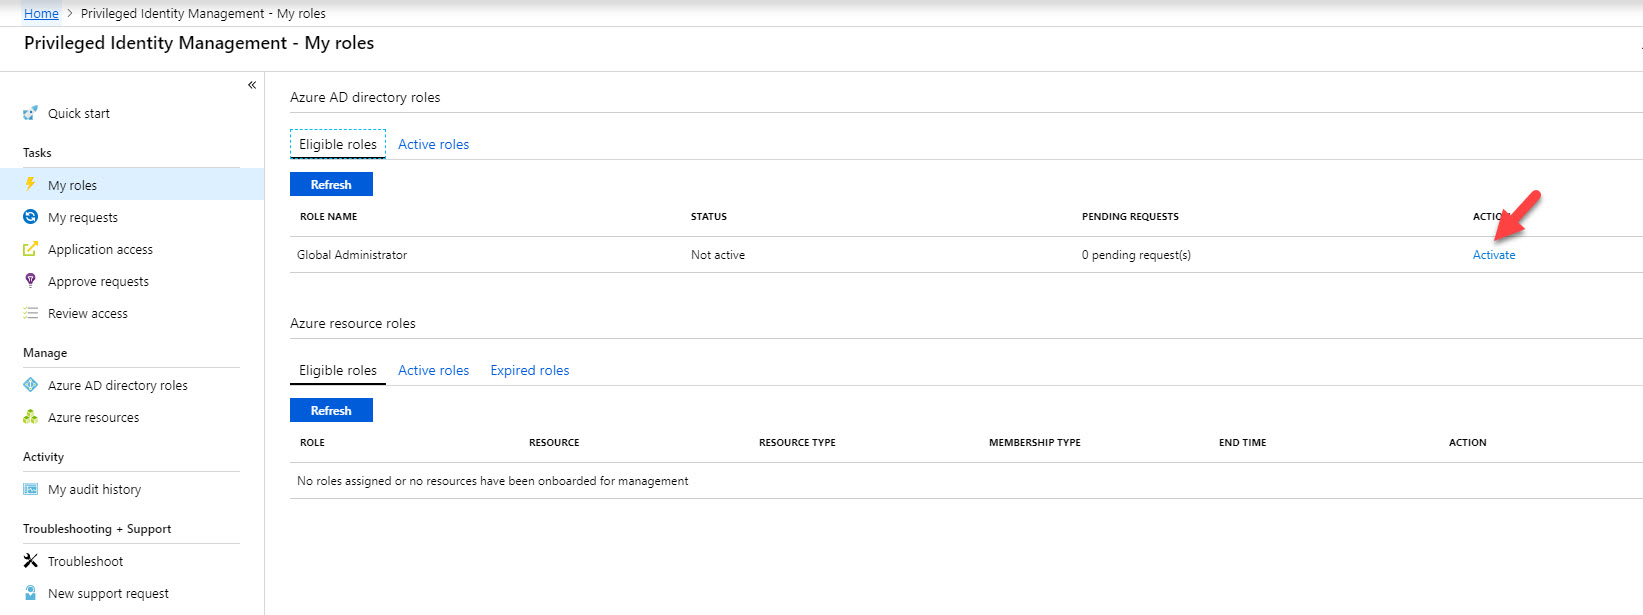
12. According to this, Isaiah Langer is a permanent global admin at the moment. I need to change it to time based membership. To do that click on user and then click on Make eligible .
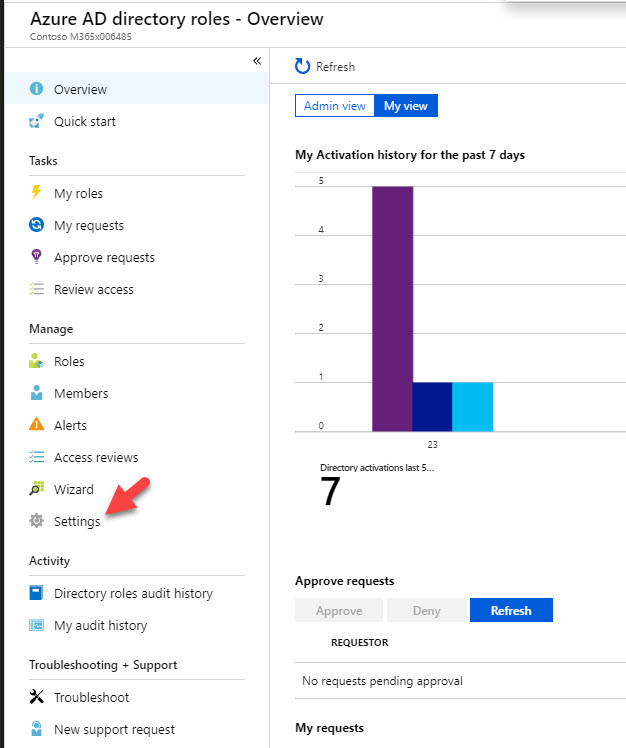
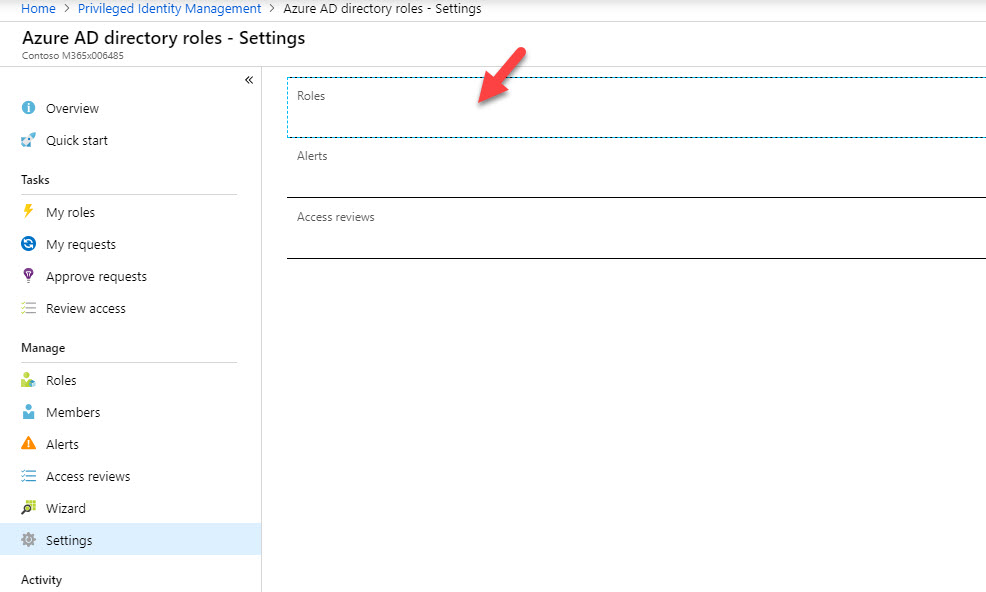
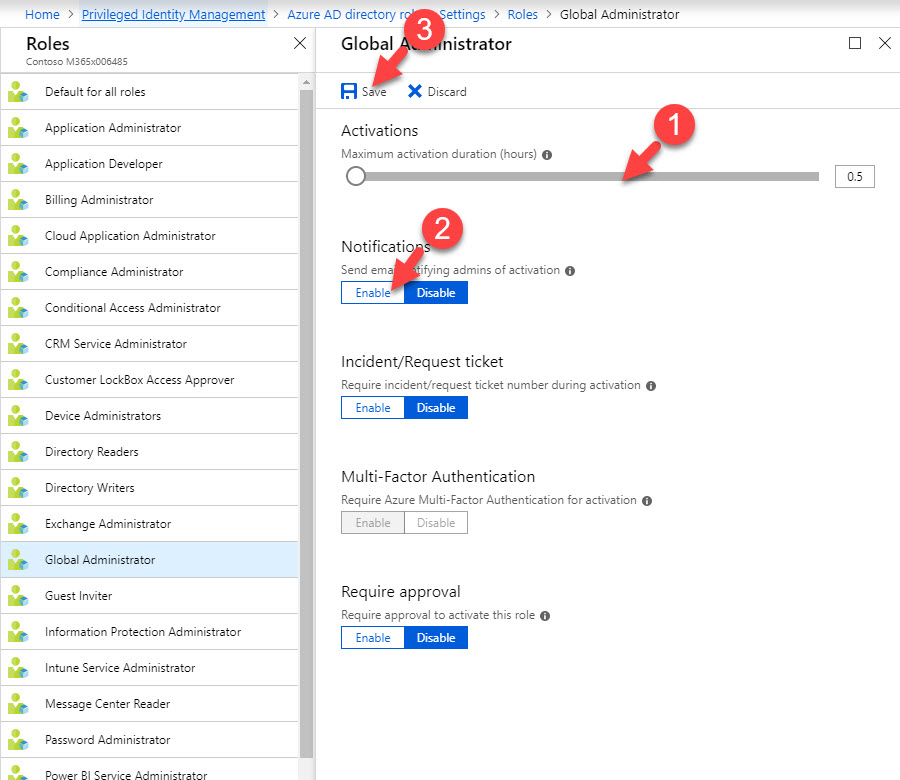
13. Once it is completed, go back to Azure AD directory roles home page and click on Settings
14. Then click on Roles
15. From the roles list, click on Global Administrator
16. In new panel, set Maximum activation duration as 0.5 hours . Also click Enable under notification . Once settings in place, click on Save .
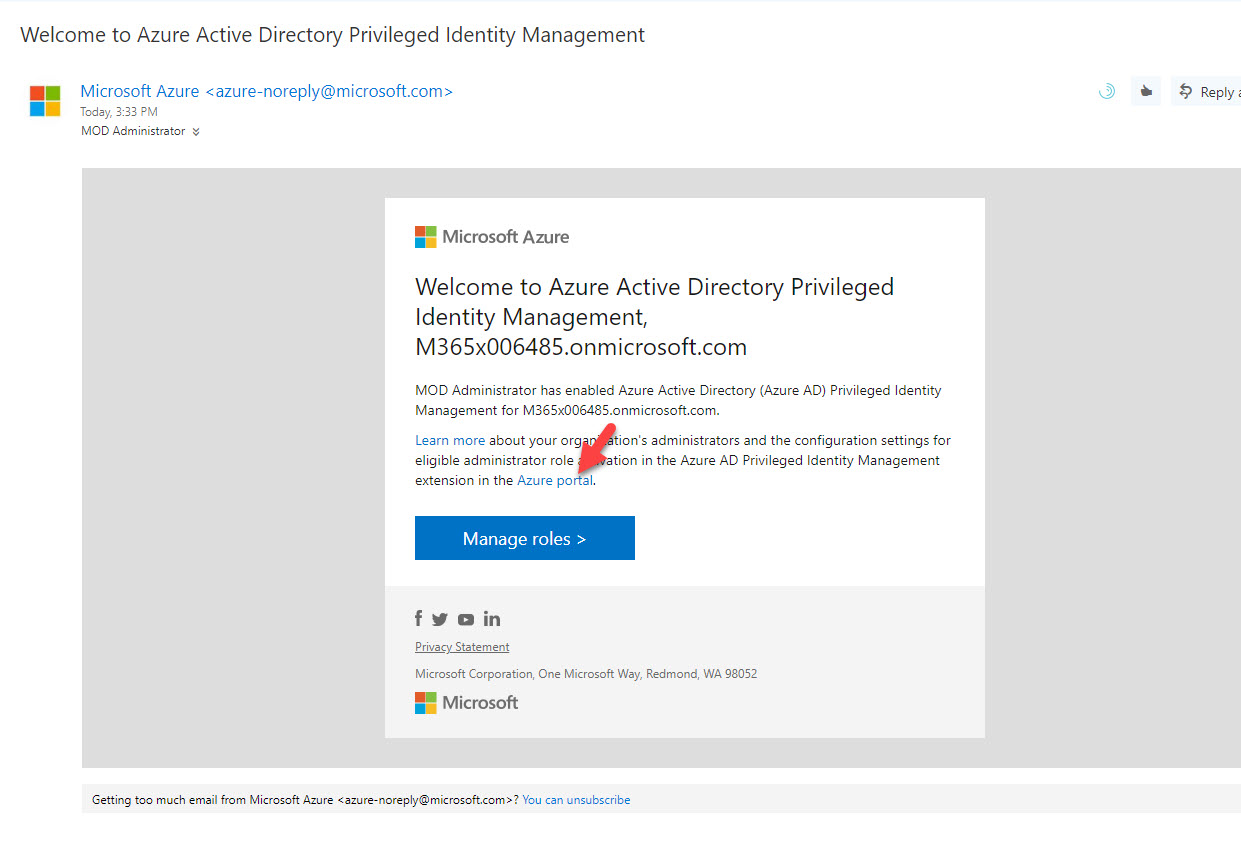
17. Now we have settings in place. To test it, go to https://outlook.office365.com/ and login as user Isaiah Langer . In there I can see an email from Azure PIM. Click on Azure Portal link.
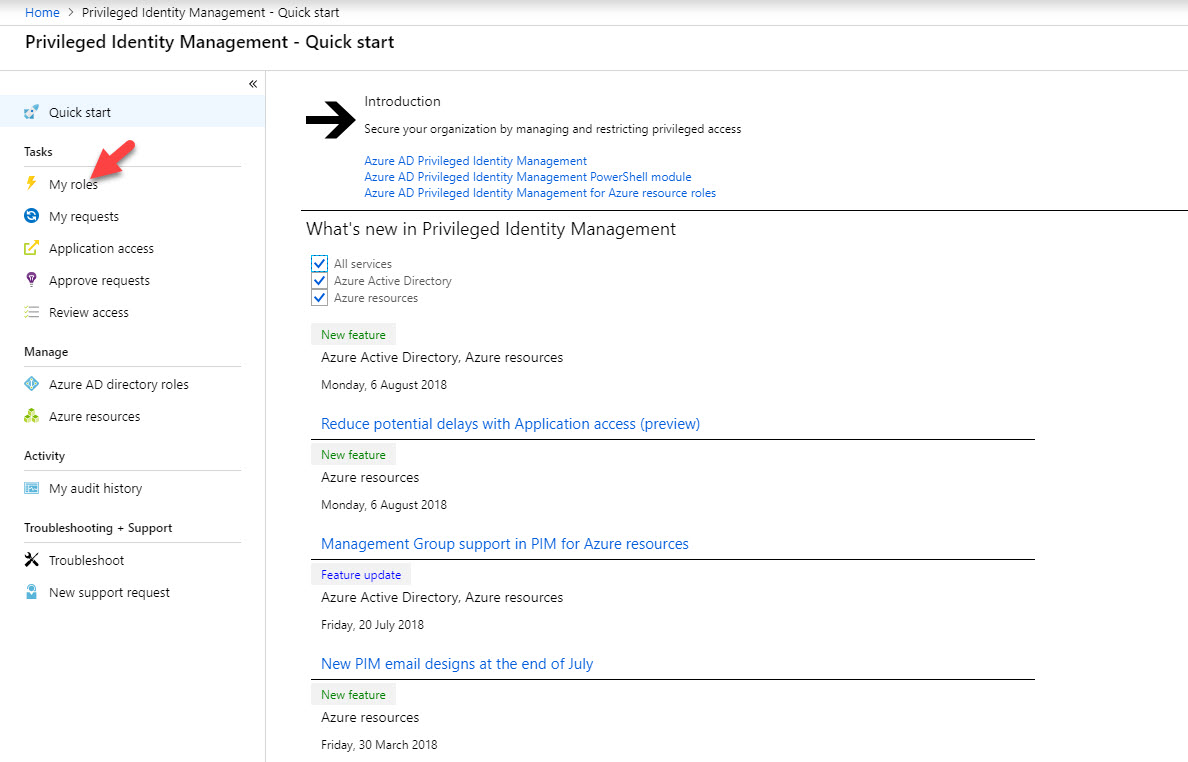
18. Then log in to portal as Isaiah Langer
19. After login go to More Services | Azure AD PIM
20. Then click on My Roles . If you do not have MFA activated for this account, you have to follow same steps to complete MFA sign up process.
21. Now we can see Global Administrator role under eligible role . Click on Activate .
22. In next window it asks to use MFA to verify account before proceed.
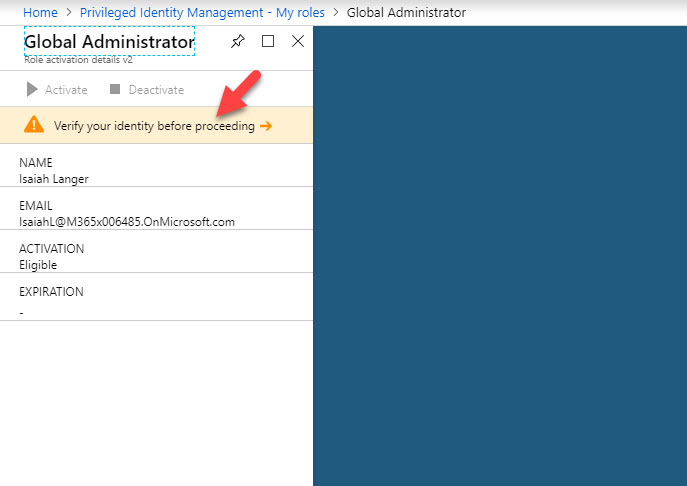
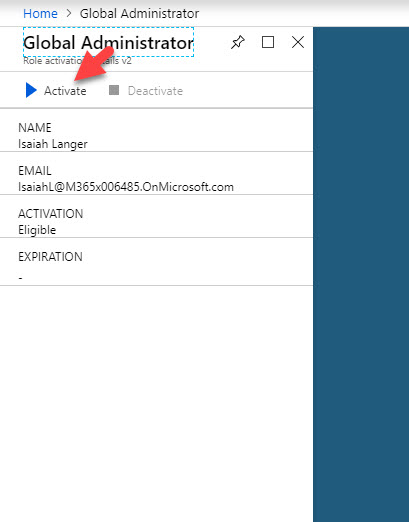
23. Once account verification is done, click on Activate
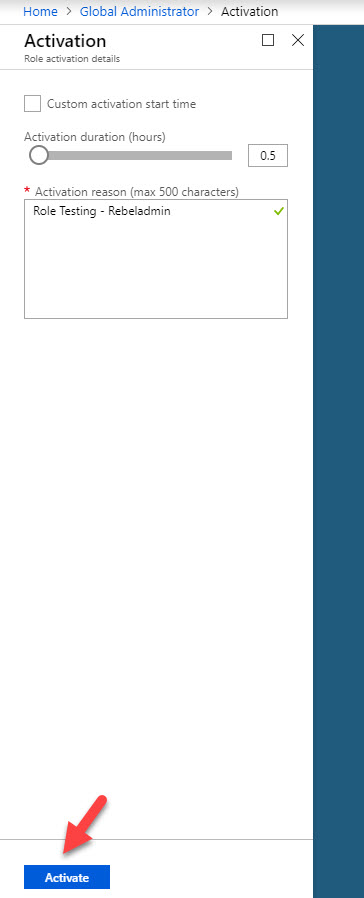
24. In next window, type reason for activation and click on Activate . If you need, using custom activation start time option we can set time to initiate the activation.
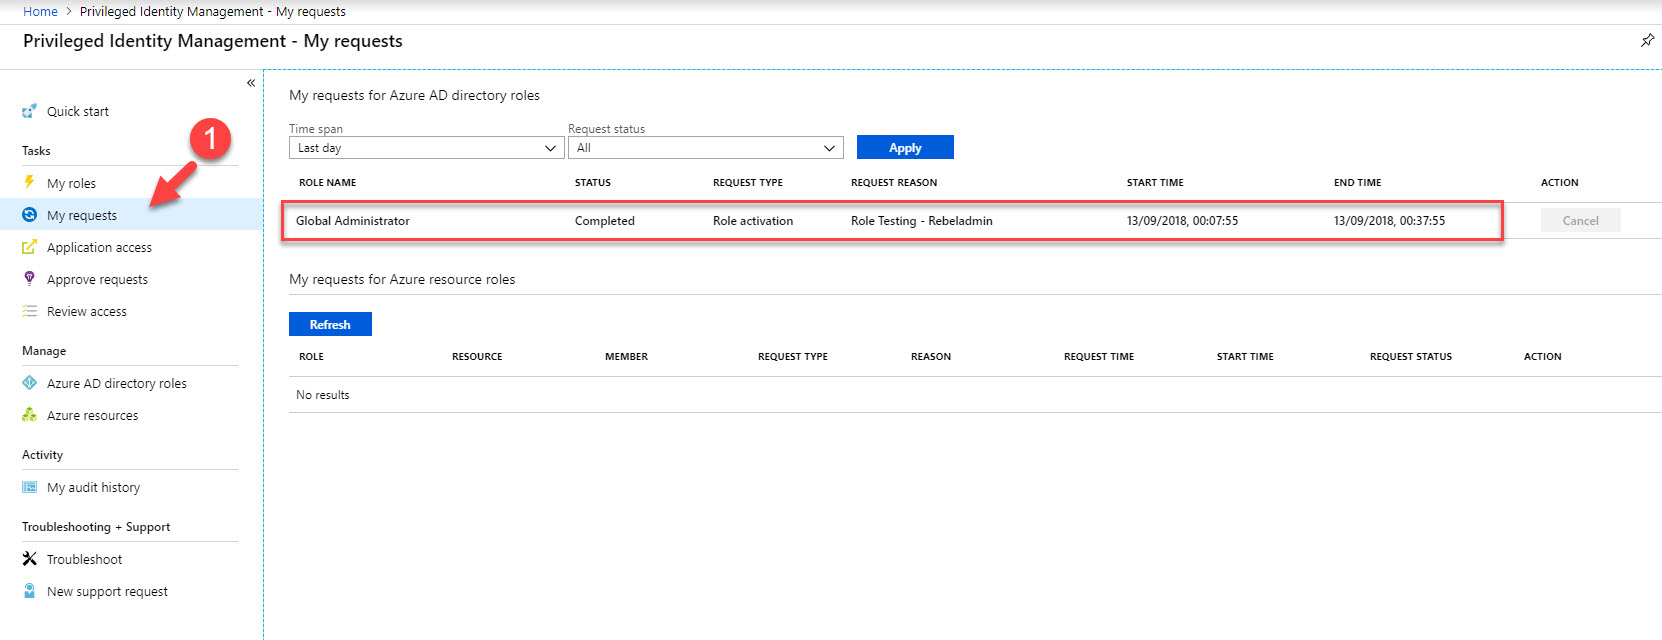
25. Then go back to home page and click on My requests . there we can see the status of the request. In here the request was completed and user got global admin privileges for 30 minutes.
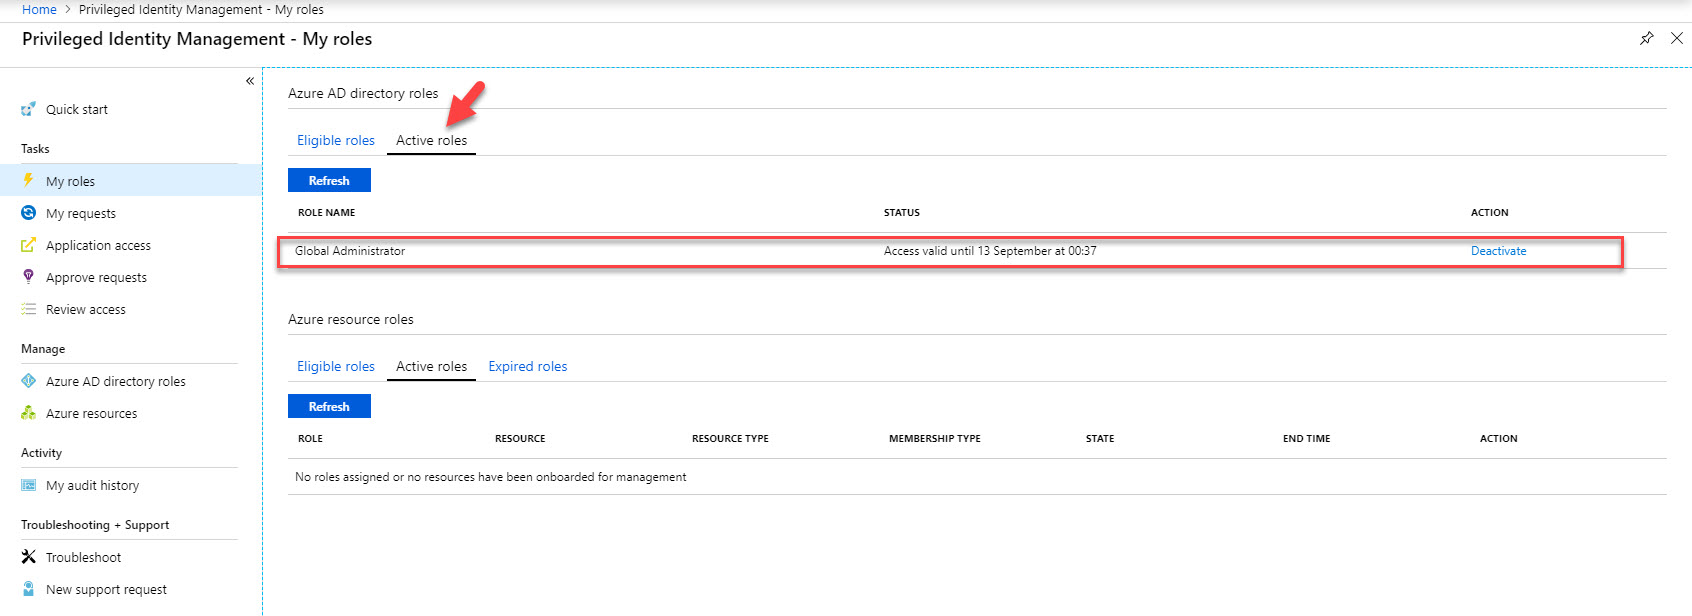
26. Also, under My Roles | Active Roles now I can see the Global Administrator role.
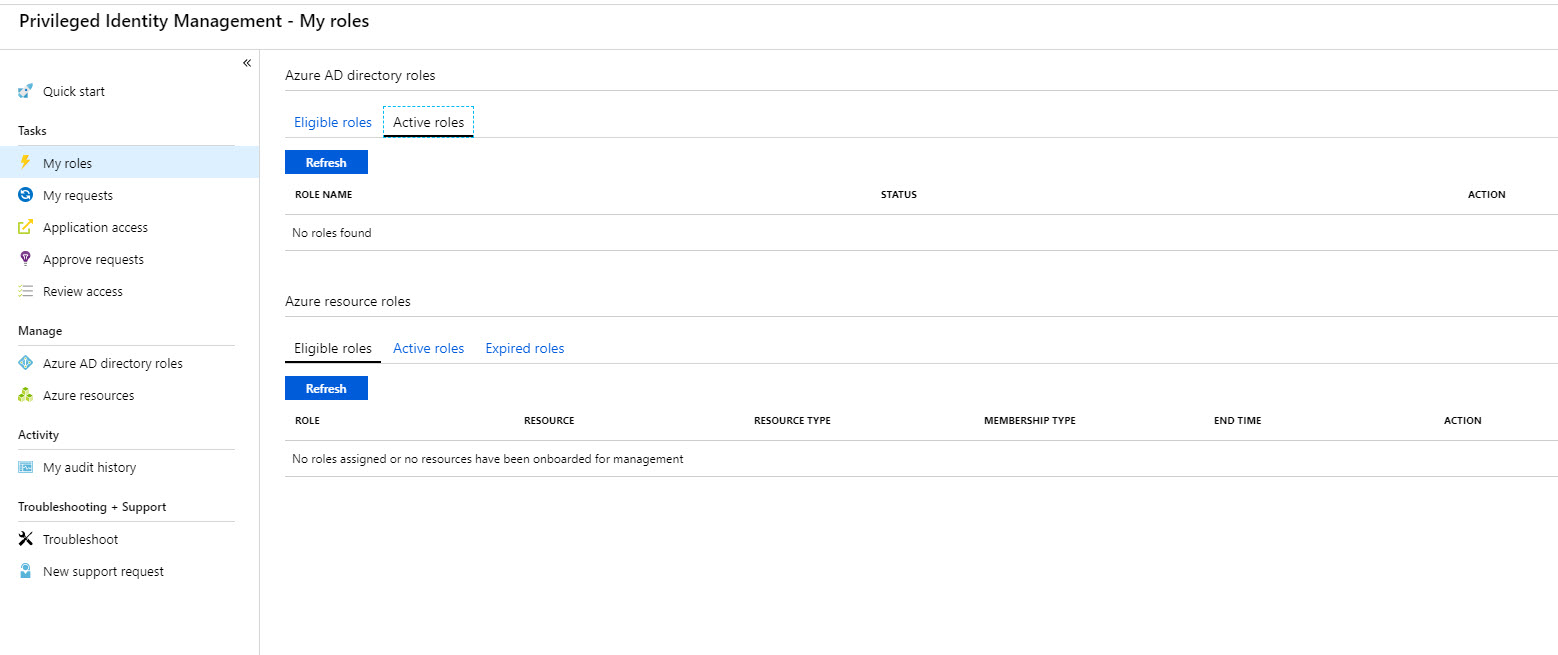
27. As expected, after 30 minutes no longer can see global admin role under active roles.
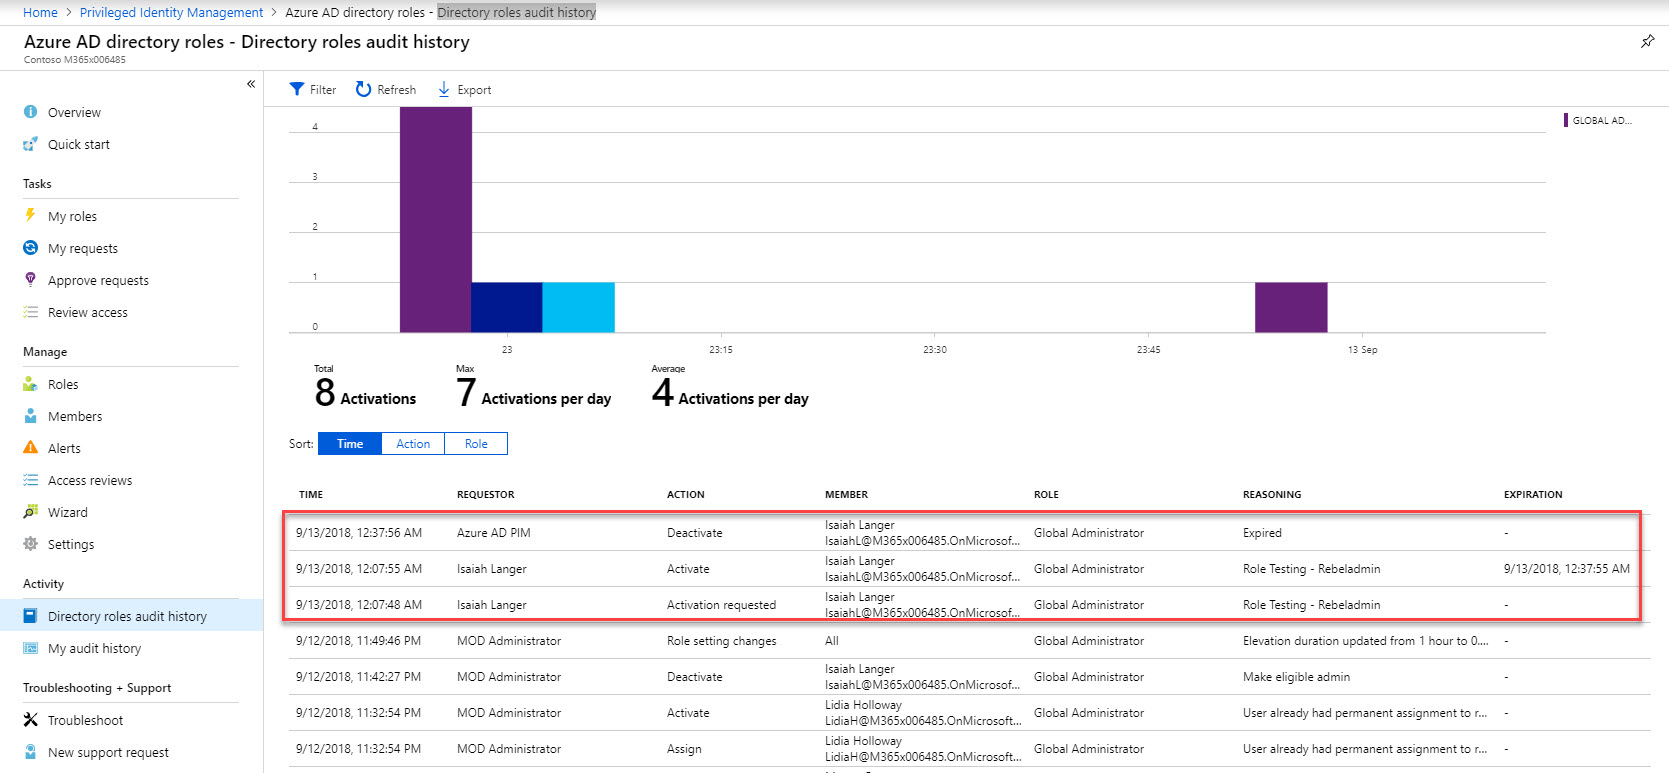
28. If we log in to azure portal as global admin and navigate to PIM | Azure AD directory roles | Directory roles audit history we can see all the activity history for role activation.
This marks the end of this blog post. Hope now you have better understanding how enable time-based privilege access using Azure AD PIM. If you have any further questions feel free to contact me on [email protected] also follow me on twitter @rebeladm to get updates about new blog posts.
Related Posts
Step-by-step guide: how to move azure vm from one region to another.
November 3, 2019
Encrypt Azure Managed Disks using Server-Side Encryption (SSE) and Customer Managed Keys (CMK)
January 1, 2021
Step-by-Step Guide: Bulk import/remove group members from Azure Active Directory (Public Preview)
October 15, 2019
Step-by-Step Guide: Azure AD Authentication for Azure Point-to-Site (P2S) VPN (PowerShell Guide)
April 17, 2020

How about if we needed the Just In Time access for half an hour on a daily basis? What setting needs to be configured?
Leave a reply Cancel reply
Your email address will not be published. Required fields are marked *
Save my name, email, and website in this browser for the next time I comment.

I am Dishan Francis. I’m a Cyber Security Consultant at Microsoft. I’m a dedicated and enthusiastic information technology expert who enjoys professional recognition and accreditation from several respected institutions. I am maintaining this blog for last 11 years. This includes more than 400 articles already. These are mainly about Microsoft Active Directory Service and Azure Active Directory Service. I also blog about different Azure services. If you need further help on subject matters, feel free to contact me on [email protected]. Also to get latest updates, follow me on twitter @rebeladm
Mastering Active Directory, Third Edition

I am glad to announce the release of my new book “ Mastering Active Directory – 3rd Edition ”. It is available for purchase worldwide now For more info….
Subscribe for Practical 365 updates
Please turn off your ad blocker and refresh the page to subscribe.
You may withdraw your consent at any time. Please visit our Privacy Statement for additional information
- Microsoft 365
Securing Administrator Access with Privileged Identity Management for Azure Active Directory

Table of Contents
In any IT organization there are administrative tasks that need powerful admin privileges. It’s a good security practice that accounts should have the fewest permissions necessary, and only for the period of time they need them. But managing the temporary assignment of admin permissions becomes time consuming. As a result, many organizations assign them on a permanent basis, which is not ideal.
Furthermore, auditing the assignment of administrative permissions is a challenging task. Many of us have used custom scripts and third party reporting tools to keep track of permissions.
In Azure Active Directory we can use Privileged Identity Management (PIM) to solve those problems. PIM allows you to grant permissions for an administrator on a temporary basis. PIM also provides approval controls, alerting, and reporting for administrator assignments.
In this blog post I’m going to walk-though the basic PIM setup within Azure Active Directory.
Privileged Identity Management Licensing
PIM is a premium feature of Azure Active Directory, and as such does need licensing. The license required is Azure AD Premium P2, which is available as a standalone add-on license. You can also buy it as part of the Enterprise Mobility + Security (EM+S) E5 license bundle.
You will need an Azure AD Premium P2 license for each user that interacts with PIM. That includes users who are receiving administrator assignments, as well as those who are involved in approvals and reviews.
For this scenario I have a single EM+S E5 license assigned to my main admin account in Office 365. I will be using PIM to grant admin permissions to a user account, Ted Tester.
Enabling Privileged Identity Management
To enable PIM, open the Azure portal and navigate to Privileged Identity Management . Then go to Azure AD Directory Roles – Overview , and click on Wizard .

Open the wizard and let it discover the admin roles setup in your tenant. Don’t try to configure anything at this point. Let the wizard activate PIM in your tenant. The account that you are using at this stage will be the first Security Administrator in your tenant.
Once the wizard completes it may take some time before you can assign permissions to users. I needed to wait about half an hour before I could proceed.

Configuring Roles in Privileged Identity Management
Next, we need to configure the specific actions for each role assigned via PIM. Navigate to Azure AD Directory Roles – Overview again, and then choose Settings -> Roles .
Select the role you will be assigning to one of your administrators. For this example I will be assigning the role “Exchange Administrator” to Ted.

On this screen, there are a few controls I want to call out:
- Maximum Activation Duration – The maximum number of hours that a user can request activation for. You should keep this as low as possible, but not so low that your users are under pressure to perform admin tasks in a rush.
- Notifications – The admin will receive a notification when a role is activated. This lets them know they can proceed with their admin tasks, and also alerts them to any unauthorized privilege escalation that may be occurring.
- Multi-Factor Authentication – This control can’t be disabled for high privilege roles. All users who have a PIM role activated will need to use MFA to activate that role.
- Selected Approver – These users can approve access requests for the role. It is important to note that the approvers do not need to have the rights they are granting.
Assigning PIM Roles to a User
To assign a PIM role to an administrator, first you must assign that role to the user’s account in the Office 365 portal.

Give that assignment a few minutes to replicate, then go back to the PIM roles wizard we used to activate PIM. Within the Wizard, select the first option to discover roles, and you’ll see the following screen.

These are the roles currently assigned within the tenant. This screen is informational, so click Next to proceed. This is where we active Privileged Identity Managemet for Ted’s Exchange Administrator permissions. Selection that assignment from the list, then click Next .

The next screen will verify your selection and configure PIM for Ted. At the end of this process, the Exchange Administrator role is removed from Ted’s account. In effect, he is a standard user again. But, he is now eligible to become an Exchange Administrator.
Requesting Activation of PIM Managed Roles
Logging into any Office 365 portal at Ted will only show user options now. If Ted needs to do some Exchange admin work, he can request to have his permissions elevated via the Azure AD portal .
When Ted logs into the PIM management tool, under My roles he’ll see roles that he is eligible to request for activation.

Selecting Exchange Administrator will take him to the activation screen.

Ted will need to verify himself with multi-factor authentication before proceeding. If MFA is not already enforced for the user, they’ll be prompted to register. I recommend configuring MFA for your administrators before you start assigning PIM roles.
Once Ted passes the MFA , he can select Activate to request rights elevation.
Authorizing PIM Role Activation
For this example, I am listed as an approver. This means I can see and approve Ted’s request in the PIM portal.

I can approve or reject Ted’s request, and also add notes justifying my action.
While testing PIM in my tenant saw a delay of 30-45 minutes for Exchange permissions to take effect. Other workloads were almost instant. Once the rights kick in for Ted, he was able to perform tasks as an Exchange Administrator. The permissions are then automatically revoked at the end of the approval period.
That approval, and all the information I enter with it, is recorded in the My audit history section of the PIM control panel. In the screenshot below you can see the approvals I did for my test account during the process of writing this blog post.

Privileged Identity Management in Azure Active Directory is the solution for managing least privilege , “just in time” administrative access for Office 365 and Azure AD. As a premium feature it does require additional licensing. However, many organizations will benefit from the increased control that PIM provides for high privilege credentials, making the additional cost a worthwhile investment.
About the Author

Nathan O'Bryan

How do you assign approvers? I am not seeing any approvals, all requests are being automatically approved.
Pingback: Multi-factor Authentication by Default for Administrators in Azure AD and Office 365 – SimpleITPro

Nnice article.
There is a course available in Pluralsight about [Implementing Azure Privileged Identity Manager][Azure AD PIM].
http://www.pluralsight.com/courses/microsoft-azure-privileged-identity-management-implementing?utm_source=Facebook&utm_medium=video&utm_campaign=authordemo
Course Description: ——————- Privileged Identity Management is emerging as one of the hottest topics in cybersecurity. In this Pluralsight course, you’ll learn how to use Microsoft Azure PIM to manage, control, and monitor access within Azure AD, Azure resources, and Microsoft Online Services.

FYI that the picture before this sentence – “On this screen, there are a few controls I want to call out:” – is seemingly the wrong picture. I see the same picture that is showing again about two images down.

These are the similar features of MIM (Microsoft Identity Management) which is similarly called as PAM (Privilaged Access Management). Although the AAD P2 seems pricey, if some one know about the implementation of PAM, PAW under MIM, complexity involved in such configurations and the security benefits that an organization will benifit – will easily compensate the the price we pay for it. Its totally worth it, I hope there will be future enhancements to the PIM on the O365 Platform like what the rich reporting that we get from MIM.

Great feature but at the cost of AAD P2 a steep price.

What too many companies don’t / won’t consider is that P2 is not required for all users. It is only required for users that are actually going to use the P2 features.
In the case of PIM, a company can select to purchase P2 licensing only for employees who will need to access higher privilege roles. That prospect can provide a much better cost/risk balance for implementing PIM.
Leave a Reply Cancel reply
Latest articles.

Celebrating 25 Years of Active Directory
Active Directory is now 25 years old! In this blog, we embark on a journey through the history and enduring significance of Active Directory over its lifespan, including what's to come in the future.

All About Pagination with the Graph and the Graph PowerShell SDK
When you're new to Graph API requests, you might not know pagination and end up retrieving less data from queries than is available. In this article, we explain how to use pagination to retrieve data using Graph queries and SDK cmdlets.
- Microsoft Graph

Cloud Security News, AI, Copilots and more: The Practical 365 Podcast S4 E16
On this episode of the Practical 365 podcast, Steve Goodman and Rich Dean chat about TEC Europe 2024 and cover some of the most important topics in the world of Microsoft 365, including Entra ID Conditional Access changes to be aware of, Copilot for Security reaching GA, plus lots more.

Using Azure policies to audit and automate RBAC role assignments
Usually different RBAC role assignments in Azure might be inherited from subscription / management group level but there may come a time when that's just way too broad spectrum to give permissions to an AD user group.

While it’s tempting to assign permissions on a larger scope, sometimes you might rather prefer to have only some of the subscription’s resource groups granted with a RBAC role with minimal permissions to accomplish the task at hand. In those scenarios you’ll usually end up with one of the following options to handle the role assignments:
- Include the role assignments in your ARM templates / Terraform codes / Bicep templates
- Manually add the role to proper resource groups
If neither these appeal to you, there’s a third option: define an Azure policy which identifies correct resource groups and then deploys RBAC role assignments automatically if conditions are met. This blog will go over with step-by-step instructions how to:
- Create a custom Azure policy definition for assigning Contributor RBAC role for an Azure AD group
- Create a custom RBAC role for policy deployments and add it to your policy definition
- Create an assignment for the custom policy
The example scenario is very specific and the policy definition is created to match this particular scenario. You can use the solution provided in this post as a basis to create something that fits exactly to your needs.
Azure policies in brief
Azure policies are a handy way to add automation and audit functionality to your cloud subscriptions. The policies can be applied to make sure resources are created following the company’s cloud governance guidelines for resource tagging or picking the right SKUs for VMs as an example. Microsoft provides a lot of different type built-in policies that are pretty much ready for assignment. However, for specific needs you’ll usually end up creating a custom policy that better suits your needs.
Using Azure policies is divided into two main steps:
- You need to define a policy which means creating a ruleset (policy rule) and actions (effect) to apply if a resource matches the defined rules.
- Then you must assign the policy to desired scope (management group / subscription / resource group / resource level). Assignment scope defines the maximum level of scanning if resources match the policy criteria. Usually the preferable levels are management group / subscription.
Depending on how you prefer governing your environment, you can resolve to use individual policies or group multiple policies into initiatives . Initiatives help you simplify assignments by working with groups instead of individual assignments. It also helps with handling service principal permissions. If you create a policy for enforcing 5 different tags, you’ll end up with having five service principals with the same permissions if you don’t use an initiative that groups the policies into one.
Creating the policy definition for assignment of Contributor RBAC role
The RBAC role assignment can be done with policy that targets the wanted scope of resources through policy rules. So first we’ll start with defining some basic properties for our policy which tells the other users what this policy is meant for. Few mentions:
- Policy type = custom . Everything that’s not built-in is custom.
- Mode = all since we won’t be creating a policy that enforces tags or locations
- Category can be anything you like. We’ll use “Role assignment” as an example
Now we have our policy’s base information set. It’s time to form a policy rule. The policy rule consists of two blocks: policyRule and then . First one is the actual rule definition and the latter is the definition of what should be done when conditions are met. We’ll want to target only a few specific resource groups so the scope can be narrowed down with tag evaluations and resource group name conventions. To do this let’s slap an allOf operator (which is kind of like the logical operator ‘and’) to the policy rule and set up the rules
As can be seen from the JSON, the policy is applied to a resource (or actually a resource group) if
- It’s type of Microsoft.Resources/subscriptions/resourceGroups = the target resource is a resource group
- It has a tag named RbacAssignment set to true
- The resource group name starts with my-rg-prefix
In order for the policy to actually do something, an effect must be defined. Because we want the role assignment to be automated, the deployIfNotExists effect is perfect. Few mentions of how to set up an effect:
- The most important stuff is in the details block
- The type of the deployment and the scope of an existence check is Microsoft.Authorization/roleAssignments for RBAC role assignments
- An existence condition is kind of an another if block: the policy rule checks if a resource matches the conditions which makes it applicable for the policy. Existence check then confirms if the requirements of the details are met. If not, an ARM template will be deployed to the scoped resource
The existence condition of then block in the code example below checks the role assignment for a principal id through combination of Microsoft.Authorization/roleAssignments/roleDefinitionId and Microsoft.Authorization/roleAssignments/principalId . Since we want to assign the policy to a subscription, roleDefinitionId path must include the /subscriptions/<your_subscription_id>/.. in order for the policy to work properly.
The last thing to add is the actual ARM template that will be deployed if existence conditions are not met. The template itself is fairly simple since it’s only containing the definitions for a RBAC role assignment.
And that’s it! Now we have the policy definition set up for checking and remediating default RBAC role assignment for our subscription. If the automated deployment feels too daunting, the effect can be swapped to auditIfNotExist version. That way you won’t be deploying anything automatically but you can simply audit all the resource groups in the scope for default RBAC role assignments.
That should be enough, right? Well it isn’t. Since we’re using ARM template deployment with our policy, we must add a role with privileges to create remediation tasks which essentially means we must add a role that has privileges to create and validate resource deployments. Azure doesn’t provide such policy with minimal privileges out-of-the-box since the scope that has all the permissions we need is Owner. We naturally don’t want to give Owner permissions to anything if we reeeeeally don’t have to. The solution: create a custom RBAC role for Azure Policy remediation tasks.
Create custom RBAC role for policy remediation
Luckily creating a new RBAC role for our needs is a fairly straightforward task. You can create new roles in Azure portal or with Powershell or Azure CLI. Depending on your desire and permissions to go around in Azure, you’ll want to create the new role into a management group or a subscription to contain it to a level where it is needed. Of course there’s no harm done to spread that role to wider area of your Azure environment, but for the sake of keeping everything tidy, we’ll create the new role to one subscription since it’s not needed elsewhere for the moment.
Note that the custom role only allows anyone to validate and create deployments. That’s not enough to actually do anything. You’ll need to combine the deployment role with a role that has permissions to do the stuff set in deployment. For RBAC role assignments you’d need to add “User Access Administrator” role to the deployer as well.
Here’s how to do it in Azure portal:
- Go to your subscription listing in Azure, pick the subscription you want to add the role to and head on to Access control (IAM) tab.
- From the top toolbar, click on the “Add” menu and select “Add custom role”.
- Give your role a clear, descriptive name such as Least privilege deployer or something else that you think is more descriptive.
- Add a description.
- Add permissions Microsoft.Resources/deployments/validate/action and Microsoft.Resources/deployments/write to the role.
- Set the assignable scope to your subscription.
- Review everything and save.
After the role is created, check it’s properties and take note of the role id. Next we’ll need to update the policy definition made earlier in order to get the new RBAC role assigned to the service principal during policy initiative assignment.
So from the template, change this in effect block:
Assigning the created policy
Creating the policy definition is not enough for the policy to take effect. As mentioned before, the definition is merely a ruleset created for assigning the policy and does nothing without the policy assignment. Like definitions, assignments can be set to desired scope. Depending on your policy, you can set the policy for management group level or individual assignments to subscription level with property values that fit each individual subscription as needed.
Open Azure Policy and select “Assignment” from the left side menu. You can find “Assign policy” from the top toolbar. There’s a few considerations that you should go over when you’re assigning a policy:
- The scope: always think about your assignment scope before blindly assigning policies that modify your environment.
- Exclusion is a possibility, not a necessity. Should you re-evaluate the policy definition if you find yourself adding a lot of exclusions?
- You can fix all the non-compliant resources with a remediation task after initial compliance scan
Remediation
- If you have a policy that changes something either with modify of deployIfNotExists effect, you’ll be creating a service principal for implementing the changes when you assign the policy. Be sure to check the location (region) of the service principal that it matches your desired location.
- If you select to create a remediation tasks upon assignment, it will implement the changes in policy to existing resources . So if you have doubts if the policy works as you desire, do not create a remediation task during assignment. Review the compliance results first, then create the remediation task if everything’s ok.
Non-compliance message
- It’s usually a good idea to create a custom non-compliance message for your own custom definitions.
After you’ve set up all relevant stuff for the assignment and created it, it’s time to wait for the compliance checks to go through. When you’ve created an assignment, the first compliance check cycle is done usually within 30 minutes of the assignment creation. After the first cycle, compliance is evaluated once every 24 hours or whenever the assigned policy definitions are changed. If that’s not fast enough for you, you can always trigger an on-demand evaluation scan .
Azure Role Assignments with Constraints
If you’ve worked in Azure, you have definitely come across managing access using Role Based Access Control (RBAC) and have been met with different challenges. Until recently, the RBAC model in Azure has been missing a key piece: the ability to enforce constraints on the delegation of role assignments. This missing piece has led to a less than ideal user experience for those managing Azure resources. Fortunately, Azure Role Assignments with Constraints is here, hopefully providing the missing piece to a complete RBAC model in Azure. With this new feature, IT administrators and stakeholders can now easily and securely manage access to Azure resources, greatly improving the experience for all parties.
Role based access control
In most Azure environments I’ve worked in, IT rarely assigns Owner or User Access Administrator to stakeholders; instead, they’re the gatekeepers for giving out permissions to resources. This often leads to tickets being placed with IT and long wait times for new stakeholders to start consuming services in Azure, and most often the actual teams have more knowledge of who should have access to a resource than IT has.
This will most likely lead to frustration as developers will have problems fully setting up an application or service. For example, a developer creates an Azure Function with a Managed Identity that requires Storage Blob Data Contributor to a Storage Account, but they’re not able to assign any roles for that identity.
On the other hand, if given full permissions, someone inexperienced with Azure or someone who doesn’t value security may end up exposing the environment to security risks. I think we can all agree the model isn’t all there yet.
How it works today
Delegate role assignments with constraints.
With this new feature, we can instead delegate Dara the ability to assign only certain roles and principal types. For example, we can allow Dara and their team members to assign only Service principals the Key Vaults Secrets User and Storage Blob Data Contributor roles. With this in place, the team is now able to create that Azure Function with a Managed Identity and assign it the Storage Blob Data Contributor for any resource inside that subscription.
Constrains example
Getting started.
Click the images to enlarge them
To get started follow the below steps.
At your desired scope, go to the IAM blade and select Add to create a new role assignment.
Select the Privileged administrator roles tab and find the Role Based Access Control Administrator role.
Add the desired User or Group that should be able to delegate roles at the scope.
Select Add condition to define the conditions.
The portal will present three templates that can be used, and in this example I’m using the middle one. It will allow me to target what roles users in the Az_Analytics_Users group can assign, and to what identity types. Opening the advanced condition editor will present the full configuration experience that allows for finer tuning. For example, users can create role assignments, but not delete them.
I want them to be able to assign Key Vaults Secrets User and Storage Blob Data Contributor to Service principals .
Hit save and the configuration will be presented before assignment is made.
That’s it! Users in the group Az_Analytics_Users are now able to assign the roles specified in the expression to Service principals. If they try to assign any other roles they’ll be denied.
We can also configure everything using PowerShell.
Another example
Here I’m using the advanced condition editor. Users are able to assign all roles except Owner and User Access Administrator for all principal types; users, group, and service principals. This is done by negating the expression by ticking the checkbox when configuring what roles can be assigned.
An imporant thing to note here is that when a user assigns a role to another user not already present in the tenant, a guest invitation will be sent out, unless guest invitation is restricted.
Final thoughts
I must say that I find this feature highly appealing, and I firmly believe that it will bring significant benefits to both IT administrators and developers alike. Previously, granting Owner or User Access Administrator permissions often entailed a considerable amount of responsibility for Azure stakeholders, akin to providing them with unrestricted access. However, with this new feature, we can now delegate some of the RBAC assignments to stakeholders, which will ultimately result in reduced wait times and minimize unwarranted frustration.
Further Reading
The Importance of Policy-Driven Governance
In Azure, following a policy-driven approach to governance is crucial. It’s all about making sure that everyone who uses Azure can’t set things up the wrong way. Imagine having a set of clear instr...
What is this Private Endpoint, and where can I buy one? (Part 1)
That’s a good question and something I’m going to try and answer in my first blog series. If you’re like me you’ve probably browsed the Azure Security Center recommendations to get a better underst...
What is this Private Endpoint, and where can I buy one? (Part 2)
In part 1 I gave an introduction on how to set up Private Endpoint and DNS and mentioned that the privatelink DNS zones should be handled centrally by your IT or Azure team. In this post I’ll expan...
Why App Service Environment v3 is Awesome!
A new version of content is available.
NashTech Insights

Digital solutions for your business.
Combining strategy, technology, automation and people
Technology advisory
Navigate the fast-changing world.
Cloud engineering
Transformational change at scale and speed
Data solutions
Realise the untapped potential of data.
AI and machine learning
Leverage your data assets.
Application engineering
Optimise and grow your digital investment.
Maintenance and support
End-to-end application management.
Business process solutions
Manage business processes to reduce operating costs.
Quality solutions
Independent testing for your systems and software.
We provide solutions tailored to your sector to assist you in identifying opportunities, realising value and opening up new markets.
Financial services and insurance
Insurance, risk management, banks, and fintech
Patient empowerment, Lifesciences, and pharma
Functional and emotional customer experiences online and in-store
Airlines, online travel giants, niche disruptors
Media and publishing
Content consumption for the tech-driven audience
Hi-tech and IOT
Real-time information and operational agility and flexibility to respond to market changes
Logistics and supply chain
Reimagine a supply chain that is more flexible and resilient to change
Create an exciting and engaging digital experience for students and departments
Our thinking
The latest updates to help future-focused organisations on the issues that matter most in business.

- Case studies
Managing Azure Role Assignments with Terraform
- Application Management Services , Cloud Engineering
- September 3, 2023

Atisha Shaurya
Table of contents.

Azure Role-Based Access Control (RBAC) is a powerful feature that allows you to manage access to Azure resources. With Azure RBAC , you can grant specific permissions to users, groups, or applications, ensuring they have the right level of access to Azure resources. Terraform, an Infrastructure as Code (IaC) tool, can help you automate and manage Azure RBAC role assignments efficiently. In this blog post, we’ll explore the importance of Azure RBAC and guide you through how to manage role assignments using Terraform.
Why Use Azure RBAC?
Azure RBAC offers several key benefits:
- Granular Access Control : RBAC provides fine-grained control over access to Azure resources, ensuring that users only have the permissions they need to perform their tasks.
- Security : RBAC enhances the security of your Azure environment by reducing the risk of unauthorized access and data breaches.
- Compliance : Many regulatory standards, such as HIPAA and GDPR, require strict access control. Azure RBAC helps you meet compliance requirements.
- Efficiency : Automating RBAC role assignments with Terraform streamlines the access management process and reduces manual errors.
Managing Azure RBAC Role Assignments with Terraform
To manage Azure RBAC role assignments using Terraform, follow these steps:
1. Install Terraform
If you haven’t already, install Terraform by following the official installation guide: Terraform Installation Guide
2. Authenticate Azure CLI
Ensure you are authenticated with your Azure subscription using the Azure CLI:
3. Create a Terraform Configuration
Create a new directory for your Terraform configuration and create a .tf file, e.g., rbac.tf . Add the following content to define a role assignment:
In this Terraform configuration:
- We specify the Azure provider.
- We create an azurerm_role_assignment resource, defining the principal_id , role_definition_name , and scope .
4. Initialize and Apply the Configuration
Navigate to the directory where your Terraform configuration file is located. Initialize Terraform by running:
Then, apply the configuration to create the role assignment:
Terraform will prompt you to confirm the creation of the role assignment. Enter yes to proceed.
5. Verify the Role Assignment
Once Terraform completes the deployment, you can verify the role assignment on the Azure portal or by using Azure CLI commands. For example, to list role assignments for a specific resource group:
Managing Azure RBAC role assignments using Terraform streamlines access control, enhances security, and ensures compliance with regulatory standards. By following the steps outlined in this blog post, you can efficiently assign roles to users, groups, or applications, ensuring they have the right level of access to Azure resources. This automation simplifies access management and reduces the risk of manual errors, making your Azure environment more secure and compliant.
Share this:
Suggested article, leave a comment cancel reply.
Your email address will not be published. Required fields are marked *
Save my name, email, and website in this browser for the next time I comment.
Notify me of follow-up comments by email.
Notify me of new posts by email.

How to use Azure Function and Service Bus trigger with Sessions to make sure message processing order

Creating Kotlin Multiplatform Mobile Projects: A Quick Guide!

Routing in Next.js
Automating role assignment to temporary identities
To automate role assignment to temporary identities in Azure using Pulumi, you'd typically use a combination of Azure Active Directory (Azure AD) and Azure role-based access control (RBAC). The goal is to create temporary identities (service principals or managed identities) and assign them specific roles that allow them to perform certain actions within Azure.
Below is a Pulumi program written in TypeScript that demonstrates how you can automate the assignment of a role to a new Azure AD Service Principal. This Service Principal could represent a temporary identity for your application or infrastructure service.
This program uses the azuread and azure-native packages to:
- Create a new application in Azure AD.
- Create a service principal for the application.
- Assign a role to the service principal at a specific scope.
The particular role and scope should be substituted with the ones relevant to your use case. Here, I will use "Contributor" as an example role, and the scope will be a subscription.
To use the following Pulumi program, ensure you have Pulumi installed and configured for Azure. You also need to have Node.js installed to run TypeScript programs.
Explanation
Azure AD Application : This resource represents an application within Azure AD. The application doesn't perform any actions by itself, but it's used to define an identity for applications and services.
Service Principal : Linked to the Azure AD application, the service principal is the identity you assign roles to and authenticate as from your applications or services.
Role Assignment : This specifies what actions the service principal can perform. The "Contributor" role lets the service principal manage resources in the subscription but doesn't allow it to manage access.
The pulumi.interpolate function is used to create the resource strings dynamically based on the current subscription fetched via resources.getClientConfig() . The "Contributor" role is typically suitable for most actions that a service or application might perform in Azure, but you should choose the minimum required permissions for your specific needs.
Be sure to replace the role definition and scope to match your desired role and the scope you want to apply it to. Scope can be a subscription, a resource group, or a specific resource within Azure.
When you run this Pulumi program with pulumi up , it will perform the specified actions in Azure, and you'll be able to see the newly created application ID, service principal ID, and role assignment ID in the Pulumi stack's outputs.
- TS TypeScript
- JS JavaScript
- TF Terraform
IMAGES
VIDEO
COMMENTS
The following screenshot lists the roles of an Azure Storage account. Select the role that you want to update or remove. Find the role assignment on the Eligible roles or Active roles tabs. To add or update a condition to refine Azure resource access, select Add or View/Edit in the Condition column for the role assignment. Currently, the ...
Once it is completed, go back to Azure AD directory roles home page and click on Settings. 14. Then click on Roles. 15. From the roles list, click on Global Administrator. 16. In new panel, set Maximum activation duration as 0.5 hours. Also click Enable under notification. Once settings in place, click on Save. 17. Now we have settings in place.
To enable PIM, open the Azure portal and navigate to Privileged Identity Management. Then go to Azure AD Directory Roles - Overview, and click on Wizard. Open the wizard and let it discover the admin roles setup in your tenant. Don't try to configure anything at this point. Let the wizard activate PIM in your tenant.
Approvers are automatically notified to view and approve pending requests, either individually or in bulk, via the Azure Portal or API. d View all temporary role assignments with the new "My Audit History " When you request to activate a role that requires approval, it's critical that you have a way to view the status of the request. So we are ...
Depending on your policy, you can set the policy for management group level or individual assignments to subscription level with property values that fit each individual subscription as needed. Open Azure Policy and select "Assignment" from the left side menu. You can find "Assign policy" from the top toolbar.
If you've worked in Azure, you have definitely come across managing access using Role Based Access Control (RBAC) and have been met with different challenges. Until recently, the RBAC model in Azure has been missing a key piece: the ability to enforce constraints on the delegation of role assignments. This missing piece has led to a less than ideal user experience for those managing Azure ...
Azure Role-Based Access Control (RBAC) is a powerful feature that allows you to manage access to Azure resources. With Azure RBAC, you can grant specific permissions to users, groups, or applications, ensuring they have the right level of access to Azure resources. Terraform, an Infrastructure as Code (IaC) tool, can help you automate and manage Azure RBAC role assignments efficiently.
The goal is to create temporary identities (service principals or managed identities) and assign them specific roles that allow them to perform certain actions within Azure. Below is a Pulumi program written in TypeScript that demonstrates how you can automate the assignment of a role to a new Azure AD Service Principal.
As mentioned earlier the utility will uses az CLI credentials for some tasks, which need to have permissions to create/delete temporary resource group,role assignments, and role definition.
I am working with the Az and the Graph Powershell Module, getting information about role assignments in Entra ID and Azure Resource Manager. I found that there is two commands each I can use to query information about what user has which eligible role assignments. For Entra ID:
How to do a role assignment for the resourcegroup with arm templates. Ask Question Asked 5 years, ... Temporary policy: Generative AI (e.g., ChatGPT) is banned. ... Azure ARM Role Assignment different Resource Group. 1. ARM Create nested Management Group.
SCUs can be purchased in the Copilot for Security portal or Azure portal. Figure 1: Provision SUCs in the Copilot for Security Portal . Figure 2: Provision SUCs in the Azure Portal . Customers will need to go through the first run experience to add capacity to their workspace, select data sharing settings, and define role assignments.
In my environment, I first created a Storage blob data contributor role (to access the storage account) for the user. Portal: After assigning the role, I confirmed it within the role assignment in the storage account. Portal: Now, using the Azure Python code below, I can access the storage account without an access key or SAS token. Code: