TechRepublic
Account information.


Share with Your Friends
How to Record a Video Presentation With Google Slides
Your email has been sent

Google Slides now lets you record a presentation with inset video from your webcam. Each recording may be a maximum of 30 minutes long. No longer do you need to turn to a third-party tool or web meeting app, such as Google Meet , to record a presentation. Instead, you can start and finish the task with nothing more than Google Slides on a laptop.
As of March 2024, slide recordings may be made by customers who use Google Workspace Business Standard or Plus; Enterprise Starter, Essentials, Essentials Plus, Standard or Plus; and Education Plus editions.
How to make a basic slide recording in Google Slides
To create a slide recording, you’ll need to use Google Chrome on a computer that has a camera and microphone.
- Go to Google Slides and open your presentation.
- Select the Rec button in the upper right area, then select the Record new video button ( Figure A ).
The system will switch to the screen recording interface, with recording controls displayed below your slides. By default, the system will display your inset (picture-in-picture) video in medium size in the lower right corner of a slide, since this portion of a slide is often empty.

- Optionally, before you start recording, you might adjust three settings:

- Modify the size of the inset video frame. Select the size icon, found to the right of the video inset location icon, then choose either a small, medium or large video frame size.
- Open speaker notes with the button found to the immediate left of the back slide (<) icon. This will display speaker notes for your reference while recording. (Ideally, you would not need to refer to speaker notes, so that you could instead look directly at the camera as you record.)
- When you are ready to record, select the large red button at the bottom of the screen.
- If prompted, you may need to allow access ( Figure C ) to the tab, along with the camera and microphone. For example, when recording on a Chromebook, you may be prompted to “Allow docs.google.com to see this tab?” and “Also allow tab audio.” Select Allow, if prompted.

In a few cases, you may need to visit the following links in Chrome to adjust permissions for:
- Camera: chrome://settings/content/camera.
- Microphone: chrome://settings/content/microphone.
- A brief countdown should display (i.e., 3, 2, 1), then your recording will begin. Record your video, advancing your slides as desired.
- To pause recording, press the large red button at the bottom of the screen.
- Once paused, you may select from two options ( Figure D ):

After you select Save to Drive, wait a bit until the system indicates the file has been saved. If you leave or close the tab too soon, you may lose your recording.
How to select inset video shapes and sizes
On any slide, you may use the Insert | Speaker spotlight option ( Figure E ), then select a shaped video frame. This inserts a frame where the speaker video will display on that slide. You may reposition or resize the frame: Select the shape, and then drag-and-drop it to move it to a different place on your slide, or select a corner and drag it to resize it.

When you insert a speaker spotlight shape, that supplants the position and size you might have selected on a basic recording. In other words, the speaker’s video will display in one of the corners or the center, and in the small, medium or large shape chosen with the settings — unless you’ve inserted a speaker spotlight shape on a page ( Figure F ). Use the speaker spotlight option to convey the most polished professional effect, since it allows precise control over the shape, size and location of a video frame.

How to play, share and manage slide recordings
You may access slide recordings within Google Slides on a computer. However, unlike recording, which requires you to use Google Chrome, you may access and play existing recordings within Google Slides on a variety of modern browsers. For example, the following steps all work when you use Google Slides within either Google Chrome or Apple’s Safari browser.
To access recordings associated with a Google Slides presentation, follow these steps.
- Select the Rec button in the upper right area. The recordings you’ve made of the presentations will display. Importantly, the system shows both the date and duration of each recording.
- To view, share or download a recording, click anywhere on the playback icon or title of the recording ( Figure G ). It should open in a new tab. Within this tab, you might:
- Select the Play icon in the center of the video image to play the recording.
- Select the Share button in the upper right corner of the screen to modify access settings and give other people access to the file.
- Select the Download icon in the down arrow above a tray icon in the upper right area of the screen to download the file.

- Select the three dot menu to the right of a listed recording to:
- Rename a file something other than the default recording title.
- Remove a previously made recording you no longer need.
- Copy link and obtain the Google Drive URL for the recorded file.
All Google Slides recordings are stored in a Slides recordings folder on Google Drive. The recordings are saved as .webm files, which is a widely supported web video format. You may easily open and play .webm files on both Apple and Android mobile phones. Any recordings you make using Google Slides should be easy to view on almost any device.
Does the ability to record a presentation within Google Slides streamline your workflow? What sorts of video presentations will you create with this new capability? Mention or message me on X ( @awolber ) to let me know how you use screen recording within Google Slides.
Subscribe to the Google Weekly Newsletter
Learn how to get the most out of Google Docs, Google Cloud Platform, Google Apps, Chrome OS, and all the other Google products used in business environments. Delivered Fridays
- How to share video with Google Sites
- How to present Google Slides in Google Meet
- Prezi announces Google Slides integration
- Google Meet: A cheat sheet to the app and platform features
- Google Meet: 3 presenter controls for smoother presentations
- Best software for businesses and end users

Create a TechRepublic Account
Get the web's best business technology news, tutorials, reviews, trends, and analysis—in your inbox. Let's start with the basics.
* - indicates required fields
Sign in to TechRepublic
Lost your password? Request a new password
Reset Password
Please enter your email adress. You will receive an email message with instructions on how to reset your password.
Check your email for a password reset link. If you didn't receive an email don't forgot to check your spam folder, otherwise contact support .
Welcome. Tell us a little bit about you.
This will help us provide you with customized content.
Want to receive more TechRepublic news?
You're all set.
Thanks for signing up! Keep an eye out for a confirmation email from our team. To ensure any newsletters you subscribed to hit your inbox, make sure to add [email protected] to your contacts list.
How to Record a Presentation on Google Slides
Recording a presentation can be an excellent way to share information asynchronously, ensure consistent delivery, or prepare for a virtual audience.
While Google Slides is a widely used tool for creating presentations, it does not have a built-in feature to record presentations directly. However, there are effective ways to record your Google Slides presentation, including narration, using various tools and techniques.
This guide will walk you through the process and share some best practices to ensure a professional and engaging recording.
2 Million+ Google Slides Themes, Presentation Templates + More With Unlimited Downloads
Download thousands of Google Slides themes, and many other design elements, with a monthly Envato Elements membership. It starts at $16 per month, and gives you unlimited access to a growing library of over 2,000,000 presentation templates, fonts, photos, graphics, and more.

Creative Template

Alloyz Business Template
Google slides.

Kloe Minimal Template
Clean & simple design.

Delica Google Slides
133+ unique slides.

Company Profile Template

Ciri Slides Template
Clean & minimal.
Explore Google Slides Themes
Step 1: Preparing Your Google Slides Presentation
Ensure that your presentation is complete with all the necessary content, animations, and transitions. It’s important to rehearse and familiarize yourself with the flow of the presentation.
If you plan to include narration, use the speaker notes section at the bottom of each slide to jot down key points or a script for your presentation.
Step 2: Choosing a Screen Recording Tool
Since Google Slides does not natively support recording, you will need to use a screen recording tool.

Choose a screen recording tool that suits your needs. Popular options include Loom , ScreenPal , and OBS Studio . Many of these tools offer free versions with basic features.
Before recording your presentation, spend some time getting to know the screen recording software. Learn how to start and stop recording, how to include your webcam (if desired), and how to capture audio.
Step 3: Setting Up for Recording
Proper setup is crucial for a high-quality recording.
Check Your Microphone and Webcam
If you are including narration or a video of yourself, ensure that your microphone and webcam are working properly. Do a test recording to check the audio and video quality.
Eliminate Distractions and Interruptions
Record in a quiet, well-lit room. Turn off notifications and other potential interruptions on your computer to ensure a smooth recording.
Step 4: Recording Your Presentation
Now you’re ready to record your presentation.
1. Open Your Presentation

Launch your Google Slides presentation and open the screen recording tool. You may have to sign-in to your account, depending on which screen recording tool you use.
2. Start Recording

Begin the recording following the screen recorder’s instructions. For example, when you open Loom, it gives you an interface with several options for recording your presentation.
You can choose whether to record fullscreen or a specific window, include your webcam, and much more.
Once you hit the Start Recording button, it will even give you a countdown to begin the recording. But that feature is only available in Loom.
It’s usually a good practice to wait a few seconds before starting your presentation to ensure the recording captures everything.
3. Deliver Your Presentation
Go through your slides at a steady pace. Use your speaker notes as a guide, but try to sound natural and engaging.
4. End the Recording
Once you’ve reached the end of your presentation, pause for a few seconds and then stop the recording. Save the file in your preferred format and location.
Step 5: Editing and Sharing Your Recorded Presentation
After recording, you might want to edit your presentation for a polished look.
Edit the Recording
Use video editing software to trim the start and end of the recording, remove any mistakes, or add additional elements like music or text overlays.
Free video editing apps like Clipchamp and CapCut are perfect for these simple projects.
Share Your Presentation (Optional)
Upload your recorded presentation to a video-sharing platform like YouTube, Vimeo, or Google Drive, and share the link with your audience.
Some screen recording tools, like Loom, allow you to host your videos and share directly from the platform as well.
Tips for a Successful Google Slides Recording
1. practice makes perfect.
Before hitting the record button, practice your presentation several times. This will help you speak more fluently, maintain a good pace, and reduce the number of pauses or errors during the actual recording.
2. Control Your Speaking Volume and Speed
Speak clearly and at a moderate pace. Avoid speaking too quickly, as this can make it difficult for your audience to follow along. Also, modulate your voice to emphasize key points and keep the presentation dynamic.
3. Test Audio and Video Quality
Do a trial recording to check the audio and video quality. Make sure there’s no background noise, and the microphone is picking up your voice clearly. If using a webcam, check the lighting and camera angle.
4. Utilize Editing to Refine Your Presentation
Post-recording editing can significantly enhance the quality of your presentation. Use editing tools to trim unnecessary parts, correct errors, or add additional visual elements like captions or transition effects.
5. Be Conscious of File Size and Format
Larger video files can be difficult to share and may not be easily accessible to all audience members. Optimize your video for a smaller file size without significantly compromising quality. Also, choose a widely compatible video format like MP4.
6. Plan for Audience Questions
If your recorded presentation is part of a larger event, plan for a live Q&A session afterward or provide a way for viewers to submit questions, such as through a form or email.
In Conclusion
Recording a Google Slides presentation might seem daunting at first, but with the right tools and preparation, it can be a straightforward and rewarding process. By following these steps and best practices, you can create a professional and engaging presentation that resonates with your audience, regardless of where or when they view it.
How-To Geek
Google slides can turn your presentations into videos.
A long-standing PowerPoint feature has made it to Google Slides.
You've probably watched recordings or videos of presentations, which are usually screen recordings with a mismatched aspect ratio, random popups from other applications, and other issues that are distracting. Google Slides is now rolling out the ability to record and save a presentation as a high quality video, all in the web browser.
Google announced the feature today in its Google Workspace Updates blog. The company said, "We’re introducing slides recordings, a new Google Slides feature that lets you easily record yourself presenting, and then share the presentation with others to view when it works for them. From webinars, to employee trainings, to lessons for your classroom, slides recordings help you effortlessly record visual and engaging presentations without ever leaving Slides."
The recording functionality, accessible from the new "Record" button in the main toolbar, will open a new screen where you can start a recording of the presentation. You can change slides at your own pace and turn your microphone and camera on and off at any point. Google said in the blog post, "This feature helps you share more engaging video presentations with others for easy, flexible viewing. Whether sharing video content inside of your company or externally, with slides recordings you don’t need to use a separate video recording tool."
The ability to export presentations as videos has been available in Microsoft PowerPoint, the main competitor to Slides, ever since PowerPoint 2010 . Back then, you could only export your presentation in MP4 format at a maximum resolution of 1280x720. The result was just the presentation with automatically changing slides, rather than a recording of a person giving the presentation. Microsoft eventually added the ability to save narrations and laser pointer gestures for each slide, as well as exporting at resolutions of up to 4K. PowerPoint also has a special "PowerPoint Show" export format, which starts playing the presentation immediately when someone else opens it with PowerPoint.
Unfortunately, the new Google Slides feature is currently limited to business and education Google accounts, not personal accounts. That's a shame, especially when PowerPoint's equivalent feature is available to everyone with the desktop PowerPoint application installed. Here's hoping the record feature eventually rolls out for everyone.
Source: Google Workspace Updates Blog
Educircles.org
This tutorial will show you how to teach lessons online by recording a Google slides lesson with audio and video.
Recording your Google Slides presentation is something you might want to do if you have to teach using distance learning and you want to create some digital resources for your students.
So, in this tutorial, I will show you
- How to record a video of you teaching a lesson using Google Slides.
- Some free software that you can use to record screencasts.
- How to upload the video to Google Drive
- How to get a link to share with your students (if you’re a teacher.)
NOTE: This video is also good if you’re a student:
- Instead of teaching a lesson, you’re probably recording a presentation for your teacher.
- At the end, you can use the link to share your video with your teacher to hand in your homework.
Resources you need for this tutorial
A couple of things to know before we start…
- You need a microphone. Maybe your laptop has a microphone, or maybe you want to wear a headset.
- The free software to record the screencast (I’ll show you how to get it in a second) and
- of course you need a Google account.
You do not need a webcam because we’re not doing any video of ourselves. So you can record in your pyjamas or with bed head, and no one will be the wiser.
What software can I use to record a Google Slides presentation (screencast)?
Free screencast software option #1: apowersoft free screen recorder.
I use something called Apowersoft Free Screen Recorder and I use the version from CNET – it’s a very specific download that I use.
I like it because…
- it’s free (it’s not a trial version.)
- There is no time limit to how long of a Google Slideshow video that you can record.
- There’s no watermark.
Of course, because it’s free, it’s a basic version with zero editing features.
(This means you have to record everything in one cut… or use another program or the premium version to edit together your video.)
PRO TEACHER TIP:
- If you record short teacher videos, it’s easier for you to record and maybe less intimidating for your students to watch (i.e. it’s not too long.)
- Also, shorter videos with good titles might make it easier for students to find what they’re looking for later on if they want to review a lesson.
Free Screencast Software Option #2: FlashBack Express
I’m going to show you how to get the Apowersoft download from CNET but of course I’m also recording this screencast of me doing a tutorial of a screencast, so the second screen recorder I’m exploring right now is called FlashBack Express.
SIDE NOTE: It seems like it’s a little easier to trim the beginning and end of a video using FlashBack express, but I find it takes longer to save the video, and I have to go in and set the resolution of the recording myself or the video looks kind of pixelated.)
Video Tutorial:
How to record a google slide presentation for distance learning.
Click here to watch the tutorial on YouTube
Okay so let’s go to Google. If I Google Apowersoft Free screen recorder, I get a couple of options.
The first few are from the official website – they’ve updated the software, which is great, but now this version is a free trial version and so it doesn’t have all of the features that the old version used to have.
I want to go to this CNET link which has an old version of the software, and I know this is the one I want because it has a blue camera icon with a red dot. I just click download here to get it from CNET.
I have already installed this, so I’m going to do a demo screencast of this slideshow about critical thinking.
When the software opens up, it’s going to right away show me a region that I can record. I probably want to record just my screen, so present the slideshow and change the bounding area (the recording area) so it just records the size of the slides in my Google slides.
A couple of things:
You want to wait for your Google slides to completely load. There is a loading bar at the bottom of the screens. You can start your slideshow before the loading bar is completely done, but your animations and transitions may look a little bit choppy. I recommend waiting until the Google slides was completely loaded so that your animations look great.
This is the recording toolbar from the screenshot software I’m using.
- I could go fullscreen and record everything or
- I can just record a region.
There’s an option for video – you can choose between your WebCam or your screen.
There’s an option for audio – right now I’m just recording my microphone.
You may want to choose the system sound and microphone setting if you have a video playing on your computer (in your lesson) and you want to record the sound from the video and your lesson.
Just be aware, the system sound also includes things like “bing” sound effects – like when your windows open.
Couple of other things on the side here.
- I have options and I could turn off the recording toolbar once I start recording if I don’t want it in. If you leave it on the screen, it will be part of your slideshow. (Unless you drag it to the side offscreen.)
- If I click on record (I can see there is) no watermark and the microphone is on.
- I’m going to click okay and so it counts down and then I can start my lesson.
- Once it starts recording, I’m going to make sure that I click on the window with the slideshow to make sure that I’m in the slideshow and then I can use the right and left cursor buttons on my keyboard so that I can slide through the slideshow and that way I don’t have to worry about accidentally moving my mouse when I click on the screen to move forwards.
When I stop recording on this video…
- it will automatically start playing back what it recorded.
- There’s a save button here.
- Even though there’s an option here to change and trim out the beginning and the end to get the exact section I want to record, I find that this older version of the software is a little bit glitchy, and sometimes I’ll set it to record a certain part and then it won’t actually record that part it. (It won’t actually trim to that spot.)
- So, I find it’s best in this free software just to start a presentation right away and then at the end leave a few seconds (of silence) as I end it.
So I’m going to close this – I’m not going to say that version.
I can see my slideshow here. My Google slides is here and the toolbar here is ready to record so I’m gonna hit record and then I’m going to move the toolbar out of the way and I’m gonna start this lesson.
Am I ready yes move that all the way…
SAMPLE LESSON ON CRITICAL THINKING:
Okay, today we’re going to start a unit on critical thinking and before we can talk about critical thinking , I’m just going to ask you a few questions to get your minds on and ready for this lesson.
So, the first “minds on” question is this: What is thinking and what does it mean to think?
So I’m going to get you to pause the video and I’m going to have you jot down on paper or in a Google Docs, what is thinking what does it mean to think?
So, pause the video and jot down some ideas.
Okay, we’re back. So, I’m going to ask you a second “minds on” question and it’s this:
What is critical thinking, and how is critical thinking different from regular thinking?
So, on your jot notes page, jot down a few ideas and pause the video. How is critical thinking, different from regular thinking? Pause the video.
Here is the third, final “minds on” question: How is critical thinking different from being critical of someone else’s ideas?
So, sometimes you might say, oh, that person is criticizing someone. Well, what’s the difference between critical thinking and being critical of someone or someone else’s ideas?
Pause the video and jot down some ideas about how is critical thinking different from criticizing someone.
Pause the video.
Okay, so now that you’ve had a chance to think about critical thinking, I’m going to have you write a paragraph response and I’m going to give you two options.
The first paragraph question is this: Why do we need to think critically?
So, if you choose this option, you look at your jot notes and you write a paragraph. Why do we need to think critically?
Or, option number two: What might happen when we don’t think critically?
So, if you choose the second option, you look at your jot notes from the previous “minds on” questions and you write a paragraph. What might happen when we don’t think critically?
To recap… You’re going to write a paragraph to one of these two questions:
- Option #1. Why do we need to think critically?
- Option #2. What might happen when we don’t think critically?
Once you write your paragraph, hand it in and tomorrow in our next lesson, we’re going to be looking at critical thinking.
So I paused this video. Apowersoft is automatically playing back what I had.
I can see that the lesson started around seven seconds.
If I move this scrubber to seven seconds, I can see the time at the beginning.
So if I move my mouse over the blue triangle – It changes into a white line with two arrows. That’s how I know I can move it backwards and forwards.
If I jump to the end of the video – I can see that even though I jumped forwards, the software is a little bit glitchy and it got rid of my blue timeline area.
So what I do is, on a separate piece of paper, I just write down when I want the video lesson to end (in this case at 242)
I know that because at the bottom here in white, it says 242 in the timeline.
At the beginning, I think I want to start around seven seconds. Maybe, I will start it at five.
Click and drag from around five seconds to three minutes.
(It automatically starts playing back my voice so just pause it.)
I’m just going to move my mouse – hover over the blue triangle
I’m gonna move it to around seven seconds to begin with and then at the other and I’m to move it to around 242 (and I know this because I watched the video and then I just wrote down sometimes.)
So now I have this blue area where I’m going to save.
I’m going to hit the save button… save as a video …file and I can play the video
(I’m not entirely sure that cropped any sounds – and I’ve found, sometimes in the past, this software is not great at trimming at the beginning.)
I’m just going to go to the end of the video…
Okay, so that looks pretty good. I’m pretty happy with that.
… If I open the folder to see where it saved it. It shows me this place where it saves all the videos.
It automatically records
- the first file was just a trial that we had
- the second one is once it records, it saves the file right away.
- this top file here – This is the one I want to upload.
So, I’m just going to rename the file. I’m going to call it Minds On Critical Thinking.
I’m going to play it just to double check this is the video I want.
If I go back to the recording software, I have to click done. If I click anywhere else, it will just beep at me. But, if I click done, there’s a couple of options here:
- this one is to save the file to the cloud. I’m not going to use it. It uploads it to a service that they have here ShowMore. That’s what they’re using. I don’t want to use.
- I could click this button over here that says share. But, I find I don’t actually use these options. It just opens up the Google Drive and I can do that manually myself.
Okay, so I’m going to hit cancel. So I have saved this. I’m going to close the recording. it automatically goes back to recorder. I’m going to close that software.
I’m going to go to my Google drive.
This is the folder where I want to upload my video.
What I’m gonna do is just drag the video file from the folder where it was saved into Google Drive.
Now it is uploading the file into Google Drive.
I find initially, it may take a few minutes for Google to process the video.
So, if I try to watch it right now, I’ll get this message that says, “hey, we’re processing the video. Check it out later” and later on, it will be fine.
I’m going to just escape and get out of that.
But now that it’s up here in my Google folder, I can get the link to share with somebody.
So if I right–click here on the file name, I can click on share and I can choose some options.
I can get a shareable link up here.
- I might change it so that only the people in my school can see it.
- I might change it so that anyone can see it.
If I click on more, I have…
- the option to make the video link either public on the Internet or
- I can make it so that anyone who has the the specific link can find it.
If I choose the top two versions, it means they don’t have to sign in. They can just watch it and that might be what works for you.
Or, you may choose it so that only people at your school or organization can view this.
Or, you might decide, hey, I don’t want that it all. I don’t want to link share and what I can do is then type in people’s names directly and share the video like a normal Google doc.
I’m going to copy this link. And now if I open a new window, if I pasted the link in here, the video will show.
This was the link that I would share with my students or with my teacher.
So that was a tutorial on how to record a Google slide presentation that includes audio and video.
- Affiliate Disclaimer
- Privacy Policy
- Terms & Conditions
eLearning Desk
Your Online Learning Guide
How to Record a Google Slides Presentation (with Audio & Video)

Whether you’re teaching an online class or having an important meeting, recording your Google Slides presentation can come in handy later for your or your students’ reference.
Stay with us as we break down how to record a Google Slides presentation with audio and video using free software.
- 1.1 Step #1: Ensure You Have the Required Resources
- 1.2 Step #2: Install Required Software
- 1.3 Step #3: Run the Tool
- 1.4 Step #4: Set Up Your Presentation
- 1.5 Step #5: Prepare to Record
- 1.6 Step #6: Start Recording
- 2.1 Related posts:
How to Record a Google Slides Presentation (with Audio & Video)
Before you can begin recording your Google Slides presentation, you will need a few things:
Step #1: Ensure You Have the Required Resources
- A microphone (you can use your laptop’s mic or wear a headset)
- Recording software (we touch on this in the coming section)
- A Google account
Step #2: Install Required Software
There are several software tools available online for free that you can use to record a Google Slides presentation. For the sake of ease and clarity, we use Apowersoft, a free tool that you can download from CNET .
After downloading the executable, double click on it to run it and complete the wizard to install.

We recommend using this tool because it is 100% free to use and does not limit how much of your presentation you can record.
While an earlier version of the tool did not add a watermark to recorded videos, in the new version, you will have to sign up with Apowersoft to record videos without a watermark.
It’s important to remember that the basic tool does not offer any editing features. In other words, you will need to record your presentation in one take or use another editing program to piece together the clips of your presentation.
If you’re a teacher, we recommend recording short videos since they’re convenient to make and also easier for students to watch.
Step #3: Run the Tool
When you launch Apowersoft Free Screen Recorder, it will show you the region you can record with the tool right away.

You can change the region the tool will record by moving the recording area around by clicking and dragging the button in the middle. You can alter the bounds of the recording area by simply dragging the bounds as you please.
Alternatively, you can click on the “Full Screen” icon on the panel on the bottom. Since you need to record a Google Slides presentation, this is the button you want to click.
It’s also important to set up the tool correctly before proceeding to the next steps. If you look at the Apowersoft recorder’s panel, you will find video and audio options next to the record button on the left.

Ensure that the tool is set to record your screen and not your webcam and that the tool is recording audio from the correct microphone.
Note that if there is a video in your slideshow, you will need to record the sound from your computer.
Remember that choosing to record the system’s sounds also means that your computer’s error sounds (“bing”) and all other system sounds may also be recorded.
Step #4: Set Up Your Presentation
Before you can start recording, navigate to slides.google.com and find your presentation. Next, click on the “Slideshow” button in the top right corner. This will display the presentation in full-screen mode.

It’s important to ensure that your slides on Google slides load completely before you start recording. If all the slides aren’t fully loaded, the transitions from slide to slide may look choppy in your recording.
Step #5: Prepare to Record
When both the recording tool and your presentation are ready, you can hit the record button on the panel. Clicking the button will make a popup appear. If you have logged into your Apowersoft account, it will record without a watermark.
You will also see the hotkeys you can use to control the recording in the popup.

If you hit the “OK” button, a 3-second countdown timer will appear before the tool starts recording. If you don’t want the Apowersoft recorder’s panel to appear in your recording, like in the following image:

You will need to navigate to the options menu by clicking on the three dots button on the right side of the panel.
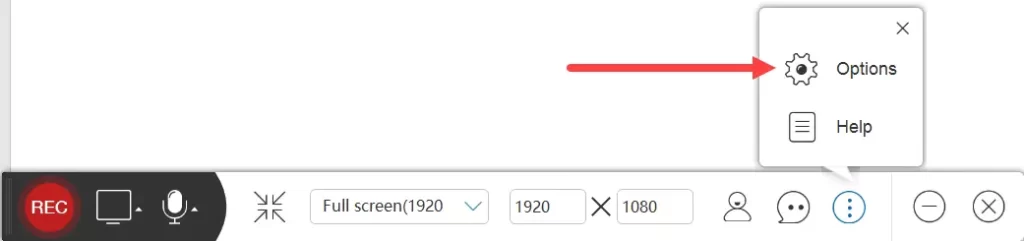
You can then toggle the “Show recording toolbar” option off from the options menu.

You can also change several other settings from this menu, including the recording format and the “Record” and “Stop Recording” keyboard shortcuts.
Step #6: Start Recording
Navigate to your slideshow window and click the “Rec” button. The tool will start recording after the countdown. You can go through the slides by pressing the right and left buttons.
One of the most useful features of this tool is that it allows you to pause recording at certain points if you need a moment to proceed to your next talking point.
If you’ve left the recording panel enabled, you can use it to pause the recording whenever you want.
Alternatively, you can press Ctrl-Alt-F3 to pause the recording. After you’ve caught up with the talking points or taken a moment to focus, you can press Ctrl-Alt-F1 to start the recording again.
After you finish recording the slideshow, press Ctrl-Alt-F2 to stop recording. The tool will then automatically start playing the video you recorded, and you can go through it.
You can use the handles on the extreme left and right of the player to trim the beginning and end of the video.
However, we suggest that you do not do any trimming with this software since it sometimes ruins the recording by not trimming at the correct point.
If you’re satisfied with the recording, click on the “Save” button on the bottom right to save the video.
A menu with a default name for the recording and the folder where it’ll be saved will open up.
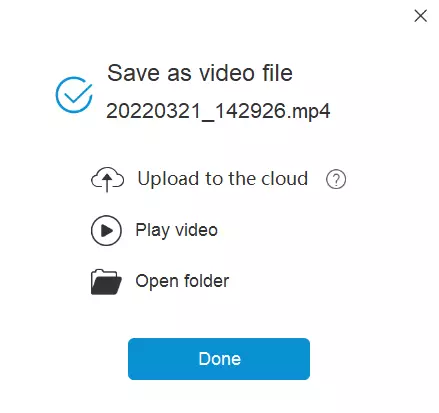
You can rename the file from this menu without any hassle. You can also select where you want to save the video from the “Open Folder” button.
If you’ve signed up with Apowersoft, they will offer you free cloud storage to save your videos. You can upload the video directly to the cloud storage by clicking on the “Upload to the cloud” button in the Save menu.
Alternatively, you can upload the video you recorded straight to YouTube, Vimeo, Google Drive, or Dropbox by clicking the “Cloud” button instead of the “Save” button.
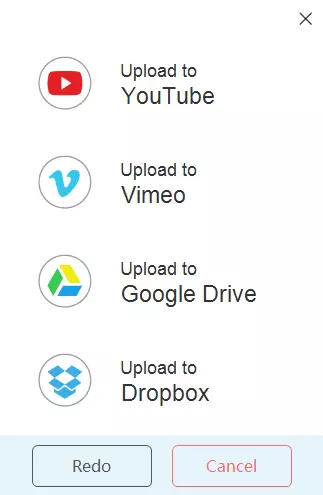
If you are a teacher, saving the video to Google Drive may be the right way to go. You can easily share the video with your students by making the video sharable and sending them the link to the file.
How to Convert Google Slides to PowerPoint in Simple Steps
While there are many ways to record a Google Slides presentation, using the Apowersoft free video recorder is one of the easiest ways to go about it.
The software is quite intuitive, and you should be able to figure out what buttons perform which function without expressly reading through this guide.
That being said, learning all the functions before you begin using the tool is an excellent way to ensure you get the most out of the tool and make a solid recording for your future reference or for your students.
Related posts:
- 10 Top Disadvantages of Online Classes
- 15 Huge Benefits of Online Classes
- The Role of Operating Systems
By Maverick
This is Maverick. During Covid-19 Pandemic, A School Teacher turned into an online Instructor. Here I Share How you can build your own Online School and offers eLearning to your Students. I'm trying to make the eLearning Desk a resource for Students as well as for Teachers.
Related Post
10 ways to use a document camera for online learning, 10 best free drawing apps for students and digital artists 2024, 10 best wireless microphone for teachers in 2024.
Create shareable video presentations in Google Slides
What’s changing.

Who’s impacted
Why it’s important , additional details , getting started .
- Admins : There is no admin control for this feature.
- End users : Visit the Help Center to learn more about recording a slideshow, finding your recording, sharing your recording, removing a recording and more . Please note that recording-creation is only accessible using Google Chrome on your Desktop. Recordings cannot be created on mobile devices and are not accessible from the Slides mobile app. However, you can find and view your recording using the Drive mobile app.
Rollout pace
- Rapid Release domains : Extended rollout (potentially longer than 15 days for feature visibility) starting on January 2, 2024
- Scheduled Release domains: Gradual rollout (up to 15 days for feature visibility) starting on February 1, 2024
Availability
- Available to Google Workspace Business Standard, Business Plus, Enterprise Starter, Enterprise Essentials, Enterprise Essentials Plus, Enterprise Standard, Enterprise Plus and Education Plus
Resources
- Google Help: Use slides recording in Google Slides
Filter by product
- Accessibility
- Admin console
- Cloud Search
- Directory Sync
- Drive for desktop
- Education Edition
- G Suite for Education
- G Suite for Government
- Google Apps Script
- Google Calendar
- Google Chat
- Google Classroom
- Google Cloud Directory Sync
- Google Docs
- Google Drawings
- Google Drive
- Google Forms
- Google Hangouts
- Google Keep
- Google Maps
- Google Meet
- Google Meet Hard
- Google Meet Hardware
- Google Photos
- Google Sheets
- Google Sites
- Google Slides
- Google Tasks
- Google Vault
- Google Voice
- Google Workspace
- Google Workspace Add-ons
- Google Workspace for Education
- Google Workspace Marketplace
- Google Workspace Migrate
- Marketplace
- Microsoft Exchange
- Microsoft Outlook
- Premier Edition
- Rapid Release
- Rapid Releases
- Scheduled Release
- Security and Compliance
- Weekly Recap
- What's New
Filter by date
Subscribe by feed, subscribe by email, localized google workspace updates, useful links, join the official community for google workspace administrators.
In the Google Cloud Community, connect with Googlers and other Google Workspace admins like yourself. Participate in product discussions, check out the Community Articles, and learn tips and tricks that will make your work and life easier. Be the first to know what's happening with Google Workspace.
______________
Learn about more Google Workspace launches
On the “What’s new in Google Workspace?” Help Center page, learn about new products and features launching in Google Workspace, including smaller changes that haven’t been announced on the Google Workspace Updates blog.
How to Record a Presentation on Google Slides?
- Share on Facebook
- Share on Twitter
By Nikolay Kaloyanov
in How-To Tutorials
2 years ago
Viewed 3,512 times
Spread the word about this article:
Recording your presentation can be a very powerful move, as you don’t want to embarrass yourself in front of your audience. Instead of relying on your “inner feelings”, you can check how you sound, how you look, what gestures you make, and how well you play with words and details.
For this guide, we will use some of the most popular online tools on the market (Panopto and Loom) and some totally free options for Windows and Mac computers.
Article overview: 1. Why do people record their presentations? 2. How to record a presentation on Google Slides using Panopto? 3. How to record a presentation on Google Slides using Loom? 4. How to record a presentation on Google Slides using Microsoft Windows? 5. How to record a presentation on Google Slides on a Mac? 6. Other tools you can try
1. Why do people record their presentations?
There is a reason why people record their presentations. Unfortunately, you don’t know how your voice will sound or articulate when you are presenting. In such situations, it will be best to record your presentation to see if there is something you need to change before doing it live. Also, recording your presentations is a very good way to remember what you are about to say. But let’s see the main use cases when recording your Google Slides presentation will make great sense:
- Practice your presentation skills – you can’t hear yourself while talking. That is why recording your voice might be a good indicator of how you present. Is your tone of voice smooth? Do you need to raise it? Are you mumbling or “like”-ing? Recordings can help you identify problems in advance.
- Save valuable time – instead of recording each lecture, you can save your efforts once, and later sent them.
- When you have stage fright – not everyone has the natural confidence of Elon Musk. If you are a shy person who gets terrified when speaking in front of huge audiences, recording your presentation is a great move.
- Avoid distractions – during live presentations, interruptions are more common which can affect your flow. A recording of your presentation at home can later be sent as a follow-up.
2. How to record a presentation on Google Slides using Panopto?
There are plenty of tools that could be utilized, so feel free to use anything which you might find suitable. Panopto is a good option since it doesn’t require us to download a software extension, and it has a free plan which is more than enough for starters. Your videos are also stored on Panopto’s drive, so you will avoid issues with cluttering your computer or mobile device.
✔️ Panopto is very easy to use.
✔️ The software is cloud-hosted.
✔️ Speech and OCR (optical character recognition).
❌ Pricing model is scaling.
❌ Slow rendering process.
❌ Issues with captions.
Step 1. Open Panopto.com
When you open the website, you will see there are plenty of options out there.
Step 2. Click on “Record”
Once you’ve opened the website, click on the big red button “Record” (next to Company and before Get Started ).

Step 3. Select your Audio, Video, and Screen Options
The browser will ask for permission, so make sure you grant Panopto access to your webcam(s) and audio source(s). Usually, if you don’t have more than one source, they will be launched by default.

Step 4. Choose what to share
Now, you have to click on Screens and Apps , and select your preferred option.
Entire screen (if you have 2 or more, you can either select one of the screens or all of them), a Window , or a Chrome Tab .

Step 5. Fix the settings
When you click on the “Settings” button (in the bottom right corner), there will be a menu that you can access.

Step 6. Start recording
Click on the big circle in the center to start recording.

Step 7. Save your recording
Once you end your recording, you can send it to Panopto , YouTube , Classroom , or download it on your computer.

3. How to record a presentation using Loom?
Loom is among the most used recording pieces of software globally. It is great for teamwork and has a lot of collaboration tools. Let’s see where it shines.
✔️ It is very easy to use.
✔️ You can share the videos with a single click.
✔️ Developers are constantly updating the app.
❌ The 5-minute free plan is not enough for long projects.
❌ It renders the videos slowly.
❌Lack of options to insert tags and notes in a video.
Step 1. Open Loom.com
The first step is to launch Loom. Just like Panopto, it’s an online-based service, so you don’t have to download or install anything.
Step 2. Sign up
Now, you have to open an account. The good news is you can use your Google Account to log in.
Step 3. Enter the recording settings
In order to start recording, click on New Video , and then from the dropdown menu select Record a video .

Step 4. Start the recording
Once you have selected whether or not you will use your Screen, Camera (or both), you can add some specific options and start recording. You’re limited to five minutes on the free plan, so don’t waste much time.

Step 5. Pause/Finish the recording
On the bottom left corner, you will have the option to pause or finish (the red square button) the recording. Before saving, you will have the options to Trim the Video, change the title (Loom | Free Screen & Video Recording Software – Day/Month/Year is by default), and make some Video Preferences.
Step 6. Share the video

Video Tutorial
4. How to record a presentation using Microsoft Windows?
There is also a free way to record presentations on your Windows computer. If you use Windows 10 or 11, this might be a good option.
✔️ You don’t have a record limit (as long as you have memory).
✔️ It is totally free forever.
❌ It is a very basic recording option.
Step 1. Open Game Bar
Many of you may seem surprised, but Windows has a built-in recording tool. It’s called Game Bar. To access it, you need to press the WIN + G . Of course, make sure it is enabled first.
Step 2. Click on “Capture”
The Capture button is next to the sound button. It will unlock you with the option to record.

Step 3. Click on “Record”
Click on the Record button which is the third from left to right. You can also start recording with Win + Alt + R .

Step 4. Record your clip
Now, you can freely record your clip.
Step 5. Delete or save the clip
Once you have filmed your presentation, you can either go to the folder where your file is stored, or delete it.
5. How to record a video on a Mac?
Last but not least, we have another free option for Apple users.
✔️ QuickTime is free forever.
✔️ There are plenty of recording options.
✔️ You can record an unlimited time.
❌ You are storing the files on your Mac.
❌ Not available on desktop PCs for free.
Step 1. Open QuickTime
The first thing you need to do is open your QuickTime.
Step 2. Click on File -> New Screen Recording
Once you’ve opened QuickTime, you have to select File -> New Screen Recording .
Step 3. Select what portion you would like to be recorded
There are several options that you can choose from.

Step 4. Start recording
After you have selected what portion of your screen you will record, you are free to start recording your screen. You have plenty of options for convenience, such as a timer, built-in microphone, where to save the recording, etc.
Video tutorial
6. Other recording tools
Of course, these 4 are just the tip of the iceberg. There are many more apps that also deserve attention but couldn’t rank higher on our list. Let’s see which they are:
- Zoom – Zoom is one of the most popular presentation software on the market, and the only reason it doesn’t appear here is because of its significance. We have prepared a separate tutorial on how to record a presentation in Zoom .
- AnyMeeting – it’s a very powerful presentation recording software. However, over the past few years, it lost some of its sheer power and it got passed by different platforms that offer much more versatility at more affordable prices.
- Camtasia – what we love about Camtasia is that you can create a next-level video experience. The cross-platform functionality is a great addition. However, it seems too hard for small tasks and the $300 purchase is not the value we are looking for here.
- OBS Studio – it’s a top solution for cross-platform live streaming. It has high-end functionalities and it is open-source. That’s great but there’s a catch – it’s too complicated for the average user.
- Debut – Debut is a great free tool that allows webcam recording and presentation recordings, too. However, it’s not compatible with any other OS than Windows, and the user interface looks dull.
- Screencast-O-Matic – it’s a very simple and effective tool but you need to pay a decent amount of money to get value out of the app. The free version doesn’t support HD recordings which limits its capabilities a lot.
Many people wonder how to record a presentation on Google Slides. Fortunately, there are many programs, and you can easily switch to anything you want. We have found that QuickTime and the Game Bar are amazing options for unlimited recording which also comes for free. However, if you’d like to upload your content online with a click of a button, you might fight Panopto and Loom better.
If you liked our presentation about screen recording, you can find these tutorials helpful, too:
- How to Write Scannable Content? Step-by-Step Guide
- How to Convert Your PowerPoint Presentation into Google Slides
- How to Start and End a Presentation: 10 Practical Tips to Grab Attention and Make an Impact

Add some character to your visuals
Cartoon Characters, Design Bundles, Illustrations, Backgrounds and more...
Like us on Facebook
Subscribe to our newsletter
Be the first to know what’s new in the world of graphic design and illustrations.
- [email protected]
Browse High Quality Vector Graphics
E.g.: businessman, lion, girl…
Related Articles
What is a storyboard [theory, examples and mega inspiration], what is google slides and how to get started, 15 keynote tutorials to make sublime presentations [2022], the top 24 figma tutorials to create a killer design in 2022, how to design graphics for social media like a guru: tutorials & tips, 500+ free and paid infographic templates compatible with google slides:, enjoyed this article.
Don’t forget to share!
- Comments (0)
Nikolay Kaloyanov
Nikolay is a copywriter with vast experience in Technology, Marketing, and Design. When he isn't playing with words and crafting texts, he watches sports and asks questions. He is a funny person...until you put him on a diet.

Thousands of vector graphics for your projects.
Hey! You made it all the way to the bottom!
Here are some other articles we think you may like:

How-To Tutorials
How to learn animation at home: beginner’s guide to online courses, software and resources.
by Al Boicheva
Creating Adobe Character Animator Puppet from Static Character: The Basics
by Iveta Pavlova

How to use Google Slides offline and Work Anywhere?
by Nikolay Kaloyanov
Looking for Design Bundles or Cartoon Characters?
A source of high-quality vector graphics offering a huge variety of premade character designs, graphic design bundles, Adobe Character Animator puppets, and more.
How To Record A Presentation On Google Slides: A Comprehensive Guide
Google Slides has become a popular choice for creating visually appealing presentations. However, many users are unaware of its powerful feature that allows recording presentations.
Billy Nichols
October 21, 2023

Google Slides has become a popular choice for creating visually appealing presentations. However, many users are unaware of its powerful feature that allows recording presentations. Whether you want to record a tutorial, a lecture, or a business presentation, Google Slides offers a simple and convenient way to capture your content and share it with others. In this article, we will guide you through the process of recording a presentation on Google Slides, step by step.
Before we dive into the details, let’s understand why recording a presentation on Google Slides can be beneficial. Firstly, it enables you to create on-demand content that can be accessed and viewed by others at their convenience. This makes it ideal for e-learning platforms, remote training sessions, or simply sharing your knowledge with a wider audience. Secondly, recording your presentation allows you to review and improve your delivery skills by analyzing your performance and making necessary adjustments. So, without further ado, let’s explore the steps to record a presentation on Google Slides.
Table of Contents
Preparing Your Presentation
Before you begin recording your presentation on Google Slides, it’s important to ensure that your content is well-organized and engaging. Here are some steps to help you prepare:
Gather Your Content
Start by gathering all the necessary content for your presentation. This includes text, images, charts, and any other media elements you plan to include. Make sure the content is relevant and supports your overall message.
Create a Clear Structure
Organize your content into a clear and logical structure. This will help you stay focused during the recording and make it easier for your audience to follow along. Consider using headings, subheadings, and bullet points to break down your presentation into smaller sections.
Select Visuals and Design
Choose visuals that enhance your presentation and make it visually appealing. Google Slides offers a wide range of pre-designed templates and free stock images that you can use. Make sure to select visuals that are relevant and reinforce your key points.
Configuring Audio and Video Settings
Before you start recording, it’s important to configure the audio and video settings in Google Slides to ensure optimal recording quality. Here’s what you need to do:
Check Your Microphone
Make sure your microphone is properly connected to your computer and functioning correctly. You can do a quick test recording to check the audio quality and adjust the microphone settings if needed.
Select the Right Audio Input
Go to the audio settings in Google Slides and select the correct audio input source. This will ensure that your voice is captured clearly during the recording. You can choose from options like built-in microphone, external microphone, or headset.
Adjust Video Resolution
If you plan to include video recordings or webcam footage in your presentation, it’s important to adjust the video resolution settings. Higher resolution videos will provide better clarity, but also require more storage space. Choose a resolution that balances quality and file size.
Recording Your Presentation
Now that your presentation is ready and the settings are configured, it’s time to hit the record button. Follow these steps to record your presentation on Google Slides:
Select the Recording Mode
Google Slides offers two recording modes: “Present” and “Create.” The “Present” mode allows you to record while presenting your slides, while the “Create” mode lets you record without the need to present. Choose the mode that suits your recording needs.
Start the Recording
Once you’ve selected the recording mode, click on the “Record” button to start recording. Google Slides will prompt you to grant permission to access your microphone and camera. Click “Allow” to proceed.
Deliver Your Presentation
If you’re using the “Present” mode, deliver your presentation as you normally would. Speak clearly and confidently, and make sure to follow your prepared structure. If you’re using the “Create” mode, simply go through your slides at your own pace.
Pause and Resume
If you need to take a break or make any adjustments during the recording, you can pause the recording and resume it later. This allows you to have more control over the final recording and ensures a seamless presentation.
Editing and Enhancing Your Recording
Once your presentation is recorded, you may want to make some edits or enhancements to improve the overall quality. Here are some editing and enhancing options available in Google Slides:
Trimming Unwanted Sections
If there are any sections in your recording that you want to remove, you can use the trimming tool in Google Slides. Simply select the section you want to remove and click on the “Trim” button. This will help you create a more concise and focused recording.
Adding Transitions and Animations
To make your presentation more visually appealing, you can add transitions and animations to your slides. Google Slides offers a variety of options to choose from, including slide transitions, object animations, and even custom animations. Experiment with different effects to find the ones that best complement your content.
Incorporating Additional Media Elements
If you feel that your recording would benefit from additional media elements, such as images, videos, or audio clips, you can easily insert them into your presentation. Use the “Insert” menu in Google Slides to add these elements and position them strategically within your slides.
Sharing and Publishing Your Recorded Presentation
After you have perfected your recorded presentation, it’s time to share it with your intended audience. Here are some options for sharing and publishing your recording:
Embedding on Websites
If you have a website or a blog, you can embed your recorded presentation directly onto your web pages. Google Slides provides an embed code that you can copy and paste into your website’s HTML. This allows visitors to view your presentation without leaving your site.
Generating Shareable Links
Google Slides allows you to generate shareable links for your recorded presentations. You can choose whether to make the presentation accessible to anyone with the link or restrict access to specific individuals or groups. This is a convenient way to share your recording via email, social media, or other communication channels.
Exporting to Various Formats
If you need to distribute your recorded presentation in different formats, Google Slides offers the option to export your recording as a video file. You can choose from formats like MP4 or AVI, depending on your requirements. This allows you to share your presentation offline or upload it to video sharing platforms.
Advanced Tips and Tricks
In this section, we will explore some advanced tips and tricks to take your recorded presentations to the next level. Here are a few ideas to enhance your recordings:
Utilizing Animations and Interactivity
Google Slides offers a range of animations and interactive features that can make your presentation more engaging. Experiment with slide transitions, object animations, and interactive elements like quizzes or polls to captivate your audience and keep them actively involved.
Incorporating External Audio Sources
If you want to include external audio sources, such as background music or sound effects, in your presentation, you can do so using Google Slides. Simply upload the audio files to your presentation and synchronize them with your slides to create a more immersive experience.
Using Presenter Notes
Presenter notes can be a valuable tool during your recording. Use them to add cues, reminders, or additional information that will help you stay on track and deliver your presentation smoothly. Presenter notes are only visible to you and won’t appear in the final recording.
Troubleshooting Common Issues
Despite Google Slides’ user-friendly interface, you may encounter some common issues while recording presentations. Here are some troubleshooting techniques to overcome them:
No Audio or Poor Audio Quality
If you’re experiencing issues with audio, make sure that your microphone is properly connected and selected as the audio input source in Google Slides settings. Check for any audio settings on your computer that may be affecting the recording quality, and adjust them accordingly.
Video Lag or Choppiness
If your video recordings or webcam footage appear laggy or choppy, try reducing the video resolution in Google Slides settings. Lower resolution videos require less processing power and can help improve the playback performance. Additionally, close any unnecessary applications or programs running in the background that may be consuming system resources.
Recording Interruptions
If you’re experiencing interruptions during the recording, such as notifications or pop-up windows, make sure to disable them beforehand. Close any unnecessary applications or browser tabs to minimize distractions and ensure a smooth recording process.
Best Practices for Engaging Presentations
Creating an engaging presentation goes beyond just recording it. Here are some best practices to help you deliver captivating presentations:
Storytelling Techniques
Incorporate storytelling techniques into your presentation to make it more compelling and memorable. Use anecdotes, examples, or personal experiencesto illustrate your points and connect with your audience on an emotional level.
Effective Use of Visuals
Visuals play a crucial role in keeping your audience engaged. Use high-quality images, charts, graphs, and diagrams that support your content and make it visually appealing. Avoid overcrowding your slides with too much information and opt for clear and concise visuals that enhance your message.
Engage with Your Audience
Engage with your audience throughout the presentation to create a dynamic and interactive experience. Encourage participation through questions, polls, or interactive activities. This not only keeps your audience involved but also allows you to gauge their understanding and address any concerns or questions they may have.
Practice and Rehearse
Practice and rehearse your presentation before recording to ensure a smooth delivery. Familiarize yourself with the content, timing, and transitions. Practice speaking clearly and confidently, and pay attention to your body language. Rehearsing will help you feel more comfortable and natural during the recording process.
Alternatives to Google Slides for Recording Presentations
While Google Slides is a fantastic tool for recording presentations, it’s always good to explore other options. Here are a few alternative platforms and software that you can consider:
Microsoft PowerPoint
Microsoft PowerPoint is a popular choice for creating and recording presentations. It offers similar features to Google Slides, including the ability to record audio and video. PowerPoint also provides various editing and enhancing options to customize your presentation.
Keynote is Apple’s presentation software, available for Mac and iOS devices. It offers a user-friendly interface and a range of creative tools for recording presentations. Keynote allows you to add animations, transitions, and interactive elements to make your recordings more engaging.
Prezi is a cloud-based presentation software that offers a unique and dynamic approach to presenting. It allows you to create non-linear presentations with zooming and panning effects. Prezi also provides recording capabilities, giving you the flexibility to record and share your presentations.
Camtasia is a screen recording and video editing software that offers advanced features for recording presentations. It allows you to capture both your screen and webcam footage, and provides powerful editing tools to enhance your recordings. Camtasia also offers options for adding annotations, animations, and effects.
Zoom is primarily known for video conferencing, but it also offers recording capabilities. You can use Zoom to present your slides and record the session, whether it’s a live presentation or a pre-recorded one. Zoom provides options for recording the screen, audio, and video, making it a versatile choice for recording presentations.
In conclusion, recording a presentation on Google Slides opens up a world of possibilities for sharing information and engaging with your audience. By following the step-by-step guide provided in this comprehensive article, you will be able to create professional recordings that captivate, educate, and inspire. Whether you choose Google Slides or explore alternative platforms, the key is to prepare, practice, and deliver your presentation with confidence. So, get ready to unleash the power of recording presentations on Google Slides and take your presentations to new heights!
Related Post
How to remove a broken spark plug: a step-by-step guide for easy removal.
October 23, 2023
How to Relight Pilot Light on Furnace: A Step-by-Step Guide for Homeowners
How to relieve pain from braces: effective and simple techniques, how to remove chain link fence: a step-by-step guide for easy removal, how to relieve braces pain at home: effective tips and remedies.
October 22, 2023
How to Refresh Curly Hair After Sleeping On It: Wake Up to Beautiful Curls!
How to Relieve Leg Pain from Standing All Day: Tips and Techniques
Leave a comment cancel reply.
You must be logged in to post a comment.
How To Pull Down Blinds Without Strings: A Comprehensive Guide
How To Put Out A Lithium Battery Fire: Essential Safety Measures
How to Safely Extinguish a Lithium Battery Fire: Essential Steps and Tips
Protecting Your AC Outdoor Unit from Sunlight: Essential Tips and Tricks
Proving Extortion: Uncovering the Truth Behind Coercion
Popular Post
How to Polish Quartz Countertops: The Ultimate Guide for a Gleaming Surface
Reviving Your Car Battery: A Step-by-Step Guide on How to Recondition a Car Battery
How To Record A Podcast On Garageband: A Comprehensive Guide
Unlocking the Secrets: How to Read People Like a Book
[email protected]
Quick Links
Privacy policy
How to Record a Presentation on Google Slides
Do you want an easy way to record a Google Slides Presentation as a video to share later with your teammates? Once you have the Zight screen recorder, the process is easy and fast.
Article Last Updated: April 23, 2024

What Is a Google Slides Presentation?
What do you need to record google slides presentations, how to record a presentation on google slides with zight: step-by-step guide, faqs on how to record a presentation on google slides.
Here’s an interesting statistic: 91% of people believe a well-designed slide deck can increase your confidence as a presenter. The first step to creating a good presentation is to choose the best software, and then record the presentation in HD.
Tell you what? You can create slides with Google Slides, then use the Zight screen recording software to present and narrate your slides to your audience. This has many benefits, including saving your presentation for future collaboration or asynchronous communication , which, in many ways, has more benefits than synchronous communication in a digital and remote workspace.
Read on as we tell you how to create this presentation from scratch, in just a few steps!
Google Slides is a free web-based presentation software provided by Google as part of the Google Drive suite. You can use it on any device with an internet connection, offering various features like an easy-to-use presenter view, speaker notes, live captions, and the ability to present to Google Meet video calls. Plus, your slides can contain text, images, videos, animations, and more to create dynamic content.
While you can present live in a meeting, today’s work landscape teams need to improve communication and productivity with asynchronous video communication . So, when you can’t gather everyone in a Google meeting, you need a way to create and share a presentation with your teams. Your options include recording a Google Slides presentation with narration, just like you create a PowerPoint presentation with Zight .
Here’s what you need:
To record a presentation on Google Slides, you will need a few things:
- A device with an internet connection: It’s best to have a computer to make it easy to create and present Google Slides
- A screen recording software like Zight: While Google Slides allows you to present live in a meeting, it won’t record audio or video files to send later. That’s where Zight comes in, allowing you to record and narrate your slides as you present so you can share with attendees at a later time
- An external microphone (optional) to record audio for your presentation. However, you can still use your native microphone on your computer
- A webcam (optional): If you want to show yourself presenting alongside the slides, a webcam will be necessary for recording. To make things easy, you can just use the Zight webcam recorder which will use your native webcam app
- A Google account: You can only access Google Slides with a Google account, so make sure to sign in to be able to create slides
- Google Slides: Before using the screen recording tool , you want to create and add content to the Google slides you will be narrating. More on this below!
Before you start recording, search for Google Slides on your browser, log in to your account and open an untitled presentation.
Alternatively, click File on a current Google Slides presentation page, then New, and Presentation (or from the template gallery to pick a presentation template).
Add content to your slides, using the (+) sign on the upper left-hand side of your Google Slides presentation page (or Ctrl+M) to add new slides. You can also click the dropdown menu next to the (+) sign and choose slides with your ideal layout. Add content to the slides by typing in text, inserting images, videos, shapes, or charts, and customize them with a unique theme and background color.
Once your Google slides are ready, here’s how to start recording:
1. Download Zight
If you don’t have Zight, click the red button below to download.
- Record your screen with audio and webcam
- Annotate with arrows, lines, and blur
- Instantly share with a link or upload to YouTube or Vimeo
Alternatively, search for “Zight” on your web browser and create an account. Then, download the app that’s compatible with your computer. Zight is available for Mac , Windows , and even as a Google Chrome extension .
2. Choose your Screen Recording Preferences
Open your presentation on Google Slides and ensure you can easily navigate to the slides once you’re ready to record.
On the Zight App
Launch the Zight app and click Record.
You’ll find recording options like Full Screen and Select Region, plus the Screen Only or Screen & Cam options. Screen Only is good when you don’t want to use your webcam, while the latter allows you to incorporate your webcam for a personal touch.
Then, select your audio/mic and webcam options, move your webcam overlay to a good space on your screen, and click Start Recording. Wait for the 3-second timer to count down before you go to the Google Slides presentation.
On the Google Chrome Extension
Click on the Zight icon on the upper left of your Google Chrome browser, click Record, and select either Screen Only or Screen & Cam. Then, turn on your microphone and webcam camera.
Next, click Start Recording and choose Entire Screen. After that, select the screen you want to record, and click Share. Click your mouse on any part of the screen to start recording and wait out the 3-second countdown.
The Zight screen recorder software will now be recording your entire screen.
3. Start Narrating Your Google Slides Presentation
On the Google Slides presentation page, click on the dropdown menu next to Slideshow.
Click Presenter View if you are viewing the first Google slide. Alternatively, click Start from the beginning if you are not on the first slide. This will turn your presentation into a full-screen view and you will see that Zight is sharing your screen.
Then, start narrating your Google slides in high video and audio quality.
You can pause and resume your screen recording and restart it to capture moments you may have missed in the beginning. You can also cancel the recording and delete the file to avoid uploading it to the cloud.
4. Annotate Your Presentation
One of the best things about presenting your Google Slides with Zight is that you can annotate the video just as easily as you narrate it.
If you are recording from the Zight app, you can pause the recording and then click the annotations button on the recording menu (the icon looks like a pen).
Once you do, you will see the different annotations you can add to the slides, including a pen, highlighter, arrow, line, ellipse, and rectangle. You can choose a different color for your annotations, even how long the annotation lasts on the final recorded video.
After annotating, resume the recording, rinse and repeat!
5. Finish Recording and Edit Your Video
Once you narrate all your Google slides, click the Finish recording button and wait for the file to upload to the cloud. Zight will also open the file on your default browser where you can edit the video file further.
When the video link opens, click the Edit button, and continue to split and merge sections, trim, crop, filter, and finetune different sections until the presentation is faultless. Click Done to save those settings.
On top of the recording, annotating, and editing of your Google Slides presentation, Zight will also transcribe your video and send the text to your email so you can go through the notes in case you missed something.
You can also add custom branding, and use AI features to generate a video summary and video titles. If you want to share the presentation with global teams, you will also love that you can translate the video file into 50 different languages for seamless communication.
6. Share the Presentation for Asynchronous Communication
To share the presentation, you can send the shareable link to your teams via Slack , Asana , Trello , and other chat boards and productivity software you use at work.
Alternatively, you can embed the video file in an email, or even download it on your computer then upload it on a platform like YouTube to reach a global audience.
7. Collaborate and Track Analytics
The best part about recording your presentation in superior video footage with Zight is how you can save it for collaboration later.
Firstly, you can save the video to a Collection on your Zight dashboard or add it to a Favorites list. This way, the video will be readily available and you can track how many people interact with it, either through comments or reactions to finetune your collaboration and communication strategy.
In addition, this video presentation will always be available on your Zight cloud account, and, as long as you keep it, even your colleagues or recipients can always retrieve it for future reference.
There you have it, an easy way to record your Google Slides presentation using Zight! With this method, you can easily create and share professional-looking recordings of your presentations to a global audience.
If you want to feel more confident before your audience with a well-designed and narrated deck, ensure you have a reliable internet connection before starting the recording. In addition, close any unnecessary tabs or programs on your computer to avoid interruptions. Finally, while Zight may use the native mic on your computer, you can prefer to use a high-quality microphone for better audio clarity.
Most importantly, don’t forget to rehearse and practice your presentation beforehand to ensure a smooth delivery and minimize any mistakes during the recording. With these tips in mind, you can confidently create engaging presentations that will impress your audience.
So why wait? Get Zight today and take your presentations to the next level!
I) Can I Record My Screen in Google Slides?
No. Google Slides does not have a built-in screen recording feature. However, you can use third-party apps like Zight to record your presentation.
II) How do you turn a Google slide into a video?
Since Google Slides does not record the screen and audio (apart from when you’re presenting in a Google meeting), you will need a third-party app to record your screen and turn your slides into a video. Follow the steps mentioned above to record and then export your presentation as a video.
When you record your Google Slides presentation with Zight, you’ll also be able to explain the contents of your slides in high-quality audio for an even better personal touch to what would be a boring presentation without narration.
III) How Do You Create a Presentation on Google Slides?
To create Google slides, follow these steps:
- Go to Google Drive and sign in.
- Click on the “New” button, then select “Google Slides.”
- Choose a template or start with a blank slide.
- Add your content by typing in text, and inserting images, videos, shapes, or charts.
- Customize your slides by changing the theme, background-color
Create & share screenshots, screen recordings, and GIFs with Zight
Get Zight for iOS.
How to Record a Presentation on Google Slides

Recording your Google Slides presentations can be extremely useful for sharing with wider audiences or repurposing content. However, Google Slides does not have a built-in recording function. You need to use third-party software to capture your screen, face, and voice.
In this comprehensive guide, we will walk you through the entire process of recording a presentation on Google Slides, from initial setup to sharing the final video. Whether you want to create tutorial videos, record webinars, or share presentations with remote teams, this guide has you covered.
Why Record Your Google Slides Presentation?
Here are some of the key reasons you may want to record your Slides presentation:
- Share presentations with people who couldn’t attend live sessions
- Repurpose webinars, training sessions, or sales pitches as evergreen content
- Create tutorial or demonstration videos
- Capture presentations for later review or critique
- Standardize delivery of presentations across a distributed team
What You Need to Record Google Slides Presentations
To record your Google Slides presentation, you will need:
- A Google account
- The Google Slides presentation you want to record
- A computer with audio/video capabilities
- Recording software like Screencastify, Loom, etc.
- Optional: Webcam, microphone
Step-by-Step Recording Instructions
Follow these steps to seamlessly record your Google Slides presentation:
1. Set Up Your Recording Software
Choose your preferred recording platform like Loom, Screencastify, or ScreenPal. Install any necessary browser extensions or applications. Most recording platforms offer free versions, but you may need to upgrade for advanced features.
Familiarize yourself with the recording options and test your microphone/webcam setup before proceeding.
2. Open Your Presentation in Google Slides
In a separate tab or window, launch your Google Slides presentation. Navigate to the specific slide deck you wish to record.
Presenter view can help you preview slides and notes as you record. Click “Present” then “Switch to presenter view” to enable this.
3. Start Your Recording
Go back to your recording platform tab and click the record button. Choose your audio sources and preferred video feed.
Give yourself a brief introduction if needed, then share your screen with the Google Slides tab open.
4. Deliver Your Presentation
Click through your Google Slides as you present, using transitions and animations as needed. Pause when necessary.
Annotate slides with a digital pen or laser pointer to draw attention to key elements. Enable your webcam to appear alongside slides.
5. End the Recording
When finished, stop your recording and confirm save settings. Most platforms process and compile recordings automatically with no editing needed.
6. Share Your Recorded Presentation
Once processed, access your new video file from your recording platform’s cloud storage or local folders. Share via link, email, or embed on websites.
Upload to video platforms like YouTube or Vimeo for wider distribution.
Tips for Better Google Slides Recordings
Follow these tips to create polished, professional recordings:
- Practice your presentation to minimize mistakes
- Speak slowly and clearly for better comprehension
- Balance vocal pace and volume with slide transitions
- Use slide notes to remember key details
- Zoom in on complex diagrams as you discuss them
- Engage the audience with eye contact if using a webcam
- Edit out unwanted sections if your software allows
Troubleshooting Google Slides Recording Issues
If you encounter problems, try these troubleshooting tips:
- Grant permission for microphone/camera access
- Check audio inputs and adjust recording volumes
- Reboot software and test connectivity
- Close unnecessary programs hogging bandwidth
- Switch to wired internet connections for stability
By following this easy guide, you can quickly record engaging Google Slides presentations to share with any audience. Take your presentations to the next level!
About The Author
Vegaslide staff, related posts.

How to Change a Google Slides Background

How to Make a Pie Chart in Google Slides

How to View Slides as a Grid in Google Slides

How to Use Presenter View when Presenting in Google Slides

- Help Center
- Google Docs Editors
- Privacy Policy
- Terms of Service
- Submit feedback
- Google Slides
Use Slides recording in Google Slides
You can only record your presentations in Google Chrome Browsers. However, you can view, share and delete recordings from any browser.
Record a slideshow
- There's a 30-minute limit to every recording.
- Information about Slides recordings isn't available in 'Revision history'.
- If you exceed your Drive storage quota, you can't create more recordings.
- You must have edit access to the slides in order to create a new recording.
- To open your presentation, go to Google Slides .
- To start again, pause and click Re-record .
- To save your recording, pause and click Save to Drive .
Find your recording
- On your computer, go to Google Slides .
- Open the presentation where you created the recording.
- Select your recording from the list that appears.
Tip: Recordings are saved in a My Drive folder called Slides recordings.
Share your recording
Recordings can be shared to collaborators on the document immediately after creation.
- To share your recording, click the title of the recording from the list.
- The video appears in the full-screen player layout.
- Select the user, audience or URL visibility rules.
Tip : Alternatively, you can share a recording like you would share any file in Drive. Learn how to share files from Google Drive .
Remove a recording
- If you created the recording, you also have the option to move the recording file in Drive to the bin. If the recording in Drive isn't moved to the bin, the recording stays visible in Drive to anyone with access.
- If you didn't create the recording, it's still visible in the creator's Drive and to anyone with access.
Use external device
You can use a microphone or camera that isn't built into your computer, such as a USB-based external camera or wireless earbuds.
To get started, set up your camera or microphone device like you would normally use it with your computer.
- Open your presentation.
- When the recording studio opens, on the bottom toolbar, click Settings .
- If your external microphone or camera is available, it's listed in the drop-down of devices available to use while recording.
Troubleshoot camera and microphone
When you create a Slides recording for the first time, it asks for a series of permissions to use your computer's camera and microphone.
Tip: Camera and microphone access isn't required to start recording.
If you decide not to grant access to your camera or microphone, you can change this later.
- On your computer, open Chrome.
- chrome://settings/content/microphone
- chrome://settings/content/camera
- Adjust the settings to grant access.
Need more help?
Try these next steps:.
Using Google products, like Google Docs, at work or school? Try powerful tips, tutorials, and templates. Learn to work on Office files without installing Office, create dynamic project plans and team calendars, auto-organize your inbox, and more.

How to Create a Resume Using Google Slides
A side from using Google Slides to create presentations, you can also use it to create resumes. Google Slides’ drag-and-drop interface makes it easy to create custom layouts and perfectly position any text, images, and videos you want to add. So, let's take a look at the easiest and fastest way to get this done.
Create a Resume Using a Google Slides Resume Template
The easiest way to create a one-page resume in Google Slides is to customize a template. Here’s how.
Step 1: Find a Suitable Resume Template
Google Slides' template gallery does not contain specific resume templates. But, there are sites with a variety of Google Slides templates to choose from. For this example, we'll use a template from SlidesMania.
- Go to SlidesMania.com .
- Type “CV” or “Resume” in the search bar to find resume templates.
- Browse the results and click on your chosen template.
- Click Open in Google Slides .
- Select Use Template in the top right corner.
Step 2: Make a Copy of the Template
If the template is set to view-only, you'll need to make a copy to edit it. Even if the template is editable, creating a copy allows you to keep the original version intact.
- Select the slide you’d like to copy. If you want to copy multiple slides, click on the first slide, press Ctrl on your keyboard, and then select any additional slides.
- Go to the File tab, click Make a copy , and select either Entire presentation or Selected slides .
- Enter a name for your new copy, select the folder you’d like to save it, and click Make a copy .
Step 3: Customize the Template
Customizing the template includes editing the text in text boxes, changing the appearance of text boxes, updating the profile image, and swapping out icons. Let's go through each step one by one.
- Double-click on a text box, edit the text, and click outside the text box area to save.
- To delete or duplicate a text box, right-click on it and select Delete or Copy .
- If you copied, right-click in an empty area and select Paste . Then click and drag the text box to your desired location.
- With the text box selected, change the font, font size, and text color to match your preferences.
- Change the appearance of the text box by adjusting its fill color, border weight, border dash, and border color.
- Click the profile image and select Replace image .
- Select Upload from computer if your photo is saved on your device. In the file explorer pop up, choose your photo and click Open .
- To fit your photo into a different shape, let’s say a rectangle, click the dropdown arrow by the crop image icon, select Shapes , and pick the rectangle.
- With the image selected, click the crop image icon to reposition your photo within the shape. Zoom in for precise adjustments and hit Enter on your keyboard when you’re done.
- Click the reset image icon if you want to undo the masked shape applied to your photo.
- To add more icons or swap out existing ones, download icons from any of the free SVG icons websites as PNG files.
- Go to the Insert tab, click on Image , and select Upload from computer . Select the icons and add them to your resume.
- Click and drag the icons to your desired position.
If you’re applying to multiple jobs, tailor your resume for the different job types and proofread your resume for errors to boost your chances of success.
How to Export Your Google Slides Resume
Once your resume is ready, you can share it with potential employers in two main ways: send a link to your resume or download it as a PDF file to attach to application forms.
Sharing Your Resume Link with Specific People
Follow these steps if you want to share your resume link with specific people:
- Click the Share button in the top right corner.
- Enter the emails of your recipients in the Share with people and groups box.
- Change the access level of recipients from Editor to Viewer .
- Check the Notify box to automatically send an email to recipients with a link to your resume.
- Add a message and click Send .
Share Your Resume Public Link
If you want to make your resume link public, so anyone can view it:
- Click the Share button.
- Change General access from Restricted to Anyone with the link .
- Set access level to Viewer .
- Copy the link to share and click Done .
Export Your Google Slides Resume as a PDF File
Follow these steps to export your resume as a PDF file:
- Click File , select Download , and choose PDF Document from the dropdown list.
- In the file explorer, select a location for the file, enter a suitable name (ideally [Your Full Name] + Resume), and click Save .
Design Beautiful Resumes Without the Hassle
Using Google Slides for your resume simplifies the design process, allowing you to focus on presenting your skills and experiences. While Google Slides offers many design options, it's important to prioritize readability and a consistent format. So go ahead and apply these steps and tips to design beautiful resumes that stand out to employers.


- SUGGESTED TOPICS
- The Magazine
- Newsletters
- Managing Yourself
- Managing Teams
- Work-life Balance
- The Big Idea
- Data & Visuals
- Reading Lists
- Case Selections
- HBR Learning
- Topic Feeds
- Account Settings
- Email Preferences
How to Make a “Good” Presentation “Great”
- Guy Kawasaki

Remember: Less is more.
A strong presentation is so much more than information pasted onto a series of slides with fancy backgrounds. Whether you’re pitching an idea, reporting market research, or sharing something else, a great presentation can give you a competitive advantage, and be a powerful tool when aiming to persuade, educate, or inspire others. Here are some unique elements that make a presentation stand out.
- Fonts: Sans Serif fonts such as Helvetica or Arial are preferred for their clean lines, which make them easy to digest at various sizes and distances. Limit the number of font styles to two: one for headings and another for body text, to avoid visual confusion or distractions.
- Colors: Colors can evoke emotions and highlight critical points, but their overuse can lead to a cluttered and confusing presentation. A limited palette of two to three main colors, complemented by a simple background, can help you draw attention to key elements without overwhelming the audience.
- Pictures: Pictures can communicate complex ideas quickly and memorably but choosing the right images is key. Images or pictures should be big (perhaps 20-25% of the page), bold, and have a clear purpose that complements the slide’s text.
- Layout: Don’t overcrowd your slides with too much information. When in doubt, adhere to the principle of simplicity, and aim for a clean and uncluttered layout with plenty of white space around text and images. Think phrases and bullets, not sentences.
As an intern or early career professional, chances are that you’ll be tasked with making or giving a presentation in the near future. Whether you’re pitching an idea, reporting market research, or sharing something else, a great presentation can give you a competitive advantage, and be a powerful tool when aiming to persuade, educate, or inspire others.
- Guy Kawasaki is the chief evangelist at Canva and was the former chief evangelist at Apple. Guy is the author of 16 books including Think Remarkable : 9 Paths to Transform Your Life and Make a Difference.
Partner Center
IMAGES
VIDEO
COMMENTS
You must have edit access to the slides in order to create a new recording. To open your presentation, go to Google Slides. To record your slideshow, in the top right, click Rec Record new video. To start recording, in the middle, click the red record button. To start over, pause and click Re-record. To save your recording, pause and click Save ...
Go to Google Slides and open your presentation. Select the Rec button in the upper right area, then select the Record new video button ( Figure A ). The system will switch to the screen recording ...
Click on the Screenflow Camera icon again, this time choosing Stop Record. A menu appears asking if you want to name your recording and place it in your video timeline. Make your selections, and you're all set. In moments, you've captured a full audio and video recording of your new Google Slides presentation deck. 4.
Open Your Presentation. Launch your Google Slides presentation and open the screen recording tool. You may have to sign-in to your account, depending on which screen recording tool you use. 2. Start Recording. Begin the recording following the screen recorder's instructions.
The recording functionality, accessible from the new "Record" button in the main toolbar, will open a new screen where you can start a recording of the presentation. You can change slides at your own pace and turn your microphone and camera on and off at any point. Google said in the blog post, "This feature helps you share more engaging video ...
Recording your Google Slides presentation is something you might want to do if you have to teach using distance learning and you want to create some digital resources for your students. So, in this tutorial, I will show you . How to record a video of you teaching a lesson using Google Slides.
Step #4: Set Up Your Presentation. Before you can start recording, navigate to slides.google.com and find your presentation. Next, click on the "Slideshow" button in the top right corner. This will display the presentation in full-screen mode. It's important to ensure that your slides on Google slides load completely before you start ...
In this video you will learn how to record video and video feedback without ever leaving the Google Slides editor.Using the Extension 'Record to Slides' you ...
Admins: There is no admin control for this feature.; End users: Visit the Help Center to learn more about recording a slideshow, finding your recording, sharing your recording, removing a recording and more.Please note that recording-creation is only accessible using Google Chrome on your Desktop. Recordings cannot be created on mobile devices and are not accessible from the Slides mobile app.
Step 2. Click on "Record". Once you've opened the website, click on the big red button "Record" (next to Company and before Get Started ). Step 3. Select your Audio, Video, and Screen Options. The browser will ask for permission, so make sure you grant Panopto access to your webcam (s) and audio source (s).
Step 1. Download and install MiniTool Video Converter and open it. Later, you can open your Google Slides presentation. MiniTool Video ConverterClick to Download100%Clean & Safe. Step 2. Click ...
Step 1: Get started on Riverside. Create a free account on Riverside.fm or choose from a paid plan with more features. Click Get Started and create an account instantly by signing into a Google or Apple ID account, or just enter in your name, email, and preferred password. No need to install anything.
Select the Recording Mode. Google Slides offers two recording modes: "Present" and "Create." The "Present" mode allows you to record while presenting your slides, while the "Create" mode lets you record without the need to present. Choose the mode that suits your recording needs. Start the Recording. Once you've selected the ...
To create a slide recording, you'll need to use Google Chrome on a computer that has a camera and microphone. Go to Google Slides and open your presentation. Select the Rec button in the upper right area, then select the Record new video button ( Figure A ). The system will switch to the screen recording interface, with recording controls ...
3. Start Narrating Your Google Slides Presentation. On the Google Slides presentation page, click on the dropdown menu next to Slideshow. Click Presenter View if you are viewing the first Google slide. Alternatively, click Start from the beginning if you are not on the first slide.
Recording your Google Slides presentations can be extremely useful for sharing with wider audiences or repurposing content. However, Google Slides does not have a built-in recording function. You need to use third-party software to capture your screen, face, and voice.
Go to "View" and click on "Slideshow". Go to the screen recorder and choose "Only Screen", then select "None" to just record the screen. A window will be displayed. In the "Entire Screen" > select the presentation tab > click on the "Share" button. Start your presentation. You can hide the screen recording prompt by ...
Step 2 - Start Recording. Next, grant Vimeo Record permission to access your microphone and camera. Ensure that you are on the screen with your Google Slides presentation. Vimeo Record automatically syncs with your audio and video sources. Click on the Record button.
You can record a Google Slides presentation with Screencastify by following the steps below. Open your slide deck in Google Slides; Start presenting the deck in "Presenter view" (be sure to click the arrow next to the "Present" button)
You must have edit access to the slides in order to create a new recording. To open your presentation, go to Google Slides. To record your slideshow, in the top right, click Rec Record new video. To start recording, in the middle, click the red record button. To start again, pause and click Re-record.
In this video, we'll show you how to record a full-screen Google Slides presentation in a way that still allows you to embed your webcam and use our drawing ...
Learn how to record your webcam over the top of your presentation in Google Slides.Google Chome Extenstion of Screen & Webcam recorder - Flonnect: https://ch...
Once you've saved the new file, to record you simply open Panopto, opt to record from PowerPoint, and click "record". Panopto does the rest. Combine existing presentation video with Google Slides. This option requires a bit more manual work, but may be a better option depending on your need. If video of your presentation already exists ...
Go to the File tab, click Make a copy, and select either Entire presentation or Selected slides. Enter a name for your new copy, select the folder you'd like to save it, and click Make a copy ...
Summary. A strong presentation is so much more than information pasted onto a series of slides with fancy backgrounds. Whether you're pitching an idea, reporting market research, or sharing ...