Microsoft Excel
11 minute read

11 Best Excel Presentation Tips in 2024

Brandon Pfaff
Twitter LinkedIn WhatsApp Pocket Email

Join the Excel conversation on Slack
Ask a question or join the conversation for all things Excel on our Slack channel.
There’s more to a spreadsheet than just the numbers on the page. It is equally important to make your spreadsheets look professional, easy to read, and visually appealing to your viewers.
The same way a lawyer with a crooked tie and disorganized papers might raise an eyebrow in court, your Excel presentation won’t hit the right marks with your audience if it looks clumsy and bland, no matter how many hours of research goes into making it or how important the information contained within it is.
Whether you are creating a spreadsheet for personal use, to pass information to your team or share with your project manager, the secrets locked away in this post will be of immense use to you. Let’s take a look at the best Excel presentation tips to help you create standout spreadsheets .
Free Excel crash course
Learn Excel essentials fast with this FREE course. Get your certificate today!
1. Get a template online
If you are a busy person, and you cannot fit an Excel presentation design into your schedule, enter the ex machina: pre-made Excel templates. You can choose from an array of purpose-specific templates with beautiful designs, fonts, and colors. Simply enter your values to customize it, and you are ready to go.
Of course, using a template means you will not get better at designing things yourself. If getting things done is your priority instead of getting better at designing presentations, then, by all means, use a template and be done with it. On the other hand, if you want to know how to make your Excel presentation better on your own, then find someone to teach you or stick around until the end of this post.
Check out our 50 best Excel templates to make your life easier and our 33 Excel business templates for workplace productivity .
2. Name your worksheets correctly
Excel presentation is all about clarity. For this single reason, the importance of a correct and reliable project or worksheet name cannot be overemphasized. It could be a sentence, a phrase or just a word. Just make sure it is easy to understand by you or by anyone you will be sharing the file with.

You also must make sure it is distinct from the names of other worksheets stored on your computer. After all, what is the use of all the tips you will learn here today if you will not be able to find the worksheet you applied them on?
3. Define your header/title
Your header and title can be anything but it needs to stand out. Your header must be able to speak to the reader and make the reader know at first glance what the header is.

To do this, try a larger font for your header, underline and embolden it. You should center align it and use a different font color. It has to stand out but also blend with the template color scheme and overall aesthetic look. You can also use a different readable for your header. Just remember, we want to make it distinct, not isolated.
Step up your Excel game
Download our print-ready shortcut cheatsheet for Excel.
4. Dos and don'ts of fonts
Full transparency: Fonts make or break your spreadsheet. Always use a uniform font for your data, you can use the same font for your header or you can change that of the header. You can use three fonts in a single presentation and that is the recommended maximum, else you would be pushing it. In this case, less is infinitely better.
These are the guidelines to follow in selecting the right format for your font.
Here is a quick tip, fonts of the sans-serif group are the best for your Excel spreadsheet if readability is your goal. Calibri, Helvetica, Arial or Playfair are few examples. If used with the right alignment, spacing, and color, they can bring out the best in your Excel presentation.

This ultimately depends on your presentation but officially, font 12 is often advised with double spacing to improve readability. As stated earlier, the header font can be larger. The headers should be larger than sub-headers which in turn should be larger than data fonts.

You want to create a sharp contrast between the text color and the background colors e.g. a light color text on a dark background and vice versa. This is where the "zebra stripes" rule comes in, which will be discussed later in the post.
People don’t often use the alignment tool in Excel. If you want to make your presentation look beautiful and business-like , you will need to maximize the alignment feature.

5. Create space for breathing room
When you see tightly packed, clumsy or wordy text or spreadsheet, your brain automatically gets tired of reading it before you even start. But when there is breathing space and the spreadsheet is divided up into categories, it becomes more pleasant to the eyes and ripe for interpretation by the brain.
This brings us to the B2 rule. Try to start your presentation on column B, row 2. Leaving the A column and the first row blank. It works like magic. You should also make sure that the column and row dimensions are the same.

Additionally, don't autofit the height and width of your document. You need to have flexibility and creative control of your workspace. Instead, manually adjust the height and width so that they have just enough white space but not too much to give your presentation some breathing room and improve readability.
6. Add an image
Whether it’s a photograph, an artistic sketch or your logo, images go a long way in making your spreadsheet better. Images make your presentation look official and possess the professional feel in many of the beautiful presentations you have seen. Pictures speak a thousand words. While Excel is not designed to accomplish the kind of presentation you can make in PowerPoint, a picture will help you to drive the point home and make your presentation memorable.

7. Go off the grid
Do you know that erasing all grid lines apart from those of your result will have people asking how you did it and if you used the same Excel software they use? Try it today. In your spreadsheet
Go to the View tab on the ribbon.
- Under the Show section, uncheck the box next to Gridlines .

8. Zebra stripes: Excel jungle law
Zebra stripes are alternating dark and light colors on rows lying on top of each other. This helps in a number of ways. First, it has this aesthetic feel that makes your work seem orderly, especially if you are displaying hundreds of rows of data. Second, it helps correlation and readability. A reader can track a row from the right-hand side to the far left and not lose track of what row his or her eyes are set upon.

You can zebra stripe using many methods. When you create a table in Excel, by default this will be zebra striped (Tip- select your data and use the shortcut Ctrl + T on a PC or ^ + T on a Mac to quickly create a table). On the Design tab, under Table Styles, you can change the color and style of your zebra stripes.
It can also be done using a formula in conditional formatting if desired. Conditional formatting is done by highlighting values that satisfy certain requirements (e.g. all odd-numbered rows). It can be copied from cell to cell using the painter tool in the Home toolbar.
9. Use charts, tables , and graphs
Most presentations are incomplete without some form of visual representation. Whether table, graph or chart, you need to visually represent your raw data in mediums that would be understood in a single glance. Charts, graphs, and tables should not be underestimated, especially if you have cumbersome data spanning many columns and rows.
In the Excel ecosystem, the chart, graph, and table features are like symbiotic siblings. You need them to bring out the beauty in the brevity of your work.

10. Create cell styles
Excel has many preset cell styles but you can create your own custom styles that will be more customized, and easier to use and edit because you created it. This is actually an alternative to getting a template if graphics consistency is your goal. After creating a beautiful spreadsheet with the above information, you can save the style so that you can apply it to future presentations.

Now your presentation is perfect with the right feel and style. Simply highlight the cells with your design for saving, then go to the Home toolbar, click on "more" at the base of the style gallery, then select "new cell style". A style dialog box will open, name the style, edit its properties and save.
If it isn't broken and it works efficiently, why change it? You can, however, add a touch of variability by changing the color palette from time to time.
11. Show restraint
You have learned all of these tips and you are ready to start your presentation - be careful of overdoing it. Use color sparingly and don't combine too many tips at once. You need to tread the fine line between underwhelming and too much to find the "just enough" middle ground. Make sure your presentation is perfectly balanced, as all things should be.
Ultimately, the way your Excel presentation turns out depends on how well you communicate your data to your audience. Although, it does help to know the psychology of colors, good fonts. Browse beautiful spreadsheet presentations online to figure out what the "best" looks like. But at the end of the day, the ball is in your court and we hope that your dedication to practicing, sharpening and perfecting your presentation skills in Excel will be rewarded with cheers.
Ready to design your own Excel presentations?
If you would like to sum up the data on your Excel spreadsheet so that its insights are conveyed in a straight-forward manner, then follow this step-by-step guide. You’ll end up with a presentation that summarizes your data in a way that’s painless to analyze.
If you’re eager to brush up on your Excel skills, check out our Excel course and master the fundamentals to boost your productivity.
Loved this? Subscribe, and join 442,189 others.
Get our latest content before everyone else. Unsubscribe whenever.

Brandon is a full time CPA specializing in all things tax. When he is not serving clients, he enjoys spending time with his wife and son, real estate investing, and sipping fine bourbon.

Recommended
Excel Challenge 39: Generate Unique Random Values
What is the best way to generate random values in Excel? Better yet, can you make them unique? Put your skills to the test with this Excel challenge.

Excel Challenge 38: Data Lookup From Multiple Sources
Take this Excel challenge by showing us what to do when XLOOKUP or VLOOKUP alone isn't enough to extract the values you want.

How to Use Excel to Manage Your Travel Budget
You'll probably want to avoid surprises like going over budget when you travel. Take charge with these expert tips for managing your travel expenses in Excel.
© 2024 GoSkills Ltd. Skills for career advancement
How-To Geek
How to link or embed an excel worksheet in a powerpoint presentation.
Sometimes, you want to include the data on an Excel spreadsheet in a Microsoft PowerPoint presentation.
Quick Links
What's the difference between linking and embedding, how to link or embed an excel worksheet in microsoft powerpoint.
Sometimes, you want to include the data on an Excel spreadsheet in a Microsoft PowerPoint presentation. There are a couple of ways to do this, depending on whether or not you want to maintain a connection with the source Excel sheet. Let's take a look.
You actually have three options for including a spreadsheet in a PowerPoint presentation. The first is by simply copying that data from the spreadsheet, and then pasting it into the target document. This works okay, but all it really does is convert the data to a simple table in PowerPoint. You can use PowerPoint's basic table formatting tools on it, but you can't use any of Excel's features after the conversion.
While that can be useful sometimes, your other two options---linking and embedding---are much more powerful, and are what we're going to show you how to do in this article. Both are pretty similar, in that you end up inserting an actual Excel spreadsheet in your target presentation. It will look like an Excel sheet, and you can use Excel's tools to manipulate it. The difference comes in how these two options treat their connection to that original Excel spreadsheet:
- If you link an Excel worksheet in a presentation, the target presentation and the original Excel sheet maintain a connection. If you update the Excel file, those updates get automatically reflected in the target presentation.
- If you embed an Excel worksheet in a presentation, that connection is broken. Updating the original Excel sheet does not automatically update the data in the target presentation.
There are advantages to both methods, of course. One advantage of linking a document (other than maintaining the connection) is that it keeps your PowerPoint presentation's file size down, because the data is mostly still stored in the Excel sheet and only displayed in PowerPoint. One disadvantage is that the original spreadsheet file needs to stay in the same location. If it doesn't, you'll have to link it again. And since it relies on the link to the original spreadsheet, it's not so useful if you need to distribute the presentation to people who don't have access to that location.
Embedding that data, on the other hand, increases the size of presentation, because all that Excel data is actually embedded into the PowerPoint file. There are some distinct advantages to embedding, though. For example, if you're distributing that presentation to people who might not have access to the original Excel sheet, or if the presentation needs to show that Excel sheet at a specific point in time (rather than getting updated), embedding (and breaking the connection to the original sheet) makes more sense.
So, with all that in mind, let's take a look at how to link and embed an Excel Sheet in Microsoft PowerPoint.
Linking or embedding an Excel worksheet into a PowerPoint presentation is actually pretty straightforward, and the process for doing either is almost identical. Start by opening both the Excel worksheet and the PowerPoint presentation you want to edit at the same time.
In Excel, select the cells you want to link or embed. If you would like to link or embed the entire worksheet, click on the box at the juncture of the rows and columns in the top left-hand corner to select the whole sheet.
Copy those cells by pressing CTRL+C in Windows or Command+C in macOS. You can also right-click any selected cell, and then choose the "Copy" option on the context menu.
Now, switch to your PowerPoint presentation and click to place the insertion point where you would like the linked or embedded material to go. On Home tab of the Ribbon, click the down arrow beneath the "Paste" button, and then choose the "Paste Special" command from the dropdown menu.
This opens the Paste Special window. And it's here where you'll find the only functional different in the processes of linking or embedding a file.
If you want to embed your spreadsheet, choose the "Paste" option over on the left. If you want to link your spreadsheet, choose the "Paste Link" option instead. Seriously, that's it. This process is otherwise identical.
Whichever option you choose, you'll next select the "Microsoft Excel Worksheet Object" in the box to the right, and then click the "OK" button.
And you'll see your Excel sheet (or the cells you selected) in your PowerPoint presentation.
If you linked the Excel data, you can't edit it directly in PowerPoint, but you can double-click anywhere on it to open the original spreadsheet file. And any updates you make to that original spreadsheet are then reflected in your PowerPoint presentation.
If you embedded the Excel data, you can edit it directly in PowerPoint. Double-click anywhere in the spreadsheet and you'll stay in the same PowerPoint window, but the PowerPoint Ribbon gets replaced by the Excel Ribbon and you can access all the Excel functionality. It's kind of cool.
And when you want to stop editing the spreadsheet and go back to your PowerPoint controls, just click anywhere outside the spreadsheet.
How to create your presentation using Excel?
Hrideep barot.
- Presentation

MS- Excel, widely known as Excel, is famous for its spreadsheets and data handling. But little has been explored of this wonderful software other than the standard features.
Do you know that you can create and give your presentation using Excel? Are you curious of how to create a presentation in Excel?
Read till the end to get familiar with the steps and bonus tips in the end!
This is our game plan for this article.
Is excel presentation a good choice?
Step 1: choose a template, step 2: create slides, step 4: remove the grids, add a background picture, add colors to your data, font size matters, make use of cells, title slide, conclusion slide, product sales, comparative analysis, financial resolution or budget proposal, who all can benefit through excel presentations, does excel have presentation mode, how to export excel presentations.
Now, you might wonder: how can a simple spreadsheet be made presentable, especially a business report or pitch?
Well, using Excel might be more advantageous than you think. Here’s why:
Although PPT or PowerPoint Presentations gives a wide variety of options and templates to choose from, it can sometimes be too stretched out or contain lots of information that can be overwhelming.
Often, the main agenda of the presentation gets blurred, as we tend to emphasize and explain each and everything on the PPT.
If you want to give a crisp, short and effective presentation, then consider going for an Excel presentation.
There are fewer chances of your audience losing focus, as you emphasize only the needed information, especially if you are presenting a business report.
You will also save time of giving and making your presentation.
Now that you know why Excel is a good choice, let us see how we can use an Excel sheet in a presentation.
Creating a presentation in Excel
Creating a presentation in Excel can be the easiest way of making a presentation.
Follow these steps to make your presentation in excel:

The first step is to choose a template that goes with the aim of your presentation.
If your aim is to give a business presentation, you can go for templates like the ones seen in the above picture.
If you aim to present a business idea or budget, then you can choose templates such as planner and checklist or expense budget.
Choosing the right template would make things easier for you and your audience.
You might wonder how can I possibly create a slide in excel? Isn’t that a feature of PowerPoint?
Well, the idea is to create one similar to PowerPoint.
By using the sheets as slides, one can easily create an impactful presentation.
Make sure to name the sheets, and arrange them in order to give a smooth presentation.
Step 3: Organize your data
Now enter your required data and arrange it.
Simply select the required data by pressing the SHIFT key and use the ARROW keys to select.
Then, click on the Insert option from the menu tab and click on the Recommended Charts.
Now, select the type of chart you want.
Here are some possible options:

If you have data that depicts a financial report, and you want to explain the profits annually, then go for Line Graphs.
Remember to name your chart. You can click on the chart title to rename it.

If you want to present a monthly report on the expenses, then go for a pie chart.
Pie charts fit well when you present on a single aspect or topic.
Tables work for almost all purposes.
However, the information presented needs to be simple and short.
You can do this by making colored tables.
You can select your data, and from the Page Layout option from the menu, browse the themes and colors.
Go for lighter tones, as they look aesthetic and professional as well.
Also, the audience won’t find it difficult to read the data, which can happen if you use darker colors.
One of the main features of Excel are the grids, i.e., rows and columns.
Our last step is to get rid of the grids, as they can distract the audience and you may also run the risk of giving a shabby presentation.
To remove grids, go to the Page Layout option in the menu tab and unselect or uncheck the boxes under Gridlines and Headings.
After this step, your presentation would seem as if it was made using a PPT!
Tips for making a creative and professional presentation using Excel

Level up your presentation by setting a background picture in your Excel sheets!
In order to do this, go to the Page Layout and click on Background.
You can choose any of your saved pictures or choose from almost infinite options by searching one.
After you choose your picture, click on insert and your background picture is ready!
Last step is to remove the gridlines for a clean presentation.
You can also remove Headings and Formula Bar by unchecking them from the View tab.
It is quite a task to locate and understand data when everything is of the same color.
In other words, when you have a single color, say white, the audience would be busy tallying the data from right to left and not be able to concentrate on your presentation.
To resolve this issue, make your tables with two color tones.
You can choose them from Themes in Page Layout.
Here is the final result:

This table would take less time to locate the data in one row, as the color makes the task easy!
I bet you took some time to read this, especially if you are looking from a laptop or PC.
Did you feel any difference?
Your eyes were strained as you tried to read what was written.
Hence, make sure to have a decently larger font for making your information visible to everyone as not everyone sees your presentation from the same proximity as you.
If you don’t want a background picture, you can go for an image.
For adding an image, go to Insert and click on Illustrations.
You can add pictures, shapes, icons, 3D models and many more.
Remember to uncheck the Gridlines and Headings, before adding the images.
Cells in a spreadsheet can be used in creative ways.
Apart from entering data and doing calculations in a breeze, they can be turned into text boxes!
So make use of them as far as you can.
You can add in the main heading in the first sheet along with a background picture.
You can also use cells for short descriptions or notes below the tables or data for better comprehension for the viewers.
This is very important for all types of presentations and not just for Excel.
The main reason to categorize is to avoid “data dump”.
This happens when you put in too much information in one chart or sheet.
You might get confused or zoned out while presenting, and it is overwhelming from an audience’s perspective as well.
So, divide your data into various sheets and name them, ensuring they are in right order.
Doing so will also give your presentation a better clarity.
Sample Excel presentation
Suppose you are from the Sales department and are asked to give a presentation to the senior executives about the current vaccination drive status and future prospects.
Considering the period to be Jan-June 2021, here is a possible sample of how you can go about giving your presentation using Excel:

Here you can talk about your views on how the organization should carry forward the vaccination drive, and give suggestions on how to do it more efficiently.

What are some good Excel presentation topics?
Excel is a good medium to present product sales. The sample presentation above is a type of product sales.
It gives the organization a clear idea of the direction of the sales of a product and planning further marketing strategy.
If you have just begun your journey as an entrepreneur or are in the sales and marketing field, here is a useful article for you to enhance your skills of giving a business pitch to your clients! Pitch Perfectly: Crucial Public Speaking Tips for Startup Founders
Some topic ideas for product sales can be:
- Annual product review in XYZ branch
- Sales review of XYZ product
- Review of top-selling products in XYZ zone
- Sales promotion review 2020-21
Comparative analysis can be presented using Excel most effectively.
You can show data in simple charts and graphs, and compare the metrics using parameters such as time( weekly, monthly, annually) or regionally( within a company or branch, across branches, or internationally).
Some topics you can consider:
- Comparative analysis of student population taking XYZ stream/course
- Analyzing weekly donations to XYZ foundation
- Regional analysis of reported crimes in XYZ state
- Health and hygiene: A correlational study
Excel is a go-to application when it comes to finances.
With its easy tools and graphics, you can present budget proposals and financial resolutions with utmost ease.
You can consider these topics:
- FDIs for the year 2018-22
- Shares review 2020-21
- Annual review: Financial department
- Funds report: XYZ branch 2020-21
Although Excel is a great tool, it is not suitable for every type of presentations and professions.
It is an excellent medium for those engaging in quantitative data such as:
- researchers
- sales and marketing
- data analysts
- corporate executives
- logisticians, etc.
You can present your data in full-screen mode or presentation mode in Excel!
To do this, go to the View tab and select Full-screen mode, or press CTRL+ SHIFT+F1.
To go back to normal mode, right-click and choose the close full-screen option, or click on the three vertical dots on the top of the screen.
To export your Excel presentation, follow these steps!
STEP 1: Go to Files tab and select Export option.
STEP 2: In Export, click on create PDF/XPS document and name your file.
STEP 3: Click on Publish. Done!
Although we went through the steps of making an Excel presentation, do not leave the other aspect out!
Your body language and delivery style also matters!
If you are confused on what approach to take regarding body language while giving a speech, follow this article! To walk or stand still: How should you present when on stage?
For preparing your voice, follow along How to prepare your voice for a speech: Step-by-step guide .
We took a look into the steps for creating a creative and effective Excel presentation in just 4 steps!
Hope that the steps and tips would make your next Excel presentation a success and completely reinvent the way Excel is seen!

Enroll in our transformative 1:1 Coaching Program
Schedule a call with our expert communication coach to know if this program would be the right fit for you

How to Negotiate: The Art of Getting What You Want

10 Hand Gestures That Will Make You More Confident and Efficient

Interrupted while Speaking: 8 Ways to Prevent and Manage Interruptions
- [email protected]
- +91 98203 57888
Get our latest tips and tricks in your inbox always
Copyright © 2023 Frantically Speaking All rights reserved
Kindly drop your contact details so that we can arrange call back
Select Country Afghanistan Albania Algeria AmericanSamoa Andorra Angola Anguilla Antigua and Barbuda Argentina Armenia Aruba Australia Austria Azerbaijan Bahamas Bahrain Bangladesh Barbados Belarus Belgium Belize Benin Bermuda Bhutan Bosnia and Herzegovina Botswana Brazil British Indian Ocean Territory Bulgaria Burkina Faso Burundi Cambodia Cameroon Canada Cape Verde Cayman Islands Central African Republic Chad Chile China Christmas Island Colombia Comoros Congo Cook Islands Costa Rica Croatia Cuba Cyprus Czech Republic Denmark Djibouti Dominica Dominican Republic Ecuador Egypt El Salvador Equatorial Guinea Eritrea Estonia Ethiopia Faroe Islands Fiji Finland France French Guiana French Polynesia Gabon Gambia Georgia Germany Ghana Gibraltar Greece Greenland Grenada Guadeloupe Guam Guatemala Guinea Guinea-Bissau Guyana Haiti Honduras Hungary Iceland India Indonesia Iraq Ireland Israel Italy Jamaica Japan Jordan Kazakhstan Kenya Kiribati Kuwait Kyrgyzstan Latvia Lebanon Lesotho Liberia Liechtenstein Lithuania Luxembourg Madagascar Malawi Malaysia Maldives Mali Malta Marshall Islands Martinique Mauritania Mauritius Mayotte Mexico Monaco Mongolia Montenegro Montserrat Morocco Myanmar Namibia Nauru Nepal Netherlands Netherlands Antilles New Caledonia New Zealand Nicaragua Niger Nigeria Niue Norfolk Island Northern Mariana Islands Norway Oman Pakistan Palau Panama Papua New Guinea Paraguay Peru Philippines Poland Portugal Puerto Rico Qatar Romania Rwanda Samoa San Marino Saudi Arabia Senegal Serbia Seychelles Sierra Leone Singapore Slovakia Slovenia Solomon Islands South Africa South Georgia and the South Sandwich Islands Spain Sri Lanka Sudan Suriname Swaziland Sweden Switzerland Tajikistan Thailand Togo Tokelau Tonga Trinidad and Tobago Tunisia Turkey Turkmenistan Turks and Caicos Islands Tuvalu Uganda Ukraine United Arab Emirates United Kingdom United States Uruguay Uzbekistan Vanuatu Wallis and Futuna Yemen Zambia Zimbabwe land Islands Antarctica Bolivia, Plurinational State of Brunei Darussalam Cocos (Keeling) Islands Congo, The Democratic Republic of the Cote d'Ivoire Falkland Islands (Malvinas) Guernsey Holy See (Vatican City State) Hong Kong Iran, Islamic Republic of Isle of Man Jersey Korea, Democratic People's Republic of Korea, Republic of Lao People's Democratic Republic Libyan Arab Jamahiriya Macao Macedonia, The Former Yugoslav Republic of Micronesia, Federated States of Moldova, Republic of Mozambique Palestinian Territory, Occupied Pitcairn Réunion Russia Saint Barthélemy Saint Helena, Ascension and Tristan Da Cunha Saint Kitts and Nevis Saint Lucia Saint Martin Saint Pierre and Miquelon Saint Vincent and the Grenadines Sao Tome and Principe Somalia Svalbard and Jan Mayen Syrian Arab Republic Taiwan, Province of China Tanzania, United Republic of Timor-Leste Venezuela, Bolivarian Republic of Viet Nam Virgin Islands, British Virgin Islands, U.S.
Contextures Blog
Excel tips and tutorials

PowerPoint Slides From Excel List

If you have a list of names or topics in Excel, here’s how you can quickly create PowerPoint slides from that list. Unlike most of my macros, these run in PowerPoint, to pull the data from Excel. That was easier than writing Excel macros to make things happen in PowerPoint!
Create a Slide for Each Excel Item
In these macros, the main PowerPoint slide is duplicated. Then, the data from Excel is added to the text boxes on the new slide.
There are 4 macros, with variations for
- 1 or 2 text boxes on the slide
- all Excel rows, or based on criteria
You can download the free files from my Contextures site . There’s a zipped folder with the PowerPoint presentation, and an Excel file with data for the slides.
Slide Data in Excel List
There’s a small named table in the sample Excel file, with data for the PowerPoint slides.
You can use this for testing, before trying the macros with your own Excel data.

PowerPoint Main Slide
In PowerPoint, the first slide in the presentation has two text boxes.
The macro duplicates the first slide, and puts the Excel information in those text boxes
In the sample file, don’t move the main slide, if you want the macros to work correctly!

That first slide in the presentation is based on a Master slide.
- You can edit its Master slide, to change the background or text box settings.
- You can also replace that chart icon with your company logo, or add other features.

More PowerPoint Slides
In the PowerPoint file that you can download from my Contextures site, there are 2 other slides.
- Those additional slides have notes on using the macros, and formatting the Slide Master.
- These slides aren’t needed by the macro, and you can delete them.

How to Run Macro to Create Slides
To create PowerPoint slides, from a list in Excel, follow these steps:
- Open the Excel file where your list is stored
- Activate the sheet where the data is stored – the list must be formatted as a named Excel table
- Open the PowerPoint presentation that contains the macros and main slide
- Be sure the main slide, that you want to duplicate, is the first slide in the presentation
- At the top of PowerPoint, on the View tab, click Macros
- Select one of the Create Slides macros, and click Run

Check the New Slides
After the macro runs, you can check the new slides that were added to the PowerPoint presentation.
- In this example, I ran the macro for 2 text boxes, and checked column 3 in the data, for a “Y”
- Three of the rows have a “Y”, so 3 slides were added to the presentation.
NOTE : This macro code is further down the page, and all four macros are in the sample PowerPoint file.

Save the PowerPoint Slides
After you run the macro, and create the duplicate slides:
- Save the PowerPoint file with a new name .
- Then, in that new file, delete the main slide and the two notes slides, or hide them.
NOTE : If you simply export the new slides, you’ll lose the formatting, because they’re based on the Master Slide in the original PowerPoint file.
Create a Presentation Template
Another option is to save the PowerPoint file in PowerPoint Macro-Enabled Template (potm) format.
By default, that file will be saved in your Custom Office Templates folder.
 format")
Then, to create a new set of slides from Excel data:
- In PowerPoint, click File, then click New
- In the Templates section, click Personal
- Click on the Slides from Excel template, then click Create

PowerPoint Slides From Excel Macro Code
Here is the code for the CreateSlidesTest_Text2 macro that fills two text boxes on a slide, and checks the Excel table for criteria.
NOTE: To use the macro with a different Excel table, you can change the variable settings, in this section of the macro code.
This macro creates slides for items in the Excel list, after checking a criteria cell, and fills 2 text boxes.
- In Excel, checks the test column ( colTest ), and creates a slide if it contains the specified text string ( strTest )
- In the PowerPoint slide, text from the specified columns ( col01 and col02 ), is entered in the 1st text box and 2nd text box
Learn More About PowerPoint Macros
There are PowerPoint code samples on the Microsoft site , that helped me get started with these macros to create slides from Excel data.
For more examples, you can check the StackOverflow forum, or PowerPoint sites.
Get the PowerPoint Slide Files
The macros that create slides are stored in the PowerPoint file. There are no macros in the Excel workbook
______________________________
PowerPoint Slides from Excel List

_____________________________
4 thoughts on “PowerPoint Slides From Excel List”
Does this work on Macs? I keep getting the “No Excel table found on active sheet” when I try to run it. I’ve been using the sample slides and sample worksheet and I am sure to have the sheet with the table “activated” (clicked on? this just means clicked on, right?) when I try to run the macros. None of them work, they all give the sam error message. I also went into VBA editor Tools/References in both programs to make sure the other was clicked on. No luck. Thoughts? Help?
I don’t think it works on Macbook. I had the same error, tried it on a Windows laptop and worked perfectly.
It also has some problems with large data sets and stops running the code after a few hundred rows, (I had almost 1000 rows) but a quick fix would be to delete the rows that it has already done and run again. It will add the new slides after the last slide in the powerpoint.
To the person behind this: thank you so much. You have saved me hours of my life. I was populating each of my slides manually and it took me the whole day to get through 1/16th fo the work. With this code, took me <5 minutes. Thank you so much.
Did you ever figure out how to do this on a mac? If so, please share…
When I click RUN, it only makes about 10 of 219 slides. I am trying to do a list of names. The error says “Could not complete Slides”
Any help would be appreciated
Leave a Reply Cancel reply
Your email address will not be published. Required fields are marked *
This site uses Akismet to reduce spam. Learn how your comment data is processed .
Improve Your PowerPoint Presentation with Excel Data Visualizations
Nothing makes information more vivid than a great visualization. We show you how to prepare your data in Excel and import the charts into PowerPoint for a lively presentation.
Ready to present your findings? Find out how to visualize your data using Excel and PowerPoint.
We've all sat through boring PowerPoint presentations at one point or another, and they're no fun. You can use countless ways to liven things up and something as simple as a chart made with Excel can go a long way.
Here's everything you need to know about creating a data visualization in Excel and exporting that content directly to a PowerPoint presentation — you might be surprised by just how easy it is.
Prepare Your Data
The first step to a professional chart is ensuring that we have all the necessary data arranged correctly. The following section will show you how to do just that for all the most common types of data visualization produced with Excel.
Column, Bar, Line, and Area Charts
The data for these charts doesn't require much processing, just ensure that your data is separated into columns or rows, and properly labelled. These two examples below demonstrate that you can use either a vertical or horizontal layout for your data.
Pie and Doughnut Charts
For a single data series, lay out your data in one column or row, with labels in a separate column or row.
If you're charting more than one data series using a doughnut chart, just add another column or row containing the additional figures. Giving each series a label isn't mandatory, but it will help you keep track of your information.
Scatter and Bubble Charts
For scatter charts, place your data for the X and Y axes in adjacent columns.
For a bubble chart, include what size you want individual bubbles to be in a further adjacent column.
Create Your Chart
Next, we're going to create the chart in Excel — my example will be a pie chart about pies, but the same concepts will apply no matter what kind of visualization you're aiming for.
Above, you can see that I've arranged my data in the correct format for a pie chart and highlighted the entire selection. With that done, it's time to head to the Insert tab and click the pop-out button on the Charts section.
The resulting window is split into two tabs; recommended charts and all charts. The former option is helpful if you're not sure what's the best way to visualize your data , but otherwise you can simply pick the correct option from the full list. The All Charts tab offers up lots more options, so it's really worth poring through the list to find the most appropriate chart.
Once you've selected your desired option, Excel will create a basic version of the chart — but it's likely that you'll want to make some edits for yourself.
First, let's change that title to something a little bit more informative. All we need to do is click the text once to select the text box, and another to drop our cursor into it so that we can make edits.
Next, let's take a look at the three icons that show up on the edge of our chart when we click on it. The box with a plus symbol helps us adjust Chart Elements , like its title and its legend. Marking the checkbox confirms that these elements should be included, while clicking the small arrow will offer up some more in-depth options.
The paintbrush icon lets us adjust the chart's color scheme , either choosing from pre-made styling templates or picking out individual shades. I'm not completely happy with the default color palette, so I'm swapping it out for a monochromatic chart.
The third icon allows us to filter the data that goes into the chart, which is particularly handy if you're working with more than one series. However, there are plenty of other uses — below, I've used the tool to quickly create a chart that only looks at dessert pies.
Once you're all set with these adjustments, we can export the chart into PowerPoint.
Transfer Your Chart to PowerPoint
Exporting your chart from Excel to PowerPoint is as easy as copying and pasting it across — but there are a couple of pitfalls to avoid. Select your chart in Excel by clicking on the background, making sure that you're not accidentally selecting a particular element, then use CTRL + C to copy the data to your clipboard. You can also right-click on its background to copy from the context menu.
Once this is done, open up PowerPoint and navigate to the slide that you want the chart to appear on. Use CTRL + V to paste the chart in place.
However, there's one more step to complete if you want to do the job properly. While the chart might already look correct, now's the time to make an important decision about how it's placed in the presentation.
This small dropdown will help you decide if your chart is linked to the Excel spreadsheet it's based on, a straightforward way of making your data available to viewers. Choosing one of the options featuring the phrase Link Data will link your visualization to the spreadsheet, whereas those that feature the phrase Embed Workbook will make that document available as part of the presentation itself .
You can also opt to paste the chart as a picture, but this doesn't offer any of the same fact-checking benefits as the other two. Once you've made this selection, you're free to integrate the visualization into your presentation however you see fit.
Visualize It to Realize It
It's not difficult to turn data from an Excel spreadsheet into a chart for your PowerPoint presentation — but this kind of visualization can really help your audience digest the information .
Microsoft has gone to great lengths to make its Office suite work as a cohesive unit, so using individual programs in tandem can produce great result. Just consider the strengths of each of its component parts; PowerPoint is great for presenting to an audience, but working with data is definitely a job for Excel.
While this guide put the focus on PowerPoint, you can use the exact same method to export charts to other programs in the Office suite — keep that in mind next time you want to include a visualization in an essay written in Word, or add it to your OneNote notebook .
Do you have more questions about using Excel charts in your PowerPoint presentation? Or are you confident enough to offer help to other users? Either way, head to the comments section below to join the discussion.
- Add WordArt to a slide Video
- Add hyperlinks to slides Video
- Import a Word outline Video
- Check spelling Video
- Add a table Video
- Insert Excel data Video
- Split a table Video

Insert Excel data

In PowerPoint, you can embed tables and worksheets from Excel in your presentation slides.
In Excel, click and drag to highlight the cells you want to copy.
Right-click the copied cells and select Copy .
In your PowerPoint presentation, right-click and select the Paste Options you want:
Use Destination Styles – Choose to edit your copied cells like a PowerPoint table, but with PowerPoint's color scheme and fonts.
Keep Source Formatting – Choose to keep your table editable in PowerPoint while maintaining the same source formatting from Excel.
Embed – Choose to keep a copy of your table in PowerPoint in case you want to edit the data, which will open in Excel.
Note: If you're working with a large Excel file, it'll inflate your PowerPoint presentation to a big size. You may also unintentionally be giving more access to your Excel file than you intend to.
Picture – Choose to paste your table as a picture to get the same benefits as embedding except you can format your cells like a picture and add effects to it. You won’t be able to edit data once it’s been pasted though.
Keep Text Only – Choose to paste your table as straight text and to do all formatting in PowerPoint.
If you pasted as a picture, on the Picture Tools Format tab, select the quick picture style you want to use. Adjust the table to your liking.
Insert Excel data in PowerPoint
Copy an Excel chart to another Office program

Need more help?
Want more options.
Explore subscription benefits, browse training courses, learn how to secure your device, and more.

Microsoft 365 subscription benefits

Microsoft 365 training

Microsoft security

Accessibility center
Communities help you ask and answer questions, give feedback, and hear from experts with rich knowledge.

Ask the Microsoft Community

Microsoft Tech Community

Windows Insiders
Microsoft 365 Insiders
Was this information helpful?
Thank you for your feedback.
- PRO Courses Guides New Tech Help Pro Expert Videos About wikiHow Pro Upgrade Sign In
- EDIT Edit this Article
- EXPLORE Tech Help Pro About Us Random Article Quizzes Request a New Article Community Dashboard This Or That Game Popular Categories Arts and Entertainment Artwork Books Movies Computers and Electronics Computers Phone Skills Technology Hacks Health Men's Health Mental Health Women's Health Relationships Dating Love Relationship Issues Hobbies and Crafts Crafts Drawing Games Education & Communication Communication Skills Personal Development Studying Personal Care and Style Fashion Hair Care Personal Hygiene Youth Personal Care School Stuff Dating All Categories Arts and Entertainment Finance and Business Home and Garden Relationship Quizzes Cars & Other Vehicles Food and Entertaining Personal Care and Style Sports and Fitness Computers and Electronics Health Pets and Animals Travel Education & Communication Hobbies and Crafts Philosophy and Religion Work World Family Life Holidays and Traditions Relationships Youth
- Browse Articles
- Learn Something New
- Quizzes Hot
- This Or That Game New
- Train Your Brain
- Explore More
- Support wikiHow
- About wikiHow
- Log in / Sign up
- Computers and Electronics
- Microsoft Office
How to Link Excel to PowerPoint
Last Updated: March 29, 2019
wikiHow is a “wiki,” similar to Wikipedia, which means that many of our articles are co-written by multiple authors. To create this article, volunteer authors worked to edit and improve it over time. This article has been viewed 93,167 times. Learn more...
Linking Excel files to a PowerPoint presentation lets you to present and display complex data on a much simpler form that people can understand. This is very handy when you’re conducting business or academic presentations. What’s more is that it also allows you to easily create tables on presentations and conveniently modify the table’s data without editing the presentation itself.
Opening the Files to Link

- If you choose to create a new document to link to a PowerPoint presentation, you need to save it first as an Excel file before you can do any kind of linking.

Linking the Files

- Click on Okay to finish inserting the file.
- The data table on your Excel file should now be displayed on the presentation slide. You can move it anywhere on the presentation and adjust its height and width by clicking and dragging its corner points across the slide.

Expert Q&A
- To link Excel documents to a PowerPoint presentation using older Microsoft Office suite, you need to resave the Excel file to a format that the old PowerPoint program can read. Thanks Helpful 2 Not Helpful 2
- You don’t need to save the Excel file first before the changes made are reflected on the presentation. The inserted object should mirror the change as you edit it. Thanks Helpful 0 Not Helpful 1

You Might Also Like

- http://office.microsoft.com/en-001/powerpoint-help/insert-a-linked-excel-chart-in-powerpoint-2010-HA101776651.aspx
About This Article
- Send fan mail to authors
Is this article up to date?

Featured Articles

Trending Articles

Watch Articles

- Terms of Use
- Privacy Policy
- Do Not Sell or Share My Info
- Not Selling Info
wikiHow Tech Help Pro:
Level up your tech skills and stay ahead of the curve

Excel Tutorial: How To Make Graphical Presentation In Excel
Introduction.
When it comes to analyzing and presenting data, graphical presentations in Excel can be a game-changer. These visual representations of data not only make it easier to understand complex information but also help in making informed decisions. In this tutorial, we will take you through the process of creating graphical presentations in Excel and explore the benefits of incorporating visuals into your data analysis.
Key Takeaways
- Graphical presentations in Excel are crucial for understanding complex data and making informed decisions.
- Understanding the basics of creating graphical presentations is essential, including the different types of graphs and charts available in Excel.
- Selecting the appropriate data and organizing it effectively is key to creating effective graphical presentations.
- Utilizing Excel's advanced features and customization options can elevate the visual appeal and insights provided by graphical presentations.
- Adding finishing touches such as visual elements and annotations can enhance the overall look and clarity of graphical presentations.
Understanding the basics of creating graphical presentations in Excel
Graphical presentations are an essential tool for visualizing data and conveying information in a clear and concise manner. In Microsoft Excel, creating graphical presentations is a straightforward process that can greatly enhance the impact of your data. In this tutorial, we will explore the basics of creating graphical presentations in Excel.
Excel offers a wide range of graph and chart types, each suited for different data sets and presentation purposes. Some of the most commonly used graph and chart types in Excel include:
- Column and Bar Charts: These charts are used to compare values across different categories.
- Line Charts: Line charts are useful for showing trends and changes over time.
- Pie Charts: Pie charts are ideal for displaying the proportion of different categories in a data set.
- Scatter Plots: Scatter plots are used to show the relationship between two variables.
When creating a graphical presentation in Excel, it's important to include key components that help convey the information effectively.
The title of the graph or chart should clearly indicate the subject of the presentation.
Axis Labels
Axis labels are essential for providing context to the data being presented. The x-axis and y-axis should be clearly labeled to indicate what each represents.
The data being used for the graphical presentation should be clearly defined and organized to ensure accuracy and relevance.
By understanding the different types of graphs and charts available in Excel and the key components of a graphical presentation, you can effectively create visual representations of your data that are both impactful and easy to understand.
Selecting the appropriate data for your graphical presentation
When creating graphical presentations in Excel, it is essential to carefully choose the data that best suits the intended visualization. Here are some key points to consider:
- Look for trends or patterns: Data that shows clear trends or patterns are ideal for graphical representation. This can include sales figures over time, survey responses, or market trends.
- Comparing data: Data that needs to be compared across different categories or variables, such as product sales by region or customer demographics, can be effectively presented graphically.
- Highlighting relationships: If you want to showcase the relationship between different sets of data, such as correlation between variables or cause-and-effect relationships, graphical representation can be very effective.
- Clean and structured data: Ensure that your data is clean and well-structured before importing it into Excel. This includes removing any unnecessary columns or rows, and organizing the data in a logical manner.
- Use proper labels and headers: Clearly label your data and use headers to identify different categories or variables. This will make it easier to interpret and visualize the data in Excel.
- Convert text to numerical values: If your data includes text that needs to be represented graphically, such as categories or labels, consider converting them to numerical values or using a numerical equivalent for easier graphing in Excel.
- Remove outliers or irrelevant data: If there are outliers or irrelevant data points that could skew the visualization, consider removing them or addressing them separately to ensure the accuracy of the graphical presentation.
Step-by-step guide to creating graphical presentations in Excel
Excel is a versatile tool not only for data analysis and calculations but also for creating visually appealing graphical presentations. In this tutorial, we will walk you through the process of creating simple bar or pie charts using Excel's chart tools and then show you how to utilize Excel's graph customization features to enhance the visual appeal of your presentation.
A. Creating a simple bar or pie chart using Excel's chart tools
Excel's chart tools make it easy to create visually stunning bar or pie charts to represent your data. Follow these simple steps:
- Select your data: Start by selecting the data that you want to include in your chart. This will typically be a range of cells containing your data.
- Insert a chart: Once you have selected your data, go to the "Insert" tab and select the type of chart you want to create, such as a bar chart or a pie chart.
- Customize your chart: Excel will automatically generate a basic chart based on your selected data. You can then customize the chart by adding titles, labels, and modifying the colors and styles to suit your presentation.
- Finalize your chart: Once you are happy with the appearance of your chart, you can further customize it by adding data labels, adjusting the axis scales, or adding a trendline.
B. Utilizing Excel's graph customization features to enhance the visual appeal of your presentation
Excel offers a range of graph customization features that allow you to enhance the visual appeal of your presentation. Here's how to make the most of these features:
- Modify chart elements: Excel allows you to modify various elements of your chart, such as the axis titles, data labels, and gridlines. You can also add or remove chart elements to make your chart more visually appealing.
- Change chart styles: Excel provides a range of pre-set chart styles that you can apply to your chart to change its appearance. You can also manually adjust the colors, fonts, and effects to create a custom look for your chart.
- Add visual effects: Excel allows you to add visual effects to your chart, such as shadows and glows, to make it stand out. You can also adjust the transparency of chart elements to create a more subtle and polished look.
- Format data series: Excel enables you to format individual data series within your chart, allowing you to highlight specific data points or make certain elements stand out.
Adding the finishing touches to your graphical presentation
Once you have created your graphical presentation in Excel, it's time to add the finishing touches to make it visually appealing and easy to understand for your audience.
Visual elements play a crucial role in making your graphical presentation stand out. Here are a few tips on how to use colors and fonts effectively:
- Use a cohesive color scheme: Select a color palette that complements your data and helps in conveying your message effectively. Avoid using too many colors that can make the presentation look cluttered.
- Choose readable fonts: Use clear and legible fonts for your titles, labels, and annotations. Make sure the font size is appropriate for the audience to read comfortably.
- Emphasize important data points: Use different colors or fonts to highlight important data points or trends in your presentation.
Titles, legends, and annotations help provide context and clarity to your graphical presentation. Here's how to effectively incorporate these elements:
- Include a descriptive title: A clear and concise title helps the audience understand the purpose of the graphical presentation. It should convey the main message or insight from the data.
- Utilize legends for clarity: If your graphical presentation includes multiple data series or categories, use a legend to provide clarity on what each element represents.
- Add annotations for additional information: Annotations can help provide additional context or explanations for specific data points. They can be used to highlight outliers, trends, or any other important details in the visualization.
Utilizing trendlines, sparklines, and other advanced chart elements to provide deeper insights
When creating graphical presentations in Excel, it's important to go beyond basic charts and graphs to provide deeper insights. Utilizing advanced features such as trendlines and sparklines can help you achieve this.
- Adding trendlines to your charts can help you identify and visualize patterns and trends in your data. This can be especially useful for predicting future values based on historical data.
- Customizing trendlines allows you to further refine your graphical presentation, adjusting the type of trendline (e.g., linear, exponential, polynomial) to best fit your data.
- Interpreting trendlines is essential for understanding the implications of the data. You can use the equation of the trendline to make predictions or analyze the relationship between variables.
- Integrating sparklines into your data tables or dashboards can provide a quick and concise visualization of trends and variations, without taking up too much space.
- Customizing sparklines allows you to adjust the appearance and layout to best suit your graphical presentation, ensuring clarity and effectiveness.
- Interpreting sparklines involves understanding the patterns and variations they display, providing quick insights into the data at a glance.
Exploring additional tools and features to further customize and polish your graphical presentation
Excel offers a range of additional tools and features to help you further customize and polish your graphical presentation, elevating it to a professional level.
Data Labels and Callouts
- Adding data labels to your charts can provide additional context and clarity, allowing viewers to easily interpret the data points.
- Using callouts to highlight specific data points or trends can draw attention to key insights, making your graphical presentation more impactful.
Interactive Elements
- Utilizing interactive elements such as drop-down menus, buttons, or sliders can make your graphical presentation more engaging and dynamic, allowing viewers to interact with the data.
- Creating interactive dashboards with linked charts and tables can provide a comprehensive view of the data, allowing for seamless exploration and analysis.
Formatting and Design
- Applying consistent formatting across all elements of your graphical presentation can create a cohesive and professional look, enhancing visual appeal and readability.
- Using design elements such as color schemes, fonts, and shapes can help convey a specific message or theme, adding depth and personality to your graphical presentation.
In conclusion, this tutorial covered the essential steps for creating graphical presentations in Excel . We discussed the process of selecting the data, choosing the appropriate chart type, customizing the design, and adding final touches to enhance the visual appeal. Now that you have the knowledge and tools at your disposal, I encourage you to start creating your own graphical presentations in Excel. Practice makes perfect, and with a little creativity, you can transform your data into compelling visuals that effectively communicate your message.

Immediate Download
MAC & PC Compatible
Free Email Support
Related aticles

The Benefits of Excel Dashboards for Data Analysts

Unlock the Power of Real-Time Data Visualization with Excel Dashboards

Unlocking the Potential of Excel's Data Dashboard

Unleashing the Benefits of a Dashboard with Maximum Impact in Excel

Exploring Data Easily and Securely: Essential Features for Excel Dashboards

Unlock the Benefits of Real-Time Dashboard Updates in Excel

Unleashing the Power of Excel Dashboards

Understanding the Benefits and Challenges of Excel Dashboard Design and Development

Leverage Your Data with Excel Dashboards

Crafting the Perfect Dashboard for Excel

An Introduction to Excel Dashboards

How to Create an Effective Excel Dashboard
- Choosing a selection results in a full page refresh.
What is Microsoft Excel PPT? (The Basics Explained)
Have you ever wished you could create stunning presentations without having to use complicated software? Well, now you can! Microsoft Excel PPT is a powerful tool that allows you to create impressive, visually-engaging presentations with ease.
In this article, we’ll explore what Microsoft Excel PPT is, its features, how to create a presentation in it, and some tips to design an engaging presentation.
We’ll also look at the benefits of using Excel PPT and its many different uses.
Finally, we’ll cover how to troubleshoot any common Excel PPT issues you may encounter.
So, let’s get started!
Table of Contents
Short Answer
Microsoft Excel PPT is a Microsoft PowerPoint presentation that contains Microsoft Excel spreadsheets.
It is used to create presentations that include graphical representations of data stored in Excel workbooks.
The data is presented in the form of tables, charts, and other visuals, making it easy for audiences to understand.
Additionally, the presentation can be easily manipulated and updated, allowing the presenter to quickly adjust the data and visuals as needed.
What is Microsoft Excel PPT?
Microsoft Excel PPT is a presentation software created by Microsoft as part of their Office Suite.
It is designed to help users create professional-looking presentations in a variety of formats, including slides, charts, tables, and animations.
It is a powerful tool for presenting data in a visually appealing way, making it ideal for meetings, classes, conferences, and more.
Excel PowerPoint allows users to easily create slides using a variety of features, from basic text to complex graphical elements.
With its intuitive user interface, users can quickly create a presentation that looks polished and professional.
They can also use a variety of templates, themes, and transitions to add a unique touch to their presentation.
In addition to featuring a wide range of features, Excel PowerPoint also offers powerful tools for editing and formatting slides.
For example, users can easily adjust the size and position of objects on their slides, add and edit text, and insert images.
Additionally, they can use a range of tools to add charts and tables to their slides and customize how they look.
Microsoft Excel PowerPoint also includes a range of features for collaborating with others.
Users can share their presentations with other users and collaborate on them in real-time.
They can also broadcast their presentations to remote audiences and even record them for later viewing.
Overall, Microsoft Excel PowerPoint is a powerful and versatile presentation software that can be used to create professional-looking presentations.
With its wide range of features and tools, it makes it easy to create engaging and visually appealing presentations for any occasion.
What Features Does Excel PPT Have?
Microsoft Excel PowerPoint (PPT) is a powerful presentation software created by Microsoft.
It has a variety of features that make it a great tool for creating visually appealing presentations.
It can be used to present data in a variety of ways, such as slides, charts, tables, and animations.
Excel PowerPoint also has features to help make creating presentations easier.
For starters, Excel PowerPoint has a wide range of templates, themes, and images to choose from.
This helps users create presentations that look professional and consistent.
Users can also customize these templates, themes, and images to their liking.
There are also a variety of chart types, including bar charts, line charts, pie charts, and scatter plots.
Excel PowerPoint also has a variety of animation options to help make presentations more engaging.
Excel PowerPoint also has features to help users organize their data.
It is capable of creating tables, which can be used to organize data into columns and rows.
It also has a formula builder, which can help make calculations easier.
Excel PowerPoint also has a variety of features to help with formatting.
For example, users can add text, images, and shapes to slides, and can also adjust the font, size, color, and alignment of text.
Finally, Excel PowerPoint has features to help make presentations more interactive.
It has a variety of tools for adding multimedia elements, such as videos, audio clips, and links.
It also has features to help with collaboration.
Users can work together in real-time on a presentation, and can also share their presentations with others.
This makes it a great tool for creating presentations for meetings, classes, conferences, and more.
Overall, Excel PowerPoint is a powerful presentation software that is capable of creating visually appealing presentations.
It has a variety of features to help make creating presentations easier, such as templates, themes, and images.
It also has features to help organize data, calculate formulas, and format slides.
Finally, it has features to help make presentations more interactive and collaborative.
How to Create a Presentation in Excel PPT
Creating a presentation in Excel PPT is easy and straightforward.
The first step is to open the program and select the New Presentation option.
This will open a blank presentation page.
From here, you can add slides by selecting the Insert option from the main menu.
Here, you can choose from a variety of slide types such as blank, title, and content.
You can also choose from a selection of built-in themes and templates.
Once you have created the slides, you can start adding content.
You can add text, images, videos, audio, and more.
To do this, you can select the Insert option from the main menu and select the item you wish to add.
You can also use the Format option to customize the look of your presentation.
Here, you can choose from a variety of text formatting options, colors, and more.
Once your presentation is complete, you can save it in the PowerPoint file format.
This will ensure that the presentation is compatible with other applications that use the same format.
You can also export your presentation as a PDF file.
This will allow you to share your presentation with others.
In addition to creating presentations, Excel PPT also provides a variety of features that allow you to manage and present data.
For example, you can use the Data Analysis option to create charts and graphs from data sets.
You can also use the Format Cells option to customize the look of your data.
Excel PPT also makes it easy to collaborate with others by allowing you to share presentations online.
By following these simple steps, you can easily create engaging and professional-looking presentations using Excel PPT.
This powerful presentation software is a great way to visualize data and share information with others.
Benefits of Using Excel PPT
Using Excel PowerPoint (PPT) can be a great way to present your data in a visually appealing way. It is an incredibly useful tool for creating professional-looking presentations for meetings, classes, conferences, and more. There are a number of benefits to using Excel PPT, including:
1. Ease of Use: Excel PPT is extremely user-friendly, with an intuitive design that makes it easy to create and edit presentations. The software also includes a variety of templates and themes to help users get started quickly. It also includes a wide range of tools and features that make creating complex presentations a breeze.
2. Visual Impact: Excel PPT is designed to help users create visually stunning presentations. It comes with a range of features, such as animations, charts, diagrams, and more, that can help users bring their data to life. This makes it easy to make presentations that are both informative and visually appealing.
3. Improved Collaboration: Excel PPT is designed to make collaboration easier. It allows users to share their presentations with others, so they can work together to make sure the presentation is perfect. It also allows users to upload presentations to the cloud, so they can be accessed from anywhere.
Overall, Excel PPT is an incredibly useful tool for creating professional-looking presentations.
It is easy to use, has a great visual impact, and makes collaboration easier.
Whether youre creating a presentation for a meeting, class, or conference, Excel PPT is a great tool to have in your arsenal.
Different Uses for Excel PPT
Microsoft Excel PowerPoint (PPT) is a powerful presentation software that has a wide range of uses.
It is not only a great tool for creating presentations for meetings, classes, and conferences, but it can also be used to create animations, charts, tables, and slides.
In a nutshell, Excel PowerPoint is a great way to present data in an engaging and visually appealing way.
For businesses, Excel PowerPoint is a great tool for creating presentations for marketing campaigns, product launches, and more.
It can be used to create visuals that will help to communicate complex ideas quickly and effectively.
Additionally, Excel PowerPoint can be used to create presentations for training sessions or to explain complicated topics in understandable terms.
For educators, Excel PowerPoint can be used to create engaging presentations for lectures and classes.
Not only can it be used to create visuals to explain topics, but it can also be used to create interactive quizzes or polls that will help to engage students.
Additionally, Excel PowerPoint can be used to create presentations for conferences and other events.
For students, Excel PowerPoint is a great tool for creating presentations for school projects or presentations for extracurricular activities.
It can be used to create visuals that will help to explain topics or to make an impactful presentation.
Additionally, Excel PowerPoint can be used to create visuals for slideshows or to create interactive activities for group projects.
Overall, Excel PowerPoint is a great tool for creating a variety of presentations.
It is capable of creating charts, slides, tables, and animations that can be used to present data in a visually appealing way.
It is a great tool for businesses, educators, and students alike and can be used to create engaging presentations for meetings, classes, conferences, and more.
Tips for Designing an Engaging Presentation in Excel PPT
Microsoft Excel PowerPoint (PPT) is a powerful presentation software package that offers a range of features to help users create professional-looking presentations. From creating slides, charts, tables, and animations to incorporating graphics and multimedia, PPT is an invaluable tool for creating engaging presentations. However, it can be intimidating to use, and it is important to understand the basics of design and layout to create an effective and engaging presentation. Here are some tips for getting the most out of Excel PPT:
Use the layout feature.
Excel PPT offers a range of different layouts to choose from, which can help you create an organized and professional-looking presentation.
Make sure to choose the most appropriate layout for the type of presentation you are creating.
Incorporate graphics and multimedia.
Graphics and multimedia can be used to add interest and help keep your audience engaged.
Excel PPT offers a range of graphics and multimedia options, from charts and graphs to videos and animations.
Use the transition and animation features.
Transitions and animations are a great way to add flair to your presentation.
Excel PPT offers a range of options for animating text, objects, and slides.
Stick to a consistent design.
Consistent design is key to creating an engaging presentation.
Make sure to use a consistent color palette, font, and style throughout your presentation.
Keep it simple.
Too much content can be overwhelming, so try to keep your presentation concise and to the point.
Make sure to use visuals to help illustrate your points and keep your audience engaged.
Use the sharing and collaboration features.
Excel PPT offers a range of collaboration and sharing features that can help you create a successful presentation.
Use the comments feature to get feedback from colleagues and the sharing feature to make sure everyone is on the same page.
Following these tips will help you create an engaging and effective presentation in Microsoft Excel PPT.
With the right design and layout, your presentation will be sure to make an impact.
Troubleshooting Common Excel PPT Problems
Microsoft Excel PPT is a powerful presentation software, but like all programs, it can have its share of issues.
Fortunately, troubleshooting common Excel PPT problems is usually straightforward and can be done in a few steps.
One of the most common issues experienced when using Excel PPT is not being able to open or view the file.
This can be caused by a few things, such as an outdated version of the program, an incompatible file format, or a corrupted file.
To fix this issue, make sure you are using the latest version of Excel PPT and that the file format is supported.
If the file is corrupted, try saving a new copy of the file and deleting the old one.
Another common issue with Excel PPT is not being able to edit slides.
This can be caused by a variety of issues, such as missing fonts, incorrect slide layout, or compatibility issues.
To fix this, make sure all the fonts used in the presentation are installed on your computer.
Check the slide layout to make sure it is correct.
Finally, make sure the presentation is compatible with the version of Excel PPT you are using.
Finally, some users may experience issues when trying to save their presentation.
This can be caused by a variety of issues, such as not having enough storage space, corrupt files, or incompatible versions.
To fix this issue, make sure you have enough storage space on your computer.
Check the file for any corruption and try saving a new copy of the file and deleting the old one.
Make sure the version of Excel PPT you are using is compatible with the presentation.
By following these simple steps, you can easily troubleshoot and fix common Excel PPT problems.
With a little bit of patience and the right steps, you can get back to creating and editing your presentations in no time.
Final Thoughts
Microsoft Excel PowerPoint (PPT) is an incredibly powerful tool for creating professional-looking presentations.
It has many features that make it easy to create slides, charts, tables, and animations, and can be used for a variety of tasks.
With the tips provided, you can create engaging presentations, perfect for meetings, classes, conferences, and more.
Now that you understand the basics, why not try out creating a presentation in Excel PPT and see what amazing things you can come up with!
James Wilson
James Wilson has extensive knowledge in the information technology industry.His second love, besides dealing with computers, is smart home technology. He is continually updating information to better comprehend this problem and has a deep understanding of the apartment’s support system.
Recent Posts
Can You Use Google Keep Offline? Here's How to Stay Organized Without Internet
Yes, you can use Google Keep offline. By enabling offline access in the settings, you can view, create, and edit notes without an internet connection. Any changes made offline will automatically sync...
Can You Share Google Keep Notes? Here's How to Collaborate Effortlessly
Yes, you can easily share Google Keep notes with others. To share a note, open it in the Google Keep app or website, then click on the collaborator icon at the bottom. Enter the email addresses of...
Excel Charts In Powerpoint
Key takeaway:.
- Excel Charts in PowerPoint can be a powerful tool for enhancing presentations: Using Excel Charts in PowerPoint can help to present data in a visually appealing and easy-to-understand manner, making presentations more effective and engaging.
- Inserting Excel Charts in PowerPoint is simple and straightforward: Excel Charts can be easily inserted into PowerPoint using either the copy and paste method or the Excel Object insertion method, both of which are simple to execute and offer flexibility in terms of editing and customization.
- A few best practices can help ensure the best results when using Excel Charts in PowerPoint: Consistency in chart design, choosing appropriate chart types for data, and ensuring data accuracy are all key factors that can help make Excel Charts in PowerPoint more effective and impactful.
Have you ever wanted to use data visuals to make a point in a presentation? Excel Charts in PowerPoint makes it easy for you to create a professional, dynamic presentation that captivates your audience. With a few simple steps, you can turn data into powerful visuals to help bolster your message.
Overview of Excel Charts in PowerPoint
Excel charts are a powerful tool for creating visual representations of data. They can help communicate complex information quickly and effectively. When used in PowerPoint presentations, Excel charts can enhance the overall impact of the presentation and convey the information more clearly.
Here are six key features of using Excel charts in PowerPoint:
- Excel charts are easily customizable in PowerPoint. Users have access to a range of chart styles and formatting options that can be tailored to the specific needs of the presentation.
- Excel charts can be updated easily. Users can update charts directly within PowerPoint and the changes will be reflected in real-time. This saves time and effort, as there is no need to create new charts each time data is updated.
- Excel charts can be animated in PowerPoint. Animation can help to engage the audience and draw attention to important data points.
- Excel charts can be excellently manipulated in PowerPoint. Users can arrange the charts on the slide and resize them as desired to make them stand out or fit in with the overall design of the presentation.
- Excel charts are seamlessly integrated into the PowerPoint presentation. Users can embed the charts directly into the presentation without having to switch between different applications.
- Excel charts allow for data-driven presentation design. Users can create a presentation based on data insights and showcase the data in an easily digestible format using Excel charts.
In addition to these benefits, Excel charts offer a level of flexibility that allows users to create the precise visual representation needed to convey the data effectively.
It’s worth noting that Microsoft first introduced Excel charts in PowerPoint in 1993, and since then, they have become an integral feature of the software. The seamless integration of Excel and PowerPoint has been a core focus of Microsoft, and it is clear that users appreciate the convenience and functionality of using Excel charts in PowerPoint.
Benefits of using Excel Charts in PowerPoint
Excel Charts in PowerPoint: Professional Benefits Explored
Excel Charts in PowerPoint enhance the visual appeal of presentations, and assist in better data comprehension, especially in professional settings.
Advantages of Integrating Excel Charts in PowerPoint
- Excel Charts help in displaying complex data sets in a visually informative and easy-to-understand format.
- Excel Charts keep the data point consistent and ensure accuracy in presentation.
- Excel Charts allow for better presentation customization, including style, colors, and fonts.
- Excel Charts can be easily updated and edited to reflect new data sets.
- Excel Charts offer an efficient and impressive way to present quantitative information.
Unique Details about Excel Charts in PowerPoint Integration
Essentially, incorporating Excel Charts in PowerPoint means more than just inserting data from Excel, but using it as an embedded data sheet in the PowerPoint. Such integration guarantees data consistency and easy update, while allowing formatting changes to be done on both platforms simultaneously.
Suggestions for Enhancing PowerPoint Presentations with Excel Charts
Incorporation of clear and concise titles, axis labels, and legends make it significantly easier for audience comprehension. Similarly, it is essential to select the correct chart type for the data presentation in order to maximize visual impact, and also optimize colors for better visual appeal.
How to Insert Excel Charts in PowerPoint
Want to place Excel charts in PowerPoint? No worries! Copy and paste them , or use the Excel Object in PowerPoint. You’ll be able to add your data quickly and without difficulty. Easy-peasy!
Copying and Pasting Excel Charts in PowerPoint
Selecting and Placing Excel Charts in PowerPoint
To embed and display charts created in Excel within the presentation slides of PowerPoint, users should follow a simple procedure:
- Copy your desired chart from the Excel worksheet by either right-clicking on it or pressing ‘CTRL + C.’
- Then, go to your desired slide location in PowerPoint and select either ‘Paste’ or ‘Paste Special’ options from the ‘Home’ tab.
- Finally, adjust size and formatting options for each specific chart as necessary.
It is important to note that depending on the type of data visualization used to create a chart, adjusting colors or size may be necessary to cater to your audiences needs.
Ensuring clear visual aids can support powerful narratives helps make for more effective presentations. Making sure visuals are large enough for audience members to see and understand ensures that everyone can get the most out of all presentations they attend! When PowerPoint and Excel collide, it’s like the ultimate power couple. Inserting Excel charts into PowerPoint? Piece of cake, even for technologically-challenged individuals.
Inserting Excel Charts using Excel Object in PowerPoint
Inserting Excel Charts in PowerPoint using Excel Object is a seamless way to enhance your presentations with rich data visuals that are easy to update and manipulate. Here’s how you can do it in just 6 simple steps:
- Open both Microsoft Excel and PowerPoint applications.
- Select the chart you want to insert into PowerPoint from your Excel spreadsheet.
- Click on Copy or press Ctrl+C on your keyboard.
- Go to the slide where you want to insert the chart in your PowerPoint presentation.
- Press Ctrl+V on your keyboard
- Right-click and select Paste from the context menu.
- Your chart will now appear in your slides, and you can format it as desired using various design tools available in PowerPoint.
When pasting an Excel chart into a PowerPoint presentation, ensure that both applications are open simultaneously. Make sure there are no confidential data present while copying the charts.
Did you know that Excel charts embedded in PowerPoint presentations were introduced back in 1997 with Microsoft Office? The feature has evolved significantly over time with newer versions of Office offering more advanced visual design tools for charts!
Editing Excel charts in PowerPoint: where you can finally fix all those mistakes you made in your data entry.
Editing Excel Charts in PowerPoint
Make your Excel charts look great in your PowerPoint presentations! To do this, you need to edit them. In this section, we’ll show you how to refine your charts. It’s called “Editing Excel Charts in PowerPoint” .
We will also teach you “Updating Chart Data in PowerPoint from Excel” and “Customizing Chart Elements in PowerPoint” . Match the look and feel of your presentation with these solutions!
Updating Chart Data in PowerPoint from Excel
To update chart data in PowerPoint from Excel, you can edit the charts directly from the presentation.
Follow these 4 simple steps to Update Chart Data in PowerPoint from Excel using Semantic NLP variation:
- On the slide with the chart, click on it to select it.
- In the ribbon menu, choose “ Chart Tools ” and then select “ Design “.
- Click “ Edit Data ” to open up the Excel spreadsheet containing the chart’s data.
- Make necessary changes in the Excel sheet then click outside of the spreadsheet window to automatically update the chart in PowerPoint.
It is worth noting that this method applies equally for bar graphs, pie charts as well as other chart types.
Pro Tip: If you want to make only minor edits or updates like changing labels or numbers on a chart, you can just double-click directly on that part of the visual inside PowerPoint and make those changes there.
Get ready to take your PowerPoint presentation to the next level by giving your charts a makeover that even Cinderella would envy.
Customizing Chart Elements in PowerPoint
Customizing the visual elements of a chart in PowerPoint enables you to create a cohesive and compelling presentation.
Here is a 4-Step Guide to Customizing Chart Elements in PowerPoint :
- Select the chart, go to ‘Chart Tools’ and click on ‘Design.’
- To modify chart elements, click on ‘Add Chart Element’ and select options such as ‘Data Labels,’ ‘Legends,’ or ‘Axis.’
- You can customize colors, shapes, and formatting of various elements through the “Format” tab.
- Ensure that your modifications are saved by right-clicking in the chart area and choosing “Save As Template.”
Of significance, keep in mind that when adding data labels to charts for large datasets, consider using leader lines or remove clutter by only labeling critical values.
Pro Tip: When modifying chart elements in PowerPoint remember that your final goal is to produce engaging graphics that enhance your message. Because who needs boring bullet points when you can visually impress with Excel charts in PowerPoint?
Best Practices for Using Excel Charts in PowerPoint
To smoothly integrate Excel charts in PowerPoint, it’s best to use these tips:
- Make sure a consistent design for the charts .
- Choose the correct chart type for your data .
- Verify that the data in the charts is accurate .
Keep Chart Designs Consistent
Establishing Uniformity in Chart Design
Maintaining a uniform template for the design aspects of Excel charts is crucial when creating presentations using PowerPoint. This helps to achieve consistency and ensures that your charts match the overall look and feel of your presentation. Here are five steps to keep chart designs consistent:
- Establish a standard format: Determine a set of standard formatting guidelines for your charts that meet your organization’s branding requirements.
- Use chart templates: Create templates with predefined designs, color scheme, labels, and data sources so that these can be quickly applied without compromising on visual consistency.
- Follow naming conventions: Use descriptive titles or names for each chart element (axis, title, data series) to easily locate and modify them.
- Reuse elements: Reusing design elements such as colors, fonts, and styles across different charts contributes to uniformity in chart design throughout the presentation.
- Test before sharing: Always check each slide containing the charts before presenting it to ensure that you have achieved consistency in both form and function.
Exemplary Characteristics
It takes time to develop an intuitive understanding of chart design best practices since they involve both technical skills and aesthetic judgement. Ensure that your PowerPoint slides remain aesthetically pleasing while still conveying important information by establishing uniformity in your chart design.
Unexpected Event
Microsoft Excel has been around for almost 30 years. The first version was introduced on September 30th, 1985! Since then, excel has become one of the most commonly used tools across workplaces all over the world.
Don’t be that person who uses a pie chart for everything – it’s like wearing a suit to the beach.
Use Appropriate Chart Types for Data Representation
When creating charts in Excel for use in PowerPoint, it’s critical to choose appropriate chart types that accurately represent the data. This ensures viewers understand the information presented without confusion.
Here is a sample table that shows which chart types are best suited to represent various kinds of data:
It’s important to note that each chart type has unique properties and best suits specific data types. Using the wrong chart type can result in inaccurate or confusing representations of the data.
Every organization should have internal guidelines about how they display data using Excel charts. For instance, some companies may prefer column charts over bar charts for comparison purposes. Therefore, practitioners must adhere to the organization’s standards and select appropriate chart types accordingly.
An illuminating fact is that Joseph Priestley used charts to illustrate scientific data back in 1765 . His graph showed the rise and fall of different gases under controlled conditions. Graphs plotting natural phenomena still use his technique today because it provides an effective way of representing complex information simply and intuitively.
Because nothing says ‘professional’ like a chart with inaccurate data – except maybe a typo in your boss’s name on the PowerPoint slide.
Ensure Data Accuracy in Charts
With the increasing reliance of businesses on data to make decisions, charts are an essential tool in delivering precise insights. Accurate data charting is vital since it provides a structure for proper decision-making. Clear analysis of data can only occur when the correct points are entered into spreadsheets and graphs flawlessly.
Any mistakes in data collection or presentation can severely impact analytical decisions, which could culminate in missed opportunities. Therefore, an imperative would be to ensure that all inputs are consistently checked and double-checked before sharing a graphic representation.
In one instance, planning officers at a leading travel company embarked on designing business plans based on misinformation about customer trends acquired by wrongly inputted spreadsheet formulas. This led to significant revenue loss from underestimation of their target market over some time due to unaltered graphs used for analyses.
Some Facts About Excel Charts in PowerPoint:
- ✅ Excel Charts can be easily added to PowerPoint presentations. (Source: Microsoft)
- ✅ Data in PowerPoint charts can be easily updated in real-time using linked Excel files. (Source: GoSkills)
- ✅ There are several chart types availabe in Excel to choose from, such as Bar, Line, Pie, and Scatter. (Source: Exceljet)
- ✅ Charts in PowerPoint can be customized with colors, font styles, and other design elements to match the presentation theme. (Source: SlideModel)
- ✅ Excel Charts in PowerPoint can help presenters convey complex data in an easy-to-understand format. (Source: BrightCarbon)
FAQs about Excel Charts In Powerpoint
What are excel charts in powerpoint.
Excel Charts in PowerPoint refer to the feature where users can insert charts and tables created in Excel into PowerPoint slides to represent data visually through graphs and charts that help convey information with ease.
How do I insert an Excel Chart into a PowerPoint presentation?
To insert an Excel Chart into a PowerPoint presentation, open the slide where you want to insert the chart and click “Insert” from the ribbon menu. Then, select “Chart” and choose the type of chart you want to insert. From there, select the Excel file that contains the data you want to include in the chart, and drag the selection box to adjust the size of the chart as needed.
How can I update an Excel Chart in PowerPoint?
To update an Excel Chart in PowerPoint, select the chart and then click the “Edit Data” button from the ribbon. This will open the Excel sheet where the chart is located, allowing you to make changes to the data. Once you have made the changes, close the Excel sheet and the changes will be automatically updated in the PowerPoint presentation.
What types of Excel Charts can be inserted into PowerPoint?
Almost all types of charts available in Excel can be inserted into PowerPoint, including line charts, pie charts, bar charts, area charts, scatter charts, and more. The process of inserting each type of chart is slightly different, but the overall steps remain the same.
Can I customize the appearance of an Excel Chart in PowerPoint?
Yes, you can customize various aspects of an Excel Chart in PowerPoint. You can change the chart type, axis labels, color scheme, font style, and more. To customize the chart, select it and then click the “Chart Tools” menu on the ribbon, where you can make your changes.
Can I animate an Excel Chart in PowerPoint?
Yes, you can add animation to an Excel Chart in PowerPoint to make it more engaging and interactive. To do this, select the chart and then click the “Animations” tab on the ribbon. From there, choose the animation effect and timing that you want to apply to the chart.
How to Insert Excel File in PowerPoint Office 365

PowerPoint presentations are an excellent way to deliver information in an engaging and visually appealing manner. However, sometimes the data we want to include in our presentations is stored in an Excel spreadsheet. Fortunately, PowerPoint Office 365 allows us to insert Excel files directly into our slides, making it easy to incorporate our data into our presentations. In this article, we will go through the step-by-step process of inserting an Excel file into a PowerPoint presentation using Office 365.
Table of Contents
Why You Might Want to Insert an Excel File in PowerPoint
Excel is a powerful tool for managing and analyzing data, and sometimes we want to include that data in our presentations. By inserting an Excel file into our PowerPoint slide, we can present our data in a visually appealing way, making it easier for our audience to understand and engage with the information.
Another reason why you might want to insert an Excel file in PowerPoint is to save time. Instead of manually inputting data into your presentation, you can simply insert the Excel file and the data will be automatically updated if any changes are made to the original file. This can be especially helpful if you are working with large amounts of data or if you need to update your presentation frequently.
Additionally, inserting an Excel file in PowerPoint allows you to customize the data in your presentation. You can choose which parts of the Excel file to include, adjust the formatting, and add charts or graphs to better illustrate your data. This level of customization can help you create a more impactful and effective presentation.
System Requirements for Inserting Excel Files in PowerPoint Office 365
Before we get started with inserting an Excel file in our PowerPoint presentation, we need to make sure our system meets the requirements necessary to do so. Firstly, we need to have a valid Office 365 subscription. Secondly, we need to have both Excel and PowerPoint installed on our computer. Finally, we need to have a compatible Microsoft Office version, as some older versions of Office may not support this feature.
It is also important to note that the Excel file we want to insert should be saved in a compatible format, such as .xlsx or .xls. Additionally, if the Excel file contains any macros or complex formulas, they may not function properly when inserted into PowerPoint. Therefore, it is recommended to test the Excel file before inserting it into the presentation to ensure that it works as intended.
Opening PowerPoint Office 365 and Starting a New Presentation
The first step to inserting an Excel file into PowerPoint is to open PowerPoint Office 365 on our computer. Once we have done this, we can start a new presentation by selecting the “New Presentation” option from the main menu. Alternatively, we can open an existing presentation and add a new slide to it.
After starting a new presentation, we can choose from a variety of pre-designed templates or create our own custom design. It is important to choose a design that complements the content of our presentation and makes it visually appealing to the audience.
Once we have selected a design, we can begin adding content to our slides. This can include text, images, charts, and graphs. It is important to keep the content concise and relevant to the topic of the presentation. We can also add animations and transitions to make the presentation more engaging for the audience.
Adding a New Slide to Your Presentation
Next, we need to add a new slide to our presentation where we want to insert our Excel file. To do this, we can select the “New Slide” option from the menu bar or right-click on an existing slide and choose “New Slide.”
Once we have added the new slide, we can choose the layout that best suits our needs. We can select a layout with a title and content, a title and two content boxes, or a blank layout where we can add our own content boxes.
It’s important to keep in mind the overall flow and organization of our presentation when adding new slides. We want to make sure that each slide builds upon the previous one and that the information is presented in a clear and logical manner.
Choosing the Right Layout for Your Slide
Now that we have our new slide, we need to choose the right layout for it. This is important because it determines the placement of our Excel file on the slide and the accompanying text. We can select the layout option from the “Layout” tab in the ribbon menu.
When choosing a layout, it’s important to consider the purpose of the slide. If the slide is meant to showcase data, then a layout with a larger area for the Excel file and a smaller area for text may be more appropriate. On the other hand, if the slide is meant to provide context or explanation for the data, a layout with a larger area for text and a smaller area for the Excel file may be better.
Additionally, it’s important to consider the overall design of the presentation. Choosing a layout that is consistent with the rest of the presentation can help create a cohesive and professional look. It’s also important to ensure that the layout is visually appealing and easy to read, with appropriate font sizes and colors.
Selecting the Excel File You Want to Insert
With our slide set up, we can now insert our Excel file into it. To do this, we need to select the “Insert” tab in the ribbon menu and click on the “Excel” option. This will open a file explorer window from which we can choose the Excel file we want to insert.
It is important to note that the Excel file you select should be relevant to the content of your presentation. If you are presenting financial data, for example, you should select an Excel file that contains financial data. This will ensure that your presentation is cohesive and easy to follow.
Additionally, if you make any changes to the Excel file after inserting it into your presentation, those changes will not be reflected in the presentation unless you update the link to the file. To update the link, simply right-click on the Excel object in your presentation and select “Update Link”. This will ensure that any changes made to the Excel file are reflected in your presentation.
Adjusting the Size and Position of Your Excel File within the Slide
Once we have inserted our Excel file, we can resize and re-position it to fit within our slide. PowerPoint Office 365 makes this easy with the “Format” tab, where we can adjust the size and position of our Excel file within the slide.
To resize the Excel file, we can click on it to select it and then drag the corners to make it larger or smaller. We can also use the “Size” options in the “Format” tab to adjust the height and width of the file. To re-position the file, we can click and drag it to a new location on the slide. Alternatively, we can use the “Position” options in the “Format” tab to align the file to the left, right, top, or bottom of the slide. By adjusting the size and position of our Excel file, we can ensure that it fits seamlessly into our presentation and enhances our message.
How to Edit Your Excel File within PowerPoint Office 365
If we need to edit the data in our Excel file after inserting it into our PowerPoint presentation, we can do so directly within PowerPoint Office 365. By double-clicking on the Excel file within our slide, we can access the Excel interface to make any necessary changes.
It is important to note that any changes made to the Excel file within PowerPoint will not necessarily affect the original Excel file. If the Excel file is an embedded object, changes made in PowerPoint will be reflected in the original file. However, if it’s a linked file, changes in PowerPoint do not affect the original Excel file. Therefore, it is recommended to make a copy of the original Excel file before inserting it into PowerPoint.
Another useful feature of editing Excel files within PowerPoint Office 365 is the ability to customize the appearance of the data. We can change the font, color, and size of the text, as well as add borders and shading to the cells. This can help to make the data more visually appealing and easier to understand for our audience.
Formatting Your Excel File to Match Your Presentation Design
To ensure that our Excel file fits seamlessly into our PowerPoint presentation, we need to format it to match our presentation design. This can be done using the “Format” tab, where we can change the font, color, and style of our Excel file to match our presentation.
One important aspect to consider when formatting our Excel file is the use of charts and graphs. These visual aids can be a great addition to our presentation, but they need to be formatted properly to match our design. We can adjust the colors, fonts, and styles of our charts and graphs using the “Chart Tools” tab in Excel.
Another useful feature to consider when formatting our Excel file is the use of conditional formatting. This allows us to highlight certain cells or ranges of cells based on specific criteria, such as values or text. By using conditional formatting, we can make our data more visually appealing and easier to understand for our audience.
Tips for Creating Engaging Presentations with Excel Data in PowerPoint Office 365
To make the most of our Excel data in our PowerPoint presentation, we can use charts and graphs to highlight the important information and make it easy to understand. We can also use animations and other visual effects to add interest to our presentation.
Another tip for creating engaging presentations with Excel data in PowerPoint Office 365 is to use color effectively. By using a consistent color scheme throughout the presentation, we can create a cohesive and professional look. We can also use color to draw attention to important data points or to differentiate between different categories of data. However, it’s important to use color sparingly and not to overwhelm the audience with too many bright or contrasting colors.
Troubleshooting Common Issues When Inserting Excel Files in PowerPoint Office 365
If we encounter issues when inserting Excel files into our PowerPoint presentation, there are a few things we can do to troubleshoot the problem. For example, we can try closing and re-opening PowerPoint, or we can make sure that our Office 365 subscription is up-to-date. We can also reach out to Microsoft support for further assistance.
By following the steps outlined in this article, we can easily insert Excel files into our PowerPoint presentations using Office 365. Whether we’re presenting data in a business setting or sharing information in an academic presentation, this feature is a valuable tool for delivering engaging and informative presentations.
By humans, for humans - Best rated articles:
Excel report templates: build better reports faster, top 9 power bi dashboard examples, excel waterfall charts: how to create one that doesn't suck, beyond ai - discover our handpicked bi resources.
Explore Zebra BI's expert-selected resources combining technology and insight for practical, in-depth BI strategies.

We’ve been experimenting with AI-generated content, and sometimes it gets carried away. Give us a feedback and help us learn and improve! 🤍
Note: This is an experimental AI-generated article. Your help is welcome. Share your feedback with us and help us improve.

Excel PowerPoint Link Excel PPT: Seamless Integration for Dynamic Presentations
Integrating excel with powerpoint.
When integrating Excel with PowerPoint, the primary focus is on embedding data, linking charts, and employing paste special for smooth transitions between the programs. This fusion ensures data remains dynamic and presentations stay up-to-date.
Embedding Excel Data in PowerPoint
To embed Excel data in PowerPoint, one must first copy the desired section from their Excel spreadsheet. In PowerPoint, this can be done by selecting the location the data is to be placed and choosing the Paste Special option for insertion. This embeds the data as an object in PowerPoint, rendering it static with no subsequent updates from the source spreadsheet after it has been inserted.
Linking Excel Charts to PowerPoint
For a more dynamic connection, linking Excel charts into PowerPoint is the method of choice. By copying the chart in Excel and selecting Paste Special in PowerPoint, one can choose to paste the link as a Microsoft Excel Chart Object. This creates a link to the source Excel file, assuring that any updates made to the Excel chart are reflected in PowerPoint, provided both files are open at the same time.
Using Paste Special for Advanced Data Integration
Paste Special offers advanced integration features beyond simply embedding or linking. By copying the desired Excel data and selecting Paste Special in PowerPoint, users can choose from a variety of formats to paste the data as. Integrating as an Excel Worksheet Object is particularly useful, as it permits future edits within PowerPoint while keeping the format and formulas from Excel intact. This way, Excel’s robust features can be utilized right within the PowerPoint presentation, while also having the convenience of local updates.
Enhancing Presentations with Excel Content
In a PowerPoint presentation, incorporating Excel content can enrich the quality and clarity of the information presented. Excel’s robust features for handling data allow for dynamic and comprehensive displays of information on PowerPoint slides.
Optimizing Excel Content for PowerPoint
When preparing to convey Excel data in a PowerPoint presentation, one must consider the formatting and layout to ensure clarity. The aim is to simplify complex data for the audience without losing vital details. Tables and graphs should be streamlined and styled to fit the PowerPoint slide’s theme and design.
- Rows and Cells : Adjust the size of rows and cells to maintain legality when presented on a slide.
- Excel Charts : Format charts to match the presentation’s color scheme and style.
- Data Table : Simplify the data table to display only essential information, avoiding overcrowding the slide.
Maintaining Data Consistency and Presentation Integrity
Linking Excel content directly to PowerPoint slides ensures that updates in the Excel spreadsheet are reflected in the presentation. This approach maintains data consistency and presentation integrity.
- Linking Excel to PowerPoint : This method allows for real-time updates of data displayed in PowerPoint from the source Excel file.
- Static Excel Data : When live updates aren’t necessary, embedding data as a static object can be beneficial to preserve a specific state of information.
To manage the integration of Excel content in PowerPoint effectively, one should grasp both the technical aspects of linking or embedding data and the design principles of PowerPoint. Understanding the features of Microsoft PowerPoint: Design for Non-Designers can aid in creating a compelling presentation backed by the strength of Excel’s data management.
Management and Troubleshooting of Excel-PowerPoint Links
Linking Excel files to PowerPoint presentations can streamline your workflow and ensure your data is always up to date. Here you’ll learn how to keep those links working smoothly and tips for optimizing your presentation’s performance.
Updating and Refreshing Linked Data
When you’ve linked an Excel source file to a PowerPoint presentation slide, it’s essential to keep the data current. To edit data or refresh data , first make sure your linked Excel file hasn’t been moved or renamed. You can update the link by going to the PowerPoint slide and selecting the linked object or chart. Right-click, and you should see an option to update link . Selecting this will refresh the data in the PowerPoint table with the latest information from the Excel file.
If you’ve had to move or modify the Excel file, you might get an error message. In this case, you’ll have to edit the links . To do this, go to the File tab in PowerPoint, click on Info , and select Edit Links to Files (this option is only visible if there are links in your presentation). From this dialog box, you can change the source of your links or even update them manually.
Reducing File Size and Improving Performance
To reduce PowerPoint file size and enhance performance, consider linking data instead of embedding it. When you link, you simply display the data from your Excel file in your PowerPoint presentation, which keeps the PowerPoint file light. Managing the styling also helps. When you insert linked data, PowerPoint might try to apply the destination theme or styles , making the file heavier.
For the best performance:
- Link to data in Excel rather than embedding entire spreadsheets.
- Use Excel’s named ranges to simplify data management.
- Before linking, apply styles and formatting in Excel to avoid PowerPoint applying additional styles.
- Ensure that any non-essential formatting in Excel is removed to keep the PowerPoint slide clean and light.
By following these specific steps, you can effectively manage and troubleshoot links between Excel and PowerPoint, ensuring that your data is both accurate and presentation-ready.
Frequently Asked Questions
Linking Excel spreadsheets to PowerPoint can streamline your presentations by automatically updating data. This FAQ section explores the how-tos and what-ifs of connecting these two Microsoft Office applications.
How can I automatically update a PowerPoint presentation with changes made to an Excel spreadsheet?
To automatically update a PowerPoint presentation with Excel changes, link the data from a saved Excel worksheet to your presentation. Whenever updates occur in the Excel sheet, they can be easily refreshed in PowerPoint, ensuring your presentation data remains current.
What is the process for embedding an Excel chart in a PowerPoint slide?
Embedding an Excel chart into PowerPoint involves selecting the chart in Excel, copying it, and pasting it onto the desired slide. During the paste action, choose to embed it, which inserts the chart as an object, making your data visually engaging in the presentation.
What are the steps to insert an entire Excel worksheet into a PowerPoint slide as an object?
To insert an entire Excel worksheet into a PowerPoint slide, go to the ‘Insert’ tab in PowerPoint, select ‘Object’, then choose ‘Create from file’. Browse to your Excel file, select it, and insert. This method ensures PowerPoint showcases a snapshot of your worksheet in the slide.
How can I link a specific cell range from Excel to a PowerPoint slide for real-time data updates?
To link a specific cell range, copy the desired cells in Excel, and in PowerPoint, choose ‘Paste Special’ after clicking ‘Home’. Select ‘Paste link’ and choose ‘Microsoft Excel Worksheet Object’. This links the cell range to your slide, allowing for real-time data updates when the Excel file is modified.
Can I link Excel files to PowerPoint when using SharePoint, and how?
Yes, you can link Excel files from SharePoint to PowerPoint. Ensure your Excel file is uploaded to SharePoint, and then in PowerPoint use the ‘Insert Object’ feature, selecting ‘Create from file’, and link to the file’s SharePoint URL. This enables updates across platforms.
Is it possible to update linked Excel data in a PowerPoint presentation if I move the original spreadsheet?
If you move the original Excel file, the link in PowerPoint will break. To maintain the link, keep the Excel file in the same location or update the link in PowerPoint to reference the spreadsheet’s new location after moving it.
Similar Posts

Essential Computer Software Programs: Top Must-Haves for Your PC
Essential Computer Software Programs are the programs that most users find critical. While you may not use…

Upgrading To Windows 11: Pros and Cons
Windows 11 has been out for several years already but Microsoft’s latest operating system still sparks a…
How To Update Your Phone Firmware: Step By Step
Updating the firmware on your cell phone is like giving your device a fresh new start. It’s…

Windows 7: History, Legacy, Specifications
Windows 7, a significant chapter in the evolution of Microsoft’s operating systems, stands as a testament to…
What Is CPUID Used For?
Have you ever wondered about the specifics of your computer’s brain, its CPU? CPUID software is your…

Customize Notification Center Settings: A Step-by-Step Guide
In an age where digital notifications are part of our daily lives, mastering your device’s Notification Center…
How to Perform Excel to PowerPoint Automation (With Easy Steps)
Sometimes, we need a lot of Excel charts and cells into PowerPoint slides quickly and easily. If we use automation to link Excel and PowerPoint, we can skip copying and pasting between them. It will be much easier to analyze data. So, now we will discuss how to perform Excel to PowerPoint Automation in easy steps.
How to Perform Excel to PowerPoint Automation: Step-by-Step Procedures
To explain the steps, we will use a dataset that contains information about a company’s sales in 4 US states and a chart that shows this information. In STEP 1 , you will see the dataset. Let’s follow the steps below to understand how it works.
STEP 1: Make Dataset Ready
- First of all, you need to make the dataset ready.
- To do so, insert the data in an Excel sheet and make a chart.
- Here, we have used the range B4:D8 to insert the sales information.
- Also, we have created a sales chart using the Insert tab.
- Now, we will automatically display the data and chart in PowerPoint .

Read More: [Solved] Embedded Excel in PowerPoint Not Showing All Data
STEP 2: Open Visual Basic Editor
- Secondly, we need to open the Visual Basic Editor in Excel.
- For that purpose, go to the Developer tab in the ribbon and select Visual Basic .
- We can also open it by pressing Alt + F11 on the keyboard.
- Furthermore, a laptop user can press Fn + Alt + F11 to open the Visual Basic Editor .

Read More:
STEP 3: Referencing PowerPoint with Excel
- For linking PowerPoint with Excel, we need to give access to Excel about PowerPoint.
- That is why, we’ll pick References from the Tools tab, and the following dialog box will appear.

- After that, check the box next to Microsoft PowerPoint 16.0 Object Library and press OK .
- Microsoft PowerPoint may differ depending on whatever version you are using.
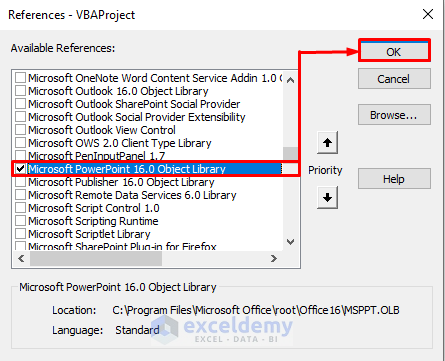
STEP 4: Insert Module Window
- In the fourth step, from the Visual Basic editor, we’ll open the Module window.
- To do so, we will go to the Insert tab and pick Module .
- Then, the Module window will be displayed.

STEP 5: Type VBA Code
- Now, you need to use a VBA code.
- In the Module window, type the code below:

VBA CODE Explanation:
Here, PwrPntAp , ippTile , iSlide are variables to indicate PowerPoint Application, Presentation and Slide respectively.
Here, we are opening PowerPoint Application and declaring a variable for Excel worksheet.
We are copying the Excel data and creating the PowerPoint page where we will place our data in this section.
And now we’re pasting the copied data from Excel into PowerPoint and formatting the representation.
STEP 6: Save and Run VBA
- Now, we need to save the code first and then, run it.
- To save the code, simply hit Ctrl + S on the keyboard.
- After that, press the F5 key to run the code.
- Otherwise, we can simply click the “ run ” button shown below after saving.

- After that, PowerPoint will open automatically and sales data and chart will be displayed over PowerPoint.
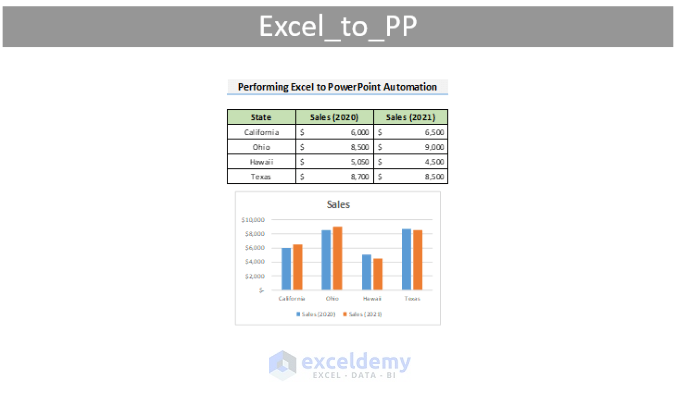
STEP 7: Make Changes in PowerPoint
- In the following step, we will make the necessary changes to the slides.
- We will put our cursor on the PowerPoint figure and right-click on the mouse.
- Then, click Edit Picture .

- After that, a window will come out and throw us a question and we will respond to it with “ Yes ”.

- We can now change the length, width, and zoom in and out by dragging the circle ends that show the picture’s end sides.
- Also, we have increased the length and width to improve the appearance of the figure and make the data more understandable.

Read More: How to Update Charts in PowerPoint from Excel Automatically
Final Output
- After editing, the following figure is our desired figure.
- We have put the data and a chart in Excel, and we have been able to put the information in PowerPoint in an automated way.

- Finally, we have renamed it “ Sales Report ” and this is our final result.
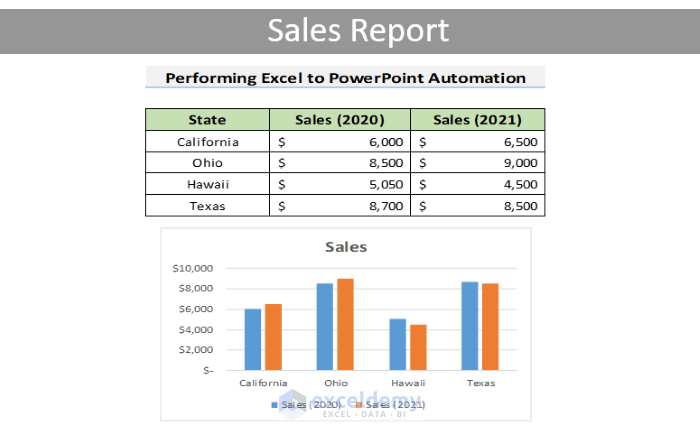
Download Practice Workbook
To practice by yourself, download the following workbook.
In this article, we have demonstrated step-by-step procedures for Excel to PowerPoint Automation. We trust that integrating Excel and PowerPoint into your workflow is now a breeze. Last but not least, please use the comment section below to post any questions or make any suggestions you might have.
Related Articles
- How to Copy Table from Excel to Powerpoint with Formatting
- How to Insert Excel Chart into PowerPoint
- How to Copy Chart from Excel to PowerPoint Without Link
- Automatically Create PowerPoint Slides from Excel
- How to Insert an Excel File into PowerPoint as an Icon
<< Go Back to Excel to PowerPoint | Export Data from Excel | Learn Excel
What is ExcelDemy?
Tags: Excel to PowerPoint

Sudipta Chandra Sarker, BSc, Electrical and Electronic Engineering, Bangladesh University of Engineering and Technology, Bangladesh, has worked on the ExcelDemy project for over a year. For ExcelDemy, he has authored 42 articles and reviewed over ten articles. He is employed as a junior software developer at the moment. He aims to create various useful Microsoft Office Add-ins, extending the functionality of Office programs. His interests span Microsoft Office Suites, Data Science, VBA, VB.NET, ASP.NET, C#, Excel, and Desktop... Read Full Bio
Leave a reply Cancel reply
ExcelDemy is a place where you can learn Excel, and get solutions to your Excel & Excel VBA-related problems, Data Analysis with Excel, etc. We provide tips, how to guide, provide online training, and also provide Excel solutions to your business problems.
Contact | Privacy Policy | TOS
- User Reviews
- List of Services
- Service Pricing

- Create Basic Excel Pivot Tables
- Excel Formulas and Functions
- Excel Charts and SmartArt Graphics
- Advanced Excel Training
- Data Analysis Excel for Beginners

Advanced Excel Exercises with Solutions PDF
Microsoft 365 Basic now includes ransomware protection for your files and photos at no extra cost.

Use Word, Excel, PowerPoint and more for free on the web
Office is now Microsoft 365
Get the Microsoft 365 mobile app
Start using Microsoft 365 today

Anywhere access
Whether you’re at work or on the go, create your best work on your favorite browser.
Familiar experience
The familiar Microsoft 365 experience you know and trust, so there’s nothing new to learn.
Work with anyone
Share your documents with anyone and work together in real-time.

Word for the web
Craft great-looking resumes, newsletters, and documents while inviting others to review and coauthor in real time. Plus, access free Word templates, formatting tools for APA, MLA, and Chicago style, and add functionality with free add-ins.
Excel for the web
Organize your data in familiar spreadsheets and workbooks, with all changes saved automatically. Create modern visuals that turn numbers into valuable insights. Work together in real time knowing that everyone is on the same page.

PowerPoint for the web
Turn your ideas into compelling presentations using professional-looking templates. Use animations, transitions, photos, and videos to tell one-of-a-kind stories. Co-author team presentations at the same time, from anywhere.
Start now at Microsoft365.com
No installation required. It's free.
Follow Microsoft 365
- Chat with sales
- Contact sales
Available M-F 6 AM to 6 PM PT.
- Online Degree Explore Bachelor’s & Master’s degrees
- MasterTrack™ Earn credit towards a Master’s degree
- University Certificates Advance your career with graduate-level learning
- Top Courses
- Join for Free

Introduction to Microsoft Excel
Taught in English

Instructor: Summer Scaggs
494,756 already enrolled

Guided Project
Recommended experience
Intermediate level
Familiarity with computers and the internet
(5,534 reviews)
What you'll learn
Create an Excel spreadsheet and learn how to maneuver around the spreadsheet for data entry.
Create simple formulas in an Excel spreadsheet to analyze data.
Skills you'll practice
- Formatting Excel Spreadsheets
- Creating Basic Formulas in Excel Spreadsheets
- Creating Excel Spreadsheets
- Maneuvering around Excel Spreadsheets
Details to know

Add to your LinkedIn profile
See how employees at top companies are mastering in-demand skills

Learn, practice, and apply job-ready skills in less than 2 hours
- Receive training from industry experts
- Gain hands-on experience solving real-world job tasks
- Build confidence using the latest tools and technologies

About this Guided Project
By the end of this project, you will learn how to create an Excel Spreadsheet by using a free version of Microsoft Office Excel.
Excel is a spreadsheet that works like a database. It consists of individual cells that can be used to build functions, formulas, tables, and graphs that easily organize and analyze large amounts of information and data. Excel is organized into rows (represented by numbers) and columns (represented by letters) that contain your information. This format allows you to present large amounts of information and data in a concise and easy to follow format. Microsoft Excel is the most widely used software within the business community. Whether it is bankers or accountants or business analysts or marketing professionals or scientists or entrepreneurs, almost all professionals use Excel on a consistent basis. You will learn what an Excel Spreadsheet is, why we use it and the most important keyboard shortcuts, functions, and basic formulas.
Learn step-by-step
In a video that plays in a split-screen with your work area, your instructor will walk you through these steps:
Download Microsoft Office365 Excel Program and view the basics of Excel
Learn the layout, navigation, and ribbon
Create a spreadsheet of information you are tracking
Create basic formulas to analyze your data
Format your data
5 project images

Instructor ratings
We asked all learners to give feedback on our instructors based on the quality of their teaching style.

The Coursera Project Network is a select group of instructors who have demonstrated expertise in specific tools or skills through their industry experience or academic backgrounds in the topics of their projects. If you're interested in becoming a project instructor and creating Guided Projects to help millions of learners around the world, please apply today at teach.coursera.org.
How you'll learn
Skill-based, hands-on learning
Practice new skills by completing job-related tasks.
Expert guidance
Follow along with pre-recorded videos from experts using a unique side-by-side interface.
No downloads or installation required
Access the tools and resources you need in a pre-configured cloud workspace.
Available only on desktop
This Guided Project is designed for laptops or desktop computers with a reliable Internet connection, not mobile devices.
Why people choose Coursera for their career

Learner reviews
Showing 3 of 5534
5,534 reviews
Reviewed on Jul 3, 2023
This was a very good and engaging start to learning Microsoft Excel. However, I definitely recommend having Excel preinstalled on your PC or MAC.
Reviewed on Feb 27, 2023
This platform is very helpful for learning skills.
I am very satisfied to this platform. If you are looking for a skill you should have to attention on your skills learning through this platform
Reviewed on Aug 11, 2023
Great course to understand the multiple uses of Excel! Lots of theory but applied to multiple exercises! I really like it because of the profesor's interactions with the learners.
You might also like

University of Colorado Boulder
Statistics and Data Analysis with Excel, Part 1

Coursera Project Network
Introduction to Python

Introduction to Basic Game Development using Scratch

Using Basic Formulas and Functions in Microsoft Excel
New to business essentials start here..

Open new doors with Coursera Plus
Unlimited access to 7,000+ world-class courses, hands-on projects, and job-ready certificate programs - all included in your subscription
Advance your career with an online degree
Earn a degree from world-class universities - 100% online
Join over 3,400 global companies that choose Coursera for Business
Upskill your employees to excel in the digital economy
Frequently asked questions
Are guided projects available on desktop and mobile.
Because your workspace contains a cloud desktop that is sized for a laptop or desktop computer, Guided Projects are not available on your mobile device.
Who are the instructors for Guided Projects?
Guided Project instructors are subject matter experts who have experience in the skill, tool or domain of their project and are passionate about sharing their knowledge to impact millions of learners around the world.
Can I download the work from my Guided Project after I complete it?
You can download and keep any of your created files from the Guided Project. To do so, you can use the “File Browser” feature while you are accessing your cloud desktop.
How much experience do I need to do this Guided Project?
At the top of the page, you can press on the experience level for this Guided Project to view any knowledge prerequisites. For every level of Guided Project, your instructor will walk you through step-by-step.
Can I complete this Guided Project right through my web browser, instead of installing special software?
Yes, everything you need to complete your Guided Project will be available in a cloud desktop that is available in your browser.
What is the learning experience like with Guided Projects?
You'll learn by doing through completing tasks in a split-screen environment directly in your browser. On the left side of the screen, you'll complete the task in your workspace. On the right side of the screen, you'll watch an instructor walk you through the project, step-by-step.
More questions

Apr 5, 2024
Share links to Sheet views in Excel for the web
- Add our blog to your RSS feed reader" href="/rss/blog.xml" data-bi-name="RSS Subscription" data-bi-id="rss_feed" data-bi-bhvr="120" data-bi-socchn="RSSSubscription" title="Microsoft 365 Insider Blog RSS" target="blank" class="d-inline-block">
Hi, Microsoft 365 Insiders! I’m Vinay, a Product Manager on the Excel team. I’m pleased to announce that you can now share links to existing or new Sheet views with others in Excel for the web.
Share links to Sheet views In Excel for the web
We’ve heard from many of you who are regularly using Sheet views that you’d like the ability to quickly bring others’ focus to the information that needs attention.
To address this request, we’re enabling you to share a link to a Sheet view that captures a subset of a workbook’s contents. By doing so, you can more efficiently collaborate on large or complex workbooks, and easily gather feedback and input from others.
How it works
- Click the View tab, and then either click the Sheet View arrow and select an existing view in the list, or create a new sheet view.

- In the Link to Sheet message that appears, click the Close button.
- Share the copied link with others in the way you want (e.g., in an email message, in a Teams chat,…), or keep and use it as reference link.
Availability
This feature is available to all Excel for the web users.
We want to hear from you! Select Help > Feedback in Excel for the web to send your thoughts about this feature.
Sorry, JavaScript must be enabled to use this app.
- All about AI
- Google Bard
- Inflection AI Pi Chatbot
- Anthropic Claude
- Generative AI
- AI Image Generation
- AI Regulation
- AI Research
- Large Language Models (LLM)
- Surface Pro
- Surface Laptop
- Surface Book
- Surface Duo
- Surface Neo
- Surface Studio
- Surface Hub
- Surface Pen
- Surface Headphones
- Surface Earbuds
- About WinBuzzer
- Follow Us: PUSH, Feeds, Social
- Write for Us
- Cookie Policy and Privacy Policy
- Terms of Service
How to Password Protect Excel, Word, PowerPoint, or PDF Files with Microsoft Office
We show you how to password protect Excel, Word, PowerPoint and PDF files in Microsoft Office so that you can keep your documents private.

Table of Contents:
While most of us already have login passwords on our PC, at times it’s necessary to go one step further. As well as encrypting individual files , you can use Microsoft Office to password protect an Excel file Word Document, PDF, and more. When you password-protect documents with modern versions of Office, they’re typically encrypted. This means that anybody who tries to read them that doesn’t have your password will just see random strings of letters and numbers. This persists even if you send the document to another person. Here we show you how to password protect Excel, Word, PowerPoint or PDF files.
How to Password Protect a Word Document, Excel File, or PowerPoint Presentation
Securing your Microsoft Office documents with a password is a straightforward process. This method is applicable to Word, Excel, and PowerPoint files, providing an extra layer of security by encrypting your documents. Follow the steps below to protect your Office documents. We use Word as an example but the exact same steps also work for other Office files.

How to Create a Password Protected PDF File with Microsoft Office
Creating a password-protected PDF file is slightly different from encrypting a Word, Excel, or PowerPoint document. This method involves converting your Office document into a PDF format and then securing it with a password. Here’s how to do it.

FAQ – Frequently Asked Questions About Password-Protection for Documents
Password-protected documents maintain their encryption when stored on cloud services..
The document remains encrypted on the server, requiring the password upon opening, regardless of the cloud storage used. It’s crucial to use strong passwords and enable two-factor authentication (2FA) for your cloud storage account for additional security. Be aware of the cloud provider’s encryption in transit and at rest protocols to ensure comprehensive protection of your documents.
What should I do if a password-protected document needs to be accessed by multiple people?
For documents requiring access by multiple users, set a shared password communicated through a secure medium, ensuring all parties understand the importance of keeping the password confidential. Alternatively, consider using document management or collaboration platforms that offer granular access controls and permissions, allowing for better management of who can view or edit the document without relying on a single shared password.
Besides password protection, what other security measures should I consider for sensitive documents?
In addition to password protecting sensitive documents, consider using encryption solutions that secure the entire document beyond the application level. For highly sensitive information, employ data loss prevention (DLP) policies, secure access management (like 2FA ), and regularly audit access logs. Awareness and training on security best practices among users who will access the documents are also vital in ensuring comprehensive protection.
Can editing restrictions be set on a password-protected Word document?
Yes, Word allows you to apply editing restrictions that let users open but not modify a document. This is done by navigating to the Review tab, selecting Restrict Editing, and choosing the editing restrictions. This feature can be applied in conjunction with or separate from password protection, offering flexibility in how you secure and share documents. Engaging both protections enhances document security, especially in collaborative environments.
How can I tell if a PDF file is encrypted and password protected without opening it?
Various PDF readers and file management tools provide visual cues or properties details indicating encryption. For example, attempting to open the file in a PDF reader will prompt for a password if encrypted. In file properties or details pane, look for security settings or encryption status. Advanced PDF management tools may offer more detailed insights into the encryption level and specifics of the protection applied. Always ensure your PDF viewer or editor is up-to-date for accurate detection and handling of encrypted files.
In addition to password protection, consider utilizing encryption solutions that secure the entire document beyond the application level. Implement data loss prevention (DLP) policies, engage secure access management practices such as two-factor authentication (2FA) , and regularly audit access logs. It’s also crucial to promote awareness and training on security best practices among users with access to the documents to ensure comprehensive protection.
Yes, Word allows users to set editing restrictions on a document, enabling viewers to open but not modify the content. This feature is accessible via the Review tab by selecting Restrict Editing and then specifying the desired editing restrictions. This functionality can synergize with or operate independently from password protection, thus offering flexibility in document security and sharing practices. Utilizing both protections can significantly enhance document protection, particularly in collaborative environments.
Related: How to Remove Password Protection from a PDF

Related: How to Password Protect Excel Files

Related: How to Lock Cells in Excel to Protect Them from Editing

Related: How to Password-Protect a Folder in Windows 11 and Windows 10

- how to password protect a pdf
- how to password protect an excel file
- Microsoft Excel
- Password Protect a PDF
- Password Protect Word Document
- PDF password
- pdf with password
Recent News

Microsoft Announces Establishment of AI Hub in London, Led by AI...

Microsoft to Power Cloud Software Group’s Future with $1.65 Billion Investment
Subscribe to WinBuzzer on Google News

IMAGES
VIDEO
COMMENTS
6. Add an image. Whether it's a photograph, an artistic sketch or your logo, images go a long way in making your spreadsheet better. Images make your presentation look official and possess the professional feel in many of the beautiful presentations you have seen. Pictures speak a thousand words.
In Excel, select the cells you want to link or embed. If you would like to link or embed the entire worksheet, click on the box at the juncture of the rows and columns in the top left-hand corner to select the whole sheet. Copy those cells by pressing CTRL+C in Windows or Command+C in macOS.
STEPS: First, launch PowerPoint. Then, select the Insert tab. Next, click Text, and later on the Object option. As a result, a new dialog box will pop up at this time, and you must click on Create from file. After that, click on Browse to find the Excel document you want to add to your slides.
Creating a presentation in Excel. Step 1: Choose a Template. Step 2: Create slides. Step 3: Organize your data. Line Graph. Pie chart. Table. Step 4: Remove the grids. Tips for making a creative and professional presentation using Excel.
In PowerPoint, on the Insert tab, click or tap Object. In the Insert Object dialog box, select Create from file. Click or tap Browse, and in the Browse box, find the Excel workbook with the data you want to insert and link to. Before you close the Insert Object box, select Link, and click OK. Important: The linked object in your presentation ...
In the Paste Special window, choose the Paste link radio button. Choose Microsoft Excel Worksheet Object . Press OK . Once done, you'll see the table you copied from Excel appear on your PowerPoint presentation. However, you need to access the source Excel file to edit the content or formatting of the table you added.
To create PowerPoint slides, from a list in Excel, follow these steps: Open the Excel file where your list is stored. Activate the sheet where the data is stored - the list must be formatted as a named Excel table. Open the PowerPoint presentation that contains the macros and main slide. Be sure the main slide, that you want to duplicate, is ...
Learn how to create high-impact, data-rich presentations using PowerPoint and Excel together. Follow along with Gini von Courter as she shows how to create presentations that are easy to use, easy ...
Select your chart in Excel by clicking on the background, making sure that you're not accidentally selecting a particular element, then use CTRL + C to copy the data to your clipboard. You can also right-click on its background to copy from the context menu. Once this is done, open up PowerPoint and navigate to the slide that you want the chart ...
In Excel, click and drag to highlight the cells you want to copy. Right-click the copied cells and select Copy. In your PowerPoint presentation, right-click and select the Paste Options you want: Use Destination Styles - Choose to edit your copied cells like a PowerPoint table, but with PowerPoint's color scheme and fonts.
1. Choose where you want to insert the Excel file. On the PowerPoint presentation, click on the text field you want to insert an Excel file then click on the Insert tab on the upper-left section of the window to view the Insert toolbar. 2. Click on the Object button.
To embed an Excel file in PowerPoint, follow these steps: Open your PowerPoint presentation and navigate to the slide where you want to embed the Excel file. Click on the "Insert" tab in the top toolbar of the PowerPoint window. Select "Object" and choose the "Create from File" option in the "Insert Object" dialog box.
Compares individual values with the sum of those values. Comparing the sales generated by individual products with the total sales enjoyed by a firm. Whole-to-whole. Compares individual data values and sets of data values (or what Excel calls data series) to each other. Comparing sales revenues of different firms in your industry.
In Microsoft Excel, creating graphical presentations is a straightforward process that can greatly enhance the impact of your data. In this tutorial, we will explore the basics of creating graphical presentations in Excel. A. Exploring the different types of graphs and charts available in Excel. Excel offers a wide range of graph and chart ...
Microsoft Excel PPT is a Microsoft PowerPoint presentation that contains Microsoft Excel spreadsheets. It is used to create presentations that include graphical representations of data stored in Excel workbooks. The data is presented in the form of tables, charts, and other visuals, making it easy for audiences to understand.
Create a Powerpoint presentation using Excel. In this video an edit has to be made to the existing presentation. Quickly make the edit and create a new versi...
YOU CAN DOWNLOAD ALL MY FILES FOR FREE AT http://www.theexcelchallenge.comLearn how to create a spreadsheet that you can navigate through the same way you do...
Open both Microsoft Excel and PowerPoint applications. Select the chart you want to insert into PowerPoint from your Excel spreadsheet. Click on Copy or press Ctrl+C on your keyboard. Go to the slide where you want to insert the chart in your PowerPoint presentation.
Selecting the Excel File You Want to Insert. With our slide set up, we can now insert our Excel file into it. To do this, we need to select the "Insert" tab in the ribbon menu and click on the "Excel" option. This will open a file explorer window from which we can choose the Excel file we want to insert. It is important to note that the ...
To link a specific cell range, copy the desired cells in Excel, and in PowerPoint, choose 'Paste Special' after clicking 'Home'. Select 'Paste link' and choose 'Microsoft Excel Worksheet Object'. This links the cell range to your slide, allowing for real-time data updates when the Excel file is modified.
STEP 1: Make Dataset Ready. First of all, you need to make the dataset ready. To do so, insert the data in an Excel sheet and make a chart. Here, we have used the range B4:D8 to insert the sales information. Also, we have created a sales chart using the Insert tab.
PowerPoint for the web. Turn your ideas into compelling presentations using professional-looking templates. Use animations, transitions, photos, and videos to tell one-of-a-kind stories. Co-author team presentations at the same time, from anywhere. Start using PowerPoint for free Learn more about PowerPoint.
This is the presentation tips for all office operator to create amazing presentation on excel data by using PowerPoint slides so if you are ms-office users t...
We will also cover how to use Copilot to help you create amazing presentations, drafting presentations from scratch based on text prompts. Since its release late last year Microsoft 365 Copilot AI ...
By the end of this project, you will learn how to create an Excel Spreadsheet by using a free version of Microsoft Office Excel. Excel is a spreadsheet that works like a database. It consists of individual cells that can be used to build functions, formulas, tables, and graphs that easily organize and analyze large amounts of information and data.
Click the View tab, and then either click the Sheet View arrow and select an existing view in the list, or create a new sheet view. In the Sheet view, right-click any cell or the sheet tab that contains the content you want to share, and then select Copy Link To Sheet View. In the Link to Sheet message that appears, click the Close button.
Tick 'Encrypt the document with a password'. In the options window, find and tick the checkbox labeled " Encrypt the document with a password ". Click " OK " to move to the next step ...